photobeam photobeam photobeam photobeam - FAAC
photobeam photobeam photobeam photobeam - FAAC
photobeam photobeam photobeam photobeam - FAAC

Create successful ePaper yourself
Turn your PDF publications into a flip-book with our unique Google optimized e-Paper software.
GBEC COMPLIANCE DECLARATIONFDECLARATION CE DE CONFORMITÉManufacturer: <strong>FAAC</strong> S.p.A.Fabricant :<strong>FAAC</strong> S.p.A.Address: Via Benini, 140069 - Zola PredosaBOLOGNA -ITALYAdresse : Via Benini, 140069 - Zola PredosaBOLOGNE-ITALIEDeclares that:The active optoelectronic safety device - modelPHOTOBEAMDéclare que :le dispositif de protection active optoélectroniquemod. PHOTOBEAM•complies with the essential safety requirements of the followingdirectives :73/23/EEC and subsequent amendment 93/68/EEC89/336/EEC and subsequent amendment 92/31/EEC and 93/68/EECAdditional note:These products have undergone tests in a typical uniform configuration(all products manufactured by <strong>FAAC</strong> S.p.A.).•est conforme aux règles de sécurité visées par les directives suivantes:73/23/CEE, modifiée 93/68/CEE89/336/CEE, modifiée 92/31/CEE et 93/68/CEERemarque supplémentaire:Ces produits ont été soumis à un test dans une configuration typiquehomogène (tous les produits sont de fabrication <strong>FAAC</strong> S.p.A.).Bologna, 1 January 1997ManagingDirectorA. BassiFait à Bologna, le 1 janvier 1997L’AdministrateurDéléguéA. BassiDEG-KONFORMITÄTSERKLÄRUNGEDECLARACION CE DE CONFORMIDADDer Hersteller: <strong>FAAC</strong> S.p.A.Fabricante:<strong>FAAC</strong> S.p.A.Anschrift: Via Benini, 140069 - Zola PredosaBOLOGNA-ITALIADirección: Via Benini, 140069 - Zola PredosaBOLOGNA-ITALIAerklärt:die aktive optoelektronische SchutzeinrichtungMod. PHOTOBEAMDeclara que:El dispositivo de protección activa opto-electrónicamod. PHOTOBEAM•entspricht den wesentlichen Sicherheitsanforderungen folgenderRichtlinien:73/23/EWG und nachträglicher Änderung 93/68/EWG89/336/EWG und nachträglicher Änderung 92/31/EWG sowie 93/68/EWGZusatzbemerkung:Diese Produkte wurden in einer typischen und einheitlichenKonfiguration (Fabrikat der Produkte durchgehend <strong>FAAC</strong> S.p.A.)geprüft.Bologna, den 01. Januar 1997Der GeschäftsführerA. Bassi•cumple los requisitos esenciales de seguridad de las siguientesdirectivas:73/23/CEE y sucesiva enmienda 93/68/CEE89/336/CEE y sucesivas enmiendas 92/31/CEE y 93/68/CEENota accesoria:Los sistemas fueron probados en una configuración típica homogénea(todos productos fabricados por <strong>FAAC</strong> S.p.A.).Bologna, 1º de enero de 1997.El AdministradorDelegadoA. Bassi
I1. MONTAGGIOÜPer un funzionamento ottimale, collocare ilRicevitore e il Trasmettitore allineati.ÜNel caso siano previste due coppie di fotocellule,per evitare interferenze reciproche, disporre iRicevitori su lati opposti.Sono possibili due installazioni:- A parete con tubo ad incasso (fig.1- rif. A) o contubo/guaina esterni (fig.1- rif.B)- Su apposita colonnetta (fig.2)•Eseguire le predisposizioni per i collegamentielettrici.•Nel caso di installazione a parete, fissare icontenitori Photobeam con la relativa guarnizioneutilizzando viti e tasselli idonei.GBA1. FITTINGÜIn order to ensure optimum working efficiency,the Receiver and Transmitter should be properlyaligned.ÜIf two pairs of photocells are to be employed,place the Receivers on opposite sides in order toavoid mutual interference.Two types of installation are possible:B- Wall with embedded tube (fig.1- item A) or withouter tube/sheath (fig.1- item B).- On special stand (fig.2).•Carry out the work necessary for the electricalconnections.•In the case of wall installation, fix the Photobeamenclosures and respective gaskets using suitablescrews and screw anchors.F1. MONTAGEÜPour un fonctionnement optimal, placez leRécepteur et l’Emetteur alignés.ÜSi deux couples de photocellules ont été prévus,pour éviter des interférences réciproques, placezles Récepteurs sur des côtés opposés.Il existe deux types d’installation :- Au mur, à l’aide d’un tube à encastrement (fig.1-réf. A) ou avecun tube/gaine externe (fig.1- réf.B).- Sur une petite colonne prévue à cet effet (fig.2).•Effectuez les préparations nécessaires auxconnexions électriques.•En cas d’installation au mur, fixez les conteneursPhotobeam avec leur joint au moyen de vis et dechevilles adéquates.D1. MONTAGEÜZur Gewährleistung des optimalen BetriebsEmpfänger und Sender gefluchtet anordnen.Ü Bei Montage von zwei Lichtschranken zurVermeidung einer gegenseitigen Beeinflussung dieSender auf gegenüberliegenden Seiten anordnen.Es sind zwei Arten von Installation möglich:-Wandmontage mit unter Putz verlegtemInstallationsrohr (Abb. 1- Pos. A) oder mit Installationsrohr/Kabelmantelauf Putz (Abb. 1-Pos. B).-auf entsprechender Säule (Abb. 2)•Die Vorbereitungen für den elektrischen Anschlußtreffen.•Für die Wandmontage die Behälter derPhotobeam einschließlich der zugehörigenDichtungen mit Hilfe geeigneter Schrauben undDübel befestigen.E1. MONTAJEÜPara un óptimo funcionamiento, colocar elReceptor y el Transmisor en línea.ÜEn el caso en que estén previstas dos parejasde fotocélulas, para evitar interferenciasrecíprocas, colocar los Receptores en ladosopuestos.Hay dos tipos de instalación posibles:- En pared con tubo que se encaja (fig. 1 – ref. A)o con tubo/vaina externos (fig. 1 - ref. B).- En columna adecuada (fig. 2).•Realizar las operaciones previas para los enlaceseléctricos.•En el caso en que se realice la instalación en lapared, sujetar los contenedores Photobeam conla junta relativa utilizando tornillos y cuñasadecuadas.DIMENSIONI - DIMENSIONS - DIMENSIONS -ABMESSUNGEN - MEDIDAS95 mm70 mmRX1 2 3 4 5NO NC COM - +TX1 2- +DL144 mmDL2DL1I2. COLLEGAMENTI ELETTRICI•Eseguire i collegamenti elettrici sulle morsettieredel Ricevitore (fig.4) e del Trasmettitore (fig.5).•Eseguire i cablaggi elettrici all’apparecchiaturaelettronica di comando e ad altre eventualifotocellule presenti nell’impianto.ÜFare riferimento agli schemi riportati nelleistruzioni delle apparecchiature per le diverseconfigurazioni.•Procedere all’allineamento .GB2. ELECTRICAL CONNECTIONS•Effect the necessary electrical connections to theterminal blocks of the Receiver (fig.4) andTransmitter (fig.5).•Connect wiring to the electronic control unit andany other photocells present in the system.ÜRefer to the diagrams contained in the electroniccontrol unit instructions for details of the variousconfigurations.•Proceed with alignment.F2. CONNEXIONS ELECTRIQUES•Effectuez les connexions électriques sur les bornesdu Récepteur (fig.4) et de l’Emetteur (fig.5).•Effectuez les câblages électriques àl’équipement électronique de commande et auxautres photocellules éventuellement présentesdans l’installation.ÜPour les différentes configurations, consultez lesschémas figurant dans les instructions desappareils.•Procédez à l’alignement.D2. ELEKTRISCHE ANSCHLÜSSE•Die elektrischen Anschlüsse an die Klemmen desEmpfängers (Abb. 4) und des Senders (Abb. 5)ausführen.•Die Verdrahtung mit dem elektronischenSteuergerät und den ggf. installierten weiterenLichtschranken der Anlage vornehmen.ÜFür die verschiedenen Konfigurationen die Plänein den Betriebsanleitungen der Geräte zu Rateziehen.•Die Fluchtung vornehmen.E2. ENLACES ELECTRICOS•Realizar los enlaces eléctricos en los tableros debornes del Receptor (fig. 4) y del Transmisor (fig. 5).•Realizar los cableados eléctricos de lamaquinaria electrónica de mando y de otrasposibles fotocélulas presentes en la instalación.ÜHacer referencia a los esquemas que aparecenen las instrucciones de las maquinarias para lasdiferentes configuraciones.•Proceder al alineamiento.
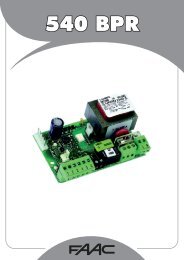
RXRX$LK1I3. ALLINEAMENTOÜSe la distanza fra il Ricevitore e il Trasmettitore èminore di 15 metri, non eseguire i punti ,, masaltare direttamente al punto . Facendo delicatamente leva con un cacciavite(fig.6) sollevare il coperchio del Ricevitore. Tagliare il ponticello LK1 (fig.7). Rimontare il coperchio. Alimentare la fotocellula verificando l’accensionedel Led DL1 sul Ricevitore (fig.4) e sul Trasmettitore(fig.5). Allineare manualmente il Ricevitore e il Trasmettitoreorientandoli in senso verticale e orizzontale,cercando la posizione in cui il Led DL2 sul Ricevitore(fig. 4) inizia a lampeggiare sempre più velocemente.ÜL’allineamento ottimale si ha quando la frequenzadi lampeggio è tale da mantenere il Led acceso. Effettuato l’allineamento, serrare la vite di fissaggio(fig.8). Assemblare la Photobeam mediante i particolaria corredo (fig.9).GB3. ALIGNMENTÜIf the distance between Receiver and Transmitteris less than 15 metres, do not carry out points ,, but go directly to point . Lift the cover of the Receiver by levering slightlywith a screwdriver (fig.6). Cut the jumper LK1 (fig.7). Refit the cover. Energise the photocell and check that LED DL1is lit on both Receiver (fig.4) and Transmitter (fig.5). Align the Receiver and Transmitter manually bypointing in a vertical and horizontal direction, whilstseeking the position in which the LED DL2 on theReceiver (fig. 4) begins flashing ever more rapidly.Ü Optimum alignment is obtained when theflashing frequency is such as to keep the LED lit. Having completed alignment, tighten the fixingscrews (fig. 8). Assemble the Photobeam using the componentssupplied (fig.9).F3. ALIGNEMENTÜSi la distance entre le Récepteur et l’Emetteurest inférieure à 15 mètres, n’exécutez pas lesopérations des points ,, mais passezdirectement au point . Alimentez la photocellule en contrôlantl’allumage du voyant DL1 sur le Récepteur (fig.4)et sur l’Emetteur (fig.5). Alignez manuellement le Récepteur etl’Emetteur en les orientant verticalement ethorizontalement, en cherchant la position danslaquelle le voyant DL2 placé sur le Récepteur (fig.4) commence à clignoter de plus en plus vite.Ü L’alignement optimal est atteint lorsque lafréquence de clignotement est telle, que le voyantreste allumé. Après avoir effectué l’alignement, serrez la visde fixage (fig. 8). Assemblez la Photobeam à l’aide des élémentsfournis avec l’appareil (fig.9).D3. FLUCHTUNGÜWenn der Abstand zwischen dem Empfänger unddem Sender weniger als 15 m beträgt, dieArbeitsschritte ,, überspringen und direkt mitPunkt beginnen. Den Deckel des Empfängers abnehmen, indemman vorsichtig einen Schraubendreher (Abb. 6) alsHebel benutzt. Die Brücke LK1 (Abb. 7) durchtrennen. Den Deckel wieder anbringen. Die Lichtschranke speisen und sicherstellen, daßdie LED DL1 auf dem Empfänger (Abb. 4) unddem Sender (Abb. 5) aufleuchtet. Empfänger und Sender von Hand senkrechtund waagrecht ausrichten und hierbei dieStellung suchen, in der die LED DL2 auf demEmpfänger (Abb. 4) immer schneller zu blinkenbeginnt.ÜDie Fluchtung ist optimal, wenn die Blinkfrequenzso hoch ist, daß die LED eingeschaltet bleibt. Nach der Fluchtung die Befestigungsschrauben(Abb. 8) festziehen. Zum Abschluß der Installation die Photobeammit den zugehörigen Teilen (Abb. 9) schließen.E3. ALLINEAMENTOÜSi la distancia entre el Receptor y el Transmisores menor de 15 metros, no sigan los puntos ,,pasen directamente al punto . Haciendo palanca delicadamente con undestornillador (fig. 6) levantar la tapa del Receptor. Cortar el puentecito LK1 (fig. 7). Volver a montar la tapa. Alimentar la fotocélula verificando que el Dispositivoluminoso DL1 se enciende en el Receptor(fig. 4) y en el Transmisor (fig. 5). Alinear manualmente el Receptor y el Transmisororientándolos en sentido vertical y horizontal, buscandola posición en la que el Dispositivo luminosoDL2 del Receptor (fig. 4) empieza a iluminarintermitentemente siempre más rápido.Ü El mejor alineamiento se da cuando lafrecuencia de la intermitencia es capaz de mantenerel Dispositivo luminoso encendido. Realizado el alineamiento, apretar el tornillo desujección (fig. 8). Ensamblar la Photobeam con los accesoriosdel equipo (fig. 9).<strong>FAAC</strong> S.p.A.Via Benini, 1 40069 Zola Predosa (BO) - ITALIATel. 051/6172411 Fax 051/758518 En vous servant délicatement d’un tourneviscomme levier (fig.6), soulevez le couvercle duRécepteur. Coupez la barrette LK1 (fig.7). Remontez le couvercle.