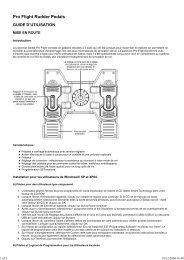
TRY BLACK FROM THEBOTTOM:HERE’S THE POSITIONWhen the <strong>com</strong>puter plays White fromthe top (Section 5.1, Option H1), be sureto set up the pieces correctly! Notice thatthe Kings and Queens are positioneddifferently, and the board notation isreversed.For more details, see Section 5.1.f. Complete Book (Square F2)On:+bk:? Off:-bk:?Turning on the Complete Book option gives the <strong>com</strong>puter the freedomto choose any move from its built-in book of openings, so you’llsee a greater variety of opening lines being played. If this option isselected, the Passive, Active, and Tournament Book options are disabled.With this option on, you may see the <strong>com</strong>puter make some questionablemoves. This is because its built-in book of openings must containresponses to certain lines of play (even questionable lines), in casethey are played. While the <strong>com</strong>puter would not make these moves on itsown, it needs to know how to respond to them in the best way. Therefore,when you turn on the Complete Book, the <strong>com</strong>puter could potentiallyplay one of these moves.g. Tournament Book (Square G2)On:+bk:t Off:-bk:tWhen you turn the Tournament Book option on, the <strong>com</strong>puter isforced to always select the best possible line of play in every opening.While this results in the best chess play, it also narrows down the<strong>com</strong>puter’s choice of moves by limiting its available book lines. If thisoption is selected, the Active and Passive Book options are disabled.h. Book On/Off (Square H2)On:+bOOk Off:-bOOkSet this option to -BOOK to <strong>com</strong>pletely lock out the <strong>com</strong>puter’s built-in book of openings. When you turn the book off, the <strong>com</strong>puter is forcedto take time to think of its moves from the very beginning of the game,rather than using moves contained in its memory. For more details onopenings, see Section 2.7. If you turn the book <strong>com</strong>pletely off, all otherbook options are also automatically disabled.5.3 Rotating Display Options (Squares A3-H3)IMPORTANT: The Rotating Display feature is only activatedWHILE THE COMPUTER IS THINKING.Normally, the display shows the time for the player to move. However,the <strong>com</strong>puter can also display other information, as noted in Section 4(Info Mode). The Rotating Display feature works hand-in-hand with InfoMode, since it allows you to choose which of the Info Displays you wantto see, and then cycles your choices in one-second increments. Youmay turn on any or all of the Rotating Display options, as desired.Press OPTION three times to select the Rotating Display Options.Then use the BLACK/> and WHITE/< keys to select theoptions you want to see rotated in the display. The options are describedbelow and summarized in the Option Mode Chart in this section.Press ENTER to turn these options on (+) or off (–). Or, simplypress the option squares to turn the options on or off.If you think the display information is changing too quickly when itrotates, press INFO to freeze the display. Successive presses of INFOand the BLACK/> and WHITE/< keys will allow you to cycle throughall the displays manually, as described in Section 4. To start the displayrotation again, press OPTION followed by CLEAR. In any event, whenthe <strong>com</strong>puter starts thinking about its next move, the display automaticallystarts rotating again.The game information you can see while the <strong>com</strong>puter is thinkingincludes the following:• rd:1 to rd:4 = the predicted line of play (up to four individualmoves)• rd:E = an evaluation of the current position• rd:d = the <strong>com</strong>puter’s search depth, and the number of movesexamined so far in the game• rd:n = the number of nodes searched per second• rd:t = the amount of time the move has taken so farWhen requested information is not available, the display will show aseries of dashes (– ––––).16
For <strong>com</strong>plete descriptions of these options and details on exactlyhow to interpret the displays, see Section 4.6. VERIFYING/SETTING UP POSITIONS6.1 Verifying PositionsSee “IT’S EASY TO VERIFY PIECES!” for a step-by-step exampleof using Verify Mode.If you should knock over the chess pieces or if you think your boardposition may be incorrect, the <strong>com</strong>puter can verify all the piece locationsfor you!When it is your turn, press one of the PIECE SYMBOL KEYS (&, %,$, #, @, or !). The <strong>com</strong>puter shows you where the first piece of thattype is located on the board—the display shows the piece symbol, colorindicator, and square designation. Press the same PIECE SYMBOLKEY again to see the location of the next piece of that same type. Allthe White pieces are shown first, then the Black pieces. When there areno more pieces of that type, only the piece symbol remains in thedisplay.Want to verify more pieces? Simply repeat the above procedureusing the other PIECE SYMBOL KEYS, verifying the entire board ifdesired! Press CLEAR to return to normal game play.clearnew gameclearenterIT’S EASY TO VERIFY PIECES!1. Press CLEAR and ENTER together to reset the<strong>com</strong>puter for a new game.Display: [ 0:00:00.2. Press the KNIGHT Key.Display: [,@,b1 (the first White Knight).3. Press KNIGHT again.Display: [,@,G1 (the second White Knight).4. Press KNIGHT again.Display: ],@,b8 (the first Black Knight).5. Press KNIGHT again.Display: ],@,g8 (the second Black Knight).6. Press KNIGHT again.Display: @ (no more Knights on the board).7. Repeat to verify any other piece! Press CLEARto exit Verify Mode.For more details, see Section 6.1.ENGLISH6.2 Changing and Setting Up PositionsSee “TRY OUT POSITION MODE” to get an idea of how thisfeature works.Position Mode is an exciting feature which lets you set up specialboard positions to play from, or problems you want the <strong>com</strong>puter tosolve! Caution: All previous moves in your current game will be erasedfrom the <strong>com</strong>puter’s memory if you make changes to the position duringa game.Press POSITION to enter Position Mode, and the display will show-POS-. You can change or set up a position whenever it is your turn tomove. After you have set up your new position, press CLEAR to exitPosition Mode.•To remove a piece from the board, press the piece down on itssquare and then remove it. Notice that the display indicates the17piece type and color, along with a minus sign (–) and the squarelocation.•To move a piece from one square to another, press the piecedown on its original square, pick it up, and then press it down onthe new square. As you do this, the display will show a minus sign(–) for the first square, and a plus sign (+) for the second square.•To add a piece to the board, first press the PIECE SYMBOL KEYfor that piece (&, %, $, #, @, or !). Make sure the display showsthe correct color symbol for the piece you want to add. If it doesnot, press BLACK/> or WHITE/< to change the color. When thedisplay shows the correct piece type and color, place that pieceonto the desired square and press down gently. The display showsa plus sign (+), along with the location for that square. To addanother piece of the same type, simply press down onto another