TA4600 TA4320 TA2300 TA2160
TA4600 TA4320 TA2300 TA2160
TA4600 TA4320 TA2300 TA2160

You also want an ePaper? Increase the reach of your titles
YUMPU automatically turns print PDFs into web optimized ePapers that Google loves.
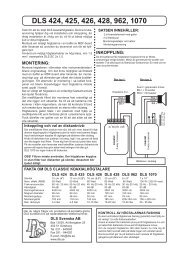
MOBILE POWER AMPLIFIERS<strong>TA4600</strong>4 X 150 WATT4 CHANNEL AMPLIFIER<strong>TA4320</strong>4 X 80 WATT4 CHANNEL AMPLIFIER<strong>TA2300</strong>2 X 150 WATT2 CHANNEL AMPLIFIER<strong>TA2160</strong>2 X 80 WATT2 CHANNEL AMPLIFIERULTIMATE ®138 University ParkwayPomona, CA 91768Toll Free: 888-909-9988Telephone: 909-594-2604Fax: 909-594-0191
INTRODUCTIONI. DescriptionThis device is a high power, audio amplifier. Use it responsibly. Veryloud music can cause permanent hearing loss. This amplifier is intendedfor installation in vehicles with a 12-Volt, negative ground electricalsystem. Attempting to connect or operate the amplifier in another type ofelectrical system may cause damage to the amplifier or the electricalsystem.II. About This ManualRead the Instructions-Be sure that you have read all operating instructions and understand allsafety precautions before installing and operating the amplifier. Werecommend that you have your TA series amplifier installed by aspecialist.Follow the Instructions-The instructions are intended to help you safely obtain the bestperformance from the amplifier. Carefully follow all installation andoperating instructions.Save the Operating Manual-Keep the manual in a safe place after installing the amplifier. You mayhave questions later.Text Conventions used in this Manual-Bold-Headings and important information.Bold, Underlined-Very important information."Bold"-As labeled on the amplifier, or quoted from elsewhere in thismanual.III. Safety and Operating Precautions-Caution!This symbol warns the user of a potential risk or hazard if instructionsare not followed.⇒ This arrow symbol points to a specific instruction for avoiding apotential hazard.ii
1. Installation1.1 Installation- Mounting the AmplifierStep 1- Disconnect the negative (-) battery cable before mounting theamplifier or making any connections. Check the battery and alternatorground (-) connections. Make sure they are properly connected and free ofcorrosionStep 2- Choose a mounting location for your amplifier. Find a location ona flat surface away from heat and moisture. Be sure the mounting locationand the drilling of pilot holes for mounting will not present a hazard to anywires, control cables, fuel lines, fuel tanks, hydraulic lines, or other vehiclesystems or components. Common mounting locations are under the frontpassenger seat, or in the trunk area. Choose a location with unimpaired aircirculation. The amplifier will dissipate heat more efficiently if mountedvertically.Step 3- Use the supplied screws. Place the amplifier in the mountinglocation, and mark the positions of the holes with a marker, pen or pencil.Carefully drill the mounting holes in the marked positions.Caution!⇒ Check carefully before drilling any pilot holes.Step 4- Use the supplied mounting screws to securely fasten the amplifierto the mounting surface.1.2 Installation- Power ConnectionsStep 1- Run a power cable from the battery to the amplifier mountinglocation. Use rubber grommets to protect the cable anywhere it has to gothrough metal.<strong>TA4600</strong>, <strong>TA4320</strong>, <strong>TA2300</strong> - Use #8 AWG or larger powerand ground cable.<strong>TA2160</strong> - Use #10 AWG or larger power and ground cable.Step 2- Connect one end of an in-line fuse holder to the power cable.Connect the other end of the fuse holder to the positive battery post with 20cm (or less) of the same cable. This fuse location will protect the systemand the vehicle against the possibility of a short circuit in the power cable.Be sure to use a fuse and fuse holder adequate for the application. Do notplace a fuse in the holder at this time.The maximum fuse rating for each amplifier in the TA series is:<strong>TA4600</strong> - 2 X 30 Amp <strong>TA4320</strong> -40 Amp<strong>TA2300</strong> - 30 Amp <strong>TA2160</strong> - 20 Amp1
Caution!⇒ Bridging fuses or replacing a fuse with one of a higher rating maycause damage to the amplifier and the vehicle's electrical system.Step 3- Run a remote turn on cable from the switched +12V source youwill be using to turn on the system components. This may be a toggleswitch, a relay, or your source unit’s remote trigger wire, or power antennatrigger wire. Run this lead to the amplifier mounting location. Use #18AWG wire or larger.POWER+12V RMT GNDStep 4- Locate a secure grounding connection asclose to the amplifier as possible. Make sure thelocation is clean and provides a direct electricalconnection to the frame of the vehicle. Connectone end of a short piece of the same size cable asthe power cable to the grounding point. Run the other end of the cable tothe amplifier mounting location.Step 5- connect the ground cable to the screw terminal labeled “POWER,GND”.Step 6- Connect the power cable to the amplifier at the screw terminallabeled “POWER, +12V”.Step 7- Connect the remote turn on cable to the screw terminal labeled“POWER, RMT”.1.3 Installation- Speaker ConnectionsStep 1- Run #16 AWG or larger connecting wire from your speakers tothe amplifier mounting location. Keep speaker wires away from powercables and amplifier input cables. Use grommets anywhere the wires haveto pass through holes in the metal frame or sheet metal. Connect to thespeakers according to the type of terminals on each speaker.Step 2- Strip 3/8" of insulation from the end of each wire and twist thewire strands together tightly. Make sure there are no stray strands thatmight touch other wires or terminals and cause a short circuit.Step 3- Crimp spade lugs over the wire ends or tin the ends with solder toprovide a secure termination.Step 4- Connect the wire ends to your amplifier as follows:2
SPEAKER TERMINALSFollow the (A/B/C/D+) (A/B/C/D-), channel and polarity markings,making sure they match the channel and polarity of the connections atthe speakers.SPEAKER(A+) (A-) (B+) (B-)SPEAKER(C+) (C-) (D+) (D-)( + ) ( - )BRIDGEMULTIPLE SPEAKER CONNECTIONPARALLEL- Each additional speaker decreases the load impedancefor the amplifier. The amplifier delivers more current and worksharder.PARALLEL CONNECTION USING 4 OHM SPEAKERS4 Ohm 2 Ohm( + ) ( - )BRIDGEAMOPULTIPFUITER+-(+)(-)(+)(-)3
SERIES- Each additional speaker increases the load impedance forthe amplifier. Impedances higher than 8 ohms are rarely used for caraudio.SERIES CONNECTION USING 4 OHM SPEAKERS4 Ohm 8 OhmAMOPULTIPFUITER+-(+)(-)(+)(-)1.4 Installation- Self-Bridging, 2+1 ModeBRIDGED MONO-Connect a 4Ω ohm speaker to theterminals marked “(+), BRIDGE, (-)”,making sure they match the polarityof the connections at the speakers.Caution!⇒ Speaker or multiple speaker loadstotaling less than 4 ohms are notrecommended for “Bridged” or“2+1 Mode”, and may damage the amplifier.SPEAKER(A+) (A-) (B+) (B-)( + ) ( - )BRIDGE<strong>TA4600</strong>, <strong>TA4320</strong>-Set the “MODE” switch to “2CH, 3CH”, or “4CH” and connect thespeakers accordingly. For “3CH” operation, bridge the “C” and “D”channels.2+1 MODE- (TRI-MODE)Simultaneous stereo and mono operation, “2+1 Mode”, requires a passivecrossover to send low frequencies to the mono speaker and higherfrequencies to the stereo speakers. The following table lists the componentvalues for a 6 dB/Octave crossover at common frequencies using 4 ohmspeakers for stereo and an 8Ω speaker for mono(subwoofer):FREQUENCY INDUCTOR CAPACITOR80 Hz 16 mH 470 uF100 Hz 7.5 mH 330 uF120 Hz 7.5mH 330 uF150 Hz 7.5 mH 220 uF4
2+1 MODE WIRING DIAGRAM-Use 100 Volt, non-polar capacitors, and connect them in series with thestereo speakers as shown in the diagram. Connect the inductor in serieswith the mono speaker as shown in the diagram. Be sure the inductor israted to handle the power of your amplifier.(+)(A+)(A-)(B+)(B-)INDUCTOR(+)(-)(-)CAPACITORS(+)(-)1.5 Installation- InputConnectionsLow Level, High Impedance, Gold Plated RCAInput Jacks-For connecting to a source providing preamp leveloutputs. Use heavy duty RCA patch cords designedfor mobile applications . Run the patch cablescarefully, maintaining as much distance as possiblefrom power, speaker, and accessory wiring. Makesure the RCA plugs fit tightly for a secure connection.Speaker Level Input Connector-Use the supplied wiring harness to connect the speakerHIGH LEVELoutputs from the source unit(AM/FM/CD/DVD or Cassette)to the “HIGH LEVEL” input.ABINPUTWiring Harness Color Code- 2 ChannelWhite Wire A Channel Positive( + )White/Black Wire A Channel Negative( - )Gray Wire B Channel Positive( + )Gray/Black Wire B Channel Negative( - )Black WireGroundNo Other Connection5
HIGH LEVELWiring Harness Color Code- 4 ChannelWhite Wire Channel A Positive( + )White/Black Wire Channel A Negative( - )Gray Wire Channel B Positive( + )Gray/Black Wire Channel B Negative( - )Green Wire Channel C Positive( + )Green/Black Wire Channel C Negative( - )Violet Wire Channel D Positive( + )Violet/Black Wire Channel D Negative( - )Black WireGroundNo Other Connection1.6 Installation- Check all ConnectionsRecheck all connections before reconnecting the negative(-) battery cable.Insert the correct value fuse in the fuse holder at the battery beforeattempting to turn on the system.2. Operation2.1 Operation- Input Level adjustmentsLEVELMIN MAXAdjust the input level for the marked channel(s) with a smallscrewdriver through the opening marked “LEVEL”. TurnCW(clockwise) to increase the level, CCW(counterclockwise)to decrease. Amplifiers will run cooler and produce lesssystem noise at lower level settings.Consult an experienced installation specialist for assistance in balancingthe levels in multi-amplifier systems, or systems with signal processingaccessories.6
2.2 Operation- Built-in CrossoversCROSSOVER FILTER SELECTIONThe TA series amplifiers have built-in low-pass andX-OVERhigh-pass crossover filters for bi-amplifying yoursystem. Select " LPF, FULL or HPF" by moving theLPF- FULL- HPFposition of the slide switch for each pair of channels."LPF" selects the low pass filter. "HPF" selects thehigh pass filter. Selecting "FULL" defeats the crossover functionsFREQUENCY ADJUSTMENTLPF40-240After selecting the crossover function, adjust the low pass or highpass frequency control with a small screwdriver through theopening marked “LP/FREQ.” or "HP/FREQ.". Turn CW toset to a higher frequency, CCW to set to a lower frequency.BASS-BOOSTONPOWEROFFTurning the “BASS BOOST” switch to “ON” increasesthe level of frequencies around 45Hz by 12dB.2.3 Operation- Protection Circuits andL.E.D. Indicators“POWER.” L.E.D. INDICATOR- Provides a visual indicationthat the amplifier is turned on.PROTECT“PROTECT” L.E.D. INDICATOR- Provides a visualindication that a problem exists and the protection circuitry hasprotected the amplifier by shutting it down. Turn the systemoff and correct the problem before turning the system on.THERMAL PROTECTION- The amplifier will shut down if itstemperature exceeds a safe operating level. The amplifier will remain offuntil it cools to a safe operating temperature. Exercise care, the exterior ofthe amplifier may get uncomfortably hot to the touch before shutting down.OVERLOAD AND SHORT CIRCUIT PROTECTION- The amplifierwill shut down if a short circuit condition exists, or if electrical currentdemands exceed safe levels.7
FUSE15AFUSE PROTECTION- A blown fuse indicates a problem thatshould be corrected before the fuse is replaced. Always replacewith the same value fuse. Never substitute a larger value fuse.15A2.4 Operation- Location of Terminals,Controls and LED indicators<strong>TA4600</strong>, <strong>TA4320</strong>1. RCA input jacks 2. High level input 3. Input level adjust4. Crossover select 5. Low pass freq. 6. High pass freq.7. Bass boost 8. Mode 9. Power L.E.D.10. Protection L.E.D.9 1 3 6 5 2 5 6 3 1 10A/B CHANNELSC/D CHANNELINPUT LEVEL HPF LPFHIGH LEVELLPFHPFLEVELINPUTACPOWERMIN MAX 40 240 40 24040 24040 240MINMAXPROTECTB X-OVER BASS-BOOST MODEBASS-BOOSTX-OVERDLPF FULLHPFONOFF 2CH 3CH 4CH ONOFFLPFFULLHPF4 7 87 41. Power terminals 2. Fuse(s) 3. Speaker terminals21 3 330AFUSE30APOWER SPEAKER SPEAKERRMT A- ) ( B- C- ) ( D- +12V GND ( A+ ) ( ) ( B+ )( C+ ) ( ) ( D+ )( + ) ( - )BRIDGED( + ) ( - )BRIDGED8
<strong>TA2300</strong>, <strong>TA2160</strong>1. RCA input jacks 2. High level input 3. Input level adjust4. Bass Boost 5. Low pass freq. 6. Crossoverselect 7. High pass freq. 8. Power L.E.D. 9. Protection L.E.D.8 2 1 3 4 5 6 7 9HIGH LEVELINPUT LEVEL BASS-BOOSTLPF X-OVER HPFLPOWERMINMAXONOFF40 240LPFFULLHPF40 240PROTECTR1. Power terminals 2. Fuse 3. Speaker terminals213FUSE15A+12VPOWERRMTGNDSPEAKER( A+ ) ( A- ) ( B- ) ( B+ )( + ) ( - )BRIDGED9
Features and Specifications:<strong>TA4600</strong>4 CHANNELPOWERAMPLIFIER<strong>TA4320</strong>4 CHANNELPOWERAMPLIFIER<strong>TA2300</strong>2 CHANNELPOWERAMPLIFIER<strong>TA2160</strong>2 CHANNELPOWERAMPLIFIER2Ω StableYesBridgeable Yes, 4ΩTri-modeYesTerminals Gold plated RCA jacks, speaker and power terminalsSoft StartYesInputsRCA line level inputs, High level inputsCrossover Low Pass, High Pass, 12dB/Octave, 50-250Hz.Bass Boost+12dB @ 45HzProtectionThermal, short-circuit, DC offset, fusePowerSupplyPulse Width Modulated, MOSFET power supply+12V/Negative GroundRMS/MaxPower, 4Ω,THD
Troubleshooting:Condition Possible Cause Possible SolutionNo soundAmplifiershut downDistortionPoor bassresponseTickingnoiseWhiningnoiseLow or no remote turnon voltage, or no remoteturn on connectionBlown fuse(s)Wiring problemsBlown speakersProtection circuitprotecting againstoverheating or overloadInput level not properlyadjustedSpeaker damageSpeakers out of phaseRadiated noise fromspark plug wiresAlternator noise causedby poor grounding ofamplifier, source, othercomponent, battery, oralternatorCheck the remote turn onconnection and the voltage atthe amplifier and source unitCheck all system fusesRecheck all connectionsCheck for short circuitsCheck speakers on anotheramplifierCheck for adequate ventilationCheck load impedance(2 ohmstereo, 4 ohm bridged)Check speaker wiring for shortto the vehicle chassisReduce input levelReadjust amplifier input levelCheck speakers on anotheramplifierRecheck speaker wiringReverse polarity of one channelReroute amplifier input wiringInstall a noise filterCheck all ground connectionsInstall a noise filter on thesource unit’s power cableInstall a coupling transformerin the signal path to improveground isolation for the signalpath11
FranceINTRODUCTIONI. DescriptionCet appareil est un amplificateur de forte puissance. Faites preuve dejugement, car un niveau sonore excessif peut causer une perte permanentede l’ouï e. Cet amplificateur est destiné aux véhicules avec une batterie de12 V, à masse négative. Connecter ou essayer de faire fonctionnerl’amplificateur sur un autre type d’équipement électrique pourrait causerdes dommages à l’appareil, ou à l’équipement.II. Remarques sur le manuelLire les instructions-Lisez le mode d’emploi au complet et assurez-vous de bien comprendre lesconsignes de sécurité avant d’installer et de faire fonctionnerl’amplificateur. Nous recommandons d’utiliser les services d’un technicienqualifié pour le montage de votre amplificateur TA.Suivre les instructions-Les instructions visent à vous aider à obtenir la meilleure performance devotre amplificateur, et ce en toute sécurité. Suivez soigneusement lesinstructions d’installation et de fonctionnement.Conserver le mode d’emploi-Conservez ce mode d’emploi dans un endroit sûr après avoir terminél’installation. Vous pourrez ainsi le consulter plus tard.Conventions utilisées pour le texte de ce manuel-Caractères gras-Titres, et renseignements importants.Caractères gras soulignés-Information très importante.« Caractères gras »-Renvoie aux inscriptions sur l’amplificateur, ou à une citation dumanuel.III. Sécurité et Précautions de fonctionnement-Attention !Cette recommandation avertit l’utilisateur d’un risque ou danger potentielssi les instructions ne sont pas suivies.⇒ Cette flèche attire l’attention sur une directive particulière pourprévenir un danger potentiel.12
1. Installation1.1 Installation- Montage de l’amplificateurÉtape 1- Vérifier les connexions de mise à la masse (-) de la batterie et del’alternateur : elles doivent être correctement branchées et libre de rouille.Débrancher le câble négatif (-) de la batterie avant d’installerl’amplificateur ou de faire des connexions.Étape 2- Choisir un emplacement pour monter l’amplificateur : la surfacedoit être plane, bien ventilée et loin de toute source de chaleur oud’humidité. S’assurer que le forage des trous-guides à cet emplacementn’endommagera pas le circuit électrique, les câbles de commande, lesconduites de carburant, le réservoir de carburant, le circuit hydraulique etautres équipements ou accessoires du véhicule. Les emplacements les pluscourants d’installation sont sous le siège avant (côté passager), ou biendans le coffre. L’appareil se refroidira mieux s’il est monté verticalement.Étape 3- Utiliser les vis fournies. Placer ce dernier à l’emplacement choisi,puis marquer les positions des trous avec un marqueur, un stylo ou uncrayon. Forer les trous avec précaution.Attention !⇒ Examiner attentivement l’emplacement avant de forer les trous-guides.Étape 4- Fixer solidement l’amplificateur avec les vis fournies.1.2 Installation- Connexions del’alimentationÉtape 1- Acheminer un fil d’alimentation de la batterie à l’amplificateur.Employer des œillets en caoutchouc pour protéger le fil lorsqu’il passe àtravers du métal.<strong>TA4600</strong>, <strong>TA4320</strong>, <strong>TA2300</strong> - Fils d’alimentation et de masse :Câbles AWG n° 8 ou plus gros. (AWG : Norme américaine des dimensionsde fils.)<strong>TA2160</strong> - Fils d’alimentation et de masse : Câbles AWG n° 10 ou plusgros.Étape 2- Brancher un bout du porte-fusible (vide pour le moment) sur le fild’alimentation (côté ampli), et l’autre bout sur le même fil, long de 20 cmmaximum (côté borne positive de la batterie). Cette position protégera lesystème et le véhicule en cas de court-circuit au fil d’alimentation. Penser àutiliser un porte-fusible (et, plus tard, un fusible) adéquats pour ce typed’installation. La valeur nominale du fusible dépend de la grosseur des filsd’alimentation et de masse. Cette valeur nominale pour chaqueamplificateur de la gamme TA est :<strong>TA4600</strong> - 2 X 30 Amp <strong>TA4320</strong> -40 Amp13
<strong>TA2300</strong> - 30 Amp <strong>TA2160</strong> - 20 AmpAttention !⇒ Exécuter un pont avec des fusibles, ou en remplacer un par unautre de valeur supérieure peut causer des dommages àl’amplificateur et au système électrique du véhicule.Étape 3- Acheminer un fil de télécommande (AWG n° 18 ou plus gros) àpartir d’une source positive commutée de 12 V (laquelle servira à allumerles composants du système) : Interrupteur à bascule, relais, commutateurd’allumage ou relais d’antenne automatique. Brancher l’autre bout surl’amplificateur.POWER+12V RMT GNDÉtape 4- Localiser un endroit sûr de mise à lamasse, aussi près que possible de l’amplificateur.L’endroit doit être propre et fournir uneconnexion électrique directe au châssis duvéhicule. Brancher à cet endroit un fil court de lamême grosseur que le fil d’alimentation, et acheminer l’autre bout àl’amplificateur.Étape 5- Brancher le fil de mise à la masse sur la borne filetée marquée« MASSE ».Étape 6- Brancher le fil d’alimentation sur la borne filetée marquée«FIL POSITIF, +12V ».Étape 7- Brancher le fil de télécommande sur la borne filetée marquée« TÉLÉCOMMANDE ».1.3 Installation- Connexions des Haut-ParleursÉtape 1- Acheminer des fils AWG n° 16 (ou plus gros) des haut-parleurs àl’amplificateur. Garder les fils des haut-parleurs éloignés des filsd’alimentation et des fils d’entrée de l’amplificateur. Employer des œilletsen caoutchouc pour protéger les fils lorsqu’ils passent à travers du métal oude la tôle. Brancher-les sur les haut-parleurs, en tenant compte des bornespositives et négatives de ceux-ci.Étape 2- Dénuder les extrémités des fils de haut-parleurs sur environ 1 cmet les tordre. Veiller à ce qu’il n’y ait aucun brin lâche : il pourrait toucherune borne ou d’autres fils et provoquer un court-circuit.Étape 3- Sertir les extrémités dénudées avec des attaches à bêche ou mettreun point de soudure d’étain pour avoir une terminaison solide.Étape 4- Brancher les fils sur les bornes de l’amplificateur comme suit :14
BORNES AV ET AR DES HAUT-PARLEURSSuivre les voies, (A/B/C/D+) (A/B/C/D-), ainsi que les repères depolarité pour s’assurer qu’ils correspondent aux voies et polarités desconnexions des haut-parleurs.SPEAKER(A+) (A-) (B+) (B-)SPEAKER(C+) (C-) (D+) (D-)( + ) ( - )BRIDGE( + ) ( - )BRIDGECONNEXIONS DE PLUSIEURS HAUT-PARLEURSPARALLÈLE- Chaque haut-parleur supplémentaire diminuel’impédance de charge pour l’amplificateur. Ainsi, ce dernier livreplus de courant et force un peu plus.CONNEXIONPARALLÈLE,H.P. DE 4 OHMS4 ohms 2 ohmsSAOMRPTLIIE+-(+)(- )(+)(- )EN SÉRIE- Chaque haut-parleur supplémentaire augmentel’impédance de charge pour l’amplificateur. Des impédancessupérieures à 8 ohms sont rarement utilisées pour les autoradios.15
CONNEXION EN SÉRIE, H.P. DE 4 OHMS4 ohms 8 ohmsSAOMRPTLIIE+-(+)(- )(+)(- )1.4 Installation- Auto-Pontage, Mode 2+1PONT MONO-Brancher un haut-parleur de 4 Ω, sur lesbornes marquées « (+), PONT, (-) », enveillant à faire correspondre la polaritédes connexions des haut-parleurs.Attention !⇒ Des haut-parleurs ou des chargesde plusieurs haut-parleurs totalisant( + ) ( - )une valeur nominale inférieure à 4BRIDGESPEAKER(A+) (A-) (B+) (B-)ohms ne sont pas recommandés pour exécuter un pont (« PONTMONO » ou « Mode 2+1 ») car cela pourrait endommagerl’amplificateur.MODE 2+1 - (TRI-MODE)La combinaison des modes stéréo et mono, « Mode 2+1 », demande untransfert passif pour acheminer les basses fréquences au haut-parleur monoet les hautes fréquences aux haut-parleurs stéréo. Le tableau suivanténumère les valeurs des composants pour un transfert de fréquence de 6dB/oct. à des fréquences normales de haut-parleurs (4/8 ohms) :FRÉQUENCE INDUCTEUR CONDENSATEUR80 Hz 16 mH 470 uF100 Hz 7,5 mH 330 uF120 Hz 7,5 mH 330 uF150 Hz 7.5 mH 220 uF16
MODE 2+1, DIAGRAMME DE CÂBLAGEBrancher en série des condensateurs non-polarisés de 100 volts sur leshaut-parleurs stéréo, selon les indications du diagramme ci-après.Brancher l’inducteur en série sur le haut-parleur mono comme illustré.S’assurer que la valeur nominale de l’inducteur est suffisamment élevéepour accepter la sortie de tension de l’amplificateur.(A+)(A-)(B+)(B-)INDUCTEUR(+)(-)(+)(-)CONDENSATEURS(+)(-)1.5 Installation- Connexions d’entréeJacks d’entrée RCA plaqués or, niveau bas, impédanceélevée-INPUTPour les connexions sur une borne offrant des sorties deAniveau préamplificateur. Utiliser des cordons deconnexion RCA pour service intensif conçues pour desapplications mobiles. Acheminer les cordons deconnexion avec soin, en les gardant aussi éloignés que Bpossible des fils d’alimentation, de haut-parleurs et ducâblage des accessoires. Faire en sorte que l’ajustage desfiches RCA soit bien serré pour avoir une connexion sûre.HIGH LEVELRaccordement entrée haut-niveau, raccorder aux sorties hautparleursde la radioblanc: entrée haut-niveau canal A (+)blanc / noir: entrée haut-niveau canal A (-)gris: entrée haut-niveau canal B (+)gris / noir: entrée haut-niveau canal B (-)noir:masse entrée haut-niveau17
HIGH LEVELblanc:blanc / noir:gris:gris / noir:vert:vert / noir:violet:violet / noir:noir:LEVELMIN MAX(+) canal A(-) canal A(+) canal B(-) canal B(+) canal C(-) canal C(+) canal D(-) canal Dmasse entrée haut-niveau1.6 Installation- Vérifier toutes lesconnexionsVérifier de nouveau toutes les connexions avant de rebrancher le câble demasse (-) de la batterie. Poser un fusible de valeur nominale appropriéedans le porte-fusible voisin de la batterie avant d’allumer le système.2. Fonctionnement2.1 Fonctionnement- Réglages du niveaud’entréeRégler le niveau d’entrée (son) pour la voie indiquée (ou lesvoies selon le cas) en insérant un petit tournevis dans l’orificemarqué « NIVEAU ». Tourner dans les sens des aiguillesd’une montre pour augmenter le son, dans l’autre sens pour lebaisser. Les amplificateurs chaufferont moins et produirontmoins de sons peu naturels à des réglages plus bas.Consulter un technicien professionnel de montage pour obtenir de l’aidedans l’équilibre des niveaux des systèmes à plusieurs amplificateurs ou dessystèmes comportant des accessoires de traitement de signaux.2.2 Fonctionnement- Sélecteur intégré desfréquences de coupureSÉLECTEUR DES FRÉQUENCES DE COUPURE18
FUSE15A15AX-OVERLPF- FULL- HPFLPF40-240BASS-BOOSTONPOWERPROTECTOFFLes amplificateurs TA ont un sélecteur intégré pour lestransferts (filtre passe-bas – FPB, et filtre passe-haut - FPH),afin de commuter la fréquence de coupure de deuxamplificateurs connectés à l’unité. Sélectionner «PLEIN, FPB, ou FPH » en déplaçant le sélecteur pour chaque paire devoies. La position « PLEIN » annule les transferts..RÉGLAGE DE LA FRÉQUENCEAprès avoir sélectionné le transfert, régler la fréquence à la mêmevaleur (basse pour filtre passe-bas, ou haute pour filtre passe-haut)avec un petit tournevis introduit dans l’orifice marqué « FRÉQ». Tourner dans le sens des aiguilles d’une montre pour unefréquence plus haute, en sens inverse pour une fréquence plusbasse.AMPLIFICATION ADDITIONELLE DES NOTESGRAVESSi vous activez cette fonction ‚, les notes graves à 45Hzsont amplifiées additionellement.2.3 Fonctionnement- Circuits de protectionet voyants DELVOYANT DEL D’ALIMENTATION (« ALIM. »)- S’allumequand l’amplificateur est en fonction.VOYANT DEL DE PROTECTION (« PROT. »)- S’allumeen cas de problème et pour signaler que le circuit de protection acoupé l’alimentation à l’amplificateur pour le protéger. Eteindrele système et corriger le problème avant de rallumerl’appareil.PROTECTION THERMIQUE- L’amplificateur s’éteindra si satempérature devient trop élevée et nuit à la sécurité de fonctionnement. Ilse rallumera quand il se sera refroidi et revenu à une température normale.Faire très attention, car la surface de l’amplificateur peut être brûlante.PROTECTION CONTRE LES COURTS-CIRCUITS ET LESSURCHARGES- L’amplificateur s’éteindra en cas de court-circuit, ou sile courant atteint une intensité dangereuse.PROTECTION CONTRE UN ÉCART DE PHASE DU COURANTCONTINU- L’amplificateur s’éteindra si un écart de phase dangereux ducourant continu se produit.PROTECTION DU FUSIBLE- Un fusible grillé signale unproblème devant être corrigé avant de remplacer le fusible.Toujours poser un fusible de même valeur nominale, jamais devaleur supérieure.19
2.4 Fonctionnement- Position des bornes,commandes et voyants DEL<strong>TA4600</strong>, <strong>TA4320</strong>-1. Jacks d’entrée RCA 2. entrée haut-niveau 3. Réglage du niveaud’entrée4. Commutateur du filtreactif5. Réglage de la fréquencede coupure passe-haut6. Réglage de la fréquencede coupure passe-bas7. commutateur pour lebass-boost8. Commutateur pour lemode9. Voyant DELd’alimentation10. Voyant DEL deprotection9 1 3 6 5 2 5 6 3 1 10A/B CHANNELSC/D CHANNELINPUT LEVEL HPF LPFHIGH LEVELLPFHPFLEVELINPUTACPOWERMIN MAX 40 240 40 24040 24040 240MINMAXPROTECTB X-OVER BASS-BOOST MODEBASS-BOOSTX-OVERDLPF FULLHPFONOFF 2CH 3CH 4CH ONOFFLPFFULLHPF4 7 87 41. Bornes d’alimentation 2. Fusibles 3. Bornes des hautparleurs21 3 330AFUSE30APOWER SPEAKER SPEAKERRMT A- ) ( B- C- ) ( D- +12V GND ( A+ ) ( ) ( B+ )( C+ ) ( ) ( D+ )( + ) ( - )BRIDGED( + ) ( - )BRIDGED<strong>TA2300</strong>, <strong>TA2160</strong>-1. Jacks d’entrée RCA 2. entrée haut-niveau 3. Réglage du niveau4. commutateur pour lebass-boost7. Réglage de la fréquencede coupure passe-haut5. Réglage de la fréquencede coupure passe-bas8. Voyant DELd’alimentation8 2 1 3 4 5 6 7 9d’entrée6. Commutateur du filtreactif9. Voyant DEL deprotectionHIGH LEVELINPUT LEVEL BASS-BOOSTLPF X-OVER HPF20LPOWERMINMAXONOFF40 240LPFFULLHPF40 240PROTECTR
4. Bornes d’alimentation 5. Fusibles 6. Bornes des hautparleurs213FUSE15A+12VPOWERRMTGNDSPEAKER( A+ ) ( A- ) ( B- ) ( B+ )( + ) ( - )BRIDGED21
Caractéristiques et fiche technique<strong>TA4600</strong><strong>TA4320</strong><strong>TA2300</strong>AMPLIFICATEURDE PUISSANCE4 VOIESAMPLIFICATEURDE PUISSANCE4 VOIESAMPLIFICATEURDE PUISSANCE2 VOIES<strong>TA2160</strong>AMPLIFICATEURDE PUISSANCE2 VOIESStable 2ΩOuiPontable Oui, 4ΩTri-modeOuiBornesJacks RCA plaqué or, haut-parleurs et bornes d’alimentationTémoin deOuidémarrageInputsJacks d’entrée RCA, entrée haut-niveauFréquence deOui, passe-bas, passe-haut, 12 dB/Oct., 50-250 Hz.coupureintégréeBass BoostProtectionAlimentationMOSFET,PWMCourant CoupéNominal, 4 Ω,DHT < 0,05%Courant CoupéNominal, 2ΩCourant CoupéNominal ponté,4 ΩRapport signalbruitpondéréen ampèresRéponse enfréquenceSéparationstéréopondérée enampèresSensibilitéd’entrée+12dB, 45HzProtégé contre les surcharges thermiques et électriques, les courts-circuits etles écarts de phase du courant continuAlimentation avec modulation de largeur d’impulsions régulée (PWM), etavec transistor à effet de champ à oxydes métalliques (MOSFET)4 X 75/150WattsCCN/MAX4 X 100/200WattsCCN/MAX2 X 200/400WattsCCN/MAX4 X 40/80WattsCCN/MAX4 X 55/110WattsCCN/MAX2 X 110/220WattsCCN/MAX2 X 75/150WattsCCN/MAX2 X 100/200WattsCCN/MAX200/400 WattsCCN/MAX2 X 40/80WattsCCN/MAX2 X 55/110WattsCCN/MAX110/220 WattsCCN/MAX-90dBA -90dBA -90dBA -90dBA10Hz. – 30kHz 10Hz. - 30kHz 10Hz. - 30kHz 10Hz. - 30kHz-60dB -60dB -60dB -60dB100mV – 1.0V 100mV - 1.0V 100mV - 1.0V 100mV - 1.0VFusible 2 X 30A 30A 30A 15ACette fiche technique est sujette à des changements en raison desaméliorations sans cesse apportées au produit.22
DépannageProblème Cause possible Solution possiblePas de sonTension d’allumage à distancebasse ou inexistante, ou aucuneconnexion d’allumage à distanceFusible(s) grillé(s)Anomalie de câblageVérifier la connexion d’allumage àdistance, et la tension à l’amplificateur età l’unité sourceVérifier tous les fusiblesRevérifier toutes les connexionsAmplifica-teuréteintDistorsionLes haut-parleurs ont sautéCircuit de protection contre lasurchauffe ou la surchargeNiveau de son mal réglé Hautparleur(s)endommagé(s)Vérifier la trace de courts-circuitsVérifier les haut-parleurs avec un autreamplificateurVérifier si la ventilation est adéquateVérifier l’impédance de charge (2 ohmsstéréo, 4 ohms pontée)Vérifier le câblage des haut-parleurs :Court-circuit à la carrosserie.Baisser le niveau de son (niveaud’entrée)Réajuster le niveau d’entrée del’amplificateur.Vérifier les haut-parleurs avec un autreamplificateurBasse médiocre Haut-parleurs déphasés Revérifier le câblage des haut-parleursPolarité inversée d’une voieCliquetisBruit stridentBruit provenant des câbles debougiesBruit de l’alternateur causé parune mise à la masse impropre del’amplificateur, de la source,d’un autre composant, de labatterie ou de l’alternateurRéacheminer le câblage d’entrée del’amplificateurPoser un filtre antiparasiteVérifier toutes les connexions de mise àla massePoser un filtre antiparasite au fild’alimentation de l’unité sourcePoser un transformateur de couplage surle trajet à signal pour en améliorerl’isolationDeutsch23
EINLEITUNGI. BeschreibungDieses Gerät ist ein Hochleistungsverstärker. Seien Sie vorsichtig bei derVerwendung. Sehr laute Musik kann zu bleibendem Gehörverlust führen.Dieser Verstärker soll nur in Fahrzeugen mit elektrischen Anlagen von 12-Volt und negativem Masseanschluss installiert werden. Jeder Versuch, denVerstärker an andere elektrische Versorgungssysteme anzuschließen odermit solchen zu verwenden, kann dem Verstärker oder der elektrischenAnlage Schaden zuführen.II. Über dieses HandbuchBitte lesen Sie die Anweisungen-Stellen Sie sicher, dass Sie alle Gebrauchsanweisungen gelesen haben undalle Sicherheitsmaßnahmen verstehen, bevor Sie den Verstärker einbauenund in Betrieb nehmen. Wir empfehlen, dass Sie sich Ihren TA Verstärkervon einer Fachkraft einbauen lassen.Befolgen Sie bitte die Anweisungen-Die Anweisungen sollen Ihnen helfen, die beste Leistung mit IhremVerstärker zu erzielen. Befolgen Sie sorgsam alle Anleitungen.Bewahren Sie das Handbuch auf-Bewahren Sie das Handbuch nach Einbau des Verstärkers an einemsicheren Ort auf, falls sich später Fragen einstellen.Textverwendung in diesem Handbuch-Fettgedruckt-Überschriften und wichtige Informationen.Fettgedruckt und unterstrichen-Sehr wichtige Informationen."Fettgedruckt"-Wie auf dem Verstärker gedruckt oder diesemHandbuch anderswo entnommen wurde.III. Sicherheit und Vorsicht beim Betrieb-Vorsicht!Dieses Symbol warnt den Benutzer vor einem eventuellen Risiko oder vorGefahr, wenn die Anweisungen nicht befolgt werden.24
⇒ Dieses Pfeilsymbol weist auf eine besondere Anleitung zurVermeidung einer eventuellen Gefahr hin.25
1. Installation1.1 Installation- Einbau des VerstärkersSchritt 1- Das (-) Kabel vom negativen Pol der Batterie abklemmen, bevorder Verstärker eingebaut oder angeschlossen wird. Masseanschlüsse (-) zuBatterie und Wechselstromgenerator prüfen. Sie müssen richtigangeschlossen und korrosionsfrei sein.Schritt 2- Wählen Sie jetzt die Stelle, wo Sie Ihren Verstärker einbauenwollen. Es soll eine gerade, vor Hitze und Feuchtigkeit geschützte Stellesein. Stellen Sie sicher, dass beim Einbau und Bohren derBefestigungslöcher keine Leitungsdrähte, Steuerkabel, Benzinleitungen,Benzintanks, hydraulische Leitungen, oder andere Fahrzeugsysteme undTeile beschädigt werden. Typische Einbaustellen befinden sich unter demMitfahrersitz oder in der Kofferraumgegend. Es soll eine Stelle mitungehinderter Luftzirkulation sein. Der Verstärker gibt die Wärme besserab, wenn er senkrecht montiert ist.Schritt 3- Verwenden Sie die mitgelieferten Schrauben. Halten Sie denVerstärker an den vorgesehenen Platz und markieren Sie mit einem Stift,wo die Löcher sein sollen. Dann bohren Sie die Befestigungslöchervorsichtig an den markierten Stellen.Vorsicht!⇒ Vorsichtig nachsehen, bevor Sie anfangen die Führungslöcher zubohren.Schritt 4- Die mitgelieferten Befestigungsschrauben verwenden, um denVerstärker sicher an der Montagefläche anzubringen.1.2 Installation- StromversorgungSchritt 1- Verlegen Sie das Batteriekabel von der Batterie bis zurAnbringungsstelle. Verwenden Sie Gummidurchgangstüllen, um das Kabelüberall dort zu schützen, wo es durch Metall geht.<strong>TA4600</strong>, <strong>TA4320</strong>, <strong>TA2300</strong> - Ein mindestens 8 AWG starkesKabel für Batterie- und Masseanschluss verwenden.<strong>TA2160</strong> – Ein mindestens 10 AWG starkes Kabel für Batterie- undMasseanschluss verwenden.Schritt 2- Verbinden Sie das eine Ende eines Reihensicherungshalters mitdem Batteriekabel. Verbinden Sie das andere Ende des Sicherungshaltersmit dem positiven Batteriepol mit 20 cm (oder weniger) des gleichenKabels. Diese Sicherungsortung schützt Ihre Anlage sowie das Fahrzeuggegen einen eventuellen Kurzschluss des Batteriekabels. Stellen Sie sicher,dass Sie eine Sicherung und einen Sicherungshalter verwenden, die für dieAnwendung leistungsfähig genug sind. Setzen Sie jetzt noch keineSicherung in den Sicherheitshalter ein. Der eigentliche Nennwert derSicherung hängt von der Stärke des Kabels für Batterie- und26
Masseanschluss ab. Bei jedem Verstärker der TA Serie ist die Höchstwerteder Sicherungen wie folgt:<strong>TA4600</strong>- 2 X 30 Amp<strong>TA4320</strong>- 40 Amp<strong>TA2300</strong>- 30 Amp <strong>TA2160</strong>- 20 AmpVorsicht!⇒ Überbrücken oder Ersetzen von anderen Sicherungen von höhererNennleistung kann den Verstärker und das elektrische System desFahrzeugs beschädigen.Schritt 3- Verlegen Sie ein Fernsteuerkabel von der geschalteten +12VVersorgung, die zum Einschalten der Systemkomponenten verwendetwerden soll. Zu diesem Zweck kann ein Kippschalter, Relais, dieFernsteuerleitung der Stromversorgung oder der Motor-Versenkantenneverwendet werden. Führen Sie diese Leitung zur Montagestelle desVerstärkers. Verwenden Sie ein mindestens 18 AWG starkes Kabel.POWER+12V RMT GNDSchritt 4- Finden Sie eine zuverlässigeMasseverbindung so nahe wie möglich amVerstärker. Überzeugen Sie sich, dass dieAnschlussstelle sauber ist und guten elektrischenKontakt mit dem Fahrzeugrahmen hat.Verbinden Sie ein kurzes Kabelstück vongleicher Stärke wie das Batteriekabel an einem Ende zur Masse. VerlegenSie das andere Ende dieses Kabels zur Montagestelle des Verstärkers.Schritt 5- Das Massekabel an der Schraubklemme mit der Beschriftung“POWER, GND” befestigen.Schritt 6- Das Batteriekabel an der Schraubklemme mit der Beschriftung“POWER, +12V” am Verstärker anschließen.Schritt 7- Schließen Sie die Fernbedienkabel an der Schraubklemme“POWER, RMT” an.1.3 Installation- LautsprecheranschlüsseSchritt 1- Einen mindestens 16 AWG starken Leitungsdraht von IhrenLautsprechern bis zur Montagestelle des Verstärkers verlegen. DieLautsprecherleitungen vom Batteriekabel und den Eingangskabeln zumVerstärker getrennt halten. Verwenden Sie Gummidurchgangstüllen, wenndie Drähte durch Löcher im Metallrahmen oder durch Blech geführtwerden sollen. Je nach der Art der vorhandenen Klemmen an dieLautsprecher anschließen.Schritt 2- Streifen Sie 1 cm der Isolierhülle von jedem Leitungsdraht abund drehen Sie die einzelnen Litzen Drähte fest zusammen. ÜberzeugenSie sich, dass alle Litzen erfasst wurden und keine anderen Leitungen oderAnschlüsse berührt werden, die Kurzschluss verursachen könnten.27
Schritt 3- Die Leitungsenden entweder durch Quetschverbindung oderLöten mit Kabelschuhen versehen, um einen zuverlässigen Anschluss zuerzielen.Schritt 4- Die Leitungsenden wie folgt an Ihrem Verstärker anbringen:LAUTSPRECHERKLEMMENÜberprüfen Sie den linken, (A/B/C/D+) (A/B/C/D-), Kanal und diePolaritätsmarkierungen, und überzeugen Sie sich, dass sie mit Kanal undPolarität der Verbindung an den Lautsprechern übereinstimmen.SPEAKER(A+) (A-) (B+) (B-)SPEAKER(C+) (C-) (D+) (D-)( + ) ( - )BRIDGE( + ) ( - )BRIDGEANSCHLUSS VON MEHREREN LAUTSPRECHERNPARALLEL- Jeder zuzügliche Lautsprecher vermindert dieAusgangsimpedanz des Verstärkers. Der Verstärker liefert mehrStrom und leistet mehr.PARALLEL CONNECTION USING 4 OHM SPEAKERS4 Ohm 2 OhmAMOPULTIPFUITER+-(+)(-)(+)(-)SERIELL- Jeder zuzügliche Lautsprecher vergrößert dieAusgangsimpedanz des Verstärkers. Impedanzen von mehr als 8 Ohmwerden selten bei Kfz-Audiosystemen verwendet.28
SERIES CONNECTION USING 4 OHM SPEAKERS4 Ohm 8 OhmAMOPULTIPFUITER+-(+)(-)(+)(-)1.4 Installation- Selbst-Überbrückung, 2+1ModusBEI MONO- Schließen Sie dieLautsprecherlast von 4 Ω Lautsprecheran die mit “(+), BRIDGE (-)”beschrifteten Klemmen an, wobei Siedarauf achten müssen, dass dieKlemmen mit der Polarität derLautsprecheranschlüsseübereinstimmen.Vorsicht!SPEAKER(A+) (A-) (B+) (B-)( + ) ( - )BRIDGE⇒ Lautsprecher- oder mehrfache Lautsprecherlasten von insgesamtweniger als 4 Ohm werden für “BRIDGED” oder “2+1 Modus undkönnen dem Verstärker Schaden zuführen.<strong>TA4600</strong>, TA4300- Wenn alle 2, 3 oder 4 Kanäle des Verstärkersgebraucht werden, so muss der Schalter für die Kanalwahl in derentsprechenden 2-, 3- oder 4-Kanal Position sein und dieLautsprecherkabel müssen entsprechend angeschlossen sein wie inZeichnung 1, 2, 3.2+1 MODUS- (DREIWEG-MODUS)Der gleichzeitige Stereo- und Monobetrieb, also der “2+1 Modus”,erfordert eine passive Frequenzweiche, um niedrige Frequenzen zumMono-Lautsprecher und höhere Frequenzen zu den Stereo Lautsprechernzu senden. Auf der folgenden Tabelle stehen die Einzelwerte bei einerWeiche für eine 6 DB-Oktave bei herkömmlichen Frequenzen und 8 OhmMono-Lautsprechern:29
FREQUENZ DROSSELSPULE KONDENSATOR80 Hz 16 mH 470 uF100 Hz 7,5 mH 330 uF120 Hz 7,5 mH 330 uF150 Hz 7,5 mH 220 uFSCHALTBILD FÜR DEN 2+1 MODUS-Verwenden Sie ungepolte Kondensatoren von 100 Volt Nennspannung undschalten Sie diese mit den Stereolautsprechern in Reihe, wie aus demSchaltbild ersichtlich. Schalten Sie die Drosselspule mit dem Mono-Lautsprecher in Reihe, wie aus dem Schaltbild ersichtlich.(A+)(A-)(B+)(B-)INDUKTOR(+)(-)(+)(-)KONDENSATOREN(+)(-)Vergewissern Sie sich, dass der Nennstrom der Drosselspule für IhrenVerstärker geeignet ist.1.5 Installation- EingangsverbindungenVergoldete Cinch-Eingangsbuchsen für schwache,hochohmige Eingangssignale-Zum Anschluss an Vorverstärkersignale benutzen Siestrapazierfähige Cinch-Verbindungskabel für Kfz.-Anwendungen. Die Verbindungskabel mit Vorsichtverlegen, d.h. sie so weit wie möglich von Batterie-,Lautsprecher- und anderen Leitungen fern halten.Überzeugen Sie sich, dass die Cinch-Stecker gut passenund einen zuverlässigen Anschluss bereiten.Anschluss Hochpegel-Eingang, zu den Lautsprecher-Ausgängen des AutoradiosHIGH LEVELABINPUTWeiss: Hochpegel-Eingang(+) Kanal AWeiss / Schwarz: Hochpegel-Eingang(-) Kanal AGrau: Hochpegel-Eingang(+) Kanal BGrau / Schwarz: Hochpegel-Eingang(-) Kanal B30
Schwarz: Hochpegel-Eingang MasseKein AnschlussHIGH LEVEL.Weiss: (+) Kanal AGrün: (+) Kanal CWeiss / Schwarz: (-) Kanal AGrün / Schwarz: (-) Kanal CGrau: (+) Kanal B Violet: (+) Kanal DGrau / Schwarz: (-) Kanal BViolet / Schwarz: (-) Kanal DSchwarz: Hochpegel-Eingang Masse1.6 Installation- alle VerbindungenüberprüfenNoch einmal alle Verbindungen überprüfen, bevor Sie das negative (-)Batteriekabel wieder anschließen. Setzen Sie vor dem Einschalten IhresVerstärkers eine Sicherung von entsprechender Stärke in denSicherungshalter bei der Batterie ein.2. Betrieb2.1 Betrieb- Einstellung des EingangspegelsLEVELMIN MAXStellen Sie den Eingangspegel für die markierten Kanäle miteinem kleinen Schraubenzieher durch die mit “LEVEL”beschriftete Öffnung ein. Nach rechts drehen, um den Pegel zuerhöhen, nach links, um ihn zu vermindern. Bei niedrigerenEinstellungen bleiben die Verstärker kühler und verursachenweniger Systemrauschen.Ziehen Sie eine erfahrene Fachkraft zu Rate, wenn Sie die Pegel inSystemen mit mehreren Verstärkern oder Systemen mit zusätzlichenSignalverarbeitungsgeräten abstimmen wollen.2.2 Betrieb- Eingebaute FrequenzweichenAuswahl der Frequenzweichen bei <strong>TA4600</strong>, <strong>TA4320</strong>,<strong>TA2300</strong>, <strong>TA2160</strong>-31
X-OVERLPF- FULL- HPFDie TA Verstärker haben eingebaute Tiefpass- undHochpassweichen um Ihr System zweifach zu verstärken.Wählen Sie "LPF, FULL oder HPF" indem Sie dieStellung für den Schiebeschalter bei jedem Kanalpaarumstellen. Bei "FULL" wird dieWeichenfunktion umgangen.<strong>TA4600</strong>, <strong>TA4320</strong>, <strong>TA2300</strong>, <strong>TA2160</strong>-- FREQUENZ - EINSTELLUNGLPFNachdem Sie die Weichenfunktion gewählt haben, stellen Sie dieÜbergangsfrequenz mit einem kleinen Schraubenzieher durch dieÖffnung, die mit “FREQ.” beschriftet ist, ein. Nach rechtsdrehen, um die Frequenz zu erhöhen, nach links, um sie zu40-240erniedrigen.BASS-BOOSTONOFFBASSANHEBUNG-Wird diese Funktion „ eingeschaltet, so werden die Tieftöne bei 45Hzangehoben.2.3 Betrieb- Schutzschaltungen und LED-AnzeigenPOWERPROTECT“EIN.” LED ANZEIGE- Eine Sichtanzeige, dass derVerstärker eingeschaltet ist.“SCHUTZ.” LED-ANZEIGE- Eine Sichtanzeige, welchemeldet dass ein Problem vorliegt und die Schutzschaltung denVerstärker vor Schaden bewahrte, indem sie ihn außer Betriebsetzte. Schalten Sie die Anlage aus, und beheben Sie dasProblem, bevor Sie die Anlage wieder einschalten.WÄRMESCHUTZ- Der Verstärker wird außer Betrieb gesetzt, wennseine Temperatur einen bestimmten Höchstwert übersteigt. Der Verstärkerbleibt außer Betrieb bis er auf eine sichere Betriebstemperatur abgekühltist. Seien Sie vorsichtig, denn das Gehäuse kann schon vor demAbschalten unangenehm heiß werden.SCHUTZ VOR ÜBERBELASTUNG UND KURZSCHLUSS- DerVerstärker schaltet sich ab, bei Kurzschluss oder wenn die Stromaufnahmeeinen bestimmten Höchstwert übersteigt.GLEICHSTROMVERSATZSCHUTZ- Der Verstärker schaltet sich beikritischen Gleichstrom-Abweichungen ab.FUSE15ASICHERUNGSSCHUTZ- Eine durchgebrannte Sicherung weistauf Fehler hin, die behoben werden sollten, bevor die Sicherung15A32
ersetzt wird. Ersetzen Sie immer mit einer Sicherung von gleicher Stärke.Niemals eine stärkere Sicherung verwenden.2.4 Betrieb- Die Ortung von Klemmen,Bedienelementen und LED-Anzeigen<strong>TA4600</strong>, <strong>TA4320</strong>1. Cinch-2. Hochpegel-Eingang 3. EingangspegelreglerEingangsbuchse4. Weicheneinstellung 5. Frequenzeinstellung 6. Frequenzeinstellung7. Bassanhebung 8. 2-, 3-, 4-Kanal- 9. Eingeschaltet-LEDBetrieb10. Schutz-LED9 1 3 6 5 2 5 6 3 1 10A/B CHANNELSC/D CHANNELINPUT LEVEL HPF LPFHIGH LEVELLPFHPFLEVELINPUTACPOWERMIN MAX 40 240 40 24040 24040 240MINMAXPROTECTB X-OVER BASS-BOOST MODEBASS-BOOSTX-OVERDLPF FULLHPFONOFF 2CH 3CH 4CH ONOFFLPFFULLHPF4 7 87 41. Stromklemmen 2. Sicherungen 3. Lautsprecherklemmen21 3 330AFUSE30APOWER SPEAKER SPEAKERRMT A- ) ( B- C- ) ( D- +12V GND ( A+ ) ( ) ( B+ )( C+ ) ( ) ( D+ )( + ) ( - )BRIDGED( + ) ( - )BRIDGED33
<strong>TA2300</strong>, <strong>TA2160</strong>1. Hochpegel-Eingang 2. Cinch-3. EingangspegelreglerEingangsbuchse4. Bassanhebung 5. Frequenzeinstellung 6. Weicheneinstellung7. Frequenzeinstellung 8. Eingeschaltet-LED 9. Schutz-LED8 2 1 3 4 5 6 7 9HIGH LEVELINPUT LEVEL BASS-BOOSTLPF X-OVER HPFLPOWERMINMAXONOFF40 240LPFFULLHPF40 240PROTECTR1. Stromklemmen 2. Sicherungen 3. Lautsprecherklemmen213FUSE15A+12VPOWERRMTGNDSPEAKER( A+ ) ( A- ) ( B- ) ( B+ )( + ) ( - )BRIDGED34
Merkmale und technische Daten<strong>TA4600</strong>4 KANALVERSTÄRKER<strong>TA4320</strong>4 KANALVERSTÄRKER<strong>TA2300</strong>2 KANALVERSTÄRKER<strong>TA2160</strong>2 KANALVERSTÄRKER2Ω stabilJaÜberbrückbar Ja, 4ΩDreiermodusJaKlemmen Vergoldete Cinchbuchsen, Lautsprecher und LeistungsanschlüsseEinschaltverzögerungJaEingangskreis Cinchbuchsen-Eingang(RCA), und Anschluss Hochpegel-EingangangEingebauteTiefpass, Hochpass, 12dB/Oktave, 40-240Hz.WeicheBassanhebung+12dB @ 45HzSchutzThermische, Üverlastungs- Kurzschluss- und GleichstromversatzSchutzschaltungMOSFET,PWM StromversorgungImpulsdauer modulierte MOSFET- Regelstromversorgung+12V Gleichstrom, netativer MasseanschlussAusgangsleistungRMS/Max 4Ω,THD
FehlerbehebungVerhalten Mögliche Ursache Mögliche LösungKeineLautstärkeVerstärkeraußer BetriebVerzerrungSchlechteBasswiedergabeTickenHeulenUnterspannung oderSpannungsausfall beiFernbedienung, oder Anschlussder Fernbedienung unterbrochenDurchgebrannte Sicherung(en)VerdrahtungsfehlerLautsprecher beschädigtSchutzschaltung gegenÜberhitzung oder ÜberlastungEingangspegel nicht richtigeingestelltLautsprecherschadenLautsprecher nicht richtig gepoltGeräusch stammt vonZündkerzenleitungenGeneratorgeräusch durchschlechte Masseverbindung desVerstärkers, der Stromquelle,anderer Teile, der Batterie oderdes GeneratorsPrüfen Sie ob die Fernbedienungangeschlossen ist und prüfen Sie dieSpannung am Verstärker und an derVersorgungsseitePrüfen Sie alle Sicherungen im SystemAlle Anschlüsse wiederholt nachprüfenMöglicher KurzschlussLautsprecher an anderem VerstärkerprüfenVentilation prüfen,Anschlussimpedanz prüfen (2 Ohmstereo, 4 Ohm überbrückt)Lautsprecherverdrahtung aufKurzschluss zum Kfz.-Chassis hin prüfenEingangspegel reduzierenEingangspegel bei Verstärker neueinstellenLautsprecher bei einem anderenVerstärker prüfenLautsprecherverdrahtung noch einmalprüfenPolarität eines Kanals vertauschenVerstärkereingangsverdrahtung andersinstallieren.Entstördrossel einbauenAlle Masseanschlüsse prüfen.Entstördrossel am Batteriekabel derStromversorgung einbauen.Einen Koppeltrafo im Signalwegeinbauen, um die Masseisolierung desSignalwegs zu verbessernEspañol36
INTRODUCCIÓNI. DescripciónEste dispositivo es un amplificador de sonido de alta potencia. Utilícelo demodo responsable. La música muy alta puede ocasionar una pérdidapermanente de oído. Este amplificador ha sido diseñado para ser instaladoen vehículos con un sistema eléctrico de 12 voltios y masa negativa. Elintento de conectar o hacer funcionar el amplificador en otro tipo desistema eléctrico puede causarle daños al amplificador o al sistemaeléctrico.II. Acerca de este manualLea las instrucciones-Asegúrese de haber leído todas las instrucciones de funcionamiento y decomprender todas las precauciones de seguridad antes de instalar y hacerfuncionar el amplificador. Le recomendamos que su amplificador TA seainstalado por un especialista.Siga las instrucciones-Las instrucciones han sido concebidas para ayudarle a obtener de manerasegura el mejor rendimiento del amplificador. Siga cuidadosamente todaslas instrucciones de instalación y funcionamiento.Guarde el manual de funcionamiento-Guarde el manual en sitio seguro tras instalar el amplificador. Puedenecesitarlo más tarde.Convenciones tipográficas utilizadas en este manual-Negrita-Títulos e información importante.Negrita subrayada-Información muy importante."Negrita"-Términos que figuran en el amplificador, o citas de otro apartadode este manual.III. Precauciones de seguridad y funcionamiento¡Atención!Este símbolo advierte al usuario de un posible riesgo o peligro si no sesiguen las instrucciones.⇒ Esta flecha señala instrucciones específicas para evitar un posiblepeligro.37
1. Instalación1.1 Instalación- Montaje del amplificadorPaso 1- Desconecte el cable negativo (-) de la batería antes de montar elamplificador o realizar cualquier conexión. Revise las conexiones a masa(-) de la batería y alternador. Asegúrese de que las conexiones seanadecuadas y no tengan corrosión.Paso 2- Elija el lugar de montaje de su amplificador. Debe ser unasuperficie plana sin calor ni humedad. Asegúrese de que el lugar demontaje y la perforación de orificios guía para éste no representen ningúnpeligro para los hilos, cables de control, tuberías de alimentación decombustible, depósitos de combustible, líneas hidráulicas u otros sistemas ocomponentes del vehículo. Son usuales los montajes bajo el asientodelantero del pasajero o en la zona del maletero. Elija un lugar con buenacirculación de aire. El amplificador disipará el calor con mayor eficacia sise monta verticalmente.Paso 3- Utilice los tornillos suministrados. Sitúe el amplificador en ellugar de montaje, y marque la posición de los orificios con un rotulador,bolígrafo o lápiz. Perfore con cuidado los orificios de montaje en lasposiciones señaladas.¡Atención!⇒ Compruebe las posiciones antes de perforar un orificio guía.Paso 4- Utilice los tornillos de montaje que se suministran para sujetarbien el amplificador a la superficie de montaje.1.2 Instalación: Conexiones eléctricasPaso 1- Tienda un cable de alimentación desde la batería hasta el lugar demontaje del amplificador. Utilice arandelas aislantes de goma paraproteger el cable donde atraviese el metal.<strong>TA4600</strong>, <strong>TA4320</strong>, <strong>TA2300</strong>- Utilice cables de masa y dealimentación AWG nº 8 o superior.<strong>TA2160</strong>- Utilice cables de masa y alimentación AWG nº 10 o superior.Paso 2- Conecte un extremo de un portafusibles en línea al cable dealimentación. Conecte el otro extremo del portafusibles al borne positivo dela batería utilizando 20 cm. (o menos) del mismo cable. Esta situación delfusible protegerá al sistema y al vehículo contra la posibilidad de uncortocircuito en el cable de alimentación. Asegúrese de utilizar un fusible yun portafusibles adecuados para este uso. No coloque un fusible en elportafusibles en este momento. El amperaje del fusible depende del tamaño38
de los cables de alimentación y de masa. El amperaje máximo del fusiblepara cada amplificador de la serie TA es:<strong>TA4600</strong> - 2 X 30 Amp <strong>TA4320</strong> -40 Amp<strong>TA2300</strong> - 30 Amp <strong>TA2160</strong> - 20 Amp¡Atención!⇒ Puentear los fusibles o sustituir un fusible por otro de un amperajemayor puede ocasionar daños al amplificador y al sistema eléctricodel vehículo.Paso 3- Tienda un cable de encendido remoto desde la fuente deconmutación de +12V. que utilizará para activar los componentes delsistema. Ésta puede ser un interruptor de palanca, un relé o el disparadorremoto de su unidad fuente o de su antena automática. Tienda esteconductor hasta el lugar de montaje del amplificador. Utilice un cableAWG nº 18 o superior.POWER+12V RMT GNDPaso 4- Localice una conexión segura a masa tancerca del amplificador como sea posible.Asegúrese de que el lugar esté limpio yproporcione una conexión eléctrica directa alchasis del vehículo. Conecte un extremo de unsegmento corto de cable del mismo tamaño que el cable de alimentación alpunto de masa. Tienda el otro extremo del cable hasta el lugar de montajedel amplificador.Paso 5- Conecte el cable de masa a la terminal roscada marcada“POTENCIA, (MASA)”.Paso 6- Conecte el cable de alimentación al amplificador en la terminalroscada marcada “POTENCIA, +12V”.Paso 7- Conecte el cable de encendido remoto a la terminal roscadamarcada “POTENCIA, (REM.)”.1.3 Instalación- Conexiones de los altavocesPaso 1- Tienda un cable de conexión AWG nº 16 o superior desde losaltavoces hasta el lugar de montaje del amplificador. Mantenga los hilos delos altavoces alejados de los cables de alimentación y de los cables deentrada del amplificador. Utilice arandelas aislantes siempre que los hilostengan que pasar por orificios en el chasis de metal o en chapa metálica.Conéctelos a los altavoces según el tipo de terminales de cada altavoz.Paso 2- Quite 1 cm. de aislante en el extremo de cada hilo y retuerza losfilamentos de manera que queden fuertemente unidos. Asegúrese de que noqueden filamentos sueltos que pudieran tocar otros hilos o terminales yprovocar un cortocircuito.39
Paso 3- Fije orejetas de pala sobre los extremos del hilo o suelde losextremos con estaño para conseguir un acabado seguro.Paso 4- Conecte los extremos de los hilos a su amplificador como sigue:TERMINALES DE LOS ALTAVOCESSiga las marcas, (A/B/C/D+)(A/B/C/D-), de polaridad y canal,asegurándose de que se correspondan con el canal y la polaridad de lasconexiones en los altavoces.SPEAKER(A+) (A-) (B+) (B-)SPEAKER(C+) (C-) (D+) (D-)( + ) ( - )BRIDGE( + ) ( - )BRIDGECONEXIÓN DE ALTAVOCES MÚLTIPLESEN PARALELO: Cada altavoz adicional disminuye la impedancia decarga para el amplificador. El amplificador suministra más corriente ytrabaja más.CONEXIÓN EN PARALELO CON ALT. DE 4 OHMIOS4 OHM. 2 OHM.AMSPALLIIFDIAC.+-(+)(- )(+)(- )EN SERIE: Cada altavoz adicional aumenta la impedancia de cargapara el amplificador. Las impedancias superiores a 8 ohmios seutilizan raramente en el sonido del automóvil.CONEXIÓN EN SERIE CON ALT. DE 4 OHMIOS4 OHM. 8 OHM.AMSPALLIIFDIAC.+-(+)(- )(+)(- )40
1.4 Instalación- Autoderivación, Modo 2+1MONO DERIVADO-Conecte un altavoz o altavoces múltiplesSPEAKERcon una carga de 4Ω a los terminales(A+) (A-) (B+) (B-)marcados “(+), PUENTE, (-)”,asegurándose de que concuerden conla polaridad de las conexiones en losaltavoces.¡Atención!( + ) ( - )⇒ No se recomienda utilizar el altavoz BRIDGEo los altavoces múltiples cuyas cargastotalicen menos de 4 ohmios con los modos “Derivado” o “Modo2+1”, ya que puede dañarse el amplificador<strong>TA4600</strong>, <strong>TA4320</strong>-Posicione el commutador al 2 canales, 3 canales, o 4 canales y conecte losaltovoces. Para la operacion de 3 canales, puente la C y D.MODO 2+1 (MODO TRIPLE)El funcionamiento simultáneo en estéreo y mono, “Modo 2+1”, requiereun cruce pasivo para enviar bajas frecuencias al altavoz mono y frecuenciasmás altas a los altavoces estéreo. La siguiente tabla recoge los valorescomponentes de un cruce de 6 dB/Octava a frecuencias normales utilizandoaltavoces de 4/8 ohmios:FRECUENCIA INDUCTOR CONDENSADOR80 Hz 16 mH 470 uF100 Hz 7,5 mH 330 uF120 Hz 7,5 mH 330 uF150 Hz 7 mH 220 uFDIAGRAMA DE CONEXIÓN DEL MODO 2+1Utilice condensadores no polarizados de 100 voltios, y conéctelos en serie alos altavoces estéreo, tal como se muestra en el diagrama. Conecte elinductor en serie con el altavoz mono, tal como se muestra en el diagrama.Asegúrese de que el inductor pueda soportar la potencia de suamplificador.41
(+)I(+)I(-)D(+)D(-)INDUCTOR(+)(-)(-)CONDENSADOR(+)(-)1.5 Instalación- Conexiones de entradaClavijas RCA de entrada chapadas en oro de alta impedancia y bajaintensidadPara la conexión a una fuente que proporcione salidas denivel de preamplificación. Utilice cables de conexiónRCA de gran resistencia diseñados para aplicacionesmóviles. Tienda los cables de conexióncuidadosamente, manteniendo a la mayor distanciaposible los hilos de la alimentación, los altavoces y losaccesorios. Asegúrese de que los enchufes RCAajusten bien para una conexión segura.Conexiones de entrada de amplificador de la salida del radio-ABINPUTHIGH LEVEL2 CanalesCable blanco Canal A ( + )Cable blanco/negro Canal A ( - )Cable gris Canal B ( + )Cable gris/negro Canal B ( - )Cable negroGroundNo hay otra conexión42
HIGH LEVEL4 CanalesCable blanco Canal A( + )Cable blanco/negro Canal A( - )Cable gris Canal B( + )Cable gris/negro Canal B( - )Cable verde Canal C( + )Cable verde/negro Canal C( - )Cable violeta Canal D( + )Cable violeta/negro Canal D( - )Cable negroGroundNo hay otra conexión1.6 Instalación- Revisión de todas lasconexionesVuelva a revisar todas las conexiones antes de conectar de nuevo el cablenegativo (-) de la batería. Inserte un fusible de valor adecuado en elportafusibles de la batería antes de intentar encender el sistema.2. Funcionamiento2.1 Funcionamiento- Ajustes del nivel deentradaLEVELMIN MAXniveles más bajos.Ajuste el nivel de entrada para los canales marcados con unpequeño destornillador a través de la abertura marcada“NIVEL”. Gire en el sentido de las agujas del reloj paraaumentar el nivel, y en el sentido contrario a las agujas delreloj para disminuirlo. Los amplificadores funcionarán amenor temperatura y producirán menos ruido de sistema en losConsulte a un especialista en instalación con experiencia para que le ayudea equilibrar los niveles en los sistemas con varios amplificadores, o en lossistemas con accesorios para procesar la señal.43
2.2 Funcionamiento: Cruces integradosSELECCIÓN DE CRUCESLos amplificadores TA tienen cruces integrados deX-OVERpaso bajo y paso alto para amplificar doblemente susistema. Seleccione "TOTAL, PB o PA" moviendo laposición del conmutador deslizante de cada par deLPF- FULL- HPFcanales. La opción "TOTAL" anula las funciones decruce.AJUSTE DE LA FRECUENCIALPF40-240Tras seleccionar la función cruce, ajuste la frecuencia de paso bajoo de paso alto con un pequeño destornillador a través de laabertura marcada “FREC.”. Gire hacia la derecha para ajustara una frecuencia mayor, y hacia la izquierda para ajustar a unafrecuencia menor.BASS-BOOSTONOFFPosicion el “BASS BOOST” bajo commutador a “ON” estoaumentar el nivel de frequencia alrededor 45Hz por 12dB.2.3 Funcionamiento- Circuitos de proteccióne indicadores luminososINDICADOR LUMINOSO “POT.”- Proporciona una indicación visualde que el amplificador está encendido.POWERINDICADOR LUMINOSO “PROT.”- Proporciona unaindicación visual de que existe un problema y los circuitos deprotección han protegido el amplificador desconectándolo.Desconecte el sistema y corrija el problema antes de volver aPROTECTencenderlo de nuevo.PROTECCIÓN TÉRMICA- El amplificador se desconectará si sutemperatura supera un nivel seguro de funcionamiento. El amplificadorpermanecerá desconectado hasta enfriarse a una temperatura segura defuncionamiento. Tenga cuidado, el exterior del amplificador puede estardesagradablemente caliente al tacto antes de desconectarse.SOBRECARGA Y PROTECCIÓN CONTRA CORTOCIRCUITOS-El amplificador se desconectará si existe una situación de cortocircuito, o silas demandas de corriente eléctrica exceden los niveles de seguridad.PROTECCIÓN CC FUERA DE LÍMITES- El amplificador sedesconectará si existe una situación peligrosa de CC fuera de límites.44
PROTECCIÓN CON FUSIBLES- Un fusible fundido indica unFUSEproblema que debería corregirse antes de reemplazar el fusible.15AReemplácelo siempre por fusibles del mismo valor. No losustituya nunca por un fusible de un valor mayor.15A2.4 Funcionamiento- Localización de losterminales, controles e indicadores luminosos<strong>TA4600</strong>, <strong>TA4320</strong>1. Clavijas de entrada RCA 2. Conexiones de entrada deamplificador de la salida delradio4. Selección de cruce 5. Ajuste la frecuencia pasobajo3. Ajuste del nivel de entrada6. Ajuste la frecuencia pasoalto7. El bajo commutador 8. Modo 2, 3, 4 canales 9. Indicador luminoso deencendido10. Indicador luminoso deprotección9 1 3 6 5 2 5 6 3 1 10A/B CHANNELSC/D CHANNELINPUT LEVEL HPF LPFHIGH LEVELLPFHPFLEVELINPUTACPOWERMIN MAX 40 240 40 24040 24040 240MINMAXPROTECTB X-OVER BASS-BOOST MODEBASS-BOOSTX-OVERDLPF FULLHPFONOFF 2CH 3CH 4CH ONOFFLPFFULLHPF4 7 87 41. Terminales de potencia 2. Fusible(s) Terminales del altavoz21 3 330AFUSE30APOWER SPEAKER SPEAKERRMT A- ) ( B- C- ) ( D- +12V GND ( A+ ) ( ) ( B+ )( C+ ) ( ) ( D+ )( + ) ( - )BRIDGED( + ) ( - )BRIDGED<strong>TA2300</strong>, <strong>TA2160</strong>-1. Clavijas de entrada RCA 2. Conexiones de entrada deamplificador de la salida delradio4. El bajo commutador 5. Ajuste la frecuencia pasobajo3. Ajuste del nivel de entrada6. Selección de cruce45
7. Ajuste la frecuencia pasoalto8. Indicador luminoso deencendido9. Indicador luminoso deprotección8 2 1 3 4 5 6 7 9HIGH LEVELINPUT LEVEL BASS-BOOSTLPF X-OVER HPFLPOWERMINMAXONOFF40 240LPFFULLHPF40 240PROTECTR1. Terminales de potencia 2. Fusible(s) Terminales del altavoz213FUSE15A+12VPOWERRMTGNDSPEAKER( A+ ) ( A- ) ( B- ) ( B+ )( + ) ( - )BRIDGEDCaracterísticas y especificacionesEstable 2ΩDerivableModo tripleTerminalesArranquesuaveInputsCrossoverBajo AumentarProtecciónMOSFET,MIDsuministro deenergíaRMS/Maxpotencia eficaz,4Ω,THD
RMS/Maxpotencia eficaz,2Ω,THD
AmplificadordesconectadoDistorsiónRespuestapobre de losbajosRuido detictacRuido desilbidoCircuito de proteccióncontra elsobrecalentamiento ola sobrecargaNivel de la entrada noajustadoadecuadamenteAltavoces dañadosAltavoces fuera de faseSonido emitido por loshilos de las bujíasRuido del alternadorcausado por una malaconexión a masa delamplificador, lafuente, otrocomponente, la bateríao el alternadorCompruebe que la ventilaciónsea la adecuadaCompruebe la impedancia decarga (2 ohmios en estéreo, 4ohmios en derivación)Revise el cableado del altavozpor un posible cortocircuito conel chasis del vehículoReduzca el nivel de entradaReajuste el nivel de entrada delamplificadorCompruebe los altavoces enotro amplificadorVuelva a revisar el cableado delos altavocesInvierta la polaridad en uncanalDesvíe los hilos de entrada alamplificadorInstale un filtro de ruidosRevise todas las conexiones amasaInstale un filtro de ruidos en elcable de alimentación de launidad fuenteInstale un transformadoracoplador en el camino de laseñal para mejorar elaislamiento a masa del caminode la señal48