LEDI® 1S LEDI® 1S VERSION NTP LEDI® 2S - Gorgy Timing
LEDI® 1S LEDI® 1S VERSION NTP LEDI® 2S - Gorgy Timing
LEDI® 1S LEDI® 1S VERSION NTP LEDI® 2S - Gorgy Timing

You also want an ePaper? Increase the reach of your titles
YUMPU automatically turns print PDFs into web optimized ePapers that Google loves.
CONSIGNES DE SÉCURITÉ IMPORTANTESATTENTION ! Avant de commencer l’installation de votre matériel, lisez attentivementla section suivante qui décrit les consignes de sécurité à respecter au coursde l’installation.L’installation électrique sur laquelle le matériel est raccordé doit être réaliséeconformément à la norme NF C 15-100 .Cet appareil ne comporte pas d’interrupteur d’alimentation primaire : un dispositifde coupure (disjoncteur ou interrupteur sectionneur), rapidement accessible, doitêtre incorporé dans l’installation de câblage. Ce dispositif doit supporter les valeursde tension et courant nominales indiquées sur l’appareil.En Europe : dans le cadre de la protection des individus et de l'environnement,il vous incombe de vous débarrasser de cet équipement dans un site de collecteprévu à cet effet (séparément des ordures ménagères). Pour de plus amplesinformations, contactez votre revendeur, votre site de collecte ou les autoritéslocales compétentes.Toute modification ou ouverture du produit sans l’accord du SAV entraîne la pertede la garantie.Toute opération de maintenance doit être effectuée hors-tension, y compris pourles systèmes reliés aux éventuelles sorties sur relais.D’une façon générale, les câbles de puissance (alimentation 220V) et de signaux(information horaire) ne doivent pas être trop proches les uns des autres, pouréviter toute perturbation. (garder quelques centimètres de distance)<strong>Gorgy</strong> <strong>Timing</strong> décline toute responsabilité en cas d’accidents ou de dommagesprovoqués par une mauvaise utilisation du produit.Les produits GORGY TIMING sont conformes aux normes : CE, EN 60950, EN 55022,EN 50024.2 MDE-LEDI<strong>1S</strong>-<strong>2S</strong>-1066V1.0
SOMMAIREFRANCAIS1. DESCRIPTION ............................................................................................................... 42. RACCORDEMENTS ...................................................................................................... 63. REGLAGE DE LA LUMINOSITE.................................................................................... 74. PROGRAMMATION DE L’HEURE................................................................................. 74.1. Autonome.............................................................................................................................. 74.2. Réceptrice du code AFNOR NFS 87500............................................................................... 74.3. Réceptrice du CODE SMPTE /EBU...................................................................................... 75. OPTION SORTIE TOPS HORAIRES.............................................................................. 86. OPTION ASCII RS232C OU RS422/485........................................................................ 96.1. Mode uni-directionnel – émetteur.......................................................................................... 96.2. Mode uni-directionnel - récepteur.......................................................................................... 97. OPTION CHRONOMETRE........................................................................................... 107.1. Fonctionnement................................................................................................................... 107.1.1. Utilisation chronomètre............................................................................................ 107.1.2. Utilisation du compte à rebours............................................................................... 107.2. Câblage du chronomètre sur un connecteur SUBD9...........................................................118. CARACTERISTIQUES TECHNIQUES......................................................................... 12MDE-LEDI<strong>1S</strong>-<strong>2S</strong>-1066V1.0 3
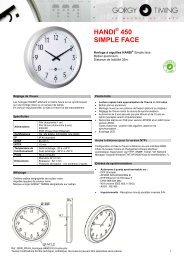
1. DESCRIPTIONLEDI 1/SLEDI 1/S <strong>VERSION</strong> <strong>NTP</strong>4 MDE-LEDI<strong>1S</strong>-<strong>2S</strong>-1066V1.0
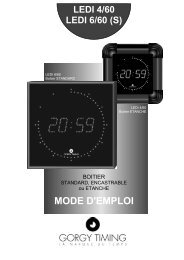
LEDI 2/SFRANCAIS►►Affichage numérique 7 segments.►►Affichage heures, minutes et secondes.►►Hauteur des chiffres : 14 mm (LEDI <strong>1S</strong>) ou 20 mm (LEDI <strong>2S</strong>).►►Alimentation 230VAC 50-60Hz, (115VAC, 48VAC ou 18-36VDC en option).►►Réglage de luminosité en face avant.►►Consommation 5VA.►►Face avant LEDI 1/S : 180 x 44 mm ou 482 xLEDI441/Smm (<strong>NTP</strong>).1704xM4►►Face avant LEDI 2/S : 190 x 130 mm.42On the wall32159LEDI 1/S4xM4170LEDI 2/S42Ouverture muraleOn the wall32LEDI 2/S15912075155Ouverture muraleOn the wall4xM412075155On the wall1804xM4MDE-LEDI<strong>1S</strong>-<strong>2S</strong>-1066V1.0 5180
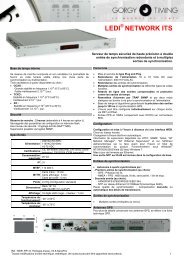
2. RACCORDEMENTSToutes les connexions s'effectuent à l'arrière du boîtier.►►Alimentation (ex : 230V 50-60Hz ).►►Entrée impulsionnelle ou entrée de synchronisation(code AFNOR, <strong>NTP</strong>,TDF ou DCF ou code SMPTE ).►►Option chronomètre.►►Option sortie Top Horaire.►►Option ASCIIPour une alimentation continue, la prise 4Pts sera câblée de la façon suivante :ASCII230VAC; 0.02A; 50-60HzChronoCODETOP1+ DCAlimentationcontinue- GND DCFace arrière ledi 2/S230VAC; 0.02A; 50-60HzCHRONOBP1 BP2<strong>NTP</strong>Option alimentation 230VAC sur câble, utiliser un cordon secteur équipé d’un connecteurEN 60320/C19 (type informatique).☛☛La version <strong>NTP</strong>, est disponible seulement en version LEDI 1/S rackdimensions 424 x 141 dans ce cas, l’option ASCII n’est pas disponible.6 MDE-LEDI<strong>1S</strong>-<strong>2S</strong>-1066V1.0
3. REGLAGE DE LA LUMINOSITELe réglage de luminosité manuellement se fait à l'aide des boutons poussoirs accessiblesen face avant à l'aide d'un petit tournevis, par les touches "+" et "-".4.1. AUTONOME4. PROGRAMMATION DE L’HEURELa touche de programmation "PROG" permet de sélectionner l'information à régler.Les touches "+" et "-" permettent d'incrémenter ou de décrémenter l'information sélectionnéepar "PROG" (digits clignotants).Déroulement de la programmation:►►Affichage heure, minute, seconde : réglage des heures.►►Affichage heure, minute, seconde : réglage des minutes.►►Affichage heure, minute, seconde : attente de synchronisation.►►Affichage heure, minute, seconde : démarrage de la base de temps.FRANCAIS4.2. RÉCEPTRICE DU CODE AFNOR NFS 87500L'affichage se met à l'heure officielle lorsque le code est présent sur la borne "entrée".4.3. RÉCEPTRICE DU CODE SMPTE /EBUHorloge destinée à la relecture du code temporel SMPTE ou EBU à la vitesse dedéfilement standard.►►Brancher le code sur la borne "entrée".►►Adaptation automatique au format SMPTE ou EBU.►►Sélection automatique de la cadence 24,25, ou 30 images par secondes.►►Erreur maximale tolérée sur la cadence du code reçu : +/- 10%►►Blocage de l'affichage sur la dernière trame reçue en cas d'arrêt de l'appareil émetteur.MDE-LEDI<strong>1S</strong>-<strong>2S</strong>-1066V1.0 7
5. OPTION SORTIE TOPS HORAIRESCette option permet d'obtenir sur la borne enfichable "TOP" soit :►►Une sortie de 4 tops d’une durée 200ms délivrés toutes les heures.1er top : 59mn 57 sec2ème top : 59mn 58 sec3ème top : 59mn 59 sec4ème top : 00mn 00 sec►►Un top 12 heures de durée 1 seconde.►►Un top seconde de durée 0,5 seconde.►►Un top minute de durée 1 seconde.►►Un top heure de durée 1 seconde.►►Un top 24 heures de durée 1 seconde.►►Un top quart d'heure de durée 1 seconde.►►Un contact fin de chronomètre (lorsque le chronomètre arrive à zéro en mode décomptage).Deux types de sorties sont prévues pour l'utilisation de ces tops :Sortie sur contact sec.►►Sortie permettant par l'intermédiaire d'un relais de disposer d'un contact se fermantà chaque top.►►Caractéristique du relais utilisé : pouvoir de coupure 30VA.Sortie sur collecteur ouvert :►►U max : 60V►►I max : 50mA8 MDE-LEDI<strong>1S</strong>-<strong>2S</strong>-1066V1.0
6. OPTION ASCII RS232C OU RS422/485Connecter la sortie ASCII sur la borne Sub.D (type C) suivant le tableau ci-dessous :RS232RS485FULL DUPLEXRS485HALF DUPLEX1 N.C 1 N.C N.C2 TXD 2 TX+ TX+/RX+3 RXD 3 RX+ N.C4 N.C 4 N.C N.C5 GND 5 GND GND6 N.C 6 TX- TX-/RX-7 N.C 7 RX- N.C8 N.C 8 N.C N.C9 N.C 9 N.C N.CFRANCAIS6.1. MODE UNI-DIRECTIONNEL – ÉMETTEURDans ce mode l’horloge émet un code (configuration : 2400 bauds, format 8 bits, paritépaire, 1 stop bit) en 2 parties :1 – L’information horaire sous la forme :STX jour de la semaine SP jour du mois/mois/année SP SP Heure : minute : seconde CR2 – Les informations correspondent aux états du chronomètre, température, luminosité etc…La première partie de l’information sert par exemple à synchroniser un ordinateur (dans cecas ne pas tenir compte de la deuxième partie).L’information complète sert à asservir une autre horloge à la première.6.2. MODE UNI-DIRECTIONNEL - RÉCEPTEURDans ce mode l’horloge fonctionne en mode autonome mais se met à l’heure par rapportau code ASCII reçu (configuration : 2400 bauds, format 8 bits, parité paire, 1 stop bit).Ce code ASCII peut être :1 – L’information horaire sous la forme :STX jour de la semaine SP jour du mois/mois/année SP SP Heure : minute : seconde CRCe code horaire est généré soit par les serveurs de temps ou par les centraleshoraire ASCII ou tout autre générateur de code ASCII.2 – Soit l’information provenant d’une autre horloge de même type fonctionnant enmode émetteur, dans ce cas l’horloge est parfaitement asservie à cette dernière.MDE-LEDI<strong>1S</strong>-<strong>2S</strong>-1066V1.0 9
7. OPTION CHRONOMETREUn commutateur clock/chrono permet de passer de l'indication : Heure "clock"à la fonction chronomètre "chrono".Deux modes chronomètre sont possibles :►►Utilisation chronomètrage (comptage du temps).►►Utilisation compte à rebours (décomptage du temps).7.1. FONCTIONNEMENTOn peut afficher ou non une heure de consigne.7.1.1. Utilisation chronomètrePas d'heure de consigne :►►Faire "START/+" (chronométrage), le chronomètre va partir de zéro et va défilerindéfiniment jusqu'à la prochaine pression sur la touche "STOP".Une heure de consigne est choisie :►►Appuyer sur la touche "PROG" (cette fonction n'est accessible que dans le cas oùle chronomètre est stoppé et remis à zéro) puis afficher l'heure désirée à l'aide destouches "+" et "-" (à chaque pression sur la touche "PROG" une partie de l'affichage semet à clignoter, régler successivement les heures puis les minutes puis les secondes).►►A la fin de cette programmation appuyer sur la touche "START/+", l'affichage va partirde l'heure programmée et va défiler indéfiniment jusqu'à la prochaine pressionsur la touche "STOP".7.1.2. Utilisation du compte à reboursPas d'heure de consigne:►►Faire "START/-" (compte à rebours), le chronomètre va partir de zéro et va défilerpendant 24 heures, ou jusqu'à la prochaine pression sur la touche "STOP".Une heure de consigne est choisie :►►Appuyer sur la touche "PROG" (cette fonction n'est accessible que dans le cas oule chronomètre est stoppé et remis à zéro) puis afficher l'heure désirée à l'aide destouches "+" et "-" (à chaque pression sur la touche "PROG" une partie de l'affichage semet à clignoter, régler successivement les heures puis les minutes puis les secondes).►►A la fin de cette programmation appuyer sur la touche "START/-" , l'affichage vapartir de l'heure programmée puis s'arrêter automatiquement à zéro et réafficherl'heure de consigne programmée.10 MDE-LEDI<strong>1S</strong>-<strong>2S</strong>-1066V1.0
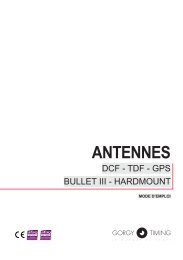
☛☛On peut aussi avoir le temps intermédiaire en maintenant une pressionsur une des touches "LAPS" du boîtier chrono.☛☛En comptage ou décomptage lorsqu’une heure de consigne estprogrammée, le chronomètre peut être arrêté puis relancé à tout momentpar pression sur les touches "STOP" puis "START" sans modifier l'heure deconsigne initialement programmée.☛☛Il est possible de déclencher à la seconde zéro un contact sec à l'aidede l'option top (nous consulter).FRANCAIS7.2. CÂBLAGE DU CHRONOMÈTRE SUR UN CONNECTEUR SUBD9Brochage de la SUBD9 femelle sur la face arrière :►►Pin1 : Non utilisée►►Pin2 : Masse►►Pin3 : Commutateur horloge/chrono►►Pin4 : Bouton poussoir "-"►►Pin5 : Bouton poussoir "+"►►Pin6 : Bouton poussoir "PROG"11Correspondance des pins de la SUBD9 mâleen sortie du boîtier chronomètre :►►Pin1 : PROG►►Pin2 : +►►Pin3 : -►►Pin4 : Commutateur horloge/chrono►►Pin5 : MasseMDE-LEDI<strong>1S</strong>-<strong>2S</strong>-1066V1.0 11
8. CARACTERISTIQUES TECHNIQUESALIMENTATION :►►230 Volts +10,-15% 50/60Hz►►Consommation maxi.5VA►►Filtre antiparasite incorporé.►►Fusible à l’intérieur, derrière la prise 230V. (Option alimentation 230VAC sur câble :fusible sur face arrière)►►Réserve de marche par pile lithium > 10 ans.ENTRÉE DE SYNCHRONISATION :►►Fréquence reçue : 77,5Khz (DCF) et 162Khz (TDF).►►Longueur maximale de liaison par câble bifilaire blindé : 100 mètres.►►Distance maximale par rapport à l'émetteur DCF (Mainflingen-Francfort-Allemagne)ou TDF (Allouis - CHER) = 2000Kms (valeur pouvant diminuer en fonction du reliefenvironnant et des conditions atmosphériques du moment.DÉMODULATEUR DE CODE AFNOR►►Isolation galvanique de la ligne par transformateur.►►Impédance d’entrée 3Kohms à 1KHz►►Niveau d’entrée : 2,2 Volts c.à c. +10,-40dBBASE DE TEMPS►►Stabilité du quartz : 5 ppm de 10 à 60 °C►►Stabilité sortie top : 5 10-6 sur collecteur ouvertRÉCEPTEUR DE CODE SMPTE / EBU :►►Niveau d'entrée : Mini +/- 0,2 Volts Maxi +/- 12 Volts►►Impédance d'entrée : 12Kohms.12 MDE-LEDI<strong>1S</strong>-<strong>2S</strong>-1066V1.0
NOTESFRANCAISMDE-LEDI<strong>1S</strong>-<strong>2S</strong>-1066V1.0 13
USER GUIDEENGLISHLEDI ® <strong>1S</strong>LEDI ® <strong>1S</strong> <strong>VERSION</strong> <strong>NTP</strong>LEDI ® <strong>2S</strong>MDE-LEDI<strong>1S</strong>-<strong>2S</strong>-1066V1.015
IMPORTANT SAFETY INSTRUCTIONSWARNING! Read the section that follows very carefully before installing your equipment.It gives the safety instructions to follow during installation.The electrical installation to which the equipment is connected must comply withthe NF C 15-100 standard.This device does not have a primary power switch. A power protection system(circuit-breaker or disconnecting switch), that is easy to access must be built intothe wiring installation. This device must support the nominal voltage and currentvalues specified on the clock.In Europe: to comply with European regulations on the protection of persons andthe environment, you must dispose of this equipment in a collection site providedfor this purpose (separately from household waste). Contact your reseller, collectionsite or the competent lcoal authorities for more information.Toute modification ou ouverture du produit sans l’accord du SAV entraîne la pertede la garantie.All maintenance operation shall be conducted with power shut off, including systemsconnected on relay outputs if any.Generally, the power cable (220V) and transmission cable (of time signal) shallnot be very close to each other, so as to avoid interference (keep the distance ofa few centimeters).<strong>Gorgy</strong> <strong>Timing</strong> disclaims all responsibility in case of accident or damage caused byan improper use of the product.GORGY TIMING products are compliant with the following standards: CE, EN 60950,EN 55022, EN 5002416 MDE-LEDI<strong>1S</strong>-<strong>2S</strong>-1066V1.0
CONTENTS1. DESCRIPTION.............................................................................................................. 182. CONNECTIONS............................................................................................................ 203. BRIGHTNESS CONTROL............................................................................................ 214. SETTING....................................................................................................................... 214.1. Autonomous......................................................................................................................... 214.2. AFNOR NFS 87500 code receiver ..................................................................................... 214.3. SMPTE / EBU receiver code............................................................................................... 21ENGLISH5. PIP OUTPUTS............................................................................................................... 226. ASCII RS232 OR RS422 OPTION................................................................................ 236.1. Uni-directional mode - Transmitter .................................................................................... 236.2. Uni-directionnel mode - Receiver........................................................................................ 237. TIMER OPTION............................................................................................................. 247.1. Operation ............................................................................................................................ 247.1.1. Stopwatch function.................................................................................................. 247.1.2. Count-down............................................................................................................. 247.2. Sub.D chronometer pin-out................................................................................................. 258. CHARACTERISTICS.................................................................................................... 26MDE-LEDI<strong>1S</strong>-<strong>2S</strong>-1066V1.017
1. DESCRIPTIONLEDI 1/SLEDI 1/S <strong>NTP</strong> <strong>VERSION</strong>18 MDE-LEDI<strong>1S</strong>-<strong>2S</strong>-1066V1.0
LEDI 2/SENGLISH►►7 segments numerical display.►►Display of hours,minutes,seconds.►►Height of figures : 14mm or 20mm.►►Power supply 230 VAC 50-60hz, 115VAC, 48VAC or 18-36VDC.►►Brightness control on front.►►Consumption 5VA.LEDI 1/S4xM4►►Front face LEDI 1/S : 180 x 44 mm or 482 x 44 mm (<strong>NTP</strong>).►►Front face LEDI 2/S : 190 x 130 mm.17042On the wall32159LEDI 1/S4xM4170LEDI 2/S42On the wall32155LEDI 2/S15912075On the wall4xM415518012075On the wall4xM4MDE-LEDI<strong>1S</strong>-<strong>2S</strong>-1066V1.019180
2. CONNECTIONSAll necessary connections are made at the back of the case►►Connect the unit to power supply 230VAC 50-60HZ►►Connect the pulse or synchronisation input (AFNOR,<strong>NTP</strong>, TDF,DCF or SMPTE code)►►Timer (optional)►►Connect pip outputs (optional)►►ASCII (optional)For a 24V supply, the 4 pin plug is connected as shown (1=+24Vdc 4=GND)ASCII230VACChronoCODEPipoutput1+ DCDC power supply- GND DCFace Rear arrière side of ledi the LEDI 2/S <strong>2S</strong>230VAC; 0.02A; 50-60HzCHRONOBP1 BP2<strong>NTP</strong>Cable 230 VAC power supply option : use a cable with EN 60320/C19 type plug.☛☛<strong>NTP</strong> version is available only in LEDI 1 / S rack dimensions 424 x 141 inthis case, the ASCII option is not available.20 MDE-LEDI<strong>1S</strong>-<strong>2S</strong>-1066V1.0
3. BRIGHTNESS CONTROLThe brightness is adjusted by pressing on the “+” and “-“ button.The button can be reached through the holes in the front of the unit, using a small screwdriver4. SETTING4.1. AUTONOMOUSThe time is set by using the “+”,”-“ and “PROG” buttons on the front of the unit.Each time the “PROG” button is used, a different part of the display begins to flash. This isthen modified by using the “+” and “-“ buttons.The setting cycle is as follows:►►Hour, minute, second display: adjustment of hours►►Hour, minute, second display: adjustment of minutes►►Hour, minute, second display: synchronisation►►Hour, minute, second display: time baseENGLISH4.2. AFNOR NFS 87500 CODE RECEIVERThe code is getting at right time when the code is connected on the «CODE» connector.4.3. SMPTE / EBU RECEIVER CODEClock used to read the time code SMPTE or EBU delivered at standard speed.►►Connect the code to the input terminal►►Automatic adaptation to SMPTE or EBU format►►Automatic selection at the rate of 24.25 or 30 images a second►►Maximum error tolerance for the rate of code received : +/- 10%►►Display freezes on last frame received if the signal emitter stops functioningMDE-LEDI<strong>1S</strong>-<strong>2S</strong>-1066V1.021
5. PIP OUTPUTSWith this option, any of the following may be obtained:(square signal)►►4 pips, each lasting 200ms, delivered on the hour1 st pip : 59mn 57sec2 nd pip : 59mn 58sec3 rd pip : 59mn 59sec4 th pip : 00mn 00sec►►a one-second pip every 12 hours►►a 0.5-second pip on the second►►a one-second pip on the minute►►a one-second pip on the hour►►a one-second pip every 24 hours►►an end-of-timer contact (when the timer function reaches 0 in count-down mode)TWO TYPES OF OUTPUT ARE OFFERED FOR THESE TIME SIGNALS:dry-contact output :►►output via a relay, with contact closing on each pip►►characteristics of relay to be used : cut-off capability : 30VAopen collector output►►U max. 60V►►I max .50Ma22 MDE-LEDI<strong>1S</strong>-<strong>2S</strong>-1066V1.0
6. ASCII RS232 OR RS422 OPTIONConnect the ASCII output to Sub.D (plug C) following the table below:RS232RS485FULL DUPLEXRS485HALF DUPLEX1 N.C 1 N.C N.C2 TXD 2 TX+ TX+/RX+3 RXD 3 RX+ N.C4 N.C 4 N.C N.C5 GND 5 GND GND6 N.C 6 TX- TX-/RX-7 N.C 7 RX- N.C8 N.C 8 N.C N.C9 N.C 9 N.C N.CENGLISH6.1. UNI-DIRECTIONAL MODE - TRANSMITTERIn this mode, the clock transmits a code (configuration 2400 bauds, 8-bit format, even parity,1 stop bit) which has two parts:1 - time information in the form:STX day of week SP day of month/month/year SP SP hour:minute:second CR2 - status information (timer, temperature, brightness, etc.).The first part of the information sequence serves, for example, to synchronise a computer(in this case the second part is not taken into account).The complete information sequence is used to control another clock.6.2. UNI-DIRECTIONNEL MODE - RECEIVERIn this mode, the clock works autonomously but is set with respect to the ASCII code that itreceives (configuration 2400 bauds, 8-bit format, even parity, 1 stop bit).This ASCII code may be either:1- time information in the form:STX day of week SP day of month/month/year SP SP hour:minute:second CRThis tie code is generated either by the time server or the time center ASCII or anyother ASCII code generator.2- information from another clock of the same type working in transmitter mode; inthis case, the clock is completely slaved to the other.MDE-LEDI<strong>1S</strong>-<strong>2S</strong>-1066V1.023
7. TIMER OPTIONA switch is provided to move from the clock function to the chronometer (timer)function.There are two possible uses in timer mode:►►Stopwatch►►Count-down7.1. OPERATIONA set time may be displayed if wished.7.1.1. Stopwatch functionNo set time :►►Press “START/+”. The timer will begin from zero and continue indefinitely until the“STOP” button is pressed.With set time :►►Press the “PROG” button (this function can only be used when the timer is stoppedat zero) and set the required time using the “+” and “-“ buttons (each time the“PROG” button is pressed, part of the display begins to flash; adjust the hours,minutes and seconds in succession).►►When programming is completed, press on the “START/+” button. The timer willbegin at the time programmed and continue indefinitely until the “STOP” button ispressed.7.1.2. Count-downNo set time :►►Press “START/-”. The timer will begin from zero and continuefor 24 hours or until the “STOP” button is pressed.With set time :►►Press the “PROG” button (this function can only be usedwhen the timer is stopped at zero) and set the requiredtime using the “+” and “-“ buttons (each time the “PROG”button is pressed, part of the display begins to flash; adjustthe hours, minutes and seconds in succession).►►When programming is completed, press on the “START/-”button. The timer will begin at the time programmed andstop automatically at zero, and then redisplay the settime.24 MDE-LEDI<strong>1S</strong>-<strong>2S</strong>-1066V1.0
☛☛It is also possible to obtain an intermediate time by keeping one of the“LAPS” buttons on the timer pressed.☛☛When a set time is programmed in either stopwatch or count-downfunction, the timer may be stopped and restarted at any moment by pressingon the “STOP” and “ START” buttons, without modifying the set time initiallyprogrammed.☛☛It is possible to trip a dry contact at zero seconds with the pip option(consult us).7.2. SUB.D CHRONOMETER PIN-OUTFemale SUBD9 pin out on the rear panel►►Pin 1 : NC►►Pin 2 : GND►►Pin 3 : Switch clock/chrono►►Pin 4 : push button “–“►►Pin 5 : push button “+”►►Pin 6 : push button “PROG”ENGLISH1Male SUBD9 pin-out of the chronometer control►►Pin 1 : push button “PROG”►►Pin 2 : push button “+”►►Pin 3 : push button “–“►►Pin 4 : Switch clock/chrono Pin 5 : GND►►Pin 6 : NC1MDE-LEDI<strong>1S</strong>-<strong>2S</strong>-1066V1.025
8. CHARACTERISTICSPOWER SUPPLY►►230Volts +10,-15% 50-60hz►►Maximum consumption 5VA►►Incorporated interference filter►►Fuse inside, behind the socket 230. (Optional 230VAC on cable: fuse on rear panel)►►Lithium battery ensuring more than 10 years’ time base autonomySYNCHRONISATION INPUT►►Frequency reception : 77.5khz (DCF) and 162khz (TDF)►►Maximum distance between the antenna and the LEDI 1/S : 100 meters►►Maximum distance in relation to the DCF transmitter (mainflingen-Germany) or TDFtransmitter (France ) = 2000Kms (this value may be less depending on the weatherconditions and the surrounding relief)AFNOR NFS87500 CODE DEMODULATOR►►Electrical insulation by transformer►►Input impedance at 3 kohm, 1 khz►►Input level : 2.2 volts peak to peak , +10,-40DbTIME BASE►►Crystal stability : 5ppm – 10 to 60°C►►Pip output stability : 5 x 10 -6 on open collectorSMPTE / EBU CODE RECEIVER►►Input level : mini +/- 0.2 volts maxi +/- 12 volts►►Input impedance : 12 Kohms26 MDE-LEDI<strong>1S</strong>-<strong>2S</strong>-1066V1.0
NOTESENGLISHMDE-LEDI<strong>1S</strong>-<strong>2S</strong>-1066V1.027
GORGY TIMING SASQuartier Beauregard38350 La Mure d'Isère (Grenoble France)Phone: +33 4 76 30 48 20 Fax: +33 4 76 30 85 33email: gorgy@gorgy-timing.fr - www.gorgy-timing.comTECHNICAL SUPPORT+33 476 30 48 20support@gorgy-timing.frRADIO TIMING®, LEDI®, LEDICA®, HANDI® are trademarks by GORGY TIMING.Number of statement for training provider activity : 82 38 04877 38<strong>Gorgy</strong> <strong>Timing</strong> RC74B38 - Any technical, aesthetic, color modifications can be made without notice.28 MDE-LEDI<strong>1S</strong>-<strong>2S</strong>-1066V1.0
MODO DE EMPLEOLEDI ® <strong>1S</strong>LEDI ® <strong>1S</strong> <strong>VERSION</strong> <strong>NTP</strong>LEDI ® <strong>2S</strong>ESPAÑOLMDE-LEDI<strong>1S</strong>-<strong>2S</strong>-1066V1.029
CONSIGNAS DE SEGURIDAD IMPORTANTES:¡ATENCIÓN! Antes de empezar la instalación de su material, lea atentamentela sección siguiente que describe las consignas de seguridad a respetar enel transcurso de la instalación.La instalación eléctrica a la que se va a conectar el material debe realizarseconforme a la norma NF C 15-100.Este aparato no incluye interruptor de alimentación primaria: Un dispositivode corte (disyuntor o interruptor sección), de acceso rápido, debe incorporarseen la instalación del cableado. Este dispositivo debe soportar losvalores de tensión y corriente nominales indicados en el aparato.En Europa: en el marco de la protección al individuo y del medioambiente, esde su incumbencia el deshacerse de este equipo en un lugar previsto a tal efecto(separadamente de los deshechos del hogar). Para ampliar esta informacióncontacte con su revendedor, su lugar de recogida o a las autoridades localescompetentes.Cualquier modificación o abertura del producto sin la autorización delServicio Postventa, comporta la pérdida de la garantía.Cualquier operación de mantenimiento debe realizarse sin tensión, incluyendolos sistemas conectados a las salidas de relés.De forma general, los cables de potencia (alimentación 220V) y de señal(información horaria), no deben estar demasiado próximos los unos a losotros, para evitar perturbaciones (dejar algunos centímetros de distancia)<strong>Gorgy</strong> <strong>Timing</strong> declina cualquier responsabilidad en caso de accidente o dedaños provocados por una mala utilización del producto.Los productos GORGY TIMING son conformes a las normas: CE, EN 60950,EN 55022, EN 5002430 MDE-LEDI<strong>1S</strong>-<strong>2S</strong>-1066V1.0
SUMARIO1. DESCRIPCIÓN ............................................................................................................ 322. CONEXIONES.............................................................................................................. 343. AJUSTE DE LA LUMINOSIDAD.................................................................................. 354. PROGRAMACIÓN DE LA HORA ................................................................................ 354.1. AUTÓNOMO........................................................................................................................ 354.2. RECEPTOR DE CÓDIGO AFNOR NFS 87500 ................................................................. 354.3. RECEPTOR DE CÓDIGO SMPTE /EBU ........................................................................... 355. OPCIÓN SALIDA TOPS HORARIOS........................................................................... 366. OPCIÓN ASCII RS232C O RS422/485 ....................................................................... 376.1. MODO UNI-DIRECCIONAL – EMISOR ............................................................................. 376.2. MODO UNI-DIRECCIONAL - RECEPTOR ........................................................................ 37ESPAÑOL7. OPCIÓN CRONÓMETRO............................................................................................. 387.1. FUNCIONAMIENTO ........................................................................................................... 387.1.1. Uso cronómetro ...................................................................................................... 387.1.2. Uso de la cuenta regresiva ..................................................................................... 387.2. CABLEADO DEL CRONÓMETRO CON UN CONECTOR SUBD9 ................................... 398. ESPECIFICACIONES TÉCNICAS................................................................................ 40MDE-LEDI<strong>1S</strong>-<strong>2S</strong>-1066V1.031
1. DESCRIPCIÓNLEDI 1/Sseg.(dimensiones: mm)LEDI 1/S <strong>NTP</strong>32 MDE-LEDI<strong>1S</strong>-<strong>2S</strong>-1066V1.0
LEDI 2/S(dimensiones: mm)ESPAÑOL►►Visualización digital 7 segmentos.LEDI 1/S4xM4170►►Visualización horas, minutos y segundos.42Apertura muralOn the wall32►►Altura de las cifras: 14 mm (LEDI<strong>1S</strong>) o 20 mm (LEDI <strong>2S</strong>).LEDI 2/S159►►Alimentación 230VAC 50-60Hz,(opcional, 115VAC, 48VAC o 18-36VDC).►►Consumo 5VA.►►Frente LEDI 1/S: 180 x 44 mm o482 x 44 mm (<strong>NTP</strong>).Frente LEDI 2/S: 190 x 130 mm.12075155Apertura muralOn the wall1804xM4MDE-LEDI<strong>1S</strong>-<strong>2S</strong>-1066V1.033
2. CONEXIONESTodas las conexiones se realizan en la parte trasera de la caja.►►Alimentación (ej.: 230V 50-60Hz).►►Entrada impulsional o entrada de sincronización (código AFNOR, <strong>NTP</strong>, TDF o DCF ocódigo SMPTE).►►Opción cronómetro.►►Opción salida Top Horario.►►Opción ASCIIPara una alimentación continua, la ficha 4puntos deberá ser cableada de la siguientemanera:ASCII230VAC; 0.02A; 50-60HzChrono CronoCODETOP1+ DCAlimentation Alimentacióncontinue continua- DCCara Face trasera arrière ledi Ledi 2/S230VAC; 0.02A; 50-60HzCHRONOBP1 BP2<strong>NTP</strong>Opción alimentación 230VAC por cable, utilizar un cable sector equipado con un conectorEN 60320/C19 (tipo informático).☛☛La versión <strong>NTP</strong> sólo está disponible en la versión LEDI 1/S rack,dimensiones 424 x 141; en este caso, la opción ASCII no está disponible.34 MDE-LEDI<strong>1S</strong>-<strong>2S</strong>-1066V1.0
3. AJUSTE DE LA LUMINOSIDADEl ajuste manual de luminosidad se realiza a través de botones pulsadores ubicados en elfrente, con ayuda de un pequeño destornillador, presionando sobre las teclas «+» y «-».4. PROGRAMACIÓN DE LA HORA4.1. AUTÓNOMOLa tecla de programación «PROG» permite seleccionar la información que debe ser configurada.Las teclas «+» et «-» permiten aumentar o disminuir la información seleccionadapor «PROG» (dígitos intermitentes).Desarrollo de la programación:►►Visualización hora, minuto, segundo: ajuste de las horas.►►Visualización hora, minuto, segundo: ajuste de los minutos.►►Visualización hora, minuto, segundo: espera de sincronización.►►Visualización hora, minuto, segundo: arranque de la base de tiempo.4.2. RECEPTOR DE CÓDIGO AFNOR NFS 87500ESPAÑOLLa pantalla sincroniza la hora oficial cuando el código está presente en el borne “entrada”.4.3. RECEPTOR DE CÓDIGO SMPTE /EBUReloj destinado a la relectura del código temporal SMPTE o EBU a velocidad estándar.►►Conectar el código en el borne «entrada».►►Adaptación automática al formato SMPTE o EBU.►►Selección automática de la frecuencia 24, 25, o 30 imágenes por segundo.►►Error máximo tolerado sobre la frecuencia del código recibido: +/- 10%►►Bloqueo de la visualización sobre la última trama recibida en caso de detención delaparato emisor.MDE-LEDI<strong>1S</strong>-<strong>2S</strong>-1066V1.035
5. OPCIÓN SALIDA TOPS HORARIOSEsta opción permite obtener que en el enchufe «TOP» haya:►►Una salida de 4 tops de una duración de 200ms emitidos cada hora.1º top: 59mn 57 seg2º top: 59mn 58 seg3º top: 59mn 59 seg4º top: 00mn 00 seg►►Un top 12 horas de duración 1 segundo.►►Un top segundo de duración 0,5 segundo.►►Un top minuto de duración 1 segundo.►►Un top hora de duración 1 segundo.►►Un top 24 horas de duración 1 segundo.►►Un top cuarto de hora de duración 1 segundo.►►Un contacto fin de cronómetro (cuando el cronómetro llega a cero en modo dedescuento).Se prevén dos tipos de salida para el uso de estos tops:Salida con contacto seco:►►Salida que permite disponer, a través de un relay, de un contacto que se cierre encada top.►►Características del relay utilizado: poder de corte 30VA.Salida con colector abierto:►►U máx.: 60V►►I máx.: 50mA36 MDE-LEDI<strong>1S</strong>-<strong>2S</strong>-1066V1.0
6. OPCIÓN ASCII RS232C O RS422/485Conectar la salida ASCII en el borne Sub.D (tipo C), de acuerdo a las instrucciones delsiguiente cuadro:RS232RS485FULL DUPLEXRS485HALF DUPLEX1 N.C 1 N.C N.C2 TXD 2 TX+ TX+/RX+3 RXD 3 RX+ N.C4 N.C 4 N.C N.C5 GND 5 GND GND6 N.C 6 TX- TX-/RX-7 N.C 7 RX- N.C8 N.C 8 N.C N.C9 N.C 9 N.C N.C6.1. MODO UNI-DIRECCIONAL – EMISOREn este modo, el reloj emite un código (configuración: 2400 baudios, formato 8 bits, paridadpar, 1 stop bit) en 2 partes:1 – La información horaria en forma:STX día de la semana SP día del mes/mes/año SP SP Hora: minuto: segundo CR2 – Las informaciones corresponden a los estados del cronómetro, temperatura, luminosidad,etc.La primera parte de la información sirve, por ejemplo, para sincronizar una ordenador (eneste caso, no tener en cuenta la segunda parte).La información completa sirve para vincular otro reloj en la primera.ESPAÑOL6.2. MODO UNI-DIRECCIONAL - RECEPTOREn este modo, el reloj funciona en modo autónomo, pero se pone en hora en relación alcódigo ASCII recibido (configuración: 2400 baudios, formato 8 bits, paridad par, 1 stop bit).Este código ASCII puede ser:1 – La información horaria en forma:STX día de la semana SP día del mes/mes/año SP SP Hora: minuto: segundo CREste código horario es generado por los servidores de tiempo o por las centrales horariaASCII o por cualquier otro generador de código ASCII2 – Si la información procede de otro reloj del mismo tipo, que esté funcionando enmodo emisor, en este caso, el reloj queda perfectamente sometido a este último.MDE-LEDI<strong>1S</strong>-<strong>2S</strong>-1066V1.037
7. OPCIÓN CRONÓMETROUn conmutador reloj/crono permite pasar de la indicación: Hora «reloj» a la función cronómetro“crono”.Existen dos modos de cronómetro posibles:►►Uso cronometraje (conteo hacia delante).►►Uso cuenta regresiva (conteo hacia atrás).7.1. FUNCIONAMIENTOEs posible visualizar o no la hora de consigna.7.1.1. Uso cronómetroSin hora de consigna:►►Hacer «START/+» (cronometraje), el cronómetro comenzará en cero y correrá indefinidamentehasta que se vuelva a presionar la tecla «STOP».Una hora de consigna es elegida:►►Apoyar sobre la tecla «PROG» (sólo puede accederse a esta función cuando elcronómetro está parado y puesto en cero), luego fijar la hora deseada con ayudade las teclas “+” y “-“(por cada presión sobre la tecla “PROG”, una parte de lo visualizadose volverá intermitente, ajustar sucesivamente las horas, luego los minutos,luego los segundos).►►Al completar esta programación, presionar la tecla «START/+», la visualización seiniciará a la hora programada y correrá indefinidamente hasta que se vuelva a presionarla tecla «STOP».7.1.2. Uso de la cuenta regresivaSin hora de consigna:►►Hacer «START/-» (cuenta regresiva), el cronómetro comenzará en cero y correrádurante 24 horas o hasta que se vuelva a presionar la tecla «STOP».Una hora de consigna es elegida:►►Apoyar sobre la tecla «PROG» (sólo puede accederse a esta función cuando elcronómetro está parado y puesto en cero), luego fijar la hora deseada con ayudade las teclas “+” y “-“(por cada presión sobre la tecla “PROG”, una parte de lo visualizadose volverá intermitente, ajustar sucesivamente las horas, luego los minutos,luego los segundos).► ► Al completar esta programación, presionar la tecla «START/+», la visualizacióncomenzará en la hora programada y se detendrá automáticamente en cero y volveráa mostrar la hora de consigna programada.38 MDE-LEDI<strong>1S</strong>-<strong>2S</strong>-1066V1.0
☛☛Es posible tener el tiempo intermedio manteniendo la presión sobre unade las teclas «LAPS» de la caja crono.☛☛En conteo hacia delante o atrás, cuando una hora de consigna esprogramada, el cronómetro puede ser detenido y luego reiniciado encualquier momento, presionando las teclas «STOP» y luego «START» sinmodificar la hora de consigna originalmente programada.☛☛Es posible activar en el segundo cero un contacto seco con ayuda de laopción top (consultarnos).7.2. CABLEADO DEL CRONÓMETRO CON UN CONECTOR SUBD9Enchufe de la SUBD9 hembra sobre la cara trasera:►►Pin1: Sin utilizar►►Pin2: Masa►►Pin3: Conmutador reloj/crono►►Pin4: Botón pulsador «-»►►Pin5: Botón pulsador «+»►►Pin6: Botón pulsador «PROG»ESPAÑOLCrono11Correspondencia de los pins de la SUBD9 macho en lasalida de la caja cronómetro:►►Pin1: PROG►►Pin2: +►►Pin3: -►►Pin4: Conmutador reloj/crono►►Pin5: MasaMDE-LEDI<strong>1S</strong>-<strong>2S</strong>-1066V1.039
8. ESPECIFICACIONES TÉCNICASALIMENTACIÓN:►►230 Volts +10,-15% 50/60Hz►►Consumo máximo 5VA►►Filtro antiparásitos incorporado.►►Fusible en el interior, detrás de la ficha 230V. (Opción alimentación 230VAC porcable: fusible en la cara trasera).►►Reserva de funcionamiento por batería de litio > 10 años.ENTRADA DE SINCRONIZACIÓN:►►Frecuencia recibida: 77,5Khz (DCF) y 162Khz (TDF).►►Longitud máxima de unión por cable bifilar blindado: 100 metros.►►Distancia máxima respecto del emisor DCF (Mainflingen-Franckfurt- Alemania) oTDF (Allouis - CHER) = 2000Km (este valor puede disminuir en función del relievecircundante y de las condiciones atmosféricas del momento).DESMODULADOR DE CÓDIGO AFNOR►►Aislación galvánica de la línea por transformador.►►Impedancia de entrada 3Kohms a 1KHz►►Nivel de entrada: 2,2 Volts c. a c. +10,-40dBBASE DE TIEMPO►►Estabilidad del cuarzo: 5 ppm de 10 a 60 °C►►Estabilidad salida top: 5 10-6 en colector abiertoRECEPTOR DE CÓDIGO SMPTE / EBU:►►Nivel de entrada: Min. +/- 0,2 Volts Máx. +/- 12 Volts►►Impedancia de entrada: 12Kohms.40 MDE-LEDI<strong>1S</strong>-<strong>2S</strong>-1066V1.0
NOTASESPAÑOLMDE-LEDI<strong>1S</strong>-<strong>2S</strong>-1066V1.041
GORGY TIMING SPAINWorld Trade Center - Edificio Este, 6ª Plta.C/ Moll de Barcelona, s/n08039 Barcelona – ESPAÑATel.: +34 93 508 83 53Fax: +34 93 508 83 54www.gorgy-timing.esemail: gorgy@gorgy-timing.esSOPORTE TÉCNICODesde fuera de Francia : +33 476 30 48 20support@gorgy-timing.frRADIO TIMING ® , LEDI ® , LEDICA ® , HANDI ® sont marcas registradas GORGY TIMING.<strong>Gorgy</strong> <strong>Timing</strong> RC74B38 Cualquier modificación de orden técnico, estético o de color pueden realizarse sin previo aviso.Numéro de déclaration d’activité de prestataire de formation : 82 38 04877 3842 MDE-LEDI<strong>1S</strong>-<strong>2S</strong>-1066V1.0
BEDIENUNGSANLEITUNGLEDI ® <strong>1S</strong>LEDI ® <strong>1S</strong> <strong>VERSION</strong> <strong>NTP</strong>LEDI ® <strong>2S</strong>DEUTSCHMDE-LEDI<strong>1S</strong>-<strong>2S</strong>-1066V1.043
WICHTIGE SICHERHEITSHINWEISE :ACHTUNG! Machen Sie sich vor der Installation der Uhr mit dem nachfolgendenAbschnitt vertraut, und beachten Sie während der Installation diedarin beschriebenen Sicherheitsanweisungen.Die Vorrichtung der Elektroanlage, an die das Gerät angeschlossen wird,muss den Anforderungen der Norm NF C 15-100 entsprechen.Dieses Gerät enthält keinen Schalter für die primäre Stromversorgung. Beider Installation der Kabel ist der Einbau einer leicht zugänglichen Unterbrechervorrichtung(Überlastschalter, Trennschalter) erforderlich. Diese Vorrichtungmuss die auf dem Gerät angegebenen Nennwerte für Spannungund Stromstärke unterstützen.In Europa: im Rahmen vom Schutz von Personen und der Umwelt, ist es in IhrerVerantwortung, dieses Gerät in einer Sammelstelle für diesen Zweck (getrenntvom Hausmüll) zu entsorgen. Für weitere Informationen kontaktieren Sie bitteIhren Händler, Sammelstellen oder lokalen Behörden.Jede Änderung oder Öffnung des Produkts ohne Zustimmung führt zum Verlustder Garantie.Alle Wartungsarbeiten müssen spannungslos durchgeführt werden, einschließlichdie daran angeschlossene Geräte.Allgemein sollten sich die Stromkabel (220 VAC) und Datenkabel nicht berührenum Störungen zu vermeiden. (Mindestabstand ein paar Zentimer).<strong>Gorgy</strong> <strong>Timing</strong> lehnt jegliche Verantwortung ab für Unfälle oder Schäden die durchunsachgemäße Anwendung des Produktes verursacht wurden.Die Produkte von GORGY TIMING entsprechen folgenden Normen:CE, EN 60950, EN 55022, EN 5002444 MDE-LEDI<strong>1S</strong>-<strong>2S</strong>-1066V1.0
INHALTSVERZEICHNIS1. BESCHREIBUNG ........................................................................................................ 462. INBETRIEBNAHME ..................................................................................................... 483. HELLIGKEITSREGELUNG.......................................................................................... 484. ZEITEINSTELLUNG..................................................................................................... 494.1. Betrieb im autonomen Modus.............................................................................................. 494.2. Nebenuhr mit Code AFNOR NFS 87-500............................................................................ 494.3. Nebenuhr mit CODE SMPTE /EBU..................................................................................... 495. OPTION ZEITZEICHEN ............................................................................................... 506.1. Unidirektionaler Modus – Sender........................................................................................ 516.2. Unidirektionaler Modus – Empfänger.................................................................................. 516. OPTION ASCII RS232C ODER RS422/485................................................................. 517 OPTION STOPPUHR..................................................................................................... 527.1. Betrieb................................................................................................................................. 527.1.1. Aufwärtszählung...................................................................................................... 527.1.2. Abwärtszählung....................................................................................................... 527.2. Stoppuhr Verkabelung mit SUBD9 Anschluss..................................................................... 53DEUTSCH8. TECHNISCHE EIGENSCHAFTEN............................................................................... 54MDE-LEDI<strong>1S</strong>-<strong>2S</strong>-1066V1.045
1. BESCHREIBUNGLEDI 1/SMaße : mmLEDI 1/S <strong>NTP</strong> AUSFÜHRUNG46 MDE-LEDI<strong>1S</strong>-<strong>2S</strong>-1066V1.0
LEDI 2/SMaße : mm►►Digitale 7-Segment-Anzeige.►►Anzeige von Stunden, Minuten und Sekunden►►Höhe der Zeichen: 14mm►►Netzanschluss 230 VAC 50-60 Hz, (115 VAC, 48 VAC oder 18-36 VDC als Option)►►Helligkeitsregelung an der Frontseite.►►Verbrauch 5 VALEDI 1/S4xM442170On the wall32DEUTSCH159LEDI 1/S4xM4170LEDI 2/S42WandbefestigungOn the wall32155LEDI 2/S15912075WandbefestigungOn the wall4xM4155180120MDE-LEDI<strong>1S</strong>-<strong>2S</strong>-1066V1.075On the wall47
2. INBETRIEBNAHMEAlle Anschlüsse werden auf der Rückseite des Geräts vorgenommen.►►Netzanschluss (z.B.: 230 V 50-60 Hz).►►Impulseingang oder Synchronisation (Code AFNOR, DCF oder TDF oder Code SMPTE)►►Option Stoppuhr.►►Option Ausgang für Zeitzeichen.►►Option ASCIIASCII230VACChronoCODEPipoutput1+ DC- DCDC power supplyBei Gleichstrom wird der Stecker, wie rechts skizziert, angeschlossen:►►Option 230 VAC über Gerätekabel: Stecker vom Typ EN 60320/C19 benutzen.Face arrière ledi 2/SRear side of the LEDI <strong>2S</strong>230VAC; 0.02A; 50-60HzCHRONOBP1 BP2<strong>NTP</strong>3. HELLIGKEITSREGELUNGDie Helligkeitsregelung wird manuell vorgenommen. An der Gehäusevorderseite befindensich dafür zwei Tasten "+" und "-", die man mit einem kleinen Schraubenzieher bedienenkann.48 MDE-LEDI<strong>1S</strong>-<strong>2S</strong>-1066V1.0
4. ZEITEINSTELLUNG4.1. BETRIEB IM AUTONOMEN MODUS►►Mit der Taste "PROG" die Information auswählen, die geändert werden soll.(Ziffernblinken)►►Mit den Tasten "+" und "-" verändert man den Wert der blinkenden Ziffern "PROG".Reihenfolge der Programmierung:1 - Anzeige Stunde, Minute, Sekunde: Stunden einstellen2 - Anzeige Stunde, Minute, Sekunde: Minuten einstellen3 - Anzeige Stunde, Minute, Sekunde: Warten auf Synchronisationszeitpunkt4 - Anzeige Stunde, Minute, Sekunde: Starten der Zeitanzeige.4.2. NEBENUHR MIT CODE AFNOR NFS 87-500Wenn der Code an der Klemme "Code" anliegt, wird die aktuelle Uhrzeit automatisch angezeigt.4.3. NEBENUHR MIT CODE SMPTE /EBUDie Uhr liest den Zeitcode SMPTE oder EBU in der Standardgeschwindigkeit.►►Zeitcode an der Klemme "Code" anschließen.►►Automatische Anpassung an das SMPTE- oder EBU-Format.►►Automatische Wahl der Bildfolgen pro Sekunde: 24, 25 oder 30 Bilder.►►Die Geschwindigkeit des empfangenen Codes kann um +/- 10% abweichenDEUTSCH►►Bei Ausfall des Empfängers wird der letzte Frame angezeigt.MDE-LEDI<strong>1S</strong>-<strong>2S</strong>-1066V1.049
5. OPTION ZEITZEICHENBei dieser Sonderausstattung erhält man über die Klemme „Top“► ► einen Ausgang für 4 Zeitzeichen zur vollen Stunde, Dauer 200 ms:1. Zeitzeichen: 59 min 57 s2. Zeitzeichen: 59 min 58 s3. Zeitzeichen: 59 min 59 s4. Zeitzeichen: 00 min 00 s (Zeichen des Stundenwechsels)►►ein Zeitzeichen zur 12. Stunde, Dauer 1 Sekunde►►ein Zeitzeichen zur vollen Minute, Dauer 0,5 Sekunden►►ein Zeitzeichen zur vollen Stunde, Dauer 1 Sekunde►►ein Zeitzeichen zur 24. Stunde, Dauer 1 Sekunde►►ein Zeitzeichen jede Viertelstunde, Dauer 1 Sekunde►►einen Kontakt "Ende der Stoppuhrfunktion" (Bei Abwärtszählen der Stoppuhr Ankunftbei Null)Für die Zeitzeichen sind zwei Ausgänge vorgesehen:Ausgang über einen potentialfreien Kontakt►►Ausgang zum Ansteuern eines Relais, das sich bei jedem Zeitzeichen schließt.►►Art des Relais: Schließer: Abschaltvermögen 30 VAAusgang über ein offenes Relais:►►Umax: 60 V►►Imax: 50 mA50 MDE-LEDI<strong>1S</strong>-<strong>2S</strong>-1066V1.0
6. OPTION ASCII RS232C ODER RS422/485Den Code ASCII an der Klemme Sub.D (Typ C) anschließen, wie in der folgenden Tabellebeschrieben:RS232RS485FULL DUPLEXRS485HALF DUPLEX1 N.C 1 N.C N.C2 TXD 2 TX+ TX+/RX+3 RXD 3 RX+ N.C4 N.C 4 N.C N.C5 GND 5 GND GND6 N.C 6 TX- TX-/RX-7 N.C 7 RX- N.C8 N.C 8 N.C N.C9 N.C 9 N.C N.C6.1. UNIDIREKTIONALER MODUS – SENDERDie Uhr sendet einen zweiteiligen Code (Konfiguration: 2400 Baud, Format 8 Bit, geradeParität, 1 Stoppbit)1 - Die Zeitinformation in folgendem Format:►►STX Wochentag SP Monatstag/Monat/Jahr SP SP Stunde:Minute:Sekunde CR2 - Die Informationen der Zustände Stoppuhr, Temperatur, Helligkeit usw. ...►►Der erste Teil der Information dient z. B. zum Synchronisieren eines Computers. (Indiesem Fall wird der zweite Teil der Information nicht beachtet.)Die komplette Information dient zum Anschluss einer zweiten Uhr an die erste.6.2. UNIDIREKTIONALER MODUS – EMPFÄNGERIn diesem Modus ist die Uhr eine autonome Uhr. Die Zeitübertragung erfolgt aber durchÜbernahme des empfangenen ASCII-Codes (Konfiguration: 2400 Baud, Format 8 Bit, geradeParität, 1 Stoppbit). Der Code kann sein:1 - Eine Zeitinformation in der Art:►►STX Wochentag SP Monatstag/Monat/Jahr SP SP Stunde:Minute:Sekunde CR, dievon einer RT3000, einer RADIO TIMING ASCII oder irgendeinem anderen ASCII-Code-Generator geliefert wird.2 - Die Zeitinformation einer Uhr des gleichen Typs im Modus Sender. In diesemFall hat die eine Uhr die gleiche Anzeige, wie die andere.DEUTSCHMDE-LEDI<strong>1S</strong>-<strong>2S</strong>-1066V1.051
7 OPTION STOPPUHRMit dem Schalter clock/chrono wechselt man vom Modus Zeitanzeige "clock"zur Stoppuhrfunktion "chrono".Es gibt zwei Möglichkeiten der Zeitnahme:►►Aufwärtszählung►►Abwärtszählung7.1. BETRIEBEs besteht die Möglichkeit, einer Zeitvorwahl.7.1.1. AufwärtszählungOhne Zeitvorwahl:►►Taste "START/+" drücken. Die Stoppuhr beginnt bei Null und stoppt nach Druck aufdie Taste "STOP".Mit Zeitvorwahl:►►Für diese Funktion muss die Stoppuhr angehalten und auf Null zurückgestellt sein(Taste "STOP"). Durch Druck auf die Taste "PROG" den Teil der Anzeige zum Blinkenbringen, der programmiert werden soll (in der Reihenfolge: Stunden, Minuten,Sekunden). Dann mit den Tasten "+" und "-" die gewünschte Zeit einstellen. Ist alleseingestellt, nochmals die Taste "PROG" drücken.►►Durch Betätigen der Taste "START/+" wird die Stoppuhr von der programmiertenZeit an aufwärts zählen bis zum nächsten Druck auf die Taste "STOP".7.1.2. AbwärtszählungOhne Zeitvorwahl:►►Taste "START/+" drücken. Die Stoppuhr beginnt bei Null und läuft 24 Stunden langoder bis die Taste "STOP" betätigt wird.Mit Zeitvorwahl:►►Für diese Funktion muss die Stoppuhr angehalten und auf Null zurückgestellt sein(Taste "STOP"). Durch Druck auf die Taste "PROG" den Teil der Anzeige zum Blinkenbringen, der programmiert werden soll (in der Reihenfolge: Stunden, Minuten,Sekunden). Dann mit den Tasten "+" und "-" die gewünschte Zeit einstellen. Ist alleseingestellt, nochmals die Taste "PROG" drücken.► ► Durch Betätigen der Taste "START/-" wird die Stoppuhr von der programmierten Zeitabwärts zählen bis Null, und anschließend wieder die programmierte Zeit anzeigen.52 MDE-LEDI<strong>1S</strong>-<strong>2S</strong>-1066V1.0
☛☛Zum Ablesen von Zwischenzeiten hält man eine der Tasten (LAPS)gedrückt.☛☛Ist eine bestimmte Zeit auf- oder abwärts programmiert, könnenZwischenzeiten genommen werden durchDrücken der Tasten "START", dann "STOP", ohne die ursprünglichprogrammierte Zeit zu verändern.☛☛Die Option Zeitzeichen bietet die Möglichkeit, bei Erreichen derSekunde Null, einen Ausgang zu aktivieren. (Bitte bei uns anfragen!)7.2. STOPPUHR VERKABELUNG MIT SUBD9 ANSCHLUSSSUBD9 Anschluss (auf Rückseite):►►Pin1 : Unbenutzt►►Pin2 : Erde►►Pin3 : Switch Uhr/chrono►►Pin4 : Drucktaste «-»►►Pin5 : Drucktaste «+»►►Pin6 : Drucktaste «PROG»1DEUTSCH<strong>1S</strong>UBD9 PIN Belegung von der Stoppuhr Bedienung:►►Pin1 : PROG►►Pin2 : +►►Pin3 : -►►Pin4 : Switch Uhr/chrono►►Pin5 : ErdeMDE-LEDI<strong>1S</strong>-<strong>2S</strong>-1066V1.053
8. TECHNISCHE EIGENSCHAFTENAUSGANG CODE AFNOR►►Galvanische Isolation der Linie durch Transformator.►►Impedanz am Eingang 3 kOhm bis 1 kHz►►Eingangspegel : 2,2 Volt Spitze/Spitze. +10 bis -40 dBEINGANG FÜR DIE FUNKSYNCHRONISATION►►Sendefrequenz: 77,5 kHz (DCF).►►Maximale Länge des Kabels: 100 Meter.►►Empfangsbereich des Senders DCF (Mainflingen-Frankfurt) = ca. 2000 km (Wertschwankt je nach Gelände und atmosphärischen Bedingungen).BETRIEBSSPANNUNG►►230 Volt +10, -15% 50/60 Hz►►Maximaler Verbrauch 5 VA►►Netzfilter►►Sicherung hinter dem Anschluss 230 V. (Bei Option 230 VAC über Kabel: Sicherungan der Rückseite)►►Gangreserve von ca. 10 Jahren durch eine Lithiumbatterie.ZEITBASIS►►Stabilität des Quarzes: 5 ppm von 10 bis 60 °C►►Stabilität des Zeitzeichenausgangs: 5 x 10 -6 über offenes RelaisEINGANG CODE SMPTE / EBU►►Eingangspegel: Mind. +/- 0,2 Volt, Maxi. +/- 12 Volt►►Eingangsimpedanz: 12 kOhm54 MDE-LEDI<strong>1S</strong>-<strong>2S</strong>-1066V1.0
NOTESDEUTSCHMDE-LEDI<strong>1S</strong>-<strong>2S</strong>-1066V1.055
GORGY TIMING GMBHÖstliche Rheinbrückenstr. 50D-76187 Karlsruhe - DEUTSCHLANDTél : +49 721 60156Fax : +49 721 695259www.gorgy-timing.deTECHNICHER SUPPORT+33 476 30 48 20support@gorgy-timing.deRADIO TIMING®, LEDI®, LEDICA®, HANDI® Marke und Modelle geschützt GORGY TIMING.GORGY TIMING RC 74 B 38 - Änderungen der Technik und Gestaltung vorbehaltenNuméro de déclaration d’activité de prestataire de formation : 82 38 04877 3856 MDE-LEDI<strong>1S</strong>-<strong>2S</strong>-1066V1.0
NOTESMDE-LEDI<strong>1S</strong>-<strong>2S</strong>-1066V1.057
w w w . g o r g y - t i m i n g . c o mRADIO TIMING ® , LEDI ® , LEDICA ® , HANDI ® sont des marques déposées GORGY TIMING.Numéro de déclaration d’activité de prestataire de formation : 82 38 04877 38GORGY TIMING RC 74 B 38 - Toutes modifications d'ordre technique ou esthétique peuvent être apportées sans préavis.RADIO TIMING ® , LEDI ® , LEDICA ® , HANDI ® are trademarks by GORGY TIMING.GORGY TIMING RC 74 B 38 - Any technical, aesthetic, color modifications can be made without notice.RADIO TIMING ® , LEDI ® , LEDICA ® , HANDI ® sont marcas registradas GORGY TIMING.GORGY TIMING RC 74 B 38 - Cualquier modificación de orden técnico, estético o de color pueden realizarse sin previo aviso.RADIO TIMING ® , LEDI ® , LEDICA ® , HANDI ® Marke und Modelle geschützt GORGY TIMING.GORGY TIMING RC 74 B 38 - Änderungen der Technik und Gestaltung vorbehalten58 MDE-LEDI<strong>1S</strong>-<strong>2S</strong>-1066V1.0