R-STW - Dusar
R-STW - Dusar
R-STW - Dusar

You also want an ePaper? Increase the reach of your titles
YUMPU automatically turns print PDFs into web optimized ePapers that Google loves.
GB<br />
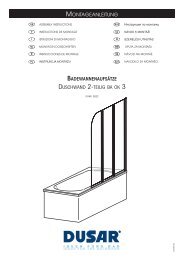
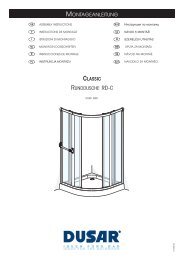
Assembly with side panel<br />
1. Take the compensating profiles out of the frame profiles of the glass<br />
swing door (Fig. A).<br />
2. Align the left-hand compensating profile with the wall using a spirit<br />
level and mark the holes to be drilled in the wall through the holes<br />
punched in the profile. Note: If the side panel is being mounted on<br />
the left-hand side, please proceed as a mirror image to (Fig. A).<br />
Please make sure that the profile is positioned 12 mm inwards from<br />
the outer bath rim.<br />
3. Drill the hole using a 6 mm stone drill bit, push in plug No. 4 and<br />
screw the compensating profile to the wall using screw No. 3 (Fig.<br />
A).<br />
4. Screw the right-hand compensating profile to the inner side panel<br />
profile using screws No. 2 (Fig. A). Caution! The compensating profile<br />
must be flush with the lower cap.<br />
5. Now take the wall compensating profile out of the frame profile of<br />
the side panel and align it with the wall 12 mm inwards from the rim<br />
of the shower tray using a spirit level. Mark the holes and drill them<br />
using an 8 mm stone drill bit. Push in plug No. 6 and screw the profile<br />
to the wall with screws No. 5 (Fig. A).<br />
6. Push the side panel with the compensating profile into the frame<br />
profile of the door.<br />
7. Now push the glass swing door onto the compensating profile<br />
attached to the wall.<br />
8. Push the side panel onto the wall compensating profile and into the<br />
frame profile of the glass swing door.<br />
9. Use a 2.8 mm bit to drill holes in the frame profile of the glass swing<br />
door and in the compensating profile from the inside (Fig. A). Screw<br />
the side panel and the glass swing door together (screw No. 1a,<br />
round plate No. 1b, cap No. 1c; Fig. A).<br />
10. Align the glass swing door using a spirit level, and drill holes and<br />
fasten it to the wall compensating profile (bit 2.8 mm, screw No. 1,<br />
round plate, cap; Fig. A). Note: Only drill and screw the door when it<br />
is closed.<br />
11. Align the side panel, and drill holes and screw it to the wall<br />
compensating profile (bit 2.8 mm, screw No. 1a, round plate No. 1b,<br />
cap No. 1c, ; Fig. D).<br />
12. Screw on the handle No. 9 (Fig. E).<br />
13. The door can be aligned with the help of the screws on the lower<br />
and upper bearing blocks (loosen screw, adjust, tighten screw<br />
again). Then push on cap No. 7 (Fig. B).<br />
14. Finally, please seal your shower cabinet, including the plastic caps,<br />
from the outside against the wall and the shower tray. Please note<br />
that all parts must by absolutely dry when doing this. Smooth the<br />
silicone with wet fingers. Add some washing-up liquid to the water<br />
(Fig. F).<br />
ASSEMBLY INSTRUCTIONS<br />
Seite<br />
8<br />
ø 2,8 mm<br />
ø 6+8 mm Stone<br />
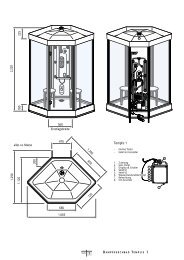
Assembly between two walls<br />
(e.g. door opening to the left)<br />
1. Take the compensating profiles out of the frame profiles of the glass<br />
swing door.<br />
2. Align the two profiles with the wall using a spirit level. Mark the holes<br />
to be drilled through the punched holes, and drill the holes using a<br />
6 mm stone drill bit. Push in plug No. 4.<br />
3. Screw the left-hand compensating profile to the wall with screws<br />
No. 3. Now pull the front PVC profile No. 8 out of the frame profile<br />
(Fig. C). Push the right-hand compensating profile into the frame<br />
profile and place the entire glass swing door on the shower tray and<br />
push it onto the already assembled compensating profile.<br />
Note: For a door opening to the right, please proceed as a mirror<br />
image.<br />
4. Screw your shower unit to the walls through the punched holes in<br />
the frame profile (screw No. 3). Clip the PVC strip No. 8 back into<br />
the correct position (Fig. C).<br />
5. Now align your shower between the profiles using a spirit level.<br />
6. Now drill holes from the inside in the frame profiles and in the<br />
compensating profiles (bit 2.8 mm), and screw them together with<br />
screws No. 1a screw, round plate No. 1b, cap No. 1c).<br />
7. Screw on the handle No. 9 (Fig. E).<br />
8. The door can be aligned with the help of the screws on the lower<br />
and upper bearing blocks (loosen screw, adjust, tighten screw<br />
again). Then push on cap No. 7 (Fig. B).<br />
9. Finally, please seal your shower cabinet, including the plastic caps,<br />
from the outside against the wall and the shower tray using silicone.<br />
Please note that all parts must by absolutely dry when doing this.<br />
Smooth the silicone with wet fingers. Add some washing-up liquid to<br />
the water (Fig. E).