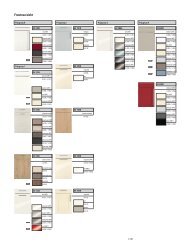
Pflege- und Bedienungsanleitung
Pflege- und Bedienungsanleitung
Pflege- und Bedienungsanleitung

You also want an ePaper? Increase the reach of your titles
YUMPU automatically turns print PDFs into web optimized ePapers that Google loves.
GB E<br />
Instructions for use<br />
Adjusting the door hinges<br />
All our unit doors are likewise adjusted to<br />
their basic setting by the factory and so, if<br />
they are correctly installed, no additional<br />
adjustment should be necessary. Should any<br />
adjustment be required, proceed as follows.<br />
Do not use a battery-operated screwdriver.<br />
Avoid over-tightening the screws.<br />
1.<br />
58<br />
1. Start by removing the cap on the top<br />
of the hinge.<br />
2. Height adjustment<br />
Vertical (+/-2 mm)<br />
Slacken the fastening screws on the<br />
mounting plate slightly and adjust the<br />
door height. Then tighten up the<br />
fastening screws again.<br />
3. Horizontal adjustment<br />
(+0.5/-3 mm).<br />
Tighten up or slacken off the front<br />
adjusting screw until the door hangs<br />
straight. There is no need to slacken the<br />
fastening screws on the mounting plate.<br />
4. Depth adjustment<br />
(+/-2 mm)<br />
The rear eccentric screw enables you to<br />
adjust the distance between the carcase<br />
and the front.<br />
Instrucciones de uso<br />
Reajuste de las bisagras<br />
Las puertas de los armarios también han sido<br />
premontadas de fábrica de modo que, si se<br />
terminan de montar bien, no haya necesidad<br />
de posteriores ajustes. Si aún así fuese<br />
necesario realizar ajustes, proceda como<br />
sigue: No utilice destornilladores eléctricos<br />
ni fuerce los tornillos apretándolos en<br />
exceso.<br />
2.<br />
1. Retire la tapa del lado superior de<br />
la bisagra.<br />
2. Regulación en la altura<br />
(+/-2 mm)<br />
Afloje ligeramente los tornillos de<br />
sujeción de la placa de montaje y ajuste<br />
la puerta a la altura deseada. Finalmente<br />
vuelva a apretar los tornillos de sujeción.<br />
3. Ajuste en la horizontal<br />
(+0,5/-3 mm)<br />
Apriete o afloje los tornillos de ajuste<br />
delanteros hasta que la puerta quede<br />
nivelada. No es necesario soltar los<br />
tornillos de sujeción.<br />
4. Ajuste en la vertical<br />
(+/-2 mm)<br />
Actuando en los tornillos excéntricos<br />
traseros podrá regular la distancia entre<br />
el mueble y el frente.