Becker Centronic MemoControl MC411 Anleitung - auf enobi.de
Becker Centronic MemoControl MC411 Anleitung - auf enobi.de
Becker Centronic MemoControl MC411 Anleitung - auf enobi.de

Create successful ePaper yourself
Turn your PDF publications into a flip-book with our unique Google optimized e-Paper software.
BedienungsanleitungGewährleistung<strong>Becker</strong>-Antriebe GmbH ist von <strong>de</strong>r gesetzlichen und vertraglichen Gewährleistungfür Sachmängel und Produkthaftung befreit, wenn ohne unsere vorherige Zustimmungeigene bauliche Verän<strong>de</strong>rungen und/o<strong>de</strong>r unsachgemäße Installationen gegenunsere vorgegebenen Montagerichtlinien vorgenommen, ausgeführt o<strong>de</strong>r veranlasstwer<strong>de</strong>n.Der Weiterverarbeiter hat dar<strong>auf</strong> zu achten, dass alle für die Herstellung undKun<strong>de</strong>nberatung erfor<strong>de</strong>rlichen gesetzlichen und behördlichen Vorschriften,insbeson<strong>de</strong>re die EMV-Vorschriften, eingehalten wer<strong>de</strong>n.Das vorliegen<strong>de</strong> Produkt unterliegt technischen Weiterentwicklungen und Verbesserungen.Informieren Sie sich in <strong>de</strong>n aktuellen Verk<strong>auf</strong>sunterlagen über die genaueProduktspezifikationen.VorsichtBitte bewahren Sie die <strong>Anleitung</strong> <strong>auf</strong>!Sicherheitshinweise• Nur in trockenen Räumen verwen<strong>de</strong>n.• Verwen<strong>de</strong>n Sie nur unverän<strong>de</strong>rte <strong>Becker</strong> Originalteile.• Halten Sie Personen aus <strong>de</strong>m Fahrbereich <strong>de</strong>r Anlagen fern.• Halten Sie Kin<strong>de</strong>r von Steuerungen fern.• Beachten Sie Ihre lan<strong>de</strong>sspezifischen Bestimmungen.• Verbrauchte Batterien fachgerecht entsorgen. Batterien nur durch i<strong>de</strong>ntischenTyp (LR 03; AAA) ersetzen.• Wird die Anlage durch einen o<strong>de</strong>r mehrere Sen<strong>de</strong>r gesteuert, muss <strong>de</strong>rFahrbereich <strong>de</strong>r Anlage während <strong>de</strong>s Betriebes einsehbar sein.AllgemeinesMit <strong>de</strong>m <strong>MC411</strong> können Sie einen o<strong>de</strong>r mehrere Rollla<strong>de</strong>nantriebe steuern. Desweiteren können Sie mit diesem Sen<strong>de</strong>r eine Schaltzeit für eine AUF- und AB-Bewegungprogrammieren.Eine einfache Bedienung zeichnet dieses Gerät aus.4
BedienungsanleitungProgrammieren <strong>de</strong>r Fahrzeiten1. Ggf. <strong>de</strong>n Rollla<strong>de</strong>n in die entgegengesetzte Endlage steuern.2. Warten bis zur gewünschten Zeit, zu <strong>de</strong>r <strong>de</strong>r automatische Fahrbefehl ausgeführtwer<strong>de</strong>n soll.3. Zum gewünschten Zeitpunkt die entsprechen<strong>de</strong> Richtungstaste betätigen undgedrückt halten bis <strong>de</strong>r Rollla<strong>de</strong>nantrieb nach ca. 6 Sekun<strong>de</strong>n kurz stoppt undanschließend bis zur Endlage weiterläuft.4. Richtungstaste loslassen.Der Rohrantrieb hat <strong>de</strong>n aktuellen Zeitpunkt für diese Bewegungsrichtung gespeichert.Mit <strong>de</strong>r an<strong>de</strong>ren Bewegungsrichtung genauso verfahren.In <strong>de</strong>r Schiebeschalterstellung Hand wer<strong>de</strong>n keine automatischen Fahrbefehle ausgeführt.Die eingespeicherten Fahrzeiten bleiben erhalten.Löschen <strong>de</strong>r FahrzeitenHinweisBeim Löschvorgang wer<strong>de</strong>n immer bei<strong>de</strong> Fahrzeiten gelöscht.Um die AUF- und AB-Fahrzeit zu löschen, drücken Sie die STOPP-Taste für 10 Sekun<strong>de</strong>n.Die Quittierung erfolgt durch ein "Klack-Klack" <strong>de</strong>s Rohrantriebes.Die Fahrzeiten sind gelöscht.Sen<strong>de</strong>kontrollleuchteEin Funksignal wird durch das Aufleuchten <strong>de</strong>r Sen<strong>de</strong>kontrollleuchte signalisiert.Lässt die Leistung <strong>de</strong>r Batterie nach, blinkt die Sen<strong>de</strong>kontrollleuchte beim Sen<strong>de</strong>n.Die Sen<strong>de</strong>leistung bzw. Funkreichweite wird durch Abnahme <strong>de</strong>r Batterieleistungreduziert. Leuchtet die Sen<strong>de</strong>kontrollleuchte bei Tastendruck nicht mehr, müssendie Batterien gewechselt wer<strong>de</strong>n.GruppeUnter einer Gruppe versteht man die Ansteuerung mehrerer Empfänger zum gleichenZeitpunkt. Die eingelernte Gruppe wird mit einem Fahrbefehl angesteuert.Bei <strong>de</strong>m <strong>MC411</strong> wird die Gruppe über einen Funkkanal angesteuert.7
Einlernen <strong>de</strong>s Funks1) Mastersen<strong>de</strong>r einlernena) Empfänger in Lernbereitschaft bringenHinweisBeachten Sie die Betriebsanleitung <strong>de</strong>s Empfängers.Bedienungsanleitung• Schalten Sie die Spannungsversorgung <strong>de</strong>s Empfängers aus und nach 5 Sekun<strong>de</strong>nwie<strong>de</strong>r ein.o<strong>de</strong>r• Betätigen Sie die Lerntaste bzw. <strong>de</strong>n Funkschalter <strong>de</strong>s Empfängers.Der Empfänger befin<strong>de</strong>t sich nun für 3 Minuten in Lernbereitschaft.b) Mastersen<strong>de</strong>r einlernenDrücken Sie die Einlerntaste innerhalb <strong>de</strong>r Lernbereitschaft, bis <strong>de</strong>r Empfänger daserfolgreiche Einlernen quittiert.Damit ist <strong>de</strong>r Einlernvorgang been<strong>de</strong>t.2) weitere Sen<strong>de</strong>r einlernena) Drücken Sie die Einlerntaste <strong>de</strong>s Mastersen<strong>de</strong>rs, bis <strong>de</strong>r Empfänger quittiert.b) Drücken Sie nun die Einlerntaste <strong>de</strong>s neuen Sen<strong>de</strong>rs, bis <strong>de</strong>r Empfänger quittiert.c) Jetzt drücken Sie die Einlerntaste <strong>de</strong>s neu einzulernen<strong>de</strong>n Sen<strong>de</strong>rs noch einmal.Der Empfänger quittiert das erfolgreiche Einlernen.Die maximale Funkreichweite beträgt im Gebäu<strong>de</strong> bis zu 25 m und im freien Feld biszu 350 m.8
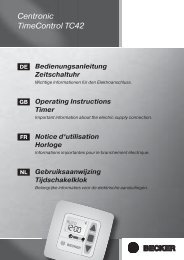
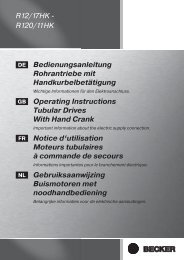
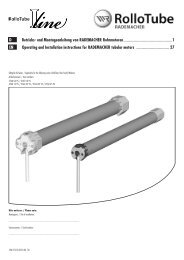
Bedienungsanleitung22,560,2Montage Wandhalterung• Prüfen Sie vor <strong>de</strong>r Montage an <strong>de</strong>r gewünschtenMontageposition die einwandfreieFunktion von Sen<strong>de</strong>r und47Empfänger.• Befestigen Sie die Halterung mit <strong>de</strong>nzwei beigelegten Schrauben an <strong>de</strong>rWand.42,9Batteriewechsel1. Entnehmen Sie die Batterien.2. Legen Sie die neuen Batterien lagerichtigein.9Reinigen Sie das Gerät nur mit einemfeuchten Tuch. Verwen<strong>de</strong>n Sie keinReinigungsmittel, da dieses <strong>de</strong>n Kunststoffangreifen kann.
Technische DatenNennspannung3 V DCBatterietypLR 03 (AAA)Schutzart IP 20Zulässige Umgebungstemperatur -10 bis +55 °CFunkfrequenz868,3 MHzStörungAntrieb läuft nicht,Sen<strong>de</strong>kontrollleuchtebleibt aus.Antrieb läuft nicht,Sen<strong>de</strong>kontrollleuchtebleibt an.Sen<strong>de</strong>kontrollleuchteblinkt.Rohrantrieb läuft nichtim 24 Stun<strong>de</strong>nrhythmusWas tun wenn ... ?Ursache1. Batterien sind leer.2. Batterieneingelegt.sind falsch1. Empfänger außerhalb <strong>de</strong>rFunkreichweite.2. Sen<strong>de</strong>r ist nicht imEmpfänger eingelernt.BedienungsanleitungAbhilfe1. Neue Batterien einlegen.2. Batterien richtig einlegen.1. Entfernung zumEmpfänger verringern.2. Sen<strong>de</strong>r einlernen.B atterien sind schwach Neue Batterien einlegen.1. SchiebeschalterHandsteht <strong>auf</strong>1. Schiebeschalterstellen<strong>auf</strong> UhrFahrzeiten weichen von<strong>de</strong>r Programmierung abkeine FunktionSen<strong>de</strong>rbeim2. keine SchaltzeitengespeichertStromausfall amRohrantriebSpannungsversorgung warzulange unterbrochen2. Schaltzeiten prorammierenSchaltzeiten neuprogrammierenRESET-Taste drücken10
BedienungsanleitungAllgemeine KonformitätserklärungHiermit erklärt die Firma <strong>Becker</strong>-Antriebe GmbH, dass sich <strong>de</strong>r <strong>Centronic</strong><strong>MemoControl</strong> <strong>MC411</strong> in Übereinstimmung mit <strong>de</strong>n grundlegen<strong>de</strong>n Anfor<strong>de</strong>rungenund <strong>de</strong>n an<strong>de</strong>ren relevanten Vorschriften <strong>de</strong>r Richtlinie 1999/5/EG befin<strong>de</strong>t.Bestimmt für <strong>de</strong>n Gebrauch in folgen<strong>de</strong>n Län<strong>de</strong>rn: DE, BE, FR, NL, AT, LU, IT, GB, ES,CH, CZ, DK, FI, HU, NO, PT, SE, IE, GRTechnische Än<strong>de</strong>rungen vorbehalten.11
Operating InstructionsWarranty<strong>Becker</strong>-Antriebe GmbH will be released from all warranty and product liability obligationsif the customer modifies the equipment without prior approval from<strong>Becker</strong>-Antriebe GmbH or if the equipment is installed incorrectly and/or contraryto the specified installation instructions, by the customer or a third party.Any further processing must comply with all current statutory and official regulationsgoverning manufacture and advice to customers, especially the EMC regulations.This product is subject to technical <strong>de</strong>velopments and improvements. Please refer tothe current sales brochure for the precise product specifications.DangerPlease keep the instructions in a safe place!• Use in dry rooms only.• Use unmodified <strong>Becker</strong> original parts only.• Keep persons away from the system gui<strong>de</strong> track.• Keep children away from controls.Safety tips• Please comply with national stipulations.• Dispose of used batteries properly. Replace batteries by an i<strong>de</strong>ntical type(LR 03; AAA) only.• If the system is controlled using one or several transmitters, the systemgui<strong>de</strong> track must be visible during operation.GeneralThe <strong>MC411</strong> can be used to operate one or more roller shutter drives. This transmittercan also be used to program switching times for UP and DOWN commands.This <strong>de</strong>vice is excellent because it is so easy to operate.12
Operating InstructionsUse in accordance with regulationsThe <strong>MC411</strong> is to be used to drive roller shutter systems only.• Please note that radio sets cannot be operated in areas with increased risk ofinterference (e.g. hospitals, airports).• The remote control is only permitted for equipment and systems with which amalfunction in the transmitter or receiver does not present a risk to persons,animals or objects, or this risk is covered by other safety <strong>de</strong>vices.• The operator does not enjoy any protection from disturbances by other remotesignalling equipment and terminal equipment (for example, also by radio setsoperated in the same frequency range in accordance with regulations).• Use radio receivers in conjunction only with <strong>de</strong>vices and systems permitted bythe manufacturer.NoteEnsure that the controls are not installed and operated in the vicinity ofmetal surfaces or magnetic fields.Radio sets transmitting at the same frequency could interfere with reception.It should be noted that the range of the radio signal is restricted by legislationand constructional measures.13
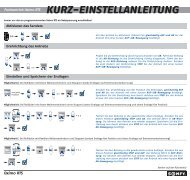
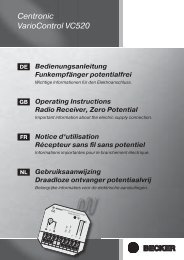
<strong>MC411</strong>ResetDisplays and pushbuttonsOperating InstructionsSliding SwitchUP pushbuttonSTOP pushbuttonDOWN pushbuttonBattery compartmentProgramming pushbuttonTransmission control lightReset buttonFunctionsSliding SwitchEvery PRF+ tubular drive can store switching times for one UP and one DOWN command.In the „Auto“ operating mo<strong>de</strong> this roller shutter command is repeated every 24hours.The sliding switch setting is not important when learning the switching time. Allpreviously stored switching times are <strong>de</strong>leted.14
Operating InstructionsProgramming the switching times1. Adjust the roller shutters, if necessary, until they are in the opposite end positionto the <strong>de</strong>sired running direction.2. Wait for the automatic control commands are to be executed.3. At the preset time, activate the <strong>de</strong>sired direction key and hold down until theroller shutter system has stopped after approximately 6 seconds and then movedinto the end position.4. Release direction key.The tubular drive will store the given time of this direction command.Follow the same procedure for the opposite direction.When the sliding switch is set to manual, no automatic control commands are executed.The stored command times remain unaltered.Deleting the switching timesNoteBoth switching times are always <strong>de</strong>leted in this process.In or<strong>de</strong>r to <strong>de</strong>lete the times the UP and DOWN control commands are to be triggered,press the STOP button for 10 seconds. This is acknowledged by a double clickof the tubular drive.The switching times have been <strong>de</strong>leted.Transmission control lightA radio signal is indicated by the transmission control light being lit.If the battery starts running out, the transmission control light flashes during transmission.The transmitter power and/or radio range is reduced when the battery is runninglow. If the transmission control light is no longer lit when the pushbutton is pressed,the batteries must be changed.GroupGroup control means controlling one or several receivers at the same time. Theprogrammed group is activated using a single command.With the <strong>MC411</strong>, the group is driven via an RF channel.15
1) Learning the master transmittera) Put receiver into learn mo<strong>de</strong>NoteProgramming the remote controlOperating InstructionsPlease refer to the operating instructions for the receiver.• Switch off the receiver’s power supply and reconnect after 5 seconds.or• Activate the “Learn” key or the radio-controlled receiver switch.The receiver will then be in “Learn” mo<strong>de</strong> for 3 minutes.b) Learn master transmitterWhen the receiver is in “Learn” mo<strong>de</strong>, the learn button is to be pressed until thereceiver indicates that the learn process has been successfully completed.The learn process is now complete.2) Learning additional transmittersa) Press the learn button of the master transmitter until acknowledgement is givenby the receiver.b) Now press the learn button of the new transmitter until acknowledgement isgiven by the receiverc) Then press the learn button of the new transmitter to be learnt once again.The receiver will indicate when the learn process has been successfully completed.The maximum radio range is up to 25 m indoors and up to 350 m in the open.16
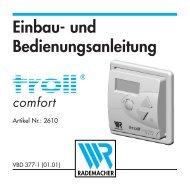
Operating Instructions60,2Installing the wall mount• Before installing in the position required,check that the transmitter andreceiver are functioning properly.• Fix the mount to the wall with thetwo screws provi<strong>de</strong>d.22,54742,9Changing the battery1. Take out the batteries.2. Insert the new batteries in the correctposition.Clean the <strong>de</strong>vice with a damp cloth only.Do not use a cleansing agent since thiscould damage the plastic.17
Technical dataNominal voltage3 V DCType of batteryLR 03 (AAA)Protection class IP 20Permissible surrounding temperature -10 to +55 °CRadio frequency868.3 MHzProblemWhat to do if ...?Cause1. Batteries are <strong>de</strong>ad.2. Batteriesinserted.Drive is not functio-ning, transmissioncontrol light is notlit.Drive is not functio-1. Receiverning, transmission range.control light is lit.2. Transmitter isin the receiver.are incorrectlyoutsi<strong>de</strong> the radionot programmedOperating InstructionsRemedy1. Insert new batteries.2. Insert batteries correctly.1. Reducereceiver.distance to the2. Programme transmitter.Transmission control B atteries are running out. Insert new batteries.light is flashing.Drive does operatein a 24 hour cycle.1. Sliding switchmanual positionnot in the1. Set sliding switchclock positionto theSwitching timesdiffer from thoseprogrammedThe transmitter isnot functioning2. Operating time notprogrammedPower failuretubular driveaffecting theThe power supply has beeninterrupted for too long2. ProgrammetimeReprogramme theswitching timesoperatingPress the RESET button18
Operating InstructionsGeneral conformity <strong>de</strong>clarationThe company BECKER-Antriebe GmbH hereby <strong>de</strong>clares that the <strong>MC411</strong> <strong>Centronic</strong><strong>MemoControl</strong> in conformity with the basic requirements and other relevant provisionsof Directive 1999/5/EC.For use in the following countries: DE, BE, FR, NL, AT, LU, IT, GB, ES, CH, CZ, DK, FI,HU, NO, PT, SE, IE, GRSubject to technical changes without notice.19
Notice d’utilisationPrestation <strong>de</strong> Garantie<strong>Becker</strong>-Antriebe GmbH est dégagé <strong>de</strong> la garantie et <strong>de</strong> la responsabilité du fait duproduit si, sans notre autorisation préalable, <strong>de</strong>s modifications <strong>de</strong> construction sonteffectuées et/ou <strong>de</strong>s installations inadéquates sont exécutées ou engagées, à l'encontre<strong>de</strong> nos directives <strong>de</strong> montage prescrites.L'utilisateur / l'électricien doit veiller à ce que toutes les consignes et prescriptionsen vigueur, particulièrement celles en matière <strong>de</strong> compatibilité électromagnétique,soient respectées.Le présent produit est soumis à <strong>de</strong>s développements et perfectionnements techniques,informez-vous dans les documents <strong>de</strong> vente actuels au sujet <strong>de</strong>s spécifications<strong>de</strong> produit précises.AttentionConsignes <strong>de</strong> sécuritéPrière <strong>de</strong> conserver cette notice d’utilisation!• A utiliser uniquement dans <strong>de</strong>s locaux secs.• Utilisez uniquement <strong>de</strong>s pièces originales <strong>de</strong> <strong>Becker</strong> qui n’ont subi aucunemodification.• Veillez à ce que personne ne se tienne dans la zone <strong>de</strong> déploiement <strong>de</strong>sinstallations.• Tenez les enfants à l’écart <strong>de</strong>s comman<strong>de</strong>s.• Observez les directives spécifiques <strong>de</strong>s pays.• Eliminez les piles usagées conformément aux prescriptions en la matière.Remplacez toujours les piles usagées par <strong>de</strong>s piles <strong>de</strong> type i<strong>de</strong>ntique (LR 03;AAA).• Lorsque l’installation est pilotée par un ou plusieurs émetteurs, la zone <strong>de</strong>fonctionnement <strong>de</strong> l’installation doit être visible pendant l’utilisation.GénéralitésLe <strong>MC411</strong> permet <strong>de</strong> comman<strong>de</strong>r un ou un groupe <strong>de</strong> moteurs <strong>de</strong> volets roulants. Al’ai<strong>de</strong> <strong>de</strong> cet émetteur, vous pouvez programmer en plus <strong>de</strong>s horaires <strong>de</strong> MONTEE etun mouvement <strong>de</strong> DESCENTE.Cet appareil se distingue par une manipulation simple.20
Notice d’utilisationUtilisation conforme aux prescriptionsLe <strong>MC411</strong> ne doit être utilisé que pour la comman<strong>de</strong> <strong>de</strong> volets roulants.• Sachez qu’il est interdit d’utiliser les installations radio dans les zones risquant <strong>de</strong>provoquer <strong>de</strong>s perturbations (p. ex. hôpitaux, aéroports).• La télécomman<strong>de</strong> n’est autorisée que pour les appareils et installations pour lesquelsune perturbation fonctionnelle dans l’émetteur ou dans le récepteur neconstitue aucun danger pour les personnes, les animaux ou les choses ou que cerisque est éliminé par d’autres dispositifs <strong>de</strong> sécurité.• L’exploitant n’est en aucun cas protégé contre les perturbations par d’autres installations<strong>de</strong> télécommunication et dispositifs terminaux (p. ex. par <strong>de</strong>s installations<strong>de</strong> radio qui sont utilisées <strong>de</strong> manière conforme dans la même plage <strong>de</strong>fréquence).• Combinez les récepteurs radio uniquement à <strong>de</strong>s appareils et installations autoriséspar le fabricant.RemarquesVeillez à ce que la comman<strong>de</strong> ne soit pas installée et utilisée dans une zoneavec <strong>de</strong>s surfaces métalliques ou <strong>de</strong> champs magnétiques.Les installations <strong>de</strong> radio qui émettent sur la même fréquence peuvent causerune perturbation <strong>de</strong> la réception.Sachez que la portée du signal radio est limitée par la législation et par lesbâtiments.21
Notice d’utilisationExplication <strong>de</strong> l’affichage et <strong>de</strong>s touchesCurseurTouche MontéeTouche Stop<strong>MC411</strong>ResetTouche DescenteCompartiment à pilesTouche <strong>de</strong> programmationTouche <strong>de</strong> contrôle d’émissionTouche ResetExplication <strong>de</strong>s fonctionsCurseurChaque moteur tubulaire <strong>de</strong> type PRF+ peut mémoriser <strong>de</strong>s horaires <strong>de</strong> MONTEE etun mouvement <strong>de</strong> DESCENTE.En mo<strong>de</strong> « Auto », ce mouvement du volet roulant se reproduit toutes les 24 heures.La position du curseur ne joue aucun rôle pour la programmation <strong>de</strong>s horaires. Leshoraires mémorisés auparavant sont écrasés.22
Notice d’utilisationProgrammation <strong>de</strong>s horaires1. Si nécessaire, piloter le volet roulant dans la position finale opposée.2. Attendre que l’heure désirée à laquelle l’ordre <strong>de</strong> mouvement automatique doitêtre exécuté soit arrivée.3. Lorsque l’heure désirée est arrivée, actionner la touche <strong>de</strong> direction correspondanteet la maintenir enfoncée jusqu’à ce que le moteur du volet roulant s’arrêteau bout <strong>de</strong> 6 secon<strong>de</strong>s environ et continue ensuite sa marche jusqu’en positionfinale.4. Lâcher la touche <strong>de</strong> direction.Le moteur tubulaire a enregistré l’heure actuelle pour ce sens <strong>de</strong> mouvement.Procé<strong>de</strong>r <strong>de</strong> la même manière pour l’autre sens <strong>de</strong> mouvement.Lorsque le curseur est sur «Manuel», les horaires ne sont pas exécutés. Les horairesrestent maintenus.Effacement <strong>de</strong>s horairesRemarquesLors <strong>de</strong> l’effacement, les <strong>de</strong>ux horaires sont toujours effacés.Pour effacer l’horaire <strong>de</strong> MONTEE et <strong>de</strong> DESCENTE, appuyez sur la touche STOPpendant 10 secon<strong>de</strong>s. L’acquittement se manifeste par un « clac-clac » du moteurtubulaire.Les horaires sont effacés.Témoin <strong>de</strong> contrôle d’émissionLe témoin <strong>de</strong> contrôle d’émission s’allume pour visualiser un signal radio.Lorsque la puissance <strong>de</strong> la pile baisse, le témoin <strong>de</strong> contrôle d’émission clignote lors<strong>de</strong> l’émission.La baisse <strong>de</strong> la puissance <strong>de</strong> la pile entraîne une réduction <strong>de</strong> la puissance d’émissionet <strong>de</strong> la portée <strong>de</strong> la radio. Lorsque le témoin <strong>de</strong> contrôle d’émission ne s’allumeplus après pression sur la touche, les piles doivent être remplacées.Comman<strong>de</strong> <strong>de</strong> groupeUn groupe désigne la comman<strong>de</strong> simultanée d’un ou <strong>de</strong> plusieurs récepteurs. Legroupe sélectionné est excité par un ordre <strong>de</strong> marche.Avec le <strong>MC411</strong>, le groupe est commandé via un canal radio.23
Programmation <strong>de</strong> la radio1) Programmation <strong>de</strong> l’émetteur maîtrea) Préparer le récepteur en mo<strong>de</strong> <strong>de</strong> programmation.RemarquesNotice d’utilisationSuivez la notice <strong>de</strong> service du récepteur.• Coupez la tension d’alimentation du récepteur et connectez-la <strong>de</strong> nouveau aubout <strong>de</strong> 5 secon<strong>de</strong>s.ou• Actionnez la touche <strong>de</strong> programmation ou le commutateur radio du récepteur.Le récepteur est alors en mo<strong>de</strong> <strong>de</strong> programmation pendant 3 minutes.b) Programmation <strong>de</strong> l’émetteur maîtreAppuyez sur la touche <strong>de</strong> programmation pendant que le récepteur est en mo<strong>de</strong> <strong>de</strong>programmation jusqu’à ce que le récepteur ait acquitté la programmation.La programmation est alors terminée.2) Programmation d’autres émetteursa) Appuyez sur la touche <strong>de</strong> programmation <strong>de</strong> l’émetteur maître jusqu’à ce que lerécepteur ait acquitté.b) Appuyez ensuite sur la touche <strong>de</strong> programmation du nouvel émetteur jusqu’à ceque le récepteur ait acquitté.c) Appuyez encore une fois sur la touche <strong>de</strong> programmation <strong>de</strong> l’émetteur à programmer.Le récepteur acquitte la programmation.La portée maximum <strong>de</strong> la radio est <strong>de</strong> 25 m dans les bâtiments. Elle peut atteindre350 m à l’extérieur.24
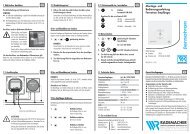
Notice d’utilisation22,5Montage du support mural• Assurez-vous avant <strong>de</strong> monter l’appareilà l’endroit désiré du bon fonctionnement<strong>de</strong> l’émetteur et du récepteur.• Fixez le support au mur au moyen <strong>de</strong>s<strong>de</strong>ux vis jointes à la fourniture.60,24742,9Remplacement <strong>de</strong>s piles1. Enlevez les piles2. Placez les nouvelles piles dans le bonsens.25Nettoyez l’appareil uniquement avec unchiffon humi<strong>de</strong>. N’utilisez aucun détergent,celui-ci risquant d’attaquer la matièresynthétique.
Caractéristiques techniquesTension nominale3 V DCType <strong>de</strong> pileLR 03 (AAA)Indice <strong>de</strong> protection IP 20Température ambiante admissible -10 à +55 °CFréquence radio868,3 MHzAnomalieQue faire quand... ?CauseLe moteur ne marche 1. Les piles dont déchargées.pas, le témoin <strong>de</strong>contrôle d’émission ne 2. Les piles ne sont pass’allume pas. placées correctement dans lecompartiment.Notice d’utilisationMesure à prendre1. Mettre <strong>de</strong> nouvelles piles.2. Placer les pilescorrectement.Le moteur ne marche 1. Récepteur hors <strong>de</strong> la portée 1. Réduire la distance entrepas, le témoin <strong>de</strong>contrôle d’émission nes’éteint pas.radio.2. L’émetteur n’est pasprogrammé dans le récepteur.l’émetteur et le récepteur.2. Programmer l’émetteur.Le témoin <strong>de</strong> contrôled’émission clignote.Le moteur tubulairene répète pas lescomman<strong>de</strong>s après 24hrsLes horaires diffèrent<strong>de</strong> la programmationPas <strong>de</strong> fonction <strong>de</strong>l’émetteurL es piles sont trop faibles. Mettre <strong>de</strong> nouvelles piles.1. Le commutateur à coulissese trouve en position"manuelle"2. Il n'y a pas d'heures <strong>de</strong>commutation programméesPanne <strong>de</strong> courant au niveaudu moteur tubulaireL’alimentation en courant aété interrompue troplongtemps1. Mettre le commutateur àcoulisse en position "horloge"2. ProgrammercommutationReprogrammer lesdéclenchementles heures <strong>de</strong>temps <strong>de</strong>Appuyer sur la touche RESET26
Notice d’utilisationDéclaration <strong>de</strong> conformité généraleLa société <strong>Becker</strong>-Antriebe GmbH déclare par la présente que le <strong>Centronic</strong><strong>MemoControl</strong> <strong>MC411</strong> est en conformité avec les exigences fondamentales et lesautres prescriptions pertinentes <strong>de</strong> la directive 1999/5/CE.Est <strong>de</strong>stiné à une utilisation dans les pays suivants: DE, BE, FR, NL, AT, LU, IT, GB, ES,CH, CZ, DK, FI, HU, NO, PT, SE, IE, GRSous réserve <strong>de</strong> modifications techniques.27
GebruiksaanwijzingGarantieverlening<strong>Becker</strong>-Antriebe GmbH is van <strong>de</strong> garantieverlening en <strong>de</strong> productaansprakelijkheidbevrijd, wanneer zon<strong>de</strong>r onze voorafgaan<strong>de</strong> toestemming eigen bouwkundigeconstructie-wijzigingen zijn aangebracht en/of onvakkundige installaties wor<strong>de</strong>ndoorgevoerd of in opdracht wor<strong>de</strong>n gegeven, die in strijd zijn met onze voorgeschrevenmontagerichtlijnen.De ver<strong>de</strong>re verwerker dient erop toe te zien dat alle voor het tot stand brengen vanen het adviseren van <strong>de</strong> consument vereiste wettelijke en officiele voorschriften inacht wor<strong>de</strong>n genomen.Dit product is on<strong>de</strong>rhevig aan technische ontwikkelingen en verbeteringen. Voor <strong>de</strong>na<strong>de</strong>re productspecificaties verwijzen wij naar <strong>de</strong> actuele verkoopdocumentatie.VoorzichtigBewaar <strong>de</strong>ze gebruiksaanwijzing goed!Veiligheidsinstructies• Uitsluitend in droge ruimtes gebruiken.• Maakt u uitsluitend gebruik van ongewijzig<strong>de</strong> <strong>Becker</strong> originele <strong>de</strong>len.• Houd personen buiten het bereik van <strong>de</strong> installaties.• Laat kin<strong>de</strong>ren niet met <strong>de</strong> installatie spelen.• Houdt u rekening met <strong>de</strong> landspecifieke bepalingen.• Verbruikte batterijen <strong>de</strong>skundig afvoeren.• Batterijen uitsluitend door i<strong>de</strong>ntieke type (LR 03; AAA) vervangen.• Wordt <strong>de</strong> installatie door één of meer<strong>de</strong>re zen<strong>de</strong>rs bestuurt, moet het bereikvan <strong>de</strong> installatie geduren<strong>de</strong> het bedrijf kunnen wor<strong>de</strong>n overzien .AlgemeenMet <strong>de</strong> <strong>MC411</strong> kunt u één of meer<strong>de</strong>re buismotoren sturen. Ver<strong>de</strong>r kunt u met <strong>de</strong>zezen<strong>de</strong>r een schakeltijd voor een OP- en NEER-beweging programmeren.Een eenvoudige bediening kenmerkt dit toestel.28
GebruiksaanwijzingReglementaire toepassingDe <strong>MC411</strong> mag uitsluitend wor<strong>de</strong>n gebruikt voor het aansturen van rolluikinstallaties.• Houdt u er alstublieft rekening mee, dat radio-installaties niet in bereiken meteen verhoogd storingsrisico mogen wor<strong>de</strong>n geëxploiteerd (bv ziekenhuizen,vliegvel<strong>de</strong>n).• De afstandsbediening is uitsluitend voor toestellen en installaties toegelaten, bijdie een storing van <strong>de</strong> functie in <strong>de</strong> zen<strong>de</strong>r of ontvanger geen gevaar voor personen,dieren of dingen veroorzaakt of dit risico door an<strong>de</strong>re veiligheidsvoorzieningenis ge<strong>de</strong>kt.• De exploitant geniet generlei bescherming voor storingen door an<strong>de</strong>retelecommunicatie-installaties en eindvoorzieningen (bv ook door radiozendinstallaties,die reglementair in hetzelf<strong>de</strong> frequentiebereik wor<strong>de</strong>n geëxploiteerd).• Ontvangers alleen met door <strong>de</strong> fabrikant toegelaten toestellen en installatiesverbin<strong>de</strong>n.OpmerkingLet u er alstublieft op dat <strong>de</strong> besturing niet in het bereik van metalen vlakkenof magnetische vel<strong>de</strong>n wordt geïnstalleerd en geëxploiteerd.Radiozendinstallaties die op <strong>de</strong>zelf<strong>de</strong> frequentie zen<strong>de</strong>n, kunnen tot storingbij het ontvangst lei<strong>de</strong>n.Er dient rekening te wor<strong>de</strong>n gehou<strong>de</strong>n met het feit, dat <strong>de</strong> reikwijdte van hetradiosignaal door <strong>de</strong> wetgever en <strong>de</strong> bouwkundige maatregelen is beperkt.29
Verklaring van display en toetsenSchuifschakelaarOpwaarts-toetsStop-toetsGebruiksaanwijzing<strong>MC411</strong>ResetNeerwaarts-toetsBatterijvakProgrammeringstoetsZendcontrolelampjeReset-toetsVerklaring van <strong>de</strong> functiesSchuifschakelaarIe<strong>de</strong>re buismotor van het type PRF+ kan schakeltij<strong>de</strong>n voor een OP- en NEER-bewegingopslaan.In het bedrijfstoestand «Auto» wordt <strong>de</strong>ze beweging alle 24 uren herhaald.De positie van <strong>de</strong> schuifschakelaar is bij het programmeren van <strong>de</strong> schakeltijd onbelangrijk.Van tevoren opgeslagen schakeltij<strong>de</strong>n wor<strong>de</strong>n evt. overgeschreven.30
GebruiksaanwijzingProgrammeren van <strong>de</strong> looptij<strong>de</strong>n1. Eventueel <strong>de</strong> rolluiken in <strong>de</strong> tegengestel<strong>de</strong> eindpositie sturen.2. Tot <strong>de</strong> gewenste tijd, wanneer het automatisch commando dient te wor<strong>de</strong>n uitgevoerd,wachten.3. Op het gewenst tijdpunt <strong>de</strong> passen<strong>de</strong> richtingstoets bedienen en ingedrukt hou<strong>de</strong>ntot dat <strong>de</strong> buismotor na ca. 6 secon<strong>de</strong>n kort stopt en vervolgens tot <strong>de</strong> eindpositiever<strong>de</strong>r loopt.4. Richtingstoets loslaten.De buismotor heeft het actueel tijdpunt voor <strong>de</strong>ze bewegingsrichting opgeslagen.Met <strong>de</strong> an<strong>de</strong>re bewegingsrichting op <strong>de</strong>zelf<strong>de</strong> manier te werk gaan.In <strong>de</strong> schakelaarpositie Hand wor<strong>de</strong>n geen automatische commando’s uitgevoerd.De ingevoer<strong>de</strong> tij<strong>de</strong>n blijven bewaard.Wissen van <strong>de</strong> looptij<strong>de</strong>nAanwijzingBij het wissen wor<strong>de</strong>n altijd bei<strong>de</strong> looptij<strong>de</strong>n gewist.Om <strong>de</strong> OP- en NEER-looptijd te wissen, <strong>de</strong> STOP-toets geduren<strong>de</strong> 10 secon<strong>de</strong>n indrukken.De bevestiging volgt door een "Klak-Klak" van <strong>de</strong> buismotor.De looptij<strong>de</strong>n zijn gewist.ZendcontrolelampjeEen commando versturen wordt door het opflikkeren van <strong>de</strong> zendcontrolelamp dui<strong>de</strong>lijkgemaakt.Neemt het vermogen van <strong>de</strong> batterij af, knippert het zendcontrolelampje bij hetzen<strong>de</strong>n.Het zendvermogen resp. <strong>de</strong> reikwijdte wordt door daling van het batterijvermogengereduceerd. Brandt het zendcontrolelampje bij toetsendruk niet meer, moeten <strong>de</strong>batterijen wor<strong>de</strong>n vervangen.GroepOn<strong>de</strong>r een groep verstaat men <strong>de</strong> aansturing van meer<strong>de</strong>re ontvangers op hetzelf<strong>de</strong>moment. De geprogrammeer<strong>de</strong> groep wordt met een commando aangestuurd.Bij <strong>de</strong> <strong>MC411</strong> wordt <strong>de</strong> groep via één draadloos kanaal aangestuurd.31
Programmeren van <strong>de</strong> zen<strong>de</strong>r1) Masterzen<strong>de</strong>r programmerena) Ontvanger in programmeergereedheid brengenOpmerkingGebruiksaanwijzingHoudt u alstublieft rekening met <strong>de</strong> gebruiksaanwijzing van <strong>de</strong> ontvanger.• Schakelt u <strong>de</strong> voedingsspanning van <strong>de</strong> ontvanger uit en na 5 secon<strong>de</strong>n weer in.of• Druk op <strong>de</strong> programmeertoets resp. <strong>de</strong> schakelaar van <strong>de</strong> ontvanger.De ontvanger bevindt zich nu 3 minuten lang in programmeergereedheid.b) Masterzen<strong>de</strong>r programmerenDrukt u <strong>de</strong> programmeertoets geduren<strong>de</strong> <strong>de</strong> programmeergereedheid in tot <strong>de</strong> ontvangerhet succesvol programmeren bevestigd.Hiermee is het programmeerproces beëindigd.2) ver<strong>de</strong>re zen<strong>de</strong>rs programmerena) Drukt u <strong>de</strong> programmeertoets van <strong>de</strong> masterzen<strong>de</strong>r in tot <strong>de</strong> ontvanger bevestigt.b) Drukt u nu <strong>de</strong> programmeertoets van <strong>de</strong> nieuwe zen<strong>de</strong>r tot <strong>de</strong> ontvanger bevestigt.c) Nu drukt u <strong>de</strong> programmeertoets van <strong>de</strong> nieuw te programmeren zen<strong>de</strong>r opnieuwin.De ontvanger bevestigt het succesvol programmeren.De maximale reikwijdte bedraagt in gebouwen tot en met 25 m en buiten tot en met350 m.32
Gebruiksaanwijzing22,5Montage van <strong>de</strong> wandhou<strong>de</strong>r60,2• Controleert u vóór <strong>de</strong> montage terplekke van <strong>de</strong> gewenste montagepositie<strong>de</strong> foutloze werking van zen<strong>de</strong>ren ontvanger.• Bevestigt u <strong>de</strong> hou<strong>de</strong>r met <strong>de</strong> twee ingeslotenschroeven aan <strong>de</strong> wand.4742,9Vervangen van <strong>de</strong> batterijen1. Verwij<strong>de</strong>rt u <strong>de</strong> batterijen.2. Plaats <strong>de</strong> nieuwe batterijen in juisterichting.Reinigt u het toestel uitsluitend met eenvochte doek. Maakt u geen gebruik vanreinigingsmid<strong>de</strong>len, omdat <strong>de</strong>ze <strong>de</strong>kunststof kunnen aantasten.33
Technische gegevensNominale spanning3 V DCBatterijtypeLR 03 (AAA)Beschermsoort IP 20Toegestane omgevingstemperatuur -10 tot +55 °CRadiofrequentie868,3 MHzGebruiksaanwijzingStoringMotor draait niet,zendcontrolelampjeblijft uit.Motor draait niet,zendcontrolelampjeblijft aan.Zendcontrolelampjeknippert.De buismotor looptniet in <strong>de</strong> 24-uurcyclusSchakeltij<strong>de</strong>n wijkenaf van <strong>de</strong>programmeringGeen functiezen<strong>de</strong>rbij <strong>de</strong>Wat te doen als ...?1. BatterijenOorzaakleeg.2. Batterijen wer<strong>de</strong>n nietcorrect geplaatst.1. Ontvangerreikwijdte.buiten <strong>de</strong>Remedie1. Nieuwe batterijen plaatsen.2. Batterijen correct plaatsen.1. Afstand t.o.v.reduceren.<strong>de</strong> ontvanger2. Zen<strong>de</strong>r is niet in <strong>de</strong> 2. Zen<strong>de</strong>r programmerenontvanger geprogrammeerdB atterijen zijn zwak. Nieuwe batterijen plaatsen.1. Schuifschakelaar staatop "hand"2. Geen schakeltij<strong>de</strong>ngeprogrammeerdStroomuitval aanbuismotorVoeding werdon<strong>de</strong>rbrokente lang1. Schuifschakelaarzettenop "klok"2. Schakeltij<strong>de</strong>n programmerenSchakeltij<strong>de</strong>n opnieuwprogrammerenRESET-toets indrukken34
GebruiksaanwijzingAlgemene conformiteitsverklaringHiermee verklaart <strong>de</strong> firma <strong>Becker</strong>-Antriebe GmbH dat het apparaat <strong>Centronic</strong><strong>MemoControl</strong> MC441 in overeenstemming is met <strong>de</strong> basisvereisten en an<strong>de</strong>re relevantevoorschriften volgens richtlijn 1999/5/EG.Bepaalt voor het gebruik in <strong>de</strong> volgen<strong>de</strong> lan<strong>de</strong>n: DE, BE, FR, NL, AT, LU, IT, GB, ES, CH,CZ, DK, FI, HU, NO, PT, SE, IE, GRTechnische wijzigingen voorbehou<strong>de</strong>n35
<strong>Becker</strong>-Antriebe GmbH35764 Sinn/Germany4034 630 010 0a 11/03 DE/GB/FR/NL 309060