gebrauchsanweisung user manual mode d`emploi istruzioni ... - Radix
gebrauchsanweisung user manual mode d`emploi istruzioni ... - Radix
gebrauchsanweisung user manual mode d`emploi istruzioni ... - Radix

You also want an ePaper? Increase the reach of your titles
YUMPU automatically turns print PDFs into web optimized ePapers that Google loves.
D<br />
GB<br />
F<br />
I<br />
INHALTSVERZEICHNIS<br />
GEBRAUCHSANWEISUNG<br />
USER MANUAL<br />
MODE D`EMPLOI<br />
ISTRUZIONI PER L`USO<br />
D GB<br />
F I<br />
Wichtige Sicherheitshinweise..........2<br />
Tasten undFunktionen.................... 4<br />
Erste Inbetriebnahme ..................... 6<br />
Bedienung.......................................8<br />
Änderung der Programmreihenfolge..... 8<br />
Programmierung...........................10<br />
Reparaturservice...........................14<br />
Probleme und Lösungen...............14<br />
Technische Daten.........................16<br />
Gebrauchsanweisung bitte zuerst<br />
vollständig durchlesen. Nicht<br />
wegwerfen!<br />
Bei Schäden durch Bedienfehler<br />
erlischt die Garantie.<br />
SATELLITE RECEIVER<br />
CONTENTS<br />
Notes and Safety Precautions.............. 2<br />
Controls and Their Functions................2<br />
Installing the Receiver.......................... 6<br />
Operating the Receiver.........................8<br />
Editing the Channel Directory...............8<br />
Programming the Receiver.................10<br />
Repair Service.................................... 14<br />
Troubleshooting..................................14<br />
Technical Data....................................16<br />
Read this instruction <strong>manual</strong> through<br />
carefully before proceeding.<br />
Keep this instruction <strong>manual</strong> on hand at<br />
all times. Do not throw it away.<br />
Abuse or improper operation will void<br />
the warranty.<br />
CONTENU<br />
Consignes de sécurité importantes...... 3<br />
Touches et fonctions........................... .3<br />
Première mise en service..................... 7<br />
Opération..............................................9<br />
Modification de l'ordre des programmes... ...9<br />
Programmation.................................. .11<br />
S.A.V.................................................. 15<br />
Problèmes et remèdes....................... 15<br />
Caractéristiques techniques............... 16<br />
D'abord lire intégralement et<br />
attentivement le <strong>mode</strong> d'emploi. Ne pas<br />
le jeter!<br />
En cas de dommages dus à une<br />
mauvaise opération échoit notre<br />
garantie!<br />
SOMMARIO<br />
Importanti note sulla sicurezza............... 3<br />
Tasti e funzioni........................................3<br />
Prima messa in esercizio........................7<br />
Uso e comandi...................................... 9<br />
Modifica della sequenza di programmazione.... 9<br />
Programmazione.................................. 11<br />
Assistenza e riparazione.......................15<br />
Problemi e soluzioni..............................15<br />
Dati tecnici............................................ 16<br />
Leggere attentamente e completamente<br />
le Istruzioni per l'uso prima di usare<br />
l'apparecchio.<br />
Non cestinare le <strong>istruzioni</strong> ma<br />
conservarle per futura consultazione!<br />
In caso di guasti causati da un uso errato<br />
dell'apparecchio scade la garanzia.
min. 20 mm cm<br />
min. 50 mm cm<br />
WICHTIGE SICHERHEITSHINWEISE<br />
min. 20 mm<br />
cm<br />
D GB<br />
Zu Ihrem eigenen Schutz lesen und beachten Sie bitte alle Sicherheitshinweise,<br />
bevor Sie das Gerät in Betrieb nehmen.<br />
Installation<br />
Alle Warnungen und Sicherheitshinweise in der Bedienungsanleitung sowie am<br />
Gerät müssen genau befolgt werden.<br />
Lüftung: Schlitze und Öffnungen im Gehäuse werden zur notwendigen Lüftung<br />
des Gerätes benötigt. Das Gerät sollte nicht in einem eingebauten Regal,<br />
Schrank usw. aufgestellt werden, es sei denn, eine ausreichende Belüftung ist<br />
gewährleistet. Stellen Sie das Gerät nicht auf einem Bett, Sofa oder Teppich ab,<br />
welche die Öffnungen blockieren könnten.<br />
Wasser und Feuchtigkeit: Betreiben Sie das Gerät nicht in der Nähe von<br />
Wasser. Ein schwerer elektrischer Schlag mit Personenschaden oder Schäden<br />
am Gerät können die Folge sein.<br />
Wärme: Stellen Sie das Gerät nicht neben Wärmequellen wie Heizkörper, Öfen<br />
oder Öffnungen von Luftheizungen auf.<br />
Pflege & Gebrauch<br />
Stromnetz: Schließen Sie das Gerät nur an ein Stromnetz an, das dem<br />
Aufdruck auf dem Gerät entspricht.<br />
Schutz des Netzkabels: Das Netzkabel soll so verlegt werden, daß man nicht<br />
darüber stolpern kann und es nicht durch berührende Gegenstände beschädigt<br />
werden kann.<br />
Reinigung des Gerätes: Trennen Sie das Gerät vom Stromnetz. Benutzen Sie<br />
zur Reinigung keine Flüssigkeiten oder Reinigungssprays, sondern nur ein<br />
leicht mit Wasser angefeuchtetes Tuch.<br />
Ersatzteile: Verwenden Sie nur solche Ersatzteile, die vom Hersteller spezifiziert<br />
wurden oder welche, die gleiche Eigenschaften wie die Originalteile haben.<br />
Nicht zugelassene Ersatzteile können einen Brand, einen elektrischen Schlag<br />
oder andere Gefahren verursachen. Bei Verwendung von nicht geeigneten<br />
Ersatzteilen erlischt die Gewährleistung.<br />
Ausserbetriebnahme: Das Gerät sollte während eines längeren Zeitraumes, in<br />
dem es unbeaufsichtigt bleibt oder nicht genutzt wird bzw. während eines<br />
Gewitters vom Stromnetz getrennt werden.<br />
ACHTUNG<br />
Um die Gefahr eines elektrischen Schlages zu vermeiden, entfernen Sie nie<br />
den Gehäusedeckel. Im Gerät befinden sich keine vom Benutzer zu wartenden<br />
Teile. Im Servicefall wenden Sie sich bitte unbedingt an das Fachpersonal bei<br />
Ihrem Fachhändler oder Installateur.<br />
Entsorgung<br />
Das Gerät, die Verpackung und die Batterien dürfen nicht mit dem Hausmüll<br />
entsorgt werden. Bitte informieren Sie sich über die geltenden Vorschriften und<br />
entsorgen Sie alles sorgfältig getrennt an den dafür ausgewiesenen Stellen.<br />
Bewahren Sie die Verpackung am besten komplett auf, dann können Sie Ihren<br />
Receiver bei einem Umzug (oder bei eventuellem Versand zur Reparatur)<br />
sicher transportieren.<br />
2<br />
NOTES AND SAFETY PRECAUTIONS<br />
For your own protection, you should carefully read the following notes and<br />
instructions before proceeding to set up and operate the receiver and observe<br />
the following safety precautions at all times.<br />
Installation<br />
Carefully observe all warnings and safety precautions appearing in this<br />
instruction <strong>manual</strong> or on the receiver at all times.<br />
Cooling: The slots and openings on the receiver’s housing are needed for<br />
cooling purposes. If you place the receiver in or on an enclosed shelf or in a<br />
cabinet, make certain that there is adequate clearance on all sides and<br />
adequate air circulation. Do not place the receiver on a bed, sofa, or carpet,<br />
since that might block the openings on its bottom panel.<br />
Water/moisture: Do not use the receiver in the vicinity of water, since that<br />
might lead to a severe electric shock resulting in personal injury and/or property<br />
damage<br />
Sources of heat: Keep the receiver well away from sources of heat, such as<br />
radiators, stoves, or the exhausts of space heaters.<br />
Proper Care & Use<br />
Check the line voltage: Connect the receiver to an electrical outlet providing a<br />
source of AC voltage matching that stated on the receiver’s manufacturer’s<br />
identification plate only.<br />
Routing the line cord: Route the receiver’s line cord such that no one will<br />
stumble over it and it will not become damaged by pedestrian traffic or foreign<br />
objects.<br />
Cleaning the receiver: Unplug the line cord from the electrical outlet. Wipe off<br />
the receiver with a damp cloth. Use no liquid cleaning agents or sprays.<br />
Replacement parts: Use exclusively replacement parts that have been<br />
approved by the receiver’s manufacturer or such that are fully equivalent to<br />
those supplied as original equipment. Using unapproved replacement parts<br />
could cause a fire, electrical shock, or other hazards. Use of unapproved<br />
replacement parts will also void the warranty.<br />
Extended periods of disuse/electrical storms: Unplug the receiver from the<br />
electrical outlet whenever it is to be left unattended or unused for extended<br />
periods and during electrical storms.<br />
CAUTION!<br />
Never remove the receiver’s cover panel, since that will expose you to electric<br />
shock hazards. There is no point in removing the receiver’s cover panel, since<br />
no parts that may be repaired or replaced by <strong>user</strong>s are located inside its<br />
housing. Return the unit to your dealer or take it to a qualified repair shop for<br />
servicing.<br />
Proper Disposal<br />
The receiver, its packagings, and its batteries are not household waste and<br />
require special disposal. Inquire regarding applicable local, state, and national<br />
regulations and carefully dispose of the receiver and its packagings and<br />
batteries separately in accordance therewith. All of the receiver’s packagings<br />
should be retained as long as you have the receiver, since they have been<br />
designed to protect it during shipment and will come in handy if you ever move<br />
house or have to send the receiver in for repair.
CONSIGNES DE SECURITE IMPORTANTES<br />
F I<br />
Pour votre propre sécurité, lisez attentivement et respectez impérativement<br />
toutes les consignes de sécurité ici redonnées avant que de mettre l'appareil en<br />
service.<br />
Installation<br />
Toutes les consignes de sécurité, et en particulier celles accompagnées du<br />
symbole “Attention”, redonnées dans le présent <strong>mode</strong> d'emploi, ou sur des<br />
autocollants apposés sur/dans l'appareil lui-même doivent être observées à la<br />
lettre.<br />
Aération : les évents d'aération et les ouvertures pratiquées sur le boîtier de<br />
l'appareil sont indispensables pour assurer une bonne ventilation de celui-ci.<br />
Pour cette raison, il est déconseillé de l'implanter dans une armoire, ou sur une<br />
étagère étroite, à moins qu'une aération suffisante de tous les côtés puisse être<br />
assurée. Ne posez pas l'appareil sur un lit, un canapé ou un tapis, ni en général<br />
sur une surface susceptible d'en obstruer les évents et les ouvertures<br />
d'aération.<br />
Eau / Humidité : ne mettez pas l'appareil en service dans le voisinage d'eau ou<br />
d'humidité. Une décharge électrostatique pourrait en résulter, elle-même<br />
susceptible d'entraîner l'endommagement de l'appareil ou des lésions<br />
corporelles.<br />
Chaleur : ne posez jamais l'appareil sur des sources de chaleur, ou dans le<br />
voisinage de celles-ci, comme par exemple des radiateurs, poêles ou bouches<br />
de climatiseurs.<br />
Entretien et utilisation<br />
Réseau secteur : ne raccordez l'appareil que sur un réseau secteur dont la<br />
tension correspond à celle supportée (indiquée sur la plaquette signalétique).<br />
Cordon d'alimentation : le cordon d'alimentation est à poser de telle sorte qu'il<br />
ne risque pas d'être vrillé ni endommagé, ni de présenter un obstacle pouvant<br />
faire trébucher.<br />
Nettoyage de l'appareil : impérativement débrancher l'appareil avant que de le<br />
nettoyer. Ne pas utiliser pour cela ni liquide, ni spray, mais se servir au contraire<br />
d'un chiffon doux légèrement humecté d'eau tiède.<br />
Pièces de rechange : n'utilisez que des pièces de rechange d'origine, ou celles<br />
agréées par le fabricant, qui présentent les mêmes caractéristiques et disposent<br />
des mêmes propriétés que les pièces d'origine. Des pièces non agréées<br />
peuvent entraîner un incendie, une décharge électrique ou présenter d'autres<br />
risques. La garantie du fabricant échoit, de même que se responsabilité s'en<br />
trouve dégagée au cas où de telles pièces seraient utilisées.<br />
Mise hors service : s'il devait être mis hors service pour une durée prolongée,<br />
ou rester sans surveillance, ou demeurer inutilisé, ou encore durant un orage, il<br />
est recommandé de débrancher l'appareil du réseau secteur.<br />
ATTENTION<br />
Pour parer tout risque de décharge électrique, n'enlevez jamais le couvercle de<br />
l'appareil. A l'intérieur de celui-ci ne se trouve aucune pièce requérant la<br />
maintenance de l'utilisateur. Si un dépannage était requis, adressez-vous<br />
impérativement au personnel spécialisé chez votre revendeur ou votre<br />
installateur.<br />
Mise aux déchets<br />
Ne se débarrasser en aucun cas de l'appareil, de son emballage ou des piles<br />
avec les déchets domestiques (ordures ménagères). Renseignez-vous auprès<br />
des autorités compétentes et tenez compte de la réglementation applicable, en<br />
séparant comme il se doit les matériaux recyclables.<br />
Dans la mesure du possible, conservez l'emballage d'origine du récepteur –<br />
vous pourriez en avoir besoin par exemple pour un déménagement, ou pour<br />
nous le retourner en cas de réparation éventuelle.<br />
3<br />
IMPORTANTI NOTE SULLA SICUREZZA<br />
!<br />
VORSICHT!<br />
GEFAHR EINES ELEKTRISCHEN SCHLAGES<br />
GERÄT NICHT ÖFFNEN!<br />
A salvaguardia della propria sicurezza, prima di mettere in funzione<br />
l'apparecchio leggere attentamente e rispettare tutte le relative avvertenze<br />
contenute nel presente <strong>manual</strong>e.<br />
Installazione<br />
Rispettare scrupolosamente tutti gli avvisi di pericolo e le avvertenze di<br />
sicurezza che sono contenute nel presente <strong>manual</strong>e o che si trovano applicate<br />
sull'apparecchio.<br />
Ventilazione: le feritoie e le aperture dell’apparecchio servono ad assicurare la<br />
necessaria ventilazione dell'apparecchio. Non installare l'apparecchio in scaffali<br />
a muro, in armadi ecc. salvo che non possa venire assicurata una sufficiente<br />
ventilazione. Non appoggiare l'apparecchio su un letto, su una poltrona o su<br />
tappeti che potrebbero ridurre o impedire una corretta ventilazione<br />
dell'apparecchio.<br />
Acqua ed umidità: Non far funzionare l'apparecchio nelle vicinanze di acqua o<br />
comunque in locali umidi. Possono svilupparsi scariche elettriche con<br />
conseguente rischio di infortunio per le persone o di danni all'apparecchio<br />
stesso..<br />
Calore: Non appoggiare l'apparecchio nelle vicinanze di fonti di calore come<br />
radiatori, stufe o bocchette di riscaldamento ad aria calda.<br />
Uso e manutenzione<br />
Rete di alimentazione: Allacciare l'apparecchio alla rete solo dopo aver<br />
accertato che le caratteristiche della corrente sono uguali a quelle stampate<br />
sulla targhetta dell'apparecchio.<br />
Protezione del cavo alimentazione rete: Il cavo di alimentazione rete deve<br />
essere posto in maniera tale da non calpestarlo e che non possa venire<br />
danneggiato da oggetti estranei.<br />
Pulizia dell'apparecchio: Staccare il cavo di alimentazione dalla rete elettrica.<br />
Per la pulizia non utilizzare nessun liquido o spray detergente ma solo un panno<br />
leggermente inumidito con acqua.<br />
Parti di ricambio: Utilizzare esclusivamente parti di ricambio prodotte secondo<br />
le specifiche del costruttore oppure che abbiano le stesse caratteristiche delle<br />
parti originali. Parti di ricambio non autorizzate possono essere causa di<br />
incendio di scariche elettriche oppure di altri rischi. L'utilizzo di parti di ricambio<br />
non idonee fa scadere automaticamente la garanzia.<br />
Messa fuori esercizio: Se l'apparecchio non dovesse venire usato per un<br />
lungo periodo di tempo durante il quale non viene periodicamente sorvegliato<br />
staccare il cavo di alimentazione dalla rete elettrica. Lo stesso dicasi anche in<br />
caso di temporali e in presenza di scariche atmosferiche.<br />
ATTENZIONE<br />
Per evitare il rischio di scariche elettriche non togliere mai il coperchio<br />
dell’apparecchio. All'interno dell'apparecchio non si trovano componenti che<br />
necessitano manutenzione da parte dell'utente. In caso di riparazione o di<br />
necessità di assistenza tecnica rivolgersi ad un negozio specializzato o ad<br />
installatore elettrotecnico.<br />
Smaltimento<br />
L'apparecchio stesso, il suo imballaggio e le batterie non devono venire smaltite<br />
gettandoli nei rifiuti domestici. Informarsi prima sulle disposizioni di legge in<br />
vigore localmente e consegnare i materiali nei centri preposti per la raccolta<br />
separata.<br />
Consigliamo di conservare l'imballaggio al completo per poter trasportare<br />
comodamente il receiver in caso di trasloco o per una eventuale spedizione in<br />
caso di riparazione.
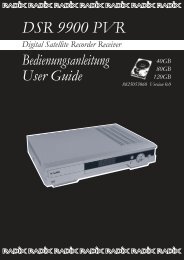
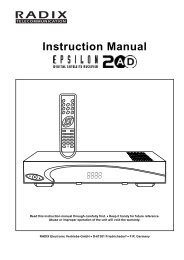
F1 F4 F2 F3<br />
TASTEN UND FUNKTIONEN<br />
D<br />
R1, F1 Taste zum Ein- und Ausschalten des Receivers (Betrieb /<br />
Standby)<br />
R2 Zifferntasten zur Eingabe von Programmnummern und<br />
div. Einstellparameter<br />
R3, F3 CH↑ Taste zum Anwählen der Programmnummer<br />
(aufwärts)<br />
R5, F2 CH↓ Taste zum Anwählen der Programmnummer<br />
(abwärts)<br />
R3, R5 CH↑,CH↓ Tasten zur Auswahl des Bildschirm-<br />
Menüpunktes<br />
R4, R6 → und ← Tasten zur Änderung des Bildschirm-<br />
Menüpunktes und zur Lautstärkeregelung im Programm-<br />
Modus<br />
R7 MENU Taste zum Aufrufen und Verlassen des<br />
Bildschirm-Menüs<br />
R8 STORE Taste zum Speichern der Einstellungen<br />
R9 ST/LT Taste zum Aufrufen des Sleep-Timers<br />
R10 MUTE Taste für Ton-Stummschaltung<br />
R11 CH.LIST/T A/B Taste zum Aufrufen der Programmliste<br />
R12 BACK Taste hat bei diesem Modell keine Funktion<br />
F4 Kanalanzeige am Frontpanel<br />
B1 Netzanschlußkabel (230 VAC ±10%, 50Hz, 25W max.)<br />
B2 UHF OUTPUT Antennenausgang, voreingestellt auf K38<br />
B3 IF INPUT Anschlußbuchse für den LNB (13/18V, 400mA<br />
max.)<br />
B4 CH Regler zur Einstellung des UHF-Kanals im Bereich<br />
K28 bis K 47<br />
B5 ANT IN Antenneneingang für die terrestrische Antenne<br />
B6 TV SCART-Buchse zum Anschluß an das Fernsehgerät<br />
B7/B8 SCART-Buchsen zum Anschluß eines Videorecorders<br />
bzw. Programm-Decoders (B8 OPTIONAL bei diversen<br />
Modellen).<br />
B9 AUDIO L/R CINCH-Buchsen zum Anschluß an einen<br />
HIFI-Verstärker<br />
4<br />
R1<br />
R2<br />
R7<br />
R6<br />
R10<br />
R12<br />
FÜR DIESES<br />
MODELL KEINE<br />
FUNKTION<br />
GB<br />
CONTROLS AND THEIR FUNCTIONS<br />
0<br />
1 2 3<br />
4 5 6<br />
7 8 9<br />
CH<br />
CH<br />
MENU<br />
MUTE LT STORE<br />
BACK CH.LIST<br />
# T A/B<br />
WEST SAT EAST<br />
R3<br />
R4<br />
R5<br />
R9<br />
R8<br />
R11<br />
R1, F1 Toggle the receiver ON/OFF (standby <strong>mode</strong>).<br />
R2 Numerical keypad for entering channel numbers<br />
and various settings.<br />
R3, F3 CH↑ Increase the current channel number.<br />
R5, F2 CH↓ Decrease the current channel number.<br />
R3, R5 CH↑ and CH↓ Cursor keys for selecting onscreen<br />
menu items.<br />
R4, R6 → and ← Used for altering onscreen menu items<br />
and setting audio volume in programming <strong>mode</strong>.<br />
R7 The MENU-key for calling up and exiting the<br />
onscreen menu.<br />
R8 The STORE-key for saving settings.<br />
R9 The ST/LT-key for calling up the ”sleep” timer.<br />
R10 The MUTE-key for muting the sound track.<br />
R11 CH.LIST/T A/B-key for calling up the channel<br />
directory.<br />
R12 The BACK-key, which serves no purpose on this<br />
particular <strong>mode</strong>l.<br />
F4 The front-panel channel indicator.<br />
B1 The jack for the line cord (230 VAC ± 10%, 50 Hz,<br />
25 W max.).<br />
B2 UHF OUTPUT The antenna output jack, preset to<br />
Channel 38.<br />
B3 IF INPUT The jack for connecting the receiver to<br />
the LNB (13/18 V, 400 mA max.).<br />
B4 CH The control for tuning in UHF-channels 28<br />
through 47.<br />
B5 ANT IN The input jack for connecting the receiver to<br />
the terrestrial antenna.<br />
B6 The TV SCART-jack for connecting the receiver to<br />
the television set.<br />
B7/B8 SCART-jacks for connecting the receiver to a video<br />
recorder and/or to a broadcast decoder(B8 is<br />
OPTIONAL on various <strong>mode</strong>ls).<br />
B9 AUDIO L/R CINCH-jacks for connecting the receiver to a<br />
stereo amplifier.
TOUCHES ET FONCTIONS<br />
B1 B4 B2 B3<br />
F I<br />
R1, F1 Touche de mise en MARCHE / d'ARRET du récepteur<br />
(service / veille)<br />
R2 Touches numériques pour l'introduction des numéros de<br />
programmes et des divers paramètres de réglage<br />
R3, F3 CH ↑ Touche de sélection des numéros de ¨<br />
programmes (croissants)<br />
R5, F2 CH↓ Touche de sélection des numéros de programmes<br />
(décroissants)<br />
R3, R5 CH↑,CH↓ Touches de sélection des points du menu<br />
d'écran<br />
R4, R6 → et ← Touches de modification du contenu des points<br />
du menu d'écran et de réglage du volume, en <strong>mode</strong><br />
Programme<br />
R7 MENU Touche servant à appeler / à délaisser le menu<br />
d'écran<br />
R8 STORE Touche servant à mémoriser les réglages<br />
effectués<br />
R9 ST/LT Touche servant à appeler la minuterie de veille<br />
R10 MUTE Touche servant à activer le mutisme<br />
R11 CH.LIST/T A/B Touche servant à appeler la liste des<br />
programmes<br />
R12 BACK Sur ce modèle, cette touche n'est affectée à<br />
aucune fonction<br />
F4 Affichage du canal sur le panneau frontal<br />
B1 Cordon de raccordement au réseau secteur (230 VAC<br />
±10%, 50 Hz, 25 W maxi)<br />
B2 UHF OUTPUT Sortie d'antenne, préréglée sur K38<br />
B3 IF INPUT Douille de raccordement du LNB (13/18 V, 400<br />
mA maxi)<br />
B4 CH Bouton de réglage du canal UHF dans la gamme<br />
K28 à K47<br />
B5 ANT IN Entrée de l'antenne terrestre<br />
B6 TV Douille SCART pour le branchement sur le téléviseur<br />
B7/B8 SCARTs pour le raccordement d’un magnétoscope et<br />
d’un décodeur de programmes cryptés (B8 en OPTION<br />
sur divers modèles).<br />
B9 AUDIO L/R Douilles CINCH pour le raccordement sur un<br />
amplificateur HI-FI<br />
B5 B9<br />
B6 B8 (OPTIONAL)<br />
5<br />
TASTI E FUNZIONI<br />
B7<br />
R1, F1 Tasto per accendere (On) o spegnere (OFF) il receiver<br />
(funzione / standby)<br />
R2 Tasti alfanumerici per impostare i numeri di programma<br />
e diversi parametri di regolazione<br />
R3, F3 CH↑ Tasto per selezionare i numeri di programma (su)<br />
R5, F2 CH↓ Tasto per selezionare i numeri di programma (giù)<br />
R3, R5 CH↑,CH↓ Tasti per selezionare i punti menu sul display<br />
R4, R6 → e ← Tasti freccia per cambiare il punto menu sul<br />
display e per regolare il volume nella modalità<br />
programma<br />
R7 MENU Tasto per richiamare e per uscire dal menu del<br />
display<br />
R8 STORE Tasto per memorizzare le impostazioni fatte<br />
R9 ST/LT Tasto per richiamare il Sleep-Timers<br />
R10 MUTE Tasto per esclusione audio<br />
R11 CH.LIST/T A/B Tasto per richiamare la lista programmi<br />
R12 BACK Tasto senza funzione con questo <strong>mode</strong>llo<br />
F4 Indicatore di canale sul pannello frontale<br />
B1 Cavo per allacciamento alla rete (230 VAC ±10%, 50Hz,<br />
max. 25W)<br />
B2 UHF OUTPUT Uscita antenna, preimpostata su C 38<br />
B3 IF INPUT presa connessione per LNB (13/18V, max.<br />
400mA)<br />
B4 CH Regolazione del canale UHF fra canale C28 e C 47<br />
B5 ANT IN Entrata per antenna terrestre<br />
B6 TV Presa SCART per connessione televisore<br />
B7/B8 SCARTs per conessione videoregristratore e decoder di<br />
programmi (B8 OPTIONAL presente in diversi <strong>mode</strong>lli).<br />
B9 AUDIO L/R prese CINCH per connessione amplificatore<br />
Hi-Fi
ERSTE INBETRIEBNAHME<br />
Anschluß der Parabolantenne<br />
D<br />
Parabolantenne, LNB (Low Noise Block-Converter) und Receiver aufstellen und<br />
miteinander verkabeln. Verwenden Sie hierzu ein doppelt abgeschirmtes Koaxialkabel.<br />
Warnung: Bei der Montage des F-Steckers kann durch ein überstehendes Drähtchen des<br />
Metallgeflechts, das in Kontakt mit dem Innenleiter gerät, ein Kurzschluß entstehen. Ihr<br />
Receiver kann dadurch Schaden nehmen.<br />
Den Receiver erst an das Stromnetz anschließen, wenn alle Komponenten<br />
ordnungsgemäß verbunden sind.<br />
Das Koaxial-Verbindungskabel vom LNB an den SAT-ZF-Eingang B3 anschließen.<br />
Ziehen Sie die Sicherungsmutter des F-Steckers mit der Hand an. Achten Sie darauf, Die<br />
Sicherungsmutter nicht zu überdrehen.<br />
Anschluß des Fernsehgerätes<br />
Fernsehgerät mit Euro-AV-Scartbuchse:<br />
Schließen Sie Ihr Fernsehgerät mit einem Euro-AV-Scartkabel an die TV-SCART-Buchse<br />
B6 Ihres Receivers an. Eine weitere Geräteabstimmung ist nicht erforderlich. Sie<br />
empfangen zukünftig die Satellitenprogramme, wenn Sie Ihr Fernsehgerät auf AV<br />
schalten.<br />
Fernsehgerät ohne Euro-AV-Scartbuchse:<br />
Verbinden Sie die Buchse UHF OUT B2 des Receivers mit dem Antenneneingang Ihres<br />
Fernsehgerätes. Sie benötigen hierzu ein handelsübliches Fernsehanschlußkabel.<br />
Nach dem Einlegen der Batterien in die Fernbedienung (Achtung auf richtige Polarität)<br />
Receiver einschalten und Fernseher auf UHF-Kanal 38 abstimmen, bis TV-Bild (oder<br />
blaues Testbild) in bester Qualität sichtbar ist.<br />
Wird das Bild durch einen TV-Sender oder den Videorecorder gestört, kann ein anderer<br />
Kanal zwischen K28 und K47 gewählt werden. Hierzu stellen Sie am Fernseher auf dem<br />
gewählten Programmplatz einen freien Fernsehkanal im Bereich UHF-Kanal 28 bis UHF-<br />
Kanal 47 ein. Drehen Sie danach den Kanalregler B4 am Receiver mit Hilfe eines<br />
Schraubendrehers vorsichtig nach rechts (Kanalzahl absteigend) oder nach links<br />
(Kanalzahl aufsteigend), bis das gewählte Programm (oder blaues Testbild) in bester<br />
Qualität auf dem Bildschirm sichtbar ist.<br />
Anschluß von Videorecorder und/oder Programm-Decoder<br />
Wenn Ihr Receiver<strong>mode</strong>ll 2 SCART-Buchsen besitzt, schließen Sie den Videorecorder an<br />
die SCART-Buchse B7 an. Hat Ihr Receiver<strong>mode</strong>ll 3 SCART-Buchsen, wählen Sie für den<br />
Videorecorder B8, für den Programm-Decoder (z.B. PREMIERE) die SCART-Buchse B7.<br />
Ausrichten der Parabolantenne<br />
RECEIVER<br />
Zum Ausrichten der Parabolantenne kann der Receiver verwendet werden. Dazu sollten<br />
Sie einen werkseitig voreingestellten Programmplatz, der ein unverschlüsseltes<br />
Programm des gewünschten Satelliten enthält, verwenden (siehe Sendertabelle).<br />
ACHTUNG: Beim Aufbau und Betrieb von Satellitenempfangsanlagen müssen die<br />
geltenden, nationalen Richtlinien beachtet werden. In Deutschland gilt die DIN EN 50083.<br />
6<br />
INSTALLING THE RECEIVER<br />
Connecting the Receiver to the Paraboloidal Antenna<br />
Set up and connect the parabolic antenna, low-noise block converter (LNB), and receiver.<br />
Use exclusively double-shielded coaxial cable for all connections.<br />
Warning: Be careful when installing the F-connector, since stray wires on the woven<br />
shielding might come into contact with the central conductor and cause a short circuit that<br />
might damage your receiver.<br />
Do not connect the receiver to the electrical outlet until all components have been<br />
correctly connected.<br />
Connect up the coaxial cable connecting the LNB to the SAT-IF-input B3. Manually tighten<br />
down the securing nut on the F-connector, but be careful not to overtighten it or strip its<br />
threads.<br />
Connecting the Television Set to the Receiver<br />
Television sets equipped with a Euro-AV Scart jack:<br />
Connect your television set to the TV-SCART-jack B6 on the receiver using a Euro-AV-<br />
Scart cable. There is no need to retune your television set. You may now receive satellite<br />
broadcasts by setting your television set to AV.<br />
Television sets lacking a Euro-AV Scart jack:<br />
Connect the UHF OUT-jack B2 on the receiver to the antenna input jack on your television<br />
set using a commercially available video cable.<br />
Insert the batteries into the remote-control unit, making certain that they are inserted with<br />
the correct polarity, and tune the television set to UHF channel 38,<br />
fine-tuning it until the television picture (or the blue test pattern) is clear and sharp.<br />
If a TV station or your video recorder interferes with the picture, you may select<br />
any other channel, ranging from Channel 28 to Channel 47, by setting your television set<br />
to any free UHF-channel within that range. Then use a screwdriver to cautiously re-adjust<br />
the tuning control B4 on the receiver either clockwise (to select higher-numbered<br />
channels) or counterclockwise (to select lower-numbered channels) until the picture for<br />
the channel chosen (or the blue text pattern) is clear and sharp on the television screen.<br />
Connecting up a Video Recorder and/or Broadcast Decoder<br />
If your satellite receiver <strong>mode</strong>l has 2 SCART sockets then connect your video recorder to<br />
SCART B7. If your satellite receiver has 3 SCART sockets then connect your video<br />
recorder to SCART B8 and your programme decoder (e.g. Premiere) to B7.<br />
Aligning the Paraboloidal Antenna<br />
GB<br />
The receiver may be used for aligning the parabolic antenna by tuning it to a factory<br />
preset channel transmitting an unencrypted broadcast from the satellite involved (cf. a<br />
program listing).<br />
NOTE: Observe all applicable national regulations at all times when setting up and<br />
operating satellite-reception systems. In Germany, the applicable regulations are set out<br />
under DIN EN 50083.
PREMIERE MISE EN SERVICE<br />
Raccordement de l'antenne parabolique<br />
Implanter la parabole, le LNB (Low Noise Block-Converter) et le récepteur, puis les<br />
raccorder entre eux. Utilisez à cet effet un câble coax à double blindage.<br />
F I<br />
Attention: au montage de la fiche F, un court-circuit peut se produire au cas où un petit<br />
bout de fil de la tresse métallique entrerait en contact avec le conducteur intérieur. Ceci<br />
risque, en aval, d'endommager votre récepteur.<br />
Ne brancher le récepteur sur le réseau secteur que lorsque toutes les composantes du<br />
système ont été correctement raccordées entre elles.<br />
Raccorder le coax de liaison du LNB à la douille d'entrée B3 SAT-FI. Serrez à la main,<br />
c’est-à-dire modérément, l'écrou servant à sécuriser la fiche F, en veillant bien à ne pas<br />
gauchir le filetage.<br />
Raccordement du téléviseur<br />
Téléviseurs avec douille SCART-EURO-AV:<br />
Raccordez votre téléviseur sur la douille TV SCART B6 de votre récepteur à l'aide d'un<br />
câble SCART EURO-AV. Il ne sera pas nécessaire de procéder à quelque autre réglage<br />
de l'appareil : vous recevrez dorénavant les programmes satellites en commutant votre<br />
téléviseur sur le <strong>mode</strong> AV.<br />
Téléviseurs sans douille SCART-EURO-AV:<br />
Raccordez la douille UHF OUT B2 du récepteur à l'entrée d'antenne de votre téléviseur, à<br />
l'aide d'un câble de raccordement d'antenne usuel.<br />
Les piles une fois mises en place dans la télécommande (veillez à la polarité correcte !),<br />
enclenchez le récepteur et réglez le téléviseur sur le canal UHF 38 jusqu'à ce que l'image<br />
(de la chaîne de télévision ou la mire bleue) soit reçue dans la meilleure qualité possible.<br />
Si l'image venait à être perturbée soit par un émetteur TV, soit par le magnétoscope, vous<br />
pouvez alors choisir un autre canal, entre K27 et K48. Réglez pour cela votre téléviseur<br />
sur l'emplacement de programme d'un canal de télévision libre dans la plage des canaux<br />
UHF 28 à 47. A l'aide d'un tournevis, tournez ensuite avec précaution le bouton de<br />
réglage B4 sur le récepteur en rotation horaire (c’est-à-dire vers la droite) pour faire<br />
croître le n° du canal, ou en rotation antihoraire (vers la gauche) pour le faire décroître,<br />
jusqu'à ce que l'image du programme sélectionné (ou la mire bleue) apparaisse à l'écran<br />
dans la meilleure qualité possible.<br />
Raccordement d'un magnétoscope et/ou d'un décodeur de programmes<br />
Si votre modèle de récepteur ne dispose que de 2 douilles SCART, branchez le<br />
magnétoscope sur la douille SCART B7. S’il dispose en revanche de 3 douilles SCART,<br />
choisissez alors pour le magnétoscope la douille B8 et pour le décodeur de programmes<br />
(PREMIERE, par exemple), la douille SCART B7.<br />
Réglage de l'antenne parabolique<br />
Pour régler la parabole vous pourrez utiliser le récepteur. Servez-vous pour cela d'un<br />
emplacement de programme pré-assigné d'usine, et qui s'applique à un programme non<br />
crypté émis par le même satellite que celui utilisé par le programme crypté (voir le tableau<br />
des émetteurs).<br />
ATTENTION: à l'implantation et à l'utilisation d'installations de réception satellite, se<br />
conformer aux prescriptions légales nationales en vigueur. En R.F.A. : la norme DIN EN<br />
50083.<br />
7<br />
PRIMA MESSA IN FUNZIONE<br />
Allacciamento dell'antenna parabolica<br />
Sistemare e collegare fra loro antenna parabolica, LNB (Low Noise Block-Converter) e il<br />
receiver. Allo scopo utilizzare un cavo coassiale a doppia schermatura.<br />
Attenzione: Montando la spina F fare attenzione che qualche filo sporgente della treccia<br />
metallica esterna non faccia contatto con il conduttore interno causando un cortocircuito<br />
che può danneggiare il Vostro receiver.<br />
Collegare il receiver alla rete solo dopo che tutti i componenti sono stati precedentemente<br />
correttamente collegati fra loro.<br />
Collegare il cavo coassiale fra LNB all'ingresso B3 per SAT-ZF. Serrare a mano il dado di<br />
sicurezza della spina F. Fare attenzione a non spanare il dado di sicurezza serrandolo<br />
troppo a fondo.<br />
Collegamento del televisore<br />
Televisore con presa SCART Euro-AV:<br />
Collegare il televisore mediante un cavo Scart Euro-AV alla presa B6 SCART TV del<br />
receiver. Non è necessaria una ulteriore regolazione dei due apparecchi. In futuro<br />
riceverete i programmi via satellite quando commutate il televisore su AV.<br />
Televisore senza presa Scart Euro-AV:<br />
Collegare la presa B2 UHF OUT del receiver con l'ingresso antenna del televisore. Allo<br />
scopo è necessario solo un cavo di collegamento per televisori reperibile in commercio.<br />
Dopo aver inserito le batterie nel telecomando (fare attenzione alla corretta polarità),<br />
accendere il receiver e impostare il televisore sul canale 38 UHF fino a che appare<br />
l'immagine TV (oppure il quadro di test di colore blu).<br />
Se l'immagine viene disturbata da un trasmettitore TV o da un videoregistratore, scegliere<br />
un altro canale da C28 a C47. Allo scopo impostare sul televisore nella locazione di<br />
programma scelta un canale TV libero situato fra il canale UHF 28 e il canale UHF 47.<br />
Successivamente ruotare verso destra con cautela mediante un cacciavite il regolatore di<br />
canale B4 sul receiver (numero di canale decrescente) oppure verso sinistra (numero di<br />
canale crescente), fino a che il programma selezionato (o il quadro test di colore blu)<br />
appare nella migliore qualità sullo schermo.<br />
Collegamento di un videoregistratore e/o di un decoder di programmi<br />
Se il Vs. Modello di receiver satellitare dispone di 2 boccole SCART, collegare il<br />
videoregistratore alla boccola SCART B7. Se invece il Vs. Modello di receiver satellitare<br />
ha 3 boccole SCART, scegliere la boccola B8 per il videoregristratore e la boccola B7 per<br />
il decoder (per es. per il programma PREMIERE).<br />
Orientamento dell'antenna parabolica<br />
Per orientare l'antenna parabolica è possibile utilizzare lo stesso receiver. A questo scopo<br />
è necessario utilizzare una locazione di programma preimpostato in fabbrica che contiene<br />
un programma non codificato del satellite desiderato (vedi tabella dei trasmettitori).<br />
ATTENZIONE: Per l'installazione e l'uso di antenne satellitari devono venire rispettate di<br />
volta in volta le normative di legge in vigore nei diversi paesi di ubicazione. In Germania<br />
per es. vale la norma DIN EN 50083 (Norma Europea).
BEDIENUNG<br />
ARD CH:001 MDR-S CH:100<br />
TON AUS<br />
PROGRAMMANZEIGE RADIOBETRIEB<br />
TON STUMMSCHALTEN<br />
Ein-/Ausschalten<br />
Durch Drücken der Taste F1 am Receiver oder R1 der Fernbedienung wechseln Sie<br />
zwischen Bereitschaft und Betrieb. Die Anzeige F4 wechselt zwischen Punkt und<br />
Programmplatz-Anzeige.<br />
Programm auswählen<br />
D<br />
Möglichkeit 1: Mit den Kanal-Auf/Ab-Tasten F3/F2 oder CH↑ und CH↓ R3/R5.<br />
Möglichkeit 2: Mit den Zifferntasten 0 bis 9 R2 durch Direkteingabe der<br />
Programmnummer.<br />
Möglichkeit 3: Mit Hilfe der CH.LIST Taste R11 können Sie die Kanalliste am<br />
Bildschirm sichtbar machen. Mit den Tasten CH↑ und CH↓<br />
R3/R5 wechseln Sie das Programm, mit den Tasten → und ←<br />
R4/R6 blättern Sie durch die einzelnen Seiten (es werden 8<br />
Programme pro Seite dargestellt). Durch nochmaliges Drücken<br />
der CH.LIST Taste R11 verlassen Sie diesen Menüpunkt.<br />
Lautstärke einstellen<br />
Mit den Tasten → und ← R4/R6 kann die Lautstärke in 8 Stufen eingestellt werden.<br />
Ton stummschalten<br />
Mit der Mute-Taste R10 kann der Ton aus- bzw. eingeschaltet werden.<br />
Sleeptimer aktivieren/deaktivieren<br />
Sie können Ihren Receiver so programmieren, daß er sich nach 30 Min., 1 Std., 1,5 Std.,<br />
2 Std., 2,5 Std., 3 Std., 3,5 Std. oder 4 Std. automatisch ausschaltet. Drücken Sie die<br />
Taste ST/LT R9. Wählen Sie mit Hilfe der Tasten → und ← R4/R6 die gewünschte<br />
Betriebsdauer. Verlassen Sie dieses Menü mit der Taste ST/LT R9. In Stellung AUS ist<br />
der Sleeptimer deaktiviert.<br />
ÄNDERUNG DER PROGRAMMREIHENFOLGE<br />
Wenn Sie mit der werkseitigen Vorprogrammierung nicht zufrieden sind, können Sie die<br />
Reihenfolge der Programme sehr leicht selbst neu zusammenstellen.<br />
Drücken Sie die CH.LIST Taste R11 um die Programmliste sichtbar zu machen. Drücken<br />
Sie die Taste STORE R8 um das Menü Programmverschieben aufzurufen. Geben Sie<br />
über das Ziffernfeld R2 die Nummer des Programms ein, das Sie verschieben möchten.<br />
Drücken Sie nun die Taste → R6. Jetzt geben Sie die Nummer ein, wohin Sie das<br />
ausgewählte Programm verschieben möchten.<br />
Abschließend bestätigen Sie mit STORE R8, um die Verschiebung zu speichern. Wenn<br />
Sie die Änderungen nicht speichern wollen, drücken Sie CH.LIST R11, um dieses Menü<br />
zu verlassen.<br />
8<br />
OPERATING THE RECEIVER<br />
Switching the Receiver ON/OFF<br />
Press button F1 on the receiver or button R1 on the remote-control unit to toggle the<br />
receiver between standby <strong>mode</strong> and ON. The channel indicator F4 will then display the<br />
current channel number instead of dots.<br />
Selecting a Channel<br />
Option 1: Use the channel-increase/decrease keys F3/F2 or CH↑ and CH↓ keys<br />
R3/R5 to select the desired channel.<br />
Option 2: Use the numerical keys 0 through 9 R2 to enter the number of the desired<br />
channel.<br />
Option 3: Press the CH.LIST-key R11 to call up a directory of available channels<br />
onscreen and then use the CH↑ and CH↓ keys R3/R5 to change the current<br />
channel. The → and ← R4/R6 may be used to browse through the various<br />
pages of the directory (eight channels appear listed on each page). Press the<br />
CH.LIST-key R11 once again to exit directory-display <strong>mode</strong>.<br />
Setting the Audio Volume Level<br />
The → and ← keys R4/R6 may be used to set the audio volume to any of eight levels.<br />
Muting<br />
Press the muting key R10 to toggle the sound track ON/OFF.<br />
Activating/Deactivating the ”Sleep” Timer<br />
You may program your receiver to automatically switch off after 30 min., 1 hour, 1.5<br />
hours, 2 hours, 2.5 hours, 3 hours, 3.5 hours, or 4 hours by pressing the ST/LT-key R9<br />
and using the → and ← keys R4/R6 to select the desired time interval. Press the ST/LTkey<br />
R9 once again to exit this menu item. The ”sleep” timer is inactive when set to OFF.<br />
EDITING THE CHANNEL DIRECTORY<br />
RADIO<br />
GB<br />
If you are unhappy with the factory preset channel directory, you may easily re-order the<br />
TV-stations listed therein yourself.<br />
To edit the channel directory, press the CH.LIST-key R11 to call up the channel directory<br />
onscreen and then press the STORE-key R8 to call up the directory-editing menu. Use<br />
the keys of the numerical keypad R2 to enter the channel number of the TV-station you<br />
would like to reposition, press the → key R6, and then enter the channel number where<br />
you would like it to appear. Repeat this process until all TV-stations you wish to reposition<br />
have been re-positioned.<br />
Finally, either press the STORE key R8 to save the changes made or press the CH.LISTkey<br />
R11 to abort any changes made and exit the directory-editing menu.
OPERATION<br />
Mise en MARCHE / ARRET<br />
F I<br />
En appuyant sur la touche F1 du récepteur, ou R1 de la télécommande, vous pouvez<br />
commuter du <strong>mode</strong> Veille au <strong>mode</strong> Marche. F4 permet de passer de l'affichage d'un point<br />
de menu à l'affichage d'un emplacement de programme.<br />
Sélection d'un programme<br />
Possibilité 1: à l'aide des touches F3/F2,ou CH↑ et CH↓ R3/R5,<br />
Possibilité 2: à l'aide des touches numériques 0 à 9 du pavé R2 en tapant<br />
directement le numéro du programme,<br />
Possibilité 3: à l'aide de la touche CH.LIST R11, avec laquelle vous pouvez<br />
faire afficher à l'écran la liste des canaux. A l'aide des touches<br />
CH↑ et CH↓ R3/R5 vous changez de programme et à l'aide des<br />
touches → et ← R4/R6 vous pouvez feuilleter les diverses<br />
pages d'écran proposées (8 programmes par page affichée). En<br />
appuyant une nouvelle fois sur CH.LIST R11, vous abandonnez<br />
ce point de menu.<br />
Réglage du volume<br />
Les touches → et ← R4/R6 permettent de régler le volume sonore sur 8 niveaux<br />
différents.<br />
Mutisme<br />
ABSCHALTZEIT : AUS<br />
SLEEPTIMER PROGRAMMLISTE<br />
La touche R10 permet d'activer / de désactiver le mutisme.<br />
Activation / Désactivation du Sleeptimer<br />
Vous pouvez programmer votre récepteur de telle sorte qu'il s'éteigne de lui-même à<br />
l'expiration d'un délai de votre choix (1/2 h / 1 h / 1,5 h / 2 h / 2,5 h / 3 h / 3,5 h / 4 h).<br />
Appuyez pour cela sur la touche ST/LT R9. A l'aide des touches → et ← R4/R6<br />
sélectionnez le délai désiré, puis quittez ce point de menu en appuyant une nouvelle fois<br />
sur la touche ST/LT R9. En position ARRET, le Sleeptimer est désactivé.<br />
MODIFICATION DE L'ORDRE DES PROGRAMMES<br />
Au cas où ne seriez pas satisfait de la pré-programmation d'usine, vous pouvez<br />
facilement modifier vous-même et à loisir l'ordre des programmes.<br />
Appuyez sur la touche CH.LIST R11 pour rendre visible la liste des programmes.<br />
Appuyez sur la touche STORE R8 pour appeler le menu Décalage des programmes. Par<br />
l'intermédiaire du pavé numérique R2, tapez le numéro du programme que vous désirez<br />
décaler. Appuyez ensuite sur la touche → R6. Tapez maintenant le numéro de<br />
l'emplacement sur lequel vous désirez décaler le programme sélectionné.<br />
Confirmez finalement votre choix en appuyant une nouvelle fois sur STORE R8, ce qui<br />
mémorise en même temps le programme sélectionné à l'emplacement sélectionné. Si<br />
vous ne souhaitez pas sauvegarder ce choix. Appuyer alors sur CH.LIST R11 pour sortir<br />
de ce menu.<br />
9<br />
USO E COMANDO<br />
Accensione/spegnimento<br />
Per spegnere (standby) e accendere l'apparecchio premere il tasto F1 sul receiver oppure<br />
il tasto R1 del telecomando. L'indicatore F4 cambia fra punto e indicazione della locazione<br />
di programma.<br />
Selezione del programma<br />
Possibilità 1: Mediante i tasti canale su/giù F3/F2 oppure mediante CH↑ e<br />
CH↓ R3/R5.<br />
Possibilità 2: Mediante i tasti alfanumerici da 0 a 9 R2 impostando<br />
direttamente il numero di programma.<br />
Possibilità 3: Mediante il tasto CH.LIST R11 è possibile visualizzare sul display<br />
la lista dei canali. Mediante i tasti CH↑ e CH↓ R3/R5 è possibile<br />
cambiare il programma, mediante i tasti freccia → e ← R4/R6 è<br />
possibile sfogliare le singole pagine (ogni pagina contiene 8<br />
programmi). Per uscire dal punto menu premere ancora una<br />
volta il tasto CH.LIST R11.<br />
Regolazione del volume<br />
Mediante i tasti freccia → e ← R4/R6 è possibile regolare il volume in 8 livelli di intensità.<br />
Esclusione audio<br />
Mediante il tasto Mute R10 è possibile attivare o disattivare l'audio.<br />
Attivazione/disattivazione dello sleep-timer<br />
PROG. LISTE<br />
VERSCHIEBE 001 ARD<br />
VON NACH 002 ZDF<br />
001 > 001 003 RTL<br />
004 SAT 1<br />
005 PRO 7<br />
006 RTL 2<br />
007 S-RTL<br />
008 KAB-1<br />
È possibile programmare il receiver in maniera tale che esso si spenga automaticamente<br />
dopo 30 Min., 1 ora, 1,5 ore, 2 ore, 2,5 ore, 3 ore, 3,5 ore o 4 ore. Premere il tasto ST/LT<br />
R9. Selezionare mediante i tasti freccia → e ← R4/R6 la durata di accensione<br />
desiderata. Per uscire da questo menu premere il tasto ST/LT R9. In posizione AUS /<br />
OFF lo sleep-timer è disattivato.<br />
MODIFICA DELLA SEQUENZA DI PROGRAMMAZIONE<br />
Se non siete contenti della programmazione che viene effettuata dalla fabbrica è possibile<br />
cambiare molto facilmente la sequenza dei programmi operando come segue.<br />
Premere il tasto CH.LIST R11 per visualizzare la lista dei programmi. Premere il tasto<br />
STORE R8 per richiamare il menu "Sposta programma". Impostare sopra il campo<br />
numerico R2 il numero del programma che desiderate spostare. Successivamente<br />
premere il tasto freccia → R6. Adesso impostare il numero sul quale volete spostare il<br />
programma precedentemente selezionato.<br />
Ultimare confermando mediante STORE R8 per salvare lo spostamento effettuato. Se<br />
non volete salvare le modifiche effettuate premere CH.LIST R11 uscendo così dal menu.
PROGRAMMIERUNG<br />
D<br />
Ihr Satellitenreceiver ist werkseitig so vorprogrammiert, daß Sie, durch Verwendung von<br />
handelsüblichen Universal-LNBs und DiSEqC-Schaltern (bei gleichzeitigem Empfang<br />
beider SAT-Systeme), die Hauptsatelliten in Europa, ASTRA bei 19° Ost und<br />
EUTELSAT/HOTBIRD bei 13° Ost, empfangen können.<br />
Sollten Sie andere LNBs verwenden, eine andere Anlagenkonfiguration besitzen oder<br />
andere Satelliten empfangen wollen, muß der Receiver an diese Situation angepaßt<br />
werden. Ihr Receiver bietet Ihnen dazu die Möglichkeit, alle Einstellparameter komfortabel<br />
über Bildschirmmenü zu programmieren.<br />
Grundeinstellungen<br />
Receiver ausschalten (Standby) und danach die Kanal-Auf/Ab-Tasten F3/F2 am Receiver<br />
gleichzeitig für ca. 3 Sekunden gedrückt halten, bis am TV-Bildschirm folgende Menütafel<br />
1 erscheint:<br />
Mit den Tasten CH↑ und CH↓ R3/R5 können Sie den Cursor (Hand) auf die gewünschte<br />
Zeile bewegen, durch Drücken der Tasten → oder ← R4/R6 wird die gewünschte<br />
Einstellung vorgenommen.<br />
1. Wählen Sie die gewünschte Menü-Sprache.<br />
2. Wählen Sie die richtige LNB-Lo-Frequenz 9,75 / 10,0 / 10,6 GHz (siehe technische<br />
Daten LNB).<br />
3. Hiermit erfolgt die Feinabstimmung an den LNB im Bereich ±15 MHz in 0,25 MHz-<br />
Schritten pro Tastendruck.<br />
4. Wenn Sie die SMATV-Funktion des DiSEqC-Systems verwenden wollen, ist es<br />
erforderlich, SMATV auf “EIN” zu stellen.<br />
Um die vorgenommenen Einstellungen zu speichern, drücken Sie nun die Taste STORE<br />
R8. Der Receiver schaltet automatisch in den Bereitschafts-Modus (Standby) zurück.<br />
Sollten die Einstellungen nicht gespeichert werden, drücken Sie die MENU-Taste R7.<br />
Programmeinstellungen<br />
Drücken Sie bei eingeschaltetem Receiver die MENU-Taste R7, um die Menü-Tafel 2 aufzurufen:<br />
Mit den Tasten CH↑ und CH↓ R3/R5 können Sie den Cursor (Hand) auf die gewünschte<br />
Zeile bewegen, durch Drücken der Tasten → oder ← R4/R6 wird die gewünschte<br />
Einstellung vorgenommen.<br />
Wenn sich der Cursor in der ersten Zeile befindet, können Sie mit der CH↑ Taste R3 zur<br />
4. Menü-Tafel (DiSEqC-Einstellungen) wechseln.<br />
1. Wählen Sie den gewünschten Programmplatz durch Drücken der Tasten → oder ←<br />
R4/R6, oder durch direkte Eingabe der dreistelligen Programmnummer über das<br />
Ziffernfeld R2.<br />
2. Schreiben Sie den gewünschten Programmnamen: Wählen Sie mit der Taste → oder<br />
← R4/R6 die gewünschte Position (blinkt) und selektieren Sie mit den Tasten CH↑<br />
und CH↓ R3/R5 den gewünschten Buchstaben (Zahl, Sonderzeichen). Durch<br />
wiederholtes Drücken der Taste → oder ← R4/R6 können Sie diesen Menüpunkt<br />
verlassen.<br />
3. Wählen Sie die erforderliche Video-Frequenz durch Drücken der Tasten → oder ←<br />
R4/R6, oder durch direkte Eingabe über das Ziffernfeld R2.<br />
4. Wählen Sie die erforderliche Polarisationsebene.<br />
5. Schalten Sie die 22 kHz ein bzw. aus (AUS=Unteres Band, EIN=Oberes Band).<br />
Wenn sich der Cursor in der letzten Zeile befindet, können Sie mit der CH↓Taste R5 zur<br />
3. Menü-Tafel für die Audio-Einstellungen wechseln.<br />
SYSTEM MENU<br />
SPRACHE : DEUTSCH<br />
LNB FREQ. : 9.75GHZ<br />
GLOB.VERS : 00.00MHZ<br />
SMATV : AUS<br />
MENÜTAFEL 1<br />
SYSTEMMENÜ<br />
10<br />
PROGRAMMING THE RECEIVER<br />
Your satellite receiver has been factory preprogrammed such that you may use standard,<br />
commercially available, universal LNB’s and DiSEqC-switches (if you plan to receive<br />
video transmissions from both satellites simultaneously) to receive broadcasts from the<br />
two major European television satellites, ASTRA at 19° East and EUTELSAT/HOTBIRD at<br />
13° East.<br />
The receiver will have to be reprogrammed if you intend to employ some other type of<br />
LNB, are using some other system configuration, or would like to receive broadcasts from<br />
other television satellites. Your receiver allows you to conveniently reset all <strong>user</strong>adjustable<br />
reception parameters from an onscreen menu..<br />
Basic Settings<br />
Switch the receiver off (standby <strong>mode</strong>) and then press both of the channel<br />
increment/decrement keys F3/F2 on the receiver and hold both of them depressed for<br />
about three seconds until the following menu (Onscreen Display Page 1) appears on the<br />
TV-screen:<br />
Use the CH↑ and CH↓ keys R3/R5 to position the cursor (stylized hand) on the desired<br />
display lines in turn and then use the → and ← keys R4/R6 to make the desired<br />
settings.<br />
1. Select the language to be employed on onscreen menus.<br />
2. Select the correct LNB-Lo-frequency (9.75/10.0/10.6 GHz; cf. the technical data for<br />
the LNB employed).<br />
3. Use these keys to fine-tune the LNB over a range of ± 15 MHz in 0.25-MHz<br />
increments per key press.<br />
4. If you intend to use the SMATV-function of the DiSEqC-system, set SMATV to ”ON.”.<br />
Press the STORE-key R8 to save the settings made. The receiver will then automatically<br />
return to standby <strong>mode</strong>. Press the MENU-key R7 to abort the settings made.<br />
Channel Settings<br />
GB<br />
While the receiver is on, press the MENU-key R7 to call up the menu of Onscreen Display<br />
Page 2:<br />
Use the CH↑ and CH↓ keys R3/R5 to position the cursor (stylized hand) on the desired<br />
display lines in turn and use the → and ← keys R4/R6 to make the desired settings.<br />
Position the cursor on the top display line and press the CH↑ key R3 to switch to the<br />
menu of Onscreen Display Page 4 (DiSEqC-settings).<br />
1. Use the → or ← keys R4/R6 to select the desired TV-station, or use the<br />
keys of the numerical keypad R2 to enter its three-digit numerical code.<br />
2. Enter a name for the TV-station. Use the → or ← keys R4/R6 to select the desired<br />
(blinking) position and then use the CH↑ and CH↓ keys R3/R5 to select the desired<br />
characters (letters, numerals, or special characters). Repeatedly press the → or ←key<br />
R4/R6 to exit this menu item.<br />
3. Select the video frequency required using the → or ←keys R4/R6, or use the keys of<br />
the numerical keypad R2 to enter the video frequency.<br />
4. Select the required orientation of the plane of polarization.<br />
5. Switch the 22-kHz local oscillator ON/OFF (OFF = the lower band, ON = the upper<br />
band).<br />
Position the cursor on the bottom display line and press the CH↓ key R5 to switch to the<br />
menu of Onscreen Display Page 3 for making the audio settings.
PROGRAMMATION<br />
F I<br />
Votre récepteur satellite est programmé d'usine de telle sorte que, par l'utilisation de<br />
LNB's universels couramment trouvés dans le commerce et de commutateurs DiSEqC<br />
(pour la réception simultanée de deux systèmes satellites), les principaux satellites<br />
arrosant l'Europe, à savoir ASTRA à 19° Est et EUTELSAT / HOTBIRD à 13° Est peuvent<br />
être reçus.<br />
Au cas où vous utiliseriez d'autres LNB's, ou si vous avez une configuration d'installation<br />
différente ou encore si vous désirez recevoir les émissions d'autres satellites, votre<br />
récepteur devra alors adapté à cette situation. Votre récepteur est conçu de telle sorte<br />
qu'il vous permette de programmer sans le moindre effort tous les paramètres de réglage,<br />
confortablement au moyen de menus affichés sur l'écran.<br />
Réglages de base<br />
Eteindre le récepteur (<strong>mode</strong> Veille) puis appuyer simultanément durant environ 3<br />
secondes sur les touches F3/F2 du récepteur, jusqu'à ce qu'apparaisse à l'écran le menu<br />
1 ci-dessous :<br />
A l'aide des touches CH↑ et CH↓ R3/R5, vous pouvez amener le curseur (représentant<br />
une main) sur la ligne désirée, et à l'aide des touches → et ← R4/R6 procéder au<br />
réglage désiré.<br />
1. Sélectionnez d'abord la langue de travail désirée.<br />
2. Sélectionnez la fréquence LNB-Lo correcte (9,75 /10,0 / 10,6 GHz – voir les<br />
caractéristiques techniques du LNB).<br />
3. Par cette action, le réglage de précision du LNB est accompli, dans une plage de ±15<br />
MHz en pas de 0,25 MHz à chaque action sur la touche.<br />
4. Au cas où la fonction SMATV du système DiSEqC devrait être utilisée, il vous faudra<br />
alors régler la fonction SMAT sur “ON”.<br />
Pour mémoriser finalement les réglages effectués, appuyez maintenant sur la touche<br />
STORE R8.<br />
Le récepteur revient automatiquement en <strong>mode</strong> Veille. Si vous ne souhaitez pas<br />
mémoriser les réglages, appuyez simplement sur la touche MENU R7.<br />
Réglages de programmes<br />
Le récepteur étant enclenché, appuyez sur la touche MENU R7 pour appeler le menu 2<br />
ci-dessous :<br />
A l'aide des touches CH↑ et CH↓ R3/R5, vous pouvez amener le curseur (représentant<br />
une main) sur la ligne désirée, et à l'aide des touches → et ← R4/R6 procéder au<br />
réglage désiré.<br />
Lorsque le curseur se trouve sur la première ligne, vous pouvez à l'aide de la touche CH↑<br />
R3 commuter sur le menu 4 (réglages DiSEqC).<br />
1. Sélectionnez l'emplacement de programme désiré en appuyant sur l'une des touches<br />
→ et ← R4/R6, ou tapez directement au pavé numérique R2 les trois chiffres du<br />
numéro de programme.<br />
2. Ecrivez le nom du programme désiré : au moyen des touches → et ← R4/R6 la<br />
position désirée (qui clignote) et sélectionnez au moyen des touches CH↑ et CH↓<br />
R3/R5 le caractère désiré (chiffre ou caractère spécial, ou lettre). En appuyant une<br />
nouvelle fois sur l'une des touches → et ← R4/R6, vous abandonnez ce point de<br />
menu.<br />
3. Sélectionnez la fréquence vidéo requise en appuyant sur l'une des touches → et ←<br />
R4/R6, ou en la tapant directement au pavé numérique R2.<br />
4. Sélectionnez maintenant le niveau de polarisation requis.<br />
5. Désactivez, ou activez, selon le cas, la bande des 22 kHz (OFF = bande inférieure, ON<br />
= bande supérieure).<br />
Lorsque le curseur se trouve sur la dernière ligne, vous pouvez maintenant à l'aide de la<br />
touche CH↓ R5 passer au menu 3 pour procéder aux réglages audio.<br />
HAUPT MENU<br />
PROGRAMM : 001<br />
NAME : ARD<br />
FREQUENZ : 1743.75MHZ<br />
POLARIS : HORZ<br />
22 KHZ : AUS<br />
MENÜTAFEL 2<br />
SYSTEMMENÜ 1<br />
11<br />
PROGRAMMAZIONE<br />
Il Vostro receiver satellitare è già stato preprogrammato in fabbrica in modo che<br />
utilizzando dei convertitori in commercio di tipo universale LNBs e DiSEqC (con ricezione<br />
simultanea di ambedue i sistemi SAT) potete ricevere in Europa i principali satelliti:<br />
ASTRA a 19° Est e EUTELSAT/HOTBIRD a 13° Est.<br />
Se utilizzate degli altri LNB, avete un'altra configurazione di apparecchi oppure volete<br />
ricevere degli altri satelliti è necessario adeguare il receiver satellitare a tale situazione. Il<br />
Vostro receiver dispone della possibilità di programmare comodamente tutti i necessari<br />
parametri operando mediante menu e display.<br />
Impostazioni base<br />
Spegnere il receiver (standby) e successivamente tenere premuti contemporaneamente<br />
per la durata di ca. 3 secondi i tasti F3/F2 per canale su/giù che si trovano sul receiver<br />
fino a che sullo schermo TV non appare il seguente quadro menu 1:<br />
Mediante i tasti CH↑ e CH↓ R3/R5 è possibile spostare il cursore (a mano) sulla riga<br />
desiderata, premendo i tasti freccia → e ← R4/R6 effettuare l'impostazione desiderata.<br />
1. Selezionare la lingua desiderata per il menu.<br />
2. Selezionare la corretta bassa frequenza LNB 9,75 / 10,0 / 10,6 GHz (vedere i dati<br />
tecnici del LNB).<br />
3. Premendo il tasto è possibile la sintonia fine del LNB nella gamma ±15 MHz in passi di<br />
0,25 MHz.<br />
4. Se volete usare la funzione SMATV del sistema DiSEqC, è necessario impostare su<br />
"EIN/ON" il SMATV.<br />
Per salvare le impostazioni effettuate premere adesso il tasto STORE R8. Il receiver<br />
ritorna automaticamente alla modalità di pronto (standby). Se non volete salvare le<br />
modifiche effettuate premere il tasto MENU R7.<br />
Impostazione programmi<br />
Richiamare il quadro menu 2 premendo con receiver acceso il tasto MENU R7:<br />
Mediante i tasti CH↑ e CH↓ R3/R5 è possibile spostare il cursore (a mano) sulla riga<br />
desiderata, premendo i tasti freccia → e ← R4/R6 effettuare l'impostazione desiderata.<br />
Quando il cursore si trova sulla prima riga, mediante il tasto CH↑ R3 è possibile passare<br />
al 4° quadro menu (impostazioni DiSEqC).<br />
1. Selezionare la locazione del programma desiderato premendo i tasti freccia → o ←<br />
R4/R6, oppure impostando direttamente il numero del programma a 3 caratteri sul<br />
campo numerico R2.<br />
2. Digitare il nome del programma desiderato: Selezionare mediante il tasto freccia → o<br />
← R4/R6 la posizione desiderata (luce intermittente) e selezionare mediante i tasti<br />
su/giù CH↑ e CH↓ R3/R5 la lettera desiderata (cifra, carattere segno). Premere più<br />
volte il tasto → o ← R4/R6 per uscire da questo punto del menu.<br />
3. Selezionare la frequenza video necessaria premendo i tasti → o ←R4/R6, oppure<br />
impostare direttamente mediante il campo numerico R2.<br />
4. Selezionare il piano di polarizzazione necessario.<br />
5. Inserire o disinserire i 22 kHz (AUS/OFF=banda bassa, EIN/ON=banda alta).<br />
Quando il cursore si trova nell'ultima riga, mediante il tasto CH↓ R5 è possibile passare al<br />
3° quadro menu per le impostazioni audio.
HAUPT MENU<br />
AUDIO L : 7.02MHZ<br />
R : 7.20MHZ<br />
DE-EMPH : STEREO/ADAPT<br />
BANDBR. : SCHMAL<br />
KINDERS. : AUS<br />
RADIO : AUS<br />
DECODER : INTERN<br />
MENÜTAFEL 3<br />
SYSTEMMENÜ 2<br />
D<br />
1. Die Wahl der linken Audio-Frequenz erfolgt durch Drücken der Tasten → oder ←<br />
R4/R6, oder durch direkte Eingabe der dreistelligen Ton-Unterträgerfrequenz über das<br />
Ziffernfeld R2. Die rechte Audio-Frequenz verändert sich automatisch im Abstand von<br />
180 kHz zur linken Audiofrequenz.<br />
2. Hier können Sie die erforderliche Audio-Deemphase-Einstellung vornehmen:<br />
STEREO/ADAPT/SCHMAL → MONO/ADAPT/SCHMAL → MONO/ADAPT/BREIT<br />
→ MONO/J17/BREIT → MONO/50U/BREIT<br />
3. Aktivieren Sie die Kindersicherung/Sperre. Bei Einstellung auf EIN wird das gesperrte<br />
Programm beim Umschalten mit den Tasten CH↑ und CH↓ F2/F3 oder R3/R5 über<br />
sprungen. Um das gesperrte Programm empfangen zu können, geben Sie mit dem<br />
Ziffernfeld R2 der Fernbedienung die dreistellige Programmnummer ein.<br />
4. Die Einstellung des Programmplatzes auf RADIO: EIN schaltet das Fernsehbild aus<br />
und ersetzt es gegen ein schwarzes Bild mit der Einblendung “RADIO”.<br />
5. Wenn Sie für dieses Programm einen Programm-Decoder anschließen wollen, setzen<br />
Sie diesen Parameter auf EIN.<br />
Wenn sich der Cursor in der letzten Zeile befindet, können Sie mit der CH↓ Taste R5 zur<br />
4. Menü-Tafel für die DiSEqC-Einstellungen wechseln.<br />
Die folgenden beiden Menüpunkte werden bei Verwendung von DiSEqC-<br />
Schaltkomponenten benötigt. Dies ist erforderlich, wenn Sie mehr als vier<br />
Frequenzbänder (z.Bsp. ASTRA Low/High - H/V und HOTBIRD Low/High - H/V)<br />
empfangen wollen. Für Einzelheiten befragen Sie bitte Ihren Fachhändler oder<br />
Installateur.<br />
1. Aktivieren Sie den DiSEqC-Tonburst durch Drücken der Tasten → oder ←R4/R6.<br />
2. Aktivieren Sie das DiSEqC-SMATV-Schaltkriterium durch Drücken der Tasten → oder<br />
← R4/R6. Damit der Receiver die gewünschten Schaltsignale an die<br />
Schaltkomponente abgibt, ist es erforderlich, diese Funktion im Systemmenü zu<br />
aktivieren (siehe Grundeinstellungen Pkt. 4.)<br />
Um die vorgenommenen Einstellungen zu speichern, drücken Sie nun die Taste STORE<br />
R8, es erfolgt die Anzeige “SPEICHERN MIT STORE”, nochmaliges Drücken der STORE-<br />
Taste führt zum Speichern (Anzeige “DATEN GESPEICHERT”). Danach schaltet der<br />
Receiver das Bildschirmmenü automatisch aus.<br />
Zum Verlassen des Bildschirmmenüs, ohne die erfolgten Einstellungen zu speichern,<br />
drücken Sie die Taste MENU R7.<br />
12<br />
1. Use the → or ← keys R4/R6 to select the left-channel audio frequency, or use the<br />
keys of the numerical keypad R2 to enter the three-digit lower audio-carrier frequency.<br />
The right-channel audio frequency will automatically be reset to a frequency 180 kHz<br />
above that for the left audio channel.<br />
2. Set the necessary audio deemphasis here:<br />
STEREO/ADAPT/NARROW → MONO/ADAPT/NARROW → MONO/ADAPT/WIDE →<br />
MONO/J17/WIDE → MONO/50U/WIDE.<br />
HAUPT MENU<br />
DISEQC TON : A<br />
SMATV : 1<br />
MENÜTAFEL 4<br />
SYSTEMMENÜ 3<br />
GB<br />
3. Activate the child-protection feature/channel lockout. If this is set to ”ON,” locked-out<br />
channels will be skipped when the CH↑ and CH↓ keys F2/F3 or R3/R5 are used for<br />
channel selection. Use the keys of the numerical keypad R2 on the remote-control unit<br />
to enter the three-digit channel numbers of locked-out channels in order to view them.<br />
4. Setting a channel to RADIO: ON will suppress the television picture for that channel<br />
and display a black screen bearing the legend ”RADIO.”<br />
5. Set this parameter to ”ON” if you intend to connect a broadcast decoder to the<br />
receiver.<br />
Position the cursor on the bottom display line and press the CH↓-key R5 to switch to the<br />
menu of Onscreen Display Page 4 for making the DiSEqC-settings.<br />
The following two menu items will be needed if DiSEqC-switching components are to be<br />
employed. These settings will have to be made if you intend to receive more than four<br />
frequency bands, e.g., ASTRA Low/High - H/V and HOTBIRD Low/High - H/V. Consult<br />
your dealer or installer for further details.<br />
1. Press the → or ← key R4/R6 to activate the DiSEqC-tone burst.<br />
2. Press the → or ← key R4/R6 to activate the DiSEqC-SMATV-switching criterion.<br />
This function must also be activated in the system menu in order that the receiver will<br />
transmit the desired switching signals to the switching components (see Item 4 under<br />
”Basic Settings,” above).<br />
Press the STORE-key R8. ”SAVE USING STORE?” will then be displayed onscreen.<br />
Press the STORE-key once again to save the settings made. ”DATA SAVED” will then be<br />
displayed onscreen. The receiver will then automatically cease to display the onscreen<br />
menu.<br />
Press the MENU-key R7 to abort the settings made and exit the DiSEqC-settings menu.
Einstellung am Receiver: Verwaltung von bis zu 8 SAT-ZF-Ebenen<br />
SYSTEM-MENÜ:<br />
HAUPT-MENÜ<br />
Polaris:<br />
22 kHz:<br />
DiSEqC-Ton<br />
SYSTEM-MENÜ:<br />
HAUPT-MENÜ<br />
Polaris:<br />
LNB-Band:<br />
DiSEqC-Ton:<br />
SMATV:<br />
F I<br />
1. La sélection de la fréquence audio à gauche est faite en appuyant sur l'une des<br />
touches → ou ← R4/R6, ou en la tapant directement (valeur à trois chiffres pour la<br />
fréquence sonore de la sous-porteuse) au pavé numérique R2. La fréquence audio de<br />
droite s'altère automatiquement en pas de 180 Hz par rapport à la fréquence audio de<br />
gauche.<br />
2. Vous pouvez ici procéder au réglage du désemphasage requis:<br />
STEREO/ADAPT/ETROIT → MONO/ADAPT/ETROIT → MONO/ADAPT/LARGE →<br />
MONO/J17/LARGE → MONO/50U/LARGE<br />
SMATV = AUS<br />
Vert./Horiz. →<br />
EIN/AUS →<br />
A/B →<br />
SMATV = EIN<br />
Vert./Horiz.<br />
9,75/10,60 GHz<br />
A/B<br />
1/2<br />
3. Activez la sécurité enfants / le verrouillage. Si vous avez réglé sur ON, le programme<br />
“verrouillé” sera purement et simplement sauté lorsque vous tenterez de commuter<br />
avec les touches CH↑et CH↓ F2/F3 ou R3/R5. Pour pouvoir recevoir le programme<br />
ainsi verrouillé, tapez sur le pavé numérique R2 de la télécommande le numéro (à trois<br />
chiffres) du programme.<br />
4. Réglage de l'emplacement de programme sur RADIO : appuyez sur ON pour<br />
obscurcir l'écran, qui affiche maintenant une image noire portant l'incrustation<br />
“RADIO”.<br />
5. Si vous souhaitez raccorder, pour ce programme, un décodeur spécial, réglez le<br />
paramètre afférent sur ON.<br />
Lorsque le curseur se trouve sur la dernière ligne, vous pouvez maintenant à l'aide de la<br />
touche CH↓ R5 passer au menu 4 (réglages DiSEqC).<br />
Les points de menu ci-dessous ne sont requis que si des composantes de commutation<br />
DiSEqC sont utilisées. De telles composantes sont en tous les cas nécessaires si vous<br />
souhaitez recevoir plus de quatre bandes de fréquences (par exemple ASTRA Low/High –<br />
H/V et HOTBIRD Low/High – H/V). Pour complément d'informations à cet égard,<br />
adressez-vous à votre revendeur ou à votre installateur.<br />
1. Activez la bande sonore DiSEqC en appuyant sur l'une des touches → ou ← R4/R6.<br />
2. Avec les mêmes touches → ou ← R4/R6, activez le critère d'enclenchement DiSEqC-<br />
SMATV. Pour que le récepteur puisse transmettre aux composantes de commutation<br />
les signaux nécessaires, il est indispensable que cette fonction ait préalablement été<br />
activée dans le menu du système (voir réglages de base, point 4).<br />
Pour mémoriser les réglages effectués, appuyez finalement sur la touche STORE R8, ce<br />
qui amène à l'écran le message “MEMORISER AVEC STORE” ; appuyez une seconde<br />
fois sur la touche STORE pour valider cette action, il apparaît alors le message<br />
“DONNEES MEMORISEES”. A la suite de quoi le récepteur éteint de lui-même l'écran.<br />
Pour abandonner le menu d'écran sans mémoriser les réglages qui viennent d'être<br />
effectués, appuyez simplement sur la touche MENU R7.<br />
→<br />
→<br />
→<br />
→<br />
SAT A<br />
14 V 18 V 14 V 18 V<br />
9,75 9,75 10,6 10,6<br />
A A A A<br />
1 1 1 1<br />
SAT A<br />
14 V 18 V 14 V 18 V<br />
0 kHz 0kHz 22kHz 22kHz<br />
A A A A<br />
13<br />
SAT B<br />
14 V 18 V 14 V 18 V<br />
9,75 9,75 10,6 10,6<br />
B B B B<br />
1 1 1 1<br />
SAT C<br />
14 V 18 V 14 V 18 V<br />
9,75 9,75 10,6 10,6<br />
A A A A<br />
2 2 2 2<br />
SAT B<br />
14 V 18 V 14 V 18 V<br />
0 kHz 0kHz 22kHz 22kHz<br />
B B B B<br />
Verwaltung von bis zu 16 SAT-ZF-Ebenen<br />
SCHALTMÖGLICHKEITEN MIT TONE BURST UND DiSEqC 1.0<br />
1. La selezione della frequenza audio sinistra avviene premendo i tasti freccia → o ←<br />
R4/R6, oppure impostando direttamente il valore della frequenza subportante di 3<br />
posizioni mediante il campo numerico R2. La frequenza audio di destra varia<br />
automaticamente con distanza di 180 kHz rispetto alla frequenza audio di sinistra.<br />
2. Adesso è possibile impostare la necessaria fase Deem:<br />
STEREO/ADAPT/SCHMAL → MONO/ADAPT/SCHMAL → MONO/ADAPT/BREIT →<br />
MONO/J17/BREIT → MONO/50U/BREIT (SCHMAL=STRETTA; BREIT=LARGA)<br />
3. Attivare la sicurezza/blocco bambini. Se è impostato EIN/ON il programma bloccato<br />
viene saltato commutando mediante i tasti CH↑ e CH↓ F2/F3 oppure R3/R5. Per poter<br />
ricevere il programma bloccato, impostare mediante il campo numerico R2 del<br />
telecomando il numero a tre posizioni del programma.<br />
4. Impostazione della locazione di programma su RADIO: EIN/ON spegne il video e lo<br />
sostituisce con un quadro nero con la scritta “RADIO“.<br />
5. Se in corrispondenza di questo programma volete allacciare un decoder di programmi,<br />
impostare detto parametro su EIN/ON.<br />
Quando il cursore si trova sull'ultima riga, è possibile passare al 4° menu per le<br />
impostazioni DiSEqC mediante il tasto CH↓ R5.<br />
Utilizzando componenti di comando DiSEqC è necessario usare i seguenti due punti<br />
menu. Questo è necessario se volete ricevere più di quattro bande di frequenza (per es.<br />
ASTRA Low/High - H/V e HOTBIRD Low/High - H/V). Per maggiori dettagli interpellare il<br />
Vostro negozio specializzato o un elettrotecnico installatore.<br />
1. Attivare il DiSEqC-Tonburst premendo i tasti freccia → o ← R4/R6.<br />
SAT D<br />
14 V 18 V 14 V 18 V<br />
9,75 9,75 10,6 10,6<br />
B B B B<br />
2 2 2 2<br />
2. Attivare il criterio di comando DiSEqC-SMATV premendo i tasti freccia → o ← R4/R6.<br />
Per fare in modo che il receiver fornisca i desiderati segnali di comando ai relativi<br />
componenti, è necessario attivare questa funzione nel menu sistema (vedi impostazioni di<br />
base al punto 4.)<br />
Per salvare le impostazioni effettuate, premere il tasto STORE R8. Appare il messaggio<br />
“SPEICHERN MIT STORE/SALVARE CON STORE“, premendo ancora una volta il tasto<br />
STORE le impostazioni sono salvate (messaggio “DATEN GESPEICHERT/DATI<br />
SALVATI“). Successivamente il receiver esce automaticamente dal menu.<br />
Per uscire dal menu video senza salvare le impostazioni effettuate premere il tasto MENU<br />
R7.
REPARATURSERVICE<br />
D<br />
Dieser Satellitenreceiver ist ein qualitativ hochwertiges Produkt aus europäischer Fertigung<br />
(EU). Sollten Sie dennoch einmal ein technisches Problem damit haben, beachten Sie bitte<br />
folgende Hinweise:<br />
Oftmals kann man sich bei der Fehlersuche selbst helfen. Viele Fehlerquellen haben Ihren<br />
Ursprung im falschen Anschluß oder in der nicht ordnungsgemäßen Aufstellung des Receivers.<br />
Bevor Sie Ihren Händler konsultieren, sollten Sie versuchen, unter Beachtung dieser<br />
Hilfestellung, den Fehler selbst zu finden.<br />
Ist eine Einsendung zur Reparatur erforderlich, verwenden Sie bitte möglichst die Originalverpackung<br />
und senden Sie das Gerät vollständig mit Zubehör ein. Legen Sie dem Gerät eine<br />
Kopie der Rechnung oder der Kaufquittung sowie eine genaue Fehlerbeschreibung bei. Senden<br />
Sie das Paket vollständig frankiert und frei Haus ein.<br />
PROBLEME UND LÖSUNGEN<br />
Grundsätzliches<br />
Ist der Receiver ordnungsgemäß aufgestellt und angeschlossen?<br />
Ist die Satellitenantenne optimal montiert und ausgerichtet?<br />
Wurde die Programmierung anweisungsgemäß durchgeführt?<br />
Ist dies alles zutreffend, prüfen Sie folgende Hinweise:<br />
Receiverdisplay leuchtet nicht, keine Funktion<br />
• Ist der Netzstecker richtig in der Steckdose?<br />
• Ist die Steckdose in Ordnung?<br />
• Ist eventuell das Netzkabel defekt?<br />
Kein Bild, kein Ton<br />
• Benutzen Sie die richtigen Verbindungskabel zwischen Receiver und TV?<br />
• Sind die Verbindungskabel eventuell beschädigt?<br />
• Besteht bei der UHF-Kanaleinstellung eine Übereinstimmung zwischen<br />
• Receiver und TV-Gerät (für den Fall, daß Sie den HF-Ausgang verwenden)?<br />
• Ist Ihre Satellitenantenne optimal ausgerichtet?<br />
• Haben Sie versehentlich einen Programmspeicherplatz aufgerufen, der für<br />
einen anderen Satelliten programmiert ist? Wenn ja, stellen Sie einen<br />
Programmspeicherplatz für den Satelliten ein, auf den Sie Ihre<br />
Satellitenantenne ausgerichtet haben.<br />
Schlechte Bild- und/oder Tonqualität<br />
• Ist die Satellitenantenne optimal ausgerichtet?<br />
• Besteht Übereinstimmung zwischen Video- und Audiofrequenzen und der<br />
aktuellen Belegung auf dem Satelliten?<br />
• Stimmt die Polarisationsebene (vertikal/horizontal)?<br />
• Überprüfen Sie die Audioeinstellung!<br />
Probleme mit dem OSD-Menü (Bildschirmanzeige)<br />
• Sollte das OSD-Menü auch auf der Videoaufnahme zu sehen sein, haben Sie<br />
möglicherweise den Videorecorder an der Scartbuchse für TV<br />
angeschlossen.<br />
Probleme mit der Fernbedienung<br />
• Besteht “freie Sicht” zwischen der Fernbedienung und dem Satellitenreceiver<br />
(unbedingt erforderlich)?<br />
• Ist der Abstand zwischen Fernbedienung und Satellitenreceiver zu groß?<br />
• Sind die Batterien zu schwach?<br />
14<br />
REPAIR SERVICE<br />
This satellite receiver is a top-quality product manufactured in Europe (EU). In the event that<br />
any problems of a technical nature with the product should arise, proceed as follows:<br />
You may be able to identify and solve the problem(s) yourself. Many problems are due to<br />
incorrect connections, defective cabling, or improper installation of the receiver. Before you<br />
consult your dealer for assistance, see if you can identify the source of the problem(s) yourself,<br />
following the trouble-shooting instructions below.<br />
If the receiver must be sent in for repair, repack it in its original packagings, if you still have them<br />
on hand, including all of its components and accessory items, a copy of the sales invoice or<br />
register receipt, and a detailed description of the problem(s) involved, and send to your dealer or<br />
repair center, with all shipping charges prepaid.<br />
TROUBLE-SHOOTING<br />
Before proceeding, verify that<br />
the receiver has been correctly installed and is connected to the satellite antenna,<br />
the satellite antenna has been properly installed and is correctly aligned, and that<br />
the receiver has been correctly programmed in accordance with this instruction<br />
<strong>manual</strong>.<br />
If all of the above appear to be in order and the problem(s) persist(s), continue checking as<br />
follows:<br />
The receiver’s display remains dark and all controls are dead<br />
• Is the line cord plugged into the electrical outlet?<br />
• Is the electrical outlet in proper working order?<br />
• Is the line cord defective?<br />
No picture, no sound<br />
• Are the cables connecting the television set the correct ones?<br />
• Are these cables in order and undamaged?<br />
• If you are using the UHF-OUTPUT jack, do the UHF-channel settings for the<br />
receiver and television set agree with one another?<br />
• Is your satellite antenna correctly aligned?<br />
• Have you inadvertently called up a channel assigned to another satellite? If so,<br />
select a channel assigned to the satellite on which your satellite antenna is<br />
aligned.<br />
Poor picture/sound reproduction<br />
• Is your satellite antenna correctly aligned?<br />
• Do the video and audio frequencies set agree with those currently in effect for the<br />
satellite involved?<br />
• Is the plane of polarization (vertical/horizontal) correctly set?<br />
• Are the audio settings correct?<br />
Problems with the OSD-menu (onscreen display page)<br />
• If the OSD-menu is visible on video recordings, you may have connected the video<br />
recorder to the Scart jack on the television set instead of that on the receiver.<br />
Problems with the remote-control unit<br />
GB<br />
• Is there a clear ”line of sight” from the remote-control unit to the satellite receiver<br />
(this is absolutely essential)?<br />
• Is the remote-control unit too far away from the satellite receiver?<br />
• Are the remote-control unit’s batteries weak?
S.A.V.<br />
F I<br />
Le récepteur satellite est un produit de haute qualité, fabriqué dans la Communauté<br />
Européenne. Auriez-vous cependant des problèmes techniques de quelque nature que ce soit,<br />
observez les remarques suivantes :<br />
Il arrive bien souvent, en présence de défauts, que l'on puisse les dépister soi-même et y<br />
remédier en conséquence. Bon nombre d'erreurs proviennent d'un mauvais raccordement, ou<br />
d'une implantation incorrecte du récepteur. Avant de consulter votre revendeur, essayez, en<br />
tenant compte des remarques afférentes, de localiser vous-même l'origine du défaut.<br />
S'il s'avérait indispensable de nous renvoyer l'appareil pour réparation, servez-vous alors dans<br />
la mesure du possible de son emballage d'origine. Renvoyez-nous l'appareil complet, avec tous<br />
ses accessoires, en y joignant une copie de la facture ou le bon de caisse, ainsi qu'un descriptif<br />
rapide du défaut reproché. Merci de nous renvoyer l'appareil dûment affranchi et hors frais.<br />
PROBLEMES ET REMEDES<br />
Fondamentalement:<br />
• Le récepteur est-il implanté et raccordé correctement ?<br />
• La parabole est-elle correctement montée et orientée de manière optimale ?<br />
• La programmation du récepteur a-t-elle été reconduite selon les instructions ?<br />
Lorsque tout ceci a été contrôlé et est en ordre, vérifiez alors les points énumérés ci-après :<br />
La visu du récepteur ne s'allume pas, aucune fonction possible<br />
• La prise de courant est-elle correctement enfichée ?<br />
• La prise de courant est-elle en ordre ?<br />
• Le cordon d'alimentation serait-il éventuellement défectueux ?<br />
Pas d'image ni de son<br />
• Vous servez-vous du câble de liaison correct entre le récepteur et le téléviseur ?<br />
• Les câbles de liaison seraient-ils éventuellement défectueux ?<br />
• Lorsque vous vous réglez sur le canal UHF, y a-t-il concordance entre le récepteur<br />
et le téléviseur (au cas où vous utiliseriez la sortie HF) ?<br />
• Votre parabole est-elle orientée de manière optimale ?<br />
• Avez-vous appelé par mégarde un emplacement de programme qui serait<br />
programmé pour un autre satellite ? Dans l'affirmative, décalez ce programme<br />
vers un autre emplacement pour lequel vous avez orienté votre antenne<br />
parabolique.<br />
Mauvaise qualité d'image et/ou de ton<br />
• Votre parabole est-elle orientée de manière optimale ?<br />
• Y a-t-il concordance entre les fréquences vidéo et audio et l'affectation actuelle sur<br />
le satellite ?<br />
• Le niveau de polarisation (verticale/horizontale) est-il correct ?<br />
• Vérifiez les réglages audio !<br />
Problèmes avec le menu OSD (Affichage sur l'écran)<br />
• Au cas où le menu OSD serait également visible sur l'enregistrement vidéo, cela<br />
signifie que vous avez probablement raccordé le magnétoscope sur la douille<br />
SCART pour le téléviseur.<br />
Problèmes avec la télécommande<br />
• Assurez-vous que la ligne théorique entre la télécommande et le récepteur satellite<br />
soit dégagée de tout obstacle (nécessité absolue !).<br />
• L'écart entre télécommande et récepteur satellite serait-il trop grand ?<br />
• Les piles de la télécommande seraient-elles éventuellement trop affaiblies ?<br />
15<br />
ASSISTENZA E RIPARAZIONE<br />
Questo ricevitore satellitare è un prodotto di qualità di fabbricazione europea (EU). Se<br />
tuttavia l'apparecchio dovesse dare dei problemi tecnici attenersi alle seguenti<br />
avvertenze:<br />
Spesso è possibile individuare ed eliminare l'anomalia da soli. Molti errori hanno la loro<br />
origine da un errato collegamento oppure in una installazione degli apparecchi collegati al<br />
receiver o del receiver stesso non effettuata correttamente. Prima di andare dal Vostro<br />
negoziante provare ad eliminare da soli l'anomalia seguendo scrupolosamente le<br />
<strong>istruzioni</strong> per l'uso e le indicazioni che seguono .<br />
Se dovesse essere necessaria la spedizione dell'apparecchio, riutilizzare possibilmente<br />
l'imballaggio originale e spedire l'apparecchi al completo di accessori. Allegare<br />
all'apparecchio una copia della fattura o della ricevuta di acquisto e una descrizione<br />
esatta del guasto. Inviare il pacco correttamente affrancato e franco domicilio.<br />
PROBLEMI E SOLUZIONI<br />
Generalità<br />
• Il receiver è stato sistemato e allacciato correttamente?<br />
• L'antenna satellitare è montata e orientata correttamente?<br />
• La programmazione dell'apparecchio è stata effettuata come da <strong>istruzioni</strong>?<br />
Se tutto è in ordine verificare ancora quanto segue:<br />
Il display del receiver non si illumina, nessuna funzione<br />
• La spina di alimentazione è inserita correttamente nella presa?<br />
• La presa di corrente è sotto tensione e funzionante?<br />
• Il cavo di alimentazione è intatto?<br />
Manca il video, manca l'audio<br />
• È stato utilizzato il cavo giusto per il collegamento fra receiver e televisore?<br />
• I cavi di collegamento sono forse danneggiati?<br />
• Esiste coincidenza fra impostazione canale UHF del receiver e del televisore<br />
(nel caso utilizziate l'uscita HF)?<br />
• L'antenna utilizzata è orientata in maniera ottimale?<br />
• Avete richiamato erroneamente una locazione di programma per la quale è s<br />
tato programmato un altro satellite? Se fosse così impostare una locazione<br />
programma per il satellite in direzione del quale avete orientato la Vostra<br />
antenna.<br />
Cattiva qualità video e/o audio<br />
• L'antenna satellitare è orientata in maniera ottimale?<br />
• Esiste coincidenza fra le frequenze video e audio e quelle attribuite al<br />
satellite?<br />
• Il piano di polarizzazione (verticale/orizzontale) è corretto?<br />
• Controllare l'impostazione audio!<br />
Problemi con il menu OSD (visualizzazione)<br />
• Se il menu OSD si dovesse vedere anche sulle registrazioni video, è<br />
possibile che abbiate collegato il videoregistratore alla presa SCART per il TV<br />
Problemi con il telecomando<br />
• Ci sono ostacoli fra il telecomando e il receiver satellitare? (lo spazio<br />
intermedio deve essere libero)<br />
• La distanza fra telecomando e receiver satellitare è forse troppo grande?<br />
• La batterie sono troppo deboli?
Austattung<br />
• 250 voreingestellte Programmspeicherplätze für TV und Radio<br />
• Programmnamen und –liste im OSD<br />
• Bildschirmmenü wählbar in Deutsch oder Englisch<br />
• Zwei (Optional drei) SCART-Buchsen für TV, VCR und Decoder<br />
• Audio-Cinch Anschlüsse für den HIFI-Verstärker<br />
• Sleeptimer von 30 Minuten bis 4 Stunden<br />
• Lautstärkeregelung über die Fernbedienung<br />
• Kindersicherung / Sperre<br />
• Programmdatentransfer über SCART-Kabel<br />
• Anpassung für den LNB (Lo: 9,75/10,0/10,60 GHz)<br />
• 22 kHz Steuersignal<br />
• DiSEqC 1.0 Steuerung<br />
• Allgemeine Feinabstimmung für den LNB<br />
Technische Daten<br />
TUNER<br />
Eingangsfrequenzbereich 900 - 2150 MHz<br />
Eingangsimpedanz 75 Ω<br />
Eingangspegel -60 bis -30 dBm<br />
Anschlußbuchse Typ F<br />
LNB-Stromversorgung +18 V (H), +13 V (V), 400 mA max.<br />
Bandbreite 27 MHz<br />
Verstärkungsregelung automatisch (AGC)<br />
Abstimmung PLL-Frequenzsynthese<br />
VIDEO-AUSGANG<br />
Ausgangssignal geklemmt, gefiltert, mit Deemphase<br />
Deemphase CCIR REC, 405-1, 625 Zeilen<br />
Bandbreite 5 MHz<br />
Unterdrückung des Verwischungs signals 40 dB min.<br />
Ausgangspegel 1 Vss bei 75 Ω<br />
Ausgangsbuchse SCART<br />
DECODER-AUSGANG<br />
Ausgangssignal PAL 1 ungeklemmt, ungefiltert, mit Deemphase (optional)<br />
Ausgangssignal PAL 2 geklemmt, gefiltert, mit Deemphase<br />
Ausgangssignal MAC ungeklemmt, ungefiltert, ohne Deemphase (optional)<br />
Ausgangspegel 1 Vss bei 75 Ω<br />
Ausgangsbuchse SCART<br />
AUDIO<br />
Abstimmungsfrequenzbereich 5,0 bis 8,8 MHz<br />
Modus Mono / Stereo wählbar<br />
ZF-Bandbreite 150 / 280 kHz umschaltbar<br />
Deemphase adaptiv / 50 µs / J17 umschaltbar<br />
Frequenzgang 20 Hz bis 15 kHz, ±2 dB<br />
Ausgangspegel 2 Vss bei 600 Ω<br />
Ausgangsbuchse AUDIO CINCH<br />
MODULATOR<br />
UHF-Einstellbereich K28 bis K47<br />
Voreinstellung K 38<br />
Ausgangspegel 75 ±4 dBµV<br />
Eingangs-/Ausgangsbuchsen IEC<br />
STROMVERSORGUNG<br />
Netzspannung 230 V (±10%), 50 Hz<br />
Stromverbrauch Betrieb / Standby 25 / 7 W max.<br />
16