PROXIMAT PRO CR
PROXIMAT PRO CR
PROXIMAT PRO CR

You also want an ePaper? Increase the reach of your titles
YUMPU automatically turns print PDFs into web optimized ePapers that Google loves.
ING<br />
INSTRUCTIONS ON USE<br />
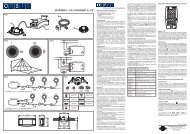
FIG.1<br />
1. Front cover<br />
2. Head<br />
3. Red led<br />
4. Sensor<br />
<strong>PRO</strong>XIMITY SWITCH<br />
DES<strong>CR</strong>IPTION<br />
The <strong><strong>PRO</strong>XIMAT</strong> <strong>PRO</strong> <strong>CR</strong> proximity switch captures the invisible infrared radiation from<br />
persons and other heat sources, but without emitting any type of radiation itself.<br />
When a heat source moves underneath the <strong><strong>PRO</strong>XIMAT</strong> <strong>PRO</strong> <strong>CR</strong> switch, their output circuits<br />
are activated. Once movement is no longer captured, they will deactivate after an<br />
adjustable delay time.<br />
The proximity switch circuit only reacts when the lighting conditions are below the selected<br />
level.<br />
INSTALLATION<br />
WARNING: The assembly and installation of electrical apparatus must be carried out by<br />
an authorised installer.<br />
BEFORE <strong>PRO</strong>CEEDING WITH THE INSTALLATION DISCONNECT THE POWER SU-<br />
PPLY.<br />
The unit is internally protected against interference by means of a safety circuit. However,<br />
certain extra strong electromagnetic fields could modify its operation and, therefore, it must<br />
not be installed close to inductive fields (motors, transformers, transformer substation or<br />
industrial machinery etc.).<br />
MOUNTING<br />
On the wall or ceiling, avoiding highly reflective surfaces (liquids and marble etc.) within<br />
its detection area, elements that are subject to sharp changes in temperature (heating, air<br />
conditioning and possible air currents etc.) or light sources. The <strong><strong>PRO</strong>XIMAT</strong> <strong>PRO</strong> <strong>CR</strong> can<br />
be installed outside because of its IP55 casing.<br />
Depending on how the <strong><strong>PRO</strong>XIMAT</strong> <strong>PRO</strong> <strong>CR</strong> is installed and its height, there are different<br />
detection areas, as shown in FIG.3.<br />
ATTENTION: The maximum installation height is 7 m.<br />
The installation of any proximity sensor must take into account that detection takes place<br />
where the detection beams cross, so that if the heat source to be detected is parallel to the<br />
beams, detection will occur at less distance because it does not cross the beams until it is<br />
very close to the unit, as shown in FIG.5.<br />
To secure the equipment, first remove the front cover by sliding it upwards. Open the inner<br />
cover with a flat-head screwdriver to gain access to the securing holes, as shown in FIG.8.<br />
Secure it to the wall or ceiling using the provided screws.<br />
The <strong><strong>PRO</strong>XIMAT</strong> <strong>PRO</strong> <strong>CR</strong> head can be rotated through 180º so that it can be installed on a<br />
ceiling just as shown in the FIG.6.<br />
The <strong><strong>PRO</strong>XIMAT</strong> <strong>PRO</strong> <strong>CR</strong> includes an accessory for corner installation. The accessory is<br />
fixed to the equipment by means of the provided screws as shown in FIG.7.<br />
CONNECTION<br />
Remove the front cover by sliding it upwards. Open the inner cover with a flat-head screwdriver<br />
in order to access the terminals and connect it according to the diagram of FIG.4.<br />
PUTTING INTO SERVICE AND ADJUSTMENT<br />
During the first connection or prolonged mains power failures, the equipment will remain<br />
active for approximately sixty seconds, after which time its will be ready for operation and<br />
the necessary adjustments.<br />
On sliding open the front cover, three selectors (FIG.9) are exposed for the various adjustments<br />
that can be made to the <strong><strong>PRO</strong>XIMAT</strong> <strong>PRO</strong> <strong>CR</strong> operation.<br />
DETECTION INDICATOR<br />
A red LED indicates the <strong><strong>PRO</strong>XIMAT</strong> <strong>PRO</strong> <strong>CR</strong> status.<br />
• ON: While the load is active during timing. Circuit is ON<br />
• Flashing: The lighting conditions are below the selected LUX level and the device is<br />
prepared to detect.<br />
• Off: The lighting conditions are above the selected LUX level and the device will not react<br />
to heat sources and will not detect.<br />
DETECTION FIELD ADJUSTMENT<br />
The ambient temperature in the <strong><strong>PRO</strong>XIMAT</strong> <strong>PRO</strong> <strong>CR</strong> installation area affects the detection<br />
sensitivity and hence, the detection distance. Since the apparatus operates by detecting<br />
the movement of heat sources, the higher the temperature the poorer the sensitivity, so<br />
the closer to 36ºC is the ambient temperature the worse is the detection (because 36ºC is<br />
human body temperature).<br />
The detection field is adjusted by rotating the SENS selector to the maximum position, the<br />
LUX selector to the ☼ position and the TIME selector to minimum position.<br />
Moving within the detection field limits will check the coverage. The limits of this field can<br />
be varied by the SENS selector.<br />
The <strong><strong>PRO</strong>XIMAT</strong> <strong>PRO</strong> <strong>CR</strong> is supplied with a detection area limiter. This Accessory is divided<br />
into eight sectors with three heights. Each sector blocks a 45º area.<br />
Cut the accessory according to the desired detection area and then fit it over the <strong>PRO</strong>XI-<br />
MAT <strong>PRO</strong> <strong>CR</strong> lens (FIG.10). Do not fit the limiter if the detection area is 360º.<br />
The sensor can be rotated through 180º to move the detection zone towards the desired<br />
area.<br />
LUMINOSITY ADJUSTMENT<br />
The <strong><strong>PRO</strong>XIMAT</strong> <strong>PRO</strong> <strong>CR</strong> proximity switch can be adjusted to that it only operates when<br />
the lighting conditions are below the selected level. By turning the LUX selector to the ☼<br />
position it will react under any luminosity conditions. By turning it to the y position, it will<br />
only react under low luminosity conditions.<br />
Luminosity measurement can only be performed when the output circuit is deactivated.<br />
ADJUSTING THE CONNECTION DELAY<br />
By rotating the TIME selector, the load switch on time can be varied between the following<br />
values:<br />
• Position : switch on 1 second, of 4 seconds. Minimum time.<br />
• Positions from 10 seconds to 10 minutes: switch on from 10s, 30s, 1min., 2 min., 3 min.,<br />
5 min., 10 min. (maximum time).<br />
The timings from 10 seconds to 10 minutes are reinitialised with each new detection. During<br />
load connection, the red LED will remain permanently on.<br />
In order for the changes to the adjustment potentiometers to take effect, it is necessary<br />
to leave the detection area and wait for the installation to switch off.<br />
TECHNICAL SPECIFICATIONS<br />
Power supply<br />
230 Vac 50 Hz.<br />
Breaking power µ10 A 230 Vac cos φ = 1.<br />
Own consumption: 11 VA capacitive (1.5 W)<br />
Luminosity range:<br />
10 to 1000 Lux.<br />
Timing range:<br />
1 second to 10 minutes.<br />
Detection angle:<br />
360° maximum.<br />
Recommended maximum loads:<br />
see Fig.2.<br />
Operating temperature<br />
-10ºC to +45ºC<br />
Protection type IP 55 according to EN 60529<br />
Protection class:<br />
Class II according to EN 60669 under correct<br />
installation conditions.<br />
<strong>PRO</strong>GRAMMING WITH THE REMOTE CONTROL<br />
DES<strong>CR</strong>IPTION<br />
The <strong>CR</strong> remote control allows simple changing of parameters<br />
and special functions for installed <strong>CR</strong> proximity detectors.<br />
It has a range of approximately 8 meters and permits<br />
fast, precise programming without any need for tools or<br />
step-ladders.<br />
When the <strong><strong>PRO</strong>XIMAT</strong> <strong>PRO</strong> <strong>CR</strong> receives a program from<br />
the <strong>CR</strong> remote control, a red LED will flash for a few seconds.<br />
If we modify any of the adjustments from the <strong>CR</strong> remote<br />
control, they will prevail over the manual adjustments<br />
trough the manual controls of the <strong><strong>PRO</strong>XIMAT</strong> <strong>PRO</strong> <strong>CR</strong>.<br />
If after programming from the <strong>CR</strong> remote control we change<br />
any of the manual adjustments, the manual adjustment will<br />
prevail.<br />
TIME 1<br />
10'' 30'' 1'<br />
2' 3' 5' 10'<br />
TIME 2<br />
10'' 30'' 1' 2'<br />
3' 5' 10' 15'<br />
10 100 500<br />
LUX<br />
1000<br />
SENS<br />
S<br />
MIN 50% 75% MAX<br />
S<br />
TEST MODE<br />
This is used to verify the detection field of each proximity switch by pressing the<br />
button and moving to the detection field limits in order to check coverage. In this mode,<br />
the proximity switch detected independently of the light level. If not changed manually, the<br />
mode will automatically change AUTO mode after five minutes.<br />
AUTO MODE<br />
Proximity switch automatic mode operation is programmed by pressing the button on<br />
the <strong>CR</strong> remote control and then selecting the time (TIME 1) during which the installation<br />
is to remain switched on. We can select between (one second ON and four seconds<br />
OFF), ten seconds, thirty seconds, one minute, two minutes, three minutes, five minutes<br />
and ten minutes.<br />
Light level LUX (the light level value below which the proximity switch will detect) is now<br />
selected from among the following values: 10 (only detects at night), 100, 500 or 1000 Lux<br />
(it will detect in any light level situation, during the day and night).<br />
Sensitivity SENS can be selected from the following values: Minimum, 50%, 75% or Maximum.<br />
These same parameters can be used to program the rest of the installation simply by positioning<br />
the remote control within range of each one and pressing the button so that<br />
they are programmed with the same parameters as previously set. This operation has to<br />
be repeated for each proximity switch.<br />
SPECIAL <strong>PRO</strong>GRAMMING MODES<br />
- MODE 5H ON<br />
When the button is pressed, the installation will remain switched on for five hours without<br />
interruption to allow cleaning and maintenance work to be performed. It will automatically<br />
return to AUTO mode after this time.<br />
- HOLIDAY MODE<br />
Holiday mode enables the installation to simulate one presence per day during long<br />
periods of absence. When this function is programmed, the proximity switch will turn the<br />
installation on for one hour when lighting conditions are those selected. After this time, it<br />
will then perform random switching during the next two hours for variable times between<br />
five and fifteen minutes.<br />
- ALARM MODE<br />
If this function is programmed, the proximity switch will turn on the installation with a<br />
sequence of fire alarm switching on and off lasting one second during thirty seconds when<br />
it detects any movement. During the last five seconds, it changes to a sequence switching<br />
on and off every 0.5 seconds.<br />
The LUX / SENS and TIME parameters can be changed in any function mode without<br />
having to change to AUTO mode<br />
For further information on programming, please read the instruction manual for the device<br />
to be configured.<br />
AUTO<br />
5H<br />
ON<br />
TEST<br />
FRA<br />
MODE D’EMPLOI<br />
FIG.1<br />
TÉLÉCOMMANDE POUR DÉTECTEURS DE <strong>PRO</strong>XIMITÉ<br />
1. Couvercle frontal<br />
2. Tête<br />
3. Voyant rouge<br />
4. Capteur<br />
DES<strong>CR</strong>IPTION<br />
L’interrupteur de proximité <strong><strong>PRO</strong>XIMAT</strong> <strong>PRO</strong> <strong>CR</strong> capte les émissions invisibles infrarouges<br />
provenant des personnes et d’autres sources de chaleur sans émettre aucun type<br />
de radiation.<br />
Lorsqu’une source de chaleur bouge sous le <strong><strong>PRO</strong>XIMAT</strong> <strong>PRO</strong> <strong>CR</strong>, ses circuits de sortie<br />
s’activent. Une fois qu’il ne capte plus de mouvement, ils se désactivent après un délai de<br />
retard réglable.<br />
Le circuit de l’interrupteur de proximité ne réagit que lorsque les conditions de lumière sont<br />
en dessous du niveau sélectionné.<br />
INSTALLATION<br />
ATTENTION : l’installation et le montage des appareils électriques doivent être réalisés<br />
par un installateur agréé.<br />
AVANT DE <strong>PRO</strong>CÉDER À L’INSTALLATION, DÉCONNECTEZ L’ALIMENTATION.<br />
L’appareil est internement protégé contre les interférences par un circuit de sécurité. Toutefois,<br />
certains champs électromagnétiques particulièrement forts peuvent arriver à altérer<br />
son fonctionnement. Par conséquent, il ne doit pas être installé à proximité de champs inductifs<br />
(moteurs, transformateurs, centres de transformation, machinerie industrielle, etc.).<br />
MONTAGE<br />
Sur mur ou toit, en évitant que dans sa zone de détection se trouvent des surfaces hautement<br />
réfléchissantes (liquides, marbre, etc.), des éléments sujets à de brusques changements<br />
de température (chauffage, air climatisé, possibles courants d’air, etc.) ou des<br />
sources lumineuses. Le <strong><strong>PRO</strong>XIMAT</strong> <strong>PRO</strong> <strong>CR</strong> peut être installé à l’air libre grâce à son<br />
enveloppe IP55.<br />
En fonction du mode d’installation du <strong><strong>PRO</strong>XIMAT</strong> <strong>PRO</strong> <strong>CR</strong> et de la hauteur de montage,<br />
différentes zones de détection seront obtenues, comme illustré sur la FIG.3.<br />
ATTENTION : La hauteur maximale d’installation est de 7 m.<br />
Lors de l’installation de tout détecteur de proximité, il faut tenir compte du fait que la détection<br />
se produit lorsque l’on croise ses faisceaux de détection et que, par conséquent, si la<br />
source de chaleur à détecter avance parallèlement aux faisceaux, la détection se produit<br />
à une plus faible distance, puisque qu’elle ne traverse pas les faisceaux que lorsqu’elle<br />
arrive très près de l’appareil (FIG.5).<br />
Pour fixer l’équipement, retirer le couvercle frontal en le faisant glisser vers le haut. Ouvrir<br />
le couvercle intérieur à l’aide d’un tournevis à bout plat pour pouvoir accéder aux trous de<br />
fixation (FIG.8). Fixer au mur ou au plafond avec les vis fournies.<br />
Le <strong><strong>PRO</strong>XIMAT</strong> <strong>PRO</strong> <strong>CR</strong> permet un pivotement de 180º de sa tête afin de pouvoir l’installer<br />
au plafond, comme illustré sur la FIG.6.<br />
Le <strong><strong>PRO</strong>XIMAT</strong> <strong>PRO</strong> <strong>CR</strong> comprend un accessoire pour l’installation dans les coins ou les<br />
angles. Pour fixer l’accessoire à l’équipement, il faut le visser avec les vis fournies, comme<br />
illustré sur la FIG.7.<br />
CONNEXION<br />
Retirer le couvercle frontal en le faisant glisser vers le haut. Ouvrir le couvercle intérieur à<br />
l’aide d’un tournevis à bout plat pour accéder aux bornes et réaliser la connexion conformément<br />
au schéma de la FIG.4.<br />
MISE EN MARCHE ET RÉGLAGE<br />
Lors de la première connexion ou en cas de coupures prolongées de l’alimentation,<br />
l’équipement reste activé pendant environ 60 secondes. Une fois ce délai écoulé, il est prêt<br />
à fonctionner et à réaliser les réglages sélectionnés.<br />
Le couvercle frontal glissant permet d’accéder aux trois sélecteurs pour les différents réglages<br />
qu’il est possible de réaliser pour le fonctionnement du <strong><strong>PRO</strong>XIMAT</strong> <strong>PRO</strong> <strong>CR</strong>, comme<br />
illustré sur la FIG.9.<br />
INDICATEUR DE DÉTECTION<br />
Un voyant rouge indique l’état du <strong><strong>PRO</strong>XIMAT</strong> <strong>PRO</strong> <strong>CR</strong>.<br />
• Allumé : lorsque la charge est activée pendant la temporisation. Circuit ON.<br />
• Clignotant : les conditions de luminosité sont inférieures au niveau LUX sélectionné et le<br />
dispositif est prêt pour la détection.<br />
• Éteint : Les conditions de luminosité sont supérieures au niveau LUX sélectionné et le<br />
dispositif ne réagira aux sources de chaleur. Pas de détection.<br />
RÉGLAGE DU CHAMP DE DÉTECTION<br />
La température ambiante de l’enceinte où est installée la <strong><strong>PRO</strong>XIMAT</strong> <strong>PRO</strong> <strong>CR</strong> a une influence<br />
sur la sensibilité de la détection et, par conséquent, sur la distance de détection.<br />
Puisque l’appareil fonctionne par détection du mouvement d’une source de chaleur, plus<br />
la température est élevée, plus la sensibilité est faible. C’est pour cette raison que plus<br />
la température ambiante se rapproche de 36 ºC, plus la détection est faible (36 ºC est la<br />
température du corps humain).<br />
Pour régler le champ de détection, tournez le sélecteur SENS sur la position maximale, le<br />
sélecteur LUX sur la position ☼ et le sélecteur TIME sur la position minimale.<br />
Déplacez-vous dans les limites du champ de détection afin de vérifier la couverture. Les<br />
limites de ce champ peuvent être modifiées à l’aide du sélecteur SENS.<br />
Le <strong><strong>PRO</strong>XIMAT</strong> <strong>PRO</strong> <strong>CR</strong> est fourni avec un limiteur de la zone de détection. L’accessoire<br />
est divisé en 8 secteurs avec trois hauteurs. Chaque secteur bloque une zone de 45º.<br />
Couper l’accessoire en fonction de la zone de détection souhaitez, puis le placer sur la<br />
lentille du <strong><strong>PRO</strong>XIMAT</strong> <strong>PRO</strong> <strong>CR</strong> (FIG.10). Si une zone de détection de 360º est souhaitée,<br />
ne pas placer le limiteur.<br />
Le capteur peut pivoter de 180º, ce qui permet de déplacer la zone de détection dans la<br />
direction souhaitée.<br />
RÉGLAGE DE LA LUMINOSITÉ<br />
L’interrupteur de proximité <strong><strong>PRO</strong>XIMAT</strong> <strong>PRO</strong> <strong>CR</strong> peut être gradué de façon à agir seulement<br />
lorsque les conditions de lumière sont en dessous du niveau sélectionné. En tournant<br />
le sélecteur LUX jusqu’à la position ☼, il réagira dans n’importe quelle condition de<br />
luminosité. En tournant jusqu’à la position y, il ne réagira que dans des conditions de<br />
luminosité faible.<br />
La mesure de la luminosité n’est réalisée que lorsque son circuit de sortie est désactivé.<br />
RÉGLAGE DU DÉLAI DE CONNEXION<br />
En tournant le sélecteur TIME, il est possible de fixer le temps d’allumage de la charge sur<br />
les valeurs suivantes :<br />
• Position : allumage 1 s, extinction 4 s (temps minimal).<br />
• Positions de 10 s à 10 min : allumage 10 s, 30 s, 1 min, 2 min, 3 min, 5 min, 10 min<br />
(temps maximal).<br />
Les temporisations de 10 s à 10 minutes sont réinitialisées à chaque captage réalisé. Lors<br />
de la connexion de la charge, le voyant rouge de l’équipement reste allumé.<br />
Pour que les modifications réalisées dans les potentiomètres de réglage de<br />
l’équipement soient appliquées, il est nécessaire de sortir de la zone de détection et<br />
d’attendre l’extinction de l’installation.<br />
CARACTÉRISTIQUES TECHNIQUES<br />
Alimentation<br />
230 Vac 50 Hz<br />
Pouvoir de rupture µ10 A 230 V~ cos φ = 1<br />
Consommation propre : 11 VA capacitifs (1,5 W)<br />
Intervalle de luminosité :<br />
10 à 1 000 Lux<br />
Intervalle de temporisation :<br />
de 1 s à 10 min<br />
Angle de détection :<br />
360° maximum<br />
Charges maximales recommandées : FIG.2<br />
Température de fonctionnement : -10 ºC à +45 ºC<br />
Type de protection IP 55 selon EN 60529<br />
Classe de protection :<br />
classe II selon EN 60669 dans des conditions de<br />
montage correctes.<br />
<strong>PRO</strong>GRAMMATION AVEC TÉLÉCOMMANDE<br />
DES<strong>CR</strong>IPTION<br />
La télécommande <strong>CR</strong> est compatible avec les détecteurs<br />
de proximité. Elle permet de changer facilement les paramètres<br />
et les fonctions spéciales des détecteurs de proximité<br />
installés. Avec une portée d’environ 8 mètres, elle permet<br />
une programmation rapide et précise sans avoir besoin<br />
d’outils ni d’échelle.<br />
A la réception d’un ordre de la télécommande <strong>CR</strong> par le<br />
<strong><strong>PRO</strong>XIMAT</strong> <strong>PRO</strong> <strong>CR</strong> une led bleue clignote pendant quelques<br />
secondes.<br />
Si vous modifiez n’importe quel ajustement à partir de la<br />
télécommande ceux-ci prévalent sur les contrôles manuels<br />
du <strong><strong>PRO</strong>XIMAT</strong> <strong>PRO</strong> <strong>CR</strong>.<br />
Si après une programmation avec la télécommande vous<br />
changez n’importe quel ajustement en manuel sur le<br />
<strong><strong>PRO</strong>XIMAT</strong> <strong>PRO</strong> <strong>CR</strong> ceux-ci prévalent.<br />
TIME 1<br />
10'' 30'' 1'<br />
2' 3' 5' 10'<br />
TIME 2<br />
10'' 30'' 1' 2'<br />
3' 5' 10' 15'<br />
10 100 500<br />
LUX<br />
1000<br />
SENS<br />
S<br />
MIN 50% 75% MAX<br />
S<br />
MODE TEST<br />
Il permet de vérifier le champ de détection de chaque interrupteur de proximité. Appuyez<br />
sur la touche , puis déplacez-vous dans les limites du champ de détection pour vérifier<br />
la couverture. Dans ce mode, l’interrupteur de proximité fonctionne indépendamment de<br />
la luminosité. Si vous ne changez pas manuellement de mode, l’appareil passe au mode<br />
AUTO au bout de 5 minutes.<br />
MODE AUTO<br />
Il permet de programmer le fonctionnement automatique de l’interrupteur de proximité.<br />
Appuyez sur la touche de la télécommande <strong>CR</strong>, puis sélectionnez le temps (TIME1)<br />
pendant lequel vous souhaitez que votre installation reste allumée. Vous avez le choix<br />
entre (1 seconde ON et 4 secondes OFF), 10 secondes, 30 secondes, 1 minute, 2<br />
minutes, 3 minutes, 5 minutes et 10 minutes.<br />
Sélectionnez ensuite la luminosité LUX (valeur en dessous de laquelle l’interrupteur de<br />
proximité commencera la détection) en choisissant entre les valeurs suivantes : 10 (détection<br />
seulement la nuit), 100, 500 ou 1000 Lux (détection dans toute situation de luminosité,<br />
tant de jour que de nuit).<br />
Pour programmer la sensibilité SENS, vous pouvez choisir entre les valeurs suivantes : sensibilité<br />
minimale, 50 %, 75 % ou sensibilité maximale.<br />
Si vous souhaitez programmer ces mêmes paramètres pour le reste de votre installation, il<br />
suffit de vous placer à la distance de portée de chaque appareil et d’appuyer sur la touche<br />
pour qu’il soit programmé avec les mêmes paramètres marqués antérieurement. Répétez<br />
la même opération pour chaque interrupteur de proximité.<br />
MODES SPÉCIAUX DE <strong>PRO</strong>GRAMMATION<br />
- MODE 5H ON<br />
Lorsque vous appuyez sur la touche , l’installation restera allumée pendant 5 heures<br />
de suite pour permettre les tâches de nettoyage, de maintenance, etc. Une fois ce temps<br />
écoulé, l’appareil passe automatiquement au mode AUTO.<br />
- MODE VACANCES<br />
Le mode vacances permet à votre installation de simuler une présence journalière<br />
pendant de longues périodes d’absence. Lors de la programmation de cette fonction,<br />
l’interrupteur de proximité allumera l’installation pendant une heure lorsque les conditions<br />
de luminosité sont celles sélectionnées. Ensuite, il réalisera des allumages aléatoires<br />
pendant les deux heures suivantes avec des allumages variables compris entre 5 et 15<br />
minutes.<br />
- MODE ALARME<br />
Si vous programmez cette fonction , le détecteur de proximité allumera l’installation en<br />
cas de détection de mouvement avec une séquence d’alarme d’allumages et d’extinctions<br />
de 1 seconde de durée pendant 30 secondes, et les 5 dernières secondes avec une séquence<br />
d’allumages et d’extinctions toutes les 0,5 secondes.<br />
Les paramètres LUX / SENS et TIME peuvent être modifiés dans n’importe quel mode<br />
de fonction sans besoin de passer au mode AUTO.<br />
Pour en savoir plus sur la programmation, consultez le manuel d’instructions du dispositif<br />
à configurer.<br />
AUTO<br />
5H<br />
ON<br />
TEST