Télécharger la notice au format pdf (36ko) - Babymoov
Télécharger la notice au format pdf (36ko) - Babymoov
Télécharger la notice au format pdf (36ko) - Babymoov

Create successful ePaper yourself
Turn your PDF publications into a flip-book with our unique Google optimized e-Paper software.
0+<br />
Babyphone Digital Green<br />
Réf. : A014200<br />
Notice d’utilisation • Instructions for use<br />
Benutzungsanleitung •Gebruikshandleiding • Instrucciones de uso<br />
Instruções de uso • Istruzioni per l’uso • Návod k používání<br />
<strong>Babymoov</strong><br />
Parc Industriel des Gravanches<br />
16, rue Jacqueline Auriol<br />
63051 Clermont-Ferrand cedex 2 - France<br />
www.babymoov.com
EC DÉCLARATION DE CONFORMITÉ<br />
<strong>Babymoov</strong><br />
Parc Industriel des Gravanches<br />
16, rue Jacqueline Auriol<br />
63051 Clermont Ferrand cedex 2<br />
France<br />
Déc<strong>la</strong>re que le produit suivant :<br />
Modèle : Babyphone Digital Green<br />
Référence : A014200<br />
Modèle : BC-52<br />
est conforme <strong>au</strong>x normes harmonisées appropriées suivantes :<br />
EMC : EN 301489-1 V1.9.2 (2011-09) EN 301489-3 V1.4.1 (2002-08)<br />
Radio : EN 300220-1 V2.3.1 (2010-02) EN 300220-2 V2.3.1 (2010-02)<br />
Health : EN 50371 : 2002<br />
Safety : EN 60065 : 2002 + A1 : 2006 + A11 : 2008 + A2 : 2010 + A12 : 2011<br />
En accord avec les dispositions de <strong>la</strong> directive du Conseil 99/05/CE sur<br />
l'équipement par radio et l'équipement terminal de télécommunications<br />
et <strong>la</strong> reconnaissance mutuelle de leur conformité.<br />
Nom : Mr L<strong>au</strong>rent Windenberger<br />
Fonction : Directeur marketing<br />
Signature : Date : 10/10/12
COMMANDES - CONTROLS - STEUERUNGEN - BEDIENING<br />
MANDOS - COMANDOS - COMANDI - OVLÁDÁNÍ PŘÍSTROJE<br />
Émetteur - Transmitter - Sender<br />
Zender - Transmisor - Emissor<br />
Trasmettitore - Vysí<strong>la</strong>č<br />
Récepteur - Receiver - Empfänger<br />
Ontvanger - Receptor - Receptor<br />
Ricevitore - Přijímač<br />
3<br />
BABYPHONE DIGITAL GREEN
Écran du récepteur - Parent unit (PU) LCD screen - Elterneinheit (PU) LCD Disp<strong>la</strong>y<br />
Ouderunit (PU) LCD scherm - Pantal<strong>la</strong> LCD de <strong>la</strong> unidad parental (UP) - Visor LCD Unidade pais (PU)<br />
Disp<strong>la</strong>y LCD Unità genitori (UG) - Displej LCD jednotky Rodi e (PU)<br />
Écran de l’émetteur - Baby unit (BU) LCD screen - Babyeinheit (BU) LCD Disp<strong>la</strong>y<br />
Baby unit (BU) LCD scherm - Pantal<strong>la</strong> LCD de <strong>la</strong> unidad del bebe (UB) - Visor LCD Unidade Bebê (BU)<br />
Disp<strong>la</strong>y LCD Unità bimbo (UB) - Displej LCD jednotky Dít (BU)<br />
4<br />
BABYPHONE DIGITAL GREEN
FR<br />
NOTICE D’UTILISATION<br />
Merci d'avoir choisi notre babyphone Digital Green. Nous vous invitons à lire attentivement cette <strong>notice</strong><br />
d'utilisation, ce<strong>la</strong> vous permettra de maximiser les performances et <strong>la</strong> durée de vie de votre appareil. Toutefois,<br />
si vous observez un déf<strong>au</strong>t ou si vous rencontrez un quelconque problème, veuillez contacter notre service<br />
consommateur.<br />
IMPORTANT : Ce babyphone utilise un mode <strong>au</strong>dio avec des puissances d’émission faibles, afin de préserver<br />
<strong>la</strong> santé de bébé. Par ailleurs, le mode <strong>au</strong>dio dispose de <strong>la</strong> fonction VOX : le récepteur et l’émetteur ne<br />
communiquent pas de manière continue afin de limiter les radiations émises dans <strong>la</strong> chambre. Quand bébé<br />
pleure, le système s’active immédiatement pour vous alerter ; quand bébé ne pleure pas, l’émetteur et le<br />
récepteur communiquent toutes les 20 s seulement pour vérifier <strong>la</strong> bonne communication.<br />
• Technologie numérique, fonctionne sur les fréquences<br />
863-870 MHz sans <strong>au</strong>cune interférence.<br />
• Basculement et recherche <strong>au</strong>tomatique des can<strong>au</strong>x.<br />
• Portée de 800m dans un espace ouvert.<br />
• Faible puissance des ondes.<br />
• Fonction « Répondre à Bébé » sur le récepteur afin<br />
d’apaiser votre enfant à distance.<br />
• Possibilité de connecter jusqu’à 2 émetteurs.<br />
• Veilleuse douce sur l’émetteur. Possibilité de contrôle<br />
à distance à partir du récepteur.<br />
• Indicateur de température.<br />
FONCTIONS<br />
• Indicateur de l’état de <strong>la</strong> batterie et alerte de batterie<br />
faible sur l’émetteur et le récepteur.<br />
• Rég<strong>la</strong>ge de <strong>la</strong> sensibilité du microphone sur<br />
l’émetteur.<br />
• A<strong>la</strong>rme hors de portée (visuelle et sonore).<br />
• Contrôle du volume sur le récepteur.<br />
• A<strong>la</strong>rme sonore, visuelle et par vibration sur le<br />
récepteur.<br />
• Ecran rétro éc<strong>la</strong>iré pour une meilleure lisibilité.<br />
• Récepteur muni d’une batterie <strong>au</strong><br />
lithium rechargeable.<br />
AVERTISSEMENT<br />
- Le Babyphone Digital Green ne doit pas être perçu comme un appareil médical. En plus de l’utilisation du Babyphone<br />
Digital Green, il est vivement recommandé que votre bébé fasse régulièrement l’objet d’un contrôle direct de <strong>la</strong> part<br />
d’un adulte. Les bébés prématurés ou les enfants considérés comme à risque doivent faire l’objet d’un contrôle par<br />
votre pédiatre ou <strong>au</strong>tre personnel de santé.<br />
- Ne vous éloignez jamais de votre enfant hors de <strong>la</strong> maison, même un court instant.<br />
- Les piles non rechargeables ne doivent pas être rechargées.<br />
- Les piles rechargeables doivent être retirées de l’appareil avant d’être rechargées.<br />
- Ne mé<strong>la</strong>ngez pas des piles neuves et des piles usagées, ou des piles rechargeables et des piles alcalines.<br />
- Les piles rechargeables ne doivent être chargées que sous <strong>la</strong> surveil<strong>la</strong>nce d’un adulte.<br />
- Les piles doivent être insérées avec <strong>la</strong> bonne po<strong>la</strong>rité (+/-).<br />
- Les piles usées doivent être retirées de l’appareil.<br />
- Les bornes d’alimentation ne doivent pas être court-circuitées.<br />
- Utilisez toujours <strong>la</strong> batterie du récepteur fournie par le fabricant : si <strong>la</strong> batterie est endommagée, elle doit être remp<strong>la</strong>cée<br />
par le fabricant, son service après-vente ou des personnes de qualification simi<strong>la</strong>ire afin d’éviter un danger.<br />
- Pour une utilisation optimale de votre babyphone, et pour limiter toute interférence, nous vous recommandons de<br />
ne brancher <strong>au</strong>cun <strong>au</strong>tre appareil électrique sur <strong>la</strong> même prise que votre babyphone (n’utilisez pas de bloc<br />
multiprise).<br />
• N'utilisez que les adaptateurs secteur fournis. L'utilisation<br />
d'<strong>au</strong>tres adaptateurs est susceptible d’endommager<br />
le Babyphone Digital Green.<br />
• Lorsque vous n’utilisez pas le Babyphone Digital Green<br />
pendant une période prolongée, retirez toutes les piles<br />
de l’émetteur et <strong>la</strong> batterie du récepteur pour éviter tout<br />
dommage lié à une fuite de batterie.<br />
PRÉCAUTIONS<br />
BABYPHONE DIGITAL GREEN • Notice d’utilisation<br />
• Débranchez l’adaptateur secteur de <strong>la</strong> prise murale<br />
lorsque vous n’utilisez pas le Babyphone.<br />
• Le Babyphone Digital Green fonctionne mieux dans une<br />
p<strong>la</strong>ge de température comprise entre - 9 °C et + 50 °C.<br />
• N’exposez pas, de manière prolongée, le Babyphone<br />
Digital Green <strong>au</strong>x rayons directs du soleil et ne le p<strong>la</strong>cez<br />
pas à proximité d’une source de chaleur, dans une<br />
pièce humide, ou très poussiéreuse.<br />
5
• Ne démontez pas l’appareil : il ne contient <strong>au</strong>cune pièce<br />
susceptible d’être utilisée de manière isolée.<br />
• Les équipements électriques et électroniques font l’objet<br />
d’une collecte sélective. Ne pas se débarrasser des<br />
déchets d’équipements électriques et électroniques<br />
avec les déchets municip<strong>au</strong>x non triés, mais procéder<br />
à leur collecte sélective.<br />
Ce symbole indique à travers l’Union Européenne<br />
que ce produit ne doit pas être jeté à <strong>la</strong> poubelle<br />
ou mé<strong>la</strong>ngé <strong>au</strong>x ordures ménagères, mais faire<br />
l’objet d’une collecte sélective.<br />
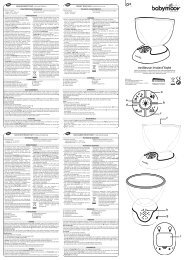
a. Adaptateur secteur 5 V AC x 2<br />
b. Émetteur<br />
c. Récepteur<br />
d. Batterie Lithium-Polymère rechargeable 3.7 V<br />
(installée dans le récepteur)<br />
e. Manuel d'utilisation<br />
ACCESSOIRES STANDARDS<br />
a<br />
b<br />
c<br />
d<br />
e<br />
Émetteur<br />
1. Interrupteur On/Off et veilleuse<br />
2-3. Contrôle de <strong>la</strong> sensibilité du microphone<br />
4. Bouton « Menu »<br />
5. Bouton « Volume »<br />
6. Veilleuse<br />
7. Microphone<br />
8. H<strong>au</strong>t-parleur<br />
9. Sonde de température<br />
10. Prise Jack CC<br />
COMMANDES<br />
Récepteur<br />
11. Interrupteur On/Off et vibreur<br />
12-13. Contrôle du volume<br />
14. Bouton « Menu »<br />
15. Bouton « Répondre à Bébé »<br />
16. Diodes lumineuses indiquant le nive<strong>au</strong> sonore<br />
17. Microphone<br />
18. H<strong>au</strong>t-parleur<br />
19. Voyant « Unité Bébé 1 »<br />
20. Voyant « Unité Bébé 2 »<br />
21. Prise Jack CC<br />
Écran du récepteur<br />
A. Puissance du signal reçu<br />
B. Indicateur du statut de <strong>la</strong> batterie<br />
C. Indicateur du statut de <strong>la</strong> batterie de l’émetteur<br />
D. Numéro de l’émetteur<br />
E. Limite de <strong>la</strong> température maximale<br />
F. Icone de transmission<br />
G. Limite de <strong>la</strong> température minimale<br />
H. Icône du vibreur<br />
I. Barres graphiques indiquant le volume<br />
J. Icône muet du h<strong>au</strong>t-parleur<br />
K. Température de <strong>la</strong> chambre de bébé<br />
L. Icône de <strong>la</strong> veilleuse<br />
M. Icône hors de portée<br />
Écran de l’émétteur<br />
N. Icone de transmission<br />
O. Indicateur du statut de <strong>la</strong> batterie<br />
P. Numéro de l’émetteur<br />
Q. Icone de <strong>la</strong> veilleuse<br />
6<br />
R. Barres graphiques indiquant <strong>la</strong> sensibilité du<br />
microphone et le volume du h<strong>au</strong>t-parleur<br />
S. Température de <strong>la</strong> chambre de bébé<br />
T. Icône hors portée<br />
BABYPHONE DIGITAL GREEN • Notice d’utilisation
ALIMENTATION<br />
A/ ÉMETTEUR<br />
1. Fonctionnement avec piles (non fournies)<br />
Appuyez sur le bouton de verrouil<strong>la</strong>ge et faites glisser le couvercle du compartiment à piles dans <strong>la</strong> direction indiquée.<br />
Insérez 3 piles alcalines de type AAA dans le compartiment. Respectez les indications de po<strong>la</strong>rité (+/-). Refermez<br />
le capot.<br />
N.B. Pour de meilleures performances, ne mé<strong>la</strong>ngez pas les piles neuves et usagées ou les piles rechargeables<br />
et alcalines.<br />
2. Fonctionnement sur secteur<br />
(adaptateur secteur non fourni)<br />
L'émetteur peut être alimenté par une prise de courant en utilisant<br />
l'adaptateur 5 V fourni. Connectez <strong>la</strong> prise de sortie de l’adaptateur<br />
à <strong>la</strong> prise jack CC de l'émetteur (10). Branchez l’adaptateur sur <strong>la</strong> prise<br />
secteur. L’alimentation des piles sera coupée dès lors que l’émetteur<br />
sera branché sur <strong>la</strong> prise secteur.<br />
NB. La distance de portée est plus longue lorsque l’émetteur<br />
fonctionne sur une prise secteur.<br />
10<br />
B/ RÉCEPTEUR<br />
1. Fonctionnement avec <strong>la</strong> batterie fournie<br />
La batterie Lithium-Polymère est déjà installée dans le<br />
récepteur. Pour changer <strong>la</strong> batterie, appuyez sur le bouton<br />
de verrouil<strong>la</strong>ge et faites glisser le couvercle du<br />
compartiment dans <strong>la</strong> direction indiquée, retirez <strong>la</strong> batterie<br />
et débranchez le fil.<br />
2. Chargement de <strong>la</strong> batterie avec l'adaptateur secteur<br />
Connectez <strong>la</strong> prise de sortie de l’adaptateur 5 V à <strong>la</strong> prise jack du<br />
récepteur (21). La batterie se recharge même si le récepteur est<br />
éteint. Lorsque le récepteur est allumé, les barres de l'indicateur<br />
d'état de charge figurant sur l'écran LCD clignotent successivement.<br />
12<br />
Lorsque <strong>la</strong> batterie est complètement chargée, toutes les barres<br />
sont visibles et ne clignotent plus. Il n’est pas obligatoire de<br />
débrancher l'adaptateur du récepteur ; ce<strong>la</strong> n'endommage pas <strong>la</strong><br />
batterie. Lorsque <strong>la</strong> batterie est déchargée et que <strong>la</strong> tension tombe<br />
en dessous d'un certain nive<strong>au</strong>, l'adaptateur recommence alors à<br />
<strong>la</strong> recharger <strong>au</strong>tomatiquement.<br />
NB. Avant <strong>la</strong> 1ère utilisation, chargez <strong>la</strong> batterie Lithium-Polymère<br />
pendant <strong>au</strong> moins 3 heures. Il est recommandé d'éteindre l'appareil pendant le premier chargement.<br />
NB. Pour une plus longue durée de vie de <strong>la</strong> batterie, attendez qu’elle soit complètement déchargée avant de<br />
<strong>la</strong> recharger.<br />
CONNEXION DE L’ÉMETTEUR AU RÉCEPTEUR<br />
Votre émetteur et votre récepteur sont déjà connectés et prêts à communiquer. Ce babyphone peut fonctionner avec<br />
plusieurs émetteurs (jusqu’à 2). Pour connecter un émetteur additionnel, veuillez suivre les étapes suivantes.<br />
1. Maintenez enfoncé le bouton (13) ▼ situé sur le récepteur.<br />
BABYPHONE DIGITAL GREEN • Notice d’utilisation<br />
7
2. Positionnez l'interrupteur marche/arrêt (11) sur ON et patientez jusqu'à ce<br />
qu'un clignote à l'écran.<br />
3. Maintenez enfoncé le bouton (3) sur l’émetteur.<br />
■ FIXE<br />
■ CLIGNOTE<br />
4. Positionnez l'interrupteur marche/arrêt (1) sur ON et patientez jusqu'à ce que<br />
le devienne fixe et que le numéro de l'unité Bébé clignote à l'écran (le cas<br />
échéant, répétez l'opération avec l'unité Bébé supplémentaire).<br />
5. Utilisez les boutons (2) (3) ▲▼ pour sélectionner le numéro de l’émetteur (1)<br />
ou (2). Ne définissez PAS le même numéro pour chaque émetteur, ce<strong>la</strong> ne<br />
permettrait pas <strong>au</strong> système de fonctionner correctement.<br />
6. Appuyez sur le bouton « Menu » (4) pour confirmer <strong>la</strong> sélection, le numéro de<br />
l’émetteur est désormais fixe et le se met à clignoter.<br />
7. Appuyez maintenant sur le bouton « Menu » (4) de l'un des 2 émetteurs, si <strong>la</strong><br />
connexion a fonctionné, le récepteur émet deux bips. Le doit être fixe sur les<br />
deux écrans et le numéro correspondant à l’émetteur doit apparaître en h<strong>au</strong>t<br />
à droite de l'écran sur le récepteur.<br />
8. Appuyez sur le bouton « Menu » (4) du 2nd émetteur, le récepteur doit émettre<br />
deux bips. Le est fixe sur l'écran de l’émetteur et clignote 2 fois sur celui du<br />
récepteur. Le numéro correspondant à l’émetteur apparaît en h<strong>au</strong>t à droite de<br />
l'écran sur le récepteur.<br />
9. Éteignez tous les appareils puis rallumez-les. Le babyphone est désormais opérationnel.<br />
10. Si le récepteur et l’émetteur ne parviennent pas à communiquer, recommencez le processus de connexion.<br />
N.B. Si vous n'aviez <strong>au</strong> départ qu’un seul émetteur et que vous avez ensuite acheté un émetteur supplémentaire,<br />
réalisez de nouve<strong>au</strong> le processus ci-dessus pour connecter les 3 appareils.<br />
FONCTIONNEMENT<br />
A/ ÉMETTEUR<br />
1. Configuration de <strong>la</strong> fonction d'alerte « Hors de portée »<br />
a. Positionnez l'interrupteur marche/arrêt (1) sur ON pour allumer l'écran LCD. Maintenez enfoncé le bouton<br />
« Menu » pendant <strong>au</strong> moins 5 secondes pour accéder <strong>au</strong> mode de programmation. Voici ce qui s'affiche<br />
à l'écran :<br />
ou<br />
■ FIXE<br />
■ CLIGNOTE<br />
b. Utilisez les boutons (2) (3) ▲▼ pour configurer <strong>la</strong> fonction d'alerte « Hors de portée ». « On » signifie que <strong>la</strong> fonction<br />
est activée et « Off » qu'elle est désactivée. Si vous sélectionnez « Off », ce<strong>la</strong> permet de réduire le nive<strong>au</strong><br />
d'émission de l’émetteur. Cependant, le récepteur n'émet plus <strong>au</strong>cune a<strong>la</strong>rme si l’émetteur se trouve hors de<br />
portée et <strong>la</strong> température de <strong>la</strong> pièce où se trouve l’émetteur ainsi que son<br />
état de charge n'apparaissent plus sur l'écran du récepteur lorsqu'il est en<br />
mode veille.<br />
c. Confirmez <strong>la</strong> sélection en appuyant sur le bouton « Menu » (4), l'écran<br />
repasse en mode normal. Si vous avez sélectionné « On », l'icône de l'alerte<br />
« Hors de portée » apparaît à l'écran.<br />
d. En mode veille, appuyez brièvement sur le bouton « Menu » (4) pour afficher<br />
<strong>la</strong> configuration de l'alerte « Hors de portée ».<br />
8<br />
BABYPHONE DIGITAL GREEN • Notice d’utilisation
2. Un capteur intégré à l'appareil détecte <strong>la</strong> température ambiante, celle-ci est affichée simultanément à l'écran de<br />
l’émetteur et du récepteur. Le capteur fonctionne normalement lorsque les températures se situent entre -9 ºC et<br />
+50 ºC. Si des températures inférieures ou supérieures sont enregistrées, le symbole<br />
apparaît à l'écran. Pour éviter que <strong>la</strong> chaleur émise par le circuit électronique de<br />
l'appareil n'affecte le capteur, il est recommandé d'écarter celui-ci de son emp<strong>la</strong>cement<br />
en formant un angle d'environ 15° comme indiqué ci-contre. En cas de brusque<br />
changement de température (ex : l'appareil est dép<strong>la</strong>cé de l'intérieur à l'extérieur en<br />
plein hiver), quelques minutes peuvent être nécessaires avant que le capteur s'adapte<br />
<strong>au</strong> nouvel environnement et affiche <strong>la</strong> bonne température.<br />
3. P<strong>la</strong>cez l’émetteur à environ 1 m du lit de votre enfant en orientant le microphone (7) vers lui.<br />
4. Ajustez <strong>la</strong> sensibilité du microphone à l'aide des boutons (2) (3) ▲▼ , ce<strong>la</strong> vous permet de déterminer à partir de<br />
quel nive<strong>au</strong> sonore l'appareil doit transmettre les sons perçus par le microphone (7). Sur l'écran, le nombre de<br />
barres indiquant <strong>la</strong> sensibilité du microphone change également en fonction du nive<strong>au</strong> choisi. Plus le nombre de<br />
barres <strong>au</strong>gmente, plus <strong>la</strong> sensibilité de l'appareil est importante. Si vous continuez d'appuyer sur le bouton une<br />
fois le nive<strong>au</strong> minimum ou maximum atteint, deux bips retentissent.<br />
5. Dès que l’émetteur se met à émettre, l'écran s'éc<strong>la</strong>ire et l'icône de transmission apparaît . Quelques secondes<br />
après que le microphone (7) a cessé de percevoir des sons, l'appareil se remet en mode veille et l'icône de<br />
transmission disparaît . L'écran s'éteint également pour économiser de l'énergie.<br />
6. Ce babyphone est équipé d'une fonction « Répondre à Bébé », elle permet <strong>au</strong>x parents de parler à leur enfant.<br />
Le nive<strong>au</strong> sonore de <strong>la</strong> voix des parents peut être réglé. Maintenez enfoncé le bouton « Volume » (5), appuyez<br />
sur les boutons (2) (3) ▲▼ pour régler le volume du h<strong>au</strong>t-parleur (8). Sur l'écran, le nombre de barres indiquant<br />
le volume change également en fonction du nive<strong>au</strong> choisi. Lorsqu'il est réglé <strong>au</strong> minimum, le son du h<strong>au</strong>t-parleur<br />
(8) est complètement coupé.<br />
7. La veilleuse (6) peut être allumée en continu en positionnant l'interrupteur marche/arrêt (1) sur <strong>la</strong> position , l'icône<br />
de <strong>la</strong> veilleuse apparaît alors à l'écran . La veilleuse (6) peut <strong>au</strong>ssi être réglée sur VOX<br />
(activation à <strong>la</strong> voix) en appuyant brièvement sur le bouton « Menu » (4), le symbole VOX<br />
apparaît près de l’icône . En mode VOX, <strong>la</strong> veilleuse (6) s'allume lorsque le microphone<br />
détecte un son et s'éteint ensuite <strong>au</strong>tomatiquement lorsqu'il cesse d'en percevoir. Appuyez<br />
brièvement sur le bouton « Menu » (4) pour basculer du mode VOX <strong>au</strong> mode continu.<br />
Vous avez également <strong>la</strong> possibilité de contrôler <strong>la</strong> veilleuse (6) à distance à partir du récepteur, reportez-vous à<br />
<strong>la</strong> section Fonctionnement de cette dernière.<br />
8. L'état des piles est indiqué par l'indicateur d'état de charge . À mesure que <strong>la</strong> charge des piles diminue, les<br />
barres remplissant l'indicateur s'éteignent progressivement. Une fois vide, ce dernier se met à clignoter. L'indicateur<br />
d'état de charge de l’émetteur apparaît également sur l'écran du récepteur, vous pouvez ainsi surveiller l'état des<br />
piles à distance. Une a<strong>la</strong>rme retentit sur votre unité dès que l'indicateur est vide .<br />
9. Un bip retentit à chaque fois que vous appuyez sur un bouton, ce<strong>la</strong> signifie que l'appareil a bien pris en compte<br />
votre action.<br />
B/ RÉCEPTEUR<br />
1. Configuration de <strong>la</strong> fonction d'alerte « Hors de portée » et de l'a<strong>la</strong>rme de température<br />
a. Positionnez l'interrupteur marche/arrêt (11) sur ON pour allumer l'écran LCD. Maintenez enfoncé le bouton «<br />
Menu » (14) pendant <strong>au</strong> moins 5 secondes pour accéder <strong>au</strong> mode de programmation. Voici ce qui s'affiche à<br />
l'écran :<br />
■ FIXE<br />
■ CLIGNOTE<br />
ou<br />
BABYPHONE DIGITAL GREEN • Notice d’utilisation<br />
9
. Utilisez les boutons (12) (13) ▲▼ pour configurer <strong>la</strong> fonction d'alerte « Hors de portée », <strong>la</strong> configuration doit être<br />
identique à celle de l’émetteur. Si <strong>la</strong> configuration est différente, l'a<strong>la</strong>rme peut se déclencher sans raison ou à<br />
l'inverse, ne pas se déclencher même si le récepteur n'est plus à portée de l’émetteur. Si l'appareil est associé<br />
à 2 émetteurs, <strong>la</strong> configuration doit être identique à celle de l’émetteur dont le numéro correspond.<br />
ou<br />
c. Appuyez sur le bouton « Menu » (14) pour confirmer <strong>la</strong> sélection (si vous avez<br />
sélectionné « On », l'icône de l'alerte « Hors de portée » apparaît à l'écran en mode<br />
normal). Voici ce qui s'affiche à l'écran :<br />
d. À l'aide des boutons (12) (13) ▲▼, réglez <strong>la</strong> température maximale <strong>au</strong>-dessus<br />
de <strong>la</strong>quelle l'appareil doit déclencher une a<strong>la</strong>rme. Si vous appuyez brièvement<br />
sur les boutons, les températures défilent degré par degré. Si vous maintenez<br />
les boutons (12) (13) appuyés, le défilement des températures est accéléré.<br />
Vous pouvez sélectionner des températures al<strong>la</strong>nt de - 3 °C à + 50 °C. Si vous<br />
avez sélectionné « Off », <strong>au</strong>cune température maximale n'est définie. Appuyez<br />
sur le bouton « Menu » (14) pour confirmer <strong>la</strong> sélection. Voici ce qui s'affiche<br />
à l'écran :<br />
e. À l'aide des boutons (12) (13) ▲▼, réglez <strong>la</strong> température minimale <strong>au</strong>-dessous<br />
de <strong>la</strong>quelle l'appareil doit déclencher une a<strong>la</strong>rme. Vous pouvez sélectionner<br />
des températures al<strong>la</strong>nt de - 8 °C à + 44 °C ou 2 °C en dessous de <strong>la</strong> température maximale choisie. Si vous<br />
avez sélectionné « Off », <strong>au</strong>cune température minimale n'est définie. Appuyez sur le bouton « Menu » (14) pour<br />
confirmer <strong>la</strong> sélection, l'écran revient en mode normal.<br />
f. Notez que <strong>la</strong> configuration des températures maximales et minimales est identique pour les<br />
deux émetteurs.<br />
g. En mode veille, appuyez brièvement sur le bouton « Menu » (14) pour afficher <strong>la</strong> configuration de l'alerte « Hors<br />
de portée » et de l'a<strong>la</strong>rme de température.<br />
2. P<strong>la</strong>cez le récepteur à une distance raisonnable de l’émetteur pour éviter les réactions parasites. Une trop grande<br />
proximité peut créer un son strident dans le h<strong>au</strong>t-parleur (18).<br />
3. Lorsque le récepteur reçoit un signal, l'écran s'éc<strong>la</strong>ire et les LED de l'indicateur de nive<strong>au</strong> sonore s'allument. Plus<br />
le nive<strong>au</strong> sonore de <strong>la</strong> voix de l'enfant est élevé, plus le nombre de LED allumées est important. Cette fonctionnalité<br />
est utile lorsque les parents préfèrent éteindre le h<strong>au</strong>t-parleur (18) pour rester <strong>au</strong> calme.<br />
En fonction de l’émetteur dont provient le signal, le voyant « Unité Bébé 1 » (19) ou le voyant « Unité Bébé 2 »<br />
(20) s'allume.<br />
4. Le volume du h<strong>au</strong>t-parleur (18) peut être réglé à l'aide des boutons (12) (13) ▲▼. Sur l'écran, le nombre de barres<br />
indiquant le volume change également en fonction du nive<strong>au</strong> choisi. Plus le nombre de barres <strong>au</strong>gmente, plus<br />
le volume du h<strong>au</strong>t-parleur (18) est élevé. Lorsqu'<strong>au</strong>cune barre n'est affichée et que l'icône apparaît, le h<strong>au</strong>tparleur<br />
(18) est complètement coupé.<br />
5. Si le récepteur a été connecté pour fonctionner avec 2 émetteurs, c'est toujours l'unité Bébé n°1 qui est prioritaire.<br />
Ce<strong>la</strong> signifie que si le récepteur est déjà en transmission avec l'unité Bébé n°2 et que l'unité Bébé n°1 commence<br />
à émettre, le récepteur bascule alors immédiatement sur l'unité Bébé n°1, jusqu'à <strong>la</strong> fin de <strong>la</strong> transmission, ce n'est<br />
qu'ensuite qu'elle reprend <strong>la</strong> transmission avec l'unité Bébé n°2.<br />
6. Pour éviter que les parents ne manquent le signal de l'unité Bébé n°2 si celui-ci commence à émettre alors<br />
que le récepteur est déjà en transmission avec l'unité Bébé n°1, le voyant Unité Bébé 2 (20) clignote pour les<br />
avertir. Si les parents veulent écouter <strong>la</strong> transmission de l'unité Bébé n°2, ils peuvent basculer sur celui-ci en<br />
appuyant brièvement sur le bouton « Menu » (14). Le voyant « Unité Bébé 2 » (20) s'allume alors et le voyant<br />
« Unité Bébé 1 » (19) se met à clignoter (si le premier enfant continue de pleurer). Pour basculer à nouve<strong>au</strong><br />
sur l'unité Bébé n°1, il suffit d'appuyer une nouvelle fois sur le bouton « Menu » (14). Il est ainsi possible de<br />
surveiller deux enfants simultanément.<br />
7. En mode veille, s'il y a 2 émetteurs, l'écran affiche alternativement <strong>la</strong> température et l'état de charge de chaque<br />
émetteur pendant 15 secondes. Lorsque l'un des émetteurs commence à émettre, le récepteur reçoit immédiatement<br />
<strong>la</strong> transmission et affiche les in<strong>format</strong>ions concernant l’émetteur en question jusqu'à <strong>la</strong> fin du signal.<br />
10<br />
BABYPHONE DIGITAL GREEN • Notice d’utilisation
Écran affichant les<br />
in<strong>format</strong>ions de l'unité<br />
Bébé n°1 (alerte « Hors<br />
de portée » activée)<br />
Écran affichant les<br />
in<strong>format</strong>ions de l'unité<br />
Bébé n°2 (Alerte « Hors<br />
de portée » désactivée et<br />
veilleuse réglée sur VOX)<br />
8. Le récepteur est équipé d'une fonction vibreur. Positionnez l'interrupteur marche/arrêt (11) sur <strong>la</strong> position vibreur,<br />
l’icone va apparaitre à l’écran. Le vibreur se met à fonctionner lorsque le nive<strong>au</strong> sonore de <strong>la</strong> voix de l'enfant<br />
atteint une certaine intensité. Cette fonctionnalité est utile lorsque les parents se trouvent dans un environnement<br />
très bruyant (ex : bruits d'aspirateurs). Pour économiser de l'énergie, il est recommandé de ne pas utiliser <strong>la</strong><br />
fonction vibreur trop fréquemment.<br />
9. Si vous sélectionnez « On » sur les deux appareils, l'alerte « Hors de portée » se déclenche dès que le récepteur<br />
n'est plus à portée de l'émetteur pendant plus de 30 secondes. L'indicateur de nive<strong>au</strong> sonore à LED (16) ainsi que<br />
l'icône de l'alerte « Hors de portée » se mettent à clignoter pour vous avertir. La température n'est également plus<br />
affichée et le symbole apparaît. L'alerte s'arrête dès que le récepteur est à nouve<strong>au</strong> à portée de l'émetteur.<br />
Si vous utilisez deux émetteurs, les in<strong>format</strong>ions concernant l'émetteur dont vous êtes hors de portée restent<br />
affichées à l'écran pendant toute <strong>la</strong> durée de l'alerte.<br />
N.B. L'alerte se déclenche également lorsque l'émetteur est éteint, que ses piles sont déchargées, qu'il n'est plus<br />
alimenté ou que <strong>la</strong> configuration de l'alerte n'est pas identique sur les deux appareils.<br />
10. Dès que <strong>la</strong> température ambiante dépasse les limites maximales ou minimales de température définies, une a<strong>la</strong>rme<br />
se déclenche. En fonction de <strong>la</strong> limite qui a été dépassée, les icônes (max) ou (min) ainsi que <strong>la</strong><br />
température se mettent à clignoter sur l'écran du récepteur.<br />
11. Il est possible de contrôler à distance <strong>la</strong> veilleuse (6) à partir du récepteur il f<strong>au</strong>t, pour ce<strong>la</strong>, que l'interrupteur<br />
marche/arrêt (1) soit positionné sur .<br />
Maintenez enfoncé le bouton (15) tout en appuyant sur le bouton (12) le nombre de fois nécessaire pour éteindre<br />
(OFF), allumer en continu (ON) ou régler en mode VOX <strong>la</strong> veilleuse. Les icônes correspondantes s'affichent alors<br />
sur l’écran des deux appareils. Notez que le récepteur peut uniquement contrôler <strong>la</strong> veilleuse de l'émetteur dont<br />
le numéro est affiché à l'écran <strong>au</strong> moment où vous appuyez sur le bouton (15).<br />
12. Les parents ont <strong>la</strong> possibilité de pouvoir répondre à leur enfant pour l'apaiser. Maintenez enfoncé le bouton (15),<br />
l'icône de transmission apparaît sur l'écran du récepteur. Parlez dans le microphone (17). Une fois que vous<br />
avez fini de parler, relâchez le bouton (15). À noter que les parents peuvent parler à leur enfant à n'importe quel<br />
moment de leur choix, y compris <strong>au</strong> cours d'une transmission. Le récepteur transmet votre voix à l’émetteur dont<br />
le numéro est affiché à l'écran <strong>au</strong> moment où vous appuyez sur le bouton (15).<br />
13. L'état de <strong>la</strong> batterie <strong>au</strong> lithium est indiqué par l'indicateur d'état de charge . À mesure que <strong>la</strong> charge de <strong>la</strong> batterie<br />
diminue, les segments remplissant l'indicateur s'éteignent progressivement. Une fois vide, ce dernier se met à<br />
clignoter et une a<strong>la</strong>rme se déclenche afin de vous rappeler de recharger <strong>la</strong> batterie à l'aide de l'adaptateur secteur.<br />
14. Un bip retentit à chaque fois que vous appuyez sur un bouton, ce<strong>la</strong> signifie que l'appareil a bien pris en compte<br />
votre action.<br />
BABYPHONE DIGITAL GREEN • Notice d’utilisation<br />
11
GUIDE DE DÉPANNAGE<br />
Problème C<strong>au</strong>ses possibles Solutions<br />
• L’émetteur n'émet pas.<br />
• Le récepteur est éteint.<br />
• La sensibilité du microphone est<br />
trop basse.<br />
• Les piles sont déchargées ou l'adaptateur<br />
secteur n'est pas correctement branché.<br />
• Allumez le récepteur<br />
• Augmentez <strong>la</strong> sensibilité du microphone à<br />
l'aide du bouton (2).<br />
• Remp<strong>la</strong>cez les piles ou vérifiez<br />
le branchement.<br />
• L’émetteur émet en permanence.<br />
• La sensibilité du microphone est trop élevée.<br />
• Diminuez <strong>la</strong> sensibilité du microphone à l'aide<br />
du bouton (3) de façon à ce que l’émetteur<br />
s'active à <strong>la</strong> voix.<br />
• L'alerte « Hors de portée »<br />
ne s'éteint pas.<br />
• L'appairage a échoué.<br />
• Les piles de l’émetteur sont déchargées.<br />
• L'alerte « Hors de portée » est activée sur<br />
l’émetteur mais désactivée sur<br />
le récepteur.<br />
• La distance entre l’émetteur et le récepteur est<br />
trop importante.<br />
• Réalisez un nouvel appairage.<br />
• Remp<strong>la</strong>cez les piles ou utilisez l'adaptateur<br />
secteur.<br />
• Activez l'alerte « Hors de portée »<br />
sur l’émetteur.<br />
• Rapprochez le récepteur de l’émetteur.<br />
• L'alerte « Hors de portée »<br />
ne fonctionne pas.<br />
• L'alerte « Hors de portée » est désactivée sur<br />
les deux appareils.<br />
• L'alerte « Hors de portée » est activée sur<br />
l’émetteur mais désactivée sur<br />
le récepteur.<br />
• Activez l'alerte sur les deux appareils.<br />
• Activez l'alerte sur le récepteur.<br />
• L'a<strong>la</strong>rme de température<br />
ne s'éteint pas .<br />
• Les températures maximales et minimales<br />
définies sont trop proches de <strong>la</strong><br />
température ambiante.<br />
• Réglez les températures maximales et<br />
minimales, celles-ci doivent être supérieures<br />
et inférieure d'environ 5 °C par rapport à <strong>la</strong><br />
température affichée par l'appareil.<br />
• L'alerte de batterie faible<br />
ne s'éteint pas.<br />
• Les piles sont déchargées.<br />
• La batterie est endommagée.<br />
• Rechargez <strong>la</strong> batterie à l'aide de<br />
l'adaptateur secteur (récepteur).<br />
Remp<strong>la</strong>cez les piles ou utilisez l'adaptateur<br />
secteur (émetteur).<br />
• Remp<strong>la</strong>cez <strong>la</strong> batterie par<br />
une batterie neuve.<br />
• La charge ne tient que peu<br />
de temps.<br />
• La veilleuse reste allumée<br />
en permanence.<br />
• La fonction vibreur est activée.<br />
• Éteignez <strong>la</strong> veilleuse ou réglez-<strong>la</strong> sur VOX.<br />
• Désactivez <strong>la</strong> fonction vibreur.<br />
• Sur l'écran du récepteur, les deux<br />
émetteurs possèdent le même numéro.<br />
• Lors de l'appairage, le même numéro a<br />
été attribué <strong>au</strong>x deux émetteurs.<br />
• Réalisez un nouvel appairage en attribuant<br />
un numéro différent à chaque émetteur.<br />
• Le h<strong>au</strong>t-parleur émet be<strong>au</strong>coup de bruits<br />
parasites et d'interférences.<br />
• L'émetteur est p<strong>la</strong>cé à proximité d'<strong>au</strong>tres<br />
appareils électriques.<br />
• Dép<strong>la</strong>cez les appareils électriques ou<br />
changez l'émetteur de p<strong>la</strong>ce, à distance de<br />
<strong>la</strong> source d'interférence.<br />
• La portée de l’émetteur<br />
est trop courte.<br />
• Les deux appareils sont séparés par des<br />
structures métalliques<br />
• Les piles de l'émetteur sont déchargées.<br />
• Changez l'émetteur ou le récepteur<br />
de p<strong>la</strong>ce.<br />
• Remp<strong>la</strong>cez les piles ou utilisez<br />
l'adaptateur secteur.<br />
12<br />
BABYPHONE DIGITAL GREEN • Notice d’utilisation
EN<br />
INSTRUCTION MANUAL<br />
Thank you for choosing our Baby monitor Digital Green. We recommend you read these instructions carefully<br />
in order to use your Baby monitor to best advantage and ensure it continues to operate as long as possible. If<br />
you should find a f<strong>au</strong>lt, however, or if you have any problem, please contact our company.<br />
IMPORTANT: This baby monitor uses low emission power, in order to protect baby’s health. The receiver and the<br />
transmitter don’t communicate continuously, in order to limit the emission of radiations in the room. When<br />
baby cries, the system is activated immediately to alert parents; when the baby doesn’t cry, the transmitter and<br />
the receiver communicate only each 20 seconds to check the good communication.<br />
• Digital technology, works on the frequencies 863-870<br />
MHz with no interference.<br />
• Automatic channel switching and searching.<br />
• 800 metre range in open space.<br />
• Low-power waves.<br />
• “Baby Answering” function on the receiver to quieten<br />
your baby at a distance.<br />
• Possibility of connecting up to 2 Transmitters.<br />
• Gentle nightlight on the Transmitter. Possibility of remote<br />
control from the receiver.<br />
FUNCTIONS<br />
• Temperature indicator.<br />
• Battery charge status indicator and low battery alert on<br />
transmitter and receiver.<br />
• Microphone sensitivity setting on the transmitter.<br />
• Out of range a<strong>la</strong>rm (visual and <strong>au</strong>dio).<br />
• Volume control on the receiver.<br />
• Audio, visual, and vibration a<strong>la</strong>rm on the receiver.<br />
• Back-lit screen for easier viewing.<br />
• Receiver with rechargeable lithium battery.<br />
WARNINGS<br />
- The Baby monitor Digital Green should not be seen as a medical device. In addition to using Baby monitor Digital<br />
Green, it is strongly recommended that an adult checks on your baby directly, on a regu<strong>la</strong>r basis. Premature babies<br />
or children considered to be at risk should be monitored by your pediatrician or a health professional.<br />
- Never go away from your baby outside the house, even a short moment.<br />
- Non-rechargeable batteries are not to be recharged.<br />
- Rechargeable batteries are to be removed from the device before being charged.<br />
- Different types of batteries: new and used batteries, or rechargeable and not rechargeable batteries, are not to<br />
be mixed.<br />
- Rechargeable batteries are only to be charged under adult supervision.<br />
- Batteries are to be inserted with the correct po<strong>la</strong>rity (+/-).<br />
- Exh<strong>au</strong>sted batteries are to be removed from the device.<br />
- The supply terminals are not to be short-circuited.<br />
- Always use the supplied battery for the receiver: if the battery is damaged it must be rep<strong>la</strong>ced by the manufacturer,<br />
the after-sales service or people with simi<strong>la</strong>r qualifications, in order to avoid any risk.<br />
- For best performance of your babyphone, and to reduce any interference, we recommend you do not plug any other<br />
electrical appliance into the same socket as your babyphone. (Do not use multiple socket outlets).<br />
• Use only the supplied AC adapters, use of other adapters<br />
may c<strong>au</strong>se damage to the baby monitor<br />
• When not using the monitor for as long period of time,<br />
remove all batteries from the transmitter and receiver<br />
to avoid damage due to battery leakage.<br />
• Disconnect the AC adapter from the wall outlet when the<br />
monitor is not to be operated.<br />
PRECAUTIONS<br />
BABYPHONE DIGITAL GREEN • Instruction Manual<br />
• The baby monitor is best performed within a temperature<br />
range of -9 °C to +50 °C<br />
• Do not leave the monitor expose to strong sunlight for<br />
a long time or nearby any heat source, moisture and<br />
excessive dusty environment.<br />
13
• Do not open the cabinet, no serviceable part inside.<br />
• Waste Electrical and Electronic Equipment should be<br />
disposed of by selective collection. Do not throw electrical<br />
and electronic equipment away with unsorted household<br />
waste, but dispose of it at a selective collection point.<br />
This marking indicates that this product should<br />
not be disposed with other household wastes<br />
throughout the EU.<br />
a. 5 V AC x 2 mains adapter<br />
b. Transmitter<br />
c. Receiver<br />
d. Lithium-Polymer rechargeable 3.7 V battery<br />
(installed in the receiver)<br />
e. Instruction manual<br />
STANDARD ACCESSORIES<br />
a<br />
b<br />
c<br />
d<br />
e<br />
CONTROLS<br />
Transmitter<br />
1. On/Off switch and nightlight<br />
2-3. Microphone sensitivity control<br />
4. Menu button<br />
5. “Volume” control<br />
6. Nightlight<br />
7. Microphone<br />
8. Speaker<br />
9. Temperature sensor<br />
10. CC Socket<br />
Receiver<br />
11. On/Off switch and vibrator<br />
12-13. Volume control<br />
14. Menu button<br />
15. “Baby answering” control<br />
16. Light diodes indicating sound level<br />
17. Microphone<br />
18. Speaker<br />
19. “Baby 1 Unit” indicator light<br />
20. “Baby 2 Unit” indicator light<br />
21. CC Socket<br />
Parent unit (PU) LCD screen<br />
A. Received signal strength<br />
B. Battery status indicator<br />
C. BU battery status indicator<br />
D. BU number<br />
E. Upper temperature limit<br />
F. Transmit icon<br />
G. Lower temperature limit<br />
H. Vibration icon<br />
I. Speaker volume bar graph<br />
J. Speaker mute icon<br />
K. Baby’s room temperature<br />
L. Night light icon<br />
M. Out of range icon<br />
Baby unit (BU) LCD screen<br />
N. Transmit icon<br />
O. Battery status indicator<br />
P. BU number<br />
Q. Night light icon<br />
14<br />
R. Microphone sensitivity and<br />
speaker volume bar graph<br />
S. Baby’s room temperature<br />
T. Out of range icon<br />
BABYPHONE DIGITAL GREEN • Instruction Manual
POWER SUPPLY<br />
A/ TRANSMITTER<br />
1. Functioning with batteries (not supplied)<br />
Press the locking button and slide the battery compartment lid in the direction indicated. Insert 3 alkaline AAA type<br />
batteries in the compartment. Respect the po<strong>la</strong>rity indications (+/-). Close the cover.<br />
N.B. For the best performances do not mix new and used or rechargeable and alkaline batteries.<br />
2. Functioning on mains (mains adapter supplied)<br />
The transmitter can be powered from a power point by using the 5 V<br />
adapter supplied.<br />
Plug the adapter into the CC socket of the transmitter (10). Connect<br />
the adapter to the mains power point. The power supply from the<br />
batteries will be cut as soon as the ’transmitter is connected to<br />
the mains.<br />
NB. The transmitter has a longer range when it is powered from<br />
the mains.<br />
10<br />
B/ RECEIVER<br />
1. Functioning with the supplied battery<br />
The Lithium-Polymer battery is already installed in the<br />
receiver. To change the battery press on the locking button<br />
and slide the compartment lid in the direction indicated;<br />
take out the battery and disconnect the wire.<br />
2. Charging the battery with the mains adapter<br />
Connect the 5 V adapter plug to the receiver socket (21). The battery<br />
recharges even if the receiver is off. When the receiver is on, the bars<br />
of the charge indicator on the LCD screen f<strong>la</strong>sh repeatedly. When the<br />
battery is fully charged all the bars are visible and stop f<strong>la</strong>shing. It<br />
is not necessary to disconnect the adapter from the receiver; it does<br />
not harm the battery. When the battery loses its charge and the<br />
voltage falls below a certain level the adapter <strong>au</strong>tomatically starts<br />
to recharger again.<br />
NB. Before using for the first time, charge the Lithium-Polymer battery<br />
for at least 3 hours. It is recommended to switch the appliance off<br />
when charging for the first time.<br />
NB. To prolong the life of the battery wait for it to be fully uncharged before recharging it.<br />
12<br />
CONNECTING THE TRANSMITTER TO THE RECEIVER<br />
Your transmitter and your receiver are already connected and ready to communicate. This babyphone can work with<br />
several transmitters (up to 2). To connect an additional transmitter please go through the following stages.<br />
1. Keep the button (13) ▼ on the receiver down.<br />
BABYPHONE DIGITAL GREEN • Instruction Manual<br />
15
2. Switch the start/stop switch (11) to ON and wait until a starts f<strong>la</strong>shing on<br />
the screen.<br />
3. Maintenez enfoncé le bouton (3) sur l’émetteur.<br />
■ STEADY<br />
■ FLASHING<br />
4. Switch the start/stop switch (1) to ON and wait until the becomes steady and<br />
the Baby unit number starts f<strong>la</strong>shing on the screen (if need be repeat the<br />
operation with the additional Baby unit).<br />
5. Use buttons (2) (3) ▲▼ to select the number of the transmitter (1) or (2). Do NOT<br />
define the same number for each transmitter; this stops the system from<br />
working properly.<br />
6. Press the “Menu” button (4) to confirm your selection; the number of the<br />
transmitter is now steady and the starts to f<strong>la</strong>sh.<br />
7. Now press the “Menu” button (4) of either transmitter; if the connection has<br />
worked the receiver makes two beeps. The has to be steady on both screens<br />
and the number corresponding to the transmitter must appear in the top right<br />
corner of the receiver’s screen.<br />
8. Press the “Menu” button (4) of the 2nd transmitter; the receiver has to make<br />
two beeps. The is steady on the transmitter’s screen and f<strong>la</strong>shes twice on<br />
the receiver’s. The number corresponding to the transmitter appears in the top<br />
right corner of the receiver’s screen.<br />
9. Switch off all the appliances and then switch them back on. The babyphone is now operational.<br />
10. If the receiver and the transmitter do not succeed in communicating start the connection procedure all over again.<br />
N.B. If you had only one transmitter to start with and you subsequently bought an additional transmitter, carry out<br />
the above procedure once again to connect the 3 appliances.<br />
FUNCTIONING<br />
A/ TRANSMITTER<br />
1. Configuration of the “Out of range” alert function<br />
a. Switch the start/stop switch (1) to ON to switch on the LCD screen. Keep the “Menu” button (4) down for at<br />
least 5 seconds to have access to the programming mode. This is what is disp<strong>la</strong>yed on the screen:<br />
or<br />
■ STEADY<br />
■ FLASHING<br />
b. Use the (2) (3) ▲▼ to configure the “Out of range” alert function. “On” means the function is activated and “Off”<br />
that it is inactivated. If you select “Off” it allows the transmitter’s emission level to be reduced. However, the receiver<br />
no longer emits any a<strong>la</strong>rm if the transmitter is out of range and the temperature of the room in which the<br />
transmitter is located as well as its charge no longer appear on the receiver’s<br />
screen when it is in stand-by mode.<br />
c. Confirm the selection by pressing the “Menu” button (4), the screen returns<br />
to normal mode. If you have selected “On” the “Out of range” alert icon<br />
appears on the screen.<br />
d. In stand-by mode, briefly press the “Menu” button (4) to disp<strong>la</strong>y the<br />
configuration of the “Out of range” alert.<br />
16<br />
BABYPHONE DIGITAL GREEN • Instruction Manual
2. A sensor built into the appliance detects the ambient temperature which is disp<strong>la</strong>yed on the screens of the<br />
transmitter and the receiver simultaneously. The sensor functions normally when the temperatures are between<br />
-9 ºC and +50 ºC. If lower or higher temperatures are recorded the symbol appears<br />
on the screen. To prevent the heat emitted by the appliance’s electronic circuit from<br />
affecting the sensor it is recommended to shift it from its position by forming an angle<br />
of about 15° as shown below. In case of a sudden change in temperature (e.g.: the<br />
appliance is disp<strong>la</strong>ced from indoors to outdoors in the middle of winter), the sensor may<br />
need a few minutes to adapt to the new environment and disp<strong>la</strong>y the right temperature.<br />
3. P<strong>la</strong>ce the transmitter about 1 metre from your child’s bed and orient the microphone (7)<br />
towards him.<br />
4. Adjust the sensitivity of the microphone with the buttons (2) (3) ▲▼ ; this lets you determine from which level of<br />
sound the appliance should transmit the sounds received by the microphone (7). On the screen the number of<br />
bars indicating the microphone’s sensitivity also changes depending on the level chosen: the higher the number<br />
of bars, the greater the sensitivity of the appliance. If you continue to press the button once the minimum or<br />
maximum level is reached two beeps sound.<br />
5. Once the transmitter starts to transmit the screen lights up and the transmission icon appears . A few seconds<br />
after the microphone (7) stops receiving the sounds the appliance goes back into stand-by mode and the<br />
transmission icon disappears . The screen also switches off to save energy.<br />
6. This babyphone is equipped with a “Baby Answering” function; it lets the parents talk to their child. The sound level<br />
of the voice of the parents can be adjusted. Keep the “Volume” button (5) down and press the buttons (2) (3) ▲▼<br />
to adjust the volume of the speaker (8). On the screen the number of bars indicating the volume also changes<br />
depending on the level chosen. When it is set to minimum the sound of the speaker is cut completely.<br />
7. The nightlight (6) can be lit continuously by setting the start/stop switch (1) in position , the nightlight icon then<br />
appears on the screen . The nightlight (6) can also be set to VOX (voice activation)<br />
by briefly pressing the “Menu” button (4): the VOX symbol appears next to the icon .<br />
In VOX mode the nightlight (6) scomes on when the microphone detects a sound and then<br />
<strong>au</strong>tomatically goes off when it no longer senses any sound. Briefly press the “Menu”<br />
button (4) to switch into VOX mode in continuous mode.<br />
You also have the possibility of controlling the nightlight (6) remotely from the receiver: refer<br />
to the <strong>la</strong>tter’s Functioning section.<br />
8. The batteries’ status is shown by the charge status indicator . As the charge of the batteries goes down the<br />
bars in the indicator progressively go out. Once empty the <strong>la</strong>tter starts f<strong>la</strong>shing. The charge status indicator also<br />
appears on the receiver screen: you can monitor the batteries’ charge at a distance. An a<strong>la</strong>rm goes off on your<br />
unit as soon as the indicator is empty .<br />
9. A beep sounds every time you press a button; it means the appliance has taken your action into account.<br />
B/ RECEIVER<br />
1. Configuration of the “Out of range” alert function and temperature a<strong>la</strong>rm<br />
a. Switch the start/stop switch (11) to ON to switch on the LCD screen. Keep the “Menu” button (14) down for at least<br />
5 seconds to have access to the programming mode. This is what is disp<strong>la</strong>yed on the screen:<br />
or<br />
■ STEADY<br />
■ FLASHING<br />
BABYPHONE DIGITAL GREEN • Instruction Manual<br />
17
. Use the buttons (12) (13) ▲▼ to configure the “Out of range” alert function; the configuration must be identical<br />
to the transmitter’s. If the configuration is different the a<strong>la</strong>rm may go off for no reason or inversely not go off at<br />
all even if the receiver is no longer in range of the transmitter. If the appliance is associated with 2 transmitters<br />
the configuration must be identical to that of the transmitter with the corresponding number.<br />
or<br />
c. Press the “Menu” button (14) to confirm the selection. (If you have selected “On”<br />
the “Out of range” alert icon appears on the screen in normal mode). This is what<br />
is disp<strong>la</strong>yed on the screen:<br />
d. By means of the buttons (12) (13) ▲▼ set the maximum temperature above<br />
which the appliance must set off an a<strong>la</strong>rm. If you press the buttons briefly the<br />
temperatures appear degree by degree in turn. If you keep the buttons (12) (13)<br />
down the temperatures appear more rapidly. You can select temperatures<br />
ranging from -3 °C to +50 °C. If you have selected “Off” no maximum temperature<br />
is defined. Press the “Menu” button (14) to confirm the selection. This is what is<br />
disp<strong>la</strong>yed on the screen:<br />
e. By means of the buttons (12) (13) ▲▼, rset the minimum temperature below which<br />
the appliance must set off an a<strong>la</strong>rm. You can select temperatures ranging from<br />
-8 °C to +44 °C or 2 °C below the maximum temperature chosen. If you have<br />
selected “Off” no minimum temperature is defined. Press the “Menu” button (14) to confirm the selection; the screen<br />
returns to normal mode.<br />
f. Note that the maximum and minimum temperature configuration is identical for both transmitters.<br />
g. In stand-by mode briefly press the “Menu” button (14) to disp<strong>la</strong>y the configuration of the “Out of range” alert and<br />
temperature a<strong>la</strong>rm.<br />
2. P<strong>la</strong>ce the receiver at a reasonable distance from the transmitter to avoid feedback. If the receiver is too close the<br />
speaker may produce a strident sound (18).<br />
3. When the receiver receivers a signal the screen comes on and the sound level indicator LEDs light up. The higher<br />
the sound level of the child’s voice the <strong>la</strong>rger the number of LEDs that light up. This function is useful when the<br />
parents prefer to switch the speaker (18) off for peace and quiet.<br />
Depending on which transmitter sends the signal the “Baby Unit 1” (19) or “Baby Unit 2” (20) indicator light comes on.<br />
4. The volume of the speaker (18) can be adjusted with the buttons (12) (13) ▲▼. On the screen the number of bars<br />
indicating the volume also changes depending on the level chosen: the higher the number of bars, the louder the<br />
volume of the speaker (18). When no bar is disp<strong>la</strong>yed and the icon appears the speaker (18) is cut completely.<br />
5. If the receiver has been connected to function with 2 transmitters, Baby unit no. 1 always has priority. This means<br />
that if the receiver is already in transmission with Baby unit no. 2 and Baby unit no. 1 starts to send, the receiver<br />
then switches immediately to Baby unit no. 1 until the end of the transmission; it only resumes the transmission<br />
with Baby unit no. 2 afterwards.<br />
6. In order to prevent the parents from missing the signal from Baby unit no. 2 if it starts transmitting when the receiver<br />
is already in transmission with Baby unit no. 1, the indicator light for Baby Unit 2 (20) f<strong>la</strong>shes to warn them. If the<br />
parents want to listen to the transmission of Baby unit no. 2 they can switch to the <strong>la</strong>tter by briefly pressing the<br />
“Menu” button (14). The “Baby Unit 2” indicator light (20) then lights up while the “Baby Unit 1” indicator light (19)<br />
starts f<strong>la</strong>shing (if the first child continues to cry). To switch back to Baby unit no. 1 it is enough to press the “Menu”<br />
button (14) again. In this way it is possible to monitor two children at the same time.<br />
7. In stand-by mode, if there are 2 transmitters the screen disp<strong>la</strong>ys each transmitter’s temperature and charge for 15<br />
seconds alternatively. When one of the transmitters starts to transmit the receiver receives the transmission<br />
immediately and disp<strong>la</strong>ys the in<strong>format</strong>ion concerning the transmitter in question until the signal comes to an end.<br />
18<br />
BABYPHONE DIGITAL GREEN • Instruction Manual
Screen disp<strong>la</strong>ying the<br />
in<strong>format</strong>ion from Baby<br />
unit no. 1 (“Out of range”<br />
alert activated)<br />
Screen disp<strong>la</strong>ying the<br />
in<strong>format</strong>ion from Baby<br />
unit no. 2 (“Out of range”<br />
alert inactivated and<br />
nightlight set to VOX)<br />
8. The receiver is equipped with a vibrator function. Set the start/stop switch (11) to the vibrator position; the vibrator<br />
icon appears on the screen . The vibrator starts functioning when the sound level of the child’s voice reaches<br />
a certain intensity. This function is useful when the parents are in a very noisy environment (e.g.: vacuum-cleaner<br />
noise). To save energy it is recommended not to use the vibrator function too often.<br />
9. If you select “On” on both appliances the “Out of range” alert is set off as soon as the receiver is no longer in range<br />
of the transmitter for more than 30 seconds. The LED sound level indicator (16) as well as the “Out of range” alert<br />
icon start to f<strong>la</strong>sh to warn you. The temperature is no longer disp<strong>la</strong>yed as well and the symbol appears. The<br />
alert stops as soon as the receiver is back within range of the transmitter. If you are using two transmitters the<br />
in<strong>format</strong>ion concerning the transmitter of which you are out of range stays disp<strong>la</strong>yed on the screen throughout<br />
the alert.<br />
N.B. The alert is also set off when the transmitter is off, when the batteries are exh<strong>au</strong>sted, when it has no power<br />
supply, or when the configuration of the alert is not identical on both appliances.<br />
10. As soon as the ambient temperature exceeds the upper or lower temperature limits defined an a<strong>la</strong>rm is set off.<br />
Depending on the limit that has been exceeded the icon (max) or (min) as well as the temperature start<br />
to f<strong>la</strong>sh on the receiver screen.<br />
11. It is possible to control the nightlight (6) remotely from the receiver: the start/stop switch (1) needs to be set to .<br />
Keep button (15) down while pressing button (12) as many times as is necessary to switch off (OFF); continuously<br />
switch on (ON) the nightlight or set it to VOX mode. The corresponding icons are then disp<strong>la</strong>yed on both appliances’<br />
screens. Note the receiver can only control the nightlight of the transmitter of which the number is disp<strong>la</strong>yed on<br />
the screen at the moment you press the button (15).<br />
12. The parents have the possibility of being able to answer their child to quieten him. Keep the button (15) down;<br />
the transmission icon appears on the receiver screen. Talk in the microphone (17). Once you have finished<br />
speaking release the button (15). Note that parents can talk to their child whenever they like - even during a<br />
transmission. The receiver transmits your voice to the transmitter of which the number is disp<strong>la</strong>yed on the screen<br />
at the moment you press the button (15).<br />
13. The status of the lithium battery is shown by the charge status indicator . As the battery charge goes down<br />
the indictor segments go out progressively. Once empty the <strong>la</strong>tter starts f<strong>la</strong>shing and an a<strong>la</strong>rm is set off to remind<br />
you to recharge the battery with the mains adapter.<br />
14. A beep sounds every time you press a button; it means the appliance has taken your action into account.<br />
BABYPHONE DIGITAL GREEN • Instruction Manual<br />
19
TROUBLE SHOOTING<br />
Problem Possible c<strong>au</strong>se Solution<br />
• The transmitter is not transmitting.<br />
• The receiver is off.<br />
• The microphone’s sensitivity is too low.<br />
• The batteries are exh<strong>au</strong>sted or the mains<br />
adapter is not correctly plugged in.<br />
• Switch the receiver on.<br />
• Increase the microphone’s sensitivity with the<br />
“Up” button (2).<br />
• Rep<strong>la</strong>ce the batteries or check the<br />
connection.<br />
• The transmitter is transmitting<br />
all the time.<br />
• The microphone’s sensitivity is too high.<br />
• Reduce the microphone’s sensitivity with the<br />
“Down” button (3) so that the transmitter<br />
reacts to the voice.<br />
• The “Out of range” alert<br />
does not switch off.<br />
• The pairing has failed.<br />
• The transmitter’s batteries are exh<strong>au</strong>sted.<br />
• The “Out of range” alert is activated on the<br />
transmitter but inactivated on the receiver.<br />
• The distance between the transmitter and<br />
the receiver is too great.<br />
• Carry out another pairing.<br />
• Rep<strong>la</strong>ce the batteries or use the mains adapter.<br />
• Activate the “Out of range” alert on<br />
the transmitter.<br />
• Bring the receiver closer to the transmitter.<br />
• The “Out of range” alert is not working.<br />
• The “Out of range” alert is inactivated on<br />
both appliances.<br />
• The “Out of range” alert is activated on the<br />
transmitter but inactivated on the receiver.<br />
• Activate the alert on both appliances.<br />
• Activate the alert on the receiver.<br />
• The temperature a<strong>la</strong>rm<br />
does not switch off .<br />
• The maximum and minimum<br />
temperatures defined are too close to the<br />
ambient temperature.<br />
• Adjust the maximum and minimum<br />
temperatures: they must be about 5 °C<br />
above and below the temperature disp<strong>la</strong>yed<br />
on the appliance.<br />
• The battery low alert does not switch off.<br />
• The batteries are exh<strong>au</strong>sted.<br />
• The battery is damaged.<br />
• Recharge the battery with the mains<br />
adapter (receiver). Rep<strong>la</strong>ce the batteries or<br />
use the mains adapter (transmitter).<br />
• Rep<strong>la</strong>ce the battery with a new battery.<br />
• The charge runs out quickly.<br />
• The nightlight is on all the time<br />
• The vibrator function is activated.<br />
• Switch off the nightlight or set it to VOX.<br />
• Inactivate the vibrator function.<br />
• On the receiver screen both transmitters<br />
have the same number.<br />
• During the pairing the same number was<br />
attributed to both transmitters.<br />
• Carry out another pairing by giving a<br />
different number to each transmitter.<br />
• The speaker produces<br />
a lot of feedback and interference.<br />
• The transmitter is p<strong>la</strong>ced close to other<br />
electric appliances.<br />
• Change the positions of the electric<br />
appliances or move the transmitter away<br />
from the source of interference.<br />
• The range of the transmitter is too small.<br />
• The two appliances are separated by<br />
metallic structures.<br />
• The transmitter’s batteries are exh<strong>au</strong>sted.<br />
• Move the transmitter or receiver.<br />
• Rep<strong>la</strong>ce the batteries or use<br />
the mains adapter.<br />
20<br />
BABYPHONE DIGITAL GREEN • Instruction Manual
DE<br />
BEDIENUNGSANLEITUNG<br />
Vielen Dank für Ihre Wahl für unser Babyphone Digital Green. Wir bitten Sie, die vorliegende Bedienungsanleitung<br />
<strong>au</strong>fmerksam zu lesen, um Ihr Gerät bestmöglich zu nutzen und ihm eine <strong>la</strong>nge Lebensd<strong>au</strong>er zu garantieren.<br />
Wenn Sie jedoch einen Fehler feststellen oder <strong>au</strong>f irgendein Problemstoßen, setzen Sie sich bitte mit unserem<br />
Kundendienst in Verbindung.<br />
WICHTIG: Das Babyphone arbeitet mit niedrigen Sendestärken, um Babys Gesundheit zu schützen. Empfänger<br />
und Sender kommunizieren nicht ständig, um die im R<strong>au</strong>m <strong>au</strong>ftretende Strahlung gering zu halten. Wenn Baby<br />
weint, aktiviert sich das System sofort, um Sie zu warnen; wenn Baby nicht weint, kommunizieren Sender und<br />
Empfänger lediglich alle 20s, um den einwandfreien Betrieb zu kontrollieren.<br />
• TStörungsfrei <strong>au</strong>f den Frequenzen 863-870 MHz<br />
arbeitende digitale Technik.<br />
• Automatischer Kanalwechsel und <strong>au</strong>tomatische Suche.<br />
• 800 m Reichweite in freiem R<strong>au</strong>m.<br />
• Geringe Wellenstärke.<br />
• Im Empfänger eingeb<strong>au</strong>te Funktion „Baby antworten“<br />
zur Beruhigung Ihres Kindes <strong>au</strong>s der Ferne.<br />
• Anschlussmöglichkeit für bis zu 2 Sender.<br />
• Sanftes Nachtlicht im Sender. Fernkontrolle über den<br />
Empfänger möglich.<br />
• Temperaturanzeige.<br />
FUNKTIONEN<br />
• Batteriestandsanzeige und Warnung bei schwacher<br />
Batterie im Sender und Empfänger.<br />
• Einstellung der Mikrofonempfindlichkeit des Senders<br />
• A<strong>la</strong>rm <strong>au</strong>ßer Reichweite (optisch und akustisch).<br />
• L<strong>au</strong>tstärkeeinstellung am Empfänger.<br />
• Akustischer, optischer und Vibrationsa<strong>la</strong>rm<br />
am Empfänger.<br />
• Bessere Lesbarkeit dank Disp<strong>la</strong>y<br />
mit Hintergrundbeleuchtung.<br />
• Empfänger mit wieder<strong>au</strong>f<strong>la</strong>dbarem Lithium-Akku.<br />
WARNHINWEISE<br />
- Das Babyphone Digital Green ist nicht als ein medizinisches Gerät zu betrachten. Neben dem Einsatz des Babyphone<br />
Digital Green wird dringend empfohlen, dass Ihr Baby regelmäßig und unmittelbar von einem Erwachsenen<br />
be<strong>au</strong>fsichtigt wird. Frühgeburten oder als Risikofälle eingestufte Kinder müssen von Ihrem Kinderarzt oder sonstigem<br />
medizinischen Personal betreut werden.<br />
- Entfernen Sie sich nie von Ihrem Kind <strong>au</strong>ßerhalb des H<strong>au</strong>ses, <strong>au</strong>ch nicht für einen kurzen Augenblick.<br />
- Es dürfen nur Akkubatterien wieder <strong>au</strong>fge<strong>la</strong>den werden.<br />
- Akkubatterien müssen vor dem Laden <strong>au</strong>s dem Gerät entnommen werden.<br />
- Weder neue und alte, noch Akkus und Alkalibatterien mischen.<br />
- Akkubatterien dürfen nur unter Aufsicht eines Erwachsenen <strong>au</strong>fge<strong>la</strong>den werden.<br />
- Die Batterien müssen in der richtigen Polrichtung (+/-) eingelegt werden.<br />
- Leere Batterien müssen <strong>au</strong>s dem Gerät entnommen werden.<br />
- Die Anschlussklemmen dürfen nicht kurzgeschlossen werden.<br />
- Immer die vom Herstellermitgelieferte Batterie für den Empfänger benutzen: wenn die Batterie beschädigt ist,<br />
muss sie vom Hersteller, seinem Kundendienst oder einer <strong>au</strong>sgebildeten Fachkraft ersetzt werden, um Gefahren<br />
zu vermeiden.<br />
- Für einen optimalen Betrieb des Babyphones und um Störungen zu vermeiden, empfehlen wir, kein anderes<br />
Elektrogerät an der Steckdose mit dem Babyphone anzuschließen. (Keine Mehrfachstecker benutzen!).<br />
• Nur die mitgelieferten Netzadapter benutzen. Die<br />
Benutzung anderer Netzadapter kann das Babyphone<br />
Digital Green beschädigen.<br />
• Wenn das Babyphone Digital Green über einen<br />
längeren Zeitr<strong>au</strong>m nicht benutzt wird, alle Batterien des<br />
Senders und die Batterie des Empfängers entfernen,<br />
um eine Beschädigung durch <strong>au</strong>s<strong>la</strong>ufende Batterien<br />
zu avermeiden.<br />
VORSICHTSMASSNAHMEN<br />
BABYPHONE DIGITAL GREEN • Bedienungsanleitung<br />
• Den Netzadapter <strong>au</strong>s der Wandsteckdose ziehen, wenn<br />
das Babyphone nicht benutzt wird.<br />
• Das Babyphone Digital Green funktioniert am besten in<br />
einem Temperaturbereich von -9 °C bis +50 °C.<br />
• Das Babyphone Digital Green nicht über einen längeren<br />
Zeitr<strong>au</strong>m direkter Sonneneinstrahlung <strong>au</strong>ssetzen und<br />
nicht in der Nähe einer Wärmequelle, in einem feuchten<br />
oder sehr st<strong>au</strong>bigen R<strong>au</strong>m <strong>au</strong>fstellen.<br />
21
• Das Gerät nicht <strong>au</strong>seinanderb<strong>au</strong>en: es enthält keine<br />
Teile, die als solche wieder verwendet werden könnten.<br />
• Elektrische und elektronische Gegenstände unterliegen<br />
Sondermüllbestimmungen für die Entsorgung. Geben Sie<br />
Ihre zu entsorgenden elektrischen und elektronischen<br />
Geräte nicht in die den allgemeinen H<strong>au</strong>shaltsmüll,<br />
sondern in ein System mit Mülltrennung.<br />
Dieses Symbol weist in der Europäischen Union<br />
dar<strong>au</strong>f hin, dass das Produkt nicht in den<br />
Mülleimer geworfen oder zu anderen<br />
H<strong>au</strong>sabfällen gegeben werden darf, sondern im<br />
Mülltrennungsverfahren entsorgt werden muss.<br />
a. Netzadapter 5 V AC x 2<br />
b. Sender<br />
c. Empfänger<br />
d. 3,7 V Lithium-Polymer Akku (im Sender)<br />
e. Gebr<strong>au</strong>chsanleitung<br />
STANDARDZUBEHÖR<br />
a<br />
b<br />
c<br />
d<br />
e<br />
Sender<br />
1. Schalter On/Off und Nachtlicht<br />
2-3. Einstellung der Empfindlichkeit des Mikrofons<br />
4. Menü-Taste<br />
5. L<strong>au</strong>tstärkeregelung<br />
6. Nachtlicht<br />
7. Mikrofon<br />
8. L<strong>au</strong>tsprecher<br />
9. Temperatursonde<br />
10. CC-Klinkenstecker<br />
STEUERUNGEN<br />
Empfänger<br />
11. Schalter On/Off und Vibrationsa<strong>la</strong>rm<br />
12-13. L<strong>au</strong>tstärkeregelung<br />
14. Menü-Taste<br />
15. Taste „Baby antworten“<br />
16. Leuchtdioden zur Anzeige der L<strong>au</strong>tstärke<br />
17. Mikrofon<br />
18. L<strong>au</strong>tsprecher<br />
19. Kontrollleuchte „Einheit Baby 1“<br />
20. Kontrollleuchte „Einheit Baby 2“<br />
21. CC-Klinkenstecker<br />
Elterneinheit (PU) LCD Disp<strong>la</strong>y<br />
A. Stärke des eingehenden Signals<br />
B. Batteriestandsanzeige<br />
C. BU Batteriestandsanzeige<br />
D. BU-Nummer<br />
E. Obere Temperaturgrenze<br />
F. Symbol Übertragung<br />
G. Untere Temperaturgrenze<br />
H. Symbol Vibrationsa<strong>la</strong>rm<br />
I. Balkenanzeige L<strong>au</strong>tsprechervolumen<br />
J. Symbol L<strong>au</strong>tsprecher <strong>au</strong>s<br />
K. R<strong>au</strong>mtemperatur des Babys<br />
L. Symbol Nachtlicht<br />
M. Stärke des eingehenden Signals<br />
Babyeinheit (BU) LCD Disp<strong>la</strong>y<br />
N. Symbol Übertragung<br />
O. Batteriestandsanzeige<br />
P. BU-Nummer<br />
Q. Symbol Nachtlicht<br />
22<br />
R. Empfindlichkeit des Mikrofons und<br />
Balkenanzeige der L<strong>au</strong>tsprecher<strong>la</strong>utstärke<br />
S. R<strong>au</strong>mtemperatur des Babys<br />
T. Symbol Außer Reichweite<br />
BABYPHONE DIGITAL GREEN • Bedienungsanleitung
STROMVERSORGUNG<br />
A/ SENDER<br />
1. Batteriebetrieb (Batterien nicht im Lieferumfang inbegriffen)<br />
Verriegelungsknopf drücken und den Deckel des Batteriefaches in die angegebene Richtung schieben. 3 Batterien<br />
vom Typ AAA in das Fach einlegen. Auf die korrekte Po<strong>la</strong>rität (+/-) achten. Deckel wieder schließen.<br />
N.B. Um bessere Leistung zu erzielen, sollten weder neue und gebr<strong>au</strong>chte, noch Alkaline-Batterien und Akkus<br />
gleichzeitig genutzt werden.<br />
2. Netzbetrieb (Netzadapter im Lieferumfang enthalten)<br />
Der Sender kann mit dem im Lieferumfang enthaltenen 5 V Adapter<br />
an eine Steckdose angeschlossen werden.<br />
Dazu den Ausgangsstecker des Adapters mit dem CC-Klinkenstecker<br />
des Sender (10) verbinden. Den Adapter in die Netzsteckdose<br />
einführen. Wenn der Sender an die Netzsteckdose angeschlossen<br />
wird, wird die Stromversorgung über die Batterien unterbrochen.<br />
NB. Bei Versorgung über das Stromnetz erreicht der Sender eine<br />
größere Reichweite.<br />
10<br />
B/ EMPFÄNGER<br />
1. Betrieb mit mitgeliefertem Akku<br />
Der Lithium-Polymer Akku ist bereits in den Empfänger<br />
eingelegt. Um den Akku zu wechseln, den<br />
Verriegelungsknopf drücken und den Deckel des Akku-<br />
Faches in die angegebene Richtung schieben, den<br />
Akku entnehmen und das Kabel trennen.<br />
2. Laden des Akkus über den Netzadapter<br />
Ausgangsstecker des 5 V Adapters mit dem Klinkenstecker des<br />
Empfängers verbinden (21). Der Akku wird <strong>au</strong>ch bei <strong>au</strong>sgeschaltetem<br />
Empfänger <strong>au</strong>fge<strong>la</strong>den. Bei eingeschaltetem Empfänger blinken<br />
die Balken in der Batteriestandsanzeige <strong>au</strong>f dem LCD-Disp<strong>la</strong>y nach<br />
12<br />
einander. Wenn der Akku ganz <strong>au</strong>fge<strong>la</strong>den ist, werden alle Balken<br />
angezeigt und blinken nicht mehr. Der Adapter des Empfängers<br />
muss nicht vom Strom getrennt werden; der Akku wird dadurch<br />
nicht beschädigt. Wenn der Akku ent<strong>la</strong>den ist und die Spannung unter<br />
einen gewissen Wert fällt, fängt der Adapter <strong>au</strong>tomatisch wieder an<br />
zu <strong>la</strong>den.<br />
NB. Vor der ersten Benutzung sollte der Lithium-Polymer-Akku<br />
mindestens 3 Stunden <strong>la</strong>ng ge<strong>la</strong>den werden. Es wird empfohlen, das Gerät während des ersten Ladevorgangs<br />
<strong>au</strong>szuschalten.<br />
NB. Um eine längere Akku-Lebensd<strong>au</strong>er zu gewährleisten, sollte der Akku vollkommen ent<strong>la</strong>den sein, bevor er<br />
wieder <strong>au</strong>fge<strong>la</strong>den wird.<br />
VERBINDUNG DES SENDERS MIT DEM EMPFÄNGER<br />
Sender und Empfänger sind bereits mit einander verbunden und einsatzbereit. Dieses Babyphone kann mit mehreren<br />
Sendern (bis zu 2) betrieben werden. Ein zusätzlicher Sender kann folgendermaßen angeschlossen werden.<br />
1. Taste (13) ▼ am Empfänger gedrückt halten.<br />
BABYPHONE DIGITAL GREEN • Bedienungsanleitung<br />
23
2. Ein/Aus-Schalter (11) <strong>au</strong>f ON schalten und warten, bis im Disp<strong>la</strong>y blinkt.<br />
3. Taste (3) am Sender gedrückt halten.<br />
■ LEUCHTET<br />
■ BLINKT<br />
4. Schalter Ein/Aus (1) <strong>au</strong>f ON schalten und warten, bis leuchtet und die<br />
Nummer der Babyeinheit im Disp<strong>la</strong>y blinkt (Den Vorgang ggf. mit der zusätzlichen<br />
Babyeinheit wiederholen).<br />
5. Die Nummer des Senders (1) oder (2) wird über die Tasten (2) (3) ▲▼<br />
<strong>au</strong>sgewählt. Das System kann NICHT korrekt funktionieren, wenn für alle<br />
Sender die gleiche Nummer gewählt wird.<br />
6. Durch Druck <strong>au</strong>f „Menü“ (4) die Auswahl bestätigen. Damit ist die Nummer des<br />
Senders fest eingestellt und beginnt zu blinken.<br />
7. Nun die Taste „Menü“ (4) <strong>au</strong>f einem der beiden Sender drücken. Wenn die<br />
Verbindung hergestellt ist, sendet der Empfänger zwei Signaltöne. muss<br />
<strong>au</strong>f beiden Disp<strong>la</strong>ys durchgehend angezeigt werden und die entsprechende<br />
Nummer des Senders muss in der rechten oberen Ecke des Disp<strong>la</strong>ys <strong>au</strong>f dem<br />
Empfänger angezeigt werden.<br />
8. Wenn die Taste „Menü“ (4) des 2. Senders gedrückt wird, muss der Empfänger<br />
zwei Signaltöne abgeben. leuchtet durchgehend <strong>au</strong>f dem Disp<strong>la</strong>y des<br />
Senders und blinkt zweimal <strong>au</strong>f dem des Empfängers. Die dem Sender<br />
entsprechende Nummer wird in der oberen rechten Ecke des Empfänger-<br />
Disp<strong>la</strong>ys angezeigt.<br />
9. Alle Geräte <strong>au</strong>s- und wieder einschalten. Jetzt ist das Babyphone betriebsbereit.<br />
10. Wenn keine Verbindung zwischen Empfänger und Sender hergestellt wurde, die Einrichtung<br />
der Verbindung wiederholen.<br />
N.B. Wenn Sie anfangs nur einen Sender hatten und später einen zweiten hinzu gek<strong>au</strong>ft haben, muss das oben<br />
beschriebene Verfahren wiederholt werden, um die 3 Geräte zu verbinden.<br />
BETRIEB<br />
A/ SENDER<br />
1. Konfiguration der Warnung „Außer Reichweite“<br />
a. Den Ein/Aus-Schalter (1) <strong>au</strong>f ON schalten, um das LCD-Disp<strong>la</strong>y einzuschalten. Die Taste „Menü“ (4) mindestens<br />
5 Sekunden <strong>la</strong>ng drücken, um zur Programmierung zu ge<strong>la</strong>ngen. Das Disp<strong>la</strong>y zeigt Folgendes an:<br />
oder<br />
■ LEUCHTET<br />
■ BLINKT<br />
b. Über die Tasten (2) (3) ▲▼ die Warnung „Außer Reichweite“ konfigurieren. „On“ bedeutet, dass die Funktion aktiviert<br />
ist, „Off“, dass sie <strong>au</strong>sgeschaltet ist. Bei Wahl von „Off“ werden die Emissionen des Senders gesenkt. Jedoch gibt<br />
der Empfänger dann keinen Warnton mehr ab, wenn der Sender sich <strong>au</strong>ßer Reichweite befindet und die<br />
Temperatur des Zimmers, in dem der Sender sich befindet und dessen<br />
Ladezustand werden im Standby des Empfängers nicht mehr angezeigt.<br />
c. Über die Taste „Menü“ (4) die Auswahl bestätigen, das Disp<strong>la</strong>y geht in den<br />
Normalbetrieb über. Wenn „On“ gewählt wurde, erscheint das Symbol<br />
„Außer Reichweite“ im Disp<strong>la</strong>y.<br />
d. Im Standby kurz <strong>au</strong>f die Taste „Menü“ (4) drücken, um die Konfiguration der<br />
Funktion „Außer Reichweite“ anzuzeigen.<br />
24<br />
BABYPHONE DIGITAL GREEN • Bedienungsanleitung
2. Ein Fühler im Gerät ermittelt die R<strong>au</strong>mtemper<strong>au</strong>r, die gleichzeitig im Disp<strong>la</strong>y von Sender und Empfänger angezeigt<br />
wird. Bei Temperaturen im Bereich zwischen -9°C und + 50°C funktioniert der Fühler normal. Wenn niedrigere oder<br />
höhere Temperaturen ermittelt werden, erscheint das Symbol im Disp<strong>la</strong>y. Um zu<br />
vermeiden, dass die von dem elektronischen Schaltkreis des Gerätes abgegebene<br />
Wärme den Fühler beeinflusst, wird empfohlen, diesen, wie unten abgebildet, in einem<br />
Winkel von etwa 15° von seiner Ausgangsstellung zu entfernen. Bei plötzlichen<br />
Temperaturschwankungen (z. B.: Gerät wird mitten im Winter von drinnen nach dr<strong>au</strong>ßen<br />
gebracht) kann es einige Minuten d<strong>au</strong>ern, bis der Fühler sich an die neue Umgebung<br />
anpasst und die richtige Temperatur anzeigt.<br />
3. Das Mikrofon (7) <strong>au</strong>f das Kind richten und den Sender in etwa 1 m Entfernung von dem Bett des Kindes <strong>au</strong>fstellen.<br />
4. Die Empfindlichkeit des Mikrofons kann über die Tasten (2) (3) ▲▼ eingestellt werden, um festzulegen, ab welcher<br />
L<strong>au</strong>tstärke das Gerät die von dem Mikrofon (7) <strong>au</strong>fgefangenen Geräusche übertragen soll. Die im Disp<strong>la</strong>y<br />
angezeigte Anzahl Balken für die Empfindlichkeit des Mikrofons ändert sich mit der <strong>au</strong>sgewählten Empfindlichkeit.<br />
Je mehr Balken angezeigt werden, je empfindlicher ist das Gerät eingestellt. Wenn die niedrigste oder höchste<br />
Empfindlichkeit eingestellt wurde und die Taste weiterhin gedrückt wird, werden zwei Signaltöne abgegeben.<br />
5. Sobald der Sender sendet, leuchtet das Disp<strong>la</strong>y <strong>au</strong>f und das Übertragungssymbol wird angezeigt. Einige<br />
Sekunden nachdem das Mikrofon (7) keine Geräusche mehr ermittelt, geht das Gerät wieder in das Standby<br />
über und das Übertragungssymbol verschwindet. Um Strom zu sparen, schaltet sich <strong>au</strong>ch das Disp<strong>la</strong>y <strong>au</strong>s.<br />
6. Dieses Babyphone verfügt über eine Funktion "Baby antworten" und ermöglicht den Eltern, mit ihrem Kind zu reden.<br />
Die Übertragungs<strong>la</strong>utstärke der Stimme der Eltern kann eingestellt werden. Dazu bei gedrückter „L<strong>au</strong>tstärke“ (5)<br />
– Taste die L<strong>au</strong>tstärke des L<strong>au</strong>tsprechers (8) über die Tasten (2) (3) ▲▼ einstellen. Die im Disp<strong>la</strong>y angezeigte Anzahl<br />
Balken für die L<strong>au</strong>tstärke ändert sich mit der Einstellung. Bei Auswahl der geringsten L<strong>au</strong>tstärke wird der Ton des<br />
L<strong>au</strong>tsprechers (8) ganz <strong>au</strong>sgeschaltet.<br />
7. Das Nachtlicht (6) kann durch Einstellung des Schalters Ein/Aus (1) <strong>au</strong>f permanent leuchten. Im Disp<strong>la</strong>y wird<br />
dann das Symbol des Nachtlichts . angezeigt. Durch kurzen Druck<br />
<strong>au</strong>f „Menü“ (4) kann das Nachtlicht <strong>au</strong>ch <strong>au</strong>f VOX (Stimmaktivierung) eingestellt werden.<br />
Neben dem Symbol wird dann VOX angezeigt. In der Betriebsart VOX leuchtet das<br />
Nachtlicht (6), wenn das Mikrofon ein Geräusch ermittelt und es schaltet sich <strong>au</strong>tomatisch<br />
<strong>au</strong>s, wenn kein Geräusch mehr festgestellt wird. Durch einen kurzen Druck <strong>au</strong>f "Menü"<br />
(4) schaltet man <strong>au</strong>s der Betriebsart VOX in den D<strong>au</strong>erbetrieb.<br />
Es besteht <strong>au</strong>ch die Möglichkeit, das Nachtlicht (6) über den Empfänger fernzusteuern. Lesen Sie dazu bitte den<br />
Abschnitt „Betrieb“ des Empfängers.<br />
8. Die Batteriestandsanzeige zeigt den Ladezustand der Batterien an. Mit fortschreitender Ent<strong>la</strong>dung der<br />
Batterien erscheinen nach und nach weniger Balken in der Anzeige. Bei leerer Batterie blinkt die Anzeige. Der<br />
Batteriestand wird <strong>au</strong>ch im Disp<strong>la</strong>y des Empfängers angezeigt, so dass der Batteriestand fernüberwacht werden<br />
kann. Wenn in der Anzeige keine Balken mehr angezeigt werden , ertönt ein Signalton der Einheit.<br />
9. Bei jeder Betätigung einer Taste bestätigt ein Ton, dass das Gerät die Eingabe registriert hat.<br />
B/ EMPFÄNGER<br />
1. Konfiguration der Warnfunktion „Außer Reichweite“ und des Temperatura<strong>la</strong>rms.<br />
a. Den Ein/Aus-Schalter (11) <strong>au</strong>f ON schalten, um das LCD-Disp<strong>la</strong>y einzuschalten. Die Taste „Menü“ (14) mindestens<br />
5 Sekunden <strong>la</strong>ng drücken, um zur Programmierung zu ge<strong>la</strong>ngen. Das Disp<strong>la</strong>y zeigt Folgendes an:<br />
oder<br />
■ LEUCHTET<br />
■ BLINKT<br />
BABYPHONE DIGITAL GREEN • Bedienungsanleitung<br />
25
. Über die Tasten (12) (13) ▲▼ die Warnung „Außer Reichweite“ gen<strong>au</strong>so konfigurieren, wie im Sender. Bei<br />
unterschiedlicher Konfiguration von Sender und Empfänger kann grundlos A<strong>la</strong>rm <strong>au</strong>sgelöst werden oder kein<br />
A<strong>la</strong>rm <strong>au</strong>sgelöst werden, wenn der Empfänger <strong>au</strong>ßerhalb der Reichweite des Senders ist. Wenn das Gerät mit<br />
2 Sendern verbunden ist, muss die Konfiguration dem Sender entsprechen, dessen Nummer angezeigt wird.<br />
oder<br />
c. Auswahl über die Taste „Menü“ (14) bestätigen. (Wenn „On“ gewählt wurde,<br />
erscheint das Symbol „Außer Reichweite“ bei Normalbetrieb im Disp<strong>la</strong>y). Das<br />
Disp<strong>la</strong>y zeigt Folgendes an:<br />
d. Über die Tasten (12) (13) ▲▼ die Höchsttemperatur anzeigen, bei deren<br />
Überschreitung das Gerät A<strong>la</strong>rm <strong>au</strong>slösen soll. Bei kurzem Druck <strong>au</strong>f die<br />
Tasten wird die Temperatur gradweise angezeigt. Bei anhaltendem Druck<br />
<strong>au</strong>f die Tasten (12) (13) wird der Durch<strong>la</strong>uf der Temperaturanzeige beschleunigt.<br />
Es kann eine Temperatur im Bereich -3°C bis +50°C <strong>au</strong>sgewählt werden.<br />
Wenn „Off“ eingestellt wird, wird keine Höchsttemperatur festgelegt. Auswahl<br />
über die Taste „Menü“ (14) bestätigen. Das Disp<strong>la</strong>y zeigt Folgendes an:<br />
e. Über die Tasten (12) (13) ▲▼ die Mindesttemperatur anzeigen, bei deren<br />
Unterschreitung das Gerät A<strong>la</strong>rm <strong>au</strong>slösen soll. Es können Temperaturen zwischen<br />
-8°C und +44°C oder 2°C unter der gewählten Höchsttemperatur eingegeben<br />
werden. Wenn "Off" gewählt wird, wird keine Mindesttemperatur festgelegt. Die Auswahl über die Taste „Menü“<br />
(14) bestätigen, das Disp<strong>la</strong>y wechselt dann wieder zur normalen Anzeige.<br />
f. Die Konfiguration der Höchst- und Mindesttemperatur ist bei beiden Sendern gleich.<br />
g. Im Standby kurz <strong>au</strong>f die Taste „Menü“ (14) drücken, um die Konfiguration der Funktion „Außer Reichweite“ und<br />
des Temperatura<strong>la</strong>rms anzuzeigen.<br />
2. Um elektromagnetische Störungen zu vermeiden, sollte der Empfänger in einem gewissen Abstand zum Sender<br />
<strong>au</strong>fgestellt werden. Ist der Abstand zu gering, kann ein schriller Ton im L<strong>au</strong>tsprecher erzeugt werden (18).<br />
3. Wenn der Empfänger ein Signal empfängt, leuchten das Disp<strong>la</strong>y und die LED der L<strong>au</strong>tstärkeeinstellung. Die Anzahl<br />
<strong>au</strong>fleuchtender LED nimmt mit der L<strong>au</strong>tstärke der Stimme des Kindes zu. Diese Funktion ist nützlich, wenn die Eltern<br />
bevorzugen, den L<strong>au</strong>tsprecher (18) <strong>au</strong>szuschalten, um Ruhe zu haben.<br />
Je nach Sender des Signals leuchtet die Kontrollleuchte „Einheit Baby 1“ (19) oder „Einheit Baby 2“ (20).<br />
4. Die L<strong>au</strong>tstärke des L<strong>au</strong>tsprechers (18) lässt sich über die Tasten (12) (13) ▲▼ einstellen. Die im Disp<strong>la</strong>y angezeigte<br />
Anzahl Balken für die L<strong>au</strong>tstärke ändert sich mit der Einstellung. Je mehr Balken angezeigt werden, je <strong>la</strong>uter ist<br />
der L<strong>au</strong>tsprecher (18) eingestellt. Wenn kein Balken, sondern das Symbol angezeigt wird, ist der L<strong>au</strong>tsprecher<br />
(18) ganz <strong>au</strong>sgeschaltet.<br />
5. Wenn 2 Sender an den Empfänger angeschlossen sind, hat immer die Einheit Baby 1 Vorrang. Das bedeutet, dass<br />
der Empfänger, wenn er bereits von der Einheit Baby 2 empfängt und die Einheit Baby 1 sich einschaltet, sofort<br />
<strong>au</strong>f die Einheit Baby Nr. 1 umschaltet, bis diese nicht mehr sendet und anschließend den Empfang von der Einheit<br />
Baby Nr. 2 fortsetzt.<br />
6. Damit die Eltern das Signal der Einheit Baby Nr. 2 erhalten, wenn dieses sendet, während der Empfänger bereits<br />
von der Einheit Baby Nr. 1 empfängt, blinkt die Kontroll<strong>la</strong>mpe der Einheit Baby 2 (20), um sie dar<strong>au</strong>f <strong>au</strong>fmerksam<br />
zu machen. Wenn die Eltern die Übertragung der Einheit Baby Nr. 2 hören wollen, können sie durch kurzen<br />
Druck <strong>au</strong>f die „Menü“-Taste (14) zu dieser Einheit wechseln. Dann leuchtet die Kontroll<strong>la</strong>mpe "Einheit Baby 2“<br />
(20) und die Kontroll<strong>la</strong>mpe „Einheit Baby 1“ (19) blinkt (wenn das erste Kind weiterhin weint). Durch erneuten<br />
Druck <strong>au</strong>f „Menü“ (14) schaltet man wieder <strong>au</strong>f die Einheit Baby Nr. 1 um. So können beide Kinder gleichzeitig<br />
überwacht werden.<br />
7. Wenn zwei Sender angeschlossen sind, zeigt das Disp<strong>la</strong>y im Standby abwechselnd 15 Sekunden <strong>la</strong>ng die<br />
Temperatur und den Ladezustand jedes Senders an. Wenn einer der Sender anfängt zu senden, empfängt der<br />
Empfänger sofort das Übertragungssignal und zeigt die In<strong>format</strong>ionen des betreffenden Senders an, bis kein Signal<br />
mehr gesandt wird.<br />
26<br />
BABYPHONE DIGITAL GREEN • Bedienungsanleitung
Disp<strong>la</strong>y mit In<strong>format</strong>ionen<br />
der Einheit Baby Nr. 1<br />
(Signal „Außer Reichweite“<br />
eingeschaltet)<br />
Disp<strong>la</strong>y mit In<strong>format</strong>ionen<br />
der Einheit Baby Nr. 2<br />
(Signal „Außer Reichweite“<br />
<strong>au</strong>sgeschaltet und Nachtlicht<br />
<strong>au</strong>f VOX eingestellt).<br />
8. Der Empfänger ist mit einem Vibrationsa<strong>la</strong>rm <strong>au</strong>sgestattet. Wenn der Schalter Ein/Aus (11) <strong>au</strong>f Vibrationsa<strong>la</strong>rm<br />
geschaltet wird, erscheint das entsprechende Symbol <strong>au</strong>f dem Disp<strong>la</strong>y. Der Vibrationsa<strong>la</strong>rm wird <strong>au</strong>sgelöst,<br />
wenn die Stimme des Kindes eine gewisse L<strong>au</strong>tstärke erreicht. Diese Funktion ist nützlich, wenn die Eltern sich in<br />
einem sehr <strong>la</strong>uten Umfeld befinden (z. B. <strong>la</strong>ufender St<strong>au</strong>bs<strong>au</strong>ger). Um Energie zu sparen, wird empfohlen, den<br />
Vibrationsa<strong>la</strong>rm nicht zu häufig einzusetzen.<br />
9. Wenn bei beiden Geräten „On“ gewählt wird, kann der A<strong>la</strong>rm „Außer Reichweite“ <strong>au</strong>sgelöst werden, sobald der<br />
Empfänger sich mehr als 30 Sekunden nicht mehr innerhalb der Reichweite des Senders befindet. Die LED-<br />
L<strong>au</strong>tstärkeanzeige (16) und das Warnsymbol „Außer Reichweite“ blinken, um dar<strong>au</strong>f <strong>au</strong>fmerksam zu machen. Auch<br />
die Temperatur wird nicht mehr angezeigt und das Symbol erscheint. Der A<strong>la</strong>rm wird eingestellt, sobald der<br />
Empfänger wieder in Reichweite des Senders ist. Wenn zwei Sender verwendet werden, werden die Angaben zu<br />
dem Sender, dessen Reichweite ver<strong>la</strong>ssen wurde, für die D<strong>au</strong>er des A<strong>la</strong>rms im Disp<strong>la</strong>y angezeigt.<br />
N.B. Es wird <strong>au</strong>ch A<strong>la</strong>rm <strong>au</strong>sgelöst, wenn der Sender <strong>au</strong>sgeschaltet ist, seine Batterien ent<strong>la</strong>den sind, er nicht mehr<br />
mit Strom versorgt wird oder die A<strong>la</strong>rmkonfiguration der beiden Geräte nicht übereinstimmt.<br />
10. Sobald die R<strong>au</strong>mtemperatur über oder unter dem vorgegebenen Temperaturbereich liegt, wird A<strong>la</strong>rm <strong>au</strong>sgelöst.<br />
Je nach überschrittenem Wert blinken die Symbole (max) oder (min) und die Temperatur im Disp<strong>la</strong>y des<br />
Empfängers.<br />
11. Das Nachtlicht (6) kann vom Empfänger <strong>au</strong>s gesteuert werden. Dazu muss der Schalter Ein/Aus (1) <strong>au</strong>f gestellt werden.<br />
Bei gedrückter Taste (15) so häufig <strong>au</strong>f die Taste (12) drücken, bis es <strong>au</strong>sgestellt wird (OFF), permanent leuchtet<br />
(ON) oder <strong>au</strong>f VOX steht. Die entsprechenden Symbole werden im Disp<strong>la</strong>y beider Geräte angezeigt. Der Empfänger<br />
kann nur das Nachtlicht des Senders steuern, dessen Nummer im Disp<strong>la</strong>y angezeigt wird, während die Taste (15)<br />
betätigt wird.<br />
12. Die Eltern haben die Möglichkeit, beruhigend <strong>au</strong>f ihr Kind einzureden. Wenn die Taste 15 gedrückt gehalten wird,<br />
wird das Übertragungssymbol im Disp<strong>la</strong>y des Empfängers angezeigt. Sprechen Sie ins Mikrofo (17). Wenn Sie<br />
fertig sind, <strong>la</strong>ssen Sie die Taste (15) los. Die Eltern können jederzeit, <strong>au</strong>ch während einer Übertragung mit ihrem<br />
Kind reden. Der Empfänger überträgt die Stimme an den Sender, dessen Nummer zu dem Zeitpunkt im Disp<strong>la</strong>y<br />
angezeigt wird, zu dem die Taste (15) gedrückt wird.<br />
13. Die Batteriestandsanzeige zeigt den Ladezustand des Lithium-Akkus an. Je schlechter der Ladezustand ist,<br />
desto weniger Balken werden angezeigt. Wenn der Akku leer ist, blinkt die Anzeige und ein A<strong>la</strong>rm erinnert<br />
daran, den Akku mit dem Adapter <strong>au</strong>fzu<strong>la</strong>den.<br />
14. Bei jeder Betätigung einer Taste bestätigt ein Signalton, dass das Gerät die Eingabe registriert hat.<br />
BABYPHONE DIGITAL GREEN • Bedienungsanleitung<br />
27
FEHLERBEHEBUNG<br />
Problem Mögliche Ursachen Lösung<br />
• Der Sender sendet nicht.<br />
• Der Empfänger ist <strong>au</strong>sgeschaltet.<br />
• Das Mikrofon ist nicht empfindlich<br />
genug eingestellt.<br />
• Die Batterien sind ent<strong>la</strong>den oder der<br />
Netzadapter ist nicht richtig angeschlossen.<br />
• Empfänger einschalten.<br />
• Empfindlichkeit des Mikrofons mit Taste<br />
„oben“ (2) einstellen.<br />
• Batterien <strong>au</strong>st<strong>au</strong>schen oder Anschluss prüfen.<br />
• Der Sender sendet permanent.<br />
• Das Mikrofon ist zu empfindlich eingestellt.<br />
• Mikrofon mittels Taste „Unten“ (3) weniger<br />
empfindlich einstellen, so dass der Sender <strong>au</strong>f<br />
die Stimme reagiert.<br />
• Die Warnung „Außer Reichweite“<br />
erlischt nicht.<br />
• Das Peering ist fehlgesch<strong>la</strong>gen.<br />
• Die Batterien des Senders sind leer.<br />
• Die Warnung „Außer Reichweite“ ist im Sender<br />
aktiviert, aber im Empfänger deaktiviert.<br />
• Der Sender ist zu weit vom Empfänger entfernt.<br />
• Peering erneut durchführen.<br />
• Batterien ersetzen oder Netzadapter verwenden.<br />
• Warnung „Außer Reichweite“ im<br />
Sender aktivieren.<br />
• Abstand zwischen Empfänger und<br />
Sender verringern.<br />
• Die Warnung „Außer Reichweite“<br />
funktioniert nicht.<br />
• Die Warnung „Außer Reichweite“ ist bei<br />
beiden Geräten <strong>au</strong>sgeschaltet<br />
• Die Warnung „Außer Reichweite“ ist im Sender<br />
aktiviert, aber im Empfänger deaktiviert.<br />
• Warnung in beiden Geräten aktivieren.<br />
• Warnung im Empfänger aktivieren.<br />
• Der Temperatura<strong>la</strong>rm erlischt nicht .<br />
• Die festgelegte Höchsttemperatur und<br />
Mindesttemperatur liegt zu nahe an<br />
der R<strong>au</strong>mtemperatur.<br />
• Höchst- und Mindesttemperatur einstellen.<br />
Sie müssen etwa 5°C über bzw. unter der von<br />
dem Gerät angezeigten Temperatur liegen.<br />
• Die Warnung „Schwache Batterie“<br />
erlischt nicht .<br />
• Die Batterien sind leer.<br />
• Der Akku ist beschädigt.<br />
• Akku mit dem Netzadapter (Empfänger)<br />
wieder <strong>au</strong>f<strong>la</strong>den. Batterien <strong>au</strong>st<strong>au</strong>schen<br />
oder Netzadapter (Sender) anschließen.<br />
• Akku gegen einen neuen <strong>au</strong>st<strong>au</strong>schen.<br />
• Es findet schnelle Ent<strong>la</strong>dung statt.<br />
• Das Nachtlicht leuchtet durchgehend.<br />
• Der Vibrationsa<strong>la</strong>rm ist aktiviert.<br />
• Nachtlicht <strong>au</strong>sschalten oder <strong>au</strong>f<br />
VOX einstellen.<br />
• Vibrationsa<strong>la</strong>rm <strong>au</strong>sschalten.<br />
• Im Disp<strong>la</strong>y des Empfängers werden<br />
beide Sender mit der gleichen<br />
Nummer angezeigt.<br />
• Beim Peering wurde beiden Sendern die<br />
gleiche Nummer zugewiesen.<br />
• Ein neues Peering durchführen und jedem<br />
Sender eine eigene Nummer geben.<br />
• Der L<strong>au</strong>tsprecher gibt viele<br />
Störgeräusche und Interferenzen ab.<br />
• Der Sender steht in der Nähe anderer<br />
elektrischer Geräte.<br />
• Die elektrischen Geräte an einen anderen<br />
Ort stellen oder den Sender an eine<br />
andere Stelle in einiger Entfernung zur<br />
Störquelle stellen.<br />
• Die Reichweite des Senders<br />
ist unzureichend.<br />
• Zwischen den beiden Geräten liegen<br />
Metallstrukturen.<br />
• Die Batterien des Senders sind leer.<br />
• Sender oder Empfänger an eine andere<br />
Stelle stellen<br />
• Batterien ersetzen oder<br />
Netzadapter verwenden.<br />
28<br />
BABYPHONE DIGITAL GREEN • Bedienungsanleitung
NL<br />
GEBRUIKSHANDLEIDING<br />
U hebt uw keuze <strong>la</strong>ten vallen op onze Babyphone Digital Green en wij danken u voor uw vertrouwen. Wij<br />
verzoeken u deze gebruikshandleiding aandachtig te lezen met het oog op een optimaal gebruik van het<br />
apparaat en een optimale levensduur. Mocht u echter een gebrek vaststellen of een probleem tegenkomen,<br />
dan verzoeken wij u contact op te nemen met onze consumentendienst.<br />
BELANGRIJK : Deze Babyphone werkt met een zwak uitzend vermogen om de gezondheid van de baby niet<br />
te schaden. De ontvanger en zender staan niet continu met elkaar in verbinding om de stralingen in de<br />
babykamer te beperken. Als het kleintje gaat huilen, wordt het systeem onmiddellijk geactiveerd om u te<br />
waarschuwen: als de baby rustig is communiceren de zender en de ontvanger slechts om de 20 s om te<br />
controleren of de communicatie nog steeds naar behoren werkt.<br />
• Digitale technologie, werkt zonder enige storing op de<br />
frequenties 863-870 MHz.<br />
• Automatische omschakeling en keuze van de kanalen.<br />
• Bereik van 800 m in een open ruimte.<br />
• Laag zendvermogen.<br />
• Terugpraatfunctie op de ontvanger om uw kindje op<br />
afstand gerust te stellen.<br />
• Mogelijkheid om tot 2 zenders aan te sluiten.<br />
• Nacht<strong>la</strong>mpje op de zender. Op afstand bedienbaar<br />
vanaf de ontvanger.<br />
• Temperatuurweergave.<br />
FUNCTIES<br />
• Batterij indicatie, en batterij zwak signaal op zender<br />
en ontvanger.<br />
• Mogelijkheid om de microfoon gevoeligheid op de<br />
zender in te stellen.<br />
• A<strong>la</strong>rmfunctie “buiten bereik” (zichtbaar en hoorbaar).<br />
• Volumeknop op de ontvanger.<br />
• Ontvanger voorzien van hoorbaar, zichtbaar en<br />
vibrerend a<strong>la</strong>rm.<br />
• Retroreflecterend scherm voor optimale leesbaarheid.<br />
• Ontvanger uitgerust met op<strong>la</strong>adbaar lithium batterij.<br />
WAARSCHUWINGEN<br />
- De Babyphone Digital Green mag niet beschouwd worden als een medisch apparaat. Buiten het gebruik van de<br />
Babyphone Digital Green, is het sterk aangeraden dat een volwassene regelmatig en rechtstreeks naar de baby<br />
gaat kijken. Premature baby’s of kinderen die gezondheidsproblemen hebben moeten door een kinderarts of<br />
iemand anders uit de gezondheidszorg gevolgd worden.<br />
- Nooit uw kind buiten alleen achter<strong>la</strong>ten, zelfs voor een ogenblik.<br />
- Niet op<strong>la</strong>adbare batterijen mogen niet opge<strong>la</strong>den worden.<br />
- De op<strong>la</strong>adbare batterijen moeten uit het apparaat gehaald worden voordat u ze gaat op<strong>la</strong>den.<br />
- Gebruik nooit nieuwe en reeds gebruikte batterijen door elkaar of op<strong>la</strong>adbare en alkalische batterijen.<br />
- Op<strong>la</strong>adbare batterijen mogen alleen onder toezicht van een volwassene opge<strong>la</strong>den worden.<br />
- De batterijen moeten met inachtneming van de juiste po<strong>la</strong>riteit op hun p<strong>la</strong>ats gebracht worden (+/-).<br />
- Lege batterijen moeten uit het apparaat gehaald worden.<br />
- De voedingsklemmen mogen niet kortgesloten worden.<br />
- Gebruik altijd de door de fabrikant meegeleverde batterij van de ontvanger : als de batterij beschadigd is, moet hij<br />
vervangen worden door de fabrikant, door zijn servicedienst of door een andere vakman om gevaar te voorkomen.<br />
- Voor een optimaal gebruik van uw babyfoon en om storingen te voorkomen, raden wij u aan geen enkel ander elektrisch<br />
apparaat op dezelfde contactdoos als de babyfoon aan te sluiten (gebruik dus niet een meervoudige stekkerdoos).<br />
• Gebruik alleen de meegeleverde adapters, het gebruik<br />
van andere adapters kan schade toebrengen aan de<br />
Babyphone Digital Green.<br />
• Als u de Babyphone Digital Green <strong>la</strong>ngere tijd niet<br />
gebruikt, moet u alle batterijen uit de zender en ook<br />
de batterij uit de ontvanger halen om schade<br />
veroorzaakt door lekken van de batterijen te voorkomen.<br />
VOORZORGSMAATREGELEN<br />
BABYPHONE DIGITAL GREEN • Gebruikshandleiding<br />
• Als u de Babyphone niet gebruikt, moet u de steker van<br />
de adapter uit de muurcontact van het stroomnet halen.<br />
• De Babyphone Digital Green werkt beter in een<br />
temperatuur bereik dat ligt tussen -9 °C en +50 °C.<br />
• De Babyphone Digital Green niet te <strong>la</strong>ng aan direct<br />
zonlicht blootstellen en hem ook niet p<strong>la</strong>atsen in de<br />
nabijheid van een warmtebron of in een vochtig en<br />
stoffig vertrek.<br />
29
• Het apparaat niet demonteren, het bevat geen enkel<br />
onderdeel dat ergens voor gebruikt kan worden.<br />
• Elektrische en elektronische uitrustingenmoeten op<br />
selectieve wijze afgevoerd worden. U mag het afval<br />
van elektrische en elektronische uitrustingen niet gooien<br />
in niet gesorteerd huisvuil, u moet ze naar speciale<br />
afvalcontainers brengen.<br />
Dit symbool geeft aan voor heel Europa dat<br />
dit product niet bij het huisvuil weggegooid<br />
mag worden, het moet op selectieve wijze<br />
afgevoerd worden.<br />
a. Stekker adapter 5 V AC x 2<br />
b. Zender<br />
c. Ontvanger<br />
d. Op<strong>la</strong>adbaar lithium polymeer batterij 3.7 V<br />
(geïnstalleerd in de ontvanger)<br />
e. Gebruiksaanwijzing<br />
STANDAARD ACCESSOIRES<br />
a<br />
b<br />
c<br />
d<br />
e<br />
BEDIENING<br />
Zender<br />
1. Aan/uit schake<strong>la</strong>ar en nacht<strong>la</strong>mpje<br />
2-3. Instelling microfoon gevoeligheid<br />
4. Menu knop<br />
5. «Volume» knop<br />
6. Nacht<strong>la</strong>mpje<br />
7. Microfoon<br />
8. Luidspreker<br />
9. Temperatuursensor<br />
10. CC contactdoos<br />
Ontvanger<br />
11. Aan/uit schake<strong>la</strong>ar en trilfunctie<br />
12-13. Volumeknop<br />
14. Menu knop<br />
15. Terugpraatfunctie<br />
16. Lichtjes die het geluidsnive<strong>au</strong> aangeven<br />
17. Microfoon<br />
18. Luidspreker<br />
19. Lichtje «Baby Unit 1»<br />
20. Lichtje «Baby Unit 2»<br />
21. CC contactdoos<br />
Ouderunit (PU) LCD scherm<br />
A. Ontvangen signaalsterkte<br />
B. Batterij indicatie<br />
C. BU Batterij indicatie<br />
D. BU nummer<br />
E. Hoge temperatuurgrens<br />
F. Buiten bereik icoon<br />
G. Lage temperatuurgrens<br />
H. Tril icoon<br />
I. Luidspreker volumestreepje<br />
J. Luidspreker uit icoon<br />
K. Temperatuur Babykamer<br />
L. Waak<strong>la</strong>mpje icoon<br />
M. Buiten bereik icoon<br />
Baby unit (BU) LCD scherm<br />
N. Buiten bereik icoon<br />
O. Batterij indicatie<br />
P. BU nummer<br />
Q. Waak<strong>la</strong>mpje icon<br />
30<br />
R. Microfoon gevoeligheid en luidspreker<br />
volumestreepje<br />
S. Temperatuur Babykamer<br />
T. Buiten bereik icoon<br />
BABYPHONE DIGITAL GREEN • Gebruikshandleiding
VOEDING<br />
A/ ZENDER<br />
1. Werking op batterijen (niet bijgeleverd)<br />
Op de vergrendeling drukken, en het deksel van het batterijvak in de aangegeven richting afschuiven. 3 AAA alkaline<br />
batterijen in het vak voegen. Let goed op de po<strong>la</strong>riteit (+/-). Het deksel weer dicht doen.<br />
N.B. Voor een optimale werking moeten nieuwe en oude, of op<strong>la</strong>adbare en alkaline batterijen niet samen<br />
gebruikt worden.<br />
2. Werking op stroom (stekker adapter bijgeleverd)<br />
De zender kan met de bijgeleverde 5 V stekker adapter ook op<br />
stroom werken.<br />
Hiervoor moet u de stekker van de adapter op de CC contactbus van<br />
de zende (10) aansluiten. De stekker adapter op het stopcontact<br />
aansluiten. De batterijvoeding wordt uitgeschakeld zo g<strong>au</strong>w de<br />
zender op het stopcontact aangesloten wordt.<br />
NB. Het bereik is groter wanneer de zender op stroom werkt.<br />
10<br />
B/ ONTVANGER<br />
1. Werking met de bijgeleverde batterij<br />
De op<strong>la</strong>adbare lithium polymeer batterij is al geïnstalleerd<br />
in de ontvanger. Om de batterij te vervangen, op de<br />
vergrendeling drukken, en het deksel van het batterijvak<br />
in de aangegeven richting afschuiven. De stekker uit het<br />
stopcontact halen alvorens de batterij te verwijderen.<br />
2. De batterij op<strong>la</strong>den met de stekker adapter<br />
De stekker van de 5 V adapter op de contactbus van de zender<br />
aansluiten (21) de batterij wordt continu opge<strong>la</strong>den, ook als de<br />
ontvanger uitgeschakeld is. Wanneer de ontvanger aanstaat, zullen<br />
de streepjes van de batterijindicatie op het LCD scherm achter elkaar<br />
12<br />
knipperen. Wanneer de batterij volledig opge<strong>la</strong>den is, zijn alle streepjes<br />
zichtbaar en knipperen niet meer. U hoeft niet persé de stekker<br />
adapter van de ontvanger af te halen, dit beschadigd de batterij niet.<br />
Wanneer de batterij leeg is en de spanning komt onder een bepaald<br />
nive<strong>au</strong>, zal de stekker adapter <strong>au</strong>tomatisch weer gaan <strong>la</strong>den.<br />
NB. Voor het eerste gebruik moet de lithium polymeer batterij ten<br />
minste 3 uur opge<strong>la</strong>den worden. Aangeraden wordt het apparaat<br />
uit te schakelen tijdens de eerste op<strong>la</strong>ding.<br />
NB. Voor een <strong>la</strong>ngere levensduur van de batterij kunt u het beste wachten tot deze volledig ont<strong>la</strong>den is alvorens<br />
weer op te <strong>la</strong>den.<br />
AANSLUITING ZENDER OP ONTVANGER<br />
De zender en ontvanger zijn al gekoppeld en k<strong>la</strong>ar voor gebruik. Deze babyfoon kan met meerdere zenders gebruikt<br />
worden (tot 2). Om een extra zender aan te sluiten, moet u de volgende stappen volgen.<br />
1. De knop (13) ▼ op de ontvanger ingedrukt houden.<br />
BABYPHONE DIGITAL GREEN • Gebruikshandleiding<br />
31
2. De Aan/uit schake<strong>la</strong>ar (11) op ON zetten, en wachten tot een knippert op<br />
het scherm.<br />
3. De knop (3) op de zender ingedrukt houden.<br />
■ VAST<br />
■ KNIPPEREND<br />
4. De aan/uit schake<strong>la</strong>ar (1) op ON zetten. Wachten tot de stopt met<br />
knipperen, en het numero van de baby-unit op het scherm knippert. (Indien<br />
van toepassing, dezelfde handeling uitvoeren voor de extra baby-unit).<br />
5. De knoppen (2) (3) ▲▼ gebruiken om zender (1) of (2) te selecteren. Voor een<br />
optimale werking van het systeem moet u NIET hetzelfde nummer voor beide<br />
zenders kiezen.<br />
6. Druk op de knop « Menu » (4) om de keuze te bevestigen, het zendernummer<br />
knippert niet meer en de gaat knipperen.<br />
7. Druk nu op de knop « Menu » (4) van één van de 2 zenders. Als de aansluiting<br />
goed is, <strong>la</strong>at de ontvanger twee geluidssignalen horen. De dop de twee<br />
schermen mag niet meer knipperen, en het overeenstemmende nummer van<br />
de zender moet rechtsboven op het scherm van de ontvanger verschijnen.<br />
8. Druk op de knop « Menu » (4) van de 2de zender, de ontvanger moet twee<br />
geluidssignalen <strong>la</strong>ten horen. De knippert niet meer op het scherm, van<br />
de zender, en knippert 2 keer op die van de ontvanger. Het nummer van de<br />
betreffende zender verschijnt rechtsboven op het scherm van de ontvanger.<br />
9. Alle apparaten uit- en weer aanzetten. De babyfoon kan nu gebruikt worden.<br />
10. Wanneer de ontvanger en zender niet kunnen communiceren, moet u de koppelingsprocedure herhalen.<br />
N.B. Wanneer u één enkele zender had, en een tweede erbij gekocht heeft, moet u de hier bovenstaande procedure<br />
uitvoeren om de 3 apparaten met elkaar te koppelen.<br />
WERKING<br />
A/ ZENDER<br />
1. Instelling van de a<strong>la</strong>rmfunctie “buiten bereik”<br />
a. De aan/uit schake<strong>la</strong>ar (1) op ON zetten om het LCD scherm aan te zetten. De « Menu » knop (4) ten minste 5<br />
seconden ingedrukt houden om toegang te krijgen tot de programmering. Dit krijgt u vervolgens op het scherm:<br />
of<br />
■ VAST<br />
■ KNIPPEREND<br />
b. De knoppen (2) (3) ▲▼ gebruiken om de a<strong>la</strong>rmfunctie «Buiten bereik» in te stellen. « On » betekent dat de functie<br />
geactiveerd is, en « Off » dat deze uitgeschakeld is. Wanneer u voor « Off » kiest, kunt u het zendnive<strong>au</strong> van de<br />
zender verminderen. Maar de ontvanger geeft geen a<strong>la</strong>rmsignaal wanneer de zender buiten bereik is; en de<br />
temperatuur van het vertrek waar de zender zich bevindt, evenals het<br />
batterijnive<strong>au</strong> wordt niet meer weergegeven op het scherm van de ontvanger<br />
wanneer hij standby staat.<br />
c. De keuze bevestigen door op de knop « Menu » (4) te drukken; het scherm<br />
gaat weer in normale modus. Wanner u het apparaat op « On » gezet heeft,<br />
verschijnt het a<strong>la</strong>rmicoon «buiten bereik» op het scherm.<br />
d. Druk in stand-by kort op de knop « Menu » (4) om de «Buiten bereik»<br />
a<strong>la</strong>rmfunctie in te stellen.<br />
32<br />
BABYPHONE DIGITAL GREEN • Gebruikshandleiding
2. Een in het apparaat geïntegreerde sensor detecteert de kamertemperatuur; deze wordt zowel op het scherm van<br />
de zender als de ontvanger weergegeven. De sensor functioneert wanneer de temperaturen tussen de - 9 ºC en<br />
+ 50 ºC liggen. Wanneer er hogere of <strong>la</strong>gere temperaturen geregistreerd worden,<br />
verschijnt het symbool op het scherm. Om te voorkomen dat de warmte van het<br />
elektronische circuit van het apparaat de sensor beïnvloedt, wordt aangeraden deze<br />
iets te verp<strong>la</strong>atsen door een hoek van ongeveer 15° te vormen, zoals hieronder. In<br />
geval van een plotselinge temperatuurverandering (bv.: Het apparaat gaat van binnen<br />
naar buiten in de winter), kan het enkele minuten duren voordat de sensor zich aan de<br />
nieuwe omgeving aangepast heeft, en opnieuw de juiste temperatuur aangeeft.<br />
3. P<strong>la</strong>ats de zender op ongeveer 1 m van het kinderbedje, met de microfoon (7) naar hem gericht.<br />
4. De gevoeligheid van de microfoon bijstellen met de knoppen (2) (3) ▲▼, zo kunt u bepalen vanaf welk geluidsnive<strong>au</strong><br />
het apparaat het door de microfoon (7) waargenomen geluid moet uitzenden. Op het scherm zullen het aantal<br />
streepjes van de microfoon ook veranderen naar ge<strong>la</strong>ng het gekozen nive<strong>au</strong>. Des te meer er streepjes zijn, des<br />
te gevoeliger is het apparaat. Wanneer het minimum of maximum nive<strong>au</strong> bereikt is en u blijft op de knop drukken,<br />
zullen twee geluidssignalen te horen zijn.<br />
5. Wanneer de zender aangaat, licht het scherm op, en het zendicoon verschijnt . Enkele seconden nadat de<br />
microfoon (7) geen geluid meer opgevangen heeft, gaat het apparaat in stand-by, en het zendicoon verdwijnt<br />
. Het scherm gaat ook uit, om energie te besparen.<br />
6. Deze babyfoon is uitgerust met een terugpraatfunctie, waardoor de ouders met de baby kunnen praten. Het<br />
geluidsnive<strong>au</strong> van de stemmen van de ouders kan bijgesteld worden. De «Volume» knop (5) ingedrukt houden,<br />
en op de knoppen (2) (3) ▲▼ drukken om het volume van de luidspreker (8) bij te stellen. Op het scherm zullen<br />
het aantal streepjes van de microfoon ook veranderen naar ge<strong>la</strong>ng het gekozen nive<strong>au</strong>. Wanneer het volume op<br />
minimum ingesteld is, komt er ook geen geluid uit de luidspreker (8).<br />
7. Het nacht<strong>la</strong>mpje (6) kan blijven branden door de aan/uit schake<strong>la</strong>ar (1) op stand te zetten; het icoon van het<br />
nacht<strong>la</strong>mpje verschijnt op het scherm . Het nacht<strong>la</strong>mpje (6) kan ook op VOX<br />
(stemactivatie) ingesteld worden, door kort op de knop « Menu » (4) te drukken. Het VOX<br />
symbool verschijnt naast het icoon . In de VOX modus gaat het nacht<strong>la</strong>mpje (6) aan<br />
wanneer de microfoon geluid waarneemt, en gaat <strong>au</strong>tomatisch weer uit wanneer er<br />
geen geluid meer waargenomen wordt. Druk kort op de knop « Menu » (4) om van de VOX<br />
modus over te schakelen naar de continu modus.<br />
U heeft ook de mogelijkheid om het nacht<strong>la</strong>mpje (6) vanaf de ontvanger op afstand in te stellen; zie hiervoor hoofdstuk<br />
“Werking van de ontvanger”.<br />
8. Hoe de batterijen ervoor staan wordt aangegeven door de batterij-indicatie . Naar ge<strong>la</strong>ng de ont<strong>la</strong>ding van<br />
de batterijen zal de batterij-indicatie geleidelijk uitgaan. Eenmaal leeg gaat de batterij-indicatie knipperen. De batterijindicatie<br />
van de zender verschijnt eveneens op het scherm van de ontvanger, zo kunt u de <strong>la</strong>ding van de batterijen<br />
op afstand volgen. Een a<strong>la</strong>rmsignaal op uw unit geeft aan dat de batterij-indicatie leeg is .<br />
9. Iedere keer als u op een knop drukt, is een geluidssignaal te horen; dit betekent dat het apparaat uw handeling<br />
heeft verwerkt.<br />
B/ ONTVANGER<br />
1. Instelling van de a<strong>la</strong>rmfunctie “buiten bereik” en het temperatuura<strong>la</strong>rm<br />
a. De aan/uit schake<strong>la</strong>ar (11) op ON zetten om het LCD scherm aan te zetten. De « Menu » knop (14) ten minste 5<br />
seconden ingedrukt houden om toegang te krijgen tot de programmering. Dit krijgt u vervolgens op het scherm:<br />
of<br />
■ VAST<br />
■ KNIPPEREND<br />
BABYPHONE DIGITAL GREEN • Gebruikshandleiding<br />
33
. De knoppen (12) (13) ▲▼ gebruiken om de a<strong>la</strong>rmfunctie «Buiten bereik» in te stellen. Deze instelling moet gelijk<br />
zijn aan die van de zender. Indien de instelling anders is, kan het a<strong>la</strong>rm zomaar afgaan, of omgekeerd, niet<br />
afgaan wanneer de ontvanger niet meer binnen bereik van de zender is. Indien het apparaat aangesloten is<br />
op 2 zenders, moet de instelling ten opzichte van beide zenders hetzelfde zijn.<br />
of<br />
c. Druk op de knop « Menu » (14) om de keuze te bevestigen. (Wanner u het<br />
apparaat op « On » gezet heeft, verschijnt het a<strong>la</strong>rmicoon «buiten bereik» in<br />
normale modus op het scherm). Dit krijgt u vervolgens op het scherm:<br />
d. Met behulp van de knoppen (12) (13) ▲▼, kunt u de maximum temperatuur<br />
instellen waarop het a<strong>la</strong>rm af moet gaan. Wanneer u kort op de knoppen drukt,<br />
gaat de temperatuur graad voor graad voorbij. Voor versnelling moet u de<br />
knoppen (12) (13) ingedrukt houden. U kunt temperaturen tussen -3 °C à +50 °C<br />
kiezen. Wanneer u « Off » geselecteerd heeft, is er geen maximale temperatuur<br />
ingesteld. Druk op de knop « Menu » (14) om de keuze te bevestigen. Dit krijgt<br />
u vervolgens op het scherm:<br />
e. Met behulp van de knoppen (12) (13) ▲▼, kunt u de minimale temperatuur<br />
instellen waarop het a<strong>la</strong>rm af moet gaan. U kunt temperaturen van -8 °C tot<br />
+44 °C kiezen, of 2 °C onder de gekozen maximum temperatuur. Wanneer u<br />
« Off » geselecteerd heeft, is er geen minimale temperatuur ingesteld. De keuze bevestigen door op de knop<br />
« Menu » (14) te drukken; het scherm gaat weer in normale modus.<br />
f. De instelling van de minimum en maximum temperaturen moet gelijk zijn voor beide zenders.<br />
g. In stand-by kort op de knop « Menu » (14) drukken om de «Buiten bereik» a<strong>la</strong>rmfunctie in te stellen.<br />
2. De ontvanger en de zender op een redelijke afstand van elkaar zetten om ruis/storing te voorkomen. Indien te<br />
dicht bij elkaar kan de luidspreker (18) een schril geluid maken.<br />
3. Wanneer de ontvanger een signaal ontvangt, licht het scherm op, en de LED lichtjes van de geluidsindicatie gaan<br />
aan. Des te harder de stem van het kind klinkt, des te meer LED lichtjes gaan er aan. Deze functie is handig wanneer<br />
de ouders de luidspreker (18) liever uitdoen om de rust te bewaren.<br />
Naar ge<strong>la</strong>ng de zender die het signaal geeft, gaat het lichtje van «Baby Unit 1» (19) of van «Baby Unit 2» (20) aan.<br />
4. Het geluid van de luidspreker (18) kan bijgesteld worden met de knoppen (12) (13) ▲▼. Op het scherm zullen het<br />
aantal streepjes van de microfoon ook veranderen naar ge<strong>la</strong>ng het gekozen nive<strong>au</strong>. Des te meer streepjes, des<br />
te harder het geluid uit de luidspreker (18). Wanneer geen enkel streepje te zien is, en het icoon verschijnt, is<br />
de luidspreker (18) uitgeschakeld.<br />
5. Wanneer de ontvanger aangesloten is op 2 zenders, heeft Baby Unit 1 altijd voorrang. Dit betekent dat wanneer<br />
de ontvanger in contact is met Baby unit 2, en Baby unit 1 begint te zenden, schakelt de ontvanger onmiddellijk<br />
over op Baby unit 1, tot einde communicatie, en gaat dan pas weer terug naar Baby unit 2.<br />
6. Om te voorkomen dat de ouders het signaal van Baby nr 2 missen wanneer deze begint te zenden terwijl de<br />
ontvanger al het signaal van Baby unit 1 opvangt, gaat het lichtje van Baby unit 2 (20) knipperen om ze te<br />
waarschuwen. Wanneer de ouders naar Baby unit 2 willen luisteren, kunnen ze omschakelen door kort op de knop<br />
« Menu » (14) te drukken. Het lichtje van «Baby unit 2» (20) gaat aan, en het lichtje van «Baby unit 1 » (19) gaat knipperen<br />
(als het eerste kind door blijft huilen). Om weer om te schakelen naar Baby unit 1, moet u weer op de knop « Menu<br />
» (14) drukken. Op deze manier is het mogelijk twee kinderen tegelijk in de gaten te houden.<br />
7. In stand-by, als er twee zenders zijn, zal het scherm 15 seconden <strong>la</strong>ng afwisselend de temperatuur en de batterijindicatie<br />
weergeven. Wanneer een van de zenders begint te zenden, ontvangt de ontvanger onmiddellijk het signaal,<br />
en zal de in<strong>format</strong>ie betreffende deze zender weergeven tot einde signaal.<br />
34<br />
BABYPHONE DIGITAL GREEN • Gebruikshandleiding
Scherm dat in<strong>format</strong>ie<br />
betreffende Baby unit 1<br />
weergeeft («Buiten bereik»<br />
a<strong>la</strong>rmfunctie geactiveerd)<br />
Scherm dat in<strong>format</strong>ie<br />
betreffende Baby unit 2<br />
weergeeft («Buiten bereik»<br />
a<strong>la</strong>rmfunctie uitgeschakeld, en<br />
nacht<strong>la</strong>mpje ingesteld op VOX)<br />
8. De ontvanger is uitgerust met een trilfunctie. De aan/uit schake<strong>la</strong>ar (11) op de trilfunctie inschakelen, en het<br />
trilicoon verschijnt op het scherm . De trilfunctie gaat werken wanneer het geluidsnive<strong>au</strong> van de kinderstem<br />
een bepaald volume heeft. Deze functie is handig wanneer de ouders zich in een <strong>la</strong>waaiige omgeving bevinden<br />
(bv.: geluid van stofzuigers). Om energie te besparen, wordt aangeraden de trilfunctie niet te vaak te gebruiken.<br />
9. Wanneer u beide apparaten op « On » inschakelt, zal het a<strong>la</strong>rmsignaal «Buiten bereik» afgaan zo g<strong>au</strong>w de<br />
ontvanger meer dan 30 seconden niet binnen het bereik van de zender is. De LED geluidsindicatie (16), evenals<br />
het a<strong>la</strong>rmicoon «Buiten bereik» gaan knipperen om u te waarschuwen. De temperatuur wordt ook niet meer<br />
aangegeven, en het symbool verschijnt. Het a<strong>la</strong>rmsignaal stopt zo g<strong>au</strong>w de ontvanger weer binnen bereik<br />
van de zender is. Wanneer u twee zenders gebruikt, zal de in<strong>format</strong>ie betreffende de zender die buiten bereik<br />
was tijdens de gehele duur van het a<strong>la</strong>rm op het scherm weergegeven worden.<br />
N.B. Het a<strong>la</strong>rmsignaal gaat ook aan wanneer de zender uit is, de batterijen leeg zijn, niet aangesloten meer is<br />
of als de a<strong>la</strong>rmfunctie op beide apparaten niet hetzelfde ingesteld zijn.<br />
10. Zo g<strong>au</strong>w de kamertemperatuur de vastgestelde maximum of minimum grens overschrijdt, gaat het a<strong>la</strong>rmsignaal<br />
af. Naar ge<strong>la</strong>ng de overschreden grens, gaan de iconen (max) of (min), evenals de temperatuur<br />
knipperen op het scherm van de ontvanger.<br />
11. Indien nodig is het mogelijk om het nacht<strong>la</strong>mpje (6) op afstand in te stellen vanaf de ontvanger; in dit geval moet<br />
de aan/uit schake<strong>la</strong>ar (1) op staan.<br />
De knop (15) ingedrukt houden terwijl u de knop (12) zo vaak als nodig indrukt om deze uit te schakelen (OFF), continu<br />
in te schakelen (ON) of de VOX modus van het nacht<strong>la</strong>mpje in te stellen. De overeenstemmende iconen worden<br />
vervolgens op het scherm van de beide apparaten weergegeven. Denk eraan dat de ontvanger alleen het<br />
waak<strong>la</strong>mpje in kan stellen van de zender waarvan het nummer op het scherm weergegeven is, op het moment<br />
waarop u op de knop drukt (15).<br />
12. De ouders hebben de mogelijkheid terug te praten om hun kindje gerust te stellen. Hiervoor moet u de knop (15),<br />
ingedrukt houden; het zendicoon verschijnt op het scherm van de ontvanger. In de microfoon praten (17). Wanneer<br />
u uitgepraat bent, de knop (15) weer los<strong>la</strong>ten. De ouders kunnen op ieder moment tegen hun kindje praten, ook<br />
tijdens een signaal. De ontvanger draagt uw stem over naar de zender waarvan het nummer weergeven wordt<br />
op het scherm op het moment dat u op de knop (15).<br />
13. De batterij-indicatie geeft aan hoe de lithium batterij ervoor staat . Naar ge<strong>la</strong>ng de ont<strong>la</strong>ding van de batterijen<br />
zal de batterij-indicatie geleidelijk uitgaan. Wanneer de batterij leeg is, gaat de batterij-indicatie knipperen en<br />
een a<strong>la</strong>rmsignaal gaat af om u eraan te herinneren dat de batterij met de stekker adapter op het elektriciteitsnet<br />
opge<strong>la</strong>den moet worden.<br />
14. Iedere keer als u op een knop drukt, is een geluidssignaal te horen; dit betekent dat het apparaat uw handeling<br />
heeft verwerkt.<br />
BABYPHONE DIGITAL GREEN • Gebruikshandleiding<br />
35
REPARATIEGIDS<br />
Probleem Mogelijke oorzaak Oplossing<br />
• De zender zendt niet.<br />
• De ontvanger is uit.<br />
• De microfoon gevoeligheid staat te<br />
<strong>la</strong>ag ingesteld.<br />
• De batterijen zijn leeg, of de stekker adapter<br />
is niet goed op het elektriciteitsnet aangesloten.<br />
• De ontvanger aanzetten.<br />
• De microfoon gevoeligheid verhogen met de<br />
knop «Hoog» (2).<br />
• De batterijen vervangen,<br />
of de aansluiting controleren.<br />
• De zender functioneert continu.<br />
• De microfoon staat te hoog ingesteld.<br />
• Ver<strong>la</strong>ag de gevoeligheid van de microfoon<br />
met de knop «Laag» (3) zodat de zender door<br />
de stem geactiveerd wordt.<br />
• Het a<strong>la</strong>rmsignaal «Buiten bereik»<br />
gaat niet uit.<br />
• De koppeling is mislukt.<br />
• De batterijen van de zender zijn leeg.<br />
• De a<strong>la</strong>rmfunctie «Buiten bereik» is<br />
ingeschakeld op de zender, maar<br />
uitgeschakeld op de ontvanger.<br />
• De afstand tussen de zender en ontvanger<br />
is te groot.<br />
• Opnieuw koppelen.<br />
• De batterijen vervangen of de stekker<br />
adapter aansluiten.<br />
• De a<strong>la</strong>rmfunctie «Buiten bereik» op<br />
de zender inschakelen.<br />
• De ontvanger dichter bij de zender zetten.<br />
• Het a<strong>la</strong>rmsignaal «Buiten bereik»<br />
functioneert niet.<br />
• De a<strong>la</strong>rmfunctie «Buiten bereik» is op beide<br />
apparaten uitgeschakeld.<br />
• De a<strong>la</strong>rmfunctie «Buiten bereik» is<br />
ingeschakeld op de zender, maar<br />
uitgeschakeld op de ontvanger.<br />
• De a<strong>la</strong>rmfunctie op<br />
beide apparaten inschakelen.<br />
• De a<strong>la</strong>rmfunctie op<br />
de ontvanger inschakelen.<br />
• Het temperatuura<strong>la</strong>rm gaat niet uit.<br />
• De ingestelde maximum en minimum<br />
temperaturen zijn te dicht bij<br />
de kamertemperatuur.<br />
• De maximum en minimum temperaturen<br />
opnieuw instellen ; deze moeten ongeveer<br />
5 °C onder of boven de temperatuur<br />
aangegeven op het apparaat liggen.<br />
• Het batterij zwak signaal gaat niet uit.<br />
• De batterijen zijn leeg.<br />
• De batterij is beschadigd.<br />
• Voor de ontvanger, de batterij op<strong>la</strong>den met<br />
de stekker adapter. De batterijen vervangen<br />
of de stekker adapter gebruiken (zender)<br />
• De batterij vervangen door een nieuwe.<br />
• De batterij is zo leeg na het op<strong>la</strong>den.<br />
• Het nacht<strong>la</strong>mpje is blijven branden.<br />
• De trilfunctie is ingeschakeld.<br />
• Het nacht<strong>la</strong>mpje uitdoen,<br />
of op VOX instellen.<br />
• De trilfunctie uitschakelen.<br />
• Op het ontvanger scherm staan twee<br />
zenders met hetzelfde nummer.<br />
• Bij de koppeling is hetzelfde nummer aan<br />
beide zenders gegeven.<br />
• Opnieuw koppelen, en aan iedere zender<br />
een ander nummer geven.<br />
• De luidspreker ruist en stoort.<br />
• De zender staat te dicht bij andere<br />
elektrische apparaten.<br />
• Verp<strong>la</strong>ats de elektrische apparaten,<br />
of zet de zender uit de buurt van de<br />
storingsbronnen.<br />
• Het bereik van de zender is te kort.<br />
• De twee apparaten worden gescheiden<br />
door structuren van metaal.<br />
• De batterijen van de zender zijn leeg.<br />
• De zender of ontvanger verp<strong>la</strong>atsen.<br />
• De batterijen vervangen of de stekker<br />
adapter aansluiten.<br />
36<br />
BABYPHONE DIGITAL GREEN • Gebruikshandleiding
ES<br />
INSTRUCCIONES DE USO<br />
Gracias por haber escogido nuestro Babyphone Digital Green. Le invitamos a leer detenidamente este manual<br />
de utilización para sacar el máximo partido a su aparato y prolongar su vida. Si a pesar de todo detecta usted<br />
algún defecto o si tiene algún problema, por favor, contacte con su distribuidor o con nuestro servicio al cliente.<br />
IMPORTANTE: Este Babyphone utiliza una potencia de transmisión reducida, para no perjudicar <strong>la</strong> salud del<br />
bebé. El receptor y el transmisor no comunican de manera continua para limitar <strong>la</strong>s radiaciones que se emiten<br />
en <strong>la</strong> habitación. Cuando el bebé llore, el sistema se activará inmediatamente para alertarle, cuando el bebé<br />
no llore, el transmisor y el receptor comunicarán únicamente cada 20 segundos, para comprobar que <strong>la</strong><br />
comunicación funciona.<br />
• Tecnología digital, funciona en <strong>la</strong>s frecuencias<br />
863-870 MHz sin ninguna interferencia.<br />
• Cambio y búsqueda <strong>au</strong>tomática de los canales.<br />
• Alcance de 800 m en un espacio abierto.<br />
• Baja potencia de <strong>la</strong>s ondas.<br />
• Función «Responder al Bebé» en el receptor con el fin<br />
de tranquilizar a su niño a distancia.<br />
• Posibilidad de conectar hasta 2 transmisores.<br />
• Piloto suave en el transmisor. Posibilidad de control a<br />
distancia a partir del receptor.<br />
FUNCIONES<br />
• Indicador de temperatura.<br />
• Indicador del estado de <strong>la</strong> batería y alerta de batería<br />
baja en el transmisor y el receptor.<br />
• Ajuste de <strong>la</strong> sensibilidad del micrófono en el transmisor.<br />
• A<strong>la</strong>rma fuera de alcance (visual y sonoro).<br />
• Control del volumen en el receptor.<br />
• A<strong>la</strong>rma sonora, visual y por vibración en el receptor.<br />
• Pantal<strong>la</strong> retroalumbrada para una mejor legibilidad.<br />
• Receptor equipado con una batería de litio recargable.<br />
ADVERTENCIAS<br />
- El Babyphone Digital Green no debe considerarse un aparato médico. Además de <strong>la</strong> utilización del Babyphone Digital<br />
Green, se recomienda encarecidamente que un adulto controle personalmente al bebé con regu<strong>la</strong>ridad. Los<br />
bebés prematuros o los niños considerados en situación de riesgo deben permanecer bajo <strong>la</strong> supervisión de un<br />
pediatra o de personal sanitario.<br />
- No se aleje nunca de su hijo saliendo de casa, ni siquiera un breve instante.<br />
- No se debe intentar recargar <strong>la</strong>s pi<strong>la</strong>s no recargables.<br />
- Deberá retirar <strong>la</strong>s pi<strong>la</strong>s recargables del aparato antes de recargar<strong>la</strong>s.<br />
- No mezcle pi<strong>la</strong>s nuevas con pi<strong>la</strong>s usadas, o pi<strong>la</strong>s recargables con pi<strong>la</strong>s alcalinas.<br />
- Las pi<strong>la</strong>s recargables no deben cargarse sin <strong>la</strong> supervisión de un adulto.<br />
- Las pi<strong>la</strong>s deben colocarse respetando su po<strong>la</strong>ridad (+/-).<br />
- Las pi<strong>la</strong>s usadas deben retirarse del aparato.<br />
- Deberá evitarse que los terminales de alimentación sufran cortocircuitos.<br />
- Utilice siempre <strong>la</strong> batería del receptor que ha proporcionado el fabricante: si <strong>la</strong> batería está estropeada, deberá ser<br />
sustituida por el fabricante, su servicio posventa o una persona con cualificación simi<strong>la</strong>r para evitar todo peligro.<br />
- Para una utilización óptima de su babyphone, y para limitar <strong>la</strong>s interferencias, le recomendamos no enchufar ningún<br />
otro aparato eléctrico en el mismo enchufe que su babyphone (no utilice un <strong>la</strong>drón).<br />
• Utilice únicamente los adaptadores de red provistos.<br />
Otros adaptadores podrían estropear el Babyphone<br />
Digital Green.<br />
• Cuando no vaya a utilizar el Babyphone Digital Green<br />
durante un <strong>la</strong>rgo periodo de tiempo, retire todas <strong>la</strong>s<br />
pi<strong>la</strong>s del transmisor y <strong>la</strong> batería del receptor para evitar<br />
daños ligados a una fuga.<br />
PRECAUCIONES<br />
BABYPHONE DIGITAL GREEN • Manual de Instrucciones<br />
• Desenchufe el adaptador de red cuando no esté<br />
utilizando el Babyphone.<br />
• El Babyphone Digital Green funciona mejor dentro de<br />
un margen de temperaturas de entre -9 °C y +50 °C.<br />
• No expongaa el Babyphone Digital Green <strong>la</strong> luz so<strong>la</strong>r<br />
directa de manera prolongada y no lo coloque cerca<br />
de una fuente de calor, ni en una habitación húmeda<br />
o muy polvorienta.<br />
37
• No desmonte el aparato: no contiene ninguna pieza que<br />
pueda utilizarse de manera ais<strong>la</strong>da.<br />
• Los equipos eléctricos y electrónicos deben ser<br />
recic<strong>la</strong>dos. No se deshaga de los desechos de equipos<br />
eléctricos y electrónicos junto con los desechos<br />
municipales sin separarlos, deberá procederse a su<br />
recogida selectiva.<br />
Este símbolo indica, en toda <strong>la</strong> Unión Europea,<br />
que este producto no debe tirarse a <strong>la</strong> basura<br />
ni mezc<strong>la</strong>rse con residuos domésticos, sino que<br />
debe ser objeto de una recogida selectiva.<br />
a. Adaptador sector 5 V CAS x 2<br />
b. Transmisor<br />
c. Receptor<br />
d. Batería Litio-Polímero recargable 3.7 V<br />
(insta<strong>la</strong>da en el receptor)<br />
e. Manual de utilización<br />
ACCESORIOS ESTÁNDAR<br />
a<br />
b<br />
c<br />
d<br />
e<br />
Transmisor<br />
1. Interruptor ON/Off y piloto<br />
2-3. Control de <strong>la</strong> sensibilidad del micrófono<br />
4. Botón Menú<br />
5. Botón «Volumen»<br />
6. Piloto<br />
7. Micrófono<br />
8. Altavoz<br />
9. Sonda de temperatura<br />
10. Toma Jack C.C.<br />
Pantal<strong>la</strong> LCD de <strong>la</strong> unidad parental (UP)<br />
A. Recepción de intensidad de señal<br />
B. Indicador del estado de <strong>la</strong> batería<br />
C. Indicador del estado de <strong>la</strong> batería de <strong>la</strong> UB<br />
D. Número UB<br />
E. Temperatura límite máxima<br />
F. Icono de trasmisión<br />
MANDOS<br />
Receptor<br />
11. Interruptor On/Off y vibrador<br />
12-13. Control del volumen<br />
14. Botón Menú<br />
15. Botón «Responder al Bebé»<br />
16. Diodos luminosos que indican el nivel sonoro<br />
17. Micrófono<br />
18. Altavoz<br />
19. Indicador luminoso «Unidad del Bebé 1»<br />
20. Indicador luminoso «Unidad del Bebé 2»<br />
21. Toma Jack C.C.<br />
G. Temperatura límite mínima<br />
H. Icono de vibración<br />
I. Gráfico de barras del volumen del altavoz<br />
J. Icono de silenciador del altavoz<br />
K. Temperatura de <strong>la</strong> habitación del bebé<br />
L. Icono de luz de noche<br />
M. Icono de fuera de cobertura<br />
Pantal<strong>la</strong> LCD de <strong>la</strong> unidad del bebe (UB)<br />
N. Icono de trasmisión<br />
O. Indicador del estado de <strong>la</strong> batería<br />
P. Número UB<br />
Q. Icono de luz de noche<br />
38<br />
R. Sensibilidad del micrófono y gráfico de barras<br />
del volumen del altavoz<br />
S. Temperatura de <strong>la</strong> habitación del bebé<br />
T. Icono de fuera de cobertura<br />
BABYPHONE DIGITAL GREEN • Manual de Instrucciones
ALIMENTACIÓN<br />
A/ TRANSMISOR<br />
1. Funcionamiento con pi<strong>la</strong>s (no proporcionadas)<br />
Pulse el botón de bloqueo y deslice <strong>la</strong> tapa del compartimento de pi<strong>la</strong>s en <strong>la</strong> dirección indicada. Introduzca 3 pi<strong>la</strong>s<br />
alcalinas de tipo AAA en el compartimento. Respete <strong>la</strong>s indicaciones de po<strong>la</strong>ridad (+). Vuelva a cerrar <strong>la</strong> tapa.<br />
N.B. Para mejores resultados, no mezcle pi<strong>la</strong>s nuevas con pi<strong>la</strong>s usadas, ni <strong>la</strong>s pi<strong>la</strong>s recargables con alcalinas.<br />
2. Funcionamiento en sector (adaptador sector proporcionado)<br />
El transmisor puede alimentarse con una toma de corriente utilizando<br />
el adaptador 5 V proporcionado. Conecte <strong>la</strong> toma de salida del<br />
adaptador a <strong>la</strong> toma jack C.C. del transmiso (10). Conecte el adaptador<br />
a <strong>la</strong> toma sector. La alimentación de <strong>la</strong>s pi<strong>la</strong>s se cortará cuando se<br />
conecte el transmisor a <strong>la</strong> toma sector.<br />
NB. <strong>la</strong> distancia de alcance es más <strong>la</strong>rga cuando el transmisor<br />
funciona en una toma sector.<br />
10<br />
B/ RECEPTOR<br />
1. Funcionamiento con <strong>la</strong> batería proporcionada<br />
La batería Litio-Polímero ya está insta<strong>la</strong>da en el receptor.<br />
Para cambiar <strong>la</strong> batería, pulse el botón de bloqueo y<br />
deslice <strong>la</strong> tapa del compartimento en <strong>la</strong> dirección indicada,<br />
retire <strong>la</strong> batería y desconecte el cable.<br />
2. Cargar <strong>la</strong> batería con el adaptador sector<br />
Conecte <strong>la</strong> toma de salida del adaptador 5 V a <strong>la</strong> toma jack del<br />
receptor (21). La batería se recarga <strong>au</strong>nque el receptor esté apagado.<br />
Cuando el receptor está encendido, <strong>la</strong>s barras del indicador de<br />
estado de carga que se ven en <strong>la</strong> pantal<strong>la</strong> LCD parpadean<br />
12<br />
sucesivamente. Cuando <strong>la</strong> batería está cargada completamente,<br />
todas <strong>la</strong>s barras son visibles y ya no parpadean. No es obligatorio<br />
desconectar el adaptador del receptor; esto no estropea <strong>la</strong> batería.<br />
Cuando <strong>la</strong> batería está descargada y que <strong>la</strong> tensión cae por debajo<br />
de un determinado nivel, el adaptador comienza entonces a<br />
recargar<strong>la</strong> <strong>au</strong>tomáticamente.<br />
NB. Antes de <strong>la</strong> 1e utilización, cargue <strong>la</strong> batería Litio-Polímero durante<br />
3 horas como mínimo. Se recomienda apagar el aparato durante <strong>la</strong> primera carga.<br />
NB. Para una mayor duración de vida útil de <strong>la</strong> batería, espere que se descargue completamente antes<br />
de recargar<strong>la</strong>.<br />
CONEXIÓN DEL TRANSMISOR AL RECEPTOR<br />
Su transmisor y su receptor ya están conectados y listos para comunicar. Este Intercomunicador para bebés puede<br />
funcionar con varios transmisores (hasta 2). Para conectar un transmisor adicional, sírvase efectuar <strong>la</strong>s siguientes etapas.<br />
1. Mantenga pulsado el botón (13) ▼ situado en el receptor.<br />
BABYPHONE DIGITAL GREEN • Manual de Instrucciones<br />
39
2. Coloque el interruptor encendido/apagado (11) en ON y espere hasta que<br />
<strong>la</strong> parpadee en <strong>la</strong> pantal<strong>la</strong>.<br />
3. Mantenga pulsado el botón (3) en el transmisor.<br />
■ FIJA<br />
■ INTERMITENTE<br />
4. Coloque el interruptor encendido/apagado (1) en ON y espere hasta que<br />
<strong>la</strong> permanezca fija y que el número de <strong>la</strong> unidad del Bebé parpadee en<br />
<strong>la</strong> pantal<strong>la</strong>. (Cuando proceda, repita <strong>la</strong> operación con <strong>la</strong> unidad<br />
suplementaria del Bebé).<br />
5. Utilice los botones (2) (3) ▲▼ para seleccionar el número del transmisor<br />
(1) o (2). NO defina el mismo número para cada transmisor, esto impediría<br />
al sistema funcionar correctamente.<br />
6. Pulse el botón «Menú» (4) para confirmar <strong>la</strong> selección, en ade<strong>la</strong>nte, el<br />
número del transmisor es fijo y comienza a parpadear.<br />
7. Ahora pulse el botón «Menú» (4) de uno de los 2 transmisores, si <strong>la</strong> conexión<br />
ha funcionado, el receptor emite dos bips. La ddebe estar fija en <strong>la</strong>s dos<br />
pantal<strong>la</strong>s y el número que corresponde al transmisor debe aparecer en <strong>la</strong><br />
parte alta derecha de <strong>la</strong> pantal<strong>la</strong> en el receptor.<br />
8. Pulse el botón «Menú» (4) del 2 e transmisor, el receptor debe emitir dos bips.<br />
La está fija en <strong>la</strong> pantal<strong>la</strong> del transmisor y parpadea 2 veces en <strong>la</strong> del<br />
receptor. El número que corresponde al transmisor aparece en <strong>la</strong> parte alta<br />
derecha de <strong>la</strong> pantal<strong>la</strong> en el receptor.<br />
9. Apague todos los aparatos, después vuélvalos a encender. En ade<strong>la</strong>nte, el Intercomunicador para bebés ya<br />
es operativo.<br />
10. Si el receptor y el transmisor no llegan a comunicar, comience de nuevo el proceso de conexión.<br />
N.B. Si al principio sólo tenía un transmisor y a continuación compró un transmisor suplementario, realice de nuevo<br />
el proceso descrito aquí arriba para conectar los 3 aparatos.<br />
FUNCIONAMIENTO<br />
A/ TRANSMISOR<br />
1. Configuración de <strong>la</strong> función de alerta «Fuera de alcance»<br />
a. Coloque el interruptor encendido/apagado (1) en ON para encender <strong>la</strong> pantal<strong>la</strong> LCD. Mantenga pulsado<br />
el botón «Menú» (4) durante al menos 5 segundos para acceder al modo de programación. Esto es lo que<br />
se visualizará en <strong>la</strong> pantal<strong>la</strong>:<br />
o<br />
■ FIJA<br />
■ INTERMITENTE<br />
b. Utilice los botones (2) (3) ▲▼ para configurar <strong>la</strong> función de alerta «Fuera de alcance». «On» significa que <strong>la</strong> función<br />
está activada y «Off» que está desactivada. Si selecciona «Off», se podrá reducir el nivel de emisión del<br />
transmisor. No obstante, el receptor ya no emite ninguna a<strong>la</strong>rma si el transmisor se encuentra fuera de alcance<br />
y <strong>la</strong> temperatura de <strong>la</strong> habitación donde se encuentra el transmisor, así como<br />
su estado de carga ya no aparecen más en <strong>la</strong> pantal<strong>la</strong> del receptor cuando<br />
está en modo espera.<br />
c. Confirme <strong>la</strong> selección pulsando el botón «Menú» (4), <strong>la</strong> pantal<strong>la</strong> pasa de nuevo<br />
modo normal. Si seleccionó «On», el icono de <strong>la</strong> alerta «Fuera de alcance»<br />
aparece en <strong>la</strong> pantal<strong>la</strong>.<br />
d. En modo espera, pulse brevemente el botón «Menú» (4) para visualizar <strong>la</strong><br />
configuración de <strong>la</strong> alerta «Fuera de alcance».<br />
40<br />
BABYPHONE DIGITAL GREEN • Manual de Instrucciones
2. Un sensor integrado al aparato detecta <strong>la</strong> temperatura ambiente, <strong>la</strong> cual se visualiza simultáneamente en <strong>la</strong> pantal<strong>la</strong><br />
del transmisor y del receptor. El sensor funciona normalmente cuando <strong>la</strong>s temperaturas están situadas entre -<br />
9ºC y +50ºC. Si se registran temperaturas inferiores o superiores, el símbolo<br />
aparece en <strong>la</strong> pantal<strong>la</strong>. Para evitar que el calor emitido por el circuito electrónico del<br />
aparato dañe el sensor, se recomienda alejarlo de su sitio formando un ángulo de cerca<br />
de 15° como se indica a continuación. En caso de cambio brusco de temperatura (p.ej.:<br />
el aparato se desp<strong>la</strong>za del interior al exterior en pleno invierno), pueden ser necesarios<br />
unos minutos antes de que el sensor se adapte al nuevo medio ambiente y visualice<br />
<strong>la</strong> temperatura correcta.<br />
3. Coloque el transmisor a 1 m aproximadamente de <strong>la</strong> cama de su niño y oriente el micrófono (7) hacia él.<br />
4. Ajuste <strong>la</strong> sensibilidad del micrófono utilizando los botones (2) (3) ▲▼, esto le permite determinar a partir de qué<br />
nivel sonoro el aparato debe transmitir los sonidos que percibe el micrófono (7). En <strong>la</strong> pantal<strong>la</strong>, el número de barras<br />
que indica <strong>la</strong> sensibilidad del micrófono cambia también en función del nivel elegido. Cuanto más <strong>au</strong>mente el<br />
número de barras, más importante es <strong>la</strong> sensibilidad del aparato. Si continúa pulsando el botón una vez que se<br />
haya alcanzado el nivel mínimo o máximo, sonarán los dos bips.<br />
5. En cuanto el transmisor comienza a transmitir, <strong>la</strong> pantal<strong>la</strong> se enciende y el icono de transmisión aparece .<br />
Segundos después de que el micrófono (7) haya dejado de percibir sonidos, el aparato se vuelve a poner en modo<br />
espera y el icono de transmisión desaparece . La pantal<strong>la</strong> se apaga también para ahorrar energía.<br />
6. Este Intercomunicador para bebés está equipado de una función «Responder al Bebé», permite que los padres<br />
hablen con su niño. El nivel sonoro de <strong>la</strong> voz de los padres puede regu<strong>la</strong>rse. Mantenga pulsado el botón<br />
«Volumen» (5), pulse los botones (2) (3) ▲▼ para regu<strong>la</strong>r el volumen del altavoz (8). En <strong>la</strong> pantal<strong>la</strong>, el número de<br />
barras que indica el volumen cambia también en función del nivel elegido. Cuando está regu<strong>la</strong>do al mínimo, el<br />
sonido del altavoz (8) se corta completamente.<br />
7. El piloto (6) puede encenderse en continuo colocando el interruptor encendido/apagado (1) en <strong>la</strong> posición , el<br />
icono del piloto aparece entonces en <strong>la</strong> pantal<strong>la</strong> . El piloto (6) también puede regu<strong>la</strong>rse<br />
en VOX (activación de <strong>la</strong> voz) pulsando brevemente el botón «Menú» (4), el símbolo VOX<br />
aparece cerca del icono . En modo VOX, el piloto (6) se enciende cuando el micrófono<br />
detecta un sonido y se apaga a continuación <strong>au</strong>tomáticamente cuando deja de percibirlo.<br />
Pulse brevemente el botón «Menú» (4) para migrar del modo VOX al modo continuo.<br />
También tiene <strong>la</strong> posibilidad de contro<strong>la</strong>r el piloto (6) a distancia a partir del receptor, para ello consulte <strong>la</strong> sección<br />
Funcionamiento de este último.<br />
8. El estado de <strong>la</strong>s pi<strong>la</strong>s está indicado mediante el indicador de estado de carga . A medida que <strong>la</strong> carga de<br />
<strong>la</strong>s pi<strong>la</strong>s disminuye, <strong>la</strong>s barras que llenan el indicador se van apagando progresivamente. Cuando <strong>la</strong> carga esté<br />
vacía, el indicador comienza a parpadear. El indicador de estado de carga del transmisor aparece igualmente<br />
en <strong>la</strong> pantal<strong>la</strong> del receptor, de este modo, puede vigi<strong>la</strong>r el estado de <strong>la</strong>s pi<strong>la</strong>s a distancia. Una a<strong>la</strong>rma suena en<br />
su unidad en cuanto el indicador está vacío .<br />
9. Un BIP suena cada vez que pulsa un botón, esto significa que el aparato registró su acción.<br />
B/ RECEPTOR<br />
1. Configuración de <strong>la</strong> función de alerta «Fuera de alcance» y de <strong>la</strong> a<strong>la</strong>rma de temperatura<br />
a. Coloque el interruptor encendido/apagado (11) en ON para encender <strong>la</strong> pantal<strong>la</strong> LCD. Mantenga pulsado el botón<br />
«Menú» (14) durante 5 segundos como mínimo para acceder al modo de programación. Esto es lo que visualiza<br />
<strong>la</strong> pantal<strong>la</strong>:<br />
■ FIJA<br />
■ INTERMITENTE<br />
o<br />
BABYPHONE DIGITAL GREEN • Manual de Instrucciones<br />
41
. Utilice los botones (12) (13) ▲▼ para configurar <strong>la</strong> función de alerta «Fuera de alcance», <strong>la</strong> configuración debe<br />
ser idéntica a <strong>la</strong> del transmisor. Si <strong>la</strong> configuración es diferente, <strong>la</strong> a<strong>la</strong>rma puede dispararse sin motivo o al contrario,<br />
no dispararse <strong>au</strong>nque el receptor ya no esté al alcance del transmisor. Si el aparato está asociado a 2<br />
transmisores, <strong>la</strong> configuración debe ser idéntica a <strong>la</strong> del transmisor cuyo número corresponde.<br />
o<br />
c. Pulse el botón «Menú» (14) para confirmar <strong>la</strong> selección. (Si ha seleccionado<br />
«On», el icono de <strong>la</strong> alerta «Fuera de alcance» aparece en <strong>la</strong> pantal<strong>la</strong> en modo<br />
normal). Esto es lo que se visualiza en <strong>la</strong> pantal<strong>la</strong>:<br />
d. Utilizando los botones (12) (13) ▲▼, regule <strong>la</strong> temperatura máxima por<br />
encima de <strong>la</strong> cual el aparato debe disparar una a<strong>la</strong>rma. Si pulsa brevemente<br />
los botones, <strong>la</strong>s temperaturas desfi<strong>la</strong>n grado por grado. Si mantiene los<br />
botones (12) (13) pulsados, <strong>la</strong>s temperaturas desfi<strong>la</strong>rán más deprisa. Puede<br />
seleccionar temperaturas que van de -3°C a +50°C. Si seleccionó “Apagado”,<br />
ninguna temperatura máxima se define. Pulse el botón “Sutilmente” (14) para<br />
confirmar <strong>la</strong> selección. Ahí tienes lo que se indica a <strong>la</strong> pantal<strong>la</strong>:<br />
e. Utilizando los botones (12) (13) ▲▼, regule <strong>la</strong> temperatura mínima por debajo<br />
de <strong>la</strong> cual el aparato debe disparar una a<strong>la</strong>rma. Puede seleccionar temperaturas<br />
que van de -8°C a + 44°C o 2°C por debajo de <strong>la</strong> temperatura máxima elegida.<br />
Si seleccionó «Off», no está definida ninguna temperatura mínima. Pulse el botón «Menú» (14) para confirmar<br />
<strong>la</strong> selección, <strong>la</strong> pantal<strong>la</strong> vuelve de nuevo a modo normal.<br />
f. Tenga en cuenta que <strong>la</strong> configuración de <strong>la</strong>s temperaturas máximas y mínimas es idéntica para los<br />
dos transmisores.<br />
g. En modo espera, pulse brevemente el botón «Menú» (14) para visualizar <strong>la</strong> configuración de <strong>la</strong> alerta «Fuera<br />
de alcance» y de <strong>la</strong> a<strong>la</strong>rma de temperatura.<br />
2. Coloque el receptor a una distancia razonable del transmisor para evitar <strong>la</strong>s reacciones parásitas. Si están muy<br />
cerca se puede producir un sonido estridente en el altavoz (18).<br />
3. Cuando el receptor recibe una señal, <strong>la</strong> pantal<strong>la</strong> se enciende y <strong>la</strong>s LED del indicador de nivel sonoro se encienden.<br />
Cuanto más alto sea el nivel sonoro de <strong>la</strong> voz del niño, más importante será el número de LED encendidas. Esta<br />
funcionalidad es útil cuando los padres prefieren apagar el altavoz (18) para que no haya ruido.<br />
En función del transmisor del que procede <strong>la</strong> señal, el indicador «Unidad del Bebé 1» (19) o el indicador visual «Unidad<br />
del Bebé 2» (20) se enciende.<br />
4. El volumen del altavoz (18) puede regu<strong>la</strong>rse utilizando los botones (12) (13) ▲▼. En <strong>la</strong> pantal<strong>la</strong>, el número de barras<br />
que indica el volumen cambia igualmente en función del nivel elegido. Cuanto más <strong>au</strong>menta el número de<br />
barras, más fuerte será el volumen del altavoz (18). Cuando no se visualiza ninguna barra y aparece el icono<br />
el altavoz (18) está completamente cortado.<br />
5. Si se conectó el receptor para que funcionase con 2 transmisores, <strong>la</strong> unidad del Bebé n°1 sigue siendo prioritaria.<br />
Esto significa que si el receptor ya está en transmisión con <strong>la</strong> unidad del Bebé n°2 y que <strong>la</strong> unidad del Bebé n°1<br />
comienza a transmitir, el receptor osci<strong>la</strong> entonces inmediatamente a <strong>la</strong> unidad del Bebé n°1, hasta el final de <strong>la</strong><br />
transmisión, y sólo después reanuda <strong>la</strong> transmisión con <strong>la</strong> unidad del Bebé n°2.<br />
6. Para evitar que los padres no se pierdan <strong>la</strong> señal de <strong>la</strong> unidad del Bebé n°2 si ésta comienza a transmitir cuando<br />
el receptor ya está en transmisión con <strong>la</strong> unidad del Bebé n°1, el indicador luminoso Unidad del Bebé 2 (20) parpadea<br />
para informarles. Si los padres desean escuchar <strong>la</strong> transmisión de <strong>la</strong> unidad del Bebé n°2, pueden pasar a ésta<br />
pulsando brevemente el botón «Menú» (14). El indicador luminoso «Unidad del Bebé nº 2» (20) se enciende<br />
entonces, y el indicador «Unidad del Bebé 1» (19) se pone a parpadear (si el primer niño sigue llorando). Para pasar<br />
de nuevo a <strong>la</strong> unidad del Bebé n°1, basta con volver a pulsar el botón «Menú» (14). Por tanto, cabe <strong>la</strong> posibilidad<br />
de vigi<strong>la</strong>r dos niños a <strong>la</strong> vez.<br />
7. En modo espera, si hay 2 transmisores, <strong>la</strong> pantal<strong>la</strong> visualiza alternativamente <strong>la</strong> temperatura y el estado de<br />
carga de cada transmisor durante 15 segundos. Cuando uno de los transmisores comienza a transmitir, el<br />
receptor recibe inmediatamente <strong>la</strong> transmisión y visualiza <strong>la</strong> información re<strong>la</strong>tiva al transmisor en cuestión hasta<br />
el final de <strong>la</strong> señal.<br />
42<br />
BABYPHONE DIGITAL GREEN • Manual de Instrucciones
Pantal<strong>la</strong> que visualiza <strong>la</strong><br />
información de <strong>la</strong> unidad<br />
del Bebé n°1 (Alerta «Fuera<br />
de alcance» activada)<br />
Pantal<strong>la</strong> que visualiza <strong>la</strong><br />
información de <strong>la</strong> unidad del<br />
Bebé n°2 (Alerta «Fuera de<br />
alcance» desactivada y piloto<br />
regu<strong>la</strong>do en VOX)<br />
8. El receptor está equipado de una función vibrador. Coloque el interruptor encendido/apagado (11) en posición<br />
vibrador, el icono aparecerá en <strong>la</strong> pantal<strong>la</strong>. El vibrador se pone a funcionar cuando el nivel sonoro de <strong>la</strong> voz<br />
del niño alcanza una determinada intensidad. Esta funcionalidad es útil cuando los padres se encuentran en un<br />
medio ambiente muy ruidoso (p.ej.: ruidos de aspiradores). Para ahorrar energía, se recomienda no utilizar <strong>la</strong><br />
función vibrador con demasiada frecuencia.<br />
9. Si selecciona «On» en los dos aparatos, <strong>la</strong> alerta «Fuera de alcance» se dispara en cuanto el receptor no está al<br />
alcance del transmisor durante más de 30 segundos. El indicador de nivel sonoro de LED (16), así como el icono<br />
de <strong>la</strong> alerta «Fuera de alcance» se ponen a parpadear para informarle. La temperatura tampoco se visualiza más<br />
y aparece el símbolo aparece. La alerta se detiene en cuanto el receptor está de nuevo al alcance del<br />
transmisor. Si utiliza dos transmisores, <strong>la</strong> información re<strong>la</strong>tiva al transmisor del que usted se encuentra fuera de<br />
alcance visualizada en <strong>la</strong> pantal<strong>la</strong> durante todo el tiempo que dure <strong>la</strong> alerta.<br />
N.B. La alerta se dispara también cuando el transmisor está apagado, sus pi<strong>la</strong>s descargadas, si no está más<br />
alimentada o si <strong>la</strong> configuración de <strong>la</strong> alerta no es idéntica en ambos aparatos.<br />
10. En cuanto <strong>la</strong> temperatura ambiente supera los límites máximos o mínimos de temperatura definidos, una<br />
a<strong>la</strong>rma se dispara. En función del límite que se haya superado, los iconos (máx) o (mín), así como <strong>la</strong><br />
temperatura se ponen a parpadear en <strong>la</strong> pantal<strong>la</strong> del receptor.<br />
11. Cabe <strong>la</strong> posibilidad de contro<strong>la</strong>r a distancia el piloto (6) a partir del receptor, para ello, el interruptor<br />
encendido/apagado (1) debe estar colocado en .<br />
Mantenga pulsado el botón (15) mientras pulsa a <strong>la</strong> vez el botón (12) el número de veces necesarias para apagar<br />
(OFF), encender en continuo (ON) o regu<strong>la</strong>r el piloto en modo VOX. Los iconos corresponsales se visualizan<br />
entonces en <strong>la</strong> pantal<strong>la</strong> de los dos aparatos. Tenga en cuenta que el receptor sólo puede contro<strong>la</strong>r el piloto del<br />
transmisor cuyo número se visualiza en <strong>la</strong> pantal<strong>la</strong> en el momento que usted pulsa el botón (15).<br />
12. Los padres tienen <strong>la</strong> posibilidad de poder responder a su niño para tranquilizarlo. Mantenga pulsado el botón<br />
(15), el icono de transmisión aparece en <strong>la</strong> pantal<strong>la</strong> del receptor. Hable en el micrófono (17). Una vez que haya<br />
terminado de hab<strong>la</strong>r, suelte el botón (15). Cabe mencionar que los padres pueden hab<strong>la</strong>r a su hijo en cualquier<br />
momento que lo desees, incluso durante una transmisión. El receptor transmite su voz al transmisor cuyo<br />
número está visualizado en <strong>la</strong> pantal<strong>la</strong> cuando usted pulsa el botón (15).<br />
13. El estado de <strong>la</strong> batería al litio está indicado por el indicador de estado de carga . A medida que va disminuyendo<br />
<strong>la</strong> carga de <strong>la</strong> batería, los segmentos que llenan el indicador se van apagando progresivamente. Una vez vacía,<br />
el indicador se pone a parpadear y se dispara una a<strong>la</strong>rma con el fin de recordarle que debe recargar <strong>la</strong> batería<br />
con el adaptador sector.<br />
14. Un bip suena cada vez que pulsa un botón, esto significa que el aparato tuvo bien en cuenta su acción.<br />
BABYPHONE DIGITAL GREEN • Manual de Instrucciones<br />
43
GUÍA DE REPARACIÓN<br />
Problema Posibles c<strong>au</strong>sas Solución<br />
• El transmisor no emite.<br />
• El receptor está apagado.<br />
• La sensibilidad del micrófono<br />
es demasiado baja.<br />
• Las pi<strong>la</strong>s están descargadas o el adaptador<br />
sector no está enchufado correctamente.<br />
• Encienda el receptor.<br />
• Aumente <strong>la</strong> sensibilidad del micrófono<br />
utilizando el botón «Alto» (2).<br />
• Cambie <strong>la</strong>s pi<strong>la</strong>s o compruebe <strong>la</strong> conexión.<br />
• El transmisor transmite continuamente.<br />
• La sensibilidad del micrófono es demasiado<br />
elevada.<br />
• Disminuya <strong>la</strong> sensibilidad del micrófono<br />
utilizando el botón «Bajo» (3) de modo que<br />
el transmisor se active a <strong>la</strong> voz.<br />
• La alerta «Fuera del alcance»<br />
no se apaga.<br />
• El emparejamiento ha fal<strong>la</strong>do.<br />
• Las pi<strong>la</strong>s del transmisor están descargadas<br />
• La alerta «Fuera del alcance» está activada<br />
en el transmisor pero desactivada en<br />
el receptor.<br />
• La distancia entre el transmisor y el receptor<br />
es demasiado importante.<br />
• Realice un nuevo emparejamiento.<br />
• Cambie <strong>la</strong>s pi<strong>la</strong>s o utiliza el adaptador sector.<br />
• Active <strong>la</strong> alerta «Fuera del alcance» en<br />
el transmisor.<br />
• Acerque el receptor al transmisor.<br />
• La alerta «Fuera del alcance»<br />
no funciona.<br />
• La alerta «Fuera del alcance» está<br />
desactivada en los dos aparatos.<br />
• La alerta «Fuera del alcance» está activada<br />
en el transmisor pero desactivada en<br />
el receptor.<br />
• Active <strong>la</strong> alerta en los dos aparatos.<br />
• Active <strong>la</strong> alerta en el receptor.<br />
• La a<strong>la</strong>rma de temperatura no se apaga.<br />
• Las temperaturas máximas y mínimas<br />
definidas son demasiado próximas a <strong>la</strong><br />
temperatura ambiente.<br />
• Regule <strong>la</strong>s temperaturas máxima y mínima,<br />
éstas deben ser superiores e inferiores de<br />
5 °C aproximadamente con re<strong>la</strong>ción a <strong>la</strong><br />
temperatura visualizada en el aparato.<br />
• La alerta de batería baja no se apaga.<br />
• Las pi<strong>la</strong>s están descargadas.<br />
• La batería está estropeada.<br />
• Recargue <strong>la</strong> batería con el adaptador<br />
sector (receptor). - Cambie <strong>la</strong>s pi<strong>la</strong>s o<br />
utilice el adaptador sector (transmisor).<br />
• Cambie <strong>la</strong> batería por una batería nueva.<br />
• La carga dura poco tiempo.<br />
• El piloto permanece encendido en continuo.<br />
• La función vibrador está activada.<br />
• Apague el piloto o regúlelo en VOX<br />
• Desactive <strong>la</strong> función vibrador.<br />
• En <strong>la</strong> pantal<strong>la</strong> del receptor, los dos<br />
transmisores poseen el mismo número.<br />
• Durante el emparejamiento , se atribuyó el<br />
mismo número a los dos transmisores.<br />
• Realice un nuevo emparejamiento<br />
asignando un número diferente<br />
a cada transmisor.<br />
• El altavoz emite muchos ruidos parásitos<br />
e interferencias.<br />
• El transmisor está colocado cerca de otros<br />
aparatos eléctricos.<br />
• Desp<strong>la</strong>ce los aparatos eléctricos o cambie<br />
el transmisor de sitio, alejado de <strong>la</strong> fuente<br />
de interferencia.<br />
• El alcance del transmisor<br />
es demasiado corto.<br />
• Los dos aparatos están separados por<br />
estructuras metálicas.<br />
• Las pi<strong>la</strong>s del transmisor están<br />
descargadas.<br />
• Cambie el transmisor o el receptor de sitio.<br />
• Cambie <strong>la</strong>s pi<strong>la</strong>s o utilice el adaptador sector.<br />
44<br />
BABYPHONE DIGITAL GREEN • Manual de Instrucciones
PT<br />
INSTRUÇÕES DE USO<br />
Agradecemos ter escolhido o nosso Babyphone Digital Green. Pedimos-lhe que leia atentamente estas instruções<br />
para assim aproveitarem ao máximo as possibilidades do nosso aparelho, garantindo-lhe uma duração<br />
máxima. Sempre que note um defeito ou avaria, deverá contactar o nosso serviço de atendimento do consumidor.<br />
IMPORTANTE: Este Babyphone utiliza potências de emissão fracas, a fim de preservar a saúde do bebé. O<br />
receptor e o emissor não comunicam entre si de forma contínua para limitação das radiações emitidas no quarto.<br />
Quando o bebé chora, o sistema é imediatamente activado para <strong>la</strong>nçar o aviso; quando o bebé não está a chorar,<br />
o emissor e o receptor só comunicam a intervalos de 20 s para verificação da boa comunicação.<br />
• Tecnologia numérica, funciona nas freqüências 863-870<br />
MHz sem nenhuma interferência.<br />
• Transição e pesquisa <strong>au</strong>tomática dos canais.<br />
• Alcance de 800 m em espaço aberto.<br />
• Fraca potência das ondas.<br />
• Função « Responder ao à Bebê » no receptor, para<br />
acalmar a criança à distancia.<br />
• Possibilidade de conectar até 2 emissores.<br />
• Luz de presença suave no emissor. Possibilidade de<br />
controlo remoto a partir do receptor.<br />
FUNÇÕES<br />
• Indicador de temperatura.<br />
• Indicador do nível de bateria e alerta de bateria fraca<br />
no emissor e no receptor.<br />
• Ajuste da sensibilidade do microfone no emissor.<br />
• A<strong>la</strong>rme fora de alcance (visual e sonora).<br />
• A<strong>la</strong>rme sonora, visual e com vibração no receptor.<br />
• Visor backlight para uma melhor legibilidade.<br />
• Receptor dotado de bateria de lítio recarregável.<br />
AVISOS<br />
- Babyphone Digital Green não deve ser considerado umaparelhomédico. A par da utilização do Babyphone Digital<br />
Green, é recomendável que as condições em que o seu bebé se encontra sejam verificadas periodicamente por<br />
uma pessoa adulta. Bebés prematuros ou crianças consideradas de risco devem ficar ao cuidado de um pediatra<br />
ou outro técnico de saúde.<br />
- Nunca se afaste do seu bebé fora de casa, mesmo que por um curto instante.<br />
- Pilhas não recarregáveis não devem ser recarregadas.<br />
- As pilhas recarregáveis devem ser retiradas do aparelho antes de serem recarregadas.<br />
- Não combine pilhas novas com pilhas já usadas nem pilhas recarregáveis com pilhas alcalinas.<br />
- As pilhas recarregáveis só devem ser carregadas sob a vigilância de uma pessoa adulta.<br />
- As pilhas devem ser introduzidas respeitando a po<strong>la</strong>ridade correcta (+/-).<br />
- As pilhas gastas devem ser retiradas do aparelho.<br />
- Os terminais não devem ser curto-circuitados.<br />
- Utilize sempre a bateria do receptor fornecida pelo fabricante: Se a bateria estiver danificada deve ser substiuída<br />
pelo fabricante, pelo seu serviço pós-venda, ou por pessoas de qualificação equivalente para se evitarem riscos.<br />
- Para a melhor utilização do seu babyphone e para limitar interferências, recomendamos que não ligue outros<br />
aparelhos eléctricos na mesma tomada juntamente com o babyphone (não utilize fichas trip<strong>la</strong>s).<br />
• Utilize exclusivamente os adaptadores para a corrente<br />
da rede fornecidos. A utilização de outros adaptadores<br />
pode danificar o Babyphone Digital Green.<br />
• Sempre que não utilizar o Babyphone Digital Green<br />
durante um período prolongado, retire todas as pilhas<br />
do emissor e a bateria do receptor para evitar danos<br />
resultantes de eventuais derrames da bateria.<br />
PRECAUÇÕES<br />
BABYPHONE DIGITAL GREEN • Manual de Instruções<br />
• Desligue o adaptador da tomada da parede sempre<br />
que não esteja a utilizar o Babyphone.<br />
• O Babyphone Digital Green funciona melhor a<br />
temperaturas compreendidas entre -9 ºC e +50 ºC.<br />
• Não exponha prolongadamente o Babyphone Digital<br />
Green à luz so<strong>la</strong>r directa e não o coloque perto de uma<br />
fonte de calor, em local húmido ou muito poeirente.<br />
45
• Não desmonte o aparelho: Não contém peças que<br />
possam ser usadas separadamente.<br />
• Os equipamento eléctricos e electrónicos devem ser<br />
objecto de recolha selectiva. Não deite fora componentes<br />
eléctricos e electrónicos juntamente com o lixo doméstico<br />
não seleccionado; faça a sua recolha selectiva.<br />
Na União Europeia, este símbolo indica que<br />
este produto não deve ser deitado no lixo nem<br />
misturado com o lixo doméstico; deve ser<br />
objecto de recolha selectiva.<br />
a. Adaptador setor 5 V AC x 2<br />
b. Emissor<br />
c. Receptor<br />
d. Bateria Polímero de Lítio recarregável 3.7 V<br />
(insta<strong>la</strong>da no receptor)<br />
e. Manual de utilização<br />
ACESSÓRIOS DE BASE<br />
a<br />
b<br />
c<br />
d<br />
e<br />
Emissor<br />
1. Interruptor On/Off e luz de presença<br />
2-3. Controlo da sensibilidade do microfone<br />
4. Botão Menu<br />
5. Botão « Volume »<br />
6. Luz de presença<br />
7. Microfone<br />
8. Alto-fa<strong>la</strong>nte<br />
9. Sonda de temperatura<br />
10. Tomada CC<br />
Visor LCD Unidade pais (PU)<br />
A. Força do sinal recebido<br />
B. Indicador nível bateria<br />
C. Indicador nível bateria BU (Unidade Bebê)<br />
D. Número Unidade Bebê (BU)<br />
E. Limite temperatura máxima<br />
F. Ícone de Transmissão<br />
COMANDOS<br />
Receptor<br />
11. Interruptor On/Off e vibração<br />
12-13. Controlo do Volume<br />
14. Botão Menu<br />
15. Botão « Responder ao Bebê »<br />
16. Diodos luminosas indicando o nível sonoro<br />
17. Microfone<br />
18. Alto-fa<strong>la</strong>nte<br />
19. Sinalização « Unidade Bebê 1 »<br />
20. Sinalização « Unidade Bebê 2 »<br />
21. Tomada CC<br />
G. Limite temperatura mínima<br />
H. Ícone vibração<br />
I. Graduação volume do alto-fa<strong>la</strong>nte<br />
J. Ícone alto-fa<strong>la</strong>nte modo silêncio<br />
K. Temperatura do quarto do bebê<br />
L. Ícone Fora de alcance<br />
M. Icono de fuera de cobertura<br />
Visor LCD Unidade Bebê (BU)<br />
N. Ícone de Transmissão<br />
O. Indicador nível bateria<br />
P. Número Unidade Bebê (BU)<br />
Q. Ícone Luz de presença<br />
46<br />
R. Sensibilidade do microfone e graduação<br />
volume do alto-fa<strong>la</strong>nte<br />
S. Temperatura do quarto do bebê<br />
T. Ícone Fora de alcance<br />
BABYPHONE DIGITAL GREEN • Manual de Instruções
ALIMENTAÇÃO<br />
A/ EMISSOR<br />
1. Funcionamento com pilhas (não disponibilizadas)<br />
Carregar no botão bloqueador e deslizar a tampa do compartimento das pilhas na direção indicada. Inserir 3<br />
pilhas alcalinas de tipo AAA no compartimento. Inserir as pilhas respeitando a po<strong>la</strong>ridade (+/-). Voltar a fechar<br />
a tampa.<br />
N.B. Para um ótimo funcionamento, não devem ser misturadas pilhas novas e usadas ou pilhas recarregáveis e<br />
alcalinas.<br />
2. Funcionamento no setor (adaptador setor disponibilizado)<br />
O emissor pode ser alimentado com corrente utilizando o adaptador<br />
5 V disponibilizado. Ligar a tomada de saída do adaptador à tomada<br />
CC do emisso (10). Ligar o adaptador à tomada elétrica do setor. A<br />
alimentação das pilhas é desligada quando o emissor for ligado à<br />
tomada elétrica.<br />
NB. A distancia de alcance é maior quando o emissor está a funcionar<br />
no setor.<br />
10<br />
B/ RECEPTOR<br />
1. Funcionamento com a bateria disponibilizada<br />
A bateria de Polímero de Lítio já está insta<strong>la</strong>da no receptor.<br />
Para mudar a bateria, prima o botão de bloqueio e faça<br />
deslizar a tampa do compartimento na direção indicada,<br />
remover a bateria e desligar o cordão.<br />
2. Carregamento da bateria com o adaptador setor<br />
Conectar a tomada de saída do adaptador 5 V à tomada do receptor<br />
(21). A bateria é carregada mesmo se o receptor estiver desligado.<br />
Quando o receptor estiver ligado, as graduações do indicador de<br />
nível da bateria do visor LCD ficam piscando sucessivamente.<br />
12<br />
Quando a bateria estiver totalmente carregada, todas as graduações<br />
ficam visíveis e deixam de piscar. Não é obrigatório desligar o<br />
adaptador do receptor; este não vai danificar a bateria. Quando a<br />
bateria estiver descarregada e que a tensão descer abaixo de<br />
determinado nível, o adaptador volta a iniciar o carregamento de<br />
forma <strong>au</strong>tomática.<br />
NB. Antes da 1ª utilização, a bateria de Polímero de Lítio deve ser<br />
carregada durante pelo menos 3 horas. É recomendado desligar o aparelho durante o primeiro carregamento.<br />
NB. Para maior duração de vida da bateria, é preciso esperar que esteja totalmente descarregada antes de iniciar<br />
novo carregamento.<br />
LIGAÇÃO DO EMISSOR AO RECEPTOR<br />
O emissor e o receptor já estão ligados e prontos a comunicar. Este babyphone pode funcionar com vários emissores<br />
(até 2). Para ligar um emissor adicional, é favor respeitar as etapas que se seguem.<br />
1. Pressione o botão (13) ▼ situado no receptor.<br />
BABYPHONE DIGITAL GREEN • Manual de Instruções<br />
47
2. Posicione o interruptor de funcionamento on/off (11) em ON e aguarde até<br />
aparecer um intermitente no visor.<br />
3. Mantenha recolhido o botão (3) no emissor.<br />
■ FIXO<br />
■ INTERMITENTE<br />
4. Posicione o interruptor de funcionamento on/off (1) em ON e aguarde até que<br />
o se torne fixo e que o número da unidade Bebê fique piscando no<br />
visor. (Se necessário, repita a operação com a unidade Bebê adicional).<br />
5. Utilize os botões (2) (3) ▲▼ para selecionar o número do emissor, (1) ou (2).<br />
NÃO defina o mesmo número para cada emissor, senão não irá permitir ao<br />
sistema funcionar corretamente.<br />
6. Prima o botão « Menu » (4) para confirmar a seleção, o número do emissor<br />
fica agora fixo e o começa a piscar.<br />
7. Prima agora o botão « Menu » (4) de um dos 2 emissores, se a ligação<br />
estiver a funcionar, o receptor vai emitir 2 bips. O tem de estar fixo nos<br />
dois visores e o número correspondente ao emissor deve aparecer em cima<br />
à direita do visor no receptor.<br />
8. Prima o botão « Menu » (4) do 2º emissor, o receptor tem de emitir dois<br />
bips. O fica fixo no visor do emissor e pisca 2 vezes no do receptor. O<br />
número correspondente ao emissor deve aparecer em cima à direita do<br />
visor no receptor.<br />
9. Desligar todos os aparelhos e voltar a ligá-los. O babyphone está agora operacional.<br />
10. Se o receptor e o emissor não conseguirem comunicar, volte a seguir todo o processo de ligação.<br />
N.B. Se inicialmente apenas possuir um só emissor e que venha a adquirir posteriormente um emissor adicional,<br />
proceda novamente ao processo supra indicado para conectar os 3 aparelhos.<br />
FUNCIONAMENTO<br />
A/ EMISSOR<br />
1. Configuração da função de alerta « Fora de alcance »<br />
a. Posicionar o interruptor de funcionamento on/off (1) em ON para acender o visor LCD. Mantenha recolhido<br />
o botão « Menu » (4) durante pelo menos 5 segundos para aceder ao modo de programação. Segue o<br />
que aparece no visor:<br />
ou<br />
■ FIXO<br />
■ INTERMITENTE<br />
b. Utilizar os botões (2) (3) ▲▼ para configurar a função de alerta « Fora de alcance ». « On » significa que a função<br />
está ativada e « Off » que está desativada. Se selecionar « Off », isto irá permitir reduzir o nível de emissão do<br />
emissor. No entanto, o receptor não emitirá nenhuma a<strong>la</strong>rme se o emissor estiver fora de alcance e que a<br />
temperatura do local onde se encontra o emissor e o nível de carregamento<br />
não irão aparecer no visor do receptor quando este estiver em standby.<br />
c. Confirme a seleção premindo o botão « Menu » (4), o visor volta para o modo<br />
normal. Se tiver selecionado « On », o ícone de alerta « Fora de alcance »<br />
aparece no visor.<br />
d. Em modo standby. Premir brevemente o botão « Menu » (4) para visualizar<br />
a configuração da alerta « Fora de alcance ».<br />
48<br />
BABYPHONE DIGITAL GREEN • Manual de Instruções
2. Um sensor integrado ao aparelho detecta a temperatura ambiente, esta ficando visível tanto no visor do emissor<br />
como no receptor. O sensor funciona normalmente quando as temperaturas estão situadas entre -9ºC e +50ºC.<br />
Se forem registradas temperaturas inferiores ou superiores, o símbolo aparece<br />
no visor. Para evitar que o circuito eletrônico afete o sensor, é recomendado afastá-lo<br />
da base formando um ângulo de perto de 15º como indicado aqui abaixo. No caso de<br />
mudança brusca de temperatura (por ex.: o aparelho é deslocado do interior para o<br />
exterior durante o Inverno), podem ser necessários alguns minutos para que o sensor<br />
se adapte ao novo ambiente, e possa apresentar a temperatura correta.<br />
3. Insta<strong>la</strong>r o emissor a uma distância de cerca de 1 m da cama da criança orientando o<br />
microfone (7) na direção dele.<br />
4. Ajuste a sensibilidade do microfone com a ajuda dos botões (2) (3) ▲▼, o que irá permitir determinar a partir<br />
de que nível sonoro o aparelho terá que transmitir os sons recebidos pelo microfone (7). No visor, o número de<br />
graduações indicando a sensibilidade do microfone fica alterada em função do nível escolhido. Quanto maior<br />
for o número de graduações, maior é a sensibilidade do aparelho. Se continuar premindo o botão quando atingido<br />
o nível mínimo ou máximo são emitidos dois bips.<br />
5. Logo que o emissor estiver a emitir, o visor acende e o ícone de transmissão aparece . Passados alguns<br />
segundos depois do microfone (7) deixar de receber sons, o aparelho passa para o modo standby e o ícone de<br />
transmissão desaparece . O visor também desliga para poupar energia.<br />
6. Este babyphone está dotado de uma função « Responder ao Bebê », permitindo aos pais fa<strong>la</strong>r com a criança. O<br />
nível sonoro da voz dos pais pode ser ajustado. Mantenha recolhido o botão « Volume » (5), carregue nos botões<br />
(2) (3) ▲▼ para ajustar o volume do alto-fa<strong>la</strong>nte (8). No visor, o número de graduações indicando o volume mudam<br />
em função do nível escolhido. Quando selecionado no mínimo, o som do alto-fa<strong>la</strong>nte (8) fica totalmente mudo.<br />
7. A luz de presença (6) pode estar ligada de forma contínua posicionando o interruptor on/off (1) na posição ,<br />
o ícone da luz de presença aparece então no viso . A luz de presença (6) pode também estar selecionada<br />
na posição VOX (ativação da voz) carregando brevemente no botão « Menu » (4), o<br />
símbolo VOX aparece junto do ícone . Em modo VOX, a luz de presença (6) acende<br />
quando o microfone detectar um som e apaga de forma <strong>au</strong>tomática quando deixa de<br />
o receber. Carregue brevemente no botão « Menu » (4) para ir do modo VOX para o<br />
modo contínuo.<br />
Tem também a possibilidade de contro<strong>la</strong>r a luz de presença (6) à distancia a partir do receptor, consulte a seção<br />
Funcionamento correspondente.<br />
8. O nível das pilhas é indicado pelo indicador do nível de carregamento . À medida que as pilhas diminuem,<br />
as graduações do indicador apagam de forma progressiva. Quando vazias, fica piscando. O indicador de nível<br />
de carregamento do emissor aparece também no receptor, pode assim ficar vigiando o nível das pilhas à<br />
distancia. Fica ouvindo uma a<strong>la</strong>rme na unidade logo que o indicador esteja vazio .<br />
9. Quando ouvir um bip sempre que carregar em um botão, significa que o aparelho está gravando a sua ação.<br />
B/ RECEPTOR<br />
1. Configuração da função de alerta « Fora de alcance » e do a<strong>la</strong>rme de temperatura<br />
a. Posicionar o interruptor de funcionamento on/off (11) em ON para acender o visor LCD. Mantenha recolhido o<br />
botão « Menu » (14) durante pelo menos 5 segundos para aceder ao modo de programação. Segue o que aparece<br />
no visor:<br />
■ FIXO<br />
■ INTERMITENTE<br />
ou<br />
BABYPHONE DIGITAL GREEN • Manual de Instruções<br />
49
. Utilize os botões (12) (13) ▲▼ para configurar a função de alerta « Fora de alcance», a configuração deve ser<br />
idêntica ao do emissor. Se a configuração for diferente, o a<strong>la</strong>rme pode disparar sem motivo algum ou ao<br />
contrário, não disparar mesmo que o receptor não se encontre ao alcance do emissor. Se o aparelho estiver<br />
associado a 2 emissores, a configuração terá de ser idêntica ao do emissor com o numero correspondente.<br />
ou<br />
c. Carregue no botão « Menu » (14) para confirmar a seleção. (Se tiver selecionado<br />
« On », o ícone de alerta « Fora de alcance» aparece no visor em modo normal).<br />
Segue o que aparece no visor:<br />
d. Com a ajuda dos botões (12) (13) ▲▼, ajuste a temperatura máxima para o<br />
aparelho disparar um a<strong>la</strong>rme quando atingida. Se carregar brevemente nos<br />
botões, as temperaturas desfi<strong>la</strong>m gr<strong>au</strong> a gr<strong>au</strong>. Se mantiver os botões (12) (13)<br />
removidos, o desfile das temperaturas é efetuado de maneira rápida. Pode<br />
selecionar temperaturas desde -3 ºC até +50 ºC. Se tiver selecionado « Off », não<br />
fica definida nenhuma temperatura máxima. Carregue no botão « Menu » (14)<br />
para confirmar a seleção. Segue o que aparece no visor:<br />
e. Com a ajuda dos botões (12) (13) ▲▼, ajuste a temperatura máxima para o<br />
aparelho disparar um a<strong>la</strong>rme quando atingida. Pode selecionar temperaturas<br />
desde -8 ºC até +44 ºC ou 2 ºC abaixo da temperatura máxima escolhida. Se<br />
tiver selecionado « Off », não fica definida nenhuma temperatura máxima. Carregue no botão « Menu » (14) para<br />
confirmar a seleção, o visor volta para o modo normal.<br />
f. É favor notar que a configuração das temperaturas máximas e mínimas é idêntica para os dois emissores.<br />
g. Em modo standby, premir brevemente o botão « Menu » (14) para visualizar a configuração da alerta « Fora<br />
de alcance » e do a<strong>la</strong>rme de temperatura.<br />
2. Colocar o receptor a uma distancia razoável do emissor para evitar interferências. Uma grande proximidade pode<br />
criar um ruído estridente no alto-fa<strong>la</strong>nte (18).<br />
3. Quando o receptor estiver a receber um sinal, o visor acende e os LED do indicador de nível sonoro ficam ligados.<br />
Quanto mais forte for o nível sonoro da voz da criança, maior é o numero de LED a acenderem. Essa função é<br />
útil quando os pais preferirem desligar o alto-fa<strong>la</strong>nte (18) para ficarem em ambiente mais calmo.<br />
Em função do emissor do qual provier o sinal, a sinalização « Unidade Bebê 1 » (19) ou a sinalização « Unidade<br />
Bebê 2 » (20) acende.<br />
4. O volume do alto-fa<strong>la</strong>nte (18) pode ser ajustado com os botões (12) (13) ▲▼. No visor, o número de graduações<br />
indicando o volume muda também em função do nível escolhido. Quanto maior for o número de graduações,<br />
maior é o volume do alto-fa<strong>la</strong>nte (18). Quando não for visível nenhuma graduação e que o ícone aparecer,<br />
significa que o alto-fa<strong>la</strong>nte (18) está completamente desligado.<br />
5. Se o receptor tiver sido conectado para funcionar com 2 emissores, a unidade Bebê nº 1 é sempre a prioritária.<br />
Isto significa que se o receptor já estiver a transmitir com a unidade Bebê nº 2 e que a unidade Bebê nº 1 começar<br />
a emitir, o receptor transita imediatamente para a unidade Bebê nº 1, até final da transmissão, e só depois<br />
retoma a transmissão com a unidade Bebê nº 2.<br />
6. Para evitar que os pais não se apercebam do sinal da unidade Bebê nº 2, se este começar a emitir enquanto<br />
o receptor já estiver em transmissão com a unidade Bebê nº 1, a sinalização Unidade Bebê 2 (20) fica<br />
piscando para avisar. Se os pais quiserem ouvir a transmissão da unidade Bebê nº 2, podem efetuar a<br />
transição carregando brevemente no botão « Menu » (14). A sinalização « Unidade Bebê 2 » (20) acende e a<br />
sinalização « Unidade Bebê 1 » (19) fica piscando (se a primeira criança continuar chorando). Para efetuar<br />
de novo a transição para a unidade Bebê nº 1, basta carregar novamente no botão « Menu » (14). Fica assim<br />
possibilitado vigiar duas crianças em simultâneo.<br />
7. Em modo standby, se houver 2 emissores, o visor mostra alternativamente a temperatura e o nível de carregamento<br />
de cada emissor durante 15 segundos. Quando um dos emissores começar a emitir, o receptor recebe de<br />
imediato a transmissão e mostra as informações re<strong>la</strong>tivas ao emissor em questão até finalizar o sinal.<br />
50<br />
BABYPHONE DIGITAL GREEN • Manual de Instruções
Visor mostrando as<br />
informações da unidade<br />
Bebê nº 1 (Alerta « Fora<br />
de alcance » ativada)<br />
Visor mostrando as<br />
informações da unidade Bebê<br />
nº 2 (Alerta « Fora de alcance »<br />
desativada e luz de presença<br />
ligada em modo VOX)<br />
8. O receptor é dotada de uma função vibração. Posicione o interruptor on/off (11), na posição vibração, o ícone vibração<br />
aparece no visor . O modo vibração fica a funcionar quando o nível sonoro da voz da criança atingir uma<br />
determinada intensidade. Essa função é útil quando os pais estão num ambiente com muito barulho (ex: barulho<br />
do aspirador). Para poupar energia, é recomendado não utilizar a função vibração com muita freqüência.<br />
9. Se selecionar « On » nos dois aparelhos, a alerta « Fora de alcance » dispara logo que o receptor esteja fora do<br />
alcance do emissor por mais de 30 segundos. O indicador de nível sonoro com LED (16) assim que o ícone de<br />
alerta « Fora de alcance » ficam piscando para avisar. A temperatura deixa também de aparecer e o símbolo<br />
aparece. A alerta para logo que o receptor se encontre de novo ao alcance do emissor. Se utilizar dois emissores,<br />
as informações re<strong>la</strong>tivas ao emissor que estiver fora de alcance ficam visíveis no visor enquanto durar a alerta.<br />
N.B. A alerta também dispara quando o emissor estiver desligado, quando as pilhas estiverem descarregadas,<br />
quando deixar de ser alimentado ou quando a configuração da alerta não for idêntica nos dois aparelhos.<br />
10. Logo que a temperatura ambiente ultrapassar os limites máximos e mínimos da temperatura definida, dispara<br />
um a<strong>la</strong>rme. Em função do limite ultrapassado, os ícones (max) ou (min) assim que a temperatura ficam<br />
piscando no visor do receptor.<br />
11. É possível contro<strong>la</strong>r à distancia a luz de presença (6) a parir do receptor, para isso, é preciso que o interruptor<br />
on/off (1) esteja posicionado em .<br />
Mantenha removido o botão (15) enquanto carrega no botão (12) o numero de vezes necessárias para desligar<br />
(OFF), acender de forma contínua (ON) ou ajustar em modo VOZ a luz de presença. Os ícones correspondentes<br />
aparecem no visor dos dois aparelhos. Note que o receptor só pode contro<strong>la</strong>r a luz de presença do emissor cujo<br />
número estiver visível no visor na altura em que estiver carregando no botão (15).<br />
12. Os pais tem a possibilidade de responder ao filho para o acalmar. Mantenha removido o botão (15), o ícone<br />
de transmissão aparece no visor do receptor. Fale no microfone (17). Quando tiver acabado de fa<strong>la</strong>r, solte o<br />
botão (15). È favor notar que os pais podem fa<strong>la</strong>r com a criança em qualquer altura mesmo durante uma<br />
transmissão. O receptor transmite a voz até ao receptor cujo número estiver visível no visor enquanto estiver<br />
carregando no botão (15).<br />
13. O nível da bateria de lítio é indicado pelo indicador do nível de carregamento . À medida que as pilhas<br />
diminuem, o segmentos do indicador apagam de forma progressiva. Quando vazio, este último fica piscando e<br />
dispara um a<strong>la</strong>rme para lembrar de recarregar a bateria com o adaptador setor.<br />
14. Quando ouvir um bip sempre que carregar em um botão, significa que o aparelho está gravando a sua ação.<br />
BABYPHONE DIGITAL GREEN • Manual de Instruções<br />
51
GUIA DE REPARAÇÕES<br />
Problema C<strong>au</strong>sas possíveis Solução<br />
•O emissor não emite.<br />
• O receptor está desligado.<br />
• A sensibilidade do microfone é baixa demais.<br />
• As pilhas estão descarregadas ou o<br />
adaptador setor não está corretamente ligado.<br />
• Ligue o receptor.<br />
• Aumente a sensibilidade do microfone com<br />
o botão « Subir » (2).<br />
• Substitua as pilhas e verifique a ligação.<br />
• O emissor emite de forma permanente.<br />
• A sensibilidade do microfone<br />
é demasiado alta.<br />
• Diminua a sensibilidade do microfone com<br />
o botão « Baixar » (3) de forma a ativar o<br />
emissor com a voz.<br />
• A alerta « Fora de alcance»<br />
não se desliga.<br />
• A interligação não ocorreu.<br />
• As pilhas do emissor estão descarregadas.<br />
• A alerta « Fora de alcance» está ativada no<br />
emissor mas desativada no receptor.<br />
• A distancia entre o emissor e o receptor és<br />
grande demais.<br />
• Realize nova interligação.<br />
• Substitua as pilhas ou o adaptador setor.<br />
• Ative a alerta « Fora de alcance» no emissor.<br />
• Aproxime o receptor do emissor.<br />
• A alerta « Fora de alcance»<br />
não funciona.<br />
• A alerta « Fora de alcance» está desativada<br />
nos dois aparelhos.<br />
• A alerta « Fora de alcance» está ativada no<br />
emissor mas desativada no receptor.<br />
• Ative a alerta nos dois aparelhos.<br />
• Ative a alerta no receptor.<br />
• O a<strong>la</strong>rme de temperatura não desliga.<br />
• As temperaturas máximas e mínimas<br />
definidas estão demasiado perto da<br />
temperatura ambiente.<br />
• Ajuste as temperaturas máximas e mínimas,<br />
estas têm de ser superiores e inferiores de<br />
perto de 5 ºC em re<strong>la</strong>ção à temperatura<br />
visível no aparelho.<br />
• A alerta de bateria fraca não se desliga.<br />
• As pilhas estão descarregadas.<br />
• A bateria está danificada.<br />
• Recarregar a bateria com o adaptador<br />
setor (receptor). Substituir as pilhas ou<br />
utilizar o adaptador setor (emissor).<br />
• Substituir por bateria nova.<br />
• A carga dura pouco tempo.<br />
• A luz de presença fica acesa<br />
em permanência.<br />
• A função vibração está ativada.<br />
• Desligue a luz de presença ou passe para<br />
o modo VOX.<br />
• Desativar a função vibração.<br />
• No visor de receptor, os dois emissores<br />
possuem o mesmo número.<br />
• Quando da interligação, o mesmo número<br />
foi atribuído aos dois emissores.<br />
• Realize nova interligação atribuindo um<br />
número diferente a cada emissor.<br />
• O alto-fa<strong>la</strong>nte emite muitos ruídos<br />
e muitas interferências.<br />
• O emissor está próximo de outros<br />
aparelhos elétricos.<br />
• Deslocar os aparelhos elétricos ou mudar<br />
o emissor de lugar, longe da fonte de<br />
interferência.<br />
• O alcance do emissor<br />
é demasiado curto.<br />
• Os dois aparelhos estão separados por<br />
estruturas metálicas.<br />
• As pilhas do emissor estão<br />
descarregadas.<br />
• Mudar o emissor ou o receptor de lugar.<br />
• Substituir as pilhas ou utilizar<br />
o adaptador setor.<br />
52<br />
BABYPHONE DIGITAL GREEN • Manual de Instruções
IT<br />
MANUALE DI ISTRUZIONI<br />
Grazie per aver scelto il nostro Babyphone Digital Green. Vi invitiamo a leggere attentamente il presente manuale<br />
di istruzioni per sfruttare al meglio il vostro apparecchio e garantirgli una durata di vita ottimale. Se doveste<br />
tuttavia notare un difetto o riscontrare qualsiasi problema, vi invitiamo a contattare il nostro servizio clienti.<br />
IMPORTANTE: Il presente Babyphone utilizza potenze di emissione deboli al fine di salvaguardare <strong>la</strong> salute<br />
del bambino. Il ricevitore e l’emettitore non comunicano in modo continuo al fine di limitare l’emissione di<br />
radiazioni nel<strong>la</strong> stanza. Quando il bambino piange, il sistema si attiva immediatamente per avvisarvi;<br />
quando il bambino cessa di piangere, l’emettitore e il ricevitore comunicano solo ogni 20 secondi per<br />
verificare <strong>la</strong> corretta comunicazione.<br />
• Tecnologia digitale, funziona sulle frequenze<br />
863-870 MHz senza alcuna interferenza.<br />
• Commutazione e ricerca <strong>au</strong>tomatica dei canali.<br />
• Portata di 800 m in uno spazio aperto.<br />
• Potenza delle onde ridotta.<br />
• Funzione « Rispondi al bimbo » sul ricevitore per<br />
tranquillizzare il bambino a distanza.<br />
• Possibilità di collegare fino a 2 trasmettitori.<br />
• Luce notturna delicata sul trasmettitore. Possibilità di<br />
comando remoto a partire dal ricevitore.<br />
FUNZIONI<br />
• Indicatore di temperatura.<br />
• Indicatore dello stato del<strong>la</strong> batteria e al<strong>la</strong>rme di batteria<br />
scarica sul trasmettitore e sul ricevitore.<br />
• Rego<strong>la</strong>zione del<strong>la</strong> sensibilità del microfono sul trasmettitore.<br />
• Al<strong>la</strong>rme fuori portata (visivo e acustico).<br />
• Controllo del volume sul ricevitore.<br />
• Al<strong>la</strong>rme acustico, visivo e mediante vibrazione<br />
sul ricevitore.<br />
• Disp<strong>la</strong>y retroilluminato per una leggibilità migliore.<br />
• Ricevitore munito di una batteria al litio ricaricabile.<br />
AVVERTENZE<br />
- Babyphone Digital Green non deve essere considerato un apparecchio medico. Oltre all’utilizzo del Babyphone Digital<br />
Green, si raccomanda il rego<strong>la</strong>re controllo diretto del bambino da parte di un adulto. I bambini prematuri o i<br />
bambini considerati a rischio devono essere oggetto di un controllo da parte del pediatra o del personale sanitario.<br />
- Non allontanatevi mai dal vostro bambino fuori da casa, anche solo per un breve istante.<br />
- Le pile non ricaricabili non devono essere ricaricate.<br />
- Le pile ricaricabili devono essere rimosse dall’apparecchio prima di essere ricaricate.<br />
- Non mischiare pile nuove e pile usate, né pile ricaricabili e pile alcaline.<br />
- Le pile ricaricabili devono essere ricaricate solo ed esclusivamente sotto <strong>la</strong> sorveglianza di un adulto.<br />
- Le pile devono essere inserite con <strong>la</strong> corretta po<strong>la</strong>rità (+/-).<br />
- Le pile usate devono essere rimosse dall’apparecchio.<br />
- I morsetti di alimentazione non devono essere cortocircuitati.<br />
- Utilizzare sempre <strong>la</strong> batteria per ricevitore fornita dal fabbricante: se <strong>la</strong> batteria è danneggiata, deve essere sostituita<br />
dal fabbricante, dal re<strong>la</strong>tivo servizio post-vendita o da persone aventi qualifica analoga al fine di evitare pericoli.<br />
- Per un uso ottimale del vostro babyphone e per limitare eventuali interferenze, consigliamo di non collegare altri<br />
apparecchi elettrici al<strong>la</strong> presa a cui è collegato il babyphone (non utilizzate ciabatte multipresa).<br />
• Utilizzare esclusivamente gli adattatori di rete in<br />
dotazione. L’utilizzo di adattatori differenti può<br />
danneggiare il Babyphone Digital Green.<br />
• Se si prevede di non utilizzare il Babyphone Digital<br />
Green per un periodo prolungato, rimuovere tutte le pile<br />
dall’emettitore e <strong>la</strong> batteria del ricevitore per evitare<br />
eventuali danni connessi a perdite dal<strong>la</strong> batteria.<br />
PRECAUZIONI<br />
BABYPHONE DIGITAL GREEN • Manuale di Istruzioni<br />
• Scollegare l’adattatore di rete dal<strong>la</strong> presa a muro<br />
quando il Babyphone non è utilizzato.<br />
• Il Babyphone Digital Green funziona in modo ottimale in<br />
un campo di temperatura compreso tra -9 °C e +50 °C.<br />
• Non esporre a lungo il Babyphone Digital Green ai raggi<br />
so<strong>la</strong>ri diretti e non collocarlo in prossimità di una fonte<br />
di calore, in un locale umido omolto polveroso.<br />
53
• Non smontare l’apparecchio: non contiene nessun<br />
componente utilizzabile separatamente.<br />
• Gli apparecchi elettrici ed elettronici sono oggetto di<br />
raccolta differenziata. Non gettare mai componenti di<br />
apparecchi elettrici ed elettronici insieme ai rifiuti<br />
domestici indifferenziati, ma procedere ad una raccolta<br />
differenziata.<br />
Questo simbolo indica, nell'Unione europea,<br />
che questo prodotto non deve essere gettato<br />
tra i rifiuti comuni o nel<strong>la</strong> spazzatura domestica,<br />
ma deve essere smaltito separatamente.<br />
a. Adattatore di rete elettrica 5 V CA x 2<br />
b. Trasmettitore<br />
c. Ricevitore<br />
d. Batteria litio-polimero ricaricabile 3.7 V<br />
(instal<strong>la</strong>ta nel ricevitore)<br />
e. Manuale d’uso<br />
ACCESSORI STANDARD<br />
a<br />
b<br />
c<br />
d<br />
e<br />
Trasmettitore<br />
1. Interruttore On/Off e luce notturna<br />
2-3. Controllo del<strong>la</strong> sensibilità del microfono<br />
4. Pulsante Menu<br />
5. Pulsante « Volume »<br />
6. Luce notturna<br />
7. Microfono<br />
8. Altopar<strong>la</strong>nte<br />
9. Sonda del<strong>la</strong> temperatura<br />
10. Presa Jack CC<br />
COMANDI<br />
Ricevitore<br />
11. Interruttore On/Off e vibratore<br />
12-13. Controllo del volume<br />
14. Pulsante Menu<br />
15. Pulsante « Rispondi al bimbo »<br />
16. Led luminosi indicanti il livello acustico<br />
17. Microfono<br />
18. Altopar<strong>la</strong>nte<br />
19. Spia « Unità bimbo 1 »<br />
20. Spia « Unità bimbo 2 »<br />
21. Presa Jack CC<br />
Disp<strong>la</strong>y LCD Unità genitori (UG)<br />
A. Forza del segnale ricevuto<br />
B. Indicatore dello stato del<strong>la</strong> batteria<br />
C. Indicatore dello stato del<strong>la</strong> batteria UB<br />
D. Numero di UB<br />
E. Limite superiore di temperatura<br />
F. Icona di trasmissione<br />
G. Limite inferiore di temperatura<br />
H. Icona di vibrazione<br />
I. Barra del volume dell’altopar<strong>la</strong>nte<br />
J. Icona altopar<strong>la</strong>nte muto<br />
K. Temperatura del<strong>la</strong> stanza del bambino<br />
L. Icona del<strong>la</strong> luce notturna<br />
M. Icona di fuori portata<br />
Disp<strong>la</strong>y LCD Unità bimbo (UB)<br />
N. Icona di trasmissione<br />
O. Indicatore dello stato del<strong>la</strong> batteria<br />
P. Numero di UB<br />
Q. Icona del<strong>la</strong> luce notturna<br />
54<br />
R. Sensibilità del microfono e barra del volume<br />
dell’altopar<strong>la</strong>nte<br />
S. Temperatura del<strong>la</strong> stanza del bambino<br />
T. Icona di fuori portata<br />
BABYPHONE DIGITAL GREEN • Manuale di Istruzioni
ALIMENTAZIONE<br />
A/ TRASMETTITORE<br />
1. Funzionamento con pile (non fornite)<br />
Premere il pulsante di blocco e far scivo<strong>la</strong>re il coperchio dello scomparto delle pile nel<strong>la</strong> direzione indicata. Inserire<br />
3 pile alcaline di tipo AAA nello scomparto. Rispettare le indicazioni di po<strong>la</strong>rità (+/-). Richiudere il coperchio.<br />
N.B. Per ottenere prestazioni migliori, non mischiare le pile nuove e usate o le pile ricaricabili e alcaline.<br />
2. Funzionamento sul<strong>la</strong> rete elettrica (adattatore di rete fornito)<br />
È possibile alimentare il trasmettitore tramite una presa di corrente<br />
utilizzando l’adattatore 5 V fornito.<br />
Collegare <strong>la</strong> presa di uscita dell’adattatore al<strong>la</strong> presa jack CC del<br />
trasmettitor (10). Collegare l’adattatore al<strong>la</strong> presa elettrica.<br />
L’alimentazione delle pile sarà interrotta non appena il trasmettitore<br />
sarà collegato al<strong>la</strong> presa elettrica.<br />
NB. La distanza del<strong>la</strong> portata è più lunga nel momento in cui il<br />
trasmettitore funziona su una presa elettrica.<br />
10<br />
B/ RICEVITORE<br />
1. Funzionamento con <strong>la</strong> batteria fornita<br />
La batteria Litio-Polimero è già instal<strong>la</strong>ta nel ricevitore.<br />
Per sostituire <strong>la</strong> batteria, premere il pulsante di blocco e<br />
far scivo<strong>la</strong>re il coperchio dello scomparto nel<strong>la</strong> direzione<br />
indicata, rimuovere <strong>la</strong> batteria e scollegare il filo.<br />
2. Caricamento del<strong>la</strong> batteria con l’adattatore di rete<br />
Collegare <strong>la</strong> presa di uscita dell’adattatore da 5 V al<strong>la</strong> presa jack del<br />
ricevitore (21). La batteria si ricarica anche se il ricevitore è spento.<br />
Nel momento in cui il ricevitore è acceso, le barre dell’indicatore di<br />
stato di carica che appaiono sul disp<strong>la</strong>y LCD <strong>la</strong>mpeggiano in<br />
12<br />
successione. Nel momento in cui <strong>la</strong> batteria è completamente carica,<br />
tutte le barre sono visibili e non <strong>la</strong>mpeggiano più. Non è obbligatorio<br />
scollegare l’adattatore dal ricevitore, poiché <strong>la</strong> batteria non rischia<br />
di danneggiarsi. Nel momento in cui <strong>la</strong> batteria è scarica e <strong>la</strong><br />
tensione scende al di sotto di un determinato livello, l’adattatore<br />
ricomincia a ricaricar<strong>la</strong> in modo <strong>au</strong>tomatico.<br />
NB. Al momento del primo utilizzo, caricare <strong>la</strong> batteria al Litio-Polimero<br />
per almeno 3 ore. Si raccomanda di spegnere l’apparecchio durante il primo caricamento.<br />
NB. Per ottenere una maggiore durata del<strong>la</strong> batteria, attendere che sia completamente scarica prima di ricaricar<strong>la</strong>.<br />
COLLEGAMENTO DEL TRASMETTITORE AL RICEVITORE<br />
Il trasmettitore e il ricevitore sono già collegati e pronti per comunicare. Questo babyphone può funzionare con più<br />
trasmettitori (fino a 2). Per collegare un trasmettitore supplementare, si raccomanda di attenersi al<strong>la</strong> seguente procedura.<br />
1. Mantenere premuto il pulsante (13) ▼ collocato sul ricevitore.<br />
BABYPHONE DIGITAL GREEN • Manuale di Istruzioni<br />
55
2. Posizionare l’interruttore On/Off (11) su ON e attendere finché una<br />
<strong>la</strong>mpeggia sul disp<strong>la</strong>y.<br />
3. Mantenere premuto il pulsante (3) sul trasmettitore.<br />
■ FISSO<br />
■ LAMPEGGIANTE<br />
4. Posizionare l’interruttore On/Off (1) su ON e attendere finché <strong>la</strong> diventa<br />
fissa e il numero dell’unità Bimbo <strong>la</strong>mpeggia sul disp<strong>la</strong>y. (All’occorrenza,<br />
ripetere l’operazione con l’Unità bimbo supplementare).<br />
5. Utilizzare i pulsanti (2) (3) ▲▼ per selezionare il numero del trasmettitore,<br />
(1) o (2). NON definire lo stesso numero per ogni trasmettitore, poiché ciò<br />
non consentirebbe al sistema di funzionare in modo corretto.<br />
6. Premere il pulsante « Menu » (4) per confermare <strong>la</strong> selezione, il numero del<br />
trasmettitore è ormai fisso e <strong>la</strong> si mette a <strong>la</strong>mpeggiare.<br />
7. A questo punto premere il pulsante « Menu » (4) di uno dei 2 trasmettitori,<br />
se il collegamento ha funzionato, il ricevitore emette due bip. La deve<br />
essere fissa sui due disp<strong>la</strong>y e il numero corrispondente al trasmettitore<br />
deve apparire in alto a destra del disp<strong>la</strong>y sul ricevitore.<br />
8. Premere il pulsante « Menu » (4) del 2° trasmettitore, il ricevitore deve<br />
emettere due bip. La è fissa sul disp<strong>la</strong>y del trasmettitore e <strong>la</strong>mpeggia<br />
2 volte su quello del ricevitore. Il numero corrispondente al trasmettitore<br />
compare in alto a destra del disp<strong>la</strong>y sul ricevitore.<br />
9. Spegnere tutti gli apparecchi, poi riaccenderli. Il babyphone è operativo.<br />
10. Nel caso in cui il ricevitore e il trasmettitore non riuscissero a comunicare, ricominciare il processo di collegamento.<br />
N.B. Nel caso in cui, all’inizio, si abbia un solo trasmettitore e in seguito si aggiunga un trasmettitore supplementare,<br />
eseguire nuovamente <strong>la</strong> procedura sopra descritta per collegare i 3 apparecchi.<br />
FUNZIONAMENTO<br />
A/ TRASMETTITORE<br />
1. Configurazione del<strong>la</strong> funzione di al<strong>la</strong>rme « Fuori portata »<br />
a. Posizionare l’interruttore On/Off (1) su ON per accendere il disp<strong>la</strong>y LCD. Mantenere premuto il pulsante « Menu »<br />
(4) per almeno 5 secondi per accedere al<strong>la</strong> modalità di programmazione. Ecco ciò che si visualizza sul disp<strong>la</strong>y:<br />
o<br />
■ FISSO<br />
■ LAMPEGGIANTE<br />
b. Utilizzare i pulsanti (2) (3) ▲▼ per configurare <strong>la</strong> funzione di al<strong>la</strong>rme « Fuori portata ». « On » significa che <strong>la</strong><br />
funzione è attiva e « Off » che è disattivata. Selezionando « Off », si riduce il livello di emissione del trasmettitore.<br />
Tuttavia, il ricevitore non emette più alcun al<strong>la</strong>rme se il trasmettitore si trova fuori portata e <strong>la</strong> temperatura del<strong>la</strong><br />
stanza in cui si trova il trasmettitore, nonché il suo stato di carica, non<br />
compaiono più sul disp<strong>la</strong>y del ricevitore nel momento in cui è in modalità<br />
stand-by.<br />
c. Confermare <strong>la</strong> selezione premendo il pulsante « Menu » (4), il disp<strong>la</strong>y ripassa<br />
in modalità normale. Nel caso in cui sia stato selezionato « On », compare<br />
sul disp<strong>la</strong>y l’icona dell’al<strong>la</strong>rme « Fuori portata » .<br />
d. In modalità stand-by, premere brevemente il pulsante « Menu » (4) per<br />
visualizzare <strong>la</strong> configurazione dell’al<strong>la</strong>rme « Fuori portata ».<br />
56<br />
BABYPHONE DIGITAL GREEN • Manuale di Istruzioni
2. Un sensore integrato all’apparecchio rileva <strong>la</strong> temperatura ambiente, quest’ultima è visualizzata<br />
contemporaneamente sul disp<strong>la</strong>y del trasmettitore e del ricevitore. Il sensore funziona normalmente nel momento<br />
in cui le temperature si collocano tra - 9 ºC e + 50 ºC. Nel caso in cui siano registrate<br />
temperature inferiori o superiori, sul disp<strong>la</strong>y compare il simbolo . Per evitare che<br />
il calore emesso dal circuito elettronico dell’apparecchio danneggi il sensore, si<br />
raccomanda di allontanare quest’ultimo dal<strong>la</strong> sua posizione formando un angolo di circa<br />
15° come indicato sotto. In caso di improvviso cambiamento di temperatura (ad es.:<br />
l’apparecchio è spostato dall’interno all’esterno in pieno inverno), possono essere<br />
necessari alcuni minuti prima che il sensore si adatti al nuovo ambiente e visualizzi <strong>la</strong><br />
temperatura corretta.<br />
3. Posizionare il trasmettitore a circa 1 m dal letto del bambino orientando il microfono (7) verso di lui.<br />
4. Impostare <strong>la</strong> sensibilità del microfono per mezzo dei pulsanti (2) (3) ▲▼, ciò consente di determinare a partire<br />
da quale livello acustico l’apparecchio deve trasmettere i suoni percepiti dal microfono (7). Sul disp<strong>la</strong>y, il numero<br />
di barre che indicano <strong>la</strong> sensibilità del microfono cambia anche in funzione del livello scelto. Più il numero di barre<br />
<strong>au</strong>menta, più è importante <strong>la</strong> sensibilità dell’apparecchio. Nel caso in cui si continui a premere il pulsante una volta<br />
raggiunto il livello minimo o massimo, l’apparecchio emetterà due bip.<br />
5. Dal momento in cui il trasmettitore inizia a trasmettere, il disp<strong>la</strong>y si illumina e compare l’icona di trasmissione .<br />
Alcuni secondi dopo che il microfono (7) ha cessato di percepire suoni, l’apparecchio si rimette in modalità standby<br />
e scompare l’icona di trasmissione . Anche il disp<strong>la</strong>y si spegne per far risparmiare energia.<br />
6. Questo babyphone è dotato di una funzione « Rispondi al bimbo » che consente ai genitori di par<strong>la</strong>re al bambino<br />
per tranquillizzarlo. È possibile impostare il livello acustico del<strong>la</strong> voce dei genitori. Mantenere premuto il pulsante<br />
« Volume » (5), premere i pulsanti (2) (3) ▲▼ per impostare il volume dell’altopar<strong>la</strong>nte (8). Sul disp<strong>la</strong>y, il numero<br />
di barre che indicano il volume cambia anche in funzione del livello scelto. Nel momento in cui è rego<strong>la</strong>to al minimo,<br />
il suono dell’altopar<strong>la</strong>nte (8) è completamente interrotto.<br />
7. La luce notturna (6) può essere accesa in modo continuo posizionando l’interruttore On/Off<br />
(1) sul<strong>la</strong> posizione , a questo punto, compare sul disp<strong>la</strong>y l’icona del<strong>la</strong> luce notturna .<br />
La luce notturna (6) può anche essere rego<strong>la</strong>ta su VOX (attivazione a voce) premendo<br />
brevemente il pulsante « Menu » (4), il simbolo VOX appare vicino all’icona . In modalità<br />
VOX, <strong>la</strong> luce notturna (6) si accende nel momento in cui il microfono rileva un suono e si spegne<br />
successivamente in modo <strong>au</strong>tomatico nel momento in cui termina di percepirne. Premere brevemente il pulsante<br />
« Menu » (4) per commutare dal<strong>la</strong> modalità VOX al<strong>la</strong> modalità continua.<br />
Nel caso in cui ci sia anche <strong>la</strong> possibilità di control<strong>la</strong>re <strong>la</strong> luce notturna (6) a distanza a partire dal ricevitore, fare<br />
riferimento al<strong>la</strong> sezione Funzionamento di quest’ultima.<br />
8. Lo stato delle pile è indicato dall’indicatore di stato di carica . Man mano che <strong>la</strong> carica delle pile diminuisce,<br />
le barre che riempiono l’indicatore si spengono progressivamente. Una volta vuoto, quest’ultimo si mette a<br />
<strong>la</strong>mpeggiare. Anche l’indicatore di stato di carica del trasmettitore compare sul disp<strong>la</strong>y del ricevitore; in questo<br />
modo, è possibile sorvegliare lo stato delle pile a distanza. L’unità emetterà un al<strong>la</strong>rme non appena l’indicatore<br />
sarà vuoto .<br />
9. Viene emesso un bip ogni volta che si preme un pulsante, ciò significa che l’apparecchio ha memorizzato l’azione<br />
in modo corretto.<br />
B/ RICEVITORE<br />
1. Configurazione del<strong>la</strong> funzione di al<strong>la</strong>rme « Fuori portata » e dell’al<strong>la</strong>rme di temperatura<br />
a. Posizionare l’interruttore On/Off (11) su ON per accendere il disp<strong>la</strong>y LCD. Mantenere premuto il pulsante « Menu »<br />
(14) per almeno 5 secondi per accedere al<strong>la</strong> modalità di programmazione. Ecco ciò che compare sul disp<strong>la</strong>y:<br />
ou<br />
■ FISSO<br />
■ LAMPEGGIANTE<br />
BABYPHONE DIGITAL GREEN • Manuale di Istruzioni<br />
57
. Utilizzare i pulsanti (12) (13) ▲▼ per configurare <strong>la</strong> funzione di al<strong>la</strong>rme « Fuori portata », <strong>la</strong> configurazione deve<br />
essere identica a quel<strong>la</strong> del trasmettitore. Nel caso in cui <strong>la</strong> configurazione sia differente, l’al<strong>la</strong>rme può attivarsi<br />
senza ragione oppure, al contrario, non attivarsi anche se il ricevitore non è più a portata del trasmettitore. Nel<br />
caso in cui l’apparecchio sia associato a 2 trasmettitori, <strong>la</strong> configurazione deve essere identica a quel<strong>la</strong> del<br />
trasmettitore il cui numero corrisponde.<br />
o<br />
c. Premere il pulsante « Menu » (14) per confermare <strong>la</strong> selezione. (Nel caso in cui<br />
non si abbia selezionato « On », l’icona dell’al<strong>la</strong>rme « Fuori portata » appare sul<br />
disp<strong>la</strong>y in modalità normale). Ecco ciò che compare sul disp<strong>la</strong>y:<br />
d. Per mezzo dei pulsanti (12) (13) ▲▼, impostare <strong>la</strong> temperatura massima al di sopra<br />
del<strong>la</strong> quale l’apparecchio deve attivare un al<strong>la</strong>rme. Se si premono brevemente i<br />
pulsanti, le temperature sfi<strong>la</strong>no grado per grado. Nel caso in cui si mantengano<br />
premuti i pulsanti (12) (13), lo scorrimento delle temperature è accelerato. È<br />
possibile selezionare temperature comprese tra -3 °C e +50 °C. Selezionando «<br />
Off », non è definita alcuna temperatura massima. Premere il pulsante « Menu<br />
» (14) per confermare <strong>la</strong> selezione. Ecco ciò che appare sul disp<strong>la</strong>y:<br />
e. Per mezzo dei pulsanti (12) (13) ▲▼, impostare <strong>la</strong> temperatura minima al di sotto<br />
del<strong>la</strong> quale l’apparecchio deve attivare un al<strong>la</strong>rme. È possibile selezionare<br />
temperature comprese tra -8 °C e +44 °C o 2 °C al di sotto del<strong>la</strong> temperatura massima scelta. Selezionando «<br />
Off », non è definita alcuna temperatura minima. Premere il pulsante « Menu » (14) per confermare <strong>la</strong> selezione,<br />
il disp<strong>la</strong>y ritorna in modalità normale.<br />
f. Osservare che <strong>la</strong> configurazione delle temperature massime e minime è identica per i due trasmettitori.<br />
g. In modalità stand-by, premere brevemente il pulsante « Menu » (14) per visualizzare <strong>la</strong> configurazione dell’al<strong>la</strong>rme<br />
« Fuori portata » e dell’al<strong>la</strong>rme di temperatura.<br />
2. Posizionare il ricevitore ad una distanza ragionevole dal trasmettitore per evitare reazioni parassitarie. Una<br />
vicinanza troppo elevata può creare un suono stridente nell’altopar<strong>la</strong>nte (18).<br />
3. Nel momento in cui il ricevitore riceve un segnale, il disp<strong>la</strong>y si illumina e i LED dell’indicatore di livello acustico si<br />
accendono. Più il livello acustico del<strong>la</strong> voce del bambino è elevato, più è importante il numero di LED accesi.<br />
Questa funzionalità è utile nel momento in cui i genitori preferiscono spegnere l’altopar<strong>la</strong>nte (18) per rimanere tranquilli.<br />
In funzione del trasmettitore da cui proviene il segnale, si accende <strong>la</strong> spia « Unità bimbo 1 » (19) o <strong>la</strong> spia « Unità<br />
bimbo 2 » (20).<br />
4. Il volume dell’altopar<strong>la</strong>nte (18) può essere impostato per mezzo dei pulsanti (12) (13) ▲▼. Sul disp<strong>la</strong>y, il numero di<br />
barre che indicano il volume cambia anche in funzione del livello scelto. Più il numero di barre <strong>au</strong>menta, più è elevato<br />
il volume dell’altopar<strong>la</strong>nte (18). Nel momento in cui non è visualizzata alcuna barra e compare l’icona ,<br />
l’altopar<strong>la</strong>nte (18) è completamente disattivato.<br />
5. Nel caso in cui il ricevitore sia stato collegato per funzionare con 2 trasmettitori, è sempre l’Unità bimbo n°1 ad<br />
essere prioritaria. Ciò significa che, se il ricevitore è già in trasmissione con l’Unità bimbo n°2 e l’Unità bimbo n°1<br />
comincia a trasmettere, il ricevitore si commuta immediatamente sull’Unità bimbo n°1, fino al<strong>la</strong> fine del<strong>la</strong><br />
trasmissione, per poi riprendere solo in seguito <strong>la</strong> trasmissione con l’Unità bimbo n°2.<br />
6. Per evitare che ai genitori manchi il segnale dell’Unità bimbo n°2, nel caso in cui questo cominci ad essere<br />
trasmesso mentre il ricevitore è già in trasmissione con l’Unità bimbo n°1, <strong>la</strong> spia Unità bimbo 2 (20) <strong>la</strong>mpeggia<br />
per avvertirli. Qualora i genitori vogliano ascoltare <strong>la</strong> trasmissione dell’Unità bimbo n°2, possono commutare<br />
su quest’ultima premendo brevemente il pulsante « Menu » (14). A questo punto, <strong>la</strong> spia « Unità bimbo 2 » (20)<br />
si accende e <strong>la</strong> spia « Unità bimbo 1 » (19) si mette a <strong>la</strong>mpeggiare (se il primo bambino continua a piangere).<br />
Per commutare di nuovo sull’Unità bimbo n°1, è sufficiente premere un’altra volta il pulsante « Menu » (14). In<br />
questo modo, è possibile sorvegliare due bambini contemporaneamente.<br />
7. In modalità stand-by, se ci sono 2 trasmettitori, il disp<strong>la</strong>y visualizza alternativamente <strong>la</strong> temperatura e lo stato di<br />
carica di ciascun trasmettitore per 15 secondi. Nel momento in cui uno dei trasmettitori inizia a trasmettere, il ricevitore<br />
riceve immediatamente <strong>la</strong> trasmissione e visualizza le informazioni inerenti il trasmettitore in questione fino al<strong>la</strong><br />
fine del segnale.<br />
58<br />
BABYPHONE DIGITAL GREEN • Manuale di Istruzioni
Disp<strong>la</strong>y che visualizza<br />
le informazioni dell’Unità<br />
bimbo n°1 (Al<strong>la</strong>rme<br />
« Fuori portata » attivato)<br />
Disp<strong>la</strong>y che visualizza le<br />
informazioni dell’Unità<br />
bimbo n°2 (Al<strong>la</strong>rme « Fuori<br />
portata » disattivato e luce<br />
notturna rego<strong>la</strong>ta su VOX)<br />
8. Il ricevitore è dotato di una funzione vibratore. Posizionare l’interruttore On/Off (11) sul<strong>la</strong> posizione vibratore, sul<br />
disp<strong>la</strong>y compare l’icona . Il vibratore si mette a funzionare nel momento in cui il livello acustico del<strong>la</strong> voce del<br />
bambino raggiunge una certa intensità. Questa funzionalità è utile nel momento in cui i genitori si trovano in un<br />
ambiente molto rumoroso (es.: rumori di aspirapolvere). Per risparmiare energia, si raccomanda di non utilizzare<br />
<strong>la</strong> funzione vibratore troppo di frequente.<br />
9. Selezionando « On » sui due apparecchi, si attiva l’al<strong>la</strong>rme « Fuori portata » dal momento in cui il ricevitore non è<br />
più a portata del trasmettitore per più di 30 secondi. L’indicatore di livello acustico a LED (16), nonché l’icona<br />
dell’al<strong>la</strong>rme « Fuori portata » si mettono a <strong>la</strong>mpeggiare per avvertire l’utilizzatore. Anche <strong>la</strong> temperatura non è più<br />
visualizzata e compare il simbolo . L’al<strong>la</strong>rme si arresta dal momento in cui il ricevitore è di nuovo a portata<br />
del trasmettitore. Nel caso in cui si utilizzino due trasmettitori, le informazioni inerenti il trasmettitore di cui si è fuori<br />
portata rimangono visualizzate sul disp<strong>la</strong>y per tutta <strong>la</strong> durata dell’al<strong>la</strong>rme.<br />
N.B. L’al<strong>la</strong>rme si attiva anche nel momento in cui il trasmettitore è spento, le sue pile sono scariche, se non è più<br />
alimentato o <strong>la</strong> configurazione dell’al<strong>la</strong>rme non è identica sui due apparecchi.<br />
10. Non appena <strong>la</strong> temperatura ambiente oltrepassa i limiti massimi o minimi di temperatura definiti, si attiva un al<strong>la</strong>rme.<br />
In funzione del limite che è stato superato, le icone (max) o (min), oltre al<strong>la</strong> temperatura, si mettono a<br />
<strong>la</strong>mpeggiare sul disp<strong>la</strong>y del ricevitore.<br />
11. È possibile control<strong>la</strong>re a distanza <strong>la</strong> luce notturna (6) a partire dal ricevitore; a tale scopo, è necessario che<br />
l’interruttore On/Off (1) sia posizionato su .<br />
Mantenere premuto il pulsante (15) premendo nello stesso tempo il pulsante (12) per il numero di volte necessario<br />
per spegnere (OFF), accendere in modo continuo (ON) o impostare in modalità VOX <strong>la</strong> luce notturna. A questo punto,<br />
le icone corrispondenti si visualizzano sul disp<strong>la</strong>y dei due apparecchi. Osservare che il ricevitore può control<strong>la</strong>re<br />
unicamente <strong>la</strong> luce notturna del trasmettitore il cui numero è visualizzato sul disp<strong>la</strong>y nel momento in cui si preme<br />
il pulsante (15).<br />
12. I genitori hanno <strong>la</strong> possibilità di poter rispondere al bambino per calmarlo. Mantenere premuto il pulsante (15),<br />
l’icona di trasmissione compare sul disp<strong>la</strong>y del ricevitore. Par<strong>la</strong>re nel microfon (17). Una volta terminato di par<strong>la</strong>re,<br />
ri<strong>la</strong>sciare il pulsante (15). Si noti che i genitori possono par<strong>la</strong>re al bambino in qualunque momento, anche nel corso<br />
di una trasmissione. Il ricevitore trasmette <strong>la</strong> voce al trasmettitore il cui numero è visualizzato sul disp<strong>la</strong>y nel momento<br />
in cui si preme il pulsante (15).<br />
13. Lo stato del<strong>la</strong> batteria al litio è indicato dall’indicatore di stato di carica . Man mano che <strong>la</strong> carica del<strong>la</strong> batteria<br />
diminuisce, i segmenti che riempiono l’indicatore si spengono progressivamente. Una volta vuoto, quest’ultimo si<br />
mette a <strong>la</strong>mpeggiare e si attiva un al<strong>la</strong>rme per ricordare all’utilizzatore di ricaricare <strong>la</strong> batteria tramite l’adattatore<br />
di rete.<br />
14. Viene emesso un bip ogni qualvolta si preme un pulsante; ciò significa che l’apparecchio ha recepito l’azione<br />
compiuta in modo corretto.<br />
BABYPHONE DIGITAL GREEN • Manuale di Istruzioni<br />
59
GUIDA DI RISOLUZIONE DEI GUASTI<br />
Problema C<strong>au</strong>se possibili Soluzione<br />
• Il trasmettitore non trasmette.<br />
• Il ricevitore è spento.<br />
• La sensibilità del microfono è troppo bassa.<br />
• Le pile sono scariche o l’adattatore di rete<br />
non è correttamente collegato.<br />
• Accendere il ricevitore.<br />
• Aumentare <strong>la</strong> sensibilità del microfono per<br />
mezzo del pulsante « Alto » (2).<br />
• Sostituire le pile o verificare il collegamento.<br />
• Il trasmettitore trasmette<br />
in modo continuo.<br />
• La sensibilità del microfono è troppo elevata.<br />
• Diminuire <strong>la</strong> sensibilità del microfono per<br />
mezzo del pulsante « Basso » (3) in maniera<br />
tale che il trasmettitore si attivi con <strong>la</strong> voce.<br />
• L'al<strong>la</strong>rme « Fuori portata » non si spegne.<br />
• L’accoppiamento è fallito.<br />
• Le pile del trasmettitore sono scariche.<br />
• L'al<strong>la</strong>rme « Fuori portata » è attivato sul<br />
trasmettitore, ma disattivato sul ricevitore.<br />
• La distanza tra il trasmettitore e il ricevitore è<br />
troppo elevata.<br />
• Realizzare un nuovo accoppiamento.<br />
• Sostituire le pile o utilizzare l’adattatore di rete.<br />
• Attivare l’al<strong>la</strong>rme « Fuori portata »<br />
sul trasmettitore.<br />
• Avvicinare il ricevitore al trasmettitore.<br />
• L’al<strong>la</strong>rme « Fuori portata » non funziona.<br />
• L'al<strong>la</strong>rme « Fuori portata » è disattivato sui<br />
due apparecchi.<br />
• L'al<strong>la</strong>rme « Fuori portata » è attivato sul<br />
trasmettitore, ma disattivato sul ricevitore.<br />
• Attivare l’al<strong>la</strong>rme sui due apparecchi.<br />
• Attivare l’al<strong>la</strong>rme sul ricevitore.<br />
• L’al<strong>la</strong>rme di temperatura non si spegne.<br />
• Le temperature massime e minime<br />
definite sono troppo vicine al<strong>la</strong><br />
temperatura ambiente.<br />
• Impostare <strong>la</strong> temperatura massima e<br />
minima; queste ultime devono essere<br />
superiori e inferiori di circa 5 °C rispetto al<strong>la</strong><br />
temperatura visualizzata sull’apparecchio.<br />
• L’al<strong>la</strong>rme di batteria quasi scarica<br />
non si spegne.<br />
• Le pile sono scariche.<br />
• La batteria è danneggiata.<br />
• Ricaricare <strong>la</strong> batteria per mezzo<br />
dell’adattatore di rete (ricevitore).<br />
Sostituire le pile o utilizzare l’adattatore di<br />
rete (trasmettitore).<br />
• Sostituire <strong>la</strong> batteria con una batteria nuova.<br />
• La carica tiene solo poco tempo.<br />
• La luce notturna rimane accesa<br />
in modo continuo.<br />
• La funzione vibratore è attivata.<br />
• Spegnere <strong>la</strong> luce notturna o rego<strong>la</strong>r<strong>la</strong><br />
su VOX.<br />
• Disattivare <strong>la</strong> funzione vibratore.<br />
• Sul disp<strong>la</strong>y del ricevitore, i due<br />
trasmettitori possiedono lo stesso numero.<br />
• Al momento dell’accoppiamento,<br />
è stato attribuito lo stesso numero<br />
ai due trasmettitori.<br />
Realizzare un nuovo accoppiamento<br />
attribuendo un numero differente<br />
a ciascun trasmettitore.<br />
• L’altopar<strong>la</strong>nte trasmette molti rumori<br />
parassiti ed interferenze.<br />
• Il trasmettitore è collocato nelle vicinanze<br />
di altri apparecchi elettrici.<br />
• Spostare gli apparecchi elettrici o cambiare<br />
posto al trasmettitore, a distanza dal<strong>la</strong><br />
fonte di interferenza.<br />
• La portata del trasmettitore<br />
è troppo corta.<br />
• I due apparecchi sono separati da<br />
strutture metalliche<br />
• Le pile del trasmettitore sono scariche.<br />
• Cambiare di posto il trasmettitore<br />
o il ricevitore.<br />
• Sostituire le pile o utilizzare l’adattatore di rete.<br />
60<br />
BABYPHONE DIGITAL GREEN • Manuale di Istruzioni
CZ<br />
NÁVOD K POUŽITÍ<br />
Děkujeme, že jste si vybrali naši dětskou chůvičku Digital Green. Doporučujeme pečlivě pročíst tento návod,<br />
abystemohli přístroj využívat co nejlépe a nejdéle. Pokud však zjistíte závadu nebo budete mít jakýkoli<br />
problém, obraťte se prosímna naši společnost.<br />
DŮLEŽITÉ: Tato dětská chůvička využívá napájení s nízkýmvyzařováním, aby chráni<strong>la</strong> zdraví dítěte. Aby se omezily<br />
emise rádiového záření v místnosti, nekomunikuje přijímač s vysí<strong>la</strong>čem nepřetržitě. Když začne dítě p<strong>la</strong>kat,<br />
systémje okamžitě aktivován a uvědomí rodiče; když dítě nepláče, komunikuje vysí<strong>la</strong>č s přijímačemjen každých<br />
20 sekund, aby se ověři<strong>la</strong> kvalita spojení.<br />
• Elektronický přístroj, funkční na frekvencích<br />
863-870 MHz bez jakékoliv interference.<br />
• Automatické vyhledávání kanálů.<br />
• Dosah na 800 m v otevřeném prostoru.<br />
• Nízká emise elektromagnetických vln.<br />
• Přijímač je vybaven funkcí « Odpovědět dítěti» a umožní<br />
uklidnit vaše dítě i na dálku.<br />
• Možnost připojení na 2 vysí<strong>la</strong>če.<br />
• Tlumená světelná kontrolka na vysí<strong>la</strong>či. Možnost kontroly<br />
na dálku pomocí přijímače.<br />
FUNKCE<br />
• Ukazatel teploty.<br />
• Ukazatel stavu baterie, oznámení s<strong>la</strong>bé baterie signálem<br />
na přijímači i vysí<strong>la</strong>či.<br />
• Nastavení citlivosti mikrofonu vysí<strong>la</strong>če.<br />
• Zvukový a vizuální signál v případě nedosažitelnosti.<br />
• Nastavitelná h<strong>la</strong>sitost přijímače.<br />
• Přijímač je vybaven zvukovým, vizuálním<br />
a vibračním signálem.<br />
• Osvícený displej pro lepší čitelnost údajů.<br />
• Přijímač je vybaven nabíjecí lithiovou baterií.<br />
VAROVÁNÍ<br />
- Dětskou chůvičku Digital Green nelze považovat za zdravotnický přístroj. Spolu s užíváním přístroje Digital Green<br />
se důrazně doporučuje, aby dítě pravidelně přímo kontrolova<strong>la</strong> zodpovědná dospělá osoba. Nedonošené nebo<br />
jinak ohrožené děti byměly být pod dohledemdětského lékaře či zdravotnického personálu.<br />
- Nikdy neodcházejte od svého dítěte mimo dům ani na krátkou chvíli.<br />
- Nedobíjejte jiné než dobíjecí baterie;<br />
- Dobíjecí baterie je třeba před dobíjením vyjmout z přístroje;<br />
- Různé typy baterií: Doporučuje se nekombinovat baterie nové a použité, případně baterie dobíjecí a jiné;<br />
- Dobíjecí baterie je třeba dobíjet pod dohledem dospělé osoby;<br />
- Baterie je třeba vkládat se správnou po<strong>la</strong>ritou (+/-);<br />
- Vybité baterie je třeba z přístroje vyjmout;<br />
- Napájecí svorky se nesmí zkratovat.<br />
- V přijímači vždy používejte dodaný akupack. Pokud je poškozen,musí jej vyměnit výrobce, poprodejní servis nebo<br />
osoby s podobnou kvalifikací, aby se předešlo případným rizikům.<br />
- Pro zajištění co nejlepšího provozu vaší dětské chůvičky a omezení případného rušení doporučujeme nezapojovat<br />
do stejné zásuvky jako chůvičku žádné další elektrické spotřebiče. (Nepoužívejte rozdvojky).<br />
• Používejte pouze přibalené adaptéry, jiné adaptéry by<br />
mohly dětskou chůvičku poškodit.<br />
• Pokud přístroj delší dobu nepoužíváte, vyjměte všechny<br />
baterie a akumulátory z přijímače i z vysí<strong>la</strong>če, aby<br />
nevytekly a nepoškodily přístroje.<br />
• Když není dětská chůvička v provozu, odpojte adaptér<br />
ze sítě.<br />
BEZPEČNOSTNÍ OPATŘENÍ<br />
BABYPHONE DIGITAL GREEN • Návod k Použití<br />
• Dětská chůvička podává nejlepší výkon při teplotách od<br />
-9 °C do +50 °C.<br />
• Nevystavujte přístroj na delší dobu intenzivnímu<br />
slunečnímu svitu, nenechávejte jej u zdrojů tep<strong>la</strong>, ani ve<br />
vlhkém či nadměrně prašném prostředí.<br />
• Neotvírejte skříňku přístroje, neobsahuje součásti, které<br />
lze opravit bez zásahu odborníka.<br />
61
• Elektrická a elektronická zařízení je třeba vyhazovat do<br />
tříděného odpadu. Elektrický a elektronický odpad<br />
nevyhazujte do netříděného komunálního odpadu, ale<br />
do zvláštních kontejnerů pro tříděný odpad.<br />
Tento symbol označuje v celé Evropské unii, že<br />
daný výrobek nelze vyhodit do popelnice nebo<br />
do směsného komunálního dopadu, ale do<br />
speciální nádoby na tříděný odpad.<br />
a. Adaptér nízkého napětí 5 V AC x 2<br />
b. Vysí<strong>la</strong>č<br />
c. Přijímač<br />
d. Lithium-polymerová nabíjecí baterie 3.7 V<br />
(dodána s přijímačem)<br />
e. Návod k použití<br />
STANDARDNÍ VYBAVENÍ<br />
a<br />
b<br />
c<br />
d<br />
e<br />
Vysí<strong>la</strong>č<br />
1. Vypínač On/Off a světelná kontrolka<br />
2-3. Kontro<strong>la</strong> citlivosti mikrofonu<br />
4. T<strong>la</strong>čítko Menu<br />
5. T<strong>la</strong>čítko « Zvuk »<br />
6. Světelná kontrolka<br />
7. Mikrofon<br />
8. Reproduktor<br />
9. Čidlo měření teploty<br />
10. Přípojka Jack CC<br />
OVLÁDÁNÍ PŘÍSTROJE<br />
Přijímač<br />
11. Vypínač On/Off a vibrátor<br />
12-13. Kontro<strong>la</strong> zvuku<br />
14. T<strong>la</strong>čítko Menu<br />
15. T<strong>la</strong>čítko «Odpovědět dítěti »<br />
16. Světelné diody označení síly zvuku<br />
17. Mikrofon<br />
18. Reproduktor<br />
19. Světelná kontrolka «Jednotka Dítě 1 »<br />
20. Světelná kontrolka «Jednotka Dítě 2 »<br />
21. Přípojka Jack CC<br />
Displej LCD jednotky Rodiče (PU)<br />
A. Sí<strong>la</strong> přijímaného signálu<br />
B. Ukazatel stavu baterie<br />
C. Stav baterie jednotky Dítě<br />
D. Číslo jednotky<br />
E. Limit maximální teploty<br />
F. Přenos<br />
G. Limit minimální teploty<br />
H. Vibrační funkce<br />
I. Ukazatel síly zvuku<br />
J. Vypnutý zvuk<br />
K. Teplota dětského pokoje<br />
L. Noční osvětlení<br />
M. Mimo dosah<br />
Displej LCD jednotky Dítě (BU)<br />
N. Přenos<br />
O. Ukazatel stavu baterie<br />
P. Číslo jednotky<br />
62<br />
Q. Noční osvětlení<br />
R. Ukazatel citlivosti mikrofonu a síly zvuku<br />
S. Teplota dětského pokoje<br />
T. Mimo dosah<br />
BABYPHONE DIGITAL GREEN • Návod k Použití
NAPÁJENÍ PŘÍSTROJE<br />
A/ VYSILAC<br />
1. Funkce na baterie (nejsou součástí výrobku)<br />
Zat<strong>la</strong>čte na uzávěr prostoru na baterie a odsuňte kryt ve vyznačeném směru. Do prostoru na baterie vložte 3<br />
alkalické baterie typu AAA. Dodržte označení po<strong>la</strong>rity (+/-). Uzavřete krytem.<br />
POZNÁMKA. Pro optimální výkon přístroje je doporučeno nemíchat nové baterie s použitými a nabíjecí baterie<br />
s alkalickými.<br />
2. Funkce připojením do sítě<br />
( adaptér nízkého napětí je součástí výrobku)<br />
Vysí<strong>la</strong>č může být napájen y elektrické sítě s použitím adaptéru 5 V, který<br />
je součástí výrobku.<br />
Adaptér zapojte přípojkou s koncovkou jack CC do vysí<strong>la</strong>č (10).<br />
Adaptér zapojte do sítě. Napájení bateriemi bude vypnuto v okamžiku<br />
zapojení vysí<strong>la</strong>če do sítě.<br />
POZNÁMKA. Je-li vysí<strong>la</strong>č zapojen do sítě, je dosah přístroje delší.<br />
10<br />
B/ PRIJIMAC<br />
1. Funkce na baterii v přijímači<br />
Lithium-polymerová baterie je již instalována v přijímači.<br />
Pro výměnu baterie zat<strong>la</strong>čte na uzávěr prostoru pro baterii<br />
a odsuňte kryt ve vyznačeném směru. Baterii vyjměte a<br />
vypněte přístroj.<br />
2. Nabíjení baterie prostřednictvím adaptéru<br />
Adaptér 5 V zapojte přípojkou s koncovkou jack do vysí<strong>la</strong>če (21).<br />
Baterie se nabíjí i v případě, kdy je přijímač vypnut. Pokud je přijímač<br />
v chodu, články ukazatele stavu nabíjení baterie na displeji LCD blikají.<br />
Je-li baterie nabitá, jsou všechny články ukazatele viditelné a neblikají.<br />
Po skončení nabíjení není nezbytné odpojit adaptér od přijímače,<br />
poškození baterie nehrozí. Pokud je baterie vybitá a napětí klesne pod<br />
přípustnou hranici, adaptér <strong>au</strong>tomaticky zahájí nové nabíjení.<br />
POZNÁMKA. Před prvním použitím nabijte lithium-polymerovou<br />
baterii minimálně po dobu 3 hod. Během prvního nabíjení baterie je<br />
doporučeno přístroj vypnout.<br />
POZNÁMKA. Nabíjejte vždy naprosto vybitou baterii, prodloužíte<br />
tím její životnost.<br />
12<br />
PŘIPOJENÍ VYSÍLAČE K PŘIJÍMAČI<br />
Vysí<strong>la</strong>č je již připojen k přijímači a připraven ke komunikaci. Tato dětská chůvička muže fungovat i se 2 vysí<strong>la</strong>či. Pro<br />
připojení přídavného vysí<strong>la</strong>če postupujte podle následujících pokynů.<br />
1. Dlouze stiskněte t<strong>la</strong>čítko (13) ▼ na přijímači.<br />
BABYPHONE DIGITAL GREEN • Návod k Použití<br />
63
2. Otočte vypínač zapnuto/vypnuto (11) na ON a vyčkejte až začne blikat<br />
na displeji.<br />
3. Dlouze stiskněte t<strong>la</strong>čítko (3) na vysí<strong>la</strong>či.<br />
■ STABILNÍ<br />
■ BLIKÁNÍ<br />
4. Otočte vypínač zapnuto/vypnuto (1) na ON vyčkejte až symbol přestane<br />
blikat a začne blikat číslo světelné kontrolky « Dítě » na displeji. ( V případě<br />
potřeby zopakujte i pro přístroj « Dítě 2 »).<br />
5. Pomocí t<strong>la</strong>čítek (2) (3) ▲▼ zvolte číslo vysí<strong>la</strong>če (1) nebo (2). Nevolte stejné číslo<br />
pro jednotlivé vysí<strong>la</strong>če, přístroj by nemohl správně fungovat.<br />
6. Stiskněte t<strong>la</strong>čítko « Menu » (4) pro potvrzení volby. Číslo vysí<strong>la</strong>če je nyní stálé<br />
a symbol začne blikat.<br />
7. Stiskněte opět t<strong>la</strong>čítko « Menu » (4) jednoho ze dvou vysí<strong>la</strong>čů. Pokud připojení<br />
proběhlo správně, přijímač vydá dva zvukové signály. Symbol musí zůstat<br />
stálý na obou displejích a číslo odpovídající vysí<strong>la</strong>či se musí objevit v pravém<br />
rohu displeje přijímače.<br />
8. Stiskněte t<strong>la</strong>čítko « Menu » (4) druhého vysí<strong>la</strong>če. Přijímač vydá dva zvukové<br />
signály. Symbol je stálý na displeji vysí<strong>la</strong>če a bliká 2x na displeji přijímače.<br />
Číslo odpovídající vysí<strong>la</strong>či se musí objevit v pravém rohu displeje přijímače.<br />
9. Vypněte všechny přístroje a opět je zapněte. Dětská chůvička je nyní připravena<br />
k použití.<br />
10. Pokud přijímač nekomunikuje s vysí<strong>la</strong>čem, zopakujte celý postup jejich připojení.<br />
POZNÁMKA. V případě, že jste zakoupili k původnímu přístroji další vysí<strong>la</strong>č, proveďte znovu výše uvedený postup<br />
pro připojení 3 přístrojů.<br />
CHOD PŘÍSTROJE<br />
A/ VYSILAC<br />
1. Nastavení funkce výstražného signálu « Mimo dosah »<br />
a. Otočte t<strong>la</strong>čítko zapnuto/vypnuto (1) na ON. Displej LCD se rozsvítí. St<strong>la</strong>čením t<strong>la</strong>čítka « Menu » (4) po dobu<br />
5 vteřin vstoupíte do režimu programování. Na displeji se zobrazí následující údaje:<br />
nebo<br />
■ STABILNÍ<br />
■ BLIKÁNÍ<br />
b. Pomocí t<strong>la</strong>čítek (2) (3) ▲▼ nastavte funkci výstražného signálu « Mimo dosah ». « On » znamená, že je funkce<br />
aktivována a « Off » označí, že je funkce vypnuta. Pokud zvolíte « Off » dojde ke snížení elektromagnetických vln<br />
vysí<strong>la</strong>če. Přijímač však nevydá žádný signál, pokud je vysí<strong>la</strong>č mimo dosah anebo není-li signál stavu baterie<br />
přítomen na displeji přijímače při pohotovostním režimu.<br />
c. Potvrďte volbu stisknutím t<strong>la</strong>čítka « Menu » (4), displej přejde do normálního<br />
režimu. Pokud jste zvolili « On », symbol výstražného signálu «Mimo dosah »<br />
se zobrazí na displeji.<br />
d. V pohotovostním režimu stiskněte krátce t<strong>la</strong>čítko « Menu » (4) zobrazí se<br />
nastavení výstražného signálu « Mimo dosah ».<br />
64<br />
BABYPHONE DIGITAL GREEN • Návod k Použití
2. Zabudované čidlo snímá okolní teplotu, která se zobrazuje simultánně na displeji vysí<strong>la</strong>če i přijímače. Čidlo snímaní<br />
teploty funguje správně, pokud se teploty pohybují v rozsahu mezi -9 ºC a +50 ºC. V případě záznamu nižších či<br />
vyšších teplot se na displeji objeví symbol . Aby neby<strong>la</strong> teplotní sonda vystavena<br />
teplotě způsobené elektronickou funkcí přístroje, je doporučeno oddálit čidlo teploty<br />
v úhlu cca 15° jak je znázorněno na následujícím obrázku. V případě náhlé změny teploty<br />
(přístroj je přemístěn v zimním období z vnitřního prostředí ven), je nutno vyčkat několik<br />
minut, než se čidlo teploty adaptuje na nové prostředí a zobrazí správnou teplotu.<br />
3. Umístěte vysí<strong>la</strong>č cca 1 m od postýlky vašeho dítěte a natočte mikrofon (7) směrem k dítěti.<br />
4. Seřiďte citlivost mikrofonu pomocí t<strong>la</strong>čítek (2) (3) ▲▼. Tímto úkonem nastavíte výši h<strong>la</strong>sitosti, která bude rozhodující<br />
pro přenos zvuků zachycených mikrofonem (7). Na displeji se počet článků znázorňujících citlivost mikrofonu<br />
mění také podle zvoleného stupně h<strong>la</strong>sitosti. Čím větší je počet článků na displeji, tím je citlivost mikrofonu vyšší.<br />
V případě dosažení minimální či maximální h<strong>la</strong>diny h<strong>la</strong>sitosti vydá přístroj při seřizování dvojitý signál.<br />
5. Vysí<strong>la</strong>č je uveden do chodu, když se na displeji rozsvítí symbol přenosu . Jakmile mikrofon (7) přestane zachycovat<br />
zvuky, přístroj se po několika vteřinách uvede do pohotovostního režimu a symbol přenosu zmizí . Z důvodu<br />
úspory energie displej zhasne.<br />
6. Tato dětská chůvička je vybavena funkcí « Odpovědět dítěti », která umožní rodičům na dítě mluvit. Sílu zvuku h<strong>la</strong>su<br />
rodičů lze nastavit. Stiskněte t<strong>la</strong>čítko « Zvuk » (5), a t<strong>la</strong>čítky (2) (3) ▲▼ nastavte výši zvuku reproduktoru (8). SPočet<br />
článků znázorňujících sílu zvuku na displeji se mění také podle nastaveného stupně h<strong>la</strong>sitosti. Pokud je h<strong>la</strong>sitost<br />
nastavena na minimum, reproduktor (8) nevydává žádný zvuk.<br />
7. Světelná kontrolka (6) může svítit nepřetržitě nastavením t<strong>la</strong>čítka zapnuto/vypnuto (1) do polohy . Symbol<br />
kontrolky se objeví na displeji . Světelnou kontrolku (6) lze také nastavit na VOX (reakce na h<strong>la</strong>s/ zvuk).<br />
Krátkým stisknutím t<strong>la</strong>čítka « Menu » (4), se objeví písmena VOX vedle symbolu . V režimu VOX se kontrolka (6)<br />
rozsvítí v případě, kdy mikrofon rozpozná zvuk. Kontrolka se zhasne <strong>au</strong>tomaticky v okamžiku,<br />
kdy není detektován žádný zvuk. Pro přechod z režimu VOX do režimu nepřetržité<br />
pohotovosti stiskněte krátce t<strong>la</strong>čítko « Menu » (4).<br />
Přístroj nabízí rovněž možnost kontroly světelné kontrolky (6) na dálku prostřednictvím<br />
přijímače. Pokyny naleznete v bodě Chod přístroje tohoto návodu.<br />
8. Stav baterií je označen prostřednictvím symbolu vybití baterie . Podle stavu baterie se počet článků uvnitř symbolu<br />
postupně snižuje. V případě vybité baterie je symbol prázdný a bliká. Na displeji přijímače se zobrazuje také<br />
ukazatel stavu baterií vysí<strong>la</strong>če, takto je možné sledovat stav baterií i na dálku. V případě prázdného symbolu<br />
zazní zvukový signál.<br />
9. Zvukový signál zazní také při každém stisknutí t<strong>la</strong>čítek a upozorní vás, že byl úkon zaznamenán.<br />
B/ PRIJIMAC<br />
1. Nastavení výstražného signálu « Mimo dosah » a signálu teploty<br />
a. Otočením t<strong>la</strong>čítka zapnuto/vypnuto (11) na ON se rozsvítí displej LCD. St<strong>la</strong>čením t<strong>la</strong>čítka « Menu » (14) po dobu<br />
5 vteřin vstoupíte do režimu programování. Na displeji se zobrazí :<br />
nebo<br />
■ STABILNÍ<br />
■ BLIKÁNÍ<br />
BABYPHONE DIGITAL GREEN • Návod k Použití<br />
65
. Pomocí t<strong>la</strong>čítek (12) (13) ▲▼ nastavte funkci výstražného signálu « Mimo dosah ». Nastavení musí být identické<br />
nastavení této funkce na vysí<strong>la</strong>či. Pokud bude nastavení rozdílné, může dojít ke spuštění signálu bez příčiny anebo<br />
se naopak signál neozve v případě, kdy bude přijímač mimo dosah vysí<strong>la</strong>če. Pokud přístroj pracuje se 2 vysí<strong>la</strong>či,<br />
nastavení přijímače musí být identické nastavení příslušného očíslovaného vysí<strong>la</strong>če.<br />
nebo<br />
c. Stisknutím t<strong>la</strong>čítka « Menu » (14) potvrďte vaši volbu (pokud jste zvolil « On »,<br />
symbol « Mimo dosah » se objeví na displeji v normálním režimu). Na displeji<br />
se zobrazí :<br />
d. Prostřednictvím t<strong>la</strong>čítek (12) (13) ▲▼ nastavte požadovanou maximální teplotu.<br />
Pokud bude naměřená teplota nad touto hranicí, přístroj vydá zvukový a<strong>la</strong>rm.<br />
Krátkým stisknutím t<strong>la</strong>čítek se začnou zobrazovat stupně. Pokud chcete tento<br />
proces zrychlit, ponechte t<strong>la</strong>čítka (12) (13) st<strong>la</strong>čená. Volba teplot je možná od -<br />
3 °C do +50 °C. Při volbě t<strong>la</strong>čítka « Off » nebude zadaná žádná maximální teplota.<br />
Stisknutím t<strong>la</strong>čítka « Menu » (14) potvrdíte volbu. Na displeji se zobrazí:<br />
e. Prostřednictvím t<strong>la</strong>čítek (12) (13) ▲▼ nastavte požadovanou minimální teplotu.<br />
Pokud bude teplota pod touto hranicí, přístroj vydá zvukový a<strong>la</strong>rm. Volba teplot<br />
je možná od -8 °C do +44 °C nebo 2 °C pod hranicí maximální zvolené teploty. Při<br />
volbě t<strong>la</strong>čítka « Off » nebude zadaná žádná minimální teplota. Stisknutím t<strong>la</strong>čítka<br />
« Menu » (14) potvrdíte volbu, displej se vrátí do normálního režimu.<br />
f. Nastavení maximální a minimální teploty musí být identické u obou vysí<strong>la</strong>čů.<br />
g. Pro zobrazení nastavení signálu « Mimo dosah » a teploty stiskněte v pohotovostním režimu krátce t<strong>la</strong>čítko «<br />
Menu » (14).<br />
2. Přijímač umístěte od vysí<strong>la</strong>če tak daleko, aby nevznikaly rušivé signály. Přílišná blízkost může způsobit pronikavý<br />
zvuk reproduktoru (18).<br />
3. V okamžiku kdy přijímač obdrží signál, displej se osvítí a rozsvítí se LED kontrolky h<strong>la</strong>sitosti zvuku. Čím silnější je<br />
h<strong>la</strong>s dítěte, tím vyšší je počet rozsvícených LED kontrolek. Tato funkce je vhodná, rozhodnou-li se rodiče vypnout<br />
reproduktor (18).<br />
Podle vysí<strong>la</strong>če, ze kterého signál přichází, se rozsvítí kontrolka « Dítě 1 » (19) nebo kontrolka « Ditě 2 » (20).<br />
4. H<strong>la</strong>sitost reproduktoru (18) lze nastavit pomocí t<strong>la</strong>čítek (12) (13) ▲▼. Počet článků znázorňujících sílu zvuku na<br />
displeji se mění také podle nastaveného stupně h<strong>la</strong>sitosti. Čím více článků je zobrazeno, tím je zvuk reproduktoru<br />
(18) vyšší. Není-li zobrazen žádný článek a na displeji je symbol , eproduktor (18) ) je vypnutý.<br />
5. Pokud je přijímač uveden do funkce se dvěma vysí<strong>la</strong>či, h<strong>la</strong>vním vysí<strong>la</strong>čem zůstává vždy vysí<strong>la</strong>č Dítě n°1. To znamená,<br />
že pokud přijímač již přenáší signál z vysí<strong>la</strong>če Dítě n°2 a z druhého vysí<strong>la</strong>če Dítě n°1 zazní signál, přijímač se<br />
okamžitě přepojí na příjem z jednotky Dítě n°1 až do doby než přenos skončí a potom přejde na příjem z jednotky<br />
Dítě 2.<br />
6. Aby rodiče nepřehlédli signál pocházející z jednotky Dítě n°2 v momentě, kdy přijímač přenáší signál z jednotky<br />
Dítě 1, začne blikat kontrolka Dítě 2 (20). Pokud rodiče chtějí slyšet přenos z vysí<strong>la</strong>če Dítě n°2, mohou přepnout<br />
na tuto jednotku krátkým stisknutím t<strong>la</strong>čítka « Menu » (14). Kontrolka « Dítě 2 » (20) se rozsvítí a kontrolka « Dítě<br />
1 » (19) začne blikat (pokud první dítě stále pláče). K návratu na příjem z vysí<strong>la</strong>če Dítě n°1 stačí opět krátce stisknout<br />
t<strong>la</strong>čítko « Menu » (14). Tato funkce umožní sledovat dvě děti najednou.<br />
7. Pokud jsou v pohotovostním režimu použity 2 vysí<strong>la</strong>če, displej zobrazuje střídavě teplotu a stav baterie jednotlivých<br />
vysí<strong>la</strong>čů po dobu 15 vteřin. V okamžiku, kdy jeden z vysí<strong>la</strong>čů začne vysí<strong>la</strong>t, přijímač obdrží okamžitě přenos signálu<br />
a na jeho displeji se zobrazují údaje o vysí<strong>la</strong>či po celou dobu příjmu.<br />
66<br />
Displej zobrazuje<br />
informace o jednotce<br />
Dítě n°1 (Signál « Mimo<br />
dosah» je aktivován)<br />
Displej zobrazuje<br />
informace o jednotce<br />
Dítě n°2 (Signál « Mimo<br />
dosah » je vypnutý a je<br />
nastaven režim VOX)<br />
BABYPHONE DIGITAL GREEN • Návod k Použití
8. Přijímač je vybaven vibrační funkcí. Otočte t<strong>la</strong>čítko zapnuto/vypnuto (11) na vibrační funkci. Na displeji se objeví<br />
symbol . Vibrační funkce je spuštěna v okamžiku, kdy h<strong>la</strong>s dítěte dosáhne určité intenzity. Funkce je vhodná<br />
pro chvíle, kdy se rodiče nachází v hlučném prostředí (př. hluk vysavače). Pro úsporu energie není doporučeno používat<br />
vibrační funkci příliš často.<br />
9. Pokud na obou přístrojích zvolíte funkci « On » , varovný signál « Mimo dosah » zazní ihned, jakmile se přijímač ocitne<br />
z dosahu vysí<strong>la</strong>če a zní po dobu cca 30 vteřin. Ukazatel h<strong>la</strong>sitosti LED (16) a symbol « Mimo dosah » začnou blikat.<br />
Teplota se nezobrazí a objeví se symbol . Signál vypne v okamžiku, kdy je přijímač opět na dosah vysí<strong>la</strong>če. Při<br />
použití dvou vysí<strong>la</strong>čů budou zobrazeny po celou dobu signálu informace týkající se vysí<strong>la</strong>če, který se ocitne mimo<br />
dosah přijímače.<br />
POZNÁMKA. Varovný signál zazní také v případě, kdy se vysí<strong>la</strong>č vypne, baterie vysí<strong>la</strong>če jsou vybité nebo není<br />
zapojen do sítě anebo v případě, kdy nastavení není identické u obou vysí<strong>la</strong>čů.<br />
10. V okamžiku, kdy okolní teplota překročí maximální nebo minimální zadanou limitní teplotu, zazní varovný signál.<br />
V závislosti překročení teplot se objeví buď symbol (maximální teplota) nebo (minimální teplota) a na<br />
displeji přijímače začne blikat naměřená teplota.<br />
11. Z přijímače je možné na dálku ovládat světelnou kontrolku (6). Pro tuto funkci je nutno natočit t<strong>la</strong>čítko<br />
vypnuto/zapnuto (1) do pozice .<br />
Stiskněte dlouze t<strong>la</strong>čítko (15) a zároveň opakovaně stiskněte t<strong>la</strong>čítko (12) <strong>la</strong>ž se objeví (OFF) a přístroj přepne na<br />
nepřetržitý provoz (ON) nebo nastavte funkci VOX . Příslušné symboly se zobrazí na displeji obou přístrojů.<br />
Upozornění: přijímač může ovládat pouze kontrolku vysí<strong>la</strong>če, jehož číslo je zobrazeno na displeji v okamžiku<br />
stisknutí t<strong>la</strong>čítka (15).<br />
12. Rodiče mohou odpovědět dítěti a uklidnit jej. Stiskněte dlouze t<strong>la</strong>čítko (15) až do zobrazení symbolu přenosu<br />
na displeji přijímače. Mluvte do mikrofonu (17). Až domluvíte, pusťte t<strong>la</strong>čítko (15). Rodiče mohou mluvit na své<br />
dítě kdykoliv, včetně okamžiku, kdy probíhá přenos z vysí<strong>la</strong>če do přijímače. Přijímač přenese h<strong>la</strong>s do vysí<strong>la</strong>če, jehož<br />
číslo je zobrazeno na displeji v okamžiku stisknutí t<strong>la</strong>čítka (15).<br />
13. Stav lithiové baterie je označen symbolem stavu baterie . Podle stavu baterie postupně zhasínají články uvnitř<br />
symbolu. Jakmile je baterie vybitá, symbol začne blikat a zazní zvukový signál, který vám připomene, že je nutné<br />
nabít baterii prostřednictvím adaptéru.<br />
14. Zvukový signál zazní také při každém stisknutí t<strong>la</strong>čítek a upozorní vás, že byl úkon zaznamenán.<br />
BABYPHONE DIGITAL GREEN • Návod k Použití<br />
67
ODSTRANĚNÍ PORUCH<br />
Závada Možné příčiny Řešení<br />
• Vysí<strong>la</strong>č nevysílá.<br />
• Přijímač je vypnutý.<br />
• Citlivost mikrofonu je nastavena na minimum.<br />
• Baterie jsou vybité anebo není správně<br />
zapojen adaptér.<br />
• Zapněte přijímač.<br />
• Zvyšte citlivost mikrofonu pomocí t<strong>la</strong>čítka<br />
« Výše » (2).<br />
• Vyměňte baterie nebo ověřte zapojení do sítě.<br />
• Vysí<strong>la</strong>č vysílá nepřetržitě.<br />
• Citlivost mikrofonu je příliš vysoká. • Snižte citlivost mikrofonu pomocí t<strong>la</strong>čítka «<br />
Níže » (3). Ověřte, zda vysí<strong>la</strong>č reaguje na h<strong>la</strong>s.<br />
• Varovný signál « Mimo dosah »<br />
stále svítí.<br />
• Párování přístrojů není správné.<br />
• Baterie vysí<strong>la</strong>če jsou vybité.<br />
• Signál « Mimo dosah » je aktivován na vysí<strong>la</strong>či,<br />
ale není aktivován na přijímači.<br />
• Vzdálenost mezi vysí<strong>la</strong>čem a přijímačem je<br />
příliš velká.<br />
• Proveďte nové párování.<br />
• Vyměňte baterie nebo použijte adaptér.<br />
• Aktivujte signál « Mimo dosah » na přijímači.<br />
• Přibližte přijímač k vysí<strong>la</strong>či.<br />
• Signál « Mimo dosah » nefunguje.<br />
• Signál « Mimo dosah » je vypnut na<br />
obou přístrojích.<br />
• Signál « Mimo dosah » je aktivován na vysí<strong>la</strong>či,<br />
ale není aktivován na přijímači.<br />
• Aktivujte signál na obou přístrojích.<br />
• Aktivujte signál na přijímači.<br />
• Signál teploty stále svítí.<br />
• Naměřená okolní teplota je příliš blízká<br />
stanovené maximální a minimální teplotě.<br />
• Seřiďte maximální a minimální teplotu tak,<br />
aby se obě zadané hodnoty lišily cca o 5 °C v<br />
porovnání s teplotou naměřenou přístrojem.<br />
• Signál s<strong>la</strong>bé baterie stále svítí.<br />
• Baterie jsou vybité<br />
• Baterie je poškozená.<br />
• Nabijte baterii v adaptéru (přijímač).<br />
Vyměňte baterie nebo zapojte přístroj do<br />
sítě přes adaptér (vysí<strong>la</strong>č).<br />
• Vyměňte baterii za novou.<br />
• Nabitá baterie vydrží velmi<br />
krátkou dobu.<br />
• Světelná kontrolka zůsta<strong>la</strong><br />
nepřetržitě zapnuta.<br />
• Je aktivována vibrační funkce.<br />
• Vypněte světelnou kontrolku nebo nastavte<br />
režim VOX.<br />
• Vypněte vibrační funkci.<br />
• Na displeji přijímače mají oba vysí<strong>la</strong>če<br />
stejné číslo.<br />
• Při párování bylo vysí<strong>la</strong>čům přiděleno<br />
stejné číslo.<br />
• Proveďte nové párování a přidělte<br />
vysí<strong>la</strong>čům rozdílná čís<strong>la</strong>.<br />
• V reproduktoru to šumí a je v něm<br />
mnoho rušivých zvuků.<br />
• Vysí<strong>la</strong>č je umístěn v blízkosti jiných<br />
elektrických přístrojů.<br />
• Přemístěte elektrické přístroje anebo<br />
umístěte vysí<strong>la</strong>č jinam a do dostatečné<br />
vzdálenosti od rušivých vln.<br />
• Dosah vysí<strong>la</strong>če je příliš krátk.<br />
• Přístroje jsou odděleny kovovými<br />
strukturami.<br />
• Baterie vysí<strong>la</strong>če jsou vybité.<br />
• Změňte umístění vysí<strong>la</strong>če nebo přijímače.<br />
• Vyměňte baterie nebo zapojte.<br />
68<br />
BABYPHONE DIGITAL GREEN • Návod k Použití
EC DECLARATION OF CONFORMITY<br />
<strong>Babymoov</strong><br />
Parc Industriel des Gravanches<br />
16, rue Jacqueline Auriol<br />
63051 Clermont Ferrand cedex 2<br />
France<br />
Dec<strong>la</strong>re that the following product:<br />
Model: Babyphone Digital Green<br />
Reference: A014200<br />
Model: BC-52<br />
is in conformity with the following relevant harmonised:<br />
EMC: EN 301489-1 V1.9.2 (2011-09) EN 301489-3 V1.4.1 (2002-08)<br />
Radio: EN 300220-1 V2.3.1 (2010-02) EN 300220-2 V2.3.1 (2010-02)<br />
Health: EN 50371 : 2002<br />
Safety: EN 60065 : 2002 + A1 : 2006 + A11 : 2008 + A2 : 2010 + A12 : 2011<br />
Following the provisions of Council Directive 99/05/CE on radio equipment<br />
and telecommunications terminal equipment and the mutual recognition<br />
of their conformity.<br />
Name: Mr L<strong>au</strong>rent Windenberger<br />
Title: Marketing Manager<br />
Signature: Date : 10/10/12
Bon de garantie à vie<br />
(à renvoyer dans les 15 jours suivant l’achat)<br />
❐ Oui, je souhaite garantir à vie mon produit <strong>Babymoov</strong> et je vous joins une copie<br />
de mon ticket de caisse (OBLIGATOIRE). Sans ce<strong>la</strong>, nous ne pourrons garantir à vie<br />
votre achat.<br />
❐ Oui, je souhaite recevoir <strong>la</strong> Moovletter, lettre d’in<strong>format</strong>ion électronique sur les<br />
nouve<strong>au</strong>tés et <strong>la</strong> société <strong>Babymoov</strong>. Merci de bien remplir votre adresse e-mail.<br />
Nom des parents : . . . . . . . . . . . . . . . . . . . . . . . . . . . . . . . . . . . . . . . . . . . . . . . . . . . . . . . . . . . . . . . . . . . . . .<br />
Prénoms des parents : . . . . . . . . . . . . . . . . . . . . . . . . . . . . . . . . . . . . . . . . . . . . . . . . . . . . . . . . . . . . . . . . . .<br />
Adresse : . . . . . . . . . . . . . . . . . . . . . . . . . . . . . . . . . . . . . . . . . . . . . . . . . . . . . . . . . . . . . . . . . . . . . . . . . . . . .<br />
. . . . . . . . . . . . . . . . . . . . . . . . . . . . . . . . . . . . . . . . . . . . . . . . . . . . . . . . . . . . . . . . . . . . . . . . . . . . . . . . . . . .<br />
Code Postal / Ville : . . . . . . . . . . . . . . . . . . . . . . . . . . . . . . . . . . . . . . . . . . . . . . . . . . . . . . . . . . . . . . . . . . . . .<br />
N° de téléphone : . . . . . . . . . . . . . . . . . . . . . . . . . . . . . . . . . . . . . . . . . . . . . . . . . . . . . . . . . . . . . . . . . . . . . .<br />
E-mail : . . . . . . . . . . . . . . . . . . . . . . . . . . . . . . . . . . . . . . . . . . . . . . . . . . . . . . . . . . . . . . . . . . . . . . . . . . . . . .<br />
Prénoms de vos enfants : . . . . . . . . . . . . . . . . . . . . . . . . . . . . . . . . . . . . . . . . . . . . . . . . . . . . . . . . . . . . . . . .<br />
Dates de naissance : . . . . . . . . . . . . . . . . . . . . . . . . . . . . . . . . . . . . . . . . . . . . . . . . . . . . . . . . . . . . . . . . . . . .<br />
Nom du produit acheté : . . . . . . . . . . . . . . . . . . . . . . . . . . . . . . . . . . . . . . . . . . . . . . . . . . . . . . . . . . . . . . . . .<br />
Référence : . . . . . . . . . . . . . . . . . . . . . . . . . . . . . . . . . . . . . . . . . . . . . . . . . . . . . . . . . . . . . . . . . . . . . . . . . . .<br />
N° de code barre (obligatoire) : . . . . . . . . . . . . . . . . . . . . . . . . . . . . . . . . . . . . . . . . . . . . . . . . . . . . . . . . . . .<br />
Date de l’achat : . . . . . . . . . . . . . . . . . . . . . . . . . . . . . . . . . . . . . . . . . . . . . . . . . . . . . . . . . . . . . . . . . . . . . . .<br />
Lieu de l’achat : . . . . . . . . . . . . . . . . . . . . . . . . . . . . . . . . . . . . . . . . . . . . . . . . . . . . . . . . . . . . . . . . . . . . . . . .<br />
Votre opinion sur <strong>la</strong> qualité du produit : M<strong>au</strong>vaise 1 2 3 4 5 très bonne<br />
Combien de produits <strong>Babymoov</strong> avez-vous déjà acheté ?<br />
1 2 3 4 5 6 7 8 <strong>au</strong>tre : . . . . . . . . . . . . . . . . . . . . . . . . . . . . . . . . . . . . . . . . . . . . . . . . . . . . . . . . . . . . . . . .<br />
Avez-vous des commentaires sur ce produit ?<br />
. . . . . . . . . . . . . . . . . . . . . . . . . . . . . . . . . . . . . . . . . . . . . . .<br />
. . . . . . . . . . . . . . . . . . . . . . . . . . . . . . . . . . . . . . . . . . . . . . .<br />
Avez-vous une idée d’un produit génial<br />
à créer pour bébé ?<br />
. . . . . . . . . . . . . . . . . . . . . . . . . . . . . . . . . . . . . . . . . . . . . . .<br />
* Garantie à vie. Cette garantie est soumise à<br />
conditions. Va<strong>la</strong>ble en France. Liste des <strong>au</strong>tres<br />
. . . . . . . . . . . . . . . . . . . . . . . . . . . . . . . . . . . . . . . . . . . . . . .<br />
pays concernés, activation et renseignements<br />
en ligne à l'adresse suivante :<br />
. . . . . . . . . . . . . . . . . . . . . . . . . . . . . . . . . . . . . . . . . . . . . . .<br />
www.service-babymoov.com<br />
Illustrations et photographies non contractuelles A014200-Manual-Artwork-01<br />
* sous réserve d’une utilisation conforme à <strong>la</strong> <strong>notice</strong>. La garantie à vie ne couvre pas les détériorations dues à une utilisation anormale, le textile, les consommables<br />
(sucettes, ampoules…), <strong>la</strong> sérigraphie, l’usure normale de certains éléments comme le p<strong>la</strong>stique, le rou<strong>la</strong>nt...<br />
• Nous vous rappelons que vous disposez d'un droit d'accès, de modification, de rectification et de suppression des données qui vous concernent (art. 34 de <strong>la</strong> loi "In<strong>format</strong>ique<br />
et Libertés" du 6 janvier 1978). Pour exercer ce droit, adressez-vous à <strong>Babymoov</strong> - 16, rue Jacqueline Auriol - 63051 Clermont-Ferrand cedex 2.<br />
• Les in<strong>format</strong>ions qui vous concernent sont destinées à <strong>Babymoov</strong>. Nous pouvons être amenés à les transmettre à des tiers (partenaires commerci<strong>au</strong>x, etc).<br />
Le souhaitez-vous ? Oui Non