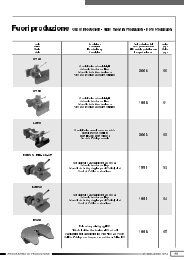
Gancio di traino GA25 Drawbar coupling GA25 Crochet d ... - Orlandi
Gancio di traino GA25 Drawbar coupling GA25 Crochet d ... - Orlandi
Gancio di traino GA25 Drawbar coupling GA25 Crochet d ... - Orlandi

Create successful ePaper yourself
Turn your PDF publications into a flip-book with our unique Google optimized e-Paper software.
7)<br />
8)<br />
9)<br />
10)<br />
11)<br />
12)<br />
1)<br />
2)<br />
3)<br />
4)<br />
5)<br />
DRAWBAR COUPLING <strong>GA25</strong><br />
INSTALLATION, OPERATING AND MAINTENANCE INSTRUCTIONS<br />
PAG.<br />
18/24<br />
CHAP. 5<br />
REV. A<br />
Position the lift lever (2) and lift lever spring (26) into the opening at the rear of<br />
the drawbar <strong>coupling</strong> body (1);<br />
Keep the closing handle rotated (5) and insert the opening handle (13);<br />
Bend the eyelet of the lift lever spring (26) until it has a position that<br />
corresponds to the hole of the screw (11). Then screw and block it;<br />
Reinstall the sealing washer (23), the spacer (14), the washer (15) and block<br />
with the self-locking nut (16);<br />
Reinstall the plate (19) fixing it with 4 self-tapping screws (20);<br />
Reinstall the gasket (28) the cap (10) and the circlip (21).<br />
5.2 REPLACEMENT OF THE RELEASE LATCH AND RELEASING SPRING<br />
ATTENTION: Make sure that the <strong>coupling</strong> is closed, i.e. the <strong>coupling</strong> pin<br />
(3) is down.<br />
Proceed accor<strong>di</strong>ng to the points 1, 2, 3, 4, 5, of chapter 5.1 REPLACEMENT<br />
OF THE COUPLING PIN page 17/24;<br />
Unthread the <strong>coupling</strong> pin (3) keeping rotated the closing handle (5);<br />
Remove the pin (18) and take out the closing handle (5) keeping the<br />
<strong>di</strong>stance washer (22);<br />
Remove the release latch (4) and the releasing spring (24) see chapter 7<br />
DISPOSAL page 22/24 ;<br />
Preassembly the new release latch (4) with the new releasing spring (24) and<br />
place them in their position, being careful that the eyelet of the spring is in<br />
the right hole of the drawbar <strong>coupling</strong> body (1);