Gancio di traino GA25 Drawbar coupling GA25 Crochet d ... - Orlandi
Gancio di traino GA25 Drawbar coupling GA25 Crochet d ... - Orlandi Gancio di traino GA25 Drawbar coupling GA25 Crochet d ... - Orlandi
8 5 4 1 DRAWBAR COUPLING GA25 INSTALLATION, OPERATING AND MAINTENANCE INSTRUCTIONS 13 3 8 PAG. 10/24 CHAP. 3 REV. A 2) Reverse slowly the towing vehicle. The drawbar eye has to enter completely into the muzzle of the drawbar coupling body (1) by operating the operating the release latch (4). This makes the coupling pin (3) fall down immediately. For drawbar coupling GA250 and GA251, the security pin (8) is back in its position. OK NO ATTENTION: control that the coupling up was carried out properly; control that the opening handle (13) is down in order to ensure a sure locking of the coupling pin (3). For the drawbar coupling GA250 and GA251, the security pin (8) has to be completely re-entered in its position. ATTENTION: in case the coupling would not close perfectly try to move the towing vehicle or the trailer back and forth about 50 cm to assist the drawbar eye to find the right position and make the coupling close; or operate the closing handle (5). If the coupling will not close perfectly it is absolutely forbidden to travel. Contact the closest workshop for the solution.
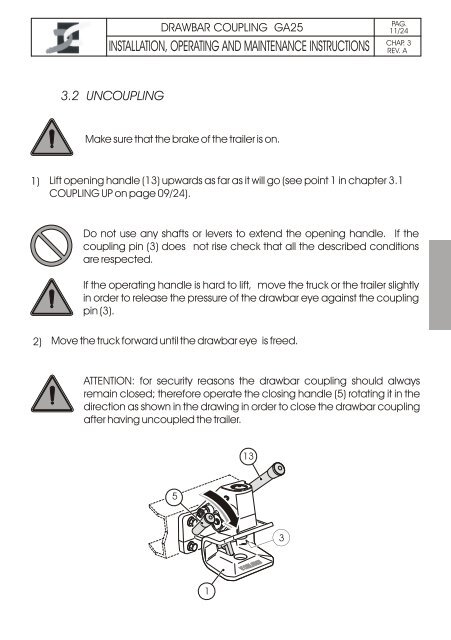
1) 2) DRAWBAR COUPLING GA25 INSTALLATION, OPERATING AND MAINTENANCE INSTRUCTIONS 3.2 UNCOUPLING Make sure that the brake of the trailer is on. 5 1 13 3 PAG. 11/24 CHAP. 3 REV. A Lift opening handle (13) upwards as far as it will go (see point 1 in chapter 3.1 COUPLING UP on page 09/24). Do not use any shafts or levers to extend the opening handle. If the coupling pin (3) does not rise check that all the described conditions are respected. If the operating handle is hard to lift, move the truck or the trailer slightly in order to release the pressure of the drawbar eye against the coupling pin (3). Move the truck forward until the drawbar eye is freed. ATTENTION: for security reasons the drawbar coupling should always remain closed; therefore operate the closing handle (5) rotating it in the direction as shown in the drawing in order to close the drawbar coupling after having uncoupled the trailer.
- Page 1 and 2: Gancio di traino GA25 Istruzioni di
- Page 3 and 4: 0 PREMESSE 0.1 GARANZIA 0.2 CONSERV
- Page 5 and 6: GANCIO DI TRAINO GA25 ISTRUZIONI DI
- Page 7 and 8: 1.2 DISIMBALLAGGIO Prima di iniziar
- Page 9 and 10: 1) GANCIO DI TRAINO GA25 ISTRUZIONI
- Page 11 and 12: 1) 2) 3.2 SGANCIAMENTO Assicurarsi
- Page 13 and 14: Dopo i primi 500 Km dall’ install
- Page 15 and 16: 3) 4) N O T E GANCIO DI TRAINO GA25
- Page 17 and 18: 1) 2) 3) 4) 5) 6) ISTRUZIONI DI MON
- Page 19 and 20: 6) 7) 8) 1) 2) GANCIO DI TRAINO GA2
- Page 21 and 22: N O T E 1) 2) 3) GANCIO DI TRAINO G
- Page 23 and 24: ISTRUZIONI DI MONTAGGI0 - USO E MAN
- Page 25 and 26: Drawbar coupling GA25 Installation,
- Page 27 and 28: DRAWBAR COUPLING GA25 INSTALLATION,
- Page 29 and 30: As well as the descriptive title of
- Page 31 and 32: 1.2 UNPACKING DRAWBAR COUPLING GA25
- Page 33: 1) DRAWBAR COUPLING GA25 INSTALLATI
- Page 37 and 38: After the first 500 Km of use: DRAW
- Page 39 and 40: N O T E DRAWBAR COUPLING GA25 INSTA
- Page 41 and 42: 1) 2) 3) 4) 5) 6) DRAWBAR COUPLING
- Page 43 and 44: 6) 7) 8) 1) 2) DRAWBAR COUPLING GA2
- Page 45 and 46: 1) 2) 3) DRAWBAR COUPLING GA25 INST
- Page 47 and 48: DRAWBAR COUPLING GA25 INSTALLATION,
- Page 49 and 50: Anhängekupplung GA25 Einbau-, Bedi
- Page 51 and 52: 0 ALLGEMEINE HINWEISE 0.1 GEWÄHRLE
- Page 53 and 54: ANHÄNGEKUPPLUNG GA 25 EINBAU-, BED
- Page 55 and 56: 1.2 AUSPACKEN ANHÄNGEKUPPLUNG GA 2
- Page 57 and 58: 1) ANHÄNGEKUPPLUNG GA 25 EINBAU-,
- Page 59 and 60: 1) 2) 3.2 AUSKUPPELN ANHÄNGEKUPPLU
- Page 61 and 62: Nach den ersten 500 km Arbeitseinsa
- Page 63 and 64: N O T E ANHÄNGEKUPPLUNG GA 25 EINB
- Page 65 and 66: 1) 2) 3) 4) 5) 6) ANHÄNGEKUPPLUNG
- Page 67 and 68: 6) 7) 8) 1) 2) ANHÄNGEKUPPLUNG GA
- Page 69 and 70: N O T E 1) 2) 3) ANHÄNGEKUPPLUNG G
- Page 71 and 72: ANHÄNGEKUPPLUNG GA 25 EINBAU-, BED
- Page 73 and 74: Crochet d’attelage GA25 Instructi
- Page 75 and 76: 0 INTRODUCTION 0.1 GARANTIE 0.2 CON
- Page 77 and 78: Au delà du titre du chapitre, nous
- Page 79 and 80: 1.2 DEBALLAGE CROCHET D'ATTELAGE GA
- Page 81 and 82: 1) CROCHET D'ATTELAGE GA25 INSTRUCT
- Page 83 and 84: 1) 2) 3.2 DESACOUPLEMENT CROCHET D'
1)<br />
2)<br />
DRAWBAR COUPLING <strong>GA25</strong><br />
INSTALLATION, OPERATING AND MAINTENANCE INSTRUCTIONS<br />
3.2 UNCOUPLING<br />
Make sure that the brake of the trailer is on.<br />
5<br />
1<br />
13<br />
3<br />
PAG.<br />
11/24<br />
CHAP. 3<br />
REV. A<br />
Lift opening handle (13) upwards as far as it will go (see point 1 in chapter 3.1<br />
COUPLING UP on page 09/24).<br />
Do not use any shafts or levers to extend the opening handle. If the<br />
<strong>coupling</strong> pin (3) does not rise check that all the described con<strong>di</strong>tions<br />
are respected.<br />
If the operating handle is hard to lift, move the truck or the trailer slightly<br />
in order to release the pressure of the drawbar eye against the <strong>coupling</strong><br />
pin (3).<br />
Move the truck forward until the drawbar eye is freed.<br />
ATTENTION: for security reasons the drawbar <strong>coupling</strong> should always<br />
remain closed; therefore operate the closing handle (5) rotating it in the<br />
<strong>di</strong>rection as shown in the drawing in order to close the drawbar <strong>coupling</strong><br />
after having uncoupled the trailer.


