luxCONTROL sensor DAYLIGHT INSTALLATION O.K. - Tridonic
luxCONTROL sensor DAYLIGHT INSTALLATION O.K. - Tridonic
luxCONTROL sensor DAYLIGHT INSTALLATION O.K. - Tridonic

You also want an ePaper? Increase the reach of your titles
YUMPU automatically turns print PDFs into web optimized ePapers that Google loves.
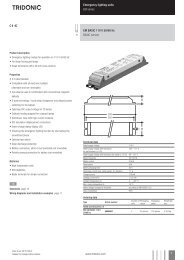
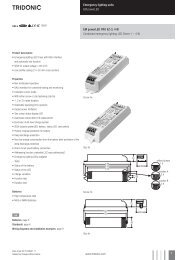
<strong>INSTALLATION</strong><br />
<strong>luxCONTROL</strong> <strong>sensor</strong> <strong>DAYLIGHT</strong><br />
article number/Artikelnummer: 86454586<br />
24<br />
80<br />
30°<br />
S1<br />
NYM 2x1,5 mm²<br />
S2<br />
S1<br />
modularDIM DM<br />
S2<br />
O.K.<br />
O.K.<br />
D<br />
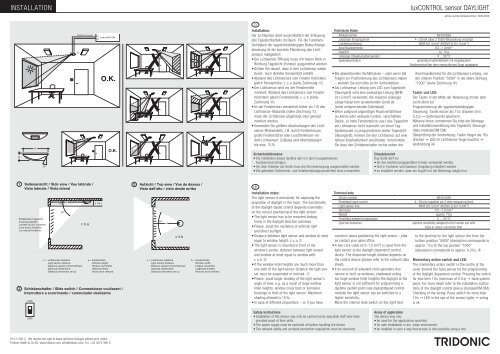
Installation:<br />
Der Licht<strong>sensor</strong> dient ausschließlich der Erfassung<br />
des Tageslichtanteils im Raum. Für die Funktionstüchtigkeit<br />
der tageslichtab hängigen Beleuchtungssteuerung<br />
ist die korrekte Platzierung des Licht<strong>sensor</strong>s<br />
maßgeblich:<br />
• Die Licht<strong>sensor</strong>-Öffnung muss mit freiem Blick in<br />
Richtung Tageslicht (Fenster) ausgerichtet werden.<br />
• Achten Sie darauf, dass in den Licht<strong>sensor</strong> weder<br />
Kunst- noch direktes Sonnenlicht einfällt.<br />
• Abstand des Licht<strong>sensor</strong>s vom Fenster höchstens<br />
gleich Fensterhöhe: c ≤ a (siehe Zeichnung 1).<br />
• Der Licht<strong>sensor</strong> wird vor der Fenstermitte<br />
montiert; Abstand des Licht<strong>sensor</strong>s vom Fenster<br />
höchstens gleich Fensterbreite: c ≤ b (siehe<br />
Zeichnung 2).<br />
• Ist der Fenstersturz wesentlich höher als 1/6 des<br />
Licht<strong>sensor</strong>-Abstands (siehe Zeichnung 1),<br />
muss der Licht<strong>sensor</strong> abgehängt oder geneigt<br />
montiert werden.<br />
• Vermeiden Sie größere Abschattungen des Licht<strong>sensor</strong>-Blickwinkels,<br />
z.B. durch Fensterkreuze,<br />
große Fensterstürze oder Leuchtenkörper vor<br />
dem Licht <strong>sensor</strong>. Zulässig sind Abschattungen<br />
bis max. 15 %.<br />
Sicherheitshinweise<br />
• Die Installation dieses Gerätes darf nur durch ausgewiesenes<br />
Fachpersonal erfolgen.<br />
• Vor dem Arbeiten am Gerät muss die Stromversorgung ausgeschaltet werden.<br />
• Die geltenden Sicherheits- und Unfallverhütungsvorschriften sind zu beachten.<br />
Technische Daten<br />
Artikelnummer 86454586<br />
zulässiger Eingangstrom<br />
4 – 20 mA (über 2 Draht-Messleitung versorgt)<br />
Licht<strong>sensor</strong>leitung NYM 2x1,5 mm² (H05VV-U 2x1,5 mm ²)<br />
Anschlussklemmen 0,5 – 1,5mm ²<br />
Gewicht<br />
ca. 70 g<br />
zulässige Umgebungstemperatur 0 ... 50 °C<br />
Spektralverhalten<br />
spektrale Empfindlichkeit mit eingebautem<br />
Farbkorrekturfilter dem menschlichen Auge angepasst<br />
• Bei abweichenden Verhältnissen – oder wenn Sie<br />
Fragen zur Positionierung des Licht<strong>sensor</strong>s haben<br />
– wenden Sie sich bitte an Ihr Vertriebsbüro.<br />
• Als Licht<strong>sensor</strong>-Leitung vom LSD zum Tageslicht-<br />
Steuergerät wird eine zweiadrige Leitung (NYM<br />
2x1,5 mm²) verwendet; die maximal zulässige<br />
Länge hängt vom auswertenden Gerät ab<br />
(siehe entsprechendes Datenblatt).<br />
• Wenn aufgrund ungünstiger Raumverhältnisse<br />
(zu kleine oder verbaute Fenster, verschattete<br />
Decke, zu hohe Fensterstürze usw.) das Tageslicht<br />
am Licht <strong>sensor</strong> nicht ausreicht um einen Tag-<br />
Systempunkt zu programmieren (siehe Tageslicht-<br />
Steuergerät), können Sie den Licht<strong>sensor</strong> auf eine<br />
höhere Empfindlichkeit umschalten: Verschieben<br />
Sie dazu den Schiebeschalter rechts neben der<br />
Anschlussklemme für die Licht sen sor-Leitung, von<br />
der unteren Position “5000” in die obere Stellung<br />
“1000” (siehe Zeichnung 3).<br />
Taster und LED:<br />
Der Taster in der Mitte der Abdeckung (hinter dem<br />
Loch) dient zur<br />
Programmierung der tageslichtabhängigen<br />
Steuerung: Taster kürzer als 10 s drücken (min.<br />
0,5 s) Ê Systempunkt speichern.<br />
Näheres hierzu entnehmen Sie bitte der Montage<br />
und Installationsanleitung des Tageslicht Steuergerätes<br />
(modularDIM DM).<br />
Überprüfung der Verdrahtung: Taster länger als 10s<br />
drücken Ê LED im Licht<strong>sensor</strong>-Auge leuchtet Ê<br />
Verdrahtung ok<br />
Einsatzbereich<br />
Das Gerät darf nur<br />
• für den bestimmungsgemäßen Einsatz verwendet werden,<br />
• fest in trockener und sauberer Umgebung installiert werden<br />
• so installiert werden, dass ein Zugriff nur mit Werkzeug möglich ist.<br />
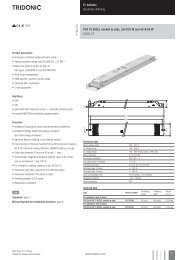
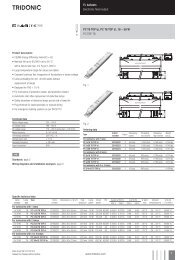
1 Seitenansicht / Side view / Vue latérale /<br />
2<br />
Vista laterale / Vista lateral<br />
Einfallendes Tageslicht<br />
Incoming daylight<br />
Lumière du jour incidente<br />
Luce diurna incidente<br />
Luz natural incidente<br />
3<br />
1000<br />
a<br />
10°<br />
40°<br />
c = Licht<strong>sensor</strong>-Abstand<br />
Light <strong>sensor</strong> distance<br />
Distance capteur photométrique<br />
Distanza foto<strong>sensor</strong>e<br />
Distancia del <strong>sensor</strong> de luz<br />
c<br />
c ≤ a<br />
≤ 1/6 c<br />
a = Fensterhöhe<br />
Window height<br />
Hauteur de fenêtre<br />
Altezza finestra<br />
Altura de la ventana<br />
Schiebeschalter / Slide switch / Commutateur coulissant /<br />
Interruttore a scorrimento / conmutador deslizante<br />
Aufsicht / Top view / Vue de dessus /<br />
Vista dall’alto / vista desde arriba<br />
b<br />
60°<br />
c<br />
c ≤ b<br />
c = Licht<strong>sensor</strong>-Abstand<br />
Light <strong>sensor</strong> distance<br />
Distance capteur photométrique<br />
Distanza foto<strong>sensor</strong>e<br />
Distancia del <strong>sensor</strong> de luz<br />
b = Fensterbreite<br />
Window width<br />
Largeur de fenêtre<br />
Larghezza finestra<br />
Anchura de la ventana<br />
UK<br />
Installation notes:<br />
The light <strong>sensor</strong> is exclusively for capturing the<br />
proportion of daylight in the room; The functionality<br />
of the daylight-based control depends essentially<br />
on the correct positioning of the light <strong>sensor</strong>:<br />
• The light <strong>sensor</strong> has to be mounted looking<br />
freely in the daylight direction (window).<br />
• Please, avoid the incidence of artificial light<br />
and direct sunlight.<br />
• Distance between light <strong>sensor</strong> and window at most<br />
equal to window height: c ≤ a 1<br />
• The light <strong>sensor</strong> is mounted in front of the<br />
window’s centre; distance between light <strong>sensor</strong><br />
and window at most equal to window with:<br />
c ≤ b 2<br />
• If the window lintel heights are much more than<br />
one sixth of the light <strong>sensor</strong> distance the light <strong>sensor</strong><br />
must be suspended or inclined. 1<br />
• Please, avoid larger shading of the light <strong>sensor</strong>’s<br />
angle of view, e.g. as a result of large window<br />
lintel heights, window cross bars or luminaire<br />
housings in front of the light <strong>sensor</strong>. Maximum<br />
shading allowed is 15 %.<br />
• In case of different proportions – or if you have<br />
Technical data<br />
Article number 86454586<br />
Permitted input current<br />
4 – 20 mA (supplied via 2-wire measuring linet)<br />
Light <strong>sensor</strong> line NYM 2x1.5 mm² (H05VV-U 2x1.5 mm ²)<br />
Terminals 0.5 – 1.5 mm ²<br />
Weight<br />
approx. 70 g<br />
Permitted ambient temperature 0 ... 50 °C<br />
Spectral behaviour<br />
spectral sensitivity adapted to the human eye with<br />
built-in colour correction filter<br />
concerns about positioning the light <strong>sensor</strong> – please<br />
contact your sales office.<br />
• A two-core cable (0.5–1.5 mm²) is used from the<br />
light <strong>sensor</strong> to the daylight-dependent control<br />
device. The maximum length allowed depends on<br />
the control device (please refer to the relevant data<br />
sheet).<br />
• If on account of awkward room geometry (too<br />
narrow or built up windows, shadowed ceiling,<br />
too large window lintel heights) the daylight at the<br />
light <strong>sensor</strong> is not sufficient for programming a<br />
daytime system point (see daylightbased control<br />
module) the light <strong>sensor</strong> can be switched to a<br />
higher sensitivity:<br />
Move the internal slide switch on the right next<br />
to the terminal for the light <strong>sensor</strong> line from the<br />
bottom position “5000” (dissolution corresponds to<br />
approx. 1 lx) to the top position “1000”<br />
(dissolution corresponds to approx. 0.2 lx). 3<br />
Momentary action switch and LED:<br />
The momentary action switch in the centre of the<br />
cover (behind the hole) serves for the programming<br />
of the daylight dependent control: Pressing the switch<br />
for less then 10 s (minimum of 0.5 s) Ê Save system<br />
point. For more detail refer to the installation instructions<br />
of the daylight control device (modularDIM DM).<br />
Checking of the wiring: Press switch for more than<br />
10 s Ê LED in the eye of the <strong>sensor</strong> lights Ê wiring<br />
is ok<br />
5000<br />
Safety instructions<br />
• Installation of this device may only be carried out by specialist staff who have<br />
provided proof of their skills<br />
• The power supply must be switched off before handling the device<br />
• The relevant safety and accident prevention regulations must be observed.<br />
Areas of application<br />
The device may only<br />
• be used for the applications specified<br />
• for safe installation in dry, clean environment<br />
• be installed in such a way that access is only possible using a tool.<br />
01/11-205-2 We reserve the right to make technical changes without prior notice.<br />
<strong>Tridonic</strong> GmbH & Co KG, www.tridonic.com, info@tridonic.com, Tel. +43 5572 395-0
<strong>INSTALLATION</strong><br />
<strong>luxCONTROL</strong> <strong>sensor</strong> <strong>DAYLIGHT</strong><br />
article number/Artikelnummer: 86454586<br />
F<br />
Notice d’installation :<br />
Le capteur photométrique sert essentiellement à<br />
la détection du pourcentage de la lumière du jour<br />
pénétrant dans une pièce. L’installation correcte de<br />
la cellule photoélectrique est donc très importante<br />
pour le bon fonctionnement de la commande de<br />
l’éclairage en fonction de la lumière du jour.<br />
• L’œil de la cellule photoélectrique doit être<br />
orienté vers la lumière du jour (fenêtre).<br />
• Veiller à ce que le capteur ne soit exposé ni<br />
au rayonnement solaire direct ni à la lumière<br />
artificielle.<br />
• Distance de la cellule par rapport à la fenêtre,<br />
max. égale à la hauteur de la fenêtre : c ≤ a 1<br />
• Montage de la cellule photoélectrique devant le<br />
milieu de la fenêtre : distance max. égale à la<br />
largeur de la fenêtre : c ≤ b 2<br />
• Si le linteau de fenêtre est nettement plus haut que<br />
1/6 de la distance de la cellule photoélectrique par<br />
rapport à la fenêtre, la cellule photo électrique doit<br />
être suspendue ou inclinée. 1<br />
• Eviter que p. ex. des croisillons, de gros linteaux<br />
ou des luminaires ne projettent de l’ombre dans<br />
l’angle de vision de la cellule photoélectrique.<br />
Ombre max. admissible 15 %.<br />
• Si les conditions d’installation diffèrent de<br />
celles-ci ou si vous avez des questions au sujet du<br />
Données techniques<br />
Référence 86454586<br />
Courant d'entrée admissible<br />
4 – 20 mA (par câble de mesure à 2 conducteurs)<br />
Ligne du capteur photométrique NYM 2x1,5 mm² (H05VV-U 2x1,5 mm ²)<br />
Bornes de raccordement 0,5 – 1,5 mm ²<br />
Poids<br />
70 g env.<br />
Temp. ambiante admissible 0 ... 50 °C<br />
Comportement spectral<br />
sensibilité spectrale adaptée à l'oeil humain<br />
parfiltre correcteur de coleurs<br />
positionnement de la cellule photoélectrique, veuillez<br />
vous adresser à votre bureau de vente.<br />
• Le capteur LSD est relié au module de gestion<br />
suivant la lumière du jour pa run câble à 2<br />
conducteurs (0,5–1,5 mm²), dont la longueur max.<br />
admissible dépend du module récepteur<br />
(voir la fiche technique correspondante).<br />
• Lorsque, en raison des conditions de pièce<br />
défavorables (des fenêtres très petites ou<br />
obstruées, projection d’ombre sur le plafond,<br />
linteaux de fenêtre très hauts), la lumière du<br />
jour au niveau du capteur est insuffisante pour<br />
la programmation du point de référence jour<br />
(voir module de commande en fonction de la<br />
lumière du jour), vous pouvez régler le capteur<br />
sur une sensibilité plus élevée: Déplacer<br />
l’interrupteur à coulisse interne, situé à droite de la<br />
borne de raccordement destinée au conducteur<br />
du capteur, de la position inférieure “5000” (la<br />
dissolution correspond à approximativement 1 lx)<br />
sur la position supérieure “1000” (la dissolution<br />
correspond à approximativement 0,2 lx). 3<br />
Touche et LED :<br />
La touche au milieu du capot (sous l‘orifice) sert à la<br />
programmation des commandes en fonction de la<br />
lumière du jour : action sur la touche de moins de<br />
10 s (min. 0,5 s) Ê enregistrement d'un point<br />
systeme. Pour plus de détails se reporter à la<br />
documentation sur le montage et l‘installation du<br />
module de commande fonction de la lumière du jour<br />
(modularDIM DM).<br />
Vérification du câblage :<br />
action sur la touche de plus de 10 s Ê la LED<br />
dans l'œil du capteur photométrique s'allume Ê<br />
câblage ok<br />
E<br />
Notas de instalación:<br />
El <strong>sensor</strong> de luz se utiliza exclusivamente para<br />
registrar la proporción de luz natural en la sala; Para<br />
que el control de la iluminación en función de la luz<br />
del día se desarrolle correctamente es importante<br />
instalar el <strong>sensor</strong> de luz en la posición correcta:<br />
• El ojo del <strong>sensor</strong> de luz debe orientarse mirando<br />
hacia la dirección de la luz del día (ventana) libre<br />
de obstrucciones<br />
• El <strong>sensor</strong> de luz no debe exponerse directamente a<br />
la luz solar o artificial.<br />
• La distancia del <strong>sensor</strong> de luz a la ventana debe<br />
ser un máximo igual a la altura de la ventana:<br />
c ≤ a 1<br />
• El <strong>sensor</strong> de luz debe montarse delante del centro<br />
de la ventana: la distancia del <strong>sensor</strong> a la ventana<br />
debe ser un máximo igual a la altura de la ventana:<br />
c ≤ b 2<br />
• Si la altura del dintel de la ventana es considerablemente<br />
superior a 1/6 de la distancia del <strong>sensor</strong><br />
de luz con respecto a la ventana, el <strong>sensor</strong> de luz<br />
debe montarse colgando del techo o inclinado. 1<br />
• Evite la formación de sombras en el ángulo de<br />
visión del <strong>sensor</strong> de luz, debido, por ejemplo,<br />
a montantes de ventanas, dinteles de gran tamaño<br />
o luminarias que pudiera haber delante del <strong>sensor</strong>.<br />
Se permite un sombreado máximo de un 15 %.<br />
Datos Técnicos<br />
Nº de referencia 86454586<br />
Corriente de entrada adm<br />
4 – 20 mA (alimentación por medio del cable de 2 hilos del <strong>sensor</strong>)<br />
Cable del <strong>sensor</strong> de luz NYM 2x1,5 mm² (H05VV-U 2x1,5 mm ²)<br />
Bornes de conexión 0,5 – 1,5 mm ²<br />
Peso<br />
aprox. 70 g<br />
Temperatura ambiente adm 0 ... 50 °C<br />
Régimen espectral<br />
sensibilidad espectral con filtro corrector de colores<br />
incorporado y adaptado al ojo humano<br />
• Si las condiciones de instalación difieren de las<br />
anteriores, o si tuviera alguna pregunta sobre la<br />
posición de montaje del <strong>sensor</strong> de luz, diríjase a su<br />
centro de ventas.<br />
• Un cable de 2 hilos (0,5–1,5 mm²) se utiliza como<br />
cable de <strong>sensor</strong> de luz al aparato de control de<br />
luz diurna, la longitud máxima permitida del cable<br />
depende del aparato utilizado (véase la ficha de<br />
datos técnicos correspondiente).<br />
• Si debido a condiciones desfavorables del recinto<br />
(ventanas demasiado pequeñas, techo ensombrecido,<br />
dinteles demasiado altos, etc.) la luz natural<br />
no fuera suficiente para programar en el <strong>sensor</strong><br />
de luz algún punto del sistema (véase el módulo<br />
de control de la luz diurna), puede usted ajustar<br />
el <strong>sensor</strong> de luz a una mayor sensibilidad: Para<br />
ello deberá desplazar el conmutador situado a la<br />
derecha del borne para conexión del cable del<br />
<strong>sensor</strong> de luz desde la posición inferior “5000” (la<br />
disolución corresponde aproximadamente a 1 lx)<br />
hasta la posición superior “1000” (la disolución<br />
corresponde aproximadamente a 0,2 lx). 3<br />
Pulsador y diodo luminiscente:<br />
Funciones del pulsador situado en el centro de la<br />
tapa (detrás del orificio): Programar el control en<br />
función de la luz natural: pulse el pulsador durante<br />
menos de 10 s (0,5 s, como minimo) Ê guarde el<br />
punto de sistema. Para más información consulte<br />
las instrucciones de montaje e instalación para<br />
el aparato de control en función de la luz natural<br />
(modularDIM DM).<br />
Comprobar el correcto cableado: pulse el pulsador<br />
durante más de 10 s Ê el diodo del ojo del <strong>sensor</strong><br />
de luz se ilumina Ê cableado correcto<br />
Consignes de sécurité<br />
• L’installation de l’appareil doit se faire exclusivement par un personnel qualifié<br />
et confirmé.<br />
• Couper l’alimentation électrique avant toute intervention sur l’appareil.<br />
• Respecter la réglementation en vigueur en matière de sécurité et de prévention<br />
des accidents.<br />
Application<br />
L’appareil doit impérativement et exclusivement :<br />
• être utilisé conformément à sa destination<br />
• être monté solidement dans un milieu sec et propre<br />
• être installé de telle manière qu’un accès ne soit possible qu’à l’aide d’un outil.<br />
Instrucciones de seguridad<br />
• La instalación de este aparato debe ser realizada exclusivamente por personal<br />
especializado y con la debida formación.<br />
• Puede desconectarse la alimentación eléctrica antes de manipular el aparato.<br />
• Deben cumplirse las regulaciones de seguridad y prevención de accidentes.<br />
Áreas de aplicación<br />
Este aparato debe<br />
• utilizarse para las aplicaciones especificadas<br />
• instalarse de forma segura, en un entorno seco y limpio<br />
• instalarse de modo que el acceso solo sea posible con el uso de una herramienta.<br />
I<br />
Note sull’installazione:<br />
Il foto<strong>sensor</strong>e serve esclusivamente per la<br />
rilevazione dell’incidenza di luce diurna nel locale;<br />
Per il corretto funzionamento del sistema è fondamentale<br />
che il foto<strong>sensor</strong>e sia posizionato in modo<br />
giusto.<br />
• L’apertura va rivolta verso la luce diurna<br />
(verso le finestre).<br />
• Fare attenzione che nel foto<strong>sensor</strong>e non incida<br />
luce artificiale né luce solare diretta.<br />
• Distanza del foto<strong>sensor</strong>e dalla finestra: al massimo<br />
uguale all’altezza della finestra c ≤ a 1<br />
• Il foto<strong>sensor</strong>e va montato davanti al centro della<br />
finestra; distanza del foto<strong>sensor</strong>e dalla finestra al<br />
massimo uguale alla larghezza della finestra:<br />
c ≤ b 2<br />
• Se il sesto della finestra supera 1/6 della distanza<br />
del foto<strong>sensor</strong>e, quest’ultimo andrà sospeso o<br />
inclinato. 1<br />
• Evitare grosse ombreggiature dovute ad es. a<br />
davan zali corpi illuminanti. Sono ammesse ombreggiature<br />
fino a max. 15 %.<br />
• In caso di problematiche particolari rivolgetevi<br />
Dati tecnici<br />
Codice articolo 86454586<br />
Corrente d’entrata ammessa<br />
4 – 20 mA (alimentazione con conduttore a 2 fili)<br />
Linea foto<strong>sensor</strong>e NYM 2x1,5 mm² (H05VV-U 2x1,5 mm ²)<br />
Morsetti di raccordo 0,5 – 1,5 mm ²<br />
Peso<br />
ca. 70 g<br />
Temperatura ambiente ammessa 0 ... 50 °C<br />
Sensibilità spettrale<br />
con filtro di correzione colori adattato all’occhio umano<br />
all’assistenza.<br />
• Il cavo foto<strong>sensor</strong>e per il apparecchio di comando<br />
luce diurna è a due fili (0,5–1,5 mm²); la lunghezza<br />
massima dipende dal apparecchio (veda anche<br />
relativo foglio dati).<br />
• Se a causa di condizioni sfavorevoli locali (finestre<br />
piccole, soffitto ombroso, puntoni alti... etc.) la<br />
luce del giorno del foto<strong>sensor</strong>e non è sufficiente<br />
per programmare il punto sistema giorno, si può<br />
cambiare il <strong>sensor</strong>e ad una sensibilità più alta:<br />
Spostare a tal proposito l’interruttore scorrevole<br />
interno che si trova a destra, accanto ai morsetti<br />
della linea del <strong>sensor</strong>e, dalla posizione in basso<br />
“5000” (la risoluzione corrisponde a verso 1 lx) alla<br />
posizione in alto “1000” (la risoluzione<br />
corrisponde a verso 0,2 lx). 3<br />
Pulsanti e LED:<br />
I pulsanti al centro del coperchio (posizionati dietro<br />
il foro) consentono la programmazione del comando<br />
in funzione della luce diurna: Premere i pulsanti per<br />
un intervallo di tempo inferiore a 10 secondi (min.<br />
0,5 sec.) Ê memorizzazione del punto di sistema.<br />
Per ulteriori informazioni, consultare il manuale per<br />
l’installazione e il montaggio dell’apparecchio di comando<br />
in funzione della luce diurna (modularDIM DM).<br />
Verifica del cablaggio:<br />
Premere i pulsanti per un intervallo di tempo inferiore<br />
a 10 secondi Ê il LED nell'apertura del foto<strong>sensor</strong>e si<br />
illumina Ê cablaggio OK<br />
Istruzioni per la sicurezza<br />
• Il presente dispositivo può essere istallato solo da personale specializzato esperto<br />
• Disattivare l’alimentazione prima di operare in qualsiasi modo sul dispositivo<br />
• Osservare scrupolosamente le norme di sicurezza e antinfortunistiche.<br />
Zona di applicazione<br />
Il dispositivo può esclusivamente<br />
• essere utilizzato per le applicazioni specificate<br />
• essere installato in ambienti asciutti e puliti ai fini della sicurezza<br />
• essere istallato in modo tale che sia accessibile solo servendosi di un utensile.<br />
01/11-205-2 We reserve the right to make technical changes without prior notice.<br />
<strong>Tridonic</strong> GmbH & Co KG, www.tridonic.com, info@tridonic.com, Tel. +43 5572 395-0