

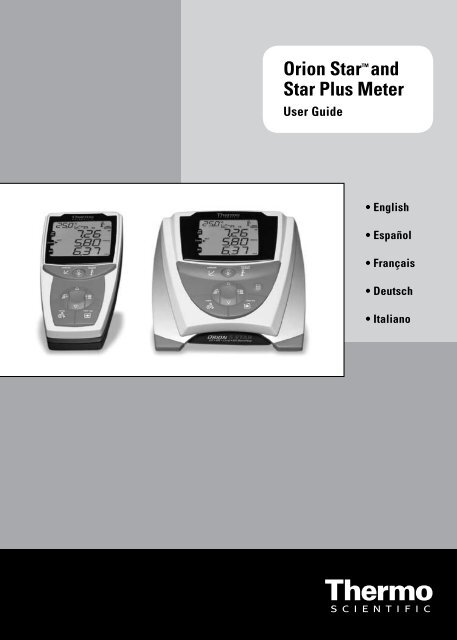
Orion Starâ„¢ and Star Plus Meter
Orion Starâ„¢ and Star Plus Meter
Orion Starâ„¢ and Star Plus Meter

Create successful ePaper yourself
Turn your PDF publications into a flip-book with our unique Google optimized e-Paper software.
<strong>Orion</strong> <strong>Star</strong> <strong>and</strong><br />
<strong>Star</strong> <strong>Plus</strong> <strong>Meter</strong><br />
User Guide<br />
• English<br />
• Español<br />
• Français<br />
• Deutsch<br />
• Italiano
ROSS <strong>and</strong> the COIL trade dress are trademarks of Thermo Fisher Scientific Inc.<br />
AQUAfast, Cahn, ionplus, KNIpHE, No Cal, ORION, perpHect, PerpHecT, PerpHecTion, pHISA, pHuture, Pure<br />
Water, Sage, Sensing the Future, SensorLink, ROSS, ROSS Ultra, Sure-Flow, Titrator PLUS <strong>and</strong> TURBO2 are<br />
registered trademarks of Thermo Fisher.<br />
1-888-pHAX-ION, A+, All in One, Aplus, AQUAsnap, AssuredAccuracy, AUTO-BAR, AUTO-CAL, AUTO DISPENSER,<br />
Auto-ID, AUTO-LOG, AUTO-READ, AUTO-STIR, Auto-Test, BOD AutoE Z, Cable-Free, CERTI-CAL, CISA, DataCOLLECT,<br />
DataPLUS, digital LogR, DirectCal, DuraProbe, Environmental Product Authority, Extra Easy/Extra Value,<br />
FAST QC, GAP, GLPcal, GLPcheck, GLPdoc, ISEasy, KAP, LabConnect, LogR, Low Maintenance Triode, Minimum<br />
Stir Requirement, MSR, NISS, One-Touch, One-Touch Calibration, One-Touch Measurement, Optimum Results,<br />
<strong>Orion</strong> <strong>Star</strong>, Pentrode, pHuture MMS, pHuture Pentrode, pHuture Quatrode, pHuture Triode, Quatrode, QuiKcheK,<br />
rf link, ROSS Resolution, SAOB, SMART AVERAGING, Smart CheK, SMART STABILITY, Stacked, <strong>Star</strong> Navigator 21,<br />
Stat Face, The Enhanced Lab, ThermaSense, Triode, TRIUMpH, Unbreakable pH, Universal Access are<br />
trademarks of Thermo Fisher.<br />
Guaranteed Success <strong>and</strong> The Technical Edge are service marks of Thermo Fisher.<br />
PerpHecT meters are protected by U.S. patent 6,168,707.<br />
PerpHecT ROSS are protected by U.S. patent 6,168,707.<br />
ORION Series A meters <strong>and</strong> 900A printer are protected by U.S. patents 5,198,093, D334,208 <strong>and</strong> D346,753.<br />
ionplus electrodes <strong>and</strong> Optimum Results solutions are protected by US Patent 5,830,338.<br />
ROSS Ultra electrodes are protected by US patents 6,793,787.<br />
<strong>Orion</strong> ORP St<strong>and</strong>ard is protected by US Patent 6,350,367.<br />
<strong>Orion</strong> NoCal electrodes are protected by US Patent 7,276,142.<br />
© 2008 Thermo Fisher Scientific Inc. All rights reserved. RDO is a registered trademark of In-Situ Inc.,<br />
Fort Collins, CO USA. All other trademarks are the property of Thermo Fisher Scientific Inc. <strong>and</strong> its subsidiaries.<br />
The specifications, descriptions, drawings, ordering information <strong>and</strong> part numbers within this document are<br />
subject to change without notice.<br />
This publication supersedes all previous publications on this subject.
English Page EN-1<br />
Thermo Scientific <strong>Orion</strong> <strong>Star</strong> <strong>and</strong> <strong>Star</strong> <strong>Plus</strong> meters are designed for every<br />
application, from basic portable measurements to advanced laboratory analysis.<br />
This user guide contains information on the preparation, operation <strong>and</strong><br />
maintenance for the <strong>Orion</strong> <strong>Star</strong> <strong>and</strong> <strong>Star</strong> <strong>Plus</strong> meters.<br />
Español Page ES-1<br />
Esta guía del usuario se presenta resumida para incluir los datos más importantes<br />
en inglés, español, francés, alemán e italiano.<br />
Para descargar la versión completa en el idioma de su elección, visite nuestro<br />
sitio web en www.thermo.com/water.<br />
Français Page FR-1<br />
Ce guide d’utilisation a été abrégé de façon à inclure les informations les plus<br />
pertinentes en anglais, espagnol, français, allem<strong>and</strong> et italien.<br />
Pour télécharger une version complète dans votre langue, connectez-vous à notre<br />
site www.thermo.com/water.<br />
Thermo Scientific <strong>Orion</strong> <strong>Star</strong> <strong>and</strong> <strong>Star</strong> <strong>Plus</strong> Series <strong>Meter</strong> User Guide
Deutsch Page DE-1<br />
Die vorliegende Kurzfassung der Bedienungsanleitung enthält die wichtigsten<br />
Anweisungen auf Englisch, Spanisch, Französisch, Deutsch und Italienisch.<br />
Die ausführliche Bedienungsanleitung ist in jeder dieser Sprachen zum Download<br />
verfügbar. Besuchen Sie hierzu die Website www.thermo.com/water.<br />
Italiano Page IT-1<br />
La presente guida per l’utente è stata ridotta per includere i dettagli più<br />
importanti in Inglese, Spagnolo, Francese, Tedesco e Italiano.<br />
Per scaricare la versione completa nella Vostra lingua, visitate il nostro sito web<br />
all’indirizzo www.thermo.com/water.<br />
Thermo Scientific <strong>Orion</strong> <strong>Star</strong> <strong>and</strong> <strong>Star</strong> <strong>Plus</strong> Series <strong>Meter</strong> User Guide
E N<br />
Table of Contents<br />
Chapter I Introduction<br />
<strong>Meter</strong> Features . . . . . . . . . . . . . . . . . . . . . . . . . . . . . . . . . . . . . . . . . . . . . . . . . . . .EN-2<br />
Chapter II Display<br />
General Description . . . . . . . . . . . . . . . . . . . . . . . . . . . . . . . . . . . . . . . . . . . . . . . .EN-3<br />
Chapter III Keypad<br />
General Description . . . . . . . . . . . . . . . . . . . . . . . . . . . . . . . . . . . . . . . . . . . . . . . .EN-5<br />
Key Definitions . . . . . . . . . . . . . . . . . . . . . . . . . . . . . . . . . . . . . . . . . . . . . . . . . . . .EN-6<br />
Chapter IV Preparation<br />
Installing the Power Adapter . . . . . . . . . . . . . . . . . . . . . . . . . . . . . . . . . . . . . . . . . .EN-7<br />
Installing the Batteries . . . . . . . . . . . . . . . . . . . . . . . . . . . . . . . . . . . . . . . . . . . . . .EN-8<br />
Connecting the Electrodes . . . . . . . . . . . . . . . . . . . . . . . . . . . . . . . . . . . . . . . . . . .EN-9<br />
Turning on the Instrument . . . . . . . . . . . . . . . . . . . . . . . . . . . . . . . . . . . . . . . . . .EN-10<br />
<strong>Meter</strong> Maintenance . . . . . . . . . . . . . . . . . . . . . . . . . . . . . . . . . . . . . . . . . . . . . . .EN-10<br />
Chapter V <strong>Meter</strong> Setup<br />
Setup Menu . . . . . . . . . . . . . . . . . . . . . . . . . . . . . . . . . . . . . . . . . . . . . . . . . . . . .EN-11<br />
Setup Menu Table . . . . . . . . . . . . . . . . . . . . . . . . . . . . . . . . . . . . . . . . . . . . . . .EN-12<br />
General Menu Settings . . . . . . . . . . . . . . . . . . . . . . . . . . . . . . . . . . . . . . . . . . . . .EN-14<br />
Time <strong>and</strong> Date Settings . . . . . . . . . . . . . . . . . . . . . . . . . . . . . . . . . . . . . . . . . . . .EN-15<br />
AUTO-READ , Continuous or Timed Measurement Settings . . . . . . . . . . . . . . . .EN-16<br />
Selecting the Measurement Parameter . . . . . . . . . . . . . . . . . . . . . . . . . . . . . . . .EN-17<br />
Method Setup . . . . . . . . . . . . . . . . . . . . . . . . . . . . . . . . . . . . . . . . . . . . . . . . . . . .EN-18<br />
Chapter VI pH Technique<br />
pH Setup Menu . . . . . . . . . . . . . . . . . . . . . . . . . . . . . . . . . . . . . . . . . . . . . . . . . .EN-19<br />
pH Calibration . . . . . . . . . . . . . . . . . . . . . . . . . . . . . . . . . . . . . . . . . . . . . . . . . . . .EN-20<br />
pH Measurement . . . . . . . . . . . . . . . . . . . . . . . . . . . . . . . . . . . . . . . . . . . . . . . . .EN-21<br />
pH Temperature Display <strong>and</strong> Calibration . . . . . . . . . . . . . . . . . . . . . . . . . . . . . . . .EN-22<br />
Chapter VII mV, Relative mV <strong>and</strong> ORP Technique<br />
Relative mV <strong>and</strong> ORP Calibration . . . . . . . . . . . . . . . . . . . . . . . . . . . . . . . . . . . . .EN-23<br />
mV, Relative mV <strong>and</strong> ORP Measurement . . . . . . . . . . . . . . . . . . . . . . . . . . . . . . .EN-24<br />
Chapter VIII Dissolved Oxygen Technique<br />
Dissolved Oxygen Setup Menu . . . . . . . . . . . . . . . . . . . . . . . . . . . . . . . . . . . . . .EN-25<br />
Dissolved Oxygen Calibration . . . . . . . . . . . . . . . . . . . . . . . . . . . . . . . . . . . . . . . .EN-26<br />
Dissolved Oxygen Measurement . . . . . . . . . . . . . . . . . . . . . . . . . . . . . . . . . . . . .EN-28<br />
Dissolved Oxygen Temperature Display <strong>and</strong> Calibration . . . . . . . . . . . . . . . . . . . .EN-29<br />
Thermo Scientific <strong>Orion</strong> <strong>Star</strong> <strong>and</strong> <strong>Star</strong> <strong>Plus</strong> Series <strong>Meter</strong> User Guide<br />
E N G L S H S E C T O N<br />
EN-
E N<br />
Chapter IX RDO ® Optical Dissolved Oxygen Technique<br />
RDO Cap Overview . . . . . . . . . . . . . . . . . . . . . . . . . . . . . . . . . . . . . . . . . . . . . . .EN-31<br />
RDO Optical Dissolved Oxygen Setup Menu . . . . . . . . . . . . . . . . . . . . . . . . . . . .EN-32<br />
Setup Menu for RDO Optical Dissolved Oxygen Sensor . . . . . . . . . . . . . . . . .EN-33<br />
RDO Optical Dissolved Oxygen Calibration . . . . . . . . . . . . . . . . . . . . . . . . . . . . .EN-35<br />
RDO Optical Dissolved Oxygen Measurement . . . . . . . . . . . . . . . . . . . . . . . . . .EN-37<br />
RDO Optical Dissolved Oxygen Temperature Display <strong>and</strong> Calibration . . . . . . . . .EN-38<br />
Chapter X Conductivity Technique<br />
Conductivity Setup Menu . . . . . . . . . . . . . . . . . . . . . . . . . . . . . . . . . . . . . . . . . . .EN-39<br />
Conductivity Calibration . . . . . . . . . . . . . . . . . . . . . . . . . . . . . . . . . . . . . . . . . . . .EN-40<br />
Conductivity Measurement . . . . . . . . . . . . . . . . . . . . . . . . . . . . . . . . . . . . . . . . .EN-41<br />
Conductivity Temperature Display <strong>and</strong> Calibration . . . . . . . . . . . . . . . . . . . . . . . .EN-42<br />
Chapter XI ISE Technique<br />
ISE Setup Menu . . . . . . . . . . . . . . . . . . . . . . . . . . . . . . . . . . . . . . . . . . . . . . . . . .EN-43<br />
ISE Calibration . . . . . . . . . . . . . . . . . . . . . . . . . . . . . . . . . . . . . . . . . . . . . . . . . . .EN-44<br />
ISE Measurement . . . . . . . . . . . . . . . . . . . . . . . . . . . . . . . . . . . . . . . . . . . . . . . . .EN-45<br />
ISE Temperature Display <strong>and</strong> Calibration . . . . . . . . . . . . . . . . . . . . . . . . . . . . . . .EN-46<br />
Chapter XII Data Archiving <strong>and</strong> Retrieval<br />
Datalog <strong>and</strong> Calibration Log . . . . . . . . . . . . . . . . . . . . . . . . . . . . . . . . . . . . . . . . .EN-47<br />
Automatic Datalog Feature . . . . . . . . . . . . . . . . . . . . . . . . . . . . . . . . . . . . . . . .EN-47<br />
Datalog Deletion Setting . . . . . . . . . . . . . . . . . . . . . . . . . . . . . . . . . . . . . . . . . .EN-48<br />
Viewing <strong>and</strong> Printing the Datalog <strong>and</strong> Calibration Log . . . . . . . . . . . . . . . . . . .EN-49<br />
Chapter XIII Declaration of Conformity<br />
Declaration of Conformity . . . . . . . . . . . . . . . . . . . . . . . . . . . . . . . . . . . . . . . . . . .EN-51<br />
WEEE Compliance . . . . . . . . . . . . . . . . . . . . . . . . . . . . . . . . . . . . . . . . . . . . . . . .EN-52<br />
Chapter XIV Troubleshooting<br />
<strong>Meter</strong> Self Test . . . . . . . . . . . . . . . . . . . . . . . . . . . . . . . . . . . . . . . . . . . . . . . . . . .EN-53<br />
<strong>Meter</strong> Error Codes . . . . . . . . . . . . . . . . . . . . . . . . . . . . . . . . . . . . . . . . . . . . . . . .EN-54<br />
General Troubleshooting . . . . . . . . . . . . . . . . . . . . . . . . . . . . . . . . . . . . . . . . . . . .EN-56<br />
Chapter XV <strong>Meter</strong> Specifications<br />
<strong>Meter</strong> Specifications . . . . . . . . . . . . . . . . . . . . . . . . . . . . . . . . . . . . . . . . . . . . . . .EN-59<br />
Ordering Information . . . . . . . . . . . . . . . . . . . . . . . . . . . . . . . . . . . . . . . . . . . . . .EN-63<br />
Appendix A <strong>Meter</strong> Setup Menu Features<br />
pH Setup Menu Features . . . . . . . . . . . . . . . . . . . . . . . . . . . . . . . . . . . . . . . . . . .EN-65<br />
Dissolved Oxygen Setup Menu Features . . . . . . . . . . . . . . . . . . . . . . . . . . . . . . .EN-65<br />
Conductivity Setup Menu Features . . . . . . . . . . . . . . . . . . . . . . . . . . . . . . . . . . .EN-66<br />
ISE Setup Menu Features . . . . . . . . . . . . . . . . . . . . . . . . . . . . . . . . . . . . . . . . . . .EN-68<br />
EN-<br />
Thermo Scientific <strong>Orion</strong> <strong>Star</strong> <strong>and</strong> <strong>Star</strong> <strong>Plus</strong> Series <strong>Meter</strong> User Guide
Chapter I ntroduction<br />
Congratulations! You have selected an industry-leading Thermo Scientific <strong>Orion</strong> <strong>Star</strong><br />
or <strong>Star</strong> <strong>Plus</strong> series meter that is designed for electrochemistry measurements in the<br />
field or in the laboratory .<br />
• 2-<strong>Star</strong> meters provide the single parameter measurement of pH .<br />
• 3-<strong>Star</strong> <strong>Plus</strong> meters provide the single parameter measurement of pH,<br />
dissolved oxygen, RDO ® optical dissolved oxygen or conductivity .<br />
• 4-<strong>Star</strong> <strong>Plus</strong> meters provide the dual parameter measurements of<br />
pH/dissolved oxygen, pH/conductivity, pH/ISE (ion selective electrode) or<br />
pH/RDO optical dissolved oxygen .<br />
• 5-<strong>Star</strong> <strong>Plus</strong> meters provide the multi-parameter measurements of<br />
pH/ISE/dissolved oxygen/conductivity, pH/dissolved oxygen/conductivity or<br />
pH/RDO optical dissolved oxygen/conductivity .<br />
All meters include a temperature measurement function . All meters with pH<br />
measurement capability include a mV/relative mV/ORP function .<br />
Built to meet the dem<strong>and</strong>s of busy, multiple user laboratory or plant environments,<br />
all <strong>Orion</strong> <strong>Star</strong> <strong>and</strong> <strong>Star</strong> <strong>Plus</strong> series meters are microprocessor controlled, which aids<br />
in the delivery of accurate <strong>and</strong> precise measurements . The waterproof portable<br />
meters can even withst<strong>and</strong> submersion for short periods of time .<br />
The 3-<strong>Star</strong> <strong>Plus</strong>, 4-<strong>Star</strong> <strong>Plus</strong> <strong>and</strong> 5-<strong>Star</strong> <strong>Plus</strong> meters have been enhanced to include<br />
an increased number of datalog points, improved temperature displays <strong>and</strong> a new<br />
temperature calibration mode for each measurement parameter . Benchtop 3-<strong>Star</strong><br />
<strong>Plus</strong>, 4-<strong>Star</strong> <strong>Plus</strong> <strong>and</strong> 5-<strong>Star</strong> <strong>Plus</strong> meters include autosampler capability <strong>and</strong> are<br />
compatible with the AutoTration -500 autosampler . Refer to the AutoTration-500<br />
user guide for information on operating the <strong>Star</strong> <strong>Plus</strong> meters with the autosampler .<br />
Note: Please read this user guide thoroughly before using your benchtop or<br />
portable meter. Any use outside of these instructions may invalidate your warranty<br />
<strong>and</strong> cause permanent damage to the meter.<br />
Thermo Scientific <strong>Orion</strong> <strong>Star</strong> <strong>and</strong> <strong>Star</strong> <strong>Plus</strong> Series <strong>Meter</strong> User Guide<br />
EN-1
Introduction<br />
<strong>Meter</strong> Features<br />
To better meet the needs of users in environmental protection <strong>and</strong> control, food <strong>and</strong><br />
beverage, pharmaceutical <strong>and</strong> consumer product laboratories, the <strong>Orion</strong> <strong>Star</strong> <strong>and</strong><br />
<strong>Star</strong> <strong>Plus</strong> series meters include these key features:<br />
• Password Protected Methods – The meter will save up to ten custom<br />
measurements <strong>and</strong> calibrations for future reference . Password protection of<br />
each method eliminates any tampering with methods as multiple users access<br />
only the procedure most appropriate to their work .<br />
• AUTO-READ – The meter takes a measurement <strong>and</strong> automatically prints or<br />
logs data when the reading becomes stable . The measurement is frozen on the<br />
display until the user prompts the meter to take a new measurement .<br />
• Stirrer Control – Benchtop meters (3-<strong>Star</strong> <strong>and</strong> higher) have a stirrer control<br />
for the stirrer probe, Cat . No . 096019, <strong>and</strong> the AUTO-STIR BOD probe, which<br />
eliminates the need for additional stir plates <strong>and</strong> stir bars .<br />
• SMART STABILITY <strong>and</strong> SMART AVERAGING – Remove the<br />
guesswork by automatically compensating for measurement conditions <strong>and</strong><br />
optimizing the meter response time .<br />
• Display Backlight – All 3-<strong>Star</strong>, 4-<strong>Star</strong> <strong>and</strong> 5-<strong>Star</strong> meters include a display<br />
backlight feature . When the meter is on, a quick press of will turn the<br />
backlight on <strong>and</strong> off . When the meter is operating on battery power, the<br />
backlight will automatically turn off after two minutes to conserve power . When<br />
batteries are low, the backlight will no longer turn on .<br />
• Automatic Shutoff – The meters will shut down after 20 minutes without<br />
a keypress . This maximizes battery power on portable meters <strong>and</strong> benchtop<br />
meters that are being run on battery power .<br />
• Audible Signals – The meter will beep whenever a key is pressed, providing<br />
immediate verification that the user’s input was received .<br />
An easy-to-use reference guide, attached to each meter, supports daily meter use .<br />
EN-2<br />
Thermo Scientific <strong>Orion</strong> <strong>Star</strong> <strong>and</strong> <strong>Star</strong> <strong>Plus</strong> Series <strong>Meter</strong> User Guide
Chapter II Display<br />
General Description<br />
Throughout a given process, the display on an <strong>Orion</strong> <strong>Star</strong> or <strong>Star</strong> <strong>Plus</strong> series meter<br />
provides temperature <strong>and</strong> calibration data . The temperature appears in the left, top<br />
corner of the display . The icon indicates that a calibration mode or calibration<br />
setup menu is active . The man, 2, 4, 7, 9, 10, <strong>and</strong> 12 icons indicate which pH<br />
buffers were saved after a pH calibration is performed . The setup icon only appears<br />
when the meter is in setup mode . The icon indicates an error condition <strong>and</strong><br />
when it is displayed with the icon, a calibration alarm or sensor quality issue<br />
exists . The icon indicates that the AUTO-READ measurement mode is active<br />
<strong>and</strong> is discussed in greater detail in the <strong>Meter</strong> Setup section .<br />
Temperature<br />
Calibration<br />
5 <strong>Star</strong> <strong>Meter</strong><br />
This is the display of the 5-<strong>Star</strong> meter capable of multi-parameter measurements .<br />
The single <strong>and</strong> dual parameter meters will have fewer measurement lines,<br />
depending on the meter capabilities .<br />
Note: In the measurement mode, the three main lines of data on the meter<br />
display correspond to what is being measured.<br />
Thermo Scientific <strong>Orion</strong> <strong>Star</strong> <strong>and</strong> <strong>Star</strong> <strong>Plus</strong> Series <strong>Meter</strong> User Guide<br />
pH/ISE/ORP<br />
Unit<br />
Conductivity<br />
Unit<br />
DO Unit<br />
EN-3
Display<br />
Measurement Unit cons<br />
In the measurement mode, the arrow icon on the left side of the display screen<br />
indicates the active line . Press to move the arrow icon to the desired line <strong>and</strong><br />
press / to scroll through the measurement unit icons associated with the<br />
selected line . The measurement unit icons for the 5-<strong>Star</strong> multi-parameter meter are<br />
shown below . The single <strong>and</strong> dual parameter meters will have fewer measurement<br />
lines <strong>and</strong> icons, depending on the meter capabilities .<br />
EN-4<br />
A pH, mV, relative mV, ISE,<br />
or temperature<br />
B Conductivity, TDS, salinity, resistivity,<br />
or temperature<br />
C Dissolved oxygen as % saturation,<br />
dissolved oxygen as concentration,<br />
barometric pressure or temperature<br />
The units of measurement, which are displayed on the right side of the screen, will<br />
flash until the reading is stable .<br />
Note: If a measurement line is not needed, press to move the arrow<br />
icon to the measurement line that is not needed <strong>and</strong> press<br />
measurement line is completely blank.<br />
/ until the<br />
Thermo Scientific <strong>Orion</strong> <strong>Star</strong> <strong>and</strong> <strong>Star</strong> <strong>Plus</strong> Series <strong>Meter</strong> User Guide
Chapter III Keypad<br />
General Description<br />
The keypad layout is the same for all <strong>Orion</strong> <strong>Star</strong> <strong>and</strong> <strong>Star</strong> <strong>Plus</strong> series meters . The<br />
portable <strong>and</strong> 2-<strong>Star</strong> benchtop meters have nine keys . The 3-<strong>Star</strong>, 4-<strong>Star</strong> <strong>and</strong> 5-<strong>Star</strong><br />
benchtop meters have 10 keys due to the addition of the stir key – .<br />
Portable Keypad<br />
Calibrate<br />
Power Backlight<br />
Scroll Up<br />
Digits<br />
Line Select<br />
Scroll Down<br />
Setup<br />
Benchtop Keypad<br />
Calibrate<br />
Scroll Up<br />
Digits<br />
Setup<br />
Power<br />
Backlight<br />
Thermo Scientific <strong>Orion</strong> <strong>Star</strong> <strong>and</strong> <strong>Star</strong> <strong>Plus</strong> Series <strong>Meter</strong> User Guide<br />
Measure<br />
Save/Print<br />
View Log<br />
Measure<br />
Save/Print<br />
Stirrer On/Off,<br />
(not on 2-<strong>Star</strong>)<br />
Line Select<br />
View Log<br />
Scroll Down<br />
EN-5
Keypad<br />
Key Definitions<br />
Key Description Key Description<br />
EN-6<br />
Turns the meter on, if the meter<br />
is off .<br />
Toggles the backlight on <strong>and</strong> off,<br />
if the meter is on (3-<strong>Star</strong>, 4-<strong>Star</strong><br />
<strong>and</strong> 5-<strong>Star</strong> meters only) .<br />
If the meter is on, hold down<br />
the key for about three seconds<br />
to turn off the meter .<br />
Scrolls the arrow icon on left of<br />
screen among the three display<br />
lines, so the selected line can<br />
be edited or calibrated .<br />
<strong>Star</strong>ts the calibration for<br />
the selected line in the<br />
measurement mode .<br />
If the arrow icon points to the<br />
top line <strong>and</strong> the displayed units<br />
are pH, pressing the key will<br />
start a pH calibration .<br />
Each time the key is pressed in<br />
the calibration mode, the meter<br />
will accept the calibration point<br />
<strong>and</strong> move to the next point<br />
until the maximum number of<br />
calibration points are reached .<br />
Enters the setup menu, starting<br />
with selected line in the<br />
measurement mode .<br />
If the arrow icon points to the<br />
top line <strong>and</strong> the displayed units<br />
are ISE, pressing the key will<br />
enter the ISE setup screen .<br />
Changes the measurement<br />
units of the selected line in the<br />
measurement mode .<br />
Changes the value on the<br />
selected line in the setup,<br />
methods <strong>and</strong> log view modes .<br />
Edits the value of the flashing<br />
digit for setup, password entry<br />
<strong>and</strong> calibration modes .<br />
Selects the next digit to edit<br />
<strong>and</strong> moves the decimal point<br />
for setup, password entry <strong>and</strong><br />
calibration modes .<br />
Prints <strong>and</strong> logs a measurement<br />
in the continuous or timed<br />
measurement modes .<br />
Prints, logs <strong>and</strong> freezes the<br />
display when the reading<br />
becomes stable in the AUTO-<br />
READ measurement mode .<br />
Exits the setup menu <strong>and</strong> returns<br />
to measurement mode .<br />
Accepts the calibration <strong>and</strong><br />
returns to measurement mode .<br />
Enters the log view <strong>and</strong><br />
download menu .<br />
Turns the stirrer on <strong>and</strong> off .<br />
Thermo Scientific <strong>Orion</strong> <strong>Star</strong> <strong>and</strong> <strong>Star</strong> <strong>Plus</strong> Series <strong>Meter</strong> User Guide
Chapter IV Preparation<br />
nstalling the Power Adapter<br />
The universal power adapter that is included with your benchtop meter is the only<br />
power adapter recommended for use with this unit . The use of any other power<br />
adapter will void your meter warranty . The external electrical power adapter is rated<br />
to be operated at 100 to 240 VAC, 0 .5 A, 50/60 Hz .<br />
Based on your wall outlet, select one of the four plug plates provided (110 V, 220 V,<br />
240V) <strong>and</strong> slide it into the grooves on the adapter . A click will be heard when the<br />
plug is properly in place .<br />
Connect the output plug of the power adapter to the power input on the benchtop<br />
meter . Refer to the diagram in the Connecting the Electrodes section .<br />
Batteries can be installed in the benchtop <strong>Orion</strong> <strong>Star</strong> or <strong>Star</strong> <strong>Plus</strong> series meters, so<br />
the meter setup settings are protected if the meter is disconnected from the wall<br />
outlet or a brief power outage occurs .<br />
Thermo Scientific <strong>Orion</strong> <strong>Star</strong> <strong>and</strong> <strong>Star</strong> <strong>Plus</strong> Series <strong>Meter</strong> User Guide<br />
EN-7
Preparation<br />
nstalling the Batteries<br />
<strong>Orion</strong> <strong>Star</strong> <strong>and</strong> <strong>Star</strong> <strong>Plus</strong> series meters use four AA alkaline batteries . Do not use<br />
lithium or rechargeable batteries . Improper installation of non-alkaline batteries<br />
could create a hazard .<br />
Note: For benchtop meters, the installation of batteries is not required if the unit<br />
will always be connected to a power source via the universal power supply. For<br />
portable meters, the batteries are supplied from the factory. To access the battery<br />
compartment in portable meters, loosen the two screws in the back of the meter.<br />
1 . Confirm that the meter is off <strong>and</strong> gently place the meter upside down on a<br />
clean, lint-free cloth to prevent scratching the LCD .<br />
2 . Remove the battery case cover .<br />
3 . Insert new batteries with the + side orientation as depicted in the battery<br />
compartment housing .<br />
4 . Replace the battery case cover .<br />
5 . Stored data, calibrations <strong>and</strong> methods will remain in the meter’s nonvolatile<br />
memory when the batteries are being replaced . However, the date <strong>and</strong> time<br />
may need to be reset when the batteries are changed .<br />
EN-8<br />
Thermo Scientific <strong>Orion</strong> <strong>Star</strong> <strong>and</strong> <strong>Star</strong> <strong>Plus</strong> Series <strong>Meter</strong> User Guide
Connecting the Electrodes<br />
Follow the diagrams below to correctly connect electrodes <strong>and</strong> probes to the meter .<br />
The multi-parameter meter is depicted; single parameter <strong>and</strong> dual parameter meters<br />
will have fewer connections, depending on the meter measurement capabilities .<br />
Benchtop <strong>Meter</strong> Electrode Connections<br />
Stirrer jack,<br />
stirrer or BOD<br />
AUTO-STIR probe<br />
Portable <strong>Meter</strong> Electrode Connections<br />
BNC,<br />
pH, ORP<br />
or ISE<br />
Reference,<br />
pH, ORP<br />
or ISE<br />
8 pin miniDIN,<br />
Cond or ATC<br />
BNC,<br />
pH, ORP<br />
or ISE<br />
9 pin<br />
miniDIN,<br />
DO<br />
8 pin miniDIN,<br />
Cond or ATC<br />
RS232<br />
9 pin<br />
miniDIN,<br />
DO<br />
RS232<br />
Ground<br />
Thermo Scientific <strong>Orion</strong> <strong>Star</strong> <strong>and</strong> <strong>Star</strong> <strong>Plus</strong> Series <strong>Meter</strong> User Guide<br />
Power<br />
Preparation<br />
EN-9
Preparation<br />
<strong>Meter</strong> Connections with Multiple Functions<br />
• Use the BNC input to connect pH, ISE <strong>and</strong> ORP electrodes with a BNC or<br />
waterproof BNC connector .<br />
• Benchtop meters have a reference input that is used to connect a separate<br />
reference electrode . Reference electrodes require an separate, appropriate<br />
sensing electrode for measurements .<br />
• The 970899WP dissolved oxygen probe can be used on the BNC input .<br />
• Use the 8 pin miniDIN input for conductivity probes or for automatic temperature<br />
compensation (ATC) probes .<br />
• The DO AUTO-STIR probe uses the 9 pin miniDIN input <strong>and</strong> the stirrer jack .<br />
• Connect a printer or computer to the RS232 input using the appropriate cable .<br />
Turning on the nstrument<br />
With the batteries installed in the portable meters <strong>and</strong> the power adapter attached<br />
or the batteries installed in the benchtop meter, press to turn on the meter .<br />
If using a 3-<strong>Star</strong>, 4-<strong>Star</strong> or 5-<strong>Star</strong> meter, press when the meter is powered on<br />
to toggle the backlight on <strong>and</strong> off . When the benchtop meter is drawing line power,<br />
the backlight will stay on until is pressed .<br />
To turn off the meter, press <strong>and</strong> hold for about three seconds .<br />
<strong>Meter</strong> Maintenance<br />
For routine meter maintenance, dust <strong>and</strong> wipe the meter with a damp cloth . If<br />
necessary, a warm water or a mild water-based detergent can be used . Perform<br />
meter maintenance on a daily, weekly or monthly basis, as required by the<br />
environment in which the meter is operated .<br />
Immediately remove any spilled substance from the meter using the proper cleaning<br />
procedure for the type of spill .<br />
EN-10<br />
Thermo Scientific <strong>Orion</strong> <strong>Star</strong> <strong>and</strong> <strong>Star</strong> <strong>Plus</strong> Series <strong>Meter</strong> User Guide
Chapter V <strong>Meter</strong> Setup<br />
Setup Menu<br />
To navigate the setup menu:<br />
1 . Press to enter the setup menu .<br />
2 . Press / until the desired setup option is displayed on the top line .<br />
3 . Press to move the arrow icon to the middle line .<br />
4 . Press / until the desired setup option is displayed on the middle line .<br />
5 . Press to move the arrow icon to the bottom line .<br />
6 . To scroll through a list of options on the bottom line, press / until the<br />
desired option is displayed . To enter a numeric value for an option on the bottom<br />
line, press / to adjust each digit <strong>and</strong> to move to the next digit .<br />
For example, to change the pH measurement resolution press<br />
0 .01 to 0 .001 on the bottom display line .<br />
to scroll from<br />
7 . Press to move the arrow icon to the top line .<br />
8 . Repeat steps 2 through 7 to program a new setup option or press to exit<br />
the setup menu <strong>and</strong> return to the measurement mode .<br />
Note: Refer to Appendix A for a description of the special setup menu features.<br />
Thermo Scientific <strong>Orion</strong> <strong>Star</strong> <strong>and</strong> <strong>Star</strong> <strong>Plus</strong> Series <strong>Meter</strong> User Guide<br />
EN-11
<strong>Meter</strong> Setup<br />
Setup Menu Table – The following table is for the complete line of <strong>Orion</strong> <strong>Star</strong> <strong>and</strong><br />
<strong>Star</strong> <strong>Plus</strong> meters. <strong>Meter</strong>s may not include all of the options listed in this table.<br />
Top Line Middle Line Bottom Line Setup Menu Description (default setting, method specific)<br />
PH rES 0.1, 0.01, 0.001 pH measurement resolution (0.01, yes)<br />
PH bUF USA, EUr0 pH buffer set for automatic buffer recognition during calibration,<br />
USA buffers are 1.68, 4.01, 7.00, 10.01, 12.46 <strong>and</strong> EUrO buffers are<br />
1.68, 4.01, 6.86, 9.18 (USA, yes)<br />
ISE rES 1, 2, 3 ISE measurement resolution in significant figures (1, yes)<br />
ISE UnIt m, mgL, PEr, PPb, n0nE ISE measurement units (PPb, yes)<br />
ISE rAng L0w, HIgH ISE concentration range for calibration stability criteria (HIgH, yes)<br />
ISE nLIn AUt0, 0FF ISE automatic blank correction for low-level calibration (AUt0, yes)<br />
C0nd tC 0FF, LIn, nLF Conductivity temperature compensation type, LIn is for linear, nLF is<br />
for non-linear pure water samples (LIn, yes)<br />
C0nd C0EF 0.0 to 10.0 Conductivity temperature compensation coefficient in % change in<br />
conductivity per °C, appears if LIn was selected for tC (2.1, yes)<br />
C0nd tdSF 0.00 to 10.0 Conductivity TDS factor value (0.49, yes)<br />
C0nd CELL 0.001 to 199.0 Conductivity default cell constant value for automatic conductivity<br />
calibration mode (0.475, yes)<br />
C0nd trEF 5, 10, 15, 20, 25 Conductivity reference temperature (25, yes)<br />
C0nd tyPE Std, 1, 2, 3, 4, 5, 6, 7, USP Conductivity cell type <strong>and</strong> selectable range (Std, yes)<br />
See the Setup Menu for RDO Optical Dissolved Oxygen Sensor section for details on the RDO sensor information menus.<br />
d0 rES 0.1, 1 % sat DO % saturation measurement resolution (0.1, yes)<br />
d0 rES 0.01, 0.1 mg/L DO mg/L measurement resolution (0.01, yes)<br />
d0 bAr AUt0, mAn DO barometric pressure compensation type (AUt0, yes)<br />
d0 PrES 450.0 to 850.0 DO manual barometric pressure compensation value, appears if<br />
mAn was selected for bAr (760.0, yes)<br />
d0 SAL AUt0, mAn DO salinity correction type (AUt0, yes)<br />
d0 SALF 0 to 45 DO manual salinity correction value, appears if mAn was selected<br />
for SAL or a DO meter without a conductivity mode is used (0, yes)<br />
d0 CALt AIr, H20, mAn, SEt0 DO calibration type (AIr, yes)<br />
d0 LIFE 365 to 0 RDO cap replacement countdown in days – 3, 4 <strong>and</strong> 5 <strong>Star</strong> <strong>Plus</strong> RDO<br />
meters only (Set by RDO sensor, no)<br />
dUE PH 0 to 9999 pH calibration alarm value in hours, 0 is off (0, yes)<br />
dUE 0rP 0 to 9999 ORP calibration alarm value in hours, 0 is off (0, yes)<br />
dUE ISE 0 to 9999 ISE calibration alarm value in hours, 0 is off (0, yes)<br />
dUE C0nd 0 to 9999 Conductivity calibration alarm value in hours, 0 is off (0, yes)<br />
dUE d0 0 to 9999 DO calibration alarm value in hours, 0 is off (0, yes)<br />
EN-12<br />
Thermo Scientific <strong>Orion</strong> <strong>Star</strong> <strong>and</strong> <strong>Star</strong> <strong>Plus</strong> Series <strong>Meter</strong> User Guide
Top Line Middle Line Bottom Line Setup Menu Description (default setting, method specific)<br />
rEAd tyPE AUt0, tImE, C0nt, Measurement read type as AUTO-READ, timed or continuous<br />
(AUt0, yes)<br />
rEAd tInE 00:05 to 99:59 Timed measurement value in minutes <strong>and</strong> seconds (01:00, yes)<br />
L0g dEL n0, YES Delete datalog after download option, select YES to delete the<br />
datalog when it is downloaded or select nO to loop through the<br />
datalog <strong>and</strong> not delete the datalog when it is downloaded (n0, yes)<br />
L0g AUt0 0FF, 0n Automatic datalog point saving option (0FF, yes)<br />
gEn dEgC -5.0 to 105 Manual temperature value (25.0, yes)<br />
gEn StIr 0FF, 1, 2, 3, 4, 5, 6, 7 Stirrer speed – 3, 4 <strong>and</strong> 5 <strong>Star</strong> benchtop meters only (4, yes)<br />
gEn PASS 0000 to 9999 <strong>Meter</strong> password entry (0000, yes)<br />
gEn AUt0 0n, 0FF Automatic meter shutoff option (0n, no)<br />
gLP SEt 0FF, 0n GLP option, GLP feature enables or disables methods (0FF, no)<br />
dAtE H0Ur HH00 to HH23 Hour setting (HH12, no)<br />
dAtE tInE mm00 to mm59 Minute setting (mm00, no)<br />
dAtE tYPE mdY, dmY Date format as month, day, year or day, month, year (mdY, no)<br />
dAtE YEAr 2000 to 2099 Year setting (2004, no)<br />
dAtE dAtE mm01 to mm12 Month setting (mm01, no)<br />
dAtE dAY dd01 to dd31 Day of the month setting (dd01, no)<br />
r232 bAUd 1200, 2400, 4800, 9600 Baud rate setting (9600, no)<br />
r232 0UtF Prnt, C0mP Output format for printer or computer, COmP format is comma<br />
delimited (Prnt, no)<br />
AUt0 SAPL 0FF, 0n Autosampler – 3, 4 <strong>and</strong> 5 <strong>Star</strong> <strong>Plus</strong> benchtop meters only (OFF, no)<br />
AUt0 trAY 28, 48 Beaker tray setting (28, no)<br />
AUt0 rInb 1, 2, 3, 4, 5 Number of rinse beakers (3, no)<br />
AUt0 rSEC 5 to 60 Rinse time in each rinse beaker, seconds (10, no)<br />
AUt0 PH 0, 1, 2, 3 pH calibration points (3, no)<br />
AUt0 0rP n0, YES ORP calibration option, appears if 0 was selected for PH (n0, no)<br />
AUt0 ISE 0, 2, 3 ISE calibration points, appears if 0 was selected for PH (2, no)<br />
1 AUt0 ISE1 Concentration value of ISE st<strong>and</strong>ard 1, appears if 2 or 3 was<br />
selected for the ISE calibration points (1, no)<br />
10 AUt0 ISE2 Concentration value of ISE st<strong>and</strong>ard 1, appears if 2 or 3 was<br />
selected for the ISE calibration points (10, no)<br />
100 AUt0 ISE3 Concentration value of ISE st<strong>and</strong>ard 1, appears if 3 was selected for<br />
the ISE calibration points (100, no)<br />
AUt0 C0nd 0, 1, 2, 3 Conductivity calibration points (3, no)<br />
AUt0 n0SA 0 to 47 Number of sample beakers (1, no)<br />
Thermo Scientific <strong>Orion</strong> <strong>Star</strong> <strong>and</strong> <strong>Star</strong> <strong>Plus</strong> Series <strong>Meter</strong> User Guide<br />
<strong>Meter</strong> Setup<br />
EN-13
<strong>Meter</strong> Setup<br />
General Menu Settings<br />
EN-14<br />
• Manual Temperature controls temperature compensation<br />
when no temperature sensor is attached to the meter .<br />
• Stirrer Speed sets the stirrer speed from 1 (slowest)<br />
through 7 (fastest) <strong>and</strong> off (3-<strong>Star</strong>, 4-<strong>Star</strong> <strong>and</strong> 5-<strong>Star</strong><br />
benchtop meters only) .<br />
• Password Protection protects setup menu options <strong>and</strong><br />
methods from being accidentally erased or tampered with<br />
(3-<strong>Star</strong>, 4-<strong>Star</strong> <strong>and</strong> 5-<strong>Star</strong> meters only) .<br />
• Automatic Shutoff controls whether the instrument will<br />
automatically turn off after 20 minutes without a keypress .<br />
1 . In the measurement mode, press .<br />
2 . Press<br />
top line .<br />
/ to scroll through the setup menu until is displayed on the<br />
3 . Press to accept the selection <strong>and</strong> move the arrow icon to the middle line .<br />
4 . Press / to scroll through for the manual temperature setting,<br />
for the stirrer speed setting,<br />
the automatic shutoff setting .<br />
for password entry <strong>and</strong> for<br />
5 . Press to accept the selection <strong>and</strong> move the arrow icon to the bottom line .<br />
6 . To scroll through a list of options on the bottom line, press / until the<br />
desired option is displayed . To enter a numeric value for an option on the bottom<br />
line, press / to adjust each digit <strong>and</strong> to move to the next digit .<br />
7 . Press to accept the selection <strong>and</strong> move the arrow icon to the top line .<br />
8 . Repeat steps 3 through 7 to change another general setting or press to<br />
return to the measurement mode .<br />
Thermo Scientific <strong>Orion</strong> <strong>Star</strong> <strong>and</strong> <strong>Star</strong> <strong>Plus</strong> Series <strong>Meter</strong> User Guide
Time <strong>and</strong> Date Settings<br />
• The date <strong>and</strong> time settings are saved with the data <strong>and</strong><br />
calibration log points <strong>and</strong> are included with the data that is<br />
sent to a computer or printer .<br />
• The date format can be set to read month, day, year or<br />
day, month, year according to the user’s preference .<br />
1 . In the measurement mode, press .<br />
2 . Press / to scroll through the setup menu until is displayed on<br />
the top line .<br />
3 . Press to accept the selection <strong>and</strong> move the arrow icon to the middle line .<br />
4 . Press / to scroll through for the current hour setting,<br />
for the current minute setting, for the date format setting, for<br />
the current month setting,<br />
current year setting .<br />
for the current day setting <strong>and</strong> for the<br />
5 . Press to accept the selection <strong>and</strong> move the arrow icon to the bottom line .<br />
6 . To scroll through a list of options on the bottom line, press / until the<br />
desired option is displayed . To enter a numeric value for an option on the bottom<br />
line, press / to adjust each digit <strong>and</strong> to move to the next digit .<br />
7 . Press to accept the selection <strong>and</strong> move the arrow icon to the top line .<br />
8 . Repeat steps 3 through 7 to change another time <strong>and</strong> date setting or press<br />
to return to the measurement mode .<br />
Thermo Scientific <strong>Orion</strong> <strong>Star</strong> <strong>and</strong> <strong>Star</strong> <strong>Plus</strong> Series <strong>Meter</strong> User Guide<br />
<strong>Meter</strong> Setup<br />
EN-15
<strong>Meter</strong> Setup<br />
AUTO-READ , Continuous or Timed Measurement Settings<br />
EN-16<br />
• In the AUTO-READ mode, the meter starts taking<br />
a measurement when is pressed . Once the<br />
measurement is stable, the display freezes <strong>and</strong> the data is<br />
logged <strong>and</strong> printed . The AUTO-READ mode also controls<br />
the stirrer . The stirrer starts when is pressed <strong>and</strong> stops<br />
when the measurement becomes stable .<br />
• In the continuous mode, the meter is constantly taking measurements <strong>and</strong><br />
updating the display . Press to log <strong>and</strong> print a measurement in this mode .<br />
• In the timed mode, the meter is constantly taking measurements <strong>and</strong> updating<br />
the display . The meter logs <strong>and</strong> prints the measurement at the selected time<br />
interval . Timed dissolved oxygen measurements with the RDO sensor are taken<br />
only at the selected time interval, which conserves the meter battery power .<br />
1 . In the measurement mode, press .<br />
2 . Press / to scroll through the setup menu until is displayed on<br />
the top line .<br />
3 . Press to accept the selection <strong>and</strong> move the arrow icon to the middle line .<br />
4 . Press / to scroll through for the measurement read type <strong>and</strong><br />
for the timed reading interval .<br />
5 . Press to accept the selection <strong>and</strong> move the arrow icon to the bottom line .<br />
6 . To scroll through a list of options on the bottom line, press / until the<br />
desired option is displayed . To enter a numeric value for an option on the bottom<br />
line, press / to adjust each digit <strong>and</strong> to move to the next digit .<br />
7 . Press to accept the selection <strong>and</strong> move the arrow icon to the top line .<br />
8 . Repeat steps 3 through 7 to change another measurement setting or press<br />
to return to the measurement mode .<br />
Thermo Scientific <strong>Orion</strong> <strong>Star</strong> <strong>and</strong> <strong>Star</strong> <strong>Plus</strong> Series <strong>Meter</strong> User Guide
Selecting the Measurement Parameter<br />
In the measurement mode, the arrow icon on the left side of the display indicates<br />
the active line . Press to move the arrow icon to the desired measurement line<br />
<strong>and</strong> press / to scroll through the measurement parameters associated with<br />
the selected line .<br />
The measurement lines <strong>and</strong> icons for the 5-<strong>Star</strong> multi-parameter meter are shown<br />
below . The single <strong>and</strong> dual parameter meters will have fewer measurement lines<br />
<strong>and</strong> icons, depending on the meter capabilities .<br />
pH<br />
mV<br />
RmV<br />
ISE<br />
No icon for temperature<br />
No icon <strong>and</strong> no measurement – the measurement line is turned off<br />
μS/cm or mS/cm for conductivity<br />
mg/L for TDS<br />
ppt for salinity<br />
MΩ-cm for resistivity<br />
No icon for temperature<br />
No icon <strong>and</strong> no measurement – the measurement line is turned off<br />
% sat for dissolved oxygen percent saturation<br />
mg/L for dissolved oxygen concentration<br />
No icon for barometric pressure<br />
No icon for sample temperature<br />
No icon for membrane temperature (polarographic DO readings only)<br />
No icon <strong>and</strong> no measurement – the measurement line is turned off<br />
Note: If a measurement line is not needed, press to move the arrow<br />
icon to the measurement line that is not needed <strong>and</strong> press<br />
measurement line is completely blank.<br />
/ until the<br />
Thermo Scientific <strong>Orion</strong> <strong>Star</strong> <strong>and</strong> <strong>Star</strong> <strong>Plus</strong> Series <strong>Meter</strong> User Guide<br />
<strong>Meter</strong> Setup<br />
EN-17
<strong>Meter</strong> Setup<br />
Method Setup<br />
The <strong>Orion</strong> 3-<strong>Star</strong>, 4-<strong>Star</strong> <strong>and</strong> 5-<strong>Star</strong> meters can save up to 10 methods when the<br />
GLP function is enabled . When a method is selected, the meter will use the last<br />
calibration performed in that method, so electrodes that share a common meter<br />
connection can be more easily interchanged . When using multiple methods, a<br />
calibration must be performed for each method that will be used .<br />
1 . To enable the GLP function:<br />
EN-18<br />
a . In the measurement mode, press .<br />
b . Press / until is displayed on top line .<br />
c . Press to move the arrow icon to the middle line <strong>and</strong> press /<br />
until is displayed .<br />
d . Press to move the arrow icon to the bottom line <strong>and</strong> press /<br />
until is displayed .<br />
e . Press to move the arrow icon to the top line .<br />
f . Press to exit the setup menu <strong>and</strong> return to the measurement mode .<br />
2 . To display <strong>and</strong> change the current method number:<br />
a . In the measurement mode, press . The current method number will<br />
be displayed .<br />
b . Press / to select a new method number .<br />
c . Press to save the method number <strong>and</strong> press to return to the<br />
measurement mode .<br />
Thermo Scientific <strong>Orion</strong> <strong>Star</strong> <strong>and</strong> <strong>Star</strong> <strong>Plus</strong> Series <strong>Meter</strong> User Guide
Chapter VI pH Technique<br />
pH Setup Menu<br />
Note: Refer to the Setup Menu section for the Setup Menu Table, which contains<br />
a complete list of meter setup options <strong>and</strong> descriptions. Refer to Appendix A for a<br />
description of the special setup menu features.<br />
1 . In the measurement mode, press .<br />
2 . Press<br />
top line .<br />
/ to scroll through the setup menu until is displayed on the<br />
3 . Press to accept the selection <strong>and</strong> move the arrow icon to the middle line .<br />
4 . Press / to scroll through for pH measurement resolution <strong>and</strong><br />
for the automatic buffer recognition setting .<br />
5 . Press to accept the selection <strong>and</strong> move the arrow icon to the bottom line .<br />
6 . To scroll through a list of options on the bottom line, press<br />
desired option is displayed .<br />
/ until the<br />
7 . Press to accept the selection <strong>and</strong> move the arrow icon to the top line .<br />
8 . Repeat steps 3 through 7 to change another pH setting or press to return to<br />
the measurement mode .<br />
Thermo Scientific <strong>Orion</strong> <strong>Star</strong> <strong>and</strong> <strong>Star</strong> <strong>Plus</strong> Series <strong>Meter</strong> User Guide<br />
EN-19
pH Technique<br />
pH Calibration<br />
1 . Prepare the electrode according to the electrode user guide .<br />
2 . In the setup mode, select the buffer set ( or ) that will be used for<br />
EN-20<br />
the automatic buffer recognition feature .<br />
3 . In the measurement mode, press until the arrow icon points to the top line,<br />
press until the pH icon is shown <strong>and</strong> press to begin the calibration .<br />
4 . Rinse the electrode, <strong>and</strong> ATC probe if being used, with distilled water <strong>and</strong> place<br />
into the buffer .<br />
5 . Wait for the pH icon to stop flashing .<br />
a . Automatic buffer recognition – When the pH icon stops flashing the meter<br />
will display the temperature-corrected pH value for the buffer .<br />
b . Manual calibration – When the pH icon stops flashing the meter will display<br />
the actual pH value read by the electrode . Press until the first digit<br />
to be changed is flashing, press / to change the value of the<br />
flashing digit <strong>and</strong> continue to change the digits until the meter displays the<br />
temperature-corrected pH value of the buffer . Once the pH buffer value is<br />
set, press until the decimal point is in the correct location .<br />
6 . Press to proceed to the next calibration point <strong>and</strong> repeat steps 4 <strong>and</strong> 5<br />
or press to save <strong>and</strong> end the calibration .<br />
7 . The actual electrode slope, in percent, will be displayed in the main field <strong>and</strong><br />
will be displayed in the lower field .<br />
a . For a one point calibration, press <strong>and</strong> / to edit the slope <strong>and</strong><br />
press to return to the measurement mode .<br />
b . For a two or more point calibration, the meter will automatically proceed to<br />
the measurement mode after the slope is displayed .<br />
Thermo Scientific <strong>Orion</strong> <strong>Star</strong> <strong>and</strong> <strong>Star</strong> <strong>Plus</strong> Series <strong>Meter</strong> User Guide
pH Measurement<br />
Note: Turn on the automatic datalog feature to send measurements to the meter<br />
datalog at the frequency specified in each measurement mode. Refer to the Data<br />
Archiving <strong>and</strong> Retrieval section for details. If the automatic datalog feature is off,<br />
connect the meter to a printer or computer to record the measurements.<br />
1 . Rinse the electrode with distilled or deionized water . Shake off any excess<br />
water <strong>and</strong> blot the electrode dry with lint-free tissue .<br />
2 . Place the electrode into the sample .<br />
a . If the meter is in the continuous measurement mode, it will start reading<br />
immediately <strong>and</strong> continuously update the display . The pH icon will flash<br />
until the reading is stable . Once the reading is stable, log <strong>and</strong> print the<br />
measurement by pressing . If a benchtop meter is used <strong>and</strong> the stirrer<br />
is enabled, press to start the stirrer . Press again to turn off the<br />
stirrer before removing the electrode <strong>and</strong> stirrer from the sample .<br />
b . If the meter is in the AUTO-READ measurement mode, press to start<br />
the reading . The AR icon will flash until the reading is stable . Once the<br />
reading is stable, the meter will log <strong>and</strong> print the measurement <strong>and</strong> freeze<br />
the display . If a benchtop meter is used <strong>and</strong> the stirrer is enabled, the stirrer<br />
will turn on when is pressed <strong>and</strong> turn off when the reading is stable .<br />
c . If the meter is in the timed measurement mode, it will start reading<br />
immediately <strong>and</strong> continuously update the display . The meter will log <strong>and</strong><br />
print the measurement at the frequency specified in the setup menu . If a<br />
benchtop meter is used <strong>and</strong> the stirrer is enabled, press to start the<br />
stirrer . Press again to turn off the stirrer before removing the electrode<br />
<strong>and</strong> stirrer from the sample .<br />
3 . Remove the electrode from the sample, rinse it with distilled or deionized water,<br />
blot it dry, place it in the next sample <strong>and</strong> repeat step 2 .<br />
4 . Once all of the samples have been measured, rinse the electrode with distilled<br />
or deionized water <strong>and</strong> blot it dry . Consult the electrode user guide for proper<br />
storage techniques .<br />
Thermo Scientific <strong>Orion</strong> <strong>Star</strong> <strong>and</strong> <strong>Star</strong> <strong>Plus</strong> Series <strong>Meter</strong> User Guide<br />
pH Technique<br />
EN-21
pH Technique<br />
pH Temperature Display <strong>and</strong> Calibration<br />
pH Temperature Display<br />
<strong>Star</strong> <strong>Plus</strong> meters allow the temperature to be viewed on individual measurement<br />
lines in addition to the temperature display on the top, left of the screen .<br />
To view the temperature for the pH measurement line:<br />
1 . In the measurement mode, press to select the top display line . The arrow<br />
icon will point to the selected line .<br />
2 . Press / to change the value on the selected line . The top line can<br />
be changed to display pH (pH), millivolts (mV), relative millivolts (RmV),<br />
concentration (ISE), temperature (no icon) or a blank line .<br />
pH Temperature Calibration<br />
The temperature calibration mode of the <strong>Star</strong> <strong>Plus</strong> meter allows the temperature on<br />
each measurement line to be manually adjusted .<br />
To calibrate the temperature for the pH measurement line:<br />
1 . In the measurement mode, press to choose the top measurement line <strong>and</strong><br />
press / until the temperature is shown for the selected line .<br />
2 . Press to begin the calibration .<br />
3 . When the reading stabilizes, the arrow icon <strong>and</strong> the first digit will flash . Enter<br />
the temperature by pressing<br />
the next digit .<br />
/ to adjust each digit <strong>and</strong> to move to<br />
4 . Press to save <strong>and</strong> end the calibration .<br />
EN-22<br />
Thermo Scientific <strong>Orion</strong> <strong>Star</strong> <strong>and</strong> <strong>Star</strong> <strong>Plus</strong> Series <strong>Meter</strong> User Guide
Chapter VII mV, Relative mV/ <strong>and</strong><br />
ORP Technique<br />
All meters with pH measurement capability include a mV, relative mV <strong>and</strong> ORP<br />
function . Measure the raw millivolt (mV) values of an electrode in the mV mode .<br />
Calibrate the relative millivolt (RmV) values of a redox electrode for oxidationreduction<br />
potential (ORP) measurements in the relative mV/ORP mode .<br />
Note: The mV measurements are raw readings <strong>and</strong> cannot be calibrated. Use the<br />
relative mV mode to calibrate mV measurements.<br />
Relative mV <strong>and</strong> ORP Calibration<br />
1 . Prepare the electrode according to the electrode user guide .<br />
2 . In the measurement mode, press until the arrow icon points to the top line,<br />
press until the RmV icon is shown <strong>and</strong> press to begin the calibration .<br />
3 . Rinse the electrode with distilled water <strong>and</strong> place it into the st<strong>and</strong>ard .<br />
4 . Wait for the RmV icon to stop flashing . If the raw mV reading of the electrode<br />
is 220 mV ± 60 mV, when the RmV icon stops flashing the meter will<br />
automatically calculate <strong>and</strong> display the EH mV value for the electrode at the<br />
measured temperature . If the raw mV reading of the electrode is outside of<br />
the 220 mV ± 60 mV range, when the RmV icon stops flashing the meter will<br />
display 000 .0 RmV . Press until the first digit to be changed is flashing,<br />
press / to change the value of the flashing digit <strong>and</strong> continue to change<br />
the digits until the meter displays the millivolt value of the st<strong>and</strong>ard . To change<br />
the value to negative or positive number, press until none of the digits are<br />
blinking <strong>and</strong> the arrow icon is blinking <strong>and</strong> then press<br />
the millivolt value .<br />
to change the sign of<br />
5 . Press to save <strong>and</strong> end the calibration . The millivolt offset will be displayed<br />
<strong>and</strong> the meter will automatically proceed to the measurement mode .<br />
Thermo Scientific <strong>Orion</strong> <strong>Star</strong> <strong>and</strong> <strong>Star</strong> <strong>Plus</strong> Series <strong>Meter</strong> User Guide<br />
EN-23
mV, Relative mV <strong>and</strong> ORP Technique<br />
mV, Relative mV <strong>and</strong> ORP Measurement<br />
Note: Turn on the automatic datalog feature to send measurements to the meter<br />
datalog at the frequency specified in each measurement mode. Refer to the Data<br />
Archiving <strong>and</strong> Retrieval section for details. If the automatic datalog feature is off,<br />
connect the meter to a printer or computer to record the measurements.<br />
1 . Rinse the electrode with distilled or deionized water . Shake off any excess<br />
water <strong>and</strong> blot the electrode dry with lint-free tissue .<br />
2 . Place the electrode into the sample .<br />
a . If the meter is in the continuous measurement mode, it will start reading<br />
immediately <strong>and</strong> continuously update the display . The mV or RmV icon will<br />
flash until the reading is stable . Once the reading is stable, log <strong>and</strong> print the<br />
measurement by pressing . If a benchtop meter is used <strong>and</strong> the stirrer<br />
is enabled, press to start the stirrer . Press again to turn off the<br />
stirrer before removing the electrode <strong>and</strong> stirrer from the sample .<br />
EN-24<br />
b . If the meter is in the AUTO-READ measurement mode, press to start<br />
the reading . The AR icon will flash until the reading is stable . Once the<br />
reading is stable, the meter will log <strong>and</strong> print the measurement <strong>and</strong> freeze<br />
the display . If a benchtop meter is used <strong>and</strong> the stirrer is enabled, the stirrer<br />
will turn on when is pressed <strong>and</strong> turn off when the reading is stable .<br />
c . If the meter is in the timed measurement mode, it will start reading<br />
immediately <strong>and</strong> continuously update the display . The meter will log <strong>and</strong><br />
print the measurement at the frequency specified in the setup menu . If a<br />
benchtop meter is used <strong>and</strong> the stirrer is enabled, press to start the<br />
stirrer . Press again to turn off the stirrer before removing the electrode<br />
<strong>and</strong> stirrer from the sample .<br />
3 . Remove the electrode from the sample, rinse it with distilled or deionized water,<br />
blot it dry, place it in the next sample <strong>and</strong> repeat step 2 .<br />
4 . Once all of the samples have been measured, rinse the electrode with distilled<br />
or deionized water <strong>and</strong> blot it dry . Consult the electrode user guide for proper<br />
storage techniques .<br />
Thermo Scientific <strong>Orion</strong> <strong>Star</strong> <strong>and</strong> <strong>Star</strong> <strong>Plus</strong> Series <strong>Meter</strong> User Guide
Chapter VIII Dissolved Oxygen Technique<br />
Dissolved Oxygen Setup Menu<br />
Note: Refer to the Setup Menu section for the Setup Menu Table, which contains<br />
a complete list of meter setup options <strong>and</strong> descriptions. Refer to Appendix A for a<br />
description of the special setup menu features.<br />
1 . In the measurement mode, press .<br />
2 . Press<br />
top line .<br />
/ to scroll through the setup menu until is displayed on the<br />
3 . Press to accept the selection <strong>and</strong> move the arrow icon to the middle line .<br />
4 . Press / to scroll through for the % saturation resolution, for<br />
the mg/L concentration resolution, for the barometer type (automatic or<br />
manual), for the manual barometric pressure compensation value,<br />
for the salinity compensation type (automatic or manual), for the manual<br />
salinity correction value <strong>and</strong> for the dissolved oxygen calibration type .<br />
5 . Press to select the option <strong>and</strong> move the arrow icon to the bottom line .<br />
6 . To scroll through a list of options on the bottom line, press / until the<br />
desired option is displayed . To enter a numeric value for an option on the bottom<br />
line, press / to adjust each digit <strong>and</strong> to move to the next digit .<br />
7 . Press to accept the selection <strong>and</strong> move the arrow icon to the top line .<br />
8 . Repeat steps 3 through 7 to change another dissolved oxygen setting or press<br />
to return to the measurement mode .<br />
Thermo Scientific <strong>Orion</strong> <strong>Star</strong> <strong>and</strong> <strong>Star</strong> <strong>Plus</strong> Series <strong>Meter</strong> User Guide<br />
EN-25
Dissolved Oxygen Technique<br />
Dissolved Oxygen Calibration<br />
• Prior to calibration, the dissolved oxygen probe must be prepared <strong>and</strong> polarized .<br />
EN-26<br />
The probe is continuously polarized when it is connected to the meter . When<br />
the probe is first connected or if the probe is disconnected for more than 60<br />
minutes, connect the probe to the meter, connect the meter to a power source<br />
<strong>and</strong> wait 30 to 60 minutes for the probe to polarize . Disconnecting the probe for<br />
less than one hour will require 5 to 25 minutes for polarization .<br />
• The meters will supply a polarization current to the dissolved oxygen probe even<br />
when the meter power is off . To maximize the meter battery life, unplug the<br />
probe if it will not be used for an extended period .<br />
1 . Select one of the following calibration modes in the setup menu .<br />
a . – An air calibration is performed in water saturated air using the<br />
calibration sleeve . This is the simplest <strong>and</strong> most accurate calibration . Due to<br />
the inherent differences between water saturated air <strong>and</strong> air saturated water,<br />
102 .3% saturation will be displayed when the calibration reading is stable .<br />
i . The highest possible accuracy is reached when calibration temperature is<br />
the same as the measuring temperature .<br />
ii . Moisten the sponge or absorbent cloth in the calibration sleeve with<br />
distilled water <strong>and</strong> insert the probe into the sleeve without touching the<br />
water saturated material . For BOD measurements, this calibration can be<br />
performed in a BOD bottle .<br />
b . – A water calibration is performed using water that is 100% saturated<br />
with air . Bubble air into a water sample <strong>and</strong> gently stir the sample to prevent<br />
the buildup of air bubbles on the dissolved oxygen probe membrane .<br />
c . – A manual calibration is performed using a water sample with a<br />
known concentration of dissolved oxygen . This method can be used to<br />
calibrate the dissolved oxygen probe to the value achieved by a<br />
Winkler titration .<br />
Thermo Scientific <strong>Orion</strong> <strong>Star</strong> <strong>and</strong> <strong>Star</strong> <strong>Plus</strong> Series <strong>Meter</strong> User Guide
i . A manual calibration involves performing a Winkler titration <strong>and</strong> using<br />
that sample as a calibration st<strong>and</strong>ard . The oxygen level result from the<br />
titration is entered in a manual calibration as the dissolved oxygen value .<br />
This correlates the meter input to the Winkler titration . This method is<br />
inherently less accurate, due to the possibility of titration errors .<br />
d . – A zero point calibration is performed in an oxygen-free solution . A<br />
zero point calibration is not generally required unless measurements will be<br />
taken below 10% saturation or 1 mg/L . Zero the probe when using a new<br />
membrane, using fresh filling solution or when measuring dissolved oxygen<br />
levels below 1 mg/L . An air calibration should be performed prior to the zero<br />
point calibration .<br />
2 . Allow the probe <strong>and</strong> calibration st<strong>and</strong>ard (water saturated air, air saturated water,<br />
Winkler st<strong>and</strong>ard or oxygen-free solution) to reach equilibrium .<br />
3 . In the measurement mode, press until the arrow icon points to the bottom<br />
line, press<br />
the calibration .<br />
until the % sat or mg/L icon is shown <strong>and</strong> press to begin<br />
4 . Wait for the dissolved oxygen reading to stabilize .<br />
a . If an air calibration is performed, the meter will display 102 .3% <strong>and</strong><br />
automatically return to the measurement mode .<br />
b . If a water calibration is performed, the meter will display 100 .0% <strong>and</strong><br />
automatically return to the measurement mode .<br />
c . If a manual calibration is performed, wait for the mg/L icon to stop flashing<br />
<strong>and</strong> enter the dissolved oxygen value by pressing until the first digit to<br />
be changed is flashing, press / to change the value of the flashing<br />
digit <strong>and</strong> continue to change the digits until the meter displays the correct<br />
dissolved oxygen value . Once the dissolved oxygen value is set, press<br />
until the decimal point is in the correct location .<br />
d . If a zero point calibration is performed, the meter will display 0 .00 <strong>and</strong><br />
automatically return to the measurement mode .<br />
Thermo Scientific <strong>Orion</strong> <strong>Star</strong> <strong>and</strong> <strong>Star</strong> <strong>Plus</strong> Series <strong>Meter</strong> User Guide<br />
Dissolved Oxygen Technique<br />
EN-27
Dissolved Oxygen Technique<br />
Dissolved Oxygen Measurement<br />
Note: Turn on the automatic datalog feature to send measurements to the meter<br />
datalog at the frequency specified in each measurement mode. Refer to the Data<br />
Archiving <strong>and</strong> Retrieval section for details. If the automatic datalog feature is off,<br />
connect the meter to a printer or computer to record the measurements.<br />
1 . Rinse the dissolved oxygen probe with distilled or deionized water . Shake off<br />
any excess water <strong>and</strong> blot the probe dry with lint-free tissue .<br />
2 . Place the dissolved oxygen probe into the sample .<br />
a . If the meter is in the continuous measurement mode, it will start reading<br />
immediately <strong>and</strong> continuously update the display . The mg/L or % sat icon<br />
will flash until the reading is stable . Once the reading is stable, log <strong>and</strong> print<br />
the measurement by pressing . If a benchtop meter is used <strong>and</strong> the<br />
stirrer is enabled, press to start the stirrer . Press again to turn off<br />
the stirrer before removing the probe <strong>and</strong> stirrer from the sample .<br />
EN-28<br />
b . If the meter is in the AUTO-READ measurement mode, press to start<br />
the reading . The AR icon will flash until the reading is stable . Once the<br />
reading is stable, the meter will log <strong>and</strong> print the reading <strong>and</strong> freeze the<br />
display . If a benchtop meter is used <strong>and</strong> the stirrer is enabled, the stirrer will<br />
turn on when is pressed <strong>and</strong> turn off when the reading is stable . If the<br />
BOD AUTO-STIR probe is used, press the button on the probe to start the<br />
AUTO-READ measurement .<br />
Note: Benchtop <strong>Star</strong> <strong>Plus</strong> dissolved oxygen meters allow the measurement<br />
<strong>and</strong> stirring functions to be controlled by the AUTO-STIR probe when the<br />
meter is in the AUTO-READ measurement mode. Press the button on the<br />
AUTO-STIR probe to start <strong>and</strong> stop measurement <strong>and</strong> stirring functions.<br />
c . If the meter is in the timed measurement mode, it will start reading<br />
immediately <strong>and</strong> continuously update the display . The meter will log <strong>and</strong><br />
print the measurement at the frequency specified in the setup menu . If a<br />
benchtop meter is used <strong>and</strong> the stirrer is enabled, press to start the<br />
stirrer . Press again to turn off the stirrer before removing the probe <strong>and</strong><br />
stirrer from the sample .<br />
Thermo Scientific <strong>Orion</strong> <strong>Star</strong> <strong>and</strong> <strong>Star</strong> <strong>Plus</strong> Series <strong>Meter</strong> User Guide
3 . Remove the dissolved oxygen probe from the sample, rinse it with distilled or<br />
deionized water, blot it dry, place it in the next sample <strong>and</strong> repeat step 2 .<br />
4 . Once all of the samples have been measured, rinse the dissolved oxygen probe<br />
with distilled or deionized water <strong>and</strong> blot it dry . Consult the dissolved oxygen<br />
probe user guide for proper storage techniques .<br />
Dissolved Oxygen Temperature Display <strong>and</strong> Calibration<br />
Dissolved Oxygen Temperature Display<br />
<strong>Star</strong> <strong>Plus</strong> meters allow the temperature to be viewed on individual measurement<br />
lines in addition to the temperature display on the top, left of the screen .<br />
To view the temperature for the dissolved oxygen measurement line:<br />
1 . In the measurement mode, press to choose the bottom display line . The<br />
arrow icon will point to the selected line .<br />
2 . Press / to change the value on the selected line . The bottom line<br />
can be changed to display dissolved oxygen (% saturation), dissolved oxygen<br />
(mg/L), barometric pressure (no icon), sample temperature (no icon), electrolyte<br />
solution/membrane temperature (no icon, after number) or a blank line .<br />
Thermo Scientific <strong>Orion</strong> <strong>Star</strong> <strong>and</strong> <strong>Star</strong> <strong>Plus</strong> Series <strong>Meter</strong> User Guide<br />
Dissolved Oxygen Technique<br />
EN-29
Dissolved Oxygen Technique<br />
Dissolved Oxygen Temperature Calibration<br />
The temperature calibration mode of the <strong>Star</strong> <strong>Plus</strong> meter allows the temperature<br />
on each measurement line to be manually adjusted . The dissolved oxygen<br />
measurement line displays the sample temperature <strong>and</strong> the electrolyte solution/<br />
membrane temperature .<br />
To calibrate the sample temperature for the dissolved oxygen measurement line:<br />
1 . In the measurement mode, press to choose the bottom measurement line<br />
<strong>and</strong> press / until the sample temperature is displayed (i .e . ) .<br />
2 . Press to begin the calibration .<br />
3 . When the reading stabilizes, the arrow icon <strong>and</strong> the first digit will flash . Enter<br />
the temperature by pressing<br />
the next digit .<br />
/ to adjust each digit <strong>and</strong> to move to<br />
4 . Press to save <strong>and</strong> end the calibration .<br />
To calibrate the electrolyte solution/membrane temperature for the dissolved oxygen<br />
measurement line:<br />
1 . In the measurement mode, press to choose the bottom measurement line<br />
<strong>and</strong> press / until the membrane temperature is displayed (i .e . ) .<br />
2 . Press to begin the calibration .<br />
3 . When the reading stabilizes, the arrow icon <strong>and</strong> the first digit will flash . Enter<br />
the temperature by pressing<br />
the next digit .<br />
/ to adjust each digit <strong>and</strong> to move to<br />
4 . Press to save <strong>and</strong> end the calibration .<br />
EN-30<br />
Thermo Scientific <strong>Orion</strong> <strong>Star</strong> <strong>and</strong> <strong>Star</strong> <strong>Plus</strong> Series <strong>Meter</strong> User Guide
Chapter IX RDO ® Optical Dissolved<br />
Oxygen Technique<br />
Note: The RDO optical dissolved oxygen meters have serial numbers that begin<br />
with R (i.e. R12345). Only the RDO meters are compatible with the RDO optical<br />
dissolved oxygen sensors.<br />
RDO Cap Overview<br />
The RDO sensor has an internal clock that counts down the 365 day lifespan of a<br />
new RDO cap . The countdown begins when the RDO cap is installed on the RDO<br />
sensor, the sensor is connected to the meter <strong>and</strong> the first measurement is taken .<br />
The 365 day countdown cannot be reset or changed once the first measurement<br />
is taken . Each RDO cap has a unique serial number that is recognized by the RDO<br />
sensor, so reinstalling the cap will not reset the countdown .<br />
Note: The power to the meter must be turned off when a new RDO cap is<br />
installed on the RDO sensor. Once the RDO cap is installed, turn the power to the<br />
meter on <strong>and</strong> the new cap information will be sent to the meter.<br />
To print the RDO cap information:<br />
1 . Connect the meter to a printer or computer <strong>and</strong> verify the meter baud rate <strong>and</strong><br />
output settings in the setup menu .<br />
2 . From the measurement mode, press .<br />
3 . Press / to scroll through the setup menu until is displayed on<br />
the top line <strong>and</strong> is displayed on the middle line .<br />
4 . Press two times to move the arrow icon to the bottom line .<br />
5 . Press / until is displayed on the bottom line .<br />
6 . Press to print the RDO cap information . Press to return to the<br />
measurement mode .<br />
Thermo Scientific <strong>Orion</strong> <strong>Star</strong> <strong>and</strong> <strong>Star</strong> <strong>Plus</strong> Series <strong>Meter</strong> User Guide<br />
EN-31
RDO ® Optical Dissolved Oxygen Technique<br />
RDO Optical Dissolved Oxygen Setup Menu<br />
Note: Refer to the Setup Menu section for the Setup Menu Table, which contains<br />
a complete list of meter setup options <strong>and</strong> descriptions.<br />
1 . From the measurement mode, press .<br />
2 . Press<br />
top line .<br />
/ to scroll through the setup menu until is displayed on the<br />
3 . Press to accept the selection <strong>and</strong> move the arrow icon to the middle line .<br />
4 . Press / to scroll through for the % saturation resolution, for<br />
the mg/L concentration resolution, for the barometer type (automatic or<br />
manual), for the manual barometric pressure compensation value,<br />
for the salinity compensation type (automatic or manual), for the manual<br />
salinity correction value, for the dissolved oxygen calibration type <strong>and</strong><br />
for the RDO cap replacement countdown in days .<br />
5 . Press to select the option <strong>and</strong> move the arrow icon to the bottom line .<br />
6 . To scroll through a list of options on the bottom line, press / until the<br />
desired option is displayed . To enter a numeric value for an option on the bottom<br />
line, press / to adjust each digit <strong>and</strong> to move to the next digit .<br />
7 . Press to accept the selection <strong>and</strong> move the arrow icon to the top line .<br />
8 . Repeat steps 3 through 7 to change another dissolved oxygen setting or press<br />
to return to the measurement mode .<br />
EN-32<br />
Thermo Scientific <strong>Orion</strong> <strong>Star</strong> <strong>and</strong> <strong>Star</strong> <strong>Plus</strong> Series <strong>Meter</strong> User Guide
Setup Menu for RDO Optical Dissolved Oxygen Sensor<br />
The RDO optical dissolved oxygen meters have a special setup menu feature that<br />
allows the user to print information about the RDO sensor .<br />
Top Line Middle Line Bottom Line Setup Menu Description<br />
Pr0b d0 tESt The tESt option initiates a 30 second test of the communication link<br />
between the RDO sensor <strong>and</strong> meter. The temperature display will show a<br />
30 second countdown as the test progresses. The meter will send a report<br />
to the printer or computer when the test is done.<br />
Pr0b d0 CAL The CAL option prints the meter serial number, date, time <strong>and</strong> slope for the<br />
last five dissolved oxygen calibrations that were performed with the RDO<br />
sensor that is currently connected to the meter.<br />
Pr0b d0 dFLt The dFLt option prints the factory calibration information for the RDO<br />
sensor that is currently connected to the meter.<br />
Pr0b d0 SLP The SLP option prints a drift per minute value of the slope for the last five<br />
dissolved oxygen calibrations that were performed with the RDO sensor<br />
that is currently connected to the meter.<br />
Pr0b d0 mEtH The mEtH option prints the RDO specific method information of the last<br />
method used for the RDO sensor that is currently connected to the meter.<br />
Pr0b d0 InF0 The InF0 option prints the RDO sensor information, including the sensor<br />
serial number <strong>and</strong> revision, sensor <strong>and</strong> RDO cap date of manufacturing,<br />
cap start date, cap life <strong>and</strong> internal real time clock for the sensor that is<br />
currently connected to the meter.<br />
1 . Connect the meter to a printer or computer <strong>and</strong> verify the meter baud rate <strong>and</strong><br />
output settings in the setup menu .<br />
2 . From the measurement mode, press .<br />
3 . Press / to scroll through the setup menu until is displayed on<br />
the top line <strong>and</strong> is displayed on the middle line .<br />
4 . Press two times to move the arrow icon to the bottom line .<br />
5 . Press / to scroll through for the communication link test,<br />
for the RDO sensor calibration information, for the RDO sensor factory<br />
calibration information, for the RDO sensor slope information, for<br />
the RDO method information <strong>and</strong> for the general RDO sensor information .<br />
Thermo Scientific <strong>Orion</strong> <strong>Star</strong> <strong>and</strong> <strong>Star</strong> <strong>Plus</strong> Series <strong>Meter</strong> User Guide<br />
RDO ® Optical Dissolved Oxygen Technique<br />
EN-33
RDO ® Optical Dissolved Oxygen Technique<br />
6 . Press to print the selected option .<br />
7 . Press / to select another option from the bottom line <strong>and</strong> press to<br />
EN-34<br />
print the selected option or press to return to the measurement mode .<br />
Example RDO Sensor General Information Printout<br />
smartprobe info<br />
type 1<br />
run_status 255<br />
format_version 1<br />
probe_SN 6<br />
app_version 9<br />
HW_version 1<br />
cap_SN 129614<br />
rtc 1210257372 (05-08-2008 14:36:12)<br />
mfg_time 1208371349 (04-16-2008 18:42:29)<br />
start_time 1210178953 (05-07-2008 16:49:13)<br />
expiration 1241736553 (05-07-2009 22:49:13)<br />
probe_mfg_time 1208440800 (04-17-2008 14:00:00)<br />
write_count 14<br />
pass_count 12<br />
expire 0x01<br />
days_left 364.3<br />
probe_reading 149.529243<br />
temp_reading 24.942651<br />
state 21<br />
general_event 0x00<br />
internal_event 0x00<br />
internal_state 3<br />
internal_retry 0x00<br />
Thermo Scientific <strong>Orion</strong> <strong>Star</strong> <strong>and</strong> <strong>Star</strong> <strong>Plus</strong> Series <strong>Meter</strong> User Guide
RDO Optical Dissolved Oxygen Calibration<br />
1 . Select one of the following calibration modes in the setup menu .<br />
a . – An air calibration is performed in water saturated air using the<br />
calibration sleeve . This is the simplest <strong>and</strong> most accurate calibration<br />
method .<br />
i . The highest possible accuracy is reached when calibration temperature is<br />
the same as the measuring temperature .<br />
ii . Moisten the sponge in the calibration sleeve with distilled water .<br />
Insert the RDO sensor into the sleeve without touching the water<br />
saturated sponge .<br />
b . – A water calibration is performed using water that is 100% saturated<br />
with air . Bubble air into a water sample <strong>and</strong> gently stir the sample to prevent<br />
the buildup of air bubbles on the RDO cap .<br />
c . – A manual calibration is performed using a water sample with a<br />
known concentration of dissolved oxygen . This method can be used to<br />
calibrate the RDO sensor to the value achieved by a Winkler titration .<br />
i . A manual calibration involves performing a Winkler titration <strong>and</strong> using<br />
that sample as a calibration st<strong>and</strong>ard . The oxygen level result from the<br />
titration is entered in a manual calibration as the dissolved oxygen value .<br />
This correlates the meter input to the Winkler titration . This method is<br />
inherently less accurate, due to the possibility of titration errors .<br />
d . – A zero point calibration is performed in an oxygen-free solution . A<br />
zero point calibration is not generally required unless measurements will be<br />
taken below 10% saturation or 1 mg/L .<br />
2 . Allow the RDO sensor <strong>and</strong> calibration st<strong>and</strong>ard (water saturated air, air saturated<br />
water, Winkler st<strong>and</strong>ard or oxygen-free solution) to reach equilibrium .<br />
Thermo Scientific <strong>Orion</strong> <strong>Star</strong> <strong>and</strong> <strong>Star</strong> <strong>Plus</strong> Series <strong>Meter</strong> User Guide<br />
RDO ® Optical Dissolved Oxygen Technique<br />
EN-35
RDO ® Optical Dissolved Oxygen Technique<br />
3 . In the measurement mode, press until the arrow icon points to the bottom<br />
EN-36<br />
line, press until the % sat or mg/L icon is shown <strong>and</strong> press to begin<br />
the calibration .<br />
4 . Wait for the dissolved oxygen reading to stabilize .<br />
a . If an air calibration is performed, the meter will display 100 .0% <strong>and</strong><br />
automatically return to the measurement mode .<br />
b . If a water calibration is performed, the meter will display 100 .0% <strong>and</strong><br />
automatically return to the measurement mode .<br />
c . If a manual calibration is performed, wait for the mg/L icon to stop flashing<br />
<strong>and</strong> enter the dissolved oxygen value by pressing until the first digit to<br />
be changed is flashing, press / to change the value of the flashing<br />
digit <strong>and</strong> continue to change the digits until the meter displays the correct<br />
dissolved oxygen value . Once the dissolved oxygen value is set, press<br />
until the decimal point is in the correct location .<br />
d . If a zero point calibration is performed, the meter will display 0 .00 <strong>and</strong><br />
automatically return to the measurement mode .<br />
Thermo Scientific <strong>Orion</strong> <strong>Star</strong> <strong>and</strong> <strong>Star</strong> <strong>Plus</strong> Series <strong>Meter</strong> User Guide
RDO Optical Dissolved Oxygen Measurement<br />
Note: Turn on the automatic datalog feature to send measurements to the meter<br />
datalog at the frequency specified in each measurement mode. Refer to the Data<br />
Archiving <strong>and</strong> Retrieval section for details. If the automatic datalog feature is off,<br />
connect the meter to a printer or computer to record the measurements.<br />
1 . Rinse the RDO sensor with distilled or deionized water . Shake off any excess<br />
water <strong>and</strong> blot the sensor dry with lint-free tissue .<br />
2 . Place the RDO sensor into the sample .<br />
a . If the meter is in the continuous measurement mode, it will start reading<br />
immediately <strong>and</strong> continuously update the display . The mg/L or % sat icon<br />
will flash until the reading is stable . Once the reading is stable, log <strong>and</strong> print<br />
the measurement by pressing . This mode will use a large amount of<br />
meter battery power .<br />
b . If the meter is in the AUTO-READ measurement mode, press to start<br />
the reading . The AR icon will flash until the reading is stable . Once the<br />
reading is stable, the meter will log <strong>and</strong> print the measurement <strong>and</strong> freeze<br />
the display . This mode uses various amounts of meter battery power,<br />
depending on how often is pressed .<br />
c . If the meter is in the timed measurement mode, it will take a dissolved<br />
oxygen reading at the frequency specified in the setup menu . If parameters<br />
other than dissolved oxygen are measured, the meter will continuously take<br />
the other readings <strong>and</strong> update the display . The meter will log <strong>and</strong> print the<br />
measurement at the predetermined time interval . This mode can be used<br />
to extend the meter battery life, since the power consumption of the RDO<br />
sensor is reduced, depending on the set time interval .<br />
3 . Remove the RDO sensor from the sample, rinse it with distilled or deionized<br />
water, blot it dry, place it in the next sample <strong>and</strong> repeat step 2 .<br />
4 . Once all of the samples have been measured, rinse the RDO sensor with<br />
distilled or deionized water <strong>and</strong> blot it dry . Consult the RDO sensor user guide<br />
for proper storage techniques .<br />
Thermo Scientific <strong>Orion</strong> <strong>Star</strong> <strong>and</strong> <strong>Star</strong> <strong>Plus</strong> Series <strong>Meter</strong> User Guide<br />
RDO ® Optical Dissolved Oxygen Technique<br />
EN-37
RDO ® Optical Dissolved Oxygen Technique<br />
RDO Optical Dissolved Oxygen Temperature Display <strong>and</strong><br />
Calibration<br />
RDO Optical Dissolved Oxygen Temperature Display<br />
<strong>Star</strong> <strong>Plus</strong> meters allow the temperature to be viewed on individual measurement<br />
lines in addition to the temperature display on the top, left of the screen .<br />
To view the temperature for the RDO dissolved oxygen measurement line:<br />
1 . In the measurement mode, press to choose the bottom display line . The<br />
arrow icon will point to the selected line .<br />
2 . Press / to change the value on the selected line . The bottom line can<br />
be changed to display dissolved oxygen (% saturation), dissolved oxygen (mg/L),<br />
barometric pressure (no icon), temperature (no icon) or a blank line .<br />
RDO Optical Dissolved Oxygen Temperature Calibration<br />
The temperature calibration mode of the <strong>Star</strong> <strong>Plus</strong> meter allows the temperature on<br />
each measurement line to be manually adjusted .<br />
To calibrate the temperature for the RDO dissolved oxygen measurement line:<br />
1 . In the measurement mode, press to choose the bottom measurement line<br />
<strong>and</strong> press / until the temperature is displayed .<br />
2 . Press to begin the calibration .<br />
3 . When the reading stabilizes, the arrow icon <strong>and</strong> the first digit will flash . Enter<br />
the temperature by pressing<br />
the next digit .<br />
/ to adjust each digit <strong>and</strong> to move to<br />
4 . Press to save <strong>and</strong> end the calibration .<br />
EN-38<br />
Thermo Scientific <strong>Orion</strong> <strong>Star</strong> <strong>and</strong> <strong>Star</strong> <strong>Plus</strong> Series <strong>Meter</strong> User Guide
Chapter X Conductivity Technique<br />
Conductivity Setup Menu<br />
Note: Refer to the Setup Menu section for the Setup Menu Table, which contains<br />
a complete list of meter setup options <strong>and</strong> descriptions. Refer to Appendix A for a<br />
description of the special setup menu features.<br />
1 . In the measurement mode, press .<br />
2 . Press / to scroll through the setup menu until is displayed on<br />
the top line .<br />
3 . Press to accept the selection <strong>and</strong> move the arrow icon to the middle line .<br />
4 . Press / to scroll through for the temperature compensation type,<br />
for the temperature coefficient value used for temperature<br />
compensation, for the TDS factor value used for total dissolved<br />
solids measurement, for the nominal cell constant value of the<br />
conductivity probe, for the reference temperature used for temperature<br />
compensation <strong>and</strong> for the conductivity cell type .<br />
5 . Press to accept the selection <strong>and</strong> move the arrow icon to the bottom line .<br />
6 . To scroll through a list of options on the bottom line, press / until the<br />
desired option is displayed . To enter a numeric value for an option on the bottom<br />
line, press / to adjust each digit <strong>and</strong> to move to the next digit .<br />
7 . Press to accept the selection <strong>and</strong> move the arrow icon to the top line .<br />
8 . Repeat steps 3 through 7 to change another conductivity setting or press to<br />
return to the measurement mode .<br />
Thermo Scientific <strong>Orion</strong> <strong>Star</strong> <strong>and</strong> <strong>Star</strong> <strong>Plus</strong> Series <strong>Meter</strong> User Guide<br />
EN-39
Conductivity Technique<br />
Conductivity Calibration<br />
Note: For an automatic calibration, the nominal cell constant of the conductivity<br />
probe must be entered in the setup menu before the calibration is performed.<br />
1 . In the measurement mode, press until the arrow icon points to the middle<br />
line, press until the µS/cm or mS/cm icon is shown <strong>and</strong> press to<br />
begin the calibration .<br />
2 . Rinse the probe with deionized water <strong>and</strong> place it into the conductivity st<strong>and</strong>ard .<br />
3 . To perform a manual calibration – The manual calibration screen will display the<br />
cell constant on the top line, the conductivity value of the calibration st<strong>and</strong>ard<br />
on the middle line <strong>and</strong> on the bottom line . To change the cell constant,<br />
press until the first digit to be changed is flashing, press / to<br />
change the value of the flashing digit <strong>and</strong> continue to change the digits until the<br />
displayed conductivity value matches the value of the st<strong>and</strong>ard at the measured<br />
temperature . Once the value is set, press until the decimal point is in the<br />
correct location . Press to save <strong>and</strong> end the calibration .<br />
EN-40<br />
Note: In the manual calibration screen, start changing the cell constant within<br />
five seconds or the meter will proceed to the automatic/direct calibration. If this<br />
occurs, press <strong>and</strong> hold to abort the calibration <strong>and</strong> repeat the calibration.<br />
4 . To perform an automatic or direct calibration – Wait for the meter to go from<br />
the manual calibration screen to the automatic/direct calibration screen . The<br />
automatic/direct calibration screen will display the conductivity value of the<br />
calibration st<strong>and</strong>ard on the middle line <strong>and</strong> on the bottom line .<br />
a . Automatic calibration – When the µS/cm or mS/cm icon stops flashing, the<br />
meter will display the temperature-corrected conductivity of the st<strong>and</strong>ard .<br />
b . Direct calibration – When the µS/cm or mS/cm icon stops flashing, the<br />
meter will display the actual conductivity value read by the probe . To<br />
change the conductivity value, press until the first digit to be changed<br />
is flashing, press / to change the value of the flashing digit <strong>and</strong><br />
continue to change the digits until the correct conductivity value of the<br />
st<strong>and</strong>ard at the measured temperature is displayed . Once the value is set,<br />
press until the decimal point is in the correct location .<br />
Thermo Scientific <strong>Orion</strong> <strong>Star</strong> <strong>and</strong> <strong>Star</strong> <strong>Plus</strong> Series <strong>Meter</strong> User Guide
5 . Press to proceed to the next calibration point, rinse the conductivity probe<br />
with distilled or deionized water, place it into the next conductivity st<strong>and</strong>ard <strong>and</strong><br />
repeat step 4a / 4b or press to save <strong>and</strong> end the calibration .<br />
6 . The cell constant will be displayed in the main field <strong>and</strong> the meter will<br />
automatically advance to the measurement mode .<br />
Conductivity Measurement<br />
Note: Turn on the automatic datalog feature to send measurements to the meter<br />
datalog at the frequency specified in each measurement mode. Refer to the Data<br />
Archiving <strong>and</strong> Retrieval section for details. If the automatic datalog feature is off,<br />
connect the meter to a printer or computer to record the measurements.<br />
1 . Rinse the conductivity probe with distilled or deionized water . Shake off any<br />
excess water <strong>and</strong> blot the probe dry with lint-free tissue .<br />
2 . Place the conductivity probe into the sample .<br />
a . If the meter is in the continuous measurement mode, it will start reading<br />
immediately <strong>and</strong> continuously update the display . The μS/cm or mS/cm<br />
icon will flash until the reading is stable . Once the reading is stable, log <strong>and</strong><br />
print the measurement by pressing . If a benchtop meter is used <strong>and</strong><br />
the stirrer is enabled, press to start the stirrer . Press again to turn<br />
off the stirrer before removing the probe <strong>and</strong> stirrer from the sample .<br />
b . If the meter is in the AUTO-READ measurement mode, press to start<br />
the reading . The AR icon will flash until the reading is stable . Once the<br />
reading is stable, the meter will log <strong>and</strong> print the measurement <strong>and</strong> freeze<br />
the display . If a benchtop meter is used <strong>and</strong> the stirrer is enabled, the stirrer<br />
will turn on when is pressed <strong>and</strong> turn off when the reading is stable .<br />
c . If the meter is in the timed measurement mode, it will start reading<br />
immediately <strong>and</strong> continuously update the display . The meter will log <strong>and</strong><br />
print the measurement at the frequency specified in the setup menu . If a<br />
benchtop meter is used <strong>and</strong> the stirrer is enabled, press to start the<br />
stirrer . Press again to turn off the stirrer before removing the probe <strong>and</strong><br />
stirrer from the sample .<br />
Thermo Scientific <strong>Orion</strong> <strong>Star</strong> <strong>and</strong> <strong>Star</strong> <strong>Plus</strong> Series <strong>Meter</strong> User Guide<br />
Conductivity Technique<br />
EN-41
Conductivity Technique<br />
3 . Remove the conductivity probe from the sample, rinse it with distilled or<br />
deionized water, blot it dry, place it in the next sample <strong>and</strong> repeat step 2 .<br />
4 . Once all of the samples have been measured, rinse the conductivity probe with<br />
distilled or deionized water <strong>and</strong> blot it dry . Consult the conductivity probe user<br />
guide for proper storage techniques .<br />
Conductivity Temperature Display <strong>and</strong> Calibration<br />
Conductivity Temperature Display<br />
<strong>Star</strong> <strong>Plus</strong> meters allow the temperature to be viewed on individual measurement<br />
lines in addition to the temperature display on the top, left of the screen .<br />
1 . In the measurement mode, press to choose the middle display line . The<br />
arrow icon will point to the selected line .<br />
2 . Press / to change the value on the selected line . The middle line can<br />
be changed to display conductivity (µS/cm or mS/cm), total dissolved solids<br />
(mg/L), salinity (ppt), resistivity (MΩ-cm), temperature (no icon) or a blank line .<br />
Conductivity Temperature Calibration<br />
The temperature calibration mode of the <strong>Star</strong> <strong>Plus</strong> meter allows the temperature on<br />
each measurement line to be manually adjusted .<br />
1 . In the measurement mode, press to choose the middle measurement line<br />
<strong>and</strong> press / until the temperature is shown for the selected line .<br />
2 . Press to begin the calibration .<br />
3 . When the reading stabilizes, the arrow icon <strong>and</strong> the first digit will flash . Enter<br />
the temperature by pressing<br />
the next digit .<br />
/ to adjust each digit <strong>and</strong> to move to<br />
4 . Press to save <strong>and</strong> end the calibration .<br />
EN-42<br />
Thermo Scientific <strong>Orion</strong> <strong>Star</strong> <strong>and</strong> <strong>Star</strong> <strong>Plus</strong> Series <strong>Meter</strong> User Guide
Chapter XI SE Technique<br />
SE Setup Menu<br />
Note: Refer to the Setup Menu section for the Setup Menu Table, which contains<br />
a complete list of meter setup options <strong>and</strong> descriptions. Refer to Appendix A for a<br />
description of the special setup menu features.<br />
1 . In the measurement mode, press .<br />
2 . Press<br />
top line .<br />
/ to scroll through the setup menu until is displayed on the<br />
3 . Press to accept the selection <strong>and</strong> move the arrow icon to the middle line .<br />
4 . Press / to scroll through for the ISE measurement resolution,<br />
for the ISE measurement units, for the ISE calibration range <strong>and</strong><br />
for the non-linear blank correction feature .<br />
5 . Press to accept the selection <strong>and</strong> move the arrow icon to the bottom line .<br />
6 . To scroll through a list of options on the bottom line, press / until the<br />
desired option is displayed . To enter a numeric value for an option on the bottom<br />
line, press / to adjust each digit <strong>and</strong> to move to the next digit .<br />
7 . Press to accept the selection <strong>and</strong> move the arrow icon to the top line .<br />
8 . Repeat steps 3 through 7 to change another ISE setting or press to return<br />
to the measurement mode .<br />
Thermo Scientific <strong>Orion</strong> <strong>Star</strong> <strong>and</strong> <strong>Star</strong> <strong>Plus</strong> Series <strong>Meter</strong> User Guide<br />
EN-43
ISE Technique<br />
SE Calibration<br />
The calibration st<strong>and</strong>ards should be prepared in the same ISE units as the desired<br />
sample results . <strong>Star</strong>t the calibration with the lowest concentration calibration<br />
st<strong>and</strong>ard <strong>and</strong> work up to the highest concentration calibration st<strong>and</strong>ard . Any<br />
reagents, such as ionic strength adjustors, should be added to samples <strong>and</strong><br />
st<strong>and</strong>ards as specified in the electrode user guide .<br />
1 . Prepare the electrode, st<strong>and</strong>ards <strong>and</strong> any other required solutions for use<br />
according to the electrode user guide .<br />
2 . In the measurement mode, press until the arrow icon points to the top line,<br />
press until the ISE icon is shown <strong>and</strong> press to begin the calibration .<br />
3 . Rinse the electrode with distilled or deionized water, shake any excess water off,<br />
blot it dry <strong>and</strong> place the electrode into the least concentrated st<strong>and</strong>ard .<br />
4 . Wait for ISE icon to stop flashing . Press until the first digit to be changed<br />
is flashing, press / to change the value of the flashing digit <strong>and</strong><br />
continue to change the digits until the meter displays the concentration value of<br />
the st<strong>and</strong>ard . Once the st<strong>and</strong>ard value is set, press<br />
is in the correct location .<br />
until the decimal point<br />
5 . Press to proceed to the next lowest calibration st<strong>and</strong>ard <strong>and</strong> repeat<br />
steps 3 <strong>and</strong> 4, working from the lowest concentration st<strong>and</strong>ard to the highest<br />
concentration st<strong>and</strong>ard, or press to save <strong>and</strong> end the calibration .<br />
6 . The actual electrode slope, in mV per decade concentration, will be displayed in<br />
the main field <strong>and</strong> will be displayed in the lower field .<br />
EN-44<br />
a . For a one point calibration, press <strong>and</strong> / to edit the slope . To<br />
change the sign of the slope to negative or positive, press until none of<br />
the digits are blinking <strong>and</strong> the arrow icon is blinking <strong>and</strong> press to change<br />
the sign of the slope . Press to return to the measurement mode .<br />
b . For a two or more point calibration, the meter will automatically proceed to<br />
the measurement mode after the slope is displayed .<br />
Thermo Scientific <strong>Orion</strong> <strong>Star</strong> <strong>and</strong> <strong>Star</strong> <strong>Plus</strong> Series <strong>Meter</strong> User Guide
SE Measurement<br />
Note: Turn on the automatic datalog feature to send measurements to the meter<br />
datalog at the frequency specified in each measurement mode. Refer to the Data<br />
Archiving <strong>and</strong> Retrieval section for details. If the automatic datalog feature is off,<br />
connect the meter to a printer or computer to record the measurements.<br />
1 . Rinse the electrode with distilled or deionized water . Shake off any excess<br />
water <strong>and</strong> blot the electrode dry with lint-free tissue .<br />
2 . Place the electrode into the sample .<br />
a . If the meter is in the continuous measurement mode, it will start reading<br />
immediately <strong>and</strong> continuously update the display . The ISE icon will flash<br />
until the reading is stable . Once the reading is stable, log <strong>and</strong> print the<br />
measurement by pressing . If a benchtop meter is used <strong>and</strong> the stirrer<br />
is enabled, press to start the stirrer . Press again to turn off the<br />
stirrer before removing the electrode <strong>and</strong> stirrer from the sample .<br />
b . If the meter is in the AUTO-READ measurement mode, press to start<br />
the reading . The AR icon will flash until the reading is stable . Once the<br />
reading is stable, the meter will log <strong>and</strong> print the measurement <strong>and</strong> freeze<br />
the display . If a benchtop meter is used <strong>and</strong> the stirrer is enabled, the stirrer<br />
will turn on when is pressed <strong>and</strong> turn off when the reading is stable .<br />
c . If the meter is in the timed measurement mode, it will start reading<br />
immediately <strong>and</strong> continuously update the display . The meter will log <strong>and</strong><br />
print the measurement at the frequency specified in the setup menu . If a<br />
benchtop meter is used <strong>and</strong> the stirrer is enabled, press to start the<br />
stirrer . Press again to turn off the stirrer before removing the electrode<br />
<strong>and</strong> stirrer from the sample .<br />
3 . Remove the electrode from the sample, rinse it with distilled or deionized water,<br />
blot it dry, place it in the next sample <strong>and</strong> repeat step 2 .<br />
4 . Once all of the samples have been measured, rinse the electrode with distilled<br />
or deionized water <strong>and</strong> blot it dry . Consult the electrode user guide for proper<br />
storage techniques .<br />
Thermo Scientific <strong>Orion</strong> <strong>Star</strong> <strong>and</strong> <strong>Star</strong> <strong>Plus</strong> Series <strong>Meter</strong> User Guide<br />
ISE Technique<br />
EN-45
ISE Technique<br />
SE Temperature Display <strong>and</strong> Calibration<br />
SE Temperature Display<br />
<strong>Star</strong> <strong>Plus</strong> meters allow the temperature to be viewed on individual measurement<br />
lines in addition to the temperature display on the top, left of the screen .<br />
To view the temperature for the ISE measurement line:<br />
1 . Press <strong>and</strong> hold until the meter displays the measurement mode .<br />
2 . Press to choose the top display line . The arrow icon will point to the<br />
selected line .<br />
3 . Press / to change the value on the selected line . The top line can<br />
be changed to display pH (pH), millivolts (mV), relative millivolts (RmV),<br />
concentration (ISE), temperature (no icon) or a blank line .<br />
SE Temperature Calibration<br />
The temperature calibration mode of the <strong>Star</strong> <strong>Plus</strong> meter allows the temperature on<br />
each measurement line to be manually adjusted .<br />
To calibrate the temperature for the ISE measurement line:<br />
1 . In the measurement mode, press to choose the top measurement line <strong>and</strong><br />
press / until the temperature is shown for the selected line .<br />
2 . Press to begin the calibration .<br />
3 . When the reading stabilizes, the arrow icon <strong>and</strong> the first digit will flash . Enter<br />
the temperature by pressing<br />
the next digit .<br />
/ to adjust each digit <strong>and</strong> to move to<br />
4 . Press to save <strong>and</strong> end the calibration .<br />
EN-46<br />
Thermo Scientific <strong>Orion</strong> <strong>Star</strong> <strong>and</strong> <strong>Star</strong> <strong>Plus</strong> Series <strong>Meter</strong> User Guide
Chapter XII Data Archiving <strong>and</strong> Retrieval<br />
Datalog <strong>and</strong> Calibration Log<br />
All 3-<strong>Star</strong> <strong>Plus</strong> <strong>and</strong> the 4-<strong>Star</strong> <strong>Plus</strong> pH/ISE meters have a 1000 point datalog . The<br />
4-<strong>Star</strong> <strong>Plus</strong> pH/conductivity <strong>and</strong> pH/dissolved oxygen meters have a 750 point<br />
datalog . The 5-<strong>Star</strong> <strong>Plus</strong> meters have a 500 point datalog . The 2-<strong>Star</strong> meter has a<br />
50 point datalog <strong>and</strong> all <strong>Orion</strong> <strong>Star</strong> meters have a 200 point datalog .<br />
The <strong>Star</strong> <strong>Plus</strong> meter printouts have been enhanced to include additional information .<br />
The pH <strong>and</strong> ISE calibration printouts now include the average slope, the slope<br />
between points <strong>and</strong> the E o per point . The polarographic dissolved oxygen printouts<br />
now include slope, membrane temperature <strong>and</strong> solution temperature .<br />
Automatic Datalog Feature<br />
The 3-<strong>Star</strong>, 4-<strong>Star</strong> <strong>and</strong> 5-<strong>Star</strong> <strong>Plus</strong> meters have been enhanced to include an<br />
automatic datalog feature that can be turned on or off . To enable the automatic<br />
recording of data into the datalog:<br />
1 . In the measurement mode, press .<br />
2 . Press / until is displayed on top line .<br />
3 . Press to accept the selection <strong>and</strong> move the arrow icon to the middle line<br />
<strong>and</strong> press / until is displayed .<br />
4 . Press to accept the selection <strong>and</strong> move the arrow icon to the bottom line<br />
<strong>and</strong> press / until is displayed .<br />
5 . Press to accept the selection <strong>and</strong> move the arrow icon to the top line .<br />
6 . Press to save the setup option <strong>and</strong> return to measurement mode .<br />
Thermo Scientific <strong>Orion</strong> <strong>Star</strong> <strong>and</strong> <strong>Star</strong> <strong>Plus</strong> Series <strong>Meter</strong> User Guide<br />
EN-47
Data Archival <strong>and</strong> Retrieval<br />
Datalog Deletion Setting<br />
The datalog deletion setting determines if the meter will automatically delete<br />
the datalog after it is downloaded to a printer or computer <strong>and</strong> if the meter will<br />
overwrite the datalog points when the datalog is full . If the datalog deletion setting<br />
is set to , the meter will automatically delete the datalog after the datalog is<br />
downloaded to a printer or computer . The meter will also display the<br />
error message when all 200 datalog points are filled <strong>and</strong> the datalog must be<br />
downloaded to a printer or computer to clear the error message . If the datalog<br />
deletion setting is set to , the meter will overwrite the oldest datalog point when<br />
all 200 datalog points are filled <strong>and</strong> will not delete the datalog after the datalog is<br />
downloaded to a printer or computer .<br />
1 . In the measurement mode, press .<br />
2 . Press / until is displayed on top line .<br />
3 . Press to accept the selection <strong>and</strong> move the arrow icon to the middle line<br />
<strong>and</strong> press / until is displayed .<br />
4 . Press to accept the selection <strong>and</strong> move the arrow icon to the bottom line<br />
<strong>and</strong> press / until or is displayed .<br />
5 . Press to accept the selection <strong>and</strong> move the arrow icon to the top line .<br />
6 . Press to save the setup option <strong>and</strong> return to measurement mode .<br />
Note: If the datalog is not required, set the datalog deletion setting to to<br />
prevent the error 038 (datalog full) message.<br />
EN-48<br />
Thermo Scientific <strong>Orion</strong> <strong>Star</strong> <strong>and</strong> <strong>Star</strong> <strong>Plus</strong> Series <strong>Meter</strong> User Guide
Viewing <strong>and</strong> Printing the Datalog <strong>and</strong> Calibration Log<br />
The 3-<strong>Star</strong>, 4-<strong>Star</strong> <strong>and</strong> 5-<strong>Star</strong> <strong>Plus</strong> meters have been enhanced to include a<br />
calibration log view feature in addition to the datalog view, datalog print <strong>and</strong><br />
calibration log print features . The <strong>Orion</strong> <strong>Star</strong> meters include the datalog view,<br />
datalog print <strong>and</strong> calibration log print features .<br />
To view the datalog or calibration log:<br />
1 . In the measurement mode, press .<br />
2 . Press / to scroll through to view the datalog or to view<br />
the calibration log (<strong>Star</strong> <strong>Plus</strong> meters only) .<br />
3 . Press . The meter will display the date/time screen . The log number will be<br />
on the top of the screen <strong>and</strong> the time, date <strong>and</strong> year the log was recorded will<br />
be on the top, middle <strong>and</strong> bottom display lines respectively . Press<br />
scroll through the log .<br />
/ to<br />
4 . Press . The meter will display the data or calibration point associated with<br />
the selected date/time screen .<br />
a . Press to print the individual data point .<br />
b . Press / to scroll through the log .<br />
c . Press to return to the date/time screen .<br />
5 . To exit the log view mode, press until the meter displays the date/time<br />
screen <strong>and</strong> press .<br />
To send the datalog or calibration log to a printer or computer:<br />
1 . Connect the meter to a printer or computer <strong>and</strong> verify the meter baud rate <strong>and</strong><br />
output settings in the setup menu .<br />
2 . In the measurement mode, press .<br />
Thermo Scientific <strong>Orion</strong> <strong>Star</strong> <strong>and</strong> <strong>Star</strong> <strong>Plus</strong> Series <strong>Meter</strong> User Guide<br />
EN-49
3 . Press / to scroll through to print the datalog or to print<br />
EN-50<br />
the calibration log . The <strong>Orion</strong> <strong>Star</strong> meters will display instead of .<br />
4 . Press to send the selected data to the printer or computer .<br />
To interfacing the meter with a computer:<br />
The <strong>Orion</strong> <strong>Star</strong> <strong>and</strong> <strong>Star</strong> <strong>Plus</strong> meters can send measurement <strong>and</strong> calibration data to<br />
a computer in a comma delimited format that is easy to parse in computer programs<br />
like Excel . Select the , , output setting in the setup menu .<br />
To send data from the meter to a computer using HyperTerminal:<br />
1 . Connect the meter to a computer port using the computer interface cable,<br />
Cat . No . 1010053 .<br />
2 . Click on the start button on the lower left side of the computer screen . Select<br />
All Programs, Accessories, Communications <strong>and</strong> HyperTerminal .<br />
3 . When the HyperTerminal window opens, enter a file name, select an icon for the<br />
connection <strong>and</strong> click on the OK button .<br />
4 . When a new window opens, go to the Connect Using drop-down menu, select<br />
the COM port that the meter is connected to <strong>and</strong> click on the OK button .<br />
5 . A window will open with the COM port properties listed . Select the following<br />
settings from the drop-down menus <strong>and</strong> then click on the OK button .<br />
Bits per second: 9600<br />
Data bits: 8<br />
Parity: None<br />
Stop bits: 1<br />
Flow control: Hardware<br />
6 . Send data from the meter to HyperTerminal .<br />
Thermo Scientific <strong>Orion</strong> <strong>Star</strong> <strong>and</strong> <strong>Star</strong> <strong>Plus</strong> Series <strong>Meter</strong> User Guide
Chapter XIII Declaration of Conformity<br />
Manufacturer: Thermo Fisher Scientific Inc .<br />
Address: 166 Cummings Center<br />
Beverly, MA 01915<br />
USA<br />
We declare that the following products described below conform to the Directive<br />
<strong>and</strong> St<strong>and</strong>ard listed below:<br />
Product(s): <strong>Meter</strong>s for measuring pH, conductivity, dissolved oxygen, <strong>and</strong>/or ISE<br />
Benchtop models are rated 100 to 240 VAC, 50/60 Hz, 0 .5 A<br />
H<strong>and</strong>held models use four non-rechargeable AA batteries<br />
Benchtop <strong>Meter</strong>s Portable <strong>Meter</strong>s<br />
5-<strong>Star</strong> <strong>Plus</strong> pH/ISE/Conductivity/DO <strong>Meter</strong> 5-<strong>Star</strong> <strong>Plus</strong> pH/ISE/Conductivity/DO <strong>Meter</strong><br />
4-<strong>Star</strong> <strong>Plus</strong> pH/Conductivity <strong>Meter</strong> 5-<strong>Star</strong> <strong>Plus</strong> pH/Conductivity/DO <strong>Meter</strong><br />
4-<strong>Star</strong> <strong>Plus</strong> pH/DO 4-<strong>Star</strong> <strong>Plus</strong> pH/Conductivity <strong>Meter</strong><br />
4-<strong>Star</strong> <strong>Plus</strong> pH/ISE <strong>Meter</strong> 4-<strong>Star</strong> <strong>Plus</strong> pH/DO <strong>Meter</strong><br />
3-<strong>Star</strong> <strong>Plus</strong> Conductivity <strong>Meter</strong> 4-<strong>Star</strong> <strong>Plus</strong> pH/ISE <strong>Meter</strong><br />
3-<strong>Star</strong> <strong>Plus</strong> DO <strong>Meter</strong> 3-<strong>Star</strong> <strong>Plus</strong> Conductivity <strong>Meter</strong><br />
3-<strong>Star</strong> <strong>Plus</strong> pH <strong>Meter</strong> 3-<strong>Star</strong> <strong>Plus</strong> pH <strong>Meter</strong><br />
2-<strong>Star</strong> pH <strong>Meter</strong> 3-<strong>Star</strong> <strong>Plus</strong> DO <strong>Meter</strong><br />
5-<strong>Star</strong> <strong>Plus</strong> RDO ® Optical DO/pH/Conductivity <strong>Meter</strong><br />
4-<strong>Star</strong> <strong>Plus</strong> RDO Optical DO/pH <strong>Meter</strong><br />
3-<strong>Star</strong> <strong>Plus</strong> RDO Optical DO <strong>Meter</strong><br />
Equipment Class: Measurement, control <strong>and</strong> laboratory<br />
Benchtop models are EMC Class A<br />
Portable models are EMC Class D<br />
Thermo Scientific <strong>Orion</strong> <strong>Star</strong> <strong>and</strong> <strong>Star</strong> <strong>Plus</strong> Series <strong>Meter</strong> User Guide<br />
EN-51
Declaration of Conformity<br />
Directive(s) <strong>and</strong> St<strong>and</strong>ard(s):<br />
• 89/336/EEC – Electromagnetic Compatibility (EMC Directive)<br />
EN-52<br />
• EN 61326:1997 + A1:1998 + A2:2001 – Electrical equipment for<br />
measurement, control, <strong>and</strong> laboratory use – EMC requirements<br />
• 73/23/EEC – Low Voltage Directive (LVD)<br />
• EN 61010-1:2001 – Safety requirements for electrical equipment for<br />
measurement, control, <strong>and</strong> laboratory use – general requirements<br />
Manufacturer’s Authorized Representative: Date:<br />
Patrick Chiu October 23, 2008<br />
Senior Quality Engineer,<br />
Regulatory Compliance<br />
WEEE Compliance<br />
This product is required to comply with the European Union’s Waste<br />
Electrical & Electronic Equipment (WEEE) Directive 2002/96/EC .<br />
It is marked with the following symbol:<br />
We have contracted with one or more recycling/disposal companies in each EU<br />
Member State <strong>and</strong> this product should be disposed of or recycled through them .<br />
Further information on compliance with these Directives, the recyclers in your<br />
country, <strong>and</strong> information on Thermo Scientific <strong>Orion</strong> products which may assist the<br />
detection of substances subject to the RoHS Directive are available at<br />
www .thermo .com/WEEERoHS .<br />
Thermo Scientific <strong>Orion</strong> <strong>Star</strong> <strong>and</strong> <strong>Star</strong> <strong>Plus</strong> Series <strong>Meter</strong> User Guide
Chapter XIV Troubleshooting<br />
<strong>Meter</strong> Self Test<br />
1 . Disconnect all of the electrodes <strong>and</strong> probes from the meter <strong>and</strong> cover all of the<br />
meter inputs with the black caps .<br />
2 . Power on the meter, wait until the software revision is displayed <strong>and</strong> press .<br />
3 . All the segments on the display will turn on . Visually inspect the display<br />
segments to verify that all of the segments are lit <strong>and</strong> press .<br />
4 . All the segments on the display will turn off . Visually inspect the display<br />
segments to verify that all of the segments are not lit <strong>and</strong> press .<br />
5 . The display will read . Press every key on the keypad one at a time in<br />
any order . If the keys are not pressed within five seconds of one another, the<br />
display will read , which indicates a key failure . Press to clear<br />
the error 033 message <strong>and</strong> complete the self test . If all the keys are pressed<br />
<strong>and</strong> functioning, the meter will restart <strong>and</strong> proceed to the measurement mode .<br />
Note: If the meter reads during the self test, ensure that all of the<br />
electrodes are disconnected from the meter, all of the meter inputs are covered<br />
with the black caps <strong>and</strong> the BNC shorting cap is firmly attached to the BNC meter<br />
input. This error code usually occurs if the BNC shorting cap is missing or not fully<br />
connected to the BNC meter input during the meter self test.<br />
Thermo Scientific <strong>Orion</strong> <strong>Star</strong> <strong>and</strong> <strong>Star</strong> <strong>Plus</strong> Series <strong>Meter</strong> User Guide<br />
EN-53
Troubleshooting<br />
<strong>Meter</strong> Error Codes<br />
• If the reading on the screen is flashing , the value is out of range .<br />
EN-54<br />
Perform the meter self test, clean the electrode according to the electrode user<br />
guide <strong>and</strong> re-calibrate the electrode with new st<strong>and</strong>ards .<br />
• If the icon is lit <strong>and</strong> the reading is flashing, the sensor needs to be<br />
calibrated according to the user’s set calibration interval or the pH slope is<br />
outside the range of 85 % to 115% .<br />
• Press to clear an error code . Error codes show on the middle line <strong>and</strong><br />
a set of three alphanumeric characters on the bottom line . Some of these codes<br />
are errors, some are warnings <strong>and</strong> some are purely informational .<br />
Error Code Description Troubleshooting<br />
002, 026,<br />
E##, F##<br />
Hardware or Memory<br />
Error<br />
005 Value Outside<br />
Allowable Range<br />
Press to clear the error. If the error occurs again, contact<br />
Technical Support.<br />
Press <strong>and</strong> re-enter the value. Check meter specifications for the<br />
allowable range of values.<br />
033 Keypad Failure Repeat the self test. When the meter reads , press all the keys,<br />
034 BNC Input Failure<br />
including the power key, within five seconds of one another.<br />
Disconnect all the electrodes from the meter, connect the BNC shorting cap<br />
to the meter <strong>and</strong> repeat the self test.<br />
038 Datalog Full Download the datalog to a printer or computer, turn the automatic datalog<br />
feature off in the setup menu (<strong>Star</strong> <strong>Plus</strong> meters only) or change the datalog<br />
setting to , , in the setup menu so the meter deletes the<br />
D## Remote Control Error<br />
datalog points when the datalog is full.<br />
Check the programming instructions to verify the correct comm<strong>and</strong>s, names<br />
<strong>and</strong> values.<br />
107 pH Calibration<br />
St<strong>and</strong>ard Error<br />
109 Bad pH Slope or<br />
Calibration Offset<br />
200 Autosampler<br />
Interface Error<br />
201 Autosampler<br />
Signal Error<br />
The millivolts measured during calibration are the same for two buffers.<br />
Review the calibration procedure <strong>and</strong> verify that the electrode was placed<br />
in the buffers at the appropriate time. Clean the electrode according to the<br />
electrode user guide. Re-calibrate the electrode with fresh buffers.<br />
Clean the electrode according to the electrode user guide. Re-calibrate the<br />
electrode with new buffers.<br />
The meter is unable to send a signal to the autosampler. Make sure that<br />
the autosampler is properly connected to the meter.<br />
The autosampler is unable to receive a signal from the meter. Review the<br />
meter setup parameters <strong>and</strong> make sure that the baud rate of the meter is<br />
set to 1200.<br />
Thermo Scientific <strong>Orion</strong> <strong>Star</strong> <strong>and</strong> <strong>Star</strong> <strong>Plus</strong> Series <strong>Meter</strong> User Guide
Error Code Description Troubleshooting<br />
202 Autosampler is<br />
Jammed<br />
203 Unstable Reading<br />
from Autosampler<br />
306 ISE Automatic<br />
Blank Error<br />
307 ISE Calibration<br />
St<strong>and</strong>ard Error<br />
Turn the autosampler off <strong>and</strong> wait 45 seconds before turning it back on.<br />
The autosampler should return to the home position.<br />
The measurements taken using the autosampler are unstable. Check the<br />
electrodes for proper function. Make sure that the electrode cables are<br />
properly connected.<br />
Disable the automatic blank feature in the setup menu <strong>and</strong> re-calibrate<br />
the meter without using a zero concentration st<strong>and</strong>ard.<br />
The millivolts measured during calibration are the same for two<br />
st<strong>and</strong>ards. Review the calibration procedure <strong>and</strong> verify that the electrode<br />
was placed in the st<strong>and</strong>ards at the appropriate times. Clean the electrode<br />
according to the electrode user guide. Re-calibrate the electrode with<br />
fresh st<strong>and</strong>ards.<br />
309 Bad ISE Slope Clean the electrode according to the electrode user guide. Re-calibrate<br />
the electrode with freshly prepared st<strong>and</strong>ards.<br />
707 Conductivity<br />
Calibration<br />
St<strong>and</strong>ard Error<br />
709 Conductivity Cell<br />
Constant Error<br />
808 Bad Zero Point<br />
DO Slope<br />
The conductivity value measured during calibration is the same for<br />
two st<strong>and</strong>ards. Review the calibration procedure <strong>and</strong> verify that the<br />
conductivity probe was placed in the st<strong>and</strong>ards at the appropriate times.<br />
Clean the conductivity probe according to the probe user guide. Recalibrate<br />
the probe with new st<strong>and</strong>ards.<br />
The cell constant is not in the range of 0.001 to 199.0 cm-1 . Clean the<br />
conductivity probe according to the probe user guide. Re-calibrate the<br />
probe with new st<strong>and</strong>ards.<br />
An air calibration should be performed before the zero point calibration.<br />
Verify that a solution with zero oxygen is being used for the zero point<br />
calibration. A solution with 15 grams of Na2SO3 dissolved in 250 mL of<br />
distilled water is recommended.<br />
809 Bad DO Slope For polarographic DO probes, connect the probe to the meter, power on<br />
the meter <strong>and</strong> let the probe to polarize for at least 30 minutes. For an<br />
air calibration, check that the sponge in the calibration sleeve is damp<br />
<strong>and</strong> there is no water on the probe membrane . For a water calibration,<br />
bubble air into the sample <strong>and</strong> stir to keep bubbles off the membrane.<br />
Clean the DO probe according to the probe user guide. Re-calibrate the<br />
DO probe.<br />
880 RDO ® Optical DO<br />
Sensor Not Attached<br />
881 RDO Optical DO<br />
Sensor Expired<br />
882 RDO Optical DO<br />
Sensor Failure<br />
Verify that the RDO sensor is properly connected to the meter. Connect<br />
another, known working RDO sensor to the meter.<br />
The RDO cap attached to the RDO sensor has expired. Install a new RDO<br />
cap according to the RDO sensor user guide.<br />
Verify that the RDO cap on the RDO sensor was properly installed, not<br />
expired <strong>and</strong> not tampered with. Connect another, known working RDO<br />
sensor to the meter.<br />
Thermo Scientific <strong>Orion</strong> <strong>Star</strong> <strong>and</strong> <strong>Star</strong> <strong>Plus</strong> Series <strong>Meter</strong> User Guide<br />
Troubleshooting<br />
EN-55
Troubleshooting<br />
General Troubleshooting<br />
Problem: The display freezes <strong>and</strong> the measurement values will not change .<br />
Solution: The meter is in the AUTO-READ measurement mode (the AR icon will<br />
appear in the top, right corner of the display) . Press to start a new<br />
reading or select another measurement mode in the setup menu .<br />
Problem: When I press the meter displays .<br />
Solution: The meter is printing <strong>and</strong> cannot enter the calibration mode until the<br />
printing is done . This should rarely occur if the meter is set to a 9600<br />
baud rate . If the meter is at a lower baud rate, the delay will be longer .<br />
Problem: The meter did not accept the change I made in the setup menu .<br />
Solution: After making a change in the setup menu, press until the arrow<br />
icon points to the top line (confirms the change) <strong>and</strong> then press to<br />
save the change <strong>and</strong> return to the measurement mode .<br />
Problem: How do I abort a calibration?<br />
Solution: Press <strong>and</strong> hold to abort any meter operation <strong>and</strong> return to the<br />
measurement mode .<br />
Problem: The printout is a string of numbers <strong>and</strong> units with commas .<br />
Solution: The output format in the setup menu is set to the computer output or<br />
the printer baud rate is set incorrectly in the setup menu . Change the<br />
output format to the printer output in the setup menu . Change the<br />
baud rate to the correct value for the printer that is being used .<br />
Problem: When I press the stirrer button, the stirrer doesn’t work .<br />
Solution: The current stirrer setting is off . Set the speed to 1 through 7 in the<br />
setup menu .<br />
Problem: The timed measurement time entry screen does not appear in the<br />
setup menu .<br />
Solution: The meter is in the AUTO-READ or continuous mode . When the meter<br />
is set to the timed mode, the next setup screen will be for time entry .<br />
Problem: I cannot tell if I have the <strong>Star</strong> <strong>Plus</strong> meter or the <strong>Orion</strong> <strong>Star</strong> meter .<br />
Solution: When the meter is powered on, the <strong>Star</strong> <strong>Plus</strong> meters with enhanced<br />
features will display with the meter revision number<br />
( or similar) <strong>and</strong> proceed to the measurement mode .<br />
EN-56<br />
Thermo Scientific <strong>Orion</strong> <strong>Star</strong> <strong>and</strong> <strong>Star</strong> <strong>Plus</strong> Series <strong>Meter</strong> User Guide
pH Troubleshooting<br />
Problem: The meter does not recognize the pH buffer value during calibration .<br />
Solution: Verify that the correct buffer set was selected in the setup menu . The<br />
meter uses the raw mV reading of the electrode to recognize a buffer<br />
during calibration . As the electrode ages or becomes dirty, its mV<br />
readings will drift <strong>and</strong> you will need to manually enter the pH buffer value<br />
when calibrating .<br />
SE Troubleshooting<br />
Problem: It takes several minutes for the readings to stabilize during a calibration .<br />
Solution: The concentration range in the setup menu is set to low . Change the<br />
concentration range to high .<br />
The ISE resolution is set to 3 digits in the setup menu . Change the ISE<br />
resolution to 2 digits for faster stabilization of the readings .<br />
Problem: When I use the automatic blank correction setting <strong>and</strong> calibrate an ISE,<br />
the meter gives a slope that is too low or cannot be manually checked .<br />
Solution: Turn the automatic blank correction setting off in the setup menu .<br />
Conductivity Troubleshooting<br />
Problem: The meter does not recognize the conductivity st<strong>and</strong>ard during<br />
calibration .<br />
Solution: Verify that the default cell constant was entered in the setup menu . The<br />
cell constant is usually printed on the conductivity probe cable . Verify<br />
that the conductivity st<strong>and</strong>ard is one that is programmed into the meter .<br />
Re-calibrate with a fresh st<strong>and</strong>ard .<br />
Problem: The temperature coefficient value does not appear in the setup menu .<br />
Solution: The current temperature compensation setting is nonlinear or off .<br />
Change the temperature compensation to linear <strong>and</strong> the next screen will<br />
be the temperature coefficient value entry screen .<br />
Problem: The measurement is out of range when it should be in range .<br />
Thermo Scientific <strong>Orion</strong> <strong>Star</strong> <strong>and</strong> <strong>Star</strong> <strong>Plus</strong> Series <strong>Meter</strong> User Guide<br />
Troubleshooting<br />
Solution: Check that the conductivity probe is fully immersed in the solution .<br />
Verify that the cell constant is correct for the conductivity probe that is<br />
connected to the meter . Verify that the cell type selected in the setup<br />
menu is set to Std .<br />
EN-57
Troubleshooting<br />
Dissolved Oxygen Troubleshooting<br />
Problem: The manual barometric pressure entry screen does not appear in the<br />
setup menu .<br />
Solution: The barometric pressure compensation is set to automatic in the setup<br />
menu . Change the barometric pressure compensation to manual <strong>and</strong><br />
the next screen will be the manual pressure entry screen .<br />
Problem: The manual salinity factor entry screen does not appear in the<br />
setup menu .<br />
Solution: The salinity correction is set to automatic in the setup menu . Change<br />
the salinity correction to manual <strong>and</strong> the next screen will be the salinity<br />
factor entry screen .<br />
Problem: The AUTO-STIR BOD probe does not turn on when the button on the<br />
probe is pressed .<br />
Solution: The read type must be set to AUTO-READ in the setup menu <strong>and</strong> the<br />
stirrer speed must be set from 1 to 7 to initiate a measurement <strong>and</strong><br />
start stirring by pressing the button on the AUTO-STIR BOD probe .<br />
RDO ® Optical Dissolved Oxygen Troubleshooting<br />
Problem: The meter displays an error 881 message <strong>and</strong> will not take a dissolved<br />
oxygen measurement .<br />
Solution: Turn the meter off, replace the old RDO cap with a new cap <strong>and</strong> turn<br />
the meter on . This should clear the error message .<br />
Assistance<br />
After troubleshooting all components of your measurement system, contact<br />
Technical Support . Within the United States call 1 .800 .225 .1480 <strong>and</strong> outside the<br />
United States call 978 .232 .6000 or fax 978 .232 .6031 . In Europe, the Middle East<br />
<strong>and</strong> Africa, contact your local authorized dealer . For the most current contact<br />
information, visit www .thermo .com/contactwater .<br />
For the latest application <strong>and</strong> technical resources for Thermo Scientific <strong>Orion</strong><br />
products, visit www .thermo .com/waterapps .<br />
Warranty<br />
For the most current warranty information, visit www .thermo .com/water .<br />
EN-58<br />
Thermo Scientific <strong>Orion</strong> <strong>Star</strong> <strong>and</strong> <strong>Star</strong> <strong>Plus</strong> Series <strong>Meter</strong> User Guide
Chapter XV <strong>Meter</strong> Specifications<br />
<strong>Meter</strong> Specifications<br />
Environmental Operating Conditions<br />
Portable <strong>and</strong> Benchtop <strong>Meter</strong> Environmental Operating Conditions<br />
Operating Ambient Temperature 5 to 45 °C<br />
Operating Relative Humidity 5 to 85 %, non-condensing<br />
Storage Temperature -20 to +60 °C<br />
Storage Relative Humidity 5 to 85 %, non-condensing<br />
Pollution Degree 2<br />
Overvoltage Category II<br />
Altitude Up to 2000 meters<br />
Weight Portable: 0.45 kg<br />
Benchtop: 0.91 kg<br />
Size Portable: 4.8 cm (H) x 9.7 cm (W) x 21.3 cm (D)<br />
Benchtop: 9.4 cm (H) x 17.0 cm (W) x 22.4 cm (D)<br />
AC Powered <strong>Meter</strong>s Indoor use only<br />
Battery Operated <strong>Meter</strong>s Indoor or outdoor use<br />
Regulatory <strong>and</strong> Safety CE, CSA, TÜV, UL, FCC Class limits*<br />
Case Material ABS<br />
Shock <strong>and</strong> Vibration Vibration, shipping/h<strong>and</strong>ling per ISTA #1A<br />
Shock, drop test in packaging per ISTA #1A<br />
Enclosure (designed to meet) IP67 (portable meter)<br />
IP54 (benchtop meter)<br />
* TÜV <strong>and</strong> UL certifications are pending for all <strong>Star</strong> <strong>Plus</strong> RDO ® optical dissolved oxygen meters .<br />
Thermo Scientific <strong>Orion</strong> <strong>Star</strong> <strong>and</strong> <strong>Star</strong> <strong>Plus</strong> Series <strong>Meter</strong> User Guide<br />
EN-59
<strong>Meter</strong> Specifications<br />
Universal Power Adapter Environmental Operating Conditions<br />
Operating Ambient Temperature 0 to 50 °C<br />
Operating Relative Humidity 0 to 90 %, non-condensing<br />
Storage Temperature -20 to +75 °C<br />
Storage Relative Humidity 0 to 90 %, non-condensing<br />
Pollution Degree 2<br />
Overvoltage Category II<br />
Operating Altitude Up to 2000 meters<br />
Benchtop <strong>Meter</strong>s Indoor use only<br />
<strong>Meter</strong> Parameter Specifications<br />
The following meter parameter specifications are for the complete line of <strong>Orion</strong> <strong>Star</strong><br />
<strong>and</strong> <strong>Star</strong> <strong>Plus</strong> series meters . Single parameter, dual parameter <strong>and</strong> some multiparameter<br />
meters will not include all of the parameters listed in this section .<br />
pH<br />
Range -2.000 to 19.999<br />
Resolution 0.1, 0.01, 0.001<br />
Relative Accuracy ± 0.002<br />
Calibration Points<br />
pH (2-<strong>Star</strong> pH <strong>Meter</strong> Only)<br />
1 to 5<br />
Range 0.000 to 14.999<br />
Resolution 0.1, 0.01, 0.001<br />
Relative Accuracy ± 0.002<br />
Calibration Points 1 to 3<br />
Millivolts, Relative Millivolts, ORP<br />
Range ± 1999.9 mV<br />
Resolution 0.1 mV<br />
Relative Accuracy ± 0.2 mV or 0.05 % of reading, whichever is greater<br />
EN-60<br />
Thermo Scientific <strong>Orion</strong> <strong>Star</strong> <strong>and</strong> <strong>Star</strong> <strong>Plus</strong> Series <strong>Meter</strong> User Guide
SE<br />
Range 0 to 19999<br />
Resolution 1 to 3 significant figures<br />
Relative Accuracy ± 0.2 mV or 0.05 %, whichever is greater<br />
Displayed Units M, mg/L, %, ppb or no units<br />
Calibration Features Linear point to point, selectable non-linear automatic blank<br />
correction <strong>and</strong> low concentration range stability<br />
Dissolved Oxygen (Polarographic)<br />
Range 0.00 to 90.0 mg/L<br />
0.0 to 600 %<br />
Resolution 0.1, 0.01 mg/L<br />
0.1, 1 %<br />
Relative Accuracy ± 0.2 mg/L<br />
± 2 %<br />
Salinity Factor 0 to 45 ppt<br />
Barometric Pressure 450 to 850 mm Hg<br />
Calibration Types Water saturated air, air saturated water, manual (Winkler), zero point<br />
Probe Type Polarographic<br />
RDO ® Optical Dissolved Oxygen<br />
Range 0.00 to 20.0 mg/L<br />
0.0 to 200 %<br />
Resolution 0.1, 0.01 mg/L<br />
0.1, 1 %<br />
Relative Accuracy ± 0.1 mg/L up to 8 mg/L; ± 0.2 mg/L from 8 mg/L to 20 mg/L<br />
± 2 %<br />
Salinity Factor 0 to 45 ppt<br />
Barometric Pressure 450 to 850 mm Hg<br />
Calibration Types Water saturated air, air saturated water, manual (Winkler), zero point<br />
Probe Type RDO optical<br />
Thermo Scientific <strong>Orion</strong> <strong>Star</strong> <strong>and</strong> <strong>Star</strong> <strong>Plus</strong> Series <strong>Meter</strong> User Guide<br />
<strong>Meter</strong> Specifications<br />
EN-61
<strong>Meter</strong> Specifications<br />
Conductivity<br />
Range 0.000 to 3000 mS/cm, auto-resolution with cell constant dependence<br />
Resolution 4 significant figures down to 0.001 µS/cm, cell constant dependant<br />
Relative Accuracy 0.5 % ± 1 digit or 0.01 µS/cm, whichever is greater<br />
Cell Constant 0.001 to 199.9 cm-1 Reference Temperature 5 °C, 10 °C, 15 °C, 20 °C or 25 °C<br />
Resistivity Range 0.0001 to 100 Megohm<br />
Resistivity Resolution Automatic<br />
Resistivity Relative Accuracy 0.5 % ± 1 digit<br />
Salinity Range 0.1 to 80.0 ppt NaCl equivalent, 0.1 to 42 ppt practical salinity<br />
Salinity Resolution 0.1 ppt<br />
Salinity Relative Accuracy 0.1 ± 1 digit<br />
TDS Range 0 to 19999 mg/L<br />
TDS Resolution 1 mg/L<br />
TDS Relative Accuracy<br />
Temperature<br />
0.5 % ± 1 digit<br />
Range -5 to 105 °C<br />
Resolution 0.1 up to 99.9 °C, 1.0 over 99.9 °C<br />
Relative Accuracy ± 0.1 °C<br />
Temperature* (RDO ® Optical Dissolved Oxygen <strong>Meter</strong> Only)<br />
Range 0 to 50 °C<br />
Resolution 0.1 °C<br />
Relative Accuracy ± 0.3 °C<br />
* This temperature specification is only for the <strong>Star</strong> <strong>Plus</strong> RDO optical dissolved<br />
oxygen meter when it is used with the RDO optical dissolved oxygen sensor.<br />
The 4-<strong>Star</strong> <strong>and</strong> 5-<strong>Star</strong> RDO meters will have the st<strong>and</strong>ard temperature<br />
specifications when used with an electrode other than the RDO sensor.<br />
Note: Specifications are subject to change without notice.<br />
EN-62<br />
Thermo Scientific <strong>Orion</strong> <strong>Star</strong> <strong>and</strong> <strong>Star</strong> <strong>Plus</strong> Series <strong>Meter</strong> User Guide
Ordering nformation<br />
Cat. No. Description<br />
1111000 2-<strong>Star</strong> pH benchtop meter with universal power adapter <strong>and</strong> user guide<br />
1112000 3-<strong>Star</strong> <strong>Plus</strong> pH benchtop meter with universal power adapter <strong>and</strong> user guide<br />
1212000 3-<strong>Star</strong> <strong>Plus</strong> pH portable meter with batteries <strong>and</strong> user guide<br />
1113000 3-<strong>Star</strong> <strong>Plus</strong> DO benchtop meter with universal power adapter <strong>and</strong> user guide<br />
1213000 3-<strong>Star</strong> <strong>Plus</strong> DO portable meter with batteries <strong>and</strong> user guide<br />
1114000 3-<strong>Star</strong> <strong>Plus</strong> conductivity benchtop meter with universal power adapter <strong>and</strong> user guide<br />
1214000 3-<strong>Star</strong> <strong>Plus</strong> conductivity portable meter with batteries <strong>and</strong> user guide<br />
1115000 4-<strong>Star</strong> <strong>Plus</strong> pH/ISE benchtop meter with universal power adapter <strong>and</strong> user guide<br />
1215000 4-<strong>Star</strong> <strong>Plus</strong> pH/ISE portable meter with batteries <strong>and</strong> user guide<br />
1116000 4-<strong>Star</strong> <strong>Plus</strong> pH/DO benchtop meter with universal power adapter <strong>and</strong> user guide<br />
1216000 4-<strong>Star</strong> <strong>Plus</strong> pH/DO portable meter with batteries <strong>and</strong> user guide<br />
1117000 4-<strong>Star</strong> <strong>Plus</strong> pH/conductivity benchtop meter with universal power adapter <strong>and</strong><br />
user guide<br />
1217000 4-<strong>Star</strong> <strong>Plus</strong> pH/conductivity portable meter with batteries <strong>and</strong> user guide<br />
1218000 5-<strong>Star</strong> <strong>Plus</strong> pH/DO/conductivity portable meter with batteries <strong>and</strong> user guide<br />
1119000 5-<strong>Star</strong> <strong>Plus</strong> pH/ISE/DO/conductivity benchtop meter with universal power adapter <strong>and</strong><br />
user guide<br />
1219000 5-<strong>Star</strong> <strong>Plus</strong> pH/ISE/DO/conductivity portable meter with batteries <strong>and</strong> user guide<br />
1213300 3-<strong>Star</strong> <strong>Plus</strong> RDO ® optical DO portable meter with batteries <strong>and</strong> user guide<br />
1213310 4-<strong>Star</strong> <strong>Plus</strong> RDO optical DO/pH portable meter with batteries <strong>and</strong> user guide<br />
1213320 5-<strong>Star</strong> <strong>Plus</strong> RDO optical DO/pH/conductivity portable meter with batteries <strong>and</strong><br />
user guide<br />
Thermo Scientific <strong>Orion</strong> <strong>Star</strong> <strong>and</strong> <strong>Star</strong> <strong>Plus</strong> Series <strong>Meter</strong> User Guide<br />
EN-63
Cat. No. Description<br />
090043 Swing arm electrode st<strong>and</strong><br />
1010003 Universal power adapter<br />
1010006 <strong>Star</strong> series printer with RS232 printer interface cable (Cat. No. 250302-001)<br />
1010053 RS232 computer interface cable<br />
096019 Stirrer probe with paddle, for 3-<strong>Star</strong>, 4-<strong>Star</strong> <strong>and</strong> 5-<strong>Star</strong> benchtop meters<br />
8102BNUWP ROSS Ultra combination pH electrode with glass body<br />
8165BNWP ROSS Sure-Flow combination pH electrode with epoxy body<br />
8172BNWP ROSS Sure-Flow combination pH electrode with glass body<br />
9107BNMD Gel-filled pH/ATC Triode with epoxy body<br />
9157BNMD Refillable pH/ATC Triode with epoxy body<br />
9165BNWP Sure-Flow combination pH electrode with epoxy body<br />
9172BNWP Sure-Flow combination pH electrode with glass body<br />
927005MD ATC probe with epoxy body<br />
927007MD ATC probe with stainless steel body<br />
9512HPBNWP High performance ammonia combination ion selective electrode<br />
9609BNWP Fluoride combination ion selective electrode<br />
9707BNWP Nitrate combination ion selective electrode<br />
8611BNWP ROSS sodium combination ion selective electrode<br />
083005MD Polarographic DO probe with calibration sleeve <strong>and</strong> 1.5 meter cable<br />
083010MD Polarographic DO probe with calibration sleeve <strong>and</strong> 3 meter cable<br />
086030MD Polarographic BOD AUTO-STIR DO probe with calibration sleeve<br />
087010MD RDO ® optical DO sensor with stainless steel guard, RDO cap <strong>and</strong> 3 meter cable<br />
087001 Replacement RDO cap<br />
011050MD Conductivity probe with 1 µS/cm to 20 mS/cm range <strong>and</strong> 1.5 meter cable<br />
013005MD DuraProbe conductivity probe with 1 µS/cm to 200 mS/cm range <strong>and</strong> 1.5 meter cable<br />
013010MD DuraProbe conductivity probe with 1 µS/cm to 200 mS/cm range <strong>and</strong> 3 meter cable<br />
013016MD Conductivity probe with 0.01 µS/cm to 300 µS/cm range <strong>and</strong> 1.5 meter cable<br />
Visit www.thermo.com/water for additional meter kits, accessories, electrodes <strong>and</strong> solutions.<br />
EN-64<br />
Thermo Scientific <strong>Orion</strong> <strong>Star</strong> <strong>and</strong> <strong>Star</strong> <strong>Plus</strong> Series <strong>Meter</strong> User Guide
Appendix A <strong>Meter</strong> Setup Menu Features<br />
pH Setup Menu Features<br />
Automatic buffer recognition<br />
The <strong>Orion</strong> <strong>Star</strong> <strong>and</strong> <strong>Star</strong> <strong>Plus</strong> pH meters are capable of automatically recognizing pH<br />
1 .68, 4 .01, 6 .86, 7 .00, 9 .18, 10 .01 <strong>and</strong> 12 .46 buffers during a pH calibration . During<br />
a calibration, the meter uses the selected buffer set <strong>and</strong> the raw mV reading of the<br />
pH electrode in the buffer to recognize <strong>and</strong> display the buffer value at the measured<br />
temperature . The raw mV value must be about ± 30 mV from the theoretical mV<br />
reading of the buffer in order for the meter to automatically recognize the buffer .<br />
Buffer mV Range Buffer mV Range Buffer mV Range<br />
1.68 +285 to +345 7.00 - 30 to + 30 10.01 -207 to -147<br />
4.01 +207 to +147 9.18 -99 to -159 12.46 -293 to -353<br />
6.86 +38 to -22<br />
Dissolved Oxygen Setup Menu Features<br />
Barometric Pressure Compensation<br />
The <strong>Orion</strong> <strong>Star</strong> <strong>and</strong> <strong>Star</strong> <strong>Plus</strong> dissolved oxygen meters have an internal barometer<br />
that is used for pressure compensated dissolved oxygen readings . The meter can<br />
also use manual barometric pressure compensation if dissolved oxygen is measured<br />
with a submerged probe or in a pressurized vessel . The pressure must be entered<br />
as mm Hg . 1 mm Hg = 0 .03937 inch Hg = 1 .3332 hPa (mBar) = 0 .01934 PSI .<br />
Salinity Correction<br />
Automatic salinity correction for dissolved oxygen readings is available on <strong>Orion</strong><br />
<strong>Star</strong> <strong>and</strong> <strong>Star</strong> <strong>Plus</strong> dissolved oxygen meters that have a conductivity measurement<br />
mode . The meter uses the conductivity value read by the conductivity probe to<br />
calculate the salinity correction factor <strong>and</strong> applies the factor to dissolved oxygen<br />
readings reported as mg/L .<br />
Thermo Scientific <strong>Orion</strong> <strong>Star</strong> <strong>and</strong> <strong>Star</strong> <strong>Plus</strong> Series <strong>Meter</strong> User Guide<br />
EN-65
<strong>Meter</strong> Setup Menu Features<br />
The meter can also use manual salinity correction for dissolved oxygen readings<br />
reported as mg/L . The manual salinity correction factor must be entered as ppt<br />
(parts per thous<strong>and</strong>) .<br />
Conductivity<br />
at 20 °C<br />
(mS/cm)<br />
EN-66<br />
Salinity<br />
Correction<br />
Value (ppt)<br />
Conductivity<br />
at 20 °C<br />
(mS/cm)<br />
Salinity<br />
Correction<br />
Value (ppt)<br />
Conductivity<br />
at 20 °C<br />
(mS/cm)<br />
5 3 20 13 35 25<br />
6 4 21 14 36 25<br />
7 4 22 15 37 26<br />
8 5 23 15 38 27<br />
9 6 24 16 39 28<br />
10 6 25 17 40 29<br />
11 7 26 18 42 30<br />
12 8 27 18 44 32<br />
13 8 28 19 46 33<br />
14 9 29 20 48 35<br />
15 10 30 21 50 37<br />
16 10 31 22 52 38<br />
17 11 32 22 54 40<br />
18 12 33 23 56 42<br />
19 13 34 24<br />
Salinity<br />
Correction<br />
Value (ppt)<br />
This table was calculated from the International Oceanographic Tables, Vol . 1, National Institute of Oceanography<br />
of Great Britain, Womley, Godaming, Surrey, Engl<strong>and</strong> <strong>and</strong> Unesco, Paris 1971 .<br />
Conductivity Setup Menu Features<br />
Temperature Compensation <strong>and</strong> Reference Temperature<br />
The <strong>Orion</strong> <strong>Star</strong> <strong>and</strong> <strong>Star</strong> <strong>Plus</strong> conductivity meters have the ability to use a<br />
temperature compensation feature that calculates <strong>and</strong> displays the conductivity<br />
measurements at a reference temperature of 5 °C, 10 °C, 15 °C, 20 °C or 25 °C<br />
(<strong>Orion</strong> <strong>Star</strong> meters have a reference temperature of 15 °C, 20 °C or 25 °C only) .<br />
The temperature compensation can be set as linear for most aqueous samples,<br />
non-linear for ultra pure <strong>and</strong> low ionic strength samples or off for non-temperature<br />
compensated conductivity measurements .<br />
Thermo Scientific <strong>Orion</strong> <strong>Star</strong> <strong>and</strong> <strong>Star</strong> <strong>Plus</strong> Series <strong>Meter</strong> User Guide
The closer the sample temperature is to the selected reference temperature, the<br />
more accurate the conductivity measurement will be, especially if the temperature<br />
compensation coefficient is estimated or inaccurate .<br />
The conductivity of a solution with a specific electrolyte concentration changes with<br />
temperature <strong>and</strong> this relationship is described by the temperature coefficient of the<br />
solution . The meter has a default temperature coefficient of 2 .1 percent change in<br />
conductivity per ˚C, which is representative of many aqueous samples .<br />
Solution (25 °C to 50 °C) Temperature Coefficient (% / °C)<br />
Ultra Pure Water 4.55<br />
Salt (NaCl) 2.12<br />
5% NaOH 1.72<br />
Dilute Ammonia 1.88<br />
10% HCl 1.32<br />
5% Sulfuric Acid 0.96<br />
98% Sulfuric Acid 2.84<br />
Sugar Syrup 5.64<br />
Total Dissolved Solids (TDS)<br />
The <strong>Orion</strong> <strong>Star</strong> <strong>and</strong> <strong>Star</strong> <strong>Plus</strong> conductivity meters measure TDS as the total amount<br />
of dissolved inorganics in a solution . The dissolved inorganics carry a current that is<br />
measured by the conductivity probe . Since there is a direct relationship between<br />
conductivity <strong>and</strong> TDS, conductivity readings are used to estimate the presence of<br />
inorganics . The user must enter a TDS factor between 0 .01 <strong>and</strong> 10 mg/L in the<br />
setup menu .<br />
Thermo Scientific <strong>Orion</strong> <strong>Star</strong> <strong>and</strong> <strong>Star</strong> <strong>Plus</strong> Series <strong>Meter</strong> User Guide<br />
<strong>Meter</strong> Setup Menu Features<br />
The st<strong>and</strong>ard method of determining TDS involves evaporating a sample to dryness<br />
at 180 ˚C <strong>and</strong> weighing the residue . The TDS factor is calculated by taking the<br />
residue weight <strong>and</strong> dividing it by the sample conductivity . Subsequent conductivity<br />
readings are multiplied by the TDS factor to determine the TDS value of the sample .<br />
EN-67
<strong>Meter</strong> Setup Menu Features<br />
Automatic Calibration<br />
The <strong>Orion</strong> <strong>Star</strong> <strong>and</strong> <strong>Star</strong> <strong>Plus</strong> conductivity meters are capable of automatically<br />
recognizing 100 µS/cm, 1413 µS/cm <strong>and</strong> 12 .9 mS/cm conductivity st<strong>and</strong>ards when<br />
the nominal cell constant of the conductivity probe is entered in the setup menu .<br />
For the meter to recognize the conductivity st<strong>and</strong>ard, the entered cell constant must<br />
be accurate within a factor of 3 . For example, if the actual cell constant is 1 .0 cm -1 ,<br />
entering a nominal cell constant in the range of 0 .3 cm -1 to 3 .0 cm -1 would allow the<br />
meter to identify the conductivity st<strong>and</strong>ard <strong>and</strong> perform the automatic calibration .<br />
SE Setup Menu Features<br />
Concentration Range<br />
The <strong>Orion</strong> <strong>Star</strong> <strong>and</strong> <strong>Star</strong> <strong>Plus</strong> ISE meters can be set for a high or low ISE<br />
concentration range that is used to determine the calibration stability criteria . If a<br />
high ISE concentration range is selected, the meter will perform a normal calibration<br />
with no delay in displaying the calibration st<strong>and</strong>ard value . If a low ISE concentration<br />
range is selected, the meter will wait about three to five minutes before displaying<br />
a stable reading for the calibration st<strong>and</strong>ard values . The delay will depend on the<br />
species being measured <strong>and</strong> the concentration of the calibration st<strong>and</strong>ards . The low<br />
ISE concentration range is designed to improve the accuracy of low concentration<br />
measurements by allowing the electrode to have a longer amount of time to<br />
stabilize in the calibration st<strong>and</strong>ards .<br />
Automatic Blank Correction<br />
The <strong>Orion</strong> <strong>Star</strong> <strong>and</strong> <strong>Star</strong> <strong>Plus</strong> ISE meters have an ISE automatic blank correction<br />
feature that uses an algorithm to compensate for the non-linearity of the ion<br />
selective electrode in low-level st<strong>and</strong>ards <strong>and</strong> samples . Since the automatic blank<br />
correction feature requires the use of a set of non-linear equations that can only<br />
be calculated numerically, the user cannot analytically verify the calibration <strong>and</strong> the<br />
average slope value that is displayed on the meter may be outside of the slope<br />
range that is specified in the electrode user guide . In applications were analytical<br />
verification is required, the automatic blank correction feature should be turned off .<br />
EN-68<br />
Thermo Scientific <strong>Orion</strong> <strong>Star</strong> <strong>and</strong> <strong>Star</strong> <strong>Plus</strong> Series <strong>Meter</strong> User Guide
E S<br />
Contenido<br />
Capítulo I Introducción<br />
Métodos de protección por contraseña . . . . . . . . . . . . . . . . . . . . . . . . . . . . . . . . .ES-1<br />
AUTO-READ . . . . . . . . . . . . . . . . . . . . . . . . . . . . . . . . . . . . . . . . . . . . . . . . . . . .ES-1<br />
Control para agitador . . . . . . . . . . . . . . . . . . . . . . . . . . . . . . . . . . . . . . . . . . . . . . .ES-2<br />
SMART STABILITY y SMART AVERAGING . . . . . . . . . . . . . . . . . . . . . . . . . . .ES-2<br />
Capítulo II Pantalla<br />
Descripción general . . . . . . . . . . . . . . . . . . . . . . . . . . . . . . . . . . . . . . . . . . . . . . . .ES-3<br />
Capítulo III Teclado<br />
Descripción general . . . . . . . . . . . . . . . . . . . . . . . . . . . . . . . . . . . . . . . . . . . . . . . .ES-5<br />
Funciones convenientes . . . . . . . . . . . . . . . . . . . . . . . . . . . . . . . . . . . . . . . . . . . . .ES-6<br />
Señales audibles y alarma . . . . . . . . . . . . . . . . . . . . . . . . . . . . . . . . . . . . . . . . .ES-6<br />
Apagado automático . . . . . . . . . . . . . . . . . . . . . . . . . . . . . . . . . . . . . . . . . . . . . .ES-6<br />
Definición de iconos . . . . . . . . . . . . . . . . . . . . . . . . . . . . . . . . . . . . . . . . . . . . . . . .ES-7<br />
Capítulo IV Preparación<br />
Instalación del adaptador de alimentación . . . . . . . . . . . . . . . . . . . . . . . . . . . . . . .ES-9<br />
Instalación de las baterías . . . . . . . . . . . . . . . . . . . . . . . . . . . . . . . . . . . . . . . . . . ES-10<br />
Conexión de los electrodos . . . . . . . . . . . . . . . . . . . . . . . . . . . . . . . . . . . . . . . . . ES-12<br />
Encendido del instrumento . . . . . . . . . . . . . . . . . . . . . . . . . . . . . . . . . . . . . . . . . . ES-14<br />
Capítulo V Menú Setup<br />
Consejos para la navegación . . . . . . . . . . . . . . . . . . . . . . . . . . . . . . . . . . . . . . . . . ES-15<br />
Settings del menú general . . . . . . . . . . . . . . . . . . . . . . . . . . . . . . . . . . . . . . . . . . ES-16<br />
Ajustes de fecha y hora . . . . . . . . . . . . . . . . . . . . . . . . . . . . . . . . . . . . . . . . . . . . ES-18<br />
Selección de medición continua, con intervalo de tiempo o AUTO-READ . . . . .ES-20<br />
Seleccion<strong>and</strong>o el modo de medición . . . . . . . . . . . . . . . . . . . . . . . . . . . . . . . . . .ES-22<br />
Ajuste de la calibración . . . . . . . . . . . . . . . . . . . . . . . . . . . . . . . . . . . . . . . . . . . . .ES-23<br />
Thermo Scientific <strong>Orion</strong> <strong>Star</strong> <strong>and</strong> <strong>Star</strong> <strong>Plus</strong> Series <strong>Meter</strong> User Guide<br />
S E C C I o n E n E S p a n o l<br />
ES-I
E n<br />
Capítulo VI Técnica del pH<br />
Configuración de pH . . . . . . . . . . . . . . . . . . . . . . . . . . . . . . . . . . . . . . . . . . . . . . .ES-25<br />
Calibración de pH . . . . . . . . . . . . . . . . . . . . . . . . . . . . . . . . . . . . . . . . . . . . . . . . .ES-27<br />
Medición de pH . . . . . . . . . . . . . . . . . . . . . . . . . . . . . . . . . . . . . . . . . . . . . . . . . .ES-28<br />
Capítulo VII Técnica del oxígeno disuelto<br />
Configuración de OD . . . . . . . . . . . . . . . . . . . . . . . . . . . . . . . . . . . . . . . . . . . . . .ES-29<br />
Calibración de OD . . . . . . . . . . . . . . . . . . . . . . . . . . . . . . . . . . . . . . . . . . . . . . . . .ES-31<br />
Medición de OD . . . . . . . . . . . . . . . . . . . . . . . . . . . . . . . . . . . . . . . . . . . . . . . . . .ES-33<br />
Capítulo VIII Técnica de conductividad<br />
Configuración de conductividad . . . . . . . . . . . . . . . . . . . . . . . . . . . . . . . . . . . . . .ES-35<br />
Calibración de conductividad . . . . . . . . . . . . . . . . . . . . . . . . . . . . . . . . . . . . . . . .ES-37<br />
Medición de conductividad . . . . . . . . . . . . . . . . . . . . . . . . . . . . . . . . . . . . . . . . . .ES-39<br />
Capítulo IX Técnica de ISE<br />
Configuración de ISE . . . . . . . . . . . . . . . . . . . . . . . . . . . . . . . . . . . . . . . . . . . . . .ES-41<br />
Preparación de est<strong>and</strong>ares . . . . . . . . . . . . . . . . . . . . . . . . . . . . . . . . . . . . . . . . . .ES-43<br />
Calibración de ISE . . . . . . . . . . . . . . . . . . . . . . . . . . . . . . . . . . . . . . . . . . . . . . . . .ES-44<br />
Medición de ISE . . . . . . . . . . . . . . . . . . . . . . . . . . . . . . . . . . . . . . . . . . . . . . . . . .ES-45<br />
Capítulo X Términos y condiciones<br />
Garantía . . . . . . . . . . . . . . . . . . . . . . . . . . . . . . . . . . . . . . . . . . . . . . . . . . . . . . . .ES-47<br />
Capítulo XI Declaración de conformidad<br />
Cumplimiento de WEEE . . . . . . . . . . . . . . . . . . . . . . . . . . . . . . . . . . . . . . . . . . . .ES-53<br />
ES-II Thermo Scientific <strong>Orion</strong> <strong>Star</strong> <strong>and</strong> <strong>Star</strong> <strong>Plus</strong> Series <strong>Meter</strong> User Guide
Capítulo I<br />
Introducción<br />
¡Felicitaciones! Usted ha elegido un medidor avanzado de la Serie <strong>Orion</strong> <strong>Star</strong><br />
diseñado para la medición electroquímica en campo y laboratorios .<br />
• Los medidores 2 y 3-<strong>Star</strong> miden 1 parámetro, ya sea pH, oxígeno disuelto<br />
o conductividad .<br />
• Los medidores 4-<strong>Star</strong> miden 2 parámetros, pH/OD (oxigeno disuelto),<br />
pH/conductividad, pH/ISE (ion selectivo) .<br />
• El medidor 5-<strong>Star</strong> es multiparamétrico y mide pH/OD/conductividad/ISE<br />
incluyendo mV/ORP .<br />
Estos equipos están construidos para satisfacer las dem<strong>and</strong>as para diversos<br />
laboratorios, en múltiple tipo de ambientes como plantas de producción, plantas de<br />
tratamiento de aguas etc . Estos equipos poseen un microprocesador controlador<br />
que garantiza la precisión y confiabilidad de cada medición . Los modelos portátiles<br />
incluso pueden sumergirse durante cortos espacios de tiempo sin que esto afecte<br />
de manera negativa su funcionamiento . Para satisfacer las necesidades relacionadas<br />
a la proteccion del medio ambiente asi como las necesidades de los usuarios en<br />
los laboratorios dedicados al control alimenticio, farmacéutico y de productos de<br />
consumo, la Serie <strong>Orion</strong> <strong>Star</strong> incluye las siguientes funciones:<br />
• Métodos de protección por contraseña - La memoria del medidor<br />
almacena hasta diez mediciones y calibraciones personalizadas para su uso<br />
como referencia . La contraseña en cada método elimina cualquier posibilidad<br />
de manipulación ya que todos los usuarios accederán sólo al procedimiento<br />
adecuado para su trabajo .<br />
• AUTO-READ - El instrumento empieza una medición e imprime o registra los<br />
datos cu<strong>and</strong>o la lectura se estabiliza, de manera automática .<br />
Thermo Scientific <strong>Orion</strong> <strong>Star</strong> <strong>and</strong> <strong>Star</strong> <strong>Plus</strong> Series <strong>Meter</strong> User Guide<br />
ES-1
Introducción<br />
• Control para agitador - Los medidores de mesa (3-<strong>Star</strong> y superiores)<br />
disponen de este control para ser usado con el agitador 096019 y la sonda BOD<br />
AUTO-STIR, lo cual elimina el uso de placas o barras agitadoras .<br />
• SMART STABILITY y SMART AVERAGING - La compensación<br />
automática de las condiciones de la medición optimiza el tiempo de respuesta y<br />
elimina cualquier necesidad de calcular aproximaciones .<br />
Cada medidor contiene una Guía rápida, adherida al equipo, para el uso diario .<br />
Lea el manual con atención antes de empezar a utilizar su medidor portátil o de<br />
mesa . Cualquier otro uso que no sea el contemplado en estas instrucciones puede<br />
suponer la anulación de la garantía y/o producir averías no reparables en el medidor .<br />
ES-2 Thermo Scientific <strong>Orion</strong> <strong>Star</strong> <strong>and</strong> <strong>Star</strong> <strong>Plus</strong> Series <strong>Meter</strong> User Guide
Capítulo II<br />
pantalla<br />
Descripción general<br />
A lo largo del proceso, la pantalla LCD de los medidores Serie <strong>Orion</strong> <strong>Star</strong><br />
proporciona datos de Temperatura y Calibración . La configuración sólo aparece<br />
cu<strong>and</strong>o el medidor se encuentra en el modo setup . indica una condición de<br />
error; cu<strong>and</strong>o aparece con un , significa que existe un problema con la calidad del<br />
sensor .<br />
se describe con más detalle en el Capítulo V, Menú Setup .<br />
Temperatura<br />
Calibración<br />
Medidor 5 <strong>Star</strong><br />
La ilustración corresponde a la pantalla LCD del modelo 5-<strong>Star</strong> con capacidad de<br />
medición multiparamétrica .<br />
Thermo Scientific <strong>Orion</strong> <strong>Star</strong> <strong>and</strong> <strong>Star</strong> <strong>Plus</strong> Series <strong>Meter</strong> User Guide<br />
pH/ISE/ORP<br />
Unidades<br />
Conductividad<br />
Unidades<br />
OD Unidades<br />
ES-3
Pantalla<br />
Nota: las 3 líneas inferiores de datos corresponden a lo que se está midiendo. s<br />
A pH, mV, mV Rel o ISE<br />
B Conductividad, TDS, Salinidad o<br />
Resistividad<br />
C Oxígeno disuelto % saturación,<br />
concentración de oxígeno disuelto,<br />
o presión barométrica<br />
Las unidades de medida, en el lado derecho de la pantalla, destellan (flash) hasta<br />
que la lectura se estabilice .<br />
ES-4 Thermo Scientific <strong>Orion</strong> <strong>Star</strong> <strong>and</strong> <strong>Star</strong> <strong>Plus</strong> Series <strong>Meter</strong> User Guide
Capítulo III<br />
Teclado<br />
Descripción general<br />
La disposición del teclado es idéntica en todos los medidores de la Serie <strong>Orion</strong> <strong>Star</strong> .<br />
Los modelos portátiles y los medidores de mesa 2-<strong>Star</strong> tienen 9 teclas . Los modelos<br />
de mesa 3-, 4- y 5-<strong>Star</strong> disponen de un botón adicional y tienen 10 teclas .<br />
Teclado del medidor portatil<br />
Calibrar<br />
Encendido/apagado Iluminación<br />
Desplazamiento arriba<br />
Dígitos<br />
Selección de línea<br />
Desplazamiento abajo<br />
Configuración<br />
Teclado de del medidor de mesa<br />
Calibrar<br />
Desplazamiento<br />
arriba<br />
Dígitos<br />
Configuración<br />
Encendido/apagado<br />
Iluminación<br />
Thermo Scientific <strong>Orion</strong> <strong>Star</strong> <strong>and</strong> <strong>Star</strong> <strong>Plus</strong> Series <strong>Meter</strong> User Guide<br />
Medir<br />
Guardar/Imprimir<br />
Ver registro<br />
Medir<br />
Guardar/Imprimir<br />
Agitador encendido/<br />
apagado (no en pH 2-<strong>Star</strong>)<br />
Selección de línea<br />
Ver registro<br />
Desplazamiento abajo<br />
ES-5
Teclado<br />
La parte central del teclado, de diseño ergonómico, es para realizar la configuración<br />
(setup) y para navegar con el uso del teclado . En particular,<br />
emplean con frecuencia para cambiar pantallas .<br />
y / se<br />
Funciones convenientes incluidas:<br />
• Iluminación de pantalla: al presionar con rapidez la iluminación de la<br />
pantalla se enciende y apaga . Cu<strong>and</strong>o el medidor funciona con alimentación de<br />
baterías, esta iluminación se apaga de manera automática después de 2 minutos<br />
para ahorrar energía . Si las baterías tienen poca carga, deja de encenderse .<br />
• Apagado automático: todos los medidores Serie <strong>Orion</strong> <strong>Star</strong> se apagan al<br />
transcurrir veinte minutos sin que se presione ninguna tecla . Esto ahorra la<br />
máxima energía en los medidores portátiles y de mesa cu<strong>and</strong>o se utilizan con<br />
alimentación de las baterías .<br />
• Señales audibles: el medidor emite un pitido cada vez que el usuario presiona<br />
una tecla a fin de confirmar el com<strong>and</strong>o recibido .<br />
• Señales de alarma visuales: el destell<strong>and</strong>o e indican que los valores<br />
de calibración requieren ajuste . Para obtener más información, consulte las<br />
secciones de este manual en que se describen los métodos de medición<br />
específicos .<br />
Con el propósito de familiarizarse con las funciones, consulte las siguientes<br />
definiciones de los iconos .<br />
ES-6 Thermo Scientific <strong>Orion</strong> <strong>Star</strong> <strong>and</strong> <strong>Star</strong> <strong>Plus</strong> Series <strong>Meter</strong> User Guide
Definición de iconos<br />
Tecla Descripción Tecla Descripción<br />
• Enciende el medidor cu<strong>and</strong>o<br />
está apagado .<br />
• Activa y desactiva la<br />
iluminación de la pantalla<br />
cu<strong>and</strong>o el medidor está<br />
encendido .<br />
• Si el medidor está encendido,<br />
al presionar se apaga .<br />
Mueve la flecha a la izquierda<br />
de la pantalla entre las 3 líneas<br />
para selección y edición .<br />
Inicia la calibración de la<br />
línea y el modo de medición<br />
seleccionados .<br />
• Si la flecha está en la primera<br />
línea y las unidades actuales<br />
son pH, empezará una<br />
calibración de pH .<br />
• Cada vez que se presiona<br />
en una calibración, el equipo<br />
acepta el valor de referencia y<br />
se mueve al siguiente punto<br />
de calibración hasta ejecutar<br />
el número máximo de puntos<br />
de calibración; después<br />
vuelve al modo de medición .<br />
Thermo Scientific <strong>Orion</strong> <strong>Star</strong> <strong>and</strong> <strong>Star</strong> <strong>Plus</strong> Series <strong>Meter</strong> User Guide<br />
Teclado<br />
• Cambia el modo de<br />
medición en la línea<br />
seleccionada .<br />
• Cambia la línea seleccionada<br />
en setup (configuración),<br />
methods (métodos) y log<br />
view (vista de registro) .<br />
• Permite editar el valor del<br />
dígito que está destell<strong>and</strong>o<br />
en el setup (configuración),<br />
calibration (calibración) y<br />
password (contraseña) .<br />
Cambia de dígito seleccionado<br />
para edición y traslada<br />
el punto decimal cu<strong>and</strong>o<br />
se modifican valores en<br />
configuration, password y<br />
calibration .<br />
• Imprime y registra una<br />
medición en modo continuo<br />
o de intervalo de tiempo .<br />
• Imprime, registra y congela<br />
las operaciones en la<br />
pantalla cu<strong>and</strong>o la lectura se<br />
estabiliza en el modo AUTO-<br />
READ .<br />
• Sale del modo setup y<br />
vuelve al modo de medición .<br />
• Acepta los puntos de<br />
calibración y vuelve al modo<br />
de medición .<br />
ES-7
Teclado<br />
Tecla Descripción Tecla Descripción<br />
Accede al menú setup y<br />
empieza por la línea y el modo<br />
de medición seleccionados:<br />
Si la flecha se encuentra en la<br />
primera línea y las unidades<br />
actuales son ISE, permite<br />
acceder a la pantalla de<br />
configuración de ISE .<br />
Accede a las pantallas log<br />
view (vista de registro) y<br />
download (descargas) .<br />
Enciende y apaga el agitador .<br />
ES-8 Thermo Scientific <strong>Orion</strong> <strong>Star</strong> <strong>and</strong> <strong>Star</strong> <strong>Plus</strong> Series <strong>Meter</strong> User Guide
Capítulo IV<br />
preparación<br />
Instalación del adaptador de alimentación<br />
La fuente de alimentación universal que se suministra con el medidor de mesa es la<br />
ÚNICA fuente de alimentación cuyo uso se recomienda con esta unidad . Utilizar otra<br />
distinta anulará la garantía del equipo .<br />
La fuente de suministro eléctrico externa puede funcionar con 100-240 V CA, 0,5 A,<br />
50/60 Hz .<br />
Elija, para el voltaje correcto, uno de los tres enchufes suministrados (110V, 220V<br />
o 240V) e introdúzcalo en las ranuras del adaptador . Al escuchar “clic”, el enchufe<br />
queda colocado en su posición .<br />
Conecte el enchufe de salida de la fuente de suministro eléctrico a la toma de<br />
alimentación en el medidor de mesa . Consulte el diagrama de la sección Conexión<br />
de electrodos .<br />
Thermo Scientific <strong>Orion</strong> <strong>Star</strong> <strong>and</strong> <strong>Star</strong> <strong>Plus</strong> Series <strong>Meter</strong> User Guide<br />
ES-9
Preparación<br />
Instalación de las baterías<br />
Los medidores Serie <strong>Orion</strong> <strong>Star</strong> utilizan cuatro baterías alcalinas de tipo AA . No<br />
instale baterías de litio ni recargables . El uso de baterías no alcalinas puede ser<br />
peligroso .<br />
Nota: Para los medidores de mesa: no es necesario instalar las baterías si el<br />
medidor va a estar siempre conectado al suministro de red CA mediante la fuente<br />
de suministro eléctrico universal. s<br />
1 . Confirme que el medidor está apagado .<br />
2 . Coloque el medidor boca arriba sobre un paño limpio y sin hilachas para evitar<br />
daños a la pantalla .<br />
3 . Retire la tapa del compartimiento de baterías .<br />
4 . Introduzca unas baterías nuevas con el polo “+” orientado como se ilustra<br />
dentro del compartimiento .<br />
5 . Vuelva a colocar la tapa .<br />
ES-10 Thermo Scientific <strong>Orion</strong> <strong>Star</strong> <strong>and</strong> <strong>Star</strong> <strong>Plus</strong> Series <strong>Meter</strong> User Guide
6 . Los datos, calibraciones y métodos que estén almacenados permanecen en la<br />
memoria no volátil del equipo cu<strong>and</strong>o se reemplazan las baterías, aunque será<br />
necesario restablecer la hora y fecha .<br />
Thermo Scientific <strong>Orion</strong> <strong>Star</strong> <strong>and</strong> <strong>Star</strong> <strong>Plus</strong> Series <strong>Meter</strong> User Guide<br />
Preparación<br />
Nota: Para los medidores portátiles: las baterías están suministradas e instaladas<br />
de fábrica. s<br />
Para acceder al compartimiento de baterías en los medidores portátiles, afloje los<br />
dos tornillos en la parte central trasera del equipo . Tenga en cuenta que son tornillos<br />
prisioneros y no es posible soltarlos del todo .<br />
ES-11
Preparación<br />
Conexión de los electrodos<br />
Siga los diagramas a continuación para conectar los electrodos y las sondas al<br />
medidor de manera correcta . Las ilustraciones corresponden al medidor 5-<strong>Star</strong>; los<br />
demás modelos disponen de menos conexiones .<br />
Medidor de mesa - Conexiones de electrodos<br />
Toma de agitador,<br />
agitador o sonda OD<br />
con autoagitación<br />
pH o ISE<br />
de referencia<br />
Cond<br />
o ATC<br />
8 pin<br />
Medidor portátil - Conexiones de electrodos<br />
Conector BNC<br />
Cond o<br />
ATC 8 pin<br />
Conector<br />
BNC<br />
OD 9 pin<br />
RS232<br />
OD<br />
9 pin<br />
RS232<br />
Tierra<br />
Encendido/apagado<br />
ES-12 Thermo Scientific <strong>Orion</strong> <strong>Star</strong> <strong>and</strong> <strong>Star</strong> <strong>Plus</strong> Series <strong>Meter</strong> User Guide
Algunas conexiones permiten varios usos, por ejemplo:<br />
• El conector BNC se utiliza para conectar las sondas combinadas pH, ISE y ORP<br />
así como los electrodos a prueba de agua con conectores BNC .<br />
• Los medidores de mesa incluyen una toma tipo pin para un electrodo de<br />
referencia independiente . En estos casos, se requiere el electrodo detector con<br />
conexión BNC .<br />
• El electrodo 970899WP para oxígeno disuelto se puede utilizar con el conector<br />
BNC .<br />
• Utilice el conector MiniDIN de 8 pines a prueba de agua para las sondas de<br />
conductividad .<br />
• El conector MiniDIN de 8 pines también se utiliza para las sondas ATC<br />
(compensación de temperatura automática) .<br />
• La sonda para oxígeno disuelto AUTO-STIR utiliza el conector MiniDIN de<br />
9 pines y el conector del agitador para el conector de la sonda que es más<br />
pequeño .<br />
Thermo Scientific <strong>Orion</strong> <strong>Star</strong> <strong>and</strong> <strong>Star</strong> <strong>Plus</strong> Series <strong>Meter</strong> User Guide<br />
Preparación<br />
ES-13
Preparación<br />
Encendido del instrumento<br />
Con las baterías instaladas en el medidor portátil, y las baterías o la línea de<br />
alimentación en el medidor de mesa, presione para encender el instrumento .<br />
Cu<strong>and</strong>o se presiona rápidamente con el medidor encendido, la iluminación de la<br />
pantalla se activa y desactiva . Cu<strong>and</strong>o el medidor de mesa funciona con la línea de<br />
alimentación, la pantalla permanece activada hasta que se desactive presion<strong>and</strong>o la<br />
tecla . Para apagar el equipo, mantenga presionado durante 3 segundos .<br />
ES-14 Thermo Scientific <strong>Orion</strong> <strong>Star</strong> <strong>and</strong> <strong>Star</strong> <strong>Plus</strong> Series <strong>Meter</strong> User Guide
Capítulo V<br />
Menú Setup<br />
Consejos de navegación<br />
• El permite acceder al modo de configuración .<br />
• Los elementos de menú principal se muestran en la<br />
primera línea de la pantalla . Presione / para<br />
desplazarse por el menú . El texto que aparece en la<br />
pantalla está mostrado en la columna Pantalla de las<br />
tablas que aparecen en las páginas a continuación .<br />
• Utilice para seleccionar la línea de arriba, del<br />
medio o de abajo .<br />
• Utilice / junto con para editar los valores<br />
en la línea seleccionada .<br />
• Presione para aceptar los cambios y para regresar<br />
al icono de la línea superior .<br />
• Utilice para guardar los cambios y volver al modo<br />
de medición .<br />
Thermo Scientific <strong>Orion</strong> <strong>Star</strong> <strong>and</strong> <strong>Star</strong> <strong>Plus</strong> Series <strong>Meter</strong> User Guide<br />
ES-15
Menú Setup<br />
Settings del menú general<br />
En la tabla siguiente se describe la configuración general del equipo .<br />
Descripción pantalla Rango de valores Valor por Específico<br />
defecto del método<br />
Ajuste de compensación gEn -5,0 - 105 25,0 Sí<br />
de temperatura manual dEgC<br />
25.0<br />
Ajuste de velocidad del gEn oFF, 1, 2, 3, 4, 5, 6, 7 4 Sí<br />
agitador (sólo medidores de<br />
mesa)<br />
StIr<br />
4<br />
Selección de apagado<br />
gEn oFF, on on No<br />
automático<br />
AUtO<br />
On<br />
• Compensación de temperatura manual permite controlar la compensación<br />
de la temperatura cu<strong>and</strong>o no hay sensores conectados al instrumento .<br />
• Velocidad del agitador (sólo medidores de mesa, excluyendo el medidor<br />
2-<strong>Star</strong>) permite ajustar la velocidad entre 1 y 7 siendo 1 la más lenta y 7 la más<br />
rápida . Es recomendable una velocidad de 3 o 4 en casi todas las aplicaciones .<br />
• Apagado automático controla si se desconecta el instrumento<br />
automáticamente después de 20 minutos sin presionar ninguna tecla . Si desea<br />
desactivar esta función, seleccione OFF para que el instrumento no se apague .<br />
ES-16 Thermo Scientific <strong>Orion</strong> <strong>Star</strong> <strong>and</strong> <strong>Star</strong> <strong>Plus</strong> Series <strong>Meter</strong> User Guide
para acceder a estos parámetros:<br />
1 . En el modo de medición, presione .<br />
2 . Presione / para desplazarse por el menú de<br />
configuración hasta que aparezca en la primera línea .<br />
3 . Presione para aceptar la selección y para regresar al<br />
icono de la línea del medio .<br />
4 . Presione / para desplazarse por:<br />
a . = Compensación de temperatura manual<br />
b . = Activar y ajustar la velocidad del agitador<br />
c . = Apagado automático activar/desactivar<br />
5 . Presione para aceptar la selección y para regresar al<br />
icono de la línea inferior .<br />
a . Presione / para identificar el siguiente valor y<br />
para editarlo .<br />
b . Presione para aceptar la selección y para regresar al<br />
icono de la línea superior .<br />
6 . Presione para volver al modo de medición .<br />
Thermo Scientific <strong>Orion</strong> <strong>Star</strong> <strong>and</strong> <strong>Star</strong> <strong>Plus</strong> Series <strong>Meter</strong> User Guide<br />
Menú Setup<br />
ES-17
Menú Setup<br />
ajustes de fecha y hora<br />
En la siguiente tabla se describen en detalle las abreviaturas mostradas en la<br />
pantalla .<br />
Descripción pantalla Rango de valores Valor por<br />
defecto<br />
Tiempo: ajuste de horas dAtE 00 - 23<br />
HOUr Define la hora actual en<br />
HH12<br />
el formato de 24 horas<br />
Tiempo: ajuste de minutos dAtE 00 - 59<br />
tInE Define los minutos de la<br />
mm12<br />
hora actual<br />
Formato de fecha dAtE mdY, dmY<br />
tYPE Selección de mes, día,<br />
dmY<br />
año, o día, mes, año<br />
Fecha: ajuste del año dAtE 00 - 99<br />
YEAr Define el año de la<br />
2004<br />
hora actual entre 2000<br />
y 2099<br />
Fecha: ajuste del mes dAtE 01 - 12<br />
dAtE Define el mes entre 01<br />
mm01<br />
“Jan” y 12 “Dec”<br />
Fecha: ajuste del día del<br />
mes<br />
dAtE<br />
dAY<br />
dd01<br />
01 - 31<br />
Día del mes<br />
12 No<br />
00 No<br />
mdY No<br />
04 No<br />
01 No<br />
01 No<br />
Específico<br />
del método<br />
ES-18 Thermo Scientific <strong>Orion</strong> <strong>Star</strong> <strong>and</strong> <strong>Star</strong> <strong>Plus</strong> Series <strong>Meter</strong> User Guide
1 . En el modo de medición, presione .<br />
2 . Presione / para desplazarse por el menú de<br />
configuración hasta que aparezca en la primera línea .<br />
3 . Presione para confirmar el parámetro y para regresar al<br />
icono de la línea del medio .<br />
4 . Presione / para desplazarse por:<br />
a . = Hora actual<br />
b . = Minutos actuales<br />
c . = Fecha en formato de “mdY” (mes, día, año) o<br />
“dmY” (día, mes, año) .<br />
d . = Mes actual (utilice los equivalentes numéricos<br />
para los meses del año) .<br />
e . = Día del mes<br />
f . = Año actual<br />
5 . Presione para aceptar la selección y para regresar al<br />
icono de la línea inferior .<br />
6 . Presione / y para editar el valor seleccionado .<br />
7 . Presione para aceptar la selección y para regresar al<br />
icono de la línea superior .<br />
8 . Repita los pasos del 3 al 7 si necesita editar los valores de<br />
fecha y hora .<br />
9 . Presione para volver al modo de medición .<br />
Thermo Scientific <strong>Orion</strong> <strong>Star</strong> <strong>and</strong> <strong>Star</strong> <strong>Plus</strong> Series <strong>Meter</strong> User Guide<br />
Menú Setup<br />
ES-19
Menú Setup<br />
Selección de medición continua, con intervalo de tiempo o<br />
aUTo-REaD<br />
En la siguiente tabla se describen en detalle las abreviaturas mostradas en la<br />
pantalla .<br />
Descripción pantalla Rango de valores Valor por<br />
defecto<br />
Selección de medición<br />
continua, con intervalo<br />
de tiempo o Auto-Read<br />
Ajuste de lectura con<br />
intervalo de tiempo<br />
rEAd<br />
tYPE<br />
COnt<br />
rEAd<br />
tInE<br />
00:00<br />
Cont, aUto, tImE<br />
Intervalo de tiempo,<br />
Continua o Auto-Read;<br />
Imprime y registra los datos<br />
automáticamente en los<br />
modos AUTO y de Intervalo<br />
de Tiempo<br />
00:05 - 99:61<br />
Lecturas con intervalo de<br />
tiempo en minutos y segundos<br />
aUto Sí<br />
01:00 Sí<br />
Específico<br />
del método<br />
Si desea cambiar los valores, utilice y / para desplazarse entre las<br />
opciones . Al presionar confirma el cambio del valor y la pantalla deja de destellar .<br />
Los medidores de la Serie <strong>Orion</strong> <strong>Star</strong> permiten seleccionar el tiempo de los<br />
intervalos de medición .<br />
• En el modo Continuo, el instrumento realiza mediciones y<br />
actualiza la pantalla de manera constante . Para imprimir y<br />
registrar la medición en este modo, presione .<br />
• En el modo de Intervalo de tiempo, el instrumento realiza<br />
mediciones y actualiza la pantalla de manera constante,<br />
además de registrar e imprimir los datos en el intervalo de<br />
tiempo seleccionado .<br />
• En el menú de Setup introduzca los minutos y segundos<br />
entre las lecturas de intervalo de tiempo presion<strong>and</strong>o<br />
ES-20 Thermo Scientific <strong>Orion</strong> <strong>Star</strong> <strong>and</strong> <strong>Star</strong> <strong>Plus</strong> Series <strong>Meter</strong> User Guide
para cambiar el valor del dígito que destella . Presione<br />
para cambiar de dígito .<br />
• El intervalo de tiempo mínimo es de 5 segundos . Los<br />
rangos de tiempo admitidos son: –<br />
• En el modo AUTO-READ el instrumento empieza una<br />
medición cada vez que se presiona . Una vez que la<br />
lectura se estabiliza, la pantalla se detiene y los datos se<br />
registran e imprimen de forma automática .<br />
• El modo AUTO-READ opera automáticamente el<br />
Control del agitador . La agitación se detendrá<br />
cu<strong>and</strong>o la lectura se estabilice . Para ajustar la velocidad<br />
del agitador, presione<br />
seleccionar:<br />
. Utilice / para<br />
AUTO-READ<br />
Thermo Scientific <strong>Orion</strong> <strong>Star</strong> <strong>and</strong> <strong>Star</strong> <strong>Plus</strong> Series <strong>Meter</strong> User Guide<br />
Menú Setup<br />
ES-21
Menú Setup<br />
Seleccion<strong>and</strong>o el modo de medición<br />
En el modo de medición, la flecha en el lado izquierdo de la pantalla indica el modo<br />
que está seleccionado . Utilice / para desplazarse por los distintos modos<br />
asociados a la línea seleccionada . Utilice para mover la flecha a la siguiente<br />
línea y después presione<br />
la línea seleccionada .<br />
/ para desplazarse por los modos asociados con<br />
pH<br />
mV<br />
Rel mV<br />
ISE<br />
Off<br />
μS/cm o mS/cm para conductividad<br />
mg/L para TDS<br />
ppt para Salinidad<br />
M?-cm for resistividad<br />
apagado<br />
%Sat para saturación porcentual de OD<br />
mg/L para concentración de OD<br />
Presión barométrica<br />
desactivada<br />
Para obtener más información de configuración relativa a las técnicas específicas,<br />
consulte del Capítulo VI al Capítulo IX de este manual .<br />
ES-22 Thermo Scientific <strong>Orion</strong> <strong>Star</strong> <strong>and</strong> <strong>Star</strong> <strong>Plus</strong> Series <strong>Meter</strong> User Guide
ajuste de la calibración<br />
El símbolo indica el modo de calibración o el setup para calibración .<br />
Antes de empezar una calibración, prepare su electrodo y/o sonda de acuerdo<br />
con las instrucciones incluidas con el electrodo . Los estándares de calibración, los<br />
tampones o el manguito de calibración deben estar preparados antes de realizar la<br />
calibración . Después de preparar el electrodo o la sonda según las instrucciones<br />
del fabricante, conecte el electrodo o la sonda al medidor . En las secciones<br />
correspondientes de este manual, se incluye información básica sobre la calibración<br />
en cada una de las técnicas de medición .<br />
navegación general para seleccionar la calibración adecuada<br />
1 . En el modo de medición, presione hasta que la flecha en la izquierda de la<br />
pantalla apunte hacia el modo de medición que se va a calibrar:<br />
pH, ORP, ISE • Conductivity (conductividad) • DO (OD)<br />
2 . Presione / hasta que se ilumine el icono correspondiente al modo de<br />
medición que desea calibrar .<br />
A – pH/ORP/ISE<br />
Icono pH - calibración pH<br />
Icono RmV - calibración ORP<br />
Icono ISE o ninguno - calibración ISE<br />
B – Calibración de conductividad<br />
Icono mS/cm, μS/cm, mg/L, ppt y MΩ-cm<br />
C – Calibración de OD<br />
Icono % sat o mg/L<br />
Ningún icono - Calibración de barómetro<br />
3 . Presione para empezar la calibración seleccionada .<br />
Thermo Scientific <strong>Orion</strong> <strong>Star</strong> <strong>and</strong> <strong>Star</strong> <strong>Plus</strong> Series <strong>Meter</strong> User Guide<br />
Menú Setup<br />
ES-23
noTaS<br />
ES-24 Thermo Scientific <strong>Orion</strong> <strong>Star</strong> <strong>and</strong> <strong>Star</strong> <strong>Plus</strong> Series <strong>Meter</strong> User Guide
Capítulo VI<br />
Técnica del pH<br />
Configuración de pH<br />
En la tabla siguiente se describe la configuración para medición de pH .<br />
Descripción pantalla Rango de valores Valor Especí-<br />
por fico del<br />
defecto método<br />
Resolución de pH PH<br />
rES<br />
0.01<br />
0,1; 0,01; 0,001 0,01 Sí<br />
Juego de tampones pH PH USa (tampones EE.UU.)<br />
USa Sí<br />
bUF<br />
USA<br />
1,68; 4,01; 7,00; 10,01; 12,46<br />
EUro (tampones europeos)<br />
1,68; 4,01; 6,86; 9,18<br />
1 . En el modo de medición, presione .<br />
2 . Presione / para desplazarse por el menú de<br />
configuración hasta que aparezca en la primera línea .<br />
3 . Presione para confirmar el parámetro y para regresar al<br />
icono de la línea del medio .<br />
4 . Presione<br />
resolución .<br />
/ para seleccionar para la<br />
5 . Presione para seleccionar la opción y para regresar al<br />
icono de la línea inferior .<br />
Thermo Scientific <strong>Orion</strong> <strong>Star</strong> <strong>and</strong> <strong>Star</strong> <strong>Plus</strong> Series <strong>Meter</strong> User Guide<br />
ES-25
Técnica del pH<br />
a . Presione / para definir la resolución deseada .<br />
6 . Presione para aceptar la selección y para regresar al<br />
icono de la línea superior .<br />
7 . Presione para desplazarse a la línea del medio y presione<br />
/ a fin de seleccionar el valor de Auto-Buffer-<br />
Recognition; después presione otra vez para desplazarse<br />
a la línea inferior .<br />
8 . Presione / para elegir o ; presione<br />
para aceptar la selección .<br />
9 . Presione para volver al modo de medición .<br />
ES-26 Thermo Scientific <strong>Orion</strong> <strong>Star</strong> <strong>and</strong> <strong>Star</strong> <strong>Plus</strong> Series <strong>Meter</strong> User Guide
Calibración de pH<br />
1 . Prepare el electrodo para su uso de acuerdo con las instrucciones incluidas con<br />
el mismo .<br />
2 . En el modo setup, seleccione el juego de tampones NIST (<br />
de manera que el equipo pueda reconocer el tampón correcto .<br />
) o DIN ( )<br />
3 . Presione hasta que la flecha apunte hacia la línea de medición de pH .<br />
4 . Presione .<br />
5 . Enjuague el electrodo y la sonda ATC y colóquelos dentro del tampón .<br />
6 . Espere a que el icono pH deje de destellar .<br />
a . Reconocimiento de Auto Buffer: cu<strong>and</strong>o el icono pH deje de destellar, el<br />
medidor mostrará el valor de pH con corrección de temperatura para el<br />
tampón .<br />
b . Calibración manual: cu<strong>and</strong>o el icono pH deje de destellar, el medidor<br />
mostrará el valor de tampón que ha leído el electrodo de pH . Utilice<br />
y / para cambiar el valor de pH al valor de pH con temperatura<br />
corregida para el tampón .<br />
7 . Una vez que se muestre el valor de tampón correcto en la pantalla del medidor,<br />
presione para proceder al siguiente punto de calibración y repita los pasos<br />
del 5 al 6, o presione para guardar la calibración .<br />
8 . Antes de que el medidor vuelva al modo de medición se mostrará la pendiente .<br />
aparece en el campo inferior mientras que la pendiente real del electrodo,<br />
en forma de porcentaje, se muestra en el campo principal .<br />
a . En la calibración de un punto, utilice y / para editar la<br />
pendiente y después presione para volver al modo de medición .<br />
b . En una calibración con 2 o más puntos, el equipo procede a la medición<br />
automáticamente 2 segundos después de mostrarse .<br />
Thermo Scientific <strong>Orion</strong> <strong>Star</strong> <strong>and</strong> <strong>Star</strong> <strong>Plus</strong> Series <strong>Meter</strong> User Guide<br />
Técnica del pH<br />
ES-27
Técnica del pH<br />
Medición de pH<br />
1 . Enjuague el electrodo con agua desionizada . Agítelo para eliminar el agua y<br />
séquelo sin frotar con un paño sin hilachas .<br />
2 . Coloque el electrodo en la muestra .<br />
a . Si el instrumento se encuentra en el modo de medición continuo, empezará a<br />
medir de inmediato . Si utiliza el medidor de mesa y el control por agitador está<br />
desactivado, al presionar empezará a funcionar el agitador . pH destellará<br />
hasta que la lectura sea estable . Cu<strong>and</strong>o la lectura sea estable, puede registrar<br />
e imprimir la medición presion<strong>and</strong>o . Si el agitador está encendido,<br />
presione para apagarlo antes de retirarlo de la muestra .<br />
b . Si el instrumento se encuentra en el modo AUTO-READ, presione<br />
para comenzar la medición . Una vez que la lectura se estabiliza, el medidor<br />
registra e imprime los datos, y detiene las operaciones de la pantalla, de<br />
forma automática . Si el agitador está activado se encenderá cu<strong>and</strong>o presione<br />
y se apagará cu<strong>and</strong>o la lectura sea estable .<br />
c . Si el instrumento se encuentra en el modo de medición por intervalo<br />
de tiempo, el equipo empezará a medir con la frecuencia que se haya<br />
especificado en la configuración . Cada medición se registra e imprime de<br />
manera automática . Si utiliza el medidor de mesa y el control del agitador<br />
está activado, al presionar empezará a funcionar el agitador . Presionar<br />
otra vez hará que el agitador se apague .<br />
3 . Retire el electrodo de la muestra y enjuáguelo con agua desionizada; agítelo o<br />
séquelo sin frotar, y colóquelo en la siguiente muestra y repita el paso 2 .<br />
4 . Una vez medidas las muestras, enjuague el electrodo con agua desionizada y<br />
séquelo sin frotar . Consulte en el manual del electrodo las instrucciones para su<br />
almacenamiento correcto .<br />
ES-28 Thermo Scientific <strong>Orion</strong> <strong>Star</strong> <strong>and</strong> <strong>Star</strong> <strong>Plus</strong> Series <strong>Meter</strong> User Guide
Capítulo VII<br />
Técnica del oxígeno Disuelto<br />
Configuración de oD<br />
En la tabla siguiente se describe la configuración para medición del oxígeno<br />
disuelto .<br />
Descripción pantalla Rango de valores Valor por<br />
defecto<br />
Oxígeno disuelto<br />
Resolución de %<br />
saturación<br />
Oxígeno disuelto<br />
Resolución de<br />
concentración<br />
Oxígeno disuelto<br />
Presión barométrica<br />
Selección de la<br />
compensación<br />
Presión barométrica del<br />
oxígeno disuelto<br />
Ajuste manual<br />
Salinidad de oxígeno<br />
disuelto<br />
Selección de la corrección<br />
Factor de corrección<br />
manual de salinidad del<br />
oxígeno disuelto<br />
dO<br />
rES<br />
0.1<br />
dO<br />
rES<br />
0.01<br />
dO<br />
bAr<br />
AUtO<br />
dO<br />
PrES<br />
760.0<br />
dO<br />
SAL<br />
AUtO<br />
dO<br />
SALF<br />
0<br />
1; 0,1<br />
Resolución de % saturación<br />
de oxígeno disuelto<br />
0,1; 0,01<br />
Resolución de concentración<br />
“mg/L” de OD<br />
aUto, man<br />
Selecciona la presión<br />
barométrica<br />
interna o manual<br />
450,0 - 850,0<br />
Valor de compensación<br />
de presión manual<br />
aUto, man<br />
Selecciona el método<br />
de corrección de<br />
salinidad; medidores con<br />
Conductividad solamente<br />
0 - 45<br />
Factor de corrección manual<br />
de salinidad<br />
Thermo Scientific <strong>Orion</strong> <strong>Star</strong> <strong>and</strong> <strong>Star</strong> <strong>Plus</strong> Series <strong>Meter</strong> User Guide<br />
0,1 Sí<br />
0,01 Sí<br />
aUto Sí<br />
760,0 Sí<br />
aUto Sí<br />
0 Sí<br />
Específico<br />
del método<br />
ES-29
Técnica del Oxígeno Disuelto<br />
Descripción pantalla Rango de valores Valor por<br />
defecto<br />
Oxígeno disuelto<br />
Selección del tipo de<br />
calibración<br />
dO<br />
CALt<br />
AIr<br />
aIr, H2o, man, SEt0<br />
AIr = Aire satur. agua,<br />
H2O = Aire satur. agua,<br />
mAn = Manual,<br />
SEt0 = Cal. cero<br />
aIr Sí<br />
Específico<br />
del método<br />
pasos para configurar la medición de oD (oxigeno Disuelto)<br />
1 . En el modo de medición, presione .<br />
2 . Presione / para desplazarse por el menú de configuración hasta que<br />
aparezca en la primera línea .<br />
3 . Presione para confirmar el parámetro y para regresar al icono de la línea del<br />
medio .<br />
4 . Presione / para desplazarse por:<br />
a . + % Sat = Resolución de % saturación<br />
b . + mg/L = Resolución de concentración<br />
c . = Tipo de barómetro (Auto/Manual)<br />
d . = Compensación de presión manual<br />
e . = Compensación de salinidad automática/manual<br />
f . = Corrección de salinidad manual<br />
g . = Tipo de calibración<br />
5 . Presione para seleccionar la opción y para regresar al icono de la línea<br />
inferior .<br />
6 . Presione / y para introducir el valor . La anterior tabla identifica lo<br />
que usted verá en la pantalla y el rango de valores que se pueden seleccionar .<br />
ES-30 Thermo Scientific <strong>Orion</strong> <strong>Star</strong> <strong>and</strong> <strong>Star</strong> <strong>Plus</strong> Series <strong>Meter</strong> User Guide
7 . Después de introducir un valor, presione para completar la programación de<br />
la opción y para regresar al icono de la línea superior . Repita los pasos del 3 al 6<br />
con todas las opciones .<br />
8 . Presione para volver al modo de medición .<br />
Calibración de oD<br />
Es necesario preparar y polarizar la sonda antes de la calibración .<br />
• La sonda de OD se polariza continuamente cu<strong>and</strong>o está conectada al medidor .<br />
Cu<strong>and</strong>o la conecte por primera vez, o después de transcurrir más de 60 minutos<br />
con la sonda desconectada, vuelva a conectarla y deje que transcurran de 30<br />
a 60 minutos para su polarización . Si las lecturas de la sonda son estables, la<br />
desconexión durante menos de 1 hora requerirá de 5 a 25 minutos para que las<br />
lecturas se vuelvan a estabilizar .<br />
Nota: Los medidores <strong>Star</strong> suministran una corriente de polarización a la sonda<br />
de OD incluso cu<strong>and</strong>o están apagados. Para aumentar al máximo la duración<br />
de las baterías en el medidor, desconecte la sonda de OD cu<strong>and</strong>o no se vaya a<br />
utilizar durante un largo periodo de tiempo. s<br />
• Puesta a cero de la sonda: una sonda de OD puede generar entre 0,02 y<br />
0,05 mg/L de error positivo en una solución sin oxígeno (anóxica) . Si este error<br />
es inaceptable, debe poner a cero la sonda utiliz<strong>and</strong>o una nueva membrana con<br />
solución de relleno fresca, o cu<strong>and</strong>o mida oxígeno disuelto por debajo de 1 mg/L<br />
o 10% de saturación .<br />
Debe realizarse una calibración de aire con anterioridad a la calibración de cero .<br />
1 . En el modo de medición, presione .<br />
2 . Presione / hasta que se muestre en la línea superior .<br />
3 . Presione para confirmar el parámetro y para desplazar la flecha a la línea del<br />
medio .<br />
4 . Presione / para desplazarse hasta .<br />
5 . Presione para seleccionar el parámetro y para regresar al icono de la línea<br />
inferior .<br />
Thermo Scientific <strong>Orion</strong> <strong>Star</strong> <strong>and</strong> <strong>Star</strong> <strong>Plus</strong> Series <strong>Meter</strong> User Guide<br />
Técnica del Oxígeno Disuelto<br />
ES-31
Técnica del Oxígeno Disuelto<br />
6 . Presione / para seleccionar uno de los siguientes modos de calibración .<br />
a . denota la calibración efectuada en aire saturado de agua utiliz<strong>and</strong>o la<br />
manga de calibración para aire . Es el método de calibración más sencillo y<br />
preciso . También es el valor ajustado de fábrica del medidor . Si la selección<br />
de calibración no se ha modificado en el modo setup , al presionar<br />
se realiza una calibración de aire automática . Debido a las diferencias<br />
inherentes entre el aire saturado de agua y el agua saturada de aire, en la<br />
estabilización el estándar de aire se ajusta en el 102,3% de saturación .<br />
i . La máxima precisión posible se alcanza cu<strong>and</strong>o la temperatura de<br />
calibración es idéntica a la temperatura de la medición .<br />
ii . Humedezca con agua destilada la esponja o el paño absorbente que está<br />
en la manga de calibración e inserte la sonda en la manga, sin tocar el<br />
material saturado de agua . Para las mediciones de DBO, esta calibración<br />
se puede realizar en una botella de DBO .<br />
iii . En el caso de niveles de oxígeno por debajo de 1 mg/L, se suele requerir<br />
un punto cero de calibración .<br />
b . denota una calibración de agua efectuada con una muestra de agua<br />
saturada de aire al 100% . Es el método de calibración menos utilizado .<br />
c . denota una calibración manual utiliz<strong>and</strong>o una muestra de agua con una<br />
concentración de oxígeno disuelto conocida . Se puede utilizar para calibrar el<br />
sensor en el valor alcanzado en una valoración Winkler .<br />
i . En una calibración de Winkler, es necesario efectuar una valoración<br />
Winkler manual y utilizar la muestra como estándar . El nivel de oxígeno del<br />
resultado de la valoración se introduce en la calibración de Winkler como<br />
valor del estándar de OD . Esto correlaciona la entrada del medidor con la<br />
valoración Winkler . Tome en cuenta que este método es menos preciso<br />
por los posibles errores introducidos cu<strong>and</strong>o la calibración se ajusta según<br />
los resultados de la valoración .<br />
ES-32 Thermo Scientific <strong>Orion</strong> <strong>Star</strong> <strong>and</strong> <strong>Star</strong> <strong>Plus</strong> Series <strong>Meter</strong> User Guide
d . es una calibración en cero que se utiliza para mediciones de nivel<br />
muy bajo de oxígeno disuelto . Normalmente, no se requiere a menos que se<br />
hagan mediciones de saturación inferior al 5%, o de 0,5 mg/L .<br />
7 . Presione para aceptar la selección y para regresar al icono de la línea superior .<br />
8 . Presione para volver al modo de medición .<br />
9 . La sonda y el estándar de calibración (aire saturado de agua, o agua saturada de<br />
aire) deben alcanzar un estado de equilibrio antes de calibrar el sistema .<br />
a . Presione .<br />
b . Espere a que la lectura se estabilice .<br />
c . El medidor mostrará 102,3% y volverá al modo de medición .<br />
Medición de oD<br />
1 . Enjuague la sonda de OD, además del agitador si lo utiliza, con agua desionizada .<br />
Séquelos sin frotar con un papel tisú sin hilachas .<br />
2 . Coloque la sonda de OD en la muestra .<br />
a . Si el instrumento se encuentra en el modo de medición continuo, empezará<br />
a medir de inmediato . Si utiliza el medidor de mesa y el control por agitador<br />
está activado, al presionar empezará a funcionar el agitador .<br />
El destellará hasta que la lectura sea estable . Una vez estabilizada la<br />
lectura, puede registrar e imprimir la medición presion<strong>and</strong>o . Si está<br />
grab<strong>and</strong>o los datos en un PC portátil, grabe tanto el OD como la temperatura<br />
a la que se tomó la lectura del OD . Si el agitador está en movimiento,<br />
presione para apagarlo antes de retirarlo de la muestra .<br />
Thermo Scientific <strong>Orion</strong> <strong>Star</strong> <strong>and</strong> <strong>Star</strong> <strong>Plus</strong> Series <strong>Meter</strong> User Guide<br />
Técnica del Oxígeno Disuelto<br />
ES-33
Técnica del Oxígeno Disuelto<br />
b . Si el instrumento se encuentra en el modo AUTO-READ, presione<br />
para comenzar la medición . Una vez que la lectura se estabiliza, el medidor<br />
registra e imprime los datos, y detiene las operaciones de la pantalla, de<br />
forma automática . Si el agitador está activado se encenderá cu<strong>and</strong>o presione<br />
, y se apagará cu<strong>and</strong>o la lectura sea estable .<br />
Si se utiliza la sonda AUTO-STIR BOD (dem<strong>and</strong>a bioquímica de oxígeno), al<br />
presionar el botón de la sonda, empieza la medición de AUTO-READ .<br />
c . Si el instrumento se encuentra en el modo de medición para intervalo de<br />
tiempo, el equipo empezará a medir con la frecuencia seleccionada en la<br />
configuración inicial del setup . Cada medición se registra e imprime de<br />
manera automática . Si utiliza el medidor de mesa y el control del agitador<br />
está activado, al presionar empezará a funcionar el agitador . Presionar<br />
otra vez hará que el agitador se apague .<br />
3 . Retire la sonda de OD de la muestra y enjuáguelo con agua desionizada;<br />
colóquelo en la siguiente muestra y repita el paso 2 .<br />
4 . Una vez medidas todas las muestras, enjuague la sonda de OD con agua<br />
desionizada y séquelo sin frotar . Consulte en el manual de la sonda de OD las<br />
instrucciones para el almacenamiento correcto de la sonda .<br />
ES-34 Thermo Scientific <strong>Orion</strong> <strong>Star</strong> <strong>and</strong> <strong>Star</strong> <strong>Plus</strong> Series <strong>Meter</strong> User Guide
Capítulo VIII<br />
Técnica de conductividad<br />
Configuración de conductividad<br />
Descripción pantalla Rango de valores Valor por<br />
defecto<br />
Selección para tipo<br />
de compensación<br />
de temperatura en<br />
conductividad<br />
Ajuste del coeficiente<br />
de compensación lineal<br />
de la temperatura de<br />
conductividad<br />
Factor TDS de<br />
conductividad Ajuste<br />
Constante de celda de<br />
calibración automática por<br />
defecto (ajuste)<br />
Selección de referencia<br />
de temperatura de<br />
conductividad<br />
Selección del tipo de celda<br />
de conductividad y rango<br />
manual<br />
COnd<br />
tC<br />
LIn<br />
COnd<br />
COEF<br />
2.1<br />
COnd<br />
tdSF<br />
0.49<br />
COnd<br />
CELL<br />
0.475<br />
COnd<br />
trEF<br />
25<br />
COnd<br />
tYPE<br />
Std<br />
oFF, lIn, nlF<br />
Selección de desactivar (OFF),<br />
lineal o no lineal para agua<br />
natural o ultra pura<br />
0,0 - 10,0<br />
Coeficiente de compens.<br />
lineal de temperatura en %/C<br />
0,00 - 10,0<br />
Factor STD<br />
1 . En el modo de medición, presione .<br />
0,001 - 199,0<br />
Constante de celda usada<br />
para Cond Auto-Calibración<br />
15, 20, 25<br />
Temperatura de referencia de<br />
la conductividad °C<br />
plnr, Std, 1, 2, 3, 4, 5, 6, 7<br />
Celda estándar, planar<br />
ajuste del rango manual 1-7<br />
Thermo Scientific <strong>Orion</strong> <strong>Star</strong> <strong>and</strong> <strong>Star</strong> <strong>Plus</strong> Series <strong>Meter</strong> User Guide<br />
lIn Sí<br />
2,1 Sí<br />
0,49 Sí<br />
0,475 Sí<br />
25 Sí<br />
Std Sí<br />
Específico<br />
del método<br />
2 . Presione / para desplazarse por el menú de configuración hasta que<br />
aparezca en la primera línea .<br />
ES-35
Técnica de conductividad<br />
3 . Presione para aceptar la selección y para regresar al icono de la línea del<br />
medio .<br />
4 . Presione / para desplazarse por los siguientes ajustes de<br />
conductividad:<br />
• = Selección de la compensación de temperatura . Los usuarios<br />
pueden elegir desactivar la compensación de temperatura con<br />
, seleccionar la compensación de temperatura lineal ,<br />
o una compensación no lineal para agua natural y para agua<br />
ultra pura .<br />
• = TCoeficiente de temperatura para la compensación lineal<br />
expresado en % /C .<br />
• = Factor TDS para medición de sólidos totales disueltos .<br />
• = Constante de celda electrolítica de conductividad (constante de<br />
celda nominal utilizada para<br />
Auto-Calibración)<br />
• = Temperatura de referencia para la compensación de temperatura .<br />
Las opciones son grados C, grados C, o grados C .<br />
• = Tipo de celda electrolítica de conductividad (planar o convencional)<br />
5 . Presione para aceptar la selección y para regresar al icono de la línea<br />
inferior .<br />
6 . Presione / y para editar el valor .<br />
7 . Presione para aceptar la selección y para regresar al icono de la línea<br />
superior .<br />
8 . Repita los pasos del 3 al 7 si necesita editar los valores de conductividad .<br />
9 . Presione para volver al modo de medición .<br />
ES-36 Thermo Scientific <strong>Orion</strong> <strong>Star</strong> <strong>and</strong> <strong>Star</strong> <strong>Plus</strong> Series <strong>Meter</strong> User Guide
Calibración de conductividad<br />
1 . Prepare la sonda para utilizarla de acuerdo con el manual de instrucciones de la<br />
sonda o el manual del operador .<br />
2 . En el modo de medición, presione hasta que la flecha apunte hacia la línea<br />
de medición de conductividad .<br />
3 . Presione .<br />
4 . Enjuague la sonda y colóquela en el estándar de conductividad .<br />
5 . Para realizar una calibración manual: la pantalla mostrará la constante de<br />
celda en la línea inferior y el valor de conductividad en la línea del medio .<br />
Utilice y / para cambiar la constante de celda hasta que el valor<br />
de conductividad mostrada coincida con la conductividad del estándar a la<br />
temperatura de medición .<br />
• Si no empieza a cambiar la constante de celda en 5 segundos, el medidor<br />
pasará de manera automática a la pantalla de AUTOCal/DirectCal .<br />
6 . Para realizar una calibración automática o una calibración directa: espere a que el<br />
icono de mS/cm o µS/cm deje de destellar .<br />
• AutoCal: cu<strong>and</strong>o el icono de µS/cm o mS/cm deje de destellar, el medidor<br />
mostrará el valor de temperatura corregido del estándar de conductividad .<br />
• DirectCal: cu<strong>and</strong>o el icono de µS/cm o mS/cm deje de destellar, el medidor<br />
mostrará el valor de conductividad real leído por la sonda de conductividad .<br />
Utilice y / para cambiar el valor de conductividad al valor real<br />
de conductividad del estándar a la temperatura de medición .<br />
7 . Presione para proceder con el siguiente punto de calibración y repita los<br />
pasos del 4 al 6, o presione para guardar y terminar la calibración .<br />
Thermo Scientific <strong>Orion</strong> <strong>Star</strong> <strong>and</strong> <strong>Star</strong> <strong>Plus</strong> Series <strong>Meter</strong> User Guide<br />
Técnica de conductividad<br />
ES-37
Técnica de conductividad<br />
8 . Una vez que haya introducido el valor del último estándar, la constante de<br />
celda se mostrará en el campo inferior y la constante real en el<br />
campo principal . Después el medidor avanza de manera automática al modo de<br />
medición . El signo aparece encima del campo principal .<br />
ES-38 Thermo Scientific <strong>Orion</strong> <strong>Star</strong> <strong>and</strong> <strong>Star</strong> <strong>Plus</strong> Series <strong>Meter</strong> User Guide
Medición de conductividad<br />
1 . Enjuague el electrodo y colóquelo en la muestra . Registre la conductividad<br />
directamente desde la pantalla principal del medidor cu<strong>and</strong>o el icono de mS/cm<br />
o µS/cm deje de destellar, lo que indica que el valor es estable . La temperatura<br />
se muestra en la esquina superior izquierda de la pantalla .<br />
2a . Si el instrumento se encuentra en el modo de medición continuo, empezará a<br />
medir de inmediato . Si utiliza el medidor de mesa y el control por agitador está<br />
activado, al presionar empezará a funcionar el agitador .<br />
El destellará hasta que la lectura sea estable . Una vez estabilizada la lectura,<br />
puede registrar e imprimir la medición presion<strong>and</strong>o . Si está grab<strong>and</strong>o los<br />
datos en un PC portátil, grabe tanto la conductividad como la temperatura a la<br />
que se tomó la lectura del conductividad . Si el agitador está en movimiento,<br />
presione para apagarlo antes de retirarlo de la muestra .<br />
2b . Si el instrumento se encuentra en el modo AUTO-READ, presione<br />
para comenzar la medición . Una vez que la lectura se estabiliza, el medidor<br />
registra e imprime los datos, y detiene las operaciones de la pantalla, de forma<br />
automática . Si el agitador está activado se encenderá cu<strong>and</strong>o presione , y se<br />
apagará cu<strong>and</strong>o la lectura sea estable .<br />
2c . Si el instrumento se encuentra en el modo de medición por intervalo de tiempo,<br />
el equipo empezará a medir con la frecuencia seleccionada en la configuración<br />
inicial del setup . Cada medición se registra e imprime de manera automática . Si<br />
utiliza el medidor de mesa y el control por agitador está activado, al presionar<br />
empezará a funcionar el agitador . Presionar otra vez hará que el<br />
agitador se apague .<br />
Thermo Scientific <strong>Orion</strong> <strong>Star</strong> <strong>and</strong> <strong>Star</strong> <strong>Plus</strong> Series <strong>Meter</strong> User Guide<br />
Técnica de conductividad<br />
ES-39
Técnica de conductividad<br />
3 . Retire la sonda de conductividad de la muestra y enjuáguela con agua<br />
desionizada; colóquela en la siguiente muestra y repita el paso 2 .<br />
4 . Una vez medidas todas las muestras, enjuague la sonda de conductividad con<br />
agua desionizada y séquela sin frotar . Consulte en el manual de la sonda de<br />
conductividad las instrucciones para el almacenamiento correcto .<br />
ES-40 Thermo Scientific <strong>Orion</strong> <strong>Star</strong> <strong>and</strong> <strong>Star</strong> <strong>Plus</strong> Series <strong>Meter</strong> User Guide
Capítulo IX<br />
Técnica de ISE<br />
Configuración de ISE<br />
Descripción pantalla Rango de valores Valor por<br />
defecto<br />
Resolución ISE ISE 1, 2, 3<br />
rES Resolución ISE en<br />
1<br />
dígitos significativos<br />
Unidades ISE ISE M, mG/l, pEr, ppb, nonE<br />
UnIt<br />
PPb<br />
Unidades ISE mostradas<br />
Rango de concentración del<br />
estándar de calibración ISE<br />
ISE<br />
rAng<br />
HIgH<br />
Corrección ISE Auto-Blank ISE<br />
nLIn<br />
AUtO<br />
1 . En el modo de medición, presione .<br />
low, HIgH<br />
Criterios de estabilidad<br />
utilizados durante la<br />
calibración ISE<br />
aUto, oFF<br />
Activa o desactiva la<br />
calibración Auto-Blank<br />
Thermo Scientific <strong>Orion</strong> <strong>Star</strong> <strong>and</strong> <strong>Star</strong> <strong>Plus</strong> Series <strong>Meter</strong> User Guide<br />
1 Sí<br />
ppb Sí<br />
HIgH Sí<br />
aUto Sí<br />
Específico<br />
del método<br />
2 . Presione / para desplazarse por el menú de configuración hasta que<br />
aparezca en la primera línea .<br />
3 . Presione para aceptar la selección y para regresar a la línea del medio .<br />
ES-41
Técnica de ISE<br />
4 . Presione / para desplazarse por las siguientes opciones:<br />
• = Resolución<br />
• = Unidades de medición ISE<br />
• M = Molar<br />
• mG/L = mg/L<br />
• PEr = Porcentual<br />
• PPb = Partes por mil millones<br />
• nOnE = Ninguna unidad<br />
• = Rango de calibración ISE<br />
• HIgH - para la mayoría de mediciones<br />
• LOw - para mediciones de bajo nivel que requieren más tiempo de<br />
estabilización<br />
• = Corrección en blanco no lineal<br />
• OFF<br />
• AUtO<br />
5 . Presione para aceptar la selección y para regresar al icono de la línea<br />
inferior .<br />
6 . Presione / y para editar el valor seleccionado .<br />
7 . Presione para aceptar la selección y para regresar al icono de la línea<br />
superior .<br />
8 . Repita los pasos del 3 al 7 si necesita editar los valores de ISE .<br />
9 . Presione para volver al modo de medición .<br />
ES-42 Thermo Scientific <strong>Orion</strong> <strong>Star</strong> <strong>and</strong> <strong>Star</strong> <strong>Plus</strong> Series <strong>Meter</strong> User Guide
preparación de estándares<br />
Thermo Scientific <strong>Orion</strong> <strong>Star</strong> <strong>and</strong> <strong>Star</strong> <strong>Plus</strong> Series <strong>Meter</strong> User Guide<br />
Técnica de ISE<br />
Los estándares deben prepararse con las mismas unidades de ISE que requieren<br />
los resultados de la muestra . Es preferible realizar diluciones en serie utiliz<strong>and</strong>o<br />
material de laboratorio volumétrico de cristal a fin de obtener los distintos niveles de<br />
concentración .<br />
Nota: Cualquier reactivo, por ejemplo, los ajustadores de fuerza iónica, deberán<br />
añadirse a muestras y estándares como se especifica en la guía del usuario o el<br />
manual de instrucciones del electrodo. s<br />
Los puntos de calibración deben englobar el rango de concentración previsto de<br />
la muestra y deberá existir un cambio por diez en la concentración (p . ej ., 1 ppm y<br />
10 ppm o 10 ppm y 100 ppm) .<br />
Deben utilizarse partes fraccionadas frescas de los estándares en cada calibración .<br />
ES-43
Técnica de ISE<br />
Calibración de ISE<br />
1 . Prepare el electrodo y los estándares para su uso de acuerdo con la guía del<br />
usuario o el manual de instrucciones del electrodo .<br />
2 . Presione hasta que la flecha apunte hacia la línea de medición de ISE .<br />
3 . Presione .<br />
4 . Enjuague el electrodo, agítelo para eliminar el agua desionizada, séquelo sin<br />
frotar e introdúzcalo en el estándar de menor concentración .<br />
5 . Espere a que ISE deje de destellar . Presione<br />
valor del estándar .<br />
/ y para cambiar el<br />
6 . Presione para proceder con el siguiente estándar de menor concentración y<br />
repita los pasos del 4 al 5, siempre de menor a mayor concentración, o presione<br />
para guardar la calibración .<br />
7 . Antes de que el medidor vuelva al modo de medición se mostrará la pendiente .<br />
aparece en el campo inferior mientras que la pendiente real del electrodo,<br />
en mV, se muestra en el campo principal .<br />
Nota: Para una calibración con 2 o más puntos, el equipo procede al modo de<br />
medición automáticamente después de 3 segundos. En la calibración de un<br />
punto, el medidor permite editar la pendiente y después presionar para<br />
cambiar al modo de medición. s<br />
Nota: Si va a editar un valor de pendiente negativo: s<br />
a. Presione hasta que no destelle ningún dígito y destelle el icono de flecha.<br />
b. Presione / para cambiar el signo de la pendiente .<br />
c. Presione para guardar.<br />
ES-44 Thermo Scientific <strong>Orion</strong> <strong>Star</strong> <strong>and</strong> <strong>Star</strong> <strong>Plus</strong> Series <strong>Meter</strong> User Guide
Medición de ISE<br />
Una vez calibrado el electrodo, el medidor está preparado para empezar a realizar<br />
mediciones . Cerciórese de que el instrumento se encuentra en el modo de<br />
medición ( iluminado) y que ISE está iluminado . Si no se ilumina presione<br />
para volver al modo de medición . Si ISE no se ilumina, presione hasta que la<br />
flecha en la izquierda de la pantalla apunte en la primera línea . Después presione<br />
hasta que se ilumine ISE . Ahora está listo para empezar las mediciones .<br />
1 . Enjuague el electrodo con agua desionizada . Agítelo para eliminar el agua y<br />
séquelo sin frotar con un paño sin hilachas .<br />
2 . Coloque el electrodo en la muestra .<br />
a . Si el instrumento se encuentra en el modo de medición continuo, empezará a<br />
medir de inmediato . Si utiliza el medidor de mesa y el control por agitador está<br />
desactivado, al presionar empezará a funcionar el agitador . ISE destellará<br />
hasta que la lectura sea estable . Cu<strong>and</strong>o la lectura sea estable, puede registrar<br />
e imprimir la medición presion<strong>and</strong>o . Si el agitador está encendido,<br />
presione para apagarlo antes de retirarlo de la muestra .<br />
b . Si el instrumento se encuentra en el modo AUTO-READ, presione<br />
para comenzar la medición . Una vez que la lectura se estabiliza, el medidor<br />
registra e imprime los datos, y detiene las operaciones de la pantalla, de<br />
forma automática . Si el agitador está activado se encenderá cu<strong>and</strong>o presione<br />
y se apagará cu<strong>and</strong>o la lectura sea estable .<br />
c . Si el instrumento se encuentra en el modo de medición por intervalo<br />
de tiempo, el equipo empezará a medir con la frecuencia que se haya<br />
especificado en la configuración . Cada medición se registra e imprime de<br />
manera automática . Si utiliza el medidor de mesa y el control del agitador<br />
está activado, al presionar empezará a funcionar el agitador . Presionar<br />
otra vez hará que el agitador se apague .<br />
Thermo Scientific <strong>Orion</strong> <strong>Star</strong> <strong>and</strong> <strong>Star</strong> <strong>Plus</strong> Series <strong>Meter</strong> User Guide<br />
Técnica de ISE<br />
ES-45
Técnica de ISE<br />
3 . Retire el electrodo de la muestra y enjuáguelo con agua desionizada; agítelo o<br />
séquelo sin frotar, y colóquelo en la siguiente muestra y repita el paso 2 .<br />
4 . Una vez medidas las muestras, enjuague el electrodo con agua desionizada y<br />
séquelo sin frotar . Consulte en el manual del electrodo las instrucciones para su<br />
almacenamiento correcto .<br />
ES-46 Thermo Scientific <strong>Orion</strong> <strong>Star</strong> <strong>and</strong> <strong>Star</strong> <strong>Plus</strong> Series <strong>Meter</strong> User Guide
Capítulo X<br />
Términos y condiciones<br />
General<br />
El vendedor ofrece a la venta al comprador (“comprador”) los productos incluidos<br />
(“productos”) con la condición expresa de que el comprador acepte los términos<br />
y condiciones aquí dispuestos . Cualquier otra estipulación contenida en los<br />
documentos emitidos por el comprador se rechaza expresamente; además, si los<br />
términos y condiciones del presente acuerdo fueran distintos de los términos de<br />
la oferta del comprador, este documento se considerará una contraoferta que no<br />
será efectiva como aceptación del documento del comprador . La recepción por el<br />
comprador de los productos o el comienzo de los servicios aquí estipulados por<br />
parte del vendedor, significará la aceptación de este acuerdo por el comprador . Este<br />
documento es una declaración completa y exclusiva del contrato entre el vendedor y<br />
el comprador con respecto a la adquisición de los productos por el segundo . Ninguna<br />
renuncia, consentimiento, modificación, enmienda o cambio de los términos aquí<br />
dispuestos será vinculante a menos que sea por escrito y con firma del vendedor y el<br />
comprador . La no objeción del vendedor a cualquiera de los términos incluidos en las<br />
comunicaciones posteriores del comprador no supondrá una renuncia o modificación<br />
de los términos aquí estipulados . Todos los pedidos están sujetos a la aceptación por<br />
escrito por parte de un representante autorizado del vendedor .<br />
Garantía<br />
La garantía para los productos Thermo Scientific <strong>Orion</strong> cubre aquellos fallos debidos a<br />
defectos en los materiales o mano de obra desde la fecha de adquisición por el usuario .<br />
El usuario debe devolver la tarjeta de garantía y conservar su factura de venta . La<br />
garantía no es válida si se ha utilizado el producto con negligencia o de modo incorrecto,<br />
y si se han intentado reparaciones por personas no autorizadas .<br />
Las garantías incluidas son para los productos vendidos/instalados por<br />
Thermo Fisher Scientific o sus distribuidores autorizados.<br />
Los productos vendidos por distribuidores en EE .UU . o Canadá tendrán que<br />
ser devueltos a Thermo Fisher Scientific para su servicio bajo garantía . Póngase<br />
Thermo Scientific <strong>Orion</strong> <strong>Star</strong> <strong>and</strong> <strong>Star</strong> <strong>Plus</strong> Series <strong>Meter</strong> User Guide<br />
ES-47
Términos y condiciones<br />
en contacto con nuestro departamento de Servicio técnico para obtener más<br />
información . Es necesario solicitar un número de autorización para devolución al<br />
Servicio técnico antes de devolver un producto para su reparación o sustitución bajo<br />
garantía . Si existen fallos dentro del periodo de garantía, Thermo Fisher Scientific<br />
reparará o sustituirá el producto defectuoso a su propia discreción . Pueden cobrarse<br />
cargos adicionales, como el transporte, en los servicios de garantía de algunos<br />
países . Para obtener servicio, llame a Thermo Fisher Scientific (o su distribuidor<br />
autorizado fuera de EE .UU . y Canadá) . Thermo Fisher Scientific se reserva el derecho<br />
de solicitar una prueba de compra, como el recibo o la factura original .<br />
Hay disponible servicio in situ para el BOD AutoEZ . Póngase en contacto con<br />
nuestro Servicio in situ para más detalles sobre los presupuestos, servicios y otras<br />
actividades relacionadas con el servicio in situ .<br />
Los siguientes productos están garantizados como libres de defectos en materiales<br />
y mano de obra desde la fecha de adquisición por el usuario, o la fecha de<br />
expedición de Thermo Fisher Scientific, la que ocurra primero, siempre que se<br />
utilicen de acuerdo con las limitaciones de funcionamiento y los procedimientos de<br />
mantenimiento descritos en el manual de instrucciones, y siempre que no hayan<br />
sufrido accidentes, modificaciones, un uso abusivo o negligente, ni rotura de los<br />
electrodos:<br />
Treinta y seis meses desde la fecha de adquisición por el usuario (o<br />
cuarenta y dos meses desde la fecha de expedición por Thermo Fisher<br />
Scientific)<br />
Toda la Serie <strong>Orion</strong> <strong>Star</strong> de medidores de pH, ISE, OD y conductividad, los<br />
medidores a prueba de agua (630, 635, 830A, 835A, 260A, 261S, 265A, 266S,<br />
130A, 131S, 135A, 136S), los medidores de conductividad (105Aplus, 115Aplus,<br />
125Aplus, 145Aplus, 150Aplus y 162A), los medidores PerpHect ® de pH y pH/<br />
ISE (310, 320, 330, 350, 370), los medidores de pH y pH/ISE (210Aplus, 230Aplus,<br />
250Aplus, 290Aplus, 410Aplus, 420Aplus, 520Aplus, 525Aplus,<br />
710Aplus, 720Aplus y 920Aplus), los medidores pHuture MMS (535A y<br />
555A), el medidor de pH/conductividad (550A), los medidores de oxígeno disuelto<br />
(805Aplus, 810Aplus, 850Aplus y 862A) .<br />
ES-48 Thermo Scientific <strong>Orion</strong> <strong>Star</strong> <strong>and</strong> <strong>Star</strong> <strong>Plus</strong> Series <strong>Meter</strong> User Guide
Thermo Scientific <strong>Orion</strong> <strong>Star</strong> <strong>and</strong> <strong>Star</strong> <strong>Plus</strong> Series <strong>Meter</strong> User Guide<br />
Términos y condiciones<br />
Veinticuatro meses desde la fecha de adquisición por el usuario (o<br />
treinta y seis meses desde la fecha de expedición por Thermo Fisher<br />
Scientific)<br />
Electrodos Ross Ultra ®, colorímetros AQUAfast ® IV, turbidímetro AQUAfast ® IV,<br />
celdas de conductividad Serie 100 DuraProbe y sondas de oxígeno disuelto Serie<br />
800 .<br />
Doce meses desde la fecha de adquisición por el usuario (o dieciocho<br />
meses desde la fecha de expedición por Thermo Fisher Scientific)<br />
Medidores de laboratorio de pH (301, 611 y 940), SensorLink ®, los medidores<br />
pHuture ® de pH (610 y 620), los medidores Smart Chek, las bombas Sage ®, las<br />
balanzas Cahn ®, el 930 Ionalyzer ®, el 950 ROSS ® FAST QC Titrator, el 960 Titrator<br />
PLUS ®, los tituladores Karl Fischer, automuestreadores, la caja de conversión<br />
pHuture ®, el Wine Master ®, el Switchbox 607, rf link, los colorímetros AQUAfast ®<br />
II, desgasificador de vacío, y flujómetro .<br />
Electrodos selectivos de iones, electrodos ionplus ®, electrodos ROSS ®, electrodos<br />
Sure-Flow ®, electrodos PerpHecT ®, electrodos profesionales AquaPro, electrodos<br />
No Cal ® pH, electrodos St<strong>and</strong>ard de pH, electrodos TRIS de pH, electrodo<br />
KNIpHE ®, ORP Triode (9180BN), sondas pHuture ® de pH (616500), pHuture<br />
MMS Quatrode, Triode (616600 y 617900), sonda 9708 de OD, celdas de<br />
conductividad convencionales Serie 100, sondas de temperatura y compensadores<br />
(excepto los modelos indicados) .<br />
La Serie ionplus ® de módulos sensores 93 y 97 está garantizada durante seis<br />
meses de funcionamiento si se pone en servicio antes de la fecha señalada<br />
en el empaquetado, excepto los módulos para nitrato 9307 y 9707, que están<br />
garantizados para noventa días de funcionamiento si se ponen en servicio antes de<br />
la fecha indicada en el empaquetado .<br />
Seis meses desde la fecha de adquisición por el usuario (o doce meses<br />
desde la fecha de expedición por Thermo Fisher Scientific)<br />
Sonda Flash Titration (092518), electrodo pHuture ® (615700), pHuture MMS<br />
Pentrode (617500), Quatrode (617800) y Triode (615800), Triode de bajo<br />
mantenimiento (9107BN), Triode ORP de bajo mantenimiento(9179BN), y<br />
ES-49
Términos y condiciones<br />
PerpHecT ® Triode de bajo mantenimiento (9207BN), Triode a prueba de agua<br />
(9107WP, 9107WL, 9109WL y 9109WP), medidores QuiKcheK ® y micro electrodos .<br />
Tres meses desde la fecha de adquisición por el usuario (o seis meses<br />
desde la fecha de expedición por Thermo Fisher Scientific)<br />
Electrodos Economy Line, 9105, 9106, 9115, 9116, 9125, 9126, 9135, 9136, 9206 . La<br />
garantía también cubre los fallos por cualquier motivo (excluida la rotura), excepto<br />
el uso abusivo, siempre que el electrodo no se utilice en soluciones que contengan<br />
TRIS, plata, sulfuro, perclorato o ácido fluorhídrico; ni en soluciones de más de (1)<br />
Mol en ácidos o bases fuertes a temperaturas por encima de 50°C .<br />
Garantía “inmediata” - Si cualquiera de los siguientes productos<br />
no funciona la primera vez que se utilice, póngase en contacto de<br />
inmediato con Thermo Fisher Scientific para su sustitución.<br />
Soluciones, estándares, reactivos, cables, adaptadores de línea, impresoras,<br />
software, cajas, soportes, membranas para sondas, tiras de prueba AQUAfast ® y<br />
accesorios en general .<br />
Para los productos del catálogo que no se mencionan en esta garantía,<br />
visite nuestro sitio web en: www.thermo.com/water.<br />
LAS GARANTÍAS ANTERIORES MENCIONADAS SON EXCLUSIVAS Y EN LUGAR<br />
DE CUALQUIER OTRA GARANTÍA LEGAL, EXPRESA O IMPLÍCITA, SIN LIMITARSE<br />
A LAS GARANTÍAS DE MERCANTIBILIDAD O IDONEIDAD PARA OTROS<br />
PROPÓSITOS EN PARTICULAR, Y TODAS LAS GARANTÍAS SURGIDAS DE LOS<br />
USOS DEL COMERCIO . LA RESPONSABILIDAD EXCLUSIVA DEL COMPRADOR<br />
SERÁ REPARAR O SUSTITUIR EL PRODUCTO O LA PIEZA DEFECTUOSA DEL<br />
MISMO, O REEMBOLSAR EL PRECIO DE COMPRA, Y EN NINGÚN CASO,<br />
THERMO FISHER SCIENTIFIC (O SUS CONTRATISTAS O PROVEEDORES) SERÁ<br />
RESPONSABLE ANTE EL COMPRADOR U OTRAS PERSONAS, POR DAÑOS<br />
ESPECIALES, INDIRECTOS, INCIDENTALES O CONSECUENTES, TANTO SI LAS<br />
RECLAMACIONES SE BASAN EN CONTRATOS, PERJUICIO LEGAL (INCLUIDA<br />
LA NEGLIGENCIA) U OTROS MOTIVOS, CON RESPECTO AL PRODUCTO<br />
SUMINISTRADO . LAS DECLARACIONES Y GARANTÍAS FORMALIZADAS POR<br />
CUALQUIER PERSONA, INCLUIDOS LOS DISTRIBUIDORES AUTORIZADOS,<br />
REPRESENTANTES Y EMPLEADOS DE THERMO FISHER SCIENTIFIC, QUE<br />
ES-50 Thermo Scientific <strong>Orion</strong> <strong>Star</strong> <strong>and</strong> <strong>Star</strong> <strong>Plus</strong> Series <strong>Meter</strong> User Guide
MODIFIQUEN O AMPLÍEN LOS TÉRMINOS DE LA PRESENTE GARANTÍA NO<br />
SERÁN VINCULANTES PARA THERMO FISHER SCIENTIFIC SI NO ES POR<br />
ESCRITO Y CON FIRMA DE SU REPRESENTANTE .<br />
limitaciones de responsabilidad<br />
CON INDEPENDENCIA DE LO QUE PUEDA AQUÍ DECLARARSE EN<br />
CONTRARIO, LA RESPONSABILIDAD DEL VENDEDOR BAJO ESTOS TÉRMINOS<br />
Y CONDICIONES (TANTO POR MOTIVO DE INCUMPLIMIENTO, PERJUICIO<br />
LEGAL, INDEMNIZACIÓN U OTROS, EXCLUYENDO LA RESPONSABILIDAD DEL<br />
VENDEDOR POR INCUMPLIMIENTO DE LA GARANTÍA (CON LOS DERECHOS<br />
QUE SE DISPONEN EN LA ANTERIOR SECCIÓN 2)) NO EXCEDERÁ DE UNA<br />
CANTIDAD IGUAL A LA MENOR DEL (A) PRECIO DE COMPRA TOTAL ABONADO<br />
POR EL COMPRADOR AL VENDEDOR POR EL PRODUCTO QUE ES MOTIVO<br />
DE LA RECLAMACIÓN, O (B) UN MILLÓN DE DÓLARES ($1 .000 .000) . CON<br />
INDEPENDENCIA DE LO QUE PUEDA AQUÍ DECLARARSE EN CONTRARIO, EN<br />
NINGÚN CASO SE RESPONSABILIZARÁ EL VENDEDOR DE DAÑOS INDIRECTOS,<br />
ESPECIALES, CONSECUENTES O INCIDENTALES (INCLUIDOS SIN LIMITACIÓN<br />
LOS DAÑOS POR PÉRDIDA DEL USO DE INSTALACIONES Y EQUIPOS, POR<br />
PÉRDIDA DE INGRESOS, PÉRDIDA DE DATOS, PÉRDIDA DE BENEFICIOS O<br />
MALA FE), SIN CONSIDERAR SI EL VENDEDOR (a) HA SIDO INFORMADO DE LA<br />
POSIBILIDAD DE DICHOS DAÑOS O (b) SI ES NEGLIGENTE .<br />
Misceláneo<br />
Thermo Scientific <strong>Orion</strong> <strong>Star</strong> <strong>and</strong> <strong>Star</strong> <strong>Plus</strong> Series <strong>Meter</strong> User Guide<br />
Términos y condiciones<br />
(a) Los derechos y obligaciones de las partes aquí consideradas se regirán e<br />
interpretarán de acuerdo con las leyes de la Comunidad de Massachusetts,<br />
sin referencia a otras disposiciones legales . Cada una de las partes consiente<br />
irrevocablemente en la jurisdicción exclusiva de los tribunales estatales y federales<br />
del condado de Suffolk, Massachusetts, para las acciones que pudieran surgir con<br />
relación a este acuerdo, renunci<strong>and</strong>o a la jurisdicción de otros tribunales a los que<br />
tendría derecho por motivo de residencia u otros . (b) En el caso de entablarse<br />
procesos legales entre el vendedor y el comprador con respecto a este acuerdo,<br />
ninguna de las partes podrá reclamar el derecho a un procedimiento con jurado,<br />
renunci<strong>and</strong>o ambas partes a los derechos que pudieran tener por ley a un proceso<br />
con jurado . Todas las acciones surgidas en virtud de este acuerdo deberán ejercerse<br />
en el periodo de un (1) año desde la fecha de su causa .<br />
ES-51
noTaS<br />
ES-52 Thermo Scientific <strong>Orion</strong> <strong>Star</strong> ES-52<br />
<strong>and</strong> <strong>Star</strong> <strong>Plus</strong> Series <strong>Meter</strong> User Guide
Capítulo XI<br />
Declaración de conformidad<br />
Fabricante: Thermo Fisher Scientific Inc .<br />
Dirección: 166 Cummings Center<br />
Beverly, MA 01915<br />
EE .UU .<br />
El fabricante designado declara que el (los) producto(s) descrito(s) a continuación<br />
son conformes a las normas y directivas que se mencionan:<br />
Producto(s): Medidores para la medición de pH, conductividad, Oxígeno Disuelto y/o ISE<br />
Los modelos de mesa tienen la clasificación 100-240 V CA, 50/60 Hz, 0,5 A<br />
Los modelos portátiles utilizan 4 baterías AA no recargables<br />
Mesa Portátil<br />
Medidor de pH/ISE/Conductividad/OD 5-<strong>Star</strong> Medidor de pH/ISE/Conductividad/OD 5-<strong>Star</strong><br />
Medidor de pH/Conductividad 4-<strong>Star</strong> Medidor de pH/Conductividad/OD 5-<strong>Star</strong><br />
pH/DO 4-<strong>Star</strong> Medidor de pH/Conductividad 4-<strong>Star</strong><br />
Medidor de pH/ISE 4-<strong>Star</strong> Medidor de pH/OD 4-<strong>Star</strong><br />
Medidor de Conductividad 3-<strong>Star</strong> Medidor de pH/ISE 4-<strong>Star</strong><br />
Medidor de OD 3-<strong>Star</strong> Medidor de Conductividad 3-<strong>Star</strong><br />
Medidor de pH 3-<strong>Star</strong> Medidor de pH 3-<strong>Star</strong><br />
Medidor de pH 2-<strong>Star</strong> Medidor de OD 3-<strong>Star</strong><br />
Clase de equipo: Medición, control y laboratorio<br />
Los modelos de mesa son EMC Clase A<br />
Los modelos portátiles son EMC Clase D<br />
Thermo Scientific <strong>Orion</strong> <strong>Star</strong> <strong>and</strong> <strong>Star</strong> <strong>Plus</strong> Series <strong>Meter</strong> User Guide<br />
ES-53
Declaración de conformidad<br />
Directiva(s) y Norma(s):<br />
• Directiva sobre compatibilidad electromagnética (EMC) 89/336/CEE<br />
• EN 61326:1997 + A1:1998 + A2:2001, Equipos eléctricos para medición,<br />
control y uso en laboratorios: Requisitos de EMC<br />
• Directiva sobre bajo voltaje 73/23/CEE (LVD)<br />
• EN 61010-1:2001, Requisitos de seguridad de los equipos eléctricos para<br />
medición, control y uso en laboratorios; requisitos generales<br />
Representante autorizado del fabricante: Fecha:<br />
Patrick Chiu 23 de octubre, 2008<br />
Senior Quality Assurance Engineering,<br />
Regulatory Compliance<br />
Cumplimiento de WEEE:<br />
Este producto debe cumplir la Directiva sobre eliminación de equipos<br />
eléctricos y electrónicos (WEEE) 2002/96/CE de la Unión Europea.<br />
Lleva la siguiente marca:<br />
Thermo Fisher Scientific tiene firmados acuerdos con una o más compañías de<br />
reciclado/eliminación de residuos en cada estado miembro de la UE para que este<br />
producto sea eliminado o reciclado mediante su intervención. Hay disponible más<br />
información sobre el cumplimiento por Thermo Fisher Scientific de estas directivas<br />
y sobre las compañías de reciclado de cada país, además de información sobre los<br />
productos de Thermo Scientific <strong>Orion</strong> que asisten en la detección de sustancias para<br />
la Directiva de RoHS, en www.thermo.com/WEEERoHS.<br />
ES-54 Thermo Scientific <strong>Orion</strong> <strong>Star</strong> <strong>and</strong> <strong>Star</strong> <strong>Plus</strong> Series <strong>Meter</strong> User Guide
F R<br />
Table des matières<br />
Chapitre I Introduction<br />
Protection des méthodes par mot de passe . . . . . . . . . . . . . . . . . . . . . . . . . . . . .FR-1<br />
AUTO-READ . . . . . . . . . . . . . . . . . . . . . . . . . . . . . . . . . . . . . . . . . . . . . . . . . . . .FR-1<br />
Contrôle de l’agitateur . . . . . . . . . . . . . . . . . . . . . . . . . . . . . . . . . . . . . . . . . . . . . .FR-2<br />
SMART STABILITY et SMART AVERAGING . . . . . . . . . . . . . . . . . . . . . . . . . .FR-2<br />
Chapitre II Affichage<br />
Description générale . . . . . . . . . . . . . . . . . . . . . . . . . . . . . . . . . . . . . . . . . . . . . . . .FR-3<br />
Chapitre III Clavier<br />
Description générale . . . . . . . . . . . . . . . . . . . . . . . . . . . . . . . . . . . . . . . . . . . . . . . .FR-5<br />
Fonctionnalités pour un plus gr<strong>and</strong> confort . . . . . . . . . . . . . . . . . . . . . . . . . . . . . .FR-6<br />
Signaux sonores & alarme . . . . . . . . . . . . . . . . . . . . . . . . . . . . . . . . . . . . . . . . .FR-6<br />
Arrêt automatique . . . . . . . . . . . . . . . . . . . . . . . . . . . . . . . . . . . . . . . . . . . . . . . .FR-6<br />
Définition des icônes . . . . . . . . . . . . . . . . . . . . . . . . . . . . . . . . . . . . . . . . . . . . . . .FR-7<br />
Chapitre IV Opérations préliminaires<br />
Mise en place du transformateur d’alimentation . . . . . . . . . . . . . . . . . . . . . . . . . .FR-9<br />
Mise en place des piles . . . . . . . . . . . . . . . . . . . . . . . . . . . . . . . . . . . . . . . . . . . . FR-10<br />
Branchement des électrodes . . . . . . . . . . . . . . . . . . . . . . . . . . . . . . . . . . . . . . . . FR-12<br />
Mise sous tension de l’appareil de mesure . . . . . . . . . . . . . . . . . . . . . . . . . . . . . FR-14<br />
Chapitre V Menu Setup (Configuration)<br />
Astuces de navigation . . . . . . . . . . . . . . . . . . . . . . . . . . . . . . . . . . . . . . . . . . . . . . FR-15<br />
Réglages généraux du menu . . . . . . . . . . . . . . . . . . . . . . . . . . . . . . . . . . . . . . . . FR-16<br />
Réglages de la date et de l’heure . . . . . . . . . . . . . . . . . . . . . . . . . . . . . . . . . . . . . FR-18<br />
Sélection du mode de mesure continu (Continuous),<br />
limité (Timed) ou AUTO-READ . . . . . . . . . . . . . . . . . . . . . . . . . . . . . . . . . . . . . .FR-20<br />
Sélection des modes de mesure . . . . . . . . . . . . . . . . . . . . . . . . . . . . . . . . . . . . .FR-22<br />
Réglages de l’étalonnage . . . . . . . . . . . . . . . . . . . . . . . . . . . . . . . . . . . . . . . . . . .FR-23<br />
Thermo Scientific <strong>Orion</strong> <strong>Star</strong> <strong>and</strong> <strong>Star</strong> <strong>Plus</strong> Series <strong>Meter</strong> User Guide<br />
S E C T I O N E N F R A N ç A I S<br />
FR-I
F R<br />
Chapitre VI Mesure du pH<br />
Configuration du pH . . . . . . . . . . . . . . . . . . . . . . . . . . . . . . . . . . . . . . . . . . . . . . .FR-25<br />
Etalonnage du pH . . . . . . . . . . . . . . . . . . . . . . . . . . . . . . . . . . . . . . . . . . . . . . . . .FR-26<br />
Mesure du pH . . . . . . . . . . . . . . . . . . . . . . . . . . . . . . . . . . . . . . . . . . . . . . . . . . . .FR-27<br />
Chapitre VII Mesure de l’oxygène dissous (OD)<br />
Configuration OD . . . . . . . . . . . . . . . . . . . . . . . . . . . . . . . . . . . . . . . . . . . . . . . . .FR-29<br />
Etalonnage OD . . . . . . . . . . . . . . . . . . . . . . . . . . . . . . . . . . . . . . . . . . . . . . . . . . .FR-31<br />
Mesure OD . . . . . . . . . . . . . . . . . . . . . . . . . . . . . . . . . . . . . . . . . . . . . . . . . . . . . .FR-33<br />
Chapitre VIII Mesure de la conductivité<br />
Configuration de la conductivité . . . . . . . . . . . . . . . . . . . . . . . . . . . . . . . . . . . . . .FR-35<br />
Etalonnage de la conductivité . . . . . . . . . . . . . . . . . . . . . . . . . . . . . . . . . . . . . . . .FR-37<br />
Mesure de la conductivité . . . . . . . . . . . . . . . . . . . . . . . . . . . . . . . . . . . . . . . . . .FR-39<br />
Chapitre IX Technique ISE<br />
Configuration ISE . . . . . . . . . . . . . . . . . . . . . . . . . . . . . . . . . . . . . . . . . . . . . . . . .FR-41<br />
Préparation des étalons . . . . . . . . . . . . . . . . . . . . . . . . . . . . . . . . . . . . . . . . . . . .FR-43<br />
Etalonnage ISE . . . . . . . . . . . . . . . . . . . . . . . . . . . . . . . . . . . . . . . . . . . . . . . . . . .FR-44<br />
Prise de mesure de l’ISE . . . . . . . . . . . . . . . . . . . . . . . . . . . . . . . . . . . . . . . . . . .FR-45<br />
Chapitre X Termes et conditions<br />
Garantie . . . . . . . . . . . . . . . . . . . . . . . . . . . . . . . . . . . . . . . . . . . . . . . . . . . . . . . .FR-47<br />
Chapitre XI Déclarations de conformité<br />
Conformité WEEE . . . . . . . . . . . . . . . . . . . . . . . . . . . . . . . . . . . . . . . . . . . . . . . . .FR-53<br />
FR-II Thermo Scientific <strong>Orion</strong> <strong>Star</strong> <strong>and</strong> <strong>Star</strong> <strong>Plus</strong> Series <strong>Meter</strong> User Guide
Chapitre I<br />
Introduction<br />
Félicitations ! Vous venez d’acquérir l’un des sept modèles de la gamme <strong>Orion</strong> <strong>Star</strong><br />
pour réaliser des analyses électrochimiques sur le terrain ou en laboratoire .<br />
• Les modèèles 2 <strong>Star</strong> et 3 <strong>Star</strong> permettent de mesurer le pH, l’oxygènedissous’n<br />
edissousoxygèène dissous ou la conductivité .<br />
• Le modèle <strong>Star</strong> 4 est un multiparamètre pH/DO, pH/conductivité ou pH/ISE (Ion<br />
Selective Electrode) .<br />
• Le modèle <strong>Star</strong> 5 est un multiparamètre mV/ORP .<br />
Conçus pour répondre aux besoins des laboratoires multi-utilisateur actifs ou des<br />
environnements d’usine, tous les appareils intègrent un microprocesseur qui assure<br />
l’exactitude et la précision des mesures . Les modèles portables étanches peuvent<br />
même être plongés en immersion pendant de courtes périodes de temps sans nuire<br />
à leur fonctionnement . Pour mieux satisfaire aux exigences environnementales, des<br />
produits alimentaires, pharmaceutiques et gr<strong>and</strong>e consommation, la gamme <strong>Orion</strong><br />
<strong>Star</strong> offre les principales caractéristiques suivantes :<br />
• Protection des méthodes par mot de passe - La mémoire des appareils<br />
de mesure permet de sauvegarder jusqu’à dix mesures et étalonnages<br />
personnalisés en vue d’une réutilisation ultérieure . La protection par mot de<br />
passe de chaque méthode élimine tout risque de modification accidentelle<br />
dans la mesure où les utilisateurs ne peuvent accéder qu’à la procédure la plus<br />
adaptée à leurs tâches .<br />
• Fonction AUTO-READ - La mesure est automatique et l’appareil imprime<br />
ou enregistre automatiquement les données une fois les valeurs stabilisées .<br />
Thermo Scientific <strong>Orion</strong> <strong>Star</strong> <strong>and</strong> <strong>Star</strong> <strong>Plus</strong> Series <strong>Meter</strong> User Guide<br />
FR-1
Introduction<br />
• Fonction de contrôle de l’agitateur - Les appareils de paillasse sont<br />
équipés d’une fonction de contrôle d’agitation compatible avec les agitateurs<br />
de type 096019 et les sondes AUTO-STIR BOD, ce qui élimine tout besoin de<br />
support d’agitateur supplémentaire .<br />
• Fonctions SMART STABILITY et SMART AVERAGING - Grâce à ces<br />
fonctions, vous ne vous perdrez plus en conjonctures car elles compensent les<br />
conditions de mesure pour optimiser le temps de réponse .<br />
Pour une utilisation simplifiée au quotidien, tous nos appareils sont accompagnés<br />
d’un Guide de référence rapide illustré .<br />
Nous vous recomm<strong>and</strong>ons de lire attentivement ce guide avant d’utiliser votre<br />
appareil portable ou de paillasse . Toute utilisation non conforme aux instructions<br />
fournies peut entraîner l’annulation de la garantie et/ou endommager l’appareil de<br />
mesure .<br />
FR-2 Thermo Scientific <strong>Orion</strong> <strong>Star</strong> <strong>and</strong> <strong>Star</strong> <strong>Plus</strong> Series <strong>Meter</strong> User Guide
Chapitre II<br />
Affichage<br />
Description générale<br />
Au cours d’une procédure donnée, l’écran LCD de tous les appareils de mesure<br />
<strong>Orion</strong> <strong>Star</strong> affiche les valeurs de température et d’étalonnage . Les données de<br />
configuration setup s’affichent uniquement lorsque l’appareil se trouve en mode<br />
configuration . Le symbole indique une condition d’erreur ; Lorsqu’il apparaît<br />
combiné au symbole , il informe l’utilisateur qu’un problème lié à la sonde est<br />
survenu .<br />
est décrit au Chapitre V, Menu Setup .<br />
Température<br />
Etalonnage<br />
Appareil <strong>Star</strong> 5<br />
L’écran LCD illustré ci-dessus est celui de l’appareil multiparamètre <strong>Star</strong> 5 .<br />
Thermo Scientific <strong>Orion</strong> <strong>Star</strong> <strong>and</strong> <strong>Star</strong> <strong>Plus</strong> Series <strong>Meter</strong> User Guide<br />
Unité de<br />
pH/ISE/ORP<br />
Unité de<br />
conductivité<br />
Unité Oxygène<br />
dissous<br />
FR-3
Affichage<br />
Remarque : les trois lignes de valeurs inférieures correspondent à l’élément<br />
mesuré. s<br />
A pH, mV, mV relatif ou ISE<br />
B Conductivité, TDS, Salinité ou<br />
Résistivité<br />
C % saturation de l’oxygène dissous<br />
Concentration oxygène dissous<br />
ou pression barométrique<br />
L’unité de mesure, affichée dans la partie droite de l’écran, clignote jusqu’à<br />
l’obtention d’une mesure stable .<br />
FR-4 Thermo Scientific <strong>Orion</strong> <strong>Star</strong> <strong>and</strong> <strong>Star</strong> <strong>Plus</strong> Series <strong>Meter</strong> User Guide
Chapitre III<br />
Clavier<br />
Description générale<br />
La disposition du clavier est identique sur tous les appareils <strong>Orion</strong> <strong>Star</strong> . Les modèles<br />
portables et le modèle de paillasse 2 <strong>Star</strong> comportent 9 touches . Les modèles de<br />
paillasse 3, 4 et 5 <strong>Star</strong> comptent 10 touches en raison de la présence d’une touche .<br />
Clavier (modèles portables)<br />
Etalonner<br />
Mise sous/hors tension Rétroéclairage<br />
Chiffres significatifs<br />
Défilement vers le bas<br />
Configuration<br />
Clavier (modèles de paillasse)<br />
Etalonner<br />
Défilement vers le<br />
haut<br />
Chiffres significatifs<br />
Configuration<br />
Mise sous/hors tension<br />
Rétroéclairage<br />
Thermo Scientific <strong>Orion</strong> <strong>Star</strong> <strong>and</strong> <strong>Star</strong> <strong>Plus</strong> Series <strong>Meter</strong> User Guide<br />
Mesurer<br />
Enregistrer/Imprimer<br />
Défilement vers le haut<br />
Sélecteur de ligne<br />
Afficher journal<br />
Mesurer<br />
Enregistrer/Imprimer<br />
Act./Dés. Agitateur<br />
(sauf 2-<strong>Star</strong> pH)<br />
Sélecteur de ligne<br />
Afficher journal<br />
Défilement vers le bas<br />
FR-5
Clavier<br />
La partie centrale de ce clavier particulièrement ergonomique constitue le point<br />
d’accès aux fonctions de configuration et de navigation de l’appareil . Les touches<br />
et / sont fréquemment utilisées pour basculer entre les différents<br />
affichages de l’écran LCD .<br />
Pour un plus gr<strong>and</strong> confort d’utilisation, les appareils <strong>Orion</strong> <strong>Star</strong> intègrent les fonctionnalités<br />
suivantes :<br />
• Rétroéclairage - Une simple pression sur la touche active et désactive la<br />
fonction de rétroéclairage . Lorsque l’appareil fonctionne sur piles, cette fonction<br />
est automatiquement désactivée après 2 minutes pour réduire la consommation<br />
d’énergie . Lorsque les piles sont faibles, la fonction de rétroéclairage n’est pas<br />
activée .<br />
• Arrêt automatique - Tous les appareils <strong>Orion</strong> <strong>Star</strong> intègrent une fonction<br />
d’arrêt automatique qui permet de les éteindre automatiquement après 20<br />
minutes d’inactivité . Cette fonction permet d’économiser les piles sur les<br />
modèles portables ou de paillasse alimentés par piles .<br />
• Signaux sonores - L’appareil de mesure émet un signal sonore chaque fois<br />
que l’utilisateur appuie sur une touche pour confirmer la réception des données<br />
saisies par l’utilisateur .<br />
• Signaux d’alarme visuelle - Le clignotement et indique que les<br />
réglages d’étalonnage doivent être ajustés . Pour de plus amples détails,<br />
reportez-vous aux sections suivantes du présent guide qui traitent des<br />
différentes techniques de mesure .<br />
Pour mieux vous familiariser avec chacune des fonctions du clavier, lisez le tableau<br />
suivant qui fournit une définition des icônes correspondantes .<br />
FR-6 Thermo Scientific <strong>Orion</strong> <strong>Star</strong> <strong>and</strong> <strong>Star</strong> <strong>Plus</strong> Series <strong>Meter</strong> User Guide
Définition des icônes<br />
Touche Description Touche Description<br />
• Allume l’appareil de mesure,<br />
lorsque celui-ci est éteint .<br />
• Active/désactive la fonction<br />
de rétroéclairage, lorsque<br />
l’appareil de mesure est<br />
allumé .<br />
• Lorsque l’appareil de mesure<br />
est allumé, une pression<br />
prolongée sur la touche<br />
permet de l’éteindre .<br />
Déplace la flèche située à<br />
gauche de l’écran entre les<br />
3 lignes d’affichage pour<br />
permettre la sélection et<br />
l’édition des valeurs .<br />
Thermo Scientific <strong>Orion</strong> <strong>Star</strong> <strong>and</strong> <strong>Star</strong> <strong>Plus</strong> Series <strong>Meter</strong> User Guide<br />
Clavier<br />
• Change le mode de<br />
mesure de la ligne<br />
sélectionnée .<br />
• Affiche les écrans Setup<br />
(Configuration), Methods<br />
(Méthodes) et Log View<br />
(Afficher journal) pour la<br />
ligne sélectionnée .<br />
• Modifie la valeur du<br />
chiffre clignotant pour<br />
les fonctions Setup<br />
(Configuration), Password<br />
entry (Saisie du mot de<br />
passe) et Calibration<br />
(Etalonnage) .<br />
Affiche la valeur<br />
sélectionnée en mode<br />
d’édition et déplace le<br />
séparateur décimal lors<br />
de l’édition des valeurs<br />
dans les écrans Setup<br />
(Configuration), Password<br />
entry (Saisie du mot de<br />
passe) et Calibration<br />
(Etalonnage) .<br />
FR-7
Clavier<br />
Touche Description Touche Description<br />
Lance le processus<br />
d’étalonnage pour la ligne<br />
sélectionnée et dans le mode<br />
de mesure actif .<br />
• Si la flèche pointe vers la<br />
ligne supérieure et que l’unité<br />
définie est pH, une pression<br />
sur lance l’étalonnage<br />
du pH .<br />
• Chaque pression sur la touche<br />
pendant l’étalonnage<br />
valide la valeur du point<br />
d’étalonnage actif et passe<br />
au point suivant dans la limite<br />
du nombre maximum de<br />
points d’étalonnage définie .<br />
Une fois l’étalonnage de tous<br />
les points effectué, l’appareil<br />
repasse en mode de mesure .<br />
Affiche le menu setup<br />
(configuration) pour la ligne et le<br />
mode de mesure sélectionnés :<br />
Si la flèche pointe vers la ligne<br />
supérieure et que l’unité définie<br />
est ISE, l’écran de configuration<br />
ISE s’affiche .<br />
• Imprime et enregistre<br />
une mesure en mode de<br />
mesure continu ou limité .<br />
• Imprime, enregistre et<br />
fige l’écran lorsque la<br />
mesure se stabilise en<br />
mode AUTO-READ .<br />
• Quitte le mode setup<br />
(configuration) et repasse<br />
en mode de mesure .<br />
• Valide le point<br />
d’étalonnage et repasse<br />
en mode de mesure .<br />
Affiche les écrans log<br />
view (afficher journal) et<br />
download (télécharger) .<br />
Active/désactive l’agitateur .<br />
FR-8 Thermo Scientific <strong>Orion</strong> <strong>Star</strong> <strong>and</strong> <strong>Star</strong> <strong>Plus</strong> Series <strong>Meter</strong> User Guide
Chapitre IV<br />
Opérations préliminaires<br />
Mise en place du transformateur d’alimentation<br />
Le transformateur d’alimentation universel fourni avec votre appareil de mesure de<br />
paillasse constitue la SEULE source d’alimentation recomm<strong>and</strong>ée dans le cadre de<br />
l’utilisation de cet appareil . L’utilisation de toute autre source d’alimentation est un<br />
motif d’annulation de la garantie de votre appareil de mesure .<br />
L’alimentation électrique nominale externe de fonctionnement est de 100-240 VCA,<br />
0,5 A, 50/60 Hz .<br />
En fonction du type d’alimentation utilisé, sélectionnez l’une des quatre prises<br />
fournies (110 V, 220 V, 240 V) et fixez-la à son transformateur en la faisant glisser<br />
dans les rainures prévues à cet effet . Lorsqu’elle est correctement fixée, la prise<br />
s’enclique en position .<br />
Branchez la prise de sortie d’alimentation sur le socle d’alimentation de l’appareil de<br />
paillasse . Reportez-vous au schéma de la section Branchement des électrodes .<br />
Thermo Scientific <strong>Orion</strong> <strong>Star</strong> <strong>and</strong> <strong>Star</strong> <strong>Plus</strong> Series <strong>Meter</strong> User Guide<br />
FR-9
Opérations préliminaires<br />
Mise en place des piles<br />
Les appareils <strong>Orion</strong> <strong>Star</strong> nécessitent quatre piles alcalines AA . N’utilisez pas de piles<br />
au lithium ou rechargeables . La mise en place incorrecte de piles autres que des<br />
piles alcalines peut s’avérer dangereuse .<br />
Remarque : Pour les appareils de paillasse - l’installation des piles est inutiles<br />
si l’appareil est destiné à demeurer branché à l’alimentation secteur via le<br />
transformateur d’alimentation. s<br />
1 . Assurez-vous d’avoir éteint l’appareil de mesure .<br />
2 . Retournez délicatement l’appareil de mesure sur un linge propre non pelucheux<br />
pour éviter de rayer l’écran LCD .<br />
3 . Retirez le couvercle du compartiment des piles .<br />
4 . Mettez en place les piles neuves en respectant la polarité indiquée (signes « + »<br />
et « - ») dans le compartiment des piles .<br />
5 . Remettez le couvercle en place .<br />
FR-10 Thermo Scientific <strong>Orion</strong> <strong>Star</strong> <strong>and</strong> <strong>Star</strong> <strong>Plus</strong> Series <strong>Meter</strong> User Guide
6 . Lors du remplacement des piles, les données, les valeurs d’étalonnage et<br />
les méthodes sont mémorisées dans la mémoire non volatile de l’appareil ;<br />
cependant, cette opération peut nécessiter le réglage de la date et de l’heure .<br />
Thermo Scientific <strong>Orion</strong> <strong>Star</strong> <strong>and</strong> <strong>Star</strong> <strong>Plus</strong> Series <strong>Meter</strong> User Guide<br />
Opérations préliminaires<br />
Remarque : Pour les appareils portables - Les piles sont fournies et installées en<br />
usine. s<br />
Pour accéder au compartiment des piles des modèles portables, desserrez les deux<br />
vis qui se trouvent au centre de l’appareil . S’agissant de vis imperdables, vous ne<br />
pouvez pas les dévisser complètement du dos .<br />
FR-11
Opérations préliminaires<br />
Branchement des électrodes<br />
Reportez-vous aux schémas ci-après pour les instructions de connexion des<br />
électrodes et des sondes à l’appareil de mesure . L’appareil 5-<strong>Star</strong> est illustré ; les<br />
autres modèles comportent moins de connexions .<br />
Appareil de mesure de paillasse - Branchement des électrodes<br />
Connecteur<br />
d’agitateur pour<br />
Agitateur ou<br />
oxygène dissous<br />
Sonde auto stir<br />
Référence<br />
pH ou ISE<br />
Connecteur à RS232 Power (Mise<br />
8 broches<br />
ou ATC<br />
sous/hors tension)<br />
BNC<br />
OD<br />
9 broches<br />
Terre<br />
Appareil de mesure portable - Branchement des électrodes<br />
BNC<br />
Connecteur à<br />
8 broches<br />
pour cellule de<br />
conductivité/<br />
ATC<br />
RS232<br />
OD à<br />
9 broches<br />
FR-12 Thermo Scientific <strong>Orion</strong> <strong>Star</strong> <strong>and</strong> <strong>Star</strong> <strong>Plus</strong> Series <strong>Meter</strong> User Guide
Thermo Scientific <strong>Orion</strong> <strong>Star</strong> <strong>and</strong> <strong>Star</strong> <strong>Plus</strong> Series <strong>Meter</strong> User Guide<br />
Opérations préliminaires<br />
Certains connecteurs sont utilisés à différents usages, par exemple :<br />
• La borne BNC peut servir au raccordement des électrodes pH, ISE et ORP<br />
combinées et aux sondes ayant un connecteur BNC étanche .<br />
• Les modèles de paillasse sont équipés d’une sortie jack à broche pour le<br />
raccordement d’une électrode de référence distincte . Ceci nécessite l’utilisation<br />
d’une électrode de mesure BNC .<br />
• L’électrode à oxygène dissous 970899WP peut s’utiliser avec le Connecteur<br />
BNC .<br />
• Utilisez le connecteur mini DIN à 8 broches étanche pour les cellules de<br />
conductivité .<br />
• Le connecteur mini DIN à 8 broches étanche sert également au raccordement<br />
des sondes ATC (Automatic Temperature Compensation) .<br />
• La sonde AUTO-STIR OD utilise le connecteur mini DIN à 9 broches étanche et<br />
le connecteur d’agitateur pour les connecteurs de sonde de plus petite taille .<br />
FR-13
Opérations préliminaires<br />
Mise sous tension de l’appareil de mesure<br />
Après avoir mis en place les piles sur le modèle portable et mis en place les piles<br />
du modèle de paillasse et/ou raccordé celui-ci au transformateur d’alimentation,<br />
appuyez sur la touche pour allumer l’appareil . Appuyez brièvement sur la<br />
touche après avoir allumé l’appareil pour activer ou désactiver la fonction<br />
de rétroéclairage . Lorsque l’appareil de paillasse est raccordé à une alimentation<br />
secteur, la fonction de rétroéclairage reste activée jusqu’à sa désactivation via une<br />
pression sur la touche . Pour éteindre l’appareil, appuyez sur la touche<br />
pendant 3 secondes .<br />
FR-14 Thermo Scientific <strong>Orion</strong> <strong>Star</strong> <strong>and</strong> <strong>Star</strong> <strong>Plus</strong> Series <strong>Meter</strong> User Guide
Chapitre V<br />
Menu Setup (Configuration)<br />
Astuces de navigation<br />
• La touche active le mode configuration .<br />
• Les principales options de menu sont affichées sur<br />
la première ligne de l’écran LCD . Appuyez sur /<br />
pour faire défiler le menu . Le texte qui apparaîtra<br />
sur l’écran LCD est représenté dans la colonne<br />
Affichage des tableaux dans les pages qui suivent .<br />
• Utilisez pour sélectionner la ligne du haut, du<br />
milieu ou du bas .<br />
• Utilisez les touches / combinées à la touche<br />
pour modifier les valeurs de la ligne sélectionnée .<br />
• Utilisez pour valider les changements et ramener<br />
l’icône représentant une flèche sur la ligne supérieure .<br />
• Utilisez pour enregistrer les changements et<br />
repasser en mode de mesure .<br />
Thermo Scientific <strong>Orion</strong> <strong>Star</strong> <strong>and</strong> <strong>Star</strong> <strong>Plus</strong> Series <strong>Meter</strong> User Guide<br />
FR-15
Menu Setup (Configuration)<br />
Réglages généraux du menu<br />
Le tableau ci-dessous décrit les réglages de configuration généraux de l’appareil de<br />
mesure .<br />
Description Affichage Plage de valeurs Valeur Méthode<br />
par défaut spécifique<br />
Réglage de compensation gEn -5,0 - 105 25,0 Oui<br />
manuelle de la température dEgC<br />
25.0<br />
Réglage de la vitesse de gEn OFF, 1, 2, 3, 4, 5, 6, 7 4 Oui<br />
l’agitateur (Modèle de<br />
paillasse seulement)<br />
StIr<br />
4<br />
Réglage de la fonction d’arrêt gEn OFF, On On Non<br />
automatique<br />
AUtO<br />
On<br />
• Le réglage de compensation manuelle de la température contrôle la<br />
compensation de température en l’absence de sonde de température connectée<br />
à l’appareil de mesure .<br />
• Le réglage de la vitesse de l’agitateur (modèles de paillasse uniquement,<br />
sauf 2 <strong>Star</strong>) définit la vitesse dans une plage comprise entre 1 et 7, 1<br />
correspondant à la vitesse la plus lente et 7 à la plus rapide . Le réglage de la<br />
vitesse sur 3 ou 4 est recomm<strong>and</strong>é pour la gr<strong>and</strong>e majorité des applications .<br />
• La fonction d’arrêt automatique est un réglage par défaut qui permet<br />
d’éteindre automatiquement l’appareil de mesure après 20 d’inactivité (aucune<br />
pression de touche détectée) . Pour neutraliser cette fonction, réglez-la sur<br />
« OFF » (Désactiver), ce qui assure le fonctionnement continu de l’appareil .<br />
FR-16 Thermo Scientific <strong>Orion</strong> <strong>Star</strong> <strong>and</strong> <strong>Star</strong> <strong>Plus</strong> Series <strong>Meter</strong> User Guide
Pour accéder à ces réglages, procédez comme suit :<br />
1 . En mode mesure, appuyez sur .<br />
2 . Appuyez sur les touches / pour faire défiler les<br />
options du menu setup (configuration) et afficher sur la<br />
ligne supérieure .<br />
3 . Appuyez sur pour valider les changements et ramener<br />
l’icône représentant une flèche sur la ligne du milieu .<br />
4 . Appuyez sur les touches / pour faire défiler les<br />
réglages suivants :<br />
a . = Réglage de la compensation manuelle de la<br />
température<br />
b . = Activation et réglage de la vitesse de<br />
l’agitateur<br />
c . = Activation/Désactivation de la fonction d’arrêt<br />
automatique<br />
5 . Appuyez sur pour valider les changements et ramener<br />
l’icône représentant une flèche sur la ligne du bas .<br />
a . Appuyez sur / pour identifier et modifier la<br />
valeur suivante .<br />
Thermo Scientific <strong>Orion</strong> <strong>Star</strong> <strong>and</strong> <strong>Star</strong> <strong>Plus</strong> Series <strong>Meter</strong> User Guide<br />
Menu Setup (Configuration)<br />
b . Appuyez sur pour valider la sélection et ramener<br />
l’icône représentant une flèche sur la ligne du haut .<br />
6 . Appuyez sur pour repasser en mode de mesure .)<br />
FR-17
Menu Setup (Configuration)<br />
Réglages de la date et de l’heure<br />
Le tableau suivant décrit de façon plus détaillée les abréviations affichées sur l’écran<br />
de l’appareil de mesure .<br />
Description Affichage Plage de valeurs Valeur par Méthode<br />
défaut spécifique<br />
Réglage de l’heure : dAtE 00 - 23<br />
12 Non<br />
Heure<br />
HOUr<br />
HH12<br />
Définit l’heure actuelle<br />
suivant le format 24 heures<br />
Réglage de l’heure : dAtE 00 - 59<br />
00 Non<br />
Minute<br />
tInE<br />
mm12<br />
Définit les minutes pour<br />
l’heure actuelle<br />
Format de date dAtE mdY, dmY<br />
mdY Non<br />
tYPE Sélection du format Mois/<br />
dmY<br />
Jour/Année ou Jour<br />
/Mois/Année<br />
Réglage de la date : dAtE 00 - 99<br />
04 Non<br />
Année<br />
YEAr<br />
2004<br />
Définit l’année de la date<br />
courante (comprise entre<br />
2000 et 2099)<br />
Réglage de la date : dAtE 01 - 12<br />
01 Non<br />
Mois<br />
dAtE<br />
mm01<br />
Réglage du mois, de 01 pour<br />
« Jan » à 12 pour « Déc »<br />
Réglage de la date : dAtE 01 - 31<br />
01 Non<br />
Jour du mois<br />
dAY<br />
dd01<br />
Jour du mois<br />
FR-18 Thermo Scientific <strong>Orion</strong> <strong>Star</strong> <strong>and</strong> <strong>Star</strong> <strong>Plus</strong> Series <strong>Meter</strong> User Guide
1 . En mode mesure, appuyez sur .<br />
2 . Appuyez sur les touches / pour faire défiler les<br />
options du menu Setup (Configuration) et afficher<br />
sur la ligne supérieure .<br />
3 . Appuyez sur pour valider le réglage et ramener l’icône<br />
représentant une flèche sur la ligne du milieu .<br />
4 . Appuyez sur les touches / pour faire défiler les<br />
réglages suivants :<br />
a . = Heure actuelle<br />
b . = Minute actuelle<br />
c . = Réglez la date en utilisant le format de date<br />
« mdY » (mois, jour, année) ou « dmY » (jour,<br />
mois, année) .<br />
d . = Mois actuel (Utilisez les numéros<br />
correspondant aux mois de l’année)<br />
e . = Jour actuel du mois<br />
f . = Année actuel<br />
5 . Appuyez sur pour valider la sélection et ramener l’icône<br />
représentant une flèche sur la ligne du bas .<br />
6 . Appuyez sur<br />
sélectionnée .<br />
/ et pour modifier la valeur<br />
7 . Appuyez sur pour valider la sélection et ramener l’icône<br />
représentant une flèche sur la ligne du haut .<br />
8 . Répétez les étapes 3 à 7 pour modifier le réglage de l’heure<br />
et de la date .<br />
Thermo Scientific <strong>Orion</strong> <strong>Star</strong> <strong>and</strong> <strong>Star</strong> <strong>Plus</strong> Series <strong>Meter</strong> User Guide<br />
Menu Setup (Configuration)<br />
9 . Appuyez sur pour repasser en mode de mesure .<br />
FR-19
Menu Setup (Configuration)<br />
Sélection du mode de mesure continu (Continuous), limité<br />
(Timed) ou AUTO-READ<br />
Le tableau suivant décrit de façon plus détaillée les abréviations affichées sur l’écran<br />
de l’appareil de mesure .<br />
Description Affichage Plage de valeurs Valeur par<br />
défaut<br />
Continu, limité,<br />
ou Auto-Read<br />
Sélection de la<br />
mesure<br />
Réglage de<br />
l’intervalle de<br />
mesure en mode<br />
limité<br />
rEAd<br />
tYPE<br />
COnt<br />
rEAd<br />
tInE<br />
00 :00<br />
COnt, AUtO, tImE<br />
Continu, limité, ou Auto-Read ;<br />
Impression automatique et<br />
enregistrement en modes<br />
AUTO et Timed (Limité)<br />
00 :05 - 99 :61<br />
Intervalle de mesure limité en<br />
minutes et secondes<br />
AUtO Oui<br />
01 :00 Oui<br />
Méthode<br />
spécifique<br />
Pour modifier les réglages, utilisez simplement et / pour passer d’une<br />
option à l’autre . Une pression sur permet de valider le changement d’une valeur<br />
et met fin au clignotement de l’affichage .<br />
Les instruments <strong>Orion</strong> <strong>Star</strong> vous permettent de sélectionner votre réglage de<br />
prédilection pour les intervalles de mesure .<br />
• En mode de mesure continu, l’appareil prend des mesures<br />
et actualise les valeurs affichées à l’écran en permanence .<br />
Pour imprimer et enregistrer la mesure dans ce mode,<br />
appuyez sur .<br />
• En mode de mesure limité, l’appareil prend des mesures<br />
et actualise les valeurs affichées à l’écran en permanence,<br />
celles-ci étant automatiquement enregistrées et imprimées<br />
suivant l’intervalle prédéfini .<br />
• Entrez le nombre de minutes et de secondes devant<br />
FR-20 Thermo Scientific <strong>Orion</strong> <strong>Star</strong> <strong>and</strong> <strong>Star</strong> <strong>Plus</strong> Series <strong>Meter</strong> User Guide
s’écouler entre les mesures en appuyant sur /<br />
pour changer la valeur du chiffre clignotant . Appuyez sur<br />
porter .<br />
pour changer le chiffre sur lequel le défilement doit<br />
• L’intervalle minimum est de 5 secondes . La plage de<br />
valeurs autorisée est la suivante : –<br />
• En mode AUTO-READ, l’instrument commence la mesure<br />
à chaque pression exercée sur la touche . Une fois<br />
la mesure stabilisée, l’écran est gelé et les valeurs<br />
correspondantes sont enregistrées et imprimées .<br />
• Le mode AUTO-READ actionne aussi automatiquement<br />
le Stirrer Control (contrôle de l’agitateur) . Il<br />
arrête le mouvement d’agitation une fois les valeurs<br />
stabilisées . Pour régler la vitesse de l’agitateur, appuyez<br />
sur<br />
cas :<br />
. Utilisez / pour sélectionner, selon le<br />
AUTO-READ (MESURE AUTO)<br />
Thermo Scientific <strong>Orion</strong> <strong>Star</strong> <strong>and</strong> <strong>Star</strong> <strong>Plus</strong> Series <strong>Meter</strong> User Guide<br />
Menu Setup (Configuration)<br />
FR-21
Menu Setup (Configuration)<br />
Sélection des modes de mesure<br />
La flèche située dans la partie gauche de l’écran indique le mode de mesure<br />
sélectionné . Utilisez / pour faire défiler les différents modes associés à une<br />
ligne donnée . permet de déplacer la flèche sur la ligne suivante . Utilisez ensuite<br />
/ pour faire défiler les différents modes associés .<br />
pH<br />
mV<br />
Rel mV<br />
ISE<br />
Off<br />
μS/cm ou mS/cm pour la conductivité<br />
mg/L pour TDS<br />
ppt pour la salinité<br />
MΩ-cm pour la résistivité<br />
Off<br />
%Sat pour le pourcentage de saturation de l’OD<br />
mg/L pour la concentration de l’OD<br />
Pression barométrique<br />
Off<br />
Pour plus d’informations sur la configuration des techniques spécifiques, reportezvous<br />
au chapitres VI à IX du présent guide .<br />
FR-22 Thermo Scientific <strong>Orion</strong> <strong>Star</strong> <strong>and</strong> <strong>Star</strong> <strong>Plus</strong> Series <strong>Meter</strong> User Guide
Réglages de l’étalonnage<br />
La flèche indique le mode d’étalonnage ou la configuration de l’étalonnage .<br />
Avant de procéder à un étalonnage, préparez l’électrode ou la sonde conformément<br />
aux instructions fournies . Les références ou tampons doivent également être<br />
préparés avant de procéder à l’étalonnage . En vous conformant aux instructions du<br />
fabricant de l’électrode ou de la sonde, branchez la(es) à l’appareil de mesure . Des<br />
informations de base relatives à la procédure d’étalonnage appropriée à chaque<br />
technique de mesure sont fournies aux chapitres correspondants .<br />
Procédure de navigation générale pour la sélection de l’étalonnage<br />
1 . En mode mesure, appuyez sur jusqu’à ce que la flèche affichée dans la<br />
partie gauche de l’écran pointe sur le type d’étalonnage voulu :<br />
pH, ORP, ISE • Conductivité • OD<br />
2 . Appuyez sur / de façon à mettre en surbrillance l’icône appropriée pour<br />
la mesure à étalonner .<br />
A – pH/ORP/ISE<br />
Icône pH - étalonnage pH<br />
Icône RmV - Etalonnage ORP<br />
Icône ISE ou aucune icône - Etalonnage ISE<br />
B – Etalonnage de la conductivité<br />
Icône mS/cm, μS/cm, mg/L, ppt et MΩ-cm<br />
C – Etalonnage OD<br />
Thermo Scientific <strong>Orion</strong> <strong>Star</strong> <strong>and</strong> <strong>Star</strong> <strong>Plus</strong> Series <strong>Meter</strong> User Guide<br />
Menu Setup (Configuration)<br />
Icône % sat ou mg/L<br />
Aucune icône - Etalonnage du baromètre<br />
3 . Appuyez ensuite pour lancer la procédure d’étalonnage sélectionnée .<br />
FR-23
REMARQUES<br />
FR-24 Thermo Scientific <strong>Orion</strong> <strong>Star</strong> <strong>and</strong> <strong>Star</strong> <strong>Plus</strong> Series <strong>Meter</strong> User Guide
Chapitre VI<br />
Mesure du pH<br />
Configuration du pH<br />
Le tableau ci-dessous décrit la configuration du pH-mètre .<br />
Description Affichage Plage de valeurs Valeur par Méthode<br />
défaut spécifique<br />
Résolution du pH PH<br />
rES<br />
0.01<br />
0,1; 0,01; 0,001 0,01 Oui<br />
Définition du tampon<br />
pH<br />
PH<br />
bUF<br />
USA<br />
USA (Tampons USA)<br />
1,68; 4,01; 7,00; 10,01; 12,46<br />
EUrO (Tampons Euro)<br />
1,68; 4,01; 6,86; 9,18<br />
1 . En mode mesure, appuyez sur .<br />
Thermo Scientific <strong>Orion</strong> <strong>Star</strong> <strong>and</strong> <strong>Star</strong> <strong>Plus</strong> Series <strong>Meter</strong> User Guide<br />
USA Oui<br />
2 . Appuyez sur / pour faire défiler les options du<br />
menu Setup (Configuration) et l’afficher<br />
supérieure .<br />
sur la ligne<br />
3 . Appuyez sur pour valider le réglage et ramener l’icône<br />
représentant une flèche sur la ligne du milieu .<br />
4 . Appuyez sur / pour sélectionner (Résolution) .<br />
5 . Appuyez sur pour sélectionner l’option et ramener<br />
l’icône représentant une flèche sur la ligne du bas .<br />
FR-25
Mesure du pH<br />
Etalonnage du pH<br />
a . Appuyez sur / pour définir la résolution voulue .<br />
6 . Appuyez sur pour valider la sélection et ramener l’icône<br />
représentant une flèche sur la ligne du haut .<br />
7 . Appuyez sur pour accéder à la ligne du milieu et<br />
appuyez sur / pour sélectionner comme<br />
réglage de tampon automatique et appuyez encore sur<br />
pour passer à la ligne inférieure .<br />
8 . Appuyez sur / pour sélectionner ou ;<br />
appuyez sur pour valider votre sélection .<br />
9 . Appuyez sur pour repasser en mode de mesure .<br />
1 . Préparez l’électrode en vue de son utilisation conformément aux instructions<br />
fournies par le fabricant .<br />
2 . En mode Setup (Configuration), sélectionnez la définition de tampon NIST ( )<br />
ou DIN (<br />
déjà fait .<br />
) appropriée pour permettre la détection du tampon, si ce n’est<br />
3 . Appuyez sur jusqu’à ce que l’icône représentant une flèche pointe vers la<br />
ligne de mesure du pH .<br />
4 . Appuyez sur .<br />
5 . Rincez l’électrode et la sonde ATC et placez-les dans le tampon .<br />
6 . Attendez que pH arrête de clignoter .<br />
FR-26 Thermo Scientific <strong>Orion</strong> <strong>Star</strong> <strong>and</strong> <strong>Star</strong> <strong>Plus</strong> Series <strong>Meter</strong> User Guide
a . Détection automatique du tampon - Lorsque pH cesse de clignoter,<br />
l’appareil affiche la valeur de pH corrigée en température pour le tampon .<br />
b . Etalonnage manuel - Lorsque pH cesse de clignoter, l’appareil affiche la<br />
valeur de pH réelle lue par l’électrode de pH . Utilisez et / pour<br />
changer la valeur de pH selon la valeur de pH corrigée en température pour<br />
le tampon .<br />
7 . Lorsque la valeur de tampon correcte est affichée sur l’appareil, appuyez<br />
pour passer au point d’étalonnage suivant et répétez les étapes 5 à 6 ou<br />
appuyez sur pour enregistrer l’étalonnage .<br />
8 . La pente est affichée avant que l’appareil ne repasse en mode de mesure .<br />
s’affiche dans le champ inférieur, t<strong>and</strong>is que la pente courante de l’électrode<br />
apparaît dans le champ principal, exprimée en pourcentage .<br />
a . En cas d’étalonnage à un seul point, utilisez et / pour modifier<br />
la pente, puis appuyez sur pour repasser en mode de mesure .<br />
b . Lors d’un étalonnage à deux points ou plus, l’appareil de mesure repasse<br />
automatiquement en mode de mesure au bout de deux secondes .<br />
Mesure du pH<br />
1 . Rincez l’électrode à l’eau déionisée . Eliminez l’excédent d’eau et séchez-la avec<br />
un tissu non pelucheux .<br />
2 . Plongez l’électrode dans votre échantillon .<br />
a . Si le mode de mesure continu est activé, l’appareil commence immédiatement<br />
la prise de mesure . Si vous utilisez un appareil de mesure de paillasse et que<br />
la fonction de contrôle de l’agitateur est désactivée, appuyez sur la touche<br />
pour mettre l’agitateur en route . pH clignote alors jusqu’à la stabilisation de la<br />
mesure . Une fois la mesure stabilisée, vous pouvez l’enregistrer et l’imprimer<br />
en appuyant sur la touche . Si l’agitateur fonctionne, appuyez sur la touche<br />
pour l’éteindre avant de le retirer de l’échantillon .<br />
Thermo Scientific <strong>Orion</strong> <strong>Star</strong> <strong>and</strong> <strong>Star</strong> <strong>Plus</strong> Series <strong>Meter</strong> User Guide<br />
Mesure du pH<br />
FR-27
Mesure du pH<br />
b . Si le mode de mesure AUTO-READ est activé, appuyez sur pour<br />
commencer la mesure . Une fois la mesure stabilisée, l’appareil enregistre<br />
et imprime automatiquement le résultat, l’affichage étant gelé pendant<br />
l’opération . Si l’agitateur est activé, il se mettra en route après une pression<br />
sur et s’arrêtera une fois la mesure stabilisée .<br />
c . Si le mode de mesure limité est activé, l’appareil commence la mesure<br />
suivant la fréquence définie lors de la configuration . Chaque mesure est<br />
automatiquement enregistrée et imprimée . Si vous utilisez un instrument de<br />
paillasse et que la fonction de contrôle de l’agitateur est activée, appuyez sur<br />
la touche pour mettre l’agitateur en route . Appuyez de nouveau sur la<br />
touche pour l’arrêter .<br />
3 . Retirez l’électrode de l’échantillon et rincez-la à l’eau déionisée, puis plongez la<br />
dans l’échantillon suivant et répétez l’étape 2 .<br />
4 . Une fois tous les échantillons mesurés, rincez l’électrode à l’eau déionisée et<br />
essuyez-la . Reportez-vous à la documentation fournie avec l’électrode pour<br />
connaître les instructions de stockage appropriées .<br />
FR-28 Thermo Scientific <strong>Orion</strong> <strong>Star</strong> <strong>and</strong> <strong>Star</strong> <strong>Plus</strong> Series <strong>Meter</strong> User Guide
Chapitre VII<br />
Mesure de l’oxygène dissous (OD)<br />
Configuration OD<br />
Le tableau suivant décrit la configuration de l’appareil pour la mesure de l’oxygène dissous .<br />
Description Affichage Plage de valeurs Valeur par<br />
défaut<br />
% de résolution de la<br />
saturation d’oxygène<br />
dissous<br />
% de résolution de la<br />
saturation d’oxygène<br />
dissous<br />
d’oxygène dissous<br />
sélection de la Pression<br />
barométrique<br />
Réglage de la pression<br />
barométrique<br />
pression barométrique<br />
Sélection de la correction<br />
de salinité de l’oxygène<br />
dissous<br />
dO<br />
rES<br />
0.1<br />
dO<br />
rES<br />
0.01<br />
dO<br />
bAr<br />
AUtO<br />
dO<br />
PrES<br />
760.0<br />
dO<br />
SAL<br />
AUtO<br />
1; 0,1<br />
% de résolution de la<br />
saturation d’OD<br />
0,1; 0,01<br />
Concentration oxygène<br />
dissous résolution<br />
« mg/L »<br />
AUtO, mAn<br />
Sélectionne le baromètre<br />
interne ou la pression<br />
manuelle<br />
450,0 - 850,0<br />
Valeur de compensation<br />
pour la pression<br />
manuelle<br />
AUtO, mAn<br />
Sélectionne la méthode<br />
de correction de salinité<br />
(appareils de mesure<br />
avec fonction de<br />
conductivité uniquement)<br />
Thermo Scientific <strong>Orion</strong> <strong>Star</strong> <strong>and</strong> <strong>Star</strong> <strong>Plus</strong> Series <strong>Meter</strong> User Guide<br />
0,1 Oui<br />
0,01 Oui<br />
AUtO Oui<br />
760,0 Oui<br />
AUtO Oui<br />
Méthode<br />
spécifique<br />
FR-29
Mesure de l’oxygène dissous (OD)<br />
Description Affichage Plage de valeurs Valeur par<br />
défaut<br />
Réglage de la pression<br />
barométrique facteur de<br />
correction de la salinité<br />
% de résolution de la<br />
saturation de l’oxygène<br />
dissous<br />
dO<br />
SALF<br />
0<br />
dO<br />
CALt<br />
AIr<br />
0 - 45<br />
Facteur de correction<br />
manuelle de salinité<br />
AIr, H2O, mAn, SEt0<br />
AIr = Air saturé d’eau,<br />
H2O = Eau saturée d’air,<br />
mAn = Manuel,<br />
SEt0 = Etalonnage du zéro<br />
0 Oui<br />
AIr Oui<br />
Méthode<br />
spécifique<br />
Procédure de configuration de l’appareil pour la mesure d’OD<br />
1 . En mode mesure, appuyez sur .<br />
2 . Appuyez sur / pour faire défiler les options du menu setup<br />
(configuration) et l’afficher sur la ligne supérieure .<br />
3 . Appuyez sur pour valider le réglage et ramener l’icône représentant une<br />
flèche sur la ligne du milieu .<br />
4 . Appuyez sur les touches / pour faire défiler les réglages suivants :<br />
a . + % Sat = % de résolution de la saturation<br />
b . + mg/L = Résolution de la concentration<br />
c . = Type de baromètre (Auto/Manuel)<br />
d . = Compensation manuelle de la température<br />
e . = Compensation automatique/manuelle de la salinité<br />
f . = Correction manuelle de la salinité<br />
g . = Type d’étalonnage<br />
5 . Appuyez sur pour sélectionner l’option et ramener l’icône représentant une<br />
flèche sur la ligne du bas .<br />
6 . Appuyez sur / et pour saisir la valeur . Le tableau suivant répertorie<br />
les valeurs affichées à l’écran et indique la plage de valeurs autorisée .<br />
FR-30 Thermo Scientific <strong>Orion</strong> <strong>Star</strong> <strong>and</strong> <strong>Star</strong> <strong>Plus</strong> Series <strong>Meter</strong> User Guide
7 . Après avoir entré une valeur, appuyez sur pour terminer la programmation<br />
de cette option et déplacer l’icône représentant une flèche sur la ligne<br />
supérieure . Répétez les étapes 3 à 6 pour toutes les options .<br />
8 . Appuyez sur pour repasser en mode de mesure .<br />
Etalonnage OD<br />
Avant de procéder à l’étalonnage, la sonde doit être préparée et polarisée .<br />
• La sonde OD est polarisée en permanence lorsqu’elle est raccordée à l’appareil<br />
de mesure . Lors de la première connexion, ou après un délai de plus de 60<br />
minutes avec la sonde déconnectée, attendez 30 à 60 minutes pour laisser le<br />
temps à la sonde d’être polarisée . Si les mesures de la sonde sont stables, des<br />
connexions interrompues moins d’une heure nécessiteront un délai de 5 à 25<br />
minutes pour la stabilisation des mesures .<br />
Remarque : Les appareils de mesure <strong>Star</strong> fournissent un courant de<br />
polarisation à la sonde OD même lorsque l’alimentation est coupée. Afin<br />
d’optimiser la longévité des piles de l’appareil, débranchez la sonde OD<br />
lorsqu’elle ne doit pas être utilisée pendant une période prolongée. s<br />
• Mise à zéro de la sonde - Une sonde OD peut générer une erreur positive de<br />
0,02 à 0,05 mg/L dans une solution exempte d’oxygène (anoxique) . Dans le cas<br />
où cette erreur serait inacceptable, il convient de procéder à la mise à zéro de<br />
la sonde lors de l’utilisation d’une nouvelle membrane de détection, en utilisant<br />
une solution de remplissage fraîche, ou lors de la prise de mesure d’oxygène<br />
dissous dont la saturation est inférieure à 1 mg/L ou 10 % .<br />
Un étalonnage de l’air doit être réalisé avant l’étalonnage du zéro .<br />
1 . En mode mesure, appuyez sur .<br />
2 . Appuyez sur / jusqu’à ce que apparaisse sur la ligne supérieure .<br />
3 . Appuyez sur pour valider le réglage et ramener l’icône représentant une<br />
flèche sur la ligne du milieu .<br />
Thermo Scientific <strong>Orion</strong> <strong>Star</strong> <strong>and</strong> <strong>Star</strong> <strong>Plus</strong> Series <strong>Meter</strong> User Guide<br />
Mesure de l’oxygène dissous (OD)<br />
4 . Appuyez sur / pour faire défiler les réglages suivants :<br />
FR-31
Mesure de l’oxygène dissous (OD)<br />
5 . Appuyez sur pour sélectionner l’option et ramener l’icône représentant une<br />
flèche sur la ligne du bas .<br />
6 . Appuyez sur / pour sélectionner l’un des deux modes d’étalonnage<br />
suivants .<br />
a . indique un étalonnage effectué dans de l’air saturé d’eau à l’aide du<br />
manchon d’étalonnage . Ceci est la méthode d’étalonnage la plus simple<br />
et la plus précise . C’est également le réglage par défaut de l’appareil de<br />
mesure . Si la sélection du type d’étalonnage n’a pas été modifiée dans<br />
, une pression sur la touche permet d’effectuer automatiquement un<br />
étalonnage de l’air . En raison des différences qui existent entre l’air saturé<br />
d’eau et l’eau saturée d’air, une fois la mesure stabilisée, la valeur de la<br />
référence d’air est fixée à une saturation de 102,3% .<br />
i . Le degré de précision le plus élevé est atteint lorsque la température<br />
d’étalonnage correspond à la température de mesure .<br />
ii . Humidifiez d’eau distillée l’éponge ou le linge absorbant dans le manchon<br />
et introduisez la sonde dans le manchon, en évitant tout contact avec le<br />
matériau saturé d’eau . Pour les mesures de DBO, l’étalonnage peut être<br />
effectué dans un flacon DBO .<br />
iii . Pour les niveaux d’oxygène inférieurs à 1 mg/L, un point d’étalonnage zéro<br />
est souvent nécessaire .<br />
b . indique l’étalonnage de l’eau effectué en utilisant un échantillon d’eau<br />
saturé à 100 % d’air . Cette méthode d’étalonnage est la moins courante .<br />
c . l’affichage indique l’étalonnage manuel utilisant un échantillon d’eau<br />
avec une concentration d’oxygène dissous connue . Cette méthode peut<br />
être utilisée pour étalonner le capteur en fonction de la valeur obtenue via la<br />
méthode de titrage Winkler .<br />
FR-32 Thermo Scientific <strong>Orion</strong> <strong>Star</strong> <strong>and</strong> <strong>Star</strong> <strong>Plus</strong> Series <strong>Meter</strong> User Guide
i . La méthode d’étalonnage Winkler implique l’exécution d’un titrage manuel<br />
Winkler, puis l’utilisation de cet échantillon comme référence . Le niveau<br />
de titrage d’oxygène doit être spécifié lors de l’étalonnage Winkler comme<br />
valeur de référence OD . Cette valeur correspond à l’entrée de l’appareil<br />
de mesure pour le titrage Winkler . Sachez que, par nature, cette méthode<br />
offre un niveau de précision inférieur en raison des erreurs de titrage<br />
possibles induites lorsque l’étalonnage est réglé sur les résultats de test<br />
de titrage .<br />
d . correspond à un étalonnage du zéro, qui est utilisé pour les<br />
mesures d’OD à très faible teneur en OD . Ce type d’étalonnage ne s’utilise<br />
généralement que pour la prise de mesure d’une saturation inférieure à 5 %<br />
(ou 0,5 mg/L) .<br />
7 . Appuyez sur pour valider les changements et ramener l’icône représentant<br />
une flèche sur la ligne supérieure .<br />
8 . Appuyez sur pour repasser en mode de mesure .<br />
9 . Il convient de laisser la sonde et la référence d’étalonnage (air saturé d’eau<br />
ou eau saturée d’air) atteindre l’équilibre avant de procéder à l’étalonnage du<br />
système .<br />
a . Appuyez sur .<br />
b . Attendez que la mesure soit stabilisée .<br />
c . L’appareil de mesure affiche 102 .3% et repasse en mode de mesure .<br />
Mesure OD<br />
1 . Rincez la sonde OD, ainsi que l’agitateur (si celui-ci est utilisé) à l’eau déionisée .<br />
Essuyez les traces d’humidité à l’aide d’un linge non pelucheux .<br />
2 . Placez la sonde OD dans votre échantillon .<br />
Thermo Scientific <strong>Orion</strong> <strong>Star</strong> <strong>and</strong> <strong>Star</strong> <strong>Plus</strong> Series <strong>Meter</strong> User Guide<br />
Mesure de l’oxygène dissous (OD)<br />
FR-33
Mesure de l’oxygène dissous (OD)<br />
a . Si le mode de mesure continu est activé, l’appareil commence<br />
immédiatement la prise de mesure . Si vous utilisez un instrument de<br />
paillasse et que la fonction de contrôle de l’agitateur est activée, appuyez sur<br />
la touche pour mettre l’agitateur en route .<br />
L’icône clignote alors jusqu’à la stabilisation de la mesure . Une fois la<br />
mesure stabilisée, vous pouvez l’enregistrer et l’imprimer en appuyant sur<br />
. Si vous prenez note des données mesurées, inscrivez également<br />
l’oxygène dissous et la température de la prise de mesure de l’OD . Si<br />
l’agitateur fonctionne, appuyez sur la touche pour l’éteindre avant de le<br />
retirer de l’échantillon .<br />
b . Si le mode de mesure AUTO-READ est activé, appuyez sur pour<br />
commencer la mesure . Une fois la mesure stabilisée, l’appareil enregistre<br />
et imprime automatiquement le résultat, l’affichage étant gelé pendant<br />
l’opération . Si l’agitateur est activé, il se mettra en route après une pression<br />
sur et s’arrêtera une fois la mesure stabilisée .<br />
Si vous utilisez une sonde BOD AUTO-STIR, appuyez sur le bouton de la<br />
sonde pour commencer la mesure AUTO-READ .<br />
c . Si le mode de mesure limité est activé, l’appareil commence la mesure dès<br />
l’activation du mode mesure, suivant la fréquence définie dans le menu<br />
Setup (Configuration) . Chaque mesure est automatiquement enregistrée et<br />
imprimée . Si vous utilisez un instrument de paillasse et que la fonction de<br />
contrôle de l’agitateur est activée, appuyez sur la touche pour mettre<br />
l’agitateur en route . Appuyez de nouveau sur la touche pour l’arrêter .<br />
3 . Retirez la sonde OD de l’échantillon et rincez-la à l’eau déionisée, puis plongez la<br />
dans l’échantillon suivant et répétez l’étape 2 .<br />
4 . Une fois tous les échantillons mesurés, rincez la sonde OD à l’eau déionisée et<br />
essuyez-la . Reportez-vous à la documentation fournie avec la sonde OD pour<br />
connaître les instructions de stockage appropriées .<br />
FR-34 Thermo Scientific <strong>Orion</strong> <strong>Star</strong> <strong>and</strong> <strong>Star</strong> <strong>Plus</strong> Series <strong>Meter</strong> User Guide
Chapitre VIII<br />
Mesure de la conductivité<br />
Configuration de la conductivité<br />
Description Affichage Plage de valeurs Valeur par<br />
défaut<br />
Sélection de la<br />
compensation de<br />
température de<br />
conductivité<br />
Définition du coefficient<br />
de compensation linéaire<br />
de température de<br />
conductivité<br />
Définition du facteur TDS<br />
de conductivité<br />
Détermination<br />
automatique de la<br />
constante de cellule<br />
Sélection de la<br />
température de référence<br />
Type de cellule de<br />
conductivité et sélection<br />
de plage manuelle<br />
COnd<br />
tC<br />
LIn<br />
COnd<br />
COEF<br />
2.1<br />
COnd<br />
tdSF<br />
0.49<br />
COnd<br />
CELL<br />
0.475<br />
COnd<br />
trEF<br />
25<br />
COnd<br />
tYPE<br />
Std<br />
1 . En mode mesure, appuyez sur .<br />
OFF, LIn, nLF<br />
Sélectionne Temp Comp OFF,<br />
Linear, ou Non-linear pour<br />
l’eau naturelle ou ultra-pure<br />
0,0 - 10,0<br />
Coefficient de compensation<br />
linéaire de température en<br />
%/C<br />
0,00 - 10,0<br />
Facteur TDS<br />
0,001 - 199,0<br />
Constante de la cellule<br />
électrolytique utilisée pour<br />
Etalonnage automatique de<br />
conductivité<br />
15, 20, 25<br />
Température de référence<br />
Température ˚C<br />
PLnr, Std, 1, 2, 3, 4, 5, 6, 7<br />
Cellule de conductivité<br />
st<strong>and</strong>ard ou planaire<br />
ou définit d’une plage<br />
manuelle de 1 à 7<br />
Thermo Scientific <strong>Orion</strong> <strong>Star</strong> <strong>and</strong> <strong>Star</strong> <strong>Plus</strong> Series <strong>Meter</strong> User Guide<br />
LIn Oui<br />
2,1 Oui<br />
0,49 Oui<br />
0,475 Oui<br />
25 Oui<br />
Std Oui<br />
Méthode<br />
spécifique<br />
FR-35
Mesure de la conductivité<br />
2 . Appuyez sur / pour faire défiler les options du menu Setup<br />
(Configuration) et afficher sur la ligne supérieure .<br />
3 . Appuyez sur pour valider les changements et ramener l’icône représentant<br />
une flèche sur la ligne du milieu .<br />
4 . Appuyez sur les touches / pour faire défiler les réglages de conductivité<br />
suivants :<br />
• = Sélection de la compensation de la température . Vous pouvez<br />
choisir de désactiver la compensation de température ,<br />
d’utiliser la compensation de température linéaire ou non<br />
linéaire pour l’eau naturelle et l’eau ultra pure .<br />
• = Coefficient de température pour la méthode de compensation<br />
(linéaire) de la température, exprimé en % /C<br />
• = Facteur TDS pour la mesure des matières totales dissoutes<br />
• = Constante de cellule de conductivité (constante de cellule<br />
nominale utilisée pour<br />
l’étalonnage automatique)<br />
• = Température de référence pour la compensation de la<br />
température . Les options disponibles sont degrés C,<br />
degrés C ou degrés C .<br />
• = Type de cellule de conductivité (Planaire ou St<strong>and</strong>ard)<br />
5 . Appuyez sur pour valider les changements et ramener l’icône représentant<br />
une flèche sur la ligne du bas .<br />
6 . Appuyez sur / et pour modifier la valeur .<br />
7 . Appuyez sur pour valider la sélection et déplacer la flèche sur la ligne<br />
supérieure .<br />
8 . Répétez les étapes 3 à 7 pour modifier les réglages de conductivité .<br />
9 . Appuyez sur pour repasser en mode de mesure .<br />
FR-36 Thermo Scientific <strong>Orion</strong> <strong>Star</strong> <strong>and</strong> <strong>Star</strong> <strong>Plus</strong> Series <strong>Meter</strong> User Guide
Etalonnage de la conductivité pour 1 à 5 points<br />
1 . Préparez la cellule pour utilisation conformément aux instructions fournies dans<br />
le manuel d’utilisation ou le manuel de l’opérateur .<br />
2 . En mode de mesure, appuyez sur jusqu’à ce que l’icône représentant une<br />
flèche pointe vers la ligne de mesure de conductivité .<br />
3 . Appuyez sur .<br />
4 . Rincez la sonde et placez-la dans la référence de conductivité .<br />
5 . Pour effectuer un étalonnage manuel - L’écran affiche la constante de la cellule<br />
sur la ligne supérieure et la conductivité sur la deuxième du milieu . Utilisez<br />
et / pour modifier la constante de la cellule jusqu’à ce que la valeur de<br />
conductivité affichée corresponde à celle de la référence de conductivité à la<br />
température mesurée .<br />
• Si vous ne commencez pas à modifier la constante de la cellule dans les cinq<br />
secondes, l’écran AutoCal/DirectCal s’affiche automatiquement .<br />
6 . Pour effectuer un étalonnage AutoCal ou DirectCal - Attendez que l’icône µS/cm<br />
or mS/cm ne clignote plus .<br />
• AutoCal - Lorsque l’icône µS/cm ou mS/cm cesse de clignoter, l’appareil<br />
de mesure affiche la valeur de référence de conductivité corrigée en<br />
température .<br />
• DirectCal - Lorsque l’icône µS/cm ou mS/cm cesse de clignoter, l’appareil<br />
de mesure affiche la valeur de conductivité réelle détectée par la sonde<br />
de conductivité . Utilisez et / pour modifier la valeur de<br />
conductivité selon la valeur de référence de conductivité à la température<br />
mesurée .<br />
Thermo Scientific <strong>Orion</strong> <strong>Star</strong> <strong>and</strong> <strong>Star</strong> <strong>Plus</strong> Series <strong>Meter</strong> User Guide<br />
Mesure de la conductivité<br />
FR-37
Mesure de la conductivité<br />
7 . Appuyez pour passer au point d’étalonnage suivant et répétez les étapes 4<br />
à 6 ou appuyez sur pour enregistrer et terminer l’étalonnage .<br />
8 . Une fois la valeur de la dernière référence entrée, la constante de la<br />
cellule apparaît dans le champ inférieur t<strong>and</strong>is que la constante courante<br />
est indiquée dans le champ principal . L’appareil repasse alors automatiquement<br />
en mode de mesure . L’icône s’affiche au-dessus du champ principal .<br />
FR-38 Thermo Scientific <strong>Orion</strong> <strong>Star</strong> <strong>and</strong> <strong>Star</strong> <strong>Plus</strong> Series <strong>Meter</strong> User Guide
Mesure de la conductivité<br />
1 . Rincez la cellule de conductivité et introduisez-la dans l’échantillon . Enregistrez<br />
la conductivité directement à partir de l’écran principal de l’appareil de mesure<br />
lorsque l’icône mS/cm ou µS/cm cesse de clignoter, indiquant que la mesure<br />
est stabilisée . La température est affichée dans l’angle supérieur gauche de<br />
l’écran .<br />
2a . Si le mode de mesure continu est activé, l’appareil commence immédiatement<br />
la prise de mesure . Si vous utilisez un instrument de paillasse et que la fonction<br />
de contrôle de l’agitateur est activée, appuyez sur la touche pour mettre<br />
l’agitateur en route .<br />
L’icône clignote alors jusqu’à la stabilisation de la mesure . Une fois la mesure<br />
stabilisée, vous pouvez l’enregistrer et l’imprimer en appuyant sur . Si vous<br />
prenez note des données mesurées, inscrivez également la conductivité et la<br />
température de la prise de mesure de conductivité . Si l’agitateur fonctionne,<br />
appuyez sur la touche pour l’éteindre avant de le retirer de l’échantillon .<br />
2b . Si le mode de mesure AUTO-READ est activé, appuyez sur pour<br />
commencer la mesure . Une fois la mesure stabilisée, l’appareil enregistre et<br />
imprime automatiquement le résultat, l’affichage étant gelé pendant l’opération .<br />
Si l’agitateur est activé, il se mettra en route après une pression sur et<br />
s’arrêtera une fois la mesure stabilisée .<br />
2c . Si le mode de mesure limité est activé, l’appareil commence la mesure dès<br />
l’activation du mode mesure, suivant la fréquence définie dans le menu Setup<br />
(Configuration) . Chaque mesure est automatiquement enregistrée et imprimée .<br />
Si vous utilisez un instrument de paillasse et que la fonction de contrôle de<br />
l’agitateur est activée, appuyez sur la touche pour mettre l’agitateur en<br />
route . Appuyez de nouveau sur la touche pour l’arrêter .<br />
Thermo Scientific <strong>Orion</strong> <strong>Star</strong> <strong>and</strong> <strong>Star</strong> <strong>Plus</strong> Series <strong>Meter</strong> User Guide<br />
Mesure de la conductivité<br />
FR-39
Mesure de la conductivité<br />
3 . Retirez la cellule de conductivité de l’échantillon et rincez-la à l’eau déionisée,<br />
puis plongez la dans l’échantillon suivant et répétez l’étape 2 .<br />
4 . Une fois tous les échantillons mesurés, rincez la cellule de conductivité à l’eau<br />
déionisée et essuyez-la . Reportez-vous à la documentation fournie avec la cellule<br />
de conductivité pour connaître les instructions de stockage appropriées .<br />
FR-40 Thermo Scientific <strong>Orion</strong> <strong>Star</strong> <strong>and</strong> <strong>Star</strong> <strong>Plus</strong> Series <strong>Meter</strong> User Guide
Chapitre IX<br />
Mesures par électrodes sélectives<br />
d’ion (ISE)<br />
Configuration ISE<br />
Description Affichage Plage de valeurs Valeur<br />
par défaut<br />
Résolution ISE ISE 1, 2, 3<br />
rES Résolution ISE en<br />
1<br />
chiffres significatifs<br />
Unités ISE ISE M, mG/L, PEr, PPb, nOnE<br />
UnIt<br />
PPb<br />
Affichage des unités ISE<br />
Plage de concentration<br />
de référence<br />
Plage de concentration<br />
Correction automatique<br />
des blancs ISE<br />
ISE<br />
rAng<br />
HIgH<br />
ISE<br />
nLIn<br />
AUtO<br />
1 . En mode mesure, appuyez sur .<br />
LOw, HIgH<br />
Critère de stabilité utilisé<br />
pendant l’étalonnage ISE<br />
AUtO, OFF<br />
Active ou désactive<br />
la correction automatique des<br />
blancs pour l’étalonnage<br />
Thermo Scientific <strong>Orion</strong> <strong>Star</strong> <strong>and</strong> <strong>Star</strong> <strong>Plus</strong> Series <strong>Meter</strong> User Guide<br />
1 Oui<br />
PPb Oui<br />
HIgH Oui<br />
AUtO Oui<br />
Méthode<br />
spécifique<br />
2 . Appuyez sur les touches / pour faire défiler les options du menu Setup<br />
(Configuration) et afficher sur la ligne supérieure .<br />
3 . Appuyez sur pour valider les changements et passer à la ligne du milieu .<br />
FR-41
Mesures par électrodes sélectives d’ion (ISE)<br />
4 . Appuyez sur / pour faire défiler les options suivantes :<br />
• = Résolution<br />
• = Unités de mesure ISE<br />
• M = Molaire<br />
• mG/L = mg/L<br />
• PEr = Pourcentage<br />
• PPb = Parties par milliard<br />
• nOnE = Pas d’unité<br />
• = Plage d’étalonnage ISE<br />
• HIgH - pour la plupart des mesures<br />
• LOw - pour les mesure à faible niveau qui nécessitent un délai de<br />
stabilisation plus long<br />
• = Correction non linéaire des blancs<br />
• OFF<br />
• AUtO<br />
5 . Appuyez sur pour valider les changements et ramener l’icône représentant<br />
une flèche sur la ligne du bas .<br />
6 . Appuyez sur / et pour modifier la valeur sélectionnée .<br />
7 . Appuyez sur pour valider les changements et ramener l’icône représentant<br />
une flèche sur la ligne supérieure .<br />
8 . Répétez les étapes 3 à 7 pour modifier les réglages ISE .<br />
9 . Appuyez sur pour repasser en mode de mesure .<br />
FR-42 Thermo Scientific <strong>Orion</strong> <strong>Star</strong> <strong>and</strong> <strong>Star</strong> <strong>Plus</strong> Series <strong>Meter</strong> User Guide
Préparation des étalons<br />
Thermo Scientific <strong>Orion</strong> <strong>Star</strong> <strong>and</strong> <strong>Star</strong> <strong>Plus</strong> Series <strong>Meter</strong> User Guide<br />
Mesures par électrodes sélectives d’ion (ISE)<br />
Les étalons doivent être préparés en utilisant la même unité ISE, comme l’exige<br />
le résultat de l’échantillonnage . Il est préférable d’utiliser la technique de dilutions<br />
successives pour obtenir des niveaux de concentration différents .<br />
Remarque : L’ajout de réactifs, tels que des ajusteurs de concentration<br />
ionique, doit être effectué dans les échantillons et les étalons comme indiqué<br />
dans le guide d’utilisation ou le manuel d’instructions de l’électrode. s<br />
Les points d’étalonnage doivent définir la plage de concentration prévue pour<br />
les échantillons à mesurer et couvrir une plage au moins dix fois supérieure en<br />
concentration(par exemple 1 ppm et 10 ppm ou 10 ppm et 100 ppm) .<br />
Il est conseillé d’utiliser des solutions fraîches pour chaque étalonnage .<br />
FR-43
Mesures par électrodes sélectives d’ion (ISE)<br />
Etalonnage ISE<br />
1 . Préparez l’électrode et les étalons à utiliser conformément aux instructions<br />
fournies avec l’électrode .<br />
2 . Appuyez sur jusqu’à ce que l’icône représentant une flèche pointe vers la<br />
ligne de mesure ISE .<br />
3 . Appuyez sur .<br />
4 . Rincez l’électrode, éliminez l’excédent d’eau déionisée et séchez-la avant de la<br />
placer dans l’étalon le moins concentré .<br />
5 . Attendez que ISE cesse de clignoter . Appuyez sur / et pour<br />
changer la valeur d’étalon .<br />
6 . Appuyez pour passer à l’étalon suivant le plus faible et répétez les étapes 4<br />
à 5 en procédant de la plus faible concentration vers la plus forte ou appuyez sur<br />
pour enregistrer l’étalonnage .<br />
7 . La pente est affichée avant que l’appareil ne repasse en mode de mesure .<br />
s’affiche dans le champ inférieur, t<strong>and</strong>is que la pente courante de l’électrode, en<br />
mV, apparaît dans le champ principal .<br />
Remarque : Lors d’un étalonnage à deux points ou plus, l’appareil de mesure<br />
repasse automatiquement en mode de mesure au bout de trois secondes. En<br />
cas d’étalonnage à un seul point, vous pouvez modifier la pente, puis appuyer<br />
sur la touche pour repasser en mode de mesure. s<br />
Remarque : Pour modifier une valeur de pente négative, procédez comme<br />
suit : s<br />
a. Appuyez sur jusqu’à ce que les chiffres clignotants soient remplacés<br />
par l’icône représentant une flèche, clignotante.<br />
b. Appuyez sur / pour changer le signe de la pente .<br />
c. Appuyez sur pour enregistrer.<br />
FR-44 Thermo Scientific <strong>Orion</strong> <strong>Star</strong> <strong>and</strong> <strong>Star</strong> <strong>Plus</strong> Series <strong>Meter</strong> User Guide
Prise de mesure de l’ISE<br />
Une fois l’étalonnage de l’électrode terminé, vous pouvez commencer à prendre<br />
des mesures . Vérifiez que le mode de mesure est activé ( est allumé) et que ISE<br />
est affiché en surbrillance . Si ne s’affiche pas, appuyez sur la touche pour<br />
repasser en mode de mesure . Si ISE ne s’affiche pas en surbrillance, appuyez sur<br />
jusqu’à ce que la flèche située dans la partie gauche de l’écran pointe vers la<br />
ligne supérieure . Appuyez ensuite sur<br />
prêt pour commencer les mesures .<br />
pour sélectionner ISE . Vous êtes alors<br />
1 . Rincez l’électrode à l’eau déionisée . Eliminez l’excédent d’eau et séchez-la avec<br />
un tissu non pelucheux .<br />
2 . Plongez l’électrode dans votre échantillon .<br />
a . Si le mode de mesure continu est activé, l’appareil commence immédiatement<br />
la prise de mesure . Si vous utilisez un appareil de mesure de paillasse et que<br />
la fonction de contrôle de l’agitateur est désactivée, appuyez sur la touche<br />
pour mettre l’agitateur en route . ISE clignote alors jusqu’à la stabilisation de la<br />
mesure . Une fois la mesure stabilisée, vous pouvez l’enregistrer et l’imprimer<br />
en appuyant sur la touche . Si l’agitateur fonctionne, appuyez sur la touche<br />
pour l’éteindre avant de le retirer de l’échantillon .<br />
b . Si le mode de mesure AUTO-READ est activé, appuyez sur pour<br />
commencer la mesure . Une fois la mesure stabilisée, l’appareil enregistre<br />
et imprime automatiquement le résultat, l’affichage étant gelé pendant<br />
l’opération . Si l’agitateur est activé, il se mettra en route après une pression<br />
sur et s’arrêtera une fois la mesure stabilisée .<br />
c . Si le mode de mesure limité est activé, l’appareil commence la mesure<br />
suivant la fréquence définie lors de la configuration . Chaque mesure est<br />
automatiquement enregistrée et imprimée . Si vous utilisez un instrument de<br />
paillasse et que la fonction de contrôle de l’agitateur est activée, appuyez sur<br />
la touche pour mettre l’agitateur en route . Appuyez de nouveau sur la<br />
touche pour l’arrêter .<br />
Thermo Scientific <strong>Orion</strong> <strong>Star</strong> <strong>and</strong> <strong>Star</strong> <strong>Plus</strong> Series <strong>Meter</strong> User Guide<br />
Mesures par électrodes sélectives d’ion (ISE)<br />
FR-45
Mesures par électrodes sélectives d’ion (ISE)<br />
3 . Retirez l’électrode de l’échantillon et rincez-la à l’eau déionisée, puis plongez la<br />
dans l’échantillon suivant et répétez l’étape 2 .<br />
4 . Une fois tous les échantillons mesurés, rincez l’électrode à l’eau déionisée et<br />
essuyez-la . Reportez-vous à la documentation fournie avec l’électrode pour<br />
connaître les instructions de stockage appropriées .<br />
FR-46 Thermo Scientific <strong>Orion</strong> <strong>Star</strong> <strong>and</strong> <strong>Star</strong> <strong>Plus</strong> Series <strong>Meter</strong> User Guide
Chapitre X<br />
Termes et Conditions<br />
Problèmes généraux<br />
Le vendeur propose de vendre à l’acheteur (ci après désigné l’« Acheteur ») les<br />
produits (ci après désigné les « Produits ») sous réserve de son acceptation et<br />
de son engagement à respecter les termes et conditions stipulés dans le présent<br />
document . Toute clause contenue dans un document quelconque établi par<br />
l’Acheteur est expressément annulée et si les termes et conditions de cet Accord<br />
diffèrent de ceux de l’offre faite à l’Acheteur, ce document devra être considéré<br />
comme une contre-proposition, mais pas comme une acceptation du document<br />
de l’Acheteur . La réception des Produits par l’Acheteur ou le début de la prestation<br />
des services du Vendeur tels que stipulés dans le présent document marque<br />
l’acceptation de l’Acheteur des termes et conditions du présent Accord . Ceci<br />
constitue la disposition complète et exclusive du contrat passé entre le Vendeur et<br />
l’Acheteur par rapport à l’achat des Produits par l’Acheteur . Aucun(e) renonciation,<br />
consentement, modification, amendement ou changement des termes contenus<br />
dans le présent document ne saurait être de nature à lier les parties, sauf accord<br />
écrit et signé par le Vendeur et l’Acheteur . Le non-respect par le Vendeur des termes<br />
et conditions contenus dans toute communication ultérieure émanant de l’Acheteur<br />
ne saurait être considéré comme une renonciation ou une modification des termes<br />
et conditions stipulés dans le présent document . Toute comm<strong>and</strong>e devra être<br />
soumise à une acceptation écrite délivrée par un représentant agréé du Vendeur .<br />
Garantie<br />
La garantie pour les produits Thermo Scientific <strong>Orion</strong> couvre tout défaut de fabrication<br />
ou de matériaux du fait du fabricant à compter de la date d’achat du produit par<br />
l’utilisateur . L’utilisateur doit retourner le coupon de garantie et conserver sa preuve<br />
d’achat . Toute utilisation abusive, mauvaise utilisation ou réparation effectuée par des<br />
personnes non autorisées entraîne l’annulation de la garantie .<br />
Thermo Scientific <strong>Orion</strong> <strong>Star</strong> <strong>and</strong> <strong>Star</strong> <strong>Plus</strong> Series <strong>Meter</strong> User Guide<br />
FR-47
Termes et conditions<br />
Les présentes garanties concernent le produit vendu/installé par<br />
Thermo Fisher Scientific ou ses revendeurs agréés.<br />
Tout produit vendu par un distributeur américain ou canadien devra être retourné<br />
à Thermo Fisher Scientific pour des réparations sous garantie . Veuillez contacter<br />
notre département Service technique pour de plus amples informations . Un numéro<br />
d’autorisation de retour devra être obtenu auprès du Service technique avant de<br />
retourner les produits pour toute réparation sous garantie ou remplacement . En<br />
cas de dysfonctionnement survenant pendant la période de garantie, Thermo Fisher<br />
Scientific pourra, à sa discrétion, réparer ou remplacer le produit non conforme à<br />
cette garantie . Dans certains pays, les services de réparation sous garantie peuvent<br />
occasionner des frais supplémentaires, y compris des frais de transport . Pour tout<br />
service de réparation, contactez Thermo Fisher Scientific (ou son revendeur agréé en<br />
dehors des Etats-Unis et du Canada) . Thermo Fisher Scientific se réserve le droit de<br />
vous dem<strong>and</strong>er une preuve d’achat, telle que la facture d’origine ou le bordereau de<br />
march<strong>and</strong>ises .<br />
Le service de maintenance sur site est disponible sur les produits BOD AutoEZ .<br />
Contactez notre département Service de maintenance sur site pour plus de détails<br />
concernant les devis, le service et les autres activités associées à notre service<br />
d’assistance sur site .<br />
Les produits suivants sont garantis être exempts de tout défaut de fabrication et<br />
de matériaux pour la période indiquée ci-après à compter de la date d’achat par<br />
l’utilisateur ou de la date de livraison par Thermo Fisher Scientific, suivant la date<br />
la plus antérieure, sous réserve qu’ils soient utilisés conformément aux limitations<br />
de fonctionnement et aux procédures de maintenance indiquées dans le manuel<br />
d’utilisation et qu’ils n’aient fait l’objet d’aucun(e) accident, altération, mauvaise<br />
utilisation, utilisation abusive ou de casse des électrodes :<br />
Trente-six mois à compter de la date d’achat par l’utilisateur (ou quarante-deux<br />
mois à compter de la livraison par Thermo Fisher Scientific)<br />
Tous les instruments pH, ISE, OD et Conductivité de la gamme <strong>Orion</strong> <strong>Star</strong>,<br />
les instruments étanches (modèles 630, 635, 830A, 835A, 260A, 261S, 265A,<br />
266S, 130A, 131S, 135A, 136S), les conductimètres (modèles 105Aplus,<br />
115Aplus, 125Aplus, 145Aplus, 150Aplus et 162A), les instruments pH<br />
et pH/ISE PerpHect ® (modèles 310, 320, 330, 350, 370), les instruments pH et<br />
pH/ISE (modèles 210Aplus, 230Aplus, 250Aplus, 290Aplus, 410Aplus,<br />
420Aplus, 520Aplus, 525Aplus, 710Aplus, 720Aplus et 920Aplus),<br />
les instruments pHuture MMS (modèles 535A et 555A), les instruments<br />
pH/Conductivité (modèle 550A), les instruments d’oxygène dissous (modèles<br />
FR-48 Thermo Scientific <strong>Orion</strong> <strong>Star</strong> <strong>and</strong> <strong>Star</strong> <strong>Plus</strong> Series <strong>Meter</strong> User Guide
805Aplus, 810Aplus, 850Aplus et 862A) .<br />
Thermo Scientific <strong>Orion</strong> <strong>Star</strong> <strong>and</strong> <strong>Star</strong> <strong>Plus</strong> Series <strong>Meter</strong> User Guide<br />
Termes et conditions<br />
Vingt-quatre mois à compter de la date d’achat par l’utilisateur (ou<br />
trente-six mois à compter de la livraison par Thermo Fisher Scientific)<br />
Les électrodes Ross Ultra ®, les colorimètres AQUAfast ® IV, le turbidimètre<br />
AQUAfast ® IV, le 925 Flash Titrator, les cellules de conductivité DuraProbe série<br />
100 et les sondes d’oxygène dissous série 800 .<br />
Douze mois à compter de la date d’achat par l’utilisateur (ou dix-huit<br />
mois à compter de la livraison par Thermo Fisher Scientific)<br />
Les pH mètres Laboratory (modèles 301, 611 et 940), SensorLink ®, les pH mètres<br />
pHuture ® (modèles 610 et 620), les instruments Smart Chek, les pompes Sage ®,<br />
les balances Cahn ®, le 930 Ionalyzer® , le titrateur 950 ROSS ® FAST QC, le<br />
titrateur 960 PLUS ®, les titrateurs Karl Fischer, les échantillonneurs automatiques,<br />
la pHuture ® Conversion Box, le Wine Master ®, la 607 Switchbox, rf link, les<br />
colorimètres AQUAfast ® II, le dégazeur sous vide et le débitmètre .<br />
Les électrodes Ion Selective, les électrodes ionplus ®, les électrodes ROSS ®,<br />
les électrodes Sure-Flow ®, les électrodes PerpHecT ®, les électrodes AquaPro<br />
Professional, les électrodes No Cal ® pH, les électrodes St<strong>and</strong>ard pH, les électrodes<br />
TRIS pH, l’électrode KNIpHE ®, la Triode ORP (modèle 9180BN), les sondes<br />
pHuture ® pH (modèle 616500) et la pHuture MMS Quatrode et Triode<br />
(modèles 616600 et 617900), la sonde OD 9708, les cellules de conductivité<br />
conventionnelles série 100, les sondes de température et les compensateurs (à<br />
l’exception des modèles spécifiés) .<br />
Les modules de détection 93 et 97 série ionplus ® bénéficient d’une garantie de<br />
six mois d’utilisation s’ils sont retournés pour réparation avant la date indiquée<br />
sur l’emballage, à l’exception des modules Nitrate 9307 et 9707 garantis pour une<br />
période d’utilisation de quatre-vingt-dix jours s’ils sont retournés pour réparation<br />
avant la date indiquée sur l’emballage .<br />
Six mois à compter de la date d’achat par l’utilisateur (ou douze mois à<br />
compter de la livraison par Thermo Fisher Scientific)<br />
La sonde Flash Titration (modèle 092518), l’électrode pHuture ® (modèle 615700),<br />
la pHuture MMS Pentrode (modèle 617500), la Quatrode (modèle 617800) et<br />
la Triode (modèle 615800), la Low Maintenance Triode (modèle 9107BN), la ORP<br />
Low Maintenance Triode (modèle 9179BN) et la PerpHecT ® Low Maintenance<br />
Triode (modèle 9207BN), la Waterproof Triode (modèles 9107WP, 9107WL,<br />
9109WL et 9109WP), les instruments QuiKcheK ® et les micro-électrodes .<br />
FR-49
Termes et conditions<br />
Trois mois à compter de la date d’achat par l’utilisateur (ou six mois à<br />
compter de la livraison par Thermo Fisher Scientific)<br />
Les électrodes de la gamme Economy Line, 9105, 9106, 9115, 9116, 9125, 9126,<br />
9135, 9136, 9206 . La garantie couvre également tout type de défaut à l’exception de<br />
ceux résultant d’une mauvaise manipulation ayant entraîné la casse des instruments<br />
ou d’une utilisation abusive, sous réserve que l’électrode ne soit pas utilisée<br />
dans des solutions à base d’argent, de TRIS, de sulfure, de perchlorate ou d’acide<br />
fluorhydrique ; ou encore dans des solutions de plus d’une (1) masse molaire<br />
d’acide fort ou dont la température est supérieure à 50 °C .<br />
Garantie « Prêt à l’emploi - Si l’un des produits suivants venait à<br />
présenter un dysfonctionnement lors de sa première utilisation, contactez<br />
immédiatement Thermo Fisher Scientific pour le remplacer.<br />
Les solutions, les références, les réactifs, les câbles, les adaptateurs de ligne, les<br />
imprimantes, les logiciels, les enceintes, les statifs, les membranes de sonde, les<br />
b<strong>and</strong>elettes réactives AQUAfast ®, et les accessoires en général .<br />
Pour les produits du catalogue ne figurant pas dans cette déclaration<br />
de garantie, veuillez consulter notre site Web à l’adresse :<br />
www.thermo.com/water.<br />
LES GARANTIES PRECEDEMMENT DECRITES SONT EXCLUSIVES ET<br />
REMPLACENT TOUTE AUTRE GARANTIE REGLEMENTAIRE, EXPRESSE OU<br />
IMPLICITE, MAIS SANS LIMITATION, Y COMPRIS TOUTE GARANTIE IMPLICITE<br />
DE QUALITE MARCHANDE OU DE CONVENANCE A UN USAGE PARTICULIER,<br />
AINSI QUE TOUTE GARANTIE DECOULANT DES NEGOCIATIONS OU DES USAGES<br />
COMMERCIAUX . LE SEUL ET UNIQUE RECOURS DE L’ACHETEUR CONSISTE<br />
DANS LA REPARATION OU LE REMPLACEMENT DU PRODUIT DEFECTUEUX OU<br />
D’UNE PARTIE DE CELUI-CI, OU ENCORE DANS LE REMBOURSEMENT DU PRIX<br />
D’ACHAT, MAIS EN AUCUN CAS THERMO FISHER SCIENTIFIC (SES FILIALES ET<br />
LES FOURNISSEURS DE TOUT TIERS) NE POURRA ETRE TENU RESPONSABLE<br />
ENVERS L’ACHETEUR OU TOUTE AUTRE PERSONNE DES DOMMAGES SPECIAUX,<br />
INDIRECTS, INCIDENTS OU CONSECUTIFS, QUEL QUE SOIT LEUR FONDEMENT,<br />
CONTRACTUEL OU AUTRE (Y COMPRIS EN CAS DE NEGLIGENCE), LIES A OU<br />
DECOULANT DE L’UTILISATION DU PRODUIT . LES DECLARATIONS ET GARANTIES<br />
FORMULEES PAR TOUTE AUTRE PERSONNE, Y COMPRIS LES REVENDEURS<br />
AGREES, LES REPRESENTANTS ET LES EMPLOYES DE THERMO FISHER<br />
SCIENTIFIC QUI VIENDRAIENT MODIFIER OU S’AJOUTER AUX TERMES ET<br />
CONDITIONS DE LA PRESENTE GARANTIE NE SAURAIENT ETRE DE NATURE A<br />
ENGAGER THERMO FISHER SCIENTIFIC, SAUF ACCORD ECRIT ET SIGNE PAR L’UN<br />
FR-50 Thermo Scientific <strong>Orion</strong> <strong>Star</strong> <strong>and</strong> <strong>Star</strong> <strong>Plus</strong> Series <strong>Meter</strong> User Guide
DE SES RESPONSABLES .<br />
Limitation de responsabilité<br />
NONOBSTANT TOUTE DISPOSITION CONTRAIRE AU PRESENT ACCORD, LA<br />
RESPONSABILITE DU VENDEUR CONFORMEMENT AUX PRESENTS TERMES<br />
ET CONDITIONS (QUE CE SOIT EN CAS DE RUPTURE DU CONTRAT, DE FAUTE,<br />
D’INDEMNISATION OU AUTRE, A L’EXCLUSION DE LA RESPONSABILITE<br />
DU VENDEUR EN CAS DE RUPTURE DE LA GARANTIE (POUR LEQUEL<br />
L’UNIQUE RECOURS SERA CELUI STIPULE A LA SECTION 2 CI-DESSUS)) NE<br />
SAURAIT DEPASSER UN MONTANT EGAL AU MOINDRE DES MONTANTS<br />
CORRESPONDANT AU (A) PRIX D’ACHAT TOTAL PAYE PAR L’ACHETEUR AU<br />
VENDEUR POUR LE(S) PRODUIT(S) A L’ORIGINE DE LADITE RESPONSABILITE<br />
OU A (B) UN MILLION DE DOLLARS (1 .000 .000 $) . NONOBSTANT TOUTE<br />
DISPOSITION CONTRAIRE AU PRESENT ACCORD, EN AUCUN CAS LE VENDEUR<br />
NE POURRA ETRE TENU RESPONSABLE DES DOMMAGES INDIRECTS,<br />
SPECIAUX, CONSECUTIFS OU INCIDENTS (Y COMPRIS, MAIS SANS S’Y LIMITER,<br />
LES PERTES D’UTILISATION DES INSTALLATIONS OU DE L’EQUIPEMENT, DE<br />
REVENUS, DE DONNEES, COMMERCIALES OU DE CLIENTELE), MEME SI LE<br />
VENDEUR (a) A ETE AVISE DE LA SURVENANCE DE TELS DOMMAGES OU (b)<br />
S’EST MONTRE NEGLIGENT .<br />
Conditions diverses<br />
Thermo Scientific <strong>Orion</strong> <strong>Star</strong> <strong>and</strong> <strong>Star</strong> <strong>Plus</strong> Series <strong>Meter</strong> User Guide<br />
Termes et conditions<br />
(a) Les droits et obligations des parties aux présentes dispositions seront régis<br />
par et interprétés conformément au droit du Commonwealth du Massachusetts,<br />
à l’exclusion des règles en matières de conflits de lois . En vertu du présent<br />
accord, chaque partie accepte de façon irrévocable la compétence exclusive des<br />
tribunaux d’état et fédéraux du comté de Suffolk, Massachusetts, pour juger tout<br />
litige découlant de ou en rapport avec le présent Accord et renonce à recourir à la<br />
compétence de toute autre juridiction dont elle pourrait relever du fait de son lieu<br />
de résidence ou autre . (b) Les parties renoncent par ailleurs à tout droit à un procès<br />
devant jury qu’elles pourraient avoir conformément aux lois applicables ou autre en<br />
cas de procédure amenée devant les tribunaux mettant en présence le Vendeur et<br />
l’Acheteur et en relation avec le présent Accord . Tout procès découlant du présent<br />
Accord devra être porté devant les tribunaux dans un délai de un (1) an à compter<br />
de la date à laquelle la cause de ce procès est survenue .<br />
FR-51
REMARQUES<br />
FR-52 Thermo Scientific <strong>Orion</strong> <strong>Star</strong> FR-52<br />
<strong>and</strong> <strong>Star</strong> <strong>Plus</strong> Series <strong>Meter</strong> User Guide
Chapitre XI<br />
Déclarations de Conformité<br />
Fabricant : Thermo Fisher Scientific Inc .<br />
Adresse : 166 Cummings Center<br />
Beverly, MA 01915<br />
Etats-Unis<br />
Nous déclarons que les produits décrits ci-après sont conformes à la directive et aux<br />
normes indiquées ci-dessous :<br />
Produit(s) : Instruments de mesure du pH, de la conductivité, de l’oxygène<br />
dissous et/ou de l’ISE<br />
Les modèles de paillasse ont une puissance nominale de 100 à 240<br />
VAC, 50/60 Hz, 0,5 A<br />
Les modèles portatifs utilisent des piles AA non rechargeables<br />
Modèles de paillasse Modèles portables<br />
Appareil de mesure de pH/ISE/Conductivité/<br />
Oxygène dissous 5-<strong>Star</strong><br />
Appareil de mesure de pH/ISE/Conductivité/<br />
Oxygène dissous 5-<strong>Star</strong><br />
Appareil de mesure de pH/Conductivité 4-<strong>Star</strong> Appareil de mesure de pH/Conductivité/Oxygène<br />
dissous 5-<strong>Star</strong><br />
pH/Oxygène dissous 4-<strong>Star</strong> Appareil de mesure de pH/Conductivité 4-<strong>Star</strong><br />
Appareil de mesure de pH/ISE 4-<strong>Star</strong> Appareil de mesure de pH/Oxygène dissous 4-<strong>Star</strong><br />
Appareil de mesure de conductivité 3-<strong>Star</strong> Appareil de mesure de pH/ISE 4-<strong>Star</strong><br />
Appareil de mesure d’oxygène dissous 3-<strong>Star</strong> Appareil de mesure de conductivité 3-<strong>Star</strong><br />
pHmètre 3-<strong>Star</strong> pHmètre 3-<strong>Star</strong><br />
pHmètre 2-<strong>Star</strong> Appareil de mesure d’oxygène dissous 3-<strong>Star</strong><br />
Thermo Scientific <strong>Orion</strong> <strong>Star</strong> <strong>and</strong> <strong>Star</strong> <strong>Plus</strong> Series <strong>Meter</strong> User Guide<br />
FR-53
Déclarations de conformité<br />
Classe d’équipement : Mesure, contrôle et laboratoire<br />
Les modèles de paillasse sont de classe A CEM<br />
Les modèles portables sont de classe D CEM<br />
Directive(s) et Norme(s) :<br />
• 89/336/CEE - Directive relative à la compatibilité électromagnétique (CEM)<br />
• Norme EN 61326 :1997 + A1 :1998 + A2 :2001 relative à l’équipement<br />
électrique pour mesure, contrôle et utilisation en laboratoire - Exigences CEM<br />
• Directive 73/23/CEE relative aux limites de tension (LVD)<br />
• EN 61010-1 :2001 - Règles de sécurité pour les appareils électriques de<br />
mesure, contrôle et d’utilisation en laboratoire - Prescriptions générales<br />
Représentant agréé du fabricant : Date :<br />
Patrick Chiu 23 octobre 2008<br />
Senior Quality Assurance Engineering,<br />
Regulatory Compliance<br />
Conformité WEEE :<br />
Ce produit est conforme à la Directive 2002/96/CE relative aux déchets<br />
d’équipements électriques et électroniques (WEEE) élaborée par l’Union<br />
européenne.<br />
Le symbole ci-dessous a été apposé sur ce produit :<br />
Thermo Fisher Scientific a passé des contrats avec une ou plusieurs sociétés spécialisées<br />
dans le recyclage/la mise au rebut de ce type d’équipement dans chacun<br />
des états membres de l’Union européenne et ce produit pourra donc être mis au<br />
rebut ou recyclé par le biais de ces sociétés. Pour plus d’informations concernant la<br />
conformité des produits aux exigences de cette directive, les sociétés de recyclage<br />
implantées dans votre pays et les produits Thermo Scientific <strong>Orion</strong> susceptibles de<br />
vous aider dans la détection des substances soumises aux exigences de la Directive<br />
RoHS, rendez-vous sur le site www.thermo.com/WEEERoHS.<br />
FR-54 Thermo Scientific <strong>Orion</strong> <strong>Star</strong> <strong>and</strong> <strong>Star</strong> <strong>Plus</strong> Series <strong>Meter</strong> User Guide
D E<br />
Inhaltsverzeichnis<br />
Kapitel I Einleitung<br />
Kennwortgeschützte Methoden . . . . . . . . . . . . . . . . . . . . . . . . . . . . . . . . . . . . . . .DE-1<br />
AUTO-READ . . . . . . . . . . . . . . . . . . . . . . . . . . . . . . . . . . . . . . . . . . . . . . . . . . . .DE-2<br />
Rührerkontrolle . . . . . . . . . . . . . . . . . . . . . . . . . . . . . . . . . . . . . . . . . . . . . . . . . . . .DE-2<br />
SMART STABILITY und SMART AVERAGING . . . . . . . . . . . . . . . . . . . . . . . . .DE-2<br />
Kapitel II Display<br />
Allgemeine Beschreibung . . . . . . . . . . . . . . . . . . . . . . . . . . . . . . . . . . . . . . . . . . . .DE-3<br />
Kapitel III Tastatur<br />
Allgemeine Beschreibung . . . . . . . . . . . . . . . . . . . . . . . . . . . . . . . . . . . . . . . . . . . .DE-5<br />
Praktische Merkmale . . . . . . . . . . . . . . . . . . . . . . . . . . . . . . . . . . . . . . . . . . . . . . .DE-6<br />
Akustische Signale und Alarm . . . . . . . . . . . . . . . . . . . . . . . . . . . . . . . . . . . . . .DE-6<br />
Automatisches Ausschalten . . . . . . . . . . . . . . . . . . . . . . . . . . . . . . . . . . . . . . . .DE-6<br />
Symboldefinitionen . . . . . . . . . . . . . . . . . . . . . . . . . . . . . . . . . . . . . . . . . . . . . . . . .DE-7<br />
Kapitel IV Vorbereitung<br />
Installation des Netzadapters . . . . . . . . . . . . . . . . . . . . . . . . . . . . . . . . . . . . . . . . .DE-9<br />
Batterieinstallation . . . . . . . . . . . . . . . . . . . . . . . . . . . . . . . . . . . . . . . . . . . . . . . .DE-10<br />
Anschluss der Elektroden . . . . . . . . . . . . . . . . . . . . . . . . . . . . . . . . . . . . . . . . . . .DE-12<br />
Einschalten des Geräts . . . . . . . . . . . . . . . . . . . . . . . . . . . . . . . . . . . . . . . . . . . . .DE-14<br />
Kapitel V Setup-Menü<br />
Navigationstipps . . . . . . . . . . . . . . . . . . . . . . . . . . . . . . . . . . . . . . . . . . . . . . . . . .DE-15<br />
Allgemeine Menü-Einstellungen . . . . . . . . . . . . . . . . . . . . . . . . . . . . . . . . . . . . . .DE-16<br />
Einstellung von Datum und Uhrzeit . . . . . . . . . . . . . . . . . . . . . . . . . . . . . . . . . . .DE-18<br />
Continuous, Timed oder AUTO READ Messoptionen . . . . . . . . . . . . . . . . . . . . .DE-20<br />
Auswahl der Messmodi . . . . . . . . . . . . . . . . . . . . . . . . . . . . . . . . . . . . . . . . . . . .DE-22<br />
Einstellung der Kalibrierung . . . . . . . . . . . . . . . . . . . . . . . . . . . . . . . . . . . . . . . . .DE-23<br />
Thermo Scientific <strong>Orion</strong> <strong>Star</strong> <strong>and</strong> <strong>Star</strong> <strong>Plus</strong> Series <strong>Meter</strong> User Guide<br />
D E U T S C H<br />
DE-I
D E<br />
Kapitel VI pH-Verfahren<br />
pH-Setup . . . . . . . . . . . . . . . . . . . . . . . . . . . . . . . . . . . . . . . . . . . . . . . . . . . . . . . .DE-25<br />
pH-Kalibrierung . . . . . . . . . . . . . . . . . . . . . . . . . . . . . . . . . . . . . . . . . . . . . . . . . . .DE-26<br />
pH-Messung . . . . . . . . . . . . . . . . . . . . . . . . . . . . . . . . . . . . . . . . . . . . . . . . . . . . .DE-27<br />
Kapitel VII Verfahren für gelösten Sauerstoff<br />
DO-Setup . . . . . . . . . . . . . . . . . . . . . . . . . . . . . . . . . . . . . . . . . . . . . . . . . . . . . . .DE-29<br />
DO-Kalibrierung . . . . . . . . . . . . . . . . . . . . . . . . . . . . . . . . . . . . . . . . . . . . . . . . . . .DE-31<br />
DO-Messung . . . . . . . . . . . . . . . . . . . . . . . . . . . . . . . . . . . . . . . . . . . . . . . . . . . .DE-33<br />
Kapitel VIII Leitfähigkeitsverfahren<br />
Leitfähigkeits-Setup . . . . . . . . . . . . . . . . . . . . . . . . . . . . . . . . . . . . . . . . . . . . . . .DE-35<br />
Kalibrierung der Leitfähigkeit . . . . . . . . . . . . . . . . . . . . . . . . . . . . . . . . . . . . . . . .DE-37<br />
Leitfähigkeitsmessung . . . . . . . . . . . . . . . . . . . . . . . . . . . . . . . . . . . . . . . . . . . . .DE-39<br />
Kapitel IX ISE-Verfahren<br />
ISE-Setup . . . . . . . . . . . . . . . . . . . . . . . . . . . . . . . . . . . . . . . . . . . . . . . . . . . . . . .DE-41<br />
Vorbereitung von St<strong>and</strong>ardlösungen . . . . . . . . . . . . . . . . . . . . . . . . . . . . . . . . . . .DE-43<br />
ISE-Kalibrierung . . . . . . . . . . . . . . . . . . . . . . . . . . . . . . . . . . . . . . . . . . . . . . . . . .DE-44<br />
ISE-Messung . . . . . . . . . . . . . . . . . . . . . . . . . . . . . . . . . . . . . . . . . . . . . . . . . . . .DE-45<br />
Kapitel X Verkaufs- und Lieferbedingungen<br />
Garantie . . . . . . . . . . . . . . . . . . . . . . . . . . . . . . . . . . . . . . . . . . . . . . . . . . . . . . . .DE-47<br />
Kapitel XI Konformitätserklärung<br />
WEEE-Konformität . . . . . . . . . . . . . . . . . . . . . . . . . . . . . . . . . . . . . . . . . . . . . . . .DE-53<br />
DE-II Thermo Scientific <strong>Orion</strong> <strong>Star</strong> <strong>and</strong> <strong>Star</strong> <strong>Plus</strong> Series <strong>Meter</strong> User Guide
Kapitel I<br />
Einleitung<br />
Herzlichen Glückwunsch! Sie haben sich für ein Messgerät der <strong>Orion</strong> <strong>Star</strong>-Serie,<br />
einem der Marktführer im Bereich elektrochemischer Messtechnik, entschieden .<br />
Diese Geräte sind speziell für die Durchführung elektrochemischer Messungen im<br />
Feld oder im Labor entwickelt worden .<br />
• Die Messgeräte der 2- und 3-<strong>Star</strong>-Reihe sind Einparameter-Messgeräte für<br />
Messungen von pH/mV-Werten, Gelöstsauerstoff oder Leitfähigkeit jeweils in<br />
Verbindung mit der Temperatur .<br />
• Mit den Messgeräten der 4-<strong>Star</strong>-Reihe können Zweiparameter-Messungen<br />
durchgeführt werden . Folgende Kombinationen sind möglich: pH/<br />
Gelöstsauerstoff, pH/Leitfähigkeit oder pH/ISE (ionenselektive Messungen)<br />
jeweils in Verbindung mit der Temperaturmessung .<br />
• Mit den Messgeräten der 5-<strong>Star</strong>-Reihe können Multiparameter-Messungen,<br />
einschließlich mV/ORP-Parameter, vorgenommen werden .<br />
Um den Bedürfnissen unserer Kunden zu entsprechen, die unsere Geräte auf<br />
vielfältige Weise in Umwelt oder Anlagen einsetzen, sind sämtliche Messgeräte mit<br />
Mikroprozessoren ausgestattet, die genaue und präzise Messungen ermöglichen .<br />
Die wasserdichten Taschengeräte (IP67) können sogar für kurze Zeit unter Wasser<br />
getaucht werden, ohne dass der Betrieb dadurch nachhaltig beeinträchtigt wird . Um<br />
den Bedürfnissen der Benutzer aus den Bereichen Umweltschutz, Lebensmittel,<br />
Pharmazie und Konsumprodukte besser entsprechen zu können, verfügt die <strong>Orion</strong><br />
<strong>Star</strong>-Serie über folgende Hauptmerkmale:<br />
• Kennwortgeschütze Methoden: Im Datenspeicher des Messgeräts können<br />
die Angaben von bis zu zehn individuell durchgeführten Messungen und<br />
Kalibrierungen als Referenzdaten für die Zukunft gespeichert werden . Durch<br />
den Kennwortschutz für jede einzelne Methode wird eine Verfälschung der<br />
Thermo Scientific <strong>Orion</strong> <strong>Star</strong> <strong>and</strong> <strong>Star</strong> <strong>Plus</strong> Series <strong>Meter</strong> User Guide<br />
DE-1
Einleitung<br />
Methoden verhindert, wenn mehrere Benutzer das Gerät für die Durchführung<br />
ihrer jeweils bevorzugten Methode einsetzen .<br />
• AUTO READ: Im automatischen Lesefunktionsmodus überwacht das<br />
Messgerät die Stabilität des Messwertsignals . Nachdem sich der Messwert<br />
stabilisiert hat, werden die gemessenen Daten vom Gerät automatisch<br />
gespeichert bzw . an einen angeschlossenen Drucker oder PC übergeben .<br />
• Rührerkontrolle: Die Tischgeräte (3 <strong>Star</strong> und höher) verfügen über eine<br />
Rührerkontrolle für den <strong>Orion</strong>rührer 096019 und die AUTO-STIR BOD-Sonde .<br />
Deshalb ist der Einsatz zusätzlicher Rührplatten und Rührfische nicht erforderlich .<br />
• SMART STABILITY und SMART AVERAGING: Diese Funktionen<br />
ermöglichen eine automatische Kompensation der Messbedingungen und führen<br />
so zu einer Optimierung der Reaktionszeit .<br />
Die Messgeräte werden außerdem zusammen mit einer leicht verständlichen<br />
Kurzanleitung für den täglichen Gebrauch geliefert .<br />
Bitte lesen Sie dieses H<strong>and</strong>buch vor der Benutzung des Tisch- oder Taschengeräts<br />
gründlich durch . Jede von dieser Anleitung abweichende Benutzung könnte dazu<br />
führen, dass die Garantie für das Gerät ungültig wird bzw . dass das Gerät dauerhaft<br />
beschädigt wird .<br />
DE-2 Thermo Scientific <strong>Orion</strong> <strong>Star</strong> <strong>and</strong> <strong>Star</strong> <strong>Plus</strong> Series <strong>Meter</strong> User Guide
Kapitel II<br />
Display<br />
Allgemeine Beschreibung<br />
Für die Dauer sämtlicher Verfahren werden auf der LCD-Anzeige eines<br />
jeden Messgeräts der <strong>Orion</strong> <strong>Star</strong>-Serie sowohl Temperatur- als auch<br />
Einstellungsdaten angezeigt . Der Bildschirm für das Setup wird nur dann<br />
angezeigt, wenn sich das Gerät im Setup-Modus befindet . Das Symbol<br />
signalisiert eine Fehlfunktion . In Verbindung mit dem Symbol liegt ein Fehler im<br />
Bereich der Sonde bzw . des Sondensignals vor .<br />
wird im Kapitel V, Setup-Menü, näher erläutert .<br />
Temperatur<br />
Kalibrierung<br />
5-<strong>Star</strong>-Messgerät<br />
Die Abbildung zeigt die primäre LCD-Anzeige eines Messgerätes der 5-<strong>Star</strong>-Reihe<br />
für Multiparameter-Messungen .<br />
Thermo Scientific <strong>Orion</strong> <strong>Star</strong> <strong>and</strong> <strong>Star</strong> <strong>Plus</strong> Series <strong>Meter</strong> User Guide<br />
pH-/ISE-/<br />
ORP-Einheit<br />
Leitfähigkeits-Einheit<br />
DO-Einheit<br />
DE-3
Display<br />
Hinweis: In den unteren drei Datenzeilen werden die Messwerte angezeigt. s<br />
A pH, mV, RmV oder ISE<br />
B Leitfähigkeit, TDS, Salinität oder<br />
spezifischer Widerst<strong>and</strong><br />
C Gelöster Sauerstoff (DO): Sättigung<br />
in %, Konzentration in mg/l<br />
oder Luftdruck<br />
Die rechts im Display angezeigten Messeinheiten blinken, bis sich der Messwert<br />
stabilisiert hat .<br />
DE-4 Thermo Scientific <strong>Orion</strong> <strong>Star</strong> <strong>and</strong> <strong>Star</strong> <strong>Plus</strong> Series <strong>Meter</strong> User Guide
Kapitel III<br />
Tastatur<br />
Allgemeine Beschreibung<br />
Sämtliche Messgeräte der <strong>Orion</strong> <strong>Star</strong>-Serie verfügen über die gleiche<br />
Tastaturanordnung . Die Taschengeräte und die 2-<strong>Star</strong>-Tischgeräte haben neun Tasten,<br />
die 3-, 4- und 5-<strong>Star</strong>-Tischgeräte hingegen besitzen aufgrund der zusätzlichen<br />
-Taste zehn Tasten .<br />
Tastatur der Taschengeräte<br />
Kalibrieren<br />
Messen Speichern/<br />
Drucken<br />
Power Hintergrundbeleuchtung<br />
Scrollen, aufwärts<br />
Kommastellen<br />
Kanalauswahl<br />
Scrollen, abwärts<br />
Setup<br />
Tastatur der Tischgeräte<br />
Kalibrieren<br />
Scrollen,<br />
aufwärts<br />
Stellen<br />
Setup<br />
Power<br />
Hintergrundbeleuchtung<br />
Thermo Scientific <strong>Orion</strong> <strong>Star</strong> <strong>and</strong> <strong>Star</strong> <strong>Plus</strong> Series <strong>Meter</strong> User Guide<br />
Protokollanzeige<br />
Messen Speichern/<br />
Drucken<br />
Rührer Ein/Aus (nicht bei<br />
2-<strong>Star</strong> pH-Messgerät)<br />
Kanalauswahl<br />
Protokollanzeige<br />
Scrollen, abwärts<br />
DE-5
Tastatur<br />
Der zentrale Bereich der ergonomisch gestalteten Tastatur ist gleichzeitig auch der<br />
Schwerpunkt für Setup und Navigation des Messgeräts . Insbesondere die Tasten<br />
und / werden häufig benutzt, um sich zwischen den einzelnen LCD-<br />
Anzeigen hin und her zu bewegen .<br />
Zu den praktischen Merkmalen gehören:<br />
• Display-Hintergrundbeleuchtung: Ein kurzes Drücken der Taste führt<br />
zum Ein- und Ausschalten dieser Funktion . Im Batteriebetrieb schaltet das<br />
Messgerät automatisch nach zwei Minuten die Hintergrundbeleuchtung aus, um<br />
Energie zu sparen . Bei schwachen Batterien bleibt die Hintergrundbeleuchtung<br />
ausgeschaltet .<br />
• Automatisches Ausschalten: Sämtliche Messgeräte der <strong>Orion</strong> <strong>Star</strong>-Serie<br />
schalten sich nach 20 Minuten ab, wenn innerhalb dieses Zeitraums keine Taste<br />
betätigt worden ist . Damit wird eine optimale Nutzung der Batterieleistung bei<br />
Taschengeräten oder batteriebetriebenen Tischgeräten gewährleistet .<br />
• Akustische Signale: Nach jedem Drücken einer Taste ertönt am Messgerät<br />
zur sofortigen Bestätigung des Empfangs der Benutzereingabe ein akustisches<br />
Signal .<br />
• Optische Alarmsignale: Ein Blinken der Symbole und bedeutet, dass<br />
die Kalibriereinstellungen bearbeitet werden müssen . Genauere Informationen<br />
zu den spezifischen Messverfahren befinden sich in den folgenden Kapiteln<br />
dieses H<strong>and</strong>buchs .<br />
Der folgende Überblick über die Definitionen der einzelnen Symbole soll den<br />
Benutzer mit den individuellen Funktionen vertraut machen .<br />
DE-6 Thermo Scientific <strong>Orion</strong> <strong>Star</strong> <strong>and</strong> <strong>Star</strong> <strong>Plus</strong> Series <strong>Meter</strong> User Guide
Symboldefinitionen<br />
Taste Beschreibung Taste Beschreibung<br />
• Einschalten des Messgeräts,<br />
wenn ausgeschaltet .<br />
• Ein- und Ausschalten der<br />
Hintergrundbeleuchtung,<br />
wenn Messgerät<br />
eingeschaltet .<br />
• Längeres Drücken der Taste<br />
schaltet das Messgerät<br />
aus .<br />
Umschalten des Pfeils auf der<br />
linken Bildschirmseite zwischen<br />
drei Bildschirmzeilen zum<br />
Auswählen und Bearbeiten .<br />
Kalibrierstart für ausgewählten<br />
Kanal und Messmodus .<br />
• Wenn Pfeil auf obere Zeile<br />
zeigt und aktuelle Einheit pH<br />
ist, führt Drücken der Taste<br />
zum <strong>Star</strong>ten der ph-<br />
Kalibrierung .<br />
• Bei Kalibrierung führt jedes<br />
Drücken der Taste zur<br />
Übernahme des aktuellen<br />
Punktwerts und zum<br />
Übergang zum nächsten<br />
Kalibrierpunkt bis letzter<br />
Kalibrierpunkt gemessen<br />
wurde . Danach führt<br />
erneutes Drücken zurück in<br />
Messmodus .<br />
Thermo Scientific <strong>Orion</strong> <strong>Star</strong> <strong>and</strong> <strong>Star</strong> <strong>Plus</strong> Series <strong>Meter</strong> User Guide<br />
Tastatur<br />
• Änderung des Messmodus<br />
/Messeinheit im ausgewählten<br />
Kanal .<br />
• Änderung des ausgewählten<br />
Kanals in Setup-, Methodenund<br />
Protokollansicht .<br />
• Wertbearbeitung der<br />
blinkenden Stelle bei Setup,<br />
Kennworteingabe und<br />
Kalibrierung .<br />
Freigabe der ausgewählten<br />
Stelle für Bearbeitung und<br />
Verschiebung von Dezimalstellen<br />
bei Wertänderungen bei<br />
Setup, Kennworteingabe und<br />
Kalibrierung .<br />
• Drucken und Protokollieren<br />
einer Messung im Continuousoder<br />
Timed-Messmodus (Daueroder<br />
Zeitvorgabemessmodus) .<br />
• Drucken, Protokollieren und<br />
Einfrieren des Bildschirms im<br />
AUTO-READ-Modus, sobald<br />
Messwerte stabil sind .<br />
• Umschalten von Setup- zu<br />
Messmodus .<br />
• Wertübernahme an<br />
Kalibrierpunkten und<br />
Umschalten in Messmodus .<br />
DE-7
Tastatur<br />
Taste Beschreibung Taste Beschreibung<br />
Umschalten in Setup-Menü,<br />
<strong>Star</strong>t im ausgewählten Kanal<br />
und Messmodus:<br />
Wenn Pfeil auf obere Zeile<br />
zeigt und aktuelle Einheiten aus<br />
ISE-Bereich sind, führt Drücken<br />
der Taste zum Umschalten<br />
in Setup-Bildschirm für ISE-<br />
Messung .<br />
Umschalten in Protokollanzeige<br />
und Download-Bildschirme .<br />
Ein- und Ausschalten des<br />
Rührers .<br />
DE-8 Thermo Scientific <strong>Orion</strong> <strong>Star</strong> <strong>and</strong> <strong>Star</strong> <strong>Plus</strong> Series <strong>Meter</strong> User Guide
Kapitel IV<br />
Vorbereitung<br />
Installation des Netzadapters<br />
Der mitgelieferte Netzadapter Ihres Tischgeräts ist die EINZIGE für dieses<br />
Gerät empfohlene Quelle zur Stromversorgung . Bei Einsatz <strong>and</strong>erer<br />
Stromversorgungseinheiten für Ihr Messgerät erlischt die Garantie .<br />
Der Weitbereichs-Netzadapter ist für den Betrieb an 100 - 240 V / 0,5 A und 50/60 Hz<br />
vorgesehen .<br />
Ihrer Stromquelle entsprechend einen der drei Stecker für 110 V, 220 V oder 240 V<br />
auswählen und diesen an der dafür vorgesehenen Stelle am Adapter anbringen . Die<br />
richtige Montage des Steckers wird durch ein hörbares Klicken bestätigt .<br />
Den Ausgangsstecker des Netzadapters am entsprechenden Anschluss des<br />
Tischgeräts einstecken . Beachten Sie hierbei die Abbildung im Abschnitt Anschluss<br />
der Elektroden .<br />
Thermo Scientific <strong>Orion</strong> <strong>Star</strong> <strong>and</strong> <strong>Star</strong> <strong>Plus</strong> Series <strong>Meter</strong> User Guide<br />
DE-9
Vorbereitung<br />
Batterieinstallation<br />
Die Messgeräte der <strong>Orion</strong> <strong>Star</strong>-Serie benötigen vier AA-Alkaline-Batterien . Keine<br />
Lithium- oder wiederaufladbaren Batterien verwenden . Eine unsachgemäße<br />
Installation nicht-alkaliner Batterien kann zu Gefahren führen .<br />
Hinweis: Nur für Tischgeräte: Es werden keine Batterien benötigt, wenn das<br />
Gerät permanent über den Netzadapter an ein Stromnetz angeschlossen ist. s<br />
1 . Sicherstellen, dass das Gerät ausgeschaltet ist .<br />
2 . Messgerät vorsichtig mit der Unterseite nach oben auf ein sauberes, fusselfreies<br />
Tuch legen, um ein Verkratzen der LCD-Anzeige zu verhindern .<br />
3 . Batteriefachabdeckung öffnen .<br />
4 . Neue Batterien einsetzen, dabei auf richtige Polung achten . +/- Pole müssen mit<br />
der Darstellung im Batteriefach übereinstimmen .<br />
5 . Abdeckung wieder schließen .<br />
DE-10 Thermo Scientific <strong>Orion</strong> <strong>Star</strong> <strong>and</strong> <strong>Star</strong> <strong>Plus</strong> Series <strong>Meter</strong> User Guide
6 . Beim Batteriewechsel bleiben gespeicherte Daten, Kalibrierungen und Methoden<br />
im Permanentspeicher erhalten . Einstellungen für Datum und Zeit müssen ggf .<br />
jedoch neu eingegeben werden .<br />
Thermo Scientific <strong>Orion</strong> <strong>Star</strong> <strong>and</strong> <strong>Star</strong> <strong>Plus</strong> Series <strong>Meter</strong> User Guide<br />
Vorbereitung<br />
Hinweis: Nur für Taschengeräte: Taschengeräte werden werkseitig mit Batterien<br />
versehen. s<br />
Für einen Batteriewechsel bei den Taschengeräten die beiden Schrauben des<br />
Batteriefachs in der Mitte der Geräterückseite lösen . Hinweis: Es h<strong>and</strong>elt sich hierbei<br />
um unverlierbare Schrauben, die nicht vollständig entfernt werden können .<br />
DE-11
Vorbereitung<br />
Anschluss der Elektroden<br />
Ein korrekter Anschluss der Elektroden und Sonden an das Messgerät erfolgt<br />
gemäß den folgenden Abbildungen . Abgebildet ist ein 5-<strong>Star</strong> Modell; <strong>and</strong>ere<br />
Messgeräte verfügen über weniger Anschlüsse .<br />
Tischgerät: Elektrodenanschlüsse<br />
Referenzbuchse<br />
(pH oder ISE)<br />
Rührerbuchse, (Rührer<br />
oder DO- Auto-Stir-<br />
Sonde mit automatischer<br />
Rührfunktion)<br />
Taschengerät: Elektrodenanschlüsse<br />
BNC-<br />
Anschluss<br />
8-Pin-Buchse<br />
(ATC,<br />
Leitfähigkeit)<br />
BNC-<br />
Anschluss<br />
9-Pin-Buchse<br />
(DO)<br />
8-Pin-Buchse<br />
(ATC,<br />
Leitfähigkeit)<br />
RS232-Anschluss<br />
RS232-<br />
Anschluss<br />
9-Pin-Buchse<br />
(DO)<br />
DE-12 Thermo Scientific <strong>Orion</strong> <strong>Star</strong> <strong>and</strong> <strong>Star</strong> <strong>Plus</strong> Series <strong>Meter</strong> User Guide<br />
Erde<br />
Power
Einige Anschlüsse haben mehrere Funktionen. Zum Beispiel:<br />
• Können an den BNC-Anschluss eine pH-, ISE- oder ORP-Elektrode sowie Sensor-<br />
Elektroden mit wasserdichtem BNC-Stecker angeschlossen werden .<br />
• Verfügen Tischgeräte über eine Pin-Steckbuchse für eine separate<br />
Referenzelektrode . Diese erfordert eine geeignete BNC-Elektrode für die<br />
Messung .<br />
• Kann die 970899WP-Elektrode für gelösten Sauerstoff an die BNC-Buchse<br />
angeschlossen werden .<br />
• Können Leitfähigkeitssonden an die wasserdichte 8-Pin-MiniDIN-Buchse<br />
angeschlossen werden .<br />
Thermo Scientific <strong>Orion</strong> <strong>Star</strong> <strong>and</strong> <strong>Star</strong> <strong>Plus</strong> Series <strong>Meter</strong> User Guide<br />
Vorbereitung<br />
• Können auch ATC-Sonden (Sonden für die automatische<br />
Temperaturkompensation) an die 8-Pin-MiniDIN-Buchse angeschlossen werden .<br />
• Kann die DO-Sonde mit Autostir-Funktion (automatischer Rührfunktion) an die<br />
wasserdichte 9-Pin-MiniDIN-Buchse und an die Rührerbuchse angeschlossen<br />
werden .<br />
DE-13
Vorbereitung<br />
Einschalten des Geräts<br />
Wenn Batterien in das Taschen- bzw . Tischgerät eingesetzt worden sind oder<br />
dieses mit dem Netzkabel an die Stromversorgung angeschlossen wurde,<br />
Taste drücken, um das Gerät einzuschalten . Ein kurzes Drücken der Taste<br />
bei eingeschaltetem Messgerät ermöglicht das Ein- und Ausschalten der<br />
Hintergrundbeleuchtung . Wird das Tischgerät über das Netzkabel betrieben, bleibt<br />
die Hintergrundbeleuchtung eingeschaltet, bis sie mit der Taste ausgeschaltet<br />
wird . Taste für drei Sekunden drücken, um das Messgerät auszuschalten .<br />
DE-14 Thermo Scientific <strong>Orion</strong> <strong>Star</strong> <strong>and</strong> <strong>Star</strong> <strong>Plus</strong> Series <strong>Meter</strong> User Guide
Kapitel V<br />
Setup-Menü<br />
Navigationstipps<br />
• Die Taste ruft den Setup-Modus auf .<br />
• Die Hauptmenüpunkte werden in der obersten<br />
Zeile des LCD-Displays angezeigt . Tasten /<br />
drücken, um durch die Menüpunkte zu scrollen . Der<br />
am LCD-Display angezeigte Text ist in den Tabellen<br />
auf den folgenden Seiten in der Spalte Display<br />
aufgeführt .<br />
• Taste drücken, um die obere, mittlere oder untere<br />
Zeile auszuwählen .<br />
• Tasten / in Kombination mit Taste<br />
verwenden, um die Werte in der ausgewählten Zeile<br />
zu bearbeiten .<br />
• Taste drücken, um Änderungen zu übernehmen<br />
und den Pfeil zur oberen Zeile zu bewegen .<br />
• Taste drücken, um Änderungen zu speichern und<br />
in den Messmodus zu wechseln .<br />
Thermo Scientific <strong>Orion</strong> <strong>Star</strong> <strong>and</strong> <strong>Star</strong> <strong>Plus</strong> Series <strong>Meter</strong> User Guide<br />
DE-15
Setup-Menü<br />
Allgemeine Menü-Einstellungen<br />
Folgende Tabelle gibt die Grundeinstellungen für das Geräte-Setup an .<br />
Beschreibung Display Wertebereich St<strong>and</strong>ardwert Spezifische<br />
Methode<br />
Manuelle Temperatur-<br />
Kompensationseinstellung<br />
Einstellung der<br />
Rührgeschwindigkeit<br />
(nur Tischgeräte)<br />
Automatische<br />
Ausschaltfunktion<br />
gEn<br />
dEgC<br />
25.0<br />
gEn<br />
StIr<br />
4<br />
gEn<br />
AUtO<br />
On<br />
-5,0 - 105 25,0 Ja<br />
OFF, 1, 2, 3, 4, 5, 6, 7 4 Ja<br />
OFF (Aus), On (Ein) On (Ein) Nein<br />
• Manuelle Temperatureinstellung: Steuerung der Temperaturkompensation,<br />
wenn keine Temperatursensoren an das Gerät angeschlossen sind .<br />
• Einstellung der Rührgeschwindigkeit (ausschließlich bei Tischgeräten<br />
außer 2-<strong>Star</strong>): Geschwindigkeitseinstellung von 1 bis 7, wobei 1 die niedrigste<br />
und 7 die höchste Geschwindigkeit angibt . Für die meisten Anwendungen wird<br />
eine Geschwindigkeit von Stufe 3 oder 4 empfohlen .<br />
• Auto-Shut Off (Automatische Ausschaltfunktion): Bestimmt, ob das<br />
Gerät automatisch abgeschaltet wird, wenn innerhalb von 20 Minuten keine<br />
Taste betätigt wurde . Diese Funktion kann mit OFF (Aus) abgeschaltet werden,<br />
wobei das Gerät weiter in Betrieb bleibt .<br />
DE-16 Thermo Scientific <strong>Orion</strong> <strong>Star</strong> <strong>and</strong> <strong>Star</strong> <strong>Plus</strong> Series <strong>Meter</strong> User Guide
Für den Zugriff auf diese Funktionen:<br />
1 . Im Messmodus die Taste drücken .<br />
2 . Mit den Tasten / durch das Setup-Menü scrollen,<br />
bis die Information in der oberen Zeile angezeigt wird .<br />
3 . Taste drücken, um die Einstellungen zu übernehmen<br />
und den Pfeil zur mittleren Zeile zu bewegen .<br />
4 . Tasten / drücken, um durch folgende Einstellungen<br />
zu scrollen:<br />
a . = Manuelle Temperatureinstellung<br />
b . = Aktivierung und Einstellung der<br />
Rührgeschwindigkeit<br />
c . = Aktivierung/Deaktivierung der Auto Shut Off-<br />
Funktion (Automatische Ausschaltfunktion)<br />
5 . Taste drücken, um die Einstellungen zu übernehmen<br />
und den Pfeil zur unteren Zeile zu bewegen .<br />
a . Tasten / drücken, um den nächsten Wert<br />
auszuwählen, und , um ihn zu bearbeiten .<br />
b . Taste drücken, um die Einstellungen zu übernehmen<br />
und den Pfeil zur oberen Zeile zu bewegen .<br />
Thermo Scientific <strong>Orion</strong> <strong>Star</strong> <strong>and</strong> <strong>Star</strong> <strong>Plus</strong> Series <strong>Meter</strong> User Guide<br />
Setup-Menü<br />
6 . Taste drücken, um in den Messmodus zurückzukehren .<br />
DE-17
Setup-Menü<br />
Einstellung von Datum und Uhrzeit<br />
Folgende Tabelle gibt eine detaillierte Beschreibung der Abkürzungen, die auf dem<br />
Display erscheinen .<br />
Beschreibung Display Wertebereich St<strong>and</strong>ardwert Spezifische<br />
Methode<br />
Zeit: Einstellung der<br />
Stunde<br />
dAtE<br />
HOUr<br />
HH12<br />
Zeit: Einstellung der dAtE<br />
Minute<br />
tInE<br />
mm12<br />
Datumsformat dAtE<br />
tYPE<br />
dmY<br />
Datum: Einstellung des dAtE<br />
Jahres<br />
YEAr<br />
2004<br />
Datum: Einstellung des dAtE<br />
Monats<br />
dAtE<br />
mm01<br />
Datum: Einstellung des dAtE<br />
aktuellen Tages dAY<br />
dd01<br />
00 - 23<br />
Einstellung der aktuellen<br />
Stunde im 24-Stunden-<br />
Format<br />
00 - 59<br />
Einstellung der aktuellen<br />
Minute<br />
mdY, dmY<br />
Auswahl: Monat, Tag, Jahr<br />
bzw. Tag, Monat, Jahr<br />
00 - 99<br />
Einstellung des aktuellen<br />
Jahres von 2000 bis 2099<br />
01 - 12<br />
Einstellung des Monats 01<br />
„Jan“ bis 12 „Dez“<br />
01 - 31<br />
Aktueller Tag<br />
12 Nein<br />
00 Nein<br />
mdY Nein<br />
04 Nein<br />
01 Nein<br />
01 Nein<br />
DE-18 Thermo Scientific <strong>Orion</strong> <strong>Star</strong> <strong>and</strong> <strong>Star</strong> <strong>Plus</strong> Series <strong>Meter</strong> User Guide
1 . Im Messmodus die Taste drücken .<br />
2 . Mit den Tasten / durch das Setup-Menü scrollen, bis<br />
die Information in der oberen Zeile angezeigt wird .<br />
3 . Taste drücken, um die Einstellung zu übernehmen und<br />
den Pfeil zur mittleren Zeile zu bewegen .<br />
4 . Tasten / drücken, um durch folgende Einstellungen<br />
zu scrollen:<br />
a . = Aktuelle Stunde<br />
b . = Aktuelle Minute<br />
c . = Entweder das Format mdY (Monat, Tag, Jahr)<br />
oder dmY (Tag, Monat, Jahr) auswählen .<br />
d . = Aktueller Monat (Numerische Werte für Monat<br />
und Jahr auswählen)<br />
e . = Aktueller Tag des jeweiligen Monats<br />
f . = Aktuelles Jahr<br />
5 . Taste drücken, um die Einstellung zu übernehmen und<br />
den Pfeil zur unteren Zeile zu bewegen .<br />
6 . Die Tasten / und drücken, um den gewählten<br />
Wert zu bearbeiten .<br />
7 . Taste drücken, um die Einstellung zu übernehmen und<br />
den Pfeil zur oberen Zeile zu bewegen .<br />
8 . Schritte 3 bis 7 bei Bedarf wiederholen, um Uhrzeit und<br />
Datum zu bearbeiten .<br />
Thermo Scientific <strong>Orion</strong> <strong>Star</strong> <strong>and</strong> <strong>Star</strong> <strong>Plus</strong> Series <strong>Meter</strong> User Guide<br />
Setup-Menü<br />
9 . Taste drücken, um in den Messmodus zurückzukehren .<br />
DE-19
Setup-Menü<br />
Messoptionen: Continuous, Timed oder AUTO READ (Dauermodus,<br />
Zeitvorgabemodus oder Modus für automatische<br />
Lesefunktion)<br />
Folgende Tabelle gibt eine detaillierte Beschreibung der Abkürzungen, die auf dem<br />
Display erscheinen .<br />
Beschreibung Display Wertebereich St<strong>and</strong>ardwert Spezifische<br />
Methode<br />
Continuous, Timed<br />
oder Auto-Read<br />
Messoptionen<br />
Einstellung<br />
der getakteten<br />
Messung<br />
rEAd<br />
tYPE<br />
COnt<br />
rEAd<br />
tInE<br />
00:00<br />
COnt, AUtO, tImE<br />
Continuous, Timed oder Auto<br />
Read-Modus (Dauermodus,<br />
Zeitvorgabemodus oder<br />
Modus für automatische<br />
Lesefunktion);<br />
Automatischer Ausdruck<br />
und Datenprotokollierung<br />
im AUTO- und Timed-<br />
Modus (Automatischer und<br />
Zeitvorgabemodus)<br />
00:05 - 99:61<br />
Getaktete Messungen in<br />
Minuten und Sekunden<br />
AUtO Ja<br />
01:00 Ja<br />
Zum Ändern der Einstellungen mit den Funktionstasten und /<br />
zwischen den Optionen umschalten . Durch Drücken der Taste<br />
bestätigt und das Display hört auf zu blinken .<br />
wird die Änderung<br />
Die Messgeräte der <strong>Orion</strong> <strong>Star</strong>-Serie ermöglichen die Auswahl der bevorzugten<br />
Zeiteinstellung für die Messintervalle .<br />
• Im Continuous-Modus (Dauermodus) führt das Gerät<br />
ständig Messungen durch und aktualisiert die im Bildschirm<br />
angezeigten Werte . Taste drücken, um die Messung<br />
in diesem Modus zu speichern oder an Drucker oder PC zu<br />
übergeben .<br />
DE-20 Thermo Scientific <strong>Orion</strong> <strong>Star</strong> <strong>and</strong> <strong>Star</strong> <strong>Plus</strong> Series <strong>Meter</strong> User Guide
• Im Timed-Modus (Zeitvorgabemodus) werden vom Gerät<br />
ständig Messungen durchgeführt, die Werte im Display<br />
aktualisiert sowie in vorausgewählten Zeitintervallen Daten<br />
gespeichert oder an Drucker oder PC übergeben .<br />
• Zur Eingabe der Minuten und Sekunden zwischen den<br />
vorgegebenen Messungen die Tasten / drücken,<br />
um den Wert der blinkenden Stelle zu ändern . Taste<br />
drücken, um eine <strong>and</strong>ere Stelle zu ändern .<br />
• Das Mindestzeitintervall beträgt 5 Sekunden . Folgende<br />
Zeitbereiche sind zulässig: –<br />
• Nach dem Drücken der Taste wird im AUTO READ-<br />
Modus (automatischer Lesefunktionsmodus) sofort eine<br />
Messung durchgeführt . Sobald das Messsignal stabil<br />
ist, friert das Display ein, wobei die Daten automatisch<br />
gespeichert oder an einen Drucker oder PC übergeben<br />
werden .<br />
• Im AUTO READ-Modus (automatischer<br />
Lesefunktionsmodus) wird ebenso automatisch die<br />
Rührerkontrolle betrieben und das Rühren angehalten,<br />
sobald eine stabile Messung vorliegt . Taste drücken,<br />
um die Rührgeschwindigkeit einzustellen . Mit Hilfe<br />
der Tasten<br />
auswählen:<br />
/ eine der folgenden Optionen<br />
AUTO-READ (Automatische Lesefunktion)<br />
Thermo Scientific <strong>Orion</strong> <strong>Star</strong> <strong>and</strong> <strong>Star</strong> <strong>Plus</strong> Series <strong>Meter</strong> User Guide<br />
Setup-Menü<br />
DE-21
Setup-Menü<br />
Auswahl der Messmodi<br />
Im Messmodus zeigt der Pfeil auf der linken Displayseite den gewählten Modus an .<br />
Mit den Funktionstasten / durch die verschiedenen Modi, die jeweils einer<br />
Zeile zugewiesen sind, scrollen . Mit Hilfe der Taste den Pfeil zur nächsten Zeile<br />
bewegen und durch Betätigung der Tasten / durch die verschiedenen Modi<br />
dieser Zeile scrollen .<br />
pH<br />
mV<br />
Rel mV<br />
ISE<br />
Off<br />
μS/cm bzw . mS/cm für die Leitfähigkeit<br />
mg/l für TDS<br />
ppt für die Salinität<br />
MΩ-cm für den Widerst<strong>and</strong><br />
Off<br />
%Sat für die Gelöstsauerstoff-Sättigung in Prozent<br />
mg/l für die Gelöstsauerstoff-Konzentration<br />
Luftdruck<br />
Off<br />
Informationen zum Setup spezifischer Verfahren befinden sich in Kapitel VI bis<br />
Kapitel IX dieses H<strong>and</strong>buchs .<br />
DE-22 Thermo Scientific <strong>Orion</strong> <strong>Star</strong> <strong>and</strong> <strong>Star</strong> <strong>Plus</strong> Series <strong>Meter</strong> User Guide
Einstellung der Kalibrierung<br />
Die Taste zeigt den Kalibriermodus bzw . das Kalibrier-Setup an .<br />
Vor Kalibrierbeginn die Elektrode bzw . Sonde nach den beigefügten Anweisungen<br />
präparieren . Es sollten auch die Kalibrierst<strong>and</strong>ardlösungen, -puffer oder -gefäße<br />
vor einer Kalibrierung präpariert werden . Die Elektroden bzw . Sonden nach<br />
der Vorbereitung gemäß den Anweisungen des Herstellers an das Messgerät<br />
anschließen . Die Grundlagen einer ordnungsgemäßen Kalibrierung für die einzelnen<br />
Messverfahren befinden sich in den jeweiligen Kapiteln dieses H<strong>and</strong>buchs .<br />
Allgemeines Navigationsverfahren zur Auswahl der Kalibrierung<br />
1 . Im Messmodus Taste drücken, bis der Pfeil links im Bildschirm auf den zu<br />
kalibrierenden Messmodus zeigt .<br />
pH, ORP, ISE • Conductivity (Leitfähigkeit) • DO (Gelöstsauerstoff)<br />
2 . Tasten / drücken, bis das entsprechende Symbol Messmodus<br />
aufleuchtet .<br />
A – pH/ORP/ISE<br />
pH-Symbol - pH-Kalibrierung<br />
RmV-Symbol - ORP-Kalibrierung<br />
ISE-Symbol bzw . kein Symbol - ISE-Kalibrierung<br />
B – Kalibrierung der Leitfähigkeit<br />
mS/cm, μS/cm, mg/l, ppt und MΩ-cm Symbol<br />
C – DO-Kalibrierung<br />
% sat- bzw . mg/L-Symbol<br />
Kein Symbol - Kalibrierung des Luftdruckmessers<br />
3 . Taste drücken, um die gewünschte Kalibrierung zu starten .<br />
Thermo Scientific <strong>Orion</strong> <strong>Star</strong> <strong>and</strong> <strong>Star</strong> <strong>Plus</strong> Series <strong>Meter</strong> User Guide<br />
Setup-Menü<br />
DE-23
HINWEISE<br />
DE-24 Thermo Scientific <strong>Orion</strong> <strong>Star</strong> <strong>and</strong> <strong>Star</strong> <strong>Plus</strong> Series <strong>Meter</strong> User Guide
Kapitel VI<br />
pH-Verfahren<br />
pH-Setup<br />
In folgender Tabelle wird das pH-Setup beschrieben .<br />
Beschreibung Display Wertebereich St<strong>and</strong>ard- Spezifische<br />
wert Methode<br />
pH-Auflösung PH<br />
rES<br />
0.01<br />
0,1; 0,01; 0,001 0,01 Ja<br />
pH-Puffereinstellung PH<br />
bUF<br />
USA<br />
USA (USA-Puffer)<br />
1,68; 4,01; 7,00; 10,01; 12,46<br />
EUrO (DIN-Puffer)<br />
1,68; 4,01; 6,86; 9,18<br />
1 . Im Messmodus die Taste drücken .<br />
Thermo Scientific <strong>Orion</strong> <strong>Star</strong> <strong>and</strong> <strong>Star</strong> <strong>Plus</strong> Series <strong>Meter</strong> User Guide<br />
USA Ja<br />
2 . Mit den Tasten / durch das Setup-Menü scrollen,<br />
bis die Information in der oberen Zeile angezeigt wird .<br />
3 . Taste drücken, um die Einstellung zu übernehmen und<br />
den Pfeil zur mittleren Zeile zu bewegen .<br />
4 . Taste / drücken, um für die Auflösung<br />
auszuwählen .<br />
5 . Taste drücken, um die Option auszuwählen und den<br />
Pfeil zur unteren Zeile zu bewegen .<br />
a . Taste / drücken, um die gewünschte Auflösung<br />
einzustellen .<br />
DE-25
pH-Verfahren<br />
pH-Kalibrierung<br />
6 . Taste drücken, um die Einstellung zu übernehmen und<br />
den Pfeil zur oberen Zeile zu bewegen .<br />
7 . Taste drücken, um den Pfeil zur mittleren Zeile zu<br />
bewegen und mit den Tasten / die Option<br />
für Auto-Buffer-Recognition (automatische Puffererkennung)<br />
auswählen . Erneut drücken, um den Pfeil zur unteren<br />
Zeile zu bewegen .<br />
8 . Tasten / drücken und entweder oder<br />
wählen; Taste drücken, um die Auswahl zu bestätigen .<br />
9 . Taste drücken, um in den Messmodus zurückzukehren .<br />
1 . Die Elektrode gemäß den der Elektrode beigefügten Anweisungen auf den<br />
Einsatz vorbereiten .<br />
2 . Im Setup die für die Puffererkennung verwendete Puffereinstellung NIST ( )<br />
oder DIN ( ) wählen, sofern diese noch nicht eingestellt ist .<br />
3 . Taste drücken, bis der Pfeil auf die Zeile für die pH-Messung zeigt .<br />
4 . Taste drücken .<br />
5 . Die Elektrode und ATC-Sonde abspülen und in die Pufferlösung eintauchen .<br />
6 . Warten, bis das pH-Symbol aufhört zu blinken .<br />
a . Automatische Puffererkennung: Wenn das pH-Symbol aufhört zu blinken,<br />
zeigt das Messgerät den temperaturkorrigierten pH-Wert des Puffers an .<br />
DE-26 Thermo Scientific <strong>Orion</strong> <strong>Star</strong> <strong>and</strong> <strong>Star</strong> <strong>Plus</strong> Series <strong>Meter</strong> User Guide
. Manuelle Kalibrierung: Wenn das pH-Symbol aufhört zu blinken, zeigt das<br />
Messgerät den aktuellen von der pH-Elektrode gemessenen Pufferwert<br />
an . Mithilfe der Tasten und / den pH-Wert auf den<br />
temperaturkorrigierten pH-Wert des Puffers ändern .<br />
7 . Wird am Display der korrekte Pufferwert angezeigt, drücken, um zum<br />
nächsten Kalibrierpunkt überzugehen und Schritte 5 bis 6 wiederholen, oder<br />
drücken, um die Kalibrierung zu speichern .<br />
8 . Vor der Rückkehr in den Messmodus wird der Steilheitswert angezeigt .<br />
erscheint im unteren Feld während die aktuelle Elektrodensteilheit im Hauptfeld<br />
in Prozent angegeben wird .<br />
a . Bei einer Ein-Punkt-Kalibrierung kann der Steilheitswert mithilfe der Tasten<br />
und / bearbeitet werden . Das Drücken der Taste führt<br />
dann zurück in den Messmodus .<br />
b . Bei einer Kalibrierung von zwei oder mehr Punkten schaltet das Messgerät<br />
nach zwei Sekunden der Anzeige automatisch in den Messmodus um .<br />
pH-Messung<br />
1 . Die Elektrode in deionisiertem Wasser abspülen . Überschüssiges Wasser<br />
abschütteln und mit einem fusselfreien Tuch trockentupfen .<br />
2 . Die Elektrode in die Probe eintauchen .<br />
a . Im Continuous-Messmodus beginnt das Gerät sofort mit der Messung .<br />
Bei Verwendung des Tischgeräts mit deaktivierter Rührerkontrolle die Taste<br />
drücken, um den Rührer zu aktivieren . Die Information pH blinkt, bis<br />
der Messwert stabil ist . Sobald der Messwert stabil ist, kann die Messung<br />
durch Drücken der Taste gespeichert und an einen Drucker bzw . PC<br />
übergeben werden . Ist der Rührer aktiviert, Taste drücken, um den<br />
Rührer auszuschalten und ihn aus der Probe nehmen zu können .<br />
Thermo Scientific <strong>Orion</strong> <strong>Star</strong> <strong>and</strong> <strong>Star</strong> <strong>Plus</strong> Series <strong>Meter</strong> User Guide<br />
pH-Verfahren<br />
DE-27
pH-Verfahren<br />
b . Im AUTO READ-Modus (Automatische Lesefunktion) Taste drücken,<br />
um mit der Messung zu beginnen . Sobald der Messwert stabil ist, friert das<br />
Display ein, wobei die Daten automatisch gespeichert und an einen Drucker<br />
bzw . PC übergeben werden . Ist der Rührer aktiviert, wird er durch Drücken<br />
der Taste eingeschaltet und schaltet sich aus, sobald sich der Messwert<br />
stabilisiert hat .<br />
c . Im Timed-Messmodus (Zeitvorgabemessmodus) beginnt das Messgerät mit<br />
der Messdurchführung in den Intervallen, die im Setup bestimmt wurden .<br />
Jede Messung wird automatisch gespeichert bzw . an einen Drucker oder PC<br />
übergeben . Bei Verwendung des Tischgeräts mit aktivierter Rührerkontrolle<br />
die Taste drücken, um den Rührer zu aktivieren . Durch erneutes<br />
Drücken der Taste wird der Rührer ausgeschaltet .<br />
3 . Die Elektrode aus der Probe nehmen und mit deionisiertem Wasser abspülen,<br />
abschütteln und trockentupfen und danach in die nächste Probe eintauchen und<br />
Schritt 2 wiederholen .<br />
4 . Nach dem Messen der Proben die Elektrode mit deionisiertem Wasser abspülen<br />
und abtrocknen . Informationen über die ordnungsgemäße Lagerung der<br />
Elektrode dem Elektrodenh<strong>and</strong>buch entnehmen .<br />
DE-28 Thermo Scientific <strong>Orion</strong> <strong>Star</strong> <strong>and</strong> <strong>Star</strong> <strong>Plus</strong> Series <strong>Meter</strong> User Guide
Kapitel VII<br />
Verfahren für gelösten Sauerstoff<br />
DO-Setup<br />
In folgender Tabelle werden die Setup-Optionen für gelösten Sauerstoff angezeigt .<br />
Beschreibung Display Wertebereich St<strong>and</strong>ardwert<br />
Gelöster Sauerstoff<br />
Sättigungsauflösung in %<br />
Gelöster Sauerstoff<br />
Konzentrationsauflösung<br />
Gelöster Sauerstoff<br />
Luftdruck-<br />
Kompensationsauswahl<br />
Gelöster Sauerstoff,<br />
manuelle Luftdruck-<br />
Einstellung<br />
Salzgehaltkorrektur im<br />
gelösten Sauerstoff<br />
Gelöster Sauerstoff,<br />
manueller<br />
Salinitätskorrekturfaktor<br />
Gelöster Sauerstoff<br />
Auswahl des Kalibrierungstyps<br />
dO<br />
rES<br />
0.1<br />
dO<br />
rES<br />
0.01<br />
dO<br />
bAr<br />
AUtO<br />
dO<br />
PrES<br />
760.0<br />
dO<br />
SAL<br />
AUtO<br />
dO<br />
SALF<br />
0<br />
dO<br />
CALt<br />
AIr<br />
1; 0,1<br />
DO-Sättigungsauflösung<br />
in %<br />
0,1; 0,01<br />
DO-Konzentrationsauflösung<br />
in mg/l<br />
AUtO, mAn<br />
Auswahl des internen<br />
Luftdruckmessers oder<br />
manueller Druckeinst.<br />
450,0 - 850,0<br />
Manueller Druck-<br />
Kompensationswert<br />
AUtO, mAn<br />
Methodenauswahl für die<br />
Salinitäts-Korrektur; Nur<br />
Messgeräte mit Leitfähigkeit<br />
0 - 45<br />
Manueller<br />
Salinitätskorrekturfaktor<br />
AIr, H2O, mAn, SEt0<br />
AIr = mit Wasserdampf<br />
gesätt. Luft,<br />
H2O = mit Luft gesätt.<br />
Wasser,<br />
mAn = Manuell,<br />
SEt0 = Nullpunktkalibrierung<br />
Thermo Scientific <strong>Orion</strong> <strong>Star</strong> <strong>and</strong> <strong>Star</strong> <strong>Plus</strong> Series <strong>Meter</strong> User Guide<br />
0,1 Ja<br />
0,01 Ja<br />
AUtO Ja<br />
760,0 Ja<br />
AUtO Ja<br />
0 Ja<br />
AIr Ja<br />
Spezifische<br />
Methode<br />
DE-29
Verfahren für gelösten Sauerstoff<br />
Schritte für DO-Setup<br />
1 . Im Messmodus die Taste drücken .<br />
2 . Mit den Tasten / durch das Setup-Menü scrollen, bis die Information<br />
in der oberen Zeile angezeigt wird .<br />
3 . Taste drücken, um die Einstellung zu übernehmen und den Pfeil zur<br />
mittleren Zeile zu bewegen .<br />
4 . Tasten / drücken, um durch folgende Einstellungen zu scrollen:<br />
a . + % Sat = Sättigungsauflösung in %<br />
b . + mg/L = Konzentrationsauflösung<br />
c . = Luftdruckmesser-Modus (Auto/Manual) (automatisch/manuell)<br />
d . = Manuelle Luftdruckkompensation<br />
e . = Automatische/Manuelle Salinitätskorrektur<br />
f . = Manuelle Salinitätskorrektur<br />
g . = Kalibrierungstyp<br />
5 . Taste drücken, um die Option auszuwählen und den Pfeil zur unteren Zeile<br />
zu bewegen .<br />
6 . Die Tasten / und drücken, um einen Wert einzugeben . In obiger Tabelle<br />
werden sowohl die Anzeigen im Display als auch die möglichen Eingabewerte angezeigt .<br />
7 . Nach der Eingabe eines Wertes die Taste drücken, um die Programmierung<br />
der Option abzuschließen und den Pfeil zur oberen Zeile zu bewegen . Die<br />
Schritte 3 bis 6 für alle Optionen wiederholen .<br />
8 . Taste drücken, um in den Messmodus zurückzukehren .<br />
DE-30 Thermo Scientific <strong>Orion</strong> <strong>Star</strong> <strong>and</strong> <strong>Star</strong> <strong>Plus</strong> Series <strong>Meter</strong> User Guide
DO-Kalibrierung<br />
Die Sonde muss vor der Kalibrierung präpariert und polarisiert werden .<br />
• Die DO-Sonde wird während der Verbindung mit dem Messgerät fortlaufend<br />
polarisiert . Bei erstmaligem Anschluss bzw . beim Anschluss wenn mehr als<br />
60 Minuten seit dem Trennen der Sonde vom Messgerät abgelaufen sind,<br />
beträgt die Zeit zur Polarisierung 30 bis 60 Minuten . Liefert die Sonde stabile<br />
Messwerte, so werden bei Verbindungsunterbrechungen von weniger als einer<br />
Stunde 5 bis 25 Minuten zur Stabilisierung der Messwerte benötigt .<br />
Hinweis: Die <strong>Star</strong>-Messgeräte geben selbst in ausgeschaltetem Zust<strong>and</strong><br />
den Polarisierungsstrom an die DO-Sonde ab. Für eine optimale Nutzung der<br />
Batterieleistung sollte die DO-Sonde daher vom Messgerät getrennt werden,<br />
wenn sie längere Zeit nicht genutzt wird.<br />
• Nullpunktrückstellung der Sonde: Eine DO-Sonde kann in einer sauerstofffreien<br />
(anoxischen) Lösung einen Positive Error von 0,02 bis 0,05 mg/l erzeugen . Ist<br />
dieser Wert unakzeptabel, muss eine Nullpunktrückstellung vorgenommen<br />
werden . Dies ist außerdem zu empfehlen, wenn eine neue Sensormembrane<br />
verwendet wird, wenn eine neue Fülllösung verwendet wird oder der gelöste<br />
Sauerstoff weniger als 1 mg/l beträgt bzw . eine Sättigung von unter 10 % vorliegt .<br />
Vor der Nullpunktrückstellung sollte eine Luftkalibrierung durchgeführt werden .<br />
1 . Im Messmodus die Taste drücken .<br />
2 . Die Tasten / drücken, bis die Information in der oberen Zeile angezeigt wird .<br />
3 . Taste drücken, um die Einstellung zu übernehmen und den Pfeil zur<br />
mittleren Zeile zu bewegen .<br />
4 . Tasten / drücken, um zur Option zu scrollen .<br />
5 . Taste drücken, um die Einstellung auszuwählen und den Pfeil zur unteren<br />
Zeile zu bewegen .<br />
Thermo Scientific <strong>Orion</strong> <strong>Star</strong> <strong>and</strong> <strong>Star</strong> <strong>Plus</strong> Series <strong>Meter</strong> User Guide<br />
Verfahren für gelösten Sauerstoff<br />
6 . Tasten / drücken, um eine der folgenden Kalibriermodi auszuwählen .<br />
DE-31
Verfahren für gelösten Sauerstoff<br />
a . Diese Information zeigt die Kalibrierung mit dem Kalibriergefäß in mit<br />
Wasserdampf gesättigter Luft an . Dies ist die einfachste und genaueste<br />
Kalibriermethode und gleichzeitig der St<strong>and</strong>ard-Modus des Messgeräts .<br />
Wenn die Kalibrierauswahl im Modus nicht geändert wurde, kann durch<br />
Drücken der Taste die Luftkalibrierung automatisch ausgeführt werden .<br />
Aufgrund der inhärenten Stabilitätsunterschiede zwischen mit Wasserdampf<br />
gesättigter Luft und mit Luft gesättigtem Wasser wird der Luftst<strong>and</strong>ard auf<br />
102,3% Sättigung eingestellt .<br />
i . Die höchstmögliche Genauigkeit kann dann erzielt werden, wenn die<br />
Kalibriertemperatur mit der Messtemperatur übereinstimmt .<br />
ii . Den Schwamm bzw . das Absorbertuch im Kalibriergefäß mit destilliertem<br />
Wasser anfeuchten und die Sonde ohne Berührung des mit Wasser<br />
getränkten Materials in das Kalibriergefäß einsetzen . Bei BSB-Messungen<br />
kann diese Kalibrierung in einer BSB-Flasche durchgeführt werden .<br />
iii . Bei Sauerstoffwerten unter 1 mg/l ist oftmals eine Nullpunktrückstellung<br />
erforderlich .<br />
b . Diese Information zeigt die Wasserkalibrierung mit Hilfe einer zu 100%<br />
luftgesättigten Wasserprobe an . Diese Kalibriermethode wird nur sehr selten<br />
verwendet .<br />
c . Diese Anzeige gibt die manuelle Kalibrierung mit Hilfe einer<br />
Wasserprobe an, bei der die Konzentration von gelöstem Sauerstoff bekannt<br />
ist . Diese kann für die Kalibrierung des Sensors auf einen mittels Winkler-<br />
Titration erzielten Wert eingesetzt werden .<br />
i . Bei einer Winkler-Kalibrierung wird eine manuelle Winkler-Titration<br />
durchgeführt und die Probe in der Folge als St<strong>and</strong>ard verwendet . Das<br />
gemessene Sauerstoffniveau der Titration wird als DO-St<strong>and</strong>ardwert in<br />
die Winkler-Kalibrierung eingetragen . Dies entspricht der Messeingabe in<br />
die Winkler-Tritation . Hinweis: Dieses Verfahren ist weniger genau, da es<br />
systembedingt zu Titrationsfehlern bei der Anpassung der Kalibrierung an<br />
die Titrationstestergebnisse kommen kann .<br />
DE-32 Thermo Scientific <strong>Orion</strong> <strong>Star</strong> <strong>and</strong> <strong>Star</strong> <strong>Plus</strong> Series <strong>Meter</strong> User Guide
d . Diese Information steht für eine Nullpunkt-Kalibrierung, die für sehr<br />
niedrige DO-Messungen verwendet wird . Diese Kalibrierung ist nur dann<br />
notwendig, wenn Messungen bei weniger als 5 % Sättigung bzw . 0,5 mg/l<br />
durchgeführt werden .<br />
7 . Taste drücken, um die Einstellung zu übernehmen und den Pfeil zur oberen<br />
Zeile zu bewegen .<br />
8 . Taste drücken, um in den Messmodus zurückzukehren .<br />
9 . Sonde und Kalibrierst<strong>and</strong>ard (mit Wasserdampf gesättigte Luft bzw . mit Luft<br />
gesättigtes Wasser) sollten ihr Gleichgewicht erreicht haben, bevor das System<br />
kalibriert wird .<br />
a . Taste drücken .<br />
b . Warten, bis sich der Messwert stabilisiert hat .<br />
c . Das Messgerät zeigt 102,3 % an schaltet in den Messmodus zurück .<br />
DO-Messung<br />
1 . Die DO-Sonde und den Rührer, falls verwendet, in deionisiertem Wasser<br />
abspülen . Mit einem fusselfreien Tuch trockentupfen .<br />
2 . Die DO-Sonde in die Probe eintauchen .<br />
a . Im Continuous-Messmodus beginnt das Gerät sofort mit der Messung . Bei<br />
Verwendung des Tischgeräts mit aktivierter Rührerkontrolle die Taste<br />
drücken, um den Rührer zu aktivieren .<br />
Das Symbol blinkt, bis der Messwert stabil ist . Sobald der Messwert<br />
stabil ist, kann die Messung durch Drücken der Taste gespeichert oder<br />
an einen PC bzw . Drucker übergeben werden . Beim Speichern der Daten ist<br />
Thermo Scientific <strong>Orion</strong> <strong>Star</strong> <strong>and</strong> <strong>Star</strong> <strong>Plus</strong> Series <strong>Meter</strong> User Guide<br />
Verfahren für gelösten Sauerstoff<br />
DE-33
Verfahren für gelösten Sauerstoff<br />
sowohl der DO-Messwert als auch die Temperatur, bei der die DO-Messung<br />
erfolgt ist, festzuhalten . Ist der Rührer aktiviert, Taste drücken, um den<br />
Rührer auszuschalten und ihn aus der Probe nehmen zu können .<br />
b . Im AUTO READ-Modus (Automatische Lesefunktion) Taste drücken,<br />
um mit der Messung zu beginnen . Sobald der Messwert stabil ist, friert das<br />
Display ein, wobei die Daten automatisch gespeichert oder an einen PC bzw .<br />
Drucker übergeben werden . Ist der Rührer aktiviert, wird er durch Drücken<br />
der Taste eingeschaltet und schaltet sich aus, sobald sich der Messwert<br />
stabilisiert hat .<br />
Bei Verwendung der AUTO-STIR BOD-Sonde (Automatische Rührfunktion)<br />
wird durch Betätigung der Sondentaste am Sensor mit der AUTO READ-<br />
Messung (Automatische Lesemessung) begonnen .<br />
c . Im Timed-Messmodus (Zeitvorgabe-Messmodus) beginnt das Messgerät mit<br />
der Messdurchführung in den Intervallen, die im Setup bestimmt wurden .<br />
Jede Messung wird automatisch gespeichert bzw . an einen Drucker oder PC<br />
übergeben . Bei Verwendung des Tischgeräts mit aktivierter Rührerkontrolle<br />
die Taste drücken, um den Rührer einzuschalten . Durch erneutes<br />
Drücken der Taste wird der Rührer ausgeschaltet .<br />
3 . Die DO-Sonde aus der Probe nehmen und mit deionisiertem Wasser abspülen,<br />
danach in die nächste Probe eintauchen und Schritt 2 wiederholen .<br />
4 . Sobald die Probenmessung beendet ist, die DO-Sonde mit deionisiertem Wasser<br />
abspülen und abtrocknen . Informationen über die ordnungsgemäße Lagerung<br />
der DO-Sonde dem Sondenh<strong>and</strong>buch entnehmen .<br />
DE-34 Thermo Scientific <strong>Orion</strong> <strong>Star</strong> <strong>and</strong> <strong>Star</strong> <strong>Plus</strong> Series <strong>Meter</strong> User Guide
Kapitel VIII<br />
Leitfähigkeitsverfahren<br />
Leitfähigkeits-Setup<br />
Beschreibung Display Wertebereich St<strong>and</strong>ardwert<br />
Temperaturkompensation<br />
für die Leitfähigkeit<br />
Koeffizienteneinstellung<br />
für die lineare<br />
Temperaturkompensation<br />
für Leitfähigkeit<br />
Einstellung des TDS-<br />
Faktors bei Leitfähigkeit<br />
Einstellung der<br />
St<strong>and</strong>ardzellkonstante- für<br />
die autom. Leitfähigkeitskalibrierung<br />
Leitfähigkeitstemperatur<br />
Referenzauswahl<br />
Leitfähigkeitszelltyp und<br />
manueller Auswahlbereich<br />
COnd<br />
tC<br />
LIn<br />
COnd<br />
COEF<br />
2.1<br />
COnd<br />
tdSF<br />
0.49<br />
COnd<br />
CELL<br />
0.475<br />
COnd<br />
trEF<br />
25<br />
COnd<br />
tYPE<br />
Std<br />
1 . Im Messmodus die Taste drücken .<br />
OFF, LIn, nLF<br />
Auswahl: Temperaturkomp.<br />
AUS, linear oder nichtlinear<br />
für natürliches Wasser oder<br />
Reinstwasser<br />
0,0 - 10,0<br />
Linearer<br />
Temperaturkompensationskoeffizient<br />
in %/°C<br />
0,00 - 10,0<br />
TDS-Faktor<br />
0,001 - 199,0<br />
Bei der automatischen<br />
Leitfähigkeits-kalibrierung<br />
verwendete Zellkonstante<br />
15, 20, 25<br />
Leitfähigkeits-<br />
Referenztemperatur in °C<br />
PLnr, Std, 1, 2, 3, 4, 5, 6, 7<br />
St<strong>and</strong>ard- oder planare<br />
Leitfähigkeitszelle<br />
oder manueller<br />
Eingabebereich von 1 bis 7<br />
Thermo Scientific <strong>Orion</strong> <strong>Star</strong> <strong>and</strong> <strong>Star</strong> <strong>Plus</strong> Series <strong>Meter</strong> User Guide<br />
LIn Ja<br />
2,1 Ja<br />
0,49 Ja<br />
0,475 Ja<br />
25 Ja<br />
Std Ja<br />
Spezifische<br />
Methode<br />
DE-35
Leitfähigkeitsverfahren<br />
2 . Mit den Tasten / durch das Setup-Menü scrollen, bis die Information<br />
in der oberen Zeile angezeigt wird .<br />
3 . Taste drücken, um die Einstellungen zu übernehmen und den Pfeil zur<br />
mittleren Zeile zu bewegen .<br />
4 . Tasten / drücken, um durch folgende Leitfähigkeitseinstellungen zu<br />
scrollen:<br />
• = Temperaturkompensationsauswahl . Die Temperaturkompensation<br />
kann ausgeschaltet oder es kann eine lineare oder,<br />
für natürliches Wasser und Reinstwasser, eine nichtlineare<br />
Temperaturkompensation ausgewählt werden .<br />
• = Temperaturkoeffizient für lineare Temperaturkompensation,<br />
angegeben in %/°C .<br />
• = TDS-Faktor zur Messung des Feststoffgehalts<br />
• = Leitfähigkeits-Zellkonstante (Nominal-Zellkonstante für<br />
automat . Kalibrierung)<br />
• = Referenztemperatur für Temperaturkompensation . Optionen:<br />
°C, °C oder °C .<br />
• = Leitfähigkeits-Zelltyp (planar oder konventionell)<br />
5 . Taste drücken, um die Einstellungen zu übernehmen und den Pfeil zur<br />
unteren Zeile zu bewegen .<br />
6 . Die Tasten / und drücken, um den Wert zu bearbeiten .<br />
7 . Taste drücken, um die Einstellung zu übernehmen und den Pfeil zur oberen<br />
Zeile zu bewegen .<br />
8 . Schritte 3-7 bei Bedarf wiederholen, um die Leitfähigkeitseinstellungen zu<br />
bearbeiten .<br />
9 . Taste drücken, um in den Messmodus zurückzukehren .<br />
DE-36 Thermo Scientific <strong>Orion</strong> <strong>Star</strong> <strong>and</strong> <strong>Star</strong> <strong>Plus</strong> Series <strong>Meter</strong> User Guide
Kalibrierung der Leitfähigkeits<br />
1 . Die Sonde gemäß den der Sonde beigefügten Anweisungen auf den Einsatz<br />
vorbereiten .<br />
2 . Im Messmodus Taste drücken, bis der Pfeil auf die Zeile für die<br />
Leitfähigkeitsmessung zeigt .<br />
3 . Taste drücken .<br />
4 . Die Sonde abspülen und in die Leitfähigkeits-St<strong>and</strong>ardlösung eintauchen .<br />
5 . Durchführung einer manuellen Kalibrierung: Im Bildschirm werden die<br />
Zellenkonstante in der unteren Zeile und die Leitfähigkeit in der mittleren Zeile<br />
angezeigt . Die Zellenkonstante mit den Tasten und / bearbeiten,<br />
bis die Leitfähigkeitsmessung mit der Leitfähigkeit der St<strong>and</strong>ardlösung bei<br />
aktueller Messtemperatur übereinstimmt .<br />
• Wenn nicht innerhalb von fünf Sekunden mit dem Bearbeiten der<br />
Zellenkonstante begonnen wird, schaltet das Gerät automatisch auf den<br />
AutoCal/DirectCal -Bildschirm um .<br />
6 . Durchführung einer automatischen Kalibrierung (AutoCal) oder direkten<br />
Kalibrierung (DirectCal): Warten, bis das Symbol µS/cm bzw . mS/cm aufhört zu<br />
blinken .<br />
• AutoCal: Wenn das Symbol µS/cm bzw . mS/cm aufhört zu blinken, zeigt das<br />
Messgerät den temperaturkorrigierten Wert des Leitfähigkeitsst<strong>and</strong>ards an .<br />
• DirectCal: Wenn das Symbol µS/cm bzw . mS/cm aufhört zu blinken, zeigt<br />
das Messgerät den aktuellen von der Leitfähigkeitssonde gemessenen<br />
Leitfähigkeitswert an . Den Leitfähigkeitswert mit den Tasten und /<br />
auf die Leitfähigkeit der St<strong>and</strong>ardlösung bei aktueller Messtemperatur<br />
setzen .<br />
Thermo Scientific <strong>Orion</strong> <strong>Star</strong> <strong>and</strong> <strong>Star</strong> <strong>Plus</strong> Series <strong>Meter</strong> User Guide<br />
Leitfähigkeitsverfahren<br />
DE-37
Leitfähigkeitsverfahren<br />
7 . Zum nächsten Kalibrierpunkt übergehen und Schritte 4 bis 6 wiederholen,<br />
oder drücken, um die Kalibrierung zu speichern und zu beenden .<br />
8 . Nach der Eingabe des Werts für den letzten St<strong>and</strong>ard wird automatisch im<br />
unteren Feld die Zellkonstante durch die Information angezeigt, während<br />
im Hauptfeld die aktuelle Zellkonstante durch die Information angezeigt<br />
wird . Das Messgerät schaltet automatisch in den Messmodus . Das Symbol<br />
wird oberhalb des Hauptfelds angezeigt .<br />
DE-38 Thermo Scientific <strong>Orion</strong> <strong>Star</strong> <strong>and</strong> <strong>Star</strong> <strong>Plus</strong> Series <strong>Meter</strong> User Guide
Leitfähigkeitsmessung<br />
1 . Leitfähigkeitssonde abspülen und in die Probe eintauchen . Wenn die Symbole<br />
mS/cm oder µS/cm zu blinken aufhören und damit einen stabilen Wert<br />
angeben, den Leitfähigkeitswert direkt vom Hauptdisplay des Messgeräts<br />
aufzeichnen . Die Temperatur wird im Display oben links angezeigt .<br />
2a . Im Continuous-Messmodus beginnt das Gerät sofort mit der Messung . Bei<br />
Verwendung des Tischgeräts mit aktivierter Rührerkontrolle die Taste<br />
drücken, um den Rührer einzuschalten .<br />
Das Symbol blinkt, bis der Messwert stabil ist . Sobald der Messwert stabil<br />
ist, kann die Messung durch Drücken der Taste protokolliert und gedruckt<br />
werden . Beim Speichern der Daten ist sowohl der Leitfähigkeitswert als auch die<br />
Temperatur, bei der die Leitfähigkeitsmessung erfolgt ist, festzuhalten . Ist der<br />
Rührer aktiviert, Taste drücken, um den Rührer auszuschalten und ihn aus<br />
der Probe nehmen zu können .<br />
2b . Im AUTO READ-Modus (Automatische Lesefunktion) die Taste drücken,<br />
um mit der Messung zu beginnen . Sobald der Messwert stabil ist, friert das<br />
Display ein, wobei die Daten automatisch gespeichert oder an einen PC bzw .<br />
Drucker übergeben werden . Ist der Rührer aktiviert, wird er durch Drücken<br />
der Taste eingeschaltet und schaltet sich aus, sobald sich der Messwert<br />
stabilisiert hat .<br />
2c . Im Timed-Messmodus (Zeitvorgabe-Messmodus) beginnt das Messgerät mit<br />
der Messdurchführung in den Intervallen, die im Setup bestimmt wurden .<br />
Jede Messung wird automatisch gespeichert bzw . an einen Drucker oder PC<br />
übergeben . Bei Verwendung des Tischgeräts mit aktivierter Rührerkontrolle die<br />
Taste drücken, um den Rührer einzuschalten . Durch erneutes Drücken<br />
der Taste wird der Rührer ausgeschaltet .<br />
Thermo Scientific <strong>Orion</strong> <strong>Star</strong> <strong>and</strong> <strong>Star</strong> <strong>Plus</strong> Series <strong>Meter</strong> User Guide<br />
Leitfähigkeitsverfahren<br />
DE-39
Leitfähigkeitsverfahren<br />
3 . Die Leitfähigkeitssonde aus der Probe nehmen und mit deionisiertem Wasser<br />
abspülen, danach in die nächste Probe eintauchen und Schritt 2 wiederholen .<br />
4 . Sobald die Probenmessung beendet ist, die Leitfähigkeitssonde mit<br />
deionisiertem Wasser abspülen und abtrocknen . Informationen über die<br />
ordnungsgemäße Lagerung der Leitfähigkeitssonde dem Sondenh<strong>and</strong>buch<br />
entnehmen .<br />
DE-40 Thermo Scientific <strong>Orion</strong> <strong>Star</strong> <strong>and</strong> <strong>Star</strong> <strong>Plus</strong> Series <strong>Meter</strong> User Guide
Kapitel IX<br />
ISE-Verfahren<br />
ISE-Setup<br />
Beschreibung Display Wertebereich St<strong>and</strong>ardwert<br />
ISE-Auflösung ISE 1, 2, 3<br />
rES ISE-Auflösung in<br />
1<br />
signifikanten Stellen<br />
ISE-Einheiten ISE M, mG/L, PEr, PPb, nOnE<br />
UnIt<br />
PPb<br />
Angezeigte ISE-Einheiten<br />
ISE-Kalibrierst<strong>and</strong>ard<br />
Konzentrationsbereich<br />
Auto Blank-Korrektur<br />
(Korrektur der<br />
automatischen<br />
Neuwertberechnung) im<br />
ISE-Verfahren<br />
ISE<br />
rAng<br />
HIgH<br />
ISE<br />
nLIn<br />
AUtO<br />
1 . Im Messmodus die Taste drücken .<br />
LOw, HIgH<br />
Verwendetes<br />
Stabilitätskriterium<br />
bei der ISE-Kalibrierung<br />
AUtO, OFF<br />
Aktiviert bzw. deaktiviert<br />
die Kalibrierfunktion Auto-<br />
Blank (automatische Blindwert-<br />
Korrektur)<br />
Thermo Scientific <strong>Orion</strong> <strong>Star</strong> <strong>and</strong> <strong>Star</strong> <strong>Plus</strong> Series <strong>Meter</strong> User Guide<br />
1 Ja<br />
PPb Ja<br />
HIgH Ja<br />
AUtO Ja<br />
2 . Mit den Tasten / durch das Setup-Menü scrollen, bis die<br />
Information in der oberen Zeile angezeigt wird .<br />
Spezifische<br />
Methode<br />
3 . Taste drücken, um die Einstellungen zu übernehmen und den Pfeil zur<br />
mittleren Zeile zu bewegen .<br />
DE-41
ISE-Verfahren<br />
4 . Tasten / drücken, um durch folgende Optionen zu scrollen:<br />
• = Auflösung<br />
• = ISE-Messeinheiten<br />
• M = Mol<br />
• mG/L = mg/l<br />
• PEr = Prozent<br />
• PPb = Teile pro Milliarde<br />
• nOnE = Keine Einheiten<br />
• = ISE-Kalibrierbereich<br />
• HIgH - für die meisten Messungen geeignet<br />
• LOw - für Low-Level-Messungen, die längere Stabilisationszeiten<br />
benötigen<br />
• = Nichtlineare Blindwert-Korrektur<br />
• OFF<br />
• AUtO<br />
5 . Taste drücken, um die Einstellungen zu übernehmen und den Pfeil zur<br />
unteren Zeile zu bewegen .<br />
6 . Die Tasten / und drücken, um den gewählten Wert zu bearbeiten .<br />
7 . Taste drücken, um die Einstellung zu übernehmen und den Pfeil zur oberen<br />
Zeile zu bewegen .<br />
8 . Schritte 3 bis 7 bei Bedarf wiederholen, um die ISE-Einstellungen zu bearbeiten .<br />
9 . Taste drücken, um zum Messmodus zurückzukehren .<br />
DE-42 Thermo Scientific <strong>Orion</strong> <strong>Star</strong> <strong>and</strong> <strong>Star</strong> <strong>Plus</strong> Series <strong>Meter</strong> User Guide
Vorbereitung von St<strong>and</strong>ardlösungen<br />
Thermo Scientific <strong>Orion</strong> <strong>Star</strong> <strong>and</strong> <strong>Star</strong> <strong>Plus</strong> Series <strong>Meter</strong> User Guide<br />
ISE-Verfahren<br />
Die St<strong>and</strong>ardlösungen sollten in denselben ISE-Einheiten wie die erforderlichen<br />
Probenergebnisse vorbereitet werden . Es empfiehlt sich, serielle Verdünnungen<br />
mit volumetrischen Glasgeräten anzusetzen, um die verschiedenen<br />
Konzentrationsniveaus zu erhalten .<br />
Hinweis: Alle Reagenzien wie Ionenstärkeregler sollten den Proben und<br />
St<strong>and</strong>ardlösungen gemäß den Anweisungen in der Gebrauchsanweisung der<br />
Elektrode hinzugefügt werden. s<br />
Die Kalibrierpunkte sollten den erwarteten Konzentrationsbereich der Proben<br />
umfassen . Darüber hinaus ist eine Konzentrationssteigerung der St<strong>and</strong>ards um<br />
mindestens eine 10er-Potenz erforderlich (d . h . 1 ppm und 10 ppm oder 10 ppm und<br />
100 ppm) .<br />
Bei jeder Kalibrierung sollten frische Mengen der jeweiligen angesetzten St<strong>and</strong>ards<br />
verwendet werden .<br />
DE-43
ISE-Verfahren<br />
ISE-Kalibrierung<br />
1 . Die Elektrode und die St<strong>and</strong>ardlösungen gemäß der Gebrauchsanweisung der<br />
Elektrode auf den Einsatz vorbereiten .<br />
2 . Taste drücken, bis der Pfeil auf die Zeile für die ISE-Messung zeigt .<br />
3 . Taste drücken .<br />
4 . Elektrode abspülen, überschüssiges deionisiertes Wasser abschütteln und<br />
Elektrode trockentupfen . Dann die Elektrode in die St<strong>and</strong>ardlösung mit dem<br />
niedrigsten Konzentrationsniveau eintauchen .<br />
5 . Warten, bis das ISE-Symbol aufhört zu blinken . Die Tasten<br />
drücken, um den Wert der St<strong>and</strong>ardlösung zu bearbeiten .<br />
/ und<br />
6 . Zum nächsthöher konzentrierten Kalibrierst<strong>and</strong>ard übergehen und Schritte 4<br />
bis 5 wiederholen und entsprechend bis zum stärksten St<strong>and</strong>ard fortfahren, oder<br />
drücken, um die Kalibrierung zu beenden .<br />
7 . Vor der Rückkehr in den Messmodus wird der Steilheitswert angezeigt .<br />
erscheint im unteren Feld während die aktuelle Elektrodensteilheit im Hauptfeld<br />
in mV angegeben wird .<br />
Hinweis: Bei einer Kalibrierung von zwei oder mehr Punkten schaltet das<br />
Messgerät nach drei Sekunden automatisch in den Messmodus um. Bei einer<br />
Kalibrierung von einem Punkt ermöglicht das Messgerät die Bearbeitung<br />
des Steilheitswerts. Das Drücken der Taste führt dann zurück in den<br />
Messmodus.<br />
Hinweis: Bei Eingabe einer negativen Zahl für den Steilheitswert gilt<br />
Folgendes:<br />
a. T aste drücken, bis keine Stelle mehr blinkt und der Pfeil anfängt zu<br />
blinken.<br />
b. Mithilfe der Tasten / das Vorzeichen des Steilheitswerts ändern .<br />
c. Zum Speichern drücken.<br />
DE-44 Thermo Scientific <strong>Orion</strong> <strong>Star</strong> <strong>and</strong> <strong>Star</strong> <strong>Plus</strong> Series <strong>Meter</strong> User Guide
ISE-Messung<br />
Nach der Kalibrierung der Elektrode ist das Messgerät für die Durchführung der<br />
Messungen einsatzbereit . Sicherstellen, dass sich das Gerät im Messmodus<br />
befindet (das Symbol leuchtet auf) und dass die Angabe ISE angezeigt wird .<br />
Leuchtet das Symbol nicht auf, die Taste drücken, um in den Messmodus<br />
zurückzukehren . Leuchtet das Symbol ISE nicht auf, die Taste drücken, bis der<br />
Pfeil links im Display auf die obere Zeile zeigt . Danach die Taste drücken, bis die<br />
Information ISE aufleuchtet . Es kann nun mit den Messungen begonnen werden .<br />
1 . Die Elektrode in deionisiertem Wasser abspülen . Überschüssiges Wasser<br />
abschütteln und mit einem fusselfreien Tuch trockentupfen .<br />
2 . Die Elektrode in die Probe eintauchen .<br />
a . Im Continuous-Messmodus beginnt das Gerät sofort mit der Messung .<br />
Bei Verwendung des Tischgeräts mit deaktivierter Rührerkontrolle die Taste<br />
drücken, um den Rührer zu aktivieren . Die Information ISE blinkt, bis<br />
der Messwert stabil ist . Sobald der Messwert stabil ist, kann die Messung<br />
durch Drücken der Taste gespeichert und an einen Drucker bzw . PC<br />
übergeben werden . Ist der Rührer aktiviert, Taste drücken, um den<br />
Rührer auszuschalten und ihn aus der Probe nehmen zu können .<br />
b . Im AUTO READ-Modus (Automatische Lesefunktion) Taste drücken,<br />
um mit der Messung zu beginnen . Sobald der Messwert stabil ist, friert das<br />
Display ein, wobei die Daten automatisch gespeichert und an einen Drucker<br />
bzw . PC übergeben werden . Ist der Rührer aktiviert, wird er durch Drücken<br />
der Taste eingeschaltet und schaltet sich aus, sobald sich der Messwert<br />
stabilisiert hat .<br />
c . Im Timed-Messmodus (Zeitvorgabemessmodus) beginnt das Messgerät mit<br />
der Messdurchführung in den Intervallen, die im Setup bestimmt wurden .<br />
Jede Messung wird automatisch gespeichert bzw . an einen Drucker oder PC<br />
übergeben . Bei Verwendung des Tischgeräts mit aktivierter Rührerkontrolle<br />
Thermo Scientific <strong>Orion</strong> <strong>Star</strong> <strong>and</strong> <strong>Star</strong> <strong>Plus</strong> Series <strong>Meter</strong> User Guide<br />
ISE-Verfahren<br />
DE-45
ISE-Verfahren<br />
die Taste drücken, um den Rührer zu aktivieren . Durch erneutes<br />
Drücken der Taste wird der Rührer ausgeschaltet .<br />
3 . Die Elektrode aus der Probe nehmen und mit deionisiertem Wasser abspülen,<br />
abschütteln und trockentupfen und danach in die nächste Probe eintauchen und<br />
Schritt 2 wiederholen .<br />
4 . Nach dem Messen der Proben die Elektrode mit deionisiertem Wasser abspülen<br />
und abtrocknen . Informationen über die ordnungsgemäße Lagerung der<br />
Elektrode dem Elektrodenh<strong>and</strong>buch entnehmen .<br />
DE-46 Thermo Scientific <strong>Orion</strong> <strong>Star</strong> <strong>and</strong> <strong>Star</strong> <strong>Plus</strong> Series <strong>Meter</strong> User Guide
Kapitel X<br />
Verkaufs- und Lieferbedingungen<br />
Allgemeines<br />
Der Verkäufer bietet hiermit dem Käufer (im Folgenden der „Käufer“) seine<br />
Produkte (im Folgenden die „Produkte“) zum Kauf an, unter der ausdrücklichen<br />
Voraussetzung, dass der Käufer die folgenden Verkaufs- und Lieferbedingungen<br />
verbindlich annimmt . Jegliche Bestimmungen in einem vom Käufer verfassten<br />
Dokument werden ausdrücklich zurückgewiesen . Weichen die Bestimmungen<br />
dieses Vertrages von den Angebotsbedingungen des Käufers ab, wird dieses<br />
Dokument als Gegenangebot ausgelegt und nicht als Annahme des vom Käufer<br />
verfassten Dokumentes geltend gemacht . Erhält der Käufer Produkte oder übt der<br />
Verkäufer seine in diesem Dokument vorgesehene Dienstleistungstätigkeit aus, gilt<br />
dies als Annahme des Vertrages vonseiten des Käufers . Das vorliegende Dokument<br />
ist die ausschließliche und vollständige Vertragsvereinbarung, die zwischen<br />
Verkäufer und Käufer zwecks Produkterwerb aufgesetzt wurde . Jegliche Aufhebung,<br />
Einwilligung, Abänderung, Ergänzung oder Bestimmungsänderung ist lediglich dann<br />
rechtsverbindlich, wenn sie in schriftlicher Form vorliegt und sowohl vom Verkäufer<br />
als auch vom Käufer unterzeichnet wurde . Versäumt es der Verkäufer in der Folge<br />
einer vom Käufer mitgeteilten Bedingung zu widersprechen, dann gilt dies nicht als<br />
Aufhebung oder Abänderung der Vertragsbedingungen . Jegliche Verfügung bedarf<br />
einer schriftlichen Einverständniserklärung durch einen befugten Vertreter des<br />
Verkäufers .<br />
Garantie<br />
Die Garantie deckt Material- und Fabrikationsfehler an allen Thermo Scientific<br />
<strong>Orion</strong>-Produkten ab dem Tag des Produkterwerbes durch den Benutzer . Der<br />
Benutzer sollte die Garantiekarte an Thermo Fisher Scientific zurückschicken und<br />
den Kaufbeleg aufbewahren . Wurde das Produkt nicht ordnungsgemäß bedient,<br />
zweckentfremdet oder durch unautorisierte Personen repariert, so wird diese<br />
Garantie ungültig .<br />
Thermo Scientific <strong>Orion</strong> <strong>Star</strong> <strong>and</strong> <strong>Star</strong> <strong>Plus</strong> Series <strong>Meter</strong> User Guide<br />
DE-47
Verkaufs- und Lieferbedingungen<br />
Garantien gelten nur für die von Thermo Fisher Scientific oder seinen<br />
Vertragshändlern verkauften/installierten Produkte.<br />
Sämtliche durch einen US-amerikanischen bzw . kanadischen Vertriebshändler<br />
verkauften Produkte müssen zur Garantie-Reparatur an Thermo Fisher Scientific<br />
zurückgeschickt werden . Ausführliche Informationen erhalten Sie bei unserem<br />
technischen Kundendienst . Vor einer Garantie-Reparatur oder einem Garantie-<br />
Ersatz benötigen Sie eine Rückgabe-Autorisierungsnummer, die beim technischen<br />
Kundendienst von Thermo Fisher Scientific erhältlich ist . Innerhalb der Garantiezeit<br />
wird Thermo Fisher Scientific nach eigenem Ermessen einen möglichen Defekt<br />
reparieren oder ein nicht garantiegerechtes Produkt austauschen . In einigen<br />
Ländern werden für die Garantieleistung zusätzliche Kosten, wie z .B . Frachtkosten,<br />
berechnet . Setzen Sie sich bei Kundendienstbedarf mit Thermo Fisher Scientific<br />
(bzw . den entsprechenden Vertragshändlern außerhalb der Vereinigten Staaten<br />
und Kanada) in Verbindung . Thermo Fisher Scientific behält sich das Recht vor, die<br />
Vorlage eines Kaufbelegs, wie z .B . die Originalrechnung oder den Lieferschein, zu<br />
verlangen .<br />
Für BOD-AutoEZ wird ein Vor-Ort-Kundendienst angeboten . Ausführliche<br />
Informationen über Kosten, Leistungen und sonstige Angelegenheiten bezüglich des<br />
Vor-Ort-Kundendienstes erhalten Sie bei unserer Vor-Ort-Kundendienstabteilung .<br />
Für folgende Produkte gilt die Garantie bei Material- oder Fabrikationsfehlern ab<br />
dem Tag des Erwerbs durch den Benutzer oder ab dem Tag des Vers<strong>and</strong>s durch<br />
Thermo Fisher Scientific, je nachdem, welche H<strong>and</strong>lung zuerst vorgenommen<br />
wird . Voraussetzung dafür ist ein ordnungsgemäßer Gebrauch des Geräts in<br />
Übereinstimmung mit den Betriebsbeschränkungen und Inst<strong>and</strong>haltungsverfahren<br />
des Anleitungsh<strong>and</strong>buchs und wenn weder Unfall, Veränderung, Missbrauch oder<br />
Elektrodenbeschädigung vorliegen:<br />
Sechsunddreißig Monate vom Tag des Erwerbs durch den Benutzer<br />
(bzw. zweiundvierzig Monate vom Tag des Vers<strong>and</strong>s durch Thermo<br />
Fisher Scientific)<br />
Alle pH-, ISE-, DO- und Leitfähigkeitsmessgeräte der <strong>Orion</strong> <strong>Star</strong>-Serie,<br />
wasserdichte Messgeräte (630, 635, 830A, 835A, 260A, 261S, 265A, 266S, 130A,<br />
131S, 135A, 136S), Leitfähigkeitsmessgeräte (105Aplus, 115Aplus, 125Aplus,<br />
145Aplus, 150Aplus und 162A), PerpHect ® pH und pH/ISE-Messgeräte<br />
(310, 320, 330, 350, 370), pH und pH/ISE-Messgeräte (210Aplus, 230Aplus,<br />
DE-48 Thermo Scientific <strong>Orion</strong> <strong>Star</strong> <strong>and</strong> <strong>Star</strong> <strong>Plus</strong> Series <strong>Meter</strong> User Guide
Thermo Scientific <strong>Orion</strong> <strong>Star</strong> <strong>and</strong> <strong>Star</strong> <strong>Plus</strong> Series <strong>Meter</strong> User Guide<br />
Verkaufs- und Lieferbedingungen<br />
250Aplus, 290Aplus, 410Aplus, 420Aplus, 520Aplus, 525Aplus,<br />
710Aplus, 720Aplus und 920Aplus), pHuture MMS-Messgeräte (535A und<br />
555A), pH-/Leitfähigkeitsmessgeräte (550A) und DO-Messgeräte (805Aplus,<br />
810Aplus, 850Aplus und 862A) .<br />
Vierundzwanzig Monate vom Tag des Erwerbs durch den Benutzer (bzw.<br />
sechsunddreißig Monate vom Tag des Vers<strong>and</strong>s durch Thermo Fisher<br />
Scientific)<br />
Ross Ultra ® -Elektroden, AQUAfast ® IV-Colorimeter, AQUAfast ® IV-Turbidimeter, 925<br />
Flash Titrator, DuraProbe-Leitfähigkeitszellen der Serie 100 und DO-Sonden der<br />
Serie 800 .<br />
Zwölf Monate vom Tag des Erwerbs durch den Benutzer (bzw. achtzehn<br />
Monate vom Tag des Vers<strong>and</strong>s durch Thermo Fisher Scientific)<br />
pH-Labormessgeräte, (301, 611 und 940), SensorLink ®-Systeme, pHuture ®-pH-<br />
Messgeräte (610 und 620), Smart Chek-Messgeräte, Sage ®-Pumpen, Cahn ®-<br />
Waagen, 930 Ionalyzer ®, 950 ROSS ® FAST QC-Titratoren, 960 Titrator PLUS ®,<br />
Karl Fischer-Titratoren, automatische Probenentnehmer, BOD AutoEZ, pHuture ®<br />
Conversion Box, Wine Master ®, 607 Switchbox, rf link und AQUAfast ® II-<br />
Colorimeter .<br />
ISE-Elektroden, ionplus ®-Elektroden, ROSS ®-Elektroden, Sure-Flow ®-Elektroden,<br />
PerpHecT ®-Elektroden, AquaPro Professional-Elektroden, No Cal ® pH-Elektroden,<br />
St<strong>and</strong>ard pH-Elektroden, TRIS-pH-Elektroden, KNIpHE ®-Elektroden, ORP-Triode<br />
(9180BN), pHuture ®-pH-Sonden (616500) und pHuture MMS-Quatrode und<br />
Triode (616600 und 617900), 9708 DO-Sonden, konventionelle Leitfähigkeitszellen<br />
der Serie 100, Temperatursonden und -kompensatoren (bis auf die erwähnten<br />
Modelle) .<br />
Die Sensormodule der 93 und 97 ionplus ®-Serie haben bis auf Modell 9307 und<br />
9707 eine Garantie von sechs Monaten, wenn sie vor dem auf der Packung<br />
angegebenen Datum in Betrieb genommen werden . Die Nitratmodule 9307 und<br />
9707 haben eine Garantie von neunzig Tagen, wenn sie vor dem auf der Packung<br />
angegebenen Datum in Betrieb genommen werden .<br />
DE-49
Verkaufs- und Lieferbedingungen<br />
Sechs Monate vom Tag des Erwerbs durch den Benutzer (bzw. zwölf<br />
Monate vom Tag des Vers<strong>and</strong>s durch Thermo Fisher Scientific)<br />
Flash Titration-Sonde (092518), pHuture ®-Elektrode (615700), pHuture MMS-<br />
Pentrode (617500), Quatrode (617800) und Triode (615800), Low Maintenance<br />
Triode (9107BN), ORP Low Maintenance Triode (9179BN) und PerpHecT ® Low<br />
Maintenance Triode (9207BN), Waterproof Triode (9107WP, 9107WL, 9109WL<br />
und 9109WP), QuiKcheK ®-Messgeräte und Mikroelektroden .<br />
Drei Monate vom Tag des Erwerbs durch den Benutzer (bzw. sechs<br />
Monate vom Tag des Vers<strong>and</strong>s durch Thermo Fisher Scientific)<br />
Economy Line Elektroden, 9105, 9106, 9115, 9116, 9125, 9126, 9135, 9136, 9206 .<br />
Die Garantie schließt jegliche Funktionsfehler ein (außer Elektrodenbrüche und bei<br />
nicht ordnungsgemäßer Bedienung), vorausgesetzt die Elektrode wurde nicht in<br />
TRIS, siber-, sulfid-, perchlorat- oder flusssäurehaltiger Lösung verwendet, bzw . in<br />
Lösungen von starken Säuren oder Basen von ein (1) Mol bei Temperaturen über 50<br />
°C .<br />
„Out-of-Box“-Garantie: Sollte eines der folgenden Produkte bei der<br />
ersten Benutzung nicht funktionieren, setzen Sie sich sofort mit Thermo<br />
Fisher Scientific in Verbindung, damit das Produkt ersetzt werden kann.<br />
Lösungen, St<strong>and</strong>ardlösungen, Reagenzien, Kabel, Leitungsadapter, Drucker,<br />
Software, Behälter, Ständer, Sondenmembranen, AQUAfast ®-Teststreifen, und<br />
allgemeines Zubehör .<br />
Besuchen Sie bei Produkten aus dem Katalog, die in dieser<br />
Garantieerklärung nicht enthalten sind, unsere Website:<br />
www.thermo.com/water.<br />
DIE OBIGEN GARANTIEERKLÄRUNGEN GELTEN AUSSCHLIESSLICH UND AN<br />
STELLE VON JEGLICHER WEITERER GARANTIE, SEI SIE EIDESSTATTLICH,<br />
AUSDRÜCKLICH ODER STILLSCHWEIGEND, INKLUSIVE JEGLICHER IMPLIZITER<br />
ZUSICHERUNG ALLGEMEINER GEBRAUCHSTAUGLICHKEIT ODER EIGNUNG<br />
ZU EINEM BESTIMMTEN ZWECK NOCH JEGLICHER GARANTIE NACH<br />
HANDELSSITTE . DEM KÄUFER STEHT AUSCHLIESSLICH DAS RECHT AUF<br />
REPARATUR ODER ERSATZ VON FEHLERHAFTEN PRODUKTEN ODER TEILEN<br />
DE-50 Thermo Scientific <strong>Orion</strong> <strong>Star</strong> <strong>and</strong> <strong>Star</strong> <strong>Plus</strong> Series <strong>Meter</strong> User Guide
DERER ODER EINE KOSTENRÜCKERSTATTUNG ZU . THERMO FISHER SCIENTIFIC<br />
(SOWIE SEINE UNTERNEHMER UND LIEFERANTEN) ÜBERNIMMT KEINE<br />
HAFTUNG FÜR SPEZIELLE ODER MITTELBARE SCHÄDEN BZW . FOLGESCHÄDEN<br />
UND GEWÄHRT KEINEN SCHADENSERSATZ FÜR AUFWENDUNGEN BEI<br />
VERTRAGSERFÜLLUNG, SEI ES EIN SCHULDRECHTLICHER ANSPRUCH,<br />
EIN ANSPRUCH AUS UNERLAUBTER HANDLUNG (EINSCHLIESSLICH<br />
FAHRLÄSSIGKEIT) ODER EIN ANDERER ANSPRUCH, DER SICH AUF DIESES<br />
PRODUKT BEZIEHT ODER DARAUS ENTSTEHT . JEGLICHE ERKLÄRUNGEN<br />
ODER GARANTIEN, DIE VON EINER VERTRAGSPARTEI, EINSCHLIESSLICH DER<br />
VERTRAGSHÄNDLER, VERTRETER UND ANGESTELLTEN VON THERMO FISHER<br />
SCIENTIFIC ABGEGEBEN WERDEN UND DIESE GARANTIEBEDINGUNGEN<br />
ÄNDERN ODER ERGÄNZEN, SIND NICHT RECHTSVERBINDLICH, ES SEI<br />
DENN, SIE LIEGEN IN SCHRIFTLICHER FORM VOR UND WURDEN VON<br />
VERANTWORTLICHER STELLE UNTERZEICHNET .<br />
Haftungsbeschränkung<br />
Thermo Scientific <strong>Orion</strong> <strong>Star</strong> <strong>and</strong> <strong>Star</strong> <strong>Plus</strong> Series <strong>Meter</strong> User Guide<br />
Verkaufs- und Lieferbedingungen<br />
UNGEACHTET ANDERSLAUTENDER BESTIMMUNGEN DES VERTRAGES<br />
WIRD DIE HAFTUNG DES VERKÄUFERS GEMÄSS DER VORLIEGENDEN<br />
VERTRAGS- UND LIEFERBEDINGUNGEN (SEI ES DURCH VERTRAGSBRUCH,<br />
UNERLAUBTE HANDLUNG, SCHADENSERSATZ ODER ÄHNLICHEM UNTER<br />
AUSSCHLUSS DER HAFTUNG VONSEITEN DES VERKÄUFERS BEI VERLETZUNG<br />
EINER GEWÄHRLEISTUNGSPFLICHT (AUSSCHLIESSLICHER RECHTSBEHELF<br />
WIE IN ABSCHNITT 2 OBEN VORGESEHEN)) AUF EINEN BETRAG IN HÖHE<br />
VON (A) DEM GESAMTKAUFPREIS, DER DEM VERKÄUFER VOM KÄUFER<br />
BEZÜGLICH DES PRODUKTS/DER PRODUKTE GEZAHLT WURDE, DAS/DIE DIE<br />
HAFTUNG ZUR FOLGE HAT ODER (B) EINER MILLION US-DOLLAR ($1 .000 .000)<br />
FESTGESETZT, JE NACHDEM, WELCHER BETRAG GERINGER IST . UNGEACHTET<br />
ANDERSLAUTENDER BESTIMMUNGEN DES VERTRAGES ÜBERNIMMT DER<br />
VERKÄUFER IN KEINEM FALL HAFTUNG FÜR EINEN SPEZIELLEN ODER<br />
MITTELBAREN SCHADEN BZW . FOLGESCHÄDEN ODER SCHADENSERSATZ<br />
FÜR AUFWENDUNGEN BEI VERTRAGSERFÜLLUNG (EINSCHLIESSLICH<br />
UNEINGESCHRÄNKT FÜR SCHÄDEN DURCH NUTZUNGSAUSFALL VON ANLAGEN<br />
ODER GERÄTEN, EINNAHMEVERLUST, DATENVERLUST, ENTGANGENEM<br />
GEWINN ODER VERLUST AN GOODWILL), UNABHÄNGIG DAVON, OB DER<br />
VERKÄUFER (a) ÜBER EINEN MÖGLICHEN SCHADEN IN KENNTNIS GESETZT<br />
WURDE ODER (b) FAHRLÄSSIG HANDELT .<br />
DE-51
Verkaufs- und Lieferbedingungen<br />
Verschiedenes<br />
(a) Die nachstehenden Rechte und Pflichten der Vertragsparteien werden in<br />
Übereinstimmung mit der Gesetzgebung des Commonwealth of Massachusetts<br />
ohne Bezug auf Kollisionsnormen geregelt und ausgelegt . Die Vertragsparteien<br />
stimmen hiermit unwiderruflich der ausschließlichen Zuständigkeit der Staats- und<br />
Bundesgerichte in Suffolk County, Massachusetts, USA, bei jeglicher Klage in<br />
Zusammenhang mit diesem Vertrag zu und verzichten auf einen etwaigen <strong>and</strong>eren<br />
Gerichtsst<strong>and</strong>, zu dem sie auf Grund des Firmensitzes oder Ähnlichem berechtigt<br />
sein könnten . (b) Im Falle eines Gerichtsverfahrens zwischen Verkäufer und Käufer<br />
besitzt keine Vertragspartei den Anspruch auf ein sog . Jury Trial (Prozess mit<br />
Geschworenen) und sie verzichten auf jeglichen Anspruch auf ein Jury Trial, der<br />
ihnen durch das geltende Recht oder Ähnliches gewährt sein könnte . Jedwede aus<br />
diesem Vertrag entstehende Klage muss innerhalb von einem (1) Jahr ab dem Tag<br />
des Klagegrundes eingereicht werden .<br />
DE-52 Thermo Scientific <strong>Orion</strong> <strong>Star</strong> DE-52<br />
<strong>and</strong> <strong>Star</strong> <strong>Plus</strong> Series <strong>Meter</strong> User Guide
Kapitel XI<br />
Konformitätserklärung<br />
Hersteller: Thermo Fisher Scientific Inc .<br />
Adresse: 166 Cummings Center<br />
Beverly, MA 01915<br />
USA<br />
Der oben genannte Hersteller erklärt hiermit, dass die im Folgenden beschriebenen<br />
Produkte den unten aufgeführten Normen und Richtlinien entsprechen:<br />
Produkte: pH-, Leitfähigkeits-, Gelöstsauerstoff- (DO) und/oder ISE-Messgeräte<br />
Tischgeräte entsprechen den Spezifikationen: 100-240 V~, 50/60 Hz, 0,5<br />
A Taschengeräte werden mit 4 nicht-aufladbaren AA-Batterien betrieben<br />
Tischgeräte Taschengeräte<br />
5-<strong>Star</strong>-Messgerät pH/ISE/Leitfähigkeit/DO 5-<strong>Star</strong>-Messgerät pH/ISE/Leitfähigkeit/DO<br />
4-<strong>Star</strong>-Messgerät pH/Leitfähigkeit 5-<strong>Star</strong>-Messgerät pH/Leitfähigkeit/DO<br />
4-<strong>Star</strong>-Messgerät pH/DO 4-<strong>Star</strong>-Messgerät pH/Leitfähigkeit<br />
4-<strong>Star</strong>-Messgerät pH/ISE 4-<strong>Star</strong>-Messgerät pH/DO<br />
3-<strong>Star</strong>-Messgerät Leitfähigkeit 4-<strong>Star</strong>-Messgerät pH/ISE<br />
3-<strong>Star</strong>-Messgerät DO 3-<strong>Star</strong>-Messgerät Leitfähigkeit<br />
3-<strong>Star</strong>-Messgerät pH 3-<strong>Star</strong>-Messgerät pH<br />
2-<strong>Star</strong>-Messgerät pH 3-<strong>Star</strong>-Messgerät DO<br />
Geräteklasse: Mess-, Steuer-, Regel- und Laborgeräte<br />
Die Tischgeräte entsprechen EMV-Klasse A .<br />
Die Taschengeräte entsprechen EMV-Klasse D .<br />
Thermo Scientific <strong>Orion</strong> <strong>Star</strong> <strong>and</strong> <strong>Star</strong> <strong>Plus</strong> Series <strong>Meter</strong> User Guide<br />
DE-53
Konformitätserklärung<br />
Richtlinien / Normen:<br />
• Richtlinie 89/336/EWG über die elektromagnetische Verträglichkeit (EMV)<br />
• EN 61326:1997 + A1:1998 + A2:2001. Elektrische Mess-, Steuer-, Regel- und<br />
Laborgeräte: EMV-Anforderungen.<br />
• Niederspannungsrichtlinie 73/23/EWG (LVD)<br />
• EN 61010-1:2001. Sicherheitsbestimmungen für elektrische Mess-, Steuer-,<br />
Regel- und Laborgeräte - Allgemeine Anforderungen.<br />
Autorisierter Vertreter des Herstellers: Datum:<br />
Patrick Chiu 23. Oktober 2008<br />
Senior Quality Assurance Engineering,<br />
Regulatory Compliance<br />
WEEE-Konformität:<br />
Dieses Produkt muss die Richtlinie der Europäischen Union über Elektro-<br />
und Elektronik-Altgeräte (WEEE, Richtlinie 2002/96/EG) erfüllen.<br />
Es ist mit nebenstehendem Symbol gekennzeichnet.<br />
Thermo Fisher Scientific hat in jedem EU-Mitgliedsstaat Verträge mit einem oder<br />
mehreren Recycling- bzw. Entsorgungsunternehmen abgeschlossen, und dieses<br />
Produkt sollte über diese Unternehmen entsorgt bzw. recycled werden. Weitere<br />
Informationen zur Erfüllung dieser Richtlinien durch Thermo Fisher Scientific und zu<br />
den Recyclingunternehmen in Ihrem L<strong>and</strong> sowie Informationen zu Thermo Scientific<br />
<strong>Orion</strong>-Produkten für den Nachweis von Substanzen, die der RoHS-Richtlinie<br />
unterliegen, finden Sie im Internet unter www.thermo.com/WEEERoHS.<br />
DE-54 Thermo Scientific <strong>Orion</strong> <strong>Star</strong> <strong>and</strong> <strong>Star</strong> <strong>Plus</strong> Series <strong>Meter</strong> User Guide
I T<br />
Indice<br />
Capitolo I Introduzione<br />
Metodi protetti da password . . . . . . . . . . . . . . . . . . . . . . . . . . . . . . . . . . . . . . . . . .IT-1<br />
AUTO-READ . . . . . . . . . . . . . . . . . . . . . . . . . . . . . . . . . . . . . . . . . . . . . . . . . . . . .IT-1<br />
Controllo degli agitatori . . . . . . . . . . . . . . . . . . . . . . . . . . . . . . . . . . . . . . . . . . . . . . .IT-2<br />
SMART STABILITY e SMART AVERAGING . . . . . . . . . . . . . . . . . . . . . . . . . . . .IT-2<br />
Capitolo II Display<br />
Descrizione generale . . . . . . . . . . . . . . . . . . . . . . . . . . . . . . . . . . . . . . . . . . . . . . . .IT-3<br />
Capitolo III Tastiera<br />
Descrizione generale . . . . . . . . . . . . . . . . . . . . . . . . . . . . . . . . . . . . . . . . . . . . . . . .IT-5<br />
Caratteristiche pratiche . . . . . . . . . . . . . . . . . . . . . . . . . . . . . . . . . . . . . . . . . . . . . . .IT-6<br />
Segnali acustici e allarmi . . . . . . . . . . . . . . . . . . . . . . . . . . . . . . . . . . . . . . . . . . . .IT-6<br />
Spegnimento automatico . . . . . . . . . . . . . . . . . . . . . . . . . . . . . . . . . . . . . . . . . . .IT-6<br />
Definizione delle icone . . . . . . . . . . . . . . . . . . . . . . . . . . . . . . . . . . . . . . . . . . . . . . .IT-7<br />
Capitolo IV Preparazione<br />
Installazione dell’adattatore . . . . . . . . . . . . . . . . . . . . . . . . . . . . . . . . . . . . . . . . . . .IT-9<br />
Installazione delle batterie . . . . . . . . . . . . . . . . . . . . . . . . . . . . . . . . . . . . . . . . . . . IT-10<br />
Collegamento degli elettrodi . . . . . . . . . . . . . . . . . . . . . . . . . . . . . . . . . . . . . . . . . . IT-12<br />
Accensione dello strumento . . . . . . . . . . . . . . . . . . . . . . . . . . . . . . . . . . . . . . . . . . IT-14<br />
Capitolo V Menu Setup<br />
Consigli per la navigazione . . . . . . . . . . . . . . . . . . . . . . . . . . . . . . . . . . . . . . . . . . . IT-15<br />
Impostazioni di menu generali . . . . . . . . . . . . . . . . . . . . . . . . . . . . . . . . . . . . . . . . IT-16<br />
Setup data e ora . . . . . . . . . . . . . . . . . . . . . . . . . . . . . . . . . . . . . . . . . . . . . . . . . . . IT-18<br />
Selezione di misurazione continua, temporizzata o di AUTO-READ . . . . . . . . . . .IT-20<br />
Selezione delle modalità di misurazione . . . . . . . . . . . . . . . . . . . . . . . . . . . . . . . . .IT-22<br />
Impostazione della calibrazione . . . . . . . . . . . . . . . . . . . . . . . . . . . . . . . . . . . . . . .IT-23<br />
Thermo Scientific <strong>Orion</strong> <strong>Star</strong> <strong>and</strong> <strong>Star</strong> <strong>Plus</strong> Series <strong>Meter</strong> User Guide<br />
S E Z I O N E I T A L I A N A<br />
IT-I
I T<br />
Capitolo VI Tecnica del pH<br />
Setup del pH . . . . . . . . . . . . . . . . . . . . . . . . . . . . . . . . . . . . . . . . . . . . . . . . . . . . . .IT-25<br />
Calibrazione del pH . . . . . . . . . . . . . . . . . . . . . . . . . . . . . . . . . . . . . . . . . . . . . . . . .IT-27<br />
Misurazioni del pH . . . . . . . . . . . . . . . . . . . . . . . . . . . . . . . . . . . . . . . . . . . . . . . . .IT-28<br />
Capitolo VII Tecnica dell'ossigeno disciolto<br />
Setup dell'OD . . . . . . . . . . . . . . . . . . . . . . . . . . . . . . . . . . . . . . . . . . . . . . . . . . . . .IT-29<br />
Calibrazione dell'OD . . . . . . . . . . . . . . . . . . . . . . . . . . . . . . . . . . . . . . . . . . . . . . . .IT-31<br />
Misurazione dell’OD . . . . . . . . . . . . . . . . . . . . . . . . . . . . . . . . . . . . . . . . . . . . . . . .IT-33<br />
Capitolo VIII Tecnica della conducibilità<br />
Setup della conducibilità . . . . . . . . . . . . . . . . . . . . . . . . . . . . . . . . . . . . . . . . . . . . .IT-35<br />
Calibrazione della conducibilità . . . . . . . . . . . . . . . . . . . . . . . . . . . . . . . . . . . . . . . .IT-37<br />
Misurazione della conducibilità . . . . . . . . . . . . . . . . . . . . . . . . . . . . . . . . . . . . . . . .IT-39<br />
Capitolo IX Tecnica ISE<br />
Setup ISE . . . . . . . . . . . . . . . . . . . . . . . . . . . . . . . . . . . . . . . . . . . . . . . . . . . . . . . .IT-41<br />
Preparazione dei riferimenti . . . . . . . . . . . . . . . . . . . . . . . . . . . . . . . . . . . . . . . . . .IT-43<br />
Calibrazione ISE . . . . . . . . . . . . . . . . . . . . . . . . . . . . . . . . . . . . . . . . . . . . . . . . . . .IT-44<br />
Misurazioni ISE . . . . . . . . . . . . . . . . . . . . . . . . . . . . . . . . . . . . . . . . . . . . . . . . . . . .IT-45<br />
Capitolo X Termini e condizioni<br />
Garanzia . . . . . . . . . . . . . . . . . . . . . . . . . . . . . . . . . . . . . . . . . . . . . . . . . . . . . . . . .IT-47<br />
Capitolo XI Dichiarazione di conformità<br />
Conformità RAEE . . . . . . . . . . . . . . . . . . . . . . . . . . . . . . . . . . . . . . . . . . . . . . . . . .IT-53<br />
IT-II Thermo Scientific <strong>Orion</strong> <strong>Star</strong> <strong>and</strong> <strong>Star</strong> <strong>Plus</strong> Series <strong>Meter</strong> User Guide
Capitolo I<br />
Introduzione<br />
Congratulazioni! Avete scelto un misuratore <strong>Orion</strong> <strong>Star</strong> Series leader del settore,<br />
progettato per l'esecuzione di misurazioni elettrochimiche sul campo o in laboratorio .<br />
• I misuratori 2 e 3-<strong>Star</strong> consentono di misurare il pH, l'ossigeno disciolto (OD)<br />
o la conducibilità .<br />
• I misuratori 4-<strong>Star</strong> consentono di effettuare misurazioni a due parametri di pH/<br />
OD, pH/conducibilità o pH/ISE (elettrodo selettivo di ioni) .<br />
• I misuratori 5-<strong>Star</strong> consentono di effettuare misurazioni a più parametri, inclusi<br />
mV/ORP (potenziale di ossidoriduzione) .<br />
Costruiti per soddisfare le esigenze di attivi laboratori multi-utente o di ambienti<br />
industriali, tutti i misuratori sono controllati da microprocessori a garanzia di<br />
misurazioni precise e accurate . I misuratori portatili a tenuta stagna possono<br />
addirittura resistere a immersioni di breve durata senza conseguenze negative<br />
sul funzionamento . Per soddisfare in maniera ottimale le esigenze degli utenti nei<br />
laboratori farmaceutici e in quelli operanti nei settori del controllo e della protezione<br />
ambientale, degli alimenti e delle bev<strong>and</strong>e e dei prodotti di consumo, gli <strong>Orion</strong> <strong>Star</strong><br />
Series includono le seguenti caratteristiche chiave:<br />
• Metodi protetti da password - La memoria dei misuratori salva fino a dieci<br />
misurazioni e calibrazioni personalizzate per futuro riferimento . La protezione<br />
mediante password di ogni metodo elimina eventuali manomissioni in quanto i<br />
diversi utenti possono accedere solo alla procedura più adatta al loro lavoro .<br />
• AUTO-READ - Lo strumento avvia automaticamente una misurazione e<br />
stampa o registra automaticamente i dati qu<strong>and</strong>o la lettura diventa stabile .<br />
Thermo Scientific <strong>Orion</strong> <strong>Star</strong> <strong>and</strong> <strong>Star</strong> <strong>Plus</strong> Series <strong>Meter</strong> User Guide<br />
IT-1
Introduzione<br />
• Controllo degli agitatori - I misuratori da banco (3 <strong>Star</strong> e superiori)<br />
dispongono di controllo dell'agitatore 096019 e della sonda BOD AUTO-STIR,<br />
elimin<strong>and</strong>o così la necessità di piastre e barre di agitazione aggiuntive .<br />
• SMART STABILITY e SMART AVERAGING - Eliminano i procedimenti<br />
per tentativi compens<strong>and</strong>o automaticamente le condizioni di misurazione e<br />
ottimizz<strong>and</strong>o così il tempo di risposta .<br />
Una guida rapida di facile consultazione, allegata ad ogni misuratore, facilita l'utilizzo<br />
giornaliero .<br />
Si prega di leggere attentamente il presente manuale prima di usare i misuratori fissi<br />
o da banco . Qualsiasi impiego non contemplato dalle presenti istruzioni potrebbe<br />
invalidare la garanzia e/o causare danni permanenti all'apparecchio .<br />
IT-2 Thermo Scientific <strong>Orion</strong> <strong>Star</strong> <strong>and</strong> <strong>Star</strong> <strong>Plus</strong> Series <strong>Meter</strong> User Guide
Capitolo II<br />
Display<br />
Descrizione generale<br />
Nel corso di un dato processo, il display LCD di tutti i misuratori <strong>Orion</strong> <strong>Star</strong> Series<br />
fornisce dati sulla Temperatura e sulla Calibrazione . Il setup appare solo<br />
qu<strong>and</strong>o il misuratore è in modalità setup . Il simbolo indica una condizione di<br />
errore; qu<strong>and</strong>o visualizzato con , esiste un problema nella qualità dei sensori .<br />
saranno discusse più approfonditamente nel Capitolo V, Menu Setup .<br />
Temperatura<br />
Calibrazione<br />
Misuratore 5 <strong>Star</strong><br />
Qui è descritto il display LCD principale del misuratore 5-<strong>Star</strong> in grado di effettuare<br />
misurazioni a più parametri .<br />
Thermo Scientific <strong>Orion</strong> <strong>Star</strong> <strong>and</strong> <strong>Star</strong> <strong>Plus</strong> Series <strong>Meter</strong> User Guide<br />
pH/ISE/ORP<br />
Unità<br />
Conducibilità<br />
Unità<br />
Unità OD<br />
IT-3
Display<br />
Nota: le 3 righe di dati inferiori corrispondono a ciò che viene misurato. s<br />
A pH, mV, Rel mV o ISE<br />
B Conducibilità, TDS, salinità o<br />
resistività<br />
C Saturazione % ossigeno disciolto,<br />
concentrazione OD<br />
o pressione barometrica<br />
Le unità di misura, visualizzate sul lato destro della schermata, lampeggiano finché<br />
la lettura è stabile .<br />
IT-4 Thermo Scientific <strong>Orion</strong> <strong>Star</strong> <strong>and</strong> <strong>Star</strong> <strong>Plus</strong> Series <strong>Meter</strong> User Guide
Capitolo III<br />
Tastiera<br />
Descrizione generale<br />
Il layout delle tastiere è uguale in tutti i misuratori <strong>Orion</strong> <strong>Star</strong> Series . I misuratori<br />
portatili e da banco 2 <strong>Star</strong> dispongono di 9 tasti . I misuratori da banco 3, 4 e 5 <strong>Star</strong><br />
hanno 10 tasti in conseguenza dell'aggiunta del tasto .<br />
Tastiera portatile<br />
Calibrazione<br />
Accensione Retroilluminazione<br />
Scorrere verso l'alto<br />
Cifre<br />
Selezione linea<br />
Scorrere verso<br />
il basso<br />
Setup<br />
Vista log<br />
Tastiera da banco<br />
Calibrazione<br />
Scorrere<br />
verso l'alto<br />
Cifre<br />
Setup<br />
Accensione<br />
Retroilluminazione<br />
Thermo Scientific <strong>Orion</strong> <strong>Star</strong> <strong>and</strong> <strong>Star</strong> <strong>Plus</strong> Series <strong>Meter</strong> User Guide<br />
Salvataggio/stampa<br />
misurazione<br />
Salvataggio/stampa<br />
misurazione<br />
Accensione/spegnimento<br />
agitatore (non nel 2-<strong>Star</strong> pH)<br />
Selezione linea<br />
Vista log<br />
Scorrere verso il<br />
basso<br />
IT-5
Tastiera<br />
L'area centrale della tastiera ergonomica è il punto focale per impostare e<br />
spostarsi all'interno del misuratore . In particolare, e / sono usati<br />
frequentemente per cambiare le viste del display LCD .<br />
Le caratteristiche che ne aumentano la praticità includono:<br />
• Retroilluminazione del display - Premere brevemente per accendere<br />
e spegnere la retroilluminazione . Qu<strong>and</strong>o l'apparecchio è alimentato da batterie,<br />
la retroilluminazione si spegne automaticamente per risparmiare energia . Se le<br />
batterie sono scariche, la retroilluminazione non si accende .<br />
• Spegnimento automatico - Tutti i misuratori <strong>Orion</strong> <strong>Star</strong> Series si spengono<br />
dopo 20 minuti se non viene premuto alcuno tasto . In tal modo si risparmia<br />
energia nei misuratori portatili o nei misuratori da banco alimentati da batterie<br />
• Segnali acustici - Il misuratore emette un "bip" ad ogni pressione di un tasto<br />
per una conferma immediata della ricezione dell'immissione da parte dell'utente .<br />
• Segnali di allarme ottici - I simboli e lampeggianti indicano che<br />
è necessaria una regolazione delle impostazioni di calibrazione . Per maggiori<br />
dettagli, consultare le sezioni successive del presente manuale concernenti le<br />
tecniche di misurazione specifiche .<br />
Per acquisire familiarità con ogni funzione, esaminare le seguenti definizioni delle<br />
icone .<br />
IT-6 Thermo Scientific <strong>Orion</strong> <strong>Star</strong> <strong>and</strong> <strong>Star</strong> <strong>Plus</strong> Series <strong>Meter</strong> User Guide
Definizione delle icone<br />
Tasto Descrizione Tasto Descrizione<br />
• Accende il misuratore, se è<br />
spento .<br />
• Accende e spegne la<br />
retroilluminazione, se il<br />
misuratore è acceso .<br />
• Se il misuratore è acceso,<br />
tenere premuto per<br />
spegnerlo .<br />
Sposta la freccia sulla sinistra<br />
dello schermo tra le 3 righe<br />
del display per selezionarle e<br />
modificarle .<br />
Avvia la calibrazione per la riga<br />
e la modalità di misurazione<br />
attualmente selezionate .<br />
• Se la freccia è rivolta verso<br />
la riga superiore e l'unità<br />
corrente è il pH, avvia<br />
una calibrazione del pH .<br />
• Ogni volta che<br />
è premuto durante la<br />
calibrazione, conferma il<br />
valore del punto corrente<br />
e si sposta al successivo<br />
punto di calibrazione fino<br />
all'esecuzione del numero<br />
massimo di punti di<br />
calibrazione, quindi torna alla<br />
modalità misurazione .<br />
Thermo Scientific <strong>Orion</strong> <strong>Star</strong> <strong>and</strong> <strong>Star</strong> <strong>Plus</strong> Series <strong>Meter</strong> User Guide<br />
Tastiera<br />
• Cambia la modalità di<br />
misurazione della riga<br />
selezionata .<br />
• Cambia la riga selezionata in<br />
setup, methods (metodi) e log<br />
view (vista log) .<br />
• Modifica il valore della cifra<br />
lampeggiante in setup,<br />
password entry (immissione<br />
password) e calibration<br />
(calibrazione) .<br />
Cambia la cifra selezionata da<br />
modificare e sposta il punto<br />
durante la modifica dei valori<br />
in setup, password entry e<br />
calibration .<br />
• Stampa e registra una<br />
misurazione in modalità<br />
misurazione continua o<br />
temporizzata .<br />
• Stampa, registra e blocca la<br />
schermata qu<strong>and</strong>o la lettura<br />
diventa stabile in modalità<br />
AUTO-READ .<br />
• Esce da setup e torna alla<br />
modalità misurazione .<br />
• Conferma il punto di<br />
calibrazione e torna alla<br />
modalità misurazione .<br />
IT-7
Tastiera<br />
Tasto Descrizione Tasto Descrizione<br />
Entra nel menu setup partendo<br />
con la riga e la modalità di<br />
misurazione selezionate:<br />
Se la freccia è rivolta verso la<br />
riga superiore e l'unità corrente<br />
è ISE, entrerà nella<br />
schermata di setup ISE .<br />
Entra nelle schermate log view<br />
(vista log) e download .<br />
Accende e spegne l'agitatore .<br />
IT-8 Thermo Scientific <strong>Orion</strong> <strong>Star</strong> <strong>and</strong> <strong>Star</strong> <strong>Plus</strong> Series <strong>Meter</strong> User Guide
Capitolo IV<br />
Preparazione<br />
Installazione dell'adattatore<br />
L'alimentatore universale incluso nel misuratore da banco è l'UNICA fonte di<br />
alimentazione raccom<strong>and</strong>ata per l'uso con l'apparecchio . L'uso di altri alimentatori<br />
invalida la garanzia del misuratore .<br />
L'alimentazione elettrica esterna è regolata per il funzionamento a 100-240 VAC,<br />
0 .5A, 50/60 Hz .<br />
In base alla fonte di alimentazione disponibile, selezionare una delle quattro spine<br />
di dotazione - 110V, 220V, 240V - e farla scorrere nelle scanalature dell'adattatore .<br />
Qu<strong>and</strong>o la spina è inserita correttamente, si sente un "click" .<br />
Collegare la spina dell’alimentatore alla presa nel misuratore da banco . Fare<br />
riferimento allo schema nella sezione Collegamento degli elettrodi .<br />
Thermo Scientific <strong>Orion</strong> <strong>Star</strong> <strong>and</strong> <strong>Star</strong> <strong>Plus</strong> Series <strong>Meter</strong> User Guide<br />
IT-9
Preparazione<br />
Installazione delle batterie<br />
I misuratori <strong>Orion</strong> <strong>Star</strong> Series usano quattro batterie alcaline AA . Non usare batterie<br />
al litio o ricaricabili . L'errata installazione di batterie non alcaline potrebbe costituire<br />
un pericolo .<br />
Nota: Per i misuratori di banco - L’installazione delle batterie non è necessaria se<br />
l’apparecchio è sempre collegato alla rete CA tramite l’alimentatore universale. s<br />
1 . Accertare che il misuratore sia spento .<br />
2 . Capovolgere delicatamente il misuratore su un panno pulito e senza pelucchi per<br />
non graffiare il display LCD .<br />
3 . Rimuovere il coperchio dello scomparto batterie .<br />
4 . Inserire batterie nuove con il polo “+” orientato come raffigurato nello<br />
scomparto delle batterie .<br />
5 . Reinstallare il coperchio .<br />
IT-10 Thermo Scientific <strong>Orion</strong> <strong>Star</strong> <strong>and</strong> <strong>Star</strong> <strong>Plus</strong> Series <strong>Meter</strong> User Guide
6 . Durante la sostituzione delle batterie, i dati, le calibrazioni e i metodi memorizzati<br />
rimangono nella memoria non volatile del misuratore, tuttavia è possibile dover<br />
resettare data e ora .<br />
Thermo Scientific <strong>Orion</strong> <strong>Star</strong> <strong>and</strong> <strong>Star</strong> <strong>Plus</strong> Series <strong>Meter</strong> User Guide<br />
Preparazione<br />
Nota: Per i misuratori portatili - Le batterie sono fornite e installate di fabbrica. s<br />
Per accedere allo scomparto delle batterie dei misuratori portatili, allentare le due viti<br />
nella parte posteriore centrale del misuratore . Notare che si tratta di viti prigioniere<br />
che non possono essere rimosse completamente .<br />
IT-11
Preparazione<br />
Collegamento degli elettrodi<br />
Seguire gli schemi sottostanti per collegare correttamente sonde ed elettrodi al<br />
misuratore . È rappresentato il misuratore 5-<strong>Star</strong>; gli altri modelli dispongono di un<br />
numero minore di collegamenti .<br />
Misuratore da banco - Collegamenti degli elettrodi<br />
Jack agitatore,<br />
agitatore o<br />
sonda AutoStir<br />
per OD<br />
Riferimento<br />
pH o ISE<br />
Cond<br />
o ATC<br />
8 pin<br />
OD<br />
9 pin<br />
Misuratore portatile - Collegamenti degli elettrodi<br />
BNC<br />
Cond o<br />
ATC 8 pin<br />
OD 9 pin<br />
BNC<br />
RS232<br />
RS232<br />
Massa<br />
Alimentazione<br />
IT-12 Thermo Scientific <strong>Orion</strong> <strong>Star</strong> <strong>and</strong> <strong>Star</strong> <strong>Plus</strong> Series <strong>Meter</strong> User Guide
Alcuni collegamenti hanno più utilizzi, per esempio:<br />
Thermo Scientific <strong>Orion</strong> <strong>Star</strong> <strong>and</strong> <strong>Star</strong> <strong>Plus</strong> Series <strong>Meter</strong> User Guide<br />
Preparazione<br />
• Usare il morsetto BNC per collegare gli elettrodi di misura e combinati pH, ISE e<br />
ORP a un connettore BNC a tenuta stagna .<br />
• I misuratori da banco dispongono di un jack miniatura per un elettrodo di<br />
riferimento separato . Questi richiedono un elettrodo di misura BNC appropriato<br />
per la misurazione .<br />
• L'elettrodo per ossigeno disciolto 970899WP può essere usato con il connettore<br />
BNC .<br />
• Usare il connettore MiniDIN 8 pin a tenuta stagna per le sonde di conducibilità .<br />
• Il connettore MiniDIN 8 pin a tenuta stagna è usato anche per le sonde ATC<br />
(compensazione automatica della temperatura) .<br />
• La sonda AUTO-STIR per OD usa il connettore MiniDIN 9 pin a tenuta stagna e<br />
il jack dell'agitatore per il connettore della sonda più piccolo .<br />
IT-13
Preparazione<br />
Accensione dello strumento<br />
Con le batterie installate nei misuratori portatili e le batterie installate o il cavo<br />
di alimentazione collegato nei misuratori da banco, premere per accendere<br />
lo strumento . Premere brevemente dopo l'accensione del misuratore per<br />
accendere o spegnere la retroilluminazione . Qu<strong>and</strong>o il misuratore da banco è<br />
alimentato dalla rete, la retroilluminazione rimane accesa fino allo spegnimento con<br />
. Per spegnere il misuratore, premere e tenere premuto per 3 secondi .<br />
IT-14 Thermo Scientific <strong>Orion</strong> <strong>Star</strong> <strong>and</strong> <strong>Star</strong> <strong>Plus</strong> Series <strong>Meter</strong> User Guide
Capitolo V<br />
Menu Setup<br />
Consigli per la navigazione<br />
• consente di entrare in modalità setup .<br />
• Le voci del menu principale sono visualizzate nella<br />
riga superiore del display LCD . Per scorrere il menu,<br />
premere / . Il testo che apparirà sul display<br />
LCD è rappresentato nella colonna Display delle<br />
tabelle nelle pagine seguenti .<br />
• Usare<br />
inferiore .<br />
per selezionare la riga superiore, centrale o<br />
• Usare / in combinazione con per<br />
modificare i valori nella riga selezionata .<br />
• Usare per accettare le modifiche e riportare la<br />
freccia sulla riga superiore .<br />
• Usare per salvare le modifiche e tornare alla<br />
modalità misurazione .<br />
Thermo Scientific <strong>Orion</strong> <strong>Star</strong> <strong>and</strong> <strong>Star</strong> <strong>Plus</strong> Series <strong>Meter</strong> User Guide<br />
IT-15
Menu Setup<br />
Impostazioni di menu generali<br />
La tabella seguente descrive il setup generale dello strumento .<br />
Descrizione Display Range di valori Valore<br />
predefinito<br />
Impostazione compensazione<br />
temperatura manuale<br />
Impostazione velocità<br />
agitatore<br />
(solo misuratori da banco)<br />
Selezione spegnimento<br />
automatico<br />
gEn<br />
dEgC<br />
25.0<br />
gEn<br />
StIr<br />
4<br />
gEn<br />
AUtO<br />
On<br />
-5,0 - 105 25,0 Sì<br />
OFF, 1, 2, 3, 4, 5, 6, 7 4 Sì<br />
OFF, On On No<br />
Metodo<br />
specifico<br />
• Impostazione temperatura manuale controlla la compensazione della<br />
temperatura qu<strong>and</strong>o allo strumento non sono collegati sensori di temperatura .<br />
• Impostazione velocità agitatore (solo misuratori da banco, escludendo<br />
il misuratore 2-<strong>Star</strong>) regola la velocità da 1 a 7, con 1 che rappresenta la<br />
velocità minima e 7 quella massima . Per la maggior parte delle applicazioni si<br />
raccom<strong>and</strong>a una velocità di 3 o 4 .<br />
• Spegnimento automatico controlla se lo strumento si spegne<br />
automaticamente se non viene premuto alcun tasto per 20 minuti . Per<br />
disabilitare questa funzione, selezionare OFF e lo strumento continuerà a<br />
funzionare .<br />
IT-16 Thermo Scientific <strong>Orion</strong> <strong>Star</strong> <strong>and</strong> <strong>Star</strong> <strong>Plus</strong> Series <strong>Meter</strong> User Guide
Per accedere a queste impostazioni:<br />
1 . In modalità misurazione premere .<br />
2 . Premere / per scorrere il menu setup finché sulla<br />
riga superiore è visualizzato .<br />
3 . Premere per accettare la selezione e spostare la freccia<br />
sulla riga centrale .<br />
4 . Premere / per scorrere tra:<br />
a . = Impostazione temperatura manuale<br />
b . = Abilitazione e regolazione velocità agitatore<br />
c . = Abilitazione/disabilitazione spegnimento<br />
automatico<br />
5 . Premere per accettare la selezione e spostare la freccia<br />
sulla riga inferiore .<br />
a . Premere / per identificare e per modificare<br />
il valore successivo .<br />
b . Premere per accettare la selezione e spostare la<br />
freccia sulla riga superiore .<br />
6 . Premere per tornare alla modalità misurazione .<br />
Thermo Scientific <strong>Orion</strong> <strong>Star</strong> <strong>and</strong> <strong>Star</strong> <strong>Plus</strong> Series <strong>Meter</strong> User Guide<br />
Menu Setup<br />
IT-17
Menu Setup<br />
Setup data e ora<br />
La tabella seguente descrive più approfonditamente le abbreviazioni che appaiono<br />
sulla schermata .<br />
Descrizione Display Range di valori Valore Metodo<br />
predefinito specifico<br />
Ora: impostazione delle ore dAtE 00 - 23<br />
12 No<br />
HOUr Imposta l'ora<br />
HH12<br />
dell'orario corrente in<br />
formato 24H<br />
Ora: impostazione dei dAtE 00 - 59<br />
00 No<br />
minuti<br />
tInE<br />
mm12<br />
Imposta i minuti<br />
dell’orario corrente<br />
Formato data dAtE mdY, dmY<br />
mdY No<br />
tYPE Selezione di mese,<br />
mdY<br />
giorno, anno o di<br />
giorno, mese, anno<br />
Data: impostazione<br />
dAtE 00 - 99<br />
04 No<br />
dell'anno<br />
YEAr<br />
2004<br />
Imposta l'anno della<br />
data corrente dal<br />
2000 al<br />
2099<br />
Data: impostazione del dAtE 01 - 12<br />
01 No<br />
mese<br />
dAtE<br />
mm01<br />
Impostazione del mese<br />
da 01 “gen”<br />
a 12 “dic”<br />
Data: impostazione del dAtE 01 - 31<br />
01 No<br />
giorno del mese<br />
dAY<br />
dd01<br />
Giorno del mese<br />
IT-18 Thermo Scientific <strong>Orion</strong> <strong>Star</strong> <strong>and</strong> <strong>Star</strong> <strong>Plus</strong> Series <strong>Meter</strong> User Guide
1 . In modalità misurazione premere .<br />
2 . Premere / per scorrere il menu setup finché sulla<br />
riga superiore è visualizzato .<br />
3 . Premere per confermare l’impostazione e spostare la<br />
freccia sulla riga centrale .<br />
4 . Premere / per scorrere tra:<br />
a . = Ora corrente<br />
b . = Minuto corrente<br />
c . = Visualizzare la data in formato “mdY” (mese,<br />
giorno, anno) o “dmY” (giorno, mese, anno)<br />
d . = Mese corrente (usare gli equivalenti numerici<br />
dei mesi dell'anno)<br />
e . = Giorno corrente del mese<br />
f . = Anno corrente<br />
5 . Premere per accettare la selezione e spostare la freccia<br />
sulla riga inferiore .<br />
6 . Premere / e per modificare il valore<br />
selezionato .<br />
7 . Premere per accettare la selezione e spostare la freccia<br />
sulla riga superiore .<br />
8 . Ripetere le fasi 3-7 per modificare le impostazioni di data e<br />
ora secondo necessità .<br />
9 . Premere per tornare alla modalità misurazione .<br />
Thermo Scientific <strong>Orion</strong> <strong>Star</strong> <strong>and</strong> <strong>Star</strong> <strong>Plus</strong> Series <strong>Meter</strong> User Guide<br />
Menu Setup<br />
IT-19
Menu Setup<br />
Selezione di misurazione continua, temporizzata o di AUTO-<br />
READ <br />
La tabella seguente descrive più approfonditamente le abbreviazioni che appaiono<br />
sulla schermata .<br />
Descrizione Display Range di valori Valore<br />
predefinito<br />
Selezione della<br />
misurazione continua,<br />
temporizzata o di Auto-<br />
Read<br />
Impostazione lettura<br />
temporizzata<br />
rEAd<br />
tYPE<br />
COnt<br />
rEAd<br />
tInE<br />
00:00<br />
COnt, AUtO, tImE<br />
Temporizzata, continua o<br />
Auto-Read; stampa e log dati<br />
automatici nelle modalità<br />
AUTO e temporizzata<br />
00:05 - 99:61<br />
Letture temporizzate in minuti<br />
e secondi<br />
AUtO Sì<br />
01:00 Sì<br />
Metodo<br />
specifico<br />
Per cambiare le impostazioni, usare semplicemente e / per spostarsi<br />
tra le opzioni . Premendo si confermerà la modifica di un valore termin<strong>and</strong>o la<br />
visualizzazione lampeggiante .<br />
I misuratori <strong>Orion</strong> <strong>Star</strong> Series consentono di selezionare la temporizzazione preferita<br />
degli intervalli di misurazione .<br />
• In modalità continua lo strumento esegue costantemente<br />
misurazioni e aggiorna la schermata . Per stampare e<br />
registrare la misurazione in questa modalità premere .<br />
• In modalità temporizzata lo strumento esegue<br />
costantemente misurazioni, aggiorn<strong>and</strong>o il display, e registra<br />
e stampa automaticamente i dati in base a intervalli di<br />
tempo preselezionati .<br />
• Nel menu setup immettere i minuti e i secondi tra le<br />
letture temporizzate premendo / per cambiare<br />
il valore della cifra lampeggiante . Premere<br />
cambiare la cifra da scorrere .<br />
per<br />
IT-20 Thermo Scientific <strong>Orion</strong> <strong>Star</strong> <strong>and</strong> <strong>Star</strong> <strong>Plus</strong> Series <strong>Meter</strong> User Guide
• L'intervallo di tempo minimo è di 5 secondi . Intervalli di<br />
tempo accettabili sono: –<br />
• In modalità AUTO-READ lo strumento avvia una misurazione<br />
ogni volta che è premuto . Qu<strong>and</strong>o la lettura si stabilizza,<br />
il display si blocca mentre i dati sono automaticamente<br />
registrati e stampati .<br />
• La modalità AUTO-READ aziona anche automaticamente<br />
il controllo dell’agitatore che arresta l’agitazione<br />
qu<strong>and</strong>o la lettura diventa stabile . Per regolare la<br />
velocità dell'agitatore, premere<br />
selezionare:<br />
. Us<strong>and</strong>o /<br />
AUTO-READ<br />
Thermo Scientific <strong>Orion</strong> <strong>Star</strong> <strong>and</strong> <strong>Star</strong> <strong>Plus</strong> Series <strong>Meter</strong> User Guide<br />
Menu Setup<br />
IT-21
Menu Setup<br />
Selezione delle modalità di misurazione<br />
In modalità misurazione la freccia sul lato sinistro della schermata indica la modalità<br />
selezionata . Usare / per scorrere le varie modalità associate a una data<br />
riga . Usare per spostare la freccia verso la riga successiva, quindi alternare<br />
/ per scorrere le varie modalità associate alla riga selezionata .<br />
pH<br />
mV<br />
Rel mV<br />
ISE<br />
Off<br />
μS/cm o mS/cm per la conducibilità<br />
mg/L per TDS<br />
ppt per la salinità<br />
MΩ-cm per la resistività<br />
Off<br />
%Sat per la saturazione percentuale OD<br />
mg/L per la concentrazione OD<br />
Pressione barometrica<br />
Off<br />
Per informazioni di setup relative a tecniche specifiche, consultare dal Capitolo VI<br />
al Capitolo IX del presente manuale .<br />
IT-22 Thermo Scientific <strong>Orion</strong> <strong>Star</strong> <strong>and</strong> <strong>Star</strong> <strong>Plus</strong> Series <strong>Meter</strong> User Guide
Impostazione della calibrazione<br />
Il simbolo indica la modalità calibrazione o il setup della calibrazione .<br />
Prima di iniziare una calibrazione, preparare l'elettrodo o la sonda in base alle<br />
istruzioni ricevute con l'elettrodo . Anche i campioni di riferimento, i tamponi di<br />
calibrazione o i manicotti di calibrazione devono essere preparati prima della<br />
calibrazione . Collegare l’elettrodo o la sonda al misuratore dopo averli preparati<br />
seguendo le istruzioni del produttore . Le informazioni base sulla corretta calibrazione<br />
per ogni tecnica di misurazione sono disponibili nelle sezioni appropriate .<br />
Navigazione generale per selezionare la calibrazione<br />
1 . In modalità misurazione premere finché la freccia sulla sinistra della<br />
schermata è puntata verso la modalità di misurazione da calibrare:<br />
pH, ORP, ISE • Conducibilità • OD<br />
2 . Premere / fino all’accensione dell’icona appropriata per la modalità di<br />
misurazione da calibrare .<br />
A - pH/ORP/ISE<br />
Icona pH - calibrazione pH<br />
Icona RmV - Calibrazione ORP<br />
Icona ISE o nessuna icona - Calibrazione ISE<br />
B - Calibrazione della conducibilità<br />
Icona mS/cm, μS/cm, mg/L, ppt e MΩ-cm<br />
C - Calibrazione OD<br />
Icona % sat o mg/L<br />
Nessuna icona - Calibrazione barometro<br />
3 . Quindi premere per iniziare la calibrazione selezionata .<br />
Thermo Scientific <strong>Orion</strong> <strong>Star</strong> <strong>and</strong> <strong>Star</strong> <strong>Plus</strong> Series <strong>Meter</strong> User Guide<br />
Menu Setup<br />
IT-23
NOTE<br />
IT-24 Thermo Scientific <strong>Orion</strong> <strong>Star</strong> <strong>and</strong> <strong>Star</strong> <strong>Plus</strong> Series <strong>Meter</strong> User Guide
Capitolo VI<br />
Tecnica del pH<br />
Setup del pH<br />
La tabella seguente descrive il setup del pH .<br />
Descrizione Display Range di valori Valore Metodo<br />
predefinito specifico<br />
Risoluzione del pH PH<br />
rES<br />
0.01<br />
0,1; 0,01; 0,001 0,01 Sì<br />
Regolazione<br />
tamponi pH<br />
PH<br />
bUF<br />
USA<br />
USA (tamponi USA)<br />
1,68; 4,01; 7,00; 10,01; 12,46<br />
EUrO (tamponi Euro)<br />
1,68; 4,01; 6,86; 9,18<br />
1 . In modalità misurazione premere .<br />
Thermo Scientific <strong>Orion</strong> <strong>Star</strong> <strong>and</strong> <strong>Star</strong> <strong>Plus</strong> Series <strong>Meter</strong> User Guide<br />
USA Sì<br />
2 . Premere / per scorrere il menu setup finché sulla<br />
riga superiore è visualizzato .<br />
3 . Premere per confermare l’impostazione e spostare la<br />
freccia al centro .<br />
4 . Premere / per selezionare per risoluzione .<br />
5 . Premere per selezionare l’opzione e spostare la freccia<br />
sulla riga inferiore .<br />
a . Usare / per impostare la risoluzione desiderata .<br />
IT-25
Tecnica del pH<br />
6 . Premere per accettare la selezione e spostare la freccia<br />
sulla riga superiore .<br />
7 . Premere per passare alla riga centrale, premere /<br />
per selezionare per l’impostazione di Auto-Buffer<br />
e premere nuovamente per passare alla riga inferiore .<br />
8 . Premere / per selezionare o ; premere<br />
per accettare la selezione .<br />
9 . Premere per tornare alla modalità misurazione .<br />
IT-26 Thermo Scientific <strong>Orion</strong> <strong>Star</strong> <strong>and</strong> <strong>Star</strong> <strong>Plus</strong> Series <strong>Meter</strong> User Guide
Calibrazione del pH<br />
1 . Preparare l'elettrodo per l'uso in base alle istruzioni ricevute con l’elettrodo .<br />
2 . In modalità setup selezionare l'impostazione del tampone NIST ( ) o DIN<br />
( ) usata per consentire il riconoscimento del tampone corretto, se non<br />
impostata precedentemente .<br />
3 . Premere finché la freccia è rivolta verso la riga della misurazione del pH .<br />
4 . Premere .<br />
5 . Risciacquare l’elettrodo e la sonda ATC e collocarli nel tampone .<br />
6 . Attendere che pH smetta di lampeggiare .<br />
a . Riconoscimento Auto-Buffer - Qu<strong>and</strong>o pH smette di lampeggiare il<br />
misuratore visualizzerà il valore del pH corretto in base alla temperatura del<br />
tampone .<br />
b . Calibrazione manuale - Qu<strong>and</strong>o pH smette di lampeggiare il misuratore<br />
visualizzerà il valore effettivo del tampone letto dall’elettrodo del pH . Usare<br />
e / per cambiare il valore del pH in base al valore del pH<br />
corretto in base alla temperatura del tampone .<br />
7 . Una volta che sul display del misuratore è visualizzato il valore corretto del<br />
tampone, premere per passare al punto di calibrazione successivo e<br />
ripetere le fasi da 5 a 6 oppure premere per salvare la calibrazione .<br />
8 . Lo slope sarà visualizzato prima che il misuratore torni in modalità misurazione .<br />
appare nel campo inferiore mentre lo slope corrente dell'elettrodo, in<br />
percentuale, appare nel campo principale .<br />
a . In una calibrazione a 1 punto, usare e / per modificare lo slope<br />
quindi premere per tornare alla modalità misurazione .<br />
b . Per una calibrazione a 2 o più punti, il misuratore passerà automaticamente<br />
alla misurazione dopo 2 secondi dalla visualizzazione di .<br />
Thermo Scientific <strong>Orion</strong> <strong>Star</strong> <strong>and</strong> <strong>Star</strong> <strong>Plus</strong> Series <strong>Meter</strong> User Guide<br />
Tecnica del pH<br />
IT-27
Tecnica del pH<br />
Misurazioni del pH<br />
1 . Risciacquare l'elettrodo in acqua deionizzata . Eliminare l’eventuale acqua in<br />
eccesso e asciugare con un panno senza pelucchi .<br />
2 . Collocare l'elettrodo nel campione .<br />
a . Se si è in modalità misurazione continua, lo strumento inizierà la misurazione<br />
immediatamente . Se si usa il misuratore da banco e il controllo dell'agitatore<br />
è disabilitato, premere per avviare l'agitatore . pH lampeggerà finché<br />
la lettura è stabile . Una volta che la lettura è stabile, è possibile registrare e<br />
stampare la misurazione premendo . Se l'agitatore è acceso, premere<br />
per spegnere l'agitatore prima di rimuoverlo dal campione .<br />
b . In modalità AUTO-READ premere per avviare la misurazione . Qu<strong>and</strong>o<br />
la lettura si stabilizza, il misuratore registrerà e stamperà automaticamente<br />
i risultati e congelerà il display . Se l'agitatore è abilitato, l'agitatore si<br />
accenderà qu<strong>and</strong>o è premuto e si spegnerà una volta che la lettura si è<br />
stabilizzata .<br />
c . In modalità misurazione temporizzata il misuratore inizierà a effettuare le<br />
misurazioni alla frequenza specificata durante il setup . Registrerà e stamperà<br />
automaticamente ogni misurazione . Se si usa il misuratore da banco e<br />
il controllo dell'agitatore è abilitato, premere per avviare l'agitatore .<br />
Premere di nuovo per spegnere l'agitatore .<br />
3 . Rimuovere l'elettrodo dal campione e sciacquarlo con acqua deionizzata,<br />
scuoterlo o asciugarlo, quindi collocarlo nel campione successivo e ripetere la<br />
fase 2 .<br />
4 . Qu<strong>and</strong>o tutti i campioni sono stati misurati, sciacquare l'elettrodo con acqua<br />
deionizzata e asciugarlo . Quindi consultare le istruzioni fornite nel manuale<br />
dell'elettrodo per riporlo correttamente .<br />
IT-28 Thermo Scientific <strong>Orion</strong> <strong>Star</strong> <strong>and</strong> <strong>Star</strong> <strong>Plus</strong> Series <strong>Meter</strong> User Guide
Capitolo VII<br />
Tecnica dell'ossigeno disciolto<br />
Setup dell'OD<br />
La tabella seguente descrive il setup dell'ossigeno disciolto .<br />
Descrizione Display Range di valori Valore<br />
predefinito<br />
Ossigeno disciolto,<br />
risoluzione saturazione %<br />
Ossigeno disciolto,<br />
risoluzione concentrazione<br />
Ossigeno disciolto,<br />
selezione compensazione<br />
pressione barometrica<br />
Ossigeno disciolto,<br />
impostazione pressione<br />
barometrica manuale<br />
Ossigeno disciolto,<br />
selezione correzione salinità<br />
Ossigeno disciolto, fattore<br />
di correzione salinità<br />
manuale<br />
Ossigeno disciolto,<br />
selezione del tipo di<br />
calibrazione<br />
dO<br />
rES<br />
0.1<br />
dO<br />
rES<br />
0.01<br />
dO<br />
bAr<br />
AUtO<br />
dO<br />
PrES<br />
760.0<br />
dO<br />
SAL<br />
AUtO<br />
dO<br />
SALF<br />
0<br />
dO<br />
CALt<br />
AIr<br />
1; 0,1<br />
Risoluzione saturazione %<br />
OD<br />
0,1; 0,01<br />
Risoluzione “mg/L”<br />
concentrazione OD<br />
AUtO, mAn<br />
Seleziona il barometro<br />
interno o la pressione<br />
manuale<br />
450,0 - 850,0<br />
Valore di compensazione<br />
pressione manuale<br />
AUtO, mAn<br />
Seleziona il metodo di<br />
correzione della salinità;<br />
solo misuratori con Cond.<br />
0 - 45<br />
Fattore di correzione salinità<br />
manuale<br />
AIr, H2O, mAn, SEt0<br />
AIr = Aria sat. d’acqua,<br />
H2O = Acqua sat. d’aria,<br />
mAn = Manuale,<br />
SEt0 = Cal. zero<br />
Thermo Scientific <strong>Orion</strong> <strong>Star</strong> <strong>and</strong> <strong>Star</strong> <strong>Plus</strong> Series <strong>Meter</strong> User Guide<br />
0,1 Sì<br />
0,01 Sì<br />
AUtO Sì<br />
760,0 Sì<br />
AUtO Sì<br />
0 Sì<br />
AIr Sì<br />
Metodo<br />
specifico<br />
IT-29
Tecnica dell'ossigeno disciolto<br />
Fasi del setup OD<br />
1 . In modalità misurazione premere .<br />
2 . Premere / per scorrere il menu setup finché sulla riga superiore è<br />
visualizzato .<br />
3 . Premere per confermare l’impostazione e spostare la freccia sulla riga<br />
centrale .<br />
4 . Premere / per scorrere tra:<br />
a . + % Sat = Risoluzione saturazione %<br />
b . + mg/L = Risoluzione concentrazione<br />
c . = Tipo di barometro (Auto/Manuale)<br />
d . = Compensazione pressione manuale<br />
e . = Compensazione salinità automatica/manuale<br />
f . = Correzione salinità manuale<br />
g . = Tipo di calibrazione<br />
5 . Premere per selezionare l’opzione e spostare la freccia sulla riga inferiore .<br />
6 . Premere / e per immettere il valore . La tabella seguente identifica<br />
ciò che apparirà sul display e il range di valori che si possono immettere .<br />
7 . Dopo l’immissione di un valore, premere per completare la programmazione<br />
di quell’opzione e spostare la freccia sulla riga superiore . Ripetere le fasi da 3 a 6<br />
per tutte le opzioni .<br />
8 . Premere per tornare alla modalità misurazione .<br />
IT-30 Thermo Scientific <strong>Orion</strong> <strong>Star</strong> <strong>and</strong> <strong>Star</strong> <strong>Plus</strong> Series <strong>Meter</strong> User Guide
Calibrazione dell’OD<br />
Prima della calibrazione la sonda deve essere preparata e polarizzata .<br />
• La sonda OD è polarizzata in continuo qu<strong>and</strong>o è collegata al misuratore . Al primo<br />
collegamento, o se la sonda è stata scollegata da più di 60 minuti, ricollegarla e<br />
attendere da 30 a 60 minuti per la polarizzazione . Se le letture della sonda sono<br />
stabili, interruzioni del collegamento di meno di un’ora richiederanno da 5 a 25<br />
minuti affinché le letture si stabilizzino nuovamente .<br />
Nota: I misuratori <strong>Star</strong> forniranno una corrente di polarizzazione alla sonda OD<br />
anche con l’alimentazione disinserita. Per massimizzare la vita della batteria nel<br />
misuratore, staccare la sonda OD se si prevede di non utilizzarla per un periodo<br />
prolungato. s<br />
• Azzeramento della sonda - Una sonda OD può generare un errore positivo da 0 .02<br />
a 0 .05 mg/L in una soluzione priva di ossigeno . Se questo errore è inaccettabile,<br />
azzerare la sonda qu<strong>and</strong>o si utilizza una nuova membrana di rilevamento,<br />
impieg<strong>and</strong>o una soluzione di riempimento fresca, o con una misurazione<br />
dell'ossigeno disciolto inferiore a 1 mg/L o a una saturazione del 10% .<br />
Si dovrebbe eseguire una calibrazione in aria prima della calibrazione zero .<br />
1 . In modalità misurazione premere .<br />
2 . Premere / finché appare sulla riga superiore .<br />
3 . Premere per confermare l’impostazione e spostare la freccia sulla riga<br />
centrale .<br />
4 . Premere / per scorrere a .<br />
5 . Premere per selezionare l’impostazione e spostare la freccia sulla riga<br />
inferiore .<br />
6 . Premere / per selezionare una delle seguenti modalità di calibrazione .<br />
a . indica la calibrazione eseguita in aria satura d'acqua us<strong>and</strong>o il<br />
manicotto per calibrazione in aria . Questo è il metodo di calibrazione più<br />
Thermo Scientific <strong>Orion</strong> <strong>Star</strong> <strong>and</strong> <strong>Star</strong> <strong>Plus</strong> Series <strong>Meter</strong> User Guide<br />
Tecnica dell'ossigeno disciolto<br />
IT-31
Tecnica dell'ossigeno disciolto<br />
semplice e accurato . É anche la modalità predefinita del misuratore . Se la<br />
selezione della calibrazione in non è stata modificata, premendo si<br />
effettuerà automaticamente una calibrazione in aria . A causa delle differenze<br />
intrinseche tra aria satura d'acqua e acqua satura d'aria, alla stabilità, il valore<br />
di riferimento dell'aria è impostato al 102 .3% di saturazione .<br />
i . Si raggiunge la massima accuratezza possibile qu<strong>and</strong>o la temperatura di<br />
calibrazione è uguale alla temperatura di misurazione .<br />
ii . Inumidire con acqua distillata la spugna o il panno assorbente nel<br />
manicotto di calibrazione e inserire la sonda nel manicotto, ma senza<br />
toccare il materiale saturo d'acqua . Per le misurazioni BOD, questa<br />
calibrazione può essere eseguita in una bottiglia BOD .<br />
iii . Per livelli di ossigeno inferiori a 1 mg/L, è spesso necessario un punto di<br />
calibrazione zero .<br />
b . indica una calibrazione in acqua eseguita us<strong>and</strong>o un campione d'acqua<br />
saturo d'aria al 100% . Si tratta del metodo di calibrazione usato meno di<br />
frequente .<br />
c . indica una calibrazione manuale us<strong>and</strong>o un campione d'acqua con una<br />
concentrazione nota di ossigeno disciolto . Può essere usata per calibrare il<br />
sensore al valore ottenuto mediante una titolazione Winkler .<br />
i . Una calibrazione Winkler prevede l'esecuzione di una titolazione Winkler<br />
manuale e quindi l'utilizzo di quel campione come riferimento . Il risultato<br />
del livello di ossigeno della titolazione è immesso in una calibrazione<br />
Winkler come il valore OD di riferimento . Ciò è correlato al valore<br />
immesso del misuratore nella titolazione Winkler . Notare che questo<br />
metodo è intrinsecamente meno accurato a causa della possibilità di errori<br />
di titolazione introdotti qu<strong>and</strong>o la calibrazione è impostata sui risultati della<br />
prova di titolazione .<br />
d . è una calibrazione zero, usata per misurazioni di bassissimi livelli di<br />
OD . Non è in genere necessaria se non si effettuano misurazioni inferiori al<br />
5% di saturazione o a 0 .5 mg/L .<br />
IT-32 Thermo Scientific <strong>Orion</strong> <strong>Star</strong> <strong>and</strong> <strong>Star</strong> <strong>Plus</strong> Series <strong>Meter</strong> User Guide
7 . Premere per accettare la selezione e riportare la freccia sulla riga superiore .<br />
8 . Premere per tornare alla modalità misurazione .<br />
9 . Si dovrebbe consentire alla sonda e al riferimento di calibrazione (aria satura<br />
d'acqua o acqua satura d'aria) di raggiungere l'equilibrio prima di calibrare il<br />
sistema .<br />
a . Premere .<br />
b . Attendere che la lettura si stabilizzi .<br />
c . Il misuratore visualizzerà 102 .3% e tornerà alla modalità misurazione .<br />
Misurazioni dell’OD<br />
1 . Risciacquare la sonda OD, e l’agitatore se è stato utilizzato, in acqua deionizzata .<br />
Asciugare con un panno privo di pelucchi .<br />
2 . Inserire la sonda OD nel campione .<br />
a . Se si è in modalità misurazione continua, lo strumento inizierà la misurazione<br />
immediatamente . Se si usa il misuratore da banco e il controllo dell'agitatore<br />
è abilitato, premere per avviare l'agitatore .<br />
lampeggerà finché la lettura si stabilizza . Una volta che la lettura è stabile,<br />
è possibile registrare e stampare la misurazione premendo . Se si stanno<br />
registr<strong>and</strong>o i dati in un notebook, registrare l’OD e la temperatura alla quale è<br />
effettuata la lettura dell’OD . Se l'agitatore è in movimento, premere per<br />
spegnere l'agitatore prima di rimuoverlo dal campione .<br />
Thermo Scientific <strong>Orion</strong> <strong>Star</strong> <strong>and</strong> <strong>Star</strong> <strong>Plus</strong> Series <strong>Meter</strong> User Guide<br />
Tecnica dell'ossigeno disciolto<br />
IT-33
Tecnica dell'ossigeno disciolto<br />
b . In modalità AUTO-READ premere per avviare la misurazione . Qu<strong>and</strong>o<br />
la lettura si stabilizza, il misuratore registrerà e stamperà automaticamente i<br />
risultati e congelerà il display . Se l'agitatore è abilitato, si accenderà qu<strong>and</strong>o<br />
è premuto e si spegnerà una volta che la lettura si è stabilizzata .<br />
In caso di utilizzo della sonda BOD AutoStir, premere il pulsante sulla<br />
sonda per avviare la misurazione AUTO-READ .<br />
c . In modalità misurazione temporizzata il misuratore inizierà a effettuare le<br />
misurazioni non appena passa in modalità misurazione secondo la frequenza<br />
selezionata nel setup . Registrerà e stamperà automaticamente ogni<br />
misurazione . Se si usa il misuratore da banco e il controllo dell'agitatore è<br />
abilitato, premere per avviare l'agitatore . Premere di nuovo per<br />
spegnere l'agitatore .<br />
3 . Rimuovere la sonda OD dal campione e sciacquarlo con acqua deionizzata,<br />
quindi collocarlo nel campione successivo e ripetere la fase 2 .<br />
4 . Qu<strong>and</strong>o tutti i campioni sono stati misurati, sciacquare l'elettrodo con acqua<br />
deionizzata e asciugarlo . Quindi consultare le istruzioni fornite nel manuale della<br />
sonda OD per riporla correttamente .<br />
IT-34 Thermo Scientific <strong>Orion</strong> <strong>Star</strong> <strong>and</strong> <strong>Star</strong> <strong>Plus</strong> Series <strong>Meter</strong> User Guide
Capitolo VIII<br />
Tecnica della conducibilità<br />
Setup della conducibilità<br />
Descrizione Display Range di valori Valore<br />
predefinito<br />
Selezione compensazione<br />
temperatura<br />
conducibilità<br />
Impostazione coefficiente<br />
compensazione della<br />
temperatura<br />
lineare conducibilità<br />
Impostazione fattore TDS<br />
conducibilità<br />
Impostazione costantedi<br />
cella predefinita<br />
autocalibrazione<br />
conducibilità<br />
Selezione temperatura<br />
di riferimento conducibilità<br />
Selezione tipo di celle e<br />
range manuale conducibilità<br />
COnd<br />
tC<br />
LIn<br />
COnd<br />
COEF<br />
2.1<br />
COnd<br />
tdSF<br />
0.49<br />
COnd<br />
CELL<br />
0.475<br />
COnd<br />
trEF<br />
25<br />
COnd<br />
tYPE<br />
Std<br />
1 . In modalità misurazione premere .<br />
OFF, LIn, nLF<br />
Seleziona Comp. temp. OFF,<br />
lineare, o non lineare per<br />
acqua naturale ultra-pura<br />
0,0 - 10,0<br />
Coefficiente compensazione<br />
temp.<br />
lineare in %/C<br />
0,00 - 10,0<br />
Fattore TDS<br />
0,001 - 199,0<br />
Costante di cella usata per<br />
riferimento automatico cond.<br />
15, 20, 25<br />
Temperatura di riferimento<br />
conducibilità ˚C<br />
PLnr, Std, 1, 2, 3, 4, 5, 6, 7<br />
Celle cond. st<strong>and</strong>ard, planari<br />
o imposta range manuale 1-7<br />
Thermo Scientific <strong>Orion</strong> <strong>Star</strong> <strong>and</strong> <strong>Star</strong> <strong>Plus</strong> Series <strong>Meter</strong> User Guide<br />
LIn Sì<br />
2,1 Sì<br />
0,49 Sì<br />
0,475 Sì<br />
25 Sì<br />
Std Sì<br />
2 . Premere / per scorrere il menu setup finché sulla riga superiore è<br />
visualizzato .<br />
Metodo<br />
specifico<br />
IT-35
Tecnica della conducibilità<br />
3 . Premere per accettare la selezione e spostare la freccia sulla riga centrale .<br />
4 . Premere / per scorrere le seguenti impostazioni della conducibilità:<br />
• = Selezione compensazione temperatura . Gli utenti possono<br />
scegliere di disattivare la compensazione della temperatura<br />
, selezionare la compensazione della temperatura lineare o<br />
una compensazione della temperatura non lineare per acqua<br />
naturale e ultra-pura .<br />
• = Coefficiente di temperatura per la compensazione della temp .<br />
lineare espresso in % /C .<br />
• = Fattore TDS per la misurazione dei solidi totali disciolti<br />
• = Costante di cella di conducibilità (costante di cella nominale usata<br />
per l’Auto-Calibrazione)<br />
• = Temperatura di riferimento per la compensazione della<br />
temperatura . Le opzioni sono gradi C, gradi C o gradi C .<br />
• = Tipo di cella di conducibilità (planare o convenzionale)<br />
5 . Premere per accettare la selezione e spostare la freccia sulla riga inferiore .<br />
6 . Premere / e per modificare il valore .<br />
7 . Premere per accettare la selezione e spostare la freccia sulla riga superiore .<br />
8 . Ripetere le fasi 3-7 per modificare le impostazioni della conducibilità secondo<br />
necessità .<br />
9 . Premere per tornare alla modalità misurazione .<br />
IT-36 Thermo Scientific <strong>Orion</strong> <strong>Star</strong> <strong>and</strong> <strong>Star</strong> <strong>Plus</strong> Series <strong>Meter</strong> User Guide
Calibrazione della conducibilità<br />
1 . Preparare la sonda per l’uso in base alla guida per l’utente della sonda o al<br />
manuale dell’operatore .<br />
2 . In modalità misurazione premere finché la freccia è rivolta verso la riga di<br />
misurazione della conducibilità .<br />
3 . Premere .<br />
4 . Risciacquare la sonda e collocarla nel riferimento della conducibilità .<br />
5 . Esecuzione di una calibrazione manuale - La schermata visualizzerà la costante<br />
di cella sulla riga inferiore e il valore della conducibilità sulla riga centrale .<br />
Usare e / per cambiare la costante di cella finché il valore della<br />
conducibilità visualizzato corrisponde alla conducibilità del riferimento alla<br />
temperatura misurata .<br />
• Se non si inizia a cambiare la costante di cella entro 5 secondi, il misuratore<br />
passerà automaticamente alla schermata AutoCal/DirectCal .<br />
6 . Esecuzione di una calibrazione AutoCal o DirectCal - Attendere che l’icona µS/<br />
cm o mS/cm smetta di lampeggiare .<br />
• AutoCal - Qu<strong>and</strong>o l’icona µS/cm o mS/cm smette di lampeggiare, il<br />
misuratore visualizzerà il valore corretto in base alla temperatura del<br />
riferimento della conducibilità .<br />
• DirectCal - Qu<strong>and</strong>o l’icona µS/cm o mS/cm smette di lampeggiare, il<br />
misuratore visualizzerà il valore della conducibilità attuale letto dalla sonda<br />
della conducibilità . Usare e / per cambiare il valore della<br />
conducibilità in base al valore attuale del riferimento della conducibilità alla<br />
temperatura misurata .<br />
Thermo Scientific <strong>Orion</strong> <strong>Star</strong> <strong>and</strong> <strong>Star</strong> <strong>Plus</strong> Series <strong>Meter</strong> User Guide<br />
Tecnica della conducibilità<br />
IT-37
Tecnica della conducibilità<br />
7 . Premere per passare al punto di calibrazione successivo e ripetere le fasi da<br />
4 a 6 o premere per salvare e terminare la calibrazione .<br />
8 . Dopo l'immissione del valore dell'ultimo riferimento, sarà visualizzata<br />
automaticamente la costante di cella, appare nel campo inferiore<br />
mentre la costante attuale appare in quello centrale . Il misuratore passa<br />
automaticamente alla modalità misurazione . Il simbolo è visualizzato sopra il<br />
campo principale .<br />
IT-38 Thermo Scientific <strong>Orion</strong> <strong>Star</strong> <strong>and</strong> <strong>Star</strong> <strong>Plus</strong> Series <strong>Meter</strong> User Guide
Misurazione della conducibilità<br />
1 . Risciacquare la sonda della conducibilità e collocarla nel campione . Registrare<br />
la conducibilità direttamente dal display principale del misuratore qu<strong>and</strong>o<br />
l'icona mS/cm o µS/cm smette di lampeggiare indic<strong>and</strong>o un valore stabile . La<br />
temperatura è visualizzata nell'angolo superiore sinistro del display .<br />
2a . Se si è in modalità misurazione continua, lo strumento inizierà la misurazione<br />
immediatamente . Se si usa il misuratore da banco e il controllo dell'agitatore è<br />
abilitato, premere per avviare l'agitatore .<br />
lampeggerà finché la lettura si stabilizza . Una volta che la lettura è stabile,<br />
è possibile registrare e stampare la misurazione premendo . Se si stanno<br />
registr<strong>and</strong>o i dati in un notebook, registrare la conducibilità e la temperatura alla<br />
quale è effettuata la lettura della conducibilità . Se l'agitatore è in movimento,<br />
premere per spegnere l'agitatore prima di rimuoverlo dal campione .<br />
2b . In modalità AUTO-READ premere per avviare la misurazione . Qu<strong>and</strong>o<br />
la lettura si stabilizza, il misuratore registrerà e stamperà automaticamente i<br />
risultati e congelerà il display . Se l'agitatore è abilitato, si accenderà qu<strong>and</strong>o è<br />
premuto e si spegnerà una volta che la lettura si è stabilizzata .<br />
2c . In modalità misurazione temporizzata il misuratore inizierà a effettuare le<br />
misurazioni non appena passa in modalità misurazione secondo la frequenza<br />
selezionata nel setup . Registrerà e stamperà automaticamente ogni misurazione .<br />
Se si usa il misuratore da banco e il controllo dell'agitatore è abilitato, premere<br />
per avviare l'agitatore . Premere di nuovo per spegnere l'agitatore .<br />
Thermo Scientific <strong>Orion</strong> <strong>Star</strong> <strong>and</strong> <strong>Star</strong> <strong>Plus</strong> Series <strong>Meter</strong> User Guide<br />
Tecnica della conducibilità<br />
IT-39
Tecnica della conducibilità<br />
3 . Rimuovere la sonda della conducibilità dal campione e sciacquarla con acqua<br />
deionizzata, quindi collocarla nel campione successivo e ripetere la fase 2 .<br />
4 . Qu<strong>and</strong>o tutti i campioni sono stati misurati, sciacquare la sonda della<br />
conducibilità con acqua deionizzata e asciugarla . Quindi consultare le istruzioni<br />
fornite nel manuale della sonda della conducibilità per riporla correttamente .<br />
IT-40 Thermo Scientific <strong>Orion</strong> <strong>Star</strong> <strong>and</strong> <strong>Star</strong> <strong>Plus</strong> Series <strong>Meter</strong> User Guide
Capitolo IX<br />
Tecnica ISE<br />
Setup ISE<br />
Descrizione Display Range di valori Valore Metodo<br />
predefinito specifico<br />
Risoluzione ISE ISE 1, 2, 3<br />
1 Sì<br />
rES Risoluzione ISE in<br />
1<br />
cifre significative<br />
Unità ISE ISE M, mG/L, PEr, PPb, nOnE PPb Sì<br />
UnIt<br />
PPb<br />
Unità ISE visualizzate<br />
Range concentrazione ISE LOw, HIgH<br />
HIgH Sì<br />
st<strong>and</strong>ard calibrazione ISE rAng<br />
HIgH<br />
Criteri di stabilità usati<br />
durante la calibrazione ISE<br />
Correzione Auto-Blank ISE ISE AUtO, OFF<br />
AUtO Sì<br />
nLIn Abilita o disabilita<br />
AUtO<br />
Auto-Blank calibrazione<br />
1 . In modalità misurazione premere .<br />
2 . Premere / per scorrere il menu setup finché sulla riga superiore è<br />
visualizzato .<br />
3 . Premere per accettare la selezione e passare alla riga centrale .<br />
Thermo Scientific <strong>Orion</strong> <strong>Star</strong> <strong>and</strong> <strong>Star</strong> <strong>Plus</strong> Series <strong>Meter</strong> User Guide<br />
IT-41
Tecnica ISE<br />
4 . Premere / per scorrere le seguenti opzioni:<br />
• = Risoluzione<br />
• = Unità misurazione ISE<br />
• M = Molare<br />
• mG/L = mg/L<br />
• PEr = Percentuale<br />
• PPb = Parti per miliardo<br />
• nOnE = Nessuna unità<br />
• = Range calibrazione ISE<br />
• HIgH - per la maggior parte delle misurazioni<br />
• LOw - per misurazioni di basso livello che richiedono più tempo per la<br />
stabilizzazione<br />
• = Correzione bianco non-lineare<br />
• OFF<br />
• AUtO<br />
5 . Premere per accettare la selezione e spostare la freccia sulla riga inferiore .<br />
6 . Premere / e per modificare il valore selezionato .<br />
7 . Premere per accettare la selezione e riportare la freccia sulla riga superiore .<br />
8 . Ripetere le fasi da 3 a 7 per modificare le impostazioni ISE secondo necessità .<br />
9 . Premere per tornare alla modalità misurazione .<br />
IT-42 Thermo Scientific <strong>Orion</strong> <strong>Star</strong> <strong>and</strong> <strong>Star</strong> <strong>Plus</strong> Series <strong>Meter</strong> User Guide
Preparazione dei riferimenti<br />
I riferimenti dovrebbero essere preparati nelle stesse unità ISE richieste dai risultati<br />
dei campioni . Usare di preferenza diluizioni seriali con recipienti di vetro volumetrici<br />
per ottenere i diversi livelli di concentrazione .<br />
Nota: eventuali reagenti come i correttori di forza ionica dovrebbero essere aggiunti<br />
ai campioni e ai riferimenti come specificato nella Guida per l’utente dell’elettrodo o<br />
nel Manuale di istruzioni. s<br />
I punti di calibrazione dovrebbero comprendere il range di concentrazione previsto<br />
dei campioni e ci dovrebbe essere una variazione di dieci volte nella concentrazione<br />
(cioè 1 ppm e 10 ppm o 10 ppm e 100 ppm) .<br />
Aliquote fresche del riferimento devono essere usate in ogni calibrazione .<br />
Thermo Scientific <strong>Orion</strong> <strong>Star</strong> <strong>and</strong> <strong>Star</strong> <strong>Plus</strong> Series <strong>Meter</strong> User Guide<br />
Tecnica ISE<br />
IT-43
Tecnica ISE<br />
Calibrazione ISE<br />
1 . Preparare l’elettrodo e il riferimento per l’uso secondo quanto indicato nella<br />
guida per l’utente dell’elettrodo o nel manuale di istruzioni .<br />
2 . Premere finché la freccia è rivolta verso la riga della misurazione ISE .<br />
3 . Premere .<br />
4 . Sciacquare l’elettrodo, rimuovere l’eventuale acqua deionizzata in eccesso,<br />
asciugarlo e collocarlo nel riferimento meno concentrato .<br />
5 . Attendere che ISE smetta di lampeggiare . Premere<br />
modificare il valore del riferimento .<br />
/ e per<br />
6 . Premere per passare al successivo riferimento di calibrazione più basso e<br />
ripetere le fasi 4-5, pass<strong>and</strong>o dalla concentrazione più bassa a quella più alta, o<br />
premere per salvare la calibrazione .<br />
7 . Lo slope sarà visualizzato prima che il misuratore torni in modalità misurazione .<br />
appare nel campo inferiore mentre lo slope corrente dell'elettrodo, in mV,<br />
appare nel campo principale .<br />
Nota: Per una calibrazione a 2 o più punti, il misuratore passerà automaticamente<br />
alla modalità misurazione dopo 3 secondi. In una calibrazione a 1 punto, il<br />
misuratore consentirà di modificare lo slope, quindi premere per passare<br />
alla modalità misurazione. s<br />
Nota: in caso di modifica di un numero di slope negativo: s<br />
a. Premere finché non lampeggia alcuna cifra mentre lampeggia la<br />
freccia.<br />
b. Premere / per cambiare il segno dello slope.<br />
c. Premere per salvare.<br />
IT-44 Thermo Scientific <strong>Orion</strong> <strong>Star</strong> <strong>and</strong> <strong>Star</strong> <strong>Plus</strong> Series <strong>Meter</strong> User Guide
Misurazioni ISE<br />
Dopo la calibrazione, l'elettrodo e il misuratore sono pronti per iniziare le misurazioni .<br />
Accertare che lo strumento sia in modalità misurazione ( è acceso) e che ISE sia<br />
acceso . Se non è acceso, premere per tornare alla modalità misurazione . Se<br />
ISE non è acceso, premere finché la freccia sulla sinistra del display è rivolta<br />
verso la riga superiore . Quindi premere finché ISE si accende . Ora è possibile<br />
iniziare la misurazione .<br />
1 . Risciacquare l'elettrodo in acqua deionizzata . Eliminare l’eventuale acqua in<br />
eccesso e asciugare con un panno senza pelucchi .<br />
2 . Collocare l'elettrodo nel campione .<br />
a . Se si è in modalità misurazione continua, lo strumento inizierà la misurazione<br />
immediatamente . Se si usa il misuratore da banco e il controllo dell'agitatore<br />
è disabilitato, premere per avviare l'agitatore . ISE lampeggerà finché<br />
la lettura è stabile . Una volta che la lettura è stabile, è possibile registrare e<br />
stampare la misurazione premendo . Se l'agitatore è acceso, premere<br />
per spegnere l'agitatore prima di rimuoverlo dal campione .<br />
b . In modalità AUTO-READ premere per avviare la misurazione . Qu<strong>and</strong>o<br />
la lettura si stabilizza, il misuratore registrerà e stamperà automaticamente<br />
i risultati e congelerà il display . Se l'agitatore è abilitato, l'agitatore si<br />
accenderà qu<strong>and</strong>o è premuto e si spegnerà una volta che la lettura si è<br />
stabilizzata .<br />
c . In modalità misurazione temporizzata il misuratore inizierà a effettuare le<br />
misurazioni alla frequenza specificata durante il setup . Registrerà e stamperà<br />
automaticamente ogni misurazione . Se si usa il misuratore da banco e<br />
il controllo dell'agitatore è abilitato, premere per avviare l'agitatore .<br />
Premere di nuovo per spegnere l'agitatore .<br />
Thermo Scientific <strong>Orion</strong> <strong>Star</strong> <strong>and</strong> <strong>Star</strong> <strong>Plus</strong> Series <strong>Meter</strong> User Guide<br />
Tecnica ISE<br />
IT-45
Tecnica ISE<br />
3 . Rimuovere l'elettrodo dal campione e sciacquarlo con acqua deionizzata,<br />
scuoterlo o asciugarlo, quindi collocarlo nel campione successivo e ripetere la<br />
fase 2 .<br />
4 . Qu<strong>and</strong>o tutti i campioni sono stati misurati, sciacquare l'elettrodo con acqua<br />
deionizzata e asciugarlo . Quindi consultare le istruzioni fornite nel manuale<br />
dell'elettrodo per riporlo correttamente .<br />
IT-46 Thermo Scientific <strong>Orion</strong> <strong>Star</strong> <strong>and</strong> <strong>Star</strong> <strong>Plus</strong> Series <strong>Meter</strong> User Guide
Capitolo X<br />
Termini e condizioni<br />
Generalità<br />
Il Venditore vende all'acquirente (“Acquirente”) i prodotti qui descritti (i “Prodotti”)<br />
a condizione che l'Acquirente accetti e rispetti i termini e le condizioni qui definiti .<br />
Eventuali disposizioni contenute in qualsiasi documento emesso dall'Acquirente sono<br />
espressamente rifiutate e se i termini e le condizioni nel presente Contratto differiscono<br />
dai termini dell'offerta all'Acquirente, il presente documento deve essere considerato<br />
come una controfferta e non costituirà un'accettazione del documento dell'Acquirente .<br />
La consegna dei prodotti all'Acquirente e l'inizio da parte del Venditore dei servizi qui<br />
definiti costituiscono l'accettazione da parte dell'Acquirente del presente Contratto .<br />
La presente è la dichiarazione completa ed esclusiva del contratto tra il Venditore e<br />
l'Acquirente per quanto concerne l'acquisto dei Prodotti da parte dell'Acquirente .<br />
Eventuali rinunce, consensi, modifiche, emendamenti o variazioni dei termini qui<br />
contenuti non saranno vincolanti se non in forma scritta e sottoscritti dal Venditore e<br />
dall'Acquirente . La mancata ricusazione da parte del Venditore dei termini contenuti<br />
in qualsiasi comunicazione successiva da parte dell'Acquirente non rappresenterà<br />
una rinuncia o una modifica dei termini qui definiti . Tutti gli ordini sono soggetti ad<br />
accettazione scritta da parte di un rappresentante autorizzato del Venditore .<br />
Garanzia<br />
La garanzia per i prodotti Thermo Scientific <strong>Orion</strong> copre i guasti dovuti a difetti di<br />
fabbricazione o nei materiali dalla data di acquisto da parte dell'utente . L'utente deve<br />
rispedire la cedola di garanzia e conservare una prova d'acquisto . La garanzia non è<br />
valida se il prodotto è stato usato in modo improprio, in maniera errata o riparato da<br />
persone non autorizzate .<br />
Le garanzie qui indicate sono valide per prodotti venduti/installati da<br />
Thermo Fisher Scientific o dai suoi rivenditori autorizzati.<br />
I prodotti venduti da distributori U .S .A . o Canadesi devono essere rispediti a Thermo<br />
Fisher Scientific per qualsiasi intervento in garanzia . Per ulteriori informazioni,<br />
contattare il nostro reparto di Assistenza Tecnica . Prima di restituire qualsiasi prodotto<br />
Thermo Scientific <strong>Orion</strong> <strong>Star</strong> <strong>and</strong> <strong>Star</strong> <strong>Plus</strong> Series <strong>Meter</strong> User Guide<br />
IT-47
Termini e condizioni<br />
per riparazioni o sostituzioni in garanzia, si deve ricevere un Codice di Autorizzazione<br />
alla Restituzione da parte del Servizio Assistenza Tecnica . Nel caso di guasti entro il<br />
periodo di garanzia, a sua discrezione Thermo Fisher Scientific riparerà o sostituirà<br />
il prodotto non conforme alla presente garanzia . I servizi in garanzia effettuati in<br />
alcuni Paesi, possono richiedere il pagamento di oneri aggiuntivi, incluse le spese<br />
di trasporto . Per l'assistenza, chiamare Thermo Fisher Scientific (o il suo rivenditore<br />
autorizzato al di fuori degli Stati Uniti o del Canada) . Thermo Fisher Scientific si riserva<br />
il diritto di richiedere una prova d'acquisto, come la fattura originale o il talloncino<br />
sull'imballaggio .<br />
Il servizio assistenza sul campo è disponibile per BOD AutoEZ . Contattare il nostro<br />
Servizio Assistenza sul Campo per dettagli su prezzi, servizi e altre attività relative<br />
all'assistenza sul campo .<br />
Si garantisce che i seguenti prodotti sono privi di difetti nei materiali e nella<br />
lavorazione per il periodo indicato sotto, dalla data di acquisto da parte dell'utente<br />
o dalla data di spedizione da parte di Thermo Fisher Scientific, scegliendo la data<br />
precedente, a condizione che siano usati in conformità alle limitazioni operative<br />
e alla procedure di manutenzione indicate nel manuale di istruzioni e che non<br />
siano stati esposti a incidenti, alterazioni, uso non conforme, abuso o rottura degli<br />
elettrodi:<br />
Trentasei mesi dalla data di acquisto da parte dell'utente (o<br />
quarantadue mesi dalla data di spedizione da parte di Thermo Fisher<br />
Scientific)<br />
Tutti i misuratori di pH, ISE, OD e conducibilità <strong>Orion</strong> <strong>Star</strong> Series, i misuratori<br />
tenuta stagna (630, 635, 830A, 835A, 260A, 261S, 265A, 266S, 130A, 131S, 135A,<br />
136S), i misuratori di conducibilità (105Aplus, 115Aplus, 125Aplus, 145Aplus,<br />
150Aplus e 162A), i misuratori PerpHect ® pH e pH/ISE (310, 320, 330, 350, 370),<br />
i misuratori di pH e pH/ISE (210Aplus, 230Aplus, 250Aplus, 290Aplus,<br />
410Aplus, 420Aplus, 520Aplus, 525Aplus, 710Aplus, 720Aplus e<br />
920Aplus), i misuratori pHuture MMS (535A e 555A), i misuratori di pH/<br />
conducibilità (550A), i misuratori di ossigeno disciolto (805Aplus, 810Aplus,<br />
850Aplus e 862A) .<br />
IT-48 Thermo Scientific <strong>Orion</strong> <strong>Star</strong> <strong>and</strong> <strong>Star</strong> <strong>Plus</strong> Series <strong>Meter</strong> User Guide
Thermo Scientific <strong>Orion</strong> <strong>Star</strong> <strong>and</strong> <strong>Star</strong> <strong>Plus</strong> Series <strong>Meter</strong> User Guide<br />
Termini e condizioni<br />
Trentaquattro mesi dalla data di acquisto da parte dell'utente (o<br />
trentasei mesi dalla data di spedizione da parte di Thermo Fisher<br />
Scientific)<br />
Elettrodi Ross Ultra ®, colorimetri AQUAfast ® IV, misuratori di torbidità AQUAfast ®<br />
IV, 925 Flash Titrator, celle di conducibilità Series 100 DuraProbe e sonde per<br />
ossigeno disciolto Series 800 .<br />
Dodici mesi dalla data di acquisto da parte dell'utente (o diciotto mesi<br />
dalla data di spedizione da parte di Thermo Fisher Scientific)<br />
pH-metri Laboratory pH, (301, 611 e 940), SensorLink ®, pH-metri pHuture ® (610<br />
e 620), misuratori Smart Chek, pompe Sage ®, bilance Cahn ®, 930 Ionalyzer ®,<br />
titolatori 950 ROSS ® FAST QC, titolatori 960 PLUS ®, titolatori Karl Fischer,<br />
autocampionatori, BOD AutoEZ, pHuture ® Conversion Box, Wine Master ®, 607<br />
Switchbox, rf link, colorimetri AQUAfast ® II .<br />
Elettrodi iono-selettivi, elettrodi ionplus ®, elettrodi ROSS ®, elettrodi Sure-Flow ®,<br />
elettrodi PerpHecT ®, elettrodi AquaPro Professional, elettrodi No Cal ® pH, elettrodi<br />
St<strong>and</strong>ard pH, elettrodi TRIS pH, elettrodi KNIpHE ®, ORP Triode (9180BN), sonde<br />
per pH pHuture ® (616500) e pHuture MMS Quatrode e Triode (616600 e<br />
617900), sonde 9708 DO, celle di conducibilità convenzionali Series 100, sonde di<br />
temperatura e compensatori (eccetto i modelli indicati) .<br />
I moduli di rilevamento 93 e 97 ionplus ® Series sono garantiti per sei mesi di<br />
funzionamento se messi in servizio prima della data indicata sulla confezione,<br />
ad eccezione di 9307 e 9707 i moduli nitrato sono garantiti per novanta giorni di<br />
funzionamento se messi in servizio prima della data indicata sulla confezione .<br />
Sei mesi dalla data di acquisto da parte dell'utente (o dodici mesi dalla<br />
data di spedizione da parte di Thermo Fisher Scientific)<br />
Sonda Flash Titration (092518), elettrodo pHuture ® (615700), pHuture MMS<br />
Pentrode (617500), Quatrode (617800) e Triode (615800), Low Maintenance<br />
Triode (9107BN), ORP Low Maintenance Triode (9179BN) e PerpHecT ® Low<br />
Maintenance Triode (9207BN), Waterproof Triode (9107WP, 9107WL, 9109WL e<br />
9109WP), misuratori QuiKcheK ® e microelettrodi .<br />
IT-49
Termini e condizioni<br />
Tre mesi dalla data di acquisto da parte dell'utente (o sei mesi dalla<br />
data di spedizione da parte di Thermo Fisher Scientific)<br />
Elettrodi Economy Line, 9105, 9106, 9115, 9116, 9125, 9126, 9135, 9136, 9206 .<br />
La garanzia include anche guasti dovuti a qualsiasi causa (eccettuata la rottura),<br />
ad eccezione dell’uso non conforme, a condizione che l’elettrodo non sia usato in<br />
soluzioni contenenti TRIS, argento, solfato, perclorato o acido idrofluiridrico; o in<br />
soluzioni fortemente acide o basiche a temperature oltre 50 °C .<br />
Garanzia “Out-of-Box” - Se uno dei seguenti prodotti dovessero<br />
guastarsi al primo utilizzo, contattare immediatamente Thermo Fisher<br />
Scientific per la sostituzione.<br />
Soluzioni, st<strong>and</strong>ard, reagenti, cavi, adattatori di linea, stampanti, software,<br />
alloggiamenti, supporti, membrane di sonde, strisce di prova AQUAfast ® e accessori<br />
generici .<br />
Per i prodotti in catalogo non elencati nella presente dichiarazione di garanzia,<br />
consultare il nostro sito Web all'indirizzo: www.thermo.com/water.<br />
LE GARANZIE SOPRA DESCRITTE SONO ESCLUSIVE E SOSTITUISCONO TUTTE<br />
LE ALTRE GARANZIE OBBLIGATORIE, ESPLICITE O IMPLICITE, INCLUSE, MA<br />
SENZA LIMITAZIONE A, EVENTUALI GARANZIE IMPLICITE DI COMMERCIABILITÀ<br />
O DI IDONEITÀ AD UNO SCOPO PARTICOLARE E TUTTE LE GARANZIE DERIVANTI<br />
DALLE CONSUETUDINI COMMERCIALI . IL PROVVEDIMENTO UNICO ED<br />
ESCLUSIVO DELL'ACQUIRENTE È LA RIPARAZIONE O LA SOSTITUZIONE DEL<br />
PRODOTTO NON CONFORME O DI PARTE DI ESSO, O IL RIMBORSO DEL<br />
PREZZO D'ACQUISTO, MA IN NESSUN CASO THERMO FISHER SCIENTIFIC<br />
(I SUOI APPALTATORI E FORNITORI DI QUALSIASI LIVELLO) SARANNO<br />
RESPONSABILI NEI CONFRONTI DELL'ACQUIRENTE O DI QUALSIASI PERSONA<br />
PER EVENTUALI DANNI SPECIALI, INDIRETTI, INCIDENTALI O EMERGENTI<br />
INDIPENDENTEMENTE DAL FATTO CHE LE RIVENDICAZIONI SI BASINO SUL<br />
CONTRATTO, SU ATTI ILLECITI (INCLUSA LA NEGLIGENZA) O SIANO ALTRIMENTI<br />
RELATIVE A O DERIVANTI DAL PRODOTTO FORNITO AI SENSI DEL PRESENTE<br />
DOCUMENTO . DICHIARAZIONI O GARANZIE FORNITE DA QUALSIASI PERSONA,<br />
INCLUSI I RIVENDITORI AUTORIZZATI, I RAPPRESENTANTI O I DIPENDENTI DI<br />
THERMO FISHER SCIENTIFIC CHE ALTERINO O SI AGGIUNGANO AI TERMINI<br />
DELLA PRESENTE GARANZIA NON SARANNO VINCOLANTI PER THERMO FISHER<br />
SCIENTIFIC A MENO CHE NON SIANO IN FORMA SCRITTA E SOTTOSCRITTE DA<br />
IT-50 Thermo Scientific <strong>Orion</strong> <strong>Star</strong> <strong>and</strong> <strong>Star</strong> <strong>Plus</strong> Series <strong>Meter</strong> User Guide
UNO DEI SUOI FUNZIONARI .<br />
Limitazione della responsabilità<br />
NONOSTANTE EVENTUALI DICHIARAZIONI CONTRARIE CONTENUTE<br />
NEL PRESENTE DOCUMENTO, LA RESPONSABILITÀ DEL VENDITORE IN<br />
BASE AI PRESENTI TERMINI E LE CONDIZIONI (SIA PER VIOLAZIONE DEL<br />
CONTRATTO, ATTO ILLECITO, INDENNIZZO O ALTRO, MA ESCLUDENDO LA<br />
RESPONSABILITÀ DEL VENDITORE PER VIOLAZIONE DELLA GARANZIA (IL CUI<br />
UNICO PROVVEDIMENTO SARÀ QUANTO DEFINITO NELLA SEZIONE 2 DI CUI<br />
SOPRA)) NON SUPERERÀ UN IMPORTO UGUALE AL MINORE DI (A) IL PREZZO<br />
D'ACQUISTO PAGATO DALL'ACQUIRENTE AL VENDITORE IN RELAZIONE AL/<br />
PRODOTTO/I CHE CAUSA/CAUSANO TALE RESPONSABILITÀ O (B) UN MILIONE<br />
DI DOLLARI ($1,000,000) . NONOSTANTE EVENTUALI DICHIARAZIONI CONTRARIE<br />
CONTENUTE NEL PRESENTE DOCUMENTO, IN NESSUN CASO IL VENDITORE<br />
SARÀ RESPONSABILE PER EVENTUALI DANNI EMERGENTI, SPECIALI, INDIRETTI<br />
O INCIDENTALI (INCLUSI, SENZA LIMITAZIONE A, DANNI PER LA PERDITA DI<br />
USO DI IMPIANTI O ATTREZZATURE, PERDITE DI INTROITI, PERDITA DI DATI,<br />
PERDITA DI PROFITTI O PERDITA DI CLIENTELA), INDIPENDENTEMENTE DAL<br />
FATTO CHE IL VENDITORE (a) SIA STATO INFORMATO DELLA POSSIBILITÀ DI TALI<br />
DANNI O (b) SIA NEGLIGENTE .<br />
Varie<br />
Thermo Scientific <strong>Orion</strong> <strong>Star</strong> <strong>and</strong> <strong>Star</strong> <strong>Plus</strong> Series <strong>Meter</strong> User Guide<br />
Termini e condizioni<br />
(a) I diritti e gli obblighi delle parti di cui nel presente documento saranno regolati e<br />
interpretati in conformità alle leggi dello Stato del Massachusetts, senza riferimento<br />
alla sua scelta di disposizioni di legge . Con il presente documento tutte le parti<br />
accettano la giurisdizione esclusiva delle corti statali e federali della Contea di<br />
Suffolk, Massachusetts, per qualsiasi azione legale derivante da o relativa al<br />
presente Contratto e rinuncia a qualsiasi altra giurisdizione processuale a cui abbia<br />
diritto per domicilio o in altro modo . (b) In caso di qualsiasi procedimento legale<br />
tra il Venditore e l'Acquirente in relazione al presente Contratto, nessuna delle due<br />
parti può rivendicare il diritto a regolare processo, ed entrambe le parti rinunciano a<br />
qualsiasi diritto che possono avere ai sensi della legge applicabile o per altro motivo<br />
a un regolare processo . Qualsiasi azione legale derivante dal presente Contratto<br />
deve essere presentata entro un (1) anno dalla data dell'evento che ha causato tale<br />
azione .<br />
IT-51
NOTE<br />
IT-52 Thermo Scientific <strong>Orion</strong> <strong>Star</strong> IT-52<br />
<strong>and</strong> <strong>Star</strong> <strong>Plus</strong> Series <strong>Meter</strong> User Guide
Capitolo XI<br />
Dichiarazione di conformità<br />
Produttore: Thermo Fisher Scientific Inc .<br />
Indirizzo: 166 Cummings Center<br />
Beverly, MA 01915<br />
USA<br />
Dichiariamo che i seguenti prodotti descritti sotto sono conformi alle Direttive e<br />
Norme elencate sotto:<br />
Prodotto/i: Misuratori del pH, della conducibilità, dell’ossigeno disciolto e/o ISE<br />
I modelli da banco sono classificati 100-240VAC, 50/60Hz, 0 .5A<br />
I modelli portatili usano 4 batterie AA non ricaricabili<br />
Da banco Portatile<br />
Misuratore pH/ISE/OD/Cond 5-<strong>Star</strong> Misuratore pH/ISE/Cond/OD 5-<strong>Star</strong><br />
Misuratore pH/Cond 4-<strong>Star</strong> Misuratore pH/Cond/OD 5-<strong>Star</strong><br />
Misuratore pH/OD 4-<strong>Star</strong> Misuratore pH/Cond 4-<strong>Star</strong><br />
Misuratore pH/ISE 4-<strong>Star</strong> Misuratore pH/OD 4-<strong>Star</strong><br />
Misuratore Cond 3-<strong>Star</strong> Misuratore pH/ISE 4-<strong>Star</strong><br />
Misuratore OD 3-<strong>Star</strong> Misuratore Cond 3-<strong>Star</strong><br />
Misuratore pH 3-<strong>Star</strong> Misuratore pH 3-<strong>Star</strong><br />
Misuratore pH 2-<strong>Star</strong> Misuratore OD 3-<strong>Star</strong><br />
Classe delle apparecchiature: Misurazione, controllo e laboratorio<br />
I modelli da banco sono EMC Classe A<br />
I misuratori portatili sono EMC Classe D<br />
Thermo Scientific <strong>Orion</strong> <strong>Star</strong> <strong>and</strong> <strong>Star</strong> <strong>Plus</strong> Series <strong>Meter</strong> User Guide<br />
IT-53
Dichiarazione di conformità<br />
Direttive e Norme:<br />
• 89/336/CEE - Direttiva sulla compatibilità elettromagnetica (EMC)<br />
• EN 61326:1997 + A1:1998 + A2:2001 - Apparecchi elettrici di misura,<br />
controllo e laboratorio - Requisiti EMC<br />
• 73/23/CEE - Direttiva per la bassa tensione (LVD)<br />
• EN 61010-1:2001 - Requisiti di sicurezza delle apparecchiature elettriche per<br />
la misurazione, il controllo e l'uso in laboratorio - requisiti generali<br />
Rappresentante autorizzato del produttore: Data:<br />
Patrick Chui 23 ottobre 2008<br />
Senior Quality Assurance Engineering,<br />
Regulatory Compliance<br />
Conformità RAEE:<br />
Il presente prodotto deve essere conforme alla Direttiva dell'Unione<br />
Europea sui rifiuti di apparecchiature elettriche ed elettroniche (RAEE)<br />
2002/96/CE.<br />
È marcato con il seguente simbolo:<br />
Thermo Fisher Scientific ha preso accordi con una o più aziende di riciclaggio/<br />
smaltimento in ciascuno Stato Membro della UE e questo prodotto deve essere<br />
smaltito e riciclato attraverso di esse. Ulteriori informazioni sulla conformità a queste<br />
Direttive, sulle aziende addette al riciclaggio nei vari Paesi e sui prodotti Thermo<br />
Scientific <strong>Orion</strong> che possono agevolare il rilevamento di sostanze soggette alla<br />
Direttiva RoHS sono disponibili presso www.thermo.com/WEEERoHS.<br />
IT-54 Thermo Scientific <strong>Orion</strong> <strong>Star</strong> <strong>and</strong> <strong>Star</strong> <strong>Plus</strong> Series <strong>Meter</strong> User Guide
Environmental Instruments<br />
Water Analysis Instruments<br />
North America<br />
166 Cummings Center<br />
Beverly, MA 01915 USA<br />
Toll Free: 1-800-225-1480<br />
Tel: 1-978-232-6000<br />
Dom. Fax: 1-978-232-6015<br />
Int’l Fax: 978-232-6031<br />
Europe<br />
P.O. Box 254, 3860 AG Nijkerk<br />
Wallerstraat 125K, 3862 BN Nijkerk,<br />
Netherl<strong>and</strong>s<br />
Tel: (31) 033-2463887<br />
Fax: (31) 033-2460832<br />
Asia Pacific<br />
Blk 55, Ayer Rajah Crescent<br />
#04-16/24, Singapore 139949<br />
Tel: 65-6778-6876<br />
Fax: 65-6773-0836<br />
www.thermo.com/water<br />
© 2008 Thermo Fisher Scientific Inc.<br />
All rights reserved.<br />
257250-001 Rev B 10-08