Jet Pumps Pompes accélératrices Bombas de chorro - Flotec
Jet Pumps Pompes accélératrices Bombas de chorro - Flotec
Jet Pumps Pompes accélératrices Bombas de chorro - Flotec

You also want an ePaper? Increase the reach of your titles
YUMPU automatically turns print PDFs into web optimized ePapers that Google loves.
Installation 9<br />
Process C, continued.<br />
5. Cement as many couplings and<br />
sections of rigid PVC pipe on both<br />
the pressure and <strong>de</strong>livery si<strong>de</strong>s as it<br />
takes to equal the <strong>de</strong>pth of your well<br />
minus four feet, then firmly clamp the<br />
assembly with a pipe clamp to prevent<br />
the assembly from sliding down into<br />
the well. Be sure to keep track of<br />
which pipe is the pressure pipe and<br />
which is the <strong>de</strong>livery pipe.<br />
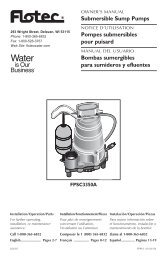
10. Open pressure regulator kit.<br />
Apply 2-3 wraps of Teflon tape<br />
to the male threads on the body<br />
of the pressure regulator. With<br />
pipe wrench, thread the pressure<br />
regulator into 1" discharge at top of<br />
pump. Thread pressure gauge into si<strong>de</strong> of pump case.<br />
11. Thread plug into opening to right of<br />
pressure regulator outlet.<br />
PRESSURE<br />
REGULATOR<br />
PRESSURE<br />
REGULATOR<br />
OUTLET<br />
PLUG<br />
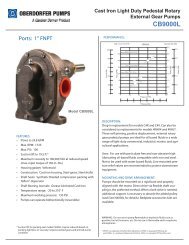
6. Remove pipe clamp and sli<strong>de</strong> well<br />
seal over PVC pipes and onto well<br />
casing. DO NOT let assembly sli<strong>de</strong><br />
down into well. Position assembly<br />
so that twelve inches of PVC pipes<br />
protru<strong>de</strong> from well seal. Using<br />
crescent wrench, turn bolts on well<br />
seal clockwise until rubber gaskets are<br />
tight against the well casing and the<br />
PVC pipes.<br />
7. Cut 1" pipe 2" shorter than the<br />
1-1/4" pipe. Smooth rough<br />
edges. Cement 1" and 1-1/4"<br />
PVC elbows to pipes protruding from<br />
the well seal.<br />
12" OF<br />
PVC PIPE<br />
PROTRUD-<br />
ING FROM<br />
WELL<br />
SEAL<br />
WELL SEAL<br />
1-1/4" PVC<br />
ELBOW<br />
1" PVC<br />
ELBOW<br />
1" PIPE 2"<br />
SHORTER<br />
THAN 1-1/4"<br />
PIPE<br />
Priming Deep Well <strong>Jet</strong> <strong>Pumps</strong><br />
12. Complete all electrical connections as <strong>de</strong>scribed on page 4.<br />
Sealing Pipe Joints<br />
Use only Teflon tape or Teflon based joint compounds<br />
for making all threa<strong>de</strong>d connections to the pump itself. Do<br />
not use pipe joint compounds on plastic pumps: they can<br />
react with the plastic in pump components. Make sure that<br />
all pipe joints in the suction pipe are air tight as well as<br />
water tight. If the suction pipe can suck air, the pump will<br />
not be able to pull water from the well.<br />
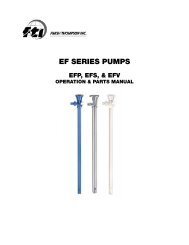
13. Thread 3/4" male PVC adapter<br />
into pressure regulator outlet.<br />
14. Thread tank tee into<br />
pre-charged pressure tank.<br />
Plug two outlets on tank tee<br />
with two 1/4" plugs.<br />
TANK TEE<br />
3/4" MALE<br />
PVC ADAPTER<br />
1/4" PLUGS<br />
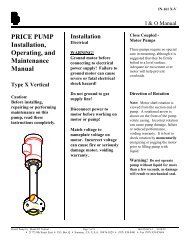
8. Thread a 1-1/4" male PVC adapter<br />
into top hole in front of pump.<br />
Thread 1" x 4" nipple into bottom<br />
hole in front of pump. Thread the<br />
1" female PVC adapter onto the<br />
1" x 4" nipple. Seal the threa<strong>de</strong>d<br />
1-1/4" MALE<br />
PVC ADAPTER<br />
1" FEMALE<br />
PVC<br />
ADAPTER<br />
1" x 4"<br />
NIPPLE<br />
pipe joints with Teflon tape or Teflon based pipe joint<br />
compound approved for use on PVC.<br />
9. Cement<br />
1-1/4" PVC P PE<br />
as many<br />
sections<br />
and<br />
couplings<br />
FEMALE ADAPTER<br />
of rigid 1"<br />
and 1-1/4"<br />
PVC as<br />
nee<strong>de</strong>d to connect the 1" female PVC adapter and the<br />
1-1/4" male PVC adapter to the 1" and 1-1/4" PVC elbows.<br />
1" PVC P PE<br />
15. Thread boiler drain into<br />
front of tank tee. Thread<br />
3/4" male PVC adapter into inlet<br />
si<strong>de</strong> of tank tee. Connect to<br />
household plumbing.<br />
3/4" MALE<br />
PVC<br />
ADAPTER<br />
1/2" BOILER<br />
DRAIN<br />
16. TO PRIME: Remove<br />
pressure regulator, put a<br />
gar<strong>de</strong>n hose into the top<br />
of the pump discharge<br />
and fill and pump<br />
with water until water<br />
overflows from top of<br />
pump. This may take several minutes. Put regulator back<br />
on pump.<br />
For parts or assistance, call <strong>Flotec</strong> Customer Service at 1-800-365-6832