Jet Pumps Pompes accélératrices Bombas de chorro - Flotec
Jet Pumps Pompes accélératrices Bombas de chorro - Flotec
Jet Pumps Pompes accélératrices Bombas de chorro - Flotec

You also want an ePaper? Increase the reach of your titles
YUMPU automatically turns print PDFs into web optimized ePapers that Google loves.
Installation 5<br />
Process C. 1. Install a shallow well pump<br />
(FP4155, FP4157, FP4150)<br />
Draining For Servicing or For Winter<br />
The pump should be drained before it is disconnected for<br />
servicing or if it is in danger of freezing. To drain:<br />
• Remove drain plug from bottom of pump case.<br />
• Remove discharge tee to vent the pump.<br />
• Drain all piping to a point 3 feet (1 meter) below<br />
ground level.<br />
For wells 25 feet or less in <strong>de</strong>pth, the 1/2 HP FP4155, 3/4 HP<br />
FP4157 and 1 HP FP4150 pumps are recommen<strong>de</strong>d. However,<br />
the 1/2 HP FP4205, 3/4 HP FP4207, and 1 HP FP4210<br />
convertible pumps may be adapted to shallow wells with an<br />
ejector kit.<br />
General Materials Required<br />
• One can PVC cement (read instructions carefully)<br />
• One can thread compound (read instructions carefully)<br />
• One 1-1/4" foot valve<br />
• Two male 1-1/4" PVC adapters<br />
• Enough rigid 1-1/4" PVC pipe and couplings to reach from<br />
bottom of well to pump<br />
• One well seal with vent plug<br />
• One 1-1/4" PVC elbow<br />
• One discharge tee<br />
• One pressure gauge<br />
• One male 1" PVC adapter<br />
• Enough rigid 1" PVC pipe to reach from pump to pressure<br />
tank to service line<br />
• One female 1" PVC adapter<br />
• One 1" tank cross (for diaphragm tanks)<br />
• Two 1/4" plugs<br />
• One 1/2" drain cock<br />
• One 10" x 1" nipple<br />
In addition to General Materials, for the FP4205,<br />
FP4207, or FP4210 Convertible only<br />
One ejector kit; inclu<strong>de</strong>s ejector, venturi tube, gasket, bolts,<br />
plug, tubing, and fittings.<br />
Tools nee<strong>de</strong>d for all pump installations<br />
Pipe wrench, pipe clamp, crescent wrench, slot screwdriver,<br />
24-tooth hacksaw, knife or round file.<br />
Remin<strong>de</strong>r: All joints and connections must be airtight. A single pinhole leak will prevent the<br />
proper operation of the pump. Use thread compound on all threa<strong>de</strong>d connections unless<br />
specified otherwise.<br />
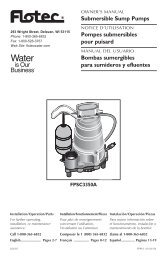
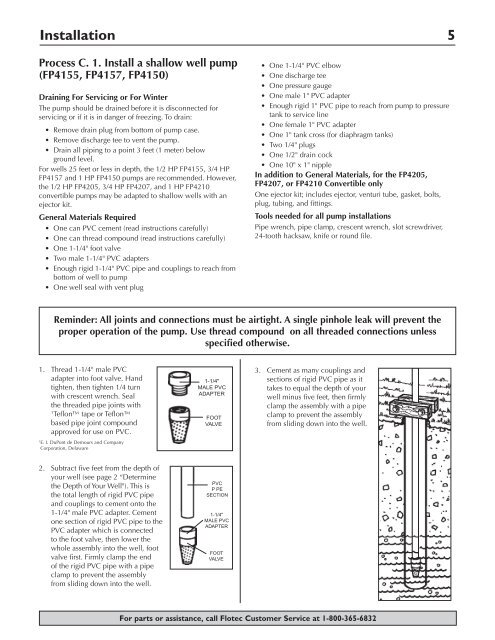
1. Thread 1-1/4" male PVC<br />
adapter into foot valve. Hand<br />
tighten, then tighten 1/4 turn<br />
with crescent wrench. Seal<br />
the threa<strong>de</strong>d pipe joints with<br />
1<br />
Teflon tape or Teflon<br />
based pipe joint compound<br />
approved for use on PVC.<br />
1<br />
E. I. DuPont <strong>de</strong> Demours and Company<br />
Corporation, Delaware<br />
1-1/4"<br />
MALE PVC<br />
ADAPTER<br />
FOOT<br />
VALVE<br />
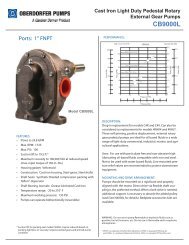
3. Cement as many couplings and<br />
sections of rigid PVC pipe as it<br />
takes to equal the <strong>de</strong>pth of your<br />
well minus five feet, then firmly<br />
clamp the assembly with a pipe<br />
clamp to prevent the assembly<br />
from sliding down into the well.<br />
2. Subtract five feet from the <strong>de</strong>pth of<br />
your well (see page 2 “Determine<br />
the Depth of Your Well"). This is<br />
the total length of rigid PVC pipe<br />
and couplings to cement onto the<br />
1-1/4" male PVC adapter. Cement<br />
one section of rigid PVC pipe to the<br />
PVC adapter which is connected<br />
to the foot valve, then lower the<br />
whole assembly into the well, foot<br />
valve first. Firmly clamp the end<br />
of the rigid PVC pipe with a pipe<br />
clamp to prevent the assembly<br />
from sliding down into the well.<br />
PVC<br />
P PE<br />
SECTION<br />
1-1/4"<br />
MALE PVC<br />
ADAPTER<br />
FOOT<br />
VALVE<br />
For parts or assistance, call <strong>Flotec</strong> Customer Service at 1-800-365-6832