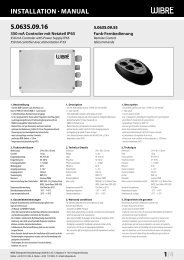
InstallatIon · Manual 4.0072 1/4 - Wibre
InstallatIon · Manual 4.0072 1/4 - Wibre
InstallatIon · Manual 4.0072 1/4 - Wibre

You also want an ePaper? Increase the reach of your titles
YUMPU automatically turns print PDFs into web optimized ePapers that Google loves.
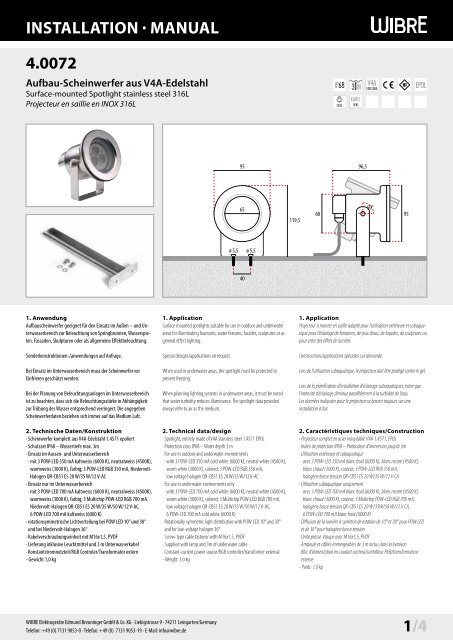
Installation · <strong>Manual</strong><br />
<strong>4.0072</strong><br />
Aufbau-Scheinwerfer aus V4A-Edelstahl<br />
Surface-mounted Spotlight stainless steel 316L<br />
Projecteur en saillie en INOX 316L<br />
IP68 3 M V4A<br />
EDELSTAHL<br />
INKL<br />
KABEL<br />
INKL<br />
EPOL<br />
95 96,5<br />
65<br />
119,5<br />
68<br />
90° 68<br />
95<br />
ø 5,5 ø 5,5<br />
40<br />
1. Anwendung<br />
Aufbauscheinwerfer geeignet für den Einsatz im Außen – und Unterwasserbereich<br />
zur Beleuchtung von Springbrunnen, Wasserspielen,<br />
Fassaden, Skulpturen oder als allgemeine Effektbeleuchtung.<br />
Sonderkonstruktionen-/anwendungen auf Anfrage.<br />
Bei Einsatz im Unterwasserbereich muss der Scheinwerfer vor<br />
Einfrieren geschützt werden.<br />
Bei der Planung von Beleuchtungsanlagen im Unterwasserbereich<br />
ist zu beachten, dass sich die Beleuchtungsstärke in Abhängigkeit<br />
zur Trübung des Wasser entsprechend verringert. Die angegeben<br />
Scheinwerferdaten beziehen sich immer auf das Medium Luft.<br />
2. Technische Daten/Konstruktion<br />
· Scheinwerfer komplett aus V4A-Edelstahl 1.4571 epoliert<br />
· Schutzart IP68 – Wassertiefe max. 3m<br />
· Einsatz im Aussen- und Unterwasserbereich<br />
· mit 3 POW-LED 350 mA kaltweiss (6000 K), neutralweiss (4500K),<br />
warmweiss (3000 K), farbig; 3 POW-LED RGB 350 mA, Niedervolt-<br />
Halogen QR-CB51 ES 20 W/35 W/12 V-AC<br />
· Einsatz nur im Unterwasserbereich<br />
· mit 3 POW-LED 700 mA kaltweiss (6000 K), neutralweiss (4500K),<br />
warmweiss (3000 K), farbig; 3 Multichip POW-LED RGB 700 mA,<br />
Niedervolt-Halogen QR-CB51 ES 20 W/35 W/50 W/12 V-AC,<br />
6 POW-LED 700 mA kaltweiss (6000 K)<br />
· rotationsymmetrische Lichtverteilung bei POW LED 10° und 30°<br />
und bei Niedervolt-Halogen 36°<br />
· Kabelverschraubungseinheit mit M16x1,5, PVDF<br />
· Lieferung inklusive Leuchtmittel und 3 m Unterwasserkabel<br />
· Konstantstromnetzteil/RGB Controler/Transformator extern<br />
- Gewicht 1,0 kg<br />
1. Application<br />
Surface mounted spotlights suitable for use in outdoor and underwater<br />
areas for illuminating fountains, water features, facades, sculptures or as<br />
general effect lighting.<br />
Special designs/applications on request.<br />
When used in underwater areas, the spotlight must be protected to<br />
prevent freezing.<br />
When planning lighting systems in underwater areas, it must be noted<br />
that water turbidity reduces illuminance. The spotlight data provided<br />
always refer to air as the medium.<br />
2. Technical data/design<br />
· Spotlight, entirely made of V4A stainless steel 1.4571 EPOL<br />
· Protection class IP68 – Water depth 3 m<br />
· For use in outdoor and underwater environments<br />
· with 3 POW-LED 350 mA cold white (6000 K), neutral white (4500 K),<br />
warm white (3000 K), colored; 3 POW-LED RGB 350 mA,<br />
low voltage halogen QR-CB51 ES 20 W/35 W/12 V-AC<br />
· For use in underwater environments only<br />
· with 3 POW-LED 700 mA cold white (6000 K), neutral white (4500 K),<br />
warm white (3000 K), colored; 3 Multichip POW-LED RGB 700 mA,<br />
low voltage halogen QR-CB51 ES 20 W/35 W/50 W/12 V-AC,<br />
6 POW-LED 700 mA cold white (6000 K)<br />
· Rotationally symmetric light distribution with POW LED 10° and 30°<br />
and for low-voltage halogen 36°<br />
· Screw-type cable fastener with M16x1.5, PVDF<br />
· Supplied with lamp and 3m of underwater cable<br />
· Constant-current power source/RGB controller/transformer external<br />
- Weight: 1,0 kg<br />
1. Application<br />
Projecteur à monter en saillie adapté pour l‘utilisation extérieure et subaquatique<br />
pour l‘éclairage de fontaines, de jeux d‘eau, de façades, de sculptures ou<br />
pour créer des effets de lumière.<br />
Constructions/applications spéciales sur demande.<br />
Lors de l‘utilisation subaquatique, le projecteur doit être protégé contre le gel.<br />
Lors de la planification d‘installation d‘éclairage subaquatiques, noter que<br />
l‘intensité d‘éclairage diminue parallèlement à la turbidité de l‘eau.<br />
Les données indiquées pour le projecteur se basent toujours sur une<br />
installation à l‘air.<br />
2. Caractéristiques techniques/Construction<br />
› Projecteur complet en acier inoxydable V4A 1.4571, EPOL<br />
· Indice de protection IP68 – Profondeur d‘immersion jusqu‘à 3m<br />
· Utilisation extérieure et subaquatique<br />
· avec 3 POW-LED 350 mA blanc froid (6000 K), blanc neutre (4500 K),<br />
blanc chaud (3000 K), couleur; 3 POW-LED RVB 350 mA,<br />
halogène basse tension QR-CB51 ES 20 W/35 W/12 V CA<br />
· Utilisation subaquatique uniquement<br />
· avec 3 POW-LED 700 mA blanc froid (6000 K), blanc neutre (4500 K),<br />
blanc chaud (3000 K), couleur; 3 Multichip POW-LED RGB 700 mA,<br />
halogène basse tension QR-CB51 ES 20 W/35W/50 W/12 V CA,<br />
6 POW-LED 700 mA blanc froid (6000 K)<br />
· Diffusion de la lumière à symétrie de rotation de 10° et 30° pour POW LED<br />
et de 36° pour halogène basse tension<br />
· Unité presse-étoupe avec M16x1,5, PVDF<br />
· Ampoule et câbles immergeables de 3 m inclus dans la livraison<br />
· Bloc d‘alimentation en courant continu/contrôleur RVB/transformateur<br />
externe<br />
- Poids: 1,0 kg<br />
WIBRE Elektrogeräte Edmund Breuninger GmbH & Co. KG · Liebigstrasse 9 · 74211 Leingarten/Germany<br />
Telefon: +49 (0) 7131 9053-0 · Telefax: +49 (0) 7131 9053-19 · E-Mail: info@wibre.de 1/4
Installation · <strong>Manual</strong><br />
Object<br />
Object<br />
ø 5,5<br />
40<br />
40<br />
3.3<br />
3.4<br />
Zahnscheiben<br />
serrated washers<br />
roues dentées<br />
Unterlegscheibe<br />
washer<br />
rondelle<br />
Hutmutter<br />
cap nut<br />
écrous-chapeaux<br />
3.1 3.2<br />
3.5<br />
3. Installation/Montage<br />
Zur Installation sind die nationalen Sicherheitsvorschriften zu<br />
beachten. Es wird keine Haftung für unsachgemäßen Einsatz oder<br />
Montage übernommen. Bei nachträglichen Änderungen an den<br />
Leuchten wird keine Haftung übernommen.<br />
POW-LED Leuchten müssen immer in Reihenschaltung an entsprechenden<br />
Konstantstromnetzteilen (siehe Betriebsgeräte) betrieben<br />
werden.<br />
Die Leuchtengehäuse sind nicht zu demontieren, da zum Schutz die<br />
Kabel und POW LED Platine vergossen ist.<br />
Montage des Scheinwerfers ist im Aussen- und Unterwasserbereich<br />
auf verschiedenstem Monatgegrund möglich. Aufbaumonatge<br />
direkt auf Beton, Pflaster, Platten, Holzdielen und in Verbindung mit<br />
Erdspiess 9.0072.20.00 in Erdreich, Kies, Rasenflächen oder Beete<br />
möglich.<br />
Da bei Projekten die Aufbausituationen variieren ist keine allgemein<br />
gültige Montageanleitung möglich. Die Piktogramme verdeutlichen<br />
typische Montagebeispiele.<br />
3.1. Aufbaumontage des Scheinwerfers auf festem Untergrund<br />
3.2. Aufbaumontage des Scheinwerfers in Verbindung mit Erdspieß<br />
in losem Untergrund.<br />
3. Installation/mounting<br />
When installing, observe the national safety regulations. We are not liable<br />
for any improper use or installation. No liability will be accepted in case of<br />
subsequent modification to the lights.<br />
POW LED lights must always be operated in series with appropriate<br />
constant-current power sources (see operating devices).<br />
The light housings must not be removed, since the cable and POW LED<br />
printed circuit board are sealed for protection.<br />
The spotlight can be mountedin outdoor and underwater areas on a broad<br />
range of surfaces. Surface mounting straight onto concrete, paving, slabs,<br />
wooden floor boards and in conjunction with earth spike 9.0072.20.00 in<br />
soil, gravel, lawns or garden beds.<br />
Since the mounting conditions vary from project to project, no general<br />
installation instructions can be provided. The icons symbolise typical<br />
installation examples.<br />
3.1. Surface mounting of the spotlight on a solid surface<br />
3.2. Surface mounting of the spotlight in conjunction with an earth spike<br />
on a soft surface<br />
3. Installation/Montage<br />
Respecter les prescriptions nationales applicables en matière de sécurité.<br />
Nous déclinons toute responsabilité pour l’utilisation ou le montage non<br />
conforme. De même, nous réfutons toute responsabilité pour les modifications<br />
réalisées sur les luminaires.<br />
Pour leur exploitation, les projecteurs à POW-LED doivent toujours être reliés<br />
en série au bloc d‘alimentation en courant continu correspondant (voir blocs<br />
d‘alimentation).<br />
Ne pas démonter les boîtiers de projecteur, étant donné que les câbles et la<br />
platine POW LED sont scellés.<br />
Le montage extérieur et subaquatique du projecteur peut être réalisé sur<br />
différents supports. Montage du projecteur directement sur le béton, les<br />
pavés, les plaques, les lames de bois et en association avec un piquet de terre<br />
9.0072.20.00 dans la terre, le gravier, les espaces verts ou les plates-bandes.<br />
Étant donné que dans les différents projets, les situations d’intégration<br />
varient, nous ne pouvons établir une notice de montage générale. Les<br />
pictogrammes expliquent les exemples de montage type.<br />
3.1. Montage en saillie du projecteur sur un support consolidé<br />
3.2. Montage en saillie du projecteur en association avec un piquet de mise<br />
à la terre sur un support non consolidé<br />
Montage<br />
Bei Aufbaumontage des Scheinwerfers auf festem Untergrund wie<br />
z.B. Beton, Steinplatten, Holz und Fassade die seitliche Hutmuttern<br />
öffnen, Unterlegscheibe und Zahnscheibe entfernen und den<br />
Schweinwerfer aus dem Bügel nehmen. Den Bügel zum Objekt<br />
ausrichten und auf Untergrund mit den beiliegenden Edelstahlschrauben<br />
befestigen 3.3.<br />
Bei Aufbaumontage des Scheinwerfers in Verbindung mit Erdspieß<br />
in losem Untergrund wie z.B. Erde, Kies die seitlichen Hutmuttern<br />
öffnen, Unterlegscheibe und Zahnscheibe entfernen und den<br />
Schweinwerfer aus dem Bügel nehmen. Den Erdspieß zum Objekt<br />
ausrichten, im Untergrund fixieren und den Bügeln mit den beiliegenden<br />
Edelstahlschrauben am Erdspieß befestigen 3.4.<br />
Achtung: Nur werkseitig angeschlossenes Kabel verwenden.<br />
Gewünschte Kabellänge bei Bestellung angeben oder entsprechende<br />
Verbinder mit Vergußmasse zur Kabelverlängerung verwenden<br />
(WIBRE Art.-Nr. 9.9011.02.02; 9.9011.02.03).<br />
Bei erhöhter mechanischer Beanspruchung sollte das Kabel zusätzlich<br />
in einem Schutzrohr zur Leuchte verlegt werden.<br />
Einzelanschlussader entsprechend den Vorschriften an den Netzteilen<br />
elektrisch anschließen. 3.6.<br />
Die maximale Anzahl der Leuchten sind dem <strong>Manual</strong> des Netzteiles<br />
zu entnehmen. 3.7.<br />
2/4<br />
Installation<br />
To surface mount the spotlight on a solid surface, such as concrete,<br />
flagstones, wood and facade, open the side cap nuts, remove washer and<br />
serrated washer and take the spotlight out of the bracket. Line up the<br />
bracket with the object and fasten to the surface using the stainless steel<br />
screws supplied 3.3.<br />
To surface mount the spotlight in conjunction with an earth spike on a soft<br />
surface, such as earth or gravel, open the side cap nuts, remove washer and<br />
serrated washer and take the spotlight out of the bracket. Line up the earth<br />
spike with the object, fix into the surface and fasten the bracket to the<br />
earth spike using the stainless steel screws supplied 3.4.<br />
Attention: Use only cable connected at the factory. Specify the<br />
required cable length when ordering or use an appropriate connector and<br />
sealing compound to extend the cable (WIBRE Art. no. 9.9011.02.02;<br />
9.9011.02.03).<br />
In case of increased mechanical load, the cable should also be laid in a<br />
protective tube leading to the light.<br />
Connect individual wires to the power supply according to the<br />
regulations. 3.6.<br />
The maximum number of lights is stated in the power supply manual. 3.7.<br />
Montage<br />
Lors du montage en saillie du projecteur sur un support consolidé, par ex. le<br />
béton, les plaques de pierre, le bois et les façades, ouvrir les écrous-chapeaux<br />
latéraux, retirer la rondelle et la roue dentée et retirer le projecteur de son<br />
étrier. Orienter l‘étrier vers l‘objet et fixer sur le support à l‘aide des vis en acier<br />
inoxydable 3.3. fournies.<br />
Lors du montage en saillie du projecteur en association avec un piquet<br />
de terre sur un support non consolidé, par ex. la terre, le gravier, ouvrir les<br />
écrous-chapeaux latéraux, retirer la rondelle et la roue dentée et retirer le<br />
projecteur de son étrier. Orienter le piquet de terre vers l‘objet et fixer sur le<br />
support et l‘étrier à l‘aide des vis en acier inoxydable fournies sur le piquet<br />
de terre 3.4.<br />
Attention: utiliser uniquement les câbles raccordés en usine. Indiquer<br />
la longueur de câble souhaitée lors de la commande ou utiliser des<br />
connecteurs adaptés avec une masse de scellement pour rallonger le câble<br />
(n° réf. WIBRE 9.9011.02.02; 9.9011.02.03).<br />
En cas de sollicitation mécanique élevée, le câble vers le luminaire doit être<br />
posé dans une gaine de protection.<br />
Raccorder les différents conducteurs aux blocs d‘alimentation conformément<br />
aux prescriptions. 3.6.<br />
Le nombre maximal de projecteurs est indiqué dans le manuel du bloc<br />
d‘alimentation. 3.7.<br />
WIBRE Elektrogeräte Edmund Breuninger GmbH & Co. KG · Liebigstrasse 9 · 74211 Leingarten/Germany<br />
Telefon: +49 (0) 7131 9053-0 · Telefax: +49 (0) 7131 9053-19 · E-Mail: info@wibre.de
Installation · <strong>Manual</strong><br />
+<br />
–<br />
braun<br />
blau<br />
+<br />
sec<br />
–<br />
Netzteil<br />
Ballast<br />
Alimentation<br />
3 POW-LED RGB 350 mA<br />
CH3<br />
CH2<br />
POW-LED<br />
blau/blue/bleu<br />
POW-LED<br />
grün/green<br />
/vert<br />
–<br />
+<br />
–<br />
+<br />
weiß/white/blanc (we)<br />
blau/blue/bleu (bl)<br />
gelb/yellow/jaune (ge)<br />
grün/green/vert (gg)<br />
MIN<br />
MAX<br />
Hinweis: Reihenverschaltung bauseits<br />
Reference: Serial connection made on site<br />
Référence: connexion en série a fairre sur place<br />
3.7<br />
CH1<br />
POW-LED<br />
rot/red/rouge<br />
–<br />
+<br />
schwarz/black/noir (sw)<br />
rot/red/rouge (rt)<br />
max 100 m<br />
3.8<br />
3 POW-LED 350 mA<br />
3 POW-LED 700 mA<br />
1<br />
2<br />
MAX<br />
prim<br />
sec<br />
braun/brown/brun<br />
blau/blue/bleu<br />
max 100 m<br />
3.8<br />
Montage des Scheinwerfers<br />
Den Scheinwerfer in den Bügel einsetzen, und 2 Zahnscheiben,<br />
Unterlegscheibe und Hutmutter wie dargestellt anbringen 3.5.<br />
Scheinwerfer erneut zum Objekt ausrichten und Hutmuttern fest<br />
anziehen.<br />
4. Anschluß an Netzteile/Anschlußmatrix<br />
Scheinwerfer mit POW-LED Einheiten sind nur in Reihe anzuschließen.<br />
Gegebenenfalls Reihenanschluß in separater Verteilerbox<br />
vornehmen, diese im Außenbereich zusätzlich mit Vergußmasse<br />
gegen Feuchtigkeit schützen.<br />
5. Allgemeine Wartungshinweise<br />
- Beim Reinigen darf die Leuchte nicht mit Metall angreifenden<br />
Reinigungsmitteln in Berührung kommen. Der Einsatz salzsäurehaltiger<br />
Reinigungsmittel an und in der Nähe von Scheinwerferteilen<br />
aus Edelstahl ist in jedem Fall zu unterlassen.<br />
- Scheinwerfer und Einbaugehäuse regelmäßig reinigen,<br />
um Fremdrostablagerungen zu vermeiden.<br />
- Achtung: Keine Hochdruckreiniger verwenden.<br />
- Achtung: Strahler vor Einfrieren schützen, gegebenenfalls<br />
müssen diese demontiert oder speziell geschützt werden.<br />
- Verloren gegangene Schrauben dürfen nur durch Schrauben aus<br />
V4A ersetzt werden.<br />
- Je nach Beanspruchung (Höhe der Watttage, äußere Umstände) ist<br />
alle 5–8 Jahre ein Wechsel der Dichtungen (Glasscheibe, Verschraubung,<br />
O-Ring) und der Kabel zu empfehlen.<br />
Installing the spotlight<br />
Insert the spotlight into the bracket and attach the 2 serrated washers,<br />
washer and cap nuts as shown 3.5.<br />
Line up the spotlight with the object again and tighten the cap nuts.<br />
4. Connection to power units/<br />
connection matrix<br />
Spotlights with POW LED units may only be connected in series.<br />
If necessary, make the serial connection in a separate distributor box and<br />
apply sealing compound to the outside to protect against moisture.<br />
5. General service information<br />
- When cleaning, make sure that the lights do not come into contact with<br />
metal-corroding cleaning agents. The use of cleaning agents containing<br />
hydrochloric acid on and near spotlight parts made of stainless steel must<br />
always be avoided.<br />
- Clean spotlights and installation housing regularly to avoid extraneous<br />
rust deposits.<br />
- Attention: Do not use high-pressure cleaners.<br />
- Attention: Protect lightbulbs from freezing; they must be removed,<br />
if necessary, or specially protected.<br />
- Lost screws may only be replaced by screws made of V4A.<br />
- Depending on load (wattage, external conditions), we recommend<br />
changing the seals (on the glass pane, screws, O-ring) and cable every<br />
5–8 years.<br />
Montage du projecteur<br />
Positionner le projecteur dans l‘étrier, et poser 2 roues dentées, rondelles et<br />
écrous-chapeaux comme représenté 3.5.<br />
Réorienter le projecteur vers l‘objet et serrer l‘écrou-chapeau.<br />
4. Raccordement aux blocs d‘alimentation/<br />
Matrice de raccordement<br />
Les projecteurs à POW-LED doivent uniquement être raccordés en série.<br />
Le cas échéant, procéder au raccordement en série dans des boîtiers répartiteurs<br />
séparés dont l‘extérieur doit en outre être protégé contre l‘humidité à<br />
l‘aide d‘une masse de scellement.<br />
5. Instructions d‘entretien générales<br />
- Lors du nettoyage, le projecteur ne doit pas entrer en contact avec des<br />
détergents agressifs contre les métaux. L‘utilisation de détergent à base<br />
d‘acide chlorhydrique sur et à proximité des pièces du projecteur en acier<br />
inoxydable est totalement interdite.<br />
- Nettoyer régulièrement le projecteur et le boîtier de montage afin d‘éviter<br />
tout dépôt d‘oxydation.<br />
- Attention: ne pas utiliser de nettoyeur haute pression.<br />
- Attention: Protéger les projecteurs contre le gel ; le cas échéant, les<br />
démonter ou assurer une protection spéciale.<br />
- Les vis perdues ne doivent être remplacées que par des vis en acier<br />
inoxydable V4A.<br />
- Selon la sollicitation (puissance, circonstances environnementales), il est<br />
recommandé de procéder au changement des joints (sur les vitres, les<br />
raccords vissés et les joints toriques) et du câble tous les 5 à 8 ans.<br />
Achtung: Anschluss der Netzteile muss stromlos erfolgen,<br />
da sonst Entladungen im Netzteil zur Schädigung der LED führen<br />
können. Es darf keine Primärspannung anliegen.<br />
Hinweis: Die Installation eines bauseitigen Überspannungsschutzes<br />
nach DIN VDE 0100-443, DIN VDE 0100-534 und<br />
EN 62305 wird empfohlen.<br />
Hinweis: Nur Edelstahlwerkzeug verwenden!<br />
Zur Vermeidung von Fremdrost!<br />
Attention: The power supply must be connected without power,<br />
since otherwise discharges in the power supply unit may damage<br />
the LED. Primary voltage must not be present.<br />
Note: Installation of customised surge protection in accordance<br />
with DIN VDE 0100-443, DIN VDE 0100-534 and<br />
EN 62305 is recommended.<br />
Note: Only use tools made of stainless steel!<br />
To avoid extraneous rust!<br />
Attention: Les blocs d‘alimentation doivent être raccordés hors<br />
tension, sinon des décharges dans le bloc d‘alimentation peuvent<br />
détériorer les LED. Aucune tension primaire ne doit être présente.<br />
Remarque: L‘installation d‘un système anti-surtension local<br />
conforme aux normes DIN VDE 0100-443, DIN VDE 0100-534 et<br />
EN 62305 est recommandée.<br />
Remarque: L‘utilisation d‘outils en acier inoxydable est obligatoire!<br />
Pour éviter que la corrosion se forme!<br />
WIBRE Elektrogeräte Edmund Breuninger GmbH & Co. KG · Liebigstrasse 9 · 74211 Leingarten/Germany<br />
Telefon: +49 (0) 7131 9053-0 · Telefax: +49 (0) 7131 9053-19 · E-Mail: info@wibre.de 3/4
Installation · <strong>Manual</strong><br />
6. Garantiebestimmungen<br />
Folgende Garantiezeiten und Bestimmungen gelten vom Tage der<br />
Lieferung an:<br />
- 24 Monate auf WIBRE-Scheinwerfer.<br />
- Von den Garantieansprüchen ausgenommen sind Leuchtmittel<br />
- Unter die Garantie fallen nachweisbare Material-, Konstruktionsund<br />
Verarbeitungsfehler vonseiten des Herstellers.<br />
- Für Schäden, welche durch Nichtbeachtung dieser Betriebsanleitung,<br />
oder durch unsachgemäße Reparatur entstehen,<br />
können wir keine Garantie übernehmen.<br />
- Keine Garantie besteht, wenn die Installation nicht korrekt nach<br />
den Bestimmungen vorgenommen wurde oder bei Verwendung<br />
nicht geeigneter Leuchtmittel bzw. Anschlusskabel.<br />
- Änderungen, die dem technischen Fortschritt dienen, behalten<br />
wir uns vor.<br />
6. Warranty conditions<br />
The following warranty periods and conditions apply from the day of<br />
delivery:<br />
- 24 months on WIBRE spotlights.<br />
- Lamps are excluded from warranty claims.<br />
- The warranty covers verifiable material, design and work errors by the<br />
manufacturer.<br />
- We cannot accept liability for damages caused by failure to comply with<br />
this operating manual or through improper repair.<br />
- The warranty is void if the installation was not performed properly<br />
according to the instructions or unsuitable lamps or connecting cables<br />
are used.<br />
- We reserve the right to make changes for the purpose of technical<br />
progress.<br />
6. Conditions de garantie<br />
Les délais et dispositions de garantie suivantes s‘appliquent à compter de la<br />
date de livraison :<br />
- 24 mois sur le projecteur WIBRE.<br />
- Sont exclus des conditions de garantie les ampoules.<br />
• La garantie couvre les défauts de matériaux, les vices de construction et de<br />
traitement dont la preuve est apportée qu‘ils sont imputables au fabricant.<br />
• Les dommages, résultant du non-respect de la présente notice d‘utilisation<br />
ou d‘une réparation non conforme, sont exclus de la garantie.<br />
• Nous déclinons toute garantie dans les cas où l‘installation n‘a pas été<br />
effectuée dans les règles de l‘art selon les instructions ou lors de l‘utilisation<br />
d‘ampoules ou de câbles de raccordement non appropriés.<br />
• Nous nous réservons le droit de réaliser toute modification répondant au<br />
progrès technique.<br />
Artikelnummer<br />
Article Number<br />
Numéro d‘article<br />
Versionen: Aussenbereich –und Unterwasserbereich · Versions: Outdoor and Underwater environments · Versions: extérieure et subaquatique<br />
Leuchtmittel<br />
Lamps<br />
Source<br />
Lichtfarbe<br />
Light colour<br />
Lumière-couleur<br />
Leistung<br />
Wattage<br />
Puissance<br />
Konstantstrom<br />
Constant current<br />
Courant<br />
<strong>4.0072</strong>.00.01 3 POW-LED cold white 6.000 K total 5 W (420 lm) 350mA spot 10°<br />
<strong>4.0072</strong>.00.02 3 POW-LED warm white 3.000 K total 5 W (330 lm) 350mA spot 10°<br />
<strong>4.0072</strong>.00.03 3 POW-LED neutral white 4.500 K total 5 W (375 lm) 350mA spot 10°<br />
<strong>4.0072</strong>.00.06 3 POW-LED blue total 5 W (400 mW/LED) 350mA spot 10°<br />
<strong>4.0072</strong>.00.09 3 POW-LED RGB all on 5 W 350mA spot 10°<br />
Ausstrahlwinkel<br />
Radation Angle<br />
Angle de rayon<br />
<strong>4.0072</strong>.00.11 3 POW-LED cold white 6.000 K total 5 W (420 lm) 350mA medium 30°<br />
<strong>4.0072</strong>.00.12 3 POW-LED warm white 3.000 K total 5 W (330 lm) 350mA medium 30°<br />
<strong>4.0072</strong>.00.13 3 POW-LED neutral white 4.500 K total 5 W (375 lm) 350mA medium 30°<br />
<strong>4.0072</strong>.00.16 3 POW-LED blue total 5 W (400 mW/LED) 350mA medium 30°<br />
<strong>4.0072</strong>.00.19 3 POW-LED RGB all on 5 W 350mA medium 30°<br />
<strong>4.0072</strong>.00.20 QR-CB51 ECO 3.000K 20W (1000 cd) 12V-AC 36°<br />
<strong>4.0072</strong>.00.35 QR-CB51 ECO 3.000K 35W (2200 cd) 12V-AC 36°<br />
Artikelnummer<br />
Article Number<br />
Numéro d‘article<br />
Versionen: Nur Unterwasserbereich · Versions: Underwater environments only · Versions: subaquatique uniquement<br />
Leuchtmittel<br />
Lamps<br />
Source<br />
Lichtfarbe<br />
Light colour<br />
Lumière-couleur<br />
Leistung<br />
Wattage<br />
Puissance<br />
Konstantstrom<br />
Constant current<br />
Courant<br />
<strong>4.0072</strong>.30.01 3 POW-LED cold white 6.000 K total 9 W (690 lm) 700mA spot 10°<br />
<strong>4.0072</strong>.30.02 3 POW-LED warm white 3.000 K total 9 W (570 lm) 700mA spot 10°<br />
<strong>4.0072</strong>.30.03 3 POW-LED neutral white 4.500 K total 9 W (645 lm) 700mA spot 10°<br />
<strong>4.0072</strong>.30.06 3 POW-LED blue total 9 W (630 mW/LED) 700mA spot 10°<br />
<strong>4.0072</strong>.30.08 6 POW-LED cold white 6.000 K total 17 W (1380 lm) 700mA spot 10°<br />
<strong>4.0072</strong>.30.09 3 POW-LED RGB all on 9 W 700mA spot 10°<br />
<strong>4.0072</strong>.30.29 3 Multichip POW-LED RGB all on 28 W 700mA spot 10°<br />
Ausstrahlwinkel<br />
Radation Angle<br />
Angle de rayon<br />
<strong>4.0072</strong>.30.11 3 POW-LED cold white 6.000 K total 9 W (690 lm) 700mA medium 30°<br />
<strong>4.0072</strong>.30.12 3 POW-LED warm white 3.000 K total 9 W (570 lm) 700mA medium 30°<br />
<strong>4.0072</strong>.30.13 3 POW-LED neutral white 4.500 K total 9 W (645 lm) 700mA medium 30°<br />
<strong>4.0072</strong>.30.16 3 POW-LED blue total 9 W (630 mW/LED) 700mA medium 30°<br />
<strong>4.0072</strong>.30.18 6 POW-LED cold white 6.000 K total 17 W (1380 lm) 700mA medium 30°<br />
<strong>4.0072</strong>.30.19 3 POW-LED RGB all on 9 W 700mA medium 30°<br />
<strong>4.0072</strong>.30.39 3 Multichip POW-LED RGB all on 28 W 700mA medium 30°<br />
<strong>4.0072</strong>.30.20 QR-CB51 ECO 3.000K 20W (1000 cd) 12V-AC 36°<br />
<strong>4.0072</strong>.30.35 QR-CB51 ECO 3.000K 35W (2200 cd) 12V-AC 36°<br />
<strong>4.0072</strong>.30.50 QR-CB51 ECO 3.000K 50W (2850 cd) 12V-AC 36°<br />
Betriebsgeräte · Power supply · Alimentation<br />
Artikelnummer<br />
Article Number<br />
Numéro d‘article<br />
Beschreibung<br />
Description<br />
Description<br />
5.0635.65.03 Netzteil · Power Supply · Alimentation für · for · pour max. 3 POW-LED 350 mA, IP65<br />
5.0635.65.10 Netzteil · Power Supply · Alimentation für · for · pour max. 6 POW-LED 350 mA, IP65<br />
5.0635.65.20 Netzteil · Power Supply · Alimentation für · for · pour max. 12 POW-LED 350 mA, IP65<br />
5.0670.00.06 Netzteil · Power Supply · Alimentation nur für · only for · seul. pour 6 POW-LED Modul, 1400 mA, IP65<br />
5.0670.65.10 Netzteil · Power Supply · Alimentation für · for · pour max. 3 POW-LED 700 mA, IP65<br />
Artikelnummer<br />
Article Number<br />
Numéro d‘article<br />
Beschreibung<br />
Description<br />
Description<br />
5.0670.65.20 Netzteil · Power Supply · Alimentation für · for · pour max. 6 POW-LED 700 mA, IP65<br />
5.0635.09.16 Controler · Controler · Commandes für · for · pour max. 12 POW-LED RGB, 350 mA, IP65<br />
5.0670.09.18 Controler · Controler · Commandes für · for · pour max. 18 POW-LED RGB, 700 mA, IP65<br />
5.0098.00.00 Transformator · Transformer · Transformateur für · for · pour 1 x 50 W (50 VA)<br />
W363 Stand 07.14 - Technische Änderungen vorbehalten - Für Druckfehler übernehmen wir keine Haftung<br />
4/4<br />
WIBRE Elektrogeräte Edmund Breuninger GmbH & Co. KG · Liebigstrasse 9 · 74211 Leingarten/Germany<br />
Telefon: +49 (0) 7131 9053-0 · Telefax: +49 (0) 7131 9053-19 · E-Mail: info@wibre.de