Owner's Manual - Blackstar Amplification
Owner's Manual - Blackstar Amplification Owner's Manual - Blackstar Amplification
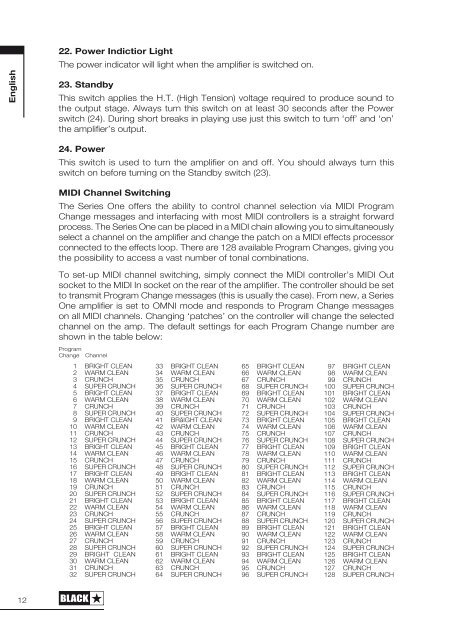
English 22. Power Indictior Light The power indicator will light when the amplifier is switched on. 23. Standby This switch applies the H.T. (High Tension) voltage required to produce sound to the output stage. Always turn this switch on at least 30 seconds after the Power switch (24). During short breaks in playing use just this switch to turn ‘off’ and ‘on’ the amplifier’s output. 24. Power This switch is used to turn the amplifier on and off. You should always turn this switch on before turning on the Standby switch (23). MIDI Channel Switching The Series One offers the ability to control channel selection via MIDI Program Change messages and interfacing with most MIDI controllers is a straight forward process. The Series One can be placed in a MIDI chain allowing you to simultaneously select a channel on the amplifier and change the patch on a MIDI effects processor connected to the effects loop. There are 128 available Program Changes, giving you the possibility to access a vast number of tonal combinations. To set-up MIDI channel switching, simply connect the MIDI controller’s MIDI Out socket to the MIDI In socket on the rear of the amplifier. The controller should be set to transmit Program Change messages (this is usually the case). From new, a Series One amplifier is set to OMNI mode and responds to Program Change messages on all MIDI channels. Changing ‘patches’ on the controller will change the selected channel on the amp. The default settings for each Program Change number are shown in the table below: Program Change Channel 1 BRIGHT CLEAN 2 WARM CLEAN 3 CRUNCH 4 SUPER CRUNCH 5 BRIGHT CLEAN 6 WARM CLEAN 7 CRUNCH 8 SUPER CRUNCH 9 BRIGHT CLEAN 10 WARM CLEAN 11 CRUNCH 12 SUPER CRUNCH 13 BRIGHT CLEAN 14 WARM CLEAN 15 CRUNCH 16 SUPER CRUNCH 17 BRIGHT CLEAN 18 WARM CLEAN 19 CRUNCH 20 SUPER CRUNCH 21 BRIGHT CLEAN 22 WARM CLEAN 23 CRUNCH 24 SUPER CRUNCH 25 BRIGHT CLEAN 26 WARM CLEAN 27 CRUNCH 28 SUPER CRUNCH 29 BRIGHT CLEAN 30 WARM CLEAN 31 CRUNCH 32 SUPER CRUNCH 33 BRIGHT CLEAN 34 WARM CLEAN 35 CRUNCH 36 SUPER CRUNCH 37 BRIGHT CLEAN 38 WARM CLEAN 39 CRUNCH 40 SUPER CRUNCH 41 BRåIGHT CLEAN 42 WARM CLEAN 43 CRUNCH 44 SUPER CRUNCH 45 BRIGHT CLEAN 46 WARM CLEAN 47 CRUNCH 48 SUPER CRUNCH 49 BRIGHT CLEAN 50 WARM CLEAN 51 CRUNCH 52 SUPER CRUNCH 53 BRIGHT CLEAN 54 WARM CLEAN 55 CRUNCH 56 SUPER CRUNCH 57 BRIGHT CLEAN 58 WARM CLEAN 59 CRUNCH 60 SUPER CRUNCH 61 BRIGHT CLEAN 62 WARM CLEAN 63 CRUNCH 64 SUPER CRUNCH 65 BRIGHT CLEAN 66 WARM CLEAN 67 CRUNCH 68 SUPER CRUNCH 69 BRIGHT CLEAN 70 WARM CLEAN 71 CRUNCH 72 SUPER CRUNCH 73 BRIGHT CLEAN 74 WARM CLEAN 75 CRUNCH 76 SUPER CRUNCH 77 BRIGHT CLEAN 78 WARM CLEAN 79 CRUNCH 80 SUPER CRUNCH 81 BRIGHT CLEAN 82 WARM CLEAN 83 CRUNCH 84 SUPER CRUNCH 85 BRIGHT CLEAN 86 WARM CLEAN 87 CRUNCH 88 SUPER CRUNCH 89 BRIGHT CLEAN 90 WARM CLEAN 91 CRUNCH 92 SUPER CRUNCH 93 BRIGHT CLEAN 94 WARM CLEAN 95 CRUNCH 96 SUPER CRUNCH 97 BRIGHT CLEAN 98 WARM CLEAN 99 CRUNCH 100 SUPER CRUNCH 101 BRIGHT CLEAN 102 WARM CLEAN 103 CRUNCH 104 SUPER CRUNCH 105 BRIGHT CLEAN 106 WARM CLEAN 107 CRUNCH 108 SUPER CRUNCH 109 BRIGHT CLEAN 110 WARM CLEAN 111 CRUNCH 112 SUPER CRUNCH 113 BRIGHT CLEAN 114 WARM CLEAN 115 CRUNCH 116 SUPER CRUNCH 117 BRIGHT CLEAN 118 WARM CLEAN 119 CRUNCH 120 SUPER CRUNCH 121 BRIGHT CLEAN 122 WARM CLEAN 123 CRUNCH 124 SUPER CRUNCH 125 BRIGHT CLEAN 126 WARM CLEAN 127 CRUNCH 128 SUPER CRUNCH Program Change Assignment To change the default assignments and set the amp up to respond to a different set of Program Changes: 1. The amp must be powered on with either the Standby switch (23) set to on, a jack in the Input socket, or both. 2. Send the appropriate Program Change message to the amp. 3. Press and hold in the appropriate front panel Channel Select switch for 2 seconds. The corresponding channel will be selected and its LED will flash three times in quick succession to indicate it has been assigned to the last received Program Change. The amplifier will now remember the selection. Repeat the operation until all your Program Changes have the desired amp channel assigned to them. MIDI Receive Channel Selection As mentioned previously, the default mode is set to OMNI and the amplifier will respond to MIDI Program Changes on all MIDI channels. You may wish to set the amplifier to respond to Program Changes on just a single MIDI channel. The Series One can be set to respond in this way for any of the first seven MIDI channels as follows: 1. The unit must be in standby (Power (24) on and Standby (23) off), and no lead connected to the Input jack. 2. Simultaneously press and hold the Bright Clean (3) and Crunch (9) Select switches. 3. After 2 seconds the LED for Super Crunch (10) will begin to flash continuously (2 flashes per second) to indicate that the unit is in MIDI Receive Channel Program Mode. 4. Release the Bright Clean (3) and Crunch (9) Select switches and select the required MIDI channel by using the Channel Select switches as shown in the table below: Bright Clean Warm Clean Crunch MIDI CHANNEL OFF OFF OFF OMNI ON OFF OFF 1 OFF ON OFF 2 ON ON OFF 3 OFF OFF ON 4 ON OFF ON 5 OFF ON ON 6 ON ON ON 7 The corresponding Channel Select LEDs will illuminate to show the selection and each press of the Channel Select switches will toggle the state of its associated LED. English 12 13
- Page 1 and 2: Owner’s Manual Designed and Engin
- Page 4: English Warning! Important safety i
- Page 8: English English Front Panel 1. Inpu
- Page 14: English English 5. To store the des
- Page 18: Wichtige Informationen zur Sicherhe
- Page 22: Deutsch Vorderseite 1. Eingang Hier
- Page 26: DPR im Overdrive-Betrieb Program Ch
- Page 30: Deutsch Rückseite 1. Netzanschluss
- Page 34: Consignes de sécurité importantes
- Page 38: Panneau de Contrôle Canal Overdriv
- Page 42: Français 22. Temoin incateur d’a
- Page 46: Français 5. MIDI Thru Tout signal
- Page 50: Introducción Características Espa
- Page 54: 16. Treble El control Treble permit
- Page 58: 2. Simultaneamente presionar y mant
English<br />
22. Power Indictior Light<br />
The power indicator will light when the amplifier is switched on.<br />
23. Standby<br />
This switch applies the H.T. (High Tension) voltage required to produce sound to<br />
the output stage. Always turn this switch on at least 30 seconds after the Power<br />
switch (24). During short breaks in playing use just this switch to turn ‘off’ and ‘on’<br />
the amplifier’s output.<br />
24. Power<br />
This switch is used to turn the amplifier on and off. You should always turn this<br />
switch on before turning on the Standby switch (23).<br />
MIDI Channel Switching<br />
The Series One offers the ability to control channel selection via MIDI Program<br />
Change messages and interfacing with most MIDI controllers is a straight forward<br />
process. The Series One can be placed in a MIDI chain allowing you to simultaneously<br />
select a channel on the amplifier and change the patch on a MIDI effects processor<br />
connected to the effects loop. There are 128 available Program Changes, giving you<br />
the possibility to access a vast number of tonal combinations.<br />
To set-up MIDI channel switching, simply connect the MIDI controller’s MIDI Out<br />
socket to the MIDI In socket on the rear of the amplifier. The controller should be set<br />
to transmit Program Change messages (this is usually the case). From new, a Series<br />
One amplifier is set to OMNI mode and responds to Program Change messages<br />
on all MIDI channels. Changing ‘patches’ on the controller will change the selected<br />
channel on the amp. The default settings for each Program Change number are<br />
shown in the table below:<br />
Program<br />
Change Channel<br />
1 BRIGHT CLEAN<br />
2 WARM CLEAN<br />
3 CRUNCH<br />
4 SUPER CRUNCH<br />
5 BRIGHT CLEAN<br />
6 WARM CLEAN<br />
7 CRUNCH<br />
8 SUPER CRUNCH<br />
9 BRIGHT CLEAN<br />
10 WARM CLEAN<br />
11 CRUNCH<br />
12 SUPER CRUNCH<br />
13 BRIGHT CLEAN<br />
14 WARM CLEAN<br />
15 CRUNCH<br />
16 SUPER CRUNCH<br />
17 BRIGHT CLEAN<br />
18 WARM CLEAN<br />
19 CRUNCH<br />
20 SUPER CRUNCH<br />
21 BRIGHT CLEAN<br />
22 WARM CLEAN<br />
23 CRUNCH<br />
24 SUPER CRUNCH<br />
25 BRIGHT CLEAN<br />
26 WARM CLEAN<br />
27 CRUNCH<br />
28 SUPER CRUNCH<br />
29 BRIGHT CLEAN<br />
30 WARM CLEAN<br />
31 CRUNCH<br />
32 SUPER CRUNCH<br />
33 BRIGHT CLEAN<br />
34 WARM CLEAN<br />
35 CRUNCH<br />
36 SUPER CRUNCH<br />
37 BRIGHT CLEAN<br />
38 WARM CLEAN<br />
39 CRUNCH<br />
40 SUPER CRUNCH<br />
41 BRåIGHT CLEAN<br />
42 WARM CLEAN<br />
43 CRUNCH<br />
44 SUPER CRUNCH<br />
45 BRIGHT CLEAN<br />
46 WARM CLEAN<br />
47 CRUNCH<br />
48 SUPER CRUNCH<br />
49 BRIGHT CLEAN<br />
50 WARM CLEAN<br />
51 CRUNCH<br />
52 SUPER CRUNCH<br />
53 BRIGHT CLEAN<br />
54 WARM CLEAN<br />
55 CRUNCH<br />
56 SUPER CRUNCH<br />
57 BRIGHT CLEAN<br />
58 WARM CLEAN<br />
59 CRUNCH<br />
60 SUPER CRUNCH<br />
61 BRIGHT CLEAN<br />
62 WARM CLEAN<br />
63 CRUNCH<br />
64 SUPER CRUNCH<br />
65 BRIGHT CLEAN<br />
66 WARM CLEAN<br />
67 CRUNCH<br />
68 SUPER CRUNCH<br />
69 BRIGHT CLEAN<br />
70 WARM CLEAN<br />
71 CRUNCH<br />
72 SUPER CRUNCH<br />
73 BRIGHT CLEAN<br />
74 WARM CLEAN<br />
75 CRUNCH<br />
76 SUPER CRUNCH<br />
77 BRIGHT CLEAN<br />
78 WARM CLEAN<br />
79 CRUNCH<br />
80 SUPER CRUNCH<br />
81 BRIGHT CLEAN<br />
82 WARM CLEAN<br />
83 CRUNCH<br />
84 SUPER CRUNCH<br />
85 BRIGHT CLEAN<br />
86 WARM CLEAN<br />
87 CRUNCH<br />
88 SUPER CRUNCH<br />
89 BRIGHT CLEAN<br />
90 WARM CLEAN<br />
91 CRUNCH<br />
92 SUPER CRUNCH<br />
93 BRIGHT CLEAN<br />
94 WARM CLEAN<br />
95 CRUNCH<br />
96 SUPER CRUNCH<br />
97 BRIGHT CLEAN<br />
98 WARM CLEAN<br />
99 CRUNCH<br />
100 SUPER CRUNCH<br />
101 BRIGHT CLEAN<br />
102 WARM CLEAN<br />
103 CRUNCH<br />
104 SUPER CRUNCH<br />
105 BRIGHT CLEAN<br />
106 WARM CLEAN<br />
107 CRUNCH<br />
108 SUPER CRUNCH<br />
109 BRIGHT CLEAN<br />
110 WARM CLEAN<br />
111 CRUNCH<br />
112 SUPER CRUNCH<br />
113 BRIGHT CLEAN<br />
114 WARM CLEAN<br />
115 CRUNCH<br />
116 SUPER CRUNCH<br />
117 BRIGHT CLEAN<br />
118 WARM CLEAN<br />
119 CRUNCH<br />
120 SUPER CRUNCH<br />
121 BRIGHT CLEAN<br />
122 WARM CLEAN<br />
123 CRUNCH<br />
124 SUPER CRUNCH<br />
125 BRIGHT CLEAN<br />
126 WARM CLEAN<br />
127 CRUNCH<br />
128 SUPER CRUNCH<br />
Program Change Assignment<br />
To change the default assignments and set the amp up to respond to a different set<br />
of Program Changes:<br />
1. The amp must be powered on with either the Standby switch (23) set to on, a<br />
jack in the Input socket, or both.<br />
2. Send the appropriate Program Change message to the amp.<br />
3. Press and hold in the appropriate front panel Channel Select switch for 2<br />
seconds.<br />
The corresponding channel will be selected and its LED will flash three times in quick<br />
succession to indicate it has been assigned to the last received Program Change.<br />
The amplifier will now remember the selection. Repeat the operation until all your<br />
Program Changes have the desired amp channel assigned to them.<br />
MIDI Receive Channel Selection<br />
As mentioned previously, the default mode is set to OMNI and the amplifier will<br />
respond to MIDI Program Changes on all MIDI channels. You may wish to set the<br />
amplifier to respond to Program Changes on just a single MIDI channel. The Series<br />
One can be set to respond in this way for any of the first seven MIDI channels<br />
as follows:<br />
1. The unit must be in standby (Power (24) on and Standby (23) off), and no lead<br />
connected to the Input jack.<br />
2. Simultaneously press and hold the Bright Clean (3) and Crunch (9) Select<br />
switches.<br />
3. After 2 seconds the LED for Super Crunch (10) will begin to flash<br />
continuously (2 flashes per second) to indicate that the unit is in MIDI Receive<br />
Channel Program Mode.<br />
4. Release the Bright Clean (3) and Crunch (9) Select switches and select the<br />
required MIDI channel by using the Channel Select switches as shown in the<br />
table below:<br />
Bright Clean Warm Clean Crunch MIDI CHANNEL<br />
OFF OFF OFF OMNI<br />
ON OFF OFF 1<br />
OFF ON OFF 2<br />
ON ON OFF 3<br />
OFF OFF ON 4<br />
ON OFF ON 5<br />
OFF ON ON 6<br />
ON ON ON 7<br />
The corresponding Channel Select LEDs will illuminate to show the selection<br />
and each press of the Channel Select switches will toggle the state of its<br />
associated LED.<br />
English<br />
12<br />
13


