INSTALLATION INSTRUCTIONS 30" (76.2 CM) GAS ... - Jenn-Air
INSTALLATION INSTRUCTIONS 30" (76.2 CM) GAS ... - Jenn-Air
INSTALLATION INSTRUCTIONS 30" (76.2 CM) GAS ... - Jenn-Air

Create successful ePaper yourself
Turn your PDF publications into a flip-book with our unique Google optimized e-Paper software.
Burner Input Requirements<br />
Input ratings shown on the gas information plate are for<br />
elevations up to 2,000 ft (609.6 m).<br />
For elevations above 2,000 ft (609.6 m), ratings are reduced at a<br />
rate of 4% for each 1,000 ft (304.8 m) above sea level (not<br />
applicable for Canada).<br />
Gas Supply Pressure Testing<br />
Gas supply pressure for testing regulator must be at least<br />
1" water column pressure above the manifold pressure shown on<br />
the gas information plate.<br />
Line pressure testing above ½ psi gauge (14" WCP)<br />
The range and its individual shutoff valve must be disconnected<br />
from the gas supply piping system during any pressure testing of<br />
that system at test pressures in excess of ½ psi (3.5 kPa).<br />
Line pressure testing at ½ psi gauge (14" WCP) or lower<br />
The range must be isolated from the gas supply piping system by<br />
closing its individual manual shutoff valve during any pressure<br />
testing of the gas supply piping system at test pressures equal to<br />
or less than ½ psi (3.5 kPa).<br />
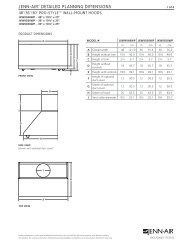
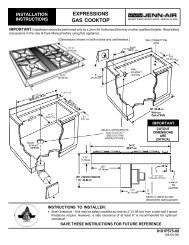
Countertop Preparation<br />
(for Slide-in Ranges Only)<br />
The cooktop sides of the slide-in range fit over the cutout edge of<br />
your countertop.<br />
If you have a square finish (flat) countertop and the opening width<br />
is 30" (<strong>76.2</strong> cm), no countertop preparation is required.<br />
Formed front-edged countertops must have molded edge<br />
shaved flat ³⁄₈" (1.0 cm) from each front corner of opening.<br />
Tile countertops may need trim cut back ³⁄₈" (1.0 cm) from each<br />
front corner and/or rounded edge flattened.<br />
30"<br />
(<strong>76.2</strong> cm)<br />
30 ¾"<br />
(78.1 cm)<br />
³⁄₈"<br />
(1.0 cm)<br />
If countertop opening width is greater than 30" (<strong>76.2</strong> cm), adjust<br />
the ³⁄₈" (1.0 cm) dimension.<br />
Countertop must be level. Place level on countertop, first side to<br />
side, then front to back. If countertop is not level, range will not<br />
be level. Range must be level for satisfactory baking conditions.<br />
<strong>INSTALLATION</strong> <strong>INSTRUCTIONS</strong><br />
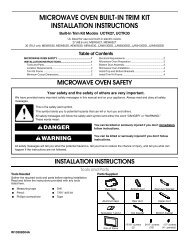
Unpack Range<br />
WARNING<br />
Excessive Weight Hazard<br />
Use two or more people to move and install range.<br />
Failure to do so can result in back or other injury.<br />
1. Remove shipping materials, tape and film from the range.<br />
Keep cardboard bottom under range.<br />
2. Remove oven racks and parts package from inside oven.<br />
3. To remove cardboard bottom, place range on its back, take<br />
4 cardboard corners from the carton. Stack one cardboard<br />
corner on top of another. Repeat with the other 2 corners.<br />
Place them lengthwise on the floor behind the range to<br />
support the range when it is laid on its back.<br />
4. Using 2 or more people, firmly grasp the range and gently lay<br />
it on its back on the cardboard corners.<br />
5. Pull cardboard bottom firmly to remove.<br />
6. Use an adjustable wrench to loosen the leveling legs.<br />
7. Place cardboard or hardboard in front of range. Using 2 or<br />
more people, stand range back up onto cardboard or<br />
hardboard.<br />
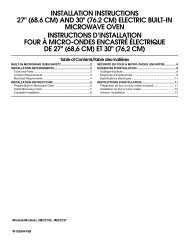
Adjust Leveling Legs<br />
1. If range height adjustment is necessary, use a wrench or<br />
pliers to loosen the 4 leveling legs.<br />
This may be done with the range on its back or with the range<br />
supported on 2 legs after the range has been placed back to<br />
a standing position.<br />
NOTE: To place range back up into a standing position, put a<br />
sheet of cardboard or hardboard in front of range. Using 2 or<br />
more people, stand range back up onto the cardboard or<br />
hardboard.<br />
2. Adjust the leveling legs to the correct height. Leveling legs<br />
can be loosened to add up to a maximum of 1" (2.5 cm). A<br />
minimum of ³⁄₁₆" (5 mm) is needed to engage the anti-tip<br />
bracket.<br />
NOTE: If height adjustment is made when range is standing,<br />
tilt the range back to adjust the front legs, then tilt forward to<br />
adjust the rear legs.<br />
3. When the range is at the correct height, check that there is<br />
adequate clearance under the range for the anti-tip bracket.<br />
Before sliding range into its final location, check that the antitip<br />
bracket will slide under the range and onto the rear<br />
leveling leg prior to anti-tip bracket installation.<br />
9