INSTALLATION INSTRUCTIONS 30" (76.2 CM) GAS ... - Jenn-Air
INSTALLATION INSTRUCTIONS 30" (76.2 CM) GAS ... - Jenn-Air INSTALLATION INSTRUCTIONS 30" (76.2 CM) GAS ... - Jenn-Air
6. Read the Use and Care Guide or User Instructions. 7. Turn on surface burners and oven. See the Use and Care Guide or User Instructions for specific instruction on range operation. If range does not operate, check the following: ■ Household fuse is intact and tight, or circuit breaker has not tripped. ■ Range is plugged into a grounded 3 prong outlet. ■ Electrical supply is connected. ■ See “Troubleshooting” in the Use and Care Guide or User Instructions. 8. When the range has been on for 5 minutes, check for heat. If the range is cold, turn off the range and check that the gas supply line shutoff valve is open. ■ If the gas supply line shutoff valve is closed, open it, then repeat the 5-minute test as outlined above. ■ If the gas supply line shutoff valve is open, press the CANCEL button on the oven control panel and contact a qualified technician. 9. Use the Flow Tester Card provided with your range to check the airflow (see card for step-by-step instructions). If there is not sufficient airflow, review the “Venting Requirements” and “Venting Methods” sections. If you need Assistance or Service: Please reference the “Assistance or Service” section of the Use and Care Guide or the cover of the User Instructions, or contact the dealer from whom you purchased your range. Gas conversions from Natural gas to LP gas or from LP gas to Natural gas must be done by a qualified installer. WARNING GAS CONVERSIONS LP Gas Conversion WARNING Explosion Hazard Use a new CSA International approved gas supply line. Install a shut-off valve. Securely tighten all gas connections. If connected to LP, have a qualified person make sure gas pressure does not exceed 14" (36 cm) water column. Examples of a qualified person include: licensed heating personnel, authorized gas company personnel, and authorized service personnel. Failure to do so can result in death, explosion, or fire. Tip Over Hazard A child or adult can tip the range and be killed. Install anti-tip bracket to floor or wall per installation instructions. Slide range back so rear range foot is engaged in the slot of the anti-tip bracket. Re-engage anti-tip bracket if range is moved. Do not operate range without anti-tip bracket installed and engaged. Failure to follow these instructions can result in death or serious burns to children and adults. 1. Turn manual shutoff valve to the closed position. A A. To range B. Shutoff valve (closed position) C. Gas supply line 2. Unplug range or disconnect power. B C 20
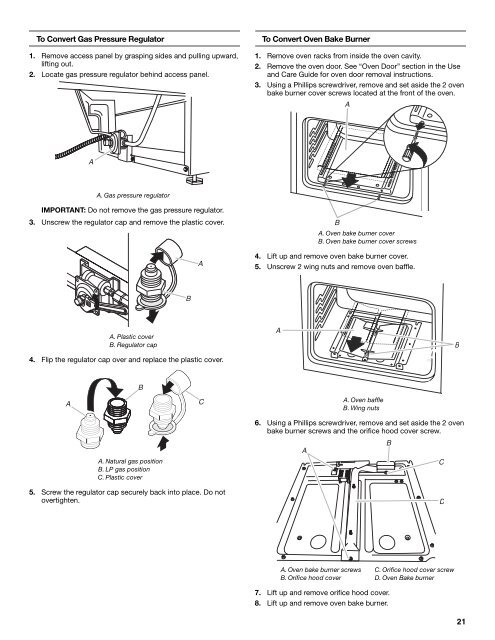
To Convert Gas Pressure Regulator 1. Remove access panel by grasping sides and pulling upward, lifting out. 2. Locate gas pressure regulator behind access panel. To Convert Oven Bake Burner 1. Remove oven racks from inside the oven cavity. 2. Remove the oven door. See “Oven Door” section in the Use and Care Guide for oven door removal instructions. 3. Using a Phillips screwdriver, remove and set aside the 2 oven bake burner cover screws located at the front of the oven. A A A. Gas pressure regulator IMPORTANT: Do not remove the gas pressure regulator. 3. Unscrew the regulator cap and remove the plastic cover. A B A. Oven bake burner cover B. Oven bake burner cover screws 4. Lift up and remove oven bake burner cover. 5. Unscrew 2 wing nuts and remove oven baffle. B A. Plastic cover B. Regulator cap 4. Flip the regulator cap over and replace the plastic cover. A B B A C A. Oven baffle B. Wing nuts 6. Using a Phillips screwdriver, remove and set aside the 2 oven bake burner screws and the orifice hood cover screw. A. Natural gas position B. LP gas position C. Plastic cover A B C 5. Screw the regulator cap securely back into place. Do not overtighten. D A. Oven bake burner screws B. Orifice hood cover C. Orifice hood cover screw D. Oven Bake burner 7. Lift up and remove orifice hood cover. 8. Lift up and remove oven bake burner. 21
- Page 1 and 2: INSTALLATION INSTRUCTIONS 30" (76.2
- Page 3 and 4: WARNING Tip Over Hazard A child or
- Page 5 and 6: Cabinet Dimensions Cabinet opening
- Page 7 and 8: Calculating Vent System Length IMPO
- Page 9 and 10: Burner Input Requirements Input rat
- Page 11 and 12: Rear Wall Venting 1. Mark the wall
- Page 13 and 14: 9. Position blower motor in cabinet
- Page 15 and 16: WARNING Make Gas Connection 5. Use
- Page 17 and 18: 10. Depending on your installation,
- Page 19: 6. To start the Bake function, pres
- Page 23 and 24: 4. Install the Number .038 LP gas o
- Page 25 and 26: 5. Unscrew 2 wing nuts and remove o
- Page 27 and 28: Use the following chart for correct
- Page 29 and 30: SÉCURITÉ DE LA CUISINIÈRE Votre
- Page 31 and 32: ■ ■ Canalisation métallique Br
- Page 33 and 34: ■ Éviter les assemblages par ser
- Page 35 and 36: IMPORTANT : La cuisinière doit êt
- Page 37 and 38: INSTRUCTIONS D’INSTALLATION Déba
- Page 39 and 40: 5. Fixer le ventilateur au sol avec
- Page 41 and 42: 2. Tracer et découper un trou de 5
- Page 43 and 44: 2. Vérifier tous les raccordements
- Page 45 and 46: 12. Insérer le filtre d’évacuat
- Page 47 and 48: 4. Utiliser un tournevis à lame pl
- Page 49 and 50: Conversion du détendeur 1. Retirer
- Page 51 and 52: 4. Installer l’injecteur femelle
- Page 53 and 54: 4. Retourner le chapeau du détende
- Page 55 and 56: Conversion des brûleurs de surface
To Convert Gas Pressure Regulator<br />
1. Remove access panel by grasping sides and pulling upward,<br />
lifting out.<br />
2. Locate gas pressure regulator behind access panel.<br />
To Convert Oven Bake Burner<br />
1. Remove oven racks from inside the oven cavity.<br />
2. Remove the oven door. See “Oven Door” section in the Use<br />
and Care Guide for oven door removal instructions.<br />
3. Using a Phillips screwdriver, remove and set aside the 2 oven<br />
bake burner cover screws located at the front of the oven.<br />
A<br />
A<br />
A. Gas pressure regulator<br />
IMPORTANT: Do not remove the gas pressure regulator.<br />
3. Unscrew the regulator cap and remove the plastic cover.<br />
A<br />
B<br />
A. Oven bake burner cover<br />
B. Oven bake burner cover screws<br />
4. Lift up and remove oven bake burner cover.<br />
5. Unscrew 2 wing nuts and remove oven baffle.<br />
B<br />
A. Plastic cover<br />
B. Regulator cap<br />
4. Flip the regulator cap over and replace the plastic cover.<br />
A<br />
B<br />
B<br />
A<br />
C<br />
A. Oven baffle<br />
B. Wing nuts<br />
6. Using a Phillips screwdriver, remove and set aside the 2 oven<br />
bake burner screws and the orifice hood cover screw.<br />
A. Natural gas position<br />
B. LP gas position<br />
C. Plastic cover<br />
A<br />
B<br />
C<br />
5. Screw the regulator cap securely back into place. Do not<br />
overtighten.<br />
D<br />
A. Oven bake burner screws<br />
B. Orifice hood cover<br />
C. Orifice hood cover screw<br />
D. Oven Bake burner<br />
7. Lift up and remove orifice hood cover.<br />
8. Lift up and remove oven bake burner.<br />
21


