INSTALLATION INSTRUCTIONS 30" (76.2 CM) GAS ... - Jenn-Air
INSTALLATION INSTRUCTIONS 30" (76.2 CM) GAS ... - Jenn-Air
INSTALLATION INSTRUCTIONS 30" (76.2 CM) GAS ... - Jenn-Air

Create successful ePaper yourself
Turn your PDF publications into a flip-book with our unique Google optimized e-Paper software.
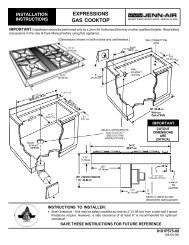
1. Attach flexible vent (provided) to the blower motor inlet using<br />
a vent clamp.<br />
Connect Range to Downdraft System<br />
6. Remove cardboard or hardboard from under the range. Using<br />
2 or more people, gently move range into its final location.<br />
1<br />
1<br />
2<br />
B<br />
A. Inlet flexible vent<br />
B. Vent clamp<br />
2. Check countertop height to allow range top to clear<br />
countertop. Adjusting leveling legs if necessary.<br />
3. Move range close to cabinet opening.<br />
A<br />
WARNING<br />
7. Check that the flexible connector and electrical cord are not<br />
kinked. Use a flashlight to look underneath the bottom of the<br />
range.<br />
8. Verify that the anti-tip bracket is installed and engaged.<br />
a.) Open access panel by grasping sides and pulling upward,<br />
lifting out.<br />
b.) Use a flashlight to look underneath the bottom of the<br />
range.<br />
c.) Visually check that the rear range foot is inserted into the<br />
slot of the anti-tip bracket.<br />
Electrical Shock Hazard<br />
Plug into a grounded 3 prong outlet.<br />
Do not remove ground prong.<br />
Do not use an adapter.<br />
Do not use an extension cord.<br />
Failure to follow these instructions can result in death,<br />
fire, or electrical shock.<br />
4. Plug into a grounded 3 prong outlet.<br />
5. Plug range electrical connector into the downdraft blower<br />
motor.<br />
9. Level the range.<br />
a.) Place rack in oven.<br />
b.) Place level on rack and check levelness of the range, first<br />
side to side; then front to back.<br />
A<br />
c.) If range is not level, pull range forward until rear leveling<br />
leg is removed from the anti-tip bracket.<br />
d.) Use a wrench or pliers to adjust leveling legs up or down<br />
until range is level.<br />
e.) Push range back into position.<br />
f.) Check that rear leveling leg is engaged in anti-tip bracket.<br />
NOTE: Range must be level for satisfactory baking<br />
performance.<br />
B<br />
A. Power supply cord<br />
B. Range electrical connector to blower motor<br />
16