Instructions de montage - Vismaravetro Srl
Instructions de montage - Vismaravetro Srl
Instructions de montage - Vismaravetro Srl

You also want an ePaper? Increase the reach of your titles
YUMPU automatically turns print PDFs into web optimized ePapers that Google loves.
programma<br />
Sintesi<br />
SL - SN<br />
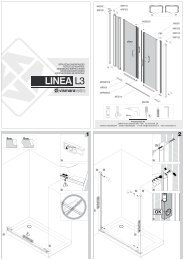
ISTRUZIONI DI MONTAGGIO<br />
NOTICE DE MONTAGE<br />
ASSEMBLING INSTRUCTIONS<br />
MONTAGEANLEITUNGEN<br />
INSTRUCCIONES DE MONTAJE<br />
vismara
Sintesi SL<br />
I<br />
Verificare che il piatto doccia sia posato in bolla.<br />
Estrarre dall'imballaggio il KIT SMF e posizionarlo a secco sul piatto doccia alle distanze consigliate.<br />
Verificare che le dimensioni <strong>de</strong>l KIT SMF siano idonee al piatto doccia.<br />
Proce<strong>de</strong>re al fissaggio <strong>de</strong>l kit utilizzando l'apposito bia<strong>de</strong>sivo.<br />
Le dimensioni e l'estensibilità <strong>de</strong>l KIT SMF corrispondono esattamente a quelle <strong>de</strong>lla cabina doccia.<br />
N.B.: Non posare la cabina doccia se il KIT SMF non si adatta perfettamente al piatto.<br />
F<br />
Vérifier que le receveur <strong>de</strong> douche soit posé <strong>de</strong> niveau.<br />
Extraire <strong>de</strong> l’emballage le KIT SMF et le positionner à blanc sur le plat du receveur aux distances conseillées.<br />
Vérifier que les dimensions du KIT SMF s’adaptent parfaitement au receveur <strong>de</strong> douche.<br />
Procé<strong>de</strong>r à la fixation du kit en utilisant l’adhésif double face fourni.<br />
Les dimensions et l’extensibilité du KIT SMF correspon<strong>de</strong>nt exactement à cette cabine <strong>de</strong> douche,<br />
N.B.: Ne pas poser la cabine douche si le KIT SMF ne s’adapte pas parfaitement.<br />
GB<br />
Check that the shower tray is installed perfectly level.<br />
Get out of the packaging the SMF KIT and position it on the dry shower tray according to the suggested<br />
distances. Check that the SMF KIT dimensions are suitable for the shower tray.<br />
Proceed fixing the kit by using the provi<strong>de</strong>d double si<strong>de</strong>d sticking tape. Dimensions and extensibility of the<br />
SMF KIT correspond exactly to those ones of the shower enclosure.<br />
N.B.: Do not mount the shower enclosure if the SMF KIT doesn’t perfectly matches with the<br />
tray.<br />
D<br />
Prüfen ob die Brausetasse waagrecht ausgerichtet ist.<br />
Die SMF-Schiene (KIT-SMF) auspacken und auf die Brausetasse auf <strong>de</strong>n vorgegebenen Abstän<strong>de</strong>n positionieren.<br />
Prüfen ob die Masse <strong>de</strong>s KIT SMF auf die Brausetasse passen.<br />
Den KIT mit einem Doppelklebeband fixieren. Die Masse und die Verstellbarkeit von KIT SMF sind genau an<br />
die Masse <strong>de</strong>r Duschkabine angepasst und ausgerichtet.<br />
! Die Duschkabine nicht montieren, wenn <strong>de</strong>r KIT SMF nicht perfekt auf die Brausetasse passt !<br />
SP<br />
Comprobar que el plato <strong>de</strong> ducha esté montado nivelado.<br />
Extraer <strong>de</strong>l embalaje el Kit SMF y presentarlo sobre el plato <strong>de</strong> ducha a la distancia aconsejada.<br />
Verificar que las dimensiones <strong>de</strong>l KIT SMF sean idóneas al plato <strong>de</strong> ducha.<br />
Proce<strong>de</strong>r a la fijación <strong>de</strong>l Kit utilizando el adhesivo incorporado.<br />
Las dimensiones y la extensibilidad <strong>de</strong>l Kit SMF correspon<strong>de</strong>n exactamente a las <strong>de</strong> la cabina <strong>de</strong> ducha.<br />
Nota: No montar la cabina <strong>de</strong> ducha si el Kit SMF no se adapta perfectamente al plato.<br />
2
ca 5 mm<br />
ca 15 mm<br />
SX<br />
3
Sintesi SL<br />
I<br />
Fissare al muro il profilo “M” con cerniere.<br />
Importante: il profilo <strong>de</strong>ve essere a piombo.<br />
Montare l’anta in vetro sul profilo “M”.<br />
Nel caso le pareti siano costituite con materiali di scarsa tenuta (cartongesso, porte a<br />
scrigno,…), non utilizzare i tasselli forniti, ma procurare a<strong>de</strong>guati sistemi di fissaggio<br />
F<br />
Fixer au mur le profilé “M” avec charnières.<br />
Important : Le profil doit être d’aplomb.<br />
Monter la porte sur le profilé “M”<br />
Avant d’effectuer la fixation <strong>de</strong>s montants, il est très important <strong>de</strong> vérifier la nature <strong>de</strong>s cloisons<br />
sur lesquelles ceux-ci seront fixés. Il faut obligatoirement utiliser <strong>de</strong>s chevilles appropriées<br />
à la nature <strong>de</strong>s cloisons.<br />
GB<br />
Fix the profile “M” with hinges at the wall.<br />
Important : the profile must be perfectly level.<br />
Install the glass door on profile “M”.<br />
In case of low resistance walls (plaster walls, casket doors, ..) don’t use the supplied screws<br />
but provi<strong>de</strong> a<strong>de</strong>quate fixing solution.<br />
D<br />
Fixieren Sie Profil “M” mit Scharnieren an <strong>de</strong>r Wand.<br />
Wichtig: prüfen Sie ob das Profil im rechten Winkel montiert wur<strong>de</strong>.<br />
Montieren Sie die Glastüre mit <strong>de</strong>m Profil “M”.<br />
Falls die Wand eine Fertigteilwand ist o<strong>de</strong>r aus einem Material mit schwacher Resistenz<br />
besteht, bitte nicht die beigelegten Dübel verwen<strong>de</strong>n son<strong>de</strong>rn das dazu passen<strong>de</strong><br />
Befestigungsmaterial besorgen bzw. verwen<strong>de</strong>n.<br />
SP<br />
Fijar a la pared el perfil “M” con bisagras.<br />
Importante: el perfil <strong>de</strong>be estar nivelado verticalmente.<br />
Montar la puerta <strong>de</strong> cristal sobre el perfil “M”.<br />
En caso <strong>de</strong> que las pare<strong>de</strong>s sean <strong>de</strong> material <strong>de</strong> poca resistencia (pladur, pared <strong>de</strong> puerta<br />
corre<strong>de</strong>ra, etc) no usar los tacos suministrados, <strong>de</strong>ben procurarse sistemas <strong>de</strong> fijación<br />
a<strong>de</strong>cuados al caso.<br />
4
M<br />
ø6<br />
5
Sintesi SL<br />
I<br />
Posizionare il montante “N” come indicato nel disegno. Le tre viti a brugola “V” <strong>de</strong>vono essere allentate.<br />
L’anta in vetro chiusa mantiene il profilo “N” nella giusta posizione.<br />
Segnare e fissare a muro (Ø 6 mm).<br />
Bloccare “N” tramite le viti “V”: non serrare eccessivamente.<br />
Calzare la guarnizione "M" sul lato inferiore <strong>de</strong>lla porta con il labbro rivolto all'interno.<br />
F<br />
Positionner le montant “N” comme indiqué sur le <strong>de</strong>ssin. Les trois vis “V” doivent être <strong>de</strong>sserrées.<br />
La porte en verre fermée maintient le profil “N” dans la bonne position.<br />
Tracer et fixer au mur (Ø 6mm).<br />
Bloquer “N” par l’intermédiaire <strong>de</strong>s vis “V” sans trop serrer.<br />
Insérer le joint “M” sur le côté inférieur <strong>de</strong> la porte avec la lèvre souple vers l’intérieur.<br />
GB<br />
Position the wall profile “N” as shown. The three screws “V” have to be loosen.<br />
The glass door has to be closed in or<strong>de</strong>r to keep profile “N” in the correct position.<br />
Mark and fix to the wall (Ø 6 mm).<br />
Block “N” by means of screws “V”: do not tighten too much.<br />
Slip on the seal "M" on the lower si<strong>de</strong> of the door with lip inwards.<br />
D<br />
Positionieren Sie das Wandprofil “N” (siehe Abbildung). Die 3 Schrauben “V” müssen gelockert wer<strong>de</strong>n.<br />
Die geschlossene Türe haltet das Profil “N” in <strong>de</strong>r korrekten Position.<br />
Zeichen Sie und an <strong>de</strong>r Wand fixieren (Ø 6 mm).<br />
Befestigen Sie “N” mit Schrauben “V”: bitte nicht fest anziehen.<br />
Montieren Sie die Dichtung „M“ auf <strong>de</strong>n unteren Türteil mit <strong>de</strong>r Lippe nach innen.<br />
SP<br />
Colocar el perfil “N” como se indica en la figura. Los tres tornillos “V” <strong>de</strong>ben ser aflojados.<br />
La puerta <strong>de</strong> cristal cerrada mantiene el perfil “N” en su posición justa.<br />
Marcar y fijarlo a la pared (O 6 mm)<br />
Fijar “N” mediante los tornillos “V”: no apretar excesivamente.<br />
Colocar la junta “M” en el lado inferior <strong>de</strong> la puerta con el labio hacia el interior.<br />
6
V<br />
N<br />
V<br />
ø6<br />
N<br />
V<br />
V<br />
7
Sintesi SL<br />
I<br />
IMPORTANTE<br />
A montaggio finito sigillare esternamente con silicone tutte le parti <strong>de</strong>lla cabina doccia a contatto con il<br />
piatto e le pareti per evitare ogni minima fuoriuscita d'acqua.<br />
Tenere periodicamente controllato il serraggio <strong>de</strong>lla viteria (profili e cerniere).<br />
F<br />
IMPORTANT<br />
Le <strong>montage</strong> terminé, procé<strong>de</strong>r au siliconage à l’extérieur <strong>de</strong> toutes les parties <strong>de</strong> la porte en contact avec<br />
les murs et le receveur, pour éviter la moindre fuite d’eau.<br />
Contrôler périodiquement le serrage <strong>de</strong>s éléments (profils et charnières).<br />
GB<br />
IMPORTANT<br />
After installation seal externally with silicone all parts of the shower enclosure touching the tray<br />
Periodically tighten the screws (profiles and hinges).<br />
D<br />
WICHTIG<br />
Nach <strong>de</strong>r Montage dichten Sie <strong>de</strong>n Abstand zwischen Duschabtrennung und Duschwanne und zwischen<br />
Wandprofil und Wän<strong>de</strong>n von außen mit Silikon ab um einen Wasseraustritt zu verhin<strong>de</strong>rn.<br />
Regelmäßig soll die Kontrolle über die Schließung erfolgen (Profile, Scharniere und Schrauben kontrollieren<br />
und justieren).<br />
SP<br />
IMPORTANTE<br />
Al finalizar el montaje sellar externamente con silicona todas las partes <strong>de</strong> la cabina <strong>de</strong> ducha en contacto<br />
con el plato y las pare<strong>de</strong>s para evitar cualquier salida <strong>de</strong> agua.<br />
Controlar periódicamente la fijación <strong>de</strong> la tornillería (perfiles y bisagras).<br />
8
24 h<br />
9
Sintesi SN<br />
I<br />
Verificare che il piatto doccia sia posato in bolla.<br />
Estrarre dall'imballaggio il KIT SMF e posizionarlo a secco sul piatto doccia alle distanze consigliate.<br />
Verificare che le dimensioni <strong>de</strong>l KIT SMF siano idonee al piatto doccia.<br />
Proce<strong>de</strong>re al fissaggio <strong>de</strong>l kit utilizzando l'apposito bia<strong>de</strong>sivo.<br />
Le dimensioni e l'estensibilità <strong>de</strong>l KIT SMF corrispondono esattamente a quelle <strong>de</strong>lla cabina doccia.<br />
N.B.: Non posare la cabina doccia se il KIT SMF non si adatta perfettamente al piatto.<br />
F<br />
Vérifier que le receveur <strong>de</strong> douche soit posé <strong>de</strong> niveau.<br />
Extraire <strong>de</strong> l’emballage le KIT SMF et le positionner à blanc sur le plat du receveur aux distances conseillées.<br />
Vérifier que les dimensions du KIT SMF s’adaptent parfaitement au receveur <strong>de</strong> douche.<br />
Procé<strong>de</strong>r à la fixation du kit en utilisant l’adhésif double face fourni.<br />
Les dimensions et l’extensibilité du KIT SMF correspon<strong>de</strong>nt exactement à cette cabine <strong>de</strong> douche,<br />
N.B.: Ne pas poser la cabine douche si le KIT SMF ne s’adapte pas parfaitement.<br />
GB<br />
Check that the shower tray is installed perfectly level.<br />
Get out of the packaging the SMF KIT and position it on the dry shower tray according to the suggested<br />
distances. Check that the SMF KIT dimensions are suitable for the shower tray.<br />
Proceed fixing the kit by using the provi<strong>de</strong>d double si<strong>de</strong>d sticking tape. Dimensions and extensibility of the<br />
SMF KIT correspond exactly to those ones of the shower enclosure.<br />
N.B.: Do not mount the shower enclosure if the SMF KIT doesn’t perfectly matches with the<br />
tray.<br />
D<br />
Prüfen ob die Brausetasse waagrecht ausgerichtet ist.<br />
Die SMF-Schiene (KIT-SMF) auspacken und auf die Brausetasse auf <strong>de</strong>n vorgegebenen Abstän<strong>de</strong>n positionieren.<br />
Prüfen ob die Masse <strong>de</strong>s KIT SMF auf die Brausetasse passen.<br />
Den KIT mit einem Doppelklebeband fixieren. Die Masse und die Verstellbarkeit von KIT SMF sind genau an<br />
die Masse <strong>de</strong>r Duschkabine angepasst und ausgerichtet.<br />
! Die Duschkabine nicht montieren, wenn <strong>de</strong>r KIT SMF nicht perfekt auf die Brausetasse passt !<br />
SP<br />
Comprobar que el plato <strong>de</strong> ducha esté montado nivelado.<br />
Extraer <strong>de</strong>l embalaje el Kit SMF y presentarlo sobre el plato <strong>de</strong> ducha a la distancia aconsejada.<br />
Verificar que las dimensiones <strong>de</strong>l KIT SMF sean idóneas al plato <strong>de</strong> ducha.<br />
Proce<strong>de</strong>r a la fijación <strong>de</strong>l Kit utilizando el adhesivo incorporado.<br />
Las dimensiones y la extensibilidad <strong>de</strong>l Kit SMF correspon<strong>de</strong>n exactamente a las <strong>de</strong> la cabina <strong>de</strong> ducha.<br />
Nota: No montar la cabina <strong>de</strong> ducha si el Kit SMF no se adapta perfectamente al plato.<br />
10
ca 5 mm<br />
ca 15 mm<br />
SX<br />
11
Sintesi SN<br />
I<br />
Separare i due profili ruotando "B" verso "A". Posizionare il profilo "A" al muro centrandolo sulla base terminale<br />
<strong>de</strong>l KIT SMF, nell'apposito perno.<br />
Fissare alla parete il profilo "A" verificandone la messa a piombo.<br />
Rimontare il profilo "B" tolto in prece<strong>de</strong>nza lasciando le viti a brugola “V” ben allentate.<br />
Nel caso le pareti siano costituite con materiali di scarsa tenuta (cartongesso, porte a<br />
scrigno,…), non utilizzare i tasselli forniti, ma procurare a<strong>de</strong>guati sistemi di fissaggio<br />
F<br />
Séparer les <strong>de</strong>ux profils en tournant "B" vers "A".<br />
Positionner le profil "A" sur le mur en le centrant sur l’axe <strong>de</strong> la basette du KIT SMF.<br />
Fixer le profil “A” avec <strong>de</strong>s chevilles adaptées à la nature <strong>de</strong>s murs.<br />
Important : le profil doit être parfaitement d’aplomb.<br />
Remonter le profil "B" enlevé auparavant en laissant les vis "V" bien <strong>de</strong>sserrés.<br />
Avant d’effectuer la fixation <strong>de</strong>s montants, il est très important <strong>de</strong> vérifier la nature <strong>de</strong>s cloisons<br />
sur lesquelles ceux-ci seront fixés. Il faut obligatoirement utiliser <strong>de</strong>s chevilles appropriées<br />
à la nature <strong>de</strong>s cloisons.<br />
GB<br />
Separate the two profiles turning “B” towards “A”. Position the profile “A” to the wall centering it at the terminal<br />
base “K1” of the SMF KIT, in the pre-existing pivot bolt.<br />
Fix profile “A” to the wall checking with a spirit level.<br />
Re-fit the profile “B” previously separated.<br />
In case of low resistance walls (plaster walls, casket doors, ..) don’t use the supplied screws<br />
but provi<strong>de</strong> a<strong>de</strong>quate fixing solution.<br />
D<br />
Die zwei Wand-Profile „A“ und „B“ trennen. Das Profil „A“ an <strong>de</strong>r Wand positionieren, und beim Unterteil von<br />
KIT SMF in vorgegebenen Zapfen zentrieren.<br />
Profil „A“ an <strong>de</strong>r Wand fixieren und prüfen ob dieses im rechten Winkel montiert wur<strong>de</strong>.<br />
Das Profil „B“ montieren, und mit <strong>de</strong>n „V“ Schrauben befestigen, jedoch nicht fest anziehen.<br />
Falls die Wand eine Fertigteilwand ist o<strong>de</strong>r aus einem Material mit schwacher Resistenz<br />
besteht, bitte nicht die beigelegte Dübel verwen<strong>de</strong>n son<strong>de</strong>rn das dazu passen<strong>de</strong><br />
Befestigungsmaterial besorgen bzw. verwen<strong>de</strong>n.<br />
SP<br />
Separar los dos perfiles girando “B” sobre “A”. Colocar el perfil “A” en la pared centrándolo sobre la base<br />
terminal <strong>de</strong>l Kit SMF, en su correspondiente perno.<br />
Fijar a la pared el perfil “A” verificando su nivelado.<br />
Volver a montar el perfil “B” <strong>de</strong>smontado previamente aflojando bien los tornillos “V”.<br />
En caso <strong>de</strong> que las pare<strong>de</strong>s sean <strong>de</strong> material <strong>de</strong> poca resistencia (pladur, pared <strong>de</strong> puerta<br />
corre<strong>de</strong>ra, etc) no usar los tacos suministrados, <strong>de</strong>ben procurarse sistemas <strong>de</strong> fijación<br />
a<strong>de</strong>cuados al caso.<br />
12
1 2 3 4<br />
V<br />
A<br />
A<br />
B<br />
ø6<br />
K1<br />
13
Sintesi SN<br />
I<br />
Infilare il vetro fisso nella fessura formata dai due profili "A" e "B". Esten<strong>de</strong>re il fisso fino a far coinci<strong>de</strong>re la<br />
freccia posta sul vetro con quella posta sulla guida "K3". Mettere il fisso a piombo e bloccare tramite le tre<br />
viti senza testa (grani) "V".<br />
Serrare la vite in nylon <strong>de</strong>l fermavetro inferiore "K3" senza forzare eccessivamente.<br />
Infilare l'anta sul fisso dall'alto tenendola aperta di 90° verso l'esterno.<br />
F<br />
Enfiler le verre <strong>de</strong> la partie fixe dans la fente formée <strong>de</strong>s <strong>de</strong>ux profils "A" et "B".<br />
Étendre la partie fixe jusqu'à faire coïnci<strong>de</strong>r la flèche positionnée sur le verre avec celle positionnée sur le<br />
gui<strong>de</strong> "K3". Régler l’aplomb et puis serrer les trois vis "V".<br />
Serrer la vis en nylon qui est sur le gui<strong>de</strong> "K3" sans forcer excessivement.<br />
Assembler la porte sur la partie fixe à l’ai<strong>de</strong> <strong>de</strong>s charnières en la tenant ouverte <strong>de</strong> 90° vers l'extérieur.<br />
GB<br />
Sli<strong>de</strong> the fixed panel in the gap between the two profiles “A” and “B”. Extend the fixed panel and make the arrow<br />
on the glass matching with the arrow on the gui<strong>de</strong> “K3”. Check with the spirit level and fix the 3 screws “V”.<br />
Tighten the nylon screw of the glass clip “K3” without forcing excessively.<br />
Fit the door on the fixed panel keeping it open 90° outwards.<br />
D<br />
Der Glasfixteil wird in die Öffnung zwischen “A” und “B” Profil hineingeschoben.<br />
Der Fixteil bis zum Pfeil auf <strong>de</strong>m Glas ausziehen und mit <strong>de</strong>m Pfeil auf <strong>de</strong>r Schiene “K3”. Prüfen ob dieses<br />
im rechten Winkel montiert wur<strong>de</strong> und mit <strong>de</strong>n 3 Schrauben ohne Kopf “V” befestigen.<br />
Anschließend die Nylon-Schrauben <strong>de</strong>r unteren Glashalterung “K3” ohne grossen Druck befestigen.<br />
Die Tür wird auf <strong>de</strong>n Fixteil in einem Winkel von 90° von aussen hineingehoben.<br />
SP<br />
Insertar el cristal fijo en la ranura formada por los dos perfiles “A” y “B”. Exten<strong>de</strong>r el fijo hasta hacer coincidir<br />
la flecha <strong>de</strong>l cristal con la colocada sobre la guía “K3”. Verificar su verticalidad y fijarlo mediante los tres<br />
tornillos sin cabeza “V”.<br />
Apretar el tornillo <strong>de</strong> nylon <strong>de</strong> la fijación inferior “K3” sin forzar excesivamente.<br />
Colocar la puerta abierta en 90º hacia el exterior sobre el fijo <strong>de</strong>s<strong>de</strong> arriba.<br />
14
B<br />
A<br />
F<br />
V<br />
V<br />
K3<br />
K2<br />
V<br />
15
Sintesi SN<br />
I<br />
Posizionare il montante “N” come indicato nel disegno. Le tre viti a frugola “V” <strong>de</strong>vono essere allentate.<br />
L’anta in vetro chiusa mantiene il profilo “N” nella giusta posizione.<br />
Segnare e fissare a muro (Ø 6 mm).<br />
Bloccare “N” tramite le viti “V”: non serrare eccessivamente.<br />
Calzare la guarnizione "M" sul lato inferiore <strong>de</strong>lla porta con il labbro rivolto all'interno.<br />
F<br />
Positionner le montant “N” comme indiqué sur le <strong>de</strong>ssin.<br />
Les trois vis “V” doivent être <strong>de</strong>sserrées.<br />
La porte fermée, maintenir le profil “N” dans la bonne position.<br />
Tracer et fixer au mur le profil “N”, avec <strong>de</strong>s chevilles adaptées à la nature du mur.<br />
Bloquer “N” par l’intermédiaire <strong>de</strong>s vis “V” sans trop serrer.<br />
Insérer le joint “M” sur le côté inférieur <strong>de</strong> la porte avec la lèvre souple vers l’intérieur.<br />
GB<br />
Position the wall profile “N” as shown. The three screws “V” have to be loose.<br />
The glass door has to be closed in or<strong>de</strong>r to keep profile “N” in the correct position.<br />
Mark and fix to the wall (Ø 6 mm).<br />
Block “N” by means of screws “V”: do not tighten too much.<br />
Slip on the seal "M" on the lower si<strong>de</strong> of the door with lip inwards.<br />
D<br />
Positionieren Sie das Wandprofil “N” (siehe Abbildung). Die 3 Schrauben “V” müssen gelockert wer<strong>de</strong>n.<br />
Die geschlossene Türe haltet das Profil “N” in <strong>de</strong>r korrekter Position.<br />
Zeichen und an <strong>de</strong>r Wand fixieren (Ø 6 mm).<br />
Befestigen Sie “N” mit Schrauben “V”: nicht fest anziehen.<br />
Montieren Sie die Dichtung “M” auf <strong>de</strong>n unteren Türteil mit <strong>de</strong>r Lippe nach innen.<br />
SP<br />
Colocar el montante “N” como se indica en la figura. Los tres tornillos “V” <strong>de</strong>ben <strong>de</strong> estar bien aflojados.<br />
La puerta <strong>de</strong> cristal cerrada mantiene el perfil “N” en la posición justa.<br />
Marcar y fijarlo a la pared (Ø 6 mm)<br />
Fijar “N” mediante los tornillos “V”: no apretar excesivamente.<br />
Colocar la junta “M” en la parte inferior <strong>de</strong> la puerta con el labio hacia el interior.<br />
16
V<br />
N<br />
ø6<br />
N<br />
17
Sintesi SN<br />
I<br />
Dopo aver controllato il corretto posizionamento e funzionamento <strong>de</strong>lla cabina doccia, serrare bene le viti “V”<br />
e proce<strong>de</strong>re alla sigillatura come indicato nella figura.<br />
IMPORTANTE<br />
A montaggio finito sigillare esternamente con silicone tutte le parti <strong>de</strong>lla cabina doccia a contatto con il<br />
piatto e le pareti per evitare ogni minima fuoriuscita d'acqua.<br />
Sigillare lo spazio tra il fisso ed il profilo SMF utilizzando, dove possibile, la guarnizione siliconica fornita a<br />
corredo (figura A), in alternativa al silicone (figura B).<br />
Tenere periodicamente controllato il serraggio <strong>de</strong>lla viteria (profili e cerniere).<br />
F<br />
Après avoir contrôlé le <strong>montage</strong> et le bon fonctionnement <strong>de</strong> la cabine douche, bien serrer les vis "V" et procé<strong>de</strong>r<br />
au siliconage comme indiqué sur les <strong>de</strong>ssins.<br />
IMPORTANT<br />
Le <strong>montage</strong> terminé, procé<strong>de</strong>r au siliconage à l’extérieur <strong>de</strong> toutes les parties <strong>de</strong> la porte en contact avec<br />
les murs et le receveur, pour éviter la moindre fuite d’eau.<br />
Colmater l’espace entre les fixes et le profil SMF, en utilisant si possible le joint souple d’étanchéité en silicone<br />
fourni avec les accessoires (situation A), ou éventuellement avec du mastic silicone (situation B).<br />
Contrôler périodiquement le serrage <strong>de</strong>s éléments (profils et charnières).<br />
GB<br />
After checking the correct fitting and functioning of the shower enclosure, tighten the screws “V” and proceed<br />
with silicone sealing as shown.<br />
IMPORTANT<br />
After installation seal externally with silicone all parts of the shower enclosure touching the tray<br />
Seal the space between the fixed and the SMF profile using, where possible, with the silicon seal supplied<br />
together with the shower enclosure (situation A), alternatively with silicone (situation B).<br />
Periodically check the tightening of the screws (profiles and hinges).<br />
D<br />
Nach<strong>de</strong>m die korrekte Position und Funktion <strong>de</strong>r Duschkabine überprüft wur<strong>de</strong>, die Schrauben „V“ gut anziehen<br />
bzw. befestigen und die Fixierung erfolgt laut Skizze.<br />
Regelmäßig soll die Kontrolle über die Schließung erfolgen (Profile, Scharniere und Schrauben kontrollieren<br />
und justieren).<br />
WICHTIG !<br />
Nach <strong>de</strong>r Montage dichten Sie <strong>de</strong>n Abstand zwischen Duschabtrennung und Duschwanne und zwischen<br />
Wandprofil und Wän<strong>de</strong>n von außen mit Silikon ab, um einen Wasseraustritt zu verhin<strong>de</strong>rn.<br />
Dichten Sie <strong>de</strong>n Abstand zwischen Fixteil und SMF- Profil mit <strong>de</strong>r Beigelieferter Silikondichtung (Abbildung<br />
A), o<strong>de</strong>r mit Silikon ab (Abbildung B).<br />
SP<br />
Después <strong>de</strong> haber comprobado la correcta colocación y funcionamiento <strong>de</strong> la cabina <strong>de</strong> ducha, apretar bien<br />
los tornillos “V” y proce<strong>de</strong>r al sellado como se indica en la figura.<br />
IMPORTANTE<br />
Al finalizar el montaje sellar externamente con silicona todas las partes <strong>de</strong> la cabina <strong>de</strong> ducha en contacto<br />
con el plato y las pare<strong>de</strong>s para evitar cualquier salida <strong>de</strong> agua.<br />
Sellar el espacio entre el fijo y el perfil SMF utilizando, don<strong>de</strong> sea posible, la junta <strong>de</strong> silicónica suministrada<br />
(Situación A), en alternativa a la silicona (Situación B).<br />
Controlar periódicamente la fijación <strong>de</strong> la tornillería (perfiles y bisagras)<br />
18
SILICONE<br />
SILICONE<br />
SILICONE<br />
A<br />
B<br />
24 h<br />
19
Sintesi SL<br />
SL<br />
MSI1201<br />
MSI73<br />
MSI75<br />
MSI4100<br />
MSI41 (MSI80+MSI81)<br />
MSI02<br />
MSI08<br />
MSI76<br />
MSI40L<br />
MSI65<br />
20
Sintesi SN<br />
SN<br />
MSI25<br />
MSI12<br />
MSI02<br />
MSI01<br />
MSI01<br />
MSI4100<br />
MSI41 (MSI80+MSI81)<br />
MSI24<br />
MSI01<br />
MSI13<br />
MSI01<br />
MSI04<br />
MSI08<br />
MSI07<br />
MSI65<br />
MSI40N<br />
21
Suggerimenti per la corretta manutenzione <strong>de</strong>lla cabina<br />
Conseils pour l’entretien d’une cabine <strong>de</strong> douche<br />
Suggestions for correct maintenance of the shower enclosure<br />
I<br />
• Se possibile, asciugare sempre la cabina doccia dopo l’uso: questa semplice operazione eviterà la formazione di macchie di calcare.<br />
• Per la pulizia utilizzare <strong>de</strong>tersivi liquidi ed acqua, con un panno morbido o una spugna. Evitare prodotti in pasta o abrasivi.<br />
• Non pulire le parti in alluminio con prodotti aggressivi. Evitare can<strong>de</strong>ggina, alcool, acetone, solventi vari o prodotti particolarmente acidi.<br />
Cristalli con trattamento preventivo anticalcare TPA<br />
<strong>Vismaravetro</strong> adotta l’innovativa tecnologia “TPA” per la protezione <strong>de</strong>lle superfici vetrate <strong>de</strong>lle cabine doccia.<br />
Il trattamento consiste nell’applicazione di uno speciale polimero che riduce notevolmente l’a<strong>de</strong>sione <strong>de</strong>l calcare sulle pareti in cristallo.<br />
Il sistema “TPA” applicato ai vetri <strong>de</strong>lle cabine doccia consente di facilitare le operazioni di pulizia e riduce l’aggressione <strong>de</strong>i residui calcarei<br />
e <strong>de</strong>llo sporco in genere.<br />
Come pulire i vetri trattati con TPA<br />
• Se possibile asciugare sempre la cabina doccia dopo l’uso.<br />
• Utilizzare un panno morbido con acqua per asportare i residui calcarei di sporco.<br />
• L’utilizzo di una spatola tergivetro ren<strong>de</strong> più comoda ed efficace l’operazione di asportazione <strong>de</strong>lle residue gocce o velo d’acqua.<br />
Come NON pulire i vetri trattati con TPA<br />
• NON utilizzare prodotti in pasta o abrasivi.<br />
• NON utilizzare can<strong>de</strong>ggina, alcol, acetone, solventi vari o prodotti particolarmente acidi (tipo Viakal o sturalavandini).<br />
• NON utilizzare prodotti contenenti silicone. Stendono una patina sulla superficie <strong>de</strong>l cristallo che annulla completamente l’effetto <strong>de</strong>l TPA.<br />
La durata <strong>de</strong>l trattamento è dipen<strong>de</strong>nte dalla frequenza d’uso <strong>de</strong>lla cabina doccia e dalla relativa manutenzione che <strong>de</strong>ve essere effettuata con<br />
<strong>de</strong>i prodotti a<strong>de</strong>guati.<br />
Le caratteristiche chimico-fisiche <strong>de</strong>ll’acqua e in particolare la durezza possono influenzare la normale durata <strong>de</strong>l trattamento (4/5 anni).<br />
TPA non elimina la pulizia <strong>de</strong>l cristallo, ma la ren<strong>de</strong> più facile.<br />
F<br />
• Il est recommandé <strong>de</strong> toujours essuyer la cabine <strong>de</strong> douche après usage : cette simple opération évite la formation <strong>de</strong> traces <strong>de</strong> calcaire.<br />
• Pour le nettoyage, utiliser du savon et <strong>de</strong> l’eau, une peau <strong>de</strong> chamois ou une éponge douce. Eviter les produits en pâte ou abrasifs.<br />
• Ne jamais entretenir les parties en aluminium avec <strong>de</strong>s produits agressifs. Eviter l’eau <strong>de</strong> javel, l’alcool, l’acétone, les solvants divers ou<br />
les produits particulièrement aci<strong>de</strong>s.<br />
Traitement Préventif Anticalcaire<br />
<strong>Vismaravetro</strong> utilise la nouvelle technologie "TPA" pour la protection <strong>de</strong>s surfaces en glace <strong>de</strong>s cabines <strong>de</strong> douche.<br />
Le traitement consiste dans l’application d’un polymère spécial qui empêche en gran<strong>de</strong> partie le calcaire contenu dans l’eau d’adhérer aux<br />
parois <strong>de</strong> la douche. Le traitement TPA, appliqué en cours <strong>de</strong> production sur les glaces <strong>de</strong>s cabines <strong>de</strong> douche, facilite les opérations <strong>de</strong><br />
nettoyage et d’entretien en limitant tout type <strong>de</strong> dépôts, et plus particulièrement le calcaire.<br />
Comment nettoyer les glaces traitées avec TPA ?<br />
• Si possible, essuyez toujours la cabine après son utilisation.<br />
• Utilisez un chiffon doux (peau <strong>de</strong> chamois humi<strong>de</strong>) pour éliminer les résidus <strong>de</strong> calcaire et tout type <strong>de</strong> dépôts.<br />
• Avec une raclette, l’élimination <strong>de</strong>s gouttes d’eau et <strong>de</strong> la con<strong>de</strong>nsation est plus facile et efficace<br />
Ce qu’il ne faut surtout pas faire sur les glaces traitées avec TPA<br />
• NE PAS utiliser <strong>de</strong> produits pâteux ou abrasifs<br />
• NE PAS utiliser <strong>de</strong> javel, d’alcool, d’acétone, <strong>de</strong> solvants et les produits particulièrement aci<strong>de</strong>s comme les anti-calcaire concentrés,<br />
• NE PAS utiliser non plus <strong>de</strong> produits contenant du silicone, sous peine d’annuler l’efficacité du traitement TPA.<br />
Durée du traitement<br />
• la durée du traitement dépend <strong>de</strong> la fréquence d’utilisation <strong>de</strong> la cabine <strong>de</strong> douche et <strong>de</strong> son entretien avec <strong>de</strong>s produits appropriés.<br />
• les caractéristiques physiques et chimiques, la dureté <strong>de</strong> l’eau sont toutefois susceptibles <strong>de</strong> limiter la durée normale du traitement (4/5<br />
années).<br />
TPA ne vous dispense pas du nettoyage <strong>de</strong>s glaces, mais le rend bien plus facile!<br />
GB<br />
• If possible, always dry the shower enclosure after using it: this simple operation will avoid limestone spots.<br />
• For cleaning use cleansing liquid and water, with smooth cloth or sponge. Don’t use paste product or abrasive.<br />
• Don’t clean aluminium parts with aggressive products. Avoid bleach, alcohol, acetone, solvents or acid products.<br />
Preventive treatment against limescale <strong>de</strong>posits<br />
<strong>Vismaravetro</strong> uses a new technology “TPA” for protecting the glass surfaces of our shower enclosures. The glass surface is treated with a<br />
polymer which limits the adhesive properties of residues such as lime scale, grease and soap <strong>de</strong>posits.<br />
The TPA treatment helps with the cleaning and removal of the lime scale <strong>de</strong>posits and residues from the glass.<br />
How to clean the glass surfaces treated with TPA<br />
• If possible always dry the shower enclosure after use<br />
• Use a wet soft cloth when cleaning the glass<br />
• The cleaning is ma<strong>de</strong> by a glass cleaning bla<strong>de</strong><br />
Don’t use any of the following products to clean tpa treated glass<br />
• DON’T use paste or abrasive products<br />
• DON’T use bleach, alcohol, solvents or very acidic products (such as Viakal or drain cleaner)<br />
• DON’T use products containing silicone They <strong>de</strong>posit produce a film on the glass surface cancelling completely the effects of TPA.<br />
The lasting effect of the treatment <strong>de</strong>pends from the frequency of use of the shower enclosures and its cleaning with correct products. The<br />
chemical and physical characteristics of the water and in particular its hardness<br />
can influence the lasting of the treatment (4/5 years).<br />
TPA does not eliminate glass cleaning but is <strong>de</strong>signed to make it easier<br />
22
Korrekte Pflegehinweise für die Duschabtrennung<br />
Sugerencias para el correcto mantenimiento <strong>de</strong> la cabina<br />
D<br />
• Wenn möglich sollte die Duschabtrennung nach Gebrauch immer getrocknet wer<strong>de</strong>n; dieses einfache Mittel vermei<strong>de</strong>t die Bildung von Kalkflecken.<br />
• Zur Reinigung verwen<strong>de</strong>n Sie flüssige Reinigungsmittel und Wasser mit einem weichen Tuch o<strong>de</strong>r einem Schwamm. Vermei<strong>de</strong>n Sie <strong>de</strong>n<br />
Gebrauch von Schleifpaste o<strong>de</strong>r Schleifmitteln.<br />
• Bitte verwen<strong>de</strong>n Sie zur Reinigung <strong>de</strong>r Oberfläche aus Aluminium keine säurehaltige Reinigungsmittel. Vermei<strong>de</strong>n Sie Bleichmittel, Alkohol,<br />
Aceton, Lösungsmittel, o<strong>de</strong>r saure Mittel.<br />
Behandlung von Gläsern mit TPA Kalkschutz<br />
Vismara verwen<strong>de</strong>t die innovative Technologie “TPA” für <strong>de</strong>n Schutz <strong>de</strong>r Duschabtrennungsglasoberfläche.<br />
Die Behandlung besteht aus <strong>de</strong>r Verwendung von einem speziellen Mittel, das die Kalkablagerungen an <strong>de</strong>n Glaswän<strong>de</strong>n merklich reduziert.<br />
Die TPA Kalkschutz Behandlung auf <strong>de</strong>n Wän<strong>de</strong>n <strong>de</strong>r Duschkabinen ermöglicht eine einfache Reinigung und reduziert merklich <strong>de</strong>n Angriff<br />
<strong>de</strong>r Kalkablagerungen und <strong>de</strong>n damit verursachten Schmutz.<br />
Wie Sie die Gläser mit TPA Kalkschutz reinigen<br />
• Trocknen Sie immer die Duschkabine nach <strong>de</strong>m Gebrauch.<br />
• Verwen<strong>de</strong>n Sie ein weiches Tuch mit Wasser, um die Kalkablagerungen zu entfernen.<br />
• Der Gebrauch einer Wischerspachtel erleichtert und verbessert die Reinigung von Wassertropfen auf <strong>de</strong>r Duschkabine.<br />
Wie Sie die Gläser mit TPA Kalkschutz NICHT reinigen sollten.<br />
• KEINE Schleifpaste und Schleifmittel verwen<strong>de</strong>n.<br />
• KEINE Bleichmittel, Alkohol, Aceton, Lösungsmittel, o<strong>de</strong>r saure Mittel (z.B.Viakal) verwen<strong>de</strong>n<br />
• KEINE Reinigungsmittel aus Silikon verwen<strong>de</strong>n. Diese Produkte streichen eine Patina auf die Glasoberfläche auf, die die positive Wirkung<br />
<strong>de</strong>r TPA Behandlung aufhebt.<br />
Die Dauerhaftigkeit <strong>de</strong>r TPA Antikalkbehandlung hängt von <strong>de</strong>r Häufigkeit <strong>de</strong>s Duschabtrennungsgebrauchs ab, wie auch von <strong>de</strong>r Pflege,<br />
die mit geeigneten Reinigungsmitteln verwen<strong>de</strong>t wer<strong>de</strong>n soll. Die chemischen und physischen Wassermerkmale und die können die Wasserhärte<br />
können die Dauerhaftigkeit <strong>de</strong>r Antikalkbehandlung (4/5 Jahre) än<strong>de</strong>rn.<br />
TPA hebt die Reinigung <strong>de</strong>s Duschglases nicht auf, son<strong>de</strong>rn erleichtert sie.<br />
SP<br />
• Si es posible, secar siempre la cabina <strong>de</strong> ducha <strong>de</strong>spués <strong>de</strong> su uso: esta simple peración evitará la formación <strong>de</strong> manchas <strong>de</strong> alcáreas.<br />
• Para su limpieza usar <strong>de</strong>tergentes líquidos y gua, con un paño mórbido o una esponja. Evitar productos en pasta o abrasivos.<br />
• No limpiar las partes <strong>de</strong> aluminio con roductos agresivos. Evitar lejía, alcohol, cetona, disolventes varios o productos articularmente ácidos.<br />
Tratamiento Preventivo Anticalcareo<br />
<strong>Vismaravetro</strong> incorpora la innovadora tecnología “TPA” para la protección e las superficies <strong>de</strong> vidrio <strong>de</strong> las cabinas <strong>de</strong> ducha. l tratamiento<br />
consiste en la aplicación <strong>de</strong> un polímero especial que reduce notablemente las adhesiones calcáreas en las superficies <strong>de</strong> cristal.<br />
El sistema “TPA” aplicado al vidrio <strong>de</strong> las cabinas <strong>de</strong> ducha facilita las operaciones <strong>de</strong> limpieza y reduce las agresiones <strong>de</strong> los residuos<br />
calcáreos y <strong>de</strong> la suciedad en general.<br />
Como limpiar el vidrio tratado con TPA<br />
• Si es posible secar siempre la cabina <strong>de</strong> ducha <strong>de</strong>spués <strong>de</strong> su uso.<br />
• Utilizar un paño mórbido con agua para quitar los residuos calcáreos <strong>de</strong> suciedad.<br />
• El uso <strong>de</strong> una espátula limpia cristales hace mas cómoda y eficaz la operación <strong>de</strong> limpieza <strong>de</strong> las gotas residuales o el empañado <strong>de</strong>l cristal.<br />
Como NO limpiar el vidrio tratado con TPA<br />
• NO utilizar productos en pasta o abrasivos.<br />
• NO utilizar lejía, alcohol, acetona, disolventes varios o productos particularmente ácidos (tipo Viacal)<br />
• NO utilizar productos que contengan siliconas. Extien<strong>de</strong>n una patina sobre la superficie <strong>de</strong>l cristal que anula completamente el efecto <strong>de</strong>l TPA.<br />
La duración <strong>de</strong>l tratamiento <strong>de</strong>pen<strong>de</strong> <strong>de</strong> la frecuencia <strong>de</strong> uso <strong>de</strong> la cabina <strong>de</strong> ducha y <strong>de</strong> que el mantenimiento se haya hecho con productos<br />
a<strong>de</strong>cuados.<br />
Las características químico-físicas <strong>de</strong>l agua, y en particular <strong>de</strong> su dureza, pue<strong>de</strong>n influenciar en la duración normal <strong>de</strong>l tratamiento (4/5 años).<br />
TPA no sustituye la limpieza <strong>de</strong>l cristal, pero la hace mas fácil.<br />
TPA<br />
vetro / verre / glass / Glas / vidrio<br />
23
<strong>Vismaravetro</strong> <strong>Srl</strong><br />
20050 Verano Brianza (MI) - Italy<br />
Via Furlanelli, 29<br />
telefono 0362/992244<br />
telefax 0362/992255<br />
e-mail: info@vismaravetro.it<br />
www.vismaravetro.it<br />
vismara