RPH12000 CE.qxp - Ramsey Winch
RPH12000 CE.qxp - Ramsey Winch
RPH12000 CE.qxp - Ramsey Winch

You also want an ePaper? Increase the reach of your titles
YUMPU automatically turns print PDFs into web optimized ePapers that Google loves.
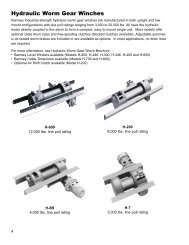
Remove o-ring (item #32), bushing (item #12) from outside of<br />
motor end bearing (item #4), remove o-ring (item #33), bearing<br />
40<br />
(item #11) from inside of motor end bearing (item #4). Place<br />
29<br />
new, well oiled, o-ring (item #33) into groove inside of end<br />
bearing and press new bearing (item #11) into end bearing.<br />
5<br />
Press bushing (item #12) onto end bearing and dip o-ring (item<br />
13<br />
#32) in oil and seat into groove of end bearing.<br />
Remove seal (item #40) from gear housing end bearing (item<br />
11<br />
#5). Loosen nut (item #21) and remove nylon setscrew (item<br />
32<br />
10<br />
#18) and remove ring gear (item #29) from gear housing end<br />
bearing, if necessary. Remove bushing (item #13) and bearing<br />
(item #10) from gear housing end bearing (item #5). Press<br />
18<br />
new bushing (item #13) and bearing (item #10) into place in<br />
33<br />
end bearing. Install ring gear and nylon setscrew and nut. Ring 4<br />
21<br />
gear must be fully seated in gear housing end bearing (item #5)<br />
12<br />
and slot in ring gear must NOT be aligned with clutch shifter<br />
hole. Install new seal in gear housing end bearing, with sharp<br />
edge of seal outward.<br />
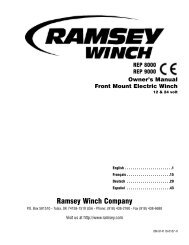
Generously apply grease (MOBILITH SHC 007) to teeth of ring gear (item #28), teeth of planet gears in drum (item #1) and to bushing in<br />
gear housing end bearing (item #5). Apply a small amount of grease to base of bushing on motor end bearing (item #4). Apply grease to<br />
teeth of gear and short end of shaft (item #8). Place gear end of shaft through thrust washer (item #47) and into bearing in end bearing<br />
(item #5). Place drum over shaft and rotate drum to engage planet gears with output gear on shaft and with ring gear in end bearing.<br />
Assemble end bearing (item #4) to drum assembly and use tie plates (item #9) and capscrews (item #16) to hold both end bearings<br />
together. Tighten capscrews to 55 Ft. Lbs. (75 Nm.). Slide thrust washer (item #48) over end of shaft and against end bearing (item #4).<br />
Place snap ring (item #41) into groove in splined end of shaft.<br />
If necessary, remove and replace appropriate shifter assembly (item #2 or #3), as follows:<br />
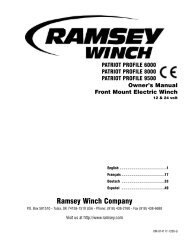
MANUAL CLUTCH SHIFTER ASSEMBLY<br />
Remove by loosening setscrew (item #18), jam nut and unscrewing clutch shifter. Be sure slot in ring gear is not aligned with clutch shifter<br />
hole. Rotate drum, if necessary, to insure hole and slot are not aligned. Reinstall clutch shifter with plunger, jam nut and handle positioned<br />
in cylinder housing, as shown. Thread assembly (with handle engaged in cylinder slot) into the end bearing. Pull drum toward the brake<br />
housing end bearing to remove play. Hold drum in the position and continue threading the shifter assembly in until the gap between the end<br />
of the handle and cylinder is 7/16 +0 -1/16 inch and handle is in the horizontal position, as shown below. NOTE: This gap will vary with<br />
drum endplay. With the drum pulled against the gear housing, the gap should be 3/8 inch. Lightly tighten jam nut. Rotate drum until handle<br />
snaps fully into the engaged position. Pull handle out and rotate 90o. Verify that drum can be rotated freely (at least one full revolution) with<br />
clutch shifter at DISENGAGED position. Securely tighten jam nut while holding the handle. Tighten setscrew securely. Re-check clutch<br />
operation as described on page 5.<br />
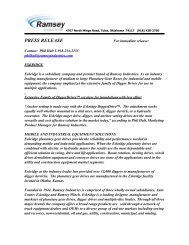
AIR CYLINDER SHIFTER ASSEMBLY<br />
HANDLE (HORIZONTAL)<br />
Remove by loosening setscrew (item #18),<br />
jam nut and unscrewing clutch shifter. To<br />
reinstall, thread air cylinder into housing.<br />
Install one or two shims (item #45) under<br />
cylinder head, if needed, to orient air cylinder<br />
port for pneumatic connections.<br />
Tighten setscrew. Refer to page 5 and<br />
check for proper operation of the clutch.<br />
BLOCKED CLUTCH<br />
Insert plunger into gear housing bore so it<br />
engages into ring gear slot. Pull drum<br />
flange toward gear housing and thread<br />
setscrew into housing until it bottoms out<br />
and drum starts to move. Back setscrew<br />
out 1/2 turn and lock in place with jam nut.<br />
16<br />
41<br />
48<br />
9<br />
4<br />
9<br />
1<br />
9<br />
16<br />
PLANET<br />
GEARS<br />
8<br />
PLUNGER<br />
18<br />
45<br />
21<br />
3<br />
47<br />
7/16<br />
2<br />
+0<br />
-1/16<br />
CYLINDER<br />
MANUAL CLUTCH ADJUSTMENT<br />
20<br />
5<br />
JAM NUT<br />
PLUNGER ASSEMBLY<br />
JAM NUT<br />
SETSCREW<br />
BLOCKED CLUTCH<br />
MANUAL CLUTCH<br />
SHIFTER<br />
AIR-CYLINDER<br />
CLUTCH SHIFTER