RPH12000 CE.qxp - Ramsey Winch
RPH12000 CE.qxp - Ramsey Winch
RPH12000 CE.qxp - Ramsey Winch

You also want an ePaper? Increase the reach of your titles
YUMPU automatically turns print PDFs into web optimized ePapers that Google loves.
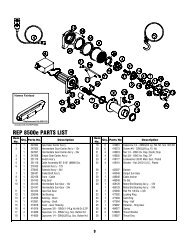
Set winch on gear housing end with motor end bearing (item #4) up. Insert (6) springs (item #42) into pockets of motor end<br />
bearing (item #4), as shown, leaving top and bottom pockets empty. Install coupling (item #23) over splined end of shaft<br />
(item #8). Put (4) brake pins (item #7) into (4) holes in motor end bearing. Install well-oiled o-ring (items #34 & #35) and<br />
backup rings (items #36 & #37) into grooves in O.D. of piston (item #3). Place o-rings into portions of grooves nearest to<br />
center of piston in both cases. See SECTION A-A below.<br />
34 35 37<br />
Piston (item #3), brake disc (item #26) and separator plates<br />
36<br />
(item #39) must be clean and free of grease and oil. Place<br />
3<br />
14<br />
piston over pins (item #7) and on top of springs (item #42).<br />
Place separator plates (item #39) and brake disc alternately<br />
6<br />
on top of piston, as shown below. Press larger diameter end<br />
23<br />
43<br />
of (4) springs (item #43) into pockets in brake housing (item<br />
#6). Place gasket (item #27) on top of end bearing (item<br />
A<br />
#4). Place brake housing over brake parts with fitting ports<br />
3<br />
42<br />
downward toward mounting feet. Align mounting holes and<br />
7<br />
force brake housing down onto end bearing (item #4). Apply<br />
27<br />
43<br />
SECTION<br />
271 Loc-tite to 6 capscrews (item #14) and finger tighten<br />
39<br />
until flush with surface of brake housing. Torque capscrews<br />
26 3<br />
A<br />
(2 turns each) in a criss-cross pattern until a torque of 30 ft.<br />
7<br />
lbs., per capscrew, is achieved.<br />
4<br />
Place gasket (item #28) into position on mounting surface of motor (item #31). Slide motor shaft into coupling and attach<br />
motor to brake housing (item #6). Use (2) capscrews (item #15) with lockwashers (item #22) and torque to 87 ft. lbs. (118<br />
Nm) each. Securely connect tube (item #44) to elbows (item #24) in valve (item #45) and in bottom of brake housing (item<br />
#6).<br />
Apply at least 550 PSI hydraulic system pressure to release brake and verify that brake releases, by observing that the winch<br />
drum rotates.<br />
24<br />
15<br />
31<br />
15<br />
22<br />
32<br />
6<br />
44<br />
22<br />
45<br />
10