

Utilisation du dMIX-600 - UniqueSquared.com
Utilisation du dMIX-600 - UniqueSquared.com
Utilisation du dMIX-600 - UniqueSquared.com

Create successful ePaper yourself
Turn your PDF publications into a flip-book with our unique Google optimized e-Paper software.
Using the DMIX-<strong>600</strong><br />
Mixer Section<br />
DMIX-<strong>600</strong> MIXER SECTION<br />
The integrated mixer section in the DMIX-<strong>600</strong> is split into 5 sections-the<br />
Input/Output section, Gain/EQ, Faders Microphone and Cue. Over the<br />
next few pages we will go over the basics of each section and how to<br />
use your DMIX-<strong>600</strong> to both play songs internally as well as hook up<br />
external equipment.<br />
The Master and Booth controls<br />
These two rotary knobs control the level of the MASTER output and the<br />
BOOTH output levels.<br />
OUTPUT SECTION<br />
Fig 7.9- Output section of the Dmix <strong>600</strong><br />
The DMIX-<strong>600</strong> has the ability to output to 3 sperate devices as well as<br />
accept 2 stereo devices (Line or Phono level). The output section consists<br />
of the following-<br />
Master-The main output of your mixer. This is the output you will connect<br />
to your amplifier, powered speakers or external mixing board and is<br />
controlled by the MASTER rotary knob located just under and to the left<br />
of the iPod dock.<br />
Booth-Like the Master output, but to be connected to your monitoring<br />
speakers and is controlled by the BOOTH rotary knob located just under<br />
and to the right of the iPod dock.. Use this output for your speaker set in<br />
the DJ booth.<br />
Record-A third output, with no volume control and set to output at a consistant<br />
level for recording. Use this to connect to a recording device.<br />
Balanced XLR-The balanced XLR outputs mirror the MASTER output<br />
except that are balanced for use in professinal installations, they are<br />
also controlled by the MASTER rotary knob.<br />
INPUT SECTION<br />
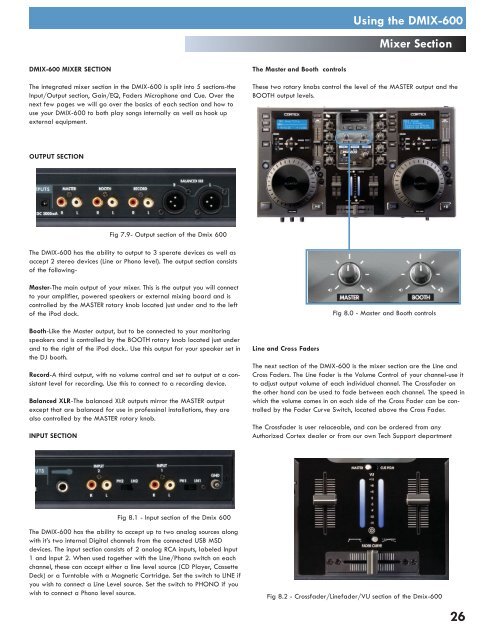
Line and Cross Faders<br />
Fig 8.0 - Master and Booth controls<br />
The next section of the DMIX-<strong>600</strong> is the mixer section are the Line and<br />
Cross Faders. The Line fader is the Volume Control of your channel-use it<br />
to adjust output volume of each indivi<strong>du</strong>al channel. The Crossfader on<br />
the other hand can be used to fade between each channel. The speed in<br />
which the volume <strong>com</strong>es in on each side of the Cross Fader can be controlled<br />
by the Fader Curve Switch, located above the Cross Fader.<br />
The Crossfader is user relaceable, and can be ordered from any<br />
Authorized Cortex dealer or from our own Tech Support department<br />
Fig 8.1 - Input section of the Dmix <strong>600</strong><br />
The DMIX-<strong>600</strong> has the ability to accept up to two analog sources along<br />
with it’s two internal Digital channels from the connected USB MSD<br />
devices. The input section consists of 2 analog RCA inputs, labeled Input<br />
1 and Input 2. When used together with the Line/Phono switch on each<br />
channel, these can accept either a line level source (CD Player, Cassette<br />
Deck) or a Turntable with a Magnetic Cartridge. Set the switch to LINE if<br />
you wish to connect a Line Level source. Set the switch to PHONO if you<br />
wish to connect a Phono level source.<br />
Fig 8.2 - Crossfader/Linefader/VU section of the Dmix-<strong>600</strong><br />
26


