PILOT'S MANUAL MANUEL DE VOL - Ozone
PILOT'S MANUAL MANUEL DE VOL - Ozone
PILOT'S MANUAL MANUEL DE VOL - Ozone

You also want an ePaper? Increase the reach of your titles
YUMPU automatically turns print PDFs into web optimized ePapers that Google loves.
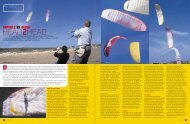
ACCELERATOR SYSTEM<br />
To fly faster, or for better penetration in headwind, you can use the accelerator<br />
system. Warning: Flying accelerated near the ground should be avoided.<br />
In accelerated flight the paraglider is less stable than at trim speed.<br />
It is important to have your accelerator system correctly rigged before take-off. It<br />
must be long enough not to pull down on the front risers while in normal flight, but<br />
not so long that it fails to work effectively. The best way to start is to get someone<br />
to hold the risers and harness taut while you adjust the bar so that it can just<br />
be found with your foot during flight. Then test the full range of the accelerator in<br />
calm flying conditions, ensuring that both risers are pulled evenly during operation.<br />
Fine-tuning can be completed when you are back on the ground.<br />
We advise you not to use more than half the accelerator's travel when flying in<br />
turbulence. Inexperienced pilots are recommended not to use the accelerator<br />
system until they are fully accustomed to the glider. Although all gliders are<br />
designed and tested with an accelerator system most experienced pilots hardly<br />
ever use the full speed range, especially in turbulent conditions.<br />
PREPARING FOR TAKE-OFF<br />
To familiarise yourself with the glider it is a good idea to perform practice inflations<br />
and small flights on a training hill. This will enable you to set up your equipment<br />
correctly.<br />
Lay the canopy out on its top surface ensuring that the leading edge is in a pronounced<br />
arc with the centre of the wing further up the slope than the tips. Lay out<br />
the lines one side at a time. Hold up the risers and starting from the brake pull all<br />
lines clear, then proceed through the D, C, B and A lines. Mirror the process on<br />
the other side. Take care to ensure that no lines are tangled, twisted or knotted.<br />
It is always important to check brake lines are clear of rocks and twigs that may<br />
snag during launch.<br />
Take-off check list:<br />
1. Check reserve parachute - pin in and handle secure<br />
2. Helmet on and fastened<br />
3. All harness buckles closed - check leg-loops again<br />
4. Karabiners and maillons tight<br />
5. Lines cleared<br />
6. Leading edge open<br />
7. Aligned directly into wind<br />
8. Airspace and visibility clear<br />
10