WTC600 - Switel.com
WTC600 - Switel.com
WTC600 - Switel.com

Create successful ePaper yourself
Turn your PDF publications into a flip-book with our unique Google optimized e-Paper software.
<strong>WTC600</strong><br />
Bedienungsanleitung<br />
Mode d’emploi<br />
Istruzioni per l’uso<br />
Operating instructions
Bedienungsanleitung . . . . . . . . . . . 3<br />
Mode d’emploi . . . . . . . . . . . . . . 15<br />
Istruzioni per l’uso . . . . . . . . . . . . 27<br />
Operating instructions . . . . . . . . . 39<br />
Declaration of Conformity . . . . . . . 52<br />
2
1<br />
Inhaltsverzeichnis<br />
1 Sicherheitshinweise . . . . . . . . . . . . . 4<br />
2 Funkgeräte in Betrieb nehmen . . . . . . 6<br />
3 Bedienelemente . . . . . . . . . . . . . . . . 8<br />
4 Wie bediene ich meine Funkgeräte? . . 9<br />
5 Falls es Probleme gibt . . . . . . . . . . . . 12<br />
6 Technische Eigenschaften . . . . . . . . . 13<br />
7 Pflegehinweise / Garantie . . . . . . . . . 14<br />
3
Sicherheitshinweise<br />
1 Sicherheitshinweise<br />
Lesen Sie diese Bedienungsanleitung sorgfältig durch.<br />
Bestimmungsgemäße Verwendung<br />
Diese Funkgeräte sind geeignet für die Kommunikation mit anderen<br />
Funkgeräten gleichen Standards. Jede andere Verwendung gilt als<br />
nicht bestimmungsgemäß. Eigenmächtige Veränderungen oder<br />
Umbauten sind untersagt. Öffnen Sie die Geräte in keinem Fall<br />
selbst und unterlassen Sie eigene Reparaturversuche.<br />
Verwendungsbereich<br />
Vermeiden Sie Belastungen durch Rauch, Staub, Erschütterungen,<br />
Chemikalien, Feuchtigkeit, Hitze oder direkte Sonneneinstrahlung.<br />
Verwenden Sie die Funkgeräte nicht in explosionsgefährdeten Bereichen.<br />
Netzteil<br />
Achtung: Verwenden Sie nur das mitgelieferte Steckernetzteil,<br />
da andere Netzteile die Funkgeräte zerstören<br />
können. Sie dürfen den Zugang zum Steckernetzteil nicht<br />
durch Möbel oder andere Gegenstände versperren.<br />
Aufladbare Akkus<br />
Achtung: Werfen Sie Akkus nicht ins Feuer. Verwenden<br />
Sie nur Akkus des gleichen Typs! Achten Sie auf die richtige<br />
Polung! Bei verkehrter Polung der Akkus besteht<br />
beim Aufladen Explosionsgefahr.<br />
Medizinische Geräte<br />
Achtung: Benutzen Sie die Funkgeräte nicht in der Nähe<br />
von medizinischen Geräten. Eine Beeinflussung kann<br />
nicht völlig ausgeschlossen werden. Funkgeräte können<br />
in Hörgeräten einen unangenehmen Brummton verursachen.<br />
4
Sicherheitshinweise<br />
Entsorgung<br />
Wollen Sie Ihr Gerät entsorgen, bringen Sie es zur Sammelstelle<br />
Ihres kommunalen Entsorgungsträgers (z. B.<br />
Wertstoffhof). Nach dem Elektro− und Elektronikgerätegesetz<br />
sind Besitzer von Altgeräten gesetzlich verpflichtet,<br />
alte Elektro− und Elektronikgeräte einer getrennten Abfallerfassung<br />
zuzuführen. Das nebenstehende Symbol bedeutet,<br />
dass Sie das Gerät auf keinen Fall in den Hausmüll<br />
werfen dürfen!<br />
Gefährdung von Gesundheit und Umwelt durch Akkus<br />
und Batterien!<br />
Akkus und Batterien nie öffnen, beschädigen, verschlucken<br />
oder in die Umwelt gelangen lassen. Sie können giftige und<br />
umweltschädliche Schwermetalle enthalten. Sie sind gesetzlich<br />
verpflichtet, Akkus und Batterien beim batterievertreibenden<br />
Handel sowie bei zuständigen Sammelstellen, die entsprechende<br />
Behälter bereitstellen, sicher zu entsorgen. Die<br />
Entsorgung ist unentgeltlich. Die Symbole bedeuten, dass<br />
Sie Akkus und Batterien auf keinen Fall in den Hausmüll<br />
werfen dürfen und sie über Sammelstellen der Entsorgung<br />
zugeführt werden müssen.<br />
Verpackungsmaterialien entsorgen Sie entsprechend<br />
den lokalen Vorschriften.<br />
5
Funkgeräte in Betrieb nehmen<br />
2 Funkgeräte in Betrieb nehmen<br />
Sicherheitshinweise<br />
Achtung: Lesen Sie vor der Inbetriebnahme unbedingt<br />
die Sicherheitshinweise in Kapitel 1.<br />
Verpackungsinhalt prüfen<br />
− zwei Funkgeräte mit Gürtelclip − Ladestation mit Netzteil<br />
− Bedienungsanleitung<br />
Ladestation anschließen<br />
Schließen Sie die Ladestation wie auf der Skizze abgebildet an.<br />
Verwenden Sie aus Sicherheitsgründen nur das mitgelieferte Netzteil.<br />
Akkus einlegen<br />
Öffnen Sie das Akkufach. Legen Sie die mitgelieferten Akkus ein.<br />
Achten Sie auf die richtige Polung! Schließen Sie das Akkufach.<br />
6
Funkgeräte in Betrieb nehmen<br />
Akkus aufladen<br />
Stellen Sie die Funkgeräte vor der ersten Inbetriebnahme<br />
für mindestens 12 Stunden in die Ladestation. Wenn die<br />
Funkgeräte korrekt in der Ladestation stehen, leuchten die<br />
roten LEDs. Diese signalisieren lediglich den korrekten Anschluss<br />
und erlöschen auch bei vollständig geladenen Akkus<br />
nicht. Verwenden Sie aus Sicherheitsgründen nur das<br />
mitgelieferte Netzteil.<br />
Sobald die Anzeige im Display blinkt, müssen die Akkus aufgeladen<br />
werden.<br />
Energiesparmodus<br />
Ihr Funkgerät ist mit einem Energiesparmodus ausgestattet, um die<br />
Lebensdauer der Akkus zu verlängern. Wenn Sie 4 Sekunden lang<br />
keine Taste am Funkgerät drücken, wird der Energiesparmodus<br />
eingeschaltet. Sobald Sie eine Taste drücken oder ein Signal empfangen,<br />
wird der Energiesparmodus ausgeschaltet.<br />
Gürtelclip anbringen / abnehmen<br />
Schieben Sie den Gürtelclip von oben in die Führung, bis er hörbar<br />
einrastet. Um den Gürtelclip wieder zu entfernen, ziehen Sie die<br />
Befestigungslasche mit dem Fingernagel etwas vom Gerät ab und<br />
schieben den Gürtelclip nach oben.<br />
7
Bedienelemente<br />
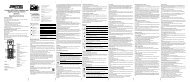
3 Bedienelemente<br />
Die Tasten Ihres Funkgeräts werden in dieser Bedienungsanleitung<br />
nachfolgend mit vereinheitlichten Symbolen dargestellt. Leichte Abweichungen<br />
der Tastensymbole Ihres Funkgeräts gegenüber den<br />
hier verwendeten Tastensymbolen sind daher möglich.<br />
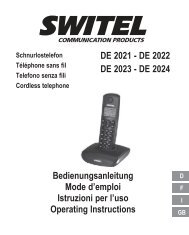
Funkgerät<br />
1 Display<br />
2 Einstellung abwärts<br />
3 Ein / Aus<br />
4 Mikrofon<br />
5 Lautsprecher<br />
6 Rufton senden<br />
7 Menü−Taste<br />
8 Einstellung aufwärts<br />
9 PTT−Sprechtaste<br />
10 Antenne<br />
11 Gürtelclip<br />
12 Headsetanschluss<br />
13 Akkufach<br />
Display<br />
1 Senden<br />
2 Empfangen<br />
3 Kanal<br />
4 Lautstärke<br />
5 Tastensperre<br />
6 Akkukapazität<br />
7 Kanalsuche<br />
10<br />
9<br />
8<br />
7<br />
6<br />
7<br />
6<br />
1<br />
2<br />
3<br />
4<br />
5<br />
5<br />
1<br />
2<br />
4<br />
3<br />
11<br />
12<br />
13<br />
8
Wie bediene ich meine Funkgeräte?<br />
4 Wie bediene ich meine Funkgeräte?<br />
Darstellungen und Schreibweisen<br />
<br />
Abgebildete Taste drücken<br />
3 Sek. Abgebildete Taste 3 Sekunden<br />
drücken<br />
2 x Abgebildete Taste 2−mal drücken<br />
<br />
Abgebildete Taste gedrückt halten<br />
<br />
Abgebildete Taste loslassen<br />
<br />
In das Mikrofon sprechen<br />
Displaybeleuchtung<br />
Nach dem Betätigen einer Taste wird das Display für einige Sekunden<br />
beleuchtet.<br />
Ein−/Ausschalten der Funkgeräte 2<br />
<br />
Funkgerät einschalten<br />
Es erklingt ein Signal. Im Display wird der aktuell eingestellte<br />
Kanal angezeigt.<br />
<br />
Funkgerät ausschalten<br />
Lautstärkeregelung<br />
oder <br />
Lauter oder leiser<br />
Senden und Empfangen<br />
Senden 3<br />
<br />
Senden<br />
Halten Sie das Funkgerät ca. 5 bis 7 cm vom Mund entfernt<br />
und sprechen Sie mit normaler Lautstärke. Um mit<br />
anderen Teilnehmern zu sprechen, müssen alle Funkgeräte<br />
auf den gleichen Kanal eingestellt sein.<br />
Empfangen 4<br />
<br />
Empfangen<br />
Sie können keine Funksignale empfangen, wenn Sie die<br />
−Taste gedrückt halten.<br />
9
Wie bediene ich meine Funkgeräte?<br />
Bestätigungston (Roger Beep)<br />
Der Bestätigungston erklingt, wenn Sie die −Taste loslassen.<br />
Dadurch wird Ihrem Gesprächspartner signalisiert, dass Ihre Übertragung<br />
beendet ist.<br />
Kanalwahl<br />
<br />
Einstellungsmodus aktivieren<br />
oder <br />
Kanal auswählen<br />
oder <br />
Auswahl bestätigen<br />
Kanal Frequenz (MHz) Kanal Frequenz (MHz)<br />
1 446.00625 5 446.05625<br />
2 446.01875 6 446.06875<br />
3 446.03125 7 446.08125<br />
4 446.04375 8 446.09375<br />
Kanalsuche<br />
In einer Endlosschleife wird auf den acht Kanälen nach Signalen<br />
gesucht. Im Display erscheint SC. Wird ein aktiver Kanal gefunden,<br />
stoppt die Kanalsuche. Drücken Sie die −Taste, um am Funkverkehr<br />
teilzunehmen.<br />
Kanalsuche starten<br />
und <br />
Kanalsuche starten<br />
Kanalsuche fortsetzen<br />
oder <br />
Kanalsuche beenden<br />
oder <br />
Kanalsuche fortsetzen<br />
Kanalsuche beenden<br />
Rufton senden<br />
Der Rufton macht andere Teilnehmer darauf aufmerksam, dass Sie<br />
ein Gespräch beginnen möchten. Voraussetzung dafür ist, dass die<br />
anderen Teilnehmer den gleichen Kanal verwenden.<br />
<br />
Rufton senden<br />
10
Wie bediene ich meine Funkgeräte?<br />
Monitor−Funktion<br />
Die Monitor−Funktion ermöglicht es Ihnen, auf dem aktuell eingestellten<br />
Kanal nach schwachen Signalen zu suchen. Wenn Sie ein<br />
fremdes Signal empfangen, wechseln Sie auf einen freien Kanal.<br />
Kommunizieren Sie mit anderen Teilnehmern immer auf einem freien<br />
Kanal, um Störungen zu vermeiden.<br />
und <br />
Kanal abhören<br />
<br />
Abhören beenden<br />
Tastensperre<br />
Die Tastensperre verhindert das ungewollte Ändern von Einstellungen.<br />
Bei eingeschalteter Tastensperre erscheint das −Symbol<br />
im Display.<br />
Aktivieren 5<br />
3 Sek. Tastensperre aktivieren<br />
Deaktivieren<br />
6<br />
3 Sek. Tastensperre deaktivieren<br />
Headset 7<br />
Schließen Sie ein passendes Headset an<br />
der rechten Seite des Funkgeräts an.<br />
Klemmen Sie das Funkgerät an den Gürtel<br />
und befestigen Sie das Kabel des<br />
Headsets an Ihrer Kleidung, sodass sich<br />
das Mikrofon kurz vor Ihrem Mund befindet.<br />
11
Falls es Probleme gibt<br />
5 Falls es Probleme gibt<br />
Service−Hotline<br />
Haben Sie Probleme mit Ihrem Funkgerät, kontrollieren Sie zuerst<br />
die folgenden Hinweise. Bei technischen Problemen können Sie<br />
sich an unsere Service−Hotline unter Tel. 0900 00 1675 innerhalb<br />
der Schweiz (Kosten Swiss<strong>com</strong> bei Drucklegung: CHF 2.60/min)<br />
wenden. Bei Garantieansprüchen wenden Sie sich an Ihren Fachhändler.<br />
Die Garantiezeit beträgt 2 Jahre.<br />
Fragen und Antworten<br />
Fragen<br />
Keine Funktion<br />
Senden nicht<br />
möglich<br />
Kein Empfang<br />
Antworten<br />
− Die Akkus sind nicht korrekt eingelegt<br />
− Die Akkus sind nicht geladen<br />
− Die Akkus sind defekt<br />
− Drücken Sie die −Taste vollständig,<br />
um zu senden<br />
− Ihr Kanal wird von anderen Teilnehmern<br />
benutzt<br />
− Lassen Sie die −Taste los, um zu<br />
empfangen<br />
− Die Lautstärke ist zu gering eingestellt<br />
− Sie befinden sich außerhalb des Empfangsbereichs,<br />
ändern Sie Ihre Position<br />
− Hindernisse wie Bäume und Gebäude haben<br />
einen negativen Einfluss auf die<br />
Reichweite<br />
− Nutzen Sie die Funktion Monitor", um<br />
nach schwachen Signalen zu suchen<br />
12
Technische Eigenschaften<br />
6 Technische Eigenschaften<br />
Technische Daten<br />
Merkmal<br />
Ausgangsleistung<br />
Reichweite<br />
Wert<br />
0.5 W<br />
ca. 8 km − bei freier Sichtlinie<br />
Akkus<br />
AAA NiMH 1.2 V<br />
Konformitätserklärung<br />
Dieses Gerät erfüllt die Anforderungen der EU−Richtlinie:<br />
1999/5/EG Richtlinie über Funkanlagen und Telekommunikationsendeinrichtungen<br />
und die gegenseitige Anerkennung<br />
ihrer Konformität. Die Konformität mit der o. a.<br />
Richtlinie wird durch das CE−Zeichen auf dem Gerät bestätigt.<br />
Für die komplette Konformitätserklärung nutzen Sie bitte den<br />
kostenlosen Download von unsere Website www.switel.<strong>com</strong>.<br />
13
Pflegehinweise / Garantie<br />
7 Pflegehinweise / Garantie<br />
Pflegehinweise<br />
Reinigen Sie die Gehäuseoberflächen mit einem weichen und<br />
fusselfreien Tuch.<br />
Verwenden Sie keine Reinigungsmittel oder Lösungsmittel.<br />
Garantie<br />
SWITEL − Geräte werden nach den modernsten Produktionsverfahren<br />
hergestellt und geprüft. Ausgesuchte Materialien und hoch entwickelte<br />
Technologien sorgen für einwandfreie Funktion und lange<br />
Lebensdauer. Die Garantie gilt nicht für die in den Produkten verwendeten<br />
Batterien, Akkus oder Akkupacks. Die Garantiezeit beträgt<br />
24 Monate, gerechnet vom Tage des Kaufs.<br />
Innerhalb der Garantiezeit werden alle Mängel, die auf Material−<br />
oder Herstellungsfehler zurückzuführen sind, kostenlos beseitigt.<br />
Der Garantieanspruch erlischt bei Eingriffen durch den Käufer oder<br />
durch Dritte. Schäden, die durch unsachgemäße Behandlung oder<br />
Bedienung, natürliche Abnutzung, durch falsches Aufstellen oder<br />
Aufbewahren, durch unsachgemäßen Anschluss oder Installation<br />
sowie durch höhere Gewalt oder sonstige äußere Einflüsse entstehen,<br />
fallen nicht unter die Garantieleistung. Wir behalten uns vor,<br />
bei Reklamationen die defekten Teile auszubessern, zu ersetzen<br />
oder das Gerät auszutauschen. Ausgetauschte Teile oder ausgetauschte<br />
Geräte gehen in unser Eigentum über. Schadenersatzansprüche<br />
sind ausgeschlossen, soweit sie nicht auf Vorsatz oder grober<br />
Fahrlässigkeit des Herstellers beruhen.<br />
Sollte Ihr Gerät dennoch einen Defekt innerhalb der Garantiezeit<br />
aufweisen, wenden Sie sich bitte unter Vorlage Ihrer Kaufquittung<br />
ausschließlich an das Geschäft, in dem Sie Ihr SWITEL − Gerät gekauft<br />
haben. Alle Gewährleistungsansprüche nach diesen Bestimmungen<br />
sind ausschließlich gegenüber Ihrem Fachhändler geltend<br />
zu machen. Nach Ablauf von zwei Jahren nach Kauf und Übergabe<br />
unserer Produkte können Gewährleistungsrechte nicht mehr geltend<br />
gemacht werden.<br />
14
8<br />
Table des matières<br />
1 Consignes de sécurité . . . . . . . . . . . . 16<br />
2 Mettre les<br />
émetteurs−récepteurs en service . . . 18<br />
3 Éléments de manipulation . . . . . . . . . 20<br />
4 Comment se servir<br />
du émetteurs−récepteurs ? . . . . . . . 21<br />
5 En cas de problèmes . . . . . . . . . . . . . 24<br />
6 Caractéristiques techniques . . . . . . . . 25<br />
7 Remarques d’entretien / Garantie . . . . 26<br />
15
Consignes de sécurité<br />
1 Consignes de sécurité<br />
Lisez très attentivement ce mode d’emploi.<br />
Utilisation conforme aux prescriptions<br />
Ces émetteurs−récepteurs conviennent pour la <strong>com</strong>munication avec<br />
d’autres émetteurs−récepteurs de même standard. Toute autre utilisation<br />
est considérée <strong>com</strong>me non conforme à l’usage. Toute modification<br />
ou transformation arbitraire est interdite. N’ouvrez en aucun<br />
cas les appareils et abstenez−vous d’essayer de les réparer vous−<br />
même.<br />
Zone d’utilisation<br />
Évitez toute nuisance par la fumée, la poussière, les chocs, les produits<br />
chimiques, l’humidité, la grande chaleur ou l’ensoleillement direct.<br />
Ne vous servez pas des émetteurs−récepteurs dans des endroits<br />
exposés aux explosions.<br />
Bloc secteur<br />
Attention : N’utilisez que le bloc d’alimentation enfichable<br />
fourni avec les émetteurs−récepteurs, d’autres blocs<br />
pouvant les détruire. Vous ne devez pas bloquer son<br />
accès par des meubles ou d’autres objets.<br />
Piles rechargeables<br />
Attention : Ne jetez pas les piles rechargeables dans le<br />
feu. N’utilisez que des piles du même type ! Observez une<br />
polarisation correcte ! Risque d’explosion pendant leur<br />
charge si la polarisation est incorrecte.<br />
Appareils médicaux<br />
Attention : N’utilisez pas ces émetteurs−récepteurs à proximité<br />
d’appareils médicaux, leur influence sur ceux−ci ne<br />
pouvant pas être totalement exclue. Les émetteurs−récepteurs<br />
peuvent causer un bourdonnement désagréable<br />
dans les aides auditives.<br />
16
Consignes de sécurité<br />
Élimination<br />
Si vous ne voulez plus vous servir de votre appareil, veuillez<br />
l’apporter au centre de collecte de l’organisme d’élimination<br />
des déchets de votre <strong>com</strong>mune (par ex. centre de<br />
recyclage). D’après la loi relative aux appareils électriques<br />
et électroniques, les propriétaires d’appareils usagés sont<br />
tenus de mettre tous les appareils électriques et électroniques<br />
usagés dans un collecteur séparé. L’icône ci−contre<br />
signifie que vous ne devez en aucun cas jeter vos appareils<br />
dans les ordures ménagères !<br />
Mise en danger de l’homme et l’environnement causée<br />
par les piles et les piles rechargeables !<br />
Ne jamais ouvrir, endommager, avaler les piles rechargeables<br />
et les piles ou ne jamais faire pénétrer leur contenu<br />
dans l’environnement. Elles peuvent contenir des métaux<br />
lourds toxiques et nuisibles pour celui−ci. Vous êtes tenus<br />
par la loi d’éliminer vos piles rechargeables et piles auprès<br />
d’un revendeur de piles ainsi qu’auprès de centres de collecte<br />
responsables de leur élimination qui mettent des conteneurs<br />
adéquats à disposition. L’élimination des piles est gratuite.<br />
L’icône ci−contre signifie que vous ne devez en aucun<br />
cas jeter les piles rechargeables et piles dans les ordures<br />
ménagères, mais que vous devez les éliminer auprès de<br />
centres de collecte.<br />
Éliminez les matériaux d’emballage conformément au<br />
règlement local.<br />
17
Mettre les émetteurs−récepteurs en service<br />
2 Mettre les émetteurs−récepteurs en service<br />
Consignes de sécurité<br />
Attention : Avant de mettre votre appareil en service,<br />
lisez impérativement les consignes de sécurité<br />
mentionnées au chapitre 1.<br />
Contrôler le contenu de l’emballage<br />
− deux émetteurs−récepteurs<br />
avec clip de ceinture<br />
− notice d’utilisation<br />
− station d’accueil avec<br />
bloc secteur<br />
Brancher la station d’accueil<br />
Branchez la station d’accueil <strong>com</strong>me indiqué sur le croquis. Pour<br />
des raisons de sécurité, n’utilisez que le bloc secteur fourni avec les<br />
appareils.<br />
Placer les piles rechargeables<br />
Ouvrez le <strong>com</strong>partiment à piles. Placez les piles rechargeables<br />
fournies avec les appareils. Observez une polarisation correcte !<br />
Fermez le <strong>com</strong>partiment à piles.<br />
18
Mettre les émetteurs−récepteurs en service<br />
Charger les piles<br />
Posez les émetteurs−récepteurs sur la station d’accueil<br />
pendant au moins 12 heures avant la première mise en<br />
service. Si l’émetteur−récepteur est placé correctement sur<br />
la station d’accueil, les DEL rouges s’allument. Celles−ci signalent<br />
uniquement un branchement correct et ne s’éteignent<br />
pas lorsque les piles sont <strong>com</strong>plètement chargées.<br />
Pour des raisons de sécurité, n’utilisez que le bloc secteur<br />
fourni avec les appareils.<br />
Il faut recharger les piles dès que le symbole clignote sur l’afficheur.<br />
Mode économie d’énergie<br />
Votre émetteur−récepteur est équipé d’un mode économie d’énergie<br />
afin de prolonger la durée de vie des piles rechargeables. Si vous<br />
n’actionnez aucune touche de l’émetteur−récepteur pendant 4 secondes,<br />
le mode économie d’énergie s’active. Dès que vous appuyez<br />
sur une touche ou que vous recevez un signal, le mode économie<br />
d’énergie se désactive.<br />
Fixer / Retirer le clip de ceinture<br />
Introduisez le clip de ceinture par le haut dans le guidage jusqu’à<br />
ce qu’il s’enclenche. Pour l’enlever, écartez légèrement la languette<br />
de fixation de l’appareil avec l’ongle et poussez le clip vers le haut.<br />
19
Éléments de manipulation<br />
3 Éléments de manipulation<br />
Dans ce mode d’emploi, les touches de votre émetteur−récepteur<br />
seront représentées par la suite par des icônes standardisées. De<br />
ce fait, il peut y avoir de légères différences entre les icônes des<br />
touches de votre émetteur−récepteur et celles utilisées ici.<br />
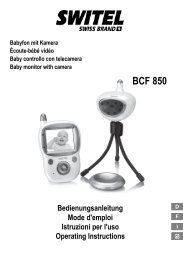
Émetteur−récepteur<br />
1 Afficheur<br />
2 Réglage vers le bas<br />
3 Allumé / Éteint<br />
4 Microphone<br />
5 Haut−parleur<br />
6 Émission d’un signal<br />
d’appel<br />
7 Touche de menu<br />
8 Réglage vers le haut<br />
9 Touche de conversation<br />
PTT (press to talk)<br />
10 Antenne<br />
11 Clip de ceinture<br />
12 Prise du kit oreillette<br />
13 Compartiment à piles<br />
Afficheur<br />
1 Émission<br />
2 Réception<br />
3 Canal<br />
4 Volume sonore<br />
5 Verrouillage des touches<br />
6 Capacité des piles<br />
7 Recherche du canal<br />
10<br />
9<br />
8<br />
7<br />
6<br />
7<br />
6<br />
1<br />
2<br />
3<br />
4<br />
5<br />
5<br />
1<br />
2<br />
4<br />
3<br />
11<br />
12<br />
13<br />
20
Comment se servir du émetteurs−récepteurs ?<br />
4 Comment se servir du émetteurs−récepteurs ?<br />
Représentations et notations<br />
<br />
Appuyer sur la touche représentée<br />
3 s Appuyer pendant 3 secondes sur la<br />
touche représentée<br />
2 x Appuyer 2 fois sur la touche<br />
représentée<br />
<br />
Maintenir appuyée la touche<br />
représentée<br />
<br />
Relâcher la touche représentée<br />
<br />
Parler dans le microphone<br />
Éclairage de l’afficheur<br />
Après l’actionnement d’une touche, l’afficheur reste allumé pendant<br />
quelques secondes.<br />
Allumer / éteindre les émetteurs−récepteurs 9<br />
<br />
Allumer l’émetteur−récepteur<br />
Un signal sonore se fait entendre. Le canal actuellement<br />
programmé apparaît sur l’afficheur.<br />
<br />
Éteindre l’émetteur−récepteur<br />
Réglage du volume sonore<br />
ou <br />
Plus fort ou plus faible<br />
Émission et réception<br />
Émission 10<br />
<br />
Émission<br />
Tenez l’émetteur−récepteur à environ 5 à 7 cm de votre<br />
bouche et parlez avec un volume sonore normal. Pour<br />
parler avec d’autres correspondants, vous devez régler<br />
tous les appareils sur le même canal.<br />
21
Comment se servir du émetteurs−récepteurs ?<br />
Réception 11<br />
<br />
Réception<br />
Vous ne pouvez pas recevoir de signal radio si vous maintenez<br />
l’appui sur la touche .<br />
Signal de confirmation (Roger Beep)<br />
Le signal de confirmation retentit quand vous relâchez la touche<br />
. Cela signale à votre correspondant que votre transmission<br />
est terminée.<br />
Choix du canal<br />
<br />
Activer le mode de réglage<br />
ou <br />
Sélectionner le canal<br />
ou <br />
Confirmer la sélection<br />
Canal Fréquence (MHz) Canal Fréquence (MHz)<br />
1 446.00625 5 446.05625<br />
2 446.01875 6 446.06875<br />
3 446.03125 7 446.08125<br />
4 446.04375 8 446.09375<br />
Rechercher un canal<br />
Dans une boucle infinie, l’appareil cherche des signaux sur les huit<br />
canaux. SC apparaît sur l’afficheur. Si un canal actif est trouvé, la<br />
recherche du canal s’interrompt. Appuyez sur la touche pour<br />
participer au contact radio.<br />
Démarrer la recherche d’un canal<br />
et <br />
Démarrer la recherche du canal<br />
Continuer la recherche d’un canal<br />
ou <br />
Terminer la recherche d’un canal<br />
ou <br />
Continuer la recherche du canal<br />
Terminer la recherche du canal<br />
22
Comment se servir du émetteurs−récepteurs ?<br />
Émettre un signal d’appel<br />
La sonnerie fait remarquer à d’autres correspondants que vous<br />
désirez entamer une conversation. À condition toutefois que les autres<br />
correspondants utilisent le même canal.<br />
<br />
Émettre le signal d’appel<br />
Fonction de balayage<br />
La fonction de balayage vous permet de chercher des signaux faibles<br />
sur le canal actuellement programmé. Si vous recevez un signal,<br />
passez sur un canal libre. Communiquez toujours avec d’autres<br />
correspondants sur un canal libre pour éviter les perturbations.<br />
et <br />
Écouter le canal<br />
<br />
Terminer l’écoute<br />
Verrouillage des touches<br />
Le verrouillage des touches empêche la modification involontaire<br />
des paramétrages. Si le verrouillage du clavier est activé, le symbole<br />
apparaît sur l’afficheur.<br />
Activer 12<br />
3 s Activer le verrouillage des touches<br />
Désactiver 13<br />
3 s Désactiver le verrouillage des<br />
touches<br />
Kit oreillette 14<br />
Raccordez un kit oreillette adéquat sur le<br />
côté droit de l´émetteur−récepteur. Fixez<br />
l’émetteur−récepteur à la ceinture et le<br />
câble du kit oreillette à vos vêtements de<br />
sorte que le microphone se trouve juste<br />
devant votre bouche.<br />
23
En cas de problèmes<br />
5 En cas de problèmes<br />
Ligne directe de service<br />
Si vous avez des problèmes avec votre émetteur−récepteur,<br />
contrôlez d’abord les points suivants. S’il s’agit de problèmes techniques,<br />
vous pouvez vous adresser à notre hotline de service en<br />
Suisse en appelant le numéro 0900 00 1675 (frais Swiss<strong>com</strong> à la<br />
date d’impression de ce manuel : CHF 2,60/min). Si vous jouissez<br />
de droits de garantie, adressez−vous à votre revendeur. La durée<br />
de la garantie est de 2 ans.<br />
Questions et réponses<br />
Questions<br />
Pas de fonction<br />
Émission pas<br />
possible<br />
Pas de<br />
réception<br />
Réponses<br />
− Les piles rechargeables ne sont pas<br />
placées correctement<br />
− Les piles rechargeables ne sont pas<br />
chargées<br />
− Les piles rechargeables sont défectueuses<br />
− Appuyez à fond sur la touche pour<br />
émettre<br />
− Votre canal est utilisé par d’autres correspondants<br />
− Relâchez la touche pour permettre<br />
la réception<br />
− Le volume sonore est réglé trop faiblement<br />
− Vous vous trouvez en dehors de la zone<br />
desservie, modifiez votre position<br />
− Des obstacles, <strong>com</strong>me des arbres ou des<br />
bâtiments, exercent une influence négative<br />
sur la portée<br />
− Servez−vous de la fonction de balayage<br />
pour chercher des signaux faibles<br />
24
Caractéristiques techniques<br />
6 Caractéristiques techniques<br />
Caractéristiques techniques<br />
Caractéristique<br />
Puissance de<br />
sortie<br />
Portée<br />
Piles<br />
rechargeables<br />
Valeur<br />
0,5 W<br />
Env. 8 km − si ligne visuelle libre<br />
AAA NiMH 1,2 V<br />
Déclaration de conformité<br />
Cet appareil répond aux exigences des directives de l’union<br />
européenne (UE) :<br />
Directive 1999/5/CE sur les installations de radio et de<br />
télé<strong>com</strong>munication et la reconnaissance réciproque de<br />
leur conformité. La conformité avec la directive mentionnée<br />
ci−dessus est confirmée par le symbole CE placé<br />
sur l’appareil.<br />
Pour obtenir la déclaration de conformité intégrale, veuillez vous<br />
servir du téléchargement gratuit depuis notre site Internet www.switel.<strong>com</strong>.<br />
25
Remarques d’entretien / Garantie<br />
7 Remarques d’entretien / Garantie<br />
Remarques d’entretien<br />
Nettoyez les surfaces du boîtier avec un chiffon doux et non<br />
pelucheux.<br />
N’utilisez pas de produits d’entretien ou de solvants.<br />
Garantie<br />
Les appareils SWITEL sont fabriqués selon les procédés les plus<br />
modernes et contrôlés. Des matériaux sélectionnés et des technologies<br />
de pointe ont pour effet un fonctionnement irréprochable et<br />
une longue durée de vie. La garantie n’est pas valable pour les<br />
piles, les piles rechargeables ou les packs de piles rechargeables<br />
utilisés dans les produits. La durée de la garantie est de 24 mois, à<br />
partir de la date d’achat.<br />
Pendant la durée de la garantie, tous les défauts dus à des vices de<br />
matériel ou de fabrication seront éliminés gratuitement. Le droit à la<br />
garantie expire en cas d’intervention de l’acheteur ou de tiers. Les<br />
dommages provenant d’un maniement ou d’une manipulation incorrects,<br />
d’une usure naturelle, d’une mauvaise mise en place ou<br />
d’une mauvaise conservation, d’un raccordement ou d’une installation<br />
incorrects ainsi que d’un cas de force majeure ou d’autres influences<br />
extérieures sont exclus de la garantie. En cas de réclamations,<br />
nous nous réservons le droit de réparer, de remplacer les<br />
pièces défectueuses ou d’échanger l’appareil. Les <strong>com</strong>posants<br />
remplacés ou les appareils échangés deviennent notre propriété.<br />
Les demandes de dommages et intérêts sont exclues tant qu’elles<br />
ne reposent pas sur l’intention ou une négligence grossière du fabricant.<br />
Si votre appareil devait malgré tout présenter une défectuosité pendant<br />
la période de garantie, veuillez vous adresser, muni de la quittance<br />
d’achat, exclusivement au magasin où vous avez acheté votre<br />
appareil SWITEL. Tous les droits de garantie basés sur ces<br />
dispositions ne peuvent être revendiqués qu’auprès de votre revendeur.<br />
Deux ans après l’achat et la remise de nos produits, il n’est<br />
plus possible de faire valoir les droits à la garantie.<br />
26
15<br />
Contenuto<br />
1 Indicazioni di sicurezza . . . . . . . . . . . 28<br />
2 Mettere in funzione i radiotrasmettitori . 30<br />
3 Elementi di <strong>com</strong>ando . . . . . . . . . . . . . 33<br />
4 Come funzionano i<br />
miei radiotrasmettitori? . . . . . . . . . . 34<br />
5 In presenza di problemi . . . . . . . . . . . 37<br />
6 Specifiche tecniche . . . . . . . . . . . . . . 38<br />
7 Consigli per la cura / Garanzia . . . . . . 39<br />
27
Indicazioni di sicurezza<br />
1 Indicazioni di sicurezza<br />
Leggere attentamente le presenti istruzioni per l’uso.<br />
Impiego conforme agli usi previsti<br />
Questi radiotrasmettitori si prestano alla <strong>com</strong>unicazione con altri<br />
apparecchi radiotrasmettitori aventi lo stesso standard. Qualsiasi altro<br />
impiego è considerato <strong>com</strong>e non conforme agli usi previsti. È<br />
vietato effettuare modifiche o trasformazioni non autorizzate. Non<br />
aprire per nessuna ragione gli apparecchi autonomamente e non<br />
sottoporli a riparazioni di propria iniziativa.<br />
Ambito di impiego<br />
Evitare un’esposizione a fumo, polvere, vibrazioni, sostanze chimiche,<br />
umidità, calore e raggi solari diretti. Non utilizzare i radiotrasmettitori<br />
in aree esposte al rischio di deflagrazione.<br />
Alimentatore di rete<br />
Attenzione: Utilizzare esclusivamente l’alimentatore a<br />
spina fornito in dotazione visto che altri alimentatori di rete<br />
potrebbero distruggere i radiotrasmettitori. Non ostacolare<br />
il libero accesso all’alimentatore a spina con mobili o<br />
altri oggetti simili.<br />
Batterie ricaricabili<br />
Attenzione: Non gettare le batterie ricaricabili nel fuoco.<br />
Utilizzare solo batterie ricaricabili dello stesso tipo. Osservare<br />
la corretta polarità! Pericolo di esplosione durante il<br />
caricamento delle batterie in caso di errata polarità.<br />
Apparecchiature mediche<br />
Attenzione: Evitare di utilizzare i radiotrasmettitori in vicinanza<br />
di apparecchiature mediche. Non è infatti possibile<br />
escludere il rischio di possibili interferenze. Radiotrasmettitori<br />
possono causare un fastidioso ronzio in apparecchi<br />
acustici.<br />
28
Indicazioni di sicurezza<br />
Smaltimento<br />
Procedere allo smaltimento dell’apparecchio esaurito consegnandolo<br />
presso uno dei punti di raccolta istituiti dalla<br />
propria società di smaltimento rifiuti <strong>com</strong>unale (ad es. centro<br />
di riciclo materiali). Secondo quanto previsto dalla legge<br />
sugli apparecchi elettrici ed elettronici, i proprietari di<br />
apparecchi esauriti sono per legge tenuti alla consegna di<br />
tutti gli apparecchi elettrici ed elettronici presso un centro<br />
di rilievo rifiuti in raccolta differenziata. Il simbolo riportato<br />
qui a lato indica che non è assolutamente consentito<br />
smaltire l’apparecchio assieme ai normali rifiuti domestici!<br />
Batterie ricaricabili e pile possono provocare danni alla<br />
salute e all’ambiente!<br />
Non aprire, danneggiare, ingerire o disperdere nell’ambiente<br />
batterie ricaricabili e pile. Questi possono contenere metalli<br />
pesanti nocivi e dannosi per l’ambiente. Per legge sussiste<br />
l’obbligo di consegnare batterie ricaricabili e pile presso i rivenditori<br />
di batterie utilizzando gli appositi contenitori di raccolta<br />
e provvedendo in tal modo al corretto smaltimento. Lo<br />
smaltimento è gratuito. I simboli indicano che non è assolutamente<br />
consentito gettare batterie ricaricabili e pile nei rifiuti<br />
domestici, consegnandole ai fini dello smaltimento nei rispettivi<br />
punti di raccolta.<br />
Smaltire confezioni ed imballaggi in base a quanto indicato<br />
dalle norme in vigore a livello locale.<br />
29
Mettere in funzione i radiotrasmettitori<br />
2 Mettere in funzione i radiotrasmettitori<br />
Indicazioni di sicurezza<br />
Attenzione: Prima della messa in funzione, leggere attentamente<br />
le indicazioni di sicurezza riportate al capitolo<br />
1.<br />
Verificare il contenuto della confezione<br />
− due radiotrasmettitori con gancio<br />
per cintura<br />
− istruzioni per l’uso<br />
− stazione di carica con alimentatore<br />
Collegare la stazione di carica<br />
Procedere al collegamento della stazione di carica seguendo quanto<br />
raffigurato sul disegno. Per motivi di sicurezza si prega di utilizzare<br />
soltanto l’alimentatore di rete fornito in dotazione.<br />
Inserire le batterie ricaricabili<br />
Aprire il vano batterie. Inserire le batterie ricaricabili accluse nell’apposito<br />
vano batterie. Osservare la corretta polarità! Richiudere il vano<br />
batterie.<br />
30
Mettere in funzione i radiotrasmettitori<br />
Caricare le batterie ricaricabili<br />
Precedentemente alla prima messa in funzione, posizionare<br />
i radiotrasmettitori per almeno 12 ore nella stazione di<br />
carica. Non appena i radiotrasmettitori sono stati posizionati<br />
correttamente nella stazione di carica, i LED rossi si<br />
accendono. Questi segnalano soltanto il corretto collegamento<br />
e non si spengono neanche con batterie <strong>com</strong>pletamente.<br />
Per motivi di sicurezza si prega di utilizzare soltanto<br />
l’alimentatore di rete fornito in dotazione.<br />
Non appena sul display lampeggia l’indicazione , si rende necessario<br />
ricaricare le batterie.<br />
Modalità di risparmio energetico<br />
Il radiotrasmettitore prevede una modalità di risparmio energetico in<br />
grado di prolungare la durata utile delle batterie ricaricabili utilizzate<br />
all’interno del dispositivo. Se non si preme per più di 4 secondi nessun<br />
tasto sul radiotrasmettitore, l’apparecchio passa alla modalità di<br />
risparmio energetico. Premendo invece un tasto o se si riceve un<br />
segnale, la modalità di risparmio energetico è di nuovo disattivata.<br />
Applicare / Rimuovere il gancio per cintura<br />
Introdurre il gancio per cintura nella guida dall’alto facendolo scattare<br />
in posizione. Per rimuovere nuovamente il gancio per cintura, afferrare<br />
la linguetta di fissaggio con l’unghia del dito allontanandola<br />
leggermente dal dispositivo e sollevare il gancio per cintura verso<br />
sopra.<br />
31
Elementi di <strong>com</strong>ando<br />
3 Elementi di <strong>com</strong>ando<br />
I tasti del radiotrasmettitore riportati nel presente manuale d’istruzioni<br />
per l’uso sono raffigurati sotto forma di simboli uniformi. Sono<br />
pertanto possibili lievi scostamenti dei simboli dei tasti sul radiotrasmettitore<br />
rispetto ai simboli dei tasti qui raffigurati.<br />
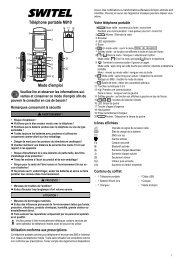
Radiotrasmettitore<br />
1 Display<br />
2 Scorrere verso sotto<br />
3 ON / OFF<br />
4 Microfono<br />
5 Altoparlante<br />
6 Invio segnale di chiamata<br />
7 Tasto menu<br />
8 Scorrere verso sopra<br />
10<br />
9<br />
8<br />
7<br />
9 Tasto conversazione PTT 6<br />
10 Antenna<br />
11 Gancio per cintura<br />
12 Cavo di allacciamento auricolare<br />
13 Vano batterie<br />
Display<br />
1 Trasmettere<br />
2 Ricevere<br />
3 Canale<br />
4 Volume<br />
5 Blocco tastiera<br />
6 Capacità di carica delle batterie<br />
7 Funzione ricerca di canale<br />
7<br />
6<br />
1<br />
2<br />
3<br />
4<br />
5<br />
5<br />
1<br />
2<br />
4<br />
3<br />
11<br />
12<br />
13<br />
32
Come funzionano i miei radiotrasmettitori?<br />
4 Come funzionano i miei radiotrasmettitori?<br />
Rappresentazioni e modi di scrittura<br />
<br />
Premere il tasto raffigurato<br />
3 sec. Premere il tasto raffigurato per 3<br />
secondi<br />
2 x Premere il tasto raffigurato 2 volte<br />
<br />
Tenere premuto il tasto raffigurato<br />
<br />
Rilasciare il tasto raffigurato<br />
<br />
Parlare rivolti verso il microfono<br />
Retroilluminazione del display<br />
Subito dopo aver premuto un tasto, il display si illumina per alcuni<br />
secondi.<br />
Inserire/Disinserire i radiotrasmettitori 16<br />
<br />
Inserire il radiotrasmettitore<br />
Si avverte un segnale acustico. Il canale attualmente impostato<br />
è visualizzato sul display.<br />
<br />
Disinserire il radiotrasmettitore<br />
Regolazione del volume<br />
o <br />
Volume più alto o più basso<br />
Trasmettere e ricevere<br />
Trasmettere 17<br />
<br />
Trasmettere<br />
Mantenere con il radiotrasmettitore una distanza di ca.<br />
5 − 7 cm dalla bocca e parlare con voce normale. Per poter<br />
<strong>com</strong>unicare con altri interlocutori, tutti i radiotrasmettitori<br />
devono essere impostati sullo stesso canale.<br />
Ricevere 18<br />
<br />
Ricevere<br />
Se si tiene premuto il tasto non è possibile ricevere<br />
alcun segnale radio.<br />
33
Come funzionano i miei radiotrasmettitori?<br />
Segnale acustico di conferma (Roger Beep)<br />
Se si rilascia il tasto si avverte il segnale acustico di conferma.<br />
In tal modo al proprio partner di chiamata si segnala la conclusione<br />
della trasmissione.<br />
Selezione del canale<br />
<br />
Attivare la modalità di impostazione<br />
o <br />
Selezionare il canale<br />
o <br />
Confermare la selezione<br />
Canale Frequenza (MHz) Canale Frequenza (MHz)<br />
1 446.00625 5 446.05625<br />
2 446.01875 6 446.06875<br />
3 446.03125 7 446.08125<br />
4 446.04375 8 446.09375<br />
Ricerca del canale<br />
In un ciclo continuo l’apparecchio scorre gli otto canali alla presenza<br />
di segnali. Sul display appare l’indicazione SC. Non appena è<br />
stato individuato un canale attivo, la ricerca di canale è interrotta.<br />
Premere il tasto per partecipare alla <strong>com</strong>unicazione via radio.<br />
Avviare la ricerca di canale<br />
e <br />
Avviare la ricerca di canale<br />
Proseguire la ricerca di canale<br />
o <br />
Concludere la ricerca di canale<br />
o <br />
Proseguire la ricerca di canale<br />
Concludere la ricerca di canale<br />
Trasmettere il segnale di chiamata<br />
Il segnale di chiamata richiama l’attenzione degli altri interlocutori<br />
indicando che il chiamante desidera avviare una conversazione. A<br />
tal fine è necessario che gli altri interlocutori utilizzino lo stesso canale.<br />
<br />
Trasmettere un segnale di chiamata<br />
34
Come funzionano i miei radiotrasmettitori?<br />
Funzione schermo<br />
La funzione schermo consente di individuare sul canale attualmente<br />
impostato la presenza di segnali deboli. In caso di ricezione di un<br />
segnale estraneo, si passa ad un canale libero. Si consiglia di <strong>com</strong>unicare<br />
con altri interlocutori sempre su un canale libero onde evitare<br />
interferenze.<br />
e <br />
Ascoltare un canale<br />
<br />
Concludere l’ascolto<br />
Blocco tastiera<br />
Il blocco tastiera impedisce di <strong>com</strong>piere modifiche non intenzionali<br />
alle impostazioni. Con blocco tastiera inserito sul display appare il<br />
simbolo .<br />
Attivare 19<br />
3 sec. Attivare il blocco tastiera<br />
Disattivare 20<br />
3 sec. Disattivare il blocco tastiera<br />
Auricolare 21<br />
Collegare un auricolare idoneo al lato<br />
destro del radiotrasmettitore. Agganciare<br />
il radiotrasmettitore alla cintura e fissare<br />
il cavo dell’auricolare agli indumenti in<br />
modo che il microfono si trovi all’altezza<br />
della propria bocca.<br />
35
In presenza di problemi<br />
5 In presenza di problemi<br />
Linea di assistenza tecnica<br />
In presenza di problemi con il radiotrasmettitore, seguire le indicazioni<br />
riportate qui di seguito. In caso di problemi tecnici è possibile<br />
rivolgersi alla nostra linea di assistenza tecnica chiamando al numero<br />
0900 00 1675 valido per la Svizzera (spese da rete Swiss<strong>com</strong><br />
alla data di stampa: CHF 2.60 / min). In caso di reclami entro il periodo<br />
di garanzia, rivolgersi al rivenditore autorizzato. Il periodo di<br />
garanzia ricopre 2 anni.<br />
Domande e risposte<br />
Domande<br />
Nessuna<br />
funzione<br />
Trasmissione<br />
non possibile<br />
Nessuna<br />
ricezione<br />
Risposte<br />
− Le batterie ricaricabili non sono state inserite<br />
correttamente<br />
− Le batterie sono scariche<br />
− Le batterie ricaricabili sono difettose<br />
− Premere interamente il tasto per<br />
trasmettere<br />
− Il canale è utilizzato da un altro interlocutore<br />
− Rilasciare il tasto per ricevere<br />
− Il volume è impostato ad un livello troppo<br />
basso<br />
− Si è al di fuori del campo di ricezione, modificare<br />
la propria posizione<br />
− Eventuali ostacoli <strong>com</strong>e alberi ed edifici<br />
hanno un influsso negativo sulla portata<br />
− Servirsi della funzione Schermo" per individuare<br />
la presenza di segnali deboli<br />
36
6 Specifiche tecniche<br />
Specifiche tecniche<br />
Specifiche tecniche<br />
Caratteristica<br />
Potenza di uscita<br />
Portata<br />
Valore<br />
0.5 W<br />
ca. 8 km − con linea di mira libera<br />
Batterie ricaricabili AAA NiMH 1.2 V<br />
Dichiarazione di conformità<br />
Questo apparecchio risponde a quanto disposto dalla Direttiva<br />
UE:<br />
1999/5/CE Direttiva concernente le apparecchiature radio,<br />
le apparecchiature terminali di tele<strong>com</strong>unicazioni e il<br />
reciproco riconoscimento della loro conformità. La conformità<br />
con la Direttiva di cui sopra viene confermata dal<br />
marchio CE applicato sull’apparecchio.<br />
Per la dichiarazione di conformità <strong>com</strong>pleta si prega di voler usufruire<br />
del servizio gratuito di download dal nostro sito internet<br />
www.switel.<strong>com</strong>.<br />
37
Consigli per la cura / Garanzia<br />
7 Consigli per la cura / Garanzia<br />
Consigli per la cura<br />
Pulire le superfici degli apparecchi con un panno morbido e<br />
antipelucchi.<br />
Non utilizzare mai detergenti o solventi.<br />
Garanzia<br />
Gli apparecchi SWITEL sono costruiti e collaudati in osservanza dei<br />
processi di produzione più moderni. L’impiego di materiali selezionati<br />
e tecnologie altamente sviluppate sono garanti di una perfetta<br />
funzionalità e lunga durata in vita. La garanzia non si estende a pile,<br />
batterie ricaricabili o pacchi batteria utilizzati all’interno degli apparecchi.<br />
Il periodo di garanzia ricopre 24 mesi a partire dalla data<br />
di acquisto.<br />
Entro il periodo di garanzia si procederà all’eliminazione gratuita di<br />
tutti i guasti dovuti a difetti di materiale o produzione. Il diritto di garanzia<br />
cessa in caso di interventi da parte dell’acquirente o di terzi.<br />
Danni derivanti da un impiego o esercizio non conforme agli usi<br />
previsti, a naturale usura, a errato montaggio o errata conservazione,<br />
a collegamento o installazione impropri, dovuti a forza maggiore<br />
o ad altri influssi esterni non sono coperti da garanzia. In qualità<br />
di produttore ci riserviamo il diritto, in caso di reclami, di riparare<br />
o sostituire le parti difettose o di rimpiazzare l’apparecchio. Parti o<br />
apparecchi sostituiti passano di nostra proprietà. Sono esclusi diritti<br />
di risarcimento per danni qualora non siano dovuti a intenzione o<br />
colpa grave del costruttore.<br />
Nel caso in cui il presente apparecchio dovesse ciò nonostante presentare<br />
un difetto durante il periodo di garanzia, si prega di rivolgersi<br />
esclusivamente al negozio di rivendita dell’apparecchio SWITEL<br />
assieme al relativo scontrino di acquisto. In base alle presenti disposizioni,<br />
tutti i diritti di garanzia dovranno essere fatti valere esclusivamente<br />
nei confronti del rivenditore autorizzato. Decorso il termine<br />
di due anni dalla data di acquisto e consegna dei nostri prodotti<br />
non sarà più possibile fare valere alcun diritto di garanzia.<br />
38
22<br />
Contents<br />
1 Safety Information . . . . . . . . . . . . . . . 42<br />
2 Preparing the Walkie−Talkies . . . . . . . 44<br />
3 Operating Elements . . . . . . . . . . . . . . 46<br />
4 Operating the Walkie−Talkies . . . . . . . 47<br />
5 In Case of Problems . . . . . . . . . . . . . 50<br />
6 Technical Properties . . . . . . . . . . . . . 51<br />
7 Maintenance / Guarantee . . . . . . . . . . 52<br />
39
Safety Information<br />
1 Safety Information<br />
Please read this operating instruction manual thoroughly.<br />
Intended use<br />
These walkie−talkies have been conceived for <strong>com</strong>munication with<br />
other walkie−talkies <strong>com</strong>plying to the same standards. Any other<br />
use is considered unintended use. Unauthorised modification or reconstruction<br />
is not permitted. Under no circumstances open the devices<br />
or <strong>com</strong>plete any repair work yourself.<br />
Ambient conditions<br />
Prevent excessive exposure to smoke, dust, vibration, chemicals,<br />
moisture, heat and direct sunlight. Do not use the walkie−talkies in<br />
potentially explosive areas.<br />
Power adapter plug<br />
Rechargeable batteries<br />
Attention: Only use the power adapter plug supplied because<br />
other power supplies could damage the walkie−<br />
talkies. Ensure access to the power adapter plug is not obstructed<br />
by furniture or such.<br />
Attention: Never throw batteries into a fire. Only use batteries<br />
of the same type. Pay attention to correct polarity.<br />
Incorrect polarity of the batteries represents a risk of explosion<br />
during charging.<br />
Medical equipment<br />
Attention: Never use the walkie−talkies in the vicinity of<br />
medical equipment. Effects on such equipment cannot be<br />
fully ruled out. Walkie−talkies can cause an unpleasant<br />
humming sound in hearing aids.<br />
40
Safety Information<br />
Disposal<br />
In order to dispose of your device, take it to a collection<br />
point provided by your local public waste authorities (e.g.<br />
recycling centre). According to laws on the disposal of<br />
electronic and electrical devices, owners are obliged to dispose<br />
of old electronic and electrical devices in a separate<br />
waste container. The adjacent symbol indicates that<br />
the device must not be disposed of in normal domestic<br />
waste!<br />
Batteries represent a hazard to health and the environment!<br />
Never open, damage or swallow batteries or allow them to<br />
pollute the environment. They may contain toxic, ecologically<br />
hazardous heavy metals. You are legally obliged to<br />
dispose of power packs and batteries at the point of sale or<br />
in the corresponding containers provided at collection<br />
points by local public waste authorities. Disposal is free of<br />
charge. The symbols indicate that the batteries must not be<br />
disposed of in normal domestic waste and that they must<br />
be brought to collection points provided by local public<br />
waste authorities.<br />
Packaging materials must be disposed of according to<br />
local regulations.<br />
41
Preparing the Walkie−Talkies<br />
2 Preparing the Walkie−Talkies<br />
Safety information<br />
Attention: It is essential to read the Safety Information in<br />
Chapter 1 before starting up.<br />
Checking the package contents<br />
− two walkie−talkies with belt clip − charging station with<br />
power adapter plug<br />
− operating instructions<br />
Connecting the charging station<br />
Connect the charging station as illustrated in the diagram. For<br />
safety reasons, only use the power adapter plug supplied.<br />
Inserting the batteries<br />
Open the battery <strong>com</strong>partment. Insert the batteries supplied. Pay<br />
attention to correct polarity. Close the battery <strong>com</strong>partment.<br />
42
Preparing the Walkie−Talkies<br />
Charging the batteries<br />
Before using the walkie−talkies for the first time, place them<br />
in the charging station for at least 12 hours. When the<br />
walkie−talkies are inserted correctly in the charging station,<br />
the red LEDs light up. They only signal that the connection<br />
is correct and continue to light up even when the batteries<br />
are fully charged. For safety reasons, only use the power<br />
adapter plug supplied.<br />
The batteries must be charged as soon as the icon flashes in<br />
the display.<br />
Energy−save mode<br />
Your walkie−talkies are provided with an energy−save mode to increase<br />
the service life of the batteries. If no buttons on the walkie−<br />
talkies are pressed for a period of 4 seconds, energy−save mode is<br />
activated. Energy−save mode is deactivated as soon as you press a<br />
button or a signal is received.<br />
Attaching/Detaching the belt clip<br />
Slide the belt clip in the guide from the top until it audibly snaps into<br />
place. To detach the belt clip, prize the fastening tab away from the<br />
device a little with your fingernail and slide the belt clip upwards.<br />
43
Operating Elements<br />
3 Operating Elements<br />
The buttons in this operating manual are subsequently depicted<br />
with a uniform contour. Therefore, slight deviations in the appearance<br />
of the symbols on the walkie−talkie buttons <strong>com</strong>pared to those<br />
depicted here are possible.<br />
Walkie−talkie<br />
1 Display<br />
2 Decrease setting<br />
3 On / Off<br />
4 Microphone<br />
5 Loudspeaker<br />
6 Transmit ringing tones<br />
7 Menu button<br />
8 Increase setting<br />
9 PTT − Talk button<br />
10 Antenna<br />
11 Belt clip<br />
12 Headset socket<br />
13 Battery <strong>com</strong>partment<br />
Display<br />
1 Transmitting<br />
2 Receiving<br />
3 Channel<br />
4 Volume control<br />
5 Key lock<br />
6 Battery capacity<br />
7 Channel scanning<br />
10<br />
9<br />
8<br />
7<br />
6<br />
7<br />
6<br />
1<br />
2<br />
3<br />
4<br />
5<br />
5<br />
1<br />
2<br />
4<br />
3<br />
11<br />
12<br />
13<br />
44
Operating the Walkie−Talkies<br />
4 Operating the Walkie−Talkies<br />
Display and notation of operating sequences<br />
<br />
Press the button depicted<br />
3 sec. Press the button depicted for<br />
3 seconds<br />
2 x Press the button depicted twice<br />
<br />
Press and hold the button depicted<br />
<br />
Release the button depicted<br />
<br />
Speak into the microphone<br />
Display illumination<br />
The display lights up for a few seconds after pressing a button.<br />
Switching the walkie−talkie on/off 23<br />
<br />
Switch the walkie−talkie on<br />
An acoustic signal is issued. The current channel setting<br />
appears in the display.<br />
<br />
Switch the walkie−talkie off<br />
Volume control<br />
or <br />
Raise or lower the volume<br />
Transmitting and receiving<br />
Transmitting 24<br />
<br />
Transmit<br />
Hold the walkie−talkie approx. 5 to 7 cm from your mouth<br />
and speak at a normal volume. In order to talk to other subscribers,<br />
the respective walkie−talkies must be set to the<br />
same channel.<br />
Receiving 25<br />
<br />
Receive<br />
Radio signals cannot be received when the button<br />
is being pressed.<br />
45
Operating the Walkie−Talkies<br />
Confirmation signal (Roger beep)<br />
The confirmation signal is issued on releasing the button.<br />
This signals to the caller that you have ended transmission.<br />
Selecting a channel<br />
<br />
Activate Programming mode<br />
or <br />
Select a channel<br />
or <br />
Confirm the selection<br />
Channel Frequency (MHz) Channel Frequency (MHz)<br />
1 446.00625 5 446.05625<br />
2 446.01875 6 446.06875<br />
3 446.03125 7 446.08125<br />
4 446.04375 8 446.09375<br />
Searching for a channel<br />
Signals are searched for in the eight channels in a continuous<br />
cycle. SC appears in the display. If an active channel is detected,<br />
the channel scan stops. Press the button to enable radio<br />
<strong>com</strong>munication.<br />
Starting channel scanning<br />
and <br />
Start the channel search<br />
Resuming channel scanning<br />
or <br />
Stopping channel search<br />
or <br />
Resume the channel search<br />
Stop the channel search<br />
Transmitting the ringing tone<br />
The ringing tones indicate to other subscribers that you want to talk<br />
to them. A condition for this is that the other subscribers are using<br />
the same channel.<br />
<br />
Transmit the ringing tone<br />
46
Key lock<br />
The key lock function prevents inadvertent modification of settings.<br />
When the key lock function is activated, the icon flashes in the<br />
display.<br />
Activating 26<br />
3 sec. Activate the key lock function<br />
Deactivating 27<br />
3 sec. Deactivate the key lock function<br />
Headset 28<br />
Connect an appropriate headset on the<br />
right−hand side of the walkie−talkie. Clip<br />
the walkie−talkie on your belt and fix the<br />
headset cable to a piece of your clothing<br />
so that the microphone is positioned near<br />
your mouth.<br />
Operating the Walkie−Talkies<br />
Monitor function<br />
The Monitor function enables the search for weak signals on the<br />
channel currently set. If you receive an external signal, switch to a<br />
free channel. Always <strong>com</strong>municate with other subscribers on a free<br />
channel to prevent interference.<br />
and <br />
Start monitoring the channel<br />
<br />
End the monitoring function<br />
47
In Case of Problems<br />
5 In Case of Problems<br />
Service hotline<br />
Should problems arise with the walkie−talkies, please refer to the<br />
following information first. In the case of technical problems, you<br />
can contact our hotline service, Tel. 0900 00 1675 within Switzerland<br />
(Swiss<strong>com</strong> fees at time of going to print: CHF 2.60/min). In the<br />
case of claims under the terms of guarantee, please contact your<br />
sales outlet. There is a 2 year period of guarantee.<br />
Problems and solutions<br />
Problems<br />
Equipment does<br />
not function<br />
Transmission<br />
not possible<br />
No reception<br />
Solutions<br />
− The batteries are not inserted correctly<br />
− The batteries are not charged<br />
− The batteries are defective<br />
− Press the button in fully in order to<br />
transmit<br />
− The channel is being used by other subscribers<br />
− Release the button in order to receive<br />
− The volume is set too low<br />
− You are outside the range of reception,<br />
change your position<br />
− Obstructions such as trees and buildings<br />
impair the range<br />
− Use the Monitor" function to search for<br />
weak signals<br />
48
6 Technical Properties<br />
Technical Data<br />
Technical Properties<br />
Feature<br />
Output power<br />
Range<br />
Value<br />
0.5 W<br />
Approx. 8 km in open space<br />
Batteries<br />
AAA NiMH 1.2 V<br />
Declaration of Conformity<br />
This device fulfils the requirements stipulated in the EU<br />
directive:<br />
1999/5/EC directive on radio equipment and tele<strong>com</strong>munications<br />
terminal equipment and the mutual recognition<br />
of their conformity.<br />
Conformity with the above mentioned directive is confirmed<br />
by the CE mark on the device.<br />
To view the <strong>com</strong>plete Declaration of Conformity, please refer to the<br />
free download available on our web site at www.switel.<strong>com</strong>.<br />
49
Maintenance / Guarantee<br />
7 Maintenance / Guarantee<br />
Maintenance<br />
Clean the housing surfaces with a soft, fluff−free cloth.<br />
Never use cleaning agents or solvents.<br />
Guarantee<br />
SWITEL equipment is produced and tested according to the latest<br />
production methods. The implementation of carefully chosen materials<br />
and highly developed technologies ensure trouble−free functioning<br />
and a long service life. The terms of guarantee do not apply<br />
to the batteries or power packs used in the products. The period of<br />
guarantee is 24 months from the date of purchase.<br />
All deficiencies related to material or manufacturing errors within the<br />
period of guarantee will be redressed free of charge. Rights to<br />
claims under the terms of guarantee are annulled following tampering<br />
by the purchaser or third parties. Damage caused as the result<br />
of improper handling or operation, normal wear and tear, incorrect<br />
positioning or storage, improper connection or installation or Acts of<br />
God and other external influences are excluded from the terms of<br />
guarantee. In the case of <strong>com</strong>plaints, we reserve the right to repair<br />
defect parts, replace them or replace the entire device. Replaced<br />
parts or devices be<strong>com</strong>e our property. Rights to <strong>com</strong>pensation in<br />
the case of damage are excluded where there is no evidence of intent<br />
or gross negligence by the manufacturer.<br />
If your device does show signs of a defect within the period of guarantee,<br />
please contact the sales outlet where you purchased the<br />
SWITEL device, producing the purchase receipt as evidence. All<br />
claims under the terms of guarantee in accordance with this agreement<br />
can only be asserted at the sales outlet. No claims under the<br />
terms of guarantee can be asserted after a period of two years from<br />
the date of purchase and hand−over of the product.<br />
50
Wichtiger Hinweis<br />
Ihr Gerät ist mit einem energieeffizienten Schaltnetzteil (Input<br />
230 V AC , Output 7,5 V DC , 300 mA) ausgestattet. Die Nulllast beträgt<br />
ca. 0,08 W. Die durchschnittliche Effizienz beträgt ca. 76 %.<br />
Die Leistungsaufnahme beträgt ca. 1,84 W / 2,2 W.<br />
Note importante<br />
La station de base de votre dispositif est équipée d’une alimentation<br />
à découpage à haut rendement énergétique (entrée 230 V AC ,<br />
sortie 7,5 V DC , 300 mA). Sans charge, le courant entrant s’élève à<br />
env. 0,08 W. Le rendement moyen est d’env. 76 %.<br />
La puissance absorbée de la station de base est de 1,84 W / 2,2 W.<br />
Avvertimento importante<br />
La stazione base del vostro apparecchio è dotata di un circuito di<br />
alimentazione rete ad efficienza energetica (Input 230 V AC , Output<br />
7,5 V DC , 300 mA). Il carico nullo è pari a circa 0,08 W. L’efficienza<br />
media è pari a circa il 76 %. L’assorbimento di potenza dalla<br />
stazione di base ammonta a 1,84 W / 2,2 W.<br />
Important note<br />
Your device is supplied with an energy−efficient switching power<br />
supply (Input 230 V AC , Output 7.5 V DC , 300 mA). The adaptor input<br />
power without load is approx. 0.08 W. The average efficiency is<br />
approx. 76 %. The electrical consumption is approx. 1.84 W / 2.2 W.
Declaration of Conformity 29<br />
Diese Anlage entspricht der europäischen R&TTE Richtlinie.<br />
Für die komplette Konformitätserklärung nutzen Sie bitte den kostenlosen<br />
Download von unserer Website www.switel.<strong>com</strong>.<br />
Cet équipement est conforme à la directive européenne R&TTE.<br />
Pour obtenir la déclaration de conformité intégrale, veuillez vous servir du<br />
téléchargement gratuit de notre site Internet www.switel.<strong>com</strong>.<br />
Quest’apparecchiatura è conforme alla direttiva europea R&TTE.<br />
Per la dichiarazione di conformità <strong>com</strong>pleta si prega di voler usufruire del<br />
servizio gratuito di download dal nostro sito Internet www.switel.<strong>com</strong>.<br />
This equipment <strong>com</strong>plies with the European R&TTE directive.<br />
To view the <strong>com</strong>plete Declaration of Conformity, please refer to the free<br />
download available at our web site: www.switel.<strong>com</strong>.<br />
Service Hotline<br />
Bei technischen Problemen können Sie sich an unsere Service−Hotline<br />
unter Tel. 0900 00 1675 innerhalb der Schweiz (Kosten Swiss<strong>com</strong> bei<br />
Drucklegung: CHF 2.60/min) wenden.<br />
S’il s’agit de problèmes techniques, vous pouvez vous adresser à notre<br />
hotline de service en Suisse en appelant le numéro 0900 00 1675 (frais<br />
Swiss<strong>com</strong> à la date d’impression de ce manuel : CHF 2.60/min).<br />
In caso di problemi tecnici è possibile rivolgersi alla nostra hotline di assistenza<br />
tecnica chiamando al numero 0900 00 1675 valido per la Svizzera<br />
(spese da rete Swiss<strong>com</strong> alla data di stampa: CHF 2.60 / min).<br />
In the event of technical problems, you can contact our hotline service,<br />
Tel. 0900 00 1675 within Switzerland (cost via Swiss<strong>com</strong> at time of going<br />
to print: CHF 2.60/min).<br />
Version 1.1 − 26.10.2012