BCC 59 - Switel.com
BCC 59 - Switel.com
BCC 59 - Switel.com

You also want an ePaper? Increase the reach of your titles
YUMPU automatically turns print PDFs into web optimized ePapers that Google loves.
Babyphon mit digitaler, rauschfreier Funkübertragung<br />
Babyphone numérique sans fil à émission silencieuse<br />
Babyfon con sistema radio digitale trasmettibile<br />
Baby Monitor with digital, noiseless Radio Communication<br />
<strong>BCC</strong> <strong>59</strong><br />
Bedienungsanleitung<br />
Mode d’emploi<br />
Istruzioni per l’uso<br />
Operating Instructions<br />
D<br />
F<br />
I<br />
GB
Wichtige Hinweise<br />
1 Wichtige Hinweise<br />
Bitte lesen Sie diese Bedienungsanleitung sorgfältig durch. Öffnen Sie niemals die Geräte und führen<br />
Sie keine Reparaturen durch. Wenden Sie sich im Garantiefall an Ihren Fachhändler. Im Zuge<br />
von Projektverbesserungen behalten wir uns technische und optische Veränderungen am Artikel vor.<br />
Bestimmungsgemäße Verwendung<br />
Das Babyphon dient zur Raumüberwachung. Der Sender (Babygerät) überträgt Stimmen und andere<br />
Geräusche vom Baby zum Empfänger (Elterngerät). Jede andere Verwendung gilt als nicht bestimmungsgemäß.<br />
Die Verwendung dieser Geräte ersetzt nicht die persönliche Anwesenheit und das<br />
Aufpassen auf Ihr Kind. Schadensersatzansprüche, die über die gesetzlichen Bestimmungen hinausgehen,<br />
sind ausgeschlossen.<br />
Sicherheitshinweise<br />
Das Babyphon wurde entwickelt, um Ihnen zusätzliche Sicherheit zu bieten, wenn Sie einmal nicht<br />
im selben Zimmer wie Ihr Baby sein können. Es ist KEIN Ersatz für das Aufpassen durch Erwachsene.<br />
Während der Benutzung muss sich ein Elternteil immer in Reichweite des Babyphons aufhalten.<br />
Ihr Babyphon ist weder ein medizinisches Gerät noch kann es den “plötzlichen Kindstod“ verhindern.<br />
Verlassen Sie sich in Bezug auf das Wohlbefinden Ihres Kindes nicht auf dieses Gerät. Überprüfen<br />
Sie regelmäßig persönlich, ob es Ihrem Kind gut geht.<br />
• Legen Sie niemals etwas über Ihr Babyphon bzw. decken Sie es niemals ab.<br />
• Legen Sie das Eltern- oder Babygerät niemals in Wassernähe oder in einer feuchten Umgebung<br />
ab.<br />
• Achten Sie bei Auslandsreisen darauf, dass die am Netzteil angegebene Spannung mit der<br />
Spannung vor Ort übereinstimmt.<br />
• Werfen Sie Batterien/Akkus niemals in den Hausmüll. Beachten Sie die Entsorgungsmöglichkeiten<br />
Ihrer Kommunalbehörden.<br />
• Verwenden Sie in Ihrem Elterngerät niemals Einwegbatterien. Verwenden Sie nur die empfohlenen<br />
Akkus - 2 x AAA 1,2 V 750 mAH NiMH.<br />
• Verwenden Sie im Babygerät keine Akkus. Verwenden Sie nur die empfohlenen Batterien - 4 x<br />
AAA 1,5 V Alkaline. Denken Sie daran, die Batterien von Zeit zu Zeit (1 x pro Jahr) auszutauschen,<br />
um die Funktion des Babygerätes bei Stromausfall sicherzustellen.<br />
• Verwenden Sie nur das mitgelieferte Netzteil, andernfalls riskieren Sie die Beschädigung Ihres<br />
Babyphons.<br />
• Ziehen Sie das Netzteil aus der Steckdose und entfernen Sie die Batterien/Akkus, wenn Sie das<br />
Babyphon nicht benutzen.<br />
• Besprühen Sie das Gerät nicht mit Reinigungspolitur. Ziehen Sie das Netzteil aus der Steckdose,<br />
bevor Sie das Gerät reinigen.<br />
• Während der Benutzung können die Netzteile warm werden.<br />
• Setzen Sie Ihr Eltern- oder Babygerät keinem direkten Sonnenlicht aus.<br />
Die Ladekapazität der Akkus im Elterngerät lässt mit der Zeit nach, so dass diese unter Umständen<br />
ersetzt werden müssen. Neue Akkus können über unsere Hotline bezogen werden.<br />
Energieverbrauch<br />
Die mitgelieferten Netzteile erfüllen die Ökodesign-Anforderungen der Europäischen Union<br />
(Richtlinie 2005/32/EG). Dies bedeutet, dass sowohl im Betrieb als auch im Ruhezustand der<br />
Stromverbrauch im Vergleich zu Netzteilen älterer Bauart deutlich niedriger ist.
Bedienelemente<br />
2 Bedienelemente<br />
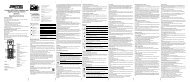
Sender (Babygerät)<br />
1 2 3<br />
6<br />
5<br />
4<br />
1 Einschalt−Taste Ein/Aus<br />
Drücken Sie diese Taste, um das Gerät einzuschalten.<br />
Halten Sie diese Taste für ca. 2 Sekunden gedrückt, um das Gerät auszuschalten.<br />
2 Nachtlicht/Temperaturanzeige<br />
Das Licht ist von der Elterneinheit ein-/ausschaltbar. Durch verschiedene Farben wird die Einhaltung<br />
des eingestellten Temperaturbereichs angezeigt (blau = unterhalb / orange = oberhalb).<br />
3 Funkruf−Taste<br />
- Drücken Sie die Taste kurz: Das Elterngerät gibt einen Alarmton.<br />
- Drücken und halten Sie die Taste, um über den Lautsprecher des Elterngerätes zu sprechen.<br />
Mit dieser Funktion können Sie Hilfe rufen oder ein verlegtes Elterngerät wiederfinden.<br />
4 Temperatursensor<br />
5 Schalter „zero emission“ (Unterseite)<br />
6 Batteriefach (Rückseite)<br />
Aufnahme für 4 AAA-Batterien (nicht im Lieferumfang) zur Versorgung der Babyeinheit während<br />
eines Stromausfalls.<br />
Strahlungsfreie Überwachung<br />
Der Sender (Babygerät) kann ihr Baby strahlungsfrei überwachen.<br />
Solange kein Geräusch die eingestellte Empfindlichkeit übersteigt, wird<br />
keine Sendeleistung ausgestrahlt. Erst wenn die eingestellte Schwelle<br />
überschritten wird, wird der Sender eingeschaltet und die Verbindung<br />
zur Elterneinheit aufgebaut. Der Verbindungsaufbau dauert in dieser<br />
Betriebsart maximal 8 Sekunden. Dazu muss der Schalter an der<br />
Unterseite der Babyeinheit in der Stellung „On“ stehen (Auslieferungszustand).<br />
Steht der Schalter in Stellung „Off“ besteht eine dauerhafte Sende-Empfangsverbindung mit sehr<br />
niedriger Leistung zwischen dem Baby- und dem Elterngerät. Dadurch entfällt die o. g. Verzögerung<br />
beim Verbindungsaufbau.<br />
D<br />
1
Bedienelemente<br />
Empfänger (Elterngerät)<br />
1<br />
2 3<br />
4<br />
5<br />
6<br />
7<br />
10<br />
9<br />
8<br />
11<br />
12<br />
1 Geräuschsensoranzeige<br />
Bei einem empfangenen Geräusch blinkt die Anzeige auf.<br />
2 Betriebsanzeige<br />
Zeigt die Betriebsbereitschaft an, blinkt während der Akkuladung in der Ladeschale.<br />
3 Verbindungsanzeige<br />
Grünes Licht EIN bedeutet, dass das Gerät mit dem Babygerät “verbunden“ ist. Wenn diese<br />
Anzeige blinkt, besteht keine Verbindung zum Babygerät.<br />
4 Display<br />
5 Sprech−Taste<br />
Beim Drücken dieser Taste können Sie über den Lautsprecher der Babyeinheit sprechen.<br />
6 Menü−Taste<br />
Im Menü können Sie verschiedene Einstellungen durchführen.<br />
7 ▼−Taste<br />
- Verringerung der Lautstärke der Wiedergabe<br />
- Auswählen von Menüpunkten<br />
8 ▲−Taste<br />
- Erhöhung der Lautstärke der Wiedergabe<br />
- Auswählen von Menüpunkten<br />
9 OK−Taste<br />
Bestätigung einer Menüauswahl.<br />
10 Einschalt−Taste Ein/Aus<br />
Halten Sie diese Taste für ca. 2 Sekunden gedrückt, um das Gerät einzuschalten.<br />
Halten Sie diese Taste für ca. 2 Sekunden gedrückt, um das Gerät auszuschalten.<br />
11 Gürtelclip (Rückseite)<br />
12 Akkufachdeckel (Rückseite)<br />
Aufnahme für 2 Akkus AAA, 1,2 V, NiMH.<br />
2
Gerät in Betrieb nehmen<br />
3 Gerät in Betrieb nehmen<br />
Sicherheitshinweise<br />
a Achtung: Lesen Sie vor der Inbetriebnahme unbedingt die “Wichtigen Hinweise“ in Kapitel 1.<br />
Verpackungsinhalt prüfen<br />
Zum Lieferumfang gehören:<br />
1 Elterngerät (Empfänger) 1 Ladeschale mit Netzteil<br />
1 Tragebeutel 2 Akkus Typ AAA, 750 mAh, NiMH<br />
1 Babygerät (Sender) 1 Netzteil mit Netzkabel<br />
Elterngerät<br />
1. Entfernen Sie den Gürtelclip, indem Sie den Clip oben<br />
anheben und nach unten schieben.<br />
2. Entfernen Sie anschließend den Akkufachdeckel an<br />
der Rückseite des Elterngeräts, indem Sie auf den<br />
Deckel drücken und ihn nach unten schieben. Legen<br />
Sie die Akkus entsprechend der Markierungen im<br />
Gerät ein und schließen Sie den Deckel wieder.<br />
3. Legen Sie das Elterngerät in die Ladeschale.<br />
4. Stecken Sie das Netzteil in die Steckdose.<br />
Die rote Ladeanzeige blinkt und im Display wird im Akkusymbol der Ladevorgang angezeigt.<br />
a Hinweis: Vor der ersten Benutzung oder nach einer langen Nutzungspause muss das<br />
Elterngerät 13 Stunden geladen werden. Während dieser Zeit wird das Elterngerät in der<br />
Ladeschale betrieben, wenn es eingeschaltet ist. Ohne Akkus ist ein Betrieb in der Ladestation<br />
nicht möglich.<br />
Babygerät<br />
1. Bei einem Stromausfall kann Ihr Babyphon auf Batterieversorgung umschalten. Aus diesem<br />
Grund wird das Einlegen von Batterien in das Babygerät empfohlen.<br />
2. Entfernen Sie den Batteriedeckel an der Rückseite des Babygeräts. Legen Sie 4 Alkaline-Batterien<br />
des Typs AAA ( nicht im Lieferumfang enthalten) entsprechend der Markierung im Gerät ein<br />
und schließen Sie den Deckel wieder. Verwenden Sie keine Akkus im Babygerät.<br />
3. Stecken Sie das Stromkabel in die Buchse an der Unterseite des Babygeräts und stecken Sie<br />
das Netzteil in die Steckdose.<br />
4. Halten Sie ggf. die Einschalt-Taste gedrückt um das Babygerät einzuschalten.<br />
a Hinweis: Das Babygerät sollte in ca. 1 bis 1,5 m Entfernung vom Kinderbett auf einer geraden<br />
Oberfläche aufgestellt werden. Stellen Sie das Babygerät niemals in das Kinderbett, Bett oder in<br />
den Laufstall. Stellen Sie sicher, dass sich das Gerät, die Kabel und das Netzteil außerhalb der<br />
Reichweite von Babys und anderen Kleinkindern befindet. Stellen Sie die Geräte niemals auf<br />
antike oder polierte Oberflächen.<br />
D<br />
3
Bedienung<br />
4 Bedienung<br />
Sobald Sie Ihr Babyphon eingeschaltet haben, können Sie die Geräusche aus dem Babyzimmer<br />
über das Elterngerät hören. Außerdem können Sie die Geräusche “sehen“, da die grüne Sensoranzeige<br />
oben am Elterngerät mit dem Geräuschpegel aufleuchtet und erlischt.<br />
a Hinweis: Wenn die Verbindung zwischen Eltern− und Babygerät zu irgendeinem Zeitpunkt<br />
ausfällt, blinkt die grüne Verbindungsanzeige am Elterngerät langsam, im Display erscheint “Keine<br />
Verb.“. Befolgen Sie die Anweisungen im Kapitel “Fehlerbeseitigung“, um die Verbindung wiederherzustellen.<br />
Babyphon ein−/ausschalten<br />
Nachdem Sie Ihr Babyphon angeschlossen haben, müssen Sie ggf. beide Geräte, das Eltern− und<br />
das Babygerät, einschalten. Dazu betätigen Sie die Einschalt−Taste des jeweiligen Geräts. Zum<br />
Ausschalten halten Sie die Einschalt−Tasten gedrückt.<br />
Lautstärke<br />
Mit den Tasten ▲ und ▼ am Elterngerät können Sie die Lautstärke einstellen, mit der Sie Ihr Baby<br />
hören.<br />
Akku-Ladeanzeige/Akku-Leerwarnung<br />
Das Elterngerät funktioniert außerhalb der Ladeschale bis zu 10 Stunden. Dies hängt jedoch davon<br />
ab, wie stark die Akkus geladen sind. Wenn die Akkus nur gering geladen sind, beginnt die Betriebsanzeige<br />
am Elterngerät zu blinken und Sie sollten das Gerät zurück in die Ladeschale legen, um die<br />
Akkus zu laden. Auch in der Ladeschale können Sie Ihr Elterngerät weiter benutzen.<br />
Wenn Sie das Elterngerät einschalten, sehen Sie im Display den aktuellen Ladezustand der Akkus:<br />
Akkusymbol vollständig gefüllt<br />
= vollständig geladen<br />
Akkusymbol zu 2/3 gefüllt<br />
= halb geladen<br />
Akkusymbol zu 1/3 gefüllt<br />
= Akkus fast entladen<br />
Akkusymbol nicht gefüllt/Rahmen blinkt = Akkus müssen geladen werden<br />
Ein Akku−Leer−Signalton wird ausgegeben, wenn die Akkus geladen werden müssen und die rote<br />
Betriebsanzeige blinkt. Wenn dieser Fall eintritt, müssen Sie das Elterngerät in die Ladestation<br />
zurückstellen. Der Betrieb ist auch während des Ladens gewährleistet.<br />
Geräusch-Alarm<br />
Wenn die Lautstärke Ihres Elterngeräts ganz ausgestellt ist, weil Sie nur die Anzeige zur Überwachung<br />
benutzen möchten und der Geräuschpegel im Babyzimmer so laut ist, dass am Elterngerät<br />
die Geräuschsensoranzeige aufleuchtet, wird am Elterngerät ein Warnton (Geräusch-Alarm) ausgesendet,<br />
wenn Sie diese Funktion eingeschaltet haben.<br />
Funkruf zwischen Baby- und Elterngerät (Paging)<br />
Diese Funktion ist nützlich, wenn sich ein Elternteil im Babyzimmer befindet und Kontakt mit dem<br />
anderen Elternteil aufnehmen möchte. Außerdem hilft diese Funktion dabei, ein verlegtes Elterngerät<br />
zu finden.<br />
Am Babygerät<br />
Drücken Sie kurz die Funkruf−Taste. Das Elterngerät sendet einen Ton. Um den Ton auszuschalten,<br />
drücken Sie eine beliebige Taste am Elterngerät oder betätigen Sie die Funkruf−Taste am Babygerät<br />
ein zweites Mal.<br />
4
Bedienung / Einstellungen<br />
Nachtlicht<br />
Das Babygerät hat ein Nachtlicht, das ein weiches, gleichmäßiges Licht ausstrahlt, das Ihrem Baby<br />
Sicherheit vermittelt und Ihnen ermöglicht, Ihr Baby in einem dunklen Raum zu sehen. Dieses Licht<br />
können Sie vom Elterngerät aus ein- oder ausschalten.<br />
5 Einstellungen<br />
Sie können mit Hilfe des Menüs verschiedene Einstellungen vornehmen.<br />
Zum Öffnen des Menüs drücken Sie die Menü-Taste.<br />
Mit den Tasten ▲ und ▼ bewegen Sie sich innerhalb des Menüs.<br />
Drücken Sie OK um ein Untermenü aufzurufen oder eine Einstellung zu bestätigen.<br />
Drücken Sie die Menü-Taste ggf. mehrfach, um das Menü zu verlassen.<br />
Uhrzeit/Datum einstellen<br />
Drücken Sie die Menü-Taste.<br />
Wählen Sie Uhr und drücken Sie OK.<br />
Wählen Sie Stundeformat und drücken Sie OK.<br />
- Ist das 24-Stunden-Format eingestellt erscheint 12 Std.?.<br />
Drücken Sie OK um das 12 Std.-Format einzuschalten.<br />
- Ist das 12-Stunden-Format eingestellt erscheint 24 Std.?.<br />
Drücken Sie OK um das 24 Std.-Format einzuschalten.<br />
Wählen Sie Zeit einst und drücken Sie OK.<br />
Stellen Sie mit ▲ und ▼ die Jahreszahl ein und drücken Sie OK.<br />
Stellen Sie mit ▲ und ▼ den Monat ein und drücken Sie OK.<br />
Stellen Sie mit ▲ und ▼ den Tag ein und drücken Sie OK.<br />
Stellen Sie mit ▲ und ▼ die Stunde ein und drücken Sie OK.<br />
Stellen Sie mit ▲ und ▼ die Minute ein und drücken Sie OK.<br />
Wählen Sie einen weiteren Menüpunkt oder verlassen Sie das Menü mit der Menü-Taste.<br />
Sprache einstellen<br />
Drücken Sie die Menü-Taste.<br />
Wählen Sie Sprache und drücken Sie OK.<br />
Wählen Sie eine Sprache und drücken Sie OK.<br />
Wählen Sie einen weiteren Menüpunkt oder verlassen Sie das Menü mit der Menü-Taste.<br />
Fütterung<br />
Wenn Sie für Ihr Baby feste Fütterungsintervalle einhalten möchten, können Sie das Gerät so einstellen,<br />
dass es Ihnen bei Erreichen des Zeitpunktes einen Hinweis gibt. Sie können einen einmaligen<br />
Alarm einstellen oder den Zeitpunkt der nächsten Fütterung und ein Intervall für nachfolgende<br />
Fütterungen.<br />
a Hinweis: Zur ordnungsgemäßen Funktion ist es erforderlich, dass die aktuelle Uhrzeit<br />
eingestellt ist. Wollen Sie nur einen einmaligen Alarm stellen Sie das Intervall auf 00:00 ein.<br />
Drücken Sie die Menü-Taste.<br />
Wählen Sie Fütterung und drücken Sie OK.<br />
Wählen Sie Zeit einst und drücken Sie OK.<br />
Stellen Sie mit ▲ und ▼ die Stunde ein und drücken Sie OK.<br />
Stellen Sie mit ▲ und ▼ die Minute ein und drücken Sie OK.<br />
D<br />
5
Einstellungen<br />
Temperatur<br />
Wählen Sie Alarm und drücken Sie OK.<br />
- Ist die Funktion eingeschaltet (Anzeige einer Glocke im Display) wird Aus? angezeigt.<br />
Drücken Sie OK um die Funktion auszuschalten.<br />
- Ist die Funktion ausgeschaltet wird Ein? angezeigt.<br />
Drücken Sie OK um die Funktion einzuschalten.<br />
oder<br />
Wählen Sie mit ▲ und ▼ Lautst und drücken Sie OK.<br />
Stellen Sie mit ▲ und ▼ die Lautstärke für den Alarm ein und drücken Sie OK und die Menü-Taste.<br />
Wählen Sie Fü. Intervall und drücken Sie OK.<br />
Stellen Sie mit ▲ und ▼ die Stunde ein und drücken Sie OK.<br />
Stellen Sie mit ▲ und ▼ die Minute ein und drücken Sie OK.<br />
Wählen Sie einen weiteren Menüpunkt oder verlassen Sie das Menü mit der Menü-Taste.<br />
Drücken Sie die Menü-Taste.<br />
Wählen Sie Temperatur und drücken Sie OK.<br />
Wählen Sie Bereichswahl und drücken Sie OK.<br />
Stellen Sie mit ▲ und ▼ die obere Grenze (Obere Gr.) ein und drücken Sie OK.<br />
Stellen Sie mit ▲ und ▼ die untere Grenze (Untere Gr.) ein und drücken Sie OK.<br />
Wählen Sie Temp. Alarm und drücken Sie OK.<br />
- Ist die Funktion eingeschaltet (Anzeige einer Glocke im Display) wird Aus? angezeigt.<br />
Drücken Sie OK um die Funktion auszuschalten.<br />
- Ist die Funktion ausgeschaltet wird Ein? angezeigt.<br />
Drücken Sie OK um die Funktion einzuschalten.<br />
oder<br />
Wählen Sie mit ▲ und ▼ Lautst und drücken Sie OK.<br />
Stellen Sie mit ▲ und ▼ die Lautstärke für den Alarm ein und drücken Sie OK und die Menü-Taste.<br />
Drücken Sie ▲ bzw. ▼, um die Einheit der Temperatur zu ändern (Grad Celsius oder Fahrenheit).<br />
- Ist “Celsius“ eingestellt, wird Grad F? angezeigt. Um “Fahrenheit“ einzuschalten drücken Sie OK.<br />
- Ist “Fahrenheit“ eingestellt, wird Grad C? angezeigt. Um “Celsius“ einzuschalten drücken Sie OK.<br />
Wählen Sie einen weiteren Menüpunkt oder verlassen Sie das Menü mit der Menü-Taste.<br />
Vibrations-Alarm<br />
a Hinweis: Ist diese Funktion eingeschaltet vibriert das Elterngerät, wenn die Geräusche aus dem<br />
Babyzimmer die Ansprechschwelle überschreiten.<br />
Drücken Sie die Menü-Taste.<br />
Wählen Sie Vibration und drücken Sie OK.<br />
- Ist die Funktion eingeschaltet wird Aus? angezeigt.<br />
Drücken Sie OK um die Funktion auszuschalten.<br />
- Ist die Funktion ausgeschaltet wird Ein? angezeigt.<br />
Drücken Sie OK um die Funktion einzuschalten.<br />
Wählen Sie einen weiteren Menüpunkt oder verlassen Sie das Menü mit der Menü-Taste.<br />
6
Einstellungen<br />
Geräusch-Alarm<br />
a Hinweis: Mit dieser Funktion wird ein Hinweiston gegeben, wenn die Geräusche aus dem<br />
Babyzimmer die Ansprechschwelle überschreiten und die Wiedergabelautstärke an der Elterneinheit<br />
auf “0“ gestellt ist.<br />
Drücken Sie die Menü-Taste.<br />
Wählen Sie Geräu. Alarm und drücken Sie OK.<br />
- Ist die Funktion eingeschaltet (Anzeige einer Glocke im Display) wird Aus? angezeigt.<br />
Drücken Sie OK um die Funktion auszuschalten.<br />
- Ist die Funktion ausgeschaltet wird Ein? angezeigt.<br />
Drücken Sie OK um die Funktion einzuschalten.<br />
oder<br />
Wählen Sie mit ▲ und ▼ Lautst und drücken Sie OK.<br />
Stellen Sie mit ▲ und ▼ die Lautstärke für den Alarm ein und drücken Sie OK und die Menü-Taste.<br />
Wählen Sie einen weiteren Menüpunkt oder verlassen Sie das Menü mit der Menü-Taste.<br />
Empfindlichkeit<br />
Schlaflied<br />
Drücken Sie die Menü-Taste.<br />
Wählen Sie Empfindlk. und drücken Sie OK.<br />
Wählen Sie Bereichswahl und drücken Sie OK.<br />
Stellen Sie mit ▲ und ▼ die gewünschte Empfindlichkeitsstufe ein und drücken Sie OK.<br />
Wählen Sie einen weiteren Menüpunkt oder verlassen Sie das Menü mit der Menü-Taste.<br />
Drücken Sie die Menü-Taste.<br />
Wählen Sie Schlaflied und drücken Sie OK.<br />
Wählen Sie Neu wählen und drücken Sie OK.<br />
Wählen Sie mit ▲ und ▼ ein Schlaflied aus und drücken Sie OK.<br />
Wählen Sie Abspielen? und drücken Sie OK.<br />
- Im Babyzimmer wird das ausgewählte Schlaflied abgespielt (für ca. 15 Minuten).<br />
Im Display erscheint ein Notensymbol.<br />
- Um das Abspielen zu stoppen wählen Sie Stopp? und drücken Sie OK.<br />
Wählen Sie Lautst und drücken Sie OK.<br />
Stellen Sie mit ▲ und ▼ die Lautstärke ein und drücken Sie OK.<br />
Wählen Sie einen weiteren Menüpunkt oder verlassen Sie das Menü mit der Menü-Taste.<br />
Nachtlicht einstellen<br />
Drücken Sie die Menü-Taste.<br />
Wählen Sie Nachtlicht und drücken Sie OK.<br />
- Ist die Funktion eingeschaltet (Anzeige einer Glühlampe im Display) wird Aus? angezeigt.<br />
Um das Nachtlicht auszuschalten drücken Sie OK.<br />
- Ist die Funktion ausgeschaltet wird Ein? angezeigt.<br />
Um das Nachtlicht einzuschalten drücken Sie OK.<br />
Wählen Sie einen weiteren Menüpunkt oder verlassen Sie das Menü mit der Menü-Taste.<br />
D<br />
7
8<br />
Anhang<br />
6 Anhang<br />
Fehlersuche<br />
Haben Sie Probleme mit Ihrem Gerät, kontrollieren Sie zuerst die folgenden Hinweise. Bei technischen<br />
Problemen können Sie sich an unsere Service-Hotline unter Tel. 0900 00 1675 innerhalb der<br />
Schweiz (Kosten aus dem Festnetz von Swiss<strong>com</strong> bei Drucklegung: CHF 2.60/min) wenden. Bei<br />
Garantieansprüchen wenden Sie sich an Ihren Fachhändler. Die Garantiezeit beträgt 2 Jahre.<br />
• Die Betriebsanzeige leuchtet nicht auf, wenn Sie den Stecker in die Steckdose stecken.<br />
− Prüfen Sie, ob die Stromversorgung besteht und ob alle Verbindungen fest sind und ob beide<br />
Geräte mit der Einschalttaste eingeschaltet sind.<br />
• Die Verbindungsanzeige am Elterngerät blinkt und Sie können keine Geräusche aus dem<br />
Babyzimmer hören.<br />
− Sie befinden sich möglicherweise außerhalb der Reichweite. Gehen Sie näher an das Babygerät<br />
und warten Sie 5 Sekunden, damit sich die Verbindung aufbauen kann.<br />
− Unter Umständen müssen Sie die Verbindung zwischen den beiden Geräten durch Aus− und<br />
erneutes Einschalten wieder herstellen. Die Betriebsanzeige und die Verbindungsanzeige<br />
(kann einige Sekunden dauern) sollten leuchten. Die Geräuschsensoranzeige leuchtet ebenfalls<br />
kurz auf.<br />
• Sie können Ihr Baby im Elterngerät nicht hören, aber die Verbindungsanzeige leuchtet immer<br />
noch durchgehend.<br />
− Prüfen Sie, ob die Lautstärke am Elterngerät eingeschaltet ist.<br />
• Am Elterngerät blinkt die Betriebsanzeige.<br />
− Ihre Akkus sind fast leer. Legen Sie das Elterngerät in die Ladeschale, um es zu laden.<br />
• Ihr Babyphon gibt einen hohen Piepton aus.<br />
− Dies kann passieren, wenn sich Eltern− und Babygerät zu nah beieinander befinden. Erhöhen<br />
Sie den Abstand zwischen den Geräten.<br />
Pflegehinweise<br />
Reinigen Sie die Gehäuseoberflächen mit einem weichen und fusselfreien Tuch. Verwenden Sie<br />
keine Reinigungs- oder Lösungsmittel.<br />
Konformitätserklärung<br />
Dieses Gerät erfüllt die Anforderungen der EU-Richtlinien:<br />
- 1999/5/EG Richtlinie über Funkanlagen und Telekommunikationsendeinrichtungen und die<br />
gegenseitige Anerkennung ihrer Konformität.<br />
- 2005/32/EG Richtlinie „Energiebetriebene Produkte“.<br />
Die Konformität mit den o. a. Richtlinien wird durch das CE-Zeichen auf dem Gerät bestätigt.<br />
Für die komplette Konformitätserklärung nutzen Sie bitte den kostenlosen Download von unserer<br />
Website www.switel.<strong>com</strong>.<br />
Entsorgung<br />
Wollen Sie Ihr Gerät entsorgen, bringen Sie es zur Sammelstelle Ihres kommunalen<br />
Entsorgungsträgers (z. B. Wertstoffhof). Nach dem Elektro− und Elektronikgerätegesetz<br />
sind Besitzer von Altgeräten gesetzlich verpflichtet, alte Elektro− und Elektronikgeräte<br />
einer getrennten Abfallerfassung zuzufuḧren. Das nebenstehende Symbol bedeutet,<br />
dass Sie das Gerät auf keinen Fall in den Hausmüll werfen dürfen!<br />
Gefährdung von Gesundheit und Umwelt durch Akkus und Batterien! Akkus und<br />
Batterien nie öffnen, beschädigen, verschlucken oder in die Umwelt gelangen lassen.<br />
Sie können giftige und umweltschädliche Schwermetalle enthalten. Sie sind gesetzlich
Anhang<br />
verpflichtet, Akkus und Batterien beim batterievertreibenden Handel sowie bei zuständigen<br />
Sammelstellen, die entsprechende Behälter bereitstellen, sicher zu entsorgen.<br />
Die Entsorgung ist unentgeltlich. Die nebenstehenden Symbole bedeuten, dass Sie<br />
Akkus und Batterien auf keinen Fall in den Hausmüll werfen dürfen und sie über Sammelstellen<br />
der Entsorgung zugefuḧrt werden müssen.<br />
Verpackungsmaterialien entsorgen Sie entsprechend den lokalen Vorschriften.<br />
Technische Daten<br />
Betriebsfrequenz<br />
1,8 GHz<br />
Reichweite Unter optimalen Bedingungen bis zu 300 m.<br />
Innerhalb von Gebäuden kann eine Reichweite<br />
von bis zu 50 m erreicht werden<br />
(aufgrund von Wänden, Türen usw.)<br />
Netzteil, Babygerät (Sender)<br />
Input: 100~240 V AC, 50/60 Hz, 150 mA<br />
Output: 7 V DC, 420 mA, Innen = +<br />
Nicht aufladbare Batterien, Babygerät Typ AAA, 1,5 V Alkaline<br />
(nicht im Lieferumfang enthalten)<br />
Sendeleistung<br />
Durchschnitt: 10 mW<br />
Maximum: 250 mW<br />
Netzteil mit Ladeschale für Elterngerät Input: 100~240 V AC, 50/60 Hz, 150 mA<br />
(direkt verdrahtet)<br />
Output: 7 V DC, 420 mA<br />
Wiederaufladbare Akkus für<br />
Typ AAA 1,2 V 750 mAh NiMH<br />
Elterngerät (Empfänger)<br />
Betriebszeit mit aufgeladenen Akkus Ca. 10 Stunden<br />
Zulässige Umgebungstemperatur 10 °C bis 30 °C<br />
Zulässige relative Luftfeuchtigkeit 20 % bis 75 %<br />
Garantie<br />
SWITEL-Geräte werden nach den modernsten Produktionsverfahren hergestellt und geprüft. Ausgesuchte<br />
Materialien und hoch entwickelte Technologien sorgen für einwandfreie Funktion und lange Lebensdauer.<br />
Ein Garantiefall liegt nicht vor, wenn die Ursache einer Fehlfunktion des Gerätes bei dem Telefonnetzbetreiber<br />
oder einer eventuell zwischengeschalteten Nebenstellenanlage liegt. Die Garantie gilt nicht für die in den<br />
Produkten verwendeten Batterien, Akkus oder Akkupacks.<br />
Die Garantiezeit beträgt 24 Monate, gerechnet vom Tage des Kaufs.<br />
Innerhalb der Garantiezeit werden alle Mängel, die auf Material- oder Herstellungsfehler zurückzuführen sind,<br />
kostenlos beseitigt. Der Garantieanspruch erlischt bei Eingriffen durch den Käufer oder durch Dritte. Schäden,<br />
die durch unsachgemässe Behandlung oder Bedienung, natürliche Abnutzung, durch falsches Aufstellen<br />
oder Aufbewahren, durch unsachgemässen Anschluss oder Installation sowie durch höhere Gewalt oder<br />
sonstige äussere Einflüsse entstehen, fallen nicht unter die Garantieleistung.<br />
Wir behalten uns vor, bei Reklamationen die defekten Teile auszubessern, zu ersetzen oder das Gerät auszutauschen.<br />
Ausgetauschte Teile oder ausgetauschte Geräte gehen in unser Eigentum über.<br />
Schadenersatzansprüche sind ausgeschlossen, soweit sie nicht auf Vorsatz oder grober Fahrlässigkeit des<br />
Herstellers beruhen.<br />
Sollte Ihr Gerät dennoch einen Defekt innerhalb der Garantiezeit aufweisen, wenden Sie sich bitte unter Vorlage<br />
Ihrer Kaufquittung ausschliesslich an das Geschäft, in dem Sie Ihr SWITEL-Gerät gekauft haben. Alle<br />
Gewährleistungsansprüche nach diesen Bestimmungen sind ausschliesslich gegenüber Ihrem Fachhändler<br />
geltend zu machen. Nach Ablauf von zwei Jahren nach Kauf und Übergabe unserer Produkte können<br />
Gewährleistungsrechte nicht mehr geltend gemacht werden.<br />
D<br />
9
Remarques importantes<br />
1 Remarques importantes<br />
Veuillez lire attentivement ce mode d'emploi. Ne jamais ouvrir les appareils ni effectuer de réparation.<br />
Si le matériel est sous garantie, veuillez contacter votre revendeur. Dans le cadre d'une amélioration<br />
constante des produits, nous nous réservons le droit d'effectuer des modifications techniques<br />
ou optiques sur le produit.<br />
Utilisation conforme<br />
Le Babyphone est utilisé pour la surveillance d'une pièce. L'émetteur (unité bébé) transmet les voix<br />
ou autres bruits du bébé au récepteur (unité parents). Toute autre utilisation ne serait pas conforme.<br />
L'utilisation de cet appareil ne saurait remplacer la présence physique et la surveillance de votre<br />
enfant. Toute demande de dommages et intérêts dépassant les dispositions légales sont exclues.<br />
Sécurité<br />
Le Babyphone a été conçu pour vous apporter une sécurité <strong>com</strong>plémentaire quand vous n'êtes pas<br />
dans la même pièce que votre bébé. Cet appareil ne peut EN AUCUN CAS remplacer la surveillance<br />
d'un adulte. Lors de l'utilisation, un parent doit toujours se trouver à proximité du Babyphone.<br />
Votre Babyphone n'est pas un appareil médical et ne peut en aucun cas prévenir une "mort subite<br />
du nourrisson". Le Babyphone ne garantit pas la sécurité de votre enfant. Vérifiez régulièrement et<br />
personnellement si votre enfant se porte bien.<br />
• Ne rien poser sur le Babyphone, ni le recouvrir.<br />
• Ne pas poser l'unité parent ou l'unité bébé à proximité d'une source d'eau ou dans un environnement<br />
humide.<br />
• En cas de voyage à l'étranger, vérifiez si la tension du pays est bien adaptée à la tension spécifiée<br />
sur le bloc alimentation de l'appareil.<br />
• Ne jamais jeter vos piles/piles rechargeables à la poubelle. Utilisez les possibilités de traitement<br />
des déchets de votre <strong>com</strong>mune.<br />
• N'utilisez jamais de piles jetables dans l'unité parents. Utiliser uniquement les piles rechargeables<br />
re<strong>com</strong>mandées - 2 x AAA 1,2 V 750 mAH NiMH.<br />
• Ne pas utiliser de piles rechargeables dans l'unité bébé. Utiliser uniquement les piles re<strong>com</strong>mandées<br />
- 4 x AAA 1,5 V Alcaline. Pensez à changer de temps en temps les piles (1 x par an),<br />
afin de garantir le bon fonctionnement de l'appareil en cas de panne de courant.<br />
• Utiliser uniquement le bloc alimentation fourni avec l'appareil ; vous risquez sinon de détériorer<br />
votre Babyphone.<br />
• Retirer le bloc alimentation de la prise et enlever les piles/piles rechargeables lorsque vous n'utilisez<br />
pas le Babyphone.<br />
• Ne pas vaporiser de produit de nettoyage sur l'appareil. Retirer le bloc alimentation de la prise<br />
avant de nettoyer l'appareil.<br />
• Les blocs alimentation peuvent chauffer pendant l'utilisation.<br />
• Ne pas placer l'unité parent ou l'unité bébé en plein soleil.<br />
La capacité de charge des piles rechargeables de l'unité parent diminue avec le temps, il faut donc<br />
les remplacer si nécessaire. Vous pouvez approvisionner de nouvelles piles rechargeables auprès<br />
de notre Hotline.<br />
Consommation d'énergie<br />
Les blocs alimentation livrés sont conformes aux exigences d'Eco-design de l'Union Européenne<br />
(directive 2005/32/CE). Cela signifie que la consommation de courant est considérablement<br />
réduite par rapport aux anciens <strong>com</strong>posants, et cela en cours de fonctionnement <strong>com</strong>me à l'arrêt.<br />
10
Eléments de <strong>com</strong>mande<br />
2 Eléments de <strong>com</strong>mande<br />
Emetteur (Unité bébé)<br />
1 2 3<br />
6<br />
5<br />
4<br />
1 Interrupteur Marche/Arrêt<br />
Appuyer sur cette touche pour mettre en marche l'appareil.<br />
Maintenez cette touche enfoncée pendant env. 2 sec. pour éteindre l'appareil.<br />
2 Voyant/Affichage de la température<br />
Le voyant s'éteint sur l'unité des parents.<br />
Différentes couleurs indiquent si la plage de température réglée est respectée (bleu = en-dessous<br />
/ orange = au-dessus).<br />
3 Touche Transmission<br />
- Appuyez brièvement sur la touche : l'unité parents donne un signal d'alarme.<br />
- Maintenez la touche appuyée pour parler à travers le haut-parleur de l'unité parent.<br />
Cette fonction permet d'appeler à l'aide, ou de retrouver l'unité parent égarée.<br />
4 Capteur de température<br />
5 Interrupteur „zéro émission“ (en bas)<br />
6 Cache du <strong>com</strong>partiment à piles (au dos)<br />
4 piles AAA (non fournies) pour l'alimentation de l'unité bébé en cas de panne de courant.<br />
Surveillance sans émission d'onde<br />
L'émetteur (unité bébé) surveille votre bébé sans émettre d'ondes. Tant<br />
qu'aucun bruit ne dépasse la sensibilité réglée, aucune onde n'est<br />
émise. Ce n'est que lorsque le seuil fixé est dépassé que l'émetteur se<br />
met en route et que la connexion à l'unité parent se fait. La connexion<br />
dans ce mode de fonctionnement ne dépasse pas les 8 secondes. Il<br />
faut pour cela que l'interrupteur situé sous l'unité bébé soit en position<br />
"On"(réglage usine).<br />
Si l'interrupteur est en position „Off“, de faibles ondes sont émises en permanence entre les deux<br />
unités. Ceci supprime le délai de connexion indiqué ci-dessus.<br />
F<br />
11
Eléments de <strong>com</strong>mande<br />
Récepteur (unité parent)<br />
1<br />
2 3<br />
4<br />
5<br />
6<br />
7<br />
10<br />
9<br />
8<br />
11<br />
12<br />
1 Affichage de l'indicateur de bruit<br />
En cas de bruit, l'affichage clignote.<br />
2 Témoin d'alimentation<br />
Indique l'état de fonctionnement, clignote lorsque les piles sont en charge.<br />
3 Affichage de la connexion<br />
Le voyant vert ON signifie que l'appareil est connecté à l'unité bébé. Lorsque ce voyant clignote,<br />
il n'y a pas de connexion à l'unité bébé.<br />
4 Ecran<br />
5 Touche de conversation<br />
Lorsque vous maintenez cette touche appuyée, vous pouvez parler à travers le haut-parleur de<br />
l'unité bébé.<br />
6 Touche Menu<br />
Le menu vous permet d'effectuer différents réglages.<br />
7 Touche ▼<br />
- Réduction du volume<br />
- Choix des différents points dans le menu<br />
8 Touche ▲<br />
- Augmentation du volume<br />
- Choix des différents points dans le menu<br />
9 Touche OK<br />
Valide un choix dans le menu.<br />
10 Interrupteur Marche/Arrêt<br />
Appuyer sur cette touche env. 2 secondes pour allumer l'appareil.<br />
Appuyer sur cette touche env. 2 secondes pour éteindre l'appareil.<br />
11 Clip ceinture (au dos)<br />
12 Cache du <strong>com</strong>partiment à piles (au dos)<br />
pour 2 piles AAA, 1,2 V, NiMH.<br />
12
Mise en service de l’appareil<br />
3 Mise en service de l’appareil<br />
Conseils de sécurité<br />
a Attention : Lire impérativement les „Remarques importantes“ du chapitre 1 avant de mettre<br />
l'appareil en service.<br />
Vérifier le contenu<br />
Le kit <strong>com</strong>prend :<br />
1 unité parents (Récepteur) 1 chargeur avec bloc d'alimentation<br />
1 pochette de transport 2 piles Type AAA, 750 mAh, NiMH<br />
1 unité bébé (Emetteur) 1 bloc alimentation avec câble réseau<br />
Unité parents<br />
1. Retirer le clip ceinture en le soulevant et le poussant<br />
vers le bas..<br />
2. Retirer ensuite le cache du <strong>com</strong>partiment à piles<br />
rechargeables au dos de l’unité parents, en appuyant<br />
sur le cache et le poussant vers le bas. Insérez les<br />
piles rechargeables en respectant les indications de<br />
l’appareil, et refermez le cache.<br />
3. Placer l’unité parents dans le chargeur.<br />
4. Brancher le chargeur dans le prise. Le voyant rouge clignote et une icône de chargement de la<br />
pile apparait sur l'écran.<br />
a Information : Avant la première utilisation, ou après une longue pause, l’unité parents doit être<br />
chargée pendant 13 heures. L’unité parents se chargera si elle est allumée. Le chargement ne<br />
fonctionnera pas si l’unité n’est pas équipée de piles rechargeables.<br />
Unité bébé<br />
1. En cas de panne de courant, l’unité bébé peut être <strong>com</strong>mutée sur l'alimentation par piles. C’est<br />
pourquoi nous re<strong>com</strong>mandons d'installer des piles dans l’unité bébé.<br />
2. Retirer le cache du <strong>com</strong>partiment à piles au dos de l’unité bébé. Insérez les 4 piles alcalines de<br />
type AAA (non fournies) en respectant les indications de l’appareil, et refermez le cache.<br />
Ne pas utiliser de piles rechargeables dans l’unité bébé.<br />
3. Brancher le câble d’alimentation au dessous de l’unité bébé et brancher le chargeur dans la<br />
prise.<br />
4. Appuyer sur la touche Marche/Arrêt pour allumer l’unité bébé.<br />
a Information : Il est re<strong>com</strong>mandé de placer l’unité bébé à environ 1 à 1,5 m du lit du bébé, sur<br />
une surface plane. Ne pas la poser dans le lit du bébé, ou dans un parc. Assurez-vous que<br />
l’appareil, les câbles et le chargeur sont hors de portée de bébés ou d’enfants. Ne placez jamais<br />
l’appareil sur des surfaces anciennes ou cirées.<br />
F<br />
13
Commande<br />
4 Commande<br />
A partir du moment où l’unité bébé est allumée, les bruits provenant de la chambre du bébé peuvent<br />
être entendus dans l’unité parents. Vous pouvez également „voir“ les bruits, car les voyants verts de<br />
niveaux sonores sur l’unité parents s’allument et s'éteignent en fonction du bruit.<br />
a Information : Si la connexion entre les unités parents et bébé s’interrompt, le voyant vert de<br />
connexion sur l’unité parents clignote lentement, et apparait sur l’écran “Pas connecté“<br />
(„Pas de connexion“). Suivez les instructions du chapitre „Dépannage“ pour rétablir la connexion.<br />
Marche / Arrêt du Babyphone<br />
Après avoir branché le Babyphone, les deux unités – parents et bébé - doivent être allumées. Utilisez<br />
pour cela l'interrupteur marche / arrêt de chaque appareil. Pour les éteindre, appuyer sur l'interrupteur<br />
marche / arrêt.<br />
Volume sonore<br />
Les touches ▲ et ▼ situées sur l’unité parents permettent de régler le volume sonore auquel vous<br />
entendez votre bébé.<br />
Icône de chargement des piles / Avertissement de piles vides<br />
L’unité parents peut fonctionner sans chargeur jusqu’à 10 heures. La durée de fonctionnement<br />
dépend néanmoins du niveau de charge des piles. Si les piles sont faiblement chargées, l’icône de<br />
chargement des piles clignotera sur l’unité parents ; vous devriez alors replacer l’appareil sur son<br />
chargeur, afin de recharger les piles. Vous pouvez utiliser l’unité parents pendant le chargement.<br />
Lorsque vous allumez l’unité parents, l’état de charge des piles est affiché :<br />
Icône piles <strong>com</strong>plètement rempli = pleine charge<br />
Icône piles rempli au 2/3 =<br />
charge à moitié<br />
Icône piles rempli au 1/3 =<br />
piles presque déchargées<br />
Icône piles non rempli/la bordure clignote = recharger les piles<br />
Un avertissement de batterie vide est émis, quand les piles doivent être rechargées, et le témoin<br />
d’alimentation rouge clignote. Lorsque cela se produit, il faut replacer l’appareil parents dans le chargeur.<br />
L’appareil fonctionne aussi pendant le chargement.<br />
Alarme bébé<br />
Lorsque le volume de l’unité est baissé parce-que vous souhaitez utiliser uniquement l’écran pour<br />
surveiller votre bébé , et que le bruit dans la chambre du bébé déclenche les voyants de niveau<br />
sonore, cette fonction provoque un signal sonore d’avertissement dans l’unité parents (alarme bébé).<br />
Transmission entre les unités bébé et parents (Paging)<br />
Cette fonction est utile quand un parent se trouve dans la chambre du bébé et souhaite contacter<br />
l’autre parent. Cette fonction vous aide aussi à retrouver une unité parents égarée.<br />
Appuyer sur la touche Transmission située sur l’unité bébé. L’unité parents va émettre un signal<br />
sonore. Pour arrêter ce signal sonore, appuyer sur n’importe quelle touche sur l’unité parents, ou<br />
réappuyez sur la touche Transmission sur l’unité bébé.<br />
Veilleuse<br />
L’unité bébé est équipée d’une veilleuse qui donne une lumière douce et régulière qui sécurise votre<br />
bébé et vous permet de le voir dans une pièce sombre. Cette veilleuse s’allume et s’éteint par l’unité<br />
parents.<br />
14
Réglages<br />
5 Réglages<br />
Le menu vous permet d’effectuer différents réglages.<br />
Pour ouvrir le menu, appuyer sur la touche Menu.<br />
Les touches ▲ et ▼ vous permettent de naviguer dans le menu.<br />
Appuyer sur OK pour accéder aux sous-menus ou pour valider un réglage.<br />
Appuyer une ou plusieurs fois sur la touche Menu pour quitter le menu.<br />
Réglage Heure/Date<br />
Appuyer sur la touche Menu.<br />
Choisissez Uhr/Heure et appuyez sur OK.<br />
Choisissez le Format heure et appuyez sur OK.<br />
- Si le format 24 heures est réglé, apparait 12 heures?.<br />
Appuyer sur OK pour passer au format 12 heures.<br />
- Si le format 12 heures est réglé, apparait 24 heures?.<br />
Appuyer sur OK pour passer au format 24 heures.<br />
Choisissez Régler délai et appuyez sur OK.<br />
Utilisez les touches ▲ et ▼ pour régler l’année et appuyer sur OK.<br />
Utilisez les touches ▲ et ▼ pour régler le mois et appuyer sur OK.<br />
Utilisez les touches ▲ et ▼ pour régler le jour et appuyer sur OK.<br />
Utilisez les touches ▲ et ▼ pour régler l’heure et appuyer sur OK.<br />
Utilisez les touches ▲ et ▼ pour régler les minutes et appuyer sur OK.<br />
Choisissez ensuite un autre sous-menu ou quitter le menu par la touche Menu.<br />
Réglage de la langue<br />
Appuyer sur la touche Menu.<br />
Choisissez Choix langue et appuyer sur OK.<br />
Choisissez une langue et appuyez sur OK.<br />
Choisissez ensuite un autre sous-menu ou quitter le menu par la touche Menu.<br />
Repas du bébé<br />
Si votre bébé est habitué à des heures de repas fixes, vous pouvez régler l’appareil pour qu’il vous<br />
prévienne par un signal sonore à l’heure des repas. Vous avez la possibilité de régler simplement le<br />
prochain repas, ou bien de régler les différents intervalles de repas.<br />
a Information : Pour un bon fonctionnement, il est indispensable que l’heure soit réglée. Si vous<br />
ne souhaitez qu’un seul signal sonore pour le prochain repas, régler l’intervalle sur 00:00.<br />
Appuyer sur la touche Menu.<br />
Choisissez Délai repas et appuyez sur OK.<br />
Choisissez Régler délai et appuyer sur OK.<br />
Utilisez les touches ▲ et ▼ pour régler l’heure et appuyer sur OK.<br />
Utilisez les touches ▲ et ▼ pour régler les minutes et appuyer sur OK.<br />
Choisissez Alarm/Alarme et appuyer sur OK.<br />
- Allumé? s’affiche quand la fonction est active (affichage d’une cloche à l’écran).<br />
Appuyer sur OK pour annuler la fonction.<br />
- Ein/Marche? est affiché lorsque la fonction n’est pas activée.<br />
Appuyer sur OK pour activer la fonction.<br />
ou<br />
F<br />
15
Réglages<br />
Température<br />
Utilisez les touches ▲ et ▼ pour régler le Volume et appuyer sur OK.<br />
Régler le volume à l’aide des touches ▲ et ▼ pour le signal sonore, et appuyer sur OK et sur la touche<br />
Menu.<br />
Choisissez Intervale et appuyer sur OK.<br />
Utilisez les touches ▲ et ▼ pour régler l’heure et appuyer sur OK.<br />
Utilisez les touches ▲ et ▼ pour régler les minutes et appuyer sur OK.<br />
Choisissez ensuite un autre sous-menu ou quitter le menu par la touche Menu.<br />
Appuyer sur la touche Menu.<br />
Choisissez Température et appuyer sur OK.<br />
Choisissez Déf. plage et appuyer sur OK.<br />
Utilisez les touches ▲ et ▼ pour définir la température maxi. (Lim. sup.) et appuyer sur OK.<br />
Utilisez les touches ▲ et ▼ pour définir la température mini. (Lim. inf.) et appuyer sur OK.<br />
Choisissez Alerte temp. et appuyer sur OK.<br />
- Éteint? s’affiche quand la fonction est active (affichage d’une cloche à l’écran).<br />
Appuyer sur OK pour désactiver la fonction.<br />
- Allumé? est affiché lorsque la fonction n’est pas activée.<br />
Appuyer sur OK pour activer la fonction.<br />
ou<br />
Utilisez les touches ▲ et ▼ pour régler le Volume et appuyer sur OK et sur la touche Menu.<br />
Utiliser les touches ▲ et ▼ pour modifier l’unité de température (°C ou Fahrenheit).<br />
- Degrés F est affiché lorsque l’appareil est réglé sur “Celsius“.<br />
Pour passer en “Fahrenheit“, appuyer sur OK.<br />
- Degrés C est affiché lorsque l’appareil est réglé sur “Fahrenheit“.<br />
Pour passer en “Celsius“, appuyer sur OK.<br />
Choisissez ensuite un autre sous-menu ou quitter le menu par la touche Menu.<br />
Alarme vibrante<br />
a Information : Si cette fonction est activée, l’unité parents vibrera lorsque les bruits dans la<br />
chambre du bébé dépasseront le seuil.<br />
Appuyer sur la touche Menu.<br />
Choisissez Vibration et appuyer sur OK.<br />
- Éteint? s’affiche quand la fonction est active.<br />
Appuyer sur OK pour désactiver la fonction.<br />
- Allumé? est affiché lorsque la fonction n’est pas activée.<br />
Appuyer sur OK pour activer la fonction.<br />
Choisissez ensuite un autre sous-menu ou quitter le menu par la touche Menu.<br />
Alarme bébé<br />
a Information : Cette fonction déclenche un signal sonore quand les bruits dans la chambre du<br />
bébé dépassent le seuil, et que le volume sur l’unité parents est réglé à “0“.<br />
Appuyer sur la touche Menu.<br />
Choisissez Alerte son et appuyer sur OK.<br />
- Éteint? s’affiche quand la fonction est active (affichage d’une cloche à l’écran).<br />
Appuyer sur OK pour désactiver la fonction.<br />
16
Réglages<br />
Sensibilité<br />
Berceuses<br />
- Allumé? est affiché lorsque la fonction n’est pas activée.<br />
Appuyer sur OK pour activer la fonction.<br />
ou<br />
Utilisez les touches ▲ et ▼ pour régler le Volume et appuyer sur OK.<br />
Régler le volume à l’aide des touches ▲ et ▼ pour le signal sonore, et appuyer sur OK et sur la touche<br />
Menu.<br />
Choisissez ensuite un autre sous-menu ou quitter le menu par la touche Menu.<br />
Appuyer sur la touche Menu.<br />
Choisissez Sensibilité et appuyer sur OK.<br />
Choisissez Déf. plage et appuyer sur OK.<br />
Régler la sensibilité désirée avec les touches ▲ et ▼, et appuyer sur OK.<br />
Choisissez ensuite un autre sous-menu ou quitter le menu par la touche Menu.<br />
Appuyer sur la touche Menu.<br />
Choisissez Berceuse et appuyer sur OK.<br />
Choisissez Sél. nouveau et appuyer sur OK.<br />
Choisissez une berceuse à l'aide des touches ▲ et ▼ et appuyer sur OK.<br />
Choisissez Lecture? Et appuyer sur OK.<br />
- La berceuse sélectionnée passe dans la chambre du bébé (pendant env. 15 minutes).<br />
Une note de musique est affichée sur l'écran.<br />
- Pour arrêter la lecture de la berceuse, choisir Stop? et appuyer sur OK.<br />
Choisir Volume et appuyer sur OK.<br />
Régler le volume à l'aide des touches ▲ et ▼ et appuyer sur OK.<br />
Choisissez ensuite un autre sous-menu ou quitter le menu par la touche Menu.<br />
Régler la veilleuse<br />
Appuyer sur la touche Menu.<br />
Choisissez Veilleuse et appuyer sur OK.<br />
- Éteint? s’affiche quand la fonction est active (affichage d’une ampoule sur l’écran).<br />
Appuyer sur OK pour éteindre la veilleuse.<br />
- Allumé? est affiché lorsque la fonction n’est pas activée.<br />
Appuyer sur OK pour allumer la veilleuse.<br />
Choisissez ensuite un autre sous-menu ou quitter le menu par la touche Menu.<br />
F<br />
17
Annexe<br />
6 Annexe<br />
Dépannage<br />
Si vous avez des problèmes avec votre appareil, contrôlez d’abord les indications suivantes. En cas<br />
de problèmes techniques, vous pouvez vous adresser à notre hotline de service en appelant le<br />
numéro 0900 00 1675 en Suisse (frais Swiss<strong>com</strong> à la date d’impression de ce manuel : CHF<br />
2.60/min). Si vous jouissez des droits de garantie, adressez-vous à votre revendeur. La durée de la<br />
garantie est de 2 ans.<br />
• Le témoin d’alimentation ne s'allume pas lorsque vous branchez la prise.<br />
− Vérifier si l'alimentation en courant est bien présente et si tous les câbles sont bien branchés ;<br />
vérifier également si les 2 unités sont bien en position Marche.<br />
• Le voyant de réception sur l'unité parents clignote et vous n’entendez pas les bruits provenant<br />
de la chambre du bébé.<br />
− L'unité parents se trouve certainement hors de portée de l'appareil. Rapprochez l'unité<br />
parents de l'unité bébé et attendez 5 secondes pour que la connexion puisse s'établir.<br />
− Vous pouvez être obligés de retrouver la connexion en éteignant puis rallumant les deux unités.<br />
Le témoin d’alimentation et le voyant de réception doivent s'allumer (cela peut durer quelques<br />
secondes). Le voyant de capteur de bruit peut également s'allumer brièvement.<br />
• Vous n'entendez pas votre bébé dans l'unité parents, alors que le voyant de réception est allumé<br />
en continu.<br />
− Vérifier si le volume de l'unité parents est bien allumé.<br />
• Le témoin d’alimentation clignote sur l'unité parents.<br />
− Vos piles sont bientôt déchargées. Placer l'unité parents dans le chargeur, afin de les recharger.<br />
• L'unité bébé émet un bip sonore aigu.<br />
− Cela peut se produire lorsque l'unité parents et l'unité bébé sont trop rapprochées l'une de<br />
l'autre. Augmenter alors la distance entre les deux appareils.<br />
Remarques d’entretien<br />
Nettoyez les surfaces du boîtier avec un chiffon doux et non pelucheux.<br />
N’utilisez pas de produits d’entretien ou de solvants.<br />
Déclaration de conformité<br />
Cet appareil répond aux exigences des directives de l’union européenne (UE) :<br />
- 1999/5/CE Directive sur les installations de radio et de télé<strong>com</strong>munication et la reconnaissance<br />
réciproque de leur conformité.<br />
- 2005/32/CE Directive « Produits consommateurs d'énergie ».<br />
La conformité avec les directives mentionnées ci-dessus est confirmée sur l’appareil par la marque<br />
CE. Pour obtenir toute la déclaration de conformité, veuillez utiliser le téléchargement gratuit de<br />
notre site Internet www.switel.<strong>com</strong>.<br />
Élimination<br />
Si vous ne voulez plus vous servir de votre appareil, veuillez l’apporter au centre de collecte<br />
de l’organisme d’élimination des déchets de votre <strong>com</strong>mune (par ex. centre de<br />
recyclage). L’icône ci-contre signifie que vous ne devez en aucun cas jeter votre appareil<br />
dans les ordures ménagères ! D’après la loi relative aux appareils électriques et<br />
électroniques, les propriétaires d’appareils usagés sont tenus de mettre tous les appareils<br />
électriques et électroniques usagés dans un collecteur séparé.<br />
18
Annexe<br />
Éliminez les piles rechargeables auprès d’un revendeur de piles ainsi que dans des<br />
centres de collecte <strong>com</strong>pétents qui tiennent à votre disposition les collecteurs appropriés<br />
correspondants.<br />
Éliminez les fournitures d’emballage conformément au règlement local.<br />
Données techniques<br />
Fréquence de fonctionnement<br />
1,8 GHz<br />
Portée Dans des conditions optimales jusqu'à 300 m.<br />
Dans des bâtiments, la portée est de 50 m. maxi<br />
(murs, portes, etc …)<br />
Bloc alimentation, unité bébé(Emetteur) Entrée : 100~240 V AC, 50/60 Hz, 150 mA<br />
Sortie : 7 V DC, 420 mA, intérieur = +<br />
Piles non rechargeables, unité bébé Type AAA, 1,5 V Alcaline<br />
(non fournies)<br />
Puissance de transmission<br />
Moyenne : 10 mW<br />
Maximum : 250 mW<br />
Bloc alimentation avec chargeur Entrée : 100~240 V AC, 50/60 Hz, 150 mA<br />
pour l'unité parents (câblé)<br />
Sortie : 7 V DC, 420 mA<br />
Piles rechargeables unité parents Type AAA 1,2 V 750 mAh NiMH<br />
(Récepteur)<br />
Durée de fonctionnement avec piles<br />
chargées<br />
Env. 10 heures<br />
Température ambiante autorisée 10 °C à 30 °C<br />
Humidité relative autorisée 20 % à 75 %<br />
Garantie<br />
Les appareils SWITEL sont fabriqués selon les procédes les plus modernes et sont contrôlés. Des<br />
matériels sélectionnés et des technologies de pointe ont pour effet un fonctionnement irréprochable<br />
et une longue durée de vie. La garantie ne rentre pas en jeu si l’exploitant du réseau téléphonique<br />
ou une installation à postes supplémentaires éventuellement intercalée est responsable du dysfonctionnement<br />
de l’appareil. La garantie n’est pas valable pour les piles, piles rechargeables ou packs de<br />
piles utilisés dans le produits. La durée de la garantie est de 24 mois, à partir de la date d’achat.<br />
Pendant la durée de la garantie, tous les défauts, dus à des vices de matériel ou de fabrication,<br />
seront éliminés gratuitement. Le droit à la garantie expire en cas d’intervention de l’acheteur ou de<br />
tiers. Les dommages provenant d’un maniement ou d’une manipulation incorrects, d’une mauvaise<br />
mise en place ou d’une mauvaise conservation de l’appareil, d’un raccordement non conforme ainsi<br />
que d’un cas de force majeure ou autres influences extérieures, sont exclus de la garantie.<br />
Nous nous reservons le droit, en cas de réclamations, de réparer ou de remplacer les <strong>com</strong>posants<br />
défectueux ou d’échanger l’appareil. Les <strong>com</strong>posants remplacés ou les appareils échangés deviennent<br />
notre propriété.<br />
Les demandes de dommages et intérêts sont exclues tant qu’elles ne reposent pas sur l’intention ou<br />
une négligence grossière du fabricant. Si votre appareil devait malgré tout présenter une défectuosité<br />
pendant la période de garantie, veuillez vous adressez, muni de la quittance d’achat, exclusivement<br />
au magasin où vous avez acheté votre appareil SWITEL. Vous ne pouvez faire valoir vos droits<br />
à la garantie selon ces dispositions qu’auprès de votre revendeur exclusivement. Deux ans après<br />
l’achat et la remise de nos produits, il n’est plus possible de faire valoir les droits à la garantie.<br />
F<br />
19
Avvertenze importanti<br />
1 Avvertenze importanti<br />
Vi preghiamo di leggere attentamente queste istruzioni per l’uso. Non aprite mai l’apparecchio e non<br />
cercate di ripararlo da soli. In caso di garanzia, rivolgeteVi al Vostro <strong>com</strong>merciante specializzato. Nel<br />
corso di miglioramenti al prodotto ci riserviamo il diritto di attuare modifiche tecniche ed ottiche<br />
sull’articolo.<br />
Utilizzo più sicuro<br />
Il Babyfon serve a tenere sotto controllo una stanza. La stazione (apparecchio del neonato) trasmette<br />
voci ed altri rumori del neonato al ricevente (apparecchio dei genitori). Ogni altro tipo di utilizzo<br />
non è considerato convenzionale. L’utilizzo di questi apparecchi non sostituisce la presenza dei genitori<br />
e la sorveglianza del loro bambino. Sono escluse pretese di risarcimento che vanno oltre le<br />
norme legali.<br />
Avvertenze di sicurezza<br />
Il Babyfon è stato sviluppato per offrirVi maggiore sicurezza per quando non Vi trovate nella stessa<br />
stanza del Vostro neonato. NON si tratta di un sostituto dei genitori, che devono <strong>com</strong>unque sorvegliare<br />
il proprio bambino. Durante l’utilizzo, i genitori devono sempre trovarsi a portata dell’apparecchio.<br />
Il Vostro Babyfon non è un apparecchio medico e non può evitare la „morte improvvisa del<br />
Vostro bambino“. Non affidateVi a questo apparecchio per accertarVi della buona salute del Vostro<br />
bambino. Controllate personalmente con regolaritá se il Vostro bambino sta bene.<br />
• Non coprite mai il Vostro Babyfon con qualcosa, non metteteci mai qualcosa sopra.<br />
• Non mettete mai l’apparecchio dei genitori o quello del neonato vicino a dell’acqua o in un<br />
ambiente umido.<br />
• In caso di viaggi all’estero, prestate attenzione che la tensione indicata sulla presa sia <strong>com</strong>patibile<br />
con la tensione del paese in cui Vi trovate.<br />
• Non gettate mai le batterie tra i rifiuti domestici. InformateVi sulle possibilitá di smaltimento di<br />
queste ultime presso il Vostro <strong>com</strong>une.<br />
• Non utilizzate mai batterie usa e getta per il Vostro apperecchio per i genitori. Utilizzate solo le<br />
batterie consigliate, -2 x AAA 1,2 V 750 mAH NiMH.<br />
• Non utilizzate batterie per l’apparecchio del neonato. Utilizzate solo le batterie consigliate, -4 x<br />
AAA 1,5 V Alkaline. Pensate a cambiare le batterie ogni tanto (1 volta all’anno), per assicurare il<br />
funzionamento dell’apparecchio del neonato in caso di corrente mancante.<br />
• Utilizzate solo l’alimentatore consegnatoVi, in caso contrario potete rischiare di danneggiare il<br />
Vostro Babyfon.<br />
• Estraete l’alimentatore dalla presa di corrente e rimuovete le batterie, se e quando non utilizzate<br />
il Babyfon.<br />
• Non pulite l’apparecchio con lucidante per la detersione. Estraete la spina dalla presa di corrente<br />
prima di detergere l’apparecchio.<br />
• Durante l’utilizzo, la presa di corrente può riscaldarsi.<br />
• Non esponete il Vostro apparecchio dei genitori o del neonato alla luce diretta del sole.<br />
La capacitá di ricarica della batteria dell’apparecchio dei genitori diminuisce col tempo. Questo può<br />
necessitare di una sostizuzione delle batterie. Potete ordinare una/delle nuova/e batteria/e attraverso<br />
la nostra hotline.<br />
Consumo energetico<br />
Gli alimentatori consegnati corrispondono ai requisiti dell’Unione Europea per il design ecologico<br />
(norma 2005/32/EG). Questo significa che il consumo energetico è visibilmente piú basso rispetto<br />
ad alimentatori di costruzione piú recente, sia nello stato di funzionamento che in quello di<br />
riposo.<br />
20
Dispositivi di <strong>com</strong>ando<br />
2 Dispositivi di <strong>com</strong>ando<br />
Stazione (apparecchio per il neonato)<br />
1 2 3<br />
6<br />
5<br />
4<br />
1 Tasto di accensione/spegnimento<br />
Premete questo tasto per accendere l’apparecchio.<br />
Tenete premuto questo tasto per ca. 2 secondi per spegnere l’apparecchio.<br />
2 Luce da notte/ Indicazione della temperatura<br />
La luce può essere accesa/spento dall’apparecchio dei genitori. Il rispetto dei campi di temperatura<br />
programmati è indicato da diversi colori (blu = sotto / arancione = sopra).<br />
3 Tasto di chiamata radiofonica<br />
- Premete brevemente il tasto: L’apparecchio dei genitori emette un segnale di allarme.<br />
- Premete e tenete premuto il tasto per parlare attraverso l’altoparlante dell’apparecchio dei<br />
genitori.<br />
Grazie a questa funzione potete chiamare aiuto o ritrovare un apparecchio dei genitori che avevate<br />
perso.<br />
4 Sensore della temperatura<br />
5 Pulsante „zero emission“ (Pagina inferiore)<br />
6 S<strong>com</strong>parto delle batterie (Pagina anteriore)<br />
Inserimento di 4 batterie AAA (non contenute nella confezione di consegna) per l’assicurazione<br />
di energia elettrica nell’apparecchio del neonato durante una mancanza di corrente elettrica.<br />
Sorveglianza non irradiante<br />
La stazione (Babyfon) sorveglia il Vostro neonato senza emenargli irradiazioni.<br />
Fino a che nessun rumore oltrepassa la sensibilitá programmata,<br />
non viene irradiata alcuna potenza trasmessa. Solo nel momento<br />
in cui la soglia programmata viene oltrepassata, si accende la stazione<br />
e viene trasmesso il segnale all’apparecchio dei genitori. La formazione<br />
del collegamento dura al massimo 8 secondi in questa modalitá<br />
di funzionamento. Per consetire ciò, l’interruttore situato sulla parte<br />
inferiore dell’apparecchio del neonato deve stare in posizione „On“<br />
(condizione di rilascio).<br />
Se l’interruttore dovesse trovarsi in posizione „Off“ si crea un collegamento stabile di invio e ricezione<br />
a potenza molto bassa tra l’apparecchio del neonato e quello dei genitori. In questo modo termine<br />
il sovracitato ritardo di segnale durante la formazione del collegamento.<br />
I<br />
21
Dispositivi di <strong>com</strong>ando<br />
Ricevitore (apparecchio dei genitori)<br />
1<br />
2 3<br />
4<br />
5<br />
6<br />
7<br />
10<br />
9<br />
8<br />
11<br />
12<br />
1 Indicazione del sensore di rumori<br />
In caso di ricezione di un rumore l’indicazione lampeggia.<br />
2 Indicazione di funzionamento<br />
Indica il funzionamento dell’apparecchio, durante la ricarica lampeggia nel ricaricatore.<br />
3 Indicazione di collegamento<br />
La lucetta verde ON significa che l’apparecchio è „collegato“ con l’apparecchio del neonato.<br />
Quando questa lucetta lampeggia, non vi è alcun collegamento con l’apparecchio del neonato.<br />
4 Display<br />
5 Tasto di chiamata<br />
Premendo questo tasto potrete parlare attraverso l’altoparlante dell’apparecchio del neonato.<br />
6 Tasto del Menu<br />
Nel Menu potete impostare diverse cose.<br />
7 Tasto ▼<br />
- Riduzione del volume della trasmissione<br />
- Scelta voci del Menu<br />
8 Tasto ▲<br />
- Aumento del volume della trasmissione<br />
- Scelta voci del Menu<br />
9 Tasto OK<br />
Conferma di una scelta del Menu.<br />
10 Tasto di accensione / spegnimento<br />
Tenete premuto questo tasto per ca. 2 secondi per accendere l’apparecchio.<br />
Tenete premuto questo tasto per ca. 2 secondi per spegnere l’apparecchio.<br />
11 Gancio per la cintura (sul lato posteriore)<br />
12 Coperchio per lo s<strong>com</strong>parto batterie (sul lato posteriore)<br />
Inserimento di 2 batterie AAA, 1,2 V, NiMH.<br />
22
Avviare il funzionamento dell’apparecchio<br />
3 Avviare il funzionamento dell’apparecchio<br />
Avvertenze di sicurezza<br />
a Attenzione: Prima dell’avvio dell’apparecchio Vi rac<strong>com</strong>andiamo di leggere assolutamente le<br />
„Avvertenze importanti“ in capitolo 1.<br />
Controllare il contenuto della confezione<br />
La confezione di consegna contiene:<br />
1 Apparecchio dei genitori (ricevitore) 1 Ricaricatore con alimentatore<br />
1 Borsa da trasporto 2 Batteria di tipo AAA, 750 mAh, NiMH<br />
1 Apparecchio del neonato (trasmettitore) 1 Alimentatore con cavo di corrente<br />
Apparecchio dei genitori<br />
1. Rimuovete il gancio per la cintura alzando il gancio dalla<br />
parte superiore e spingendolo in giú.<br />
2. Rimuovete successivamente il coperchio dello s<strong>com</strong>parto<br />
per le batterie dell’apparecchio dei genitori premendo sul<br />
coperchio e spingendolo in giú. Posizionate le batterie<br />
sulle rispettive marcature nell’apparecchio e richiudete il<br />
coperchio<br />
3. Mettete l’apparecchio dei genitori nel ricaricatore.<br />
4. Inserite l’alimentatore nella presa di corrente. L’avviso di ricarica rosso lampeggia e sul display<br />
appare il simbolo della batteria che si sta ricaricando.<br />
a Avvertenza: Prima del primo utilizzo o dopo una lunga pausa dall’ultimo utilizzo, l’apparecchio<br />
dei genitori deve essere ricaricato per almeno 13 ore. Durante quest’arco di tempo esso può essere<br />
utilizzato dal ricaricatore, se è acceso. Senza batterie non è possibile utilizzare il ricaricatore.<br />
Apparecchio del neonato<br />
1. In caso di mancanza di corrente, il Vostro Babyfon può essere alimentato con energia dalle batterie.<br />
Per questo motivo Vi consigliamo di inserire delle batterie nell’apparecchio del neonato.<br />
2. Rimuovete il coperchio delle batterie sul lato posteriore dell’apparecchio del neonato. Inserite 4<br />
batterie Alkaline del tipo AAA (non incluse nella confezione di consegna) <strong>com</strong>e indicato sulla<br />
marcatura nell’apparecchio, e richiudete poi il coperchio. Non utilizzate batterie nell’apparecchio<br />
del neonato.<br />
3. Inserite il cavo della corrente nella presa sulla parte inferiore dell’apparecchio del neonato e<br />
inserite la spina nella presa di corrente.<br />
4. Tenete premuto il tasto di accensione per accendere l’apparecchio del neonato.<br />
a Avvertenza: L’apparecchio del neonato deve essere posizionato da 1 a 1,5 m di lontananza dal<br />
lettino del neonato, su una superificie dritta. Non mettete mai l’apparecchio del neonato nel lettino,<br />
letto o lettiera. AssicurateVi che l’apparecchio, il cavo e l’alimentatore si trovino lontani dalla portata<br />
di neonati o bambini piccoli. Non mettete mai gli apparecchi su superfici antiche o lucide.<br />
I<br />
23
Utilizzo<br />
4 Utilizzo<br />
Non appena avrete acceso il Vostro Babyfon potrete sentire i rumori dalla camera del neonato attraverso<br />
l’apparecchio dei genitori. Inoltre potrere „vedere“ i rumori, poiché l’indicazione del sensore<br />
sulla parte superiore dell’apparecchio dei genitori si alza e/o si abbassa a seconda del volume del<br />
rumore.<br />
a Avvertenza: Se il collegamento tra l’apparecchio dei genitori e quello del neonato ad un certo<br />
punto dovesse interrompersi, l’indicazione di collegamento verde sull’apparecchio dei genitori<br />
lampeggia lentamente, e sul display appare la scritta „Non Conn.“. Seguite le istruzioni contenute<br />
nel capitolo „Rilevazione di errori“ per ristabilire il collegamento.<br />
24<br />
Accendere / Spegnere il Babyfon<br />
Dopo aver collegato il Vostro Babyfon, dovete accendere entrambi gli apparecchi (quello dei genitori<br />
e quello del neonato). Per fare ciò, premete il tasto di accensione del rispettivo apparecchio. Per<br />
spegnere l’apparecchio, invece, tenete premuto il tasto di accensione.<br />
Volume<br />
Con i tasti ▲ e ▼ sull’apparecchio dei genitori potete regolare il volume con il quale sentite il Vostro<br />
bambino.<br />
Indicazione di ricarica della batteria/Indicazione di avvertenza della batteria scarica<br />
L’apparecchio dei genitori, dopo essere stato ricaricato, funziona per 10 ore. Questo dipende però da<br />
quanto sono ricaricate le batterie. Se le batterie sono state ricaricate per poco tempo, l’indicazione di<br />
funzionamento dell’apparecchio dei genitori inizia a lampeggiare per indicarVi che dovreste rimettere<br />
l’apparecchio nel ricaricatore per finire di ricaricare la/le batteria/e. Potete continuare ad utilizzare<br />
l’apparecchio dal ricaricatore. Se accendete l’apparecchio dei genitori, nel display potete vedere lo<br />
stato di ricarica attuale della/e batteria/e:<br />
Simbolo di ricarica <strong>com</strong>pletamente pieno =<br />
ricarica <strong>com</strong>pletata<br />
Simbolo di ricarica pieno a 2/3 =<br />
batterie ricaricate a metá<br />
Simbolo di ricarica pieno a 1/3 =<br />
batterie quasi scariche<br />
Simbolo di ricarica vuoto/la cornice lampeggia = le batterie devono essere ricaricate<br />
Un segnale di avviso di scaricamento della batteria suonerá quando le batterie dovranno essere ricaricate<br />
e quando l’indicazione di funzionamento rossa lampeggerá. Se questo é il caso, dovete rimettere<br />
l’apparecchio dei genitori nel ricaricatore. Il funzionamento é garantito anche durante la ricarica.<br />
Segnale di rumore<br />
Se il volume del Vostro apparecchio dei genitori è del tutto inattivo, perché volete solo utilizzare l’indicazione<br />
di sorvegliamento, e il livello di rumore nella stanza del bambino è cosí forte che sull’apparecchio<br />
dei genitori si accende l’indicazione del sensore del rumore, all’apparecchio dei genitori verrà<br />
inviato un segnale di allarme (segnale di rumore), se avrete attivato questa funzione.<br />
Chiamata radiofonica tra l’apparecchio del neonato e quello dei genitori (Paging)<br />
Questa funzione è utile se nella stanza del bambino si trova un genitore che vuole avviare un collegamento<br />
con l’altro genitore. Inoltre questa funzione aiuta a trovare un apparecchio dei genitori che<br />
era stato perso in precedenza. Premete brevemente il tasto di chiamata radiofonica sull’apparecchio<br />
del neonato. L’apparecchio dei genitori invia un segnale. Per spegnere il segnale, premete un tasto a<br />
piacimento sull’apparecchio dei genitori o riattivate il tasto di chiamata radiofonica sull’apparecchio<br />
del neonato.
Utilizzo / Impostazioni<br />
Luce da notte<br />
L’apparecchio del neonato dispone di una luce da notte, che splende di una luce piacevole ed uniforme,<br />
che trasmette sicurezza al Vostro bambino e che Vi permette di vedere il bambino in una stanza<br />
buia. Potete accendere / spegnere questa luce dall’apparecchio dei genitori.<br />
5 Impostazioni<br />
Con l’aiuto del Menu potete impostare diversi aspetti.<br />
Per aprire il menu premete sul tasto del Menu.<br />
Con i tasti ▲ e ▼ Vi potrete muovere all’interno del Menu.<br />
Premete su OK per aprire un Sottomenú o per confermare un’impostazione.<br />
Premete piu volte il tasto del Menú per abbandonare il Menú.<br />
Impostare orario/data<br />
Premete il tasto del Menú.<br />
Scegliete Orologio e premete OK.<br />
Scegliete Formato ora e premete OK.<br />
- È impostato il formato-24-ore e appare il formato 12 ore.<br />
Premete OK per impostare il formato-12-ore.<br />
- È impostato il formato-12-ore e appare il formato 24 ore.<br />
Premete OK per impostare il formato-24-ore.<br />
Scegliete Orario imp. e premete OK.<br />
Impostate l’anno con ▲ e ▼ e premete OK.<br />
Impostate il mese con ▲ e ▼ e premete OK.<br />
Impostate il giorno con ▲ e ▼ e premete OK.<br />
Impostate l’ora con ▲ e ▼ e premete OK.<br />
Impostate i minuti con ▲ e ▼ e premete OK.<br />
Scegliete un’altra voce del Menú o abbandonate il Menú con il tasto del Menú.<br />
Impostare la lingua<br />
Premete il tasto del Menú.<br />
Scegliete Lingua e premete OK.<br />
Scegliete una lingua e premete OK.<br />
Scegliete un’altra voce del Menú o abbandonate il Menú con il tasto del Menú.<br />
Allattamento<br />
Se volete rispettare intervalli regolari per l’allattamento del Vostro neonato, potete impostare l’apparecchio<br />
in modo che esso Vi avverta quando inizia la pausa per l’allattamento. Potete impostare un<br />
avviso unico o anche l’orario del prossimo allattamento e dun intervallo per i prossimi allattamenti.<br />
a Avvertenza: Per consentire la corretta funzione di tale impostazione è necessario che sia<br />
impostato l’orario attuale. Se volete impostare un avviso unico, impostate l’intervallo su 00:00.<br />
Premete il tasto del Menú.<br />
Scegliete Orario pasto e premete OK.<br />
Scegliete Orario imp. e premete OK.<br />
Impostate l’ora con ▲ e ▼ e premete OK.<br />
Impostate i minuti con ▲ e ▼ e premete OK.<br />
Scegliete Allarme e premete OK.<br />
I<br />
25
Impostazioni<br />
Temperatura<br />
- Quando è impostata la funzione (<strong>com</strong>parsa di una campana sul display) Vi <strong>com</strong>pare Spento?.<br />
Premete OK per spegnere la funzione.<br />
- Quando è disattivata la funzione Vi <strong>com</strong>pare Acceso?.<br />
Premete OK per attivare la funzione.<br />
o<br />
Impostate il Volume con ▲ e ▼ e premete OK.<br />
Impostate il volume per la sveglia con ▲ e ▼ e premete OK ed il tasto del Menú.<br />
Scegliete Interv.pasti e premete OK.<br />
Impostate l’ora con ▲ e ▼ e premete OK.<br />
Impostate i minuti con ▲ e ▼ e premete OK.<br />
Scegliete un’altra voce del Menú o abbandonate il Menú con il tasto del Menú.<br />
Premete il tasto del Menú.<br />
Scegliete Temperatura e premete OK.<br />
Scegliete Imp. Coper. e premete OK.<br />
Impostate il limite massimo (Lim. Sup.) con ▲ e ▼ e premete OK.<br />
Impostate il limite minimo (Lim. Inf.) con ▲ e ▼ e premete OK.<br />
Scegliete Notif. Temp. e premete OK.<br />
- Quando è impostata la funzione (<strong>com</strong>parsa di una campana sul display) Vi <strong>com</strong>pare Spento?.<br />
Premete OK per disattivare la funzione.<br />
- Quando è disattivata la funzione Vi <strong>com</strong>pare Acceso?.<br />
Premete OK per attivare la funzione.<br />
o<br />
Scegliete Lautst/Volume con ▲ e ▼ e premete OK.<br />
Impostate il volume per la sveglia con ▲ e ▼ e premete OK ed il tasto del Menú.<br />
Premete ▲ e ▼ per modificare l’unitá di temperatura (in gradi Celsius o Fahrenheit).<br />
- Avete impostato “Celsius“ ma Vi <strong>com</strong>pare Gradi °F.<br />
Per attivare “Fahrenheit“ premete OK.<br />
- Avete impostato “Fahrenheit“ ma Vi <strong>com</strong>pare Gradi °C.<br />
Per attivare “Celsius“ premete OK.<br />
Scegliete un’altra voce del Menú o abbandonate il Menú con il tasto del Menú.<br />
Segnale di vibrazione<br />
a Avvertenza: Se questa funzione è attivata, l’apparecchio dei genitori vibra quando i rumori<br />
provenienti dalla stanza del bambino superano la soglia del rumore parlato.<br />
Premete il tasto del Menú.<br />
Scegliete Vibrazione e premete OK.<br />
- Avete attivato la funzione ma Vi <strong>com</strong>pare Spento?.<br />
Premete OK per disattivare la funzione.<br />
- Avete disattivato la funzione ma Vi <strong>com</strong>pare Acceso?.<br />
Premete OK per attivare la funzione.<br />
Scegliete un’altra voce del Menú o abbandonate il Menú con il tasto del Menú.<br />
26
Impostazioni<br />
Segnale di rumore<br />
a Avvertenza: Impostando questa funzione Vi sará dato un segnale di avvertenza se i rumori<br />
provenienti dalla stanza del bambino superano la soglia del rumore parlato e se il volume di<br />
riproduzione nell’apparecchio dei genitori è impostato su “0“.<br />
Premete sul tasto del Menú.<br />
Scegliete Not. Sonora e premete OK.<br />
- Avete attivato la funzione (<strong>com</strong>parsa di una campana sul display) ma Vi <strong>com</strong>pare Spento?.<br />
Premete OK per disattivare la funzione.<br />
- Avete disattivato la funzione ma Vi <strong>com</strong>pare Acceso?.<br />
Premete OK per attivare la funzione<br />
o<br />
Scegliete Volume con ▲ e ▼ e premete OK.<br />
Impostate il volume con ▲ e ▼ e premete OK ed il tasto del Menú.<br />
Scegliete un’altra voce del Menú o abbandonate il Menú con il tasto del Menú.<br />
Sensibilitá<br />
Ninna nanna<br />
Premete il tasto del Menú.<br />
Scegliete Sensibilitá e premete OK.<br />
Scegliete Imp. Coper. e premete OK.<br />
Impostate il livello di sensibilitá desiderato con ▲ e ▼ e premete OK.<br />
Scegliete un’altra voce del Menú o abbandonate il Menú con il tasto del Menú.<br />
Premete il tasto del Menú.<br />
Scegliete Ninnananna e premete OK.<br />
Scegliete Selez. Nuovo e premete OK.<br />
Scegliete una ninna nanna con ▲ e ▼ e premete OK.<br />
Scegliete Riproduci? e premete OK.<br />
- Nella stanza del bambino viene riprodotta la ninna nanna scelta (per ca. 15 minuti).<br />
Sui display <strong>com</strong>pare il simbolo di una nota.<br />
- Per terminare la riproduzione della canzone scegliete Interrompi? e premete OK.<br />
Scegliete Volume e premete OK.<br />
Impostate il volume con ▲ e ▼ e premete OK.<br />
Scegliete un’altra voce del Menú o abbandonate il Menú con il tasto del Menú.<br />
Impostare la luce da notte<br />
Premete il tasto del Menú.<br />
Scegliete Luce nottur. e premete OK.<br />
- Avete attivato la funzione (<strong>com</strong>parsa di una lampadina sul display) ma Vi <strong>com</strong>pare Spento?.<br />
Per spegnere la luce da notte premete OK.<br />
- Avete disattivato la funzione ma Vi <strong>com</strong>pare Acceso?.<br />
Per accendere la luce da notte premete OK.<br />
Scegliete un’altra voce del Menú o abbandonate il Menú con il tasto del Menú.<br />
I<br />
27
28<br />
Appendice<br />
6 Appendice<br />
Ricerca di errori<br />
In presenza di problemi con il apparecchio, seguire le indicazioni riportate qui di seguito. In caso di<br />
problemi tecnici è possibile rivolgersi alla nostra hotline di assistenza tecnica chiamando al numero<br />
0900 00 1675 valido per la Svizzera (spese da rete Swiss<strong>com</strong> alla data di stampa: CHF 2.60 / min).<br />
In caso di reclami entro il periodo di garanzia, rivolgersi al rivenditore autorizzato.<br />
Il periodo di garanzia ricopre 2 anni.<br />
• L’indicazione di funzionamento non si illumina quando inserite la spina nella presa di corrente.<br />
− Verificate se Vi è corrente elettrica e se tutte le connessioni sono ben congiunte. Guardate<br />
inoltre se entrambi gli apparecchi siano accesi con il tasto di accensione.<br />
• Il segnale di collegamento sull’apparecchio dei genitori lampeggia e Voi non potete sentire rumori<br />
provenienti dalla stanza del neonato.<br />
− Probabilmente Vi trovate fuori dal raggio di segnale. AvvicinateVi all’apparecchio del neonato<br />
e aspettate 5 secondi che si ristabilisca il collegamento.<br />
− Può essere che dobbiate ristabilire il collegamento tra i due apparecchi rieffettuandone l’accensione.<br />
L’indicazione di funzionamento e quella di collegamento (può durare alcuni secondi)<br />
dovrebbero illuminarsi. L’indicazione del sensore del rumore lampeggia anch’essa brevemente.<br />
• Non riuscite a sentire il Vostro bambino dall’apparecchio dei genitori, ma l’indicazione di collegamento<br />
è illuminato.<br />
− Verificate che il volume sia impostato all’apparecchio dei genitori.<br />
• Sull’apparecchio dei genitori lampeggia l’indicazione di funzionamento.<br />
− Le Vostre batterie sono quasi scariche. Mettete l’apparecchio dei genitori nel ricaricatore per<br />
ricaricarlo.<br />
• Il Vostro Babyfon emette un suono molto alto.<br />
− Questo può succedere se l’apparecchio del neonato e quello dei genitori si trovano troppo<br />
vicini. Allontanateli l’uno dall’altro.<br />
Consigli per la cura<br />
Pulire le superfici degli apparecchi con un panno morbido e antipilling.<br />
Non utilizzare mai detergenti o solventi.<br />
Dichiarazione di conformità<br />
Questo apparecchio risponde a quanto disposto dalla Direttiva UE:<br />
- 1999/5/CE Direttiva concernente le apparecchiature radio, le apparecchiature terminali di tele<strong>com</strong>unicazioni<br />
e il reciproco riconoscimento della loro conformità.<br />
- 2005/32/CE Direttiva “Prodotti che consumano energia“.<br />
La conformità con la direttiva di cui sopra viene confermata dal marchio CE applicato sull’apparecchio.<br />
Per la dichiarazione di conformità <strong>com</strong>pleta si prega di voler usufruire del servizio gratuito di<br />
download dal nostro sito Internet www.switel.<strong>com</strong>.<br />
Smaltimento<br />
Procedere allo smaltimento dell’apparecchio esaurito consegnandolo presso uno dei<br />
punti di raccolta istituiti dalla propria società di smaltimento rifiuti <strong>com</strong>unale (per es. centro<br />
di riciclo materiali). Il simbolo riportato qui a lato indica che non è assolutamente<br />
consentito smaltire l’apparecchio assieme ai normali rifiuti domestici!<br />
Secondo quanto previsto dalla legge sugli apparecchi elettrici ed elettronici, i proprietari<br />
di apparecchi esauriti sono per legge tenuti alla consegna di tutti gli apparecchi elettrici
Appendice<br />
ed elettronici presso un centro di rilievo rifiuti in raccolta differenziata.<br />
Consegnare le batterie ricaricabili per lo smaltimento presso rivenditori al dettaglio di<br />
batterie o centri di raccolta che mettono a disposizione appositi contenitori.<br />
Smaltire confezioni ed imballaggi in base a quanto indicato dalle norme in vigore a livello<br />
locale.<br />
Dati tecnici<br />
Frequenza operativa<br />
1,8 GHz<br />
Raggio di azione In situazioni ottimali fino a 300 m.<br />
All’interno di edifici può essere raggiunto un raggio<br />
d’azione di 50 m (a causa di pareti, porte, ecc.)<br />
Alimentatore, Apparecchio del neonato Input: 100~240 V AC, 50/60 Hz, 150 mA<br />
(Trasmettitore) Output: 7 V DC, 420 mA, Dentro = +<br />
Batterie non ricaricabili, Apparecchio<br />
del neonato<br />
Tipo AAA, 1,5 V Alkaline<br />
(non incluse nella confezione di consegna)<br />
Servizio di consegna<br />
Media: 10 mW<br />
Massimo: 250 mW<br />
Alimentatore con ricaricatore per<br />
l’apparecchio dei genitori<br />
Input: 100~240 V AC, 50/60 Hz, 150 mA<br />
(direttamente cablato)<br />
Output: 7 V DC, 420 mA<br />
Batterie ricaricabili per l’apparecchio Tipo AAA 1,2 V 750 mAh NiMH<br />
dei genitori (Ricevitore)<br />
Funzionamento con batterie ricaricate Ca. 10 ore<br />
Temperatura ambiente circostante<br />
consentita 10 °C fino a 30 °C<br />
Umiditá dell’aria relativa consentita 20 % fino a 75 %<br />
Garanzia<br />
Gli apparecchi SWITEL sono costruiti e collaudati in osservanza dei processi di produzione più moderni. L’impiego<br />
di materiali selezionati e tecnologie altamente sviluppate sono garanti di una perfetta funzionalità e<br />
lunga durata in vita. La garanzia non viene considerata esecutiva qualora la causa del malfunzionamento<br />
dell’apparecchio è dovuta al gestore della rete telefonica oppure se questa è da attribuirsi ad un impianto<br />
telefonico interno interposto. La garanzia non si estende a batterie, accumulatori o batterie ricaricabili utilizzati<br />
all’interno degli apparecchi. Il periodo di garanzia ricopre 24 mesi a partire dalla data di acquisto.<br />
Entro il periodo di garanzia si procederà all’eliminazione gratuita di tutti i guasti dovuti a difetti di materiale o<br />
produzione. Il diritto di garanzia cessa in caso di interventi da parte dell’acquirente o di terzi. Danni derivanti<br />
da un impiego o esercizio non conforme agli usi previsti, a naturale usura, a errato montaggio o errata conservazione,<br />
a collegamento o installazione impropri, dovuti a forza<br />
maggiore o ad altri influssi esterni non sono coperti da garanzia. In qualità di produttore ci riserviamo il diritto,<br />
in caso di reclami, di riparare o sostituire le parti difettose o di rimpiazzare l’apparecchio.<br />
Parti o apparecchi sostituiti passano di nostra proprietà. Sono esclusi diritti di risarcimento per danni qualora<br />
non siano dovuti a intenzione o colpa grave del costruttore.<br />
Nel caso in cui il presente apparecchio dovesse ciò nonostante presentare un difetto durante il periodo di<br />
garanzia, si prega di rivolgersi esclusivamente al negozio di rivendita dell’apparecchio SWITEL assieme al<br />
relativo scontrino di acquisto. In base alle presenti disposizioni, tutti i diritti di garanzia dovranno essere fatti<br />
valere esclusivamente nei confronti del rivenditore autorizzato.<br />
Decorso il termine di due anni dalla data di acquisto e consegna dei nostri prodotti non sarà più possibile fare<br />
valere alcun diritto di garanzia.<br />
I<br />
29
Important Information<br />
1 Important Information<br />
Please read this operating instruction manual thoroughly. Under no circumstances open the equipment<br />
or <strong>com</strong>plete any repair work yourself. In the case of claims under the terms of guarantee, contact<br />
your sales outlet. We reserve the right to make technical and appearance modifications to the<br />
product during the course of product improvement.<br />
Intended use<br />
The baby monitor serves to monitor rooms. The baby unit (sender) transmits vocal sounds and other<br />
noises from the baby to the parent unit (receiver). Any other use is considered unintended use.<br />
Use of the equipment is no substitute for personal attention and supervision of a child. Rights to<br />
claims for liability beyond the scope of legal regulations are excluded.<br />
Safety notes<br />
The baby monitor has been designed to provide added reassurance for those times when you cannot<br />
be in the same room as your baby. It is NOT a substitute for adult supervision. A parent must<br />
always stay within range of the monitor during use. Your baby monitor is not a medical device, nor a<br />
device to prevent cases of Sudden Infant Death Syndrome or `cot death´, and you should not rely on<br />
it for your baby´s wellbeing. It is important that you regularly check on your baby personally.<br />
• Never place anything over your baby monitor or cover it in any way.<br />
• Do not place your parent or baby unit near water or in a damp environment.<br />
• If travelling abroad, make sure that the voltage shown on the mains power adaptor corresponds<br />
to the local mains power supply.<br />
• Never dispose of batteries in the household rubbish. Check with you local authority for correct<br />
disposal options.<br />
• Never use non−rechargeable batteries in your parent unit. Use only the re<strong>com</strong>mended type −<br />
2 x AAA 1.2 V 750 mAH NiMH.<br />
• Don’t use any rechargeable batteries in the baby unit. Only use re<strong>com</strong>mended batteries - 4 x<br />
AAA 1,5 V Alkaline. Please note to change the batteries from time to time (once a year) to make<br />
sure, the baby unit will be working under mains failure.<br />
• Use only the mains adaptor supplied or you may risk damaging your baby monitor.<br />
• When your baby monitor is not in use, it is re<strong>com</strong>mended that you disconnect it from the mains<br />
supply and remove the batteries.<br />
• Do not spray it with cleaning polish. Disconnect it from the mains power before cleaning.<br />
• The adaptors may be<strong>com</strong>e warm during use, please take care when handling.<br />
• Do not place your parent or baby unit in direct sunlight.<br />
The charge capacity of the re−chargeable batteries in the parent unit will reduce with time and will<br />
eventually need to be replaced. New re-chargeable batteries are obtainable from our Helpline.<br />
Power consumption<br />
The power adapter plugs supplied fulfils the eco−design directive of the European Council<br />
(Directive 2005/32/EC).<br />
This means that power consumption is considerably lower than power adapter plugs of an earlier<br />
design both in operating and idling modes.<br />
30
Operating Elements<br />
2 Operating Elements<br />
Sender (Baby unit)<br />
1 2 3<br />
6<br />
5<br />
4<br />
1 On/Off key<br />
Press to switch on the unit.<br />
Press and hold down for approx. 2 seconds to switch off the unit.<br />
2 Night light / temperature indicator<br />
On/Off controllable from the parent unit. Different colours indicate a lower and higher temperature<br />
range (blue = below / orange = above).<br />
3 Paging key<br />
- Press briefly to “page“ the parent unit with an audible alert.<br />
- Press and hold to talk via the parent unit’s loudspeaker.<br />
Useful to call for assistance or to locate a missing parent unit.<br />
4 Temperature Sensor<br />
5 Switch „zero emission“ (bottom)<br />
6 Battery <strong>com</strong>partment (rear)<br />
Compartment for 4 AAA batteries (not provided) for backing up the baby unit during a power<br />
failure.<br />
Zero emission<br />
The baby unit is equipped with a special transmission technology.<br />
When the baby unit stays at stand-by and no noise or baby crying is<br />
detected, it does not transmit any radiation power. When the unit<br />
detects any sound which is higher than the sensitivity level, it starts to<br />
transmit a signal to the parent unit in order to establish digital <strong>com</strong>munication.<br />
This may take up to 8 seconds. The zero emission feature is<br />
controlled by the bottom switch of baby unit (set to “On“ - delivery<br />
state).<br />
With the switch in position „Off“ a continuous low power connection to the parent unit is on. By this<br />
the above described delay for establishing the link will not take place.<br />
GB<br />
31
Operating Elements<br />
Receiver (Parent unit)<br />
1<br />
2 3<br />
4<br />
5<br />
6<br />
7<br />
10<br />
9<br />
8<br />
11<br />
12<br />
1 Noise indicator<br />
Flashes when noise is detected.<br />
2 Power LED<br />
Lights steady when power is on. Flashes during charging the batteries.<br />
3 Link indicator<br />
Green light ON means “Linked“ to the baby unit. A flashing light means the “Link“ has been lost.<br />
4 Display<br />
5 Talk key<br />
Press and hold to talk to your baby or partner in the baby‘s room via the baby unit.<br />
6 Menu key<br />
In the menu you can select several options.<br />
7 ▼ key<br />
- Volume down<br />
- Selection of menu items.<br />
8 ▲ key<br />
- Volume up<br />
- Selection of menu items.<br />
9 OK key<br />
Confirmation of a menu item.<br />
10 On/Off key<br />
Press and hold down for approx. 2 seconds to switch on the unit.<br />
Press and hold down for approx. 2 seconds to switch off the unit.<br />
11 Belt clip (rear)<br />
12 Battery <strong>com</strong>partment cover (rear)<br />
Compartment for 2 rechargeable batteries AAA, 1.2 V, NiMH.<br />
32
Starting Up<br />
3 Starting Up<br />
Safety notes<br />
a It is essential to read the “General Information" at the beginning of this manual before starting<br />
up.<br />
Checking the package contents<br />
The package contains:<br />
1 Parent unit (receiver) 1 charger pod with mains adapter<br />
1 Transport bag 2 rechargeable batteries AAA, 750 mAh, NiMH<br />
1 Baby unit (sender) 1 mains adapter with power cord<br />
Parent unit<br />
1. Remove the belt clip by lifting the clip at the top and<br />
sliding it downwards.<br />
2. Then remove the battery cover on the back of the<br />
parent unit by applying pressure and sliding it down.<br />
Insert the rechargeable batteries as marked on the<br />
unit and close the cover again.<br />
3. Place the parent unit into the charger pod.<br />
4. Plug the mains adaptor into a mains power socket.<br />
The red LED flashes and the display shows the charging state.<br />
a Note: Before first use, or if it has been out of use for a long time, the parent unit will need to be<br />
charged for 13 hours. During this time, the parent unit will operate from the charger pod when<br />
switched on. Note that the parent unit cannot be used without batteries, even if it is placed in the<br />
charger.<br />
Baby unit<br />
1. In event of a power failure, your baby monitor can switch to battery power. It is therefore re<strong>com</strong>mended<br />
that you insert non-rechargeable batteries in the baby unit.<br />
2. Remove the battery cover on the back of the baby unit by applying pressure and sliding it down.<br />
Insert 4 alkaline batteries of the type AAA (not provided) as marked on the unit and close the<br />
cover again. Do not use rechargeable batteries in the baby unit.<br />
3. Plug the power cord into the power input at the bottom of the baby unit and plug the adaptor<br />
plug into a mains power socket.<br />
4. Press and hold down the Power Key to turn the baby unit on if necessary.<br />
a Note: The baby unit should be placed about 1 m to 1.5 m away from the baby‘s cot on a flat<br />
surface.<br />
Never place the baby unit inside the cot, bed or playpen. Make sure the unit, cords and mains<br />
adaptor are out of reach of the baby and other young children. Never place either unit on antique<br />
or polished surfaces.<br />
33<br />
GB
Operation<br />
4 Operation<br />
Once you have set up your baby monitor, you will be able to hear the sounds in your baby´s room<br />
through the parent unit. You will also be able to see those sounds as the green sound sensor lights<br />
around the top of the parent unit, which rise and fall with the volume level.<br />
a Note: If the connection between the parent unit and baby unit is broken at any time the green<br />
“Link“ light on the parent unit will flash and the green sensor light will cease to react to any<br />
sounds. To re−establish the “Link“, follow the directions in the “Troubleshooting“ chapter.<br />
Powering on/off the baby monitor<br />
After having connected the baby monitor you will have to switch on both units. Press the On/Off key<br />
on each unit. To switch off the unit press and hold down the On/Off key.<br />
Volume<br />
You can adjust the volume at which you hear your baby by using the keys ▲ and ▼ on the parent<br />
unit. This will not effect the sensitivity of your baby monitor, only the volume at which you hear those<br />
sounds through the parent unit.<br />
Battery charge indicator and battery low warning<br />
The parent unit will work up to 10 hours out of the charger pod, but this depends on the level of<br />
charge in the batteries. The charge level is indicated by the battery icon on the Display. If the charge<br />
be<strong>com</strong>es low, a “battery low warning beep“ will sound and the battery icon on the parent unit´s<br />
Display will begin to flash. If this occurs you should return the parent unit to the charger pod to<br />
re−charge the batteries. You can still use your parent unit from the charger pod.<br />
On the display you can see the charging status:<br />
Battery icon filled<br />
= full capacity<br />
Battery icon 2/3 filled<br />
= approx.half capacity<br />
Battery icon 1/3 filled<br />
= batteries nearly exhausted<br />
Battery icon not filled / frame flashes = batteries must be charged<br />
Sound alert<br />
You can set your parent unit to give an extra warning “beep“ should the noise levels in your baby’s<br />
room activate the light on the sound sensor. This is particularly useful if the volume of your parent<br />
unit is turned down and you are just using the sensor light to monitor the noise levels in your baby’s<br />
room.<br />
Parent to parent paging<br />
Useful if one parent is in the baby’s room and needs to contact the other. Also helps to find a mislaid<br />
parent unit.<br />
At the baby unit<br />
Press and hold the Page Key for 2 seconds. The parent unit will emit a tone. The tone can be switched<br />
off by pressing any key on the parent unit or by pressing the page key on the baby unit once<br />
again.<br />
Night light<br />
The baby unit has a night light which emits a soft starry glow, providing <strong>com</strong>fort and re−assurance<br />
for your baby and allowing you to see them in a darkened room. You may also turn the night light on<br />
and off from the parent unit.<br />
34
Settings<br />
5 Settings<br />
You can make several settings using the menu.<br />
Press the Menu key to open the menu.<br />
Use the ▲ and ▼ key to scroll through the menu.<br />
Press OK to open a submenu or to confirm a setting.<br />
Press the Menu key several times if necessary, to leave the menu.<br />
Date and time<br />
Press the Menu key.<br />
Select Clock and press OK.<br />
Select Hour Format and press OK.<br />
- If 24 hours is set 12Hrs? appears. Press OK to activate 12 hours format.<br />
- If 12 hours is set 24Hrs? appears. Press OK to activate 24 hours format.<br />
Select Set Time and press OK.<br />
Use ▲ and ▼ to adjust the year and press OK.<br />
Use ▲ and ▼ to adjust the month and press OK.<br />
Use ▲ and ▼ to adjust the day and press OK.<br />
Use ▲ and ▼ to adjust the hour and press OK.<br />
Use ▲ and ▼ to adjust the minute and press OK.<br />
Select another menu item or leave the menu by pressing the Menu key.<br />
Language<br />
Press the Menu key.<br />
Select Language and press OK.<br />
Select a language and press OK.<br />
Select another menu item or leave the menu by pressing the Menu key.<br />
Feed timer<br />
If your baby is in a routine of regular feeding intervals, you may wish to set your Baby Monitor to<br />
alert you when your baby’s feeds are due. You have the choice to either set an alert just for your<br />
baby’s next feed time, or for your baby’s next feed time plus subsequent feeds based on the interval<br />
time between them.<br />
a Note: Make sure you have set the correct date and time.<br />
If you only want to get a single alarm set the interval to 00:00.<br />
Press the Menu key.<br />
Select Feed Time and press OK.<br />
Select Set Time and press OK.<br />
Use ▲ and ▼ to adjust the hour and press OK.<br />
Use ▲ and ▼ to adjust the minute and press OK.<br />
Select Alarm and press OK.<br />
- If the function is switched on (bell icon on the display) Off? is shown.<br />
To switch the function off press OK.<br />
- If the function is switched off On? is shown.<br />
To switch the function on press OK.<br />
or<br />
Use ▲ and ▼ to select Volume and press OK.<br />
GB<br />
35
Settings<br />
Temperature<br />
Use ▲ and ▼ to adjust the alarm volume and press OK and the Menu key.<br />
Select Set Interval and press OK.<br />
Use ▲ and ▼ to adjust the hour and press OK.<br />
Use ▲ and ▼ to adjust the minute and press OK.<br />
Select another menu item or leave the menu by pressing the Menu key.<br />
Press the Menu key.<br />
Select Temperature and press OK.<br />
Select Set Range and press OK.<br />
Use ▲ and ▼ to adjust the upper limit (Up Limit) and press OK.<br />
Use ▲ and ▼ to adjust the lower limit (Low Limit) and press OK.<br />
Select Temp. Alert and press OK.<br />
- If the function is switched on (bell icon on the display) Off? is shown.<br />
To switch the function off press OK.<br />
- If the function is switched off On? is shown.<br />
To switch the function on press OK.<br />
or<br />
Use ▲ and ▼ to select Volume and press OK.<br />
Use ▲ and ▼ to adjust the alarm volume and press OK and the Menu key.<br />
Press ▲ or ▼ to change the temperature unit (degrees Celsius or Fahrenheit).<br />
- If “Celsius“ is set, Degree F? is shown. To set to “Fahrenheit“ press OK.<br />
- If “Fahrenheit“ is set, Degree C? is shown. To set to “Celsius“ press OK.<br />
Select another menu item or leave the menu by pressing the Menu key.<br />
Vibrating alert<br />
a Note: You can set your parent unit to vibrate should the noise levels in your baby’s room<br />
reach the sensitivity of the sound sensor.<br />
Press the Menu key.<br />
Select Vibration and press OK.<br />
- If the function is switched on Off? is shown.<br />
To switch the function off press OK.<br />
- If the function is switched off On? is shown.<br />
To switch the function on press OK.<br />
Select another menu item or leave the menu by pressing the Menu key.<br />
36
Settings<br />
Sound alert<br />
a Note: You can set your parent unit to give an extra warning “beep“ should the noise levels in<br />
your baby’s room activate the sound level LED on the sound sensor. This is particularly useful if the<br />
volume of your parent unit is turned down and you are just using the sensor light to monitor the<br />
noise levels in your baby’s room.<br />
Press the Menu key.<br />
Select Sound Alert and press OK.<br />
- If the function is switched on (bell icon on the display) Off? is shown.<br />
To switch the function off press OK.<br />
- If the function is switched off On? is shown.<br />
To switch the function on press OK.<br />
or<br />
Use ▲ and ▼ to select Volume and press OK.<br />
Use ▲ and ▼ to adjust the alarm volume and press OK and the Menu key.<br />
Select another menu item or leave the menu by pressing the Menu key.<br />
Sensitivity<br />
Lullaby<br />
Press the Menu key.<br />
Select Sensitivity and press OK.<br />
Select Level and press OK.<br />
Use ▲ and ▼ to select the desired level and press OK.<br />
Select another menu item or leave the menu by pressing the Menu key.<br />
Press the Menu key.<br />
Select Lullaby and press OK.<br />
Select Select new and press OK.<br />
Use ▲ and ▼ to select a lullaby and press OK.<br />
Select Play? and press OK.<br />
- The selected lullaby is played in the baby’s room (for approx. 15 minutes).<br />
On the display appears a musical note icon.<br />
- To stop playing select Stop? and press OK.<br />
Select Volume and press OK.<br />
Use ▲ and ▼ to adjust the volume and press OK.<br />
Select another menu item or leave the menu by pressing the Menu key.<br />
Night light<br />
Press the Menu key.<br />
Select Night Light and press OK.<br />
- If the function is switched on (lightbulb icon on the display) Off? is shown.<br />
To switch the night light off press OK.<br />
- If the function is switched off On? is shown.<br />
To switch the night light on press OK.<br />
Select another menu item or leave the menu by pressing the Menu key.<br />
37<br />
GB
Appendix<br />
6 Appendix<br />
Troubleshooting<br />
Should problems arise with the device, please refer to the following information first. In the case of<br />
technical problems, you can contact our hotline service, Tel. 0900 00 1675 within Switzerland (Costs<br />
for call from Swiss<strong>com</strong> landline at time of going to print: CHF 2.60/min). In the case of claims under<br />
the terms of guarantee, contact your sales outlet. There is a 2 year period of guarantee.<br />
• The power LED does not light up when connecting the unit to the mains.<br />
− Check whether there is a power failure. Check whether all connections are ok and both units<br />
are switched on (on/off key).<br />
• The “Link“ light on the parent unit is flashing and you cannot hear the sounds from your baby‘s<br />
room.<br />
− You may have moved out of range −move closer to the baby unit and wait 5 seconds for the<br />
Link" to establish.<br />
− You may need to re−establish the “Link“ between the two units. Turn both units off and then:<br />
On the baby unit: −Press the On/Off key.<br />
On the parent unit: −Press and hold down the On/Off key for approx. 2 seconds.<br />
The green “Link“ light <strong>com</strong>es on (this may take a few seconds).<br />
• Can’t hear your baby on the parent unit, but the “Link“ light is still glowing steadily.<br />
− Check the volume is turned up on the parent unit.<br />
– You may need to turn up the sensitivity of your baby monitor.<br />
• The power LED on the parent unit is flashing.<br />
− The rechargeable batteries are nearly exhausted. Put the parent unit onto the charger pod.<br />
• Your baby monitor is emitting an high pitched ear−piercing noise.<br />
− This may happen if your parent and baby units are too close together. Move them further<br />
apart.<br />
Cleaning and upkeep<br />
Clean the equipment with a dry, soft, lint−free cloth. Never use cleaning agents or solvents.<br />
Declaration of Conformity<br />
This device fulfils the requirements stipulated in the EU directives:<br />
- 1999/5/EU directive on radio equipment and tele<strong>com</strong>munications<br />
terminal equipment and the mutual recognition of their conformity.<br />
- 2005/32/EU directive “Energy-using products“.<br />
Conformity with the above mentioned directive is confirmed by the CE symbol on the device.<br />
Please refer to the free download in our Website www.switel.<strong>com</strong> for <strong>com</strong>plete declaration of conformity.<br />
Disposal<br />
You are obliged to dispose of consumable goods according to legal requirements. The<br />
adjacent symbol indicates that electrical and electronic apparatus and batteries no<br />
longer required must be disposed of separate from domestic waste.<br />
Electrical and electronic devices must be disposed of at suitable collection points<br />
provided by the public waste authorities.<br />
Batteries must be disposed of at the point of sale or at appropriate collection points<br />
provided by the public waste authorities.<br />
Packaging materials must be disposed of according to local regulations.<br />
38
Appendix<br />
Technical data<br />
Operating frequency<br />
Range<br />
Power supply, baby unit (sender)<br />
Non rechargeable batteries for<br />
the baby unit (sender)<br />
(not included in the package contents)<br />
Transmitting power<br />
Power supply, parent unit (receiver)<br />
(hard wired)<br />
1,8 GHz<br />
Up to 300 m under optimum conditions. It is possible to<br />
reach up to 50 m in buildings (as a result of walls,<br />
doors etc.)<br />
Input: 100~240 V AC, 50/60 Hz, 150 mA<br />
Output: 7 V DC, 420 mA, Center = +<br />
Type AAA, 1.5 V Alkaline<br />
Average: 10 mW<br />
Maximum: 250 mW<br />
Input: 100~240 V AC, 50/60 Hz, 150 mA<br />
Output: 7 V DC, 420 mA<br />
Rechargeable batteries<br />
Typ AAA 1.2 V 750 mAh NiMH<br />
for the parent unit (receiver)<br />
Operating time with charged battery Approx. 10 hours<br />
Permissible ambient temperature 10 °C to 30 °C<br />
Permissible relative humidity 20 % to 75 %<br />
Guarantee<br />
SWITEL equipment is produced and tested according to the latest production methods. The implementation<br />
of carefully chosen materials and highly developed technologies ensure trouble-free functioning<br />
and a long service life. The terms of guarantee do not apply where the cause of equipment<br />
malfunction is the fault of the telephone network operator or any interposed private branch extension<br />
system. The terms of guarantee do not apply to the batteries or power packs used in the products.<br />
The period of guarantee is 24 months from the date of purchase.<br />
All deficiencies related to material or manufacturing errors within the period of guarantee will be<br />
redressed free of charge. Rights to claims under the terms of guarantee are annulled following tampering<br />
by the purchaser or third parties. Damage caused as the result of improper handling or operation,<br />
normal wear and tear, incorrect positioning or storage, improper connection or installation or<br />
Acts of God and other external influences are excluded from the terms of guarantee. In the case of<br />
<strong>com</strong>plaints, we reserve the right to repair defect parts, replace them or replace the entire device.<br />
Replaced parts or devices be<strong>com</strong>e our property. Rights to <strong>com</strong>pensation in the case of damage are<br />
excluded where there is no evidence of intent or gross negligence by the manufacturer.<br />
If your device shows signs of defect during the period of guarantee, please return it to the sales outlet<br />
in which you purchased the SWITEL device together with the purchase receipt. All claims under<br />
the terms of guarantee in accordance with this agreement can only be asserted at the sales outlet.<br />
No claims under the terms of guarantee can be asserted after a period of two years from the date of<br />
purchase and hand-over of the product.<br />
39<br />
GB
Für die komplette Konformitätserklärung nutzen Sie bitte<br />
den kostenlosen Download von unserer Website www.switel.<strong>com</strong>.<br />
Pour obtenir la déclaration de conformité intégrale, veuillez vous servir du<br />
téléchargement gratuit de notre site Internet www.switel.<strong>com</strong>.<br />
Per la dichiarazione di conformità <strong>com</strong>pleta si prega di voler usufruire<br />
del servizio gratuito di download dal nostro sito Internet www.switel.<strong>com</strong>.<br />
To view the <strong>com</strong>plete Declaration of Conformity, please refer to the free download<br />
available at our web site: www.switel.<strong>com</strong>.<br />
Service Hotline<br />
Bei technischen Problemen können Sie sich an unsere Service-Hotline unter Tel. 0900 00 1675<br />
innerhalb der Schweiz (Kosten Swiss<strong>com</strong> bei Drucklegung: CHF 2.60/min) wenden.<br />
S’il s’agit de problèmes techniques, vous pouvez vous adresser à notre hotline de service en<br />
Suisse en appelant le numéro 0900 00 1675 (frais Swiss<strong>com</strong> à la date d’impression de ce<br />
manuel : CHF 2.60/min).<br />
In caso di problemi tecnici è possibile rivolgersi alla nostra hotline di assistenza tecnica chiamando<br />
al numero 0900 00 1675 valido per la Svizzera (spese da rete Swiss<strong>com</strong> alla data di stampa:<br />
CHF 2.60 / min).<br />
In the event of technical problems, you can contact our hotline service, Tel. 0900 00 1675<br />
within Switzerland (cost via Swiss<strong>com</strong> at time of going to print: CHF 2.60/min).<br />
Version 1.0 • 03.03.2011