Bedienungsanleitung Mode d'emploi Istruzioni per l'uso ... - Switel.com
Bedienungsanleitung Mode d'emploi Istruzioni per l'uso ... - Switel.com
Bedienungsanleitung Mode d'emploi Istruzioni per l'uso ... - Switel.com

Create successful ePaper yourself
Turn your PDF publications into a flip-book with our unique Google optimized e-Paper software.
Schnurlostelefon<br />
Téléphone sans fil<br />
Telefono senza fili<br />
Cordless telephone<br />
DE 2021 - DE 2022<br />
DE 2023 - DE 2024<br />
<strong>Bedienungsanleitung</strong><br />
<strong>Mode</strong> d’emploi<br />
<strong>Istruzioni</strong> <strong>per</strong> l’uso<br />
O<strong>per</strong>ating Instructions<br />
D<br />
F<br />
I<br />
GB
Inhaltsverzeichnis<br />
1 Sicherheitshinweise . . . . . . . . . . . . . . . . . . . . . . . . . . . . . . . . . . . . . . . .2<br />
2 Telefon in Betrieb nehmen . . . . . . . . . . . . . . . . . . . . . . . . . . . . . . . . . . .4<br />
3 Bedienelemente . . . . . . . . . . . . . . . . . . . . . . . . . . . . . . . . . . . . . . . . . . . .7<br />
4 Einführende Informationen . . . . . . . . . . . . . . . . . . . . . . . . . . . . . . . . . . .9<br />
5 Telefonieren . . . . . . . . . . . . . . . . . . . . . . . . . . . . . . . . . . . . . . . . . . . . . .13<br />
6 Weitere Leistungsmerkmale . . . . . . . . . . . . . . . . . . . . . . . . . . . . . . . . .17<br />
7 Anrufliste / Wahlwiederholung . . . . . . . . . . . . . . . . . . . . . . . . . . . . . . .18<br />
8 Telefonbuch . . . . . . . . . . . . . . . . . . . . . . . . . . . . . . . . . . . . . . . . . . . . . .19<br />
9 Telefon einstellen . . . . . . . . . . . . . . . . . . . . . . . . . . . . . . . . . . . . . . . . .21<br />
10 Mobilteile an-/abmelden . . . . . . . . . . . . . . . . . . . . . . . . . . . . . . . . . . . .25<br />
11 Betrieb an Telefonanlagen/Zusatzdienste . . . . . . . . . . . . . . . . . . . . .26<br />
12 Anhang . . . . . . . . . . . . . . . . . . . . . . . . . . . . . . . . . . . . . . . . . . . . . . . . . .27<br />
D<br />
1
Sicherheitshinweise<br />
1 Sicherheitshinweise<br />
Lesen Sie diese <strong>Bedienungsanleitung</strong> sorgfältig durch.<br />
Bestimmungsgemäße Verwendung<br />
Dieses Telefon ist geeignet zum Telefonieren innerhalb eines Telefonnetzes.<br />
Jede andere Verwendung gilt als nicht bestimmungsgemäß. Eigenmächtige<br />
Veränderungen oder Umbauten sind nicht zulässig. Öffnen Sie das Gerät in<br />
keinem Fall selbst und führen Sie keine eigenen Reparaturversuche durch.<br />
Aufstellungsort<br />
Vermeiden Sie Belastungen durch Rauch, Staub, Erschütterungen, Chemikalien,<br />
Feuchtigkeit, Hitze oder direkte Sonneneinstrahlung.<br />
Verwenden Sie das Mobilteil nicht in explosionsgefährdeten Bereichen.<br />
Netzteil<br />
a Achtung: Verwenden Sie nur das mitgelieferte Steckernetzteil, da andere<br />
Netzteile das Telefon beschädigen können. Sie dürfen den Zugang zum<br />
Steckernetzteil nicht durch Möbel oder andere Gegenstände vers<strong>per</strong>ren.<br />
Akkus<br />
a Achtung: Werfen Sie Akkus nicht ins Feuer. Verwenden Sie nur Akkus<br />
des gleichen Typs! Achten Sie auf die richtige Polung! Bei verkehrter Polung<br />
der Akkus besteht beim Aufladen Explosionsgefahr.<br />
Stromausfall<br />
Bei Stromausfall kann mit dem Telefon nicht telefoniert werden. Halten Sie für<br />
Notfälle ein schnurgebundenes Telefon bereit, welches ohne externe Stromversorgung<br />
arbeitet.<br />
2
Sicherheitshinweise<br />
Medizinische Geräte<br />
a Achtung: Benutzen Sie das Telefon nicht in der Nähe von medizinischen<br />
Geräten. Eine Beeinflussung kann nicht völlig ausgeschlossen werden.<br />
DECT 1 -Telefone können in Hörgeräten einen unangenehmen Brummton<br />
verursachen.<br />
Entsorgung<br />
Wollen Sie Ihr Gerät entsorgen, bringen Sie es zur Sammelstelle<br />
Ihres kommunalen Entsorgungsträgers (z. B. Wertstoffhof).<br />
Das nebenstehende Symbol bedeutet, dass Sie das<br />
Gerät auf keinen Fall in den Hausmüll werfen dürfen! Nach<br />
dem Elektro- und Elektronikgerätegesetz sind Besitzer von<br />
Altgeräten gesetzlich gehalten, alte Elektro- und Elektronikgeräte<br />
einer getrennten Abfallerfassung zuzuführen.<br />
Akkus entsorgen Sie beim batterievertreibenden Handel<br />
sowie bei zuständigen Sammelstellen, die entsprechende<br />
Behälter bereitstellen.<br />
Verpackungsmaterialien entsorgen Sie entsprechend den<br />
lokalen Vorschriften.<br />
D<br />
1<br />
DECT: Digital Enhanced Cordless Tele<strong>com</strong>munication = Standard für<br />
kabellose Telefone.<br />
3
Telefon in Betrieb nehmen<br />
2 Telefon in Betrieb nehmen<br />
Sicherheitshinweise<br />
a Achtung: Lesen Sie vor der Inbetriebnahme unbedingt die<br />
Sicherheitshinweise in Kapitel 1.<br />
Verpackungsinhalt prüfen<br />
Zum Lieferumfang gehören:<br />
Inhalt<br />
DE 202x-<strong>Mode</strong>ll<br />
2021 2022 1 2023 1 2024 1<br />
Basisstation mit Netzteil 1 1 1 1<br />
Ladestation mit Netzteil - 1 2 3<br />
Mobilteil 1 2 3 4<br />
Telefonanschlusskabel 1 1 1 1<br />
Akkus 2 4 6 8<br />
<strong>Bedienungsanleitung</strong> 1 1 1 1<br />
1<br />
Unter www.switel.<strong>com</strong> erfahren Sie, ob dieses Telefonset bereits<br />
erhältlich ist.<br />
Stromverbrauch<br />
Die Leistungsaufnahme der Basisstation beträgt:<br />
- im Betrieb (Bereitschaft/Gespräch): ca. 1,2 W<br />
- während der Ladung des Mobilteils: ca. 2 W.<br />
Die Nulllast des Netzteils beträgt ca. 0,15 W.<br />
Die durchschnittliche Effizienz beträgt ca. 67 %.<br />
Die Leistungsaufnahme der Ladestation beträgt:<br />
- ohne Mobilteil: ca. 0,15 W<br />
- während der Ladung des Mobilteils: ca. 1,2 W.<br />
Die Nulllast des Netzteils beträgt ca. 0,15 W.<br />
Die durchschnittliche Effizienz beträgt ca. 67 %.<br />
4
Telefon in Betrieb nehmen<br />
Basisstation anschließen<br />
a Achtung: Stellen Sie die Basisstation mit einem Mindestabstand von 1 m<br />
zu anderen elektronischen Geräten auf, da es sonst zu gegenseitigen<br />
Störungen kommen kann.<br />
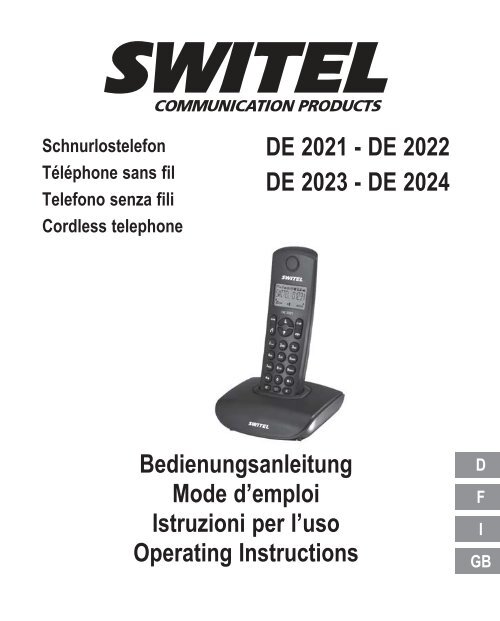
Schließen Sie die Basisstation wie auf der Skizze abgebildet an. Verwenden<br />
Sie aus Sicherheitsgründen nur das mitgelieferte Netzteil sowie das beigefügte<br />
Telefonanschlusskabel.<br />
Netzsteckdose<br />
Telefonanschluss<br />
a Achtung: Verwenden Sie für die Basisstation nur das mitgelieferte<br />
Netzteil !<br />
Ladestation anschließen 2<br />
Schließen Sie die Ladestation mit dem fest angeschlossenen Netzteil an eine<br />
Netzsteckdose an. Achten Sie darauf, dass die Netzsteckdose frei zugänglich<br />
ist.<br />
D<br />
2<br />
Gilt nur für Telefonsets mit mindestens zwei Mobilteilen, siehe „Verpackungsinhalt<br />
prüfen".<br />
5
Telefon in Betrieb nehmen<br />
6<br />
Akkus einlegen<br />
Öffnen Sie das Akkufach. Legen Sie die Akkus in<br />
das Akkufach ein. Schließen Sie das Akkufach.<br />
a Achtung: Verwenden Sie nur NiMH-Akkus<br />
vom Typ AAA (Microzellen) 1,2 V / 500 mAh!<br />
Niemals Batterien/Primärzellen verwenden!<br />
Achten Sie auf die richtige Polarität!<br />
Akkus aufladen<br />
☞ Stellen Sie das Mobilteil bei der ersten Inbetriebnahme für mindestens 16<br />
Stunden in die Basisstation / Ladestation.<br />
Das Mobilteil erwärmt sich beim Laden. Dies ist normal und ungefährlich.<br />
Laden Sie das Mobilteil nicht mit fremden Aufladegeräten. Der Akkuladezustand<br />
wird im Display angezeigt. Wenn die Ladung der Akkus die untere<br />
Grenze erreicht hat, blinkt das Akkusymbol (L) im Display und Sie hören<br />
den Akku-Warnton (falls Akku-Warnton eingeschaltet / Menüpunkt „MT-EIN-<br />
STEL./TONE/AKKU LEER“). Sie haben noch ca. 10 Minuten Gesprächszeit.<br />
Datum und Uhrzeit des Mobilteils einstellen<br />
Bei Inbetriebnahme verfügt das Mobilteil nicht über eine korrekte Uhrzeit<br />
(z. B. für Einträge in der Anrufliste). Datum und Uhrzeit stellen Sie über den<br />
Menüpunkt „MT-EINSTEL./ DATUM & ZEIT“ ein.<br />
Displaysprache einstellen<br />
Die Displaysprache ist in 13 verschiedenen Sprachen einstellbar. Im Auslieferungszustand<br />
ist „Deutsch“ eingestellt. Sie können die Sprache über den<br />
Menüpunkt „MT-EINSTEL./ SPRACHE“ ändern.<br />
Automatische Rufannahme / Direktannahme<br />
Ist die Funktion aktiviert (Auslieferungszustand), wird ein Anruf automatisch<br />
beim Herausnehmen des Mobilteils aus der Basisstation angenommen. Die<br />
automatische Anrufannahme wird über den Menüpunkt „MT-EINSTEL./ AUTO-<br />
ANTWORT“ ein- oder ausgeschaltet.
Bedienelemente<br />
3 Bedienelemente<br />
Hörkapsel<br />
Display<br />
Anrufliste<br />
Softkey<br />
(Menü / OK)<br />
Abnehmetaste<br />
Zifferntasten<br />
DE 2021<br />
Pfeiltasten<br />
(auf / ab)<br />
Softkey (Intern /<br />
Löschen / Stumm)<br />
Auflegetaste<br />
Wahlwiederholung<br />
Freisprechtaste<br />
R-Taste<br />
(Signaltaste)<br />
Telefonbuchtaste<br />
Mikrofon<br />
D<br />
7
Bedienelemente<br />
Mobilteil suchen<br />
(Paging)<br />
Ladekontakte<br />
8
Einführende Informationen<br />
4 Einführende Informationen<br />
In diesem Kapitel finden Sie grundlegende Informationen zur Handhabung<br />
der <strong>Bedienungsanleitung</strong> und des Telefons.<br />
Darstellungweise in der <strong>Bedienungsanleitung</strong><br />
Darstellung<br />
Beschreibung<br />
NAME?<br />
Abgebildete Taste drücken<br />
Ziffern oder Buchstaben eingeben<br />
Telefon klingelt<br />
Mobilteil aus der Basisstation nehmen<br />
Mobilteil in die Basisstation stellen<br />
Darstellung von Display-Texten<br />
Darstellung von Display-Symbolen<br />
Symbole im Display des Mobilteils<br />
Symbol<br />
Beschreibung<br />
Konstant: Verbindung zur Basisstation.<br />
Blinkt: keine Verbindung zur Basisstation.<br />
Konstant: Anzeige der Batteriekapazität.<br />
Blinkt während Mobilteil in der Basis:<br />
Die Akkus werden geladen.<br />
Konstant: Akkus sollten geladen werden.<br />
Blinkend: Laden Sie die Akkus.<br />
Konstant: Sie führen ein Gespräch.<br />
Blinkend: Sie erhalten gerade einen Anruf.<br />
Freisprechbetrieb ist aktiviert.<br />
Tonruf ist ausgeschaltet.<br />
Konstant: Eine Weckzeit ist eingestellt.<br />
Blinkt: Die eingestellte Weckzeit ist erreicht.<br />
Tastens<strong>per</strong>re ist eingeschaltet.<br />
9<br />
D
Einführende Informationen<br />
Sie haben eine Nachricht in der Sprachbox Ihres<br />
Netzbetreibers (abhängig vom Netzbetreiber)<br />
Konstant: Sie führen ein Interngespräch (nur bei<br />
mehreren Mobilteilen an einer Basis).<br />
Blinkt: Eintreffendes Interngespräch.<br />
Während Anzeige der Anrufliste: Neuer Anruf<br />
Weitere Ziffern/Buchstaben vor bzw. hinter den<br />
gegenwärtig angezeigten. Um diese anzuzeigen<br />
drücken Sie .<br />
In der unteren Displayzeile werden zugehörig zu den beiden Softkeys die<br />
abhängig vom Betriebszustand verfügbaren Funktionen angezeigt.<br />
Aufruf des Menüs.<br />
Bestätigung einer Einstellung.<br />
Aufbau eines Interngesprächs (nur bei mehreren<br />
Mobilteilen an einer Basis).<br />
Zurück zum übergeordneten Menü bzw. Abbruch<br />
der Programmierung.<br />
Rückwärts-Löschen von Zeichen bei der Eingabe<br />
(kurzer Druck löscht letztes Zeichen, langer Druck<br />
die ganze Zeile),<br />
Mikrofon aus-/einschalten während eines<br />
Gesprächs (Mute)<br />
10
Einführende Informationen<br />
Bereitschaftsmodus<br />
Alle Beschreibungen in dieser <strong>Bedienungsanleitung</strong> gehen davon aus,<br />
dass sich das Mobilteil im Bereitschaftsmodus befindet. Den Bereitschaftsmodus<br />
erreichen Sie, indem Sie die Taste drücken.<br />
Strahlungsreduzierung (ECO-<strong>Mode</strong>)<br />
Im Gesprächsmodus wird die Strahlung im Vergleich zu Standard-DECT-<br />
Schnurlostelefonen erheblich reduziert.<br />
Navigation im Menü<br />
Alle Funktionen sind über unterschiedliche Menüs zu erreichen. Die komplette<br />
Menüstruktur finden Sie im Anhang.<br />
Zur Navigation im Menü benutzen Sie die Softkeys und die Pfeiltasten.<br />
Mit dem linken Softkey öffnen Sie das Menü.<br />
Mit den Pfeiltasten bzw. bewegen Sie sich im Menü.<br />
Zum Öffnen eines Untermenüs drücken Sie den Softkey .<br />
Wollen Sie zum übergeordneten Menü zurück drücken Sie kurz. Bei<br />
langem Druck gelangen Sie wieder in den Bereitschaftszustand.<br />
D<br />
11
Einführende Informationen<br />
Beispiel: Telefonbucheintrag anlegen<br />
Wie Sie in den Menüs navigieren und Einstellungen vornehmen, ist hier<br />
anhand des Beispiels zum Anlegen eines Telefonbucheintrags erklärt.<br />
Verfahren Sie bei allen Einstellungen wie in diesem Beispiel.<br />
Drücken Sie die Telefonbuchtaste.<br />
oder<br />
Drücken Sie den Softkey Menü.<br />
Wählen Sie TELEFONBUCH und bestätigen Sie mit OK.<br />
Ist noch kein Eintrag vorhanden wird LEER angezeigt.<br />
Sind bereits Einträge vorhanden wird der erste Eintrag<br />
angezeigt.<br />
Drücken Sie den Softkey Menü.<br />
Bestätigen Sie EINTRAG NEU mit OK.<br />
Geben Sie den Namen ein (maximal 12 Zeichen).<br />
Die Ziffern-Tasten sind mit Buchstaben beschriftet. Durch<br />
mehrmaliges Drücken der entsprechenden Taste können<br />
Buchstaben und Ziffern eingegeben werden.<br />
Nach kurzer Zeit springt die Einfügemarke (Cursor) weiter.<br />
Schließen Sie die Eingabe des Namens mit OK ab.<br />
Geben Sie die Rufnummer ein (maximal 20 Ziffern).<br />
Schließen Sie die Eingabe der Rufnummer mit OK ab.<br />
/ Wählen Sie eine Melodie für den Eintrag aus.<br />
Bestätigen Sie mit OK.<br />
Zurück zum Bereitschaftsmodus.<br />
12
Telefonieren<br />
5 Telefonieren<br />
Anruf annehmen<br />
Ihr Telefon klingelt.<br />
Befindet sich das Mobilteil nicht in der Basis:<br />
/ Drücken Sie die Abnehmetaste oder die Freisprechtaste.<br />
Befindet sich das Mobilteil in der Basis und AUTO-ANTWORT ist nicht<br />
eingeschaltet:<br />
/ Nehmen Sie das Mobilteil aus der Basis und drücken Sie die<br />
Abnehmetaste oder die Freisprechtaste.<br />
Befindet sich das Mobilteil in der Basis und AUTO-ANTWORT ist<br />
eingeschaltet:<br />
Nehmen Sie einfach das Mobilteil aus der Basis; das<br />
Gespräch wird automatisch angenommen.<br />
Anrufen<br />
Geben Sie die Rufnummer ein.<br />
Fehler bei der Eingabe mit<br />
/ Rufnummer wird gewählt.<br />
korrigieren.<br />
☞ Sie können auch zuerst die Abnehmetaste drücken und erhalten damit<br />
das Freizeichen. Die eingegebenen Ziffern Ihrer gewünschten Rufnummer<br />
werden sofort gewählt. Eine Korrektur einzelner Ziffern der Rufnummer ist bei<br />
dieser Form des Gesprächsaufbaus nicht möglich.<br />
Gespräch beenden<br />
/ Auflegetaste drücken oder Mobilteil in die Basis stellen.<br />
D<br />
13
Telefonieren<br />
Wahlwiederholung<br />
☞ Ihr Telefon speichert die 5 zuletzt gewählten Rufnummern. Ist für die<br />
Rufnummer ein Telefonbucheintrag angelegt, wird der Name angezeigt. Um<br />
die zugehörige Rufnummer anzuzeigen drücken Sie die Raute-Taste .<br />
Die zuletzt gewählte Rufnummer steht immer am Anfang der Liste.<br />
Öffnen Sie die Wahlwiederholungsliste.<br />
/ Wählen Sie einen Eintrag aus.<br />
/ Rufnummer wird gewählt.<br />
Aus der Anrufliste anrufen<br />
☞ Ihr Telefon speichert die letzten 10 Anrufe in der Anrufliste. Ist für die<br />
Rufnummer ein Telefonbucheintrag angelegt, wird der Name angezeigt. Um<br />
die zugehörige Rufnummer anzuzeigen drücken Sie die Raute-Taste .<br />
Die Speicherung kann nur erfolgen, wenn die Funktion „Rufnummernübertragung<br />
(CLIP)“ an Ihrem Anschluss verfügbar ist und die Rufnummer vom<br />
Anrufer nicht unterdrückt oder aus anderen Gründen nicht übertragen wurde.<br />
Öffnen Sie die Anrufliste.<br />
/ Wählen Sie einen Eintrag aus.<br />
/ Rufnummer wird gewählt..<br />
Aus dem Telefonbuch anrufen<br />
☞ Das Telefonbuch kann 20 Einträge aufnehmen.<br />
Zum Anlegen von Einträgen siehe Abschnitt „Telefonbuch“.<br />
Öffnen Sie das Telefonbuch.<br />
/ Wählen Sie einen Eintrag aus.<br />
/ Rufnummer wird gewählt.<br />
14
Telefonieren<br />
Anzeige der Gesprächsdauer<br />
Während eines Gesprächs wird die Gesprächsdauer in Stunden, Minuten und<br />
Sekunden angezeigt.<br />
Hörer-/Lautsprecherlautstärke einstellen<br />
/ Sie können während eines Gesprächs die Lautstärke in 5<br />
Stufen einstellen (bei Hörerbetrieb -> Hörerlautstärke, bei<br />
Freisprechen -> Lautsprecherlautstärke).<br />
Die Einstellungen sind getrennt voneinander und bleiben<br />
auch nach Ende des Gespräches gespeichert.<br />
Mikrofon ausschalten (Mute)<br />
Sie können während eines Gesprächs das Mikrofon ausschalten,<br />
so dass Ihr Gesprächspartner Sie nicht hören kann.<br />
Im Display wird STUMM angezeigt.<br />
Zum Einschalten des Mikrofons drücken Sie die Taste<br />
erneut.<br />
Intern telefonieren<br />
☞ Interne Gespräche, Vermitteln und Konferenzgespräche sind nur möglich,<br />
wenn mehrere Mobilteile angemeldet sind. Ist dies nicht der Fall, wird im<br />
Display NICHT MOEGL. angezeigt.<br />
Internes Gespräch führen<br />
Drücken Sie den Softkey Intern. Sind zwei Mobilteile angemeldet,<br />
wird das andere Mobilteil sofort gerufen. Bei mehreren<br />
angemeldeten Mobilteilen werden deren interne Nummern<br />
angezeigt (z. B. 2 3 4). Drücken Sie die gewünschte<br />
interne Nummer.<br />
Drücken Sie bei mehreren angemeldeten Mobilteilen „9“,<br />
werden alle gleichzeitig gerufen.<br />
D<br />
15
Telefonieren<br />
Externes Gespräch vermitteln<br />
Während eines Externgespräches . . .<br />
Drücken Sie den Softkey Menü.<br />
/ Wählen Sie INTERN aus und drücken Sie OK.<br />
Geben Sie die interne Rufnummer ein. Das externe<br />
Gespräch wird gehalten.<br />
Wenn das gerufene Mobilteil eingeschaltet wird ggf.<br />
Gespräch ankündigen.<br />
Drücken Sie die Auflegetaste. Das Gespräch ist übergeben.<br />
Konferenz<br />
Während eines Externgespräches . . .<br />
Drücken Sie den Softkey Menü.<br />
/ Wählen Sie INTERN aus und drücken Sie OK.<br />
Geben Sie die interne Rufnummer ein.<br />
Wenn das gerufenene Mobilteil eingeschaltet wird drücken<br />
und halten Sie die Stern-Taste bis KONFERENZ im Display<br />
erscheint.<br />
☞ Legt einer der beteiligten Konferenzteilnehmer auf, bleiben die beiden<br />
anderen miteinander verbunden.<br />
16
Weitere Leistungsmerkmale<br />
6 Weitere Leistungsmerkmale<br />
Tastens<strong>per</strong>re<br />
☞ Die Tastens<strong>per</strong>re verhindert ein unbeabsichtigtes Betätigen der Tasten.<br />
Eintreffende Anrufe können wie gewohnt entgegengenommen werden.<br />
Drücken und halten Sie die Stern-Taste bis im Display das<br />
Symbol für die Tastens<strong>per</strong>re erscheint.<br />
Zum Ents<strong>per</strong>ren der Tastatur drücken und halten Sie die<br />
Stern-Taste erneut bis das Symbol wieder erlischt.<br />
Tonruf am Mobilteil ausschalten<br />
☞ Sie können den Tonruf auch über das Menü „MT-EINSTEL./RUFTON“<br />
ausschalten.<br />
Drücken und halten Sie die Raute-Taste bis im Display das<br />
Symbol für den ausgeschalteten Tonruf erscheint.<br />
Zum Wiedereinschalten des Tonrufs drücken und halten Sie<br />
die Raute-Taste erneut bis das Symbol wieder erlischt.<br />
Mobilteil ausschalten<br />
☞ Sie können das Mobilteil ausschalten um die Akkus zu schonen.<br />
Drücken Sie die Auflegetaste und halten Sie sie gedrückt.<br />
Nach wenigen Sekunden wird das Mobilteil ausgeschaltet.<br />
Die Displaybeleuchtung erlischt.<br />
D<br />
Zum Wiedereinschalten des Mobilteils drücken Sie die Auflegetaste<br />
so lange, bis Sie einen Signalton hören und das Display<br />
wieder leuchtet.<br />
17
Anrufliste / Wahlwiederholung<br />
18<br />
7 Anrufliste / Wahlwiederholung<br />
Anrufliste bearbeiten<br />
Öffnen Sie die Anrufliste.<br />
/ Wählen Sie einen Eintrag aus.<br />
Drücken Sie den Softkey Menü.<br />
/ Wählen Sie aus den folgenden Möglichkeiten und bestätigen<br />
Sie mit OK:<br />
NR.SPEICHERNDie Rufnummer wird im Telefonbuch gespeichert. Geben Sie<br />
einen Namen ein, bestätigen oder bearbeiten Sie die Rufnummer<br />
und legen Sie eine Tonrufmelodie für diesen Eintrag<br />
fest.<br />
LOESCHEN Der Eintrag wird gelöscht.<br />
ALLE LOESCH. Die gesamte Liste wird nach einer Sicherheitsabfrage<br />
gelöscht.<br />
DETAILS Datum und Uhrzeit des Anrufs werden angezeigt.<br />
☞ Sie können die Anrufliste auch über das Menü öffnen:<br />
( / ANRUFLISTE ).<br />
Wahlwiederholung bearbeiten<br />
/ Öffnen Sie die Wahlwiederholung.<br />
/ Wählen Sie einen Eintrag aus.<br />
Drücken Sie den Softkey Menü.<br />
/ Wählen Sie aus den folgenden Möglichkeiten und bestätigen<br />
Sie mit OK:<br />
NR.SPEICHERNDie Rufnummer wird im Telefonbuch gespeichert. Geben Sie<br />
einen Namen ein, bestätigen oder bearbeiten Sie die Rufnummer<br />
und legen Sie eine Tonrufmelodie für diesen Eintrag<br />
fest.<br />
LOESCHEN Der Eintrag wird gelöscht.<br />
ALLE LOESCH. Die gesamte Liste wird nach einer Sicherheitsabfrage<br />
gelöscht.
Telefonbuch<br />
8 Telefonbuch<br />
☞ Im Telefonbuch können Sie 20 Rufnummern und zugehörige Namen<br />
speichern. Sie können jedem Eintrag eine eigene Melodie zuordnen, mit der<br />
ein Anruf signalisiert werden soll. Geben Sie die Rufnummern immer mit der<br />
Ortsvorwahl ein; das ermöglicht eine korrekte Anzeige des jeweiligen<br />
Anrufers, für den ein Eintrag angelegt ist und dessen Übertragung der<br />
Rufnummer an Ihrem Anschluss verfügbar ist.<br />
Neuen Eintrag anlegen<br />
Drücken Sie die Telefonbuchtaste.<br />
Ist noch kein Eintrag vorhanden wird LEER angezeigt.<br />
Sind bereits Einträge vorhanden wird der erste Eintrag<br />
angezeigt.<br />
Drücken Sie den Softkey Menü.<br />
Bestätigen Sie EINTRAG NEU mit OK.<br />
Geben Sie den Namen ein (maximal 12 Zeichen).<br />
Die Zifferntasten sind mit Buchstaben beschriftet. Durch<br />
mehrmaliges Drücken der entsprechenden Taste können<br />
Buchstaben und Ziffern eingegeben werden.<br />
Nach kurzer Zeit springt die Einfügemarke (Cursor) weiter.<br />
Schließen Sie die Eingabe des Namens mit OK ab.<br />
Geben Sie die Rufnummer ein (maximal 20 Ziffern). Ist Ihr<br />
Telefon an einer Telefonanlage angeschlossen, geben Sie<br />
die Amtskennziffer mit ein. Ist eine Wahlpause erforderlich,<br />
drücken Sie nach der Amtskennziffer die Taste 0 für ca. 2 s;<br />
im Display wird P angezeigt.<br />
Schließen Sie die Eingabe der Rufnummer mit OK ab.<br />
/ Wählen Sie eine Melodie für den Eintrag aus.<br />
Bestätigen Sie mit OK.<br />
Zurück zum Bereitschaftsmodus.<br />
D<br />
19
Telefonbuch<br />
☞ Sie können das Telefonbuch auch über das Menü öffnen.<br />
( / TELEFONBUCH ).<br />
Telefonbucheinträge bearbeiten<br />
Drücken Sie die Telefonbuchtaste.<br />
/ Wählen Sie einen Eintrag aus.<br />
Drücken Sie den Softkey Menü.<br />
/ Wählen Sie aus den folgenden Möglichkeiten und bestätigen<br />
Sie mit OK:<br />
EINTRAG NEU Sie können einen neuen Eintrag anlegen.<br />
ANSEHEN Der Eintrag wird angezeigt. Mit den Pfeiltasten sehen Sie<br />
Name, Rufnummer und Melodie.<br />
AENDERN Sie können den Eintrag ändern. Löschen Sie Buchstaben<br />
und Ziffern mit , geben Sie mit den Zifferntasten neue<br />
Buchstaben und Ziffern ein. Einzelheiten dazu siehe unter<br />
„Neuen Eintrag anlegen“.<br />
LOESCHEN Der Eintrag wird gelöscht.<br />
ALLE LOESCH. Die gesamte Liste wird nach einer Sicherheitsabfrage<br />
gelöscht.<br />
TB-STATUS Die aktuelle Belegung wird angezeigt (z. B. 07/20 BELEGT:<br />
7 von 20 möglichen Einträgen sind vorhanden).<br />
20
Telefon einstellen<br />
9 Telefon einstellen<br />
Datum/Zeit<br />
Drücken Sie den Softkey Menü.<br />
/ Wählen Sie MT-EINSTEL. aus und drücken Sie OK.<br />
/ Wählen Sie DATUM & ZEIT aus und drücken Sie OK.<br />
/ Wählen Sie aus den folgenden Möglichkeiten und bestätigen<br />
Sie mit OK:<br />
DATUMSFORMAT Sie können die Darstellung des Datums einstellen:<br />
(TT-MM-JJ oder MM-TT-JJ).<br />
ZEITFORMAT Sie können die Darstellung der Zeit einstellen:<br />
(24 Stunden oder 12 Stunden).<br />
ZEIT EINST. Geben Sie mit den Zifferntasten die Uhrzeit ein.<br />
DATUM EINST. Geben Sie mit den Zifferntasten das Datum ein.<br />
☞ Bei einem Stromausfall geht die Einstellung verloren, wenn<br />
gleichzeitig das Mobilteil ausgeschaltet ist oder die Akkus leer sind.<br />
Wecker<br />
Drücken Sie den Softkey Menü.<br />
/ Wählen Sie MT-EINSTEL. aus und drücken Sie OK.<br />
/ Wählen Sie WECKER aus und drücken Sie OK.<br />
/ Wählen Sie EIN aus und drücken Sie OK.<br />
Geben Sie mit den Zifferntasten die Weckzeit ein.<br />
SNOOZE Drücken Sie OK.<br />
/ Wählen Sie EIN oder AUS und drücken Sie OK.<br />
Ist „Snooze“ eingeschaltet, bedeutet dies, dass das Wecksignal<br />
nach 7 Minuten wiederholt wird, bis diese Funktion durch<br />
Drücken und Halten der Auflegetaste beendet wird.<br />
Ist „Snooze“ ausgeschaltet, wird das Wecksignal einmalig zur<br />
eingestellten Zeit gegeben. Zum Quittieren des Wecksignals<br />
drücken Sie eine beliebige Taste.<br />
D<br />
21
Telefon einstellen<br />
Tonruf für das Mobilteil einstellen<br />
Drücken Sie den Softkey Menü.<br />
/ Wählen Sie MT-EINSTEL. aus und drücken Sie OK.<br />
/ Wählen Sie RUFTON aus und drücken Sie OK.<br />
/ Wählen Sie aus den folgenden Möglichkeiten und bestätigen<br />
Sie mit OK:<br />
INTERN Wählen Sie eine Melodie für die Signalisierung eines internen<br />
Anrufes aus.<br />
EXTERN Wählen Sie eine Melodie für die Signalisierung eines externen<br />
Anrufes aus.<br />
RUFTONLAUTSTWählen Sie die Lautstärke für den Rufton aus. Wählen Sie<br />
„RUFTON AUS“ wird das Symbol im Display angezeigt.<br />
Hinweistöne einstellen<br />
Drücken Sie den Softkey Menü.<br />
/ Wählen Sie MT-EINSTEL. aus und drücken Sie OK.<br />
/ Wählen Sie TONE aus und drücken Sie OK.<br />
/ Wählen Sie aus den folgenden Möglichkeiten und bestätigen<br />
Sie mit OK:<br />
TASTENTON Schalten Sie den Quittungston für eine Tastenbetätigung ein<br />
oder aus.<br />
AKKU LEER Schalten Sie den Hinweiston ein oder aus. Der Ton signalisiert,<br />
wenn der Akku geladen werden muss.<br />
REICHWEITE Schalten Sie den Hinweiston ein oder aus. Der Ton signalisiert,<br />
wenn Sie sich mit dem Mobilteil am Rande der Reichweite<br />
zur Basis befinden.<br />
Displaysprache einstellen<br />
Drücken Sie den Softkey Menü.<br />
/ Wählen Sie MT-EINSTEL. aus und drücken Sie OK.<br />
/ Wählen Sie SPRACHE aus und drücken Sie OK.<br />
/ Wählen Sie eine Sprache und bestätigen Sie mit OK.<br />
22
Telefon einstellen<br />
Mobilteilnamen einstellen<br />
Drücken Sie den Softkey Menü.<br />
/ Wählen Sie MT-EINSTEL. aus und drücken Sie OK.<br />
/ Wählen Sie MT-NAME aus und drücken Sie OK.<br />
Löschen Sie den alten Namen mit , geben Sie mit den<br />
Zifferntasten einen neuen Namen ein und drücken Sie OK.<br />
Displayanzeige einstellen<br />
Drücken Sie den Softkey Menü.<br />
/ Wählen Sie MT-EINSTEL. aus und drücken Sie OK.<br />
/ Wählen Sie MT-DISPLAY aus und drücken Sie OK.<br />
/ Wählen Sie, ob im Bereitschaftsmodus der Name des Mobilteils<br />
oder die Uhrzeit angezeigt werden soll und bestätigen<br />
Sie mit OK.<br />
Automatische Rufannahme einstellen<br />
Drücken Sie den Softkey Menü.<br />
/ Wählen Sie MT-EINSTEL. aus und drücken Sie OK.<br />
/ Wählen Sie AUTO-ANTWORT aus und drücken Sie OK.<br />
/ Wählen Sie, ob im die automatische Rufannahmen ein- oder<br />
ausgeschaltet sein soll und bestätigen Sie mit OK.<br />
☞ Bei eingeschalteter automatischer Rufannahme wird ein Anruf sofort<br />
angenommen wenn das Mobilteil aus der Basis genommen wird.<br />
Wahlverfahren einstellen<br />
Drücken Sie den Softkey Menü.<br />
/ Wählen Sie BS-EINSTEL. aus und drücken Sie OK.<br />
/ Wählen Sie WAHLVERFAHR. aus und drücken Sie OK.<br />
/ Wählen Sie TONWAHL oder IMPULSWAHL und bestätigen<br />
Sie mit OK.<br />
D<br />
☞ Für die meisten Anschlüsse ist TONWAHL die richtige Einstellung.<br />
23
Telefon einstellen<br />
Flashzeit einstellen<br />
Drücken Sie den Softkey Menü.<br />
/ Wählen Sie BS-EINSTEL. aus und drücken Sie OK.<br />
/ Wählen Sie FLASH-ZEIT aus und drücken Sie OK.<br />
/ Wählen Sie KURZ (100 ms), MITTEL (300 ms) oder LANG<br />
(600 ms) und bestätigen Sie mit OK.<br />
PIN ändern<br />
Drücken Sie den Softkey Menü.<br />
/ Wählen Sie BS-EINSTEL. aus und drücken Sie OK.<br />
/ Wählen Sie PIN AENDERN aus und drücken Sie OK.<br />
Geben Sie die aktuelle PIN ein<br />
(im Auslieferungszustand 0 0 0 0) und drücken Sie OK.<br />
Geben Sie eine neue PIN ein und drücken Sie OK.<br />
Geben Sie die neue PIN noch einmal ein und drücken Sie OK.<br />
☞ Die vierstellige PIN schützt einige Einstellungen vor unbefugtem Zugriff.<br />
Wenn Sie die PIN vergessen haben wenden Sie sich bitte an unsere Service-<br />
Hotline.<br />
Telefon in den Auslieferungszustand zurücksetzen<br />
Drücken Sie den Softkey Menü.<br />
/ Wählen Sie RUECKSETZ. aus und drücken Sie OK.<br />
Geben Sie die aktuelle PIN ein und drücken Sie OK.<br />
Bestätigen Sie auch die nachfolgende Sicherheitsabfrage mit<br />
OK.<br />
☞ Das Telefonbuch wird nicht gelöscht. Bitte löschen Sie das Telefonbuch<br />
über das Telefonbuch-Menü.<br />
Angemeldete Mobilteile bleiben angemeldet.<br />
24
Mobilteile an-/abmelden<br />
10 Mobilteile an-/abmelden<br />
An einer Basisstation können bis zu 5 Mobilteile angemeldet werden. Die mit<br />
Ihrem Telefon ausgelieferten Mobilteile sind bereits an der Basis angemeldet.<br />
Zum Anmelden eines „fremden“ Mobilteils ziehen Sie bitte auch dessen<br />
<strong>Bedienungsanleitung</strong> zu Rate.<br />
Weiteres Mobilteil des gleichen Typs anmelden<br />
Drücken Sie den Softkey Menü.<br />
/ Wählen Sie ANMELDEN aus und drücken Sie OK.<br />
Geben Sie die aktuelle PIN der Basis ein, an der das Mobilteil<br />
angemeldet werden soll, und drücken Sie OK.<br />
Drücken und halten Sie die Paging-Taste an der Basisstation<br />
für ca. 5 s.<br />
Nach einer kurzen Zeit leuchtet das Antennensymbol im Display<br />
konstant und das Mobilteil ist angemeldet.<br />
Mobilteil löschen<br />
Drücken Sie den Softkey Menü.<br />
/ Wählen Sie BS-EINSTEL. aus und drücken Sie OK.<br />
/ Wählen Sie MT ABMELDEN aus und drücken Sie OK.<br />
Geben Sie die aktuelle PIN ein und drücken Sie OK.<br />
/ Wählen Sie eines der angezeigten Mobilteile aus und drücken<br />
Sie OK.<br />
☞ Das Mobilteil, das Sie gerade benutzen, kann nicht abgemeldet werden.<br />
D<br />
25
Betrieb an Telefonanlagen/Zusatzdienste<br />
11 Betrieb an Telefonanlagen/Zusatzdienste<br />
Betrieb an Telefonanlagen<br />
Ist Ihr Telefon an einer Telefonanlage angeschlossen, können Sie über die<br />
R- Taste Funktionen, wie z. B. Anrufe weiterleiten und automatischen Rückruf<br />
nutzen. Lesen Sie bitte in der <strong>Bedienungsanleitung</strong> Ihrer Telefonanlage, welche<br />
Flash-Zeit Sie zur Nutzung dieser Funktionen einstellen müssen. Ob Ihr<br />
Telefon an Ihrer Telefonanlage einwandfrei funktioniert, erfahren Sie bei dem<br />
Händler, bei dem die Anlage gekauft wurde.<br />
Bitte denken Sie daran, bei Telefonbucheinträgen ggf. die Amtskennziffer und<br />
eine ggf. erforderliche Wahlpause (Ziffer „0“ lange drücken) mit einzugeben.<br />
Zusatzdienste Ihres Netzbetreibers<br />
Ihr Telefon unterstützt Zusatzdienste Ihres Netzbetreibers, wie z. B. Makeln,<br />
Anklopfen und Konferenz. Über die R-Taste können Sie diese Zusatzdienste<br />
nutzen. Bitte erkundigen Sie sich bei Ihrem Netzbetreiber, welche Flash-Zeit<br />
Sie zur Nutzung von Zusatzdiensten einstellen müssen. Zur Freischaltung von<br />
Zusatzdiensten wenden Sie sich bitte an Ihren Netzbetreiber.<br />
26
Anhang<br />
12 Anhang<br />
Menüstruktur<br />
ANRUFLISTE<br />
TELEFONBUCH<br />
BS-EINSTEL.<br />
MT ABMELDEN<br />
WAHLVERFAHR.<br />
TONWAHL<br />
IMPULSWAHL<br />
FLASH-ZEIT KURZ<br />
MITTEL<br />
LANG<br />
PIN AENDERN<br />
MT-EINSTEL. WECKER AUS/EIN / Weckzeit<br />
RUFTON INTERN MELODIE 1 . . . 10<br />
EXTERN MELODIE 1 . . . 10<br />
RUFTONLAUTST AUS, 1…5<br />
TOENE TASTENTON EIN/AUS<br />
ANMELDEN<br />
RUECKSETZ.<br />
SPRACHE<br />
MT-NAME<br />
MT-DISPLAY<br />
AUTO-ANTWORT<br />
DATUM & ZEIT<br />
AKKU LEER EIN/AUS<br />
REICHWEITE EIN/AUS<br />
DEUTSCH / ENGLISH / TURKCE<br />
MT-NAME<br />
ZEIT<br />
EIN/AUS<br />
DATUMSFORMAT<br />
ZEITFORMAT<br />
ZEIT EINST.<br />
DATUM EINST.<br />
D<br />
27
Anhang<br />
Fehlersuche<br />
Haben Sie Probleme mit Ihrem Telefon, kontrollieren Sie zuerst die folgenden<br />
Hinweise. Bei technischen Problemen können Sie sich an unsere Service-Hotline<br />
unter Tel. 0900 00 1675 innerhalb der Schweiz (Kosten aus dem Festnetz<br />
von Swiss<strong>com</strong> bei Drucklegung: CHF 2.60/min) wenden. Bei Garantieansprüchen<br />
wenden Sie sich an Ihren Fachhändler. Die Garantiezeit beträgt 2 Jahre.<br />
• Nach Betätigung der Abhebetaste ist kein Wählton hörbar, die Wählleitung<br />
wird nicht belegt.<br />
- Telefonanschluss-Stecker an der Basisstation und an der Telefonsteckdose<br />
kontrollieren.<br />
- Netzstecker an der Basisstation und an 230 V kontrollieren.<br />
- Die Wählleitung wird durch ein anderes Mobilteil belegt. Warten Sie, bis<br />
die Verbindung beendet ist.<br />
• Displayanzeige:„SUCHE BASIS”.<br />
- Netzstecker an der Basisstation und an 230 V kontrollieren.<br />
- Reichweite verringern.<br />
- Mobilteil anmelden.<br />
• Keine Anzeige auf dem Display.<br />
- Mobilteil ausgeschaltet -> einschalten.<br />
- Akku leer -> aufladen.<br />
28
Anhang<br />
Werkseinstellungen/Auslieferungszustand<br />
Anrufliste<br />
Kein Eintrag<br />
Telefonbuch<br />
Kein Eintrag<br />
Wecker<br />
Aus<br />
Tonruf Mobilteil Intern: Melodie 2<br />
Extern: Melodie 1<br />
Tonruflautstärke: 3<br />
Hinweistöne<br />
Tastenton: Ein<br />
Akku leer: Ein<br />
Reichweite: Ein<br />
Sprache<br />
Deutsch<br />
Mobilteilname DE 202x<br />
Displayanzeige Mobilteilname<br />
Autom. Rufannahme Ein<br />
Datum & Zeit<br />
Datumsformat: TT-MM-JJ<br />
Zeitformat: 24 Stunden<br />
Wahlverfahren Tonwahl<br />
Flash-Zeit<br />
Kurz (100 ms)<br />
PIN 0 0 0 0<br />
D<br />
29
Anhang<br />
Technische Daten<br />
Standard: DECT / GAP<br />
Kanalzahl: 120 Duplexkanäle<br />
Frequenzen: 1880 MHz bis 1900 MHz<br />
Duplexverfahren: Zeitmultiplex, 10ms Rahmenlänge<br />
Kanalraster: 1728 kHz<br />
Bitrate: 1152 kBit / s<br />
Modulation: GFSK<br />
Sprachkodierung: 32 kBit / s<br />
Sendeleistung: 10 mW (mittlere Leistung pro Kanal)<br />
Reichweite: bis zu 300 Meter im Freien, in Gebäuden bis zu 50 Metern<br />
Stromversorgung Basisstation / Stromversorgung Ladestation:<br />
Steckernetzgerät (S002CV0600030, 6V DC/300mA) oder<br />
(VT04EEU06045, 6V DC/450mA).<br />
Stromversorgung Mobilteil: 2 x AAA NiMH / 1,2 V / 500 mAh<br />
Betriebsdauer Mobilteil: in Bereitschaft / im Gespräch<br />
500 mAh = ca. 100 h / ca. 10 h<br />
Ladezeit der Akkus: ca. 16 Stunden<br />
Zulässige Umgebungsbedingungen für den Betrieb des Mobilteils:<br />
5°C bis 45°C ; 20 % bis 75 % relative Luftfeuchtigkeit<br />
Zulässige Umgebungsbedingungen für den Betrieb der Basisstation:<br />
5°C bis 45°C ; 20 % bis 75 % relative Luftfeuchtigkeit<br />
Zulässige Lagertem<strong>per</strong>atur: -10°C bis +60°C<br />
Wahlverfahren: MFV / IWV<br />
R-Taste: Flash (100 ms/300 ms/600 ms)<br />
Abmessungen Basisstation (mm): L / B / H = 110 x 115 x 35<br />
Abmessungen Mobilteil (mm): L / B / H = 48 x 30 x 160<br />
Telefon-Anschluss-Schnur Belegung:<br />
TSV auf Pin 3 und 4 gemäß CTR 37 (Euro-Belegung)<br />
Steckernetzgerät: Eurostecker<br />
30
Anhang<br />
Konformitätserklärung<br />
Dieses Gerät erfüllt die Anforderungen der EU-Richtlinien:<br />
- 1999/5/EG Richtlinie über Funkanlagen und Telekommunikationsendeinrichtungen<br />
und die gegenseitige Anerkennung ihrer Konformität.<br />
- 2005/32/EG Richtlinie „Energiebetriebene Produkte“.<br />
- Verordnung 1275/2008 „Stromverbrauch im Bereitschafts- und im<br />
Auszustand“.<br />
- Verordnung 278/2009 „Netzteile bei Nulllast sowie ihre durchschnittliche<br />
Effizienz im Betrieb“.<br />
Die Konformität mit den o. a. Richtlinien wird durch das CE-Zeichen auf dem<br />
Gerät bestätigt.<br />
Für die komplette Konformitätserklärung nutzen Sie bitte den kostenlosen<br />
Download von unserer Website www.switel.<strong>com</strong>.<br />
Pflegehinweise<br />
Reinigen Sie die Gehäuseoberflächen mit einem weichen und fusselfreien<br />
Tuch. Verwenden Sie keine Reinigungs- oder Lösungsmittel.<br />
Garantie<br />
SWITEL-Geräte werden nach den modernsten Produktionsverfahren hergestellt<br />
und geprüft. Ausgesuchte Materialien und hoch entwickelte Technologien<br />
sorgen für einwandfreie Funktion und lange Lebensdauer.<br />
Ein Garantiefall liegt nicht vor, wenn die Ursache einer Fehlfunktion des Gerätes<br />
bei dem Telefonnetzbetreiber oder einer eventuell zwischengeschalteten<br />
Nebenstellenanlage liegt. Die Garantie gilt nicht für die in den Produkten verwendeten<br />
Batterien, Akkus oder Akkupacks.<br />
Die Garantiezeit beträgt 24 Monate, gerechnet vom Tage des Kaufs.<br />
Innerhalb der Garantiezeit werden alle Mängel, die auf Material- oder Herstellungsfehler<br />
zurückzuführen sind, kostenlos beseitigt. Der Garantieanspruch<br />
erlischt bei Eingriffen durch den Käufer oder durch Dritte. Schäden, die durch<br />
unsachgemäße Behandlung oder Bedienung, natürliche Abnutzung, durch falsches<br />
Aufstellen oder Aufbewahren, durch unsachgemäßen Anschluss oder<br />
D<br />
31
Anhang<br />
Installation sowie durch höhere Gewalt oder sonstige äußere Einflüsse entstehen,<br />
fallen nicht unter die Garantieleistung.<br />
Wir behalten uns vor, bei Reklamationen die defekten Teile auszubessern, zu<br />
ersetzen oder das Gerät auszutauschen. Ausgetauschte Teile oder ausgetauschte<br />
Geräte gehen in unser Eigentum über.<br />
Schadenersatzansprüche sind ausgeschlossen, soweit sie nicht auf Vorsatz<br />
oder grober Fahrlässigkeit des Herstellers beruhen.<br />
Sollte Ihr Gerät dennoch einen Defekt innerhalb der Garantiezeit aufweisen,<br />
wenden Sie sich bitte unter Vorlage Ihrer Kaufquittung ausschließlich an das<br />
Geschäft, in dem Sie Ihr SWITEL-Gerät gekauft haben. Alle Gewährleistungsansprüche<br />
nach diesen Bestimmungen sind ausschließlich gegenüber Ihrem<br />
Fachhändler geltend zu machen. Nach Ablauf von zwei Jahren nach Kauf und<br />
Übergabe unserer Produkte können Gewährleistungsrechte nicht mehr geltend<br />
gemacht werden.<br />
32
Anhang<br />
Stichwortverzeichnis<br />
A<br />
Akkus . . . . . . . . . . . . . . . . . . . . . . . . .2<br />
Akkus aufladen . . . . . . . . . . . . . . . . . .6<br />
Akkus einlegen . . . . . . . . . . . . . . . . . .6<br />
Anruf annehmen . . . . . . . . . . . . . . . .13<br />
Anrufen . . . . . . . . . . . . . . . . . . . . . . .13<br />
Anrufliste . . . . . . . . . . . . . . . . . . .14, 18<br />
Aufstellungsort . . . . . . . . . . . . . . . . . .2<br />
Auslieferungszustand . . . . . . . . . . . .29<br />
Automatische Rufannahme . . . . .6, 23<br />
B<br />
Basisstation anschließen . . . . . . . . . .5<br />
Bereitschaftsmodus . . . . . . . . . . . . . .11<br />
Bestimmungsgemäße Verwendung . .2<br />
D<br />
Datum/Uhrzeit . . . . . . . . . . . . . . . .6, 21<br />
Direktannahme . . . . . . . . . . . . . . . . . .6<br />
Displayanzeige . . . . . . . . . . . . . . . . .23<br />
Displaysprache . . . . . . . . . . . . . . .6, 22<br />
E<br />
ECO-<strong>Mode</strong> . . . . . . . . . . . . . . . . . . . .11<br />
Entsorgung . . . . . . . . . . . . . . . . . . . . .3<br />
Externes Gespräch vermitteln . . . . .16<br />
F<br />
Fehlersuche . . . . . . . . . . . . . . . . . . .28<br />
Flashzeit . . . . . . . . . . . . . . . . . . . . . .24<br />
G<br />
Garantie . . . . . . . . . . . . . . . . . . . . . .31<br />
Gespräch beenden . . . . . . . . . . . . . .13<br />
Gesprächsdauer . . . . . . . . . . . . . . . .15<br />
H<br />
Hinweistöne . . . . . . . . . . . . . . . . . . .22<br />
Hörer-/Lautsprecherlautstärke . . . . .15<br />
I<br />
Intern telefonieren . . . . . . . . . . . . . . .15<br />
K<br />
Konferenz . . . . . . . . . . . . . . . . . . . . .16<br />
Konformitätserklärung . . . . . . . . . . . .31<br />
L<br />
Ladestation . . . . . . . . . . . . . . . . . . . . .5<br />
Lautstärke (Hörer) . . . . . . . . . . . . . . .15<br />
Lautstärke (Tonruf) . . . . . . . . . . . . . .22<br />
Leistungsaufnahme . . . . . . . . . . . . . . .4<br />
M<br />
Medizinische Geräte . . . . . . . . . . . . . .3<br />
Menüstruktur . . . . . . . . . . . . . . . . . . .27<br />
Mikrofon ausschalten . . . . . . . . . . . .15<br />
Mobilteil ausschalten . . . . . . . . . . . . .17<br />
Mobilteile an-/abmelden . . . . . . . . . .25<br />
Mobilteilnamen . . . . . . . . . . . . . . . . .23<br />
Mute . . . . . . . . . . . . . . . . . . . . . . . . .15<br />
D<br />
33
Anhang<br />
N<br />
Navigation im Menü . . . . . . . . . . . . .11<br />
Netzteil . . . . . . . . . . . . . . . . . . . . . . . .2<br />
P<br />
Pflegehinweise . . . . . . . . . . . . . . . . .31<br />
PIN . . . . . . . . . . . . . . . . . . . . . . . . . .24<br />
R<br />
Rufton . . . . . . . . . . . . . . . . . . . . . . . .22<br />
S<br />
Sicherheitshinweise . . . . . . . . . . . . . .2<br />
Strahlungsreduzierung . . . . . . . . . . .11<br />
Stromausfall . . . . . . . . . . . . . . . . . . . .2<br />
Stromverbrauch . . . . . . . . . . . . . . . . .4<br />
Symbole im Display . . . . . . . . . . . . . .9<br />
T<br />
Tastens<strong>per</strong>re . . . . . . . . . . . . . . . . . . .17<br />
Technische Daten . . . . . . . . . . . . . . .30<br />
Telefonanlagen . . . . . . . . . . . . . . . . .26<br />
Telefonbuch . . . . . . . . . . . . . . . . .14, 19<br />
Tonruf . . . . . . . . . . . . . . . . . . . . . . . .22<br />
Tonruf am Mobilteil ausschalten . . . .17<br />
V<br />
Verpackungsinhalt . . . . . . . . . . . . . . . .4<br />
W<br />
Wahlverfahren . . . . . . . . . . . . . . . . . .23<br />
Wahlwiederholung . . . . . . . . . . .14, 18<br />
Wecker . . . . . . . . . . . . . . . . . . . . . . .21<br />
Werkseinstellungen . . . . . . . . . . . . . .29<br />
Z<br />
Zurücksetzen . . . . . . . . . . . . . . . . . .24<br />
Zusatzdienste . . . . . . . . . . . . . . . . . .26<br />
34
Table des matières<br />
1 Consignes de sécurité . . . . . . . . . . . . . . . . . . . . . . . . . . . . . . . . . . . . . .2<br />
2 Mettre votre téléphone en service . . . . . . . . . . . . . . . . . . . . . . . . . . . . .4<br />
3 Éléments de manipulation . . . . . . . . . . . . . . . . . . . . . . . . . . . . . . . . . . .7<br />
4 Introduction . . . . . . . . . . . . . . . . . . . . . . . . . . . . . . . . . . . . . . . . . . . . . . .9<br />
5 Téléphoner . . . . . . . . . . . . . . . . . . . . . . . . . . . . . . . . . . . . . . . . . . . . . . .13<br />
6 Fonctions spéciales . . . . . . . . . . . . . . . . . . . . . . . . . . . . . . . . . . . . . . .17<br />
7 Liste d’appels / Répétition des derniers numéros . . . . . . . . . . . . . . .18<br />
8 Ré<strong>per</strong>toire . . . . . . . . . . . . . . . . . . . . . . . . . . . . . . . . . . . . . . . . . . . . . . . .19<br />
9 Réglage du téléphone . . . . . . . . . . . . . . . . . . . . . . . . . . . . . . . . . . . . . .21<br />
10 Déclarer/retirer un <strong>com</strong>biné . . . . . . . . . . . . . . . . . . . . . . . . . . . . . . . . .25<br />
11 Installations à postes supplém. / services confort . . . . . . . . . . . . . .26<br />
12 Annexe . . . . . . . . . . . . . . . . . . . . . . . . . . . . . . . . . . . . . . . . . . . . . . . . . .27<br />
F<br />
1
Consignes de sécurité<br />
1 Consignes de sécurité<br />
Lisez très attentivement ce mode d’emploi.<br />
Utilisation conforme aux prescriptions<br />
Ce téléphone convient pour téléphoner à l’intérieur d’un réseau téléphonique.<br />
Tout autre utilisation est considérée <strong>com</strong>me non conforme à l’usage.<br />
Des modifications ou changements effectués d’un propre gré ne sont pas autorisés.<br />
N’ouvrez en aucun cas l’appareil et n’effectuez aucun essai de réparation<br />
vous-même.<br />
Lieu d’installation<br />
Évitez toute nuisance par la fumée, la poussière, les vibrations, les produits chimiques,<br />
l’humidité, la grande chaleur ou l’ensoleillement direct.<br />
Ne vous servez pas du <strong>com</strong>biné dans des endroits exposés aux explosions.<br />
Bloc secteur<br />
a Attention: N’utilisez que le bloc secteur fourni avec l’appareil, d’autres<br />
pouvant endommager votre téléphone. Vous ne devez pas bloquer l’accès au<br />
bloc secteur par des meubles ou d’autres objets.<br />
Piles rechargeables<br />
a Attention: Ne jetez pas les piles rechargeables dans le feu. N’utilisez que<br />
des piles rechargeables du même type ! Veillez à une polarisation correcte !<br />
Risque d’explosion lors de leur chargement si la polarisation est incorrecte.<br />
Panne de courant<br />
En cas de panne de courant, vous ne pouvez pas téléphoner avec le téléphone.<br />
Tenez à votre disposition, pour parer à de telles situations, un téléphone filaire<br />
fonctionnant sans alimentation externe en courant.<br />
2
Consignes de sécurité<br />
Appareils médicaux<br />
a Attention: N’utilisez pas ce téléphone à proximité d’appareils médicaux.<br />
Leur influence ne peut pas être entièrement exclue.<br />
Les téléphones DECT 1 peuvent causer un bourdonnement désagréable dans les<br />
prothèses auditives.<br />
Élimination<br />
Si vous ne voulez plus vous servir de votre appareil, veuillez<br />
l’apporter au centre de collecte de l’organisme d’élimination des<br />
déchets de votre <strong>com</strong>mune (par ex. centre de recyclage).<br />
L’icône ci-contre signifie que vous ne devez en aucun cas jeter<br />
votre appareil dans les ordures ménagères ! D’après la loi relative<br />
aux appareils électriques et électroniques, les propriétaires<br />
d’appareils usagés sont tenus de mettre tous les appareils<br />
électriques et électroniques usagés dans un collecteur<br />
séparé.<br />
Éliminez les piles rechargeables auprès d’un revendeur de<br />
piles ainsi que dans des centres de collecte <strong>com</strong>pétents qui<br />
tiennent à votre disposition les collecteurs appropriés correspondants.<br />
Éliminez les fournitures d’emballage conformément au règlement<br />
local.<br />
F<br />
1<br />
DECT: Digital Enhanced Cordless Tele<strong>com</strong>munication = Standard<br />
pour les téléphones sans fil.<br />
3
Mettre votre téléphone en service<br />
4<br />
2 Mettre votre téléphone en service<br />
Remarques concernant la sécurité<br />
a Attention: Avant de mettre votre appareil en service, lisez impérativement<br />
les consignes de sécurité mentionnées au chapitre 1.<br />
Contrôler le contenu de l’emballage<br />
Les éléments suivants font partie de la livraison :<br />
Contenu<br />
Modèle DE 202x<br />
2021 2022 1 2023 1 2024 1<br />
Base avec bloc d’alimentation 1 1 1 1<br />
Chargeur avec bloc d’alimentation - 1 2 3<br />
Combiné 1 2 3 4<br />
Câble de raccordement<br />
téléphonique 1 1 1 1<br />
Piles rechargeables 2 4 6 8<br />
<strong>Mode</strong> d’emploi 1 1 1 1<br />
1<br />
À l’adresse www.switel.<strong>com</strong>, vous apprendrez si ce kit téléphonique est déjà disponible<br />
à la vente.<br />
Puissance absorbée<br />
Puissance absorbée de la station de base :<br />
- en mode de fonctionnement (disponible/conversation) : env. 1,2 W<br />
- pendant le chargement du <strong>com</strong>biné : env. 2,0 W.<br />
Sans charge, le courant d’alimentation à découpage entrant s‘élève à env.<br />
0,15 W. Le rendement moyen est d’env. 67 %.<br />
Puissance absorbée de la station de chargement :<br />
- sans le <strong>com</strong>biné : env. 0,15 W<br />
- pendant le chargement du <strong>com</strong>biné : env. 1,2 W.<br />
Sans charge, le courant d’alimentation à découpage entrant s‘élève à env.<br />
0,15 W. Le rendement moyen est d’env. 67 %.
Mettre votre téléphone en service<br />
Raccorder la base<br />
a Attention: Posez la base à une distance minimum d’1 m par rapport à<br />
d’autres appareils électroniques, une distance inférieure pouvant provoquer<br />
des interactions.<br />
Raccordez la base <strong>com</strong>me représenté sur le croquis. Pour des raisons de<br />
sécurité, n’utilisez que le bloc d’alimentation fourni avec l’appareil ainsi<br />
que le câble de raccordement téléphonique ci-joint.<br />
Prise réseau<br />
Prise de raccordement téléphonique<br />
a Attention: N’utilisez pour la base que le bloc d’alimentation fourni avec<br />
l’appareil !<br />
Raccorder le chargeur 2<br />
Branchez fermement l'alimentation sur le chargeur et branchez-le à une prise de<br />
courant. Assurez-vous que la prise de courant soit librement accessible.<br />
F<br />
2<br />
N’est valable que pour les kits téléphoniques avec au moins deux <strong>com</strong>binés, -><br />
“Contrôler le contenu de l’emballage“.<br />
5
Mettre votre téléphone en service<br />
6<br />
Mettre en place les piles rechargeables<br />
Ouvrez le <strong>com</strong>partiment à piles. Introduisez les piles dans<br />
le <strong>com</strong>partiment prévu à cet effet. Fermez le <strong>com</strong>partiment<br />
à piles.<br />
a Attention: N’utilisez que des piles rechargeables de<br />
type AAA Ni-MH 1,2 V/500 mAh. Observez une polarisation<br />
correcte ! Ne jamais utiliser de piles ou piles primaires !<br />
Recharger les piles rechargeables<br />
☞ Pour la première mise en service, posez le <strong>com</strong>biné sur la base / le<br />
chargeur pour une durée d’au moins 16 heures.<br />
Le <strong>com</strong>biné chauffe lors du chargement. C’est normal et ce n’est pas dangereux.<br />
Ne chargez pas le <strong>com</strong>biné avec des chargeurs d’un autre fabricant. L’état de<br />
charge des piles rechargeables est indiqué sur l’écran. Lorsque le chargement<br />
des piles rechargeables a atteint la limite inférieure, le symbole de la pile (L)<br />
clignote sur l’écran et vous entendez l’alerte sonore des piles (si l’alerte sonore<br />
des piles est activée/via le menu "REGL. COMB/ALERTES SON./BATT.FAIBLE“).<br />
Vous avez encore un temps de <strong>com</strong>munication d’env. 10 minutes.<br />
Réglage de la date et de l’heure<br />
Lors de la mise en service, le <strong>com</strong>biné n’est pas réglé à l’heure correcte (p. ex.<br />
pour les entrées de la liste d’appels). Vous réglez la date et l’heure via le menu<br />
„REGL. COMB. /DATE & HEURE“.<br />
Paramétrer la langue de l’écran<br />
La langue de l’écran est réglable en 13 langues différentes. Dans son état à la<br />
livraison, elle est réglée sur „allemand“. Vous pouvez changer la langue via le<br />
menu „MT-EINSTEL./ SPRACHE“.<br />
Prise d’appel automatique / Réponse autom.<br />
Si vous avez activé la fonction, l’appel sera automatiquement réceptionné<br />
quand vous prendrez le <strong>com</strong>biné de la base. La prise d’appel automatique<br />
s’active ou se désactive via le menu „REGL. COMB/ REPONSE AUTO“.
Éléments de manipulation<br />
3 Éléments de manipulation<br />
Haut-parleur<br />
Écran<br />
Liste d’appels<br />
Touche softkey<br />
(Menu / OK)<br />
Répondre<br />
Pavé numérique<br />
DE 2021<br />
Touche haut/bas<br />
Touche softkey<br />
(Int / C = Cancel)<br />
Raccrocher<br />
Répétition des derniers<br />
numéros<br />
Mains-libres<br />
Touche ré<strong>per</strong>toire<br />
Touche R (Flash)<br />
Microphone<br />
F<br />
7
Éléments de manipulation<br />
Chercher le <strong>com</strong>biné<br />
(Paging)<br />
Contacts de chargement<br />
8
Introduction<br />
4 Introduction<br />
Dans ce chapitre, vous trouverez des informations de base vous expliquant<br />
<strong>com</strong>ment vous servir du mode d’emploi et du téléphone.<br />
<strong>Mode</strong> de représentation dans le mode d’emploi<br />
Visualisation Description<br />
NAME?<br />
Appuyer sur la touche représentée<br />
Saisir des chiffres ou des lettres<br />
Le téléphone sonne<br />
Prendre le <strong>com</strong>biné de la base<br />
Poser le <strong>com</strong>biné sur la base<br />
Visualisation des textes de l’écran<br />
Visualisation des icônes de l’écran<br />
Icônes à l’écran du <strong>com</strong>biné<br />
Icône<br />
Description<br />
Constant : la liaison avec la base est bonne.<br />
Clignotant : la liaison avec la base s’interrompt.<br />
Constant : affichage de la capacité des piles.<br />
Clignotant quand le <strong>com</strong>biné est sur la base :<br />
Les piles rechargeables se rechargent.<br />
Constant : les piles rechargeables devraient être chargées.<br />
Clignotant : chargez les piles rechargeables.<br />
Constant : Vous téléphonez.<br />
Clignotant : Le téléphone sonne.<br />
Le mode mains-libres est activé.<br />
La sonnerie d’appel est désactivée.<br />
Constant : la fonction d’alarme est activée.<br />
Clignotant : alarme.<br />
Le verrouillage du clavier est activé.<br />
9<br />
F
Introduction<br />
Vous avez un message dans la boite vocale de votre<br />
exploitant de réseau (selon l’exploitant de réseau)<br />
Constant : vous tenez une <strong>com</strong>munication interne<br />
(uniquement si base avec plusieurs <strong>com</strong>binés).<br />
Clignotant : réception d’un message interne.<br />
Quand affichage de la liste d’appels: nouvel appel<br />
Autres chiffres/lettres affichées avant ou après<br />
les actuelles. Pour les afficher, appuyez<br />
sur la touche .<br />
Dans les lignes de l’écran ci-dessous sont indiquées les fonctions disponibles<br />
liées aux deux touches softkeys dépendamment de l’état de fonctionnement.<br />
Appel du menu.<br />
Confirmation d’un réglage.<br />
Tenir un appel interne (uniquement si base avec plusieurs<br />
<strong>com</strong>binés).<br />
Retour au menu supérieur ou interruption<br />
de la programmation.<br />
Effacer à reculons les signes de l’entrée<br />
(une pression courte efface le dernier signe, une pression<br />
longue efface la ligne entière),<br />
Activer/désactiver le microphone pendant une<br />
<strong>com</strong>munication (muet).<br />
10
Introduction<br />
<strong>Mode</strong> veille<br />
Toutes les descriptions dans ce mode d’emploi partent du principe que le<br />
<strong>com</strong>biné se trouve en mode veille. Vous parviendrez au mode veille en<br />
appuyant sur la touche .<br />
Réduction du rayonnement (mode ÉCO)<br />
En <strong>com</strong>paraison avec les téléphones sans fil DECT standard, le rayonnement est<br />
considérablement réduit en mode de <strong>com</strong>munication.<br />
Navigation dans le menu<br />
Vous pouvez accéder à toutes les fonctions via différents menus. Vous trouvez la<br />
structure <strong>com</strong>plète du menu dans l’annexe.<br />
Pour naviguer dans le menu, utilisez les touches softkeys et fléchées.<br />
Avec touche softkey gauche , vous ouvrez le menu.<br />
Avec les touches fléchées ou , vous naviguez dans le menu.<br />
Pour ouvrir un sous-menu, appuyez sur la touche softkey .<br />
Si vous voulez revenir au menu supérieur, appuyez brièvement sur . Par<br />
pression longue, vous retournez en mode veille.<br />
F<br />
11
Introduction<br />
Créer des enregistrements dans le ré<strong>per</strong>toire - exemple<br />
L’exemple Créer des enregistrements dans le ré<strong>per</strong>toire vous explique<br />
<strong>com</strong>ment naviguer dans les menus et saisir des données. Pour tous les<br />
réglages, procédez <strong>com</strong>me dans cet exemple.<br />
Ouvrir le ré<strong>per</strong>toire<br />
ou<br />
Appuyer touche softkey Menu.<br />
Sélectionner REPERTOIRE et confirmer sur OK.<br />
S’il n’y a encore aucune entrée, VIDE s’affiche.<br />
S’il y a déjà des entrées, la première entrée<br />
est affichée.<br />
Appuyez touche softkey Menu.<br />
Confirmez AJOUTER avec OK.<br />
Indiquez le nom (12 signes maximum).<br />
Les touches de chiffres <strong>com</strong>portent des lettres.<br />
Lettres et chiffres peuvent être entrés par pressions répétées<br />
de la touche correspondante.<br />
Après peu de temps, le curseur se déplace vers la droite.<br />
Terminez l’entrée du nom avec OK.<br />
Entrez le numéro de téléphone (20 chiffres maximum).<br />
Terminez l’entrée du numéro de téléphone avec OK.<br />
/ Sélectionnez une mélodie pour l’entrée.<br />
Confirmez avec OK.<br />
Retour au mode veille.<br />
12
Téléphoner<br />
5 Téléphoner<br />
Prendre l’appel<br />
Votre téléphone sonne.<br />
Si le <strong>com</strong>biné ne se trouve pas sur la base:<br />
/ Appuyez sur la touche décrocher ou la touche mains-libres.<br />
Si le <strong>com</strong>biné se trouve sur la base et REPONSE AUTO n’est pas activé:<br />
/ Prenez le <strong>com</strong>biné de la base et appuyez sur<br />
la touche décrocher ou la touche mains-libres.<br />
Si le <strong>com</strong>biné se trouve sur la base et REPONSE AUTO est activé:<br />
Prenez simplement le <strong>com</strong>biné de la base ; la <strong>com</strong>munication<br />
est réceptionnée automatiquement.<br />
Appeler<br />
Entrez le numéro de téléphone.<br />
Corrigez une erreur d’entrée avec .<br />
/ Le numéro de téléphone est <strong>com</strong>posé.<br />
☞ Vous pouvez aussi appuyer d’abord sur la touche <strong>com</strong>munication et vous<br />
obtenez ainsi la tonalité. Les chiffres entrés du numéro de téléphone choisi<br />
sont aussitôt <strong>com</strong>posés. Il n’est pas possible de corriger les chiffres du<br />
numéro de de téléphone dans cette forme de mise en <strong>com</strong>munication.<br />
Terminer la <strong>com</strong>munication<br />
/ Appuyer sur la touche décrocher ou poser le <strong>com</strong>biné sur la<br />
base.<br />
F<br />
13
Téléphoner<br />
Répétition des derniers numéros<br />
☞ Votre téléphone mémorise les cinq derniers numéros de téléphone <strong>com</strong>posés.<br />
Si le numéro de téléphone est mémorisé dans le ré<strong>per</strong>toire, le nom s’affiche. Pour<br />
afficher le numéro de téléphone correspondant, appuyez sur la touche dièse<br />
Le dernier numéro de téléphone <strong>com</strong>posé se trouve to jours en tête de liste.<br />
Ouvrir la liste de répétition des derniers numéros.<br />
/ Sélectionner l’enregistrement.<br />
/ Le numéro est <strong>com</strong>posé.<br />
Appeler depuis la liste d’appels<br />
☞ Votre téléphone mémorise les 10 derniers appels dans la liste d’appels. Si le<br />
numéro de téléphone est mémorisé dans le ré<strong>per</strong>toire, le nom s’affiche. Pour afficher<br />
le numéro de téléphone correspondant, appuyez sur la touche dièse .<br />
L’enregistrement ne peut avoir lieu que si la fonction „transfert d’appel (CLIP)“ est<br />
disponible sur votre raccordement et le numéro de l’appelant n’a pas étéretenu<br />
ou rendu non transmissible pour d’autres raisons.<br />
Ouvrir la liste d’appels.<br />
/ Sélectionner l’enregistrement.<br />
/ Le numéro est <strong>com</strong>posé.<br />
Appeler depuis le ré<strong>per</strong>toire<br />
☞ Le ré<strong>per</strong>toire peut recevoir 20 entrées.<br />
Pour mémoriser des entrées voir le paragraphe „Ré<strong>per</strong>toire“.<br />
Ouvrir le ré<strong>per</strong>toire.<br />
/ Sélectionner l’enregistrement.<br />
/ Le numéro est <strong>com</strong>posé.<br />
14
Téléphoner<br />
Affichage de la durée de la <strong>com</strong>munication<br />
Pendant une <strong>com</strong>munication, sa durée est affichée en heures, minutes et<br />
secondes.<br />
Régler le volume sonore de l’écouteur<br />
/ Vous disposez de 5 niveaux pour régler le volume pendant une<br />
<strong>com</strong>munication (sous fonctionnement de l’écouteur-> Volume<br />
sonore de l’écouteur, en mains-libres -> volume sonore du hautparleur).<br />
Les réglages sont indépendants les uns des autres et restent<br />
mémorisés même après fin de la <strong>com</strong>munication.<br />
Débranchement du microphone du <strong>com</strong>biné<br />
Vous pouvez désactiver le microphone pendant une <strong>com</strong>munication<br />
afin que votre interlocuteur ne puisse pas vous déranger.<br />
MUET s’affiche sur l’écran.<br />
Pour activer le microphone, appuyez de nouveau sur la touche.<br />
Téléphoner en interne<br />
☞ Communication internes, transferts et <strong>com</strong>munications en conférence sont<br />
possibles uniquement si plusieurs <strong>com</strong>binés sont déclarés. Si ce n’est pas le cas,<br />
PAS POSS. s’affichera sur l’écran.<br />
Téléphoner en interne<br />
Appuyez la touche softkey Inter<strong>com</strong>. Si deux <strong>com</strong>binés sont<br />
déclarés, l’autre <strong>com</strong>biné est aussitôt appelé. Dans le cas de<br />
plusieurs <strong>com</strong>binés déclarés, leurs numéros internes s’affichent<br />
(p. ex. 2 3 4). Appuyez sur le numéro interne souhaité.<br />
Si vous appuyez sur „9“ dans le cas de plusieurs <strong>com</strong>binés<br />
déclarés, tous sont appelés simultanément.<br />
F<br />
15
Téléphoner<br />
Transfert d’une <strong>com</strong>munication externe<br />
Pendant une <strong>com</strong>munication externe. . .<br />
Appuyez la touche softkey Menu.<br />
/ Sélectionnez INTERN et appuyez sur OK.<br />
Entrez le numéro interne. La <strong>com</strong>munication externe est maintenue.<br />
Si le <strong>com</strong>biné appelé est activé, annoncer la <strong>com</strong>munication le<br />
cas échéant<br />
Appuyez sur la touche raccrocher. La <strong>com</strong>munication est transmise.<br />
Conférence<br />
Pendant une <strong>com</strong>munication externe. . .<br />
Appuyez la touche softkey Menu.<br />
/ Sélectionnez INTERN et appuyez sur OK.<br />
Entrez le numéro interne.<br />
Quand le <strong>com</strong>biné appelé est activé, appuyez et maintenez la<br />
touche étoile jusqu’à ce que CONFERENCE apparaisse sur<br />
l’écran.<br />
☞ i l’un des participants à la conférence raccroche, les deux autres restent en<br />
<strong>com</strong>munication.<br />
16
Fonctions spéciales<br />
6 Fonctions spéciales<br />
Verrouillage du clavier<br />
☞ La touche verrouillage empêche une manipulation involontaire des touches.<br />
Les appels peuvent être reçus <strong>com</strong>me d’habitude.<br />
Appuyez et maintenez la touche étoile jusqu’à l’apparition du<br />
symbole de verrouillage des touches.<br />
Pour déverrouiller le clavier, appuyez et maintenez de nouveau<br />
la touche étoile jusqu'à la disparition du symbole.<br />
Désactiver la sonnerie du <strong>com</strong>biné<br />
☞ Vous pouvez désactiver la sonnerie d’appel aussi via le menu<br />
„REGL.COMB./SONNERIE“.<br />
Appuyez et maintenez la touche dièse jusqu’à l’apparition du<br />
symbole de désactivation de la sonnerie d’appel .<br />
Pour réactiver la sonnerie d’appel, appuyez et maintenez de<br />
nouveau la touche dièse jusqu’à disparition du symbole.<br />
Désactiver le <strong>com</strong>biné<br />
☞ Vous pouvez désactiver le <strong>com</strong>biné pour économiser les piles rechargeables.<br />
Appuyez sur raccrocher et maintenez la touche appuyée. Après<br />
quelques secondes, le <strong>com</strong>biné est désactivé. L’éclairage de<br />
l’écran s’éteint.<br />
Pour réactiver le <strong>com</strong>biné, appuyez sur la touche raccrocher<br />
jusqu’à ce que vous entendiez le signal sonore et que l’écran<br />
s’éclaire de nouveau.<br />
F<br />
17
Liste d’appels / Répétition des derniers numéros<br />
7 Liste d’appels / Répétition des derniers numéros<br />
Utiliser la liste d’appels<br />
Ouvrez la liste d’appels.<br />
/ Sélectionnez une entrée.<br />
Appuyez sur touche softkey Menu.<br />
/ Sélectionnez l’une des options suivantes et confirmez avec<br />
OK:<br />
AJOUTER Le numéro est enregistré dans le ré<strong>per</strong>toire. Entrez le nom,<br />
confirmez ou modifiez le numéro et fixez une mélodie sonore<br />
pour cette entrée.<br />
SUPPRIMER L’entrée est effacée.<br />
SUPPRIM.TOUT La liste <strong>com</strong>plète est effacée après une question de sécurité.<br />
DETAILS Date et heure de l’appel sont affichées.<br />
☞ Vous pouvez ouvrir la liste d’appels aussi via le menu:<br />
( / JOURNAL ).<br />
Utiliser la répétition des derniers numéros<br />
/ Ouvrir la répétition des derniers numéros.<br />
/ Sélectionnez une entrée.<br />
Appuyez sur touche softkey Menu.<br />
/ Sélectionnez l’une des options suivantes et confirmez avec<br />
OK:<br />
AJOUTER Le numéro est enregistré dans le ré<strong>per</strong>toire. Entrez le nom,<br />
confirmez ou modifiez le numéro et fixez une mélodie sonore<br />
pour cette entrée.<br />
SUPPRIMER L’entrée est effacée.<br />
SUPPRIM.TOUT La liste <strong>com</strong>plète est effacée après une question de sécurité.<br />
18
Ré<strong>per</strong>toire<br />
8 Ré<strong>per</strong>toire<br />
☞ Dans le ré<strong>per</strong>toire, vous pouvez mémoriser 20 numéros et noms correspondants.<br />
Vous pouvez associer à chaque entrée une mélodie propre par laquelle un<br />
appel doit être signalé. Entrez toujours les numéros avec le préfixe ; ceci <strong>per</strong>met<br />
un affichage correct de chaque appelant dont il existe une entrée et dont le transfert<br />
de numéro à votre raccordement est disponible.<br />
Saisir une nouvelle entrée<br />
Appuyez sur la touche ré<strong>per</strong>toire.<br />
S’il n’y a encore aucune entrée, VIDE s’affiche.<br />
S’il y a déjà des entrées, la première entrée est affichée.<br />
Appuyez touche softkey Menu.<br />
Confirmez AJOUTER avec OK.<br />
Entrez le nom (12 signes maximum).<br />
Les touches de chiffres <strong>com</strong>portent des lettres.<br />
Lettres et chiffres peuvent être entrés par pressions répétées<br />
de la touche correspondante.<br />
Après peu de temps, le curseur se déplace vers la droite.<br />
Terminez l’entrée du nom avec OK.<br />
Entrez le numéro (20 chiffres maximum). Si votre téléphone est<br />
raccordé à une installation téléphonique, entrez aussi le code<br />
d’identification. Si une pause est nécessaire, après le code<br />
d’identification, appuyez sur la touche 0 pendant env. 2 s ; P<br />
s’affiche sur l’écran.<br />
Terminez l’entrée du numéro avec OK.<br />
/ Sélectionnez une mélodie pour l’entrée.<br />
Confirmez avec OK.<br />
Retour au mode veille.<br />
F<br />
☞ Vous pouvez ouvrir le ré<strong>per</strong>toire aussi via le menu.<br />
( / REPERTOIRE ).<br />
19
Ré<strong>per</strong>toire<br />
Utiliser les entrées du ré<strong>per</strong>toire<br />
Appuyez la touche ré<strong>per</strong>toire.<br />
/ Sélectionnez une entrée.<br />
Appuyez la touche softkey Menu.<br />
/ Sélectionnez parmi les options suivantes et confirmez avec<br />
OK:<br />
AJOUTER Vous pouvez effectuer une nouvelle entrée.<br />
EDITER L’entrée est affichée. Avec les touches fléchées, vous pouvez<br />
voir nom, numéro et mélodie.<br />
MODIFIER Vous pouvez modifier l’entrée. Effacez les lettres et chiffres<br />
avec , entrez de nouvelles lettres et chiffres avec les<br />
touches de chiffres. Pour plus de détails, voir „insérer nouvelle<br />
entrée“.<br />
SUPPRIMER L’entrée est effacée.<br />
SUPPRIM.TOUT La liste <strong>com</strong>plète est effacée après une question de sécurité.<br />
ETAT REPERT. La configuration actuelle est affichée (p. ex. 07/20 CREEES:<br />
7 sur 20 entrées possibles sont existantes).<br />
20
Réglage du téléphone<br />
9 Réglage du téléphone<br />
Date/heure<br />
Appuyez touche softkey Menu.<br />
/ Sélectionnez REGL. COMB et appuyer sur OK.<br />
/ Sélectionnez DATE & HEURE et appuyer sur OK.<br />
/ Choisissez parmi les options suivantes et confirmez avec OK:<br />
FORMAT DATE Vous pouvez régler la représentation de la date :<br />
(JJ-MM-AA ou MM-JJ-AA).<br />
FORMAT HEURE Vous pouvez régler la représentation de l’heure:<br />
(24 heures ou 12 heures).<br />
REGLER HEURE Entrez l’heure avec les touches de chiffres.<br />
REGLER DATE Entrez la date avec les touches de chiffres.<br />
☞ En cas de panne de courant, le réglage est <strong>per</strong>du si le <strong>com</strong>biné est désactivé<br />
en même temps ou les piles rechargeables sont vides.<br />
Réveil<br />
Appuyez touche softkey Menu.<br />
/ Sélectionnez REGL. COMB et appuyer sur OK.<br />
/ Sélectionnez ALARME et appuyez sur OK.<br />
/ Sélectionnez ON et appuyez sur OK.<br />
Entrez l’heure de réveil avec les touches de chiffres.<br />
SNOOZE Appuyez sur OK.<br />
/ Sélectionnez ON ou OFF et appuyez sur OK.<br />
Si „Snooze“ est activé, cela signifie que le signal de réveil sera<br />
répété après 7 minutes, jusqu’à ce que cette fonction soit arrêtée<br />
par pression et maintien de la touche raccrocher.<br />
Si „Snooze“ est désactivé, le signal de réveil retentira une seule<br />
fois à l’heure fixée. Pour quitter le signal de réveil, appuyez sur<br />
une touche quelconque.<br />
F<br />
21
Réglage du téléphone<br />
Régler la sonnerie du <strong>com</strong>biné<br />
Appuyez touche softkey Menu.<br />
/ Sélectionnez REGL. COMB et appuyer sur OK.<br />
/ Sélectionnez SONNERIE et appuyez sur OK.<br />
/ Choisissez parmi les options suivantes et confirmez avec OK.:<br />
SONNERIE INT Sélectionnez une mélodie pour la signalisation d’un appel<br />
interne.<br />
SONNERIE EXT Sélectionnez une mélodie pour la signalisation d’un appel<br />
externe.<br />
VOL.SONNERIE Sélectionnez le volume de la sonnerie. Sélectionnez „VOLUME<br />
OFF“, le symbole s’affiche sur l’écran.<br />
Régler la tonalités d’information<br />
Appuyez touche softkey Menu.<br />
/ Sélectionnez REGL. COMB et appuyer sur OK.<br />
/ Sélectionnez ALERTES SON. et appuyez sur OK.<br />
/ Choisissez parmi les options suivantes et confirmez avec OK.:<br />
BIPS TOUCHES Activez ou désactivez la tonalité de confirmation pour l’activation<br />
d’une touche.<br />
BATT.FAIBLE Activez ou désactivez la tonalité d’information spéciale. La<br />
tonalité signale quand les piles rechargeables doivent être chargées.<br />
HORS PORTEE Activez ou désactivez la tonalité d’information spéciale. La<br />
tonalité signale quand vous vous trouvez avec le <strong>com</strong>biné à la<br />
limite de portée de la base.<br />
Régler la langue de l’écran<br />
Appuyez touche softkey Menu.<br />
/ Sélectionnez REGL. COMB et appuyer sur OK.<br />
/ Sélectionnez LANGUE et appuyez sur OK.<br />
/ Sélectionnez une langue et confirmez avec OK.<br />
22
Réglage du téléphone<br />
Régler le nom du <strong>com</strong>biné<br />
Appuyez touche softkey Menu.<br />
/ Sélectionnez REGL. COMB et appuyer sur OK.<br />
/ Sélectionnez RENOMMER CB et appuyez sur OK.<br />
Effacez l’ancien nom avec , entrez le nouveau nom avec<br />
les touches de chiffres et appuyez sur OK.<br />
Régler l’affichage de l’écran<br />
Appuyez touche softkey Menu.<br />
/ Sélectionnez REGL. COMB et appuyer sur OK.<br />
/ Sélectionnez AFFICHAGE et appuyez sur OK.<br />
/ Choisissez si, en mode veille, le nom du <strong>com</strong>biné ou l’heure<br />
doivent être affichés et confirmez avec OK.<br />
Régler la réponse d’appel automatique<br />
Appuyez touche softkey Menu.<br />
/ Sélectionnez REGL. COMB et appuyer sur OK.<br />
/ Sélectionnez REPONSE AUTO et appuyez sur OK.<br />
/ Choisissez si la réponse automatique doit être activée ou désactivée<br />
et confirmez avec OK.<br />
☞ Lorsque la réponse automatique est activée, un appel est aussitôt<br />
réceptionné quand le <strong>com</strong>biné est pris de la base.<br />
Régler le processus de numérotation<br />
Appuyez touche softkey Menu.<br />
/ Sélectionnez REGL. BASE et appuyer sur OK.<br />
/ Sélectionnez NUMEROTATION et appuyez sur OK.<br />
/ Sélectionnez FREQ. VOCALE ou DECIMALE et confirmez avec<br />
OK.<br />
F<br />
☞ Pour la plupart des raccordements, le réglage correct est FREQ. VOCALE.<br />
23
Réglage du téléphone<br />
Réglez le temps de flash<br />
Appuyez touche softkey Menu.<br />
/ Sélectionnez REGL. BASE et appuyer sur OK.<br />
/ Sélectionnez DELAI R et appuyez sur OK.<br />
/ Sélectionnez COURT (100 ms), MEDIUM (300 ms) ou LONG<br />
(600 ms) et confirmez avec OK.<br />
Modifier le PIN<br />
Appuyez touche softkey Menu.<br />
/ Sélectionnez REGL. BASE et appuyer sur OK.<br />
/ Sélectionnez MODIFIER PIN et appuyez sur OK.<br />
Entrez le PIN actuel<br />
(Etat à la livraison : 0 0 0 0) et appuyez sur OK.<br />
Entrez un nouveau PIN et appuyez sur OK.<br />
Entrez le nouveau PIN une nouvelle fois et appuyez sur OK.<br />
☞ Le PIN à quatre chiffres protége quelques réglages contre un accès non<br />
autorisé. Si vous avez oublié le PIN, merci de vous adresser à notre service<br />
hotline.<br />
Remettre le téléphone <strong>com</strong>me à l’état de livraison<br />
Appuyez touche softkey Menu.<br />
/ Sélectionnez DEFAUT et appuyez sur OK.<br />
Entrez le PIN actuel et appuyez sur OK.<br />
Confirmez aussi la question de sécurité suivante avec OK.<br />
☞ Le ré<strong>per</strong>toire n’est pas effacé. Veuillez effacer le ré<strong>per</strong>toire via le menu du<br />
ré<strong>per</strong>toire.<br />
Les <strong>com</strong>binés déclarés restent déclarés.<br />
24
Déclarer/retirer un <strong>com</strong>biné<br />
10 Déclarer/retirer un <strong>com</strong>biné<br />
Sur une base, vous pouvez déclarer jusqu’à 5 <strong>com</strong>binés. Les <strong>com</strong>binés livrés<br />
avec votre téléphone sont déjà déclarés sur la base. Pour déclarer un <strong>com</strong>biné<br />
„étranger“, consultez aussi la notice d’utilisation de ce <strong>com</strong>biné.<br />
Déclarer un autre <strong>com</strong>biné du même type<br />
Appuyez touche softkey Menu.<br />
/ Sélectionnez ASSOCIATION et appuyez sur OK.<br />
Entrez le PIN actuel de la base sur laquelle le <strong>com</strong>biné doit être<br />
déclaré et appuyez sur OK.<br />
Appuyez et maintenez la touche Paging (env. 5 s).<br />
Peu de temps après, le symbole de l’antenne est éclairé,<br />
constant, sur l’écran et le <strong>com</strong>biné est déclaré.<br />
Retirer le <strong>com</strong>biné<br />
Appuyez touche softkey Menu.<br />
/ Sélectionnez REGL. BASE et appuyer sur OK.<br />
/ Sélectionnez ANNULER COMB et appuyez sur OK.<br />
Entrez le PIN actuel et appuyez sur OK.<br />
/ Sélectionnez l’un des <strong>com</strong>binés indiqués et appuyez sur OK.<br />
☞ Le <strong>com</strong>biné que vous utilisez en ce moment ne peut pas être annulé.<br />
F<br />
25
Installations à postes supplém. / services confort<br />
11 Installations à postes supplém. / services confort<br />
Installations à postes supplémentaires<br />
Si votre téléphone est raccordé à une installation à postes supplémentaires, vous<br />
pouvez au moyen de la touche R tirer profit de certaines fonctions <strong>com</strong>me par ex.<br />
le transfert d’appels et le rappel automatique. Veuillez lire le mode d’emploi de<br />
votre installation à postes supplémentaires pour connaître le temps de flash à<br />
paramétrer pour tirer profit de ces fonctions.<br />
Votre revendeur, auprès duquel vous avez acheté l’installation, vous informera si<br />
votre téléphone fonctionne impeccablement sur ce genre d’installation.<br />
Merci de penser le cas échéant, pour les entrées dans le ré<strong>per</strong>toire, au code<br />
d’identification et à la pause parfois nécessaire lui succédant (appuyer longuement<br />
sur le chiffre „0“).<br />
Services confort<br />
Votre téléphone supporte les services confort de votre opérateur, <strong>com</strong>me par ex.<br />
le va-et-vient, la signalisation d’appel en instance et la conférence.<br />
Via la touche R vous pouvez tirer profit de ces services confort. Veuillez demander<br />
à votre opérateur quel temps de flash vous devez paramétrer pour tirer profit<br />
des services confort. Adressez-vous également à lui pour la déconnexion de ces<br />
services.<br />
26
Annexe<br />
12 Annexe<br />
Structure du menu<br />
JOURNAL<br />
REPERTOIRE<br />
REGL. BASE<br />
ANNULER COMB<br />
NUMEROTATION<br />
FREQ. VOCALE<br />
DECIMALE<br />
DELAI R<br />
COURT<br />
MEDIUM<br />
LONG<br />
MODIFIER PIN<br />
REGL. COMB ALARME OFF/ON/ heure d’alarme<br />
SONNERIE SONNERIE INT MELODIE 1...10<br />
SONNERIE EXT MELODIE 1...10<br />
VOL.SONNERIE OFF, 1...5<br />
ALERTES SON. BIPS TOUCHES ON/OFF<br />
ASSOCIATION<br />
DEFAUT<br />
LANGUE<br />
RENOMMER CB<br />
AFFICHAGE<br />
REPONSE AUTO<br />
DATE & HEURE<br />
BATT.FAIBLE<br />
HORS PORTEE<br />
-> 13 langues<br />
NOM COMBINE<br />
HEURE<br />
ON/OFF<br />
FORMAT DATE<br />
FORMAT HEURE<br />
REGLER HEURE<br />
REGLER DATE<br />
ON/OFF<br />
ON/OFF<br />
F<br />
27
Annexe<br />
Recherche erronée<br />
Si vous avez des problèmes avec votre téléphone, contrôlez d’abord les indications<br />
suivantes. En cas de problèmes techniques, vous pouvez vous adresser à<br />
notre hotline de service en appelant le numéro 0900 00 1675 en Suisse (frais<br />
Swiss<strong>com</strong> à la date d’impression de ce manuel : CHF 2.60/min). Si vous jouissez<br />
des droits de garantie, adressez-vous à votre revendeur. La durée de la garantie<br />
est de 2 ans.<br />
• Après activation de la touche décrocher, aucune tonalité n’est audible, la ligne<br />
d’appel n’est pas occupée.<br />
- Contrôler la fiche du raccordement téléphonique de la base et de la prise de<br />
téléphone.<br />
- Contrôler la prise réseau à la base et les 230 V.<br />
- La ligne d’appel est occupée par un autre <strong>com</strong>biné. Patientez jusqu'à ce que<br />
la liaison soit terminée.<br />
• Affichage de l’écran : „CHERCHE”.<br />
- Contrôler la prise réseau à la base et les 230 V.<br />
- Réduire distance.<br />
- Déclarer <strong>com</strong>biné.<br />
• Aucun affichage sur l’écran.<br />
- Combiné désactivé -> activer.<br />
- Pile vide -> recharger.<br />
28
Annexe<br />
Configuration d’origine/Etat à la livraison<br />
Liste d’appels<br />
Vide<br />
Re<strong>per</strong>toire<br />
Vide<br />
Alarme<br />
OFF<br />
Sonnerie <strong>com</strong>bine Interne Melodie 2<br />
Externe Melodie 1<br />
Vol. sonnerie 3<br />
Alertes son.<br />
Bips touches: Activer<br />
Accu faible: Activer<br />
Hors portée: Activer<br />
Langue<br />
Allemand<br />
Nom <strong>com</strong>bine<br />
DE 202x<br />
Affichage<br />
Nom <strong>com</strong>bine<br />
Reponse auto<br />
ON<br />
Date & Heure<br />
Format date: JJ-MM-AA<br />
Format heure: 24 heures<br />
<strong>Mode</strong> de numerotation Tonalité<br />
Temps Flash<br />
Court<br />
PIN 0 0 0 0<br />
F<br />
29
Annexe<br />
30<br />
Caractéristiques techniques<br />
Standard : DECT / GAP<br />
Nombre de canaux : 120 canaux duplex<br />
Fréquences : 1880 MHz jusqu’à 1900 MHz<br />
Processus duplex : multiplexage par répartition dans le temps (MRT),<br />
10ms longueur de marge<br />
Trame canaux : 1728 kHz<br />
Débit binaire : 1152 kbits / s<br />
Modulation : GFSK<br />
Codage langue : 32 kbits / s<br />
Puissance d’émission : 10 mW (puissance moyenne par canal)<br />
Portée: jusqu’à 300 mètres en champ libre,<br />
jusqu’à 50 mètres à l’intérieur d’un bâtiment<br />
Alimentation en courant de la base / Alimentation de courant chargeur :<br />
Bloc d’alimentation (S002CV0600030, 6V DC/300mA) ou<br />
(VT04EEU06045, 6V DC/450mA).<br />
Alimentation de courant <strong>com</strong>biné: 2 x AAA NiMH 1,2 V / 500 mAh<br />
Durée de service <strong>com</strong>biné : en veille / en <strong>com</strong>munication<br />
500 mAh = env. 100 h / env. 10 h<br />
Temps de charge des piles rechargeables : env. 16 heures<br />
Conditions ambiantes admissibles pour le fonctionnement du <strong>com</strong>biné :<br />
5°C jusqu’à 45°C ; 20 % jusqu’à 75 % d’humidité relative<br />
Conditions ambiantes admissibles pour le fonctionnement de la base :<br />
5°C jusqu’à 45°C ; 20 % jusqu’à 75 % d’humidité relative<br />
Température de stockage admissible : -10°C jusqu’à +60°C<br />
Processus de numérotation : MFV / IWV<br />
Fonction touche R : Flash (100 ms/300 ms/600 ms)<br />
Dimensions de la base (mm) : Longueur / largeur / hauteur = 110 x 115 x 35<br />
Dimensions du <strong>com</strong>biné (mm): Longueur / largeur / hauteur = 48 x 30 x 160<br />
Configuration du câble de raccordement téléphonique :<br />
TSV 3/4 selon CTR 37 (configuration européenne)<br />
Bloc d’alimentation : prise européenne
Annexe<br />
Déclaration de conformité<br />
Cet appareil répond aux exigences des directives de l’union européenne (UE) : -<br />
1999/5/CE Directive sur les installations de radio et de télé<strong>com</strong>munication et<br />
la reconnaissance réciproque de leur conformité.<br />
- 2005/32/CE Directive « Produits consommateurs d'énergie ».<br />
- Règlement 1275/2008 « Consommation d’électricité en mode veille et en<br />
mode arrêt ».<br />
- Règlement 278/2009 « Sources d’alimentation hors charge et leur rendement<br />
moyen en mode actif ».<br />
La conformité avec les directives mentionnées ci-dessus est confirmée sur l’appareil<br />
par la marque CE. Pour obtenir toute la déclaration de conformité, veuillez utiliser<br />
le téléchargement gratuit de notre site Internet www.switel.<strong>com</strong>.<br />
Remarques d’entretien<br />
Nettoyez les surfaces du boîtier avec un chiffon doux et non pelucheux.<br />
N’utilisez pas de produits d’entretien ou de solvants.<br />
Garantie<br />
Les appareils SWITEL sont fabriqués selon les procédes les plus modernes et<br />
sont contrôlés. Des matériels sélectionnés et des technologies de pointe ont pour<br />
effet un fonctionnement irréprochable et une longue durée de vie. La garantie ne<br />
rentre pas en jeu si l’exploitant du réseau téléphonique ou une installation à<br />
postes supplémentaires éventuellement intercalée est responsable du dysfonctionnement<br />
de l’appareil. La garantie n’est pas valable pour les piles, piles rechargeables<br />
ou packs de piles utilisés dans le produits. La durée de la garantie est de<br />
24 mois, à partir de la date d’achat.<br />
Pendant la durée de la garantie, tous les défauts, dus à des vices de matériel ou<br />
de fabrication, seront éliminés gratuitement. Le droit à la garantie expire en cas<br />
d’intervention de l’acheteur ou de tiers. Les dommages provenant d’un maniement<br />
ou d’une manipulation incorrects, d’une mauvaise mise en place ou d’une<br />
mauvaise conservation de l’appareil, d’un raccordement non conforme ainsi que<br />
F<br />
31
Annexe<br />
d’un cas de force majeure ou autres influences extérieures, sont exclus de la<br />
garantie.<br />
Nous nous reservons le droit, en cas de réclamations, de réparer ou de remplacer<br />
les <strong>com</strong>posants défectueux ou d’échanger l’appareil. Les <strong>com</strong>posants remplacés<br />
ou les appareils échangés deviennent notre propriété.<br />
Les demandes de dommages et intérêts sont exclues tant qu’elles ne reposent<br />
pas sur l’intention ou une négligence grossière du fabricant.<br />
Si votre appareil devait malgré tout présenter une défectuosité pendant la période<br />
de garantie, veuillez vous adressez, muni de la quittance d’achat, exclusivement<br />
au magasin où vous avez acheté votre appareil SWITEL. Vous ne pouvez faire<br />
valoir vos droits à la garantie selon ces dispositions qu’auprès de votre revendeur<br />
exclusivement. Deux ans après l’achat et la remise de nos produits, il n’est plus<br />
possible de faire valoir les droits à la garantie.<br />
32
Annexe<br />
Index<br />
A<br />
Affichage de l’écran . . . . . . . . . . . . .23<br />
Appareils médicaux . . . . . . . . . . . . . . .3<br />
Appeler . . . . . . . . . . . . . . . . . . . . . . .13<br />
B<br />
Bloc secteur . . . . . . . . . . . . . . . . . . . .2<br />
C<br />
Caractéristiques techniques . . . . . . .30<br />
Conférence . . . . . . . . . . . . . . . . . . . .16<br />
Configuration d’origine . . . . . . . . . . .29<br />
Consignes de sécurité . . . . . . . . . . . .2<br />
Contenu de l’emballage . . . . . . . . . . .4<br />
D<br />
Date/heure . . . . . . . . . . . . . . . . . .6, 21<br />
Débranchement du microphone . . . .15<br />
Déclaration de conformité . . . . . . . . .31<br />
Déclarer/retirer un <strong>com</strong>biné . . . . . . .25<br />
Désactiver la sonnerie du <strong>com</strong>biné .17<br />
Désactiver le <strong>com</strong>biné . . . . . . . . . . .17<br />
Durée de la <strong>com</strong>munication . . . . . . .15<br />
E<br />
Élimination . . . . . . . . . . . . . . . . . . . . .3<br />
Etat à la livraison . . . . . . . . . . . . . . .29<br />
G<br />
Garantie . . . . . . . . . . . . . . . . . . . . . .31<br />
I<br />
Icônes . . . . . . . . . . . . . . . . . . . . . . . . .9<br />
L<br />
Langue de l’écran . . . . . . . . . . . . .6, 22<br />
Lieu d’installation . . . . . . . . . . . . . . . .2<br />
Liste d’appels . . . . . . . . . . . . . . .14, 18<br />
M<br />
Mettre en place les piles<br />
rechargeables . . . . . . . . . . . . . . . . . . .6<br />
<strong>Mode</strong> ÉCO . . . . . . . . . . . . . . . . . . . .11<br />
<strong>Mode</strong> veille . . . . . . . . . . . . . . . . . . . .11<br />
N<br />
Navigation dans le menu . . . . . . . . .11<br />
Nom du <strong>com</strong>biné . . . . . . . . . . . . . . . .23<br />
Numérotation . . . . . . . . . . . . . . . . . .23<br />
P<br />
Panne de courant . . . . . . . . . . . . . . . .2<br />
Piles rechargeables . . . . . . . . . . . . . .2<br />
PIN . . . . . . . . . . . . . . . . . . . . . . . . . .24<br />
Postes supplémentaires . . . . . . . . . .26<br />
Prendre l’appel . . . . . . . . . . . . . . . . .13<br />
Prise d’appel automatique . . . . . . . . .6<br />
Puissance absorbée . . . . . . . . . . . . . .4<br />
R<br />
Recharger les piles rechargeables . . .6<br />
Recherche erronée . . . . . . . . . . . . . .28<br />
Réduction du rayonnement . . . . . . . .11<br />
33<br />
F
Annexe<br />
Régler le volume . . . . . . . . . . . . . . . .15<br />
Remarques d’entretien . . . . . . . . . . .31<br />
Remettre le téléphone . . . . . . . . . . .24<br />
Ré<strong>per</strong>toire . . . . . . . . . . . . . . . . . .14, 19<br />
Répétition des derniers numéros 14, 18<br />
Réponse autom. . . . . . . . . . . . . . . . . .6<br />
Réponse d’appel automatique . . . . .23<br />
Réveil . . . . . . . . . . . . . . . . . . . . . . . .21<br />
S<br />
Services confort . . . . . . . . . . . . . . . .26<br />
Sonnerie du <strong>com</strong>biné . . . . . . . . . . . .22<br />
Structure du menu . . . . . . . . . . . . . .27<br />
T<br />
Téléphoner en interne . . . . . . . . . . . .15<br />
Temps de flash . . . . . . . . . . . . . . . . .24<br />
Terminer la <strong>com</strong>munication . . . . . . . .13<br />
Tonalités d’information . . . . . . . . . . .22<br />
Transfert d’une <strong>com</strong>munication<br />
externe . . . . . . . . . . . . . . . . . . . . . . .16<br />
U<br />
Utilisation conforme aux prescriptions 2<br />
V<br />
Verrouillage du clavier . . . . . . . . . . .17<br />
34
Contenuto<br />
1 Indicazioni di sicurezza . . . . . . . . . . . . . . . . . . . . . . . . . . . . . . . . . . . . .2<br />
2 Mettere in funzione il telefono . . . . . . . . . . . . . . . . . . . . . . . . . . . . . . . .4<br />
3 Elementi di <strong>com</strong>ando . . . . . . . . . . . . . . . . . . . . . . . . . . . . . . . . . . . . . . .7<br />
4 Informazioni introduttive . . . . . . . . . . . . . . . . . . . . . . . . . . . . . . . . . . . .9<br />
5 Compiere telefonate . . . . . . . . . . . . . . . . . . . . . . . . . . . . . . . . . . . . . . .13<br />
6 Funzioni speciali . . . . . . . . . . . . . . . . . . . . . . . . . . . . . . . . . . . . . . . . . .17<br />
7 Elenco chiamate/ripetizione di selezione . . . . . . . . . . . . . . . . . . . . .18<br />
8 Rubrica telefonica . . . . . . . . . . . . . . . . . . . . . . . . . . . . . . . . . . . . . . . . .19<br />
9 Impostazioni Telefono . . . . . . . . . . . . . . . . . . . . . . . . . . . . . . . . . . . . . .21<br />
10 Registrare/cancellare un’unità portatile . . . . . . . . . . . . . . . . . . . . . . .25<br />
11 Impianti telefonici interni / Servizi addizionali . . . . . . . . . . . . . . . . . .26<br />
12 Appendice . . . . . . . . . . . . . . . . . . . . . . . . . . . . . . . . . . . . . . . . . . . . . . .27<br />
I<br />
1
Indicazioni di sicurezza<br />
1 Indicazioni di sicurezza<br />
Leggere attentamente le presenti istruzioni <strong>per</strong> l’uso.<br />
Impiego conforme agli usi previsti<br />
Il presente telefono consente di svolgere telefonate all’interno di una rete telefonica.<br />
Qualsiasi altro impiego è considerato <strong>com</strong>e non conforme agli usi previsti.<br />
Non sono consentite modifiche o trasformazioni non autorizzate. Non aprire <strong>per</strong><br />
nessuna ragione l’apparecchio autonomamente, né <strong>com</strong>piere riparazioni di propria<br />
iniziativa.<br />
Luogo di installazione<br />
Evitare l’esposizione a fumo, polvere, vibrazioni, sostanze chimiche, umidità,<br />
eccessivo calore o irradiazioni solari dirette.<br />
Non utilizzare l’unità portatile in aree esposte al rischio di deflagrazione.<br />
Alimentatore di rete<br />
a Attenzione: Utilizzare solo l’alimentatore a spina fornito in dotazione<br />
visto che altri alimentatori di rete potrebbero addirittura danneggiare il<br />
telefono. Non ostacolare il libero accesso all’alimentatore a spina con mobili o<br />
altri oggetti simili.<br />
Accumulatore ricaricabile<br />
a Attenzione: Non gettare batterie ricaricabili nel fuoco. Utilizzare solo<br />
batterie ricaricabili dello stesso tipo! Osservare la corretta polarità! Pericolo di<br />
esplosione durante il caricamento della batteria in caso di errata polarità.<br />
Caduta di tensione<br />
In caso di caduta di tensione non è possibile <strong>com</strong>piere chiamate con il telefono.<br />
Si consiglia di ricorrere in caso di emergenza ad un telefono con filo in grado di<br />
funzionare anche senza alimentazione elettrica esterna.<br />
2
Indicazioni di sicurezza<br />
Apparecchiature mediche<br />
a Attenzione: Non utilizzare il telefono in prossimità di apparecchiature<br />
mediche. Non è possibile escludere il subentro di eventuali interferenze.<br />
Telefoni DECT 1 possono causare un fastidioso ronzio in apparecchi acustici.<br />
Smaltimento<br />
Procedere allo smaltimento dell’apparecchio esaurito consegnandolo<br />
presso uno dei punti di raccolta istituiti dalla propria<br />
società di smaltimento rifiuti <strong>com</strong>unale (<strong>per</strong> es. centro di riciclo<br />
materiali). Il simbolo riportato qui a lato indica che non è assolutamente<br />
consentito smaltire l’apparecchio assieme ai normali<br />
rifiuti domestici!<br />
Secondo quanto previsto dalla legge sugli apparecchi elettrici<br />
ed elettronici, i proprietari di apparecchi esauriti sono <strong>per</strong><br />
legge tenuti alla consegna di tutti gli apparecchi elettrici ed elettronici<br />
presso un centro di rilievo rifiuti in raccolta differenziata.<br />
Consegnare le batterie ricaricabili <strong>per</strong> lo smaltimento presso<br />
rivenditori al dettaglio di batterie o centri di raccolta che mettono<br />
a disposizione appositi contenitori.<br />
Smaltire confezioni ed imballaggi in base a quanto indicato<br />
dalle norme in vigore a livello locale.<br />
1<br />
DECT: Digital Enhanced Cordless Tele<strong>com</strong>munication = Standard <strong>per</strong><br />
telefoni senza cavo.<br />
I<br />
3
Mettere in funzione il telefono<br />
2 Mettere in funzione il telefono<br />
Indicazioni di sicurezza<br />
a Attenzione: Prima della messa in funzione, leggere attentamente<br />
le indicazioni di sicurezza riportate al capitolo 1.<br />
Verificare il contenuto della confezione<br />
Contenuto<br />
<strong>Mode</strong>llo DE 202x<br />
2021 2022 1 2023 1 2024 1<br />
Stazione base<br />
con alimentatore di rete 1 1 1 1<br />
Stazione di carica con<br />
alimentatore - 1 2 3<br />
Unità portatile 1 2 3 4<br />
Cavo di collegamento telefonico 1 1 1 1<br />
Accumulatore ricaricabile 2 4 6 8<br />
<strong>Istruzioni</strong> <strong>per</strong> l’uso 1 1 1 1<br />
1<br />
Per ulteriori informazioni riguardo la disponibilità di questo set telefonico<br />
si prega di visitare il sito www.switel.<strong>com</strong>.<br />
Potenza assorbita<br />
La potenza assorbita dalla stazione base ammonta a:<br />
- in servizio (stand-by/conversazione): ca. 1,2 W<br />
- durante la carica dell'unità mobile: ca. 2,0 W.<br />
Il carico nullo de circuito di alimentazione rete è pari a circa 0,15 W.<br />
L'efficienza media è pari a circa il 67 %.<br />
La potenza assorbita dalla stazione di carica ammonta a:<br />
- senza unità mobile: ca. 0,15 W<br />
- durante la carica dell'unità mobile: ca. 1,2 W.<br />
Il carico nullo de circuito di alimentazione rete è pari a circa 0,15 W.<br />
L'efficienza media è pari a circa il 67 %.<br />
4
Mettere in funzione il telefono<br />
Collegare la stazione base<br />
a Attenzione: Montare la stazione base con una distanza minima di 1 m da<br />
altri apparecchi elettronici in modo da evitare interferenze reciproche.<br />
Procedere al collegamento della stazione base seguendo quanto raffigurato<br />
nella figura. Utilizzare <strong>per</strong> motivi di sicurezza solo l’alimentatore di rete oltre che il<br />
cavo di collegamento telefonico forniti in dotazione.<br />
Presa elettrica<br />
Presa di collegamento telefonico<br />
a Attenzione: Utilizzare <strong>per</strong> la stazione base, solo l’alimentatore fornito in<br />
dotazione !<br />
Collegare la stazione di carica 2<br />
Collegare la stazione di carica con l’alimentatore saldamente inserito ad una<br />
presa elettrica. Verificare che la presa elettrica sia liberamente accessibile.<br />
2<br />
Vale solo <strong>per</strong> set telefonici con minimo due unità portatili, -> “Verificare il contenuto<br />
della confezione“.<br />
I<br />
5
Mettere in funzione il telefono<br />
6<br />
Inserire l’accumulatore ricaricabile<br />
Inserire le batterie ricaricabili nel vano batterie precedentemente<br />
a<strong>per</strong>to. Chiudere infine il vano accumulatore.<br />
a Attenzione: Utilizzare a tale scopo solo batterie<br />
ricaricabili del tipo AAA Ni-MH da 1,2 V/500 mAh.<br />
Osservare la corretta polarità!<br />
Non utilizzare mai batterie/celle primarie!<br />
Caricare le batterie<br />
☞ Riporre l’unità portatile in sede di prima messa in funzione <strong>per</strong> minimo 16<br />
ore nella stazione base / stazione di carica.<br />
L’unità portatile si surriscalda durante il processo di carica. Questo è un fenomeno<br />
normale e non <strong>per</strong>icoloso. Evitare di caricare l’unità portatile con dispositivi di<br />
carica differenti o estranei. L’avviso di batteria scarica verrà visualizzato sul<br />
display. Quando il livello di carica della batteria è sceso al limite, sul display lampeggia<br />
il simbolo della batteria (L) e viene emesso un allarme acustico (nel<br />
caso di allarme acustico abilitato/menu „IMPOSTA PT/IMPOSTA TONI/TONO<br />
BATT“). Sono ancora a disposizione circa 10 minuti di chiamata.<br />
Impostare ora e data dell’unità portatile<br />
All’accensione l’unità portatile non dispone di un’impostazione oraria corretta (<strong>per</strong><br />
esempio: <strong>per</strong> le registrazioni nell’elenco chiamate). Impostate data e ora nel<br />
menu „IMPOSTA PT/ DATA E ORA“.<br />
Impostare la lingua di display<br />
La lingua di display può essere impostata in 13 diverse lingue. Il telefono è impostato<br />
su “Tedesco”. Modificare la lingua nel menu „MT-EINSTEL./ SPRACHE“.<br />
Accettazione di chiamata automatica / Risposta dir<br />
L’attivazione di questa funzione consente di ricevere automaticamente una chiamata<br />
estraendo semplicemente l’unità portatile dalla stazione base. L’accettazione<br />
di chiamata automatica è attivata o disattivata nel menu „IMPOSTA PT/<br />
RISPOSTA AUT“.
Elementi di <strong>com</strong>ando<br />
3 Elementi di <strong>com</strong>ando<br />
Altoparlante<br />
Display<br />
Elenco chiamate<br />
Tasto softkey<br />
Tasto di chiamata/<br />
risposta<br />
Tasti numerici<br />
DE 2021<br />
Tasti Su/Giù<br />
Tasto softkey<br />
Tasto di fine chiamata<br />
Tasto ripetizione<br />
di selezione<br />
Tasto Viva Voce<br />
Tasto rubrica<br />
Tasto R (flash)<br />
Microfono<br />
I<br />
7
Elementi di <strong>com</strong>ando<br />
Cercare l’unità portatile<br />
(funzione di<br />
paging)<br />
Contatti di carica<br />
8
Informazioni introduttive<br />
4 Informazioni introduttive<br />
In questo capitolo sono riportate le principali informazioni riguardo l’uso delle presenti<br />
istruzioni e del telefono.<br />
Modi di rappresentazione delle istruzioni <strong>per</strong> l’uso<br />
Rappresentazione Descrizione<br />
NAME?<br />
Premere il tasto raffigurato<br />
Inserire numeri o lettere<br />
Telefono squilla<br />
Estrarre l’unità portatile dalla stazione base<br />
Riporre l’unità portatile nella stazione base<br />
Rappresentazione di testi sul display<br />
Rappresentazione di simboli sul display<br />
Symbole im Display des Mobilteils<br />
Simbolo<br />
Descrizione<br />
Costante: Collegamento con la stazione base<br />
Lampeggiante: Il collegamento con la stazione base<br />
si interrompe.<br />
Costante: Indicazione dello stato di carica delle batterie.<br />
Lampeggiante quando l’unità portatile è collegata all’unità<br />
base: L’accumulatore ricaricabile è in fase di carica.<br />
Costante: le batterie dovrebbero essere ricaricate.<br />
Lampeggiante: Caricare le batterie.<br />
Costante: Chiamata in corso.<br />
Lampeggiante: Chiamata in arrivo.<br />
La funzione vivavoce è attivata.<br />
La segnalazione acustica di chiamata è disinserita.<br />
Costante: Funzione allarme inserita.<br />
Lampeggiante: Allarme.<br />
9<br />
I
Informazioni introduttive<br />
Il blocco tastiera è attivato.<br />
Nuovo messaggio nella Casella Vocale dell’O<strong>per</strong>atore di<br />
Rete (variabile a seconda dell’o<strong>per</strong>atore di rete).<br />
Costante: E’ in corso una chiamata interna (solo con più<br />
unità portatili registrate su una sola base).<br />
Lampeggiante: Chiamata interna in arrivo.<br />
Con un messaggio dell’elenco chiamate: Nuova Chiamata<br />
Altri tasti cifra/carattere precedenti o successivi al tasto<br />
attualmente selezionato. Per selezionarli premere .<br />
Nelle seguenti descrizioni del display vengono visualizzate le funzioni disponibili<br />
<strong>per</strong> entrambi i softkey a seconda della modalità.<br />
Aprire il Menu.<br />
Confermare una selezione.<br />
Attivare una chiamata interna (solo <strong>per</strong> più unità portatili su<br />
una sola unità base).<br />
Ritornare al livello precedente del menu o terminare la<br />
funzione.<br />
Tornare indietro-cancellare le voci inserite (una pressione<br />
breve cancella gli ultimi segni, una pressione più lunga<br />
cancella l’intera riga),<br />
Microfono attivo/disattivo durante la conversazione (Muto)<br />
10
Informazioni introduttive<br />
Modalità di stand-by<br />
In tutte le descrizioni del presente manuale di istruzioni si considera l’unità<br />
portatile in modalità di stand-by. Per passare alla modalità di stand-by, premere il<br />
tasto .<br />
Riduzione delle radiazioni (modalità ECO)<br />
Le radiazioni sono considerevolmente ridotte in modalità conversazione rispetto<br />
ad un telephono cordless a standard DECT.<br />
Navigazione nel menu<br />
I differenti menu consentono di raggiungere tutte le funzioni del telefono. La struttura<br />
<strong>com</strong>pleta del menu si trova in appendice.<br />
Per la navigazione nel menu utilizzare le softkeys ed i tasti freccia.<br />
Utilizzando i Softkeys a sinistra si accede al menu.<br />
Utilizzare i tasti freccia e <strong>per</strong> navigare all’interno del menu.<br />
Per aprire un sottomenu premere il tasto .<br />
Per ritornare al livello del menu precedente premere brevemente . Premendo<br />
più a lungo si ritornerà in modalità stand by.<br />
I<br />
11
Informazioni introduttive<br />
Creare voci nella rubrica telefonica - Esempio<br />
La navigazione nei menu e la procedura da seguire <strong>per</strong> inserire nuove voci è indicata<br />
a titolo esemplificativo in „Creare voci nella rubrica telefonica“. Si consiglia di<br />
seguire quanto riportato nell’esempio <strong>per</strong> tutte le altre impostazioni che si desiderano<br />
<strong>com</strong>piere.<br />
Aprire la rubrica telefonica.<br />
o<br />
Premere il tasto softkey Menu.<br />
Selezionare RUBRICA e confermare con OK.<br />
Se non è ancora presente alcuna voce verrà visualizzato<br />
VUOTO. Se vi sono già delle voci inserite, verrà visualizzata la<br />
prima voce.<br />
Premere il softkey Menu.<br />
Confermare AGGIUNGI con OK.<br />
Immettere il nome (al massimo 12 caratteri).<br />
I tasti-cifra si immettono con i caratteri. Premere più volte i tasti<br />
corrispondenti <strong>per</strong> inserire i caratteri e le cifre.<br />
Dopo poco tempo il cursore avanza automaticamente.<br />
Concludere l’immissione del nome con OK.<br />
Immettere il numero di telefono (al massimo 20 cifre).<br />
Concludere l’immissione del numero di telefono con OK.<br />
/ Selezionare una suoneria <strong>per</strong> la voce inserita.<br />
Confermare con OK.<br />
Ritornare alla modalità stand-by.<br />
12
Compiere telefonate<br />
5 Compiere telefonate<br />
Ricevere una chiamata<br />
Il telefono suona.<br />
L’unità portatile non si trova inserita nell’unità base:<br />
/ Premere il tasto di risposta o il vivavoce.<br />
L’unità portatile non si trova inserita nell’unità base e la RISPOSTA AUT non è<br />
inserita:<br />
/ Sollevare l’unità portatile dall’unità base e premere il tasto di<br />
risposta o il vivavoce.<br />
L’unità portatile non si trova inserita nell’unità base e la RISPOSTA AUT è<br />
inserita:<br />
E’ sufficiente prelevare l’unità portatile dall’unità base; la<br />
conversazione sarà automaticamente accettata.<br />
Telefonare<br />
Immettere un numero di chiamata.<br />
In caso di immissione errata, correggere .<br />
/ Il numero di chiamata viene selezionato.<br />
☞ E’ altresì possibile premere prima il tasto di chiamata e ricevere il segnale<br />
di linea libera. Le cifre immesse <strong>per</strong> la <strong>com</strong>posizione del numero desiderato<br />
verranno così selezionate. Con questo tipo di funzione chiamata non è<br />
possibile correggere le singole cifre che <strong>com</strong>pongono il numero di chiamata.<br />
Concludere una chiamata<br />
/ Premere il tasto di fine chiamata o riporre l’unità portatile<br />
sull’unità base.<br />
I<br />
13
Compiere telefonate<br />
Ripetizione di selezione<br />
☞ Il telefono memorizza gli ultimi 5 numeri <strong>com</strong>posti. Se il numero è stato<br />
inserito nella rubrica del telefono, apparirà il nome memorizzato con quel numero.<br />
Per visualizzare il numero corrispondente al nome premere il tasto cancelletto<br />
. L’ultimo numero <strong>com</strong>posto apparirà sempre all’inizio dell’elenco.<br />
Aprire l’elenco di ripetizione di chiamata.<br />
/ Selezionare la voce.<br />
/ Il numero di chiamata viene selezionato.<br />
Per chiamare un numero dall’elenco chiamate.<br />
☞ Il vostro telefono memorizza le ultime 10 chiamate nell’elenco chiamate. Se il<br />
numero è stato inserito nella rubrica del telefono, apparirà il nome memorizzato<br />
con quel numero. Per visualizzare il numero corrispondente al nome premere il<br />
tasto cancelletto . La memorizzazione può avvenire solo, se sulla vostra<br />
connessione è disponibile “l’identificazione del numero di chiamata (CLIP)” e se il<br />
numero di chi telefona non è trattenuto o non è trasmesso <strong>per</strong> altri motivi.<br />
Aprire l’elenco chiamate.<br />
/ Selezionare la voce.<br />
/ Il numero di chiamata viene selezionato.<br />
Effettuare delle chiamate dalla rubrica<br />
☞ La rubrica può contenere fino a 20 voci.<br />
Per immettere una voce vedere la sezione „Rubrica Telefonica“.<br />
Aprire la rubrica telefonica.<br />
/ Selezionare la voce.<br />
/ Il numero di chiamata viene selezionato.<br />
14
Compiere telefonate<br />
Visualizzazione della durata di conversazione<br />
Durante lo svolgimento di una chiamata, la durata della telefonata è visualizzata<br />
in ore, minuti e secondi.<br />
Impostare il volume del ricevitore<br />
/ Il volume è regolabile durante lo svolgimento di una chiamata in<br />
5 livelli (dal ricevitore -> volume ricevitore, dal vivavoce -> volume<br />
altoparlante).<br />
Le impostazioni sono separate tra di loro e rimangono memorizzate<br />
anche una volta terminata la conversazione.<br />
Silenziamento del microfono nell’unità portatile<br />
Durante la conversazione è possibile disattivare il microfono,<br />
<strong>per</strong> fare in modo che il vostro interlocutore non vi possa sentire.<br />
Sul display apparirà MUTO.<br />
Per attivare il microfono premere il tasto ripristina.<br />
Compiere chiamate interne<br />
☞ Le conversazioni interne, trasferimenti di chiamata e teleconferenze sono<br />
possibili solo quando sono registrate più unità portatili. Se non è questo il<br />
caso, sul display verrà visualizzato IMPOSSIBILE.<br />
Effettuare chiamate interne<br />
Premere il softkey Inter<strong>com</strong>. Se sono registrate due unità portatili,<br />
verrà chiamato subito l’altra unità portatile. Se sono registrate<br />
più unità portatili, vengono visualizzati i relativi numeri<br />
interni (<strong>per</strong> esempio 2 3 4). Premere il numero interno desiderato.<br />
Premere “9” <strong>per</strong> chiamare contemporaneamente tutti i telefoni<br />
collegati.<br />
I<br />
15
Compiere telefonate<br />
Trasferire chiamate esterne<br />
Nel corso di una chiamata esterna. . .<br />
Premere il softkey Menu.<br />
/ Selezionare INTERNO e premere OK.<br />
Digitate il numero interno. La chiamata esterna verrà trattenuta.<br />
Se l’unità portatile chiamata è accesa, verrà eventualmente<br />
annunciata la <strong>com</strong>unicazione.<br />
Premere il tasto di fine chiamata. La chiamata è stata trasmessa.<br />
Teleconferenza<br />
Nel corso di una chiamata esterna. . .<br />
Premere il softkey Menu.<br />
/ Selezionare INTERNO e premere OK.<br />
Digitare il numero di chiamata interno.<br />
Quando l’unità portatile chiamata viene inserita, tenere premuto<br />
il tasto asterisco fino a quando non appare CONFERENZA sul<br />
display.<br />
☞ Se uno dei partecipanti alla teleconferenza riattacca, gli altri partecipanti<br />
rimangono connessi fra di loro.<br />
16
Funzioni speciali<br />
6 Funzioni speciali<br />
Blocco tastiera<br />
☞ Il blocco tastiera impedisce la digitazione involontaria dei tasti.<br />
Le chiamate in arrivo possono essere ricevute <strong>com</strong>e di consueto.<br />
Tenere premuto il tasto asterisco fino a quando appare sul<br />
display il simbolo del blocco tastiera.<br />
Per sbloccare la tastiera tenere premuto nuovamente il tasto<br />
asterisco fino a quando il simbolo non s<strong>com</strong>pare di nuovo.<br />
Disattivare il tono chiamata sull’unità portatile<br />
☞ E‘ possibile disattivare il tono chiamata anche sul menu „IMP SUONERIA/<br />
VOLUME“.<br />
Tenere premuto il tasto cancelletto fino a quando il simbolo di<br />
disattivazione tono chiamata non appare sul display.<br />
Per riattivare il tono chiamata tenere premuto nuovamente il<br />
tasto cancelletto fino a quando non riappare il simbolo.<br />
Spegnimento unità portatile<br />
☞ Per risparmiare la batteria spegnere l’unità portatile.<br />
Tenere premuto il tasto di fine chiamata. Dopo alcuni secondi<br />
l’unità portatile si spegnerà. L’illuminazione del display si spegnerà.<br />
Per riaccendere l’unità portatile tenere premuto il tasto di fine<br />
chiamata fino a quando non si avverte un segnale accustico e<br />
fino a quando il display non si illuminerà di nuovo.<br />
I<br />
17
Elenco chiamate/ripetizione di selezione<br />
7 Elenco chiamate/ripetizione di selezione<br />
Modificare l’elenco chiamate<br />
Accedere all’elenco chiamate.<br />
/ Selezionare una voce.<br />
Premere il softkey Menu.<br />
/ Selezionare una delle seguenti opzioni e confermare con OK:<br />
AGG A RUBR Il numero di chiamata verrà memorizzato nella rubrica. Se è<br />
inserito un nome, confermare o modificare il numero di telefono<br />
ed associare una suoneria <strong>per</strong> questa voce della rubrica.<br />
ELIMINA La voce verrà eliminata.<br />
ELIM. TUTTI L’intera rubrica verrà eliminata a seguito di un’ulteriore richiesta<br />
di conferma.<br />
DETTAGLI Per visualizzare data e ora della chiamata.<br />
☞ E‘ possibile accedere all’enco chiamate anche dal menu:<br />
( / LISTA CHIAM ).<br />
Modificare ripetizione di selezione<br />
/ Accedere alla ripetizione di selezione.<br />
/ Selezionare una voce.<br />
Premere il softkey Menu.<br />
/ Selezionare una delle seguenti opzioni e confermare con OK:<br />
AGG A RUBR Il numero di chiamata verrà memorizzato nella rubrica. Se è<br />
inserito un nome, confermare o modificare il numero di telefono<br />
ed associare una suoneria <strong>per</strong> questa voce della rubrica.<br />
ELIMINA La voce verrà eliminata.<br />
ELIM. TUTTI L’intera rubrica verrà eliminata a seguito di un’ulteriore richiesta<br />
di conferma.<br />
18
Rubrica telefonica<br />
8 Rubrica telefonica<br />
☞ Nella rubrica è possibile memorizzare fino a 20 numeri di telefono e<br />
relativi nomi. E‘ possibile associare ad ogni voce una suoneria, con la quale<br />
verrà segnalata la chiamata. Immettere sempre il numero di telefono con il<br />
relativo prefisso; questo <strong>per</strong>metterà una corretta visualizzazione del corrispondente<br />
chiamante, <strong>per</strong> il quale è stata inserita una voce nella rubrica e <strong>per</strong> il<br />
quale sulla vostra connessione è disponibile la trasmissione del numero.<br />
Aggiungere una nuova voce alla rubrica<br />
Premere il tasto rubrica.<br />
Se è ancora stata inserita alcuna voce verrà visualizzato<br />
VUOTO. Se sono già state inserite delle voci, verrà visualizzata<br />
la prima voce.<br />
Premere il softkey Menu.<br />
Confermare AGGIUNGI con OK.<br />
Immettere il nome (al max. 12 caratteri).<br />
Le cifre si immettono con i tasti carattere. Premendo più più<br />
volte il tasto relativo è possibile inserire caratteri e cifre.<br />
Dopo una breve attesa il cursore procede automaticamente.<br />
Terminare l’immissione del nome con OK.<br />
Inserire il numero di telefono (max. 20 cifre). Se il telefono è collegato<br />
ad un impianto telefonico interno, è necessario selezionare<br />
un numero di accesso alla rete esterna. Se occorre una<br />
pausa di selezione, premere il tasto 0 <strong>per</strong> circa 2 secondi dopo<br />
aver inserito il numero di accesso alla rete esterna; sul display<br />
apparirà la lettera P.<br />
Terminare l’inserimento del numero di chiamata con OK.<br />
/ Selezionare una suoneria <strong>per</strong> la nuova voce della rubrica.<br />
Confermare con OK.<br />
Ritornare alla modalità stand-by.<br />
I<br />
19
Rubrica telefonica<br />
☞ E‘ possibile accedere alla rubrica anche dal menu.<br />
( / RUBRICA ).<br />
Modificare le voci della rubrica.<br />
Premere il tasto rubrica.<br />
/ Selezionare la voce.<br />
Premere il softkey Menu.<br />
/ Selezionare una delle seguenti opzioni e confermare con OK.<br />
AGGIUNGI Per aggiungere una nuova voce alla rubrica.<br />
VISUALIZZA La voce della rubrica verrà visualizzata. Visualizzare Nome,<br />
Numero di Telefono e Suoneria con i tasti freccia.<br />
COMPONI E’ possibile modificare l’inserimento di una voce. Eliminare<br />
caratteri e cifre con , inserire con i tasti cifra dei nuovi<br />
caratteri e nuove cifre. Per ulteriori dettagli consultare “Immettere<br />
nuova voce”.<br />
ELIMINA La voce della rubrica verrà eliminata.<br />
ELIM. TUTTI L’intero elenco verrà eliminato a seguito di un ulteriore richiesta<br />
di conferma.<br />
STATO RUBR Verrà visualizzata la situazione attuale della rubrica (<strong>per</strong> esempio<br />
07/20 IN USO: sono disponibili 7 voci su 20 della rubrica).<br />
20
Impostazioni Telefono<br />
9 Impostazioni Telefono<br />
Data/Ora<br />
Premere il softkey Menu.<br />
/ Selezionare IMPOSTA PT e premere OK.<br />
/ Selezionare DATA E ORA e premere OK.<br />
/ Selezionare una delle seguenti opzioni e confermare con OK:<br />
FORMATO DATAPer impostare il formato data:<br />
(DD-MM-YY oppure MM-DD-YY).<br />
FORMATO ORAPer impostare il formato ora:<br />
(24 ore oppure 12 ore).<br />
IMPOSTA ORA Immettere l’ora con i tasti cifra.<br />
IMPOSTA DATAImmettere la data con i tasti cifra.<br />
☞ In caso di interruzione dell’alimentazione elettrica l’impostazione verrà<br />
<strong>per</strong>sa, se contemporaneamente l’unità portatile è disattivata o le batterie sono<br />
scariche.<br />
Sveglia<br />
Premere il softkey Menu.<br />
/ Selezionare IMPOSTA PT e premere OK.<br />
/ Selezionare SVEGLIA e premere OK.<br />
/ Selezionare ATTIVA e premere OK.<br />
Inserire l’ora della sveglia con i tasti cifra.<br />
SNOOZE Premere OK.<br />
/ Selezionare ATTIVA o DISATTIVA e premere OK.<br />
Se „Snooze“ è inserito, significa che l’allarme della sveglia verrà<br />
ripetuto dopo 7 minuti, fino a quando la funzione verrà disattivata<br />
tenendo premuto il tasto di fine chiamata.<br />
Se „Snooze“ non è inserito, l’allarme della sveglia verrà emesso<br />
solo una volta all’ora impostata. Per arrestare l’allarme della<br />
sveglia premere un tasto qualsiasi.<br />
I<br />
21
Impostazioni Telefono<br />
Impostare il tono di chiamata dell’unità mobile<br />
Premere il softkey Menu.<br />
/ Selezionare IMPOSTA PT e premere OK.<br />
/ Selezionare IMP SUONERIA e premere OK.<br />
/ Selezionare una delle seguenti opzioni e confermare con OK:<br />
CHIAMATE INT Selezionare una suoneria <strong>per</strong> la segnalazione di una chiamata<br />
interna.<br />
CHIAMATE EST Selezionare una suoneria <strong>per</strong> la segnalazione di una chiamata<br />
esterna.<br />
VOLUME Selezionare il volume <strong>per</strong> il tono chiamata. Se viene selezionato<br />
„SILENZIOSO“ apparirà sul display il simbolo relativo.<br />
Impostazione toni di avviso<br />
Premere il softkey Menu.<br />
/ Selezionare IMPOSTA PT e premere OK.<br />
/ Selezionare IMPOSTA TONI e premere OK.<br />
/ Selezionare una delle seguenti opzioni e premere OK:<br />
TONI TASTI Attivare o disattivare il tono dei tasti.<br />
TONO BATT Attivare o disattivare il tono di avviso che segnala quando la<br />
batteria deve essere ricaricata.<br />
FUORIPORTATAAttivare o disattivare il tono che segnala quando l’unità portatile<br />
si trova fuori dalla co<strong>per</strong>tura del segnale dell’unità base.<br />
Impostazione lingua del display<br />
Premere il softkey Menu.<br />
/ Selezionare IMPOSTA PT e premere OK.<br />
/ Selezionare LINGUA e premere OK.<br />
/ Selezionare una lingua e confermare con OK.<br />
22
Impostazioni Telefono<br />
Impostare nome dell’unità portatile<br />
Premere il softkey Menu.<br />
/ Selezionare IMPOSTA PT e premere OK.<br />
/ Selezionare RINOMINA PT e premere OK.<br />
Eliminare il vecchio nome con , inserire il nuovo nome<br />
con i tasti cifra e premere OK.<br />
Impostazione messaggio display<br />
Premere il softkey Menu.<br />
/ Selezionare IMPOSTA PT e premere OK.<br />
/ Selezionare DISPLAY PT e premere OK.<br />
/ Selezionare, se in modalità stand-by, il nome dell’unità portatile<br />
o l’ora che deve essere visualizzata e confermare con OK.<br />
Impostazione Risposta automatica<br />
Premere il softkey Menu.<br />
/ Selezionare IMPOSTA PT e premere OK.<br />
/ Selezionare RISPOST AUT e premere OK.<br />
/ Selezionare se la risposta automatica deve essere attivata o<br />
disattivata e premere OK.<br />
☞ Se la risposta automatica è attivata, la chiamata verrà subito accettata nel<br />
momento in cui l’unità portatile verrà estratta dall’unità base.<br />
Impostazione modalità di selezione<br />
Premere il softkey Menu.<br />
/ Selezionare IMPOSTA BS e premere OK.<br />
/ Selezionare MODO SELEZ e premere OK.<br />
/ Selezionare TONI o IMPULSI e confermare con OK.<br />
☞ Per la maggior parte degli impianti telefonici, l’impostazione giusta è TONI.<br />
I<br />
23
Impostazioni Telefono<br />
Impostazione tempo flash<br />
Premere il softkey Menu.<br />
/ Selezionare IMPOSTA BS e premere OK.<br />
/ Selezionare TEMPO FLASH e premere OK.<br />
/ Selezionare BREVE (100 ms), MEDIA (300 ms) oppure<br />
LUNGO (600 ms) e confermare con OK.<br />
Modificare PIN<br />
Premere il softkey Menu.<br />
/ Selezionare IMPOSTA BS e premere OK.<br />
/ Selezionare CAMBIA PIN e premere OK.<br />
Inserire il codice PIN attuale<br />
(nella configurazione predefinita 0 0 0 0) e premere OK.<br />
Inserire un nuovo codice PIN e premere OK.<br />
Inserire un nuovo codice PIN ancora una volta e premere OK.<br />
☞ Il codice PIN a quattro cifre protegge alcune impostazioni da un accesso<br />
non autorizzato. Nel caso non si dovesse ricordare il codice PIN, rivolgersi al<br />
nostro Servizio di Assistenza.<br />
Rimpostare il telefono secondo la configurazione predefinita<br />
Premere il softkey Menu.<br />
/ Selezionare DEFAULT e premere OK.<br />
Inserire il codice PIN attuale e premere OK.<br />
Confermare anche la successiva richiesta di conferma con OK.<br />
☞ La rubrica non viene cancellata. Cancellare la rubrica dal menu-rubrica.<br />
L’unità portatile registrata rimane registrata.<br />
24
Registrare/cancellare un’unità portatile<br />
10 Registrare/cancellare un’unità portatile<br />
Su una stazione base possono essere registrate fino a 5 unità portatili. Le unità<br />
portatili fornite con il vostro telefono sono già registrate con l’unità base. Per registrare<br />
un’unità mobile „estranea“ si prega di consultare il manuale di istruzioni.<br />
Registrare un’altra unità mobile dello stesso tipo<br />
Premere il softkey Menu.<br />
/ Selezionare REGISTRAZ e premere OK.<br />
Inserire l’attuale codice PIN dell’unità di base sulla quale deve<br />
essere registrata l’unità portatile e premere OK.<br />
Tenere premuto il tasto Paging nell’unità base (ca. 5 sec.).<br />
Poco dopo si illumina costantemente sul display il simbolo dell’antenna<br />
e l’unità portatile è così registrata.<br />
Cancellare un’unità portatile<br />
Premere il softkey Menu.<br />
/ Selezionare IMPOSTA BS e premere OK.<br />
/ Selezionare CANCELLA PT e premere OK.<br />
Inserire il codice PIN attuale e premere OK.<br />
/ Selezionare una delle unità portatili registrate e premere OK.<br />
☞ L’unità portatile in uso non può essere cancellata.<br />
I<br />
25
Impianti telefonici interni / Servizi addizionali<br />
11 Impianti telefonici interni / Servizi addizionali<br />
Impianti telefonici interni<br />
Avendo collegato il telefono ad un impianto telefonico interno, il tasto R consente<br />
di accedere a tutte le altre funzioni disponibili <strong>com</strong>e <strong>per</strong> es. trasferimento di chiamata<br />
e funzione di richiamata automatica. Si prega di consultare le istruzioni <strong>per</strong><br />
l’uso del proprio impianto telefonico interno <strong>per</strong> individuare il tempo flash da impostare<br />
al fine di poter usufruire di queste funzioni. Il rivenditore autorizzato è in<br />
grado di indicare se il telefono acquistato funzionerà senza alcun problema nel<br />
proprio impianto telefonico interno.<br />
Si consiglia di inserire le voci della rubrica con l’eventuale numero di accesso alla<br />
rete esterna e la pausa di selezione necessaria (premere a lungo “0”).<br />
Servizi addizionali<br />
Il telefono supporta servizi addizionali messi a disposizione dal proprio gestore<br />
di rete telefonica <strong>com</strong>e <strong>per</strong> es. le funzioni di chiamata in attesa, avviso di chiamata<br />
e chiamata a conferenza. Il tasto R consente di accedere a questi servizi addizionali.<br />
Si prega di consultare il proprio gestore di rete telefonica <strong>per</strong> ottenere<br />
informazioni sul tempo flash necessario all’utilizzo dei servizi addizionali. Rivolgersi<br />
al proprio gestore di rete telefonica <strong>per</strong> ottenere l’abilitazione ai servizi addizionali.<br />
26
Appendice<br />
12 Appendice<br />
Struttura di menu<br />
LISTA CHIAM<br />
RUBRICA<br />
IMPOSTA BS<br />
CANCELLA PT<br />
MODO SELEZ<br />
TONI<br />
IMPULSI<br />
TEMPO FLASH BREVE<br />
MEDIA<br />
LUNGO<br />
CAMBIA PIN<br />
IMPOSTA PT SVEGLIA DISATTIVA / ATTIVA / HH:MM<br />
IMP SUONERIA CHIAMATE INT MELODIA 1...10<br />
CHIAMATE EST MELODIA 1...10<br />
VOLUME SILENZIOSO, 1...5<br />
IMPOSTA TONI TONI TASTI ATTIVA / DISATTIVA<br />
REGISTRAZ<br />
DEFAULT<br />
Lingua<br />
RINOMINA PT<br />
DISPLAY PT<br />
RISPOSTA AUT<br />
DATA E ORA<br />
TONO BATT<br />
FUORIPORTATA<br />
-> 13 lingue<br />
NOME PORT<br />
TEMPO<br />
ATTIVA / DISATTIVA<br />
FORMATO DATA<br />
FORMATO ORA<br />
IMPOSTA ORA<br />
IMPOSTA DATA<br />
ATTIVA / DISATTIVA<br />
ATTIVA / DISATTIVA<br />
I<br />
27
Appendice<br />
Localizzazione guasti<br />
In presenza di problemi con il telefono, seguire le indicazioni riportate qui di seguito.<br />
In caso di problemi tecnici è possibile rivolgersi alla nostra hotline di assistenza<br />
tecnica chiamando al numero 0900 00 1675 valido <strong>per</strong> la Svizzera (spese da rete<br />
Swiss<strong>com</strong> alla data di stampa: CHF 2.60 / min). In caso di reclami entro il <strong>per</strong>iodo<br />
di garanzia, rivolgersi al rivenditore autorizzato.<br />
Il <strong>per</strong>iodo di garanzia ricopre 2 anni.<br />
• Dopo la selezione del tasto di risposta non è udibile alcun segnale acustico, la<br />
linea non è occupata.<br />
- Controllare la spina della connessione telefonica sull’unità base e sulla<br />
presa del telefono.<br />
- Controllare la spina elettrica sull’unità di base e sul 230 V.<br />
- La linea è occupata da un’altra unità portatile. Attendere fino a quando non è<br />
terminata la <strong>com</strong>unicazione.<br />
• Sul display è visualizzato „RICERCA“.<br />
- Controllare la spina elettrica sull’unità di base e sul 230 V.<br />
- Ridurre la portata.<br />
- Cancellare l’unità portatile.<br />
• Nessuna visualizzazione sul display.<br />
- Unità portatile spenta -> accenderla.<br />
- Batterie scariche -> caricare le batterie.<br />
28
Appendice<br />
Impostazioni predefinite/Configurazioni predefinite<br />
Elenco chiamate Vuoto<br />
Rubrica telefonica Vuoto<br />
Sveglia<br />
Disattivato<br />
Suoneria pt Interno: Melodia 2<br />
Esterno: Melodia 1<br />
Volume: 3<br />
Imposta toni<br />
Toni tasti: Attivato<br />
Toni batt: Attivato<br />
Fuoriportata: Attivato<br />
Lingua<br />
Tedesco<br />
Nome portatile DE 202x<br />
Display<br />
Nome portatile<br />
Risposta aut.<br />
Attivato<br />
Data e ora<br />
Formato data: DD-MM-YY<br />
Formato ora: 24 ora<br />
Proc selezione Toni<br />
Tempo flash<br />
Breve (100 ms)<br />
PIN 0 0 0 0<br />
I<br />
29
Appendice<br />
Dati Tecnici<br />
Standard: DECT / GAP<br />
Numero di canali: 120 canali duplex<br />
Frequenza: 1880 MHz - 1900 MHz<br />
Procedura duplex: a divisione di tempo, 10 ms lunghezza trama<br />
Distanza canali: 1728 kHz<br />
Bit rate: 1152 kBit / s<br />
Modulazione: GFSK<br />
Codifica Voce: 32 kBit / s<br />
Potenza di trasmissione: 10 mW (potenza media <strong>per</strong> canale)<br />
Co<strong>per</strong>tura: fino a 300 metri all’a<strong>per</strong>to, fino a 50 metri all’interno di un edificio<br />
Alimentazione stazione base / Alimentazione Unità di carica:<br />
Adattatore (S002CV0600030, 6V DC/300mA) o<br />
(VT04EEU06045, 6V DC/450mA).<br />
Alimentazione unità portatile: 2 x AAA NiMH / 1,2 V / 500 mAh<br />
Autonomia dell’unità portatile: in stand-by/in conversazione<br />
500 mAh = ca. 100 h / ca. 10 h<br />
Tempo di carica della batteria: ca. 16 Ore<br />
Requisiti ambientali ammessi <strong>per</strong> il funzionamento dell’unità portatile:<br />
5°C - 45°C ; 20 % - 75 % umidità relativa dell’aria<br />
Requisiti ambientali ammessi <strong>per</strong> il funzionamento dell’unità base:<br />
5°C - 45°C ; 20 % - 75 % umidità relativa dell’aria<br />
Tem<strong>per</strong>atura di conservazione: -10°C - +60°C<br />
Selezione impostabile: MFV / IWV<br />
Funzione Flash: Flash (100 ms/300 ms/600 ms)<br />
Dimensioni stazione di base (mm): Lungh./Largh./Altezza = 110 x 115 x 35<br />
Dimensioni unità portatile (mm): Lungh./Largh./Altezza = 48 x 30 x 160<br />
Corrispondenza cavo di connessione del telefono:<br />
TSV <strong>per</strong> Pin 3 e 4 conforme CTR 37 (conformità europea)<br />
Trasformatore: presa europea<br />
30
Appendice<br />
Dichiarazione di conformità<br />
Questo apparecchio risponde a quanto disposto dalla Direttiva UE:<br />
- 1999/5/CE Direttiva concernente le apparecchiature radio, le apparecchiature<br />
terminali di tele<strong>com</strong>unicazioni e il reciproco riconoscimento della loro<br />
conformità.<br />
- 2005/32/CE Direttiva “Prodotti che consumano energia“.<br />
- Regolamento 1275/2008 “Consumo di energia elettrica nei modi stand-by<br />
e spento “.<br />
- Regolamento 278/2009 “I <strong>com</strong>ponenti di rete in caso di peso nullo, nonché<br />
la loro efficienza media in funzionamento“.<br />
La conformità con la direttiva di cui sopra viene confermata dal marchio CE applicato<br />
sull’apparecchio.<br />
Per la dichiarazione di conformità <strong>com</strong>pleta si prega di voler usufruire del servizio<br />
gratuito di download dal nostro sito Internet www.switel.<strong>com</strong>.<br />
Consigli <strong>per</strong> la cura<br />
Pulire le su<strong>per</strong>fici degli apparecchi con un panno morbido e antipilling.<br />
Non utilizzare mai detergenti o solventi.<br />
Garanzia<br />
Gli apparecchi SWITEL sono costruiti e collaudati in osservanza dei processi di<br />
produzione più moderni. L’impiego di materiali selezionati e tecnologie altamente<br />
sviluppate sono garanti di una <strong>per</strong>fetta funzionalità e lunga durata in vita. La<br />
garanzia non viene considerata esecutiva qualora la causa del malfunzionamento<br />
dell’apparecchio è dovuta al gestore della rete telefonica oppure se questa è da<br />
attribuirsi ad un impianto telefonico interno interposto. La garanzia non si estende<br />
a batterie, accumulatori o batterie ricaricabili utilizzati all’interno degli apparecchi.<br />
Il <strong>per</strong>iodo di garanzia ricopre 24 mesi a partire dalla data di acquisto.<br />
Entro il <strong>per</strong>iodo di garanzia si procederà all’eliminazione gratuita di tutti i guasti<br />
dovuti a difetti di materiale o produzione. Il diritto di garanzia cessa in caso di<br />
interventi da parte dell’acquirente o di terzi. Danni derivanti da un impiego o esercizio<br />
non conforme agli usi previsti, a naturale usura, a errato montaggio o errata<br />
I<br />
31
Appendice<br />
conservazione, a collegamento o installazione impropri, dovuti a forza maggiore o<br />
ad altri influssi esterni non sono co<strong>per</strong>ti da garanzia. In qualità di produttore ci<br />
riserviamo il diritto, in caso di reclami, di riparare o sostituire le parti difettose o di<br />
rimpiazzare l’apparecchio.<br />
Parti o apparecchi sostituiti passano di nostra proprietà. Sono esclusi diritti di<br />
risarcimento <strong>per</strong> danni qualora non siano dovuti a intenzione o colpa grave del<br />
costruttore.<br />
Nel caso in cui il presente apparecchio dovesse ciò nonostante presentare un<br />
difetto durante il <strong>per</strong>iodo di garanzia, si prega di rivolgersi esclusivamente al<br />
negozio di rivendita dell’apparecchio SWITEL assieme al relativo scontrino di<br />
acquisto. In base alle presenti disposizioni, tutti i diritti di garanzia dovranno essere<br />
fatti valere esclusivamente nei confronti del rivenditore autorizzato. Decorso il<br />
termine di due anni dalla data di acquisto e consegna dei nostri prodotti non sarà<br />
più possibile fare valere alcun diritto di garanzia.<br />
32
Appendice<br />
Indice alfabetico<br />
A<br />
Accettazione di chiamata automatica .6<br />
Accumulatore . . . . . . . . . . . . . . . . . . .2<br />
Alimentatore di rete . . . . . . . . . . . . . . .2<br />
Apparecchiature mediche . . . . . . . . . .3<br />
I<br />
Impiego conforme agli usi previsti . . .2<br />
Impostazioni predefinite . . . . . . . . . .29<br />
Indicazioni di sicurezza . . . . . . . . . . . .2<br />
Inserire l’accumulatore ricaricabile . . .6<br />
B<br />
Blocco tastiera . . . . . . . . . . . . . . . . .17<br />
C<br />
Caduta di tensione . . . . . . . . . . . . . . .2<br />
Caricare le batterie . . . . . . . . . . . . . . .6<br />
Chiamate interne . . . . . . . . . . . . . . . .15<br />
Collegare la stazione base . . . . . . . . .5<br />
Concludere una chiamata . . . . . . . . .13<br />
Configurazioni predefinite . . . . . . . . .29<br />
Consigli <strong>per</strong> la cura . . . . . . . . . . . . . .31<br />
Contenuto della confezione . . . . . . . .4<br />
D<br />
Data e Ora . . . . . . . . . . . . . . . . . .6, 21<br />
Dati Tecnici . . . . . . . . . . . . . . . . . . . .30<br />
Dichiarazione di conformità . . . . . . .31<br />
Disattivare il tono chiamata<br />
sull’unità portatile . . . . . . . . . . . . . . .17<br />
Durata di conversazione . . . . . . . . . .15<br />
E<br />
Elenco chiamate . . . . . . . . . . . . .14, 18<br />
G<br />
Garanzia . . . . . . . . . . . . . . . . . . . . . .31<br />
L<br />
Lingua . . . . . . . . . . . . . . . . . . . . . .6, 22<br />
Localizzazione guasti . . . . . . . . . . . .28<br />
Luogo di installazione . . . . . . . . . . . . .2<br />
M<br />
Messaggio display . . . . . . . . . . . . . .23<br />
Modalità di selezione . . . . . . . . . . . .23<br />
Modalità di stand-by . . . . . . . . . . . . .11<br />
Modalità ECO . . . . . . . . . . . . . . . . . .11<br />
N<br />
Navigazione nel menu . . . . . . . . . . . .11<br />
Nome dell’unità portatile . . . . . . . . . .23<br />
P<br />
PIN . . . . . . . . . . . . . . . . . . . . . . . . . .24<br />
R<br />
Registrare/cancellare un’unità<br />
portatile . . . . . . . . . . . . . . . . . . . . . . .25<br />
Ricevere una chiamata . . . . . . . . . . .13<br />
Riduzione delle radiazioni . . . . . . . . .11<br />
Rimpostare il telefono . . . . . . . . . . . .24<br />
Ripetizione di selezione . . . . . . .14, 18<br />
Risposta automatica . . . . . . . . . . . . .23<br />
33<br />
I
Appendice<br />
Risposta dir . . . . . . . . . . . . . . . . . . . . .6<br />
Rubrica telefonica . . . . . . . . . . . .14, 19<br />
S<br />
Servizi addizionali . . . . . . . . . . . . . . .26<br />
Silenziamento del microfono . . . . . . .15<br />
Smaltimento . . . . . . . . . . . . . . . . . . . .3<br />
Spegnimento unità portatile . . . . . . .17<br />
Stazione di carica . . . . . . . . . . . . . . . .5<br />
Struttura di menu . . . . . . . . . . . . . . .27<br />
Sveglia . . . . . . . . . . . . . . . . . . . . . . .21<br />
Symbole im Display . . . . . . . . . . . . . .9<br />
T<br />
Teleconferenza . . . . . . . . . . . . . . . . .16<br />
Telefonare . . . . . . . . . . . . . . . . . . . . .13<br />
Telefonici interni . . . . . . . . . . . . . . . .26<br />
Tempo flash . . . . . . . . . . . . . . . . . . . .24<br />
Toni di avviso . . . . . . . . . . . . . . . . . .22<br />
Tono di chiamata . . . . . . . . . . . . . . . .22<br />
Trasferire chiamate esterne . . . . . . .16<br />
V<br />
Volume del ricevitore . . . . . . . . . . . .15<br />
34
Table of contents<br />
1 Safety Information . . . . . . . . . . . . . . . . . . . . . . . . . . . . . . . . . . . . . . . . . .2<br />
2 Preparing the Telephone . . . . . . . . . . . . . . . . . . . . . . . . . . . . . . . . . . . .4<br />
3 O<strong>per</strong>ating Elements . . . . . . . . . . . . . . . . . . . . . . . . . . . . . . . . . . . . . . . . .7<br />
4 Preliminary Information . . . . . . . . . . . . . . . . . . . . . . . . . . . . . . . . . . . . .9<br />
5 Telephoning . . . . . . . . . . . . . . . . . . . . . . . . . . . . . . . . . . . . . . . . . . . . . .13<br />
6 Other features . . . . . . . . . . . . . . . . . . . . . . . . . . . . . . . . . . . . . . . . . . . .17<br />
7 Call list / Redial . . . . . . . . . . . . . . . . . . . . . . . . . . . . . . . . . . . . . . . . . . .18<br />
8 Phone book . . . . . . . . . . . . . . . . . . . . . . . . . . . . . . . . . . . . . . . . . . . . . .19<br />
9 Setting the telephone . . . . . . . . . . . . . . . . . . . . . . . . . . . . . . . . . . . . . .21<br />
10 Registering/de-registering handsets . . . . . . . . . . . . . . . . . . . . . . . . . .25<br />
11 PBX / Supplementary Services . . . . . . . . . . . . . . . . . . . . . . . . . . . . . .26<br />
12 Appendix . . . . . . . . . . . . . . . . . . . . . . . . . . . . . . . . . . . . . . . . . . . . . . . .27<br />
GB<br />
1
Safety Information<br />
1 Safety Information<br />
Please read this o<strong>per</strong>ating instruction manual thoroughly.<br />
Intended use<br />
The telephone is suitable for telephoning within a public telephone network<br />
system. Any other use is considered unintended use. Unauthorised modification<br />
or reconstruction is not <strong>per</strong>mitted. Under no circumstances open the<br />
device or <strong>com</strong>plete any repair work yourself.<br />
Installation location<br />
Prevent excessive exposure to smoke, dust, vibration, chemicals, moisture,<br />
heat and direct sunlight.<br />
Do not use the handset in potentially explosive areas.<br />
Power adapter plug<br />
a Attention: Only use the power adapter plug supplied because other<br />
power supplies could damage the telephone.<br />
Ensure access to the power adapter plug is not obstructed by furniture or<br />
such.<br />
Rechargeable batteries<br />
a Attention: Never throw batteries into a fire. Only use batteries of the<br />
same type. Pay attention to the correct polarity. Incorrect polarity of the<br />
batteries represents a risk of explosion during charging.<br />
Power failure<br />
The telephone cannot be used to make calls in the event of a power failure.<br />
Always keep a cord connected telephone which o<strong>per</strong>ates without an external<br />
power supply available in case of emergency situations.<br />
2
Safety Information<br />
Medical equipment<br />
a Attention: Never use the telephone in the vicinity of medical equipment.<br />
Effects on such equipment cannot be fully ruled out.<br />
DECT 1 telephones can cause an unpleasant humming sound in hearing aids.<br />
Disposal<br />
In order to dispose of your device, take it to a collection point<br />
provided by your local public waste authorities (e.g. recycling<br />
centre). The adjacent symbol indicates that the device must<br />
not be disposed of in normal domestic waste! According to<br />
laws on the disposal of electronic and electrical devices,<br />
owners are obliged to dispose of old electronic and electrical<br />
devices in a separate waste container.<br />
Batteries must be disposed of at the point of sale or at the<br />
appropriate collection points provided by the public waste<br />
authorities.<br />
Packaging materials must be disposed of according to local<br />
regulations.<br />
1<br />
DECT: Digital Enhanced Cordless Tele<strong>com</strong>munication = Standard for<br />
cordless telephones.<br />
GB<br />
3
Preparing the Telephone<br />
2 Preparing the Telephone<br />
Safety information<br />
a Attention: It is essential to read the Safety Information in Chapter 1<br />
before starting up.<br />
Checking the package contents<br />
The package contains:<br />
Content<br />
DE 202x model<br />
2021 2022 1 2023 1 2024 1<br />
Base station with power adapter<br />
plug 1 1 1 1<br />
Charging station with power<br />
adapter plug - 1 2 3<br />
Handset 1 2 3 4<br />
Telephone connection cable 1 1 1 1<br />
Rechargeable batteries 2 4 6 8<br />
O<strong>per</strong>ating instructions 1 1 1 1<br />
1<br />
Visit www.switel.<strong>com</strong> to find out whether this telephone is available.<br />
Electrical consumption<br />
The electrical consumption of the base is:<br />
- in o<strong>per</strong>ation mode (idle/call): approx. 1.2 W<br />
- during charging of the handset: approx. 2.0 W.<br />
The adaptor input power without load is approx. 0.15 W. The average efficiency<br />
is approx. 67 %.<br />
The electrical consumption of the charger is:<br />
- without handset charging: approx. 0.15 W<br />
- during charging of the handset: approx. 1.2 W.<br />
The adaptor input power without load is approx. 0.15 W. The average efficiency<br />
is approx. 67 %.<br />
4
Preparing the Telephone<br />
Connecting the base station<br />
a Attention: Position the base station at least 1 m away from other<br />
electronic devices, otherwise there is a risk of mutual disturbance.<br />
Connect the base station as illustrated in the diagram. For reasons of<br />
safety, only use the power adapter plug and telephone connection line<br />
supplied.<br />
Mains power outlet<br />
Telephone line socket<br />
a Attention: Use only the power adapter plug supplied with the base<br />
station!<br />
Connecting the charging station 2<br />
Connect the charging station to the mains. Ensure access to the power<br />
adapter plug is not obstructed by furniture or such.<br />
2<br />
Only applies to telephone sets with at least two handsets, see “Checking the<br />
package content“.<br />
5<br />
GB
Preparing the Telephone<br />
6<br />
Inserting the batteries<br />
Open the battery <strong>com</strong>partment cover. Put in the<br />
batteries. Close the battery <strong>com</strong>partment cover.<br />
a Attention: Use only type AAA NiMH 1.2 V /<br />
500 mAh rechargeable batteries. Never use normal<br />
batteries / primary cell batteries.<br />
Observe the correct polarity!<br />
Charging the batteries<br />
☞ Before the handset is used for the first time, insert it in the base station /<br />
charging station for at least 16 hours.<br />
The handset warms up during the charging process. This is normal and<br />
does not represent a risk. Use only the adapter plug unit provided for the<br />
charging station. The battery status is shown on the display. When the battery<br />
capacity is nearly exhausted, the battery symbol (L) will flash in the display<br />
and you will hear the battery warning sound (if the option is switched on) /<br />
menu item “HS SETTINGS/TONE/BATTERY TONE“). You still have up to ten<br />
minutes of talk time.<br />
Setting the time and date on the handset<br />
At initial o<strong>per</strong>ation the handset does not have the correct time (e.g. for entries<br />
in the call list). Date and time are set through the menu item “HS SETTINGS/<br />
DATE & TIME“.<br />
Setting the display language<br />
The display language is available in 13 languages. The default setting is “German<br />
(Deutsch)“. Set the language using the menu item “MT-EINSTEL. /<br />
SPRACHE“.<br />
Auto Answer<br />
If this function is activated, an in<strong>com</strong>ing call is taken when the handset is<br />
removed from the base station. The automatic answering function is activated<br />
and deactivated using the menu item “HS SETTINGS/ AUTO ANSWER“.
O<strong>per</strong>ating Elements<br />
3 O<strong>per</strong>ating Elements<br />
Earpiece<br />
Display<br />
Call list<br />
Softkey<br />
(Menu / OK)<br />
Off Hook button<br />
Digit keys<br />
DE 2021<br />
Up/down keys<br />
Softkey<br />
(Int / C = Cancel)<br />
On Hook button<br />
Redial list<br />
Handsfree<br />
Phone book<br />
R-key<br />
Microphone<br />
GB<br />
7
O<strong>per</strong>ating Elements<br />
Locate handset<br />
(Paging)<br />
Charge contacts<br />
8
Preliminary Information<br />
4 Preliminary Information<br />
This chapter provides basic information on using the o<strong>per</strong>ating instruction<br />
manual and the telephone.<br />
Description of o<strong>per</strong>ating sequences in the manual<br />
Display<br />
Description<br />
NAME?<br />
Press the button depicted.<br />
Enter digits or letters.<br />
Handset rings.<br />
Remove the handset from the base station.<br />
Place the handset in the base station.<br />
Depicts text in the display.<br />
Depicts icons in the display.<br />
Icons in the handset display<br />
Icon<br />
Description<br />
On: The connection to the base station is good.<br />
Flashing: The connection to the base station is lost.<br />
On: Indicates the battery charge status.<br />
Flashing while handset in base:<br />
Batteries are being charged.<br />
On: Batteries need charging.<br />
Flashing: Batteries should be charged immediately.<br />
On: A call is currently being made.<br />
Flashing: A call has been received.<br />
Handsfree mode is activated.<br />
The ringing tone has been switched off.<br />
On: The alarm function is activated.<br />
Flashing: The alarm is ringing.<br />
The key lock is activated<br />
9<br />
GB
Preliminary Information<br />
You received a message in your answering machine<br />
provided by the telephone network (depending on<br />
telephone network/provider).<br />
On: You can conduct an internal call (only with<br />
several handsets registrated on the base station).<br />
Flashing: In<strong>com</strong>ing internal call.<br />
While browsing call list: New call.<br />
Character overflow left/right. Use to scroll.<br />
The functions assigned to the two softkeys are shown in the lowest line of<br />
the display. The key function changes automatically according to the o<strong>per</strong>ating<br />
status of the handset.<br />
Accessing the menu.<br />
Confirmation.<br />
Making an internal call (only with several handsets<br />
registrated on the base station).<br />
Back to the previous menu or cancel programming.<br />
Backwards deleting of characters during entry (brief<br />
pressing deletes one character, long pressing<br />
deletes the whole line),<br />
Muting/unmuting the microphone during a call.<br />
10
Preliminary Information<br />
Standby mode<br />
All descriptions in this o<strong>per</strong>ating manual assume that the handset is in Standby<br />
mode. The system switches to Standby mode by pressing the button.<br />
Low-radiation o<strong>per</strong>ation (ECO mode)<br />
In call mode, the radiation is reduced considerably as <strong>com</strong>pared to standard,<br />
cordless DECT telephones.<br />
Navigating in the menu<br />
All the functions can be accessed via the various menus. The entire menu<br />
structure can be found in the appendix.<br />
The softkeys and the arrow keys are used for navigation in the menu.<br />
The menu is opened with the left softkey .<br />
Use the arrow keys and to move within the menu<br />
Press the softkey to open a sub menu.<br />
To return to the main menu press briefly. With a long press you will<br />
return to the standby state.<br />
GB<br />
11
Preliminary Information<br />
Creating phone book entries - example<br />
The way in which to navigate through the menus and enter data is explained<br />
by means of the example “Creating phone book entries“. Proceed as in this<br />
example for all the settings.<br />
Press the phone book key.<br />
or<br />
Press the Menu softkey.<br />
Select PHONEBOOK and confirm with OK.<br />
Empty telephone book: EMPTY is shown.<br />
If there are entries yet: the first entry is shown.<br />
Press the Menu softkey.<br />
Confirm ADD with OK.<br />
Enter the name (max. 12 digits).<br />
Letters are also imprinted on the digit keys. Letters, digits<br />
and special characters are entered by pressing the relevant<br />
key the respective number of times.<br />
After a short time the cursor skips one position forwards.<br />
Confirm with OK.<br />
Enter the phone number (max. 20 digits).<br />
Confirm with OK.<br />
/ Select a melody for the entry.<br />
Confirm with OK.<br />
Back to Standby mode.<br />
12
Telephoning<br />
5 Telephoning<br />
Taking a call<br />
Your phone is ringing.<br />
If the handset is not in the base station:<br />
/ Press the Off Hook button or the Handsfree button.<br />
If the handset is in the base station and AUTO ANSWER is not activated:<br />
/ Remove the handset from the base and press the Off Hook<br />
button or the Handsfree button.<br />
If the handset is in the base station and AUTO ANSWER is activated:<br />
Remove the handset from the base - the call will be taken<br />
automatically.<br />
Making a call<br />
Enter the telephone number.<br />
Delete wrong characters pressing .<br />
/ The telephone number is being dialled.<br />
☞ You can also press the Off Hook button and you will hear the dialling tone.<br />
The entered number will be dialled immediately. It is not possible to correct<br />
wrong digits individually using this dialling procedure.<br />
Ending a call<br />
/ Press the On Hook button or replace the handset in the base<br />
station.<br />
GB<br />
13
Telephoning<br />
Redial<br />
☞ Your handset saves the last 5 dialled telephone numbers. If a caller is<br />
stored in your phone book, the name will be displayed.<br />
Whilst the name is displayed to show the respective number press .<br />
The most recent last number will be displayed at the top of the list.<br />
Open the redial list.<br />
/ Select an entry.<br />
/ Dial out the telephone number.<br />
Making a call from the call list<br />
☞ Your handset saves the numbers of the last 10 in<strong>com</strong>ing calls in the call<br />
list. If a caller is stored in your phone book, the name will be displayed.<br />
Whilst the name is displayed to show the respective number press .<br />
Saving can only take place if the function “Phone number transmission<br />
(CLIP)” is available at your connection and caller ID is not suppressed by the<br />
caller or was not transmitted for any other reason.<br />
Open the call list.<br />
/ Select an entry.<br />
/ Dial out the telephone number.<br />
Making a call from the phone book<br />
☞ You can store up to 20 entries in the phone book.<br />
For creating entries see section “Phone book“.<br />
Open the telephone book.<br />
/ Select the name of the <strong>per</strong>son you wish to call.<br />
/ Dial out the telephone number.<br />
14
Telephoning<br />
Call timer<br />
Your handset automatically times the duration of every call in hours, minutes<br />
and seconds.<br />
Setting the earpiece/loudspeaker volume<br />
/ During a call you can adjust the volume in 5 levels (if telephoning<br />
“normally“ -> earpiece volume, with hands-free -><br />
loudspeaker volume).<br />
These se<strong>per</strong>ate settings will remain at the last selected level<br />
when you end the call.<br />
Muting the microphone<br />
During a call you can switch your handset’s microphone off.<br />
The display shows MUTED.<br />
To unmute press the c softkey again.<br />
Internal calls<br />
☞ Internal calls, transfers and conference calls are only possible if multiple<br />
handsets are registered. If this is not the case NOT POSSIBLE will be<br />
indicated on the display.<br />
Making an internal call<br />
Press the Internal softkey. If two handsets are registrated to<br />
the base station the other handset will be called immediately.<br />
If three or more handsets are registrated to the base station<br />
their internal numbers will be displayed (for example 2 3 4).<br />
Press the internal number you want to call.<br />
If you press “9“ in the case of several registered handsets all<br />
will be called at the same time.<br />
GB<br />
15
Telephoning<br />
Transferring an external call to another handset<br />
During an external call . . .<br />
Press the Menu softkey.<br />
/ Select INTERCOM and press OK.<br />
Enter the internal telephone number. The external call is put<br />
on hold. When the called handset answers you can<br />
announce the call transfer.<br />
Press the On-Hook key. The call will be transferred.<br />
3-Party Conference<br />
During an external call . . .<br />
Press the Menu softkey.<br />
/ Select INTERCOM and press OK.<br />
Enter the internal telephone number.<br />
When the called handset answers ... press and hold down<br />
the star key until CONFERENCE appears in the display.<br />
☞ Any handset hangs up during a conference call will leave the other<br />
handset still in connection with the external call.<br />
16
Other Features<br />
6 Other features<br />
Key lock<br />
☞ The key lock prevents functions assigned to buttons being activated<br />
inadvertently. In<strong>com</strong>ing calls can still be taken in the normal way even when<br />
the key lock function is activated.<br />
Press and hold down the star-key until the key lock icon<br />
appears in the display.<br />
For unlocking the keypad again press and hold down the<br />
star-key until the icon disappears.<br />
Switching the handset ringer on/off<br />
☞ You can turn off the ringer via the menu item “HS SETTINGS/<br />
RING SETUP/RING VOLUME“ as well.<br />
Press and hold down the #-key until the<br />
in the display.<br />
icon appears<br />
For turning the ringer on again press and hold down the #-<br />
key until the icon disappears.<br />
Switching off the handset<br />
☞ You can switch off the handset for saving battery capacity.<br />
Press and hold down the On Hook-button. After a few seconds<br />
the handset will be switched off. The display illumination<br />
goes down.<br />
For switching the handset on again press and hold down the<br />
On Hook-button until you hear a short beep and the display<br />
is illuminated.<br />
GB<br />
17
Call list / Redial<br />
7 Call list / Redial<br />
Editing the call list<br />
Open the call list.<br />
/ Select an entry.<br />
Press the Menu softkey.<br />
/ Select one of the following options and confirm with OK:<br />
ADD TO PB The telephone number will be stored in the telephone book.<br />
Enter a name, confirm or edit the telephone number and<br />
select a ringtone melody for the entry.<br />
DELETE The entry will be deleted.<br />
DELETE ALL The <strong>com</strong>plete list will be deleted after a confirmation query.<br />
DETAILS The respective call’s date and time is shown.<br />
☞ You can access the call list via the menu as well:<br />
( / CALL LIST ).<br />
Editing the redial list<br />
/ Open the redial list.<br />
/ Select an entry.<br />
Press the Menu softkey.<br />
/ Select one of the following options and confirm with OK:<br />
ADD TO PB The telephone number will be stored in the telephone book.<br />
Enter a name, confirm or edit the telephone number and<br />
select a ringtone melody for the entry.<br />
DELETE The entry will be deleted.<br />
DELETE ALL The <strong>com</strong>plete list will be deleted after a confirmation query.<br />
18
Phonebook<br />
8 Phone book<br />
☞ Your phone can store up to 20 private phonebook entries with names and<br />
numbers. You can also select different ringtones for your phonebook entries.<br />
Always enter the phone numbers with the area code; this enables a correct<br />
display of the respective caller for whom there is an existing entry and whose<br />
phone number transmission to your connection is available.<br />
Creating a new entry<br />
Press the phone book key.<br />
Empty telephone book: EMPTY is shown.<br />
If there are entries yet: the first entry is shown.<br />
Press the Menu softkey.<br />
Confirm ADD with OK.<br />
Enter the name (max. 12 digits).<br />
Letters are also imprinted on the digit keys. Letters, digits<br />
and special characters are entered by pressing the relevant<br />
key the respective number of times.<br />
After a short time the cursor skips one position forwards.<br />
Confirm with OK.<br />
Enter the phone number (max. 20 digits). If your telephone is<br />
connected to a PBX start the telephone number with the<br />
access code. If a dialling pause is needed, press after the<br />
access code the 0 key for approx. 2 sec. A P appears in the<br />
display.<br />
Confirm with OK.<br />
/ Select a melody for the entry.<br />
Confirm with OK.<br />
Back to Standby mode.<br />
☞ You can access the telephone book via the menu as well:<br />
( / PHONEBOOK ).<br />
GB<br />
19
Phonebook<br />
Editing telephone book entries<br />
Press the phone book key.<br />
/ Select an entry.<br />
Press the Menu softkey.<br />
/ Select one of the following options and confirm with OK:<br />
ADD You can create a new entry.<br />
VIEW The entry is shown. Using the up/down key you switch<br />
between name, number and melody.<br />
EDIT You can edit the entry. Use the “C“ softkey to delete characters<br />
and numbers then add new characters and numbers as<br />
required. Please refer to “Creating a new entry“.<br />
DELETE The entry will be deleted.<br />
DELETE ALL The <strong>com</strong>plete list will be deleted after a confirmation query.<br />
PB STATUS The current allocation will be displayed (e.g. 07/20 USED:<br />
7 of 20 possible entries are present).<br />
20
Setting the telephone<br />
9 Setting the telephone<br />
Date/Time<br />
Press the Menu softkey.<br />
/ Select HS SETTINGS and press OK.<br />
/ Select DATE & TIME and press OK.<br />
/ Select one of the following options and confirm with OK:<br />
DATE FORMAT You can select your desired date format:<br />
(DD-MM-YY or MM-DD-YY).<br />
TIME FORMAT You can select your desired time format:<br />
(24 hours or 12 hours).<br />
SET TIME Enter the time using the digit keys.<br />
SET DATE Enter the date using the digit keys.<br />
☞ In case of mains failure this setting will be deleted when simultaneously<br />
the handset will be switched off or the batteries will be empty.<br />
Alarm<br />
Press the Menu softkey.<br />
/ Select HS SETTINGS and press OK.<br />
/ Select ALARM and press OK.<br />
/ Select ON and press OK.<br />
Enter the alarm time using the digit keys.<br />
SNOOZE Press OK.<br />
/ Select ON or OFF and press OK.<br />
If “Snooze“ is turned on it means that the alarm signal is<br />
being repeated after 7 minutes until this function is terminated<br />
by pressing and holding the off hook button.<br />
If “Snooze“ is turned off the alarm signal is given once at the<br />
specified time. To confirm the alarm signal, press any key.<br />
GB<br />
21
Setting the telephone<br />
Setting the ringer for the handset<br />
Press the Menu softkey.<br />
/ Select HS SETTINGS and press OK.<br />
/ Select RING SETUP and press OK.<br />
/ Select one of the following options and confirm with OK:<br />
INT. RING Select a melody for internal calls.<br />
EXT. RING Select a melody for external calls.<br />
RING VOLUME Select the volume. If you select „VOLUME OFF“ the respective<br />
icon appears in the display.<br />
Setting the alert tones<br />
Press the Menu softkey.<br />
/ Select HS SETTINGS and press OK.<br />
/ Select TONE SETUP and press OK.<br />
/ Select one of the following options and confirm with OK:<br />
KEY TONE Switch the keytone on or off.<br />
BATTERY TONE Switch the alert tone on or off. The tone sounds if “Low battery“<br />
is detected.<br />
OUT OF RANGE Switch the alert tone on or off. The tone sounds if “Out of<br />
range“ is detected.<br />
Setting the display language<br />
Press the Menu softkey.<br />
/ Select HS SETTINGS and press OK.<br />
/ Select LANGUAGE and press OK.<br />
/ Select a language and press OK.<br />
22
Setting the telephone<br />
Setting the handset name<br />
Press the Menu softkey.<br />
/ Select HS SETTINGS and press OK.<br />
/ Select RENAME HS and press OK.<br />
Delete the old name with , enter a new name using<br />
the digit keys and confirm with OK.<br />
Setting the display<br />
Press the Menu softkey.<br />
/ Select HS SETTINGS and press OK.<br />
/ Select HS DISPLAY and press OK.<br />
/ Select whether in standby-mode the handset’s name or the<br />
time will be displayed and confirm with OK.<br />
Setting Auto Answer<br />
Press the Menu softkey.<br />
/ Select HS SETTINGS and press OK.<br />
/ Select AUTO ANSWER and press OK.<br />
/ Select whether the automatic answer function will be on or<br />
off and confirm with OK.<br />
☞ If AUTO ANSWER is on an in<strong>com</strong>ing call will immediately be taken when<br />
the handset is taken from the base.<br />
Setting the dial mode<br />
Press the Menu softkey.<br />
/ Select BS SETTINGS and press OK.<br />
/ Select DIAL MODE and press OK.<br />
/ Select TONE or PULSE and press OK.<br />
☞ In most situations the TONE option should be selected.<br />
GB<br />
23
Setting the telephone<br />
Setting the Flash Time<br />
Press the Menu softkey.<br />
/ Select BS SETTINGS and press OK.<br />
/ Select FLASH TIME and press OK.<br />
/ Select SHORT (100 ms), MEDIUM (300 ms) or LONG (600<br />
ms) and confirm with OK.<br />
Editing the PIN<br />
Press the Menu softkey.<br />
/ Select BS SETTINGS and press OK.<br />
/ Select CHANGE PIN and press OK.<br />
Enter the relevant PIN (default 0 0 0 0) and press OK.<br />
Enter the new PIN and press OK.<br />
Enter the new PIN again and press OK.<br />
☞ The four digit PIN protects some settings against unauthorized changes.<br />
If you have forgotten your PIN please call our service hotline.<br />
Resetting your phone<br />
Press the Menu softkey.<br />
/ Select DEFAULT and press OK.<br />
Enter the relevant PIN (default 0 0 0 0) and press OK.<br />
Confirm the confirmation query with OK.<br />
☞ The phone book entries will not be deleted. Please delete the phone book<br />
using the menu item “PHONE BOOK/DELETE ALL“<br />
The registration of handsets will not be changed.<br />
24
Registering/de-registering handsets<br />
10 Registering/de-registering handsets<br />
Five handsets can be registered to a base station. The handsets delivered<br />
with your telephone are already registered. To register a “foreign“ handset<br />
please refer to it’s user manual.<br />
Registering a handset of the same type<br />
Press the Menu softkey.<br />
/ Select REGISTRATION and press OK.<br />
Enter the relevant PIN for the base, the new handset should<br />
be registered on, and press OK.<br />
Press and hold down the paging key on the base station for<br />
approx. 5 sec.<br />
After a few seconds the antenna icon on the display is on.<br />
The handset is registered.<br />
Deleting a handset<br />
Press the Menu softkey.<br />
/ Select BS SETTINGS and press OK.<br />
/ Select DELETE HS and press OK.<br />
Enter the relevant PIN and press OK.<br />
/ Select a handset and press OK.<br />
☞ You cannot de-register the handset you are currently using.<br />
GB<br />
25
PBX / Supplementary Services<br />
11 PBX / Supplementary Services<br />
PBX<br />
If the telephone is connected to a private branch exchange, functions such as<br />
transferring calls and automatic call back can be used via the R button.<br />
Refer to the o<strong>per</strong>ating manual provided with your private branch exchange as<br />
to which Flash time must be set in order to use these functions. The sales outlet<br />
where you purchased the exchange can provide information as to whether<br />
the telephone will work pro<strong>per</strong>ly with the exchange.<br />
Please remember to enter the access code and a neccessary dialling pause<br />
(longpress “0“) when creating phone book entries.<br />
Supplementary services<br />
Your telephone supports supplementary services provided by your telephone<br />
network provider, such as brokering, call waiting and conference facilities.<br />
These supplementary services can be used via the R-button.<br />
Please contact your telephone network provider regarding which Flash time<br />
must be set to use the supplementary services. Contact your telephone<br />
network provider with regard to enabling supplementary services.<br />
26
Appendix<br />
12 Appendix<br />
Menu Structure<br />
CALL LIST<br />
PHONEBOOK<br />
BS SETTINGS<br />
DELETE HS<br />
DIAL MODE<br />
TONE<br />
PULSE<br />
FLASH TIME SHORT<br />
MEDIUM<br />
LONG<br />
CHANGE PIN<br />
HS SETTINGS ALARM OFF/ON / Alarm time<br />
RING SETUP INT. RING MELODY 1...10<br />
EXT. RING MELODY 1...10<br />
RING VOLUME OFF, 1…5<br />
TONE SETUP KEY TONE ON / OFF<br />
REGISTRATION<br />
DEFAULT<br />
LANGUAGE<br />
RENAME HS<br />
HS DISPLAY<br />
AUTO ANSWER<br />
DATE & TIME<br />
BATTERY TONE<br />
OUT OF RANGE<br />
-> 13 languages<br />
HANDSET NAME<br />
TIME<br />
ON/OFF<br />
DATE FORMAT<br />
TIME FORMAT<br />
SET TIME<br />
SET DATE<br />
ON / OFF<br />
ON / OFF<br />
GB<br />
27
Appendix<br />
In Case of Problems<br />
Should problems arise with the telephone, please refer to the following information<br />
first. In the case of technical problems, you can contact our hotline<br />
service, Tel. 0900 00 1675 within Switzerland (Costs for call from Swiss<strong>com</strong><br />
landline at time of going to print: CHF 2.60/min). In the case of claims under<br />
the terms of guarantee, contact your sales outlet. There is a 2 year <strong>per</strong>iod of<br />
guarantee.<br />
• After pressing the on hook button, no ring tone is audible, the line is not<br />
engaged.<br />
- Check the telephone connector on the base station and on the wall socket.<br />
- Check power connector on the base station and on 230 V.<br />
- The line is being occupied by another handset. Wait until the connection<br />
is terminated.<br />
• Display:„SEARCHING”.<br />
- Check power connector on the base station and on 230 V.<br />
- Reduce range.<br />
- Register handset.<br />
• No display.<br />
- Handset turned off -> turn on.<br />
- Battery empty -> recharge.<br />
28
Appendix<br />
Default settings<br />
Call list<br />
No entry<br />
Phonebook<br />
No entry<br />
Alarm<br />
Off<br />
Ringer handset Internal call: Melody 2<br />
External call: Melody 1<br />
Volume: 3<br />
Tone setup<br />
Key tone: On<br />
Battery tone: On<br />
Out of range: On<br />
Language<br />
German<br />
Handset name DE 202x<br />
Handset display Handset name<br />
Auto answer<br />
On<br />
Date & Time<br />
Date format: TT-MM-JJ<br />
Time format: 24 hours<br />
Dial mode<br />
Tone<br />
Flash time<br />
Short (100 ms)<br />
PIN 0 0 0 0<br />
GB<br />
29
Appendix<br />
Technical data<br />
Standard: DECT / GAP<br />
Number of channels: 120 duplex channels<br />
Frequencies: 1880 MHz to 1900 MHz<br />
Duplex mode: Time division multiplex, 10ms frame length<br />
Channel spacing: 1728 kHz<br />
Bit rate: 1152 kBit / s<br />
Modulation: GFSK<br />
Voice encoding: 32 kBit / s<br />
Transmitter power: 10 mW (average power <strong>per</strong> channel)<br />
Range: up to 300 m outside, up to 50 m inside buildings<br />
Electricity supply base station / Electricity supply charger:<br />
Adaptor plug (S002CV0600030, 6V DC/300mA) or<br />
(VT04EEU06045, 6V DC/450mA).<br />
Electricity supply handset: 2 x AAA NiMH / 1,2 V / 500 mAh<br />
Handset: O<strong>per</strong>ating time: Stand-by time / Talk time<br />
500 mAh = up to 100 h / up to 10 h<br />
Charging time: approx. 16 hours<br />
O<strong>per</strong>ating tem<strong>per</strong>ature for handset o<strong>per</strong>ation:<br />
5°C to 45°C ; 20 % to 75 % rel. humidity<br />
O<strong>per</strong>ating tem<strong>per</strong>ature for base station o<strong>per</strong>ation:<br />
5°C to 45°C ; 20 % to 75 % rel. humidity<br />
Storage tem<strong>per</strong>ature: -10°C to +60°C<br />
Dial mode: Tone / Pulse<br />
R-key : Flash time (100 ms/300 ms/600 ms)<br />
Base station dimensions (mm): L / W / H = 110 x 115 x 35<br />
Handset dimensions (mm): L / W / H = 48 x 30 x 160<br />
Telephone line cord:<br />
TSV on Pin 3 and 4 according to CTR 37 (Euro)<br />
Adapter plug: European-type mains connector<br />
30
Appendix<br />
Declaration of Conformity<br />
This device fulfils the requirements stipulated in the EU directives:<br />
- 1999/5/EU directive on radio equipment and tele<strong>com</strong>munications terminal<br />
equipment and the mutual recognition of their conformity.<br />
- 2005/32/EU directive “Energy-using products“.<br />
- Regulation 1275/2008 “Electric power consumption in standby- and offstate“.<br />
- Regulation 278/2009 “External power supplies without load and their<br />
average efficiency in use“.<br />
Conformity with the above mentioned directives is confirmed by the CE symbol<br />
on the device.<br />
To view the <strong>com</strong>plete Declaration of Conformity, please refer to the free download<br />
available on our web site www.switel.<strong>com</strong>.om.<br />
Maintenance<br />
Clean the housing surfaces with a soft, fluff-free cloth.<br />
Do not use any cleaning agents or solvents.<br />
Guarantee<br />
SWITEL equipment is produced and tested according to the latest production<br />
methods. The implementation of carefully chosen materials and highly developed<br />
technologies ensure trouble-free functioning and a long service life. The<br />
terms of guarantee do not apply where the cause of equipment malfunction is<br />
the fault of the telephone network o<strong>per</strong>ator or any interposed private branch<br />
extension system. The terms of guarantee do not apply to the batteries or<br />
power packs used in the products. The <strong>per</strong>iod of guarantee is 24 months from<br />
the date of purchase.<br />
All deficiencies related to material or manufacturing errors within the <strong>per</strong>iod of<br />
guarantee will be redressed free of charge. Rights to claims under the terms<br />
of guarantee are annulled following tam<strong>per</strong>ing by the purchaser or third parties.<br />
Damage caused as the result of impro<strong>per</strong> handling or o<strong>per</strong>ation, normal<br />
wear and tear, incorrect positioning or storage, impro<strong>per</strong> connection or instal-<br />
GB<br />
31
Appendix<br />
lation or Acts of God and other external influences are excluded from the<br />
terms of guarantee. In the case of <strong>com</strong>plaints, we reserve the right to repair<br />
defect parts, replace them or replace the entire device. Replaced parts or<br />
devices be<strong>com</strong>e our pro<strong>per</strong>ty. Rights to <strong>com</strong>pensation in the case of damage<br />
are excluded where there is no evidence of intent or gross negligence by the<br />
manufacturer.<br />
If your device shows signs of defect during the <strong>per</strong>iod of guarantee, please<br />
return it to the sales outlet in which you purchased the SWITEL device together<br />
with the purchase receipt. All claims under the terms of guarantee in accordance<br />
with this agreement can only be asserted at the sales outlet.<br />
No claims under the terms of guarantee can be asserted after a <strong>per</strong>iod of two<br />
years from the date of purchase and hand-over of the product.<br />
32
Appendix<br />
Index<br />
A<br />
Alarm . . . . . . . . . . . . . . . . . . . . . . . . .21<br />
Alert tones . . . . . . . . . . . . . . . . . . . . .22<br />
Auto Answer . . . . . . . . . . . . . . . . .6, 23<br />
C<br />
Call list . . . . . . . . . . . . . . . . . . . .14, 18<br />
Call timer . . . . . . . . . . . . . . . . . . . . . .15<br />
Charging the batteries . . . . . . . . . . . .6<br />
Conference . . . . . . . . . . . . . . . . . . . .16<br />
Connecting the base station . . . . . . . .5<br />
Connecting the charging station . . . . .5<br />
D<br />
Date/time . . . . . . . . . . . . . . . . . . . .6, 21<br />
Declaration of Conformity . . . . . . . . .31<br />
Default settings . . . . . . . . . . . . . . . . .29<br />
Dial mode . . . . . . . . . . . . . . . . . . . . .23<br />
Display . . . . . . . . . . . . . . . . . . . . . . .23<br />
Display language . . . . . . . . . . . . . . . .6<br />
Disposal . . . . . . . . . . . . . . . . . . . . . . .3<br />
E<br />
Earpiece/loudspeaker volume . . . . . .15<br />
ECO mode . . . . . . . . . . . . . . . . . . . .11<br />
Electrical consumption . . . . . . . . . . . .4<br />
Ending a call . . . . . . . . . . . . . . . . . . .13<br />
F<br />
Flash Time . . . . . . . . . . . . . . . . . . . .24<br />
G<br />
Guarantee . . . . . . . . . . . . . . . . . . . . .31<br />
H<br />
Handset name . . . . . . . . . . . . . . . . . .23<br />
I<br />
Icons . . . . . . . . . . . . . . . . . . . . . . . . . .9<br />
In Case of Problems . . . . . . . . . . . . .28<br />
Inserting the batteries . . . . . . . . . . . . .6<br />
Installation location . . . . . . . . . . . . . . .2<br />
Intended use . . . . . . . . . . . . . . . . . . . .2<br />
Internal calls . . . . . . . . . . . . . . . . . . .15<br />
K<br />
Key lock . . . . . . . . . . . . . . . . . . . . . .17<br />
L<br />
Language . . . . . . . . . . . . . . . . . . . . .22<br />
Low-radiation o<strong>per</strong>ation . . . . . . . . . . .11<br />
M<br />
Maintenance . . . . . . . . . . . . . . . . . . .31<br />
Making a call . . . . . . . . . . . . . . . . . . .13<br />
Medical equipment . . . . . . . . . . . . . . .3<br />
Menu Structure . . . . . . . . . . . . . . . . .27<br />
Muting the microphone . . . . . . . . . . .15<br />
N<br />
Navigating in the menu . . . . . . . . . . .11<br />
33<br />
GB
Appendix<br />
P<br />
Package contents . . . . . . . . . . . . . . . .4<br />
PBX . . . . . . . . . . . . . . . . . . . . . . . . . .26<br />
Phone book . . . . . . . . . . . . . . . . .14, 19<br />
PIN . . . . . . . . . . . . . . . . . . . . . . . . . .24<br />
Power adapter plug . . . . . . . . . . . . . . .2<br />
Power failure . . . . . . . . . . . . . . . . . . . .2<br />
R<br />
Rechargeable batteries . . . . . . . . . . . .2<br />
Redial . . . . . . . . . . . . . . . . . . . . .14, 18<br />
Registering/de-registering handsets .25<br />
Reset . . . . . . . . . . . . . . . . . . . . . . . . .24<br />
Ringer . . . . . . . . . . . . . . . . . . . . . . . .22<br />
S<br />
Safety Information . . . . . . . . . . . . . . . .2<br />
Standby mode . . . . . . . . . . . . . . . . . .11<br />
Supplementary services . . . . . . . . . .26<br />
Switching off the handset . . . . . . . . .17<br />
Switching the handset ringer on/off .17<br />
T<br />
Taking a call . . . . . . . . . . . . . . . . . . .13<br />
Technical data . . . . . . . . . . . . . . . . . .30<br />
Transferring an external call . . . . . . .16<br />
34
Für die komplette Konformitätserklärung nutzen Sie bitte<br />
den kostenlosen Download von unserer Website www.switel.<strong>com</strong>.<br />
Pour obtenir la déclaration de conformité intégrale, veuillez vous servir du<br />
téléchargement gratuit de notre site Internet www.switel.<strong>com</strong>.<br />
Per la dichiarazione di conformità <strong>com</strong>pleta si prega di voler usufruire<br />
del servizio gratuito di download dal nostro sito Internet www.switel.<strong>com</strong>.<br />
To view the <strong>com</strong>plete Declaration of Conformity, please refer to the free download<br />
available at our web site: www.switel.<strong>com</strong>.<br />
Service Hotline<br />
Bei technischen Problemen können Sie sich an unsere Service-Hotline unter Tel. 0900 00 1675<br />
innerhalb der Schweiz (Kosten Swiss<strong>com</strong> bei Drucklegung: CHF 2.60/min) wenden.<br />
S’il s’agit de problèmes techniques, vous pouvez vous adresser à notre hotline de service en Suisse<br />
en appelant le numéro 0900 00 1675 (frais Swiss<strong>com</strong> à la date d’impression de ce manuel : CHF 2.60/min).<br />
In caso di problemi tecnici è possibile rivolgersi alla nostra hotline di assistenza tecnica chiamando al<br />
numero 0900 00 1675 valido <strong>per</strong> la Svizzera (spese da rete Swiss<strong>com</strong> alla data di stampa: CHF 2.60 / min).<br />
In the event of technical problems, you can contact our hotline service, Tel. 0900 00 1675 within<br />
Switzerland (cost via Swiss<strong>com</strong> at time of going to print: CHF 2.60/min).<br />
Version 1.0 • 22.02.2012