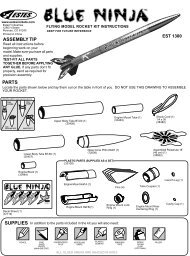
2 - Stanbridges
2 - Stanbridges
2 - Stanbridges

You also want an ePaper? Increase the reach of your titles
YUMPU automatically turns print PDFs into web optimized ePapers that Google loves.
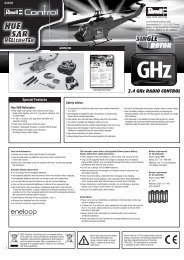
Changing the Setup 設 定 の 変 更 方 法<br />
If you are using a LiPo battery pack it is mandatory to use a Low voltage cut-off setting. This will shut down the ESC when the battery goes below a pre-set voltage (3V per cell) to protect your battery from<br />
over-discharge and possible damage. The Auto LiPo setting will auto detect if you are using a 2 cell or 3 cell LiPo battery and then each cell will cut off at the set cut-off voltage accordingly. It is not<br />
recommended to use a 3 cell (11.1v) or more LiPo pack with the Flux ESC if you do not use the fan.<br />
LiPoバッテリーを 使 用 する 場 合 は 必 ず 電 圧 カット 設 定 を 使 用 してください。 電 圧 カットはLiPoバッテリーがセルあたり3Vになるとスピードコントローラーの 動 作 が 停 止 し 過 放 電 によるバッテリー<br />
の 破 損 を 防 止 します。オートLiPoバッテリー 設 定 はLiPoバッテリのセル 数 を 自 動 的 に2セルか3セルと 判 断 しそれぞれに 合 わせた 電 圧 カット 設 定 をします。<br />
3セル 以 上 のLiPoバッテリーを 使 用 する 場 合 はファンを 使 用 してください。<br />
Before Setup <br />
Start with the transmitter ON and the ESC switched OFF.<br />
<br />
Programmable Mode Settings <br />
The Flux Reload ESC has a number of programmable modes that can be altered to suit a variety of functions. Each<br />
set of green LED flashes/beep represents the Programmable Mode (1 flash = Running mode, 2 flashes = Drag brake<br />
Force and 3 flashes = Auto-lipo settings etc..) and each set of red LED flashes/beep represents that Modes value.<br />
See the table below for all the Programmable Modes and there values. The number 5 is represented by one long flash/beep so it can easily be identified. This makes the number 6 one long flash/beep<br />
followed by one short flash/beep and so on. When you enter the setup mode you need to keep the button pressed until you enter the desired program mode (green flashes/beeps). Once you reach that<br />
mode release the button and that will allow you to change the mode value (red flashes/beeps). You need to switch off the ESC to save the settings and then re-do the process to change a different mode or<br />
mode value setting. If you lose your way with setup you can return the unit to default settings by turning on the ESC, keeping the transmitter in neutral and pressing the setup button for 3 seconds.<br />
Both red and green LED’s will flash together 3 times to confirm this.<br />
Fluxスピードコントローラーは 様 々な 機 能 を 設 定 可 能 です。グリーンLEDの 点 滅 と 確 認 音 はプログラムモード(1 回 点 滅 =ランニングモード、2 回 点 滅 =ドラックブレーキモード、3 回 点 滅 =オートLiPo 設 定 など)であ<br />
ることを 表 示 しています。レッドLEDの 点 滅 と 確 認 音 はモード 設 定 であることを 表 示 しています。 下 記 の 表 でプログラムモードとモード 設 定 の 内 容 を 参 照 してください。5 番 目 の 設 定 はLEDの 長 い 点 灯 と 確 認 音 で<br />
設 定 の 確 認 が 分 かりやすくなっています<br />
設 定 を 変 更 するプログラムモードにするためにグリーンLEDの 点 滅 と 確 認 音 が 鳴 るまでボタンを 押 し 続 けます。 希 望 のモードになったらボタンを 離 すとレッドLEDの 点 滅 と 確 認 音 になりモード 設 定 が 可 能 になります<br />
。 設 定 を 変 更 した 後 、スピードコントローラーのスイッチをオフにして 設 定 を 保 存 します。 他 の 設 定 をする 場 合 は 繰 り 返 してください。 設 定 がわからなくなった 場 合 は 送 信 機 のスロットルをニュー<br />
トラルのままスピードコントローラーのボタンを3 秒 間 押 し 続 けます。レッドとグリーンのLEDが3 回 点 滅 して 基 本 セットに 戻 ります。。<br />
Programmable Modes Table <br />
1 OFF<br />
2<br />
<br />
ESC<br />
<br />
ON<br />
<br />
Transmitter<br />
<br />
G<br />
R<br />
E<br />
E<br />
N<br />
L<br />
E<br />
D<br />
<br />
<br />
<br />
<br />
L<br />
E<br />
D<br />
Programmable Mode Settings<br />
<br />
Running Mode<br />
<br />
Drag Brake Force<br />
<br />
Auto-Lipo Cut off<br />
<br />
Start Mode (Punch)<br />
<br />
Max Brake Force<br />
<br />
Max Reverse Force<br />
<br />
Initial Brake Force<br />
<br />
Neutral Range<br />
<br />
Motor Timing<br />
<br />
Over Heat Protection<br />
<br />
Mode Value (Red LED) (LED)<br />
1 2 3 4 5 6 7 8 9<br />
Fwd w/ Brake Fwd/REV/Brake Rock Crawler<br />
<br />
0% 5% 10%<br />
20% 40% 60% 80% 100%<br />
No Protection 2.6V /cell 2.8V /cell 3.0V /cell 3.2V /cell 3.4V /cell<br />
<br />
L1 (Soft ) L2 L3 L4 L5 L6 L7<br />
L8<br />
25% 50% 75% 100%<br />
25% 50% 75% 100%<br />
= Drag Brake<br />
<br />
0%<br />
20% 40%<br />
6% (Narrow) 9% (Normal) 12% (Wide)<br />
<br />
0.00 3.75 7.50 11.25 15.00 18.75 22.50 26.25<br />
Enable Disable<br />
<br />
*Default settings shown in black highlighted boxes <br />
L9 (Aggressive)<br />
<br />
Setup <br />
En<br />
While switching on ESC<br />
hold down the setup<br />
button. Continue to hold<br />
the setup button while<br />
the LED’s flash<br />
Continue to hold<br />
the setup button until<br />
the green LED’s flash.<br />
Each flash represents<br />
the programmable<br />
mode number.<br />
Release the setup<br />
button when you<br />
reach the desired<br />
mode. You are now<br />
in the program mode<br />
setting.<br />
Press the setup button<br />
to change the mode<br />
value. Each mode value<br />
will have different<br />
amounts of red LED<br />
flashes.<br />
In order save the changes and the settings<br />
you must switch off the ESC. When you<br />
next switch it back on it will have saved<br />
your new settings. To make further alterations<br />
you need to re-enter the mode values again.<br />
ON<br />
HOLD<br />
HOLD<br />
OFF<br />
ON<br />
x1 x2 x3 x?<br />
RED LED FLASHES<br />
FOR 4 SECONDS<br />
GREEN LED WILL<br />
BEGIN TO FLASH<br />
GREEN<br />
RED<br />
RED<br />
<br />
<br />
<br />
<br />
<br />
<br />
グリーンLEDが 点 滅 す<br />
るまでボタンを 押 し 続<br />
けます。 点 滅 回 数 でプ<br />
ログラムモードを 選 択<br />
します<br />
希 望 のモードになった<br />
らボタンを 離 します。<br />
モード 設 定 を 変 更 する<br />
ためにボタンを 押 しま<br />
す。レッドLEDの 点 滅<br />
で 設 定 内 容 がわかり<br />
ます。<br />
設 定 を 保 存 するためにスピードコントローラーのスイ<br />
ッチをオフにします。スイッチを 再 度 オンにすると<br />
保 存 された 内 容 が 反 映 されます。 他 のモードを 設 定<br />
する 場 合 は 再 度 設 定 をします。<br />
<br />
<br />
<br />
<br />
<br />
x1 x2 x3<br />
x3<br />
<br />
<br />
<br />
<br />
<br />
<br />
<br />
37