81131020 TECHNO ARC 60_96196012D - Karl Storz
81131020 TECHNO ARC 60_96196012D - Karl Storz
81131020 TECHNO ARC 60_96196012D - Karl Storz

You also want an ePaper? Increase the reach of your titles
YUMPU automatically turns print PDFs into web optimized ePapers that Google loves.
Kaltlicht-Projektor<br />
Cold light projector<br />
Projecteur de lumière froide<br />
Proyector de luz fría<br />
<strong>TECHNO</strong> <strong>ARC</strong> <strong>60</strong><br />
Gebrauchsanweisung<br />
Instruction manual<br />
Manuel d’utilisation<br />
Manual de instrucciones
Inhaltsverzeichnis<br />
Contents<br />
1 Allgemeines . . . . . . . . . . . . . . . . . . . . . . . . . . . . . . . 6<br />
1.1 Wichtiger Hinweis für Benutzer von<br />
KARL-STORZ Geräten und Instrumenten. . . . . 6<br />
1.2 Gerätebeschreibung . . . . . . . . . . . . . . . . . . . . . 6<br />
1.3 Warnsymbole . . . . . . . . . . . . . . . . . . . . . . . . . . 6<br />
1.4 Piktogramm-Erläuterung . . . . . . . . . . . . . . . . . . 8<br />
2 Sicherheitshinweise. . . . . . . . . . . . . . . . . . . . . . . . 10<br />
2.1 Warn- und Vorsichtshinweise . . . . . . . . . . . . . 10<br />
2.2 Was Sie vermeiden sollten:. . . . . . . . . . . . . . . 14<br />
2.3 Bestimmungsgemäße Verwendung . . . . . . . . 14<br />
2.4 Qualifikation des Anwenders . . . . . . . . . . . . . 14<br />
2.5 Sicherheitsmaßnahmen am Aufstellort . . . . . . 14<br />
2.6 Sicherheitsmaßnahmen beim<br />
Einsatz des Systems . . . . . . . . . . . . . . . . . . . . 14<br />
2.7 Reinigung und Wartung . . . . . . . . . . . . . . . . . 16<br />
3 Bedienungselemente/Anzeigen/Anschlüsse<br />
und ihre Funktion . . . . . . . . . . . . . . . . . . . . . . . . . 19<br />
4 Inbetriebnahme . . . . . . . . . . . . . . . . . . . . . . . . . . . 22<br />
4.1 Grundausstattung . . . . . . . . . . . . . . . . . . . . . . 22<br />
4.2 Auspacken . . . . . . . . . . . . . . . . . . . . . . . . . . . 22<br />
4.3 Aufstellung und Anschluss . . . . . . . . . . . . . . . 22<br />
4.4 Einschalten . . . . . . . . . . . . . . . . . . . . . . . . . . . 26<br />
4.5 Einstellen der Lichtintensität . . . . . . . . . . . . . . 26<br />
5 Instandhaltung. . . . . . . . . . . . . . . . . . . . . . . . . . . . 28<br />
5.1 Lampenwechsel . . . . . . . . . . . . . . . . . . . . . . . 28<br />
5.2 Sicherungswechsel . . . . . . . . . . . . . . . . . . . . . 32<br />
5.3 Instandsetzung . . . . . . . . . . . . . . . . . . . . . . . . 32<br />
5.4 Entsorgung . . . . . . . . . . . . . . . . . . . . . . . . . . . 32<br />
6 Technische Daten . . . . . . . . . . . . . . . . . . . . . . . . . 34<br />
6.1 Verantwortlichkeit . . . . . . . . . . . . . . . . . . . . . . 34<br />
6.2 Normenkonformität . . . . . . . . . . . . . . . . . . . . . 34<br />
6.3 Richtlinienkonformität . . . . . . . . . . . . . . . . . . . 34<br />
6.4 Technische Daten und Anschlüsse. . . . . . . . . 34<br />
6.5 Technische Unterlagen . . . . . . . . . . . . . . . . . . 36<br />
6.6 Ersatzteilliste . . . . . . . . . . . . . . . . . . . . . . . . . . 36<br />
6.7 Hersteller . . . . . . . . . . . . . . . . . . . . . . . . . . . . . 36<br />
1 General information. . . . . . . . . . . . . . . . . . . . . . . . . 6<br />
1.1 Important note for users of KARL STORZ<br />
devices and instruments.. . . . . . . . . . . . . . . . . 6<br />
1.2 Description of the device . . . . . . . . . . . . . . . . . 6<br />
1.3 Warning symbols. . . . . . . . . . . . . . . . . . . . . . . . 6<br />
1.4 Explanation of symbols . . . . . . . . . . . . . . . . . . 8<br />
2 Safety instructions. . . . . . . . . . . . . . . . . . . . . . . . . 10<br />
2.1 Warnings and cautions . . . . . . . . . . . . . . . . . . 10<br />
2.2 What you should avoid:. . . . . . . . . . . . . . . . . . 14<br />
2.3 Normal use . . . . . . . . . . . . . . . . . . . . . . . . . . . 14<br />
2.4 User qualification . . . . . . . . . . . . . . . . . . . . . . 14<br />
2.5 Safety precautions at the installation site . . . . 14<br />
2.6 Safety precautions when operating<br />
the system . . . . . . . . . . . . . . . . . . . . . . . . . . . . 14<br />
2.7 Cleaning and maintenance. . . . . . . . . . . . . . . 16<br />
3 Controls, displays, connectors<br />
and their uses . . . . . . . . . . . . . . . . . . . . . . . . . . . . 19<br />
4 Getting started . . . . . . . . . . . . . . . . . . . . . . . . . . . 22<br />
4.1 Basic equipment . . . . . . . . . . . . . . . . . . . . . . . 22<br />
4.2 Unpacking . . . . . . . . . . . . . . . . . . . . . . . . . . . 22<br />
4.3 Installation and connection . . . . . . . . . . . . . . . 22<br />
4.4 Power up . . . . . . . . . . . . . . . . . . . . . . . . . . . . . 26<br />
4.5 Setting the light intensity. . . . . . . . . . . . . . . . . 26<br />
5 Maintenance . . . . . . . . . . . . . . . . . . . . . . . . . . . . . 28<br />
5.1 Lamp replacement . . . . . . . . . . . . . . . . . . . . . 28<br />
5.2 Fuse replacement . . . . . . . . . . . . . . . . . . . . . . 32<br />
5.3 Servicing and repair . . . . . . . . . . . . . . . . . . . . 32<br />
5.4 Disposal . . . . . . . . . . . . . . . . . . . . . . . . . . . . . 32<br />
6 Technical data . . . . . . . . . . . . . . . . . . . . . . . . . . . 34<br />
6.1 Responsibility . . . . . . . . . . . . . . . . . . . . . . . . . 34<br />
6.2 Standard compliance . . . . . . . . . . . . . . . . . . . 34<br />
6.3 Directive compliance . . . . . . . . . . . . . . . . . . . 34<br />
6.4 Technical data and connections. . . . . . . . . . . 34<br />
6.5 Technical documentation . . . . . . . . . . . . . . . . 36<br />
6.6 Spare parts list . . . . . . . . . . . . . . . . . . . . . . . . 36<br />
6.7 Manufacturer . . . . . . . . . . . . . . . . . . . . . . . . . 36<br />
01/08<br />
2
Table des matières<br />
Contenido del manual<br />
1 Généralités . . . . . . . . . . . . . . . . . . . . . . . . . . . . . . . 7<br />
1.1 Consignes importantes pour les usagers<br />
des appareils et instruments KARL STORZ . . . 7<br />
1.2 Description de l'appareil. . . . . . . . . . . . . . . . . . 7<br />
1.3 Symboles d'avertissement . . . . . . . . . . . . . . . . 7<br />
1.4 Explication des pictogrammes . . . . . . . . . . . . . 9<br />
2 Consignes de sécurité . . . . . . . . . . . . . . . . . . . . . 11<br />
2.1 Avertissements et consignes de sécurité. . . . 11<br />
2.2 Ce qu'il convient d'éviter : . . . . . . . . . . . . . . . 15<br />
2.3 Utilisation correcte . . . . . . . . . . . . . . . . . . . . . 15<br />
2.4 Qualification de l'utilisateur . . . . . . . . . . . . . . . 15<br />
2.5 Mesures de sécurité sur le lieu d'installation . 15<br />
2.6 Mesures de sécurité pour<br />
l'emploi de l'appareil . . . . . . . . . . . . . . . . . . . . 15<br />
2.7 Nettoyage et entretien. . . . . . . . . . . . . . . . . . . 17<br />
3 Organes de commande, affichages,<br />
raccordements et leurs fonctions . . . . . . . . . . . . . 19<br />
4 Mise en service . . . . . . . . . . . . . . . . . . . . . . . . . . . 23<br />
4.1 Équipement de base. . . . . . . . . . . . . . . . . . . . 23<br />
4.2 Déballage . . . . . . . . . . . . . . . . . . . . . . . . . . . . 23<br />
4.3 Installation et raccordement . . . . . . . . . . . . . . 23<br />
4.4 Mise sous tension . . . . . . . . . . . . . . . . . . . . . . 27<br />
4.5 Réglage de l'intensité lumineuse . . . . . . . . . . 27<br />
5 Maintenance . . . . . . . . . . . . . . . . . . . . . . . . . . . . . 29<br />
5.1 Changement de lampe . . . . . . . . . . . . . . . . . . 29<br />
5.2 Changement des fusibles . . . . . . . . . . . . . . . . 33<br />
5.3 Réparations . . . . . . . . . . . . . . . . . . . . . . . . . . . 33<br />
5.4 Élimination . . . . . . . . . . . . . . . . . . . . . . . . . . . . 33<br />
6 Données techniques . . . . . . . . . . . . . . . . . . . . . . 35<br />
6.1 Responsabilité. . . . . . . . . . . . . . . . . . . . . . . . . 35<br />
6.2 Conformité normative . . . . . . . . . . . . . . . . . . . 35<br />
6.3 Conformité à la directive. . . . . . . . . . . . . . . . . 35<br />
6.4 Données techniques et raccordements . . . . . 35<br />
6.5 Documents techniques . . . . . . . . . . . . . . . . . . 37<br />
6.6 Liste des pièces de rechange . . . . . . . . . . . . 37<br />
6.7 Fabricant . . . . . . . . . . . . . . . . . . . . . . . . . . . . . 37<br />
1 Generalidades . . . . . . . . . . . . . . . . . . . . . . . . . . . . . 7<br />
1.1 Consejos importantes para el usuario de<br />
los equipos e instrumentos de KARL STORZ. . 7<br />
1.2 Descripción del aparato . . . . . . . . . . . . . . . . . . 7<br />
1.3 Símbolos de advertencia . . . . . . . . . . . . . . . . . 7<br />
1.4 Explicación de los pictogramas . . . . . . . . . . . . 9<br />
2 Instrucciones de seguridad. . . . . . . . . . . . . . . . . . 11<br />
2.1 Indicaciones de alarma y advertencia . . . . . . 11<br />
2.2 Lo que usted debe evitar:. . . . . . . . . . . . . . . . 15<br />
2.3 Empleo previsto . . . . . . . . . . . . . . . . . . . . . . . 15<br />
2.4 Cualificación del usuario. . . . . . . . . . . . . . . . . 15<br />
2.5 Medidas de seguridad en el lugar<br />
de emplazamiento. . . . . . . . . . . . . . . . . . . . . . 15<br />
2.6 Medidas de seguridad al emplear el sistema 15<br />
2.7 Limpieza y mantenimiento . . . . . . . . . . . . . . . 17<br />
3 Elementos de mando, indicadores,<br />
conexiones y sus funciones . . . . . . . . . . . . . . . . . 19<br />
4 Puesta en servicio. . . . . . . . . . . . . . . . . . . . . . . . . 23<br />
4.1 Equipo básico . . . . . . . . . . . . . . . . . . . . . . . . . 23<br />
4.2 Desembalaje . . . . . . . . . . . . . . . . . . . . . . . . . . 23<br />
4.3 Montaje y conexión . . . . . . . . . . . . . . . . . . . . . 23<br />
4.4 Puesta en marcha . . . . . . . . . . . . . . . . . . . . . . 27<br />
4.5 Ajuste de la intensidad lumínica. . . . . . . . . . . 27<br />
5 Mantenimiento. . . . . . . . . . . . . . . . . . . . . . . . . . . . 29<br />
5.1 Cambio de la lámpara . . . . . . . . . . . . . . . . . . 29<br />
5.2 Cambio de fusibles . . . . . . . . . . . . . . . . . . . . . 33<br />
5.3 Reparaciones . . . . . . . . . . . . . . . . . . . . . . . . . 33<br />
5.4 Gestión de desechos . . . . . . . . . . . . . . . . . . . 33<br />
6 Datos técnicos . . . . . . . . . . . . . . . . . . . . . . . . . . . 35<br />
6.1 Responsabilidad . . . . . . . . . . . . . . . . . . . . . . . 35<br />
6.2 Conformidad con las normas . . . . . . . . . . . . . 35<br />
6.3 Conformidad con las directivas . . . . . . . . . . . 35<br />
6.4 Datos técnicos y conexiones . . . . . . . . . . . . . 35<br />
6.5 Documentación técnica . . . . . . . . . . . . . . . . . 37<br />
6.6 Piezas de repuesto . . . . . . . . . . . . . . . . . . . . . 37<br />
6.7 Fabricante . . . . . . . . . . . . . . . . . . . . . . . . . . . . 37<br />
01/08<br />
3
Inhaltsverzeichnis A-Z<br />
Index A-Z<br />
A<br />
Allgemeines. . . . . . . . . . . . . . . . . . . . . . . . . . . . . . . . . . 6<br />
Anschluss . . . . . . . . . . . . . . . . . . . . . . . . . . . . . . . . . . 22<br />
Anschlüsse . . . . . . . . . . . . . . . . . . . . . . . . . . . . . . . . . 34<br />
Anzeigen . . . . . . . . . . . . . . . . . . . . . . . . . . . . . . . . . . . 19<br />
Aufstellung und Anschluss . . . . . . . . . . . . . . . . . . . . . 22<br />
Auspacken . . . . . . . . . . . . . . . . . . . . . . . . . . . . . . . . . 22<br />
B<br />
Bedienungselemente/Anzeigen/Anschlüsse. . . . . . . . 19<br />
Bestimmungsgemäße Verwendung . . . . . . . . . . . . . . 14<br />
E<br />
Einschalten . . . . . . . . . . . . . . . . . . . . . . . . . . . . . . . . . 26<br />
Einstellen der Lichtintensität . . . . . . . . . . . . . . . . . . . . 26<br />
Entsorgung . . . . . . . . . . . . . . . . . . . . . . . . . . . . . . . . . 32<br />
Ersatzteilliste . . . . . . . . . . . . . . . . . . . . . . . . . . . . . . . . 38<br />
G<br />
Grundausstattung . . . . . . . . . . . . . . . . . . . . . . . . . . . . 22<br />
Gerätebeschreibung . . . . . . . . . . . . . . . . . . . . . . . . . . . 6<br />
H<br />
Hersteller . . . . . . . . . . . . . . . . . . . . . . . . . . . . . . . . . . . 38<br />
I<br />
Inbetriebnahme . . . . . . . . . . . . . . . . . . . . . . . . . . . . . . 22<br />
Instandhaltung. . . . . . . . . . . . . . . . . . . . . . . . . . . . . . . 28<br />
Instandsetzung . . . . . . . . . . . . . . . . . . . . . . . . . . . . . . 32<br />
L<br />
Lampenwechsel . . . . . . . . . . . . . . . . . . . . . . . . . . . . . 28<br />
N<br />
Normenkonformität . . . . . . . . . . . . . . . . . . . . . . . . . . . 36<br />
P<br />
Piktogramm-Erläuterung . . . . . . . . . . . . . . . . . . . . . . . . 8<br />
Prüfzertifikate. . . . . . . . . . . . . . . . . . . . . . . . . . . . . . . . 34<br />
Q<br />
Qualifikation des Anwenders . . . . . . . . . . . . . . . . . . . 16<br />
R<br />
Reinigung und Wartung . . . . . . . . . . . . . . . . . . . . . . . 16<br />
Richtlinienkonformität . . . . . . . . . . . . . . . . . . . . . . . . . 34<br />
S<br />
Sicherheitshinweise. . . . . . . . . . . . . . . . . . . . . . . . . . . 10<br />
Sicherheitsmaßnahmen am Aufstellungsort . . . . . . . . 16<br />
Sicherheitsmaßnahmen beim Einsatz des Gerätes . . 16<br />
Sicherungswechsel . . . . . . . . . . . . . . . . . . . . . . . . . . . 32<br />
T<br />
Technische Daten . . . . . . . . . . . . . . . . . . . . . . . . . . . . 34<br />
Technische Unterlagen . . . . . . . . . . . . . . . . . . . . . . . . 36<br />
V<br />
Verantwortlichkeit . . . . . . . . . . . . . . . . . . . . . . . . . . . . 34<br />
W<br />
Warn- und Vorsichtshinweise . . . . . . . . . . . . . . . . . . . 10<br />
Warnsymbole. . . . . . . . . . . . . . . . . . . . . . . . . . . . . . . . . 6<br />
Was Sie vermeiden sollten . . . . . . . . . . . . . . . . . . . . . 14<br />
Wartung . . . . . . . . . . . . . . . . . . . . . . . . . . . . . . . . . . . . 16<br />
Wichtiger Hinweis . . . . . . . . . . . . . . . . . . . . . . . . . . . . . 6<br />
B<br />
Basic equipment . . . . . . . . . . . . . . . . . . . . . . . . . . . . . 22<br />
C<br />
Cleaning and maintenance. . . . . . . . . . . . . . . . . . . . 16<br />
Connecting up . . . . . . . . . . . . . . . . . . . . . . . . . . . . . 22<br />
Connections. . . . . . . . . . . . . . . . . . . . . . . . . . . . . . . 34<br />
Controls/displays/connectors . . . . . . . . . . . . . . . . . . 19<br />
D<br />
Description of the device . . . . . . . . . . . . . . . . . . . . . . 6<br />
Directive compliance . . . . . . . . . . . . . . . . . . . . . . . . 34<br />
Displays . . . . . . . . . . . . . . . . . . . . . . . . . . . . . . . . . . 19<br />
Disposal . . . . . . . . . . . . . . . . . . . . . . . . . . . . . . . . . . 32<br />
E<br />
Explanation of symbols . . . . . . . . . . . . . . . . . . . . . . . . . 8<br />
F<br />
Fuse replacement . . . . . . . . . . . . . . . . . . . . . . . . . . . . 32<br />
G<br />
General informations . . . . . . . . . . . . . . . . . . . . . . . . . . . 6<br />
Getting started . . . . . . . . . . . . . . . . . . . . . . . . . . . . . . 22<br />
I<br />
Important note . . . . . . . . . . . . . . . . . . . . . . . . . . . . . . 6<br />
Installation and connection . . . . . . . . . . . . . . . . . . . . . 22<br />
L<br />
Lamp replacement . . . . . . . . . . . . . . . . . . . . . . . . . . . 28<br />
M<br />
Maintenance.. .. . . . . . . . . . . . . . . . . . . . . . . . . . 16, 28<br />
Manufacturer . . . . . . . . . . . . . . . . . . . . . . . . . . . . . . . . 14<br />
N<br />
Normal use . . . . . . . . . . . . . . . . . . . . . . . . . . . . . . . . . 36<br />
P<br />
Power up . . . . . . . . . . . . . . . . . . . . . . . . . . . . . . . . . . . 26<br />
R<br />
Responsibility . . . . . . . . . . . . . . . . . . . . . . . . . . . . . . . 34<br />
S<br />
Safety information. . . . . . . . . . . . . . . . . . . . . . . . . . . 10<br />
Safety precautions at the installation site . . . . . . . . . 16<br />
Safety precautions when operating the system . . . . . 16<br />
Servicing and repair . . . . . . . . . . . . . . . . . . . . . . . . . 32<br />
Setting the light intensity. . . . . . . . . . . . . . . . . . . . . . 26<br />
Spare parts list . . . . . . . . . . . . . . . . . . . . . . . . . . . . 38<br />
Standard compliance . . . . . . . . . . . . . . . . . . . . . . . . 36<br />
T<br />
Technical data . . . . . . . . . . . . . . . . . . . . . . . . . . . . . 34<br />
Technical documentation . . . . . . . . . . . . . . . . . . . . . 36<br />
Test certificates . . . . . . . . . . . . . . . . . . . . . . . . . . . . . . 34<br />
U<br />
Unpacking . . . . . . . . . . . . . . . . . . . . . . . . . . . . . . . . 22<br />
User qualification . . . . . . . . . . . . . . . . . . . . . . . . . . . 16<br />
W<br />
Warning symbols . . . . . . . . . . . . . . . . . . . . . . . . . . . . 6<br />
Warnings and cautions . . . . . . . . . . . . . . . . . . . . . . . 10<br />
What you should avoid . . . . . . . . . . . . . . . . . . . . . . . 14<br />
01/08<br />
4
Index de A à Z<br />
Índice A-Z<br />
01/08<br />
A<br />
Affichages . . . . . . . . . . . . . . . . . . . . . . . . . . . . . . . . . . 19<br />
Avertissements et consignes de sécurité. . . . . . . . . . 11<br />
C<br />
Ce qu'il convient d'éviter. . . . . . . . . . . . . . . . . . . . . . . 15<br />
Certificats de contrôle. . . . . . . . . . . . . . . . . . . . . . . . . 35<br />
Changement de lampe . . . . . . . . . . . . . . . . . . . . . . . . 29<br />
Changement des fusibles . . . . . . . . . . . . . . . . . . . . . . 33<br />
Conformité à la directive . . . . . . . . . . . . . . . . . . . . . . . 34<br />
Conformité normative . . . . . . . . . . . . . . . . . . . . . . . . . 37<br />
Consignes de sécurité . . . . . . . . . . . . . . . . . . . . . . . . 11<br />
Consignes importantes . . . . . . . . . . . . . . . . . . . . . . . . . 7<br />
D<br />
Déballage . . . . . . . . . . . . . . . . . . . . . . . . . . . . . . . . . . 23<br />
Description de l'appareil . . . . . . . . . . . . . . . . . . . . . . . . 7<br />
Documents techniques . . . . . . . . . . . . . . . . . . . . . . . . 37<br />
Données techniques . . . . . . . . . . . . . . . . . . . . . . . . . 35<br />
E<br />
Élimination . . . . . . . . . . . . . . . . . . . . . . . . . . . . . . . . . . 33<br />
Entretien . . . . . . . . . . . . . . . . . . . . . . . . . . . . . . . . . . . 17<br />
Équipement de base. . . . . . . . . . . . . . . . . . . . . . . . . . 23<br />
Explication des pictogrammes . . . . . . . . . . . . . . . . . . . 9<br />
F<br />
Fabricant . . . . . . . . . . . . . . . . . . . . . . . . . . . . . . . . . . . 37<br />
G<br />
Généralités . . . . . . . . . . . . . . . . . . . . . . . . . . . . . . . . . . 7<br />
I<br />
Installation et raccordement . . . . . . . . . . . . . . . . . . . . 23<br />
L<br />
Liste des pièces de rechange . . . . . . . . . . . . . . . . . . 37<br />
M<br />
Maintenance . . . . . . . . . . . . . . . . . . . . . . . . . . . . . . . . 29<br />
Mesures de sécurité pour l'emploi de l'appareil . . . . 15<br />
Mesures de sécurité sur le lieu d'installation . . . . . . . 15<br />
Mise en service . . . . . . . . . . . . . . . . . . . . . . . . . . . . . . 23<br />
Mise sous tension . . . . . . . . . . . . . . . . . . . . . . . . . . . . 27<br />
N<br />
Nettoyage et entretien. . . . . . . . . . . . . . . . . . . . . . . . . 17<br />
O<br />
Organes de commande, affichages, raccordements. 19<br />
Q<br />
Qualification de l'utilisateur . . . . . . . . . . . . . . . . . . . . . 15<br />
R<br />
Raccordement. . . . . . . . . . . . . . . . . . . . . . . . . . . . . . . 23<br />
Raccordements . . . . . . . . . . . . . . . . . . . . . . . . . . . . . . 35<br />
Réglage de l'intensité lumineuse . . . . . . . . . . . . . . . . 27<br />
Réparations . . . . . . . . . . . . . . . . . . . . . . . . . . . . . . . . . 33<br />
Responsabilité. . . . . . . . . . . . . . . . . . . . . . . . . . . . . . . 35<br />
S<br />
Signification des pictogrammes . . . . . . . . . . . . . . . . . . 8<br />
Symboles d'avertissement . . . . . . . . . . . . . . . . . . . . . . 7<br />
U<br />
Utilisation correcte . . . . . . . . . . . . . . . . . . . . . . . . . . . 15<br />
A<br />
Ajuste de la intensidad lumínica. . . . . . . . . . . . . . . . . 27<br />
C<br />
Cambio de fusibles . . . . . . . . . . . . . . . . . . . . . . . . . . . 33<br />
Cambio de la lámpara . . . . . . . . . . . . . . . . . . . . . . . . 29<br />
Certificados de ensayos . . . . . . . . . . . . . . . . . . . . . . . 35<br />
Conformidad con las normas . . . . . . . . . . . . . . . . . . . 37<br />
Conformidad con las directivas . . . . . . . . . . . . . . . . . 35<br />
Conexión . . . . . . . . . . . . . . . . . . . . . . . . . . . . . . . . . . . 23<br />
Conexiones . . . . . . . . . . . . . . . . . . . . . . . . . . . . . . . . . 15<br />
Cualificación del usuario. . . . . . . . . . . . . . . . . . . . . . . 17<br />
D<br />
Datos técnicos . . . . . . . . . . . . . . . . . . . . . . . . . . . . . . 35<br />
Descripción del aparato . . . . . . . . . . . . . . . . . . . . . . . . 7<br />
Desembalaje . . . . . . . . . . . . . . . . . . . . . . . . . . . . . . . . 23<br />
Documentación técnica . . . . . . . . . . . . . . . . . . . . . . . 37<br />
E<br />
Elementos de mando/indicadores/conexiones. . . . . . 20<br />
Empleo previsto . . . . . . . . . . . . . . . . . . . . . . . . . . . . . 15<br />
Equipo básico . . . . . . . . . . . . . . . . . . . . . . . . . . . . . . . 23<br />
Explicación de los pictogramas . . . . . . . . . . . . . . . . . . 9<br />
F<br />
Fabricante . . . . . . . . . . . . . . . . . . . . . . . . . . . . . . . . . . 39<br />
G<br />
Generalidades. . . . . . . . . . . . . . . . . . . . . . . . . . . . . . . . 7<br />
Gestión de desechos . . . . . . . . . . . . . . . . . . . . . . . . . 33<br />
I<br />
Indicaciones de alarma y advertencia . . . . . . . . . . . . 11<br />
Indicaciones importantes . . . . . . . . . . . . . . . . . . . . . . . 7<br />
Indicadores . . . . . . . . . . . . . . . . . . . . . . . . . . . . . . . . . 20<br />
Instrucciones de seguridad . . . . . . . . . . . . . . . . . . . . 11<br />
L<br />
Limpieza y mantenimiento . . . . . . . . . . . . . . . . . . . . . 17<br />
Lo que usted debe evitar . . . . . . . . . . . . . . . . . . . . . . 15<br />
M<br />
Mantenimiento. . . . . . . . . . . . . . . . . . . . . . . . . . . . 17, 29<br />
Medidas de seguridad durante el empleo del equipo . 17<br />
Medidas de seguridad en el lugar de emplazamiento . 17<br />
Montaje y conexión . . . . . . . . . . . . . . . . . . . . . . . . . . . 23<br />
P<br />
Piezas de repuesto . . . . . . . . . . . . . . . . . . . . . . . . . . . 39<br />
Puesta en marcha . . . . . . . . . . . . . . . . . . . . . . . . . . . . 27<br />
Puesta en servicio. . . . . . . . . . . . . . . . . . . . . . . . . . . . 23<br />
R<br />
Reparaciones . . . . . . . . . . . . . . . . . . . . . . . . . . . . . . . 33<br />
Responsabilidad . . . . . . . . . . . . . . . . . . . . . . . . . . . . . 35<br />
S<br />
Símbolos de advertencia . . . . . . . . . . . . . . . . . . . . . . . 7<br />
5
1 Allgemeines 1 General information<br />
1.1 Wichtiger Hinweis<br />
1.2 Gerätebeschreibung<br />
1.3 Warnsymbole<br />
1.4 Piktogramm-Erläuterung<br />
1.1 Important note<br />
1.2 Description of the device<br />
1.3 Warning symbols<br />
1.4 Explanation of symbols<br />
1.1 Wichtiger Hinweis für Benutzer von<br />
KARL STORZ Geräten und Instrumenten<br />
Vielen Dank für Ihr Vertrauen in den Namen<br />
KARL STORZ. Sie und Ihr Haus haben sich damit für<br />
ein modernes und hochwertiges Gerät entschieden.<br />
Die vorliegende Gebrauchsanweisung soll helfen,<br />
das von KARL STORZ hergestellte Gerät richtig aufzustellen,<br />
anzuschließen und zu bedienen. Alle notwendigen<br />
Einzelheiten und Handgriffe werden anschaulich<br />
erklärt.<br />
Lesen Sie deshalb diese Anleitung sorgfältig durch<br />
und bewahren Sie diese zum Nachlesen an gut sichtbarer<br />
Stelle beim Gerät auf.<br />
KARL STORZ arbeitet ständig an der Weiterentwicklung<br />
aller Produkte. Bitte haben Sie Verständnis dafür, dass<br />
deshalb Änderungen des Lieferumfangs, der Form,<br />
Ausstattung und Technik möglich sind. Aus den Angaben,<br />
Abbildungen und Beschreibungen dieser Anleitung<br />
können daher keine Ansprüche hergeleitet werden.<br />
1.2 Gerätebeschreibung<br />
Ein hochwertiges Lampensystem sorgt für hohe<br />
Lichtausbeute, die Konstruktion für einfache Bedienung<br />
und unproblematischen Service.<br />
Das optische System eines Kaltlicht-Projektors besteht<br />
aus einer Halogenlampe oder Entladungslampe, einem<br />
Kondensorsystem und einem Kaltlicht-Spiegel.<br />
Mit dem Kondensorsystem wird das Licht auf die<br />
Stirnfläche eines an die Lichtquelle anzuschließenden<br />
Lichtkabels fokussiert. Der Kaltlicht-Spiegel reflektiert<br />
im wesentlichen nur den sichtbaren Anteil der<br />
Strahlung. Er ist durchlässig für Infrarot-Strahlung. Die<br />
Helligkeit kann am Gerät eingestellt werden. Die durch<br />
die Lampe entstehende Wärme wird von einem Lüfter<br />
abtransportiert.<br />
1.3 Warnsymbole<br />
Bitte lesen Sie diese Gebrauchsanweisung sorgfältig<br />
durch, und beachten Sie die Anweisungen genau. Die<br />
Bezeichnungen Warnung, Vorsicht und Hinweise haben<br />
spezielle Bedeutungen. Wo immer sie in der Gebrauchsanweisung<br />
verwendet werden, den nachfolgenden Text<br />
genau lesen, um einen sicheren und effizienten Betrieb<br />
des Gerätes zu gewährleisten. Zur deutlichen Hervorhebung<br />
steht den Bezeichnungen Warnung, Vorsicht<br />
und Hinweis ein Piktogramm voran.<br />
1.1 Important note for users of<br />
KARL STORZ devices and instruments<br />
Thank you for choosing a product by KARL STORZ,<br />
a name you can trust. You and your organization have<br />
decided in favor of a modern, high-quality item of<br />
equipment.<br />
The instruction manual is intended to serve as an aid in<br />
the proper setup, installation and operation of this<br />
device from KARL STORZ. All essential details of the<br />
equipment and all actions required on your part are<br />
clearly presented and explained.<br />
We thus ask that you read this manual carefully and<br />
that you keep it available for ready reference in a convenient<br />
and conspicuous location near the equipment.<br />
KARL STORZ is continuously working on the enhancement<br />
of all its products. Please appreciate that<br />
changes to the scope of supply in form, equipment and<br />
technology are possible for this reason. Therefore, no<br />
claims can be derived from the specifications, illustrations<br />
and descriptions contained in this information.<br />
1.2 Description of the device<br />
A high-quality lamp system ensures high light efficiency,<br />
while the design provides simple operation and<br />
servicing.<br />
The optical system of a cold light projector consists of<br />
a halogen lamp or discharge lamp, a condenser<br />
system and a cold light mirror.<br />
The condenser system focuses the light on the end<br />
surface of a light cable connected to the light source.<br />
The cold light mirror essentially reflects only the visible<br />
part of the radiation. It is permeable to infrared radiation.<br />
The brightness can be adjusted on the device. The<br />
heat generated by the lamp is removed by a fan.<br />
1.3 Warning symbols<br />
Please read this manual carefully and follow its instructions<br />
precisely. The terms Warning, Caution, and Note<br />
convey special meanings. Wherever they are used in<br />
this manual, they should be carefully reviewed to<br />
ensure the safe and effective operation of this product.<br />
To further emphasize the words Warning, Caution and<br />
Note, they are preceded by a pictogram.<br />
01/08<br />
6
1 Généralités 1 Generalidades<br />
1.1 Consignes importantes<br />
1.2 Description de l'appareil<br />
1.3 Symboles d'avertissement<br />
1.4 Explication des pictogrammes<br />
1.1 Consejos importantes<br />
1.2 Descripción del aparato<br />
1.3 Símbolos de advertencia<br />
1.4 Explicación de los pictogramas<br />
01/08<br />
1.1 Consignes importantes pour les<br />
usagers des appareils et instruments<br />
KARL STORZ<br />
Nous vous remercions de la confiance que vous<br />
accordez à la marque KARL STORZ. Vous-même, ainsi<br />
que votre établissement, vous êtes prononcés en<br />
faveur d'un appareil moderne et d'une qualité supérieure.<br />
Le présent manuel a pour but de vous aider à monter,<br />
brancher et utiliser correctement l'appareil fabriqué par<br />
KARL STORZ. Tous les détails et toutes les<br />
manipulations nécessaires vous sont fournis d'une<br />
manière très explicite.<br />
C'est pourquoi nous vous prions de bien vouloir lire<br />
attentivement ce manuel et, pour toute consultation<br />
ultérieure, de le conserver dans un emplacement<br />
parfaitement visible, à proximité de l'appareil.<br />
KARL STORZ s'attache sans relâche à perfectionner<br />
tous ses produits. Vous comprendrez certainement<br />
qu'il est possible que nous apportions pour cela des<br />
modifications dans l'équipement fourni, sa forme, ses<br />
options ou sa technique. Il n'est donc pas possible de<br />
faire valoir des prétentions sur la base des données,<br />
illustrations et descriptions fournies dans le présent<br />
manuel.<br />
1.2 Description de l'appareil<br />
Un système d'éclairage de grande qualité assure une<br />
efficacité lumineuse élevée. Sa construction garantit un<br />
emploi et un service technique simples.<br />
Le système optique d'un projecteur de lumière froide<br />
se compose d'une lampe halogène ou d'une lampe à<br />
décharge, d'un système de condenseur et d'un miroir<br />
à lumière froide.<br />
Le système de condenseur permet de concentrer la<br />
lumière sur la surface frontale d'un guide de lumière à<br />
raccorder à la source lumineuse. Le miroir à lumière<br />
froide reflète essentiellement la seule partie visible du<br />
rayonnement. Il laisse passer le rayonnement infrarouge.<br />
La luminosité peut être réglée sur l'appareil. La chaleur<br />
dégagée par la lampe est évacuée par un ventilateur.<br />
1.3 Symboles d'avertissement<br />
Prière de lire attentivement ce manuel dans son intégralité<br />
et de se conformer strictement aux instructions<br />
qu'il contient. Les termes Avertissement, Avis et<br />
Remarque ont des significations spécifiques. Le texte<br />
qu'ils annoncent dans le présent manuel devrait<br />
toujours être lu avec beaucoup d'attention afin de<br />
garantir un fonctionnement sûr et efficace de l'appareil.<br />
Les termes Avertissement, Avis et Remarque sont<br />
précédés d'un pictogramme qui a pour but d'attirer<br />
l'attention du lecteur.<br />
1.1 Consejos importantes para el usuario de los<br />
equipos e instrumentos de KARL STORZ<br />
Agradecemos la confianza que ha depositado en la<br />
marca KARL STORZ. Tanto usted como su empresa se<br />
han decidido por un producto moderno y de alta calidad.<br />
El Manual de instrucciones le ayudará a montar, poner<br />
en marcha y utilizar correctamente este aparato de<br />
KARL STORZ, ya que contiene todas las explicaciones<br />
necesarias sobre las particularidades y detalles de su<br />
manejo.<br />
Recomendamos la lectura detenida de este manual y<br />
su colocación en un lugar visible y a mano para una<br />
consulta posterior.<br />
KARL STORZ trabaja constantemente en el desarrollo<br />
de todos sus productos. Por ello, es posible que se<br />
produzcan algunas modificaciones en el volumen del<br />
suministro, en la forma, el equipamiento y la técnica.<br />
En consecuencia, no podrá presentarse ninguna reclamación<br />
derivada de los datos, las ilustraciones y las<br />
descripciones contenidos en este Manual.<br />
1.2 Descripción del aparato<br />
Sistema de iluminación de gran calidad con elevada<br />
potencia lumínica, cuya construcción proporciona un<br />
manejo sencillo y una puesta en marcha sin complicaciones.<br />
El sistema óptico del proyector de luz fría se compone<br />
de una lámpara halógena o lámpara de descarga, de<br />
un sistema de condensación y de un espejo de luz fría.<br />
Con el sistema de condensación, se enfoca la luz a la<br />
superficie frontal de uno de los cables de luz conectados<br />
a la fuente de luz. El espejo de luz fría refleja fundamentalmente<br />
sólo la parte visible de la radiación y permite<br />
el paso de la radiación por infrarrojos. La luminosidad<br />
puede ajustarse en el aparato. El calor producido<br />
por la lámpara se expulsa por medio de un ventilador.<br />
1.3 Símbolos de advertencia<br />
Lea este Manual y siga las instrucciones cuidadosamente.<br />
Los términos Cuidado, Advertencia y Nota tienen<br />
significados especiales. Cuando aparezcan en<br />
alguna parte de este Manual, revise esa sección cuidadosamente<br />
para asegurar la operación inocua y eficaz<br />
de este aparato. Para destacar más claramente los<br />
términos Cuidado, Advertencia y Nota, éstos aparecen<br />
precedidos por un pictograma adicional.<br />
7
1 Allgemeines 1 General information<br />
1.3 Warnsymbole<br />
1.4 Piktogramm-Erläuterung<br />
1.3 Warning symbols<br />
1.4 Explanation of symbols<br />
Warnung macht auf eine Gefährdung von Menschen<br />
aufmerksam. Die Nichtbeachtung einer Warnung kann<br />
Verletzungen des Anwenders oder anderer Personen<br />
zur Folge haben.<br />
Warning indicates that personal safety may be<br />
involved. Disregarding a Warning could result in injury<br />
to the user or other persons.<br />
Vorsicht macht darauf aufmerksam, dass bestimmte<br />
Wartungs- oder Sicherheitsmaßnahmen zu treffen sind,<br />
um eine Beschädigung des Gerätes zu vermeiden.<br />
Caution indicates that particular service procedures or<br />
safety precautions must be followed to avoid possible<br />
damage to the product.<br />
Hinweise enthalten spezielle Informationen zur<br />
Bedienung des Gerätes, oder sie erklären wichtige<br />
Informationen.<br />
Notes Note indicates special information about<br />
operating the product, or clarifies important information.<br />
1.4 Piktogramm-Erläuterung<br />
1.4 Explanation of symbols<br />
EIN/AUS Schalter<br />
ON/OFF switch<br />
Helligkeitsregler der Lichtquelle<br />
Brightness control for light source<br />
Lichtentnahmestelle<br />
Light outlet socket<br />
Potentialausgleichsanschluss<br />
Potential equalization connection<br />
Warnung: Verbrennungsgefahr<br />
Warning: Danger of burns<br />
Vermeidung von Umweltverschmutzung durch<br />
elektronische Geräte (China RoHS)<br />
Electronic information product pollution control<br />
(China RoHS)<br />
Das Gerät unterliegt den Anforderungen der<br />
WEEE-Richtlinie 2002/96/EG<br />
The device is subject to the requirements of the<br />
WEEE Directive, 2002/96/EC<br />
01/08<br />
8
1 Généralités 1 Generalidades<br />
1.3 Symboles d'avertissement<br />
1.4 Explication des pictogrammes<br />
1.3 Símbolos de advertencia<br />
1.4 Explicación de los pictogramas<br />
Le texte d'avertissement attire ici l'attention sur un<br />
risque encouru par l'homme. Le non-respect de cet<br />
avertissement peut entraîner des blessures pour l'utilisateur<br />
ou pour d'autres personnes.<br />
Cuidado llama la atención sobre una situación de peligro<br />
para los seres humanos. La inobservancia de este<br />
aviso podría conllevar lesiones para el usuario u otras<br />
personas.<br />
Le terme Avis indique qu'il faut prendre certaines<br />
mesures d'entretien ou de sécurité pour garantir le parfait<br />
état de l'appareil.<br />
Advertencia llama la atención sobre determinadas<br />
medidas de mantenimiento o de seguridad que han de<br />
llevarse a cabo a fin de evitar el deterioro del aparato.<br />
Les remarques contiennent des informations spéciales<br />
sur l'emploi de l'appareil ou fournissent des informations<br />
importantes.<br />
Nota contiene información adicional para el manejo<br />
seguro del equipo o aclara información relevante.<br />
1.4 Explication des pictogrammes<br />
1.4 Explicación de los pictogramas<br />
Touche M<strong>ARC</strong>HE/ARRÊT<br />
Interruptor de CONEXIÓN/DESCONEXIÓN<br />
Régulateur de luminosité de la source<br />
lumineuse<br />
Regulador de brillo de la fuente de luz<br />
Prise de lumière<br />
Punto de toma de luz<br />
Prise de compensation de potentiel<br />
Conexión equipotencial<br />
Avertissement : Risque de brûlure<br />
Cuidado: Peligro de quemaduras<br />
Contrôle de la pollution issue des produits d'information<br />
électronique (RoHS chinoise).<br />
Certificación de control de la contaminación<br />
ambiental debida a aparatos electrónicos<br />
(directiva RoHS china)<br />
L'appareil satisfait aux exigences de la directive<br />
DEEE 2002/96/CE.<br />
El aparato debe desecharse de acuerdo con los<br />
requisitos dispuestos en la directiva europea<br />
2002/96/CE referida a aparatos eléctricos y electrónicos<br />
viejos (waste electrical and electronic<br />
equipment o WEEE)<br />
01/08<br />
9
2 Sicherheitshinweise 2 Safety instructions<br />
2.1 Warn- und Vorsichtshinweise<br />
2.2 Was Sie vermeiden sollten<br />
2.3 Bestimmungsgemäße Verwendung<br />
2.4 Qualifikation des Anwenders<br />
2.5 Sicherheitsmaßnahmen am Aufstellort<br />
2.1 Warnings and cautions<br />
2.2 What you should avoid<br />
2.3 Normal use<br />
2.4 User qualification<br />
2.5 Safety precautions at the installation site<br />
2.6 Sicherheitsmaßnahmen beim<br />
Einsatz des Systems<br />
2.7 Reinigung und Wartung<br />
2.1 Warn- und Vorsichtshinweise<br />
Lesen Sie, bevor Sie das Gerät in Betrieb<br />
nehmen, diese Gebrauchsanweisung genau<br />
durch, insbesondere das Kapitel Sicherheitshinweise,<br />
um eine Gefährdung Ihres Personals,<br />
sowie Ihrer eigenen Person zu vermeiden.<br />
2.6 Safety precautions when operating<br />
the system<br />
2.7 Cleaning and maintenance<br />
2.1 Warnings and cautions<br />
Before using the device, please read this<br />
instruction manual thoroughly, particularly the<br />
section Safety instructions, so as to avoid any<br />
risk to yourself or your staff<br />
KALTLICHT-PROJEKTOR <strong>TECHNO</strong> <strong>ARC</strong> <strong>60</strong><br />
• Machen Sie sich vor der ersten Anwendung des<br />
Kaltlicht-Projektors mit der Funktionsweise und<br />
Bedienung des Systems vertraut.<br />
• Prüfen Sie das System vor jeder Anwendung auf<br />
seine Funktionsfähigkeit.<br />
• Das Produkt ist nicht für den Betrieb in explosionsgefährdeten<br />
Bereichen bestimmt!<br />
• Das Gerät ist nur dann zuverlässig geerdet, wenn<br />
es an einer einwandfrei installierten Schutzkontakt-<br />
Steckdose angeschlossen ist. Stecker und Kabel<br />
routinemäßig prüfen und bei Beschädigung nicht<br />
verwenden.<br />
• Vor sämtlichen Wartungsarbeiten am Gerät: Netzverbindung<br />
trennen und Lampe abkühlen lassen!<br />
• Gefahr eines elektrischen Schlages!<br />
Gehäuse des Grundgerätes nicht öffnen! Einzige<br />
Ausnahme: die in dieser Gebrauchsanweisung<br />
beschriebenen Tätigkeiten Lampenwechsel und<br />
Sicherungswechsel. Lassen Sie Service-Arbeiten nur<br />
durch den Hersteller KARL STORZ oder durch vom<br />
Hersteller autorisiertes Personal durchführen. Jedes<br />
Öffnen des Gerätes durch unautorisierte Personen<br />
führt zum Erlöschen der Garantie.<br />
• Das vom Kaltlicht-Projektor ausgestrahlte<br />
Hochleistungslicht kann am Lichtausgang und<br />
an den Endflächen des Lichtkabels zu hohen<br />
Temperaturen führen.<br />
<strong>TECHNO</strong> <strong>ARC</strong> <strong>60</strong> COLD LIGHT PROJECTOR<br />
• Before using the cold light projector for the first time,<br />
you should familiarize yourself with how the system<br />
operates and is controlled.<br />
• Test the system before each use to ensure that it<br />
functions correctly.<br />
• The product is not intended for use in potentially<br />
explosive atmospheres!<br />
• The unit is only reliably grounded when it is connected<br />
to a correctly installed grounded socket. Routinely<br />
inspect electrical plug and cord. Do not use if<br />
inspection reveals damage.<br />
• Always unplug the device before carrying out any<br />
maintenance work on it, and allow the lamp to cool!<br />
• Danger of electric shock!<br />
Do not open the housings of the basic device! The<br />
only exceptions are the lamp and fuse replacement<br />
described in this manual. Refer servicing to the manufacturer<br />
KARL STORZ or to personnel authorized by<br />
the manufacturer. Any attempt to open the equipment<br />
by unauthorized personnel shall render the warranty<br />
void.<br />
• The high-intensity light emitted by the cold light projector<br />
may cause high temperatures at the light outlet<br />
and at the end faces of the light cable.<br />
01/08<br />
10
2 Consignes de sécurité 2 Instrucciones de seguridad<br />
2.1 Avertissements et consignes de sécurité<br />
2.2 Ce qu'il convient d'éviter<br />
2.3 Utilisation correcte<br />
2.4 Qualification de l'utilisateur<br />
2.5 Mesures de sécurité sur le lieu<br />
d'installation<br />
2.6 Mesures de sécurité pour l'emploi<br />
de l'appareil<br />
2.7 Nettoyage et entretien<br />
2.1 Indicaciones de alarma y advertencia<br />
2.2 Lo que usted debe evitar<br />
2.3 Empleo previsto<br />
2.4 Cualificación del usuario<br />
2.5 Medidas de seguridad en el lugar de<br />
emplazamiento<br />
2.6 Medidas de seguridad al emplear el<br />
sistema<br />
2.7 Limpieza y mantenimiento<br />
2.1 Avertissements et consignes de<br />
sécurité<br />
Avant d'utiliser l'appareil, lire attentivement le<br />
présent manuel et attacher une attention toute<br />
particulière au chapitre sur les consignes de<br />
sécurité afin d'éviter tout risque pour votre<br />
personnel et vous-même.<br />
PROJECTEUR DE LUMIÈRE FROIDE <strong>TECHNO</strong> <strong>ARC</strong> <strong>60</strong><br />
• Il est impératif de commencer par se familiariser avec<br />
le fonctionnement et la commande du projecteur de<br />
lumière froide avant de l'utiliser pour la première fois.<br />
• Vérifier le bon fonctionnement du système avant<br />
chaque utilisation.<br />
• L'appareil n'est pas conçu pour fonctionner dans les<br />
zones à risques d'explosion.<br />
• L'appareil n'est correctement mis à la terre que s'il est<br />
branché sur une prise de courant de sécurité<br />
parfaitement installée. Vérifier régulièrement les<br />
connecteurs et les câbles et ne pas les utiliser s'ils ne<br />
sont pas en parfait état.<br />
• Toujours débrancher l'appareil du secteur et laisser la<br />
lampe refroidir avant toute manipulation technique.<br />
• Risque de décharge électrique !<br />
Ne pas ouvrir le boîtier de l'appareil de base. Seule<br />
exception : les opérations décrites dans le présent<br />
manuel pour changer la lampe ou les fusibles. Les travaux<br />
de maintenance ne doivent être confiés qu'au<br />
fabricant KARL STORZ ou à un personnel autorisé par<br />
lui. Toute ouverture de l'appareil par des personnes<br />
non autorisées annule tout droit à garantie.<br />
• La lumière puissante émise par le projecteur de<br />
lumière froide peut provoquer des températures élevées<br />
à la sortie de lumière et sur les extrémités du<br />
guide de lumière.<br />
2.1 Indicaciones de alarma y<br />
advertencia<br />
Lea detenidamente este Manual de instrucciones antes<br />
de usar el equipo, prestando particular atención al<br />
capítulo “Instrucciones de seguridad”, a fin de evitar<br />
riesgos a su personal y a usted mismo.<br />
PROYECTOR DE LUZ FRÍA <strong>TECHNO</strong> <strong>ARC</strong> <strong>60</strong><br />
• Familiarícese con los modos de funcionamiento y con<br />
el manejo del sistema del proyector de luz fría antes<br />
de utilizarlo por primera vez.<br />
• Verifique la capacidad de funcionamiento del sistema<br />
antes de cada aplicación.<br />
• El producto no es apropiado para su utilización en<br />
sectores expuestos a peligro de explosión.<br />
• La conexión a tierra de este equipo sólo es fiable si<br />
se encuentra conectado a un enchufe con puesta a<br />
tierra debidamente instalado. Compruebe regularmente<br />
el enchufe y el cable y no los utilice si están<br />
deteriorados.<br />
• Antes de realizar trabajos de mantenimiento en el<br />
aparato, desconéctelo de la red y deje enfriar la lámpara.<br />
• Peligro de descarga eléctrica:<br />
No abra la carcasa del equipo principal. Única<br />
excepción: el cambio de lámparas y fusibles descritos<br />
en este Manual de instrucciones. Las tareas de<br />
mantenimiento sólo podrán llevarse a cabo por el<br />
fabricante KARL STORZ o por personal autorizado<br />
por el fabricante. Si personas no autorizadas abren el<br />
equipo, los derechos de garantía quedan revocados.<br />
• La luz de alta energía que irradia el proyector de luz<br />
fría puede producir temperaturas elevadas en la salida<br />
de luz y en las superficies de los extremos del<br />
cable de luz.<br />
01/08<br />
11
2 Sicherheitshinweise 2 Safety instructions<br />
2.1 Warn- und Vorsichtshinweise 2.1 Warnings and cautions<br />
• Verbrennungsgefahr!<br />
Die Lampe und deren Umgebung können heiß sein.<br />
Abkühlen lassen!<br />
• Verletzungsgefahr!<br />
Die Lampe kann beim Lampenwechsel bersten.<br />
Herumfliegende Glassplitter können Augen und Hautoberfläche<br />
verletzen. Geeignete Schutzkleidung und<br />
Augenschutz tragen!<br />
• Bei Sicherungswechsel nur die angegebenen<br />
Sicherungen verwenden.<br />
• Bei der Reinigung unbedingt die Anweisungen in<br />
der Gebrauchsanweisung beachten.<br />
• Ein Eindringen von Flüssigkeit in das Gehäuse ist<br />
unbedingt zu vermeiden.<br />
• Keine Flüssigkeit auf oder über dem Gerät lagern.<br />
Lampen sind Verschleißartikel. Während des<br />
Einsatzes kann es somit auch zu Lampenausfällen<br />
kommen. Gegebenenfalls sollte deshalb<br />
stets eine Ersatzlampe zur Verfügung stehen.<br />
Bei der Entsorgung oder dem Recycling von Komponenten<br />
sind die jeweils geltenden Bestimmungen<br />
einzuhalten.<br />
Lichtkabel<br />
• Blendgefahr! Nie in das freie Ende eines Lichtkabels<br />
schauen.<br />
• Verbrennungsgefahr! Der Kontakt mit dem freien Ende<br />
eines an der Kaltlichtquelle angeschlossenen<br />
Lichtkabels kann u.U. zu Verbrennungen führen.<br />
• Angeschlossene Lichtkabel nicht auf brennbaren<br />
Materialien wie Textilien oder in unmittelbarer Nähe<br />
von mit brennbaren Flüssigkeiten getränkten Textilien<br />
ablegen. Durch die Hitzeentwicklung am freien Ende<br />
des Lichtkabels können sich diese entzünden.<br />
Videoskope, Boreskope und flexible Endoskope<br />
• Gefahr eines elektrischen Schlages!<br />
Beim Berühren von spannungsführenden Teilen<br />
kann das Endoskop unter Strom stehen. Niemals<br />
spannungsführende Teile berühren.<br />
• Risk of burns!<br />
The lamp and surrounding area may be hot.<br />
Allow to cool down!<br />
• Risk of injury!<br />
The lamp may burst during replacement. Flying glass<br />
shards can cause eye and skin injuries. Wear suitable<br />
protective clothing and eye protection.<br />
• When replacing fuses, use only fuses with the<br />
correct rating.<br />
• When cleaning the device, always observe the<br />
instructions in the instruction manual.<br />
• Avoid allowing liquids to enter the housing.<br />
• Do not store liquids on or above the device.<br />
Lamps are subject to wear. This means that a<br />
lamp may potentially fail during use. Therefore,<br />
a spare lamp should always be kept available.<br />
Follow local governing ordinances and recycling plans<br />
regarding the disposal or recycling of device<br />
components.<br />
Light cable<br />
• Danger of glare! Never look into the free end of a light<br />
cable.<br />
• Risk of burns! Contact with the free end of a light<br />
cable that is connected to the cold light source may<br />
cause burns.<br />
• Do not lay the connected light cables on combustible<br />
objects such as textiles or in the immediate vicinity of<br />
flammable liquids such as swabs soaked in disinfectant.<br />
These may ignite due to the build-up of heat at<br />
the end of the light cable.<br />
Videoscopes, borescopes, and flexible endoscopes<br />
• Risk of electric shock!<br />
On contact with live parts, the endoscope<br />
is susceptible to electric current. Never touch<br />
live parts!<br />
01/08<br />
12
2 Consignes de sécurité 2 Instrucciones de seguridad<br />
2.1 Avertissements et consignes de sécurité 2.1 Indicaciones de alarma y advertencia<br />
• Risque de brûlures !<br />
La lampe et la zone environnante peuvent être très<br />
chaudes. Laisser refroidir !<br />
• Risque de blessure !<br />
La lampe peut éclater lorsqu'on la change. Des<br />
projections d'éclats de verre peuvent toucher les<br />
yeux ou la peau, entraînant des blessures. Porter<br />
des vêtements et des lunettes de protection<br />
appropriés.<br />
• N'employer que des fusibles prescrits.<br />
• Respecter impérativement les instructions du manuel<br />
d'utilisation pour le nettoyage.<br />
• Éviter impérativement que du liquide ne s'infiltre<br />
dans le boîtier de l'appareil.<br />
• Ne déposer de liquide ni sur ni au-dessus de<br />
l'appareil.<br />
Les lampes sont des articles d'usure qui<br />
peuvent tomber en panne pendant leur<br />
service. Il est recommandé de toujours avoir<br />
une lampe de rechange à disposition au cas<br />
où cela se produirait.<br />
Respecter les réglementations en vigueur pour l'élimination<br />
et le recyclage des composants.<br />
Guide de lumière<br />
• Risque d'éblouissement ! Ne jamais regarder dans<br />
l'extrémité libre d'un guide de lumière.<br />
• Risque de brûlures ! Le contact avec l'extrémité libre<br />
d'un guide de lumière branché sur la source de<br />
lumière froide peut, dans certains cas, entraîner des<br />
brûlures.<br />
• Ne pas déposer des guides de lumière branchés sur<br />
des objets inflammables comme des textiles ou à<br />
proximité immédiate de textiles imbibés de liquide<br />
inflammable. Ils pourraient s'enflammer sous l'effet<br />
de la chaleur produite sur l'extrémité libre du guide<br />
de lumière.<br />
Vidéoscopes, borescopes et endoscopes flexibles<br />
• Risque de décharge électrique !<br />
Au contact d'éléments sous tension, l'endoscope<br />
est susceptible de conduire le courant électrique.<br />
Ne jamais toucher des éléments sous tension !<br />
• Peligro de quemaduras:<br />
La lámpara y sus inmediaciones pueden estar calientes.<br />
Déjelas enfriar.<br />
• Peligro de lesiones:<br />
La lámpara podría explotar al realizar un cambio de<br />
lámpara. Las astillas de vidrio podrían lesionar los<br />
ojos y la piel. Utilice una vestimenta de protección<br />
adecuada y gafas de protección.<br />
• Utilice sólo fusibles con las características correctas.<br />
• Para la limpieza deberá observarse el Manual de<br />
instrucciones.<br />
• Deberá evitarse en todo momento la penetración de<br />
líquidos en la carcasa del aparato.<br />
• No deposite líquidos sobre el aparato o por encima<br />
de él.<br />
Las lámparas son productos sometidos a desgaste,<br />
por lo que podrían fallar durante una<br />
intervención. Por este motivo, deberá disponerse<br />
siempre de una lámpara de repuesto para<br />
su uso en caso necesario.<br />
En la gestión de residuos o reciclaje de componentes,<br />
deben observarse las disposiciones nacionales vigentes<br />
pertinentes.<br />
Cable de luz<br />
• Peligro de deslumbramiento: No mire nunca en el<br />
extremo libre de un cable de luz.<br />
• Peligro de quemaduras: El contacto con el extremo<br />
libre del cable de luz conectado al proyector de luz<br />
puede producir quemaduras.<br />
• No acerque los cables de luz conectados a materiales<br />
combustibles, tales como, p. ej., tejidos, ni deposite<br />
estos cables cerca de tejidos humedecidos con<br />
líquidos inflamables, ya que podrían inflamarse debido<br />
al calor que se produce en el extremo libre del<br />
cable.<br />
Videoscopios, boroscopios y endoscopios flexibles<br />
• Peligro de descarga eléctrica!<br />
Al entrar en contacto con piezas conductoras de tensión,<br />
el endoscopio puede estar bajo corriente.<br />
Nunca toque piezas conductoras de tensión.<br />
01/08<br />
13
2 Sicherheitshinweise 2 Safety instructions<br />
2.2 Was Sie vermeiden sollten<br />
2.3 Bestimmungsgemäße Verwendung<br />
2.4 Qualifikation des Anwenders<br />
2.5 Sicherheitsmaßnahmen am Aufstellort<br />
2.2 What you should avoid<br />
2.3 Normal use<br />
2.4 User qualification<br />
2.5 Safety precautions at the installation site<br />
2.6 Sicherheitsmaßnahmen beim<br />
Einsatz des Systems<br />
2.2 Was Sie vermeiden sollten:<br />
• Starke Stöße gegen das Gerät.<br />
• Umgebungstemperaturen über 40 °C (104 °F).<br />
• Übermäßige Verschmutzung oder Feuchtigkeit. Durch<br />
den Ventilator werden Schmutz und Feuchtigkeit in das<br />
Gerät gesaugt und können dort zu Schäden führen.<br />
• Häufiges Ein- und Ausschalten der Lampe. Die<br />
Lebensdauer der Lampe sinkt drastisch bei zu<br />
häufigem Einschalten mit kurzen Betriebszeiten. Die<br />
Betriebszeit der Lampe vor dem Ausschalten sollte<br />
mindestens 2-3 Minuten betragen.<br />
2.6 Safety precautions when operating the<br />
system<br />
2.2 What you should avoid:<br />
• Strong impacts against the device.<br />
• Ambient temperatures in excess of 40°C (104°F)<br />
• Excessive dirt or humidity. The fan sucks dirt and<br />
humidity into the housing, which may result in<br />
damage.<br />
• Turning the lamp on/off frequently. A too frequent<br />
turning on/off of the lamp with short operating cycles<br />
will drastically reduce the service life of the lamp.<br />
The lamp should be kept running for at least<br />
2-3 minutes before being switched off.<br />
2.3 Bestimmungsgemäße Verwendung<br />
Der Kaltlicht-Projektor <strong>TECHNO</strong> <strong>ARC</strong> <strong>60</strong> ist für endoskopische<br />
Inspektionen im industriellen Bereich vorgesehen.<br />
Beschädigungen des Gerätes, die aufgrund von<br />
Fehlbedienungen entstehen, fallen nicht unter die<br />
Gewährleistungsansprüche.<br />
2.3 Normal use<br />
The <strong>TECHNO</strong> <strong>ARC</strong> <strong>60</strong> cold light projector is intended<br />
for endoscopic inspections in industry.<br />
Any damage to the device resulting from incorrect<br />
operation is not covered by the manufacturer’s<br />
warranty.<br />
2.4 Qualifikation des Anwenders<br />
Das Produkt darf nur von KARL STORZ autorisierten<br />
Personen angewendet werden, die über eine<br />
entsprechende fachliche Qualifikation verfügen.<br />
2.4 User qualification<br />
This product must only be used by persons authorized<br />
by KARL STORZ who are suitably qualified.<br />
2.5 Sicherheitsmaßnahmen am Aufstellort<br />
Das Gerät darf nicht in explosionsgefährdeten<br />
Bereichen betrieben werden.<br />
Das Gerät ist mit einer Steckvorrichtung für den<br />
Potentialausgleich ausgerüstet. Diese nach Maßgabe<br />
der national gültigen Vorschriften anschließen.<br />
2.5 Safety precautions at the installation site<br />
The device may not be operated in potentially<br />
explosive atmospheres.<br />
The device is equipped with a connector for potential<br />
equalization. It should be connected up in accordance<br />
with national regulations.<br />
2.6 Sicherheitsmaßnahmen beim Einsatz<br />
des Systems<br />
Vor der Anwendung des Gerätes hat sich der Anwender<br />
von der Funktionssicherheit und dem ordnungsgemäßen<br />
Zustand des Gerätes zu überzeugen.<br />
2.6 Safety precautions when operating the<br />
system<br />
Before use, the user should check that the device is<br />
functioning correctly and in proper working condition.<br />
01/08<br />
14
2 Consignes de sécurité 2 Instrucciones de seguridad<br />
2.2 Ce qu'il convient d'éviter<br />
2.3 Utilisation correcte<br />
2.4 Qualification de l'utilisateur<br />
2.5 Mesures de sécurité sur le lieu<br />
d'installation<br />
2.6 Mesures de sécurité pour l'emploi<br />
de l'appareil<br />
2.2 Lo que usted debe evitar<br />
2.3 Empleo previsto<br />
2.4 Cualificación del usuario<br />
2.5 Medidas de seguridad en el lugar de<br />
emplazamiento<br />
2.6 Medidas de seguridad durante el empleo<br />
del sistema<br />
2.2 Ce qu'il convient d'éviter :<br />
• Les chocs brutaux contre l'appareil.<br />
• Températures ambiantes supérieures à 40 °C.<br />
• Toute souillure ou humidité excessives. La saleté et<br />
l'humidité sont aspirées dans l'appareil par le ventilateur<br />
et peuvent y provoquer une détérioration.<br />
• Éteindre et allumer la lampe trop fréquemment. La<br />
longévité de la lampe se réduit drastiquement quand<br />
elle est allumée trop souvent pour une courte durée.<br />
La durée de fonctionnement de la lampe avant sa<br />
désactivation doit être d'au moins 2 à 3 minutes.<br />
2.2 Lo que usted debe evitar:<br />
• Golpes fuertes sobre el equipo.<br />
• Temperaturas ambientales superiores a 40 °C.<br />
• Suciedad o humedad excesivas. El ventilador aspira<br />
la suciedad y humedad que se deposita en el equipo,<br />
por lo que pueden producirse averías.<br />
• Encender y apagar la lámpara frecuentemente. La<br />
vida útil de la lámpara se reduce drásticamente si se<br />
enciende y se apaga con frecuencia a intervalos<br />
breves de tiempo. Los intervalos de la lámpara<br />
deben ser de 2 ó 3 minutos como mínimo.<br />
2.3 Utilisation correcte<br />
Le projecteur de lumière froide <strong>TECHNO</strong> <strong>ARC</strong> <strong>60</strong> est<br />
conçu pour des examens endoscopiques dans le secteur<br />
industriel.<br />
La garantie ne couvre pas les dommages causés à<br />
l'appareil par des erreurs de commande.<br />
2.3 Empleo previsto<br />
El proyector de luz fría <strong>TECHNO</strong> <strong>ARC</strong> <strong>60</strong> está previsto<br />
para su uso en inspecciones endoscópicas en el<br />
ámbito industrial.<br />
Los deterioros del aparato derivados de su manejo<br />
incorrecto no serán reconocidos como derechos de<br />
garantía.<br />
2.4 Qualification de l'utilisateur<br />
L'appareil ne doit être utilisé que par des personnes<br />
habilitées par KARL STORZ, possédant la qualification<br />
professionnelle suffisante.<br />
2.4 Cualificación del usuario<br />
El producto sólo podrá ser utilizado por personal autorizado<br />
por KARL STORZ que disponga de una cualificación<br />
profesional adecuada.<br />
2.5 Mesures de sécurité sur le lieu<br />
d'installation<br />
L'appareil ne doit pas être utilisé dans des zones à<br />
risque d'explosion.<br />
L'appareil est équipé d'une fiche de compensation de<br />
potentiel dont le branchement doit être effectué<br />
conformément aux réglementations nationales en<br />
vigueur.<br />
2.5 Medidas de seguridad en el lugar de<br />
emplazamiento<br />
El aparato no es adecuado para el servicio en zonas<br />
expuestas a peligro de explosión.<br />
El aparato está provisto de una conexión equipotencial.<br />
La conexión debe efectuarse de acuerdo con las<br />
normas nacionales de seguridad vigentes.<br />
2.6 Mesures de sécurité pour l'emploi de<br />
l'appareil<br />
Avant l'utilisation, l'utilisateur doit s'assurer du bon<br />
fonctionnement de l'appareil et de son parfait état.<br />
2.6 Medidas de seguridad al emplear el<br />
sistema<br />
El usuario debe cerciorarse de la seguridad de funcionamiento<br />
y el buen estado del aparato antes de cada<br />
aplicación.<br />
01/08<br />
15
2 Sicherheitshinweise 2 Safety instructions<br />
2.7 Reinigung und Wartung 2.7 Cleaning and maintenance<br />
2.7 Reinigung und Wartung<br />
Eine vorbeugende Wartung der Kaltlicht-Projektoren ist<br />
nicht notwendig.<br />
Die Lampen sind Verschleißartikel und sollten regelmäßig<br />
ausgetauscht werden.<br />
Die Außenflächen des Projektor-Gehäuses können<br />
mit einem geeigneten Mittel für alkoholempfindliche<br />
Flächen gereinigt werden.<br />
(Empfehlung: Einmaltuch befeuchtet mit alkoholfreiem<br />
Desinfektionsmitttel).<br />
Die zugänglichen Glasflächen der Lampe und des<br />
Kondensorsystems reiben Sie mit einem mit Alkohol<br />
befeuchteten Einmaltuch ab.<br />
Niemals scharfkantige Gegenstände, wie zum<br />
Beispiel Bürsten zum Reinigen verwenden.<br />
2.7 Cleaning and maintenance<br />
No preventive maintenance is necessary with the cold<br />
light projectors.<br />
The lamps are wearing parts and should be replaced<br />
at regular intervals.<br />
The outer surfaces of the projector housing can<br />
be cleaned with a cleaning agent that is<br />
suitable for alcohol-sensitive surfaces.<br />
(Recommendation: Use a disposable cloth moistened<br />
with an alcohol-free disinfectant).<br />
Rub over the accessible glass surfaces of the lamp<br />
and condenser system with a disposable cloth<br />
moistened with alcohol.<br />
Never use sharp-edged objects, such as a<br />
brush, for cleaning.<br />
01/08<br />
16
2 Consignes de sécurité 2 Instrucciones de seguridad<br />
2.7 Nettoyage et entretien 2.7 Limpieza y mantenimiento<br />
2.7 Nettoyage et entretien<br />
Une maintenance préventive des projecteurs de lumière<br />
froide n'est pas nécessaire.<br />
Les lampes sont des articles d'usure qui devront être<br />
remplacées à intervalles réguliers.<br />
Les surfaces externes du boîtier du projecteur<br />
peuvent être nettoyées avec un produit adapté<br />
pour les surfaces sensibles à l'alcool.<br />
(Recommandation : chiffon à usage unique imbibé de<br />
produit de désinfection sans alcool).<br />
Essuyer les surfaces de verre accessibles de la lampe<br />
et du système de condenseur avec un chiffon à usage<br />
unique imbibé d'alcool.<br />
Ne jamais utiliser d'objets pointus (comme des<br />
brosses, par exemple) pour le nettoyage.<br />
2.7 Limpieza y mantenimiento<br />
El proyector de luz fría no precisa de mantenimiento<br />
preventivo.<br />
Las lámparas son productos sometidos a desgaste y<br />
deben reemplazarse con regularidad.<br />
Las superficies externas de la carcasa del proyector<br />
pueden limpiarse con un producto adecuado<br />
para superficies sensibles al alcohol.<br />
(Recomendación: Emplee un paño desechable humedecido<br />
con un producto desinfectante sin alcohol).<br />
Frote las superficies de vidrio accesibles de la lámpara<br />
y del sistema de condensación con un paño desechable<br />
humedecido con alcohol.<br />
Nunca elimine la suciedad usando objetos con<br />
cantos afilados como, p. ej., cepillos.<br />
01/08<br />
17
3 Bedienungselemente/Anzeigen/Anschlüsse und ihre Funktion<br />
3 Controls, displays, connectors and their uses<br />
3 Organes de commande, affichages, raccordements et leurs<br />
fonctions<br />
3 Elementos de mando, indicadores, conexiones y sus funciones<br />
19
c<br />
d<br />
e<br />
f<br />
g<br />
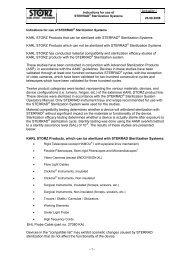
Netzschalter mit Kontroll-Leuchte<br />
Lichtintensitätsregler<br />
Lichtentnahmestelle, abschraubbar<br />
Potentialausgleichsanschluss<br />
Netzsicherungshalter<br />
Netzanschlussbuchse<br />
b<br />
c<br />
d<br />
e<br />
f<br />
g<br />
Power switch with pilot light<br />
Luminous intensity regulator<br />
Light outlet socket, unscrewable<br />
Potential equalization connection<br />
Power fuser holder<br />
Power cord socket<br />
b<br />
c<br />
d<br />
e<br />
f<br />
g<br />
Interrupteur principal avec lampe<br />
témoin<br />
Régulateur d'intensité lumineuse<br />
Prise de lumière, dévissable<br />
Prise de compensation de potentiel<br />
Porte-fusible<br />
Prise d’alimentation électrique<br />
b<br />
c<br />
d<br />
e<br />
f<br />
g<br />
Interruptor de la red con luz de control<br />
Regulador de la intensidad lumínica<br />
Punto de toma de luz, desatornillable<br />
Conexión equipotencial<br />
Portafusibles<br />
Conector de la red<br />
1<br />
2<br />
3<br />
4 5<br />
6<br />
20<br />
21
4 Inbetriebnahme 4 Getting started<br />
4.1 Grundausstattung<br />
4.2 Auspacken<br />
4.3 Aufstellung und Anschluss<br />
4.4 Einschalten<br />
4.5 Einstellen der Lichtintensität<br />
4.1 Basic equipment<br />
4.2 Unpacking<br />
4.3 Installation and connection<br />
4.4 Power up<br />
4.5 Setting the light intensity<br />
4.1 Grundausstattung<br />
1 Kaltlicht-Projektor 811310 20<br />
1 Netzkabel 400 F<br />
1 Netzkabel 400 FUS<br />
1 Gebrauchsanweisung<br />
4.1 Basic equipment<br />
1 cold light projector 811310 20<br />
1 power cord 400 F<br />
1 power cord 400 FUS<br />
1 instruction manual<br />
4.2 Auspacken<br />
Entnehmen Sie den Kaltlicht-Projektor und das Zubehör<br />
vorsichtig der Verpackung.<br />
Überprüfen Sie die Lieferung auf Vollständigkeit und<br />
auf eventuelle Beschädigungen.<br />
Sollte die Lieferung Anlass zur Reklamation geben, so<br />
wenden Sie sich bitte umgehend an den Hersteller<br />
oder Lieferanten. Wenn möglich, bewahren Sie die<br />
Originalverpackung auf, sie kann bei einem Transport<br />
des Gerätes nützlich sein.<br />
4.2 Unpacking<br />
Remove the cold light projector and the accessories<br />
carefully from the packaging.<br />
Check for missing items and evidence of shipping<br />
damage.<br />
File any complaints immediately with the manufacturer<br />
or supplier. If possible, retain the original packing<br />
materials for later use; these can come in handy if the<br />
device has to be transported.<br />
4.3 Aufstellung und Anschluss<br />
Kaltlicht-Projektor aufstellen (Fig. 1), Kühlschlitze immer<br />
frei halten.<br />
Warnung: Der Kaltlicht-Projektor darf nicht in<br />
explosionsgefährdeten Bereichen in Betrieb<br />
genommen werden!<br />
Vorsicht: Lüftungsschlitze nicht abdecken.<br />
Überhitzungsgefahr. Freie Luftzirkulation nach<br />
oben und zur Seite muss gewährleistet sein<br />
(Rückwandabstand 10 cm). Bei Überhitzung<br />
schaltet das Gerät automatisch ab.<br />
Das Gerät auf eine ebene Fläche stellen.<br />
Gerät erden (Stecker für Potentialausgleichs-Leitung,<br />
Buchse e). (Fig. 2)<br />
Netzkabel am Gerät anschließen, bis zum Anschlag in<br />
Netzgerätestecker g einschieben. (Fig. 3)<br />
4.3 Installation and connection<br />
Install the cold light projector (Fig. 1). Always keep the<br />
cooling slits free.<br />
Warning: The cold light projector must not be<br />
operated in potentially explosive atmospheres!<br />
Caution: Do not cover the air vents. Make certain<br />
there is free air circulation upwards and to<br />
the side (distance of rear panel from wall:<br />
10 cm). If the device overheats, it will shut<br />
down automatically.<br />
Place the device on a level surface.<br />
Ground the device (connector for potential equalization<br />
line, socket e). (Fig. 2)<br />
Connect the power cord to the device by pushing the<br />
power cord connector fully into the power socket g.<br />
(Fig. 3)<br />
Fig. 1<br />
Fig. 2<br />
01/08<br />
22
4 Mise en service 4 Puesta en servicio<br />
4.1 Équipement de base<br />
4.2 Déballage<br />
4.3 Installation et raccordement<br />
4.4 Mise sous tension<br />
4.5 Réglage de l'intensité lumineuse<br />
4.1 Equipo básico<br />
4.2 Desembalaje<br />
4.3 Montaje y conexión<br />
4.4 Puesta en marcha<br />
4.5 Ajuste de la intensidad lumínica<br />
4.1 Équipement de base<br />
1 projecteur de lumière froide 811310 20<br />
1 cordon secteur 400 F<br />
1 cordon secteur 400 FUS<br />
1 manuel d'utilisation<br />
4.1 Equipo básico<br />
1 Proyector de luz fría 811310 20<br />
1 Cable de red 400 F<br />
1 Cable de red 400 FUS<br />
1 Manual de instrucciones<br />
4.2 Déballage<br />
Retirer précautionneusement le projecteur de lumière<br />
froide et ses accessoires de leur emballage.<br />
Contrôler si la livraison est complète et vérifier si elle<br />
n'a pas subi d'éventuels dommages.<br />
Si la livraison devait faire l'objet d'une réclamation, se<br />
mettre immédiatement en rapport avec le fabricant ou<br />
avec le fournisseur. Conserver si possible l'emballage<br />
d'origine ; il peut être utile à un transport ultérieur de<br />
l'appareil.<br />
4.2 Desembalaje<br />
Extraiga cuidadosamente el proyector de luz fría y los<br />
accesorios del embalaje.<br />
Revise si el envío está completo y compruebe posibles<br />
averías.<br />
En caso de reclamaciones, diríjase inmediatamente al<br />
fabricante o al proveedor. Es recomendable conservar<br />
el embalaje original para su uso posterior en un posible<br />
transporte del equipo.<br />
4.3 Installation et raccordement<br />
Installer le projecteur de lumière froide (Fig. 1), veiller à<br />
ce que les fentes de refroidissement soient toujours<br />
dégagées.<br />
Avertissement : Le projecteur de lumière froide<br />
ne doit pas être utilisé dans des zones à risques<br />
d'explosion.<br />
Avis : Ne jamais obstruer les fentes d'aération.<br />
Risque de surchauffe. S'assurer que l'air peut<br />
librement circuler au-dessus et sur les côtés de<br />
l'appareil (10 cm par rapport au mur). En cas<br />
de surchauffe, l'appareil s'arrête automatiquement.<br />
Placer l'appareil sur une surface plane.<br />
Mettre l'appareil à la terre (prise de la ligne de compensation<br />
de potentiel, prise e). (Fig. 2)<br />
Brancher le cordon secteur sur l'appareil et l'enfoncer<br />
à fond dans la fiche secteur g. (Fig. 3)<br />
4.3 Montaje y conexión<br />
Monte el proyector de luz fría (Fig. 1). Las ranuras de<br />
refrigeración deberán mantenerse siempre libres.<br />
Cuidado: El proyector de luz fría no deberá utilizarse<br />
en áreas expuestas a posibles explosiones.<br />
Advertencia: No cubra las ranuras de ventilación.<br />
Peligro de sobrecalentamiento. Deberá garantizarse<br />
la libre circulación del aire hacia arriba<br />
y en el lateral (manténgase una distancia<br />
con respecto a la pared de 10 cm). En caso de<br />
sobrecalentamiento, el aparato se apaga automáticamente.<br />
Coloque el aparato sobre una superficie plana y<br />
conéctelo a tierra (en el enchufe para la línea de conexión<br />
equipotencial, conector e). (Fig. 2)<br />
Conecte el cable de red al aparato e insértelo hasta el<br />
tope en el enchufe de la red g. (Fig. 3)<br />
Fig. 3<br />
01/08<br />
23
4 Inbetriebnahme 4 Getting started<br />
4.3 Aufstellung und Anschluss<br />
4.3 Installation and connection<br />
Einstellen der Netzspannung<br />
Die Lichtquelle ist mit einem sog. Weltnetzteil ausgerüstet.<br />
Das Einstellen der Netzspannung entfällt daher.<br />
Setting the line voltage<br />
The light source is equipped with a universal power<br />
supply, so the line voltage does not need to be set.<br />
Vorsicht: Gerät nur mit der auf dem<br />
Typenschild angegebenen Spannung betreiben!<br />
Netzstecker mit der Netzstrom-Versorgung verbinden.<br />
(Fig. 4)<br />
Es wird empfohlen, nur Original KARL STORZ-<br />
Lichtkabel zu verwenden.<br />
Lichtkabel anderer Hersteller könnten beschädigt<br />
werden, wenn der Kaltlicht-Projektor mit<br />
hoher Leistung betrieben wird.<br />
Lichtkabel bis zum Einrasten in Buchse d einschieben.<br />
Nur am Griff anfassen, nie am Kabel ziehen! (Fig. 5)<br />
Lichtkabel mit dem Endoskop verbinden (durch<br />
Vierteldrehung der Rändelschraube auf den<br />
Schraubsockel). (Fig. 6)<br />
Flexoskope haben im allgemeinen ein fest mit dem<br />
Instrument verbundenes Lichtkabel.<br />
Caution: Only operate the device with the<br />
voltage stated on the device’s identification<br />
plate!<br />
Connect the power plug to the power supply. (Fig. 4)<br />
It is recommended to use only original<br />
KARL STORZ light cables.<br />
Light cables from other manufacturers might<br />
be damaged if the cold light projector is<br />
operated at high output.<br />
Push the light cable into the socket d until it engages.<br />
Only hold by the grip; never pull on the cable! (Fig. 5)<br />
Connect the light cable to the endoscope (with a quarter<br />
turn of the knurled screw onto the screw base).<br />
(Fig. 6)<br />
Flexoscopes usually have a light cable permanently<br />
attached to the instrument.<br />
Fig. 4 Fig. 5<br />
01/08<br />
24
4 Mise en service 4 Puesta en servicio<br />
4.3 Installation et raccordement<br />
4.3 Montaje y conexión<br />
Réglage de la tension secteur<br />
La source lumineuse est équipée d'un bloc d'alimentation<br />
universel. Il n'est donc pas nécessaire de régler la<br />
tension secteur.<br />
Ajuste de la tensión de red<br />
La fuente de luz está equipada con un transformador<br />
de red internacional, por lo que no es necesario el ajuste<br />
de la tensión de red.<br />
Avis : Utiliser l'appareil uniquement avec la tension<br />
indiquée sur la plaque signalétique !<br />
Raccorder la fiche secteur à l'alimentation électrique<br />
secteur. (Fig. 4)<br />
Il est recommandé de n'utiliser que des guides<br />
de lumière KARL STORZ d'origine.<br />
Des guides de lumière d'autres marques peuvent<br />
être endommagés si le projecteur de lumière<br />
froide est utilisé avec une puissance élevée.<br />
Introduire le guide de lumière jusqu'à ce qu'il s'enclenche<br />
dans la prise d.<br />
Toujours le saisir par son manche, ne jamais tirer sur le<br />
câble ! (Fig. 5)<br />
Relier le guide de lumière et l'endoscope (en faisant<br />
effectuer un quart de tour à la vis moletée sur le culot<br />
Edison). (Fig. 6)<br />
En règle générale, les flexiscopes possèdent un guide<br />
de lumière assemblé fixement à l'instrument.<br />
Advertencia: Utilice el aparato exclusivamente<br />
con la tensión indicada en la placa de especificaciones.<br />
Conecte el enchufe a la alimentación de la corriente de<br />
red. (Fig. 4)<br />
Se recomienda utilizar exclusivamente cables<br />
de luz originales de KARL STORZ.<br />
Los cables de luz de otros fabricantes pueden<br />
averiarse al emplear el proyector de luz fría a<br />
alta potencia.<br />
Introduzca el cable de luz en el conector d hasta que<br />
encastre.<br />
Sujételo siempre por la parte del mango y no tire<br />
nunca del cable. (Fig. 5)<br />
Conecte el cable de luz con el endoscopio apretando<br />
un cuarto de vuelta el tornillo moleteado en el casquillo<br />
de rosca. (Fig. 6)<br />
Los flexoscopios suelen tener un cable de luz conectado<br />
de forma fija al instrumento.<br />
Fig. 6<br />
01/08<br />
25
4 Inbetriebnahme 4 Getting started<br />
4.4 Einschalten<br />
4.5 Einstellen der Lichtintensität<br />
4.4 Power up<br />
4.5 Setting the light intensity<br />
4.4 Einschalten<br />
Warnung: Blendgefahr! Nie in die<br />
Lichtentnahmestelle oder das freie Ende des<br />
Lichtkabels schauen.<br />
Warnung: Verbrennungsgefahr! Der Kontakt mit<br />
dem freien Ende eines an den Kaltlicht-<br />
Projektor angeschlossenen Lichtkabels kann u.<br />
U. zu Verbrennungen führen.<br />
Gerät einschalten (Schalter b). Netzschalter mit<br />
Betriebskontroll-Leuchte b leuchtet. (Fig. 7)<br />
Die Zündung der Lampe erfolgt automatisch, nach<br />
ca. 3 Minuten wird die volle Leistung erreicht.<br />
4.5 Einstellen der Lichtintensität<br />
Die für die endoskopische Untersuchung erforderliche<br />
Lichtintensität wird an dem dafür vorgesehenen<br />
Drehknopf c am Gerät eingestellt. (Fig. 8)<br />
4.4 Power up<br />
Warning: Danger of glare! Never look into the<br />
light outlet socket or free end of the light cable.<br />
Warning: Risk of burns! Contact with the free<br />
end of a light cable that is connected to the<br />
cold light projector may cause burns.<br />
Switch on the device (switch b) Power switch pilot<br />
lights up b. (Fig. 7)<br />
The lamp ignites automatically and full capacity is<br />
reached after approx. 3 minutes.<br />
4.5 Setting the light intensity<br />
The light intensity required for endoscopic examination<br />
is set by turning the rotary knob c on the device.<br />
(Fig. 8)<br />
Fig. 7 Fig. 8<br />
01/08<br />
26
4 Mise en service 4 Puesta en servicio<br />
4.4 Mise sous tension<br />
4.5 Réglage de l'intensité lumineuse<br />
4.4 Puesta en marcha<br />
4.5 Ajuste de la intensidad lumínica<br />
4.4 Mise sous tension<br />
Avertissement : Risque d'éblouissement. Ne<br />
jamais regarder la prise de lumière, ni l'extrémité<br />
libre d'un guide de lumière.<br />
Avertissement : Risque de brûlure. Le contact<br />
avec l'extrémité libre d'un guide de lumière<br />
branché sur le projecteur de lumière froide<br />
peut dans certains cas provoquer des brûlures.<br />
Mettre l'appareil sous tension (interrupteur b).<br />
L'interrupteur principal avec lampe témoin b s'allume.<br />
(Fig. 7)<br />
L'allumage de la lampe s'effectue automatiquement, et<br />
la puissance maximale est atteinte au bout d'environ<br />
trois minutes.<br />
4.5 Réglage de l'intensité lumineuse<br />
Le réglage de l'intensité lumineuse nécessaire à l'examen<br />
endoscopique s'effectue à l'aide du bouton de<br />
réglage c prévu à cet effet sur l'appareil. (Fig. 8)<br />
4.4 Conexión<br />
Cuidado: Peligro de deslumbramiento. No mire<br />
nunca en el conector de toma de luz o en el<br />
extremo libre del cable de luz.<br />
Cuidado: Peligro de quemaduras. El contacto<br />
con el extremo libre de un cable de luz conectado<br />
al proyector de luz fría puede, bajo determinadas<br />
circunstancias, producir quemaduras.<br />
Conecte el aparato (interruptor b). Se enciende la luz<br />
de control b del interruptor de la red. (Fig. 7)<br />
La lámpara se enciende automáticamente y alcanza el<br />
punto máximo de potencia una vez transcurridos<br />
aproximadamente 3 minutos.<br />
4.5 Ajuste de la intensidad lumínica<br />
La intensidad lumínica necesaria para la intervención<br />
endoscópica se ajusta por medio del correspondiente<br />
botón giratorio c del aparato. (Fig. 8)<br />
01/08<br />
27
5 Instandhaltung 5 Maintenance<br />
5.1 Lampenwechsel<br />
5.2 Sicherungswechsel<br />
5.3 Instandsetzung<br />
5.4 Entsorgung<br />
5.1 Lamp replacement<br />
5.2 Fuse replacement<br />
5.3 Servicing and repairs<br />
5.4 Disposal<br />
5.1 Lampenwechsel<br />
Gerät ausschalten und Netzstecker ziehen.<br />
Alle Stecker an der Geräterückseite abziehen. (Fig. 9)<br />
Gehäuseabdeckung öffnen. Dazu zuerst die beiden<br />
Schnellverschlüsse an der Geräterückseite öffnen.<br />
(Fig. 10)<br />
Anschließend von vorn und Druck von oben die<br />
Gerätehaube mit beiden Händen nach hinten schieben.<br />
(Fig. 11)<br />
Schnellverschluss am Deckel des Lampenschachtes<br />
entriegeln und Deckel öffnen. (Fig. 12)<br />
Warnung: Verbrennungsgefahr! Lampe und<br />
deren Umgebung können noch heiß sein.<br />
5.1 Lamp replacement<br />
Switch the device off and unplug the power plug.<br />
Disconnect all the connectors on the back of the<br />
device. (Fig. 9)<br />
Open the housing cover: first undo the two quickrelease<br />
mechanisms on the back of the device. (Fig. 10)<br />
Then, from the front, press upwards and slide the<br />
housing cover off backwards. (Fig. 11)<br />
Unlock the quick-release mechanism on the cover of<br />
the lamp compartment and open the cover. (Fig. 12)<br />
Warning: Risk of burns! The lamp and<br />
surrounding area may still be hot.<br />
Sicherungsbügel entriegeln. Lampenklammer mit der<br />
zweiten Hand etwas nach vorn drücken. (Fig. 13)<br />
Lampenklammer nach hinten drücken. Mit der zweiten<br />
Hand Lampe nach hinten führen, bis diese am<br />
Auflageflansch freikommt, dann nach oben herausheben.<br />
(Fig. 14)<br />
Lampenstecker abziehen und Lampe sachgerecht entsorgen.<br />
(Fig. 15)<br />
Neue Lampe der Verpackung entnehmen.<br />
Spiegelfläche nicht berühren.<br />
Unlock the securing clamp. Press the lamp clip forward<br />
slightly with your other hand. (Fig. 13)<br />
Press the lamp clip backward. With your other hand,<br />
guide the lamp backward until it is free of the support<br />
flange, then lift it out. (Fig. 14)<br />
Pull off the lamp connector and dispose of the lamp<br />
correctly. (Fig. 15)<br />
Remove the new lamp from its packaging. Do not<br />
touch the mirror surface.<br />
Fig. 9 Fig. 10<br />
Fig. 13 Fig. 14<br />
01/08<br />
28
5 Maintenance 5 Mantenimiento<br />
5.1 Changement de lampe<br />
5.2 Changement des fusibles<br />
5.3 Réparations<br />
5.4 Élimination<br />
5.1 Cambio de la lámpara<br />
5.2 Cambio de fusibles<br />
5.3 Reparaciones<br />
5.4 Gestión de desechos<br />
5.1 Changement de lampe<br />
Éteindre l'appareil et débrancher la fiche secteur.<br />
Débrancher toutes les fiches au dos de l'appareil. (Fig. 9)<br />
Ouvrir le couvercle du boîtier. Pour cela, commencer<br />
par ouvrir les deux raccords rapides situés au dos de<br />
l'appareil. (Fig. 10)<br />
En s'aidant des deux mains, pousser ensuite le couvercle<br />
de l'appareil vers l'arrière, en se plaçant devant l'appareil<br />
et en exerçant une légère pression depuis le haut.<br />
(Fig. 11)<br />
Déverrouiller le raccord rapide du couvercle du compartiment<br />
de la lampe, puis ouvrir le couvercle. (Fig. 12)<br />
Avertissement : Risque de brûlure. La lampe<br />
et son environnement peuvent être encore très<br />
chauds.<br />
Déverrouiller le circlip. Avec la seconde main, pousser<br />
légèrement la pince-clip de la lampe vers l'avant. (Fig. 13)<br />
Repousser la pince-clip de la lampe vers l'arrière.<br />
S'aider de la deuxième main pour guider la lampe vers<br />
l'arrière jusqu'à ce qu'elle arrive à la patte d'appui, puis<br />
la dégager vers le haut. (Fig. 14)<br />
Retirer le connecteur de lampe et éliminer la lampe<br />
conformément aux prescriptions en vigueur. (Fig. 15)<br />
Retirer la lampe neuve de son emballage.<br />
Ne pas toucher la surface du miroir.<br />
5.1 Cambio de la lámpara<br />
Desconecte el aparato y extraiga el enchufe de la red.<br />
Desconecte todos los enchufes de la parte posterior<br />
del aparato. (Fig. 9)<br />
Abra la cubierta de la carcasa. Para ello, abra primero<br />
los cierres rápidos situados en la parte posterior del<br />
aparato. (Fig. 10)<br />
A continuación, tire con suavidad de la cubierta de la<br />
carcasa con ambas manos desde la parte frontal y<br />
presionando desde arriba. (Fig. 11)<br />
Desbloquee el cierre rápido de la cubierta de la ranura<br />
de la lámpara y abra la cubierta. (Fig. 12)<br />
Cuidado: Peligro de quemaduras. La lámpara y<br />
las superficies situadas junto a ella pueden<br />
seguir calientes.<br />
Desenclave el pasador de seguridad. Presione ligeramente<br />
la pinza de la lámpara hacia adelante con la<br />
otra mano. (Fig. 13)<br />
Presione la pinza de la lámpara hacia atrás. Con la<br />
otra mano, tire suavemente de la lámpara hacia atrás<br />
hasta que salga de la brida de asiento; a continuación,<br />
extráigala hacia arriba. (Fig. 14)<br />
Extraiga el conector de la lámpara y deseche la lámpara<br />
de la forma debida. (Fig. 15)<br />
Extraiga una nueva lámpara de su embalaje. No toque<br />
la superficie reflectante.<br />
Fig. 11 Fig. 12<br />
Fig. 15<br />
01/08<br />
29
5 Instandhaltung 5 Maintenance<br />
5.1 Lampenwechsel 5.1 Lamp replacement<br />
Lampenstecker aufstecken.<br />
Nur in einer Stellung möglich (Fig. 16)<br />
Lampenklammer nach hinten drücken. Mit der zweiten<br />
Hand Lampe einsetzen. Auf die Lage der Führungsnut<br />
am Lampenflansch achten. Nur eine Position ist möglich.<br />
(Fig. 17)<br />
Sicherungsbügel wieder verriegeln. Dazu<br />
Lampenklammer mit der zweiten Hand nach vorn<br />
drücken. (Fig. 18)<br />
Alle weiteren Schritte in umgekehrter Reihenfolge wie<br />
oben beschrieben durchführen.<br />
Alle Verbindungen wieder herstellen.<br />
Funktionstest durchführen. (Fig. 19)<br />
Attach the lamp connector.<br />
Only possible in one direction. (Fig. 16)<br />
Press the lamp clip backward. Insert the lamp with your<br />
other hand. Observe the position of the guide groove<br />
on the lamp flange. Only one position is possible.<br />
(Fig. 17)<br />
Lock the securing clamp again by pressing the lamp<br />
clip forward slightly with your other hand. (Fig. 18)<br />
Follow all the remaining steps described above, but in<br />
reverse order.<br />
Restore all the connections.<br />
Test the device for proper operation. (Fig. 19)<br />
Bei geöffnetem Gehäuse kann der Kaltlicht-<br />
Projektor nicht betrieben werden.<br />
The cold light projector cannot be operated<br />
with the housing open.<br />
Fig. 16 Fig. 17<br />
01/08<br />
30
5 Maintenance 5 Mantenimiento<br />
5.1 Changement de lampe 5.1 Cambio de la lámpara<br />
Brancher le connecteur de lampe.<br />
Cela n'est possible que dans une seule position (Fig. 16).<br />
Repousser la pince-clip de lampe vers l'arrière. Mettre<br />
la lampe en place à l'aide de la seconde main. Veiller<br />
au bon positionnement de la rainure de guidage située<br />
au niveau de la patte de la lampe. Une seule position<br />
est possible (Fig. 17).<br />
Verrouiller à nouveau le circlip. Pour cela, s'aider de la<br />
seconde main pour pousser la pince-clip de la lampe<br />
vers l'avant. (Fig. 18)<br />
Réaliser toutes les autres étapes comme décrit plus<br />
haut, mais dans le sens inverse.<br />
Rétablir toutes les connexions.<br />
Contrôler le bon fonctionnement. (Fig. 19)<br />
Enchufe el conector de la lámpara en la única posición<br />
en la que es posible hacerlo. (Fig. 16)<br />
Presione la pinza de la lámpara hacia atrás. Coloque<br />
la lámpara con la otra mano. Al alcanzar la ranura<br />
guía, preste atención a la brida de la lámpara. Sólo es<br />
posible colocar la lámpara en una posición. (Fig. 17)<br />
Vuelva a enclavar el pasador de seguridad. Para ello,<br />
presione ligeramente la pinza de la lámpara hacia<br />
adelante con la otra mano. (Fig. 18)<br />
Realice el resto de los pasos descritos anteriormente<br />
en orden inverso.<br />
Vuelva a conectar todas las conexiones. Realice una<br />
prueba de funcionamiento. (Fig. 19)<br />
Le projecteur de lumière froide ne peut pas<br />
fonctionner si son boîtier est ouvert.<br />
Si la carcasa está abierta, no puede ponerse<br />
en funcionamiento el proyector de luz fría.<br />
Fig. 18 Fig. 19<br />
01/08<br />
31
5 Instandhaltung 5 Maintenance<br />
5.2 Sicherungswechsel<br />
5.3 Instandsetzung<br />
5.4 Entsorgung<br />
5.2 Fuse replacement<br />
5.3 Servicing and repair<br />
5.4 Disposal<br />
5.2 Sicherungswechsel<br />
Gerät ausschalten und Netzstecker ziehen.<br />
Netzsicherungshalter mit einem Schraubendreher oder<br />
anderem geeigneten Werkzeug lösen. (Fig. 20)<br />
Neue Sicherungen einsetzen. (Fig. 21)<br />
Vorsicht: Nur die angegebenen<br />
Sicherungswerte verwenden.<br />
2 x Feinsicherung, T1,<strong>60</strong> A (SB)<br />
Netzsicherungshalter wieder einsetzen. (Fig. 22)<br />
Netzverbindung wieder herstellen. Funktionsprüfung<br />
durchführen. (Fig. 23)<br />
5.2 Fuse replacement<br />
Switch the device off and unplug the power plug.<br />
Remove the power fuse holder with a screwdriver or<br />
other suitable tool. (Fig. 20)<br />
Insert new fuses. (Fig. 21)<br />
Caution: Only use the stated fuse ratings.<br />
2 x power fuses, T1.<strong>60</strong> A (SB)<br />
Reinsert the power fuse holder. (Fig. 22)<br />
Reconnect the power cord. Test the device for proper<br />
operation. (Fig. 23)<br />
5.3 Instandsetzung<br />
Die Instandsetzung von defekten Kaltlicht-Projektoren<br />
darf nur durch von uns autorisierte Personen und unter<br />
Verwendung von KARL STORZ-Originalteilen erfolgen.<br />
Die Instandsetzung aller optischen Teile kann grundsätzlich<br />
nur bei KARL STORZ durchgeführt werden.<br />
5.3 Servicing and repair<br />
Defective cold light projectors must only be repaired by<br />
persons authorized by us and using original<br />
KARL STORZ parts.<br />
All optical parts can only be repaired by KARL STORZ.<br />
5.4 Entsorgung<br />
Dieses Gerät ist entsprechend der europäischen<br />
Richtlinie 2002/96/EG über Elektro- und Elektronik-<br />
Altgeräte (waste electrical and electronic equipment<br />
– WEEE) gekennzeichnet.<br />
Nach Ablauf der Lebensdauer ist das Gerät als<br />
Elektronikschrott zu entsorgen.<br />
Hierzu erfragen Sie bitte die für Sie zuständige<br />
Sammelstelle bei KARL STORZ GmbH & Co. KG,<br />
einer KARL STORZ Niederlassung oder Ihrem<br />
Fachhändler. Im Geltungsbereich der Richtlinie ist<br />
KARL STORZ GmbH & Co. KG für die ordnungsgemäße<br />
Entsorgung des Gerätes verantwortlich.<br />
5.4 Disposal<br />
This device is marked in accordance with the<br />
European Directive 2002/96/EC on waste electrical<br />
and electronic equipment (WEEE).<br />
At the end of its useful operating life, dispose of the<br />
device as electronic scrap.<br />
Please ask either KARL STORZ GmbH & Co. KG,<br />
a KARL STORZ subsidiary or your specialist dealer<br />
for information on your local collection point.<br />
Within the scope of application of this Directive,<br />
KARL STORZ GmbH & Co. KG is responsible for<br />
the proper disposal of this device.<br />
Fig. 20 Fig. 21<br />
01/08<br />
32
5 Maintenance 5 Mantenimiento<br />
5.2 Changement des fusibles<br />
5.3 Réparations<br />
5.4 Élimination<br />
5.2 Cambio de fusibles<br />
5.3 Reparaciones<br />
5.4 Gestión de desechos<br />
5.2 Changement des fusibles<br />
Éteindre l'appareil et débrancher la fiche secteur.<br />
Dévisser le porte-fusible à l'aide d'un tournevis ou de<br />
tout autre outil approprié. (Fig. 20)<br />
Mettre les fusibles neufs en place. (Fig. 21)<br />
Avis : N'employer que des fusibles ayant les<br />
spécifications prescrites.<br />
5.2 Cambio de fusibles<br />
Apague el aparato y extraiga el enchufe de la red.<br />
Afloje el portafusibles con un destornillador o con otra<br />
herramienta adecuada para ello. (Fig. 20)<br />
Coloque los nuevos fusibles. (Fig. 21)<br />
Advertencia: Utilice exclusivamente los fusibles<br />
con las características indicadas.<br />
2 fusibles pour courant faible, T1,<strong>60</strong> A (SB)<br />
Remettre le porte-fusible en place. (Fig. 22)<br />
Rebrancher l'appareil sur le secteur. Contrôler son bon<br />
fonctionnement. (Fig. 23)<br />
2 fusibles para baja intensidad, T 1,<strong>60</strong> A (SB)<br />
Vuelva a montar el portafusibles. (Fig. 22)<br />
Vuelva a conectar la red. Compruebe el funcionamiento.<br />
(Fig. 23)<br />
5.3 Réparations<br />
Les réparations de projecteurs de lumière froide<br />
défectueux doivent être effectuées uniquement par<br />
des personnes habilitées par nos soins et exclusivement<br />
avec des pièces KARL STORZ d'origine.<br />
Les réparations de toutes les pièces optiques ne peuvent<br />
être réalisées que par KARL STORZ.<br />
5.3 Reparaciones<br />
La reparación de componentes defectuosos de los<br />
proyectores de luz fría sólo deberá ser efectuada por<br />
personal autorizado por KARL STORZ y utilizando<br />
exclusivamente las piezas originales de KARL STORZ.<br />
La reparación de todas las piezas ópticas sólo podrá<br />
ser realizada por KARL STORZ.<br />
5.4 Élimination<br />
Cet appareil présente le marquage approprié<br />
conformément à la directive européenne<br />
2002/96/CE sur les déchets d'équipements<br />
électriques et électroniques (DEEE).<br />
L'appareil, une fois hors d'usage, doit être éliminé<br />
comme déchet électronique. Adressezvous<br />
à KARL STORZ GmbH & Co. KG, à une<br />
filiale KARL STORZ ou à votre distributeur pour<br />
connaître le centre de collecte le plus proche.<br />
Dans le champ d'application de cette directive,<br />
KARL STORZ GmbH & Co. KG est responsable<br />
de l'élimination correcte de l'appareil.<br />
5.4 Gestión de desechos<br />
Este aparato está identificado conforme a la<br />
directiva europea 2002/96/CE referida a aparatos<br />
eléctricos y electrónicos viejos (waste electrical<br />
and electronic equipment o WEEE).<br />
Después de transcurrida su vida útil, deseche el<br />
equipo como residuo electrónico.<br />
Consulte a KARL STORZ GmbH & Co. KG, a una<br />
sociedad distribuidora de KARL STORZ o a su<br />
comercio especializado para averiguar el centro de<br />
recogida que le corresponde. En el ámbito de validez<br />
de la directiva, KARL STORZ GmbH & Co. KG<br />
es responsable de la correcta gestión residual del<br />
aparato.<br />
Fig. 22 Fig. 23<br />
01/08<br />
33
6 Technische Daten 6 Technical data<br />
6.1 Verantwortlichkeit<br />
6.2 Normenkonformität<br />
6.3 Richtlinienkonformität<br />
6.4 Technische Daten und Anschlüsse<br />
6.5 Technische Unterlagen<br />
6.6 Ersatzteilliste<br />
6.7 Hersteller<br />
6.1 Responsibility<br />
6.2 Standard conformity<br />
6.3 Directive conformity<br />
6.4 Technical data and connections<br />
6.5 Technical documentation<br />
6.6 Spare parts list<br />
6.7 Manufacturer<br />
6.1 Verantwortlichkeit<br />
Als Hersteller dieses Gerätes betrachten wir uns für die<br />
Sicherheit, Zuverlässigkeit und Leistung des Gerätes<br />
nur dann als verantwortlich, wenn<br />
Montage, Erweiterung, Neuinstallation, Änderungen<br />
oder Reparaturen durch von uns autorisierte Personen<br />
durchgeführt werden,<br />
die elektrische Installation des betreffenden Raumes<br />
den einschlägigen Sicherheits-Bestimmungen entspricht<br />
und<br />
das Gerät in Übereinstimmung mit der<br />
Gebrauchsanweisung betrieben wird.<br />
6.2 Normenkonformität<br />
• Nach IEC 61010-1:<br />
Art des Schutzes gegen elektrischen Schlag:<br />
Schutzklasse I<br />
Grad des Schutzes gegen Eindringen von<br />
Festkörpern und Wasser:<br />
IP 20<br />
• Nach EN 55011 Klasse B, EN 61000-3-2,<br />
EN 61000-3-3:<br />
Funkstörstrahlung<br />
• Nach EN 61000-6-2:<br />
Störimmunität<br />
6.3 Richtlinienkonformität<br />
Das Gerät ist nach den auf das Produkt anzuwendenden<br />
Richtlinien mit CE-Zeichen versehen.<br />
EWG: 73/23 Niederspannungs-Richtlinie<br />
EWG: 89/336 EMV-Richtlinie<br />
6.4 Technische Daten und Anschlüsse<br />
• Netzspannung:<br />
100-240 VAC<br />
• Netzfrequenz:<br />
40-400 Hz<br />
• Lampenspannung: 12 VAC<br />
• Lampenleistung: 170 VA<br />
• Netzsicherung:<br />
2 x 1,6 AL 250 V<br />
• Betriebstemperatur: 10-40 °C<br />
• Lagertemperatur: 0-<strong>60</strong> °C<br />
• Abmessungen:<br />
305 mm x 110 mm x 240 mm (B x H x T)<br />
• Gewicht:<br />
3,9 kg<br />
6.1 Responsibility<br />
As the manufacturer of this device, we shall be liable<br />
for failure or deterioration in the safe operation, operational<br />
reliability, and performance of this equipment<br />
only subject to the following conditions:<br />
all assembly operations, system expansions, readjustments,<br />
modifications, or repairs have been performed<br />
by a person or persons duly authorized;<br />
all electrical installations at the location of use meet<br />
applicable national and local electrical codes; and<br />
the device has been used in accordance with its<br />
operating instructions at all times.<br />
6.2 Standard conformity<br />
• According to IEC 61010-1:<br />
Type of protection against electric shock:<br />
Protection Class I<br />
Degree of protection against ingress of<br />
solids and water:<br />
IP 20<br />
• According to EN 55011 Class B, EN 61000-3-2,<br />
EN 61000-3-3:<br />
Interference radiation<br />
• According to EN 61000-6-2:<br />
Interference immunity<br />
6.3 Directive conformity<br />
The device carries the CE mark in accordance with the<br />
directives applicable to the product.<br />
EEC: 73/23 Low Voltage Directive<br />
EEC: 89/336 EMC Directive<br />
6.4 Technical data and connections<br />
• Line voltage:<br />
100-240 VAC<br />
• Line frequency:<br />
40-400 Hz<br />
• Lamp voltage:<br />
12 VAC<br />
• Lamp output:<br />
170 VA<br />
• Line fuse:<br />
2 x 1.6 AL 250 V<br />
• Operating temperature: 10-40°C<br />
• Storage temperature: 0-<strong>60</strong>°C<br />
• Dimensions:<br />
305 mm x 110 mm x 240 mm (B x H x T)<br />
• Weight: 3.9 kg<br />
01/08<br />
34
6 Données techniques 6 Datos técnicos<br />
6.1 Responsabilité<br />
6.2 Conformité normative<br />
6.3 Conformité à la directive<br />
6.4 Données techniques et raccordements<br />
6.5 Documents techniques<br />
6.6 Liste des pièces de rechange<br />
6.7 Fabricant<br />
6.1 Responsabilidad<br />
6.2 Conformidad con las normas<br />
6.3 Conformidad con las directivas<br />
6.4 Datos técnicos y conexiones<br />
6.5 Documentación técnica<br />
6.6 Piezas de repuesto<br />
6.7 Fabricante<br />
01/08<br />
6.1 Responsabilité<br />
Le fabricant de cet appareil assume toute responsabilité<br />
quant à la sécurité, la fiabilité et les performances<br />
de l'appareil, à condition toutefois que<br />
les travaux de montage, les extensions, les réinstallations,<br />
les modifications ou les réparations soient réalisés<br />
par un personnel habilité par nos soins,<br />
l'installation électrique des locaux concernés soit<br />
conforme aux prescriptions de sécurité applicables, et,<br />
enfin,<br />
que l'appareil soit utilisé conformément au manuel d'utilisation.<br />
6.2 Conformité normative<br />
• Selon la norme CEI 61010-1 :<br />
Type de protection anti-électrocution :<br />
catégorie de protection I<br />
Degré de protection contre la pénétration de corps<br />
solides et d'eau :<br />
IP 20<br />
• Selon EN 55011 Classe B, EN 61000-3-2,<br />
EN 61000-3-3 :<br />
Émissions parasites<br />
• Selon EN 61000-6-2 :<br />
Immunité aux parasites<br />
6.3 Conformité à la directive<br />
L'appareil présente le sigle CE conformément aux<br />
directives applicables.<br />
CEE : 73/23 Directive basse tension<br />
CEE : 89/336 Directive CEM<br />
6.4 Données techniques et raccordements<br />
• Tension de secteur : 100/240 V AC<br />
• Fréquence du secteur : 40 à 400 Hz<br />
• Tension de la lampe : 12 V AC<br />
• Puissance de la lampe : 170 VA<br />
• Fusibles de secteur : 2 x 1,6 AL 250 V<br />
• Température de service : 10 à 40 °C<br />
• Température de stockage : 0 à <strong>60</strong> °C<br />
• Dimensions :<br />
305 mm x 110 mm x 240 mm (l x h x p)<br />
• Poids :<br />
3,9 kg<br />
6.1 Responsabilidad<br />
Como fabricantes de este aparato, sólo asumiremos la<br />
responsabilidad por la seguridad, la fiabilidad y el rendimiento<br />
del aparato si<br />
el montaje, las ampliaciones, los reajustes o las reparaciones<br />
se han llevado a cabo por personal autorizado<br />
por nosotros,<br />
la instalación eléctrica del lugar en que vaya a instalarse<br />
el aparato cumple con las directivas de seguridad<br />
aplicables y<br />
si el aparato se emplea según lo dispuesto en el<br />
Manual de instrucciones.<br />
6.2 Conformidad con las normas<br />
• Según IEC 61010-1:<br />
Tipo de protección contra choque eléctrico:<br />
Clase de protección I<br />
Grado de protección contra penetración de<br />
componentes sólidos y agua:<br />
IP 20<br />
• Según EN 55011 clase B, EN 61000-3-2,<br />
EN 61000-3-3:<br />
Emisión de radiointerferencias<br />
• Según EN 61000-6-2:<br />
Inmunidad a las interferencias<br />
6.3 Conformidad con las directivas<br />
El aparato está previsto para su uso conforme a lo<br />
dispuesto por las directivas provistas con el símbolo<br />
CE aplicables al producto.<br />
CEE: 73/23 Directiva relativa a equipos de baja tensión<br />
CEE: 89/336 Directiva CEM.<br />
6.4 Datos técnicos y conexiones<br />
• Tensión de la red:<br />
100-240 VCA<br />
• Frecuencia de la red:<br />
40-400 Hz<br />
• Tensión de la lámpara:<br />
12 VCA<br />
• Potencia de la lámpara:<br />
170 VA<br />
• Fusible de la red:<br />
2 x 1,6 AL 250 V<br />
• Temperatura de servicio: 10-40 °C<br />
• Temperatura de almacenamiento: 0-<strong>60</strong> °C<br />
• Dimensiones:<br />
305 mm x 110 mm x 240 mm (an x al x pr)<br />
• Peso:<br />
3,9 kg<br />
35
6 Technische Daten 6 Technical data<br />
6.5 Technische Unterlagen<br />
6.6 Ersatzteilliste<br />
6.7 Hersteller<br />
6.5 Technical documentation<br />
6.6 Spare parts list<br />
6.7 Manufacturer<br />
6.5 Technische Unterlagen<br />
Auf Anfrage stellt der Hersteller ihm verfügbare<br />
Schaltpläne, ausführliche Ersatzteillisten,<br />
Beschreibungen, Einstellanweisungen und andere<br />
Unterlagen bereit, die dem entsprechend qualifizierten<br />
und vom Hersteller autorisierten Personal des<br />
Anwenders beim Reparieren von Geräteteilen, die vom<br />
Hersteller als reparierbar bezeichnet werden, von<br />
Nutzen sind.<br />
Das Verfügen über technische Unterlagen zum Gerät<br />
stellt auch für technisch geschultes Personal keine<br />
Autorisierung durch den Hersteller zum Öffnen oder<br />
Reparieren des Gerätes dar.<br />
Ausgenommen sind im Text der vorliegenden<br />
Gebrauchsanweisung beschriebene Eingriffe.<br />
6.5 Technical documentation<br />
On request, the manufacturer will provide those circuit<br />
diagrams, itemized parts listings, descriptions, sets of<br />
adjustment instructions and other items of available<br />
documentation to suitably qualified user personnel duly<br />
authorized by the manufacturer for their use in repairing<br />
those components of the instrument that have been<br />
designated as reparable by their respective<br />
manufacturers.<br />
Supply of such technical documentation relating to the<br />
device shall not be construed as constituting manufacturer’s<br />
authorization of user’s personnel, regardless of<br />
their level of technical training, to open or repair the<br />
device.<br />
Explicitly exempted herefrom are those maintenance<br />
and repair operations described in this instruction<br />
manual.<br />
Konstruktionsänderungen, insbesondere im<br />
Zusammenhang mit der Weiterentwicklung und<br />
Verbesserung unserer Geräte, behalten wir uns<br />
vor.<br />
6.6 Ersatzteilliste<br />
Artikel<br />
Bestell-Nr.<br />
Ersatzlampe 50 W für <strong>TECHNO</strong> <strong>ARC</strong> <strong>60</strong> 811310 21<br />
Lebensdauer: 2500 Stunden<br />
Farbtemperatur: <strong>60</strong>00 K<br />
Netzsicherung 1069500<br />
Feinsicherung, 5,0 x 20 mm, T 1,6 A (SB)<br />
Netzkabel (Schuko)<br />
400 F<br />
Netzkabel mit 90° abgewinkeltem Gerätestecker<br />
und geradem Netzstecker,<br />
Schuko-Zentralstecker, Länge 300 cm<br />
Netzkabel (USA)<br />
400 FUS<br />
Netzkabel mit 90° abgewinkeltem Gerätestecker<br />
und geradem Netzstecker,<br />
US-Zentralstecker, Länge 250 cm<br />
We reserve the right to make engineering modifications<br />
in the interest of promoting technological<br />
progress and generating performance<br />
improvements without obligation on our part to<br />
submit prior notice thereof.<br />
6.6 Spare parts list<br />
Article<br />
Order no.<br />
Spare 50 W lamp for <strong>TECHNO</strong> <strong>ARC</strong> <strong>60</strong> 811310 21<br />
Service life: 2500 hours<br />
Color temperature: <strong>60</strong>00 K<br />
Line fuse 1069500<br />
Power fuse, 5.0 x 20 mm, T 1.6 A (SB)<br />
Power cord (ground contact)<br />
400 F<br />
Power cord with 90° angled connector and<br />
straight power plug, grounded central<br />
connector, length 300 cm<br />
Power cord (USA)<br />
400 FUS<br />
Power cord with 90° angled connector and<br />
straight power plug, US central connector,<br />
length 250 cm<br />
6.7 Hersteller<br />
KARL STORZ GmbH & Co. KG<br />
Mittelstraße 8<br />
78532 Tuttlingen<br />
Postfach 230<br />
78503 Tuttlingen<br />
Germany<br />
Telefon:+49 (0)7461 708-742<br />
Telefax:+49 (0)7461 78912<br />
E-Mail: industrialgroup@karlstorz.de<br />
Web: www.karlstorz.com<br />
6.7 Manufacturer<br />
KARL STORZ GmbH & Co. KG<br />
Mittelstrasse 8<br />
78532 Tuttlingen<br />
Postfach 230<br />
78503 Tuttlingen<br />
Germany<br />
Telephone: + 49 (0)7461 708-926<br />
Fax: + 49 (0)7461 78912<br />
E-mail: industrialgroup@karlstorz.de<br />
Web: www.karlstorz.com<br />
01/08<br />
36
6 Données techniques 6 Datos técnicos<br />
6.5 Documents techniques<br />
6.6 Liste des pièces de rechange<br />
6.7 Fabricant<br />
6.5 Documentación técnica<br />
6.6 Piezas de repuesto<br />
6.7 Fabricante<br />
6.5 Documents techniques<br />
Sur demande, le fabricant fournit les schémas fonctionnels,<br />
les listes détaillées des pièces de rechange, les<br />
descriptions, les directives de réglage et autres documents<br />
dont il dispose et qui pourraient être utiles au<br />
personnel qualifié de l'usager, habilité par le fabricant<br />
pour effectuer des réparations sur des pièces de l'appareil<br />
considérées par le fabricant comme réparables.<br />
Le fait de disposer de documents techniques sur l'appareil<br />
ne signifie aucunement que le personnel technique,<br />
même qualifié, soit autorisé par le fabricant à<br />
ouvrir et à réparer l'appareil.<br />
Sont exclues de ces réserves les interventions décrites<br />
dans le texte du présent manuel.<br />
6.5 Documentación técnica<br />
El personal cualificado del usuario que haya sido debidamente<br />
autorizado por el fabricante para reparar los<br />
componentes del equipo calificados como reparables<br />
por el fabricante podrá pedir al fabricante los esquemas<br />
de distribución, listas completas de piezas de<br />
repuesto, descripciones, instrucciones de ajuste y<br />
demás documentación útil para ese propósito.<br />
La posesión de documentación técnica sobre el equipo<br />
no implica, ni siquiera para el personal con formación<br />
técnica, la autorización por parte del fabricante<br />
para abrir o reparar el equipo.<br />
Se excluyen las intervenciones descritas en el texto de<br />
este Manual de instrucciones.<br />
Nous nous réservons le droit d'effectuer des<br />
modifications de construction qui contribueraient<br />
notamment au développement technologique<br />
et à l'amélioration de nos appareils.<br />
6.6 Liste des pièces de rechange<br />
Article<br />
N° de cde<br />
Lampe de rechange 50 W pour<br />
<strong>TECHNO</strong> <strong>ARC</strong> <strong>60</strong> 811310 21<br />
Longévité : 2 500 heures<br />
Température de couleur : <strong>60</strong>00 K<br />
Fusible de secteur 1069500<br />
Fusible pour courant faible,<br />
5,0 x 20 mm, T 1,6 A (SB)<br />
Cordon secteur (contact de protection) 400 F<br />
Cordon secteur avec connecteur d'appareil<br />
coudé à 90 ° et fiche secteur droite,<br />
connecteur central de protection, longueur 300 cm<br />
Cordon secteur (USA)<br />
400 FUS<br />
Cordon secteur avec connecteur d'appareil<br />
coudé à 90 ° et fiche secteur droite,<br />
connecteur central US, longueur 250 cm<br />
Nos reservamos el derecho de efectuar modificaciones<br />
de construcción, especialmente en<br />
relación con el desarrollo ulterior y la mejora<br />
continua de nuestros aparatos.<br />
6.6 Piezas de repuesto<br />
Artículo<br />
N.° de pedido<br />
Lámpara de repuesto de 50 W para<br />
<strong>TECHNO</strong> <strong>ARC</strong> <strong>60</strong> 811310 21<br />
Tiempo de vida útil: 2500 horas<br />
Temperatura de color: <strong>60</strong>00 K<br />
Fusible 1069500<br />
Fusible para baja intensidad,<br />
5,0 x 20 mm, T 1,6 A (SB)<br />
Cable de red (Schuko)<br />
400 F<br />
Cable de red con enchufe para el aparato<br />
con ángulo de 90° y con enchufe de red recto,<br />
enchufe central Schuko, longitud 300 cm<br />
Cable de red (EE. UU.)<br />
400 FUS<br />
Cable de red con enchufe para el aparato<br />
con ángulo de 90° y con enchufe de red recto,<br />
enchufe central Schuko para EE. UU., longitud 250 cm<br />
01/08<br />
6.7 Fabricant<br />
KARL STORZ GmbH & Co. KG<br />
Mittelstrasse 8<br />
78532 Tuttlingen, Allemagne<br />
Postfach 230<br />
78503 Tuttlingen<br />
Allemagne<br />
Téléphone :+49 (0)7461 708-926<br />
Télécopie : +49 (0)7461 78912<br />
E-mail : industrialgroup@karlstorz.de<br />
Internet : www.karlstorz.com<br />
6.7 Fabricante<br />
KARL STORZ GmbH & Co. KG<br />
Mittelstrasse 8<br />
78532 Tuttlingen, Alemania<br />
Postfach 230<br />
78503 Tuttlingen<br />
Alemania<br />
Teléfono: +49 (0)7461 708-926<br />
Fax: +49 (0)7461 78912<br />
E-Mail: industrialgroup@karlstorz.de<br />
Web: www.karlstorz.com<br />
37
Für die Dauer von zwei Jahren ab<br />
Übergabe an den Endkunden<br />
leisten wir unentgeltlich Ersatz für<br />
nachweisbar fehlerhaftes Material<br />
oder mangelhafte Verarbeitung.<br />
Transportkosten und Versandrisiko<br />
können dabei nicht übernommen<br />
werden.<br />
Garantiekarte bei Kauf/Lieferung<br />
ausfüllen lassen und möglichst bald<br />
zurücksenden an:<br />
KARL STORZ GmbH & Co. KG<br />
Postfach 230<br />
D-78503 Tuttlingen<br />
Vom Lieferanten/Importeur auszufüllen:<br />
Firmenstempel/Unterschrift:<br />
Durante un período de dos años,<br />
a partir de la fecha de entrega al<br />
cliente final, procedemos a la reposición<br />
gratuita por fallas<br />
comprobables del material o acabados<br />
defectuosos. No nos hacemos<br />
cargo de los gastos de transporte<br />
ni nos responsabilizamos del<br />
riesgo de envío.<br />
Rellenar la tarjeta de garantía en el<br />
momento de la compra o suministro<br />
y enviar inmediatamente a la<br />
siguiente dirección:<br />
KARL STORZ GmbH & Co. KG<br />
Postfach 230<br />
78503 Tuttlingen/Alemania<br />
For a period of two years after<br />
delivery to the end-user, we shall<br />
replace free of charge equipment<br />
that can be proven to have defects<br />
in material or workmanship.<br />
In doing so we cannot accept to<br />
bear the cost of transportation or<br />
the risk of shipment.<br />
Complete warranty card upon<br />
purchase/delivery and return<br />
immediately to:<br />
KARL STORZ GmbH & Co. KG<br />
Postfach 230<br />
78503 Tuttlingen/Germany<br />
A rellenar por el suministrador/importador:<br />
Sello de la empresa/Firma:<br />
To be completed by the supplier/importer:<br />
Company stamp/signature:<br />
GARANTIE<br />
WARRANTY GARANTÍA<br />
Nous remplaçons gratuitement du<br />
matériel reconnu défectueux ou<br />
présentant un vice de fabrication<br />
pendant une période de deux ans<br />
à dater de la livraison au client<br />
final.<br />
Nous ne pouvons cependant<br />
prendre en charge ni les frais de<br />
transport, ni les risques liés à<br />
l’expédition. Par ailleurs, nous<br />
appliquons la garantie énoncée<br />
dans nos conditions générales de<br />
vente.<br />
Faire remplir la carte de garantie à<br />
l’achat/à la livraison et la retourner le plus<br />
rapidement possible à :<br />
KARL STORZ GmbH & Co. KG<br />
Postfach 230<br />
78503 Tuttlingen/Allemagne<br />
À remplir par le fournisseur/l’importateur :<br />
Cachet de l’entreprise/Signature :<br />
GARANTIE
Rellenar por el propietario del equipo:<br />
Remitente/Sello de la empresa:<br />
Campo de aplicación:<br />
Tipo del aparato: Número de serie:<br />
Fecha de compra:<br />
Firma/Fecha:<br />
To be filled out by the instrument owner:<br />
Return address/company stamp:<br />
Field of application:<br />
Type of instrument: Serial no.:<br />
Purchase date:<br />
Signature/Date:<br />
Franqueo postal<br />
o<br />
sello<br />
Tarjeta de repuesta<br />
KARL STORZ GmbH & Co. KG<br />
Postfach 230<br />
78503 TUTTLINGEN<br />
ALEMANIA<br />
Please<br />
attach<br />
sufficient<br />
postage<br />
Reply card<br />
KARL STORZ GmbH & Co. KG<br />
Postfach 230<br />
78503 TUTTLINGEN<br />
GERMANY<br />
À remplir par le propriétaire de l’appareil :<br />
Expéditeur/Cachet de l’entreprise :<br />
Champ d’application :<br />
Type de l’appareil : N o de série :<br />
Date d’achat :<br />
Signature/Date :<br />
Vom Geräte-Besitzer auszufüllen:<br />
Absender/Firmenstempel:<br />
Anwendungsgebiet:<br />
Geräte-Typ: Serien-Nr.:<br />
Kauf-Dat.:<br />
Unterschrift/Datum:<br />
Affranchir<br />
au tarif<br />
lettre<br />
CARTE-RÉPONSE<br />
KARL STORZ GmbH & Co. KG<br />
Postfach 230<br />
78503 TUTTLINGEN<br />
ALLEMAGNE<br />
Bitte<br />
ausreichend<br />
frankieren<br />
Antwortkarte<br />
KARL STORZ GmbH & Co. KG<br />
Postfach 230<br />
D-78503 Tuttlingen
KARL STORZ GmbH & Co. KG<br />
Industrial Group • Mittelstrasse 8 • 78532 Tuttlingen/Germany<br />
Tel.: +49 (0)7461 708-926 • Fax: +49 (0)7461 78912 • E-mail: industrialgroup@karlstorz.de<br />
www.karlstorz.com