Owner's Manual - Samson
Owner's Manual - Samson
Owner's Manual - Samson

Create successful ePaper yourself
Turn your PDF publications into a flip-book with our unique Google optimized e-Paper software.
Owner’s <strong>Manual</strong>
Copyright 2012 - V2
Important Safety Information<br />
ATTENTION<br />
RISQUE D’ÉLECTROCUTION !<br />
NE PAS OUVRIR !<br />
CAUTION: TO REDUCE THE RISK OF ELECTRIC SHOCK, DO NOT<br />
REMOVE COVER (OR BACK). NO USER-SERVICEABLE PARTS<br />
INSIDE. REFER SERVICING TO QUALIFIED SERVICE PERSONNEL.<br />
This lightning flash with arrowhead symbol within an equilateral triangle is<br />
intended to alert the user to the presence of non-insulated “dangerous voltage”<br />
within the product’s enclosure that may be of sufficient magnitude to<br />
constitute a risk of electric shock.<br />
The exclamation point within an equilateral triangle is intended to alert the<br />
user to the presence of important operating and maintenance instructions<br />
in the literature accompanying the appliance.<br />
WARNING<br />
TO PREVENT FIRE OR SHOCK HAZARD. DO NOT USE THIS PLUG WITH AN EXTENSION CORD, RE-<br />
CEPTACLE OR OTHER OUTLET UNLESS THE BLADES CAN BE FULLY INSERTED TO PREVENT BLADE<br />
EXPOSURE. TO PREVENT FIRE OR SHOCK HAZARD. DO NOT EXPOSE THIS APPLIANCE TO RAIN<br />
OR MOISTURE. TO PREVENT ELECTRICAL SHOCK, MATCH WIDE BLADE PLUG TO WIDE SLOT AND<br />
FULLY INSERT.<br />
ENGLISH<br />
FRANÇAIS<br />
DEUTSCHE<br />
ESPAÑOL<br />
If you want to dispose this product, do not mix it with general household waste. There is a<br />
separate collection system for used electronic products in accordance with legislation that<br />
requires proper treatment, recovery and recycling.<br />
ITALIANO<br />
Private household in the 25 member states of the EU, in Switzerland and Norway may return their used<br />
electronic products free of charge to designated collection facilities or to a retailer (if you purchase a similar<br />
new one).<br />
For Countries not mentioned above, please contact your local authorities for a correct method of disposal.<br />
By doing so you will ensure that your disposed product undergoes the necessary treatment, recovery and<br />
recycling and thus prevent potential negative effects on the environment and human health.<br />
Stage 266: Dual Handheld Wireless System 3
Important Safety Information<br />
1. Read these instructions.<br />
2. Keep these instructions.<br />
3. Heed all warnings.<br />
4. Follow all instructions.<br />
5. Do not use this apparatus near water.<br />
6. Clean only with dry cloth.<br />
7. Do not block any ventilation openings.<br />
Install in accordance with the<br />
manufacturer’s instructions.<br />
8. Do not install near any heat sources<br />
such as radiators, heat registers,<br />
stoves, or other apparatus (including<br />
amplifiers) that produce heat.<br />
9. Do not defeat the safety purpose<br />
of the polarized or grounding type<br />
plug. A polarized plug has two<br />
blades with one wider than the<br />
other. A grounding type plug has<br />
two blades and a third grounding<br />
prong. The wide blade or the third<br />
prong are provided for your safety.<br />
If the provided plug does not fit into<br />
your outlet, consult an electrician for<br />
replacement of the obsolete outlet.<br />
10. Protect the power cord from being<br />
walked on or pinched particularly at<br />
the plugs, convenience receptacles,<br />
and at the point where they exit from<br />
the apparatus.<br />
11. Only use attachments/accessories<br />
specified by the manufacturer.<br />
12. Use only with the cart, stand, tripod,<br />
bracket, or table specified by the<br />
manufacturer, or sold with the apparatus.<br />
When a cart<br />
is used, use caution<br />
when moving the cart/<br />
apparatus combination<br />
to avoid injury<br />
from tip-over.<br />
13. Unplug the apparatus during lightening<br />
storms, or when unused for<br />
long periods of time.<br />
14. Refer all servicing to qualified<br />
personnel. Service is required when<br />
the apparatus has been damaged in<br />
any way, such as power supply cord<br />
or plug is damaged, liquid has been<br />
spilled or objects have fallen into<br />
the apparatus has been exposed to<br />
rain or moisture, does not operate<br />
normally, or has been dropped.<br />
15. This appliance shall not be exposed<br />
to dripping or splashing water and<br />
that no object filled with liquid such<br />
as vases shall be placed on the apparatus.<br />
16. Caution-to prevent electrical shock,<br />
match wide blade plug wide slot<br />
fully insert.<br />
17. Please keep a good ventilation environment<br />
around the entire unit.<br />
18. The direct plug-in adapter is used as<br />
disconnect device, the disconnect<br />
device shall remain readily operable.<br />
19. Batteries (battery pack or batteries<br />
installed) shall not be exposed to<br />
excessive heat such as sunshine, fire<br />
or the like.<br />
4
Table of Contents<br />
Introduction. . . . . . . . . . . . . . . . . . . . . . . . . . . . . . . . . . . . . . . . . . . . . . . . 6<br />
Receiver Controls and Features. . . . . . . . . . . . . . . . . . . . . . . . . . . . . . . . . . . . 7<br />
Transmitter Controls and Features. . . . . . . . . . . . . . . . . . . . . . . . . . . . . . . . . . 8<br />
Quick Start Guide . . . . . . . . . . . . . . . . . . . . . . . . . . . . . . . . . . . . . . . . . . . . 9<br />
Specifications . . . . . . . . . . . . . . . . . . . . . . . . . . . . . . . . . . . . . . . . . . . . . . 12<br />
Troubleshooting . . . . . . . . . . . . . . . . . . . . . . . . . . . . . . . . . . . . . . . . . . . . 13<br />
ITALIANO<br />
ESPAÑOL<br />
DEUTSCHE<br />
FRANÇAIS<br />
ENGLISH<br />
Stage 266: Dual Handheld Wireless System 5
Introduction<br />
Congratulations on purchasing the <strong>Samson</strong> Stage 266 Dual Microphone Wireless System! The<br />
Stage 266 system is the perfect solution for any application requiring two high quality, wireless<br />
microphones in an easy to use, compact package. The system features the SR266 dual channel<br />
receiver with individual and mixed outputs. Also included are two HT6 handheld microphone<br />
transmitters.<br />
With the Stage 266 system, you’ll have great sound quality with clear reception, and the ability<br />
to walk freely around your venue. For any live sound application (karaoke, schools, conferences,<br />
houses of worship, etc.) the Stage 266 is the ideal tool for your dual-channel wireless microphone<br />
needs. The Stage 266 always provides outstanding performance and reliability.<br />
Although this product is designed for intuitive operation, we suggest you take some time to<br />
go through these pages to learn how we’ve implemented a number of unique features, and<br />
to get step-by-step instructions for setting up your system. If your Stage 266 was purchased in<br />
the United States, you’ll also find a warranty card enclosed—please don’t forget to fill it out and<br />
mail it in so that you can receive online technical support, and so that we can send you updated<br />
information about this and other <strong>Samson</strong> products. Also, be sure to check out our website<br />
(www.samsontech.com) for complete information about our full product line.<br />
We recommend that you record your serial number in the space provided below, for future reference.<br />
Serial number:_______________________________<br />
Date of purchase:____________________________<br />
Should your unit ever require servicing, a Return Authorization (RA) number must be obtained<br />
before shipping your unit to <strong>Samson</strong>. Without this number, the unit will not be accepted. Please<br />
call <strong>Samson</strong> at 1-800-3SAMSON (1-800-372-6766) for an RA number prior to shipping your unit.<br />
Please retain the original packing materials and, if possible, return the unit in the original carton.<br />
If you purchased your <strong>Samson</strong> product outside the United States, please contact your local distributor<br />
for warranty information and service.<br />
Features<br />
• Professional, dual-handheld wireless system.<br />
• Easy setup and operation.<br />
• Crystal-controlled, Superheterodyne circuitry for clear and reliable reception.<br />
• Individual or mixed ¼” outputs<br />
• Up to 250’ of line-of-sight operating range.<br />
• Two professional HT6 handheld transmitters with mute switches<br />
• Each HT6 transmitter provides nine hours of battery life, using standard 9-volt batteries.<br />
6
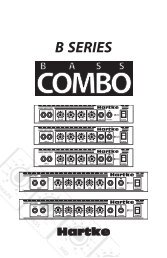
SR266 Receiver Controls and Features<br />
9 8 10<br />
1. Power Switch - Press to turn<br />
the receiver on or off.<br />
3 4 6<br />
5<br />
2<br />
1<br />
2. Power Indicator - Lights red<br />
when the receiver is powered<br />
on.<br />
3. Volume Control (Channel 1) - Rotate to adjust the level of the audio signal output from the<br />
Channel 1 receiver.<br />
4. Channel 1 RF Indicator - Lights green when the corresponding Channel 1 HT6 transmitter is<br />
powered on, and there is an RF signal present and detected by the receiver.<br />
5. Volume Control (Channel 2) - Rotate to adjust the level of the audio signal output from the<br />
Channel 2 receiver.<br />
6. Channel 2 RF Indicator - Lights green when the corresponding Channel 2 HT6 transmitter is<br />
powered on, and there is an RF signal present and detected by the receiver.<br />
7. DC Input - Connect the supplied<br />
12-volt, 200 mA power<br />
adapter here.<br />
WARNING: The substitution<br />
of any other kind of power<br />
adapter can cause severe damage<br />
to the SR266 and will void<br />
your warranty.<br />
8. Channel 1 Output - Use this<br />
unbalanced, ¼” jack to connect<br />
the SR266 Channel 1 receiver<br />
to the line level input of a<br />
mixer, amplifier, or other audio<br />
equipment. For a mixed signal<br />
of both receivers, only plug<br />
into one output on the SR266.<br />
Otherwise, Channel 1 and<br />
Channel 2 will output separate<br />
signals.<br />
9 8 10<br />
9. Channel 2 Output - Use this unbalanced, ¼” jack to connect the SR266 Channel 2 receiver to<br />
the line level input of a mixer, amplifier, or 3 other 4audio 6equipment.<br />
For a mixed 5 signal 2 of both 1<br />
receivers, only plug into one output on the SR266. Otherwise, Channel 1 and Channel 2 will<br />
output separate signals.<br />
10. Adaptor Strain Relief - Loop the included adaptor’s cord through the<br />
strain relief to prevent the plug from accidentally detaching from the<br />
receiver.<br />
11<br />
7 11<br />
11. Antenna - The antenna mountings allow full rotation for optimum<br />
placement. In normal operation, both antennas should be placed in a vertical position. The<br />
antennas can be folded inward for convenience when transporting the SR266.<br />
ITALIANO ESPAÑOL DEUTSCHE FRANÇAIS ENGLISH<br />
Stage 266: Dual Handheld Wireless System 7
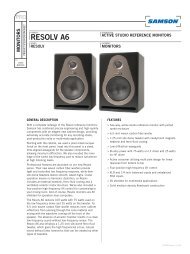
HT6 Transmitter Controls and Features<br />
1. Audio ON/OFF Switch - When set to the ON position, audio signal<br />
is transmitted. When set to the OFF position, the audio signal is<br />
muted. Note that moving this switch to the OFF position does not<br />
turn off the transmitter power—it is simply a way to temporarily<br />
mute the transmission of audio signal. When not in use for extended<br />
periods, the transmitter power should be turned off by using the<br />
power ON/OFF switch.<br />
2. Power ON/OFF Switch - Use this switch to turn the HT6 on or off (to<br />
conserve battery power, be sure to leave it off when not in use).<br />
Be sure to mute the audio signal at your external mixer or amplifier<br />
before turning transmitter power on or off, or an audible pop may<br />
result.<br />
3. Power Indicator - LED lights green when the transmitter is powered<br />
on.<br />
4. Battery Compartment - Insert a standard 9-volt alkaline battery<br />
here. Be sure to observe the plus and minus polarity markings when<br />
installing the battery. We recommend 3 the Duracell MN 1604 type<br />
battery for use with this device. Although rechargeable 1 Ni-Cad<br />
batteries can be used, they do not supply adequate current for more<br />
than four hours.<br />
WARNING: Do not insert the battery backwards; doing so can cause<br />
severe damage to the HT6 and will void your warranty.<br />
5. Channel Marking - Printed number corresponding 2 to the appropriate<br />
channel on the SR266 receiver.<br />
4<br />
3<br />
4<br />
1<br />
2<br />
5<br />
8
Quick Start Guide<br />
Follow these basic procedures for setting up and using your Stage 266 Series Wireless System.<br />
1. Connect the SR266 receiver power<br />
adaptor to the rear panel DC input, and<br />
then to an electrical outlet.<br />
FRANÇAIS<br />
DEUTSCHE<br />
ESPAÑOL<br />
ENGLISH<br />
2. Connect the receiver’s appropriate ¼” output to the input of a mixer, stereo, karaoke machine,<br />
or any other line level input (see below).<br />
Use the included ¼” to ¼” cable to connect<br />
the SR266 receiver to a mixer.<br />
Use the included ¼” to dual RCA cable to<br />
connect the SR266 recevier to a stereo or<br />
other HI-FI device.<br />
ITALIANO<br />
3. Plugging the receiver into a stereo using the 1/4" - RCA cable.<br />
Stage 266: Dual Handheld Wireless System 9
Quick Start Guide<br />
1. Plugging the receiver into the wall.<br />
Use the included ¼” to ¼” cable to connect<br />
the SR266 receiver to a karaoke machine.<br />
4. Plugging the receiver into a Karaoke machine using 1/4" - 1/4" cable.<br />
3. While holding the upper section<br />
of the HT6 transmitter, rotate the<br />
bottom section and slide down to<br />
expose the battery compartment.<br />
Insert a standard 9-volt alkaline<br />
battery, being sure to follow the plus<br />
and minus polarity markings.<br />
cable.<br />
4. Turn on the HT6 transmitter by sliding the POWER<br />
switch to the right, and replace the bottom section.<br />
10
Quick Start Guide<br />
5. Place the SR266 receiver where it will<br />
be used (the general rule of thumb is<br />
to maintain “line of sight” between the<br />
receiver and transmitters so that the<br />
person(s) using the transmitter can see<br />
the receiver). Turn on the power of the<br />
SR266 receiver.<br />
ENGLISH<br />
6. Turn on the connected amplifier and/<br />
or mixer, but keep its volume all the<br />
way down. Next, make sure that your<br />
transmitter is un-muted by setting<br />
its Audio switch to ON. Then, set the<br />
Volume Control knob on the SR266<br />
fully clockwise; this is unity gain.<br />
Speak or sing into the mic at a normal<br />
performance level while slowly raising<br />
the volume of your amplifier/mixer until<br />
the desired level is reached.<br />
FRANÇAIS<br />
DEUTSCHE<br />
ITALIANO<br />
ESPAÑOL<br />
Stage 266: Dual Handheld Wireless System 11
Specifications<br />
OVERALL SYSTEM SPECIFICATIONS<br />
Operating Frequency<br />
VHF 173.80 MHz to 213.20 MHz<br />
Number of Channels<br />
Fixed channel<br />
Frequency Stability ±0.005%<br />
Modulation Mode<br />
FM<br />
Maximum Deviation<br />
±15 kHz<br />
Operating Range<br />
250’ (line of sight)<br />
Operating Temperature Range 40° F (4° C) to 110° F (43° C)<br />
Frequency Response<br />
80 Hz to 15 kHz<br />
SR266 RECEIVER SPECIFICATIONS<br />
Image Rejection<br />
30 dB<br />
Dynamic range<br />
95.5 dB<br />
Maximum Output<br />
900mV<br />
Sensitivity<br />
10 dBµV for 48 dB S/N<br />
Output Connectors<br />
Two - 1/4” TS (“mono”) phone jack<br />
Audio Output Levels<br />
-10dB unbalanced (1/4” phone connector)<br />
Power Supply 100-240V AC (50/60 Hz) to 12V DC 0.2A<br />
Dimensions 7.9” x 5.3” x 1.7”<br />
200 mm x 134 mm x 43 mm<br />
Net Weight<br />
0.84 lbs<br />
0.38 kg<br />
HT6 HANDHELD TRANSMITTER SPECIFICATIONS<br />
RF Power Output<br />
10 mW<br />
Microphone Element<br />
H6 Dynamic unidirectional<br />
Typical Battery Life (9-volt alkaline battery) 9-hours<br />
Current Consumption<br />
30 mA typical<br />
Dimensions Ø2.1” x 9.3”<br />
Ø52.6 mm x 235.5 mm<br />
Net Weight<br />
0.4 lbs<br />
0.18 kg<br />
12
Troubleshooting<br />
Issue<br />
No Audio<br />
Distorted Audio<br />
Audio Dropout<br />
Transmitters and Receiver<br />
on Different Channels<br />
Solutions<br />
Turn on the HT6 transmitter using the Power ON/OFF switch.<br />
Ensure the HT6 transmitter’s batteries are installed correctly.<br />
Check that the HT6 Audio ON/OFF switch is in the ON position.<br />
Confirm that the SR266 adaptor is correctly connected and<br />
plugged into an electrical outlet.<br />
Turn on the SR266 receiver.<br />
Make sure the SR266 output and audio input connections are<br />
securely connected.<br />
Ensure that the SR266 receiver and HT6 transmitters are in line of<br />
sight with one another.<br />
Check the receiver and audio input device level controls.<br />
Check the receiver output level and audio input device level.<br />
Check the HT6’s batteries and replace if low.<br />
Another transmitter may be broadcasting on the same channel.<br />
Turn off transmitter that may be causing interference.<br />
The transmitter may be too far away from the receiver. Move<br />
closer to the receiver, or reposition the antennas.<br />
Remove any sources that may cause RF interference, such as cell<br />
phones, cordless phones, lighting equipment, computers, etc.<br />
Contact your <strong>Samson</strong> reseller or distributor for assistance.<br />
ENGLISH<br />
FRANÇAIS<br />
DEUTSCHE<br />
ITALIANO<br />
ESPAÑOL<br />
Stage 266: Dual Handheld Wireless System 13
FCC Rules and Regulations<br />
<strong>Samson</strong> wireless receivers are certified under FCC Rules part<br />
15 and transmitters are certified under FCC Rules part 74.<br />
Licensing of <strong>Samson</strong> equipment is the user’s responsibility<br />
and licensability depends on the user’s classification, application<br />
and frequency selected.<br />
NOTE: This equipment has been tested and found to comply with the<br />
limits for a Class B digital device, pursuant to Part 15 of the FCC Rules.<br />
These limits are designed to provide reasonable protection against<br />
harmful interference in a residential installation. This equipment generates,<br />
uses and can radiate radio frequency energy and, if not installed<br />
and used in accordance with the instructions, may cause harmful interference<br />
to radio communications. However, there is no guarantee that<br />
interference will not occur in a particular installation. If this equipment<br />
does cause harmful interference to radio or television reception, which<br />
can be determined by turning the equipment off and on, the user is<br />
encouraged to try to correct the interference by one or more of the following<br />
measures:<br />
• Reorient or relocate the receiving antenna.<br />
• Increase the separation between the equipment and receiver.<br />
• Connect the equipment into an outlet on a circuit different from that<br />
to which the receiver is connected.<br />
• Consult the dealer or an experienced Radio/TV technician for help.<br />
WARNING: Changes or modifications not expressly approved by the<br />
party responsible for compliance could void the user’s authority to<br />
operate the equipment.<br />
This device complies with RSS-210 of<br />
Industry & Science Canada.<br />
Operation is subject to the following two conditions:<br />
(1) this device may not cause harmful interference and (2)<br />
this device must accept any interference received, including<br />
interference that may cause<br />
undesired operation.
Consignes de sécurité importantes<br />
ATTENTION<br />
RISQUE D’ÉLECTROCUTION !<br />
NE PAS OUVRIR !<br />
ATTENTION : POUR ÉVITER TOUT RISQUE D’ÉLECTROCUTION,<br />
NE RETIREZ PAS LES VIS. TOUTE RÉPARATION DOIT ÊTRE<br />
CONFIÉE À UN PERSONNEL QUALIFIÉ.<br />
Le symbole de l’éclair prévient l’utilisateur de la présence de tensions “dangereuses”<br />
et non isolées dans l’appareil, d’une amplitude suffisante pour<br />
présenter un risque d’électrocution.<br />
Le symbole du point d’exclamation prévient l’utilisateur de la présence<br />
d’instructions importantes sur le fonctionnement et la maintenance de ce<br />
produit dans le mode d’emploi fourni.<br />
ENGLISH<br />
FRANÇAIS<br />
ESPAÑOL<br />
DEUTSCHE<br />
Ce produit ne doit pas être jeté avec les ordures ménagères. Il existe un service de<br />
collecte séparé pour les produits électroniques usés. Ce service respecte les législations<br />
sur le traitement approprié, la récupération et le recyclage.<br />
ITALIANO<br />
Les consommateurs des 27 pays membres de l’Union européenne, de la Suisse et de la Norvège peuvent<br />
se départir gratuitement de leurs produits électroniques usagés dans des points de collecte désignés, ou auprès<br />
d’un revendeur (lorsqu’un nouveau produit est acheté).<br />
Pour les autres pays, veuillez contacter votre administration locale pour connaître la méthode de mise au rebut<br />
appropriée.<br />
En procédant ainsi, vous êtes assuré que votre produit sera correctement traité, récupéré et recyclé<br />
afin de prévenir les effets négatifs possibles sur l’environnement et la santé.<br />
Stage 266 : Double micro main sans fil 15
Important Safety Information<br />
1. Veuillez lire toutes les instructions.<br />
2. Conservez ces instructions.<br />
3. Respectez les mises en garde.<br />
4. Suivez les instructions.<br />
5. N’utilisez pas cet appareil près d’une<br />
source liquide.<br />
6. Nettoyez avec un tissu sec.<br />
7. Veillez à ne pas obstruer les fentes de<br />
ventilation. Installez l’appareil selon<br />
les instructions du fabricant.<br />
8. N’installez pas près d’une source de<br />
chaleur (radiateurs, etc.), ou de tout<br />
équipement générant de la chaleur<br />
(amplificateurs de puissance, etc.).<br />
9. Ne retirez pas la terre du cordon secteur<br />
ou de la prise murale. Les fiches<br />
canadiennes avec polarisation (avec<br />
une lame plus large) ne doivent pas<br />
être modifiées. Si votre prise murale<br />
ne correspond pas au modèle fourni,<br />
consultez votre électricien.<br />
10. Protégez le cordon secteur contre<br />
tous les dommages possibles (pincement,<br />
tension, torsion, etc.). Veillez à<br />
ce que le cordon secteur soit libre, en<br />
particulier à sa sortie du boîtier.<br />
11. Utilisez uniquement les fixations et<br />
accessoires spécifiés par le fabricant.<br />
12. Utilisez uniquement le support,<br />
le pied, ou la table spécifiés par le<br />
fabricant, ou vendus avec l’appareil.<br />
Lorsque vous utilisez un chariot,<br />
procédez avec vigilance lorsque vous<br />
vous déplacez pour éviter toute blessure<br />
aux personnes<br />
et tout dommage aux<br />
équipements.<br />
13. Déconnectez l’appareil<br />
du secteur en<br />
présence d’orage ou<br />
lors de périodes de non-utilisation<br />
prolongées<br />
14. Consultez un service de réparation<br />
qualifié pour tout dysfonctionnement<br />
(dommage sur le cordon<br />
secteur, baisse de performances,<br />
exposition à la pluie, projection<br />
liquide dans l’appareil, introduction<br />
d’un objet dans le boîtier, etc.).<br />
15. N’exposez pas cet appareil aux projections<br />
liquides. Veillez à ne placer<br />
aucun objet contenant un liquide<br />
(vase, verre, etc.) sur l’appareil.<br />
16. Vérifiez que la broche de terre soit<br />
présente sur le fiche secteur .<br />
17. Vérifiez la bonne ventilation autour<br />
de l’appareil.<br />
18. La fiche secteur permet la déconnexion<br />
instantanée de l’appareil.<br />
Veillez à ce que cette fiche soit facilement<br />
atteignable.<br />
19. N’exposez pas les piles ou accumulateurs<br />
à une chaleur excessive (exposition<br />
directe au soleil, feu, etc.).<br />
16
Table des Matières<br />
Introduction. . . . . . . . . . . . . . . . . . . . . . . . . . . . . . . . . . . . . . . . . . . . . . . 18<br />
Récepteur SR266 — Fonctions et réglages . . . . . . . . . . . . . . . . . . . . . . . . . . . 19<br />
Émetteur HT6 — Fonctions et réglages . . . . . . . . . . . . . . . . . . . . . . . . . . . . . 20<br />
Guide de prise en main. . . . . . . . . . . . . . . . . . . . . . . . . . . . . . . . . . . . . . . . 21<br />
Caractéristiques techniques. . . . . . . . . . . . . . . . . . . . . . . . . . . . . . . . . . . . . 24<br />
Assistance technique . . . . . . . . . . . . . . . . . . . . . . . . . . . . . . . . . . . . . . . . . 25<br />
ITALIANO<br />
ESPAÑOL<br />
DEUTSCHE<br />
FRANÇAIS<br />
ENGLISH<br />
Stage 266 : Double micro main sans fil 17
Introduction<br />
Merci d’avoir choisi le double micro main sans fil <strong>Samson</strong> Stage 266 ! Le Stage 266 vous offre la<br />
solution parfaite aux applications nécessitant l’utilisation de deux micros sans fil de haute qualité,<br />
le tout dans un système compact et complet. Ce système sans fil utilise le double récepteur SR266<br />
avec sorties individuelles et mélangées. Il comprend également deux micros main HT6 haute<br />
qualité.<br />
Avec le système sans fil Stage 266, vous bénéficiez d’une très haute qualité sonore avec une<br />
réception claire, et la possibilité de parler en vous déplaçant totalement librement. Pour toutes<br />
les applications de sonorisation (karaoké, écoles, conférences, lieux de culte, etc.), le Stage 266 est<br />
l’outil idéal. Le Stage 266 vous offre toujours une qualité et une fiabilité exceptionnelles.<br />
Bien que ce produit ait été conçu pour que son utilisation soit intuitive, prenez le temps de lire<br />
ces quelques pages pour en savoir plus sur les fonctions de ce système sans fil. Si vous avez<br />
acheté ce systèmes sans fil Stage 266 aux USA, vous trouverez une carte de garantie — prenez<br />
le temps de nous la retourner pour bénéficier de l’assistance technique et pour recevoir des<br />
documentations sur les nouveaux produits <strong>Samson</strong>. N’oubliez pas de consulter notre site Internet<br />
à l’adresse suivante www.samsontech.com.<br />
Prenez le temps de noter le numéro de série et la date d’achat ci-dessous pour toute référence<br />
ultérieure.<br />
Numéro de série :_______________________________<br />
Date d’achat :____________________________<br />
Si vous devez faire réparer cet appareil, vous devez tout d’abord obtenir un numéro de retour<br />
auprès de nos services. Sans ce numéro, l’appareil ne sera pas accepté. Appelez <strong>Samson</strong> au :<br />
1-800-3SAMSON (1-800-372-6766) pour obtenir ce numéro. Utilisez les emballages d’origine<br />
pour le retour. Si vous avez acheté ce produit hors des USA, contactez votre revendeur ou votre<br />
distributeur, pour en savoir plus sur les termes de la garantie.<br />
Généralités :<br />
• Double micro main sans fil professionnel.<br />
• Mise en œuvre et utilisation simples.<br />
• Circuit superhétérodyne géré par quartz offrant une réception claire et fiable.<br />
• Sorties en Jacks 6,35 mm individuelles ou mélangées<br />
• Portée de 75 mètres (en ligne directe dégagée).<br />
• Deux micros main émetteur professionnels HT6 avec touches de coupure<br />
• Chaque émetteur HT6 offre une autonomie de neuf heures, avec une pile de 9 Volts standard.<br />
18
9 8 10<br />
Récepteur SR266 — Fonctions et réglages<br />
1. Interrupteur - Appuyez pour<br />
placer le récepteur sous/hors<br />
tension.<br />
3 4 6<br />
5<br />
2<br />
1<br />
2. Témoin - S’allume en rouge<br />
avec la mise sous tension.<br />
3. Volume (canal 1) - Tournez le bouton pour régler le niveau de sortie du signal du canal 1.<br />
4. Témoin HF du canal 1 - S’allume en vert lorsque le micro main émetteur HT6 couplé au<br />
canal 1 est sous tension, et lorsque le signal HF est présent et détecté par le récepteur.<br />
5. Volume (canal 2) - Tournez le bouton pour régler le niveau de sortie du signal du canal 2.<br />
6. Témoin HF du canal 2 - S’allume en vert lorsque le micro main émetteur HT6 couplé au<br />
canal 2 est sous tension, et lorsque le signal HF est présent et détecté par le récepteur.<br />
7. Embase DC - Reliez l’adaptateur secteur 12 Volts (200 mA) fourni à cette embase.<br />
ATTENTION : L’utilisation d’un autre adaptateur secteur peut causer des dommages sévères<br />
au SR266, et annule la garantie.<br />
8. Sortie du canal 1 - Utilisez<br />
ce Jack asymétrique 6,35 mm<br />
pour connecter le canal 1 du<br />
récepteur SR266 à l’entrée<br />
ligne d’une console de mixage,<br />
d’un amplificateur, ou tout<br />
autre équipement audio. Pour<br />
disposer du signal mélangé<br />
des deux récepteurs, utilisez<br />
une seule des deux sorties du<br />
SR266. Dans le cas contraire les<br />
sorties des canaux 1 et 2 sont<br />
séparées et non mélangées.<br />
9. Sortie du canal 2 - Utilisez<br />
ce Jack asymétrique 6,35 mm<br />
pour connecter le canal 2 du<br />
récepteur SR266 à l’entrée ligne<br />
9 8 10<br />
d’une console de mixage, d’un amplificateur, ou tout autre équipement audio. Pour disposer<br />
du signal mélangé des deux récepteurs, utilisez une seule des deux sorties du SR266. Dans le<br />
cas contraire les sorties des canaux 1 et 23sont séparées 4 6et<br />
non mélangées. 5 2 1<br />
10. Passe-câble - Enroulez le cordon de l’adaptateur secteur dans le passe-câble pour éviter que<br />
la fiche d’alimentation soit accidentellement déconnectée.<br />
11. Antenne - Les embases d’antennes permettent leur rotation pour une<br />
position optimum. En utilisation normale, les deux antennes doivent<br />
être verticales. Les antennes peuvent être pliées vers l’avant, ce qui<br />
facilite le transport du récepteur SR266.<br />
11<br />
7 11<br />
ITALIANO ESPAÑOL DEUTSCHE FRANÇAIS ENGLISH<br />
Stage 266 : Double micro main sans fil 19
Émetteur HT6 — Fonctions et réglages<br />
1. Interrupteur Audio ON/OFF - En position ON, le signal audio est<br />
transmis. En position OFF, le signal audio est coupé. Notez que<br />
lorsque vous placez l’interrupteur en position OFF, vous ne placez<br />
pas le micro hors tension — vous ne faites que couper la transmission<br />
HF du signal audio. Lorsque vous ne l’utilisez plus, placez<br />
l’émetteur hors tension avec l’interrupteur ON/OFF (2).<br />
2. Interrupteur ON/OFF - Utilisez cet interrupteur pour placer l’interrupteur<br />
HT6 sous/hors tension (pour économiser la pile, laisser le<br />
micro hors tension lorsque vous ne l’utilisez pas).<br />
Veillez à couper le signal audio sur la console de mixage ou l’amplificateur<br />
externe avant de placer l’émetteur sous/hors tension pour<br />
éviter tout bruit de pop violent.<br />
3. Témoin Led - Ce témoin s’allume en vert lorsque vous placez l’émetteur<br />
sous tension.<br />
4. Compartiment de la pile - Insérez une pile de 9 Volts alcaline<br />
standard dans ce compartiment. Respectez les polarités (+ et -) de<br />
la pile. Nous conseillons la pile 3 Duracell MN 1604 avec cet émetteur.<br />
Bien que vous puissiez utiliser des accumulateurs 1 rechargeables au<br />
Ni-Cad, ceux-ci ne fonctionnent que pendant 4 heures.<br />
ATTENTION : Veillez à ne pas insérer la pile à l’envers ; ceci endommagerait<br />
sérieusement le HT6 et annulerait la garantie.<br />
5. Numéro de canal - Le numéro sérigraphié correspond au numéro<br />
de canal sur le récepteur SR266.<br />
2<br />
4<br />
3<br />
4<br />
1<br />
2<br />
5<br />
20
Guide de prise en main<br />
Procédez comme suit pour installer et utiliser votre système sans fil Stage 266 :<br />
1. Connectez l’adaptateur secteur entre<br />
l’embase DC à l’arrière du récepteur<br />
SR266 et la prise électrique.<br />
FRANÇAIS<br />
DEUTSCHE<br />
ESPAÑOL<br />
ENGLISH<br />
2. Connectez la sortie en Jack 6,35 mm correspondant à l’émetteur à l’entrée d’une console de<br />
mixage, d’un amplificateur, d’une machine de karaoké, ou à l’entrée de tout équipement à<br />
entrée ligne (voir ci-contre).<br />
3. Utilisez le cordon Jack 6,35 mm/ Jack<br />
6,35 mm fourni pour relier le récepteur<br />
SR266 à la console de mixage.<br />
4. Utilisez le cordon adaptateur fourni<br />
(Jack 6,35 mm vers deux RCA)<br />
pour relier le récepteur SR266 à un<br />
équipement Hi-Fi.<br />
ITALIANO<br />
3. Plugging the receiver into a stereo using the 1/4" - RCA cable.<br />
Stage 266 : Double micro main sans fil 21
Guide de prise en main<br />
1. Plugging the receiver into the wall.<br />
5. Utilisez le cordon Jack 6,35 mm/ Jack<br />
6,35 mm fourni pour relier le récepteur<br />
SR266 à la machine de karaoké.<br />
4. Plugging the receiver into a Karaoke machine using 1/4" - 1/4" cable.<br />
6. Tout en tenant fermement la partie<br />
supérieure de l’émetteur HT6, faites<br />
tourner la partie inférieure et faitesla<br />
glisser vers le bas pour ouvrir le<br />
compartiment de la pile.<br />
Insérez une pile alcaline de 9 Volts<br />
standard, en respectant les polarités.<br />
cable.<br />
7. Placez l’émetteur HT6 sous tension en plaçant<br />
l’interrupteur POWER sur la droite et replacez la<br />
section inférieure du micro.<br />
22
Guide de prise en main<br />
8. Placez le récepteur SR266 où il sera<br />
utilisé pendant la prestation (pensez à<br />
conserver une ligne de mire directe entre<br />
l’émetteur et le récepteur, exempte de<br />
tout obstacle — l’utilisateur du micro<br />
doit voir le récepteur). Placez le récepteur<br />
SR266 sous tension.<br />
FRANÇAIS<br />
DEUTSCHE<br />
ITALIANO<br />
ESPAÑOL<br />
ENGLISH<br />
9. Placez la console de mixage ou<br />
l’amplificateur connecté, en veillant à<br />
régler son volume au minimum. Veillez<br />
à ce que la transmission de l’émetteur<br />
soit assurée (et non en coupure audio),<br />
en veillant à ce que le sélecteur Audio<br />
soit en position ON. Ensuite, montez<br />
le bouton de Volume du SR266 au<br />
maximum, ce qui correspond au gain<br />
unitaire. Parlez ou chantez normalement<br />
dans le micro tout en montant<br />
progressivement le volume de votre amplificateur/mélangeur jusqu’à obtenir le niveau sonore<br />
souhaité.<br />
Stage 266 : Double micro main sans fil 23
Caractéristiques techniques<br />
CARACTÉRISTIQUES SYSTÈME GÉNÉRALES<br />
Fréquence<br />
VHF 173,80 MHz à 213,20 MHz<br />
Nombre de canaux<br />
Canal fixe<br />
Stabilité en fréquence ±0,005 %<br />
Mode de modulation<br />
FM<br />
Déviation maximum<br />
±15 kHz<br />
Portée<br />
75 mètres (en ligne directe)<br />
Plage de température de fonctionnement 4° C à 43° C<br />
Réponse en fréquence<br />
80 Hz à 15 kHz<br />
CARACTÉRISTIQUES DU RÉCEPTEUR SR266<br />
Réjection d’image<br />
Plage dynamique<br />
Niveau de sortie maximum<br />
Sensibilité<br />
Connecteurs de sortie<br />
Niveaux de sorties audio<br />
Alimentation<br />
Dimensions<br />
Poids net<br />
30 dB<br />
95,5 dB<br />
900 mV<br />
10 dBµV pour un signal/bruit de 48 dB<br />
Deux Jacks 6,35 mm mono<br />
-10 dB asymétrique (Jack 6,35 mm)<br />
100-240 Vca (50/60 Hz) vers 12 Vcc, 0,2 A<br />
200 mm x 134 mm x 43 mm<br />
0,38 kg<br />
CARACTÉRISTIQUES DU MICRO MAIN ÉMETTEUR HT6<br />
Puissance HF<br />
10 mW<br />
Élément du micro<br />
Capsule H6, dynamique, unidirectionnelle<br />
Autonomie type (pile alcaline de 9 Volts) 9 heures<br />
Consommation en courant<br />
30 mA, type<br />
Dimensions<br />
Ø de 52,6 mm x 235,5 mm<br />
Poids net<br />
0,18 kg<br />
24
Assistance technique<br />
Problème<br />
Pas de signal audio<br />
Distorsion audio<br />
Décrochages audio<br />
L’émetteur et le récepteur<br />
sont sur des canaux<br />
différents<br />
Solutions<br />
Placez l’émetteur HT6 sous tension avec l’interrupteur ON/OFF.<br />
Vérifiez que la pile de l’émetteur HT6 soit installée correctement.<br />
Vérifiez que l’interrupteur Audio ON/OFF du HT6 soit sur ON.<br />
Vérifiez que l’adaptateur secteur SR266 soit correctement<br />
connecté et relié à une prise secteur.<br />
Placez le récepteur SR266 sous tension.<br />
Vérifiez que la sortie audio du SR266 et les entrées audio de tous<br />
les équipements soient correctement connectées.<br />
Vérifiez que le récepteur SR266 et les émetteurs HT6 soient en<br />
ligne directe.<br />
Vérifiez le réglage de niveau sur le récepteur et sur la console de<br />
mixage.<br />
Vérifiez le réglage de niveau sur le récepteur et sur la console de<br />
mixage.<br />
Contrôlez la pile de l’émetteur HT6. Remplacez-la si besoin est.<br />
Il se peut qu’un autre émetteur utilise la même fréquence que<br />
vous. Placez l’émetteur qui semble causer le problème hors<br />
tension.<br />
L’émetteur est trop loin du récepteur. Rapprochez-vous du récepteur,<br />
ou essayez de modifier la position des antennes.<br />
Placez hors tension toutes les soures qui peuvent causer des<br />
interférences HF, comme les téléphones portables, sans fil, équipements<br />
d’éclairage, ordinateurs, etc.<br />
Contactez votre revendeur ou votre distributeur <strong>Samson</strong> et<br />
demandez son aide.<br />
ESPAÑOL DEUTSCHE FRANÇAIS ENGLISH<br />
ITALIANO<br />
Stage 266 : Double micro main sans fil 25
Régulations FCC<br />
Les systèmes <strong>Samson</strong> répondent aux normes FCC, alinéa 15<br />
et les émetteurs répondent aux normes FCC, alinéa 74.<br />
L’obtention des licences pour l’utilisation des produits<br />
<strong>Samson</strong> est de la responsabilité du client et dépend du pays<br />
d’utilisation.<br />
REMARQUE : Cet appareil a été testé et répond aux normes sur les<br />
équipements numériques de Classe B, alinéa 15 des normes FCC. Ces<br />
normes ont été conçues pour offrir une protection raisonnable contre<br />
les interférences en installations résidentielles. Cet appareil génère, utilise<br />
et peut émettre des fréquences radio, et s’il n’est pas installé ou utilisé<br />
selon les instructions, il peut causer des interférences aux communications<br />
radio. Cependant, il n’y a aucune garantie que les interférences<br />
ne se manifestent jamais dans une installation donnée. Si cet appareil<br />
cause des interférences aux réceptions radio ou télévision, ce qui peut<br />
être vérifié en plaçant l’appareil sous et hors tension, l’utilisateur est<br />
encouragé à essayer de rectifier les interférences par une ou plusieurs<br />
des mesures suivantes :<br />
• Réorientez ou déplacez l’antenne de réception.<br />
• Éloignez l’appareil fautif et le récepteur.<br />
• Connectez l’appareil à une prise secteur sur une autre ligne secteur<br />
que celle utilisée par le récepteur.<br />
• Consultez le revendeur ou un technicien Radio/TV.<br />
ATTENTION : Les modifications non approuvées par les agences de normalisation<br />
peuvent annuler votre droit à utiliser cet appareil.<br />
Cet appareil répond aux normes RSS-210 du ministère de<br />
l’Insdustrie et des Sciences du Canada.<br />
L’utilisation est sujette aux deux conditions suivantes :<br />
(1) cet appareil ne doit pas causer d’interférences et (2)<br />
cet appareil doit fonctionner en présence d’interférences<br />
externes, ce qui comprend les interferences qui peuvent<br />
générer un dysfonctionnement.
Wichtige Sicherheitshinweise<br />
ATTENTION<br />
RISQUE D’ÉLECTROCUTION !<br />
NE PAS OUVRIR !<br />
VORSICHT: UM DIE GEFAHR EINES STROMSCHLAGS ZU VERRINGERN,<br />
ENTFERNEN SIE NICHT DIE VORDER- ODER RÜCKSEITE DES GERÄTS. IM<br />
INNERN BEFINDEN SICH KEINE VOM ANWENDER WARTBAREN BAU TEILE.<br />
ÜBERLASSEN SIE DIE WARTUNG QUALIFIZIERTEM FACHPERSONAL.<br />
Der Blitz mit Pfeilspitze im gleichseitigen Dreieck soll den Anwender vor<br />
nichtisolierter, gefährlicher Spannung im Geräteinnern warnen. Diese<br />
Spannung kann so hoch sein, dass die Gefahr eines Stromschlags besteht.<br />
Das Ausrufezeichen im gleichseitigen Dreieck soll den Anwender auf wichtige<br />
Bedienungs- und Wartungsanleitungen aufmerksam machen, die im<br />
mitgelieferten Informationsmaterial näher beschrieben werden.<br />
VORSICHT<br />
UM BRÄNDE ODER STROMSCHLÄGE ZU VERHINDERN, VERWENDEN SIE DIESEN STECKER NICHT MIT<br />
VERLÄNGERUNGSKABELN, STECKDOSEN ODER ANDEREN NETZANSCHLÜSSEN, WENN MAN DIE POLE<br />
NICHT GANZ EINSTECKEN KANN, DAMIT SIE UNZUGÄNGLICH SIND. SETZEN SIE DAS GERÄT WEDER<br />
REGEN NOCH FEUCHTIGKEIT AUS. STECKEN SIE DEN BREITEN POL GANZ IN DEN BREITEN SCHLITZ.<br />
DIESES GERÄT ENTSPRICHT PART 15 DER FCC-VORSCHRIFTEN<br />
CLASS B. DER BETRIEB UNTERLIEGT FOLGENDEN ZWEI<br />
BEDINGUNGEN: (1) DIESES GERÄT DARF KEINE STÖRUNGEN<br />
VERURSACHEN UND (2) ES MUSS ALLE EMPFANGENEN<br />
STÖRUNGEN VERKRAFTEN KÖNNEN, AUCH SOLCHE, DIE DIE<br />
FUNKTION BEEINTRÄCHTIGEN. GEEIGNET FÜR PRIVAT- UND<br />
BÜROANWENDUNGEN.<br />
Dieses Produkt darf nicht mit dem normalen Hausmüll entsorgt werden. Es gibt ein separates<br />
Entsorgungssystem für gebrauchte elektronische Produkte, das die gesetzlichen Vorschriften<br />
zur korrekten Behandlung, Verarbeitung und Wiederaufbereitung erfüllt.<br />
ITALIANO ESPAÑOL DEUTSCHE FRANÇAIS ENGLISH<br />
Private Haushalte in den 25 Mitgliedstaaten der EU, in der Schweiz und Norwegen können ihre gebrauchten<br />
elektronischen Produkte kostenlos bei ausgewiesenen Sammelstellen oder Einzelhändlern (bei Kauf eines<br />
ähnlichen neuen Produkts) abgeben.<br />
In Ländern, die nicht oben erwähnt wurden, informieren Sie sich bitte bei Ihrer Gemeindeverwaltung über<br />
eine korrekte Entsorgungsmöglichkeit.<br />
Auf diese Weise stellen Sie sicher, dass Ihr entsorgtes Produkt sachgemäß behandelt, verarbeitet und<br />
wiederaufbereitet wird und potentiell negative Auswirkungen auf die Umwelt und menschliche<br />
Gesundheit vermieden werden.<br />
<strong>Owner's</strong> <strong>Manual</strong> Stage 266<br />
27
Wichtige Sicherheitshinweise<br />
1. Lesen Sie diese Anleitungen.<br />
2. Bewahren Sie diese Anleitungen auf.<br />
3. Beachten Sie alle Warnungen.<br />
4. Befolgen Sie alle Anweisungen.<br />
5. Verwenden Sie das Gerät nicht in<br />
Wassernähe.<br />
6. Reinigen Sie das Gerät nur mit einem<br />
trockenen Tuch.<br />
7. Blockieren Sie keine Belüftungsöffnungen.<br />
Installieren Sie das Gerät<br />
nur entsprechend den Anweisungen<br />
des Herstellers.<br />
8. Installieren Sie das Gerät nicht in<br />
der Nähe von Wärmequellen, wie<br />
Heizkörpern, Wärmeklappen, Öfen<br />
oder anderen Geräten (inklusive<br />
Verstärkern).<br />
9. Setzen Sie die Funktion des polarisierten<br />
oder geerdeten Steckers nicht<br />
außer Kraft. Ein polarisierter Stecker<br />
hat zwei flache, unterschiedlich<br />
breite Pole. Ein geerdeter Stecker hat<br />
zwei flache Pole und einen dritten<br />
Erdungsstift. Der breitere Pol oder<br />
der dritte Stift dient Ihrer Sicherheit.<br />
Wenn der vorhandene Stecker nicht<br />
in Ihre Steckdose passt, lassen Sie<br />
die veraltete Steckdose von einem<br />
Elektriker ersetzen.<br />
10. Schützen Sie das Netzkabel dahingehend,<br />
dass niemand darüber laufen<br />
und es nicht geknickt werden kann.<br />
Achten Sie hierbei besonders auf<br />
Netzstecker, Mehrfachsteckdosen<br />
und den Kabelanschluss am Gerät.<br />
11. Benutzen Sie nur die vom Hersteller<br />
angegebenen Halterungen/Zubehörteile.<br />
12. Benutzen Sie das Gerät nur mit den<br />
Wagen, Ständern,<br />
Stativen, Halterungen<br />
oder Tischen, die vom<br />
Hersteller empfohlen<br />
oder mit dem Gerät<br />
verkauft wurden. Gehen<br />
Sie beim Bewegen<br />
eines Wagens vorsichtig vor, damit<br />
die Wagen/Geräte-Kombination<br />
nicht umkippt und Verletzungen<br />
verursacht.<br />
13. Ziehen Sie den Netzstecker des<br />
Geräts bei Gewittern oder längeren<br />
Betriebspausen aus der Steckdose.<br />
14. Überlassen Sie die Wartung qualifiziertem<br />
Fachpersonal. Eine Wartung<br />
ist notwendig, wenn das Gerät auf<br />
irgendeine Weise beschädigt wurde,<br />
z. B. am Netzkabel oder -stecker,<br />
oder wenn Flüssigkeiten/Objekte in<br />
das Gerät gelangt sind, es Regen/<br />
Feuchtigkeit ausgesetzt war, nicht<br />
mehr wie gewohnt funktioniert oder<br />
fallen gelassen wurde.<br />
15. Setzen Sie dieses Gerät keinen tropfenden<br />
oder spritzenden Flüssigkeiten<br />
aus und stellen Sie keine mit<br />
Flüs sigkeit gefüllten Objekte, z. B.<br />
Vasen, auf das Gerät.<br />
16. Um Stromschläge zu verhindern,<br />
stecken Sie den breiten Pol des<br />
Steckers ganz in den breiten Schlitz.<br />
17. Sorgen Sie rund um das Gerät immer<br />
für ausreichende Belüftung.<br />
18. Der direkt einsteckbare Adapter dient<br />
zur Unterbrechung der Stromzufuhr<br />
und sollte immer erreichbar<br />
sein.<br />
19. Batterien (Akkus oder installierte<br />
Batterien) dürfen keiner starken<br />
Hitzen, wie Sonnenlicht, Feuer o. Ä.,<br />
ausgesetzt werden.<br />
28 Stage 266
Inhalt<br />
Einleitung . . . . . . . . . . . . . . . . . . . . . . . . . . . . . . . . . . . . . . . . . . . . . . . . 30<br />
SR266 Empfänger - Regler und Funktionen . . . . . . . . . . . . . . . . . . . . . . . . . . . 31<br />
HT6 Sender – Regler und Funktionen. . . . . . . . . . . . . . . . . . . . . . . . . . . . . . . 32<br />
Schnellstart . . . . . . . . . . . . . . . . . . . . . . . . . . . . . . . . . . . . . . . . . . . . . . . 33<br />
Technische Daten . . . . . . . . . . . . . . . . . . . . . . . . . . . . . . . . . . . . . . . . . . . 36<br />
Fehlersuche . . . . . . . . . . . . . . . . . . . . . . . . . . . . . . . . . . . . . . . . . . . . . . . 37<br />
ITALIANO<br />
ESPAÑOL<br />
DEUTSCHE<br />
FRANÇAIS<br />
ENGLISH<br />
<strong>Owner's</strong> <strong>Manual</strong> Stage 266<br />
29
Einleitung<br />
Herzlichen Glückwunsch zum Kauf eines <strong>Samson</strong> Stage 266 Drahtlossystems mit zwei Mikrofonen!<br />
Das Stage 266 ist die perfekte Lösung für alle Anwendungen, die zwei hochwertige<br />
Drahtlosmikrofone in einem einfach bedienbaren, kompakten System erfordern. Es zeichnet sich<br />
aus durch den 2-kanaligen SR266 Empfänger mit separaten und gemischten Ausgängen sowie<br />
zwei HT6 Handmikrofonen mit Sendern.<br />
Mit dem Stage 266 System erhalten Sie erstklassige Klangqualität sowie klaren Empfang und<br />
vollständige Bewegungsfreiheit am Veranstaltungsort. Das Stage 266 ist das ideale Tool für alle<br />
Live-Beschallungsaufgaben (Karaoke, Schulen, Konferenzen, Gotteshäuser usw.), die 2-kanalige<br />
drahtlose Mikrofone erfordern. Das System begeistert durch seine hervorragende Performance<br />
und Zuverlässigkeit.<br />
Obwohl sich das Produkt intuitiv bedienen lässt, sollten Sie sich auf den folgenden Seiten<br />
informieren, wie einige neuartige Features integriert wurden und wie man das System<br />
schrittweise optimal einrichtet. Beim Kauf in den USA wurde auch eine Garantiekarte beigelegt,<br />
die Sie unbedingt ausfüllen und abschicken sollten! Dadurch können Sie online technischen<br />
Support in Anspruch nehmen und zukünftig aktualisierte Informationen über dieses und andere<br />
<strong>Samson</strong>-Produkte erhalten. Besuchen Sie auch unsere Website (www.samsontech.com), auf der<br />
Sie ausführliche Informationen über unsere gesamte Produktpalette finden.<br />
Die Seriennummer Ihres Geräts sollten Sie vorsorglich in der Zeile unten eintragen.<br />
Seriennummer:_______________________________<br />
Kaufdatum:__________________________________<br />
Wenn Ihr Gerät einmal gewartet werden muss, besorgen Sie sich vor der Rücksendung an<br />
<strong>Samson</strong> bitte eine Return Authorization Number (RA) (Rücksendeberechtigungs nummer). Ohne<br />
diese Nummer wird das Gerät nicht angenommen. Bitte rufen Sie <strong>Samson</strong> unter der Nummer<br />
1-800-3SAMSON (1-800-372-6766) an, um eine RA-Nummer vor der Rücksendung zu erhalten.<br />
Heben Sie das Originalverpackungsmaterial auf und schicken Sie das Gerät möglichst im<br />
originalen Karton und Verpackungsmaterial zurück. Wenn Sie das <strong>Samson</strong>-Produkt außerhalb<br />
der USA gekauft haben, setzen Sie sich bezüglich Garantiebedingungen und Wartung bitte mit<br />
unserem lokalen Vertriebspartner in Verbindung.<br />
Features<br />
• Professionelles Drahtlossystem mit zwei Handmikrofonen<br />
• Einfache Einrichtung und Bedienung<br />
• Kristallgesteuerte Superheterodyn-Schaltung für klaren und zuverlässigen Empfang<br />
• Separate oder gemischte 6,35 mm Ausgänge<br />
• Bis zu 85 m Betriebsbereich bei Sichtverbindung<br />
• Zwei professionelle HT6 Handsender mit Stummschaltung<br />
• Jeder HT6 Sender mit 9 Stunden Betriebsdauer bei standard 9-Volt Batterien<br />
30 Stage 266
9 8 10<br />
SR266 Empfänger - Regler und Funktionen<br />
1. Netzschalter - Damit schalten<br />
Sie den Empfänger ein/aus.<br />
3 4 6<br />
5<br />
2<br />
1<br />
2. Netzanzeige - Leuchtet rot,<br />
wenn der Empfänger eingeschaltet<br />
ist.<br />
3. Pegelregler (Kanal 1) - Damit stellen Sie den Pegel des Audiosignals ein, das vom CH 1-Empfänger<br />
ausgegeben wird.<br />
4. Kanal 1 RF-Anzeige - Leuchtet grün, wenn der entsprechende HT6-Sender für Kanal 1 eingeschaltet<br />
ist und ein Signal anliegt, das vom Empfänger erkannt wird.<br />
5. Pegelregler (Kanal 2) - Damit stellen Sie den Pegel des Audiosignals ein, das vom CH 2-Empfänger<br />
ausgegeben wird.<br />
6. Kanal 2 RF-Anzeige - Leuchtet grün, wenn der entsprechende HT6-Sender für Kanal 2 eingeschaltet<br />
ist und ein Signal anliegt, das vom Empfänger erkannt wird.<br />
7. DC-Eingang - Hier schließen<br />
Sie den mitgelieferten 12-Volt,<br />
200 mA Netzadapter an.<br />
VORSICHT: Bei der Verwendung<br />
anderer Netzadapter kann<br />
das SR266 ernsthaft beschädigt<br />
werden, wodurch Sie Ihre Garantieansprüche<br />
verlieren.<br />
8. Channel 1-Ausgang - Über<br />
diese unsymmetrische 6,35<br />
mm Buchse verbinden Sie<br />
Kanal 1 des SR266 Empfängers<br />
mit dem Line-Pegel-Eingang<br />
eines Mischers, Verstärkers<br />
oder anderen Audiogeräts. Für<br />
eine gemischte Signalausgabe<br />
beider Empfänger belegen Sie<br />
nur einen Ausgang des SR266.<br />
Andernfalls werden über Kanal<br />
1 und 2 getrennte Signale ausgegeben.<br />
9 8 10<br />
9. Channel 2-Ausgang - Über diese unsymmetrische 3 4 6,356<br />
mm Buchse verbinden 5 Sie 2Kanal 12<br />
des SR266 Empfängers mit dem Line-Pegel-Eingang eines Mischers, Verstärkers oder anderen<br />
Audiogeräts. Für eine gemischte Signalausgabe beider Empfänger belegen<br />
Sie nur einen Ausgang des SR266. Andernfalls werden über Kanal 1<br />
und 2 getrennte Signale ausgegeben.<br />
10. Adapter-Zugentlastung - Fädeln Sie das Adapterkabel durch die<br />
Zugentlastung, damit der Stecker nicht versehentlich herausgezogen<br />
werden kann.<br />
11<br />
7 11<br />
11. Antenne - Man kann die Antennen vollständig drehen und dadurch optimal ausrichten. Im<br />
Normalbetrieb sollte man die Antennen vertikal ausrichten. Zum Transport des SR266 kann<br />
man die Antennen nach innen klappen.<br />
ITALIANO ESPAÑOL DEUTSCHE FRANÇAIS ENGLISH<br />
<strong>Owner's</strong> <strong>Manual</strong> Stage 266<br />
31
HT6 Sender – Regler und Funktionen<br />
1. Audio ON/OFF-Schalter - In der ON-Stellung werden Audiosignale<br />
übertragen. In der OFF-Stellung sind die Audiosignale stummgeschaltet.<br />
In der OFF-Stellung ist die Spannungsversorgung des Senders<br />
nicht ausgeschaltet — nur die Übertragung des Audiosignals ist<br />
vorübergehend unterbrochen. Bei längerem Nichtgebrauch sollte<br />
man die Spannungsversorgung des Senders mit dem Power ON/<br />
OFF-Schalter deaktivieren.<br />
2. Power ON/OFF-Schalter - Damit schalten Sie den HT6 ein/aus. (Bei<br />
Nichtgebrauch unbedingt auf OFF setzen, um Batterien zu sparen.)<br />
Vor dem Ein/Ausschalten des Senders sollten Sie das Audiosignal<br />
am externen Mischer oder Verstärker stummschalten, um störende<br />
Poppgeräusche zu vermeiden.<br />
3. Spannungsanzeige - Leuchtet grün, wenn der Sender eingeschaltet<br />
ist.<br />
4. Batteriefach - Hier legen Sie eine standard 9-Volt Alkaliebatterie<br />
ein. Beachten Sie beim Einlegen die Markierungen für die Plus- und<br />
Minus-Polarität. Wir empfehlen 3 Batterien des Typs Duracell MN 1604.<br />
Obwohl man auch Nickel-Kadmium-Akkus verwenden 1 kann, liefern<br />
sie nur für vier Stunden ausreichend Strom.<br />
VORSICHT: Legen Sie die Batterie nicht umgekehrt ein. Dadurch<br />
kann der HT6 ernsthaft beschädigt werden, wodurch Sie Ihren<br />
Garantieanspruch verlieren.<br />
5. Kanalmarkierung - Die aufgedruckte Nummer 2 entspricht der<br />
Kanalnummer am SR266-Empfänger.<br />
4<br />
3<br />
4<br />
1<br />
2<br />
5<br />
32 Stage 266
Schnellstart<br />
Gehen Sie wie folgt vor, um Ihr Drahtlossystem der Stage 266-Serie einzurichten und einzusetzen.<br />
1. Schließen Sie den Netzadapter des<br />
SR266-Empfängers an den rückseitigen<br />
DC-Eingang und an eine Netzsteckdose<br />
an.<br />
ENGLISH<br />
2. Verbinden Sie den entsprechenden 6,35 mm Ausgang des Empfängers mit dem Line-Pegel-<br />
Eingang eines Mischers, einer Stereo- oder Karaoke-Anlage oder eines anderen Geräts (siehe<br />
unten).<br />
FRANÇAIS<br />
Verbinden Sie den SR266-Empfänger über<br />
das mitgelieferte Klinkenkabel mit einem<br />
Mischpult.<br />
ESPAÑOL<br />
DEUTSCHE<br />
Verbinden Sie den SR266-Empfänger<br />
über das mitgelieferte Spezialkabel (6,35<br />
mm auf 2 x Cinch) mit einer Stereo- oder<br />
anderen HI-FI-Anlage.<br />
ITALIANO<br />
3. Plugging the receiver into a stereo using the 1/4" - RCA cable.<br />
<strong>Owner's</strong> <strong>Manual</strong> Stage 266<br />
33
Schnellstart<br />
1. Plugging the receiver into the wall.<br />
Verbinden Sie den SR266-Empfänger über<br />
das mitgelieferte Klinkenkabel mit einer<br />
Karaoke-Anlage.<br />
4. Plugging the receiver into a Karaoke machine using 1/4" - 1/4" cable.<br />
3. Während Sie die obere Hälfte des<br />
HT6-Senders festhalten, können<br />
Sie die untere Hälfte drehen und<br />
nach unten schieben, um das<br />
Batteriefach freizulegen. Legen Sie<br />
eine standard 9-Volt Alkaliebatterie<br />
ein und beachten Sie hierbei die<br />
Markierungen für die Plus- und<br />
Minus-Polarität.<br />
cable.<br />
4. Schalten Sie den HT6-Sender ein, indem Sie den<br />
POWER-Schalter nach rechts schieben. Setzen Sie die<br />
untere Hälfte wieder ein.<br />
34 Stage 266
Schnellstart<br />
5. Stellen Sie den SR266-Empfänger an<br />
seinem Einsatzort auf. (Der Benutzer des<br />
Senders sollte den Empfänger immer<br />
sehen können – “Sichtverbindung”).<br />
Schalten Sie den SR266-Empfänger ein.<br />
FRANÇAIS<br />
DEUTSCHE<br />
ITALIANO<br />
ESPAÑOL<br />
ENGLISH<br />
6. Schalten Sie den angeschlossenen<br />
Verstärker und/oder Mischer bei ganz<br />
zurückgedrehter Lautstärke ein. Stellen<br />
Sie den Audio-Schalter des Senders<br />
auf ON, um dessen Stummschaltung<br />
aufzuheben. Drehen Sie dann den<br />
Pegelregler des SR266 ganz nach rechts.<br />
Dies ist Unity Gain. Sprechen oder<br />
singen Sie mit normaler Performance-<br />
Lautstärke ins Mikrofon, während Sie den<br />
Pegel am Verstärker/Mischer langsam<br />
wunschgemäß aufdrehen.<br />
<strong>Owner's</strong> <strong>Manual</strong> Stage 266<br />
35
Technische Daten<br />
TECHNISCHE DATEN – ALLGEMEIN<br />
Betriebsfrequenz<br />
VHF 173,80 MHz bis 213,20 MHz<br />
Kanalanzahl<br />
fest<br />
Frequenzstabilität ±0,005%<br />
Modulationsmodus<br />
FM (UKW)<br />
Max. Abweichung<br />
±15 kHz<br />
Betriebsbereich<br />
75 m (250’) (Sichtverbindung)<br />
Temperatur-Betriebsbereich 4° C (40° F) bis 43° C (110° F)<br />
Frequenzgang<br />
80 Hz bis 15 kHz<br />
TECHNISCHE DATEN – SR266 EMPFÄNGER<br />
Spiegelselektion<br />
Dynamikbereich<br />
Max. Ausgangsspannung<br />
Empfindlichkeit<br />
Ausgänge<br />
Audio-Ausgangspegel<br />
Spannungsversorgung<br />
Abmessungen<br />
Nettogewicht<br />
TECHNISCHE DATEN – HT6 HANDSENDER<br />
RF-Ausgangsleistung<br />
Mikrofonelement<br />
Typische Batterie-Lebensdauer<br />
Stromverbrauch<br />
Abmessungen<br />
Nettogewicht<br />
30 dB<br />
95,5 dB<br />
900 mV<br />
10 dBµV für 48 dB Geräuschspannungsabstand<br />
zwei 6,35 mm (“mono”) Klinkenbuchsen<br />
-10 dB unsymmetrisch (6,35 mm Klinkenbuchse)<br />
100-240V AC (50/60 Hz) bis 12V DC 0,2 A<br />
200 mm x 134 mm x 43 mm<br />
7,9” x 5,3” x 1,7”<br />
0,38 kg<br />
0,84 lbs<br />
10 mW<br />
H6 dynamisch, unidirektional<br />
9 Stunden (9-V Alkaliebatterie)<br />
30 mA typisch<br />
Ø52,6 mm x 235,5 mm<br />
Ø2,1” x 9,3”<br />
0,18 kg<br />
0,4 lbs<br />
36 Stage 266
Fehlersuche<br />
Problem<br />
Kein Audiosignal<br />
Verzerrte Audiosignale<br />
Audio-Dropouts<br />
Sender und Empfänger<br />
auf unterschiedlichen<br />
Kanälen<br />
Lösung<br />
Schalten Sie den HT6-Sender mit dem Power ON/OFF-Schalter<br />
ein.<br />
Prüfen Sie, ob die Batterien des HT6-Senders korrekt installiert<br />
sind.<br />
Prüfen Sie, ob der Audio ON/OFF-Schalter des HT6 auf ON steht.<br />
Prüfen Sie, ob der SR266-Adapter korrekt angeschlossen und mit<br />
einer Netzsteckdose verbunden ist.<br />
Schalten Sie den SR266-Empfänger ein.<br />
Prüfen Sie, ob die Ausgänge und Audioeingänge des SR266 fest<br />
verkabelt sind.<br />
Prüfen Sie, ob SR266-Empfänger und HT6-Sender in “Sichtverbind<br />
ung” zueinander stehen.<br />
Prüfen Sie die Pegelregler von Empfänger und Audioanlage.<br />
Prüfen Sie den Ausgangspegel des Empfängers und den Pegel<br />
der Audioanlage.<br />
Prüfen Sie die HT6-Batterien und ersetzen Sie sie nötigenfalls.<br />
Eventuell überträgt ein anderer Sender auf dem gleichen Kanal.<br />
Schalten Sie den störenden Sender aus.<br />
Eventuell ist der Sender zu weit vom Empfänger entfernt. Nähern<br />
Sie sich dem Empfänger oder positionieren Sie die Antennen neu.<br />
Entfernen Sie alle Quellen, die RF-Interferenzen verursachen<br />
könnten, z. B. Handys, Drahtlostelefone, Beleuchtungsanlagen,<br />
Computer etc.<br />
Fragen Sie Ihren <strong>Samson</strong>-Händler oder die Vertriebsfirma um Rat.<br />
ESPAÑOL DEUTSCHE FRANÇAIS ENGLISH<br />
ITALIANO<br />
<strong>Owner's</strong> <strong>Manual</strong> Stage 266<br />
37
FCC Regeln und Bestimmungen<br />
<strong>Samson</strong> Drahtlosempfänger sind typgeprüft unter den FCC<br />
Bestimmungen Part 15 und die Sender sind typgeprüft<br />
unter den FCC Bestimmungen Part 74. Für die Zulassung<br />
der <strong>Samson</strong>-Geräte ist der Anwender verantwortlich.<br />
Die Zulassungsfähigkeit hängt von der Klassifizierung,<br />
Anwendung und gewählten Frequenz des Nutzers ab.<br />
HINWEIS: Dieses Gerät wurde getestet und entspricht den Einschränkungen<br />
für Class B Digitalgeräte, gemäß Part 15 der FCC Vorschriften.<br />
Diese Einschränkungen sollen angemessenen Schutz vor schädlichen<br />
Interferenzen bei der Installation in Wohngebieten bieten. Dieses<br />
Gerät erzeugt, verwendet und kann Rundfunkfrequenz-Energie ausstrahlen<br />
und kann, wenn es nicht gemäß den Anleitungen instal liert<br />
und betrieben wird, schädliche Interferenzen bei der Rundfunk kommunikation<br />
erzeugen. Es gibt allerdings keine Garantien, dass bei einer<br />
bestimmten Installation keine Interferenzen auftreten. Wenn dieses<br />
Gerät schädliche Interferenzen beim Radio- oder TV-Empfang verursacht,<br />
was sich durch Aus- und Einschalten des Geräts feststellen lässt,<br />
sollte der Anwender versuchen, die Interferenzen durch eine oder mehrere<br />
der folgenden Maßnahmen zu beseitigen:<br />
• Die Empfangsantenne neu ausrichten oder neu positionieren.<br />
• Die Entfernung zwischen Gerät und Empfänger erhöhen.<br />
• Das Gerät an die Steckdose eines anderen Stromkreises als den des<br />
Empfängers anschließen.<br />
• Einen Fachhändler oder erfahrenen Radio-/TV-Techniker um Hilfe<br />
bitten.<br />
VORSICHT: Änderungen oder Modifikationen, die von der für die Konformität<br />
verantwortlichen Stelle nicht ausdrücklich bewilligt wurden,<br />
können zum Entzug der Betriebserlaubnis führen.<br />
Dieses Gerät entspricht RSS-210 von Industry & Science<br />
Kanada.<br />
Der Betrieb unterliegt folgenden zwei Bedingungen:<br />
(1) dieses Gerät darf keine schädlichen Störungen verursachen<br />
und (2) dieses Gerät muss empfangene Störungen<br />
verkraften können - inklusive Störungen, die ein unerwünschtes<br />
Betriebsverhalten verursachen.
Instrucciones importantes de seguridad<br />
ATTENTION<br />
RISQUE D’ÉLECTROCUTION !<br />
NE PAS OUVRIR !<br />
ATENCIÓN: PARA REDUCIR EL RIESGO DE DESCARGAS<br />
ELÉCTRICAS, NO DESMONTE LA TAPA (NI EL CHASIS). DENTRO<br />
DE ESTE APARATO NO HAY PIEZAS SUSCEPTIBLES DE SER<br />
REPARADAS POR EL PROPIO USUARIO. DIRIJA CUALQUIER<br />
REPARACIÓN AL SERVICIO TÉCNICO OFICIAL.<br />
El símbolo del rayo dentro de un triángulo equilátero pretende advertir<br />
al usuario de la presencia de “voltajes peligrosos” no aislados dentro de la<br />
carcasa del producto, que pueden ser de suficiente magnitud como para<br />
suponer un riesgo de descarga eléctrica.<br />
El símbolo de exclamación dentro de un triángulo equilátero pretende<br />
advertir al usuario de la existencia de instrucciones de manejo y<br />
mantenimiento importantes en los documentos que vienen con el aparato.<br />
ATENCIÓN<br />
PARA EVITAR EL RIESGO DE INCENDIOS O DESCARGAS ELÉCTRICAS, NO USE EL ENCHUFE DE ESTE<br />
APARATO CON UNA REGLETA, RECEPTÁCULO O SALIDA DE CORRIENTE SALVO QUE LOS BORNES<br />
DEL MISMO QUEDEN COMPLETAMENTE INTRODUCIDOS Y NO QUEDEN PARTES DE LOS MISMOS AL<br />
DESCUBIERTO. PARA EVITAR EL RIESGO DE INCENDIOS O DESCARGAS ELÉCTRICAS, NO PERMITA QUE<br />
ESTE APARATO QUEDE EXPUESTO A LA LLUVIA O LA HUMEDAD. PARA EVITAR DESCARGAS ELÉCTRICAS,<br />
COLOQUE E INTRODUZCA CORRECTAMENTE EL ENCHUFE EN LA UNIDAD.<br />
ENGLISH<br />
FRANÇAIS<br />
DEUTSCHE<br />
ESPAÑOL<br />
A la hora de deshacerse de este aparato, no lo elimine junto con la basura orgánica. Existe un<br />
procedimiento de eliminación de aparatos electrónicos usados que cumple con la legislación<br />
actual sobre tratamiento, recuperación y reciclaje de elementos electrónicos.<br />
ITALIANO<br />
Todos los usuarios no profesionales y que sean ciudadanos de uno de los 25 países miembros de la EU, Suiza<br />
y Noruega, pueden devolver sus aparatos electrónicos usados, sin coste alguno, al comercio en el que fueron<br />
adquiridos (si adquiere allí otro aparato similar) o en determinados puntos limpios designados<br />
En el caso de cualquier otro país distinto a los anteriores, póngase en contacto con las autoridades locales para que<br />
le informen del método adecuado para deshacerse de este aparato. El hacer lo anterior le asegurará que este aparato<br />
sea eliminado siguiendo las normas actuales de tratamiento, recuperación y reciclaje de materiales, evitando los<br />
posibles efectos negativos para el medio ambiente y la salud.<br />
<strong>Owner's</strong> <strong>Manual</strong> Stage 266<br />
39
Instrucciones importantes de seguridad<br />
1. Lea estas instrucciones.<br />
2. Conserve estas instrucciones.<br />
3. Preste atención a todos los avisos.<br />
4. Siga todo lo indicado en estas<br />
instrucciones.<br />
5. No utilice este aparato cerca del<br />
agua.<br />
6. Limpie este aparato solo con un<br />
trapo suave y seco.<br />
7. No bloquee ninguna de las ranuras<br />
de ventilación. Instale este aparato<br />
solo de acuerdo con las instrucciones<br />
del fabricante.<br />
8. No instale este aparato cerca de<br />
fuentes de calor como radiadores,<br />
hornos u otros aparatos (incluyendo<br />
amplificadores) que produzcan calor.<br />
9. No anule el sistema de seguridad<br />
que supone un enchufe de tipo<br />
polarizado o con toma de tierra. Un<br />
enchufe polarizado tiene dos bornes<br />
de distinta anchura. Uno con toma<br />
de tierra tiene dos bornes iguales y<br />
una tercera lámina para la conexión<br />
a tierra. El borne ancho o la lámina<br />
se incluyen para su seguridad. Si el<br />
enchufe que viene con el aparato no<br />
encaja en su salida de corriente, haga<br />
que un electricista sustituya su salida<br />
anticuada.<br />
10. Evite que el cable de alimentación<br />
pueda quedar aplastado o retorcido,<br />
especialmente en los enchufes,<br />
receptáculos y en el punto en el que<br />
salen del aparato.<br />
11. Utilice solo accesorios/<br />
complementos especificados por el<br />
fabricante.<br />
12. Utilice este aparato solo con el<br />
soporte, trípode, mesa o bastidor<br />
especificado por el fabricante o que<br />
sea comercializado con<br />
este aparato. Cuando<br />
utilice un bastidor con<br />
ruedas, tenga especial<br />
cuidado al mover la<br />
combinación bastidor/<br />
aparato para evitar<br />
daños en caso de un vuelco.<br />
13. Desconecte este aparato de la<br />
corriente durante las tormentas<br />
eléctricas o cuando no lo vaya a usar<br />
durante un periodo de tiempo largo.<br />
14. Consulte cualquier posible<br />
reparación al servicio técnico oficial.<br />
Este aparato deberá ser reparado<br />
cuando haya resultado dañado<br />
de cualquier forma, tal como por<br />
ejemplo si el cable de alimentación<br />
o el enchufe se han roto, si se<br />
ha derramado algún líquido o<br />
introducido algún objeto dentro de<br />
la unidad, si el aparato ha quedado<br />
expuesto a la lluvia o la humedad, si<br />
no funciona correctamente o si hay<br />
caído al suelo.<br />
15. No permita que este aparato quede<br />
expuesto a salpicaduras de líquidos,<br />
ni coloque ningún objeto que los<br />
contenga (como un jarrón) sobre él.<br />
16. Atención - para evitar descargas<br />
eléctricas, introduzca totalmente el<br />
enchufe dentro del receptáculo.<br />
17. Mantenga este aparato en un<br />
entorno con buena ventilación.<br />
18. El adaptador de corriente se usa<br />
como sistema de desconexión, por<br />
lo que debe colocarlo de forma que<br />
pueda acceder fácilmente a él.<br />
19. No permita que las pilas (pack o<br />
pilas instaladas) queden expuestas<br />
a niveles de calor excesivos<br />
como cerca llamas o expuestas<br />
directamente al sol.<br />
40 Stage 266
Índice<br />
Introducción . . . . . . . . . . . . . . . . . . . . . . . . . . . . . . . . . . . . . . . . . . . . . . 42<br />
Controles y funciones del receptor . . . . . . . . . . . . . . . . . . . . . . . . . . . . . . . . 43<br />
Controles y funciones del transmisor . . . . . . . . . . . . . . . . . . . . . . . . . . . . . . . 44<br />
Guía de puesta en marcha . . . . . . . . . . . . . . . . . . . . . . . . . . . . . . . . . . . . . . 45<br />
Especificaciones técnicas . . . . . . . . . . . . . . . . . . . . . . . . . . . . . . . . . . . . . . 48<br />
Resolución de problemas . . . . . . . . . . . . . . . . . . . . . . . . . . . . . . . . . . . . . . 49<br />
ITALIANO<br />
ESPAÑOL<br />
DEUTSCHE<br />
FRANÇAIS<br />
ENGLISH<br />
<strong>Owner's</strong> <strong>Manual</strong> Stage 266<br />
41
Introducción<br />
¡Felicidades y gracias por su compra del Sistema de doble micrófono inalámbrico <strong>Samson</strong><br />
Stage 266! El sistema Stage 266 es la solución perfecta para cualquier aplicación en la que sean<br />
necesarios dos micros inalámbricos de alta calidad en un paquete compacto y fácil de usar. El<br />
sistema está formado por el receptor de doble canal SR266 con salidas individuales y mezcladas y<br />
por dos transmisores de micrófono de mano HT6.<br />
Con el sistema Stage 266 tendrá una gran calidad de sonido con una recepción totalmente limpia<br />
y la capacidad de moverse libremente por el escenario. El sistema Stage 266 es la herramienta<br />
perfecta para cubrir todas sus necesidades de micrófonos inalámbricos de doble canal en<br />
cualquier aplicación de sonido directo (karaoke, charlas en colegios, conferencias, centros de<br />
trabajo, etc.). El Stage 266 siempre le ofrecerá un rendimiento y fiabilidad a toda prueba.<br />
Aunque este producto ha sido diseñado para un funcionamiento totalmente intuitivo, le<br />
recomendamos que dedique unos minutos a leer estas páginas y aprender a usar todas sus<br />
exclusivas funciones, así como las instrucciones paso-a-paso sobre su configuración y ajuste. Si<br />
adquirió su Stage 266 en los Estados Unidos, también encontrará una tarjeta de garantía—no se<br />
olvide cumplimentarla y devolvérnosla para que podamos ofrecerle soporte técnico online y para<br />
que le podamos facilitar la información más actualizada sobre este y otros productos <strong>Samson</strong> en<br />
el futuro. Además, asegúrese de acceder a nuestra página web (www.samsontech.com) para ver<br />
toda la información disponible relacionada con toda nuestra gama de productos.<br />
Le recomendamos que apunte el número de serie y la fecha de compra en los espacios<br />
reservados para ello por si tiene que hacer cualquier consulta en el futuro.<br />
Número de serie:_____________________________<br />
Fecha de compra:____________________________<br />
En el improbable caso de que este aparato deba ser reparado, deberá solicitarnos un número<br />
de autorización de devolución (RA) antes de devolver esta unidad a <strong>Samson</strong>. Sin este número,<br />
ninguna unidad será aceptada. Póngase en contacto con <strong>Samson</strong> en el 1-800-3SAMSON (1-800-<br />
372-6766) para que le facilitemos el número de autorización de devolución antes de devolvernos<br />
la unidad. Trate de utilizar para el envío el embalaje y las protecciones originales. SI ha adquirido<br />
este producto <strong>Samson</strong> fuera de los Estados Unidos, póngase en contacto con su distribuidor local<br />
para que le informe de los términos de la garantía y condiciones de servicio aplicables.<br />
Características<br />
• Sistema inalámbrico de doble micrófono de mano profesional.<br />
• Configuración y manejo muy simple.<br />
• Circuitería superheterodina controlada por cristal para una recepción limpia y fiable.<br />
• Salidas individuales o mezcladas en conectores de 6,3 mm<br />
• Rango operativo de hasta 76 metros en línea recta.<br />
• Dos transmisores de mano HT6 profesionales con interruptores de anulación<br />
• Cada transmisor HT6 le ofrece 9 horas de duración de la pila (pilas alcalinas de 9 V standard).<br />
42 Stage 266
9 8 10<br />
SR266 Controles y funciones del receptor<br />
1. Interruptor de encendido<br />
- Púlselo para encender y<br />
apagar el receptor.<br />
3 4 6<br />
5<br />
2<br />
1<br />
2. Indicador de encendido - Se<br />
ilumina en rojo cuando el<br />
receptor esté encendido.<br />
3. Control de volumen (canal 1) - Gírelo para ajustar el nivel de la salida de la señal audio del<br />
receptor del canal 1.<br />
4. Indicador RF de canal 1 - Se ilumina en verde cuando el transmisor HT6 correspondiente al<br />
canal 1 esté encendido y si hay una señal RF presente y detectada por el receptor.<br />
5. Control de volumen (canal 2) - Gírelo para ajustar el nivel de la salida de la señal audio del<br />
receptor del canal 2.<br />
6. Indicador RF de canal 2 - Se ilumina en verde cuando el transmisor HT6 correspondiente<br />
al canal 2 esté encendido y si<br />
hay una señal RF presente y<br />
detectada por el receptor.<br />
7. Entrada DC - Conecte aquí<br />
el adaptador de 12 V, 200<br />
mA incluido.<br />
ATENCIÓN: El uso de cualquier<br />
otro tipo de adaptador puede<br />
dañar el SR266 y anular la<br />
garantía.<br />
8. Salida del canal 1 - Use<br />
esta toma no balanceada<br />
de 6,3 mm para conectar el<br />
receptor del canal 1 del SR266<br />
a la entrada de nivel de línea<br />
de una mesa de mezclas,<br />
amplificador u otro dispositivo<br />
11<br />
7 11<br />
audio. Para una señal mezclada<br />
de ambos receptores, conecte<br />
9 8 10<br />
solo una salida del SR266. En caso contrario, el canal 1 y el 2 emitirán señales independientes.<br />
9. Salida del canal 2 - Use esta toma no balanceada 3 4 de 6,3 6 mm para conectar 5el receptor 2 del 1<br />
canal 2 del SR266 a la entrada de nivel de línea de una mesa de mezclas, amplificador u<br />
otro dispositivo audio. Para una señal mezclada de ambos receptores,<br />
conecte solo una salida del SR266. En caso contrario, el canal 1 y el 2<br />
emitirán señales independientes.<br />
10. Pinza de sujeción del adaptador - Pase el cable del adaptador incluido<br />
por esta pinza de sujeción para evitar que se suelte el cable del receptor<br />
de forma accidental.<br />
11. Antena - Los sistemas de montaje de las antenas permiten una rotación total para ofrecerle<br />
una ubicación óptima. En condiciones normales de funcionamiento, las dos antenas<br />
deberían estar colocadas en vertical. Puede plegar hacia dentro (sistema telescópico) las<br />
antenas para mayor comodidad a la hora de transportar el SR266.<br />
ITALIANO ESPAÑOL DEUTSCHE FRANÇAIS ENGLISH<br />
<strong>Owner's</strong> <strong>Manual</strong> Stage 266<br />
43
HT6 Controles y funciones del transmisor<br />
1. Interruptor Audio ON/OFF - Cuando lo coloque en la posición ON,<br />
la señal audio será transmitida. Cuando lo coloque en la posición<br />
OFF, la señal audio quedará anulada. Tenga en cuenta que el colocar<br />
este interruptor en la posición OFF no hace que el transmisor quede<br />
apagado — simplemente es una forma de anular temporalmente la<br />
transmisión de la señal audio. Cuando no vaya a usar el transmisor<br />
durante un periodo de tiempo largo, apáguelo usando el interruptor<br />
ON/OFF de encendido.<br />
2. Interruptor ON/OFF de encendido - Use este interruptor para<br />
encender o apagar el HT6 (para conservar la máxima duración de la<br />
pila, asegúrese de dejar este interruptor en la posición Off cuando<br />
no use el transmisor).<br />
Asegúrese de anular la señal audio en su mesa de mezclas o<br />
amplificador externo antes de apagar o encender el transmisor, para<br />
evitar la producción de posibles chasquidos.<br />
3<br />
4<br />
1<br />
2<br />
3. Indicador de encendido - Este piloto se ilumina en verde cuando el<br />
transmisor esté encendido.<br />
3<br />
4. Compartimento de la pila - Introduzca aquí una 1 pila alcalina<br />
standard de 9 voltios. Asegúrese de seguir las indicaciones de<br />
polaridad (símbolos más/menos) a la hora de instalar la pila. Le<br />
recomendamos que utilice una pila de tipo Duracell MN 1604 para<br />
este aparato. Aunque también puede usar pilas recargables de<br />
Ni-Cad, debe tener en cuenta que ese tipo de pilas no ofrecen un<br />
flujo de corriente adecuado durante más de 4<br />
2<br />
horas.<br />
ATENCIÓN: No introduzca la<br />
4<br />
pila al revés; el hacerlo podría<br />
producir daños graves en el HT6 y anularía su garantía.<br />
5. Marca de canal - Número impreso que se corresponde con el<br />
canal adecuado del receptor SR266.<br />
5<br />
44 Stage 266
Guía de puesta en marcha<br />
Siga estos sencillos pasos para configurar y usar su sistema inalámbrico Stage 266 Series.<br />
1. Conecte el adaptador de corriente del<br />
receptor SR266 a la toma DC del panel<br />
trasero y a una salida de corriente.<br />
FRANÇAIS<br />
DEUTSCHE<br />
ESPAÑOL<br />
ENGLISH<br />
2. Conecte la salida de 6,3 mm adecuada del receptor a la entrada de una mesa de mezclas,<br />
sistema stereo, unidad de karaoke u otra entrada de nivel de línea (vea abajo).<br />
Use el cable incluido de 6,3 mm a 6,3 mm<br />
para conectar el receptor SR266 a una<br />
mesa de mezclas.<br />
Use el cable incluido de 6,3 mm a doble<br />
RCA para conectar el receptor SR266 a un<br />
dispositivo HI-FI o equipo stereo.<br />
ITALIANO<br />
3. Plugging the receiver into a stereo using the 1/4" - RCA cable.<br />
<strong>Owner's</strong> <strong>Manual</strong> Stage 266<br />
45
Guía de puesta en marcha<br />
1. Plugging the receiver into the wall.<br />
Use el cable incluido de 6,3 mm a 6,3 mm<br />
para conectar el receptor SR266 a un<br />
sistema de karaoke.<br />
4. Plugging the receiver into a Karaoke machine using 1/4" - 1/4" cable.<br />
3. Mientras sujeta la sección superior<br />
del transmisor HT6, desenrosque la<br />
sección inferior y tire de ella hacia<br />
abajo para hacer que quede al<br />
descubierto el compartimento de<br />
la pila.<br />
Introduzca una pila alcalina de 9 V<br />
standard, asegurándose de seguir<br />
las indicaciones de polaridad.<br />
cable.<br />
4. Encienda el transmisor HT6 deslizando el interruptor<br />
POWER hacia la derecha, y vuelva a colocar después<br />
la sección inferior.<br />
46 Stage 266
Guía de puesta en marcha<br />
5. Coloque el receptor SR266 en la<br />
ubicación en la que lo vaya a usar (la<br />
regla de oro aquí es tratar de mantener<br />
la “línea recta” entre el receptor y los<br />
transmisores de forma que el usuario<br />
del transmisor pueda ver siempre<br />
directamente el receptor). Encienda el<br />
receptor SR266.<br />
FRANÇAIS<br />
DEUTSCHE<br />
ITALIANO<br />
ESPAÑOL<br />
ENGLISH<br />
6. Encienda el amplificador y/o mesa de<br />
mezclas conectados, pero mantenga su<br />
volumen al mínimo. Después, asegúrese<br />
de que su transmisor no esté anulado<br />
ajustando su interruptor Audio a ON.<br />
Ajuste posteriormente el control de<br />
volumen del SR266 en su extremo<br />
derecho; eso es la ganancia unitaria.<br />
Hable o cante en el micro a un nivel<br />
de interpretación normal mientras va<br />
subiendo lentamente el volumen del<br />
amplificador/mesa de mezclas hasta conseguir el nivel que quiera.<br />
<strong>Owner's</strong> <strong>Manual</strong> Stage 266<br />
47
Especificaciones técnicas<br />
ESPECIFICACIONES DE TODO EL SISTEMA<br />
Frecuencia operativa<br />
VHF 173.80 a 213.20 MHz<br />
Número de canales<br />
Canal fijo<br />
Estabilidad de la frecuencia ±0.005%<br />
Modo de modulación<br />
FM<br />
Desviación máxima<br />
±15 kHz<br />
Rango operativo<br />
76 m (línea recta)<br />
Rango de temperaturas de funcionamiento 4° a 43° C<br />
Respuesta de frecuencia<br />
80 Hz a 15 kHz<br />
ESPECIFICACIONES DEL RECEPTOR SR266<br />
Rechazo de imagen<br />
Rango dinámico<br />
Salida máxima<br />
Sensibilidad<br />
Conectores de salida<br />
Niveles de salida audio<br />
Fuente de alimentación<br />
Dimensiones<br />
Peso neto<br />
30 dB<br />
95.5 dB<br />
900 mV<br />
10 dBµV para una relación señal-ruido de 48 dB<br />
2x conectores TS (“mono”) de 6,3 mm<br />
-10 dB no balanceado (conector de 6,3 mm)<br />
100-240 V CA (50/60 Hz) a 12 V CC 0.2 A<br />
200 x 134 x 43 mm<br />
0.38 kg<br />
ESPECIFICACIONES DEL TRANSMISOR DE MANO HT6<br />
Potencia de salida RF<br />
10 mW<br />
Elemento del micrófono<br />
H6 Dinámico unidireccional<br />
Duración típica de la pila (alcalina de 9 V) 9 horas<br />
Consumo<br />
30 mA típico<br />
Dimensiones<br />
Ø52.6 x 235.5 mm<br />
Peso neto<br />
0.18 kg<br />
48 Stage 266
Resolución de problemas<br />
Problema<br />
No hay señal audio<br />
Sonido distorsionado<br />
Cortes en el sonido<br />
Transmisores y receptor<br />
en canales distintos<br />
Posibles soluciones<br />
Encienda el transmisor HT6 usando el interruptor Power ON/OFF.<br />
Asegúrese de que las pilas del transmisor HT6 estén<br />
correctamente colocadas.<br />
Compruebe que el interruptor Audio ON/OFF del HT6 esté en la<br />
posición ON.<br />
Compruebe que el adaptador del SR266 esté correctamente<br />
colocado y conectado a una salida de corriente.<br />
Encienda el receptor SR266.<br />
Asegúrese de que las conexiones de entrada y salida audio del<br />
SR266 estén correctamente realizadas.<br />
Asegúrese de que el receptor SR266 y los transmisores HT6 estén<br />
en línea recta y sin obstáculos entre ellos.<br />
Compruebe los controles de nivel del dispositivo de entrada<br />
audio y del receptor.<br />
Compruebe el nivel de salida del receptor y el nivel del<br />
dispositivo de entrada audio.<br />
Compruebe la carga de las pilas del HT6 y sustitúyalas si están<br />
casi descargadas.<br />
Es posible que haya otro transmisor emitiendo señal en el mismo<br />
canal. Desactive el transmisor que pueda estar produciendo las<br />
interferencias.<br />
Es posible que el transmisor esté demasiado lejos del receptor.<br />
Acérquelo más al receptor o recoloque las antenas.<br />
Elimine cualquier posible fuente de interferencias RF, como<br />
teléfonos móviles, auriculares inalámbricos, ordenadores,<br />
sistemas de iluminación, etc.<br />
Póngase en contacto con su distribuidor o comercio habitual<br />
<strong>Samson</strong> para que le indiquen los pasos a seguir.<br />
ESPAÑOL DEUTSCHE FRANÇAIS ENGLISH<br />
ITALIANO<br />
<strong>Owner's</strong> <strong>Manual</strong> Stage 266<br />
49
Normas FCC y otras regulaciones<br />
Los receptores inalámbricos <strong>Samson</strong> están certificados<br />
bajo las Normas FCC, sección 15 y los transmisores bajo las<br />
Normas FCC, sección 74.<br />
La licencia de aparatos <strong>Samson</strong> queda bajo responsabilidad<br />
del usuario y su licenciabilidad depende de la clasificación,<br />
aplicación y frecuencia elegidas por el usuario.<br />
NOTA: Se ha verificado que este aparato cumple con los límites<br />
establecidos para un dispositivo digital de clase B, de acuerdo a lo<br />
establecido en la sección 15 de las Normas FCC. Estos límites han<br />
sido diseñados para ofrecer una protección razonable contra las<br />
interferencias molestas en instalaciones residenciales. Este aparato<br />
genera, usa y puede emitir energía de radiofrecuencias y, si no es<br />
instalado y usado de acuerdo con las instrucciones, puede producir<br />
interferencias molestas en las comunicaciones de radio. No obstante,<br />
no está garantizado que estas interferencias no se produzcan en una<br />
instalación concreta. Si este aparato produce interferencias molestas<br />
en la recepción de la radio o la televisión, lo cual podrá comprobar<br />
fácilmente apagando y encendiendo este aparato, el usuario será el<br />
responsable de tratar de corregir dichas interferencias por medio de<br />
una o más de las siguientes medidas:<br />
• Reorientar o reubicar la antena receptora.<br />
• Aumentar la separación entre este aparato y el receptor.<br />
• Conectar este aparato a una salida de corriente o regleta distinta a la<br />
que esté conectado el receptor.<br />
• Pedir consejo a un técnico especialista en radio/TV.<br />
ATENCIÓN: Cualquier cambio o modificación que no haya sido<br />
expresamente aprobado por escrito por el responsable anulará la<br />
autorización del usuario para utilizar este aparato.<br />
Este dispositivo cumple con la Norma RSS-210 de<br />
Industry & Science Canada. Su funcionamiento está<br />
sujeto a las dos condiciones siguientes:<br />
(1) este aparato no puede producir interferencias<br />
molestas y (2) este aparato debe aceptar cualquier<br />
interferencia recibida, incluyendo aquellas que puedan<br />
producir un funcionamiento no deseado.
Istruzioni importanti sulla sicurezza<br />
ATTENTION<br />
RISQUE D’ÉLECTROCUTION !<br />
NE PAS OUVRIR !<br />
ATTENZIONE PER RIDURRE IL PERICOLO DI SCOSSE ELETTRICHE NON RIMUOVERE LA<br />
COPERTURA SUPERIORE (O LA SEZIONE POSTERIORE). ALL’INTERNO NON CI SONO PARTI<br />
RIPARABILI DALL’UTENTE. PER LE RIPARAZIONI, RIVOLGERSI A PERSONALE QUALIFICATO.<br />
Il simbolo del fulmine con la punta a freccia all’interno di un triangolo<br />
equilatero è da intendersi come avvertimento della presenza di voltaggio<br />
pericoloso non isolato all’interno dello chassis del prodotto, che potrebbe<br />
essere di intensità sufficiente per costituire un rischio di scosse elettriche.<br />
Il simbolo del punto esclamativo all’interno di un triangolo equilatero segnala<br />
la presenza di importanti istruzioni operative e di manutenzione nei<br />
documenti che accompagnano il prodotto.<br />
AVVERTIMENTO<br />
PER EVITARE IL RISCHIO DI INCENDI O SCOSSE ELETTRICHE. UTILIZZARE QUESTA SPINA ESCLU-<br />
SIVAMENTE CON PROLUNGHE E PRESE IN CUI LE LAME POSSANO ESSERE INSERITE COMPLE-<br />
TAMENTE, PER EVITARE CHE RESTINO ESPOSTE. PER EVITARE IL RISCHIO DI INCENDI O SCOSSE<br />
ELETTRICHE. NON ESPORRE L’UNITÀ A PIOGGIA O UMIDITÀ. PER EVITARE IL RISCHIO DI SCOSSE<br />
ELETTRICHE, FAR COMBACIARE LA LAMA LARGA DELLA SPINA ALLO SLOT LARGO E INSERIRLA<br />
COMPLETAMENTE.<br />
ESPAÑOL<br />
ENGLISH<br />
FRANÇAIS<br />
DEUTSCHE<br />
If you want to dispose this product, do not mix it with general household waste. There is a<br />
separate collection system for used electronic products in accordance with legislation that<br />
requires proper treatment, recovery and recycling.<br />
ITALIANO<br />
Private household in the 25 member states of the EU, in Switzerland and Norway may return their used<br />
electronic products free of charge to designated collection facilities or to a retailer (if you purchase a similar<br />
new one).<br />
For Countries not mentioned above, please contact your local authorities for a correct method of disposal.<br />
By doing so you will ensure that your disposed product undergoes the necessary treatment, recovery and<br />
recycling and thus prevent potential negative effects on the environment and human health.<br />
<strong>Owner's</strong> <strong>Manual</strong> Stage 266<br />
51
Istruzioni importanti sulla sicurezza<br />
1. Leggere queste istruzioni,<br />
2. Conservare queste istruzioni,<br />
3. Rispettare tutti gli avvertimenti.<br />
4. Seguire le istruzioni.<br />
5. Non usare l’unità in prossimità di<br />
acqua.<br />
6. Pulire solamente con un panno<br />
asciutto.<br />
7. Non ostruire nessuna apertura per<br />
l’aerazione. Installare l’unità secondo<br />
le istruzioni del produttore.<br />
8. Non installare l’unità in prossimità<br />
di fonti di calore come termosifoni,<br />
bocchette di riscaldamento, forni o<br />
altri apparati (inclusi gli amplificatori)<br />
che producono calore.<br />
9. Non annullare l’obiettivo di sicurezza<br />
delle spine polarizzate o con messa<br />
a terra. Le spine polarizzate hanno<br />
due lame, una più larga dell’altra.<br />
Una spina con messa ha terra ha due<br />
lame e un terzo polo di terra. La lama<br />
larga o il terzo polo è presente la per<br />
la sicurezza dell’utente. Se la spina<br />
fornita non è adatta alla propria<br />
presa, consultare un elettricista per la<br />
sostituzione della spina.<br />
10. Posizionare il cavo di alimentazione<br />
in modo che non possa essere calpestato<br />
o compresso, specialmente in<br />
prossimità di spine e alloggiamenti e<br />
nel punto di uscita dall’unità.<br />
11. Usare solo dispositivi opzionali/accessori<br />
specificati dal produttore.<br />
12. Usare solo carrelli,<br />
supporti, cavalletti,<br />
sostegni o tavoli specificati<br />
dal produttore o<br />
acquistati con l’apparecchio.<br />
Quando si usa<br />
un carrello, prestare<br />
attenzione durante gli spostamenti<br />
onde evitare che la combinazione<br />
carrello/unità possa ribaltarsi.<br />
13. Scollegare l’unità dalla corrente durante<br />
i temporali o quando inutilizzata<br />
per lunghi periodi.<br />
14. Per l’assistenza tecnica rivolgersi a<br />
personale qualificato. L’assistenza<br />
tecnica è necessaria nel caso in cui<br />
l’unità sia danneggiata, per esempio<br />
in caso di danni al cavo di alimentazione<br />
o alla spina, rovesciamento di<br />
liquidi o caduta di oggetti nell’unità,<br />
esposizione alla pioggia o all’umidità,<br />
o se l’unità non funziona correttamente<br />
o è stata fatta cadere.<br />
15. Non esporre l’unità a gocce o spruzzi<br />
d’acqua e non appoggiare sull’unità<br />
alcun oggetto contenente liquidi, per<br />
esempio vasi.<br />
16. Attenzione: per evitare il rischio di<br />
scosse elettriche, far combaciare la<br />
lama larga della spina allo slot largo<br />
e inserirla completamente.<br />
17. Mantenere uno spazio adeguatamente<br />
areato attorno all’unità.<br />
18. L’adattatore a presa diretta viene<br />
utilizzato come dispositivo di scollegamento,<br />
pertanto deve essere<br />
facilmente raggiungibile.<br />
19. Le batterie (il battery pack o le batterie<br />
installate) non devono essere<br />
esposte a un calore eccessivo, per<br />
esempio luce solare diretta o fiamme.<br />
52 Stage 266
Indice<br />
Introduzione . . . . . . . . . . . . . . . . . . . . . . . . . . . . . . . . . . . . . . . . . . . . . . 54<br />
Controlli e funzioni del ricevitore SR266 . . . . . . . . . . . . . . . . . . . . . . . . . . . . . 55<br />
Controlli e funzioni del trasmettitore HT6 . . . . . . . . . . . . . . . . . . . . . . . . . . . . 56<br />
Guida rapida . . . . . . . . . . . . . . . . . . . . . . . . . . . . . . . . . . . . . . . . . . . . . . 57<br />
Specifiche . . . . . . . . . . . . . . . . . . . . . . . . . . . . . . . . . . . . . . . . . . . . . . . . 60<br />
Risoluzione dei problemi. . . . . . . . . . . . . . . . . . . . . . . . . . . . . . . . . . . . . . . 61<br />
ITALIANO<br />
ESPAÑOL<br />
DEUTSCHE<br />
FRANÇAIS<br />
ENGLISH<br />
<strong>Owner's</strong> <strong>Manual</strong> Stage 266<br />
53
Introduzione<br />
Complimenti per aver scelto il sistema wireless <strong>Samson</strong> Stage 266 con doppio microfono!<br />
Lo Stage 266 è ideale per chi necessita di due microfoni wireless di alta qualità in una soluzione<br />
compatta e facile da usare. Il sistema include il ricevitore SR266 a doppio canale con uscite individuali<br />
e combinate, e due microfoni trasmettitori palmari HT6.<br />
Con il sistema Stage 266 avrai un’eccellente qualità audio con una ricezione chiara insieme alla<br />
possibilità di spostarti liberamente. È la soluzione perfetta per ogni tipo di applicazione dal vivo<br />
(karaoke, scuole, conferenze, luoghi di culto ecc.) che richieda microfoni senza fili su due canali.<br />
In più lo Stage 266 garantisce prestazioni al top e la massima affidabilità.<br />
Anche se questo prodotto è progettato per essere intuitivo, ti consigliamo di leggere le pagine<br />
seguenti per scoprire le funzioni più esclusive e per avere istruzioni dettagliate su come<br />
impostare il tuo sistema. Se il tuo Stage 266 è stato acquistato negli Stati Uniti, troverai anche<br />
la garanzia, da compilare e inviare per posta per poter ricevere supporto tecnico online e<br />
informazioni aggiornate su questo e altri prodotti <strong>Samson</strong>. Ti invitiamo anche a visitare il nostro<br />
sito web (www.samsontech.com) per informazioni complete sulla nostra intera linea di prodotti.<br />
Ti raccomandiamo di annotare qui sotto il numero di serie come futuro riferimento.<br />
Numero di serie:_______________________________<br />
Data d’acquisto:____________________________<br />
Se l’unità necessitasse di riparazione, prima di spedirla a <strong>Samson</strong> dovrai ottenere un numero<br />
di Autorizzazione Reso. In sua assenza, l’unità non verrà accettata. Ti preghiamo di contattare<br />
<strong>Samson</strong> al numero 1-800-3SAMSON (1-800-372-6766) per richiedere il numero di autorizzazione<br />
prima di procedere alla spedizione. Conserva l’imballaggio originale e, se possibile, utilizzalo per<br />
spedire l’unità. Se il prodotto <strong>Samson</strong> è stato acquistato al di fuori degli Stati Uniti, contatta il tuo<br />
distributore di zona per tutti i dettagli sulla garanzia e l’assistenza.<br />
Caratteristiche<br />
• Doppio sistema wireless portatile professionale.<br />
• Facile da impostare e da utilizzare.<br />
• Circuito supereterodina con controllo a cristallo per una ricezione chiara e affidabile.<br />
• Uscite individuali e combinate da 6,3 mm.<br />
• Portata operativa fino a 76 metri in linea di visuale.<br />
• Due trasmettitori palmari professionali HT6 con interruttori mute.<br />
• Ogni trasmettitore HT6 offre fino a 9 ore di autonomia utilizzando batterie standard da 9<br />
volt.<br />
54 Stage 266
9 8 10<br />
Controlli e funzioni del ricevitore SR266<br />
1. Interruttore Power – Accende<br />
e spegne il ricevitore.<br />
3 4 6<br />
5<br />
2<br />
1<br />
2. Indicatore Power – È rosso<br />
quando il ricevitore è acceso.<br />
3. Controllo volume (Channel 1)<br />
– Ruotalo per regolare il livello di uscita del segnale audio dal ricevitore Channel 1.<br />
4. Indicatore RF Channel 1 – È verde quando il trasmettitore HT6 Channel 1 è acceso ed è<br />
presente un segnale RF rilevato dal ricevitore.<br />
5. Controllo volume (Channel 2) – Ruotalo per regolare il livello di uscita del segnale audio dal<br />
ricevitore Channel 2.<br />
6. Indicatore RF Channel 2 – È verde quando il trasmettitore HT6 Channel 2 è acceso ed è<br />
presente un segnale RF rilevato dal ricevitore.<br />
7. Ingresso CC – Collega qui l’alimentatore da 200 mA e12 volt in dotazione.<br />
ATTENZIONE: l’uso di un qualsiasi<br />
altro tipo di alimentatore<br />
può danneggiare seriamente<br />
l’unità e invaliderà la garanzia.<br />
8. Uscita Channel 1 – Usa questo<br />
jack sbilanciato da 6,3 mm per<br />
collegare il ricevitore SR266<br />
Channel 1 all’ingresso di linea<br />
di un mixer, un amplificatore<br />
o altra attrezzatura audio. Per<br />
usare il segnale combinato di<br />
entrambi i ricevitori, collega<br />
una sola uscita sull’SR266.<br />
Altrimenti Channel 1 e Channel<br />
2 trasmetteranno segnali<br />
separati.<br />
9. Uscita Channel 2 – Usa questo<br />
9 8 10<br />
jack sbilanciato da 6,3 mm per<br />
collegare il ricevitore SR266 Channel 2 all’ingresso di linea di un mixer, un amplificatore o<br />
altra attrezzatura audio. Per usare il segnale combinato di entrambi i ricevitori, collega una<br />
sola uscita sull’SR266. Altrimenti Channel 31 e Channel 4 26<br />
trasmetteranno segnali 5 separati. 2 1<br />
10. Serracavo – Fai scorrere il cavo dell’alimentatore in dotazione nel serracavo per evitare di<br />
scollegare accidentalmente il connettore dal ricevitore.<br />
11. Antenne – I sostegni delle antenne consentono una rotazione completa<br />
per un posizionamento ottimale. Durante il normale funzionamento,<br />
entrambe le antenne dovrebbero essere in posizione verticale. Possono<br />
essere ripiegate all’interno per facilitare il trasporto dell’SR266.<br />
11<br />
7 11<br />
ITALIANO ESPAÑOL DEUTSCHE FRANÇAIS ENGLISH<br />
<strong>Owner's</strong> <strong>Manual</strong> Stage 266<br />
55
Controlli e funzioni del trasmettitore HT6<br />
1. Interruttore Audio ON/OFF – Quando è in posizione ON, viene<br />
trasmesso il segnale audio. In posizione OFF il segnale audio è in<br />
mute. Ricorda che spostare questo interruttore su OFF non spegne<br />
il trasmettitore: è solo un modo temporaneo di interrompere la trasmissione<br />
del segnale. Se il trasmettitore non verrà usato per lungo<br />
periodo, spegnilo usando l’interruttore Power ON/OFF.<br />
2. Interruttore Power ON/OFF – Usalo per accendere e spegnere<br />
l’HT6 (per preservare la batteria, lascialo su OFF quando non usi il<br />
trasmettitore).<br />
Ricordati di mettere in mute il segnale audio sul mixer o sull’amplificatore<br />
prima di accendere/spegnere il trasmettitore, o si potrebbe<br />
udire un rumore secco.<br />
3. Indicatore Power – Il LED è verde quando il trasmettitore è acceso.<br />
4. Vano batteria – Inserisci qui una batteria alcalina standard da 9 volt.<br />
Nel farlo assicurati di rispettare la polarità positiva e negativa. Raccomandiamo<br />
di utilizzare una batteria Duracell tipo MN 1604.<br />
Le batterie ricaricabili al nichel-cadmio 3 possono essere usate, ma<br />
non forniscono una corrente adeguata per più 1di quattro ore.<br />
ATTENZIONE: non inserire la batteria al contrario; potresti danneggiare<br />
seriamente l’HT6 e invalideresti la garanzia.<br />
5. Etichetta canale – Il numero stampato corrisponde al relativo<br />
canale sul ricevitore SR266.<br />
2<br />
4<br />
3<br />
4<br />
1<br />
2<br />
5<br />
56 Stage 266
Guida rapida<br />
Segui queste semplici procedure per impostare e utilizzare il tuo sistema wireless Stage 266.<br />
1. Collega l’alimentatore del ricevitore<br />
SR266 all’ingresso CC sul pannello<br />
posteriore e a una presa elettrica.<br />
FRANÇAIS<br />
DEUTSCHE<br />
ESPAÑOL<br />
ENGLISH<br />
2. Collega l’uscita da 6,3 mm in uso all’ingresso di un mixer, uno stereo o un karaoke, o a un altro<br />
ingresso di linea (vedi sotto).<br />
Usa il cavo da 6,3 mm a 6,3 mm in<br />
dotazione per collegare il ricevitore SR266<br />
a un mixer.<br />
Usa il cavo da 6,3 mm a doppio RCA in<br />
dotazione per collegare il ricevitore SR266<br />
a uno stereo o altro dispositivo Hi-Fi.<br />
ITALIANO<br />
3. Plugging the receiver into a stereo using the 1/4" - RCA cable.<br />
<strong>Owner's</strong> <strong>Manual</strong> Stage 266<br />
57
Guida rapida<br />
1. Plugging the receiver into the wall.<br />
Usa il cavo da 6,3 mm a 6,3 mm in<br />
dotazione per collegare il ricevitore SR266<br />
a un karaoke.<br />
4. Plugging the receiver into a Karaoke machine using 1/4" - 1/4" cable.<br />
3. Tenendo la sezione superiore del<br />
trasmettitore, ruota la sezione<br />
inferiore e spostala verso il basso<br />
per accedere al vano batteria.<br />
Inserisci una batteria alcalina<br />
standard da 9 volt, assicurandoti<br />
di rispettare la polarità positiva e<br />
negativa.<br />
cable.<br />
4. Accendi il trasmettitore HT6 spostando a destra<br />
l’interruttore Power, e riposiziona la sezione inferiore.<br />
58 Stage 266
Guida rapida<br />
5. Sistema il ricevitore SR266 dove verrà<br />
usato; come regola generale, mantieni<br />
una linea di visuale fra il ricevitore e<br />
i trasmettitori, in modo che chi usa il<br />
trasmettitore possa vedere il ricevitore.<br />
Accendi il ricevitore SR266.<br />
FRANÇAIS<br />
DEUTSCHE<br />
ITALIANO<br />
ESPAÑOL<br />
ENGLISH<br />
6. Accendi l’amplificatore e/o il mixer<br />
collegato, ma tieni il volume al minimo.<br />
Quindi verifica che il trasmettitore non<br />
sia in mute spostando l’interruttore<br />
Audio su ON. Ruota completamente in<br />
senso orario la manopola del controllo<br />
volume sull’SR266; questo è il guadagno<br />
unitario. Parla o canta nel microfono a un<br />
volume da performance tipica alzando<br />
lentamente volume dell’amplificatore<br />
o mixer, fino a raggiungere il livello<br />
desiderato.<br />
<strong>Owner's</strong> <strong>Manual</strong> Stage 266<br />
59
Specifiche<br />
SPECIFICHE GENERALI DEL SISTEMA<br />
Frequenza operativa<br />
VHF da 173,80 MHz a 213,20 MHz<br />
Numero di canali<br />
Canale fisso<br />
Stabilità di frequenza ±0,005%<br />
Modulazione<br />
FM<br />
Deviazione massima<br />
±15 kHz<br />
Portata operativa<br />
76 m (linea di visuale)<br />
Temperatura operativa Da 4 °C a 43 °C<br />
Risposta in frequenza<br />
Da 80 Hz a 15 kHz<br />
SPECIFICHE DEL RICEVITORE SR266<br />
Reiezione immagine<br />
Gamma dinamica<br />
Uscita massima<br />
Sensibilità<br />
Connettori in uscita<br />
Livelli di uscita audio<br />
Alimentazione<br />
Dimensioni<br />
Peso netto<br />
30 dB<br />
95,5 dB<br />
900 mV<br />
10 dBµV per 48 dB S/N<br />
Due jack TS (“mono”) da 6,3 mm<br />
-10 dB sbilanciati (connettore da 6,3 mm)<br />
Da 100-240 V CA (50/60 Hz) a 12 V CC 0,2 A<br />
200 mm x 134 mm x 43 mm<br />
0,38 kg<br />
SPECIFICHE DEL TRASMETTITORE PALMARE HT6<br />
Potenza RF in uscita<br />
10 mW<br />
Elemento microfono<br />
Unidirezionale dinamico H6<br />
Durata tipica della batteria<br />
(batteria alcalina da 9 volt)<br />
9 ore<br />
Consumo di corrente<br />
30 mA (tipico)<br />
Dimensioni<br />
Ø52,6 mm x 235,5 mm<br />
Peso netto<br />
0,18 kg<br />
60 Stage 266
Risoluzione dei problemi<br />
Problema<br />
Audio assente<br />
Audio distorto<br />
Interruzione dell’audio<br />
Trasmettitori e ricevitore<br />
su canali diversi<br />
Soluzioni<br />
Accendi il trasmettitore HT6 usando l’interruttore Power ON/OFF.<br />
Verifica che la batteria dell’HT6 sia installata correttamente.<br />
Verifica che l’interruttore Audio ON/OFF dell’HT6 sia in posizione<br />
ON.<br />
Verifica che l’alimentatore dell’SR266 sia collegato correttamente<br />
e inserito in una presa elettrica.<br />
Accendi il ricevitore SR266.<br />
Verifica che l’uscita dell’SR266 e l’ingresso audio siano collegati<br />
saldamente.<br />
Assicurati che il ricevitore SR266 e i trasmettitori HT6 siano su una<br />
linea di visuale.<br />
Verifica i controlli del volume del ricevitore e del dispositivo di<br />
ingresso audio.<br />
Verifica il livello di uscita del ricevitore e il livello del dispositivo di<br />
ingresso audio.<br />
Controlla la batteria dell’HT6 e sostituiscila se è quasi scarica.<br />
Forse un altro trasmettitore sta usando lo stesso canale. Spegni il<br />
trasmettitore che potrebbe causare l’interferenza.<br />
Il trasmettitore potrebbe essere troppo lontano dal ricevitore.<br />
Avvicinati al ricevitore o riposiziona le antenne.<br />
Rimuovi ogni potenziale fonte di interferenze RF, come telefoni<br />
cellulari, cordless, attrezzatura di illuminazione, computer ecc.<br />
Contatta il tuo rivenditore o distributore <strong>Samson</strong> per assistenza.<br />
ESPAÑOL DEUTSCHE FRANÇAIS ENGLISH<br />
ITALIANO<br />
<strong>Owner's</strong> <strong>Manual</strong> Stage 266<br />
61
Norme e regolamenti FCC<br />
I ricevitori wireless <strong>Samson</strong> sono certificati in base alla Parte<br />
15 delle Norme FCC; i trasmettitori sono certificati in base<br />
alla Parte 74 delle Norme FCC.<br />
È responsabilità dell’utente ottenere una licenza adeguata<br />
per l’uso del prodotto <strong>Samson</strong>, e il rilascio di tale licenza<br />
dipende dalla classificazione dell’utente, dall’applicazione e<br />
dalla frequenza scelta,<br />
NOTA: questo apparecchio è stato testato ed è risultato conforme ai<br />
limiti stabiliti per i dispositivi digitali di Classe B, ai sensi della Parte 15<br />
delle Norme FCC. I valori limite intendono assicurare ragionevoli margini<br />
di protezione dalle interferenze nelle installazioni a carattere residenziale.<br />
Questo apparecchio genera, usa e può emettere energia di radiofrequenza<br />
e, se non viene installato ed utilizzato secondo il manuale di<br />
istruzioni, potrebbe causare interferenze dannose alle comunicazioni<br />
radio. Non è tuttavia garantito che non si verifichino interferenze in una<br />
particolare installazione. Se questa attrezzatura causa interferenze dannose<br />
alla ricezione dei programmi radiofonici o televisivi, fatto verificabile<br />
spegnendo e riaccendendo l’attrezzatura, si consiglia all’utente di<br />
provare a correggere l’interferenza in uno o più dei modi seguenti:<br />
• riorientare o riposizionare l’antenna di ricezione;<br />
• allontanare l’apparecchio dal ricevitore;<br />
• collegare l’attrezzatura a una diversa presa elettrica in modo che<br />
attrezzatura e ricevitore si trovino su circuiti diversi;<br />
• per assistenza, rivolgersi al rivenditore o a un tecnico radiotelevisivo<br />
qualificato.<br />
ATTENZIONE: qualsiasi cambiamento o modifica non espressamente<br />
approvato dalla parte competente in materia di conformità potrebbe<br />
invalidare il diritto dell’utente di utilizzare l’apparecchio.<br />
Questo dispositivo è conforme alla norma RSS-210 di<br />
Industry & Science Canada.<br />
Il funzionamento è soggetto alle due seguenti condizioni:<br />
(1) il dispositivo non può causare interferenze dannose e<br />
(2) deve accettare qualsiasi interferenza ricevuta,<br />
comprese quelle che possono causare un funzionamento<br />
indesiderato.
<strong>Samson</strong> Technologies<br />
45 Gilpin Avenue<br />
Hauppauge, New York 11788-8816<br />
Phone: 1-800-3-SAMSON (1-800-372-6766)<br />
Fax: 631-784-2201<br />
www.samsontech.com