Create successful ePaper yourself
Turn your PDF publications into a flip-book with our unique Google optimized e-Paper software.
GAIN<br />
CLIP<br />
5<br />
10<br />
15<br />
5<br />
10<br />
15<br />
5<br />
10<br />
15<br />
10<br />
5<br />
0<br />
5<br />
0 10<br />
0<br />
PAN<br />
L<br />
30<br />
0<br />
0<br />
0<br />
HF<br />
5 12K<br />
10<br />
15<br />
MF<br />
5 2.5K<br />
10<br />
15<br />
LF<br />
5 80Hz<br />
10<br />
15<br />
R<br />
AUX<br />
10<br />
5<br />
0<br />
10<br />
10<br />
15 15<br />
20<br />
30<br />
40<br />
MIC/LINE 1 MIC/LINE 2 MIC/LINE 3/4 MIC/LINE 5/6<br />
REC<br />
5<br />
20<br />
30<br />
40<br />
GAIN<br />
CLIP<br />
10<br />
10<br />
10<br />
10<br />
5<br />
0<br />
5<br />
5<br />
15<br />
5<br />
15<br />
5<br />
15<br />
0 10<br />
0<br />
PAN<br />
L<br />
30<br />
0<br />
0<br />
0<br />
5<br />
15<br />
5<br />
15<br />
R<br />
HF<br />
12K<br />
10<br />
MF<br />
2.5K<br />
10<br />
LF<br />
5 80Hz<br />
15<br />
10<br />
AUX<br />
10<br />
5<br />
0<br />
10<br />
10<br />
15 15<br />
20<br />
20<br />
30<br />
40<br />
REC<br />
5<br />
30<br />
40<br />
10<br />
10<br />
10<br />
10<br />
5<br />
0<br />
5<br />
5<br />
15<br />
5<br />
15<br />
5<br />
15<br />
LINE IN<br />
0 10<br />
0<br />
BAL<br />
L<br />
0<br />
0<br />
0<br />
5<br />
15<br />
5<br />
15<br />
R<br />
HF<br />
12K<br />
10<br />
MF<br />
2.5K<br />
10<br />
LF<br />
5 80Hz<br />
15<br />
10<br />
AUX<br />
10<br />
5<br />
0<br />
5<br />
10<br />
10<br />
15 15<br />
20<br />
20<br />
30<br />
40<br />
REC<br />
30<br />
40<br />
LEFT/MONO<br />
AUX RET<br />
RIGHT<br />
2T IN<br />
AUX RETURN<br />
5<br />
C/ROOM<br />
+PHONES<br />
LEFT<br />
CR OUT<br />
RIGHT<br />
2T OUT<br />
LEFT<br />
MIX OUT<br />
RIGHT<br />
LEFT RIGHT LEFT RIGHT<br />
2TK TO RETURN<br />
5<br />
0 10<br />
0 10<br />
MIX/2T<br />
5<br />
0 10<br />
HARD<br />
DISK<br />
10<br />
5<br />
0<br />
5<br />
AUX OUT<br />
MONO OUT<br />
5<br />
0 10<br />
10<br />
10<br />
10<br />
10<br />
15 15 15<br />
20<br />
20<br />
20<br />
30<br />
40<br />
48V<br />
10<br />
5<br />
0<br />
5<br />
30<br />
40<br />
PEAK<br />
+6<br />
0<br />
-6<br />
-20<br />
POWER<br />
5<br />
0<br />
5<br />
30<br />
40<br />
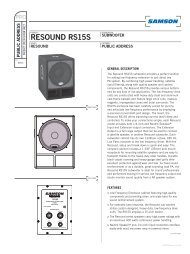
Operating the <strong>MDR6</strong><br />
BASIC OPERATION<br />
The following section explains the basic operation of the <strong>MDR6</strong>.<br />
CONNECTING MICROPHONES AND<br />
INSTRUMENTS<br />
1. Before connecting mics or instruments, make<br />
sure that the power of all your systems components<br />
including the <strong>MDR6</strong> is turned off.<br />
Also, make sure that the Left and Right MIX<br />
faders are turned all the way down.<br />
Vocal<br />
SAMSON R21<br />
Bass Guitar<br />
Direct Box<br />
Lead Guitar<br />
Signal Processor<br />
Stereo Signal<br />
ENGLISH<br />
2. Connect the cables to your microphones and<br />
instruments, and insert the other end of the<br />
cable firmly into the appropriate input on the<br />
<strong>MDR6</strong>.<br />
SIGNAL FLOW<br />
SIGNAL FLOW<br />
SIGNAL FLOW<br />
SIGNAL FLOW<br />
MASTER SECTION<br />
Keyboards<br />
NOTE: SETTING THE INPUT GAIN - When connecting<br />
a microphone to channels 1 + 2, it’s a<br />
good idea to start with the Gain Control turned<br />
all the way down. Set the input fader to the "0"<br />
position and slowly raise the GAIN control until<br />
you see the CLIP LED turn on. Now, back the<br />
GAIN control down so that the CLIP LED only<br />
lights for a short time during the loudest input<br />
the channel will see.<br />
3/L<br />
5/L<br />
5 60<br />
5 60<br />
-26 +26 -26 +26 4/R<br />
6/R<br />
MONO<br />
MODE<br />
MASTER SECTION<br />
3. Switch on the power of any peripheral devices,<br />
and then power up the <strong>MDR6</strong>.<br />
_<br />
_<br />
_<br />
_<br />
_<br />
_<br />
NOTE: It is important to remember the Golden<br />
Rule of audio … " LAST ON, FIRST OFF".<br />
Translated, this means that when turning on<br />
your system, you should always turn your power<br />
CHANNEL 1 CHANNEL 2 CHANNEL 3/4 CHANNEL 5/6 PHONES<br />
L MIX R<br />
amplifiers or powered monitors on LAST, and when turning your system off, turn your power amps off FIRST. This helps<br />
avoid any loud pops caused by inrush current at power up, which can sometimes damage loudspeakers.<br />
4. Turn on your power amp or powered monitors and raise the level control to the manufacturers’ recommended operating<br />
level.<br />
5. Set the Left and Right MIX faders in the <strong>MDR6</strong>’s master section to the "0" position.<br />
6. While speaking into the mic (or playing the instrument), adjust the channel Fader control so that the "0" LED of the<br />
MAIN section peak level meter lights occasionally.<br />
7. You can shape the tone of each channel by adjusting the equalizer controls as desired.<br />
13