EM-25/EM-15 - Roland Keyboard Club
EM-25/EM-15 - Roland Keyboard Club
EM-25/EM-15 - Roland Keyboard Club

Create successful ePaper yourself
Turn your PDF publications into a flip-book with our unique Google optimized e-Paper software.
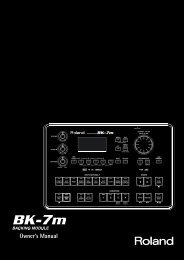
<strong>EM</strong>-<strong>25</strong>/<strong>EM</strong>-<strong>15</strong><br />
Creative <strong>Keyboard</strong><br />
English/Español/Français<br />
Thank you for choosing a <strong>Roland</strong> <strong>EM</strong>-<strong>25</strong>/<strong>EM</strong>-<strong>15</strong> Creative <strong>Keyboard</strong>,<br />
the perfect arranger instrument for countless hours of<br />
pure, unadulterated fun.<br />
To get the most out of the <strong>EM</strong>-<strong>25</strong>/<strong>EM</strong>-<strong>15</strong> and to ensure many<br />
years of trouble-free service, we urge you to read through this<br />
Owner’s Manual thoroughly.<br />
To avoid confusion, let’s agree to use the word “button” for all<br />
keys on the front panel, and only use “key” when referring to<br />
the <strong>EM</strong>-<strong>25</strong>/<strong>EM</strong>-<strong>15</strong>’s keyboard.<br />
Before using this instrument, carefully read the sections entitled<br />
“Important Safety Instructions” and “Important notes”.<br />
They provide important information concerning the proper<br />
operation of the <strong>EM</strong>-<strong>25</strong>/<strong>EM</strong>-<strong>15</strong>. Be sure to keep this manual in<br />
a safe place for future reference.<br />
Gracias por elegir el <strong>Roland</strong> <strong>EM</strong>-<strong>25</strong>/<strong>EM</strong>-<strong>15</strong> Creative <strong>Keyboard</strong>,<br />
el instrumento de acompañamiento perfecto para innumerables<br />
horas de pura diversión.<br />
Para obtener el máximo rendimiento del <strong>EM</strong>-<strong>25</strong>/<strong>EM</strong>-<strong>15</strong>, y para<br />
garantizar una utilización sin problemas durante muchos años, le<br />
aconsejamos que lea con atención todo este Manual del Usuario.<br />
Para evitar confusiones, utilizaremos la palabra “botón” para<br />
todas las teclas del panel frontal, y sólo utilizaremos la palabra<br />
“tecla” para referirnos al teclado del <strong>EM</strong>-<strong>25</strong>/<strong>EM</strong>-<strong>15</strong>.<br />
Antes de utilizar este instrumento, lea con atención las secciones<br />
tituladas “Important Safety Instructions” y “Notas Importantes”.<br />
Estas secciones ofrecen información importante referente a la<br />
correcta utilización del <strong>EM</strong>-<strong>25</strong>/<strong>EM</strong>-<strong>15</strong>. Guarde este manual en un<br />
lugar seguro y téngalo siempre a mano para posibles consultas.<br />
Merci d’avoir choisi le clavier <strong>Roland</strong> <strong>EM</strong>-<strong>25</strong>/<strong>EM</strong>-<strong>15</strong> Creative<br />
<strong>Keyboard</strong>, la référence en matière de clavier arrangeur et qui<br />
vous procurera d’innombrables heures de pur plaisir musical!<br />
Pour tirer parti des nombreuses fonctions de votre <strong>EM</strong>-<strong>25</strong>/<br />
<strong>EM</strong>-<strong>15</strong> et lui assurer de nombreuses années de bons et loyaux<br />
services, lisez entièrement le présent Manuel d’utilisation.<br />
Pour éviter toute confusion, convenons d’emblée d’utiliser le<br />
mot “bouton” pour désigner les commandes en face avant et<br />
de réserver le mot “touche” au clavier de l’<strong>EM</strong>-<strong>25</strong>/<strong>EM</strong>-<strong>15</strong>.<br />
Avant d’utiliser cet instrument, lisez attentivement les sections<br />
“Important Safety Instructions” et “Remarques importantes”.<br />
Elles contiennent des informations vitales pour l’utilisation<br />
correcte de l’<strong>EM</strong>-<strong>25</strong>/<strong>EM</strong>-<strong>15</strong>. Rangez ce manuel en lieu<br />
sûr car il vous sera utile lors de références ultérieures.<br />
Copyright © 2001 ROLAND EUROPE. All rights reserved. No part of this publication<br />
may be reproduced in any form without the written permission of <strong>Roland</strong> Europe<br />
s.p.a.<br />
Copyright © 2001 ROLAND EUROPE. Todos los derechos reservados. Ninguna parte de<br />
esta publicación puede ser reproducida en forma alguna sin el premiso por escrito de<br />
<strong>Roland</strong> Europe s.p.a.<br />
Copyright © 2001 ROLAND EUROPE. Tous droits réservés. Toute reproduction intégrale<br />
ou partielle de ce manuel est interdite sans l’autorisation de <strong>Roland</strong> Europe s.p.a.
<strong>EM</strong>-<strong>25</strong>/<strong>EM</strong>-<strong>15</strong><br />
Features<br />
Style Morphing and Orchestrator functions<br />
Style Morphing allows you to “create” new Music Styles<br />
(accompaniments) on the fly by replacing selected<br />
accompaniment parts of one Style with the parts from<br />
another Style.<br />
The Orchestrator function, on the other hand, allows you<br />
to simplify, add, or leave out accompaniment parts of the<br />
selected Music Style. This intuitive way of controlling the<br />
arrangements of your accompaniments is a wonderful<br />
assistant for creating just the right atmosphere for the<br />
music you play.<br />
Graphic display<br />
Your <strong>EM</strong>-<strong>25</strong>/<strong>EM</strong>-<strong>15</strong> is equipped with a backlit display that<br />
keeps you posted about the current status of your instrument.<br />
Most functions are represented by means of<br />
straightforward icons that provide massive at-a-glance<br />
information without confusing you.<br />
8 User Programs<br />
User Programs are memories where you can save your<br />
own panel settings. These include the currently selected<br />
Style, Tone (sound), tempo, as well as a lot of other<br />
parameters. At the press of a maximum of two buttons,<br />
you can thus completely reconfigure your instrument.<br />
226 Tones and 9 Drum Sets<br />
The <strong>EM</strong>-<strong>25</strong>/<strong>EM</strong>-<strong>15</strong> comes with 226 excellent instrument<br />
sounds taken from <strong>Roland</strong>’s acclaimed sound library. In<br />
most instances, there will be several Tones to choose from<br />
for the song you are about to play.<br />
The <strong>EM</strong>-<strong>25</strong>/<strong>EM</strong>-<strong>15</strong>’s sound source conforms to General<br />
MIDI System Level 1 (GM for short) as well as <strong>Roland</strong>’s GS<br />
Format.<br />
Funciones<br />
Funciones Style Morphing y Orchestrator<br />
Style Morphing le permite “crear” nuevos Estilos Musicales<br />
(acompañamientos) de manera improvisada mediante<br />
la sustitución de partes de acompañamiento seleccionadas<br />
de un Estilo con las partes de otro Estilo.<br />
La función Orchestrator, por otra parte, le permite simplificar,<br />
añadir, o no incluir partes de acompañamiento del<br />
Estilo Musical seleccionado. Esta forma intuitiva de controlar<br />
los arreglos de sus acompañamientos es un asistente<br />
maravilloso para crear la atmósfera adecuada para<br />
la música que interprete.<br />
Pantalla gráfica<br />
El <strong>EM</strong>-<strong>25</strong>/<strong>EM</strong>-<strong>15</strong> está equipado con una pantalla retroiluminada<br />
que le proporciona información sobre el estado<br />
actual del instrumento. La mayoría de funciones se representan<br />
mediante iconos directos que le ofrecen información<br />
clara y directa para evitar confusiones.<br />
8 Programas de Usuario<br />
Los Programas de Usuario son memorias donde puede<br />
guardar sus propios ajustes del panel. Éstos incluyen el<br />
Estilo, Tone (sonido), tempo, así como muchos otros parámetros<br />
seleccionados actualmente. Pulsando un máximo<br />
de dos botones, puede reconfigurar por completo el instrumento.<br />
226 Tones y 9 Grupos de percusión<br />
El <strong>EM</strong>-<strong>25</strong>/<strong>EM</strong>-<strong>15</strong> incluye 226 excelentes sonidos de instrumentos<br />
tomados de la popular biblioteca de sonidos<br />
de <strong>Roland</strong>. En la mayoría de casos, podrá seleccionar diferentes<br />
Tones para la canción que desee interpretar.<br />
Además, la fuente de sonido del <strong>EM</strong>-<strong>25</strong>/<strong>EM</strong>-<strong>15</strong> se adapta<br />
al Nivel 1 del Sistema General MIDI (abreviado como GM)<br />
y al formato <strong>Roland</strong> GS.<br />
Caractéristiques<br />
Fonctions Style Morphing et Orchestrator<br />
Style Morphing est une fonction qui vous permet de<br />
“créer” de nouveaux styles musicaux (accompagnements)<br />
sur le vif en remplaçant les parties choisies d’un style par<br />
celles d’un autre style.<br />
La fonction Orchestrator permet elle de simplifier, d’ajouter<br />
ou de retirer des parties d’accompagnement dans le<br />
style musical (“Music Style”) choisi. Ce pilotage très simple<br />
des arrangements de vos accompagnements est un<br />
allié en or qui vous permettra de toujours planter le décor<br />
musical parfait pour vos morceaux.<br />
Ecran graphique<br />
Votre <strong>EM</strong>-<strong>25</strong>/<strong>EM</strong>-<strong>15</strong> est muni d’un écran rétroéclairé qui<br />
affiche en permanence le statut de l’instrument. La plupart<br />
des fonctions sont représentées à l’aide d’icônes<br />
“parlantes” qui permettent de vérifier une foule de paramètres<br />
d’un coup d’œil et sans y perdre son latin.<br />
8 programmes utilisateur<br />
Les programmes utilisateur (User) désignent des<br />
mémoires destinées à recueillir vos propres réglages. Ces<br />
programmes comprennent ainsi le style en vigueur, le son<br />
(“Tone”), le tempo ainsi qu’une foule d’autres paramètres.<br />
Il vous suffit ainsi d’enfoncer deux boutons pour reconfigurer<br />
entièrement l’instrument.<br />
226 sons et 9 Drum Sets<br />
L’<strong>EM</strong>-<strong>25</strong>/<strong>EM</strong>-<strong>15</strong> est fourni avec 226 sons (ou “Tones”)<br />
super-léchés et issus de la célébrissime bibliothèque de<br />
sons <strong>Roland</strong>. Pour chacun de vos morceaux, vous aurez<br />
donc toujours plusieurs Tones dans votre manche.<br />
Le générateur de sons de l’<strong>EM</strong>-<strong>25</strong>/<strong>EM</strong>-<strong>15</strong> est compatible<br />
avec la norme General MIDI System Level 1 (aussi<br />
désignée par l’abréviation GM) ainsi qu’avec le format GS<br />
de <strong>Roland</strong>.<br />
2
<strong>EM</strong>-<strong>25</strong>/<strong>EM</strong>-<strong>15</strong><br />
64 Music Styles<br />
The <strong>EM</strong>-<strong>25</strong>/<strong>EM</strong>-<strong>15</strong> contains 64 Music Styles that will supply<br />
a perfect accompaniment for your solo playing. Each<br />
Music Style includes several “Divisions” that allow you to<br />
vary the accompaniment. Coupled with the Style Morphing<br />
and Orchestrator functions, the total number of<br />
accompaniment patterns adds up to far more than 64.<br />
Four modes<br />
For enhanced operation, the <strong>EM</strong>-<strong>25</strong>/<strong>EM</strong>-<strong>15</strong> provides an<br />
M. Drums, Organ, Arranger, and a Piano mode. Pressing<br />
one of these button will immediately reconfigure your<br />
Creative <strong>Keyboard</strong>.<br />
64 Estilos Musicales<br />
El <strong>EM</strong>-<strong>25</strong>/<strong>EM</strong>-<strong>15</strong> incluye un total de 64 Estilos Musicales<br />
que le proporcionarán un acompañamiento perfecto para<br />
sus interpretaciones en solo. Cada Estilo Musical incluye<br />
varias “Divisiones” que le permiten variar el acompañamiento.<br />
Junto con las funciones Style Morphing y Orchestrator,<br />
el número total de patrones de acompañamiento<br />
sobrepasa los 64.<br />
Cuatro modos<br />
Para unas mayores posibilidades de interpretación, el<br />
<strong>EM</strong>-<strong>25</strong>/<strong>EM</strong>-<strong>15</strong> le proporciona un modo M. Drums, Organ,<br />
Arranger, y un modo Piano. El Creative <strong>Keyboard</strong> se<br />
reconfigurará si pulsa uno de estos botones.<br />
64 styles musicaux<br />
L’<strong>EM</strong>-<strong>25</strong>/<strong>EM</strong>-<strong>15</strong> vous propose 64 styles musicaux (alias<br />
“Music Styles”) qui vous fourniront de superbes accompagnements<br />
pour toutes vos parties solo. Chaque style<br />
musical comprend plusieurs “divisions” qui permettent de<br />
varier l’accompagnement. Si on y ajoute les fonctions<br />
Style Morphing et Orchestrator, le nombre total de motifs<br />
d’accompagnement s’élève bien au-delà de 64.<br />
Quatre modes<br />
L’<strong>EM</strong>-<strong>25</strong>/<strong>EM</strong>-<strong>15</strong> propose un mode M. Drums, Organ,<br />
Arranger et Piano assurant une grande polyvalence. Il<br />
suffit d’appuyer sur un de ces boutons pour reconfigurer<br />
instantanément votre Creative <strong>Keyboard</strong>.<br />
3
<strong>EM</strong>-<strong>25</strong>/<strong>EM</strong>-<strong>15</strong><br />
Contents<br />
Features . . . . . . . . . . . . . . . . . . . . . . . . . . . . . . . . . . . . . . . .2<br />
1. Important notes . . . . . . . . . . . . . . . . . . . . . . . . . . . . . . .5<br />
2. Panel descriptions . . . . . . . . . . . . . . . . . . . . . . . . . . . . . .8<br />
3. Setting up . . . . . . . . . . . . . . . . . . . . . . . . . . . . . . . . . . .13<br />
4. Demo songs . . . . . . . . . . . . . . . . . . . . . . . . . . . . . . . . . .13<br />
5. Game function . . . . . . . . . . . . . . . . . . . . . . . . . . . . . . .<strong>15</strong><br />
6. Playing with accompaniment . . . . . . . . . . . . . . . . . . .21<br />
7. Splitting the keyboard (Organ) . . . . . . . . . . . . . . . . . .<strong>25</strong><br />
8. Playing one sound (Piano) . . . . . . . . . . . . . . . . . . . . . .26<br />
9. Drumming on the keyboard. . . . . . . . . . . . . . . . . . . . .27<br />
10. Recording your music. . . . . . . . . . . . . . . . . . . . . . . . .28<br />
11. Additional Music Style functions . . . . . . . . . . . . . . .32<br />
One Touch . . . . . . . . . . . . . . . . . . . . . . . . . . . . . . . . . . . . . . . . 32<br />
Melody Intelligence (INT) . . . . . . . . . . . . . . . . . . . . . . . . . . . 33<br />
Orchestrator . . . . . . . . . . . . . . . . . . . . . . . . . . . . . . . . . . . . . . 34<br />
Style Morphing. . . . . . . . . . . . . . . . . . . . . . . . . . . . . . . . . . . . 35<br />
Working with Styles on floppy disk (<strong>EM</strong>-<strong>25</strong>). . . . . . . . . . . 37<br />
12. More <strong>Keyboard</strong> part functions . . . . . . . . . . . . . . . . .40<br />
Using two Upper parts (Layer) . . . . . . . . . . . . . . . . . . . . . . . 40<br />
Selecting Tone Variations . . . . . . . . . . . . . . . . . . . . . . . . . . . 41<br />
Balance . . . . . . . . . . . . . . . . . . . . . . . . . . . . . . . . . . . . . . . . . . 42<br />
Transpose. . . . . . . . . . . . . . . . . . . . . . . . . . . . . . . . . . . . . . . . . 43<br />
13. Recorder functions . . . . . . . . . . . . . . . . . . . . . . . . . . .45<br />
Playback functions. . . . . . . . . . . . . . . . . . . . . . . . . . . . . . . . . 45<br />
Playing back Standard MIDI Files (<strong>EM</strong>-<strong>25</strong>). . . . . . . . . . . . . 47<br />
Other recording modes . . . . . . . . . . . . . . . . . . . . . . . . . . . . . 49<br />
14. Function menu . . . . . . . . . . . . . . . . . . . . . . . . . . . . . .56<br />
Editing parameters (general procedure). . . . . . . . . . . . . . . 56<br />
General Function parameters. . . . . . . . . . . . . . . . . . . . . . . . 57<br />
<strong>15</strong>. Working with User Programs. . . . . . . . . . . . . . . . . . .64<br />
16. MIDI functions . . . . . . . . . . . . . . . . . . . . . . . . . . . . . .68<br />
17. Using the outputs and an optional pedal . . . . . . . .73<br />
18. Disk functions (<strong>EM</strong>-<strong>25</strong>) . . . . . . . . . . . . . . . . . . . . . . .75<br />
19. Miscellaneous . . . . . . . . . . . . . . . . . . . . . . . . . . . . . . .84<br />
Specifications. . . . . . . . . . . . . . . . . . . . . . . . . . . . . . . .86<br />
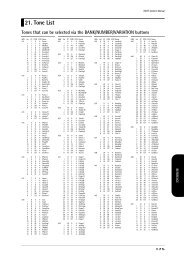
Tone List . . . . . . . . . . . . . . . . . . . . . . . . . . . . . . . . . . . .87<br />
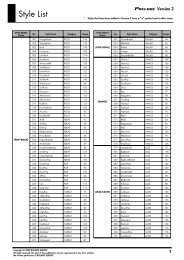
Music Style list. . . . . . . . . . . . . . . . . . . . . . . . . . . . . . .90<br />
Drum Sets. . . . . . . . . . . . . . . . . . . . . . . . . . . . . . . . . . .91<br />
4<br />
Contenido<br />
Funciones . . . . . . . . . . . . . . . . . . . . . . . . . . . . . . . . . . . . . . 2<br />
1. Notas Importantes . . . . . . . . . . . . . . . . . . . . . . . . . . . . . 5<br />
2. Descripciones del panel. . . . . . . . . . . . . . . . . . . . . . . . . 8<br />
3. Instalar . . . . . . . . . . . . . . . . . . . . . . . . . . . . . . . . . . . . . 13<br />
4. Canciones de demostración . . . . . . . . . . . . . . . . . . . . . . . . . . . 13<br />
5. Función Game . . . . . . . . . . . . . . . . . . . . . . . . . . . . . . . <strong>15</strong><br />
6. Tocar con acompañamiento . . . . . . . . . . . . . . . . . . . . 21<br />
7. Dividir el teclado (Organ) . . . . . . . . . . . . . . . . . . . . . . <strong>25</strong><br />
8. Tocar un sonido (Piano). . . . . . . . . . . . . . . . . . . . . . . . 26<br />
9. Tocar percusión en el teclado. . . . . . . . . . . . . . . . . . . 27<br />
10. Grabar música . . . . . . . . . . . . . . . . . . . . . . . . . . . . . . 28<br />
11. Funciones adicionales del Estilo Musical . . . . . . . . . 32<br />
One Touch . . . . . . . . . . . . . . . . . . . . . . . . . . . . . . . . . . . . . . . .32<br />
Melody Intelligence (INT). . . . . . . . . . . . . . . . . . . . . . . . . . . .33<br />
Orchestrator. . . . . . . . . . . . . . . . . . . . . . . . . . . . . . . . . . . . . . .34<br />
Style Morphing . . . . . . . . . . . . . . . . . . . . . . . . . . . . . . . . . . . .35<br />
Trabajar con Estilos en disquetes (<strong>EM</strong>-<strong>25</strong>) . . . . . . . . . . . . .37<br />
12. Más funciones de la parte del teclado . . . . . . . . . . 40<br />
Utilizar dos partes Upper (Layer) . . . . . . . . . . . . . . . . . . . . .40<br />
Seleccionar Variaciones de Tone. . . . . . . . . . . . . . . . . . . . . .41<br />
Balance . . . . . . . . . . . . . . . . . . . . . . . . . . . . . . . . . . . . . . . . . . .42<br />
Transpose . . . . . . . . . . . . . . . . . . . . . . . . . . . . . . . . . . . . . . . . .43<br />
13. Funciones del grabador. . . . . . . . . . . . . . . . . . . . . . . 45<br />
Funciones de reproducción . . . . . . . . . . . . . . . . . . . . . . . . . .45<br />
Reproducir Archivos MIDI Estándar (<strong>EM</strong>-<strong>25</strong>) . . . . . . . . . . .47<br />
Otros modos de grabación. . . . . . . . . . . . . . . . . . . . . . . . . . .49<br />
14. Menú Function. . . . . . . . . . . . . . . . . . . . . . . . . . . . . . 56<br />
Editar parámetros (procedimiento general) . . . . . . . . . . . .56<br />
Parámetros Function generales . . . . . . . . . . . . . . . . . . . . . .57<br />
<strong>15</strong>. Trabajar con Programas de Usuario . . . . . . . . . . . . . 64<br />
16. Funciones MIDI . . . . . . . . . . . . . . . . . . . . . . . . . . . . . 68<br />
17. Utilizar las salidas y un pedal opcional . . . . . . . . . . 73<br />
18. Funciones de disco (<strong>EM</strong>-<strong>25</strong>) . . . . . . . . . . . . . . . . . . . 75<br />
19. Miscelánea . . . . . . . . . . . . . . . . . . . . . . . . . . . . . . . . . 84<br />
Especificaciones . . . . . . . . . . . . . . . . . . . . . . . . . . . . . 86<br />
Lista de Tones . . . . . . . . . . . . . . . . . . . . . . . . . . . . . . . 87<br />
Lista de Estilos Musicales. . . . . . . . . . . . . . . . . . . . . . 90<br />
Grupos de percusión . . . . . . . . . . . . . . . . . . . . . . . . . 91<br />
Sommaire<br />
Caractéristiques . . . . . . . . . . . . . . . . . . . . . . . . . . . . . . . . . 2<br />
1. Remarques importantes . . . . . . . . . . . . . . . . . . . . . . . . 5<br />
2. Description des panneaux. . . . . . . . . . . . . . . . . . . . . . . 8<br />
3. Branchements . . . . . . . . . . . . . . . . . . . . . . . . . . . . . . . 13<br />
4. Morceaux de démo . . . . . . . . . . . . . . . . . . . . . . . . . . . 13<br />
5. Jeux musicaux . . . . . . . . . . . . . . . . . . . . . . . . . . . . . . . <strong>15</strong><br />
6. Jeu avec accompagnement . . . . . . . . . . . . . . . . . . . . 21<br />
7. Partage de clavier (Organ) . . . . . . . . . . . . . . . . . . . . . <strong>25</strong><br />
8. Jeu avec un son (Piano) . . . . . . . . . . . . . . . . . . . . . . . 26<br />
9. Jouer de la batterie sur le clavier. . . . . . . . . . . . . . . . 27<br />
10. Enregistrer votre jeu . . . . . . . . . . . . . . . . . . . . . . . . . 28<br />
11. Fonctions Music Style supplémentaires. . . . . . . . . . 32<br />
One Touch . . . . . . . . . . . . . . . . . . . . . . . . . . . . . . . . . . . . . . . .32<br />
Melody Intelligence (INT). . . . . . . . . . . . . . . . . . . . . . . . . . . .33<br />
Orchestrator. . . . . . . . . . . . . . . . . . . . . . . . . . . . . . . . . . . . . . .34<br />
Style Morphing . . . . . . . . . . . . . . . . . . . . . . . . . . . . . . . . . . . .35<br />
Travail avec des styles sur disquette (<strong>EM</strong>-<strong>25</strong>) . . . . . . . . . .37<br />
12. Autres fonctions de parties <strong>Keyboard</strong> . . . . . . . . . . . 40<br />
Utiliser deux parties Upper (Layer). . . . . . . . . . . . . . . . . . . .40<br />
Choix de variations de sons . . . . . . . . . . . . . . . . . . . . . . . . .41<br />
Balance . . . . . . . . . . . . . . . . . . . . . . . . . . . . . . . . . . . . . . . . . . .42<br />
Transpose . . . . . . . . . . . . . . . . . . . . . . . . . . . . . . . . . . . . . . . . .43<br />
13. Fonctions Recorder . . . . . . . . . . . . . . . . . . . . . . . . . . 45<br />
Fonctions de reproduction . . . . . . . . . . . . . . . . . . . . . . . . . .45<br />
Jeu de fichiers Standard MIDI (<strong>EM</strong>-<strong>25</strong>) . . . . . . . . . . . . . . . .47<br />
Autres modes d’enregistrement . . . . . . . . . . . . . . . . . . . . . .49<br />
14. Menu Function . . . . . . . . . . . . . . . . . . . . . . . . . . . . . 56<br />
Edition de paramètres (procédure générale) . . . . . . . . . . .56<br />
Paramètres Function généraux. . . . . . . . . . . . . . . . . . . . . . .57<br />
<strong>15</strong>. Tirer parti des programmes utilisateur . . . . . . . . . . 64<br />
16. Fonctions MIDI. . . . . . . . . . . . . . . . . . . . . . . . . . . . . . 68<br />
17. Utilisation des sorties et d’une pédale en option. . 73<br />
18. Fonctions Disk (<strong>EM</strong>-<strong>25</strong>). . . . . . . . . . . . . . . . . . . . . . . 75<br />
19. Divers . . . . . . . . . . . . . . . . . . . . . . . . . . . . . . . . . . . . . 84<br />
Fiche technique . . . . . . . . . . . . . . . . . . . . . . . . . . . . . 86<br />
Liste de sons . . . . . . . . . . . . . . . . . . . . . . . . . . . . . . . . 87<br />
Liste des styles musicaux. . . . . . . . . . . . . . . . . . . . . . 90<br />
Kits de batterie (Drum Sets) . . . . . . . . . . . . . . . . . . . 91
<strong>EM</strong>-<strong>25</strong>/<strong>EM</strong>-<strong>15</strong><br />
1. Important notes<br />
In addition to the items listed under “Important Safety<br />
Instructions”, please read and observe the following:<br />
Power supply<br />
• Do not use this instrument on the same power circuit with any<br />
device that will generate line noise (such as an electric motor or<br />
variable lighting system).<br />
• Be sure to only use the supplied adapter (<strong>Roland</strong> ACN for the <strong>EM</strong>-<strong>15</strong>,<br />
ACO for the <strong>EM</strong>-<strong>25</strong>). The use of other adapters may damaged your<br />
<strong>EM</strong>-<strong>25</strong>/<strong>EM</strong>-<strong>15</strong>.<br />
• Before connecting the <strong>EM</strong>-<strong>25</strong>/<strong>EM</strong>-<strong>15</strong> to other devices, turn off the<br />
power to all units. This will help prevent malfunctions and/or damage<br />
to speakers or other devices.<br />
Placement<br />
• Using the <strong>EM</strong>-<strong>25</strong>/<strong>EM</strong>-<strong>15</strong> near power amplifiers (or other equipment<br />
containing large power transformers) may induce hum. To alleviate<br />
the problem, change the orientation of this instrument or move it<br />
farther away from the source of interference.<br />
• This instrument may interfere with radio and television reception.<br />
Do not use it in the vicinity of such receivers.<br />
• Do not expose the <strong>EM</strong>-<strong>25</strong>/<strong>EM</strong>-<strong>15</strong> to direct sunlight, place it near<br />
devices that radiate heat, leave it inside an enclosed vehicle, or otherwise<br />
subject it to temperature extremes. Excessive heat can<br />
deform or discolor the instrument.<br />
Maintenance<br />
• For everyday cleaning wipe the <strong>EM</strong>-<strong>25</strong>/<strong>EM</strong>-<strong>15</strong> with a soft, dry cloth<br />
or one that has been slightly dampened with water. To remove stubborn<br />
dirt, use a mild, non-abrasive detergent. Afterwards, be sure to<br />
wipe the instrument thoroughly with a soft, dry cloth.<br />
• Never use benzene, thinner, alcohol or solvents of any kind, to avoid<br />
the possibility of discoloration and/or deformation.<br />
Repairs and data<br />
• Please be aware that all data contained in the instrument’s memory<br />
may be lost when it is sent for repairs. In certain cases (such as when<br />
circuitry related to memory itself is out of order), we regret that it<br />
may not be possible to restore the data. <strong>Roland</strong> assumes no liability<br />
concerning such loss of data.<br />
1. Notas Importantes<br />
Además de los artículos indicados en la sección “Important<br />
Safety Instructions”, por favor, lea y tenga en cuenta lo<br />
siguiente:<br />
Alimentación<br />
• No utilice este instrumento en la misma derivación de circuito que<br />
otro dispositivo que pueda generar interferencias en la línea (como<br />
un motor eléctrico o un sistema de iluminación variable).<br />
• Utilice solamente el adaptador que se entrega con el equipo (<strong>Roland</strong><br />
ACN para el <strong>EM</strong>-<strong>15</strong>, ACO para el <strong>EM</strong>-<strong>25</strong>). El uso de otros adaptadores<br />
podría dañar su <strong>EM</strong>-<strong>25</strong>/<strong>EM</strong>-<strong>15</strong>.<br />
• Antes de conectar el <strong>EM</strong>-<strong>25</strong>/<strong>EM</strong>-<strong>15</strong> con otros dispositivos, desactive<br />
todas las unidades. Esto evitará un mal funcionamiento y/o daños a<br />
los altavoces u otros aparatos.<br />
Ubicación<br />
• Al utilizar el <strong>EM</strong>-<strong>25</strong>/<strong>EM</strong>-<strong>15</strong> cerca de amplificadores de corriente (u<br />
otros equipos que contengan transformadores de corriente de gran<br />
potencia) pueden producirse zumbidos. Para solucionar el problema,<br />
cambie la orientación del instrumento o aléjelo de la fuente de<br />
interferencias.<br />
• Este instrumento puede interferir con la recepción de radio y televisión.<br />
No lo utilice cerca de este tipo de receptores.<br />
• No exponga el <strong>EM</strong>-<strong>25</strong>/<strong>EM</strong>-<strong>15</strong> a la luz solar directa, no lo coloque<br />
cerca de dispositivos que generen calor, no lo deje dentro de vehículos<br />
cerrados ni lo exponga a temperaturas extremas. Un calor excesivo<br />
puede deformar o decolorar el instrumento.<br />
Mantenimiento<br />
• Para una limpieza diaria, frote el <strong>EM</strong>-<strong>25</strong>/<strong>EM</strong>-<strong>15</strong> con un paño suave y<br />
seco o ligeramente humedecido con agua. Para eliminar la suciedad<br />
adherida, utilice un paño impregnado con un detergente suave no<br />
abrasivo. Seguidamente seque el instrumento con un paño suave y<br />
seco.<br />
• No utilice nunca gasolina, disolvente, alcohol o solventes de cualquier<br />
tipo. Podría decolorar y/o deformar el equipo.<br />
Reparaciones y datos<br />
• Tenga en cuenta que todos los datos contenidos en la memoria del<br />
instrumento se pueden perder durante una reparación. En algunos<br />
casos (como cuando la circuitería relacionada con la propia memoria<br />
no funciona), no será posible recuperar los datos. <strong>Roland</strong> no asume<br />
ninguna responsabilidad en relación con la pérdida de datos.<br />
1. Remarques importantes<br />
Outre les informations de la section “Important Safety<br />
Instructions”, veuillez lire et suivre les conseils suivants:<br />
Alimentation<br />
• Ne vous servez pas de cet instrument sur le même circuit qu’un<br />
appareil générateur de parasites (tel qu'un moteur électrique ou un<br />
système variateur de lumière).<br />
• Veillez à utiliser uniquement l’adaptateur secteur fourni (<strong>Roland</strong><br />
ACN pour l’<strong>EM</strong>-<strong>15</strong>, ACO pour l’<strong>EM</strong>-<strong>25</strong>). L’utilisation de tout autre<br />
adaptateur pourrait endommager votre <strong>EM</strong>-<strong>25</strong>/<strong>EM</strong>-<strong>15</strong>.<br />
• Avant de brancher l’<strong>EM</strong>-<strong>25</strong>/<strong>EM</strong>-<strong>15</strong> à d’autres appareils, mettez tous<br />
les appareils hors tension. Le non-respect de cette précaution pourrait<br />
entraîner des dysfonctionnements et/ou l’endommagement de<br />
vos enceintes ou d’autres appareils.<br />
Emplacement<br />
• L’usage de l’<strong>EM</strong>-<strong>25</strong>/<strong>EM</strong>-<strong>15</strong> à proximité d’amplificateurs (ou de tout<br />
autre matériel contenant de grands transformateurs électriques)<br />
peut être source de bruit. Pour résoudre le problème, changez<br />
l’orientation de l’instrument ou éloignez-le de la source d’interférence.<br />
• Cet instrument peut causer des interférences lors de la réception<br />
radio ou télévisée. Ne vous en servez pas à proximité de tels<br />
récepteurs.<br />
• N'exposez pas l’<strong>EM</strong>-<strong>25</strong>/<strong>EM</strong>-<strong>15</strong> directement au soleil, ne le laissez pas<br />
près d'appareils irradiant de la chaleur, dans un véhicule fermé ou<br />
dans un endroit le soumettant à des températures extrêmes. Une<br />
chaleur excessive peut déformer ou décolorer l’instrument.<br />
Entretien<br />
• Pour nettoyer l’<strong>EM</strong>-<strong>25</strong>/<strong>EM</strong>-<strong>15</strong>, utilisez un chiffon sec et doux ou à la<br />
rigueur légèrement humidifié avec de l’eau. Pour enlever des saletés<br />
plus tenaces, servez-vous d’un détergent doux. Ensuite, essuyez soigneusement<br />
l’instrument avec un chiffon doux et sec.<br />
• N’utilisez jamais d’essence, de diluant, de solvant ou d’alcool<br />
d’aucune sorte pour éviter le risque de décoloration et/ou de déformation.<br />
5
<strong>EM</strong>-<strong>25</strong>/<strong>EM</strong>-<strong>15</strong><br />
Additional precautions<br />
• Please be aware that the memory contents can be irretrievably lost<br />
as a result of a malfunction, or the improper operation of the instrument.<br />
• Use a reasonable amount of care when using the instrument’s buttons,<br />
other controls, and jacks/connectors. Rough handling can lead<br />
to malfunctions.<br />
• Never strike or apply strong pressure to the display.<br />
• When connecting/disconnecting cables, grasp the connector itself—<br />
never pull on the cable. This way you will avoid causing shorts, or<br />
damage to the cable’s internal elements.<br />
• A small amount of heat will radiate from the instrument during normal<br />
operation. This is perfectly normal.<br />
• To avoid disturbing your neighbors, try to keep the instrument’s volume<br />
at reasonable levels. You may prefer to use headphones, so you<br />
do not need to be concerned about those around you (especially late<br />
at night).<br />
• When you need to transport the instrument, package it in the box<br />
(including padding) that it came in. Otherwise, you will need to use<br />
equivalent packaging materials, or a flightcase.<br />
Handling floppy disks (only for the <strong>EM</strong>-<strong>25</strong>)<br />
• Floppy disks contain a plastic disk with a thin magnetic coating.<br />
Microscopic precision is required to enable storage of large amounts<br />
of data on such a small surface area. To preserve their integrity,<br />
please observe the following when handling floppy disks:<br />
• Never touch the magnetic medium inside the disk.<br />
• Do not use or store floppy disks in dirty or dusty areas.<br />
• Do not subject floppy disks to temperature extremes (e.g., direct<br />
sunlight in an enclosed vehicle). Recommended temperature range:<br />
10° to 50°C (50 to 122°F).<br />
• Do not expose floppy disks to strong magnetic fields, such as those<br />
generated by loudspeakers.<br />
Precauciones Adicionales<br />
• Tenga en cuenta que el contenido de la memoria se puede perder<br />
irremediablemente como resultado de un mal funcionamiento, o<br />
una utilización incorrecta del instrumento.<br />
• Tenga mucho cuidado cuando utilice los botones del instrumento, y<br />
el resto de controles y conectores/jacks. Una mala utilización puede<br />
acabar en un mal funcionamiento.<br />
• No golpee ni aplique una presión excesiva sobre la pantalla.<br />
• Cuando conecte/desconecte todos los cables, sujete el conector—no<br />
tire nunca del cable. De esta manera evitará los cortocircuitos o<br />
daños en los elementos internos de los cables.<br />
• El instrumento irradiará una pequeña cantidad de calor cuando esté<br />
funcionando. Esto es perfectamente normal.<br />
• Para evitar molestar a los vecinos, intente mantener el nivel de volumen<br />
a unos niveles razonables. Quizá prefiera utilizar auriculares,<br />
con lo cual no deberá preocuparse por las personas a su alrededor<br />
(especialmente a altas horas de la noche).<br />
• Cuando necesite transportar el instrumento, póngalo dentro de la<br />
caja original (con los elementos de protección incluidos). De no ser<br />
así, necesitará materiales de embalaje equivalentes, o una maleta<br />
especial de transporte aéreo.<br />
Manejar los disquetes (sólo para el <strong>EM</strong>-<strong>25</strong>)<br />
• Los disquetes contienen un disco de plástico con un fino recubrimiento<br />
magnético. Es necesaria una precisión microscópica para<br />
permitir el almacenamiento de grandes cantidades de información<br />
en una área tan pequeña. Para preservar su integridad, tenga en<br />
cuenta lo siguiente al manipular los disquetes:<br />
• No toque nunca el soporte magnético del interior del disco.<br />
• No utilice ni guarde disquetes en lugares con mucha suciedad o<br />
polvo.<br />
• No exponga los disquetes a temperaturas extremas (p.ej., la luz<br />
directa del sol dentro de un vehículo cerrado). La gama de temperaturas<br />
permitidas es de: 10° a 50°C (50 a 122°F).<br />
• No exponga los disquetes a campos magnéticos muy potentes, como<br />
los generados por altavoces.<br />
Réparations et données<br />
• N’oubliez pas que toutes les données contenues dans l’instrument<br />
seront perdues s’il doit subir une réparation. Dans certains cas<br />
(notamment lorsque les circuits touchant à la mémoire elle-même<br />
sont endommagés), il peut s’avérer impossible de récupérer des données.<br />
<strong>Roland</strong> n’endosse aucune responsabilité concernant la perte de<br />
ces données.<br />
Précautions supplémentaires<br />
• N’oubliez jamais que le contenu de la mémoire peut être irrémédiablement<br />
perdu suite à un mauvais fonctionnement ou un mauvais<br />
maniement de l’instrument.<br />
• Maniez les boutons, les autres commandes et les jacks et prises avec<br />
un minimum d’attention. Un maniement trop brutal peut les<br />
endommager et entraîner des dysfonctionnements.<br />
• Evitez les coups ou les pressions trop fortes sur l’écran.<br />
• Lorsque vous branchez/débranchez des câbles, prenez la fiche en<br />
main — jamais le câble. Vous éviterez ainsi d’endommager le câble<br />
ou de provoquer des court-circuits.<br />
• L’instrument dégage une faible quantité de chaleur durant son<br />
fonctionnement. C’est normal.<br />
• Pour ne pas déranger vos voisins, maintenez le volume à un niveau<br />
raisonnable. Il peut parfois être préférable d’utiliser le casque (surtout<br />
quand vous jouez la nuit).<br />
• Si vous souhaitez transporter l’instrument, emballez-le dans la boîte<br />
(et les protections de polystyrène) d’origine ou servez-vous d’un boîtier<br />
de protection dur ou souple.<br />
Maniement des disquettes (uniquement pour l’<strong>EM</strong>-<strong>25</strong>)<br />
• Les disquettes sont constituées d’un disque plastic recouvert d’une<br />
fine couche magnétique. Une précision microscopique est nécessaire<br />
pour pouvoir sauvegarder de larges quantités de données sur une<br />
surface si petite. Pour les garder en bon état, veuillez suivre les conseils<br />
suivants:<br />
• Ne touchez jamais le support magnétique de la disquette.<br />
• Evitez d’utiliser ou de stocker vos disquettes dans des endroits sales<br />
ou poussiéreux.<br />
• Ne soumettez jamais vos disquettes à des températures extrêmes<br />
(dans un véhicule fermé en plein soleil, par exemple). Plage de températures<br />
recommandée: 10 à 50°C.<br />
• N’exposez pas vos disquettes à des champs magnétiques puissants<br />
tels que ceux générés par des hauts-parleurs.<br />
6
<strong>EM</strong>-<strong>25</strong>/<strong>EM</strong>-<strong>15</strong><br />
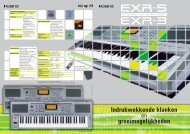
• Floppy disks have a “WRITE” tab which can protect the disk from<br />
accidental erasure. It is recommended that the tab be kept in the<br />
PROTECT position, and moved to the WRITE position only when you<br />
wish to write new data onto the disk.<br />
Rear side of the disk<br />
WRITE<br />
(you can save new data to disk)<br />
• Los disquetes disponen de un pestillo de “protección contra escritura”<br />
que permite proteger el disco contra un borrado accidental. Se<br />
recomienda que este pestillo esté en la posición PROTECT (de PRO-<br />
TECCIÓN), y en la posición WRITE (ESCRITURA) sólo para escribir<br />
información nueva en el disquete.<br />
Parte posterior del disco<br />
WRITE<br />
(permite guardar datos<br />
nuevos en el disco)<br />
• Les disquettes sont pourvues d’un volet de protection “WRITE” contre<br />
tout effacement accidentel. Nous vous conseillons de laisser ce<br />
volet en position PROTECT et de ne le placer en position WRITE que<br />
lorsque vous souhaitez enregistrer de nouvelles données sur la disquette.<br />
Face arrière de la disquette<br />
WRITE<br />
(sauvegarde impossible)<br />
Write protect tab<br />
PROTECT<br />
(prevents writing to disk)<br />
• Disks containing important performance data for this instrument<br />
should always be locked (have their write protect tab slid to the<br />
PROTECT position) before you insert them into the drive of another<br />
instrument.<br />
• The identification label should be firmly affixed to the disk. If the<br />
label comes loose while the disk is in the drive, it may be difficult to<br />
remove the disk.<br />
• Put the disk back into its case for storage.<br />
Pestillo de protección<br />
de escritura<br />
PROTECT<br />
(protege contra la<br />
escritura en el disco)<br />
• Los discos con información importante para el instrumento deben<br />
estar siempre bloqueados (en posición PROTECT) antes de insertarlos<br />
en la disquetera de otro instrumento.<br />
• La etiqueta de identificación debería estar firmemente pegada al<br />
disco. Si ésta se despega en el interior de la unidad de disquetes,<br />
puede ser difícil expulsar el disco.<br />
• Guarde de nuevo los disquetes en su caja.<br />
Volet de protection<br />
PROTECT<br />
(la disquette est verrouillée)<br />
• Les disquettes contenant d’importantes données pour cet instrument<br />
doivent toujours être verrouillées (protégées) avant d’être<br />
insérées dans le lecteur d’un autre instrument.<br />
• L’étiquette d’identification de la disquette doit être bien collée sur la<br />
disquette. Si elle se détache alors que la disquette se trouve dans le<br />
lecteur, vous risquez d’avoir des difficultés à l’en extraire.<br />
• Remettez la disquette dans sa boîte pour la conserver.<br />
7
<strong>EM</strong>-<strong>25</strong>/<strong>EM</strong>-<strong>15</strong><br />
B C D E<br />
K L M N O P<br />
R<br />
F G H I J<br />
Q<br />
S T U V<br />
A<br />
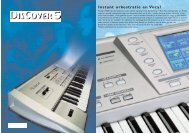
2. Panel descriptions<br />
A POWER button<br />
Press this button to switch the <strong>EM</strong>-<strong>25</strong>/<strong>EM</strong>-<strong>15</strong> on and off.<br />
B VOLUME √ ® buttons<br />
Use these buttons to set the global volume of your<br />
<strong>EM</strong>-<strong>25</strong>/<strong>EM</strong>-<strong>15</strong>.<br />
C D<strong>EM</strong>O button<br />
Press this button whenever you want to listen to the<br />
<strong>EM</strong>-<strong>25</strong>/<strong>EM</strong>-<strong>15</strong>’s demo songs (see p. 13).<br />
D DISK [MENU] and [EXECUTE] buttons (<strong>EM</strong>-<strong>25</strong>)<br />
These buttons are only available on the <strong>EM</strong>-<strong>25</strong> (the<br />
<strong>EM</strong>-<strong>15</strong> has no disk drive). They allow you to check what’s<br />
on a floppy disk and to confirm the selected operation<br />
(see p. 75).<br />
2. Descripciones del panel<br />
A Botón POWER<br />
Pulse este botón para activar y desactivar el <strong>EM</strong>-<strong>25</strong>/<br />
<strong>EM</strong>-<strong>15</strong>.<br />
B Botones VOLUME √ ®<br />
Use estos botones para ajustar el volumen global del<br />
<strong>EM</strong>-<strong>25</strong>/<strong>EM</strong>-<strong>15</strong>.<br />
C Botón D<strong>EM</strong>O<br />
Pulse este botón cuando quiera escuchar las canciones de<br />
demostración del <strong>EM</strong>-<strong>25</strong>/<strong>EM</strong>-<strong>15</strong> (consulte la p. 13).<br />
D Botones DISK [MENU] y [EXECUTE] (<strong>EM</strong>-<strong>25</strong>)<br />
Estos botones sólo están disponibles en el <strong>EM</strong>-<strong>25</strong> (el<br />
<strong>EM</strong>-<strong>15</strong> no dispone de unidad de discos). Le permiten comprobar<br />
que hay guardado en un disquete y confirmar la<br />
operación seleccionada (consulte la p. 75).<br />
W<br />
2. Description des panneaux<br />
A Bouton POWER<br />
Appuyez sur ce bouton pour mettre l’<strong>EM</strong>-<strong>25</strong>/<strong>EM</strong>-<strong>15</strong> sous<br />
tension et hors tension.<br />
B Boutons VOLUME √ ®<br />
Ces boutons servent à régler le volume général de votre<br />
<strong>EM</strong>-<strong>25</strong>/<strong>EM</strong>-<strong>15</strong>.<br />
C Bouton D<strong>EM</strong>O<br />
Appuyez sur ce bouton pour écouter les morceaux de<br />
démonstration de l’<strong>EM</strong>-<strong>25</strong>/<strong>EM</strong>-<strong>15</strong> (voyez p. 13).<br />
D Boutons DISK [MENU] et [EXECUTE] (<strong>EM</strong>-<strong>25</strong>)<br />
Ces boutons ne sont disponibles que sur l’<strong>EM</strong>-<strong>25</strong> (l’<strong>EM</strong>-<strong>15</strong><br />
ne possède pas de lecteur de disquettes). Ils permettent de<br />
vérifier le contenu d’une disquette et de confirmer une<br />
opération que vous avez choisie (voyez p. 75).<br />
8
<strong>EM</strong>-<strong>25</strong>/<strong>EM</strong>-<strong>15</strong><br />
E STYLE MORPHING buttons<br />
Use these three button to create a new Style from two<br />
existing ones. See page 35 for details.<br />
F BALANCE [√ACCOMP] [KEYBOARD ®] buttons<br />
Use the BALANCE buttons to change the volume of the<br />
corresponding section (accompaniment/song, or the parts<br />
you play on the keyboard).<br />
G TRANSPOSE button<br />
Press this button to transpose the keyboard (see p. 43).<br />
Like all other buttons marked with “*”, holding it for more<br />
than one second calls up a FUNCTION parameter you can<br />
set.<br />
H METRONOME button<br />
This button is used to switch the metronome on and off.<br />
Like all other buttons marked with “*”, holding it for more<br />
than one second calls up a FUNCTION parameter you can<br />
set.<br />
I REC/2nd TRACK button<br />
This button allows you to engage the <strong>EM</strong>-<strong>25</strong>/<strong>EM</strong>-<strong>15</strong>’s<br />
record function. In some cases, you can use it to activate<br />
the 2nd TRACK function for re-recording the <strong>Keyboard</strong><br />
parts. See page 30 for details.<br />
J ORCHESTRATOR buttons<br />
Press one of these buttons to choose the desired orchestration<br />
for the selected Music Style. See page 34.<br />
K MUSICAL GAMES button<br />
Press this button if you want to learn more about the<br />
“nuts and bolts” of music – or just to have some fun with<br />
your <strong>EM</strong>-<strong>25</strong>/<strong>EM</strong>-<strong>15</strong>.<br />
L SONG button<br />
This button allows you to select the <strong>EM</strong>-<strong>25</strong>/<strong>EM</strong>-<strong>15</strong>’s Song<br />
mode, and to specify that the [INTRO], [ORIGINAL], etc.,<br />
buttons should be used to operate the on-board Recorder.<br />
M STYLE button<br />
Press this button if you want to select Music Styles. By<br />
activating this button, you also specify that the [INTRO],<br />
[ORIGINAL], etc., buttons are used for selecting a Style<br />
Division, while the [1]~[8] buttons can be used to select<br />
the desired Style memory (11~64).<br />
E Botones STYLE MORPHING<br />
Utilice estos tres botones para crear un nuevo Estilo<br />
mediante la mezcla de dos estilos existentes. Consulte la<br />
pág. 35 para más detalles.<br />
F Botones BALANCE [√ACCOMP] [KEYBOARD ®]<br />
Use los botones BALANCE para cambiar el volumen de la<br />
sección correspondiente (acompañamiento/canción o las<br />
partes que interpreta en el teclado).<br />
G Botón TRANSPOSE<br />
Pulse este botón para transponer el teclado (consulte la<br />
p. 43). Al igual que el resto de botones marcados con “*”,<br />
si lo mantiene pulsado más de un segundo, accederá al<br />
parámetro FUNCTION que puede modificar.<br />
H Botón METRONOME<br />
Este botón se utiliza para activar y desactivar el metrónomo.<br />
Al igual que el resto de botones marcados con “*”,<br />
si lo mantiene pulsado más de un segundo, accederá al<br />
parámetro FUNCTION que puede modificar.<br />
I Botón REC/2nd TRACK<br />
Este botón permite poner en marcha la función de grabación<br />
del <strong>EM</strong>-<strong>25</strong>/<strong>EM</strong>-<strong>15</strong>. En algunos casos, puede utilizarlo para<br />
activar la función 2nd TRACK que sirve para volver a grabar<br />
las partes del teclado. Consulte la pág. 30 para más detalles.<br />
J Botones ORCHESTRATOR<br />
Pulse uno de estos botones para seleccionar la orquestación<br />
deseada para el Estilo Musical seleccionado. Consulte la pág. 34.<br />
K MUSICAL GAMES<br />
Pulse este botón si desea aprender más acerca de los “secretos”<br />
de la música – o sólo como diversión con el <strong>EM</strong>-<strong>25</strong>/<strong>EM</strong>-<strong>15</strong>.<br />
L Botón SONG<br />
Este botón le permite seleccionar el modo Song del <strong>EM</strong>-<strong>25</strong>/<br />
<strong>EM</strong>-<strong>15</strong>, y especificar si los botones [INTRO], [ORIGINAL],<br />
etc., se utilizan para hacer funcionar el Grabador integrado.<br />
M Botón STYLE<br />
Pulse este botón si desea seleccionar Estilos Musicales. Activando<br />
este botón, especifica también si los botones [INTRO],<br />
[ORIGINAL], etc., se utilizan para seleccionar una División de<br />
Estilo, mientras los botones [1]~[8] se pueden utilizar para<br />
seleccionar la memoria de Estilo deseada (11~64).<br />
E Boutons STYLE MORPHING<br />
Ces trois boutons servent à créer un nouveau Style avec<br />
deux styles existants. Pour en savoir plus, voyez page 35.<br />
F Boutons BALANCE [√ACCOMP] [KEYBOARD ®]<br />
Servez-vous des boutons BALANCE pour changer le<br />
volume de la section correspondante (accompagnement/<br />
morceau ou les parties que vous jouez sur le clavier).<br />
G Bouton TRANSPOSE<br />
Appuyez sur ce bouton pour transposer le clavier (voyez<br />
p. 43). Comme tous les autres boutons repérés par “*”,<br />
vous pouvez l’enfoncer pendant plus d’une seconde pour<br />
activer un paramètre FUNCTION réglable.<br />
H Bouton METRONOME<br />
Ce bouton sert à activer et à couper le métronome.<br />
Comme tous les autres boutons repérés par “*”, vous pouvez<br />
l’enfoncer pendant plus d’une seconde pour activer<br />
un paramètre FUNCTION réglable.<br />
I Bouton REC/2nd TRACK<br />
Active la fonction d’enregistreur de l’<strong>EM</strong>-<strong>25</strong>/<strong>EM</strong>-<strong>15</strong>. Parfois<br />
il sert à activer la fonction 2nd TRACK pour<br />
réenregistrer les parties <strong>Keyboard</strong>. Voyez les détails<br />
page 30.<br />
J Boutons ORCHESTRATOR<br />
Appuyez sur un de ces boutons afin de choisir le type<br />
d’orchestration voulue pour le style musical en question.<br />
Voyez page 34.<br />
K Bouton MUSICAL GAMES<br />
Appuyez sur ce bouton pour en apprendre un peu plus<br />
sur les bases musicales élémentaires – ou tout simplement<br />
pour vous amuser avec votre <strong>EM</strong>-<strong>25</strong>/<strong>EM</strong>-<strong>15</strong>.<br />
L Bouton SONG<br />
Ce bouton sert à choisir le mode Song de l’<strong>EM</strong>-<strong>25</strong>/<strong>EM</strong>-<strong>15</strong><br />
et à affecter les boutons [INTRO], [ORIGINAL], etc. au pilotage<br />
de la fonction d’enregistreur (Recorder) incorporée.<br />
M Bouton STYLE<br />
Sert à choisir les styles musicaux (Music Styles). En activant<br />
ce bouton, vous affectez les boutons [INTRO],<br />
[ORIGINAL], etc. au choix d’une division de style (Style<br />
Division), tandis que les boutons [1]~[8] peuvent servir à<br />
sélectionner la mémoire de style voulue (11~64).<br />
9
<strong>EM</strong>-<strong>25</strong>/<strong>EM</strong>-<strong>15</strong><br />
N TONE button<br />
Press this button if you want to use the [A/B] and [1]~[8]<br />
buttons for assigning a sound (“Tone”) to the selected<br />
<strong>Keyboard</strong> part. See p. 24.<br />
O USER PROGRAM/WRITE button<br />
Press this button whenever you want to select a User Program<br />
(a set of registrations). Press and hold it to save the<br />
current panel and parameter settings to a User Program.<br />
See page 64.<br />
P FUNCTION button<br />
This button provides access to the FUNCTION menu. This<br />
menu contains parameters you probably only need occasionally.<br />
Q Style/Song control buttons<br />
(INTRO, ORIGINAL, FILL, etc.) These buttons allow you to<br />
select the Music Style division (after pressing the [STYLE]<br />
button) or to control the <strong>EM</strong>-<strong>25</strong>/<strong>EM</strong>-<strong>15</strong>’s Recorder (after<br />
pressing [SONG]). Note that the MARKER A/B functions<br />
are only available on the <strong>EM</strong>-<strong>25</strong>.<br />
R A/B buttons, numeric keypad, VARIATION/DISK USER<br />
button<br />
Use [A/B] to select the Tone bank (there are two banks of<br />
64 Tones each). The keypad is used for selecting Tones<br />
(sounds) for the <strong>Keyboard</strong> parts, Music Styles, and User<br />
Programs. The function of these buttons depends on<br />
which button you pressed last: the [STYLE], [TONE], or<br />
[USER PROGRAM] button.<br />
Note: On the <strong>EM</strong>-<strong>25</strong>, the [VARIATION] button also doubles as<br />
[DISK USER] button (after pressing the [STYLE] button). See<br />
p. 37.<br />
Note: On the <strong>EM</strong>-<strong>25</strong>, the numeric keypad also allows you to<br />
enter file names.<br />
S T<strong>EM</strong>PO –/+, DATA, YES/NO buttons<br />
Use these buttons to lower or increase the Arranger or<br />
Recorder tempo, to set the desired value (after pressing<br />
[FUNCTION]), or to cancel (NO) or confirm (YES) a question<br />
or command.<br />
N Botón TONE<br />
Pulse este botón si desea utilizar los botones [A/B] y<br />
[1]~[8] para asignar un sonido (“Tone”) a la parte del<br />
teclado seleccionada. Consulte la p. 24.<br />
O Botón USER PROGRAM/WRITE<br />
Pulse este botón cuando quiera seleccionar un Programa<br />
de Usuario (un conjunto de registros). Púlselo y manténgalo<br />
pulsado para guardar los ajustes de parámetro y del<br />
panel en un Programa de Usuario. Consulte la pág. 64.<br />
P Botón FUNCTION<br />
Este botón proporciona acceso al menú FUNCTION. Este<br />
menú contiene los parámetros que probablemente necesitará<br />
sólo ocasionalmente.<br />
Q Botones de control Style/Song<br />
(INTRO, ORIGINAL, FILL, etc.) Estos botones le permiten<br />
seleccionar la división del Estilo Musical (una vez haya pulsado<br />
el botón [STYLE]) o controlar el Grabador del <strong>EM</strong>-<strong>25</strong>/<br />
<strong>EM</strong>-<strong>15</strong> (una vez haya pulsado [SONG]). Observe que las<br />
funciones MARKER A/B sólo están disponibles en el <strong>EM</strong>-<strong>25</strong>.<br />
R Botones A/B, teclado numérico, botón VARIATION/DISK<br />
USER<br />
Utilice [A/B] para seleccionar el banco de Tone (existen<br />
dos bancos de 64 Tones cada uno). El teclado se utiliza<br />
para seleccionar Tones (sonidos) para las partes del<br />
teclado, Estilos Musicales, y Programas de Usuario. La<br />
función de estos botones depende del botón que haya<br />
pulsado en último lugar: el botón [STYLE], [TONE], o [USER<br />
PROGRAM].<br />
Nota: En el <strong>EM</strong>-<strong>25</strong>, el botón [VARIATION] sirve al mismo tiempo<br />
de botón [DISK USER] (una vez haya pulsado el botón [STYLE]).<br />
Consulte la p. 37.<br />
Nota: En el <strong>EM</strong>-<strong>25</strong>, el teclado numérico también le permite<br />
introducir nombres de archivo.<br />
S Botones T<strong>EM</strong>PO –/+, DATA, YES/NO<br />
Utilice estos botones para definir un tempo más lento o<br />
más rápido para el Arranger o el Grabador, para ajustar el<br />
valor deseado (una vez haya pulsado [FUNCTION]), o para<br />
cancelar (NO) o confirmar (YES) una pregunta o comando.<br />
N Bouton TONE<br />
Appuyez sur ce bouton si vous voulez utiliser les boutons<br />
[A/B] et [1]~[8] pour assigner un son (“Tone”) à la partie<br />
<strong>Keyboard</strong> choisie. Voyez p. 24.<br />
O Bouton USER PROGRAM/WRITE<br />
Ce bouton sert à choisir un programme utilisateur (alias<br />
User, désignant un ensemble de réglages). Maintenez-le<br />
enfoncé pour mémoriser les réglages en face avant et les<br />
réglages de paramètres dans un programme utilisateur.<br />
Voyez page 64.<br />
P Bouton FUNCTION<br />
Donne l’accès au menu FUNCTION. Ce menu contient des<br />
paramètres dont vous n’aurez probablement besoin que<br />
de manière occasionnelle.<br />
Q Boutons de Style/de pilotage de morceau<br />
(INTRO, ORIGINAL, FILL, etc.) Ces boutons permettent de<br />
choisir la division de style musical (après avoir appuyé sur<br />
[STYLE]) ou de piloter la fonction Recorder de l’<strong>EM</strong>-<strong>25</strong>/<br />
<strong>EM</strong>-<strong>15</strong> (après avoir appuyé sur [SONG]). Notez que les<br />
fonctions MARKER A/B sont uniquement disponibles sur<br />
l’<strong>EM</strong>-<strong>25</strong>.<br />
R Boutons A/B, pavé numérique, bouton VARIATION/DISK<br />
USER<br />
Choisissez la banque de sons avec [A/B] (vous disposez de<br />
deux banques de 64 Tones chacune). Le pavé numérique<br />
sert au choix des sons (“Tones”), des parties <strong>Keyboard</strong>, des<br />
styles musicaux et des programmes utilisateur. La fonction<br />
de ces boutons dépend du dernier bouton enfoncé:<br />
[STYLE], [TONE] ou [USER PROGRAM].<br />
Remarque: Sur l’<strong>EM</strong>-<strong>25</strong>, le bouton [VARIATION] fait aussi office<br />
de bouton [DISK USER] (après que vous ayez enfoncé le bouton<br />
[STYLE]. Voyez p. 37.<br />
Remarque: Sur l’<strong>EM</strong>-<strong>25</strong>, le pavé numérique sert aussi à entrer<br />
des noms de fichiers.<br />
S Boutons T<strong>EM</strong>PO –/+, DATA, YES/NO<br />
Utilisez ces boutons pour augmenter ou diminuer le<br />
tempo de l’Arranger ou du Recorder, pour régler la valeur<br />
voulue (après avoir enfoncé [FUNCTION]) ou pour annuler<br />
(NO) ou confirmer (YES) une question ou une opération.<br />
10
<strong>EM</strong>-<strong>25</strong>/<strong>EM</strong>-<strong>15</strong><br />
T M.DRUMS, ORGAN, ARRANGER, PIANO buttons<br />
These buttons allow you to specify how you want to use<br />
your <strong>EM</strong>-<strong>25</strong>/<strong>EM</strong>-<strong>15</strong>:<br />
Button<br />
M.DRUMS<br />
ORGAN<br />
ARRANGER<br />
PIANO<br />
Function<br />
You can drum on the keyboard.<br />
You can play two sounds via the keyboard<br />
(Split mode).<br />
The chords you play with your left hand are<br />
used to transpose the automatic accompaniment<br />
in realtime. With your right hand, you<br />
can play solos.<br />
A piano sound is assigned to the entire keyboard.<br />
(Only the Arranger drums are available.)<br />
U INTELL/LAYER button<br />
Press this button to add an automatic harmony voice to<br />
your melody (INTELL), or to add a second Tone to your<br />
right-hand melody playing (LAYER).<br />
V ONE TOUCH buttons (1–2, 3–4)<br />
Press one of these buttons to select the desired One<br />
Touch memory. To select memory “2” or “4”, you need to<br />
press the corresponding button twice. One Touch memories<br />
contain a number of settings that complement the<br />
currently selected Music Style. See p. 32.<br />
W Disk drive (<strong>EM</strong>-<strong>25</strong> only)<br />
This is where you can insert a 2DD or 2HD floppy disk<br />
with Standard MIDI Files (SMF) or Music Styles. It also<br />
allows you to save your User Program settings and the<br />
Songs you record.<br />
T Botones M.DRUMS, ORGAN, ARRANGER, PIANO<br />
Estos botones le permiten especificar cómo desea utilizar<br />
el <strong>EM</strong>-<strong>25</strong>/<strong>EM</strong>-<strong>15</strong>:<br />
Botón<br />
M.DRUMS<br />
ORGAN<br />
ARRANGER<br />
PIANO<br />
Función<br />
Puede golpear el teclado.<br />
Puede reproducir dos sonidos mediante el<br />
teclado (modo Split).<br />
Los acordes que interprete con la mano<br />
izquierda se utilizan para transponer el acompañamiento<br />
automático a tiempo real. Con la<br />
mano derecha, puede interpretar solos.<br />
Se asigna un sonido de piano a todo el teclado.<br />
(Sólo están disponibles las percusiones del<br />
Arranger.)<br />
U Botón INTELL/LAYER<br />
Pulse este botón para añadir una voz armónica automática<br />
a la melodía (INTELL), o para añadir un segundo Tone<br />
a la interpretación de la melodía de la mano derecha<br />
(LAYER).<br />
V Botones ONE TOUCH (1–2, 3–4)<br />
Pulse uno de estos botones para seleccionar la memoria<br />
One Touch deseada. Para seleccionar la memoria “2” o “4”,<br />
deberá pulsar el botón correspondiente dos veces. Las<br />
memorias One Touch contienen un número de ajustes<br />
que complementan el Estilo Musical actualmente seleccionado.<br />
Consulte la p. 32.<br />
W Unidad de disco (sólo <strong>EM</strong>-<strong>25</strong>)<br />
Aquí es donde puede insertar un disquete 2DD o 2HD con<br />
Archivos MIDI Estándar (SMF) o Estilos Musicales. También<br />
le permite guardar los ajustes de un Programa de<br />
Usuario y las Canciones que grabe.<br />
T Boutons M.DRUMS, ORGAN, ARRANGER, PIANO<br />
Avec ces boutons, vous définissez la manière dont vous<br />
voulez utiliser votre <strong>EM</strong>-<strong>25</strong>/<strong>EM</strong>-<strong>15</strong>:<br />
Bouton<br />
M.DRUMS<br />
ORGAN<br />
ARRANGER<br />
PIANO<br />
Fonction<br />
Vous pouvez jouer de la batterie sur le clavier.<br />
Le clavier permet de jouer deux sons (mode<br />
Split ou de partage).<br />
Les accords que vous jouez de la main gauche<br />
servent à transposer l’accompagnement automatique<br />
en temps réel. Vous pouvez donc jouer<br />
des solos de la main droite.<br />
Un son de piano est assigné au clavier entier.<br />
(Seule la batterie de l’Arranger est disponible.)<br />
U Bouton INTELL/LAYER<br />
Appuyez sur ce bouton pour ajouter une voix d’harmonie<br />
automatique à votre mélodie (INTELL) ou pour ajouter un<br />
deuxième son à la mélodie jouée de la main droite<br />
(LAYER).<br />
V Boutons ONE TOUCH (1–2, 3–4)<br />
Appuyez sur un de ces boutons pour choisir la mémoire<br />
One Touch voulue. Pour sélectionner la mémoire “2” ou<br />
“4”, appuyez deux fois sur le bouton correspondant. Les<br />
mémoires One Touch contiennent un nombre de réglages<br />
qui sont complémentaires au style musical en question.<br />
Voyez p. 32.<br />
W Lecteur de disquette (<strong>EM</strong>-<strong>25</strong> uniquement)<br />
Chargez une disquette 2DD ou 2HD contenant des<br />
fichiers Standard MIDI (SMF) ou des styles musicaux. Vous<br />
pouvez aussi sauvegarder vos réglages de programmes<br />
utilisateur et les morceaux (Songs) que vous enregistrez.<br />
11
<strong>EM</strong>-<strong>25</strong>/<strong>EM</strong>-<strong>15</strong><br />
X Y Z a b<br />
X MIDI OUT/IN sockets<br />
Connect the MIDI OUT socket to the MIDI IN jack of your<br />
computer (or MIDI instrument) to transfer MIDI data from<br />
the <strong>EM</strong>-<strong>25</strong>/<strong>EM</strong>-<strong>15</strong> to the computer or external MIDI<br />
instrument. Connect the MIDI IN socket of the <strong>EM</strong>-<strong>25</strong>/<br />
<strong>EM</strong>-<strong>15</strong> to the computer’s MIDI OUT jack to receive data<br />
from the computer.<br />
Y SUSTAIN FOOTSWITCH socket<br />
This is where you can connect an optional DP-2, DP-6, or<br />
BOSS FS-5U footswitch that allows you to hold (“sustain”)<br />
the notes you play with your right hand.<br />
Z DC 12V IN socket<br />
This is where you need to connect the supplied adapter<br />
(ACO for the <strong>EM</strong>-<strong>15</strong> and ACN for the <strong>EM</strong>-<strong>25</strong>).<br />
Note: Be sure to only use the supplied adapter supplied with<br />
your <strong>EM</strong>-<strong>25</strong>/<strong>EM</strong>-<strong>15</strong>. Other adapters may damage your Creative<br />
<strong>Keyboard</strong>.<br />
a OUTPUT/PHONES 1 socket<br />
This socket serves two purposes: using a special “Y” cable<br />
(stereo jack to 2x mono), you can connect it to your HiFi<br />
amplifier, a mixer, a cassette deck, etc.<br />
You, can, however, also connect optional stereo headphones<br />
(<strong>Roland</strong> RH series) to this jack.<br />
b PHONES 2 socket<br />
This is where you can connect second pair of optional<br />
headphones. If you wish to listen to your <strong>EM</strong>-<strong>25</strong>/<strong>EM</strong>-<strong>15</strong><br />
via headphones, while recording your music with an MD<br />
recorder, cassette deck, etc., consider connecting the<br />
headphones to PHONES 2, and the MD recorder, etc. to<br />
the OUTPUT/PHONES 1 socket.<br />
X Zócalo MIDI OUT/IN<br />
Conecte el zócalo MIDI OUT al jack MIDI IN de su ordenador<br />
(o instrumento MIDI) para transferir datos MIDI desde<br />
el <strong>EM</strong>-<strong>25</strong>/<strong>EM</strong>-<strong>15</strong> al ordenador o instrumento MIDI<br />
externo. Conecte el zócalo MIDI IN del <strong>EM</strong>-<strong>25</strong>/<strong>EM</strong>-<strong>15</strong> al<br />
jack MIDI OUT del ordenador para recibir datos del ordenador.<br />
Y Zócalo SUSTAIN FOOTSWITCH<br />
Aquí puede conectar un pedal interruptor DP-2, DP-6, o<br />
BOSS FS-5U opcional que le permite mantener (“sostener”)<br />
las notas que toca con la mano derecha.<br />
Z Zócalo DC 12V IN<br />
Aquí deberá conectar el adaptador entregado (ACO para<br />
el <strong>EM</strong>-<strong>15</strong> y ACN para el <strong>EM</strong>-<strong>25</strong>).<br />
Nota: Utilice sólo el adaptador que se entrega con el <strong>EM</strong>-<strong>25</strong>/<br />
<strong>EM</strong>-<strong>15</strong>. La utilización de otros adaptadores podría dañar el Creative<br />
<strong>Keyboard</strong>.<br />
a Zócalo OUTPUT/PHONES 1<br />
Este zócalo sirve para dos propósitos: si utiliza un cable<br />
“Y” especial (jack estéreo a 2x mono), puede conectarlo a<br />
un amplificador HiFi, un mezclador, una pletina de cassette,<br />
etc.<br />
También puede, sin embargo, conectar unos auriculares<br />
estéreo opcionales (serie RH de <strong>Roland</strong>) a este jack.<br />
b Zócalo PHONES 2<br />
Aquí es donde puede conectar el segundo par de auriculares<br />
opcionales. Si desea escuchar el <strong>EM</strong>-<strong>25</strong>/<strong>EM</strong>-<strong>15</strong><br />
mediante auriculares, mientras graba la música con un<br />
grabador MD, una pletina de cassette, etc., conecte los<br />
auriculares a PHONES 2, y el grabador MD, etc. al zócalo<br />
OUTPUT/PHONES 1.<br />
X Prises MIDI OUT/IN<br />
Branchez la prise MIDI OUT à la prise MIDI IN de votre<br />
ordinateur (ou instrument MIDI) pour transférer des données<br />
MIDI de l’<strong>EM</strong>-<strong>25</strong>/<strong>EM</strong>-<strong>15</strong> à l’ordinateur ou à l’instrument<br />
MIDI externe. Pour recevoir des données transmises<br />
par l’ordinateur, branchez la prise MIDI IN de l’<strong>EM</strong>-<strong>25</strong>/<br />
<strong>EM</strong>-<strong>15</strong> à la prise MIDI OUT de l‘ordinateur.<br />
Y Prise SUSTAIN FOOTSWITCH<br />
Cette prise sert à brancher un commutateur au pied DP-<br />
2, DP-6 ou BOSS FS-5U en option; vous pouvez l’utiliser<br />
pour maintenir (effet “sustain”) les notes jouées de la<br />
main droite.<br />
Z Prise DC 12V IN<br />
C’est ici que vous branchez l’adaptateur secteur fourni<br />
(ACO pour l’<strong>EM</strong>-<strong>15</strong> et ACN pour l’<strong>EM</strong>-<strong>25</strong>).<br />
Remarque: Veillez bien à utiliser exclusivement l’adaptateur<br />
secteur fourni avec votre <strong>EM</strong>-<strong>25</strong>/<strong>EM</strong>-<strong>15</strong>. L’utilisation de tout<br />
autre adaptateur pourrait endommager votre Creative <strong>Keyboard</strong>.<br />
a Prise OUTPUT/PHONES 1<br />
Cette prise joue deux rôles: vous pouvez la brancher à<br />
votre amplificateur hi-fi, à un mélangeur, une platine à<br />
cassettes, etc. à l’aide d’un câble spécial en “Y” (stéréo<br />
d’un côté et 2x mono de l’autre).<br />
Vous pouvez en outre aussi y brancher un casque stéréo<br />
en option (de la série <strong>Roland</strong> RH).<br />
b Prise PHONES 2<br />
Vous pouvez brancher un deuxième casque en option à<br />
cette prise. Si vous voulez écouter le son de votre <strong>EM</strong>-<strong>25</strong>/<br />
<strong>EM</strong>-<strong>15</strong> avec un casque d’écoute tout en enregistrant<br />
votre jeu sur une platine à cassettes, MD, etc., branchez le<br />
casque à la prise PHONES 2 et l’enregistreur MD, etc. à la<br />
prise OUTPUT/PHONES 1.<br />
12
<strong>EM</strong>-<strong>25</strong>/<strong>EM</strong>-<strong>15</strong><br />
3. Setting up 3. Instalar 3. Branchements<br />
The first thing you need to do is connect the<br />
adapter to a suitable wall outlet.<br />
(1) Unpack the <strong>EM</strong>-<strong>25</strong>/<strong>EM</strong>-<strong>15</strong> and place it<br />
on a stable surface.<br />
(2) Connect the small end of the adapter<br />
cable to the <strong>EM</strong>-<strong>25</strong>/<strong>EM</strong>-<strong>15</strong>’s DC IN jack,<br />
and the other end to a suitable wall outlet.<br />
(3) Press the [POWER] button to switch on<br />
the <strong>EM</strong>-<strong>25</strong>/<strong>EM</strong>-<strong>15</strong>.<br />
Lo primero que debe hacer es conectar el<br />
adaptador a una toma de corriente apropiada.<br />
(1) Desempaquete el <strong>EM</strong>-<strong>25</strong>/<strong>EM</strong>-<strong>15</strong> y colóquelo<br />
sobre una superficie estable.<br />
(2) Conecte el extremo pequeño del cable<br />
del adaptador al jack DC IN del <strong>EM</strong>-<strong>25</strong>/<br />
<strong>EM</strong>-<strong>15</strong>, y el otro extremo a la toma de<br />
corriente.<br />
(3) Pulse el botón [POWER] para poner en<br />
marcha el <strong>EM</strong>-<strong>25</strong>/<strong>EM</strong>-<strong>15</strong>.<br />
La première chose à faire, c’est de brancher<br />
l’adaptateur à une prise de courant ad hoc.<br />
(1) Déballez l’<strong>EM</strong>-<strong>25</strong>/<strong>EM</strong>-<strong>15</strong> et posez-le sur<br />
une surface stable.<br />
(2) Branchez la plus petite extrémité du<br />
câble de l’adaptateur à la prise DC IN de<br />
l’<strong>EM</strong>-<strong>25</strong>/<strong>EM</strong>-<strong>15</strong> et l’autre bout à une prise<br />
de courant de tension appropriée.<br />
(3) Appuyez sur le bouton [POWER] pour<br />
mettre l’<strong>EM</strong>-<strong>25</strong>/<strong>EM</strong>-<strong>15</strong> sous tension.<br />
4. Demo songs 4. Canciones de demostración 4. Morceaux de démo<br />
Demo All<br />
1<br />
120<br />
001<br />
Your <strong>EM</strong>-<strong>25</strong>/<strong>EM</strong>-<strong>15</strong> comes with 8 Tone<br />
demos and 8 Style demos.<br />
• Tone demos show off the <strong>EM</strong>-<strong>25</strong>/<br />
<strong>EM</strong>-<strong>15</strong>’s amazing sound quality.<br />
• Style demos give you an impression of<br />
the quality of the on-board Music Styles.<br />
(1) Press the [D<strong>EM</strong>O] button.<br />
The [D<strong>EM</strong>O] icon in the lower left of the<br />
display is highlighted.<br />
El <strong>EM</strong>-<strong>25</strong>/<strong>EM</strong>-<strong>15</strong> dispone de 8 demostraciones<br />
de Tone y 8 demostraciones de Estilo.<br />
• Las demostraciones de Tone reflejan la<br />
sorprendente calidad de sonido del<br />
<strong>EM</strong>-<strong>25</strong>/<strong>EM</strong>-<strong>15</strong>.<br />
• Las demostraciones de estilo dan una<br />
idea de la calidad de los Estilos Musicales<br />
incorporados.<br />
(1) Pulse el botón [D<strong>EM</strong>O].<br />
El icono [D<strong>EM</strong>O] en la parte inferior<br />
izquierda de la pantalla queda seleccionado.<br />
Votre <strong>EM</strong>-<strong>25</strong>/<strong>EM</strong>-<strong>15</strong> est accompagné de 8<br />
démos de sons et de 8 démos de styles.<br />
• Les démos de sons mettent en exergue<br />
le son superbe de l’<strong>EM</strong>-<strong>25</strong>/<strong>EM</strong>-<strong>15</strong>.<br />
• Les démos de styles donnent une idée<br />
de l’extraordinaire qualité des styles musicaux<br />
(“Music Styles”) de l’instrument.<br />
(1) Appuyez sur le bouton [D<strong>EM</strong>O].<br />
L’icône [D<strong>EM</strong>O] est affichée dans la partie<br />
inférieure gauche de l’écran.<br />
Playback of all demo songs:<br />
Press the [START/STOP] button. This will start<br />
playback of a Tone demo song, followed by a<br />
Style demo song, then again a Tone demo<br />
song, etc.<br />
Note: You need to press [START/STOP] after every<br />
demo song.<br />
Reproducir todas las canciones de<br />
demostración:<br />
Pulse el botón [START/STOP]. Empezará a<br />
reproducirse una canción de demostración de<br />
un Tone, seguida por una canción de demostración<br />
de un Estilo, a continuación una canción<br />
de demostración de Tone y así sucesivamente,<br />
etc.<br />
Nota: Deberá pulsar [START/STOP] después de cada<br />
canción de demostración.<br />
Jeu de tous les morceaux de démo:<br />
Appuyez sur le bouton [START/STOP]. L’instrument<br />
lance le jeu d’un morceau de démo de<br />
sons, suivi d’un morceau de démo de styles,<br />
puis à nouveau d’une démo de sons, etc.<br />
Remarque: Vous devez appuyer sur le bouton<br />
[START/STOP] après chaque morceau de démonstration.<br />
13
<strong>EM</strong>-<strong>25</strong>/<strong>EM</strong>-<strong>15</strong><br />
Playback of a Tone demo song:<br />
• Press the [D<strong>EM</strong>O] button. This is only necessary<br />
if you haven’t already done so.<br />
• Press the [TONE] button.<br />
• Press a numeric button [1]~[8]. Each button<br />
selects a different Tone demo song.<br />
• Press the [START/STOP] button to start<br />
playback of the selected song. Press it<br />
again to stop playback.<br />
Reproducir una canción de demostración<br />
de Tone:<br />
• Pulse el botón [D<strong>EM</strong>O]. Esto sólo es necesario<br />
si aún no lo ha hecho.<br />
• Pulse el botón [TONE].<br />
• Pulse un botón numérico [1]~[8]. Cada<br />
botón selecciona una canción de demostración<br />
de Tone diferente.<br />
• Pulse el botón [START/STOP] para iniciar la<br />
reproducción de la canción seleccionada.<br />
Púlselo de nuevo para detener la reproducción.<br />
Reproduiction d’une démo de sons:<br />
• Appuyez sur le bouton [D<strong>EM</strong>O]. Si c’est<br />
déjà fait, passez à l’étape suivante.<br />
• Appuyez sur le bouton [TONE].<br />
• Appuyez sur un bouton [1]~[8] du pavé<br />
numérique. Chaque bouton permet de<br />
choisir un autre morceau de démonstration<br />
de sons.<br />
• Appuyez sur le bouton [START/STOP] pour<br />
lancer la reproduction du morceau choisi.<br />
Appuyez à nouveau sur ce bouton pour<br />
arrêter la reproduction.<br />
DemoTne1<br />
120<br />
001<br />
1<br />
Playback of a Style demo song:<br />
• Press the [D<strong>EM</strong>O] button. This is only necessary<br />
if you haven’t already done so.<br />
• Press the [STYLE] button.<br />
• Press a numeric button [1]~[8]. Each button<br />
selects a different Style demo song.<br />
• Press the [START/STOP] button to start<br />
playback of the selected song.<br />
® For teachers: You can deactivate the [D<strong>EM</strong>O]<br />
button: hold down [D<strong>EM</strong>O] while switching the<br />
<strong>EM</strong>-<strong>25</strong>/<strong>EM</strong>-<strong>15</strong> on. It is now no longer possible to<br />
play back demo songs. Repeat this to activate the<br />
[D<strong>EM</strong>O] button once again.<br />
Reproducir una canción de demostración<br />
de Estilo:<br />
• Pulse el botón [D<strong>EM</strong>O]. Esto sólo es necesario<br />
si aún no lo ha hecho.<br />
• Pulse el botón [STYLE].<br />
• Pulse un botón numérico [1]~[8]. Cada<br />
botón selecciona una canción de demostración<br />
de Estilo diferente.<br />
• Pulse el botón [START/STOP] para iniciar la<br />
reproducción de la canción seleccionada.<br />
® Para profesores: Puede desactivar el botón<br />
[D<strong>EM</strong>O]: mantenga pulsado [D<strong>EM</strong>O] mientras pone<br />
en marcha el <strong>EM</strong>-<strong>25</strong>/<strong>EM</strong>-<strong>15</strong>. A partir de ahora ya<br />
no será posible reproducir canciones de demostración.<br />
Repita esto para activar el botón [D<strong>EM</strong>O] de<br />
nuevo.<br />
Reproduction d’une démo de styles:<br />
• Appuyez sur le bouton [D<strong>EM</strong>O]. Si c’est<br />
déjà fait, passez à l’étape suivante.<br />
• Appuyez sur le bouton [STYLE].<br />
• Appuyez sur un bouton [1]~[8] du pavé<br />
numérique. Chaque bouton permet de<br />
choisir un autre morceau de démonstration<br />
de styles.<br />
• Appuyez sur le bouton [START/STOP] pour<br />
lancer la reproduction du morceau choisi.<br />
® Avis aux professeurs: Vous pouvez désactiver<br />
le bouton [D<strong>EM</strong>O]: maintenez [D<strong>EM</strong>O] enfoncé<br />
tout en mettant l’<strong>EM</strong>-<strong>25</strong>/<strong>EM</strong>-<strong>15</strong> sous tension. Les<br />
morceaux de démonstration ne sont alors plus disponibles.<br />
Répétez cette procédure pour activer à<br />
nouveau le bouton [D<strong>EM</strong>O].<br />
14
<strong>EM</strong>-<strong>25</strong>/<strong>EM</strong>-<strong>15</strong><br />
Setting the volume<br />
• If necessary, adjust the <strong>EM</strong>-<strong>25</strong>/<strong>EM</strong>-<strong>15</strong>’s volume<br />
with its VOLUME √ ® buttons.<br />
Press VOLUME [√ DOWN] to decrease the<br />
volume. Press VOLUME [UP ®] to increase<br />
it. (The setting range is 0~127. This value is<br />
briefly displayed.)<br />
Ajustar el volumen<br />
• Si es necesario, ajuste el volumen del <strong>EM</strong>-<strong>25</strong>/<br />
<strong>EM</strong>-<strong>15</strong> con los botones VOLUME √ ®.<br />
Pulse VOLUME [√ DOWN] para bajar el<br />
volumen. Pulse VOLUME [UP ®] para<br />
aumentarlo. (La gama de ajustes es de<br />
0~127. Este valor se visualiza brevemente.)<br />
Réglage du volume<br />
• Si nécessaire, réglez le volume de l’<strong>EM</strong>-<strong>25</strong>/<br />
<strong>EM</strong>-<strong>15</strong> avec ses boutons VOLUME √ ®.<br />
Appuyez sur VOLUME [√ DOWN] pour<br />
diminuer le volume. Pour l’augmenter,<br />
enfoncez VOLUME [UP ®]. (La plage de<br />
réglage s’étend de 0~127. Cette valeur<br />
s’affiche brièvement.)<br />
Stopping demo song playback<br />
(1) Press the [START/STOP] button.<br />
(2) Press the [D<strong>EM</strong>O] button again to switch<br />
off the <strong>EM</strong>-<strong>25</strong>/<strong>EM</strong>-<strong>15</strong>’s demo function.<br />
If the display now reads “DemoAll”, you<br />
need to press the [D<strong>EM</strong>O] button once more.<br />
Detener la reproducción de la canción<br />
de demostración<br />
(1) Pulse el botón [START/STOP].<br />
(2) Pulse el botón [D<strong>EM</strong>O] de nuevo para<br />
desactivar la función de demostración del<br />
<strong>EM</strong>-<strong>25</strong>/<strong>EM</strong>-<strong>15</strong>.<br />
Si la pantalla visualiza el mensaje “DemoAll”,<br />
deberá pulsar el botón [D<strong>EM</strong>O] una vez más.<br />
Arrêter le jeu du morceau de démo<br />
(1) Appuyez sur le bouton [START/STOP].<br />
(2) Enfoncez à nouveau [D<strong>EM</strong>O] pour couper<br />
la fonction de démo de l’<strong>EM</strong>-<strong>25</strong>/<strong>EM</strong>-<strong>15</strong>.<br />
Si l’écran affiche alors “DemoAll”, appuyez<br />
encore une fois sur le bouton [D<strong>EM</strong>O].<br />
5. Game function 5. Función Game 5. Jeux musicaux<br />
GuessTne<br />
1<br />
120<br />
001<br />
Your <strong>EM</strong>-<strong>25</strong>/<strong>EM</strong>-<strong>15</strong> contains several musical<br />
games you may want to play at times. These<br />
games will help you master some basic musical<br />
concepts. They are called:<br />
• Guess the Tone: find out if you can name<br />
the sound you hear.<br />
• Guess the Style: see if you know what<br />
musical genre the <strong>EM</strong>-<strong>25</strong>/<strong>EM</strong>-<strong>15</strong> is playing.<br />
This will help you find the right Music Styles<br />
for playing your own music.<br />
• Chord Finder: This game will help you find<br />
out how to play chords you may come<br />
across in written music. This is a wonderful<br />
way of learning new chords.<br />
(1) Press the [MUSICAL GAME] button.<br />
The arrow (√) to the left of the display<br />
jumps to “MUSICAL GAME” and flashes.<br />
Note: The “DISK” entries are not available on the<br />
<strong>EM</strong>-<strong>15</strong>.<br />
El <strong>EM</strong>-<strong>25</strong>/<strong>EM</strong>-<strong>15</strong> contiene diferentes juegos<br />
musicales con los que puede divertirse. Estos<br />
juegos le ayudarán a dominar algunos conceptos<br />
musicales básicos. Se denominan:<br />
• Adivinar el Tone: ver si es capaz de nombrar<br />
el sonido que oye.<br />
• Adivinar el Estilo: ver si conoce el género<br />
musical que el <strong>EM</strong>-<strong>25</strong>/<strong>EM</strong>-<strong>15</strong> está interpretando.<br />
Esto le ayudará a encontrar los Estilos<br />
Musicales correctos para interpretar su propia<br />
música.<br />
• Buscador de acordes: Este juego le ayudará<br />
a averiguar cómo interpretar los acordes<br />
que se puede encontrar en la música<br />
escrita. Es una sorprendente manera de<br />
aprender nuevo acordes.<br />
(1) Pulse el botón [MUSICAL GAME].<br />
La flecha (√) hacia la izquierda de la pantalla<br />
pasa a “MUSICAL GAME” y parpadea.<br />
Nota: Las entradas “DISK” no están disponibles<br />
en el <strong>EM</strong>-<strong>15</strong>.<br />
L’<strong>EM</strong>-<strong>25</strong>/<strong>EM</strong>-<strong>15</strong> se propose de vous divertir<br />
avec plusieurs jeux musicaux. Ces jeux vous<br />
aideront aussi à acquérir certaines bases musicales.<br />
Vous trouverez les jeux suivants:<br />
• Guess the Tone: ce jeu vous invite à reconnaître<br />
le son joué.<br />
• Guess the Style: dans ce jeu, l’instrument<br />
vous défie d’identifier le style musical joué.<br />
Le but est de vous aider à trouver rapidement<br />
le style qui “colle” à votre musique.<br />
• Chord Finder: l’objectif est de vous aider à<br />
jouer les accords que vous rencontrerez au<br />
fil des partitions. Une manière superbement<br />
musicale d’apprendre de nouveaux accords!<br />
(1) Appuyez sur le bouton [MUSICAL GAME].<br />
La flèche (√) à gauche de l’écran passe à<br />
“MUSICAL GAME” et se met à clignoter.<br />
Remarque: Les entrées “DISK” ne sont pas disponibles<br />
sur l’<strong>EM</strong>-<strong>15</strong>.<br />
<strong>15</strong>
<strong>EM</strong>-<strong>25</strong>/<strong>EM</strong>-<strong>15</strong><br />
Beginner Advanced Expert<br />
(2) Press [MUSICAL GAME] again to select<br />
the desired game (“GuessTne”, “GuessStl”<br />
or “ChordFnd”).<br />
You can also press ORCHESTRATOR [DRUM<br />
& BASS] or [COMBO] to select the game.<br />
The arrow next to “MUSICAL GAME” stops<br />
flashing.<br />
(3) Use the STYLE MORPHING [DRUM],<br />
[BASS], and [ACCOMP] buttons to select<br />
the level (only for “Guess Tone” and<br />
“Guess Style”).<br />
(2) Pulse [MUSICAL GAME] de nuevo para<br />
seleccionar el juego deseado (“GuessTne”,<br />
“GuessStl” o “ChordFnd”).<br />
También puede pulsar ORCHESTRATOR<br />
[DRUM & BASS] o [COMBO] para seleccionar<br />
el juego.<br />
La flecha junto a “MUSICAL GAME” deja de<br />
parpadear.<br />
(3) Utilice los botones STYLE MORPHING<br />
[DRUM], [BASS], y [ACCOMP] para seleccionar<br />
el nivel (sólo para “Adivinar Tone” y<br />
“Adivinar Estilo”).<br />
(2) Appuyez à nouveau sur [MUSICAL GAME]<br />
pour choisir le jeu voulu (“GuessTne”,<br />
“GuessStl” ou “ChordFnd”).<br />
Vous pouvez aussi choisir le jeu en appuyant<br />
sur ORCHESTRATOR [DRUM & BASS] ou<br />
[COMBO].<br />
La flèche en face de “MUSICAL GAME”<br />
s’arrête de clignoter.<br />
(3) Utilisez les boutons STYLE MORPHING<br />
[DRUM], [BASS] et [ACCOMP] pour choisir<br />
votre niveau (uniquement pour les jeux<br />
“Guess Tone” et “Guess Style”).<br />
Button<br />
Function<br />
Botón<br />
Función<br />
Bouton<br />
Fonction<br />
DRUM<br />
Beginner (easiest)<br />
DRUM<br />
Beginner (más fácil)<br />
DRUM<br />
Beginner (le plus facile)<br />
BASS<br />
Advanced (intermediary)<br />
BASS<br />
Advanced (intermedio)<br />
BASS<br />
Advanced (intermédiaire)<br />
ACCOMP<br />
Expert (most difficult)<br />
ACCOMP<br />
Expert (el más difícil)<br />
ACCOMP<br />
Expert (le plus difficile)<br />
Example: to select the “Advanced” level of the<br />
“GuessTne” game:<br />
• Press [MUSICAL GAME].<br />
• Press [MUSICAL GAME] again (or ORCHES-<br />
TRATOR [COMBO]) twice.<br />
• Press STYLE MORPHING [BASS].<br />
Ejemplo: para seleccionar el nivel “Avanzado”<br />
del juego “GuessTne”:<br />
• Pulse [MUSICAL GAME].<br />
• Pulse [MUSICAL GAME] de nuevo (o ORCHE-<br />
STRATOR [COMBO]) dos veces.<br />
• Pulse STYLE MORPHING [BASS].<br />
Exemple: pour choisir le niveau “Advanced” du<br />
jeu “GuessTne”:<br />
• Appuyez sur [MUSICAL GAME].<br />
• Appuyez à nouveau deux fois sur [MUSICAL<br />
GAME] (ou sur ORCHESTRATOR [COMBO]).<br />
• Appuyez sur STYLE MORPHING [BASS].<br />
(4) Press ORCHESTRATOR [BIG BAND] to<br />
confirm your choice (“OK”).<br />
(4) Pulse ORCHESTRATOR [BIG BAND] para<br />
confirmar su elección (“OK”).<br />
(4) Appuyez sur ORCHESTRATOR [BIG BAND]<br />
pour confirmer votre choix (“OK”).<br />
16
<strong>EM</strong>-<strong>25</strong>/<strong>EM</strong>-<strong>15</strong><br />
Oboe<br />
Piano<br />
Guess Tone<br />
After pressing OK (see step (4) above), the<br />
<strong>EM</strong>-<strong>25</strong>/<strong>EM</strong>-<strong>15</strong> plays a sound, while the display<br />
shows “Listen”.<br />
Next, a Tone name is displayed (“Piano?”, for<br />
example).<br />
(5) Use the “1”, “2”, “3” buttons (or √ ®) to<br />
select the name of the correct sound.<br />
(6) Press ORCHESTRATOR [BIG BAND] to<br />
confirm your choice (“OK”).<br />
If your choice was correct, the display indicates<br />
“OK”, and you will get a standing ovation<br />
from your <strong>EM</strong>-<strong>25</strong>/<strong>EM</strong>-<strong>15</strong>.<br />
If your choice was wrong, the display shows<br />
“ERR”, and the <strong>EM</strong>-<strong>25</strong>/<strong>EM</strong>-<strong>15</strong> plays a<br />
“crashing” sound.<br />
Next, the display indicates the correct<br />
sound, and returns to the level indication.<br />
Adivinar Tone<br />
Una vez haya pulsado OK (consulte el paso (4)<br />
anterior), el <strong>EM</strong>-<strong>25</strong>/<strong>EM</strong>-<strong>15</strong> reproduce un<br />
sonido, mientras la pantalla muestra “Listen”.<br />
A continuación, se visualiza un nombre de<br />
Tone (“Piano?”, por ejemplo).<br />
(5) Utilice los botones “1”, “2”, “3” (o √ ®)<br />
para seleccionar el nombre del sonido<br />
correcto.<br />
(6) Pulse ORCHESTRATOR [BIG BAND] para<br />
confirmar su elección (“OK”).<br />
Si su elección era la correcta, la pantalla<br />
indica “OK”, y se le ovacionará desde el<br />
<strong>EM</strong>-<strong>25</strong>/<strong>EM</strong>-<strong>15</strong>.<br />
Si su elección era incorrecta, la pantalla<br />
muestra “ERR”, y el <strong>EM</strong>-<strong>25</strong>/<strong>EM</strong>-<strong>15</strong> reproduce<br />
un sonido “rompedor”.<br />
A continuación, la pantalla indica el sonido<br />
correcto, y vuelve a la indicación de nivel.<br />
Guess Tone (deviner le son)<br />
Une fois que vous avez appuyé sur OK (voyez<br />
l’étape (4) ci-dessus), l’<strong>EM</strong>-<strong>25</strong>/<strong>EM</strong>-<strong>15</strong> joue un<br />
son et affiche “Listen” à l’écran.<br />
L’écran affiche ensuite un nom de son<br />
(“Piano?”, par exemple).<br />
(5) Utilisez les boutons “1”, ‘2”, “3” (ou<br />
√ ®) pour choisir le nom du son correct.<br />
(6) Appuyez sur ORCHESTRATOR [BIG BAND]<br />
pour confirmer votre choix (“OK”).<br />
Si vous avez fait le bon choix, l’écran indique<br />
“OK” et vous recevez des tonnerres<br />
d’applaudissements de votre <strong>EM</strong>-<strong>25</strong>/<strong>EM</strong>-<strong>15</strong>.<br />
Si vous avez mal choisi, l’écran indique<br />
“ERR” et l’<strong>EM</strong>-<strong>25</strong>/<strong>EM</strong>-<strong>15</strong> joue un son de<br />
“crash”.<br />
L’écran affiche ensuite le nom du son correct<br />
et retourne à l’affichage du niveau.<br />
(7) Press “OK” to have the <strong>EM</strong>-<strong>25</strong>/<strong>EM</strong>-<strong>15</strong><br />
sound another Tone.<br />
Use the √ ® or “1”, “2”, “3” buttons if you<br />
wish to select another level. Then confirm<br />
by pressing “OK”.<br />
(8) Indicate which sound it is (see step (5)<br />
above) and press “OK”.<br />
After applauding (or playing the crashing<br />
sound), the <strong>EM</strong>-<strong>25</strong>/<strong>EM</strong>-<strong>15</strong> returns to the<br />
level indication. Repeat steps (7) and (8), if<br />
you like, or press [MUSICAL GAME] to select<br />
another game.<br />
(7) Pulse “OK” para que el <strong>EM</strong>-<strong>25</strong>/<strong>EM</strong>-<strong>15</strong><br />
reproduzca otro Tone.<br />
Utilice los botones √ ® o“1”, “2”, “3” si<br />
desea seleccionar otro nivel. Confírmelo<br />
pulsando “OK”.<br />
(8) Indique qué sonido es (consulte el paso<br />
(5) anteriormente explicado) y pulse “OK”.<br />
Después de los aplausos (o de reproducir un<br />
sonido estridente), el <strong>EM</strong>-<strong>25</strong>/<strong>EM</strong>-<strong>15</strong> vuelve a<br />
la indicación de nivel. Repita los pasos (7) y<br />
(8), si lo desea, o pulse [MUSICAL GAME]<br />
para seleccionar otro juego.<br />
(7) Appuyez sur “OK” si vous voulez poursuivre<br />
le jeu et deviner un autre son.<br />
Pour changer de niveau, utilisez les boutons<br />
√ ® ou “1”, “2”, “3”. Confirmez ensuite<br />
votre choix en appuyant sur “OK”.<br />
(8) Identifiez le son (voyez l’étape (5) ci-dessus)<br />
et appuyez sur “OK”.<br />
Après vous avoir applaudi (ou joué le son de<br />
crash), l’<strong>EM</strong>-<strong>25</strong>/<strong>EM</strong>-<strong>15</strong> retourne à l’affichage<br />
de niveau. Si vous le voulez, répétez les étapes<br />
(7) et (8) ou appuyez sur<br />
[MUSICAL GAME] pour choisir un autre jeu.<br />
17
<strong>EM</strong>-<strong>25</strong>/<strong>EM</strong>-<strong>15</strong><br />
Guess Style<br />
After pressing OK (see step (4) on p. 16), the<br />
<strong>EM</strong>-<strong>25</strong>/<strong>EM</strong>-<strong>15</strong> plays a given type of accompaniment,<br />
while the display shows a Style name<br />
(“TWIST?”, for example).<br />
(5) Use the “1”, “2”, “3” buttons (or √ ®) to<br />
select the name of the correct style.<br />
(6) Press ORCHESTRATOR [BIG BAND] to<br />
confirm your choice (“OK”).<br />
If your choice was correct, the display indicates<br />
“OK”, and you will get a standing ovation<br />
from your <strong>EM</strong>-<strong>25</strong>/<strong>EM</strong>-<strong>15</strong>. If your choice was<br />
wrong, the display shows “ERR”, and the<br />
<strong>EM</strong>-<strong>25</strong>/<strong>EM</strong>-<strong>15</strong> plays a crashing sound. Next,<br />
the display indicates the correct Style, and<br />
returns to the level indication.<br />
(7) Press “OK” to have the <strong>EM</strong>-<strong>25</strong>/<strong>EM</strong>-<strong>15</strong><br />
play another Style.<br />
Use the √ ® or “1”, “2”, “3” buttons if you<br />
wish to select another level. Then confirm<br />
by pressing “OK”.<br />
(8) Indicate which Style it is (see step (5)<br />
above) and press “OK”.<br />
After applauding you (or playing the crashing<br />
sound), the <strong>EM</strong>-<strong>25</strong>/<strong>EM</strong>-<strong>15</strong> once again<br />
returns to the level indication. Repeat steps<br />
(7) and (8), or press [MUSICAL GAME] to<br />
select another game.<br />
(9) Press [SONG], [STYLE], [TONE], [USER<br />
PROGRAM] or [FUNCTION] to leave this<br />
function.<br />
Adivinar Estilo<br />
Una vez haya pulsado OK (consulte el paso (4)<br />
en la p. 16), el <strong>EM</strong>-<strong>25</strong>/<strong>EM</strong>-<strong>15</strong> reproduce un<br />
tipo de acompañamiento dado, mientras la<br />
pantalla muestra un nombre de Estilo<br />
(“TWIST?”, por ejemplo).<br />
(5) Utilice los botones “1”, “2”, “3” (o √ ®)<br />
para seleccionar el nombre del estilo<br />
correcto.<br />
(6) Pulse ORCHESTRATOR [BIG BAND] para<br />
confirmar su elección (“OK”).<br />
Si su elección era la correcta, la pantalla indica<br />
“OK”, y se le ovacionará desde el <strong>EM</strong>-<strong>25</strong>/<br />
<strong>EM</strong>-<strong>15</strong>. Si su elección no era correcta, la pantalla<br />
muestra “ERR”, y el <strong>EM</strong>-<strong>25</strong>/<strong>EM</strong>-<strong>15</strong> reproduce<br />
un sonido estridente. A continuación, la<br />
pantalla indica el Estilo correcto, y vuelve a la<br />
indicación de nivel.<br />
(7) Pulse “OK” para que el <strong>EM</strong>-<strong>25</strong>/<strong>EM</strong>-<strong>15</strong><br />
reproduzca otro Estilo.<br />
Utilice los botones √ ® o “1”, “2”, “3” si<br />
desea seleccionar otro nivel. Confírmelo<br />
pulsando “OK”.<br />
(8) Indique qué Estilo es (consulte el paso (5)<br />
anteriormente explicado) y pulse “OK”.<br />
Después de los aplausos (o de reproducir un<br />
sonido estridente), el <strong>EM</strong>-<strong>25</strong>/<strong>EM</strong>-<strong>15</strong> vuelve<br />
de nuevo a la indicación de nivel. Repita los<br />
pasos (7) y (8), si lo desea, o pulse [MUSICAL<br />
GAME] para seleccionar otro juego.<br />
(9) Pulse [SONG], [STYLE], [TONE], [USER<br />
PROGRAM] o [FUNCTION] para dejar esta<br />
función.<br />
Guess Style (deviner le style)<br />
Une fois que vous avez appuyé sur OK (voyez<br />
l’étape (4) à la p. 16), l’<strong>EM</strong>-<strong>25</strong>/<strong>EM</strong>-<strong>15</strong> joue un<br />
type d’accompagnement donné tout en affichant<br />
un nom de style (“TWIST?”, par exemple).<br />
(5) Utilisez les boutons “1”, “2”, “3” (ou<br />
√ ®) pour choisir le nom du style correct.<br />
(6) Appuyez sur ORCHESTRATOR [BIG BAND]<br />
pour confirmer votre choix (“OK”).<br />
Si vous avez fait le bon choix, l’écran indique<br />
“OK” et vous recevez des tonnerres d’applaudissements<br />
de votre <strong>EM</strong>-<strong>25</strong>/<strong>EM</strong>-<strong>15</strong>. Si votre<br />
choix était erroné, l’écran indique “ERR” et<br />
l’<strong>EM</strong>-<strong>25</strong>/<strong>EM</strong>-<strong>15</strong> joue un son de crash. L’écran<br />
affiche ensuite le nom du style correct et<br />
retourne à l’affichage du niveau.<br />
(7) Appuyez sur “OK” si vous voulez que<br />
l’<strong>EM</strong>-<strong>25</strong>/<strong>EM</strong>-<strong>15</strong> joue un autre style.<br />
Pour changer de niveau, utilisez les boutons<br />
√ ® ou “1”, “2”, “3”. Confirmez ensuite<br />
votre choix en appuyant sur “OK”.<br />
(8) Identifiez le style (voyez l’étape (5) cidessus)<br />
et appuyez sur “OK”.<br />
Après vous avoir applaudi (ou joué le son de<br />
crash), l’<strong>EM</strong>-<strong>25</strong>/<strong>EM</strong>-<strong>15</strong> retourne à l’affichage<br />
de niveau. Répétez les étapes (7) et (8) ou<br />
appuyez sur [MUSICAL GAME] pour choisir<br />
un autre jeu.<br />
(9) Appuyez sur [SONG], [STYLE], [TONE],<br />
[USER PROGRAM] ou [FUNCTION] pour<br />
quitter cette fonction.<br />
18
<strong>EM</strong>-<strong>25</strong>/<strong>EM</strong>-<strong>15</strong><br />
Chord Finder<br />
Apart from being a fun game, the Chord Finder<br />
is also useful for learning how to play certain<br />
chords you are unfamiliar with. Here is how to<br />
play this game:<br />
(1) Press the [MUSICAL GAME] button.<br />
See p. <strong>15</strong> for a detailed discussion.<br />
(2) Press [MUSICAL GAME] again to select<br />
“ChordFnd”.<br />
Press “3” [ACCOMP] to select it directly.<br />
Buscador de acordes<br />
A parte de ser un juego divertido, el Buscador de acordes<br />
también es útil para aprender cómo interpretar<br />
ciertos acordes con los cuales no está familiarizado. A<br />
continuación se describe cómo jugar a este juego:<br />
(1) Pulse el botón [MUSICAL GAME].<br />
Consulte la p. <strong>15</strong> para una discusión detallada.<br />
(2) Pulse [MUSICAL GAME] de nuevo para<br />
seleccionar “ChordFnd”.<br />
Pulse “3” [ACCOMP] para seleccionarlo<br />
directamente.<br />
Chord Finder<br />
Outre un jeu très amusant, Chord Finder est<br />
aussi un outil utile pour assimiler certains<br />
accords avec lesquels vous n’êtes pas familier.<br />
Voici comment jouer avec Chord Finder:<br />
(1) Appuyez sur le bouton [MUSICAL GAME].<br />
Pour en savoir plus, voyez p. <strong>15</strong>.<br />
(2) Appuyez à nouveau sur [MUSICAL GAME]<br />
pour choisir “ChordFnd”.<br />
Vous pouvez appuyer sur “3” [ACCOMP]<br />
pour choisir directement le jeu.<br />
Root<br />
Type<br />
(3) Use the “1” or “2” button to select the<br />
entry you wish to specify:<br />
(3) Utilice el botón “1” o “2” para seleccionar<br />
la entrada que desea especificar:<br />
(3) Choisissez l’élément que vous voulez<br />
définir avec le bouton “1” ou “2”:<br />
Button<br />
Function<br />
Botón<br />
Función<br />
Bouton<br />
Fonction<br />
“1” Root (i.e. the “name” of the chord).<br />
“1” Root (p. ej. el “nombre” del acorde).<br />
“1” Root (c.-à-d. le “nom” de l’accord).<br />
“2” Type (major, minor, etc.)<br />
“2” Type (mayor, menor, etc.)<br />
“2” Type (majeur, mineur, etc.)<br />
To specify the Root:<br />
• Press “1”. The display now shows the message<br />
“1 Root”.<br />
• Use the √ ® buttons to select the root<br />
(“F#”, for example). The name of this chord<br />
appears in the CHORD field of the display (1,<br />
see below).<br />
Para especificar el Root:<br />
• Pulse “1”. Ahora la pantalla muestra el mensaje<br />
“1 Root”.<br />
• Utilice los botones √ ® para seleccionar la<br />
nota fundamental (“F#”, por ejemplo). El<br />
nombre de este acorde aparece en el campo<br />
CHORD de la pantalla (“1”, consulte a continuación).<br />
Pour spécifier la tonique (Root):<br />
• Appuyez sur “1”. L’écran affiche alors le message<br />
“1 Root”.<br />
• Spécifiez la tonique avec les boutons √ ®<br />
(“F#”, par exemple). Le nom de cet accord<br />
apparaît dans la zone CHORD de l’écran (1,<br />
voyez à droite).<br />
19
<strong>EM</strong>-<strong>25</strong>/<strong>EM</strong>-<strong>15</strong><br />
(1)<br />
(2)<br />
To specify the Type:<br />
• Press the “2” button. The display now shows<br />
the message “2 Type”.<br />
• Use the √ ® buttons to select the chord<br />
type (“m”, for example). The complete name<br />
of this chord appears in the CHORD field of<br />
the display (2).<br />
Para especificar el Type:<br />
• Pulse el botón “2”. La pantalla ahora muestra<br />
el mensaje “2 Type”.<br />
• Utilice los botones √ ® para seleccionar el<br />
tipo de acorde (“m”, por ejemplo). El nombre<br />
completo de este acorde aparece en el<br />
campo CHORD de la pantalla (2).<br />
Pour spécifier le type:<br />
• Appuyez sur le bouton “2”. L’écran affiche<br />
alors le message “2 Type”.<br />
• Utilisez les boutons √ ® pour choisir le<br />
type d’accord (“m”, par exemple). Le nom<br />
complet de l’accord s’affiche dans la zone<br />
CHORD de l’écran (2).<br />
F#A C#<br />
(4) Press ORCHESTRATOR [BIG BAND] to<br />
confirm your choice (“OK”).<br />
The display now indicates the constituent<br />
notes of the selected chord (here “F#<br />
minor”).<br />
(4) Pulse ORCHESTRATOR [BIG BAND] para<br />
confirmar su elección (“OK”).<br />
Ahora la pantalla indica las notas constituyentes<br />
del acorde seleccionado (aquí “F#<br />
menor”).<br />
(4) Appuyez sur ORCHESTRATOR [BIG BAND]<br />
pour confirmer votre choix (“OK”).<br />
L’écran affiche maintenant les notes composant<br />
l’accord choisi (dans ce cas, “F#<br />
mineur”).<br />
(5) Play the indicated notes in the left half<br />
of the keyboard and press “OK” again.<br />
(5) Interprete las notas indicadas en la mitad<br />
izquierda del teclado y pulse “OK” de<br />
nuevo.<br />
(5) Jouez les notes indiquées dans la moitié<br />
gauche du clavier et appuyez à nouveau<br />
sur “OK”.<br />
F#A C#<br />
F#A#C#<br />
F#A#C# <br />
If your chord was correct, the display indicates<br />
“OK”, and you will be treated to a<br />
standing ovation.<br />
If the chord was wrong, the display indicated<br />
“ERR” and the <strong>EM</strong>-<strong>25</strong>/<strong>EM</strong>-<strong>15</strong> plays a<br />
roaring “crash” sound. The wrong note(s)<br />
now flash(es) in the display.<br />
Play the chord again and press “OK”.<br />
(6) Repeat steps (3)~(5) to practise other<br />
chords.<br />
Si el acorde era el correcto, la pantalla<br />
visualizará “OK”, y se le ovacionará.<br />
Si el acorde no era el correcto, la pantalla<br />
indica “ERR” y el <strong>EM</strong>-<strong>25</strong>/<strong>EM</strong>-<strong>15</strong> reproduce<br />
un sonido “rompedor” clamoroso. La nota(s)<br />
incorrecta(s) parpadea(n) en la pantalla.<br />
Interprete de nuevo el acorde y pulse “OK”.<br />
(6) Repita los pasos (3)~(5) para practicar<br />
otros acordes.<br />
Si vous avez joué le bon accord, l’écran affiche<br />
“OK” et vous êtes salué par des applaudissements.<br />
Si vous avez joué un accord incorrect,<br />
l’écran indique “ERR” et l’<strong>EM</strong>-<strong>25</strong>/<strong>EM</strong>-<strong>15</strong><br />
joue un son de “crash”. La ou les mauvaises<br />
notes clignotent alors à l’écran.<br />
Jouez à nouveau l’accord et appuyez sur<br />
“OK”.<br />
(6) Répétez les étapes (3)~(5) pour vous<br />
entraîner à jouer d’autres accords.<br />
(7) Appuyez sur [SONG], [STYLE], [TONE],<br />
[USER PROGRAM] ou [FUNCTION] pour<br />
quitter cette fonction.<br />
(7) Press [SONG], [STYLE], [TONE], [USER<br />
PROGRAM] or [FUNCTION] to leave this<br />
function.<br />
(7) Pulse [SONG], [STYLE], [TONE], [USER<br />
PROGRAM] o [FUNCTION] para dejar esta<br />
función.<br />
20
<strong>EM</strong>-<strong>25</strong>/<strong>EM</strong>-<strong>15</strong><br />
6. Playing with accompaniment<br />
Let us now take advantage of the <strong>EM</strong>-<strong>25</strong>/<br />
<strong>EM</strong>-<strong>15</strong>’s accompaniment function. This function<br />
is called “Arranger”.<br />
(1) Press the [ARRANGER] button.<br />
The [ARRANGER] icon is displayed and the<br />
keyboard is split into two halves. The keys<br />
you press in the left half are used to specify<br />
the key of the accompaniment. The right<br />
half of the keyboard allows you to play a<br />
tune to the accompaniment.<br />
At power-on, the <strong>EM</strong>-<strong>25</strong>/<strong>EM</strong>-<strong>15</strong> automatically<br />
selects the “28 16Bpop4” Style.<br />
6. Tocar con acompañamiento<br />
Vamos a sacar partido de la función de acompañamiento<br />
del <strong>EM</strong>-<strong>25</strong>/<strong>EM</strong>-<strong>15</strong>. Esta función se<br />
conoce como “Arranger”.<br />
(1) Pulse el botón [ARRANGER].<br />
El icono [ARRANGER] se visualiza y el<br />
teclado se divide en dos mitades. Las teclas<br />
que pulsa con la mano izquierda se utilizan<br />
para especificar la tecla de acompañamiento.<br />
La mitad derecha del teclado le<br />
permite reproducir una melodía en el<br />
acompañamiento.<br />
Cuando se activa, el <strong>EM</strong>-<strong>25</strong>/<strong>EM</strong>-<strong>15</strong> selecciona<br />
de forma automática el Estilo “28<br />
16Bpop4”.<br />
6. Jeu avec accompagnement<br />
Voyons à présent comment exploiter la fonction<br />
d’accompagnement de l’<strong>EM</strong>-<strong>25</strong>/<strong>EM</strong>-<strong>15</strong>.<br />
Cette fonction est appelée “Arranger”.<br />
(1) Appuyez sur le bouton [ARRANGER].<br />
L’icône [ARRANGER] s’affiche et le clavier<br />
est divisé en deux moitiés. Les touches que<br />
vous enfoncez dans la partie gauche permettent<br />
de spécifier la tonalité de l’accompagnement.<br />
La moitié droite du clavier<br />
permet de jouer une mélodie sur l’accompagnement.<br />
A la mise sous tension, l’<strong>EM</strong>-<strong>25</strong>/<strong>EM</strong>-<strong>15</strong> choisit<br />
automatiquement le style “28 16Bpop4”.<br />
(2) Press the [START/STOP] button to start<br />
Arranger playback.<br />
(2) Pulse el botón [START/STOP] para iniciar<br />
la reproducción del Arranger.<br />
(2) Appuyez sur le bouton [START/STOP]<br />
pour lancer le jeu de l’Arranger.<br />
(3) Play a chord (or just one note) with your<br />
left hand.<br />
(4) Play another chord (or note) to change<br />
the Arranger’s key.<br />
(3) Reproduzca un acorde (o sólo una nota)<br />
con la mano izquierda.<br />
(4) Interprete otro acorde (o nota) para cambiar<br />
el tono del Arranger.<br />
(3) Jouez un accord (ou une seule note) de la<br />
main gauche.<br />
(4) Jouez un autre accord (ou une autre<br />
note) pour changer la tonalité de l’Arranger.<br />
(5) Press the following buttons to use other<br />
patterns of the currently selected Music<br />
Style:<br />
(5) Pulse los siguientes botones para utilizar<br />
otros patrones del Estilo Musical actualmente<br />
seleccionado:<br />
(5) Appuyez sur les boutons ci-dessous pour<br />
utiliser d’autres motifs (“Pattern”) du style<br />
musical en vigueur:<br />
21
<strong>EM</strong>-<strong>25</strong>/<strong>EM</strong>-<strong>15</strong><br />
Button<br />
INTRO<br />
ORIGINAL<br />
FILL<br />
Function<br />
Playback of an introduction. Press this<br />
button before activating [START/<br />
STOP].<br />
Simple accompaniment version.<br />
Transition (“Fill In”) to VARIATION or<br />
ORIGINAL.<br />
VARIATION Slightly more complex accompaniment<br />
version.<br />
ENDING Phrase that indicates the end of the<br />
song. Use this button instead of<br />
[START/STOP] to stop playback.<br />
These buttons select Music Style “patterns”.<br />
The display uses the icons pictured in the left<br />
column to indicate which patterns is currently<br />
selected.<br />
Also, the CHORD field indicates which chord<br />
you played last. This chord is used by the<br />
accompaniment.<br />
As soon as you feel comfortable with the<br />
Arranger, you should try to play a melody with<br />
your right hand while using your left for<br />
selecting Arranger chords.<br />
Botón<br />
Función<br />
INTRO Reproducción de una introducción.<br />
Pulse este botón antes de activar<br />
mediante [START/STOP].<br />
ORIGINAL Versión de acompañamiento sencilla.<br />
FILL Transición (“Relleno”) a VARIATION u<br />
ORIGINAL.<br />
VARIATION Versión de acompañamiento ligeramente<br />
más compleja.<br />
ENDING Frase que indica el final de la canción.<br />
Utilice este botón en lugar de [START/<br />
STOP] para detener la reproducción.<br />
Estos botones seleccionan “patrones” de Estilo<br />
Musical. La pantalla utiliza los iconos dibujados<br />
en la columna izquierda para indicar qué<br />
patrón está actualmente seleccionado.<br />
Además, el campo CHORD indica qué acorde<br />
ha tocado en último lugar. Este acorde se utiliza<br />
mediante el acompañamiento.<br />
Tan pronto como se sienta cómodo con el<br />
Arranger, debería probar de tocar una melodía<br />
con la mano derecha mientras utiliza la derecha<br />
para seleccionar los acordes del Arranger.<br />
Bouton<br />
INTRO<br />
ORIGINAL<br />
FILL<br />
Fonction<br />
Joue une introduction. Appuyez sur ce<br />
bouton avant d’activer [START/STOP].<br />
Version simple d’accompagnement.<br />
Transition (“Fill In”) pour passer à<br />
VARIATION ou ORIGINAL.<br />
VARIATION Version d’accompagnement un peu<br />
plus sophistiquée.<br />
ENDING Phrase indiquant la fin du morceau.<br />
Vous pouvez utiliser ce bouton au lieu<br />
de [START/STOP] pour arrêter le jeu.<br />
Ces boutons servent à choisir les motifs de<br />
style musical. L’écran utilise les icônes représentées<br />
dans la colonne de gauche pour indiquer<br />
les motifs sélectionnés.<br />
En outre, la zone CHORD indique le dernier<br />
accord joué. Il s’agit de l’accord utilisé par<br />
l’accompagnement.<br />
Dès que vous vous êtes familiarisé avec<br />
l’Arranger, essayez de jouer une mélodie de la<br />
main droite tout en pilotant les accords de<br />
l’Arranger de la main gauche.<br />
Changing the tempo<br />
(6) Use the T<strong>EM</strong>PO [–] or [+] button to<br />
decrease (–) or increase (+) the tempo (if<br />
necessary).<br />
To return to the Music Style’s default tempo,<br />
press T<strong>EM</strong>PO [–][+] simultaneously.<br />
Cambiar el tempo<br />
(6) Utilice el botón T<strong>EM</strong>PO [–] o [+] para disminuir<br />
(–) o aumentar (+) el tempo (si es<br />
necesario).<br />
Para volver al tempo por defecto del Estilo<br />
Musical, pulse T<strong>EM</strong>PO [–][+] simultáneamente.<br />
Changer le tempo<br />
(6) Utilisez le bouton T<strong>EM</strong>PO [–] ou [+] pour<br />
diminuer (–) ou augmenter (+) le tempo<br />
(si nécessaire).<br />
Pour retourner au tempo par défaut du style<br />
musical, appuyez simultanément sur les<br />
boutons T<strong>EM</strong>PO [–][+].<br />
22
<strong>EM</strong>-<strong>25</strong>/<strong>EM</strong>-<strong>15</strong><br />
Stopping Arranger playback<br />
(7) Press [START/STOP] again to stop playback.<br />
You can also press [ENDING]. In that case,<br />
you first hear an ending phrase. When it is<br />
finished, Arranger playback stops automatically.<br />
Detener la reproducción del Arranger<br />
(7) Pulse [START/STOP] de nuevo para detener<br />
la reproducción.<br />
También puede pulsar [ENDING]. En este<br />
caso, oye en primer lugar una frase de final.<br />
Cuando termina, la reproducción del Arranger<br />
se detiene de forma automática.<br />
Arrêter le jeu de l’Arranger<br />
(7) Appuyez à nouveau sur [START/STOP]<br />
pour arrêter la reproduction.<br />
Vous pouvez aussi enfoncer [ENDING]. Dans<br />
ce cas, vous entendrez d’abord la phrase<br />
finale. Quand elle est terminée, le jeu de<br />
l’Arranger s’arrête automatiquement.<br />
Automatic playback start (Sync Start)<br />
Press [SYNC START]. Arranger playback now<br />
starts as soon as you play a chord in the left<br />
half of the keyboard.<br />
Inicio de reproducción automática<br />
(Sync Start)<br />
Pulse [SYNC START]. La reproducción del<br />
Arranger se inicia tan pronto como toca un<br />
acorde en la mitad izquierda del teclado.<br />
Démarrage automatique du jeu<br />
(Sync Start)<br />
Appuyez sur [SYNC START]. L’Arranger commence<br />
alors à jouer dès que vous jouez un<br />
accord dans la moitié gauche du clavier.<br />
SlRock2<br />
Mambo<br />
Selecting other Music Styles<br />
Your <strong>EM</strong>-<strong>25</strong>/<strong>EM</strong>-<strong>15</strong> comes with 64 different<br />
accompaniments (called “Music Styles”) that<br />
reside in eight banks. Here is how to select<br />
them:<br />
(1) Press the [STYLE] button.<br />
(2) Use the numeric keypad to select the<br />
desired Music Style bank (1~8).<br />
See the list in the left half of the front panel<br />
for locating the Music Style.<br />
Example: press [5] to select the “LATIN”<br />
bank.<br />
(3) Use the numeric keypad to select a Music<br />
Style from that bank (x1~x8).<br />
Example: press [6] to select the “MAMBO”<br />
Style.<br />
Note: You can also press [STYLE] to scroll<br />
through all 64 Music Styles.<br />
Seleccionar otros Estilos Musicales<br />
El <strong>EM</strong>-<strong>25</strong>/<strong>EM</strong>-<strong>15</strong> dispone de 64 acompañamientos<br />
diferentes (conocidos como “Estilos<br />
Musicales”) que residen en ocho bancos. A<br />
continuación, se describe cómo seleccionarlos:<br />
(1) Pulse el botón [STYLE].<br />
(2) Utilice el teclado numérico para seleccionar<br />
el banco de Estilo Musical deseado<br />
(1~8).<br />
Consulte la lista en la mitad izquierda del<br />
panel frontal para localizar el Estilo Musical.<br />
Ejemplo: pulse [5] para seleccionar el banco<br />
“LATIN”.<br />
(3) Utilice el teclado numérico para seleccionar<br />
un Estilo Musical de ese banco<br />
(x1~x8).<br />
Ejemplo: pulse [6] para seleccionar el Estilo<br />
“MAMBO”.<br />
Nota: También puede pulsar [STYLE] para desplazarse<br />
a través de todos los 64 Estilos Musicales.<br />
Choix d’autres styles musicaux<br />
Votre <strong>EM</strong>-<strong>25</strong>/<strong>EM</strong>-<strong>15</strong> est accompagné de 64<br />
accompagnements différents (appelés “styles<br />
musicaux”, alias “Music Styles”) répartis dans<br />
huit banques. Voici comment les choisir:<br />
(1) Appuyez sur le bouton [STYLE].<br />
(2) Choisissez la banque du style musical<br />
voulu (1~8) avec les boutons numériques.<br />
Pour trouver le style musical voulu, voyez la<br />
liste sur le côté gauche du panneau avant.<br />
Exemple: Appuyez sur [5] pour choisir la<br />
banque “LATIN”.<br />
(3) Choisissez un style musical de cette banque<br />
avec les boutons numériques (x1~x8).<br />
Exemple: Appuyez sur [6] pour choisir le<br />
style “MAMBO”.<br />
Remarque: Vous pouvez aussi utiliser [STYLE]<br />
pour passer en revue les 64 styles musicaux.<br />
23
<strong>EM</strong>-<strong>25</strong>/<strong>EM</strong>-<strong>15</strong><br />
Piano 2<br />
Selecting sounds for the right hand<br />
Do the following if you wish to assign a different<br />
sound to your (right-hand) melody playing:<br />
(1) Press the [TONE] button.<br />
The arrow (√) jumps to the “TONE” entry.<br />
You can now select Tones.<br />
(2) Have a look at the TONE A/TONE B lists<br />
on the right-hand side of front panel to<br />
locate the Tone (sound) you need.<br />
In this example, we will select the Tone “B41<br />
Fantasia”.<br />
(3) Press the [A/B] button to select the Tone<br />
group.<br />
The “Fantasia” Tone belongs to the “TONE B”<br />
group. You therefore need to press [A/B]<br />
once or twice to make the display read “b”.<br />
Note: This is only necessary if the currently<br />
selected Tone belongs to the A group.<br />
Note: The name (“Piano 2” in the illustration) still<br />
refers to the previously selected Tone.<br />
Seleccionar sonidos para la mano derecha<br />
Siga los pasos descritos a continuación si<br />
desea asignar un sonido diferente a su interpretación<br />
de melodía (mano derecha):<br />
(1) Pulse el botón [TONE].<br />
La flecha (√) avanza hasta la entrada<br />
“TONE”. Ahora puede seleccionar Tones.<br />
(2) Consulte las listas TONE A/TONE B en la<br />
parte de la mano derecha del panel frontal<br />
para localizar el Tone (sonido) que<br />
necesite.<br />
En este ejemplo, seleccionaremos el Tone<br />
“B41 Fantasia”.<br />
(3) Pulse el botón [A/B] para seleccionar el<br />
grupo de Tone.<br />
El Tone “Fantasia” pertenece al grupo “TONE<br />
B”. Entonces deberá pulsar [A/B] una vez o<br />
dos para que la pantalla visualice “b”.<br />
Nota: Esto sólo es necesario si el Tone actualmente<br />
seleccionado pertenece al grupo A.<br />
Nota: El nombre (“Piano 2” en el dibujo) hace<br />
referencia aún al Tone seleccionado anteriormente.<br />
Choix des sons pour la main droite<br />
Voici comment faire pour assigner un autre<br />
son à la mélodie que vous jouez de la main<br />
droite:<br />
(1) Appuyez sur le bouton [TONE].<br />
La flèche (√) se déplace jusqu’en face de<br />
“TONE”. Vous pouvez alors choisir des sons.<br />
(2) Regardez les listes TONE A/TONE B sur le<br />
côté droit du panneau avant afin de trouver<br />
le son (“Tone”) recherché.<br />
Pour cet exemple, nous choisirons le son<br />
“B41 Fantasia”.<br />
(3) Appuyez sur le bouton [A/B] pour choisir<br />
le groupe Tone.<br />
Le son “Fantasia” fait partie du groupe<br />
“TONE B”. Appuyez donc une ou deux fois<br />
sur [A/B] de sorte que l’écran indique “b”.<br />
Remarque: Cette étape n’est nécessaire que si le<br />
son en vigueur appartient au groupe A.<br />
Remarque: Le nom (“Piano 2” dans l’illustration)<br />
indique toujours le dernier son sélectionné.<br />
Piano 2<br />
(4) Press the numeric button [4] to select<br />
bank “4”.<br />
Note: The name (“Piano 2” in the illustration) still<br />
refers to the previously selected Tone.<br />
(4) Pulse el botón numérico [4] para seleccionar<br />
banco “4”.<br />
Nota: El nombre (“Piano 2” en el dibujo) hace<br />
referencia aún al Tone seleccionado anteriormente.<br />
(4) Appuyez sur le bouton numérique [4]<br />
pour choisir la banque “4”.<br />
Remarque: Le nom (“Piano 2” dans l’illustration)<br />
indique toujours le dernier son sélectionné.<br />
24<br />
Fantasia<br />
(5) Press the numeric button [1] to select the<br />
“Fantasia” Tone.<br />
Notice how the Tone name in the display<br />
changes. If you now play in the right half of<br />
the keyboard, you will hear the “Fantasia”<br />
Tone.<br />
Note: See p. 41 for how to select Tone Variations.<br />
Note: You can also press [TONE] repeatedly to<br />
scroll through all available Tones (excluding the<br />
Variations.)<br />
(5) Pulse el botón numérico “1” para seleccionar<br />
el Tone “Fantasia”.<br />
Observe cómo cambia el nombre de Tone en<br />
la pantalla. Si ahora está tocando en la mitad<br />
derecha del teclado, oirá el Tone “Fantasia”.<br />
Nota: Consulte la p. 41 para más información<br />
acerca de cómo seleccionar Variaciones del Tone.<br />
Nota: También puede pulsar [TONE] repetidamente<br />
para desplazarse a través de todos los<br />
Tones disponibles (excluyendo las Variaciones.)<br />
(5) Appuyez sur le bouton numérique [1]<br />
pour choisir le son “Fantasia”.<br />
Notez comme le nom de son change à<br />
l’écran. Jouez maintenant dans la moitié<br />
droite du clavier: vous entendez le son “Fantasia”.<br />
Remarque: Pour savoir comment choisir les sons<br />
de variation, voyez p. 41.<br />
Remarque: Vous pouvez aussi appuyer plusieurs<br />
fois sur [TONE] pour passer en revue tous les sons<br />
disponibles (sauf les variations).
<strong>EM</strong>-<strong>25</strong>/<strong>EM</strong>-<strong>15</strong><br />
7. Splitting the keyboard<br />
(Organ)<br />
7. Dividir el teclado<br />
(Organ)<br />
7. Partage de clavier<br />
(Organ)<br />
Lower (+M. Bass)<br />
Upper<br />
Here is how to split the keyboard without<br />
using the Arranger. This allows you to play<br />
separate sounds with your left and right<br />
hands:<br />
• One sound in the right half (Upper).<br />
• One sound in the left half (Lower). You can<br />
also add an automatic bass line (M.Bass).<br />
See p. 61.<br />
(1) Press the [ORGAN] button.<br />
The [ORGAN] icon appears in the display.<br />
(2) Start playing with your left and right<br />
hands.<br />
See “Selecting sounds for the right hand”<br />
(p. 24) for assigning a different sound to the<br />
right hand.<br />
To select another Tone for the Lower part,<br />
you need to press and hold [ORGAN] while<br />
using [A/B], [1]~[8], and possibly also<br />
[VARIATION].<br />
(3) If you like, you can press [START/STOP] to<br />
start the drum accompaniment of the<br />
currently selected Music Style.<br />
See p. 23 for how to select other Music<br />
Styles.<br />
A continuación, se explica cómo dividir el<br />
teclado sin utilizar el Arranger. Esto le permite<br />
reproducir sonido separados con la mano<br />
izquierda y la mano derecha:<br />
• Un sonido en la mitad derecha (Upper).<br />
• Un sonido en la mitad izquierda (Lower).<br />
También puede añadir una línea de bajo<br />
automática (M.Bass). Consulte la p. 61.<br />
(1) Pulse el botón [ORGAN].<br />
El icono [ORGAN] aparece en la pantalla.<br />
(2) Empiece a tocar con su mano izquierda y<br />
derecha.<br />
Consulte “Seleccionar sonidos para la mano<br />
derecha” (p. 24) para asignar un sonido diferente<br />
a la mano derecha.<br />
Para seleccionar otro Tone para la parte<br />
Lower, deberá mantener pulsado [ORGAN]<br />
mientras utiliza [A/B], [1]~[8], y posiblemente<br />
también [VARIATION].<br />
(3) Si lo desea, puede pulsar [START/STOP]<br />
para iniciar el acompañamiento de percusión<br />
del Estilo Musical actualmente seleccionado.<br />
Consulte la p. 23 para más información<br />
acerca de cómo seleccionar otros Estilos<br />
Musicales.<br />
Voici comment partager le clavier sans utiliser<br />
l’Arranger. Cela permet de jouer des sons différents<br />
de la main gauche et de la main droite:<br />
• Un son dans la moitié droite (Upper).<br />
• Un son dans la moitié gauche (Lower). Vous<br />
pouvez en outre ajouter une ligne de basse<br />
automatique (M.Bass). Voyez p. 61.<br />
(1) Appuyez sur le bouton [ORGAN].<br />
L’icône [ORGAN] s’affiche à l’écran.<br />
(2) Commencez à jouer de la main gauche et<br />
de la main droite.<br />
Pour savoir comment assigner un son différent<br />
à la main droite, voyez “Choix des sons<br />
pour la main droite” (p. 24).<br />
Si vous voulez choisir un autre son pour la<br />
partie Lower, vous devez maintenir<br />
[ORGAN] enfoncé tout en utilisant [A/B],<br />
[1]~[8] et éventuellement aussi<br />
[VARIATION].<br />
(3) Si vous le voulez, vous pouvez appuyer<br />
sur [START/STOP] pour lancer l’accompagnement<br />
de batterie du style musical courant.<br />
Pour savoir comment choisir d’autres styles<br />
musicaux, voyez p. 23.<br />
<strong>25</strong>
<strong>EM</strong>-<strong>25</strong>/<strong>EM</strong>-<strong>15</strong><br />
8. Playing one sound<br />
(Piano)<br />
8. Tocar un sonido<br />
(Piano)<br />
8. Jeu avec un son<br />
(Piano)<br />
Upper<br />
Upper<br />
MetroTS<br />
Here is how to play one sound via the entire<br />
keyboard. This mode is automatically selected<br />
when you switch on the <strong>EM</strong>-<strong>25</strong>/<strong>EM</strong>-<strong>15</strong>.<br />
As it was mainly meant to use the <strong>EM</strong>-<strong>25</strong>/<br />
<strong>EM</strong>-<strong>15</strong> like a digital piano, this mode is called<br />
“PIANO”.<br />
(1) Press the [PIANO] button.<br />
The [ORGAN], [ARRANGER], or [M.DRUMS]<br />
icon in the center of the display (depending<br />
on which one was displayed) disappears.<br />
See “Selecting sounds for the right hand”<br />
(p. 24) for selecting a different sound.<br />
Using the metronome<br />
You can switch on the metronome when practising<br />
a new song.<br />
(1) Press the [METRONOME] button.<br />
The icon appears in the display and you<br />
hear the metronome sound.<br />
(2) Press and hold [METRONOME] to select<br />
the “Metro TS” function.<br />
(3) Use the T<strong>EM</strong>PO [–][+] buttons (that now<br />
function as “DATA” buttons (notice the<br />
“VALUE” message in the display) to set<br />
another time signature.<br />
The possibilities are: 1/4, 2/4, 3/4, 4/4, 5/4,<br />
6/4, 6/8, 9/8.<br />
(4) Press [SONG], [STYLE], [TONE], or [USER<br />
PROGRAM] to leave this function.<br />
A continuación, se explica cómo tocar un<br />
sonido mediante todo el teclado. Este modo se<br />
selecciona de forma automática al poner en<br />
marcha el <strong>EM</strong>-<strong>25</strong>/<strong>EM</strong>-<strong>15</strong>.<br />
Ya que la intención principal de utilizar el<br />
<strong>EM</strong>-<strong>25</strong>/<strong>EM</strong>-<strong>15</strong> era como un piano digital, este<br />
modo se conoce como “PIANO”.<br />
(1) Pulse el botón [PIANO].<br />
El icono [ORGAN], [ARRANGER], o<br />
[M.DRUMS] en el centro de la pantalla<br />
(según el que se visualizaba) desaparece.<br />
Consulte “Seleccionar sonidos para la mano derecha”<br />
(p. 24) para seleccionar un sonido diferente.<br />
Utilizar el metrónomo<br />
Puede activar el metrónomo si practica una<br />
nueva canción.<br />
(1) Pulse el botón [METRONOME].<br />
El icono aparece en la pantalla y oirá el<br />
sonido de metrónomo.<br />
(2) Pulse y mantenga pulsado [METRO-<br />
NOME] para seleccionar la función<br />
“Metro TS”.<br />
(3) Utilice los botones T<strong>EM</strong>PO [–][+] (que<br />
ahora funcionan como botones “DATA”<br />
(observe el mensaje “VALUE” en la pantalla)<br />
para ajustar otro tipo de compás.<br />
Las posibilidades son: 1/4, 2/4, 3/4, 4/4, 5/4,<br />
6/4, 6/8, 9/8.<br />
(4) Pulse [SONG], [STYLE], [TONE], o [USER<br />
PROGRAM] para salir de esta función.<br />
Voici comment jouer un seul et même son sur<br />
tout le clavier. Ce mode est automatiquement<br />
choisi quand vous mettez l’<strong>EM</strong>-<strong>25</strong>/<strong>EM</strong>-<strong>15</strong> sous<br />
tension.<br />
Vu que ce mode a été conçu avant tout pour<br />
utiliser l’<strong>EM</strong>-<strong>25</strong>/<strong>EM</strong>-<strong>15</strong> comme un piano<br />
numérique, il s’appelle “PIANO”.<br />
(1) Appuyez sur le bouton [PIANO].<br />
L’icône [ORGAN], [ARRANGER] ou<br />
[M.DRUMS] disparaît du centre de l’écran<br />
(selon l’icône affichée).<br />
Voyez “Choix des sons pour la main droite”<br />
(p. 24) pour savoir comment choisir un<br />
autre son.<br />
Utilisation du métronome<br />
Si vous le voulez, vous pouvez activer le<br />
métronome quand vous répétez un morceau.<br />
(1) Appuyez sur le bouton [METRONOME].<br />
L’icône s’affiche à l’écran et le son du<br />
métronome retentit.<br />
(2) Maintenez [METRONOME] enfoncé pour<br />
choisir la fonction “Metro TS”.<br />
(3) Utilisez les boutons T<strong>EM</strong>PO [–][+] (qui<br />
font maintenant office de boutons<br />
“DATA”; notez l’indication “VALUE” à<br />
l’écran) pour choisir une autre armure de<br />
temps.<br />
Voici les possibilités: 1/4, 2/4, 3/4, 4/4, 5/4,<br />
6/4, 6/8, 9/8.<br />
(4) Appuyez sur [SONG], [STYLE], [TONE] ou<br />
[USER PROGRAM] pour quitter cette<br />
fonction.<br />
26
<strong>EM</strong>-<strong>25</strong>/<strong>EM</strong>-<strong>15</strong><br />
9. Drumming on the<br />
keyboard<br />
9. Tocar percusión en el<br />
teclado<br />
9. Jouer de la batterie<br />
sur le clavier<br />
Here is how to assign drum and percussion<br />
sounds to the entire keyboard.<br />
A continuación, se explica cómo asignar sonidos<br />
de percusión a todo el teclado.<br />
Cette section vous montre comment assigner<br />
des sons de batterie et de percussion au clavier<br />
entier.<br />
M.Drums<br />
M.Drums<br />
(1) Press the [M.DRUMS] button.<br />
The [M.DRUMS] icon appears in the display.<br />
Play a few notes on the keyboard. This time,<br />
every key is assigned to a different sound.<br />
With the leftmost key, you can play a bass<br />
drum sound (also called “kick”). The white<br />
key next to it triggers a snare drum sound,<br />
etc. Try it out by pressing several keys, either<br />
in succession or simultaneously.<br />
(1) Pulse el botón [M.DRUMS].<br />
El icono [M.DRUMS] aparece en la pantalla.<br />
Toque unas cuantas notas en el teclado.<br />
Desde este momento, cada tecla se asigna a<br />
un sonido diferente.<br />
Con la tecla de más a la izquierda, puede reproducir<br />
un sonido de percusión de bajo (también<br />
conocido como “Bombo”). La tecla blanca que<br />
está junto a éste desencadena un sonido de<br />
caja, etc. Pruébelo pulsando diferentes teclas,<br />
ya sea en sucesión o simultáneamente.<br />
Seleccionar otros Grupos de percusión<br />
Los sonidos utilizados en el modo M.Drums<br />
(“M.Drums” es la abreviación de Manual<br />
Drums) no están producidos por Tones sino<br />
por un Grupo de percusión. Los Grupos de<br />
percusión son colecciones de más de 90 sonidos,<br />
cada uno asignado a una tecla diferente.<br />
(1) Pulse un botón [1]~[8] de número para<br />
seleccionar el Grupo de percusión<br />
deseado.<br />
Como se habrá dado cuenta, existen 9 Grupos<br />
de percusión, mientras que sólo existen<br />
8 botones numéricos. Para seleccionar el<br />
Grupo de percusión “TR-808”, deberá seguir<br />
los pasos que se describen a continuación:<br />
• En primer lugar pulse el botón [4] para seleccionar<br />
el Grupo de percusión “Electron”. A<br />
continuación, pulse el botón [VARIATION].<br />
Aparece un pequeño “1” a la derecha del<br />
número del Grupo de percusión, mientras<br />
que el nombre cambia a “TR-808”.<br />
(1) Appuyez sur le bouton [M.DRUMS].<br />
L’icône [M.DRUMS] s’affiche à l’écran. Jouez<br />
quelques notes sur le clavier. Cette fois, un<br />
son différent est affecté à chaque touche.<br />
La dernière touche à gauche pilote un son<br />
de grosse caisse (alias le “kick”). La touche<br />
blanche juste à côté pilote un son de caisse<br />
claire, etc. Essayez de jouer un rythme de<br />
batterie en enfonçant simultanément ou<br />
tour à tour plusieurs touches.<br />
dr1 Standard<br />
dr2 Room<br />
dr3 Power<br />
dr4 Electron<br />
dr41 TR-808<br />
dr5 Jazz<br />
dr6 Brush<br />
dr7 Orchestra<br />
dr8 SFX<br />
Selecting other Drum Sets<br />
The sounds used in M.Drums mode (“M.Drums”<br />
is short for Manual Drums) are not produced<br />
by Tones but rather by a Drum Set. Drum Sets<br />
are collections of over 90 sounds, each<br />
assigned to a different key.<br />
(1) Press a number [1]~[8] button to select<br />
the desired Drum Set.<br />
As you see, there are 9 Drum Sets, while<br />
there are only 8 numeric buttons. To select<br />
the “TR-808” Drum Set, you need to proceed<br />
as follows:<br />
• First press the [4] button to select the “Electron”<br />
Drum Set. Then press the<br />
[VARIATION] button.<br />
A small “1” appears to the right of the Drum<br />
Set number, while the name changes to<br />
“TR-808”.<br />
Choix d’un autre Drum Set<br />
Les sons utilisés en mode M.Drums (“M.Drums”<br />
est l’abréviation de Manual Drums) ne sont<br />
pas produits sur base de Tones (c.-à-d. de sons)<br />
mais font partie d’un Drum Set. Les Drum Sets<br />
sont des ensembles comprenant plus de 90<br />
sons affectés chacun à une touche du clavier.<br />
(1) Appuyez sur un bouton numérique<br />
[1]~[8] pour choisir le Drum Set voulu.<br />
Comme vous le voyez, il existe 9 Drum Sets,<br />
tandis que l’instrument comporte seulement<br />
8 boutons numériques. Voici comment<br />
faire pour choisir le Drum Set “TR-808”:<br />
• Appuyez d’abord sur le bouton [4] pour<br />
choisir le Drum Set “Electron”. Appuyez<br />
ensuite sur le bouton [VARIATION].<br />
Un petit “1” apparaît à droite du numéro de<br />
Drum Set et le nom change en “TR-808”.<br />
27
<strong>EM</strong>-<strong>25</strong>/<strong>EM</strong>-<strong>15</strong><br />
10. Recording your music 10. Grabar música 10. Enregistrer votre jeu<br />
Your <strong>EM</strong>-<strong>25</strong>/<strong>EM</strong>-<strong>15</strong> contains a 2-track<br />
Recorder you can use for recording your own<br />
songs. Feel free to use the Arranger to add an<br />
accompaniment to the melodies you record.<br />
This functionality is actually the main reason<br />
why the Recorder provides two tracks: the<br />
first is used to record the accompaniment or<br />
Lower part, while track 2 (or 2nd Track, as it is<br />
called) allows you to record the melody, etc.<br />
Here, we will show you how to record your<br />
melody and the Arranger accompaniment.<br />
(1) Press the [ARRANGER] button.<br />
The [ARRANGER] icon is displayed in the<br />
center of the display. You can now use your<br />
left hand for transposing the Arranger’s key<br />
in realtime.<br />
El <strong>EM</strong>-<strong>25</strong>/<strong>EM</strong>-<strong>15</strong> dispone de un Grabador de 2<br />
pistas que puede utilizar para grabar sus propias<br />
canciones. No dude en utilizar el Arranger<br />
para añadir un acompañamiento a las<br />
melodías que grabe. Esta funcionalidad es, en<br />
realidad, la razón principal por la que el Grabador<br />
dispone de dos pistas: la primera se utiliza<br />
para grabar el acompañamiento o parte Lower,<br />
mientras que la pista 2 (o 2nd Track, tal como<br />
se llama) le permite grabar la melodía, etc.<br />
A continuación, se explicará cómo grabar la<br />
melodía y el acompañamiento del Arranger.<br />
(1) Pulse el botón [ARRANGER].<br />
El icono [ARRANGER] se visualiza en el centro<br />
de la pantalla. Ahora puede utilizar su<br />
mano izquierda para transponer el tono del<br />
Arranger a tiempo real.<br />
Votre <strong>EM</strong>-<strong>25</strong>/<strong>EM</strong>-<strong>15</strong> comporte une fonction<br />
Recorder d’enregistreur 2 pistes que vous pouvez<br />
exploiter pour enregistrer vos propres<br />
morceaux. Vous pouvez aussi utiliser l’Arranger<br />
pour ajouter un accompagnement à la<br />
mélodie enregistrée. Cette option explique<br />
pourquoi la fonction Recorder comporte deux<br />
pistes: la piste 1 pour l’accompagnement ou<br />
la partie Lower et la piste 2 (2nd Track) pour<br />
enregistrer la mélodie, etc.<br />
Voyons à présent comment enregistrer votre<br />
mélodie et l’accompagnement de l’Arranger.<br />
(1) Appuyez sur le bouton [ARRANGER].<br />
L’icône [ARRANGER] s’affiche au centre de<br />
l’écran. Vous pouvez à présent transposer la<br />
tonalité de l’Arranger en temps réel avec<br />
votre main gauche.<br />
(2) Press the [STYLE] button.<br />
(3) Use the numeric keypad to select the<br />
desired Music Style bank (1~8).<br />
See the list in the left half of the front panel<br />
for locating the Music Style.<br />
(4) Use the numeric keypad to select a Music<br />
Style from that bank (x1~x8).<br />
See also page 23.<br />
(5) Press the [START/STOP] button.<br />
(6) Use the T<strong>EM</strong>PO [–] or [+] button to<br />
decrease (–) or increase (+) the tempo (if<br />
necessary).<br />
(7) Press [START/STOP] again to stop<br />
Arranger playback.<br />
(2) Pulse el botón [STYLE].<br />
(3) Utilice los botones numéricos para seleccionar<br />
el banco de Estilo Musical deseado<br />
(1~8).<br />
Consulte la lista en la mitad izquierda del<br />
panel frontal para localizar el Estilo Musical.<br />
(4) Utilice los botones numéricos para seleccionar<br />
un Estilo Musical de ese banco<br />
(x1~x8).<br />
Consulte también la página 23.<br />
(5) Pulse el botón [START/STOP].<br />
(6) Utilice el botón T<strong>EM</strong>PO [–] o [+] para disminuir<br />
(–) o aumentar (+) el tempo (si es<br />
necesario).<br />
(7) Pulse [START/STOP] de nuevo para detener<br />
la reproducción del Arranger.<br />
(2) Appuyez sur le bouton [STYLE].<br />
(3) Choisissez la banque du style musical<br />
voulu (1~8) avec les boutons numériques.<br />
Pour trouver le style musical voulu, voyez la<br />
liste sur le côté gauche du panneau avant.<br />
(4) Choisissez un style musical de cette banque<br />
avec les boutons numériques (x1~x8).<br />
Voyez aussi page 23.<br />
(5) Appuyez sur le bouton [START/STOP].<br />
(6) Si nécessaire, diminuez ou augmentez le<br />
tempo avec le bouton T<strong>EM</strong>PO [–] ou [+].<br />
(7) Appuyez à nouveau sur [START/STOP]<br />
pour arrêter la reproduction de l’Arranger.<br />
28
<strong>EM</strong>-<strong>25</strong>/<strong>EM</strong>-<strong>15</strong><br />
(8) Assign the desired Tone to the right half<br />
of the keyboard.<br />
Press [TONE], and use the [A/B] and [1]~[8]<br />
buttons. See also page 24.<br />
Note: If necessary, you can also use the [VARIA-<br />
TION] button to select a Tone Variation. See p. 41<br />
for details.<br />
(8) Asigne el Tone deseado a la mitad derecha<br />
del teclado.<br />
Pulse [TONE], y utilice los botones [A/B] y<br />
[1]~[8]. Consulte también la página 24.<br />
Nota: Si es necesario, también puede pulsar el<br />
botón [VARIATION] para seleccionar una Variación<br />
del Tone. Consulte la p. 41 para más detalles.<br />
(8) Assignez le son voulu à la moitié droite<br />
du clavier.<br />
Appuyez sur [TONE] et utilisez les boutons<br />
[A/B] et [1]~[8]. Voyez aussi page 24.<br />
Remarque: Si nécessaire, vous pouvez aussi utiliser<br />
le bouton [VARIATION] pour choisir un son<br />
de variation. Pour en savoir plus, voyez p. 41.<br />
(9) Press the [● REC] button once or twice<br />
to select the [REC] icon.<br />
Note: This will erase the song that currently<br />
resides in the <strong>EM</strong>-<strong>25</strong>/<strong>EM</strong>-<strong>15</strong>’s internal memory.<br />
(10) Start recording in one of the following<br />
ways:<br />
• Play the first melody notes (to the right of<br />
the Split point). This will start the recording<br />
without Arranger backing. You can add it<br />
whenever you like by playing a chord in the<br />
left half of the keyboard (if the SYNC START<br />
function (see p. 23) is on). The Arranger will<br />
then start immediately.<br />
Note: If you start recording without the<br />
Arranger and want to bring it in at a later stage,<br />
it would be a good idea to switch on the metronome<br />
by pressing the [METRONOME] button.<br />
• Press the [START/STOP] button to start<br />
Arranger playback with the selected Division<br />
at the next downbeat.<br />
• Activate the SYNC START function and press<br />
one or several keys to the left of the Split<br />
point.<br />
Note: It is also possible to record in PIANO,<br />
ORGAN, and M.DRUMS modes (after pressing<br />
the buttons of the same name). In that case, you<br />
should use the metronome. The song’s time signature<br />
can be set with the MetroTS function.<br />
See page 26.<br />
(9) Pulse el botón [● REC] una vez o dos<br />
para seleccionar el icono [REC].<br />
Nota: De esta forma, borrará la canción que<br />
actualmente reside en la memoria interna del<br />
<strong>EM</strong>-<strong>25</strong>/<strong>EM</strong>-<strong>15</strong>.<br />
(10) Empiece a grabar siguiendo una de las<br />
formas descritas a continuación:<br />
• Reproduzca las primeras notas de la melodía<br />
(a la derecha del punto de división). De esta<br />
forma, se iniciará la grabación sin el acompañamiento<br />
del Arranger. Puede añadirlo<br />
siempre que lo desee reproduciendo un<br />
acorde en la mitad izquierda del teclado (si<br />
la función SYNC START está activada (consulte<br />
la p. 23). A continuación, el Arranger<br />
se iniciará inmediatamente.<br />
Nota: Si inicia la grabación sin el Arranger y<br />
desea introducirlo más adelante, sería una buena<br />
idea activar el metrónomo pulsando el botón<br />
[METRONOME].<br />
• Pulse el botón [START/STOP] para iniciar la<br />
reproducción del Arranger sin la División<br />
seleccionada en el próximo tiempo fuerte.<br />
• Active la función SYNC START y pulse una<br />
de las diferentes teclas a la izquierda del<br />
punto de División.<br />
Nota: También es posible grabar en los modos<br />
PIANO, ORGAN, y M.DRUMS (después de pulsar<br />
los botones del mismo nombre). En este caso,<br />
debería utilizar el metrónomo. El tipo de compás<br />
de la canción se puede ajustar con la función<br />
MetroTS. Consulte la página 26.<br />
(9) Appuyez une ou deux fois sur le bouton<br />
[● REC] pour choisir l’icône [REC].<br />
Remarque: Cette opération efface le morceau<br />
dans la mémoire interne de l’<strong>EM</strong>-<strong>25</strong>/<strong>EM</strong>-<strong>15</strong>.<br />
(10) Lancez l’enregistrement en suivant une<br />
des méthodes ci-dessous:<br />
• Jouez les premières notes de la mélodie (à<br />
droite du point de partage du clavier).<br />
L’enregistrement démarre alors sans l’Arranger.<br />
Vous pouvez ajouter le jeu de l’Arranger<br />
à tout moment en jouant un accord dans la<br />
moitié gauche du clavier – à condition que<br />
SYNC START (voyez p. 23) soit activé.<br />
L’Arranger démarre alors immédiatement.<br />
Remarque: Si vous démarrez l’enregistrement<br />
sans l’Arranger et que vous comptez lancer ce<br />
dernier plus tard, nous vous conseillons d’activer<br />
le métronome en appuyant sur [METRONOME].<br />
• Appuyez sur [START/STOP] pour lancer le jeu<br />
de l’Arranger avec la mesure spécifiée sur le<br />
prochain temps fort.<br />
• Activez la fonction SYNC START et enfoncez<br />
une ou plusieurs touches à gauche du point<br />
de partage.<br />
Remarque: Vous pouvez aussi enregistrer en<br />
modes PIANO, ORGAN et M.DRUMS (après avoir<br />
enfoncé le bouton du même nom). Dans ce cas,<br />
veillez à utiliser le métronome. Vous pouvez<br />
régler l’armure de temps du morceau avec la<br />
fonction MetroTS. Voyez page 26.<br />
29
<strong>EM</strong>-<strong>25</strong>/<strong>EM</strong>-<strong>15</strong><br />
(11) Stop recording in one of the following<br />
ways:<br />
• Press [START/STOP].<br />
• Press the [ENDING] button to start the Ending<br />
phrase. As soon as it ends, recording<br />
stops.<br />
(11) Detenga la grabación siguiendo una de<br />
las formas descritas a continuación:<br />
• Pulse [START/STOP].<br />
• Pulse el botón [ENDING] para iniciar la frase<br />
de Final. Tan pronto como termine, la grabación<br />
se detiene.<br />
(11) Arrêtez l’enregistrement en suivant une<br />
des méthodes ci-dessous:<br />
• Appuyez sur [START/STOP].<br />
• Appuyez sur le bouton [ENDING] pour lancer<br />
la phrase de finale. L’enregistrement<br />
s’arrête dès que la finale se termine.<br />
Listening to your song<br />
(1) Press the [SONG] button.<br />
The [STYLE] (upper right corner), [INTRO],<br />
[ORIGINAL], etc. (center), icons are now<br />
deactivated, while the [PLAY®], [REC∏], etc.,<br />
icons are used.<br />
The arrow (√) appears next to the “SONG”<br />
entry in the left column.<br />
(2) Press [ORIGINAL |√] to return to the<br />
beginning of the song.<br />
(3) Press [START/STOP] to start playback.<br />
The [PLAY®] icon is surrounded by a box to<br />
indicate that playback is running.<br />
(4) Press [START/STOP] once again to stop<br />
playback.<br />
Second recording pass<br />
Suppose that you are happy with the accompaniment<br />
but would like to redo the melody<br />
(or that you left out melody the first time<br />
around). The <strong>EM</strong>-<strong>25</strong>/<strong>EM</strong>-<strong>15</strong> allows you to do<br />
just that – and best of all: you only need to<br />
play the melody again because the accompaniment<br />
resides on a separate track!<br />
(1) Press the [ORIGINAL |√] button to<br />
return to the beginning of your song<br />
(“Reset” function).<br />
Escuchar la canción<br />
(1) Pulse el botón [SONG].<br />
Los iconos [STYLE] (ángulos superior derecho),<br />
[INTRO], [ORIGINAL], etc. (centro), se<br />
desactivan, mientras se utilizan los iconos<br />
[PLAY®], [REC∏], etc.<br />
La flecha (√) aparece junto a la entrada<br />
“SONG” en la columna izquierda.<br />
(2) Pulse [ORIGINAL |√] para volver al principio<br />
de la canción.<br />
(3) Pulse [START/STOP] para iniciar la reproducción.<br />
El icono [PLAY®] está rodeado por un cuadro<br />
para indicar que la reproducción está en<br />
marcha.<br />
(4) Pulse [START/STOP] de nuevo para detener<br />
la reproducción.<br />
Segundo pase de grabación<br />
Supongamos que está satisfecho con el acompañamiento<br />
pero le gustaría volver a realizar<br />
la melodía (o que se olvidó de la melodía del<br />
principio). El <strong>EM</strong>-<strong>25</strong>/<strong>EM</strong>-<strong>15</strong> le permite realizar<br />
esto – y lo mejor de todo: sólo debe tocar la<br />
melodía otra vez porque el acompañamiento<br />
se encuentra en una pista separada!<br />
(1) Pulse el botón [ORIGINAL |√] para volver<br />
al principio de la canción (función<br />
“Reset”).<br />
Ecoute de votre morceau<br />
(1) Appuyez sur le bouton [SONG].<br />
Les icônes [STYLE] (coin supérieur droit),<br />
[INTRO], [ORIGINAL], etc. (centre) sont à présent<br />
désactivées, tandis que les icônes<br />
[PLAY®], [REC∏], etc. sont utilisées.<br />
La flèche (√) s’affiche en face de “SONG”<br />
dans la colonne de gauche.<br />
(2) Appuyez sur [ORIGINAL |√] pour retourner<br />
au début du morceau.<br />
(3) Appuyez sur [START/STOP] pour lancer la<br />
reproduction.<br />
L’icône [PLAY®] est entourée d’un cadre<br />
indiquant que la reproduction est en cours.<br />
(4) Appuyez à nouveau sur [START/STOP]<br />
pour arrêter la reproduction.<br />
Deuxième enregistrement<br />
Supposons que vous soyez content de votre<br />
accompagnement mais que vous souhaitiez<br />
rejouer la mélodie (ou que vous n’ayez pas<br />
joué la mélodie lors du premier enregistrement).<br />
Pas de problème avec l’ <strong>EM</strong>-<strong>25</strong>/<strong>EM</strong>-<strong>15</strong> –<br />
il vous suffit de rejouer la mélodie car en effet<br />
l’accompagnement se trouve dans une piste<br />
séparée!<br />
(1) Appuyez sur le bouton [ORIGINAL |√]<br />
pour retourner au début de votre morceau<br />
(fonction “Reset”).<br />
30
<strong>EM</strong>-<strong>25</strong>/<strong>EM</strong>-<strong>15</strong><br />
(2) Press the [● REC] button.<br />
The <strong>EM</strong>-<strong>25</strong>/<strong>EM</strong>-<strong>15</strong> now automatically<br />
selects the [2nd≈TRK] function.<br />
Note: (For the <strong>EM</strong>-<strong>25</strong>) This 2nd Track function is<br />
not available for Songs loaded from disk.<br />
(3) Select the Upper Tone you wish to use.<br />
See page 24.<br />
(2) Pulse el botón [● REC].<br />
El <strong>EM</strong>-<strong>25</strong>/<strong>EM</strong>-<strong>15</strong> selecciona de forma<br />
automática la función [2nd≈TRK].<br />
Nota: (Para el <strong>EM</strong>-<strong>25</strong>) Esta función 2nd Track no<br />
está disponible para las Canciones cargadas<br />
desde el disco.<br />
(3) Seleccione el Tone Upper que desee utilizar.<br />
Consulte la página 24.<br />
(4) Reproduzca algunas notas en el teclado:<br />
esta vez, todas las teclas se asignan a la<br />
parte Upper.<br />
Nota: Puede grabar una parte de percusión antes<br />
que una melodía pulsando el botón [M.DRUMS].<br />
(2) Appuyez sur le bouton [● REC].<br />
L’<strong>EM</strong>-<strong>25</strong>/<strong>EM</strong>-<strong>15</strong> choisit à présent automatiquement<br />
la fonction [2nd≈TRK].<br />
Remarque: (pour l’<strong>EM</strong>-<strong>25</strong>) Cette fonction 2nd<br />
Track n’est pas disponible pour les Songs chargés<br />
depuis une disquette.<br />
(3) Choisissez le son Upper Tone que vous<br />
voulez utiliser.<br />
Voyez page 24.<br />
(4) Jouez quelques notes sur le clavier: cette<br />
fois, toutes les touches sont affectées à la<br />
partie Upper.<br />
Remarque: Au lieu d’une mélodie, vous pouvez<br />
enregistrer une partie de batterie; pour cela,<br />
appuyez sur le bouton [M.DRUMS].<br />
Upper<br />
Upper<br />
(4) Play a few notes on the keyboard: this<br />
time, all keys are assigned to the Upper<br />
part.<br />
Note: You can record a drum part rather than a<br />
melody by pressing the [M.DRUMS] button.<br />
(5) Switch on the metronome if you like.<br />
(6) Press the [START/STOP] button.<br />
The [PLAY®] icon is surrounded by a box to<br />
signal that the <strong>EM</strong>-<strong>25</strong>/<strong>EM</strong>-<strong>15</strong> has started<br />
recording.<br />
(7) Play your melody or solo.<br />
(8) When you are finished, press the [● REC]<br />
button (or [START/STOP]).<br />
Note: See p. 45 and following for details about<br />
the 2nd Track function.<br />
(5) Active el metrónomo si lo desea.<br />
(6) Pulse el botón [START/STOP].<br />
El icono [PLAY®] está rodeado por un cuadro<br />
para indicar que el <strong>EM</strong>-<strong>25</strong>/<strong>EM</strong>-<strong>15</strong> ha iniciado<br />
la grabación.<br />
(7) Interprete la melodía o el solo.<br />
(8) Una vez haya terminado, pulse el botón<br />
[● REC] (o [START/STOP]).<br />
Nota: Consulte la p. 45 y siguientes para más<br />
detalles acerca de la función 2nd Track.<br />
(5) Activez le métronome si nécessaire.<br />
(6) Appuyez sur le bouton [START/STOP].<br />
L’icône [PLAY®] est entourée d’un cadre<br />
vous indiquant que l’<strong>EM</strong>-<strong>25</strong>/<strong>EM</strong>-<strong>15</strong> a<br />
démarré l’enregistrement.<br />
(7) Jouez votre mélodie ou votre solo.<br />
(8) Quand vous avez terminé, appuyez sur le<br />
bouton [● REC] (ou [START/STOP]).<br />
Remarque: Pour en savoir plus sur la fonction<br />
2nd Track, voyez p. 45 et les pages suivantes.<br />
31
<strong>EM</strong>-<strong>25</strong>/<strong>EM</strong>-<strong>15</strong><br />
11. Additional Music Style<br />
functions<br />
Apart from the basic Music Style functions covered on page 21<br />
and following, your <strong>EM</strong>-<strong>25</strong>/<strong>EM</strong>-<strong>15</strong> also provides the following<br />
functions.<br />
The following are only available after pressing the<br />
[ARRANGER] button (the [ARRANGER] icon must be displayed).<br />
11. Funciones adicionales del<br />
Estilo Musical<br />
A parte de las funciones básicas del Estilo Musical explicadas<br />
en la página 21 y siguientes, el <strong>EM</strong>-<strong>25</strong>/<strong>EM</strong>-<strong>15</strong> dispone también<br />
de las siguientes funciones.<br />
Están sólo están disponibles después de pulsar el botón<br />
[ARRANGER] (debe visualizarse el icono [ARRANGER]).<br />
11. Fonctions Music Style<br />
supplémentaires<br />
Outre les fonctions Music Style élémentaires décrites à la<br />
page 21 et aux pages suivantes, votre <strong>EM</strong>-<strong>25</strong>/<strong>EM</strong>-<strong>15</strong> propose<br />
les fonctions décrites ci-dessous.<br />
Ces fonctions ne sont disponibles que si vous appuyez sur le<br />
bouton [ARRANGER] (l’icône [ARRANGER] doit être affichée).<br />
One Touch<br />
The One Touch function automates quite a few tasks:<br />
The Arranger selects the preset Style tempo.<br />
Suitable Reverb and Chorus settings.<br />
The <strong>EM</strong>-<strong>25</strong>/<strong>EM</strong>-<strong>15</strong> selects Tones for the Upper 1 and Upper 2<br />
parts that are is suitable for the selected Style (eight different<br />
possibilities, according to the selected One Touch memory).<br />
There are 4 One Touch memories per Style with different<br />
settings for the above parameters. Here is how to<br />
select one:<br />
(1) Select the desired Music Style.<br />
(2) Press the ONE TOUCH [1–2] or [3–4] button.<br />
The number field in the upper left corner reads “OT”, followed<br />
by the number of the selected One Touch memory.<br />
(3) Press the same ONE TOUCH button again if you need<br />
“OT2” (1–2) or “OT4” (3–4).<br />
One Touch is switched off every time you select a new<br />
Music Style, so you need to repeat the above steps.<br />
32<br />
One Touch<br />
La función One Touch permite automatizar algunas<br />
tareas:<br />
El Arranger selecciona el tempo del Estilo predefinido.<br />
Ajustes Reverb y Chorus idóneos.<br />
El <strong>EM</strong>-<strong>25</strong>/<strong>EM</strong>-<strong>15</strong> selecciona Tones para las partes Upper 1 y<br />
Upper 2 que se adaptan al Estilo seleccionado (ocho posibilidades<br />
diferentes, según la memoria One Touch seleccionada).<br />
Existen 4 memorias One Touch por Estilo con ajustes<br />
diferentes para los parámetros antes mencionados. Aquí<br />
le mostramos cómo seleccionar uno:<br />
(1) Seleccione el Estilo Musical deseado.<br />
(2) Pulse el botón ONE TOUCH [1–2] o [3–4].<br />
El campo de número en el ángulo superior izquierda sea<br />
“OT”, seguido por el número de la memoria One Touch<br />
seleccionada.<br />
(3) Pulse el mismo botón ONE TOUCH de nuevo si necesita<br />
“OT2” (1–2) o “OT4” (3–4).<br />
One Touch se desactiva cada vez que selecciona un nuevo<br />
Estilo Musical, por lo que deberá repetir los pasos descritos<br />
anteriormente.<br />
One Touch<br />
La fonction One Touch automatise plusieurs tâches:<br />
L’Arranger choisit le tempo préprogrammé du style musical.<br />
Les effets Reverb et Chorus adoptent des réglages ad hoc.<br />
L’<strong>EM</strong>-<strong>25</strong>/<strong>EM</strong>-<strong>15</strong> choisit des sons pour les parties Upper 1 et<br />
Upper 2 appropriés au style en vigueur (huit possibilités différentes<br />
selon la mémoire One Touch choisie).<br />
Chaque style comporte 4 mémoires One Touch offrant<br />
des réglages différents pour les paramètres ci-dessus.<br />
Voici comment choisir une de ces mémoires:<br />
(1) Sélectionnez le style musical (Music Style) voulu.<br />
(2) Appuyez sur le bouton ONE TOUCH [1–2] ou [3–4].<br />
La plage numérique dans le coin supérieur gauche de<br />
l’écran indique “OT”, suivi du numéro de la mémoire One<br />
Touch choisie.<br />
(3) Appuyez à nouveau sur le même bouton ONE TOUCH<br />
pour choisir “OT2” (1–2) ou “OT4” (3–4).<br />
La fonction One Touch est désactivée chaque fois que<br />
vous choisissez un autre style musical; vous ne devez<br />
donc pas répéter les étapes ci-dessus.
Melody Intelligence (INT)<br />
The Melody Intelligence function adds a second voice<br />
(harmony notes) to the melodies you play with your right<br />
hand.<br />
Melody Intelligence (INT)<br />
La función Melody Intelligence añade una segunda voz<br />
(notas armónicas) a las melodías que se tocan con la<br />
mano derecha.<br />
<strong>EM</strong>-<strong>25</strong>/<strong>EM</strong>-<strong>15</strong><br />
Melody Intelligence (INT)<br />
Melody Intelligence est une fonction qui ajoute une<br />
deuxième voix (des notes d’harmonie) aux mélodies que<br />
vous jouez de la main droite.<br />
In fact, MELODY INT uses both halves of the keyboard to<br />
determine which notes to play:<br />
It looks at the melody notes in the right half; and…<br />
It analyzes the chords you play in the left half to see which<br />
notes it must add to your melody.<br />
Press the [MELODY INT] button so that the corresponding<br />
icon (see rightmost illustration) appears in the display.<br />
Changing the MELODY INT Tone<br />
The <strong>EM</strong>-<strong>25</strong>/<strong>EM</strong>-<strong>15</strong> automatically assigns a Tone (sound)<br />
to the harmony voice. This voice is played by a part called<br />
UPPER 2.<br />
Here is how to assign a different Tone to UPPER 2:<br />
(1) Press and hold the [MELODY INT] button until the<br />
[UPPER2] icon starts flashing.<br />
(2) Keep holding [MELODY INT] while using [A/B], [1]~[8]<br />
and possibly also [VARIATION] to select another Tone<br />
for the Upper 2 part.<br />
See also “Selecting sounds for the right hand” (p. 24).<br />
(3) Release the [MELODY INT] button.<br />
En realidad, MELODY INT utiliza ambas partes del teclado<br />
para determinar las notas que debe tocar:<br />
Estudia las notas de la melodía en la mitad derecha; y…<br />
Analiza los acordes que usted toca en la parte izquierda para<br />
determinar las notas que debe añadir a la melodía.<br />
Pulse el botón [MELODY INT] de manera que aparezca el<br />
icono correspondiente (vea el dibujo de más a la derecha)<br />
en la pantalla.<br />
Cambiar el Tone de MELODY INT<br />
El <strong>EM</strong>-<strong>25</strong>/<strong>EM</strong>-<strong>15</strong> asigna de forma automática un Tone<br />
(sonido) a la voz armónica. Esta voz se reproduce<br />
mediante una parte llamada UPPER 2.<br />
A continuación, se describe cómo asignar un Tone diferente<br />
a UPPER 2:<br />
(1) Pulse y mantenga pulsado el botón [MELODY INT]<br />
hasta que el icono [UPPER2] empiece a parpadear.<br />
(2) Mantenga pulsado [MELODY INT] mientras utiliza [A/<br />
B], [1]~[8] y posiblemente también [VARIATION] para<br />
seleccionar otro Tone para la parte de Upper 2.<br />
Consulte también “Seleccionar sonidos para la mano<br />
derecha” (p. 24).<br />
(3) Suelte el botón [MELODY INT].<br />
En fait, la fonction MELODY INT se base sur les deux moitiés<br />
du clavier pour déterminer les notes à jouer:<br />
Elle examine les notes de la mélodie dans la moitié droite et…<br />
Elle analyse les accords que vous jouez dans la moitié gauche<br />
pour déterminer quelles notes elle doit ajouter à votre mélodie.<br />
Appuyez sur le bouton [MELODY INT] de sorte que l’icône<br />
correspondante (voyez la dernière illustration à droite)<br />
s’affiche à l’écran.<br />
Changer le son MELODY INT<br />
L’<strong>EM</strong>-<strong>25</strong>/<strong>EM</strong>-<strong>15</strong> assigne automatiquement un son<br />
(“Tone”) à la voix d’harmonie. Cette voix est prise en<br />
charge par une partie appelée UPPER 2.<br />
Voici comment affecter un autre son à la partie UPPER 2:<br />
(1) Appuyez sur le bouton [MELODY INT] et tenez-le<br />
enfoncé jusqu’à ce que l’icône [UPPER2] se mette à clignoter.<br />
(2) Gardez le bouton [MELODY INT] enfoncé tout en affectant<br />
un autre son à la partie Upper 2 avec [A/B],<br />
[1]~[8] et éventuellement avec [VARIATION].<br />
Voyez aussi “Choix des sons pour la main droite” (p. 24).<br />
(3) Relâchez le bouton [MELODY INT].<br />
33
<strong>EM</strong>-<strong>25</strong>/<strong>EM</strong>-<strong>15</strong><br />
Orchestrator<br />
The Orchestrator function allows you to vary the accompaniment<br />
patterns played by the Arranger. You can leave<br />
out parts, thin out the drum part, or even use a totally<br />
different accompaniment – in realtime (i.e. while you are<br />
playing).<br />
Orchestrator<br />
La función Orchestrator le permite variar los patrones de<br />
acompañamiento reproducidos por el Arranger. Es posible<br />
omitir partes, afinar la parte de percusión, o incluso utilizar<br />
un acompañamiento totalmente diferente – a tiempo<br />
real (p.ej. mientras está tocando).<br />
Orchestrator<br />
La fonction Orchestrator sert à varier les motifs d’accompagnement<br />
joués par l’Arranger. Vous pouvez omettre des<br />
parties, élaguer la partie de batterie ou même utiliser un<br />
tout autre accompagnement – en temps réel (c.-à-d. pendant<br />
que vous jouez).<br />
(1) Select the Music Style you wish to use for playing.<br />
See page 23.<br />
(2) Press one of the following buttons to select the desired<br />
level of musical “complexity”:<br />
Drum & Bass<br />
Combo<br />
Big Band<br />
The simplest accompaniment that only contains<br />
the drum and bass lines.<br />
Accompaniment pattern with only a few instruments<br />
(i.e. a band).<br />
Accompaniment pattern with a lush arrangement<br />
(several melodic instrument lines).<br />
Note: Immediately after switching on the <strong>EM</strong>-<strong>25</strong>/<strong>EM</strong>-<strong>15</strong>, the<br />
Orchestrator selects the “BIG BAND” level.<br />
Note: The effect of these three levels also depends on whether<br />
the [VARIATION] or [ORIGINAL] button was pressed. In effect, the<br />
combination of the [ORIGINAL]/[VARIATION] and [DRUM &<br />
BASS]/[COMBO]/BIG BAND] buttons provides 12 accompaniment<br />
patterns per Music Style.<br />
The last selection you make can be saved to a User Program.<br />
See p. 64.<br />
(1) Seleccione el Estilo Musical que desee utilizar para<br />
interpretar.<br />
Consulte la página 23.<br />
(2) Pulse uno de los siguientes botones para seleccionar el<br />
nivel deseado de “complejidad” musical:<br />
Drum & Bass<br />
Combo<br />
Big Band<br />
El acompañamiento más simple que sólo contiene<br />
las líneas de percusión y bajo.<br />
Patrón de acompañamiento con sólo unos<br />
pocos instrumentos (p.ej. una banda).<br />
Patrón de acompañamiento con un acompañamiento<br />
sorprendente (varias líneas de instrumento<br />
melódicas).<br />
Nota: Inmediatamente después de activar el <strong>EM</strong>-<strong>25</strong>/<strong>EM</strong>-<strong>15</strong>, el<br />
Orchestrator selecciona el nivel “BIG BAND”.<br />
Nota: El efecto de estos tres niveles también depende de si<br />
pulsó el botón [VARIATION] o [ORIGINAL]. En efecto, la combinación<br />
de los botones [ORIGINAL]/[VARIATION] y [DRUM & BASS]/<br />
[COMBO]/BIG BAND] proporciona 12 patrones de acompañamiento<br />
por Estilo Musical.<br />
Puede guardar la última selección realizada en un Programa<br />
de Usuario. Consulte la p. 64.<br />
(1) Choisissez un style musical adapté à votre jeu.<br />
Voyez page 23.<br />
(2) Appuyez sur un des boutons suivants pour choisir le<br />
degré souhaité de “sophistication” musicale:<br />
Drum & Bass<br />
Combo<br />
Big Band<br />
C’est la forme d’accompagnement la plus simple:<br />
elle contient seulement la batterie et la<br />
ligne de basse.<br />
Motif d’accompagnement comprenant seulement<br />
quelques instruments (c.-à-d. un groupe).<br />
Motif d’accompagnement dont l’arrangement<br />
est bien étoffé (plusieurs lignes mélodiques<br />
d’instrument).<br />
Remarque: A la mise sous tension, l’<strong>EM</strong>-<strong>25</strong>/<strong>EM</strong>-<strong>15</strong> choisit le<br />
niveau “BIG BAND”.<br />
Remarque: L’effet de ces trois niveaux varie aussi selon que<br />
vous avez enfoncé ou non le bouton [VARIATION] ou [ORIGI-<br />
NAL]. La combinaison des boutons [ORIGINAL]/[VARIATION] et<br />
[DRUM & BASS]/[COMBO]/BIG BAND] offre en réalité 12 motifs<br />
d’accompagnement par style musical.<br />
Vous pouvez mémoriser la dernière sélection effectuée<br />
dans un programme utilisateur (User). Voyez p. 64.<br />
34
Style Morphing<br />
Style Morphing allows you to use one or several accompaniment<br />
parts of one Music Style and the others of a<br />
second Music Style.<br />
Every time you select a Music Style, the <strong>EM</strong>-<strong>25</strong>/<strong>EM</strong>-<strong>15</strong><br />
automatically prepares a second Style in the background.<br />
The Style you select is called “STYLE A” (this is indicated<br />
by the [STYLE≈A] icon in the upper right corner of the display.<br />
The “covert” Style is called “STYLE B”.<br />
The link between “A” and “B” Styles is preset. This allows<br />
the <strong>EM</strong>-<strong>25</strong>/<strong>EM</strong>-<strong>15</strong> to automate the selection process and<br />
to prepare a suitable “B” Style. Feel free, however, to<br />
assign another Music Style to “B” if you want to explore<br />
new morphing combinations (see below).<br />
Style Morphing<br />
Style Morphing le permite utilizar una o varias partes de<br />
acompañamiento de un Estilo Musical y las otras de un<br />
segundo Estilo Musical.<br />
Cada vez que seleccione un Estilo Musical, el <strong>EM</strong>-<strong>25</strong>/<br />
<strong>EM</strong>-<strong>15</strong> automáticamente prepara un segundo Estilo<br />
Musical en segundo término. El Estilo que seleccione se<br />
conoce como “STYLE A” (esto se indica por el icono<br />
[STYLE≈A] en el ángulo superior derecho de la pantalla. El<br />
Estilo “encubierto” se conoce como “STYLE B”.<br />
El vínculo entre los Estilos “A” y “B” está predefinido. Esto<br />
permite al <strong>EM</strong>-<strong>25</strong>/<strong>EM</strong>-<strong>15</strong> automatizar el proceso de<br />
selección y preparar un Estilo “B” apropiado. No dude, sin<br />
embargo, en asignar otro Estilo Musical a “B” si desea<br />
explorar nuevas combinaciones para la formación de Estilos<br />
(consulte a continuación).<br />
<strong>EM</strong>-<strong>25</strong>/<strong>EM</strong>-<strong>15</strong><br />
Style Morphing<br />
Style Morphing vous permet de combiner une ou plusieurs<br />
parties d’accompagnement d’un style musical avec<br />
d’autres parties d’un deuxième style musical.<br />
Chaque fois que vous choisissez un style musical,<br />
l’<strong>EM</strong>-<strong>25</strong>/<strong>EM</strong>-<strong>15</strong> prépare automatiquement un deuxième<br />
style à l’arrière-plan. Le style que vous choisissez s’appelle<br />
“STYLE A” (ce qu’indique l’icône [STYLE≈A] dans le coin<br />
supérieur droit de l’écran). Le style avec lequel vous allez<br />
le fusionner s’appelle le “STYLE B”.<br />
Le lien entre les styles “A” et “B” est préprogrammé. C’est<br />
grâce à cela que l’<strong>EM</strong>-<strong>25</strong>/<strong>EM</strong>-<strong>15</strong> est en mesure d’automatiser<br />
la sélection et de proposer un style “B” qui convient<br />
bien. Naturellement, vous pouvez affecter un autre style<br />
musical à “B” et explorer ainsi d’autres combinaisons de<br />
“morphing” (voyez ci-dessous).<br />
BASS (B)<br />
DRUM B + BASS B<br />
DRUM (A) ACCOMP (A)<br />
ACCOMP A<br />
There are three part groups per Style (A or B) that can be<br />
morphed:<br />
DRUMS The drums and percussion.<br />
BASS The bass line.<br />
ACCOMP<br />
Other melodic accompaniments (piano, guitar,<br />
strings, etc.).<br />
The seven rectangles of the STYLE MORPHING field keep<br />
you posted about the Style (A or B) whose drum, bass,<br />
and/or accompaniment lines are used. See the rightmost<br />
illustration.<br />
(1) Press the [DRUM A/B] button once to select the drum<br />
part of the “other” Style (A or B).<br />
Press it again to return to the previous drum part.<br />
(2) Press the [BASS A/B] button once to select the bass<br />
part of the “other” Style (A or B).<br />
Puede formar tres grupos de parte por Estilo (A o B):<br />
DRUMS Ritmos y percusiones.<br />
BASS La línea de bajo.<br />
ACCOMP<br />
Otros acompañamientos melódicos (piano, guitarra,<br />
cuerdas, etc.).<br />
Los siete rectángulos del campo STYLE MORPHING le<br />
informan acerca del Estilo (A o B) cuya percusión, bajo, y/<br />
o líneas de acompañamiento se utilizan. Consulte el<br />
dibujo de más a la derecha.<br />
(1) Pulse el botón [DRUM A/B] una vez para seleccionar la<br />
parte de percusión del “otro” Estilo (A o B).<br />
Púlselo de nuevo para volver a la parte de percusión<br />
anterior.<br />
(2) Pulse el botón [BASS A/B] una vez para seleccionar la<br />
parte de bajo del “otro” Estilo (A o B).<br />
Chaque style (A ou B) permet de “fusionner” trois groupes<br />
de parties:<br />
DRUMS La batterie et la percussion<br />
BASS La ligne de basse<br />
ACCOMP<br />
D’autres accompagnements mélodiques (piano, guitare,<br />
cordes, etc.)<br />
Les sept rectangles de la zone STYLE MORPHING vous<br />
informent sur le style (A ou B) dont la batterie, la basse<br />
et/ou les lignes d’accompagnement sont utilisées. Voyez<br />
la dernière illustration à droite.<br />
(1) Appuyez une fois sur le bouton [DRUM A/B] pour choisir<br />
la partie de batterie de “l’autre style” (A ou B).<br />
Enfoncez-le à nouveau pour retourner à la partie de batterie<br />
précédente.<br />
(2) Appuyez une fois sur le bouton [BASS A/B] pour choisir<br />
la partie de basse de “l’autre style” (A ou B).<br />
35
<strong>EM</strong>-<strong>25</strong>/<strong>EM</strong>-<strong>15</strong><br />
Press it again to return to the previous bass part.<br />
(3) Press the [ACCOMP A/B] button once to select the<br />
melodic parts of the “other” Style (A or B).<br />
Press it again to return to the previous accompaniment<br />
parts.<br />
Selecting another “B” Style<br />
As stated earlier, the “B” Style is prepared automatically<br />
whenever you select an “A” Style, so that the Style Morphing<br />
function is ready whenever you are.<br />
If you do not agree with this preset selection (or want to<br />
experiment with other Styles), hold down the [STYLE]<br />
button and select the desired “B” Style using the [1]~[8]<br />
keypad. This selection will also be written to a User Program.<br />
Note: On the <strong>EM</strong>-<strong>25</strong>, you can also select the DISK USER Style by<br />
pressing [VARIATION/DISK USER]. See page 37 for details about<br />
the DISK USER Style function.<br />
Note: The Intro and Ending patterns of Style A will be used in<br />
their original state for all Style Morphing combinations except<br />
the one where all parts are played by Style B (i.e. when only the<br />
upper-row rectangles are dark).<br />
Note: You can also morph between Styles that use different<br />
time signatures.<br />
Note: When you select a new Music Style with the numeric keypad,<br />
the Style Morphing function is reset to the “Style A only”<br />
status. The Style Morphing setting can, however, be written to a<br />
User Program. See p. 64.<br />
Púlselo de nuevo para volver a la parte de bajo anterior.<br />
(3) Pulse el botón [ACCOMP A/B] una vez para seleccionar<br />
las partes melódicas del “otro” Estilo (A o B).<br />
Púlselo de nuevo para volver a las partes de acompañamiento<br />
anteriores.<br />
Seleccionar otro Estilo “B”<br />
Como se ha explicado anteriormente, el Estilo “B” se prepara<br />
automáticamente siempre que seleccione un Estilo<br />
“A”, de manera que la función Style Morphing está preparada<br />
se encuentre donde se encuentre.<br />
Si no está de acuerdo con esta selección predefinida (o<br />
desea experimentar con otros Estilos), mantenga pulsado<br />
el botón [STYLE] y seleccione el Estilo “B” deseado<br />
utilizando el teclado [1]~[8]. Esta selección se escribirá<br />
también en un Programa de Usuario.<br />
Nota: En el <strong>EM</strong>-<strong>25</strong>/<strong>EM</strong>-<strong>15</strong>, también puede seleccionar el Estilo<br />
DISK USER pulsando [VARIATION/DISK USER]. Consulte la<br />
página 37 para más detalles acerca de la función del Estilo DISK<br />
USER.<br />
Nota: Los patrones Intro y Ending del Estilo A se utilizarán en<br />
su estado original para todas las combinaciones Style Morphing<br />
excepto una en la que todas las partes se interpretan mediante<br />
el Estilo B (p.ej. cuando sólo los rectángulos superiores están<br />
oscurecidos).<br />
Nota: También puede formar estilos entre Estilos que utilicen<br />
unos tipos de compás diferentes.<br />
Nota: Al seleccionar un nuevo Estilo Musical con los botones<br />
numéricos, la función Style Morphing se reinicia al estado “Style<br />
A only”. No obstante, puede escribir el ajuste Style Morphing en<br />
un Programa de Usuario. Consulte la p. 64.<br />
Enfoncez-le à nouveau pour retourner à la partie de<br />
basse précédente.<br />
(3) Appuyez une fois sur le bouton [ACCOMP A/B] pour<br />
choisir les parties mélodiques de “l’autre style” (A ou<br />
B).<br />
Enfoncez-le à nouveau pour retourner aux parties<br />
d’accompagnement précédentes.<br />
Choix d’un autre style “B”<br />
Comme nous l’avons vu, le style “B” est automatiquement<br />
préparé quand vous choisissez un style “A”; la fonction<br />
Style Morphing est donc toujours prête à l’emploi.<br />
Si la sélection automatique ne vous satisfait pas (ou si<br />
vous souhaitez expérimenter d’autres styles), maintenez<br />
enfoncé le bouton [STYLE] et choisissez le style “B”<br />
voulu avec le pavé numérique [1]~[8]. Ce choix est aussi<br />
mémorisé dans un programme utilisateur.<br />
Remarque: Sur l’<strong>EM</strong>-<strong>25</strong>, vous pouvez aussi choisir le style DISK<br />
USER en appuyant sur [VARIATION/DISK USER]. Pour en savoir<br />
plus sur la fonction DISK USER, voyez page 37.<br />
Remarque: Les motifs Intro et Ending du Style A seront utilisés<br />
tels quels pour toutes les combinaisons Style Morphing sauf<br />
celle où toutes les parties sont jouées par le Style B (c.-à-d.<br />
quand seuls les rectangles de la rangée supérieure sont éteints).<br />
Remarque: Vous pouvez aussi “morpher” entre des styles musicaux<br />
dotés d’armures de temps différentes.<br />
Remarque: Quand vous choisissez un nouveau style musical<br />
avec le pavé numérique, la fonction Style Morphing est initialisée<br />
au statut “Style A uniquement”. Vous pouvez cependant<br />
mémoriser le réglage Style Morphing dans un programme utilisateur.<br />
Voyez p. 64.<br />
36
Working with Styles on floppy disk<br />
(<strong>EM</strong>-<strong>25</strong>)<br />
The <strong>EM</strong>-<strong>25</strong> provides a special temporary memory that<br />
allows you to use one Music Style on a floppy disk as if it<br />
were an internal Style. The function in question is called<br />
DISK USER.<br />
A Music Style you select via this function is not stored<br />
internally. It will be replaced when you select another<br />
Music Style on disk, or erased when you switch off the<br />
<strong>EM</strong>-<strong>25</strong>.<br />
Note: See also page 6 for details about how to handle floppy<br />
disks.<br />
Trabajar con Estilos en disquetes<br />
(<strong>EM</strong>-<strong>25</strong>)<br />
El <strong>EM</strong>-<strong>25</strong> dispone de una memoria temporal especial a<br />
que le permite utilizar un Estilo Musical en un disquete<br />
como si se tratara de un Estilo interno. La función en<br />
cuestión se conoce como DISK USER.<br />
Un Estilo Musical que seleccione mediante este función<br />
no se guarda internamente. Se sustituirá al seleccionar<br />
otro Estilo Musical en el disco, o se borrará al desactivar el<br />
<strong>EM</strong>-<strong>25</strong>.<br />
Nota: Consulte también la página 6 para más detalles acerca de<br />
cómo manejar disquetes.<br />
<strong>EM</strong>-<strong>25</strong>/<strong>EM</strong>-<strong>15</strong><br />
Travail avec des styles sur disquette<br />
(<strong>EM</strong>-<strong>25</strong>)<br />
L’<strong>EM</strong>-<strong>25</strong> comporte une mémoire spéciale temporaire qui<br />
permet d’utiliser un style musical résidant sur disquette<br />
tout comme s’il s’agissait d’un style interne. Cette fonction<br />
s’appelle DISK USER.<br />
Un style musical choisi avec cette fonction n’est pas sauvegardé<br />
en mémoire interne. Il est remplacé quand vous<br />
choisissez un autre style musical résidant sur disquette<br />
ou est effacé quand vous mettez l’<strong>EM</strong>-<strong>25</strong> hors tension.<br />
Remarque: Voyez aussi page 6 pour en savoir plus sur la manipulation<br />
des disquettes.<br />
MusicSt<br />
Working with Styles on disk requires that you purchase a<br />
floppy disk containing Music Styles:<br />
<strong>Roland</strong> MSA, MSD, and MSE series. You can also use<br />
Music Styles that were programmed for the following<br />
<strong>Roland</strong> instruments: E-86, E-68, E-96.<br />
(1) Insert a floppy disk with compatible Music Styles into<br />
the <strong>EM</strong>-<strong>25</strong>’s disk drive.<br />
(2) Press the [STYLE] button (the “√” arrow jumps to the<br />
“STYLE” entry).<br />
(3) Press the [VARIATION/DISK USER] button.<br />
The [DISK≈USER] icon appears in the upper right corner of<br />
the display, while you will also see the “USt” message and<br />
the name of the Music Style name that is currently in the<br />
<strong>EM</strong>-<strong>25</strong>’s RAM memory.<br />
(4) Press [VARIATION/DISK USER] again.<br />
Para trabajar con Estilos en disco deberá adquirir un disquete<br />
que contenga Estilos Musicales:<br />
Series MSA, MSD y MSE de <strong>Roland</strong>. También puede utilizar<br />
Estilos Musicales que estén programados para los<br />
siguientes instrumentos de <strong>Roland</strong>: E-86, E-68, E-96.<br />
(1) Inserte un disquete con Estilos Musicales compatibles<br />
en la unidad de disco del <strong>EM</strong>-<strong>25</strong>.<br />
(2) Pulse el botón [STYLE] (la flecha“√” avanza hasta la<br />
entrada “STYLE”).<br />
(3) Pulse el botón [VARIATION/DISK USER].<br />
El icono [DISK≈USER] aparece en el ángulo superior derecho<br />
de la pantalla, mientras también puede leer el mensaje<br />
“USt” y el nombre del Estilo Musical que se encuentra<br />
actualmente en la memoria RAM del <strong>EM</strong>-<strong>25</strong>/<strong>EM</strong>-<strong>15</strong>.<br />
(4) Pulse [VARIATION/DISK USER] de nuevo.<br />
Le travail avec des styles résidant sur disquette présuppose<br />
que vous possédez une disquette de styles musicaux.<br />
Il s’agit des séries <strong>Roland</strong> MSA, MSD et MSE. Vous pouvez<br />
aussi utiliser des styles musicaux programmés pour<br />
les instruments <strong>Roland</strong> suivants: E-86, E-68, E-96.<br />
(1) Insérez une disquette contenant des styles musicaux<br />
compatibles dans le lecteur de disquette de l’<strong>EM</strong>-<strong>25</strong>.<br />
(2) Appuyez sur le bouton [STYLE] (la flèche “√” se<br />
déplace jusqu’en face de “STYLE”).<br />
(3) Appuyez sur le bouton [VARIATION/DISK USER].<br />
L’icône [DISK≈USER] apparaît dans le coin supérieur droit<br />
de l’écran; vous verrez aussi le message “USt” et le nom<br />
du style musical se trouvant alors dans la mémoire RAM<br />
de l’<strong>EM</strong>-<strong>25</strong>.<br />
(4) Appuyez à nouveau sur [VARIATION/DISK USER].<br />
37
<strong>EM</strong>-<strong>25</strong>/<strong>EM</strong>-<strong>15</strong><br />
If the display now shows the message “Err – No Disk”, you<br />
need to insert a floppy disk. If the drive contains a floppy<br />
disk with readable Music Styles, the name of the first<br />
Style on disk will be displayed.<br />
Si la pantalla muestra el mensaje “Err – No Disk”, deberá<br />
insertar un disquete. Si la unidad ya contiene un disquete<br />
con Estilos Musicales legibles, se visualizará el nombre del<br />
primer Estilo en el disco.<br />
Si l’écran affiche le message “Err – No Disk”, insérez une<br />
disquette. Si vous avez chargé dans le lecteur une disquette<br />
contenant des styles musicaux compatibles, l’écran<br />
affiche le nom du premier style de la disquette.<br />
(5) Press T<strong>EM</strong>PO/DATA [–][+] to select the desired Music<br />
Style.<br />
You can also press [DISK USER] to scroll through the<br />
Music Styles on disk.<br />
(6) Press T<strong>EM</strong>PO/DATA [+] in response to the flashing “YES”<br />
message that appears after a brief interval to load the<br />
selected Music Style.<br />
Press T<strong>EM</strong>PO/DATA [–] if you want to select another Music<br />
Style on disk and load that one.<br />
Note: If the Style on disk does not fit into the <strong>EM</strong>-<strong>25</strong>’s RAM<br />
memory, the “Err – Too Big!” error message is displayed, and the<br />
Style will not be loaded.<br />
(7) Press [START/STOP] to start playback of the Disk User<br />
Style.<br />
(8) Press [STYLE], [[TONE], [MUSICAL GAME], or [FUNC-<br />
TION] to leave the DISK USER function.<br />
Note: The selection of the Disk User memory will be written to a<br />
User Program (see p. 64). This, however refers to the memory<br />
address rather than its contents. Next time you recall such a<br />
User Program, the <strong>EM</strong>-<strong>25</strong> will therefore use the last Disk User<br />
Style you loaded after switching it on. If you haven’t yet loaded<br />
a User Style, the <strong>EM</strong>-<strong>25</strong> selects a ROM Style.<br />
(5) Pulse T<strong>EM</strong>PO/DATA [–][+] para seleccionar el Estilo<br />
Musical deseado.<br />
También puede pulsar [DISK USER] para desplazarse a través<br />
de los Estilos Musicales en el disco.<br />
(6) Pulse T<strong>EM</strong>PO/DATA [+] en respuesta al mensaje “YES”<br />
parpadeante que aparece después de un breve intervalo<br />
para cargar el Estilo Musical deseado.<br />
Pulse T<strong>EM</strong>PO/DATA [–] si desea seleccionar otro Estilo<br />
Musical en el disco y cargarlo.<br />
Nota: Si el Estilo en disco no se adapta a la memoria RAM del<br />
<strong>EM</strong>-<strong>25</strong>, se visualiza el mensaje de error “Err – Too Big!”, y el<br />
Estilo no se cargará.<br />
(7) Pulse [START/STOP] para iniciar la reproducción del<br />
Estilo Disc User.<br />
(8) Pulse [STYLE], [[TONE], [MUSICAL GAME], o [FUNCTION]<br />
para salir de la función DISK USER.<br />
Nota: La selección de la memoria Disk User se escribirá en un<br />
Programa de Usuario (consulte la p. 64). Esto, sin embargo hace<br />
referencia a la dirección de memoria antes que a su contenido.<br />
La próxima vez que recupere un Programa de Usuario, el <strong>EM</strong>-<strong>25</strong><br />
utilizará el último Estilo Disk User cargado después de poner en<br />
marcha el equipo. Si aún no ha cargado ningún Estilo de Usuario,<br />
el <strong>EM</strong>-<strong>25</strong> selecciona un Estilo ROM.<br />
(5) Appuyez sur T<strong>EM</strong>PO/DATA [–][+] pour choisir le style<br />
musical voulu.<br />
Vous pouvez aussi appuyer sur [DISK USER] pour passer<br />
en revue les styles musicaux de la disquette.<br />
(6) Appuyez sur T<strong>EM</strong>PO/DATA [+] en réponse au message<br />
“YES” clignotant qui apparaît après un bref intervalle<br />
afin de charger le style musical voulu.<br />
Si vous voulez choisir et charger un autre style musical de<br />
la disquette, appuyez sur T<strong>EM</strong>PO/DATA [–].<br />
Remarque: Si le style de la disquette est trop volumineux pour<br />
la mémoire RAM de l’<strong>EM</strong>-<strong>25</strong>, le message d’erreur “Err – Too Big!”<br />
s’affichera et le style ne sera pas chargé.<br />
(7) Appuyez sur [START/STOP] pour lancer la reproduction<br />
du style utilisateur résidant sur disquette.<br />
(8) Pour quitter la fonction DISK USER, appuyez sur<br />
[STYLE], [[TONE], [MUSICAL GAME] ou [FUNCTION].<br />
Remarque: Le choix de la mémoire Disk User sera mémorisé<br />
dans un programme utilisateur (voyez p. 64). Cette sauvegarde<br />
ne porte toutefois que sur l’adresse du style et non sur son contenu.<br />
La prochaine fois que vous rappelez un de ces programmes<br />
utilisateur, l’<strong>EM</strong>-<strong>25</strong> utilisera ainsi le dernier style Disk User<br />
chargé après la mise sous tension de l’instrument. Si vous n’avez<br />
pas encore chargé de style utilisateur, l’<strong>EM</strong>-<strong>25</strong> choisira un style<br />
résidant en ROM.<br />
38
<strong>EM</strong>-<strong>25</strong>/<strong>EM</strong>-<strong>15</strong><br />
Additional Music Style functions<br />
Here are yet other functions related to Music Styles. These<br />
can be set via the FUNCTION menu, or are covered elsewhere:<br />
• Bass Inversion (see p. 60)<br />
• Balance between the <strong>Keyboard</strong> parts and the Music Style<br />
parts (see p. 42)<br />
• Volume of certain Music Style parts (see p. 59)<br />
• Arranger split point (see p. 62)<br />
• Hold function for the Arranger notes (see p. 60).<br />
Funciones adicionales del Estilo Musical<br />
A continuación, se nombran otras funciones relacionadas<br />
con los Estilos Musicales. Estas se pueden ajustar<br />
mediante el menú FUNCTION, o se cubren en otra parte:<br />
• Bass Inversion (consulte la p. 60)<br />
• Balance entre las partes del teclado y las partes del Estilo<br />
Musical (consulte la p. 42)<br />
• Volumen de ciertas partes del Estilo Musical (consulte la<br />
p. 59)<br />
• Punto de división del Arranger (consulte la p. 62)<br />
• Función Hold para las notas de Arranger (consulte la<br />
p. 60).<br />
Autres fonctions des styles musicaux<br />
Vous disposez encore d’autres fonctions liées aux styles<br />
musicaux. Vous pouvez les régler avec le menu FUNC-<br />
TION, ou elles sont décrites autre part:<br />
• Bass Inversion (voyez p. 60)<br />
• Balance entre les parties <strong>Keyboard</strong> et les parties Music<br />
Style (voyez p. 42)<br />
• Volume de certaines parties Music Style (voyez p. 59)<br />
• Point de partage de l’Arranger (voyez p. 62)<br />
• Fonction Hold pour les notes de l’Arranger (voyez p. 60).<br />
39
<strong>EM</strong>-<strong>25</strong>/<strong>EM</strong>-<strong>15</strong><br />
12. More <strong>Keyboard</strong> part<br />
functions<br />
Using two Upper parts (Layer)<br />
The <strong>EM</strong>-<strong>25</strong>/<strong>EM</strong>-<strong>15</strong>’s Upper 1 part is assigned to the right<br />
half of the keyboard (in ARRANGER and ORGAN modes)<br />
or to the entire keyboard (PIANO mode).<br />
In all modes except M.DRUMS, you can add a second part<br />
(Upper 2) to Upper 1 by activating the LAYER function.<br />
This allows you to play two sounds simultaneously (piano<br />
and strings, for example).<br />
12. Más funciones de la parte del<br />
teclado<br />
Utilizar dos partes Upper (Layer)<br />
La parte Upper 1 del <strong>EM</strong>-<strong>25</strong>/<strong>EM</strong>-<strong>15</strong> se asigna a la mitad<br />
derecha del teclado (en los modos ARRANGER y ORGAN)<br />
o a todo el teclado (modo PIANO).<br />
En todos los modos excepto en M.DRUMS, puede añadir<br />
una segunda parte (Upper 2) a Upper 1 activando la función<br />
LAYER. Esto le permite reproducir dos sonidos simultáneamente<br />
(piano y cuerdas, por ejemplo).<br />
12. Autres fonctions de parties<br />
<strong>Keyboard</strong><br />
Utiliser deux parties Upper (Layer)<br />
La partie Upper 1 de l’<strong>EM</strong>-<strong>25</strong>/<strong>EM</strong>-<strong>15</strong> est assignée à la<br />
moitié droite du clavier (en modes ARRANGER et ORGAN)<br />
ou au clavier entier (en mode PIANO).<br />
Tous les modes sauf M.DRUMS permettent d’ajouter une<br />
deuxième partie (Upper 2) à Upper 1 en activant la fonction<br />
LAYER. Cela vous permet de jouer simultanément<br />
deux sons superposés (piano et cordes, par exemple).<br />
(1) To use both Upper 1 and Upper 2, press the [MELODY<br />
INT] button once or twice until the Layer icon (see<br />
right illustration) appears in the display.<br />
The Layer icon tells you that the Upper 2 part is now<br />
added to Upper 1. Every solo/melody note you play will be<br />
sounded by two Tones.<br />
Note: The Layer function is not available when you activate the<br />
Melody Intelligence function (see p. 33).<br />
(2) Press [MELODY INT] again to switch de Layer function<br />
off again.<br />
Note: By doing so, you may activate the Melody Intelligence<br />
function. If that is not what you want, press [MELODY INT] again<br />
(so that neither the MELODY INTELL nor the LAYER icon is displayed).<br />
(1) Para utilizar Upper 1 y Upper 2, pulse el botón<br />
[MELODY INT] una vez o más hasta que el icono Layer<br />
(consulte el dibujo de la derecha) aparezca en la pantalla.<br />
El icono Layer le indica que la parte Upper 2 se añade<br />
ahora a Upper 1. Cada nota de solo/melodía que toque<br />
sonará mediante dos Tones.<br />
Nota: La función Layer no está disponible si activa la función<br />
Melody Intelligence (consulte la p. 33).<br />
(2) Pulse [MELODY INT] de nuevo para desactivar la función<br />
Layer de nuevo.<br />
Nota: Con esto, puede activar la función Melody Intelligence. Si<br />
esto no es lo que desea, pulse [MELODY INT] de nuevo (de<br />
manera que ni el icono MELODY INTELL ni el LAYER se visualicen).<br />
(1) Pour utiliser simultanément les parties Upper 1 et<br />
Upper 2, appuyez une fois ou deux sur le bouton<br />
[MELODY INT] jusqu’à ce que l’icône Layer (voyez l’illustration<br />
de droite) s’affiche à l’écran.<br />
L’icône Layer vous indique que la partie Upper 2 est à présent<br />
superposée à Upper 1. Chaque note de votre solo/<br />
mélodie déclenche donc deux sons.<br />
Remarque: La fonction Layer n’est pas disponible quand vous<br />
avez activé la fonction Melody Intelligence (voyez p. 33).<br />
(2) Appuyez à nouveau sur [MELODY INT] pour couper la<br />
fonction Layer.<br />
Remarque: Ce faisant, vous pourriez activer la fonction Melody<br />
Intelligence. Si c’est le cas et que cela ne vous arrange pas,<br />
appuyez à nouveau sur [MELODY INT] (de sorte que ni l’icône<br />
MELODY INTELL ni l’icône LAYER ne soit affichée).<br />
40
Selecting Tone Variations<br />
Tone Variations are alternatives for the Tones you can<br />
select with the numeric keypad. The PIANO bank, for<br />
instance, contains a grand piano, an upright piano, an<br />
electric piano, etc. These are the Tones. If you also want to<br />
specify the kind of grand piano (mellow, bright, stereo/<br />
mono), you need to turn to the Variations (i.e. “Tone subcategories”).<br />
Variations are indicated by means of a smaller number in<br />
the upper left corner of the display (see the rightmost<br />
illustration).<br />
Seleccionar Variaciones de Tone<br />
Las Variaciones de Tone son alternativas para los Tones<br />
que puede seleccionar con el teclado numérico. El banco<br />
PIANO, por ejemplo, contiene un piano de cola, un piano<br />
de pared, un piano eléctrico, etc. Estos son los Tones. Si<br />
también desea especificar el tipo de piano de cola (melodioso,<br />
brillante, estéreo/mono), deberá volver a las Variaciones<br />
(p.ej. “Subcategorías de Tone”).<br />
Las Variaciones se indican mediante significados de un<br />
pequeño número en el ángulo superior izquierdo de la<br />
pantalla (consulte la ilustración más a la derecha).<br />
<strong>EM</strong>-<strong>25</strong>/<strong>EM</strong>-<strong>15</strong><br />
Choix de variations de sons<br />
Les “Tone Variations” alias “variations de sons” offrent des<br />
alternatives aux sons disponibles via le pavé numérique.<br />
Par exemple, la banque PIANO comporte un son de piano<br />
à queue, de piano droit, de piano électrique, etc. Il s’agit<br />
là des sons. Si maintenant vous voulez préciser le type de<br />
piano à queue (doux, brillant, stéréo/mono), vous devez<br />
pour cela faire appel aux Variations (c.-à-d. aux “souscatégories<br />
de sons”).<br />
Les variations sont repérées pas un plus petit numéro<br />
affiché dans le coin supérieur gauche de l’écran (voyez la<br />
dernière illustration à droite).<br />
Variation<br />
Bank<br />
1<br />
Number<br />
Group<br />
(1) Press the [TONE] button.<br />
(2) Select the desired Tone with [A/B] and [1]~[8] (see<br />
p. 24).<br />
Be sure to select a Tone memory with an arrow (®) in the<br />
Tone list on the front panel (the black names in the above<br />
illustration).<br />
(3) Press the [VARIATION/DISK USER] button to step<br />
through the available Variations.<br />
See the Tone list on page 87. The number of Variations<br />
depends on the Tone you select. Whenever the Variation<br />
entry in the address field is empty, the “main” Tone (called<br />
Capital) is selected.<br />
Note: You can also select Variations by holding down [VARIA-<br />
TION] while you press a number button.<br />
(1) Pulse el botón [TONE].<br />
(2) Seleccione el Tone deseado con [A/B] y [1]~[8] (consulte<br />
la p. 24).<br />
Asegúrese que selecciona una memoria de Tone con una<br />
flecha (®) en la lista de Tone en el panel frontal (los<br />
nombres de la ilustración anterior).<br />
(3) Pulse el botón [VARIATION/DISK USER] para desplazarse<br />
a través de las Variaciones disponibles.<br />
Consulte la lista Tone en la página 87. El número de<br />
Variaciones depende del Tone que seleccione. Siempre<br />
que la entrada de Variación en el campo de la dirección<br />
esté vacía, se seleccionará el Tone “principal” (conocido<br />
como Capital).<br />
Nota: También puede seleccionar Variaciones manteniendo pulsado<br />
[VARIATION] mientras pulsa un botón de número.<br />
(1) Appuyez sur le bouton [TONE].<br />
(2) Choisissez le son voulu avec [A/B] et [1]~[8] (voyez<br />
p. 24).<br />
Veillez à choisir une mémoire de son avec la flèche (®)<br />
dans la liste de Tones sur le panneau avant de l’instrument<br />
(les noms en noir dans l’illustration ci-dessus).<br />
(3) Appuyez sur le bouton [VARIATION/DISK USER] pour<br />
passer en revue les variations de sons disponibles.<br />
Voyez la liste de sons à la page 87. Le nombre de variations<br />
dépend du Tone choisi. Si la zone d’écran des variations<br />
est vide, c’est que le son “principal” (appelé Capital)<br />
est choisi.<br />
Remarque: Vous pouvez aussi choisir les variations en maintenant<br />
[VARIATION] enfoncé tout en appuyant sur le pavé numérique.<br />
41
<strong>EM</strong>-<strong>25</strong>/<strong>EM</strong>-<strong>15</strong><br />
Balance<br />
The BALANCE [√ACCOMP] and [KEYBOARD®] buttons<br />
allow you to change the volume balance between the<br />
Arranger (or Song) parts and the <strong>Keyboard</strong> parts (the ones<br />
you can play yourself).<br />
Balance<br />
Los botones BALANCE [√ACCOMP] y [KEYBOARD®] le<br />
permiten cambiar el balance del volumen entre el Arranger<br />
(o partes de la Canción) y las partes del teclado (las<br />
que puede tocar por usted mismo).<br />
Balance<br />
Les boutons BALANCE [√ACCOMP] et [KEYBOARD®]<br />
permettent de changer la balance de volume entre les<br />
parties Arranger (ou parties du morceau) et les parties<br />
<strong>Keyboard</strong> (à savoir celles que vous jouez vous-même).<br />
(1) Press BALANCE [√ACCOMP] if the Arranger (or Song<br />
parts) are too soft.<br />
(2) Press BALANCE [KEYBOARD®] if you think your solo<br />
playing should be louder.<br />
Not all <strong>Keyboard</strong> parts shown above are available at all<br />
times. Note also that this function does not allow you to<br />
set the balance between the Lower and M.Bass parts (left)<br />
and the Upper 1/2 parts (right) in ORGAN mode.<br />
Note: See p. 59 for setting the volume of individual parts.<br />
A Drums<br />
A Bass<br />
Accomp<br />
(1) Pulse BALANCE [√ACCOMP] si el Arranger (o partes de<br />
la Canción) son demasiado suaves.<br />
(2) Pulse BALANCE [KEYBOARD®] si piensa que la interpretación<br />
de solo debería ser a un volumen más alto.<br />
Observe que todas las partes del teclado mostradas anteriormente<br />
están disponibles en todos los momentos.<br />
Observe también que esta función no le permite ajustar el<br />
balance entre las partes Lower y M.Bass (izquierda) y las<br />
partes Upper 1/2 (derecha) en el modo ORGAN.<br />
Nota: Consulte la p. 59 para ajustar el volumen de partes individuales.<br />
Upper 1<br />
Upper 2 (Melody Intelligence/Layer)<br />
Lower [ORGAN]<br />
M. Bass [ORGAN]<br />
M. Drums [M≈DRUMS]<br />
(1) Appuyez sur le bouton BALANCE [√ACCOMP] si le son<br />
de l’Arranger (ou des parties du morceau) est trop bas.<br />
(2) Appuyez sur BALANCE [KEYBOARD®] si vous souhaitez<br />
augmenter le niveau de votre jeu solo.<br />
Toutes les parties <strong>Keyboard</strong> ci-dessus ne sont pas toujours<br />
disponibles. De plus, Balance ne permet pas de régler la<br />
balance entre les parties Lower et M.Bass (gauche) ni les<br />
parties Upper 1/2 (droite) en mode ORGAN.<br />
Remarque: Pour en savoir plus sur le réglage de volume des<br />
parties individuelles, voyez p. 59.<br />
42
<strong>EM</strong>-<strong>25</strong>/<strong>EM</strong>-<strong>15</strong><br />
Transpose<br />
The Transpose function changes the pitch of the notes<br />
and chords you play. Instead of figuring out what other<br />
keys you need to press to accommodate the singer or an<br />
instrumentalist, you can set the required Transpose value<br />
and go on playing the song the way you practised it while<br />
sounding in a different key. See the example below.<br />
Transpose<br />
La función Transpose cambia la afinación de las notas y acordes<br />
que se interpretan. En lugar de suponer qué otras teclas deberá<br />
pulsar para adaptar el cantante o un instrumentalista, puede<br />
ajustar el valor Transpose necesario y continuar reproduciendo<br />
la canción de la forma como la practicaba mientras suena en<br />
un tono diferente. Consulte el ejemplo siguiente.<br />
Transpose<br />
La fonction Transpose change la hauteur des notes et des<br />
accords joués. Si jamais vous devez changer de tonalité<br />
pour un chanteur ou un autre instrument, vous n’aurez<br />
aucun mal à trouver les notes à jouer: vous définissez<br />
simplement la valeur Transpose ad hoc et vous jouez<br />
votre morceau comme d’habitude tout en sonnant dans<br />
la tonalité spécifiée. Voyez l’exemple ci-dessous.<br />
No transposition (C major)<br />
Sin transposición (C mayor)<br />
Pas de transposition (Do majeur)<br />
TrpValue= 4 (E major)<br />
TrpValue= 4 (E mayor)<br />
TrpValue= 4 (Mi majeur)<br />
TrpValue<br />
(1) Press the [TRANSPOSE] button. A box appears around<br />
[TRANSPOSE] message in the lower left of the display.<br />
The default transposition interval is “1” (one semitone<br />
up).<br />
To change the interval:<br />
(2) Press and hold the [TRANSPOSE] button until the<br />
“TrpValue” message appears in the display.<br />
(3) Use the T<strong>EM</strong>PO [–]/[+] buttons to select the desired<br />
transposition interval (–12~12 semitones).<br />
Here’s an example: if you want to hear a “D” every time<br />
you play a “C”, select “2”. All other notes will be shifted by<br />
the same amount so that you end up sounding in D major<br />
when you actually play in C major, etc.<br />
(4) Release the [TRANSPOSE] button.<br />
(5) Press the [TRANSPOSE] button again to switch off the<br />
Transpose function (if it is still on).<br />
The box that surrounds the [TRANSPOSE] message disappears.<br />
(1) Pulse el botón [TRANSPOSE]. Aparece un cuadro alrededor<br />
del mensaje [TRANSPOSE] en la parte inferior<br />
izquierda de la pantalla.<br />
El intervalo de transposición por defecto es “1” (un semitono<br />
más grave).<br />
Para cambiar el intervalo:<br />
(2) Pulse y mantenga pulsado el botón [TRANSPOSE] hasta<br />
que aparezca el mensaje “TrpValue” en la pantalla.<br />
(3) Utilice los botones T<strong>EM</strong>PO [–]/[+] para seleccionar el<br />
intervalo de transposición deseado (–12~12 semitonos).<br />
Aquí le mostramos un ejemplo: si desea escuchar un “D”<br />
cada vez que toque un “C”, seleccione “2”. El resto de<br />
notas cambiarán de la misma forma como dejó de sonar<br />
en D mayor, cuando en realidad toca en C mayor, etc.<br />
(4) Suelte el botón [TRANSPOSE].<br />
(5) Pulse el botón [TRANSPOSE] de nuevo para desactivar<br />
la función Transpose (si aún está activada).<br />
El cuadro que rodea el mensaje [TRANSPOSE] desaparece.<br />
(1) Appuyez sur le bouton [TRANSPOSE]. Un cadre s’affiche<br />
autour du message [TRANSPOSE] dans le coin inférieur<br />
gauche de l’écran.<br />
L’intervalle de transposition par défaut est de “1” (plus un<br />
demi-ton).<br />
Pour changer cet intervalle:<br />
(2) Appuyez et maintenez enfoncé le bouton [TRANSPOSE]<br />
jusqu’à ce le message “TrpValue” s’affiche à l’écran.<br />
(3) Spécifiez l’intervalle de transposition voulu (–12~12<br />
demi-tons) avec les boutons T<strong>EM</strong>PO [–]/[+].<br />
Voici un exemple: Si vous voulez entendre un “D” (Ré)<br />
chaque fois que vous jouez un “C” (Do), choisissez “2”.<br />
Toutes les autres notes sont décalées du même intervalle,<br />
de sorte que vous sonnez en Ré Majeur alors que vous<br />
jouez en fait en Do Majeur, etc.<br />
(4) Relâchez le bouton [TRANSPOSE].<br />
(5) Appuyez à nouveau sur [TRANSPOSE] pour désactiver<br />
la fonction Transpose (si elle est toujours active).<br />
Le cadre entourant le message [TRANSPOSE] disparaît<br />
alors.<br />
43
<strong>EM</strong>-<strong>25</strong>/<strong>EM</strong>-<strong>15</strong><br />
Other <strong>Keyboard</strong> part functions<br />
Here are yet other functions related to the <strong>Keyboard</strong><br />
parts. These can be set via the FUNCTION menu, or are<br />
covered elsewhere:<br />
• Reverb effect (see p. 58)<br />
• Chorus effect (see p. 59)<br />
• <strong>Keyboard</strong> velocity (see p. 57)<br />
• Octave transposition of the Upper 1, Upper 2, and Lower<br />
parts (see p. 60)<br />
• Master Tune (see p. 57)<br />
• Volume of the <strong>Keyboard</strong> parts (see p. 59)<br />
• Intelligence function in ORGAN mode (see p. 61)<br />
• Split point in ORGAN mode (see p. 62)<br />
• Hold function for the left-hand chords in ORGAN mode<br />
(see p. 61).<br />
Otras funciones de parte del teclado<br />
A continuación, se nombran otras funciones relacionadas<br />
con las partes del teclado. Estas se pueden ajustar<br />
mediante el menú FUNCTION, o se cubren en otra parte:<br />
• Efecto Reverb (consulte la p. 58)<br />
• Efecto Chorus (consulte la p. 59)<br />
• Velocidad del teclado (consulte la p. 57)<br />
• Transposición de octava de las partes Upper 1, Upper 2, y<br />
Lower (consulte la p. 60)<br />
• Master Tune (consulte la p. 57)<br />
• Volumen de las partes del teclado (consulte la p. 59)<br />
• Función Intelligence en el modo ORGAN (consulte la<br />
p. 61)<br />
• Punto de división en el modo ORGAN (consulte la p. 62)<br />
• Función Hold para los acordes de la mano izquierda en el<br />
modo ORGAN (consulte la p. 61).<br />
Autres fonctions liées aux parties <strong>Keyboard</strong><br />
Voici d’autres fonctions liées aux parties <strong>Keyboard</strong>, à<br />
savoir les parties que vous jouez. Vous pouvez régler ces<br />
fonctions avec le menu FUNCTION, ou elles sont décrites<br />
autre part:<br />
• Effet Reverb (voyez p. 58)<br />
• Effet Chorus (voyez p. 59)<br />
• Toucher du clavier (voyez p. 57)<br />
• Transposition d’octave des parties Upper 1, Upper 2 et<br />
Lower (voyez p. 60)<br />
• Master Tune (voyez p. 57)<br />
• Volume des parties <strong>Keyboard</strong> (voyez p. 59)<br />
• Fonction Intelligence en mode ORGAN (voyez p. 61)<br />
• Point de partage en mode ORGAN (voyez p. 62)<br />
• Fonction Hold pour les accords joués à la main gauche en<br />
mode ORGAN (voyez p. 61).<br />
44
<strong>EM</strong>-<strong>25</strong>/<strong>EM</strong>-<strong>15</strong><br />
13. Recorder functions<br />
Playback functions<br />
The [INTRO], [ORIGINAL], etc. buttons have two functions:<br />
one in Style mode (printed above the buttons), and<br />
another one in Song mode (printed below the buttons).<br />
You need to select the Song mode (by pressing the [SONG]<br />
button).<br />
13. Funciones del grabador<br />
Funciones de reproducción<br />
Los botones [INTRO], [ORIGINAL], etc. funcionan de dos<br />
maneras: una en el modo Style (impreso por encima de<br />
los botones), y otra en el modo Song (impreso por debajo<br />
de los botones).<br />
Deberá seleccionar el modo Song (pulsando el botón [SONG]).<br />
13. Fonctions Recorder<br />
Fonctions de reproduction<br />
Les boutons [INTRO], [ORIGINAL], etc. ont deux fonctions:<br />
une en mode Style (imprimée au-dessus des boutons) et<br />
une autre en mode Song (imprimée en-dessous des boutons).<br />
Vous devez choisir le mode Song (en appuyant sur le bouton<br />
[SONG]).<br />
<strong>EM</strong>-<strong>25</strong><br />
MARKER A↔B<br />
IntSNG<br />
MARKER A↔B<br />
<strong>EM</strong>-<strong>15</strong><br />
Note: On the <strong>EM</strong>-<strong>15</strong>, these functions are only meaningful after<br />
recording a song (see p. 28).<br />
Fast Forward, Rewind, and Reset<br />
•To fast forward (jump to a measure later in the song),<br />
press [®®].<br />
•To rewind (return to a measure that lies before the current<br />
position), press [√√].<br />
You can hold down either button to accelerate the fast<br />
forward or rewind process. The measure indication in the<br />
upper right corner of the display will help you locate the<br />
measure you need.<br />
• Press [|√] (Reset) to jump back to the first measure of<br />
the song. You need to stop playback before using the<br />
[|√] button.<br />
Note: In certain cases, [®®] and [√√] may not be available.<br />
This is only the case for very large songs, however.<br />
Nota: En el <strong>EM</strong>-<strong>15</strong>, estas funciones sólo son significativas después<br />
de grabar una canción (consulte la p. 28).<br />
Avance rápido, Rebobinado y Reinicio<br />
• Para avanzar rápido (pasar a un compás posterior de la<br />
canción), pulse [®®].<br />
• Para rebobinar (volver a un compás anterior a la posición<br />
actual), pulse [√√].<br />
Puede mantener pulsados estos botones para acelerar el<br />
proceso de avance rápido o rebobinado. La indicación de<br />
compás en el ángulo superior derecho de la pantalla le<br />
ayudará a localizar el compás deseado.<br />
• Pulse [|√] (Reset) para volver al primer compás de la<br />
canción. Deberá parar la reproducción para poder utilizar<br />
el botón [|√].<br />
Nota: En ciertos casos, [®®] y [√√] pueden no estar disponibles.<br />
No obstante, este sólo el caso de canciones muy largas.<br />
Remarque: Sur l’<strong>EM</strong>-<strong>15</strong>, l’utilisation de ces fonctions n’a de<br />
sens que si vous avez enregistré un morceau (voyez p. 28).<br />
Avance, recul et retour au début<br />
• Pour avancer (sauter à une mesure plus loin dans le morceau),<br />
appuyez sur [®®].<br />
• Pour reculer (retourner à une mesure antérieure à<br />
l’emplacement actuel), appuyez sur [√√].<br />
Vous pouvez accélérer l’avance ou le recul en maintenant<br />
enfoncé le bouton correspondant. L’affichage de mesure<br />
dans le coin supérieur gauche de l’écran vous aidera à<br />
trouver la mesure voulue.<br />
• Appuyez sur [|√] (Reset) pour retourner à la première<br />
mesure du morceau. Vous devez arrêter la reproduction<br />
pour pouvoir utiliser le bouton [|√].<br />
Remarque: Dans certains cas, [®®] et [√√] ne seront pas<br />
disponibles. Cela ne se produit cependant que pour de très longs<br />
morceaux.<br />
45
<strong>EM</strong>-<strong>25</strong>/<strong>EM</strong>-<strong>15</strong><br />
Loop playback (Repeat) (<strong>EM</strong>-<strong>25</strong>)<br />
Another clever feature of the <strong>EM</strong>-<strong>25</strong>’s Recorder is that<br />
you can program playback loops. You can do so during<br />
playback or while the Recorder is stopped.<br />
(1) Press [MARKER A–B] where you want the loop to begin<br />
(the [MARKER≈||:≈A] icon is displayed).<br />
(2) Fast forward to the measure where you want the loop<br />
to end and press [MARKER A–B] again (the<br />
[MARKER≈B≈:||] icon appears).<br />
You can also program loops on the fly. Remember, however,<br />
that the Recorder always memorizes the beginning<br />
(downbeat) of the next measure.<br />
(3) To play back the loop you have just programmed, hold<br />
down [SYNC START] and press [START/STOP].<br />
At the end of the B measure, the Recorder immediately<br />
jumps back to the beginning of measure A.<br />
Note: In certain cases, the Marker function may not be available.<br />
This only happens with very large songs, however.<br />
Live performance with song backing (Minus One)<br />
Your <strong>EM</strong>-<strong>25</strong>/<strong>EM</strong>-<strong>15</strong> allows you to mute the solo part of<br />
the song you are playing back. This is called Minus One<br />
playback (because one part of the original song will not<br />
be played back).<br />
(1) Press the [SONG] button.<br />
On the <strong>EM</strong>-<strong>25</strong>, you can now select a Song on disk, if you<br />
like (see p. 47). In the case of the <strong>EM</strong>-<strong>15</strong>, you can play<br />
back the Song in the internal memory.<br />
(2) Press the [MINUS ONE] button.<br />
(3) Press [|√] and [®/■] to start playback.<br />
(4) You will now hear all parts except the melody, which<br />
can be played using the Upper 1 part.<br />
Note: See page 62 for a parameter that allows you to specify<br />
which part should be muted when you press [MINUS ONE].<br />
Reproducción en bucle (Repeat) (<strong>EM</strong>-<strong>25</strong>)<br />
Otra función muy interesante del Grabador del <strong>EM</strong>-<strong>25</strong> es<br />
la que permite programar bucles de reproducción. Puede<br />
hacerlo durante la reproducción o con el Grabador<br />
parado.<br />
(1) Pulse [MARKER A–B] en el punto en que desee iniciar el<br />
bucle (se visualizará el icono [MARKER≈||:≈A]).<br />
(2) Avance rápido hasta el compás en que desee terminar<br />
el bucle, y pulse [MARKER A–B] de nuevo (aparece el<br />
icono [MARKER≈B≈:||]).<br />
También es posible programar bucles al momento. No<br />
obstante, debe recordar que el Grabador siempre memoriza<br />
el principio (tiempo fuerte) del siguiente compás.<br />
(3) Para reproducir el bucle que acaba de programar, mantenga<br />
pulsado [SYNC START] y pulse [START/STOP].<br />
Al final del compás B, el grabador volverá de manera<br />
inmediata al principio del compás A.<br />
Nota: En algunos casos, la función Marker puede no estar disponible.<br />
No obstante, esto sólo ocurre con canciones muy largas.<br />
Interpretación en vivo con acompañamiento de canción<br />
(Minus One)<br />
El <strong>EM</strong>-<strong>25</strong>/<strong>EM</strong>-<strong>15</strong> le permite enmudecer la parte de solo de<br />
la canción que está reproduciendo actualmente. Esto se<br />
conoce como reproducción Minus One (porque una parte<br />
de la canción original no se reproduce).<br />
(1) Pulse el botón [SONG].<br />
En el <strong>EM</strong>-<strong>25</strong>, ahora puede seleccionar una Canción en<br />
disco, si lo desea (consulte la p. 47). En el caso del <strong>EM</strong>-<strong>15</strong>,<br />
puede reproducir la Canción en la memoria interna.<br />
(2) Pulse el botón [MINUS ONE].<br />
(3) Pulse [|√] y [®/■] para iniciar la reproducción.<br />
(4) Ahora oirá todas las partes excepto la melodía, la cual<br />
se puede reproducir utilizando la parte Upper 1.<br />
Nota: Consulte la página 62 para un parámetro que le permite<br />
especificar qué parte debería enmudecer al pulsar [MINUS ONE].<br />
Reproduction en boucle (<strong>EM</strong>-<strong>25</strong>)<br />
La fonction Recorder de l’<strong>EM</strong>-<strong>25</strong> propose une autre fonction<br />
bien futée qui permet de programmer des boucles de<br />
reproduction. Vous pouvez programmer ces boucles pendant<br />
la reproduction ou quand l’enregistreur est à l’arrêt.<br />
(1) Appuyez sur [MARKER A–B] à l’endroit où vous voulez<br />
démarrer la boucle (l’icône [MARKER≈||:≈A] s’affiche).<br />
(2) Avancez jusqu’à l’endroit où vous voulez arrêter la<br />
boucle et appuyez à nouveau sur [MARKER A–B]<br />
(l’icône [MARKER≈B≈:||] s’affiche alors).<br />
Vous pouvez aussi programmer des boucles sur le vif.<br />
Souvenez-vous cependant que la fonction Recorder<br />
mémorise toujours le début (temps fort) de la mesure suivante.<br />
(3) Pour jouer la boucle que vous venez de programmer,<br />
maintenez [SYNC START] enfoncé et appuyez sur<br />
[START/STOP].<br />
A la fin de la mesure B, l’enregistreur passe immédiatement<br />
au début de la mesure A.<br />
Remarque: Dans certains cas, la fonction Marker pourrait être<br />
indisponible. Cela ne se produit cependant que pour de très<br />
longs morceaux.<br />
Jeu “live” avec accompagnement de morceau (Minus One)<br />
Votre <strong>EM</strong>-<strong>25</strong>/<strong>EM</strong>-<strong>15</strong> vous permet d’étouffer la partie solo<br />
d’un morceau reproduit. C’est ce qu’on appelle la reproduction<br />
Minus One (car en effet une partie du morceau<br />
original n’est pas jouée).<br />
(1) Appuyez sur le bouton [SONG].<br />
Sur l’<strong>EM</strong>-<strong>25</strong>, vous pouvez choisir un Song sur disquette<br />
(voyez p. 47). L’<strong>EM</strong>-<strong>15</strong> vous permet lui de jouer le Song<br />
contenu dans sa mémoire interne.<br />
(2) Appuyez sur le bouton [MINUS ONE].<br />
(3) Utilisez [|√] et [®/■] pour lancer la reproduction.<br />
(4) Vous entendez alors toutes les parties jouées sauf la<br />
mélodie, que vous pouvez jouer vous-même avec la<br />
partie Upper 1.<br />
Remarque: Pour en savoir plus sur la manière de définir quelle<br />
partie est étouffée quand vous appuyez sur [MINUS ONE], voyez<br />
page 62.<br />
46
Playing back Standard MIDI Files<br />
(<strong>EM</strong>-<strong>25</strong>)<br />
The <strong>EM</strong>-<strong>25</strong> allows you to play back commercially available<br />
music data files (called Standard MIDI Files) or your own<br />
songs you saved to disk.<br />
In fact, when you save a song to disk, it is saved as Standard<br />
MIDI Format 1 file and can also be played back using<br />
any other SMF compatible sequencer (or software).<br />
Reproducir Archivos MIDI Estándar (<strong>EM</strong>-<strong>25</strong>)<br />
El <strong>EM</strong>-<strong>25</strong> permite reproducir archivos de información<br />
musical disponibles en el mercado (llamados Archivos<br />
MIDI Estándar) o las canciones propias que haya guardado<br />
en disco.<br />
En realidad, al guardar una canción en un disco, ésta se<br />
guarda como un Archivo MIDI Estándar del Formato 1, y<br />
también podrá reproducirse utilizando otros secuenciadores<br />
(o programas) compatibles con SMF.<br />
<strong>EM</strong>-<strong>25</strong>/<strong>EM</strong>-<strong>15</strong><br />
Jeu de fichiers Standard MIDI<br />
(<strong>EM</strong>-<strong>25</strong>)<br />
L’<strong>EM</strong>-<strong>25</strong> peut jouer des fichiers de données musicales disponibles<br />
dans le commerce (les fichiers Standard MIDI) ou<br />
vos morceaux sauvegardés sur disquette.<br />
Un morceau sauvegardé sur disquette est sauvé sous<br />
forme de fichier Standard MIDI de format 1 et peut être<br />
joué par tout séquenceur (ou logiciel) compatible SMF.<br />
IntSNG<br />
(1) Insert a floppy disk with Song/Standard MIDI File data<br />
into the drive.<br />
(2) Press the [SONG] button to switch to the <strong>EM</strong>-<strong>25</strong>’s Song<br />
mode.<br />
This is necessary because, otherwise, pressing the [START/<br />
STOP] button will start Arranger playback. The black message<br />
in the upper right corner must read [SONG].<br />
(3) Press [SONG] again to display the name of the first<br />
Standard MIDI File on disk.<br />
What is actually displayed depends on whether you have<br />
inserted a disk and whether it contains Standard MIDI<br />
Files. See below for what the various messages mean.<br />
Message<br />
Empty<br />
No Disk<br />
No Files<br />
IntSong<br />
Meaning<br />
The <strong>EM</strong>-<strong>25</strong>’s song memory does not contain data<br />
(you have neither recorded a song nor played<br />
back a song on disk).<br />
You forgot to insert a disk into the drive.<br />
The disk you inserted into the drive does not<br />
contain Standard MIDI Files.<br />
You selected the Song you recorded yourself.<br />
(1) Inserte un disquete con datos de una Canción/Archivo<br />
MIDI Estándar en la unidad.<br />
(2) Pulse el botón [SONG] para pasar al modo Song del<br />
<strong>EM</strong>-<strong>25</strong>.<br />
Esto es necesario porque, en caso contrario, al pulsar el botón<br />
[START/STOP] empezará a reproducirse el Arranger. El mensaje<br />
en negro del ángulo superior derecho debe ser [SONG].<br />
(3) Pulse [SONG] de nuevo para visualizar el nombre del<br />
primer Archivo MIDI Estándar en el disco.<br />
Lo que en realidad se visualiza en pantalla depende de si<br />
ha insertado un disco y de si éste contiene Archivos MIDI<br />
Estándar. A continuación se explica el significado de los<br />
diferentes mensajes.<br />
Mensaje<br />
Empty<br />
No Disk<br />
No Files<br />
IntSong<br />
Significado<br />
La memoria de canción del <strong>EM</strong>-<strong>25</strong> no contiene ninguna<br />
información (tampoco ha grabado ninguna<br />
canción ni ha reproducido una canción del disco).<br />
Ha olvidado insertar un disco en la unidad.<br />
El disco que ha insertado en la unidad no contiene<br />
Archivos MIDI Estándar.<br />
Ha seleccionado la Canción grabada por usted<br />
mismo.<br />
(1) Chargez la disquette contenant les données de Song/<br />
de fichiers Standard MIDI dans le lecteur de disquette.<br />
(2) Appuyez sur [SONG] pour activer le mode Song de<br />
l’<strong>EM</strong>-<strong>25</strong>.<br />
Effectuez cette étape car sinon, quand vous enfoncez<br />
[START/STOP], vous lancez la reproduction de l’Arranger.<br />
Le message affiché en noir dans le coin supérieur droit de<br />
l’écran doit indiquer [SONG].<br />
(3) Appuyez à nouveau sur [SONG] pour afficher le nom<br />
du premier fichier Standard MIDI de la disquette.<br />
L’affichage varie selon qu’une disquette est chargée ou<br />
non et selon qu’elle contient ou non des fichiers Standard<br />
MIDI. Voyez ci-dessous le sens des divers messages.<br />
Message<br />
Empty<br />
No Disk<br />
No Files<br />
IntSong<br />
Signification<br />
La mémoire de morceau de l’<strong>EM</strong>-<strong>25</strong> est vide<br />
(vous n’avez enregistré aucun Song ni joué de<br />
morceau d’une disquette).<br />
Il n’y a pas de disquette dans le lecteur.<br />
La disquette chargée dans le lecteur ne contient<br />
pas de fichiers Standard MIDI.<br />
Il s’agit d’un Song enregistré par vos soins.<br />
47
<strong>EM</strong>-<strong>25</strong>/<strong>EM</strong>-<strong>15</strong><br />
(4) Use the T<strong>EM</strong>PO [–][+] buttons to select the Standard<br />
MIDI file you want to listen to.<br />
Note: Please bear in mind that starting playback of the selected<br />
song on disk will erase your own song. Be sure to save it to disk<br />
before proceeding (see p. 76).<br />
(5) Press [START/STOP] to load the first data chunk and<br />
start playback.<br />
You can also wait for the flashing “YES” message and<br />
press T<strong>EM</strong>PO [+]. You then need to start playback by<br />
pressing [START/STOP].<br />
Press this button once again to stop playback. See also<br />
“Fast Forward, Rewind, and Reset” (p. 45) and “Loop playback<br />
(Repeat) (<strong>EM</strong>-<strong>25</strong>)” (p. 46) for other functions you<br />
can use during playback.<br />
If one of the following error messages appears, either<br />
select another Standard MIDI File or insert another disk:<br />
Message<br />
NoFormat<br />
File Err<br />
Over 18T<br />
Meaning<br />
The inserted floppy disk has not been formatted<br />
for the <strong>EM</strong>-<strong>25</strong>.<br />
The selected file cannot be read.<br />
The Standard MIDI File contains more tracks<br />
than the <strong>EM</strong>-<strong>25</strong> can handle.<br />
(4) Utilice los botones T<strong>EM</strong>PO [–][+] para seleccionar el<br />
archivo MIDI Estándar que desee escuchar.<br />
Nota: Tenga en cuenta que al iniciar la reproducción de la canción<br />
seleccionada del disco se borrará la canción propia. Guárdela<br />
en un disco antes de proceder (consulte la p. 76).<br />
(5) Pulse [START/STOP] para cargar el primer bloque de<br />
información e iniciar la reproducción.<br />
También puede esperar a que el mensaje “YES” parpadee y<br />
luego pulse T<strong>EM</strong>PO [+]. A continuación, deberá iniciar la<br />
reproducción pulsando [START/STOP].<br />
Pulse este botón una vez más para detener la reproducción.<br />
Consulte también “Avance rápido, Rebobinado y<br />
Reinicio” (p. 45) y “Reproducción en bucle (Repeat)<br />
(<strong>EM</strong>-<strong>25</strong>)” (p. 46), donde se explican otras funciones que<br />
puede utilizar durante la reproducción.<br />
Si aparece uno de los siguientes mensajes de error, seleccione<br />
otro Archivo MIDI Estándar o inserte otro disco:<br />
Mensaje<br />
NoFormat<br />
File Err<br />
Over 18T<br />
Significado<br />
El disquete insertado no ha sido formateado<br />
para el <strong>EM</strong>-<strong>25</strong>.<br />
No puede leerse el archivo seleccionado.<br />
El Archivo MIDI Estándar contiene más pistas<br />
que las que el <strong>EM</strong>-<strong>25</strong> puede gestionar.<br />
(4) Utilisez les boutons T<strong>EM</strong>PO [–][+] pour choisir le fichier<br />
Standard MIDI que vous voulez écouter.<br />
Remarque: N’oubliez pas que le fait de lancer le jeu du Song<br />
choisi sur la disquette écrase votre propre morceau. Veillez donc<br />
à le sauvegarder sur disquette avant de poursuivre (voyez p. 76).<br />
(5) Appuyez sur [START/STOP] pour charger le premier bloc<br />
de données et lancer la reproduction.<br />
Vous pouvez aussi attendre que le message clignotant<br />
“YES” s’affiche et appuyer sur T<strong>EM</strong>PO [+]. Il suffit alors<br />
d’appuyer sur [START/STOP] pour lancer la reproduction.<br />
Appuyez à nouveau sur ce bouton pour arrêter la reproduction.<br />
Voyez aussi “Avance, recul et retour au début”<br />
(p. 45) et “Reproduction en boucle (<strong>EM</strong>-<strong>25</strong>)” (p. 46) pour<br />
en savoir plus sur d’autres fonctions disponibles pendant<br />
la reproduction.<br />
Si un des messages d’erreur suivants s’affiche, choisissez<br />
un autre fichier Standard MIDI ou chargez une autre disquette:<br />
Message<br />
NoFormat<br />
File Err<br />
Over 18T<br />
Signification<br />
La disquette chargée n’a pas été formatée<br />
pour l’<strong>EM</strong>-<strong>25</strong>.<br />
Le fichier choisi est illisible.<br />
Le fichier Standard MIDI contient plus de<br />
pistes que l’<strong>EM</strong>-<strong>25</strong> ne peut gérer.<br />
48
Other recording modes<br />
Here are some other possibilities for recording your<br />
music. Select one of these if you do not wish to use the<br />
Arranger (see p. 28).<br />
Recording in ORGAN mode<br />
Select this method when you want to record organ music,<br />
or for any other type of song that requires the use of different<br />
sounds for the left and right hands. What is<br />
recorded onto Track “A” cannot be replaced without overwriting<br />
the entire song, so be sure to get the Lower part<br />
right.<br />
Track “B” can be used for recording the Upper 1/2 or<br />
M.Drums part.<br />
First recording pass<br />
(1) Press the [STYLE] button below the display and check<br />
whether the INTRO, ORIGINAL, etc. icons are displayed.<br />
(2) Press the [ORGAN] button so that the [ORGAN] icon<br />
appears.<br />
(3) Select the desired Tones for the Upper and Lower parts<br />
(see p. 24 and <strong>25</strong>).<br />
If desired, you can also switch on the M.Bass part. See<br />
p. 61.<br />
(4) Set the tempo using the T<strong>EM</strong>PO [–]/[+] buttons.<br />
Note: It is not possible to add the Lower, M. Bass, and/or<br />
Arranger drum part without overwriting the entire song, so be<br />
sure to record them the first time around (using [REC∏] rather<br />
than [2nd≈TRK≈REC∏]).<br />
(5) If necessary, select the Music Style whose drum part<br />
you want to use as backing. See p. 23.<br />
(6) Press the [● REC] button once or twice to select the<br />
[REC∏] function.<br />
(7) Start recording in one of the following ways:<br />
a) Play the first melody notes (to the right of the Split<br />
point). This will start the recording without the<br />
Arranger drums. You can add them whenever you like<br />
by pressing [START/STOP]. The drums will start at the<br />
next downbeat.<br />
Otros modos de grabación<br />
A continuación, se describen otras posibilidades para la<br />
grabación de su música. Seleccione una si no desea utilizar<br />
el Arranger (consulte la p. 28).<br />
Grabar en el modo ORGAN<br />
Seleccione este método cuando desee grabar música de<br />
órgano, o para cualquier otro tipo de canción que requiera<br />
el uso de diferentes sonidos para las manos izquierda y<br />
derecha. Una vez más, lo que grabe en la Pista “A” no se<br />
podrá reemplazar sin sobrescribir la canción entera, de<br />
modo que asegúrese de obtener la parte derecha de Lower.<br />
La Pista “B” se puede utilizar para grabar la parte Upper 1/<br />
2 o M.Drums.<br />
Primera pasada de grabación<br />
(1) Pulse el botón [STYLE] que se encuentra justo debajo<br />
de la pantalla y compruebe que se visualizan los iconos<br />
INTRO, ORIGINAL, etc.<br />
(2) Pulse el botón [ORGAN] para que aparezca el icono<br />
[ORGAN].<br />
(3) Seleccione los Tones deseados para las partes Upper y<br />
Lower (consulte la p. 24 y <strong>25</strong>).<br />
Si lo desea, también puede activar la parte M.Bass. Consulte<br />
la p. 61.<br />
(4) Ajuste el tempo utilizando los botones T<strong>EM</strong>PO [–]/[+].<br />
Nota: No es posible añadir la parte Lower, M. Bass, y/o parte de<br />
percusión del Arranger sin sobrescribir la canción entera, de<br />
modo que asegúrese de grabarlas en primer lugar (utilizando<br />
[REC∏] en vez de [2nd≈TRK≈REC∏]).<br />
(5) Si es necesario, seleccione el Estilo Musical cuya parte<br />
de percusión desee utilizar como acompañamiento.<br />
Consulte la p. 23.<br />
(6) Pulse el botón [● REC] una vez o dos para seleccionar<br />
la función [REC∏].<br />
(7) Empiece a grabar en uno de los siguientes modos:<br />
a) Toque las primeras notas de la melodía (a la derecha del<br />
punto de División). Con esto se iniciará la grabación sin las<br />
percusiones de Arranger. Puede añadirlas cuando quiera<br />
pulsando [START/STOP]. La percusión se iniciará en el<br />
próximo tiempo fuerte.<br />
<strong>EM</strong>-<strong>25</strong>/<strong>EM</strong>-<strong>15</strong><br />
Autres modes d’enregistrement<br />
Voici d’autres possibilités pour enregistrer votre propre<br />
musique. Choisissez une de ces alternatives si vous ne<br />
voulez pas utiliser l’Arranger (voyez p. 28).<br />
Enregistrement en mode ORGAN<br />
Choisissez cette méthode quand vous voulez enregistrer<br />
un morceau d’orgue ou pour tout autre type de Song<br />
requérant l’utilisation de sons différents pour les mains<br />
gauche et droite. Le contenu enregistré dans la piste “A”<br />
ne peut être remplacé sans écraser le morceau entier;<br />
vérifiez donc que vous avez bien joué la partie Lower.<br />
La piste “B” peut servir à l’enregistrement de la partie<br />
Upper 1/2 ou M.Drums.<br />
Première prise d’enregistrement<br />
(1) Appuyez sur [STYLE] en-dessous de l’écran et vérifiez si<br />
les icônes INTRO, ORIGINAL, etc. sont ou non affichées.<br />
(2) Appuyez sur le bouton [ORGAN] de sorte que l’icône<br />
[ORGAN] s’affiche.<br />
(3) Assignez les sons voulus aux parties Upper et Lower<br />
(voyez p. 24 et <strong>25</strong>).<br />
Si nécessaire, vous pouvez aussi activer la partie M.Bass.<br />
Voyez p. 61.<br />
(4) Réglez le tempo avec les boutons T<strong>EM</strong>PO [–]/[+].<br />
Remarque: Vous ne pouvez pas ajouter la partie Lower, M. Bass,<br />
et/ou la batterie de l’Arranger sans écraser le Song entier; veillez<br />
donc bien à les enregistrer lors de la première prise d’enregistrement<br />
(en utilisant [REC∏] plutôt que [2nd≈TRK≈REC∏]).<br />
(5) Si nécessaire, choisissez le style dont vous voulez la<br />
partie Drum comme accompagnement. Voyez p. 23.<br />
(6) Appuyez une fois ou deux sur le bouton [● REC] pour<br />
choisir la fonction [REC∏].<br />
(7) Lancez l’enregistrement en suivant une des méthodes<br />
ci-dessous:<br />
a) Jouez les premières notes de la mélodie (à droite du<br />
point de partage). Vous lancez ainsi l’enregistrement<br />
sans la batterie de l’Arranger. Vous pouvez l’ajouter à<br />
tout moment en appuyant sur [START/STOP]. La partie<br />
de batterie démarre sur le prochain temps fort.<br />
49
<strong>EM</strong>-<strong>25</strong>/<strong>EM</strong>-<strong>15</strong><br />
Note: If you start recording without the Arranger drums and<br />
want to bring them in at a later stage, it would be a good idea to<br />
switch on the metronome.<br />
b) Press the [START/STOP] button to start Arranger<br />
drum playback with the selected Division.<br />
c) Press one or several keys to the left of the Split point<br />
(to play the first Lower-part notes).<br />
d) Press [SYNC START] to activate this function, and<br />
play one or several notes to the left of the Split point.<br />
The Arranger drums will start in sync with your first<br />
notes.<br />
(8) Stop recording in one of the following ways:<br />
a) If you started recording using methods (b) or (d)<br />
above, press [START/STOP] to stop both the Arranger<br />
and recording.<br />
b) Press [● REC] again.<br />
c) Press the [ENDING] button to start the Ending<br />
phrase. As soon as it ends, recording stops.<br />
Here is what can be recorded. Not all parts need to be<br />
used at all times. (Upper 2 cannot be used without Upper<br />
1, while M.Drums means that Upper 1/2 are not available.)<br />
Track A<br />
Track B<br />
Arranger Drums Upper 1<br />
Lower<br />
Upper 2 (via LAYER)<br />
M.Bass (see p. 61)<br />
M.Drums<br />
Second recording pass<br />
Operations are the same as for recordings made with the<br />
Arranger, so please see p. 30. Bear in mind though that by<br />
selecting 2nd TRACK, you overwrite (and thus lose) the<br />
Upper/M. Drum part notes you may have recorded the<br />
first time around.<br />
Nota: Si empieza la grabación sin la percusión del Arranger y<br />
quiere introducirla más tarde, es una buena idea activar el<br />
metrónomo.<br />
b) Pulse el botón [START/STOP] para iniciar la reproducción<br />
de la percusión Arranger con la División seleccionada.<br />
c) Pulse una o más teclas de la izquierda del punto de<br />
División (para tocar las primeras notas de la parte Lower).<br />
d) Pulse [SYNC START] para activar esta función y toque<br />
una o más notas a la izquierda del punto de División. La<br />
percusión del Arranger se iniciará en sincronización con<br />
las primeras notas.<br />
(8) Detenga la grabación en uno de los siguientes modos:<br />
a) Si empezó la grabación con los métodos (b) o (d) antes<br />
descritos, pulse [START/STOP] para detener el Arranger y la<br />
grabación.<br />
b) Pulse [● REC] de nuevo.<br />
c) Pulse el botón [ENDING] para iniciar la frase de final.<br />
Cuando ésta finalice, se detendrá la grabación.<br />
A continuación, se describe lo que puede grabar. No todas<br />
las partes deben utilizarse en cada momento. (Upper 2 no<br />
se puede utilizar sin Upper 1, mientras M.Drums significa<br />
que Upper 1/2 no está disponible.)<br />
Pista A<br />
Pista B<br />
Arranger Drums Upper 1<br />
Lower<br />
Upper 2 (mediante LAYER)<br />
M.Bass (consulte la p. 61) M.Drums<br />
Segundo pase de grabación<br />
Las operaciones en este caso son las mismas que las realizadas<br />
para el Arranger, así pues, consulte la p. 30. Tenga<br />
en cuenta que aunque seleccione 2nd TRACK, sobrescribirá<br />
(y por tanto perderá) las notas de la parte Upper/M.<br />
Drum que haya grabado en primer lugar.<br />
Remarque: Si vous lancez l’enregistrement sans la partie de<br />
batterie de l’Arranger et que vous comptez l’incorporer plus loin<br />
dans le morceau, nous vous conseillons d’activer le métronome.<br />
b) Appuyez sur [START/STOP] pour lancer le jeu de batterie<br />
de l’Arranger avec la Division en vigueur.<br />
c) Enfoncez une ou plusieurs touches à gauche du<br />
point de partage (pour jouer les premières notes de la<br />
partie Lower).<br />
d) Appuyez sur [SYNC START] pour activer cette fonction<br />
et jouez une ou plusieurs notes à gauche du point<br />
de partage. La batterie de l’Arranger démarre alors en<br />
synchronisation avec vos premières notes.<br />
(8) Arrêtez l’enregistrement en suivant une des méthodes<br />
ci-dessous:<br />
a) Si vous avez lancé l’enregistrement avec la méthode<br />
(b) ou (d) ci-dessus, appuyez sur [START/STOP] pour<br />
arrêter simultanément l’Arranger et l’enregistrement.<br />
b) Appuyez à nouveau sur [● REC].<br />
c) Appuyez sur le bouton [ENDING] pour lancer la<br />
finale (Ending). L’enregistrement s’arrête dès que la<br />
finale est terminée.<br />
Voici ce que vous pouvez enregistrer. Notez que vous ne<br />
pouvez pas utiliser toutes les parties en permanence.<br />
(Upper 2 ne peut pas être utilisée sans Upper 1, tandis<br />
que le choix de M.Drums signifie qu’Upper 1/2 ne sont<br />
pas disponibles.)<br />
Piste A<br />
Piste B<br />
Arranger Drums Upper 1<br />
Lower<br />
Upper 2 (via LAYER)<br />
M.Bass (voyez p. 61) M.Drums<br />
Deuxième prise d’enregistrement<br />
Les opérations sont identiques à celles des enregistrements<br />
effectués avec l’Arranger, voyez p. 30. N’oubliez<br />
toutefois pas que si vous choisissez la 2nd TRACK, vous<br />
écrasez (et donc perdez) les notes des parties Upper/M.<br />
Drum que vous avez peut-être enregistrées lors de la première<br />
prise.<br />
50
<strong>EM</strong>-<strong>25</strong>/<strong>EM</strong>-<strong>15</strong><br />
Recording in PIANO mode<br />
Select this method when you want to record piano music,<br />
or any other song that requires the use of only one sound<br />
for the entire keyboard. What is recorded onto Track “A”<br />
cannot be replaced without overwriting the entire song.<br />
Here, however, you can record a first Upper part (Track<br />
“A”) and add a second one on track “B” during your second<br />
session.<br />
The most obvious use for this function is to record the<br />
left-hand part of a piano piece the first time around, and<br />
the right hand-part using 2nd TRACK. If you like, you can<br />
add a drum accompaniment to your playing.<br />
Note: The Upper part you add using the 2nd TRACK function<br />
(Track “B”) will use the same Tone as the part on track “A”.<br />
First recording pass<br />
(1) Press the [STYLE] button below the display and check<br />
whether the INTRO, ORIGINAL, etc. icons are displayed.<br />
(2) Press the [PIANO] button so that neither the<br />
[ARRANGER] nor the [ORGAN] icon is displayed<br />
([M≈DRUMS] should not appear either).<br />
(3) Select the desired Tone for the Upper part (see p. 24).<br />
(4) Set the tempo using the T<strong>EM</strong>PO [–]/[+] buttons.<br />
(5) If necessary, select the Music Style whose drum part<br />
you want to use as backing. See p. 23.<br />
(6) Press the [● REC] button once or twice to select the<br />
[REC∏] function.<br />
(7) Start recording in one of the following ways:<br />
a) Play the first melody notes. This will start the recording<br />
without the Arranger drums. You can add them<br />
whenever you like by pressing [START/STOP]. The drums<br />
will start at the next downbeat.<br />
Note: If you start recording without the Arranger drums and<br />
want to bring them in at a later stage, it would be a good idea to<br />
switch on the metronome.<br />
b) Press the [START/STOP] button to start Arranger<br />
drum playback with the selected Division.<br />
c) Press [SYNC START] to activate this function, and<br />
play one or several notes. The Arranger drums will start<br />
in sync with your first notes.<br />
Grabar en el modo PIANO<br />
Seleccione este método cuando quiera grabar música de<br />
piano, o cualquier otra canción que requiera el uso de un<br />
sólo sonido para todo el teclado. Una vez más, lo que se<br />
grabe en la Pista “A” no se podrá reemplazar sin sobrescribir<br />
la canción entera. Aquí, sin embargo, puede grabar<br />
una primera parte Upper (Pista “A”) y añadir una segunda<br />
parte en la pista “B” durante la segunda sesión.<br />
El uso más obvio de esta función es el de grabar en primer<br />
lugar la parte de la mano izquierda de una pieza de piano, y<br />
la parte de la mano derecha utilizando 2nd TRACK. Si lo<br />
desea, puede añadir un acompañamiento de percusión a su<br />
interpretación.<br />
Nota: La parte Upper que añada mediante la función 2nd TRACK<br />
(Pista “B”) utilizará el mismo Tone que la parte de la pista “A”.<br />
Primera pasada de grabación<br />
(1) Pulse el botón [STYLE] que se encuentra justo debajo<br />
de la pantalla y compruebe que se visualizan los iconos<br />
INTRO, ORIGINAL, etc.<br />
(2) Pulse el botón [PIANO] de manera que no se visualicen<br />
ni el icono [ARRANGER] ni el icono [ORGAN] (el icono<br />
[M≈DRUMS] tampoco debería visualizarse).<br />
(3) Seleccione el Tone deseado para la parte Upper (consulte<br />
la p. 24).<br />
(4) Ajuste el tempo utilizando los botones T<strong>EM</strong>PO [–]/[+].<br />
(5) Si es necesario, seleccione el Estilo Musical cuya parte<br />
de percusión desee utilizar como acompañamiento.<br />
Consulte la p. 23.<br />
(6) Pulse el botón [● REC] una o dos veces para seleccionar<br />
la función [REC∏].<br />
(7) Empiece a grabar en uno de los siguientes modos:<br />
a) Toque las primeras notas de la melodía. Con esto se iniciará<br />
la grabación sin la percusión del Arranger. Puede<br />
añadirla cuando quiera pulsando [START/STOP]. La percusión<br />
se iniciará en el próximo tiempo fuerte.<br />
Nota: Si empieza la grabación sin la percusión del Arranger y<br />
quiere introducirla más tarde, es una buena idea activar el<br />
metrónomo.<br />
Enregistrement en mode PIANO<br />
Choisissez cette méthode quand vous voulez enregistrer<br />
un morceau de piano ou tout autre morceau requérant<br />
l’utilisation d’un seul et même son pour le clavier entier.<br />
Ce qui est enregistré dans la piste “A” ne peut être remplacé<br />
sans écraser le Song entier. Ici, vous pouvez enregistrer<br />
une première partie Upper (piste “B”) et ajouter une<br />
deuxième dans la piste “A” au cours de la seconde prise.<br />
Cette fonction vous servira sans doute le plus souvent<br />
pour enregistrer la partie de main gauche d’un morceau<br />
de piano durant la première prise et pour y ajouter la partie<br />
de main droite avec 2nd TRACK. Vous pouvez aussi<br />
étoffer votre jeu d’un accompagnement de batterie.<br />
Remarque: La partie Upper que vous ajoutez avec 2nd TRACK<br />
(piste “B”) utilise le même son que dans la partie de la piste “A”.<br />
Première prise d’enregistrement<br />
(1) Appuyez sur [STYLE] en-dessous de l’écran et vérifiez si<br />
les icônes INTRO, ORIGINAL, etc. sont ou non affichées.<br />
(2) Appuyez sur le bouton [PIANO] de sorte que ni l’icône<br />
[ARRANGER] ni l’icône [ORGAN] ne soit affichée<br />
([M≈DRUMS] ne devrait également pas être affichée).<br />
(3) Affectez le son voulu à la partie Upper (voyez p. 24).<br />
(4) Réglez le tempo avec les boutons T<strong>EM</strong>PO [–]/[+].<br />
(5) Si nécessaire, choisissez le style dont vous voulez la<br />
partie Drum comme accompagnement. Voyez p. 23.<br />
(6) Appuyez une fois ou deux sur le bouton [● REC] pour<br />
choisir la fonction [REC∏].<br />
(7) Lancez l’enregistrement en suivant une des méthodes<br />
ci-dessous:<br />
a) Jouez les premières notes de la mélodie. Vous lancez<br />
ainsi l’enregistrement sans la batterie de l’Arranger.<br />
Vous pouvez l’ajouter à tout moment en appuyant sur<br />
[START/STOP]. La partie de batterie démarre sur le prochain<br />
temps fort.<br />
Remarque: Si vous lancez l’enregistrement sans la partie de<br />
batterie de l’Arranger et que vous comptez l’incorporer plus loin<br />
dans le morceau, nous vous conseillons d’activer le métronome.<br />
b) Appuyez sur [START/STOP] pour lancer le jeu de batterie<br />
de l’Arranger avec la Division en vigueur.<br />
51
<strong>EM</strong>-<strong>25</strong>/<strong>EM</strong>-<strong>15</strong><br />
(8) Stop recording in one of the following ways:<br />
a) If you started recording using methods (b) or (c)<br />
above, press [START/STOP] to stop both the Arranger<br />
and recording.<br />
b) Press [● REC] again.<br />
c) Press the [ENDING] button to start the Ending<br />
phrase. As soon as it ends, recording stops.<br />
Here is what can be recorded. Not all parts need to be<br />
used at all times. (Upper 2 cannot be used without Upper<br />
1, while M.Drums means that Upper 1/2 are not available.)<br />
Track A<br />
Track B<br />
Arranger Drums Upper 1<br />
Upper 1<br />
Upper 2 (via LAYER)<br />
M.Drums<br />
Second recording pass<br />
Operations are the same as for recordings made with the<br />
Arranger, so please see p. 30. Here, you can add more<br />
Upper part notes to the ones already recorded onto track<br />
“A”, or add some live drums using the M.Drums part.<br />
b) Pulse el botón [START/STOP] para iniciar la reproducción<br />
de la percusión Arranger con la División seleccionada.<br />
c) Pulse [SYNC START] para activar esta función, y toque<br />
una o más notas. La percusión del Arranger se iniciará en<br />
sincronización con las primeras notas.<br />
(8) Detenga la grabación en uno de los siguientes modos:<br />
a) Si inició la grabación siguiendo los métodos (b) o (c)<br />
antes descritos, pulse [START/STOP] para detener el Arranger<br />
y la grabación.<br />
b) Pulse [● REC] de nuevo.<br />
c) Pulse el botón [ENDING] para iniciar la frase de final.<br />
Cuando ésta finalice, se detendrá la grabación.<br />
A continuación, se describe lo que puede grabar. No todas<br />
las partes deben utilizarse en cada momento. (Upper 2 no<br />
se puede utilizar sin Upper 1, mientras M.Drums significa<br />
que Upper 1/2 no está disponible.)<br />
Pista A<br />
Pista B<br />
Arranger Drums Upper 1<br />
Upper 1<br />
Upper 2 (mediante LAYER)<br />
M.Drums<br />
Segundo pase de grabación<br />
Las operaciones que se realizan aquí son las mismas que<br />
se realizan para las grabaciones con el Arranger, así pues,<br />
consulte la p. 30. Aquí, puede añadir más notas de la<br />
parte Upper a las que ya están grabadas en la pista “A”, o<br />
añadir sonidos de percusión en vivo mediante la parte<br />
M.Drums.<br />
c) Appuyez sur [SYNC START] pour activer cette fonction<br />
et jouez une ou plusieurs notes. La batterie de<br />
l’Arranger démarre alors en synchronisation avec vos<br />
premières notes.<br />
(8) Arrêtez l’enregistrement en suivant une des méthodes<br />
ci-dessous:<br />
a) Si vous avez lancé l’enregistrement avec la méthode<br />
(b) ou (c) ci-dessus, appuyez sur [START/STOP] pour<br />
arrêter simultanément l’Arranger et l’enregistrement.<br />
b) Appuyez à nouveau sur [● REC].<br />
c) Appuyez sur le bouton [ENDING] pour lancer la<br />
finale (Ending). L’enregistrement s’arrête dès que la<br />
finale est terminée.<br />
Voici ce que vous pouvez enregistrer. Vous ne devez pas<br />
utiliser toutes les parties en permanence. (Upper 2 ne<br />
peut pas être utilisée sans Upper 1, tandis que le choix de<br />
M.Drums signifie qu’Upper 1/2 ne sont pas disponibles.)<br />
Piste A<br />
Piste B<br />
Arranger Drums Upper 1<br />
Upper 1<br />
Upper 2 (via LAYER)<br />
M.Drums<br />
Deuxième prise d’enregistrement<br />
Les opérations sont identiques à celles des enregistrements<br />
effectués avec l’Arranger, voyez p. 30. Vous pouvez<br />
ajouter ici des notes à celles déjà enregistrées pour la partie<br />
Upper dans la piste “A” ou ajouter de la batterie “live”<br />
avec la partie M.Drums.<br />
52
<strong>EM</strong>-<strong>25</strong>/<strong>EM</strong>-<strong>15</strong><br />
Recording in M.DRUMS mode<br />
Select this method to record a live drum part using the<br />
<strong>EM</strong>-<strong>25</strong>/<strong>EM</strong>-<strong>15</strong>’s M.Drums function (see p. 27). What is<br />
recorded onto Track “A” cannot be replaced without overwriting<br />
the entire song, so be sure to get your first (or all)<br />
drum notes right. You can, however, add more drum<br />
notes using the 2nd TRACK function – or add a melodycum-chords<br />
to your drum track. Feel free to use the<br />
Arranger’s drum part as rhythmic backbone during the<br />
first recording pass.<br />
First recording pass<br />
(1) Press the [STYLE] button below the display and check<br />
whether the INTRO, ORIGINAL, etc. icons are displayed.<br />
(2) Press the [M.DRUMS] button until the [M≈DRUMS]icon<br />
appears.<br />
(3) Select the Drum Set you want to use for recording (see<br />
p. 27).<br />
(4) Set the tempo using the T<strong>EM</strong>PO [–]/[+] buttons.<br />
Note: It is not possible to add the Arranger drum part without<br />
overwriting the entire song, so be sure to record them the first<br />
time around (using [REC∏] rather than [2nd≈TRK≈REC∏]).<br />
(5) If necessary, select the Music Style whose drum part<br />
you want to use as backing. See p. 23.<br />
(6) Press the [● REC] button once or twice to select the<br />
[REC∏] function.<br />
(7) Start recording in one of the following ways:<br />
a) Play the first drum notes. This will start the recording<br />
without the Arranger drums. You can add them<br />
whenever you like by pressing [START/STOP]. The drums<br />
will then start at the next downbeat.<br />
Note: If you start recording without the Arranger drums and<br />
want to bring them in at a later stage, it would be a good idea to<br />
switch on the metronome.<br />
b) Press the [START/STOP] button to start Arranger<br />
drum playback with the selected Division.<br />
c) Press [SYNC START] to activate this function, and<br />
play one or several notes. The Arranger drums will start<br />
in sync with your first notes.<br />
Grabar en el modo M.DRUMS<br />
Seleccione este método para grabar una parte de sonidos de<br />
percusión en directo mediante la función M.Drums del <strong>EM</strong>-<strong>25</strong>/<br />
<strong>EM</strong>-<strong>15</strong> (consulte la p. 27). Lo que se grabe en la Pista “A” no se<br />
podrá reemplazar sin sobrescribir la canción entera, de manera<br />
que asegúrese de obtener correctamente las primeras (o<br />
todas) las notas de percusión. No obstante, puede añadir más<br />
notas de percusión mediante la función 2nd TRACK – o añadir<br />
una melodía-acordes- a la pista de percusión. No dude en utilizar<br />
la parte de percusión del Arranger como elemento rítmico<br />
principal durante la Primera pasada de grabación.<br />
Primera pasada de grabación<br />
(1) Pulse el botón [STYLE] que se encuentra justo debajo<br />
de la pantalla y compruebe que se visualizan los iconos<br />
INTRO, ORIGINAL, etc.<br />
(2) Pulse el botón [M.DRUMS] hasta que aparezca el icono<br />
[M≈DRUMS].<br />
(3) Seleccione el Grupo de Percusión que desee utilizar<br />
para grabar (consulte la p. 27).<br />
(4) Ajuste el tempo utilizando los botones T<strong>EM</strong>PO [–]/[+].<br />
Nota: No es posible añadir la parte de percusión del Arranger<br />
sin sobrescribir toda la canción, así pues, asegúrese de grabarla<br />
en primer lugar (mediante [REC∏] en vez de [2nd≈TRK≈REC∏]).<br />
(5) Si es necesario, seleccione el Estilo Musical cuya parte<br />
de percusión desee utilizar como acompañamiento.<br />
Consulte la p. 23.<br />
(6) Pulse el botón [● REC] una o dos veces para seleccionar<br />
la función [REC∏].<br />
(7) Empiece a grabar en uno de los siguientes modos:<br />
a) Toque las primeras notas de percusión. Con esto se iniciará<br />
la grabación sin las percusiones del Arranger. Puede<br />
añadirlas más tarde pulsando [START/STOP]. Las percusiones<br />
se iniciarán en el próximo tiempo fuerte.<br />
Nota: Si empieza la grabación sin la percusión del Arranger y quiere<br />
introducirla más tarde, es una buena idea activar el metrónomo.<br />
b) Pulse el botón [START/STOP] para iniciar la reproducción<br />
de la percusión Arranger con la División seleccionada.<br />
Enregistrement en mode M.DRUMS<br />
Cette méthode permet d’enregistrer une partie de batterie<br />
“live” avec la fonction M.Drums de l’<strong>EM</strong>-<strong>25</strong>/<strong>EM</strong>-<strong>15</strong><br />
(voyez p. 27). Vous ne pouvez pas remplacer les données<br />
enregistrées dans la piste “A” sans effacer le morceau<br />
entier; veillez donc bien à jouer correctement vos premières<br />
(ou toutes les) notes de batterie. Vous pouvez toutefois<br />
ajouter des notes de batterie avec la fonction 2nd<br />
TRACK – ou ajouter une mélodie plus des accords à votre<br />
piste de batterie. N’hésitez donc pas à vous servir de la<br />
piste de batterie de l’Arranger comme support rythmique<br />
durant la première prise d’enregistrement.<br />
Première prise d’enregistrement<br />
(1) Appuyez sur [STYLE] en-dessous de l’écran et vérifiez si<br />
les icônes INTRO, ORIGINAL, etc. sont ou non affichées.<br />
(2) Appuyez sur le bouton [M.DRUMS] jusqu’à ce que<br />
l’icône [M≈DRUMS] s’affiche.<br />
(3) Choisissez le Drum Set voulu pour l’enregistrement<br />
(voyez p. 27).<br />
(4) Réglez le tempo avec les boutons T<strong>EM</strong>PO [–]/[+].<br />
Remarque: Vous ne pouvez pas ajouter la partie de batterie de<br />
l’Arranger sans écraser le Song entier; veillez donc à l’enregistrer<br />
dès la première prise (avec [REC∏] plutôt que [2nd≈TRK≈REC∏]).<br />
(5) Si nécessaire, choisissez le style dont vous voulez la<br />
partie Drum comme accompagnement. Voyez p. 23.<br />
(6) Appuyez une fois ou deux sur le bouton [● REC] pour<br />
choisir la fonction [REC∏].<br />
(7) Lancez l’enregistrement en suivant une des méthodes<br />
ci-dessous:<br />
a) Jouez les premières notes de batterie. Vous lancez<br />
ainsi l’enregistrement sans la batterie de l’Arranger.<br />
Vous pouvez l’ajouter à tout moment en appuyant sur<br />
[START/STOP]. La partie de batterie démarre sur le prochain<br />
temps fort.<br />
Remarque: Si vous lancez l’enregistrement sans la partie de<br />
batterie de l’Arranger et que vous comptez l’incorporer plus loin<br />
dans le morceau, nous vous conseillons d’activer le métronome.<br />
b) Appuyez sur [START/STOP] pour lancer le jeu de batterie<br />
de l’Arranger avec la Division en vigueur.<br />
53
<strong>EM</strong>-<strong>25</strong>/<strong>EM</strong>-<strong>15</strong><br />
(8) Stop recording in one of the following ways:<br />
a) If you started recording using methods (b) or (c)<br />
above, press [START/STOP] to stop both the Arranger<br />
and recording.<br />
b) Press [● REC] again.<br />
c) Press the [ENDING] button to start the Ending<br />
phrase. As soon as it ends, recording stops.<br />
Here is what can be recorded. Not all parts need to be<br />
used at all times. (Upper 2 cannot be used without Upper<br />
1, while M.Drums means that Upper 1/2 are not available.)<br />
Track A<br />
Track B<br />
Arranger Drums Upper 1<br />
M. Drums Upper 2 (via LAYER)<br />
M.Drums<br />
Second recording pass<br />
Operations are the same as for recordings made with the<br />
Arranger, so please see p. 30. Here, you can add more<br />
drum notes (using the same Drum Set as the one you<br />
selected before you started recording), or play the<br />
melodic part using the Upper part.<br />
Other recording options (Song mode)<br />
It is also possible to record in the <strong>EM</strong>-<strong>25</strong>/<strong>EM</strong>-<strong>15</strong>’s Song<br />
mode (when the INTRO, ORIGINAL, etc., icons are not displayed).<br />
Doing so, however, means that you cannot rely<br />
on the Arranger for melodic and/or rhythmic backing.<br />
Another “drawback” is that if you press [ARRANGER] to<br />
switch to the [ARRANGER] mode after selecting the Song<br />
mode, you cannot record anything to the “A” track so that<br />
the left half of the keyboard does nothing (because the<br />
Arranger cannot be used in Song mode). Recording (using<br />
the [REC∏] option) in Song/Arranger mode is probably not<br />
very useful. Just remember that the start/stop functions<br />
related to the Arranger (Sync Start, Ending) are no longer<br />
available.<br />
c) Pulse [SYNC START] para activar esta función y pulse<br />
una o más teclas. La percusión del Arranger se iniciará en<br />
sincronización con las primeras notas.<br />
(8) Detenga la grabación en uno de los siguientes modos:<br />
a) Si inició la grabación siguiendo los métodos (b) o (c)<br />
antes descritos, pulse [START/STOP] para detener el Arranger<br />
y la grabación.<br />
b) Pulse [● REC] de nuevo.<br />
c) Pulse el botón [ENDING] para iniciar la frase de final.<br />
Cuando ésta finalice, se detendrá la grabación.<br />
A continuación, se describe lo que puede grabar. No todas<br />
las partes deben utilizarse en cada momento. (Upper 2 no<br />
se puede utilizar sin Upper 1, mientras M.Drums significa<br />
que Upper 1/2 no está disponible.)<br />
Pista A<br />
Pista B<br />
Arranger Drums Upper 1<br />
M. Drums Upper 2 (mediante LAYER)<br />
M.Drums<br />
Segundo pase de grabación<br />
Las operaciones que se realizan aquí son las mismas que<br />
se realizan para las grabaciones con el Arranger, así pues,<br />
consulte la p. 30. Aquí, puede añadir más notas de percusión<br />
(utilizando el mismo Grupo de Percusión que seleccionó<br />
antes de empezar la grabación), o toque la parte<br />
melódica utilizando la parte Upper.<br />
Otras opciones de grabación (modo Song)<br />
También es posible grabar en el modo Song del <strong>EM</strong>-<strong>25</strong>/<br />
<strong>EM</strong>-<strong>15</strong> (cuando no se visualizan los iconos INTRO, ORIGI-<br />
NAL, etc.). No obstante, esto significa que no puede utilizar<br />
el Arranger como acompañamiento rítmico y/o melódico.<br />
Otro “inconveniente” es que si pulsa [ARRANGER] para<br />
pasar al modo [ARRANGER] después de seleccionar el<br />
modo Song, no puede grabar nada en la pista “A”, por lo<br />
que podemos decir que la mitad izquierda del teclado no<br />
hace nada (puesto que el Arranger no se puede utilizar en<br />
el modo Song). La grabación (utilizando la opción [REC∏])<br />
c) Appuyez sur [SYNC START] pour activer cette fonction<br />
et jouez une ou plusieurs notes. La batterie de<br />
l’Arranger démarre alors en synchronisation avec vos<br />
premières notes.<br />
(8) Arrêtez l’enregistrement en suivant une des méthodes<br />
ci-dessous:<br />
a) Si vous avez lancé l’enregistrement avec la méthode<br />
(b) ou (c) ci-dessus, appuyez sur [START/STOP] pour<br />
arrêter simultanément l’Arranger et l’enregistrement.<br />
b) Appuyez à nouveau sur [● REC].<br />
c) Appuyez sur le bouton [ENDING] pour lancer la<br />
finale (Ending). L’enregistrement s’arrête dès que la<br />
finale est terminée.<br />
Voici ce que vous pouvez enregistrer. Vous ne devez pas<br />
utiliser toutes les parties en permanence. (Upper 2 ne<br />
peut pas être utilisée sans Upper 1, tandis que le choix de<br />
M.Drums signifie qu’Upper 1/2 ne sont pas disponibles.)<br />
Piste A<br />
Piste B<br />
Arranger Drums Upper 1<br />
M. Drums Upper 2 (via LAYER)<br />
M.Drums<br />
Deuxième prise d’enregistrement<br />
Les opérations sont identiques à celles des enregistrements<br />
effectués avec l’Arranger, voyez p. 30. Vous pouvez<br />
ajouter ici des notes de batterie (en utilisant le même<br />
Drum Set que celui choisi avant de lancer l’enregistrement)<br />
ou jouer la mélodie avec la partie Upper.<br />
Autres options d’enregistrement (mode Song)<br />
Vous pouvez aussi enregistrer en mode Song de l’<strong>EM</strong>-<strong>25</strong>/<br />
<strong>EM</strong>-<strong>15</strong> (quand les icônes INTRO, ORIGINAL, etc., ne sont<br />
pas affichées). Cela signifie toutefois que vous ne pouvez<br />
pas confier le jeu de la mélodie et/ou de l’accompagnement<br />
rythmique à l’Arranger.<br />
Un autre “désavantage”, c’est que si vous appuyez sur<br />
[ARRANGER] pour passer en mode [ARRANGER] après<br />
avoir choisi le mode Song, vous ne pouvez rien enregistrer<br />
dans la piste “A”. La moitié gauche du clavier ne joue<br />
54
<strong>EM</strong>-<strong>25</strong>/<strong>EM</strong>-<strong>15</strong><br />
(1) Press the [SONG] button and check whether the display<br />
contains the [SONG] icon.<br />
(2) Select the desired mode by pressing [M.DRUMS],<br />
[ORGAN], or [PIANO].<br />
The options are practically the same as when the [STYLE]<br />
icon is displayed (see p. 50, 52, and 54), except that the<br />
Arranger (drum) parts are not available.<br />
Note: Again, Upper notes added using the 2nd TRACK function<br />
supplement the notes recorded onto track “A”.<br />
Changing the song tempo<br />
You can change the song tempo with the T<strong>EM</strong>PO [–]/[+]<br />
buttons. Doing so, however, means that the tempo will<br />
still change if the song you are playing back contains<br />
tempo change messages. Furthermore, every time you<br />
jump back to the beginning of the song using [|√], the<br />
programmed song tempo will be set.<br />
en el modo Song/Arranger probablemente no es muy útil.<br />
Recuerde que las funciones start/stop relacionadas con el<br />
Arranger (Sync Start, Ending) ya no están disponibles.<br />
(1) Pulse el botón [SONG] y compruebe si la pantalla contiene<br />
el icono [SONG].<br />
(2) Seleccione el modo deseado pulsando [M.DRUMS],<br />
[ORGAN], o [PIANO].<br />
Las opciones son prácticamente las mismas que si se<br />
visualiza el icono [STYLE] (consulte la p. 50, 52, y 54),<br />
excepto que las partes (de percusión) del Arranger no<br />
están disponibles.<br />
Nota: De nuevo, las notas Upper añadidas mediante la función<br />
2nd TRACK complementan las notas grabadas en la pista “A”.<br />
Cambiar el tempo de la canción<br />
Puede cambiar el tempo de la canción con los botones<br />
T<strong>EM</strong>PO [–]/[+]. No obstante, esto significa que el tempo<br />
también cambiará si la canción que toca contiene mensajes<br />
de cambio de tempo. Además, cada vez que vuelva al<br />
principio de la canción mediante [|√], se ajustará el<br />
tempo de la canción programada.<br />
donc aucun rôle (car l’Arranger n’est pas disponible en<br />
mode Song). Il n’est donc sans doute pas très intéressant<br />
d’enregistrer (avec l’option [REC∏]) en mode Song/Arranger.<br />
Souvenez-vous simplement que les fonctions de lancement/d’arrêt<br />
liées à l’Arranger (Sync Start, Ending) n’y<br />
sont plus disponibles.<br />
(1) Appuyez sur le bouton [SONG] et vérifiez si l’écran<br />
comporte l’icône [SONG].<br />
(2) Choisissez le mode voulu en appuyant sur [M.DRUMS],<br />
[ORGAN] ou [PIANO].<br />
Les options sont pratiquement identiques à celles disponibles<br />
quand l’icône [STYLE] est affichée (voyez p. 50, 52<br />
et 54), sauf que les parties Arranger (batterie) ne sont pas<br />
disponibles.<br />
Remarque: A nouveau, les notes Upper ajoutées avec la fonction<br />
2nd TRACK s’additionnent aux notes enregistrées dans la<br />
piste “A”.<br />
Changer le tempo du morceau<br />
Vous pouvez changer le tempo du Song avec les boutons<br />
T<strong>EM</strong>PO [–]/[+]. Toutefois, si vous changez le tempo et que<br />
le Song reproduit contient des messages de changement<br />
de tempo, ce dernier changera encore pendant la reproduction.<br />
En outre, chaque fois que vous retournez au<br />
début du morceau avec [|√], c’est le tempo préprogrammé<br />
du Song qui sera utilisé.<br />
55
<strong>EM</strong>-<strong>25</strong>/<strong>EM</strong>-<strong>15</strong><br />
14. Function menu<br />
The <strong>EM</strong>-<strong>25</strong>/<strong>EM</strong>-<strong>15</strong>’s Function mode contains more<br />
advanced settings you may not need every day. They<br />
allow you to fine-tune your instrument’s response. It<br />
would therefore be a good idea to familiarize yourself<br />
with these parameters. All settings (except Mstr Tune,<br />
Local and Resume) can be written to a User Program (see<br />
p. 64).<br />
14. Menú Function<br />
El modo Function del <strong>EM</strong>-<strong>25</strong>/<strong>EM</strong>-<strong>15</strong> contiene más ajustes<br />
avanzados de los que posiblemente no va a necesitar a<br />
diario. Éstos le permiten ajustar con gran precisión la respuesta<br />
del instrumento. Por lo tanto, es aconsejable que<br />
se familiarice con estos parámetros. Todos los ajustes<br />
(excepto Mstr Tune, Local y Resume) pueden escribirse en<br />
un Programa de Usuario (consulte la p. 64).<br />
14. Menu Function<br />
Le mode Function de l’<strong>EM</strong>-<strong>25</strong>/<strong>EM</strong>-<strong>15</strong> contient des paramètres<br />
plus sophistiqués dont vous n’aurez sans doute<br />
pas besoin tous les jours. Ces paramètres servent à peaufiner<br />
la réponse de votre instrument. Nous vous recommandons<br />
donc de vous familiariser avec leur utilisation.<br />
Vous pouvez mémoriser tous les réglages (sauf Mstr Tune,<br />
Local et Resume) dans un programme utilisateur (voyez<br />
p. 64).<br />
MstrTune<br />
MstrTune<br />
Editing parameters (general procedure)<br />
You can edit the <strong>EM</strong>-<strong>25</strong>/<strong>EM</strong>-<strong>15</strong>’s Function parameters via<br />
the display. Here is a general outline to be used for all<br />
parameters discussed below:<br />
(1) Press [FUNCTION] to place the mode arrow (√) next to<br />
the FUNCTION message.<br />
The mode arrow now flashes in the display.<br />
(2) Use [FUNCTION] or T<strong>EM</strong>PO [–][+] to select the parameter<br />
you wish to edit (see below).<br />
(3) Wait until the mode arrow (√) stops flashing.<br />
The “VALUE” message above the parameter value now<br />
flashes to signal that you can change (“edit”) the value of<br />
the selected parameter.<br />
(4) Use the T<strong>EM</strong>PO [–][+] buttons to modify the value of<br />
the selected parameter.<br />
Note: To return to the default value of the currently selected<br />
parameter, simultaneously press T<strong>EM</strong>PO [–][+].<br />
(5) Press [FUNCTION] again and use T<strong>EM</strong>PO [–][+] to select<br />
another Function parameter.<br />
56<br />
Editar parámetros (procedimiento general)<br />
Es posible editar los parámetros Function del <strong>EM</strong>-<strong>25</strong>/<br />
<strong>EM</strong>-<strong>15</strong> mediante la pantalla. A continuación se describe el<br />
proceso general que deberá seguir para todos los parámetros<br />
que se describen a continuación:<br />
(1) Pulse [FUNCTION] para colocar la flecha de modo (√)<br />
junto al mensaje FUNCTION.<br />
La flecha de modo parpadea en la pantalla.<br />
(2) Utilice [FUNCTION] o T<strong>EM</strong>PO [–][+] para seleccionar el<br />
parámetro que desee editar (consulte más adelante).<br />
(3) Espere hasta que la flecha de modo (√) deje de parpadear.<br />
El mensaje “VALUE” por encima del valor de parámetro<br />
parpadea para indicar que puede cambiar (“editar”) el<br />
valor del parámetro seleccionado.<br />
(4) Utilice los botones T<strong>EM</strong>PO [–][+] para modificar el<br />
valor del parámetro seleccionado.<br />
Nota: Para volver al valor por defecto del parámetro seleccionado<br />
actualmente, pulse T<strong>EM</strong>PO [–][+] a la vez.<br />
(5) Pulse [FUNCTION] de nuevo y utilice T<strong>EM</strong>PO [–][+] para<br />
seleccionar otro parámetro Function.<br />
Edition de paramètres (procédure générale)<br />
Vous pouvez éditer les paramètres Function de l’<strong>EM</strong>-<strong>25</strong>/<br />
<strong>EM</strong>-<strong>15</strong> à l’écran. Voici la procédure générale que vous<br />
appliquerez à tous les paramètres dont il est question ici:<br />
(1) Appuyez sur [FUNCTION] pour amener la flèche de<br />
mode (√) en face du message FUNCTION.<br />
La flèche de mode clignote à présent à l’écran.<br />
(2) Utilisez les boutons [FUNCTION] ou T<strong>EM</strong>PO [–][+] pour<br />
choisir le paramètre à éditer (voyez ci-dessous).<br />
(3) Attendez que la flèche de mode (√) cesse de clignoter.<br />
Le message “VALUE” clignote maintenant au-dessus de la<br />
valeur du paramètre choisi pour signaler que vous pouvez<br />
modifier (“éditer”) cette valeur.<br />
(4) Utilisez les boutons T<strong>EM</strong>PO [–][+] pour modifier la<br />
valeur du paramètre sélectionné.<br />
Remarque: Pour retrouver la valeur par défaut du paramètre<br />
choisi, appuyez simultanément sur T<strong>EM</strong>PO [–][+].<br />
(5) Appuyez à nouveau sur [FUNCTION] et utilisez T<strong>EM</strong>PO<br />
[–][+] pour choisir un autre paramètre Function.
<strong>EM</strong>-<strong>25</strong>/<strong>EM</strong>-<strong>15</strong><br />
(6) To leave the Function mode, press [SONG], [TONE],<br />
[STYLE], or [USER PROGRAM].<br />
General Function parameters<br />
Kbd Velocity<br />
(On/Off) The <strong>EM</strong>-<strong>25</strong>/<strong>EM</strong>-<strong>15</strong> is velocity sensitive, which<br />
means that the volume and brightness of the Upper 1/2,<br />
Lower, M.Drums, and M.Bass notes depend on the force/<br />
speed with which you strike the keys.<br />
The harder you play, the louder and brighter the resulting<br />
notes will be, which creates a perfectly natural effect.<br />
(That explains why the KEYBOARD VELOCITY function is<br />
on every time you power on the <strong>EM</strong>-<strong>25</strong>/<strong>EM</strong>-<strong>15</strong>.)<br />
With this parameter, you can switch off the <strong>EM</strong>-<strong>25</strong>/<br />
<strong>EM</strong>-<strong>15</strong>’s velocity sensitivity. In that case, the<br />
icon disappears.<br />
MstrTune (Master Tune)<br />
(4<strong>15</strong>.3~466.2, Default setting: 440.0) This parameter<br />
allows you to change the <strong>EM</strong>-<strong>25</strong>/<strong>EM</strong>-<strong>15</strong>’s overall tuning,<br />
which may be necessary when you accompany a singer,<br />
an acoustic instrument, or when you play to a recording<br />
on CD or cassette.<br />
TrpValue (Transpose interval)<br />
(–12~12, Default setting: 1) Use this parameter to transpose<br />
the <strong>EM</strong>-<strong>25</strong>/<strong>EM</strong>-<strong>15</strong> in semitones. If you’re not sure<br />
what transposition is, see p. 43. This parameter can also<br />
be selected by holding down the [TRANSPOSE] button.<br />
Metro TS (metronome time signature)<br />
(1/4~6/4, 6/8, 9/8, Default setting: 4/4) This parameter<br />
allows you to set the metronome’s time signature (number<br />
of beats per bar). Please bear in mind that this setting<br />
changes whenever you select a Music Style with a different<br />
time signature. See also p. 26 for how to use the metronome.<br />
This parameter can also be selected by holding<br />
down the [METRONOME] button.<br />
(6) Para salir del modo Function, pulse [SONG], [TONE],<br />
[STYLE], o [USER PROGRAM].<br />
Parámetros Function generales<br />
Kbd Velocity<br />
(On/Off) El <strong>EM</strong>-<strong>25</strong>/<strong>EM</strong>-<strong>15</strong> es sensible a la velocidad, lo que<br />
significa que el volumen y el brillo de las notas Upper 1/2,<br />
Lower, M.Drums, y M.Bass depende de la fuerza/velocidad<br />
con la que golpee las teclas.<br />
Cuanto más fuerte toque, más altas y brillantes serán las<br />
notas resultantes, lo cual crea un efecto perfectamente<br />
natural. (Eso explica por qué la función KEYBOARD VELO-<br />
CITY está activada cada vez que pone en marcha el<br />
<strong>EM</strong>-<strong>25</strong>/<strong>EM</strong>-<strong>15</strong>.)<br />
Con este parámetro, puede desactivar la sensibilidad a la<br />
velocidad del <strong>EM</strong>-<strong>25</strong>/<strong>EM</strong>-<strong>15</strong>. En este caso, el icono<br />
desaparece.<br />
MstrTune (Master Tune)<br />
(4<strong>15</strong>.3~466.2, Valor por defecto: 440.0) Este parámetro<br />
permite cambiar la afinación general del <strong>EM</strong>-<strong>25</strong>/<strong>EM</strong>-<strong>15</strong>,<br />
lo cual puede ser necesario para acompañar a un cantante,<br />
a un instrumento acústico, o cuando toque sobre<br />
una grabación de un CD o cassette.<br />
TrpValue (Intervalo de transposición)<br />
(–12~12, Valor por defecto: 1) Utilice este parámetro<br />
para transponer el <strong>EM</strong>-<strong>25</strong>/<strong>EM</strong>-<strong>15</strong> en semitonos. Si no está<br />
seguro de lo que es la transposición, consulte la p. 43.<br />
Este parámetro también puede seleccionarse manteniendo<br />
pulsado el botón [TRANSPOSE].<br />
Metro TS (tipo de compás del metrónomo)<br />
(1/4~6/4, 6/8, 9/8, Valor por defecto: 4/4) Este parámetro<br />
le permite ajustar el tipo de compás del metrónomo<br />
(número de tiempos por compás). Tenga en cuenta que<br />
este ajuste cambia siempre que seleccione un Estilo Musical<br />
con un tipo de compás diferente. Consulte también la<br />
p. 26 para más información acerca de cómo utilizar el<br />
metrónomo. Este parámetro también se puede seleccionar<br />
manteniendo pulsado el botón [METRONOME].<br />
(6) Pour quitter le mode Function, appuyez sur [SONG],<br />
[TONE], [STYLE] ou [USER PROGRAM].<br />
Paramètres Function généraux<br />
Kbd Velocity<br />
(On/Off) L’<strong>EM</strong>-<strong>25</strong>/<strong>EM</strong>-<strong>15</strong> est sensible au toucher, ce qui<br />
veut dire que le volume et la brillance des notes Upper 1/<br />
2, Lower, M.Drums et M.Bass dépendent de la force/de la<br />
vitesse avec lesquelles vous enfoncez les touches dans la<br />
moitié droite du clavier.<br />
Plus vous jouez fort, plus le volume et la brillance des<br />
notes augmentent, créant par la même occasion un effet<br />
des plus naturels. (Cela explique pourquoi la fonction<br />
KEYBOARD VELOCITY est active chaque fois que vous<br />
mettez l’<strong>EM</strong>-<strong>25</strong>/<strong>EM</strong>-<strong>15</strong> sous tension.)<br />
Ce paramètre vous permet de désactiver la fonction de<br />
sensibilité au toucher de l’<strong>EM</strong>-<strong>25</strong>/<strong>EM</strong>-<strong>15</strong>. Dans ce cas,<br />
l’icône disparaît.<br />
MstrTune (Master Tune)<br />
(4<strong>15</strong>.3~466.2, Défaut: 440.0) Ce paramètre permet de<br />
changer l’accord global de l’<strong>EM</strong>-<strong>25</strong>/<strong>EM</strong>-<strong>15</strong>, ce qui peut se<br />
révéler nécessaire quand vous accompagnez un chanteur,<br />
un instrument acoustique ou quand vous jouez en<br />
accompagnant une cassette ou un CD.<br />
TrpValue (intervalle de transposition)<br />
(–12~12, Défaut: 1) Utilisez ce paramètre pour transposer<br />
l’<strong>EM</strong>-<strong>25</strong>/<strong>EM</strong>-<strong>15</strong> par demi-tons. Pour en savoir plus sur<br />
la transposition, voyez p. 43. Vous pouvez aussi activer ce<br />
paramètre en maintenant enfoncé le bouton [TRANS-<br />
POSE].<br />
Metro TS (armure de temps du métronome)<br />
(1/4~6/4, 6/8, 9/8, Défaut: 4/4) Ce paramètre sert à<br />
régler l’armure de temps du métronome (le nombre de<br />
temps par mesure). N’oubliez pas que ce réglage change<br />
chaque fois que vous choisissez un style musical d’une<br />
armure de temps différente. Voyez p. 26 la manière de<br />
régler le métronome. Vous pouvez aussi régler ce paramètre<br />
en maintenant enfoncé le bouton [METRONOME].<br />
57
<strong>EM</strong>-<strong>25</strong>/<strong>EM</strong>-<strong>15</strong><br />
Metro Vol (metronome volume)<br />
(0~127, Default setting: 100) Use this parameter whenever<br />
you think the metronome is too loud/soft with<br />
respect to the music. The default value is usually an<br />
appropriate setting.<br />
Reverb<br />
(On/Off) This parameter allows you to switch the onboard<br />
digital Reverb effect on or off. When it is on, the<br />
icon is displayed. Reverb is an effect that<br />
simulates the sound reflections of a hall, room, etc. Use<br />
the following parameter for selecting the kind of Reverb<br />
you need.<br />
RevType (Reverb Type)<br />
(Default setting: HL2) Use this parameter to select the<br />
kind of Reverb that best suits your musical purposes.<br />
There are four major types (Room, Hall, Plate, and Delay)<br />
with one or several variations. The best way to find out<br />
more about them is to experiment.<br />
Type<br />
RM1, RM2,<br />
RM3<br />
HL1, HL2<br />
PLT<br />
dlY<br />
PdY<br />
Explanation<br />
These types simulate the Reverb characteristics<br />
of a room. The higher the number (1, 2, or 3),<br />
the “bigger” the room becomes.<br />
These types simulate the Reverb of a small (1) or<br />
large (2) concert hall and thus sound far “bigger”<br />
than the RM types above.<br />
Digital simulation of a metal plate that is sometimes<br />
used for creating Reverb effects. Works<br />
well for percussive sounds.<br />
A Delay effect (no Reverb). Works a lot like an<br />
echo effect and thus repeats the sounds.<br />
Pan Delay. This is a stereo version of the preceding<br />
Delay effect. It creates repetitions that<br />
alternate between the left and right channels.<br />
Please bear in mind that you will only hear the difference<br />
when the Reverb effect is on (see above).<br />
Metro Vol (volumen del metrónomo)<br />
(0~127, Valor por defecto: 100) Utilice este parámetro<br />
siempre que piense que el metrónomo está demasiado<br />
alto/suave respecto a la música. El valor por defecto normalmente<br />
es un ajuste adecuado.<br />
Reverb<br />
(On/Off) Este parámetro le permite activar o desactivar el<br />
efecto Reverb integrado. Si está activado, se visualiza el<br />
icono<br />
. Reverb es un efecto que simula las<br />
reflexiones del sonido de un sala, habitación, etc. Utilice el<br />
siguiente parámetro para seleccionar el tipo de Reverb<br />
que necesite.<br />
RevType (Tipo de Reverb)<br />
(Valor por defecto: HL2) Utilice este parámetro para seleccionar<br />
el tipo de Reverb más apropiado para sus propósitos<br />
musicales. Existen cuatro tipos (Room, Hall, Plate, y<br />
Delay) con una o varias variaciones. La mejor manera de<br />
saber más acerca de ellas es experimentando.<br />
Tipo<br />
RM1, RM2,<br />
RM3<br />
HL1, HL2<br />
PLT<br />
dlY<br />
PdY<br />
Explicación<br />
Estos tipos simulan las características de reverberación<br />
de una habitación. Cuánto más alto es<br />
el número (1, 2, o 3), más “amplia” pasa a ser la<br />
habitación.<br />
Estos tipos simulan la reverberación de una sala<br />
de conciertos pequeña (1) o grande (2) y, por<br />
tanto, suenan más “amplios” que los tipos RM<br />
descritos anteriormente.<br />
Simulación digital de una placa metálica que a<br />
veces se utiliza para crear efectos Reverb. Funciona<br />
bien con sonidos de percusión.<br />
Un efecto Delay (sin Reverb). Funciona igual que<br />
un efecto de eco y, por tanto, repite los sonidos.<br />
Pan Delay. Es una versión estéreo del efecto<br />
Delay anterior. Crea repeticiones que alternan<br />
entre los canales izquierdo y derecho.<br />
Tenga en cuenta que sólo oirá la diferencia si el efecto<br />
Reverb está activado (consulte la explicación anteriormente<br />
descrita).<br />
Metro Vol (volume du métronome)<br />
(0~127, Défaut: 100) Servez-vous de ce paramètre s’il<br />
vous semble que le son du métronome est trop fort/faible<br />
par rapport à la musique. Le réglage par défaut convient<br />
dans la plupart des cas.<br />
Reverb<br />
(On/Off) Permet d’activer et de couper l’effet de<br />
réverbération numérique intégré. Quand cet effet est<br />
actif, l’icône est affichée. La réverbération<br />
est un effet simulant les réflexions acoustiques sur les<br />
parois d’une salle, pièce, etc. Le paramètre suivant permet<br />
de choisir le type de Reverb voulu.<br />
RevType (Reverb Type)<br />
(Défaut: HL2) Choisissez avec ce paramètre le type de<br />
réverbération le mieux adapté à vos besoins. Vous avez le<br />
choix entre quatre types principaux (Room, Hall, Plate et<br />
Delay) offrant une ou plusieurs variations. La meilleure<br />
façon de les découvrir consiste à les essayer.<br />
Type<br />
RM1, RM2,<br />
RM3<br />
HL1, HL2<br />
PLT<br />
dlY<br />
PdY<br />
Explication<br />
Ces types simulent la réverbération d’une pièce.<br />
Plus le chiffre est élevé (1, 2 ou 3), plus la pièce<br />
est grande.<br />
Ces types simulent la réverbération d’une petite<br />
(1) ou grande (2) salle de concert et produisent<br />
un espace nettement plus vaste que les types<br />
RM ci-dessus.<br />
Simulation numérique d’une plaque métallique<br />
parfois utilisée pour créer des effets de<br />
réverbération. Bon résultat avec les sons de percussion.<br />
Effet Delay (pas de réverb). Fonctionne un peu<br />
comme un écho et répète les sons.<br />
Pan Delay. Version stéréo de l’effet précédent.<br />
Crée des répétitions qui alternent entre les<br />
canaux gauche et droit.<br />
Pour entendre la différence, n’oubliez pas d’activer l’effet<br />
Reverb (voyez ci-dessus).<br />
58
<strong>EM</strong>-<strong>25</strong>/<strong>EM</strong>-<strong>15</strong><br />
Chorus<br />
(On/Off) This parameter allows you to switch the onboard<br />
digital Chorus effect on or off. When it is on, the<br />
icon is displayed. Chorus is an effect that<br />
adds “width” and “warmth” to the sound by simulating<br />
several identical instruments that play in unison. Use the<br />
following parameter for selecting the kind of effect you<br />
need.<br />
ChrType (Chorus Type)<br />
(Default setting: CH3) This parameter allows you to specify<br />
the sound of the Chorus effect. We could try to<br />
describe them, but you will get a better idea by selecting<br />
one after the other. Flanger (FLN) or Feedback Chorus<br />
(FbC) can be interesting for guitar Tones.<br />
Again, there are two echo effects: Short Delay (SdY) and<br />
Short Delay with Feedback (SdF). They are, however, much<br />
shorter than those available for the Reverb effect processor.<br />
Note: Please bear in mind that you will only hear the difference<br />
when the Chorus effect is on.<br />
Upper 1, Upper 2, Lower: volume & status<br />
(OFF, 0~127, Default setting: 127 Upper 1/100 Upper 2/<br />
80 Lower) These three parameters allow you to set the<br />
volume of the Upper 1, Upper 2, and Lower parts respectively.<br />
You could also select “OFF” for a part you do not<br />
want to hear by simultaneously pressing T<strong>EM</strong>PO [–] and<br />
[+]. Please note that the settings you make here will have<br />
no effect if you used BALANCE [√ACCOMP] to set the<br />
maximum volume for the Arranger/Song parts.<br />
MBass: status and volume<br />
(OFF, 0~127, Default setting: 90) In ORGAN mode, this<br />
parameter allows you to set the volume of the M.Bass<br />
part. See also page 61.<br />
ADrums, ABass, Accomp: volume & status<br />
(OFF, 0~127, Default setting: 90) Here are the volume<br />
parameters for certain Arranger parts. This also means<br />
that they are only available when the [ARRANGER] icon is<br />
Chorus<br />
(On/Off) Este parámetro le permite activar o desactivar el<br />
efecto Chorus digital integrado. Si está activado, se visualiza<br />
el icono<br />
. Chorus es un efecto que añade “amplitud”<br />
y “entusiasmo” al sonido simulando varios instrumentos<br />
idénticos que tocan en armonía. Utilice el siguiente parámetro<br />
para seleccionar el tipo de efecto que necesite.<br />
ChrType (Tipo de Chorus)<br />
(Valor por defecto: CH3) Este parámetro le permite especificar<br />
el sonido del efecto Chorus. Podríamos intentar describirlos,<br />
pero se hará mejor a la idea seleccionando las<br />
diferentes opciones una a una. Flanger (FLN) o Feedback<br />
Chorus (FbC) pueden ser interesantes para Tones de guitarras.<br />
Aquí también hay dos efectos de eco: Delay corto (SdY) y<br />
Delay corto con Feedback (SdF). No obstante, son más<br />
cortos que los que están disponibles para el procesador<br />
del efecto Reverb.<br />
Nota: Tenga en cuenta que sólo podrá oír la diferencia si el<br />
efecto Chorus está activado.<br />
Upper 1, Upper 2, Lower: volumen y estado<br />
(OFF, 0~127, Valor por defecto: 127 Upper 1/100 Upper<br />
2/80 Lower) Estos tres parámetros le permiten ajustar el<br />
volumen de las partes Upper 1, Upper 2 y Lower respectivamente.<br />
También puede seleccionar “OFF” para una parte<br />
que no desee escuchar pulsando T<strong>EM</strong>PO [–] y [+] a la vez.<br />
Observe que los ajustes que defina aquí no tendrán<br />
efecto si utiliza BALANCE [√ACCOMP] para ajustar el<br />
volumen máximo para las partes Arranger/Song.<br />
MBass: estado y volumen<br />
(OFF, 0~127, Valor por defecto: 90) En el modo ORGAN,<br />
este parámetro le permite ajustar el volumen de la parte<br />
M.Bass. Consulte también la página 61.<br />
ADrums, ABass, Accomp: volumen y estado<br />
(OFF, 0~127, Valor por defecto: 90) Aquí se describen los<br />
parámetros de volumen para ciertas partes del Arranger.<br />
Esto también significa que sólo están disponibles cuando<br />
Chorus<br />
(On/Off) Permet d’activer et de couper l’effet de Chorus<br />
numérique intégré. Quand cet effet est actif, l’icône<br />
est affichée. Le Chorus est un effet ajoutant<br />
de “l’ampleur” et de la “chaleur” au son en simulant le jeu<br />
à l’unisson de plusieurs instruments identiques. Le paramètre<br />
suivant permet de choisir le type d’effet voulu.<br />
ChrType (type de Chorus)<br />
(Défaut: CH3) Ce paramètre permet de spécifier le son de<br />
l’effet Chorus. Nous pourrions essayer de vous le décrire<br />
mais il vaut mieux sélectionner les types les uns après les<br />
autres et les écouter. Flanger (FLN) ou Feedback Chorus<br />
(FbC) est intéressant pour des Tones de guitare.<br />
Une fois de plus, il y a deux effets d’écho: Short Delay<br />
(SdY) et Short Delay avec Feedback (SdF). Ils sont toutefois<br />
nettement plus brefs que ceux disponibles avec le<br />
processeur de réverbération.<br />
Remarque: Pour entendre la différence, n’oubliez pas d’activer<br />
l’effet Chorus.<br />
Upper 1, Upper 2, Lower: volume & statut<br />
(OFF, 0~127, Défaut: 127 Upper 1/100 Upper 2/80<br />
Lower) Ces trois paramètres permettent de régler respectivement<br />
le volume des parties Upper 1, Upper 2 et Lower.<br />
Vous pourriez aussi choisir “OFF” pour une partie que<br />
vous ne voulez pas entendre en appuyant simultanément<br />
sur T<strong>EM</strong>PO [–] et [+]. Notez que les réglages effectués ici<br />
resteront sans effet si vous avez utilisé BALANCE<br />
[√ACCOMP] pour régler au maximum le volume des parties<br />
de l’Arranger/du Song.<br />
MBass: statut et volume<br />
(OFF, 0~127, Défaut: 90) En mode ORGAN, ce paramètre<br />
sert à régler le volume de la partie M.Bass. Voyez aussi<br />
page 61.<br />
ADrums, ABass, Accomp: volume & statut<br />
(OFF, 0~127, Défaut: 90) Il s’agit des paramètres de<br />
volume de certaines parties Arranger. Cela veut aussi dire<br />
qu’ils sont uniquement disponibles quand l’icône<br />
59
<strong>EM</strong>-<strong>25</strong>/<strong>EM</strong>-<strong>15</strong><br />
displayed. In fact, the parts correspond exactly to what<br />
can be selected using the STYLE MORPHING function (see<br />
p. 35).<br />
You could also select “OFF” for a part you do not want to<br />
hear. Please note that the settings you make here will<br />
have no effect if you used BALANCE [KEYBOARD®] to set<br />
the maximum volume for the <strong>Keyboard</strong> parts (Upper1,<br />
Upper2, Lower, M.Bass).<br />
UP1 Octv, UP2 Octv, LWR Octv (octave up/down)<br />
(–1, 0, 1, Default setting: 0) These three parameters allow<br />
you to shift the octave of the part in question (Upper1,<br />
Upper2, or Lower) up or down by an octave. This can be<br />
useful for Techno/Dance songs where you need a piano<br />
sound that plays in two different octaves.<br />
To achieve this, assign two different (or the same) piano<br />
sounds to Upper1 and Upper2, activate the LAYER function<br />
(see p. 40), and set UP2 Octv to “–1” (or “1”).<br />
Arr Mem (Arranger Chord Memory)<br />
(On/Off, Default setting: On) The Arranger Chord Memory<br />
function memorizes the chords you play with your left<br />
hand and keeps playing the corresponding notes until<br />
you play another chord.<br />
If you switch off Arr Mem, the melodic Arranger parts<br />
(A.Bass, Accomp) stop playing as soon as you release the<br />
key(s) in the left half of the keyboard, leaving you only<br />
with the drum accompaniment.<br />
For your convenience, this function is switched on every<br />
time you power on the <strong>EM</strong>-<strong>25</strong>/<strong>EM</strong>-<strong>15</strong>.<br />
Bass Inv ( )<br />
(On/Off) Use this parameter to change the way in which<br />
the Arranger reads the chords you play.<br />
If the icon is not displayed, the A. Bass part plays the root<br />
of the chords that feed the Arranger. If you play a C (or C<br />
chord), the bass sounds a C; if you play an A minor chord<br />
(or if you press A and the C to its right), the bass sounds<br />
an A, etc.<br />
se visualice el icono [ARRANGER]. En realidad, las partes<br />
se corresponden exactamente a lo que puede seleccionar<br />
mediante la función STYLE MORPHING (consulte la p. 35).<br />
También puede seleccionar “OFF” para una parte que no<br />
desee escuchar. Observe que los ajustes que defina no<br />
tendrán efecto si utiliza BALANCE [KEYBOARD®] para<br />
ajustar el volumen máximo para las partes del teclado<br />
(Upper1, Upper2, Lower, M.Bass).<br />
UP1 Octv, UP2 Octv, LWR Octv (octava más grave/más<br />
aguda)<br />
(–1, 0, 1, Valor por defecto: 0) Estos tres parámetros le<br />
permiten transponer una octava de la parte en cuestión<br />
(Upper1, Upper2, o Lower) más grave o más aguda<br />
mediante una octava. Esto le puede resultar útil para canciones<br />
Techno/Dance donde necesita un sonido de piano<br />
que toque en dos octavas diferentes.<br />
Para realizarlo, asigne dos sonidos de piano diferentes (o<br />
el mismo) a Upper1 y Upper2, active la función LAYER<br />
(consulte la p. 40), y ajuste UP2 Octv a “–1” (o “1”).<br />
Arr Mem (Arranger Chord Memory)<br />
(On/Off, Valor por defecto: On) La función Arranger<br />
Chord Memory memoriza los acordes que toca con la<br />
mano izquierda y continúa tocando las notas correspondientes<br />
hasta que toca otro acorde.<br />
Si desactiva Arr Mem, las partes melódicas del Arranger<br />
(A.Bass, Accomp) dejarán de tocar tan pronto como suelte<br />
la(s) tecla(s) en la mitad izquierda del teclado, y quedará<br />
sólo el acompañamiento de percusión.<br />
Para su comodidad, esta función se activa cada vez que<br />
pone en marcha el <strong>EM</strong>-<strong>25</strong>/<strong>EM</strong>-<strong>15</strong>.<br />
Bass Inv ( )<br />
(On/Off) Utilice este parámetro para cambiar el modo<br />
como el Arranger lee los acordes que usted toca.<br />
Si el icono no se visualiza, las partes A. Bass tocan la nota<br />
fundamental de los acordes que alimentan el Arranger. Si<br />
toca un C (u acorde C), el bajo toca un C; si usted toca un<br />
acorde A menor (o si pulsa A y C a su derecha), el bajo<br />
toca un A, etc.<br />
[ARRANGER] est affichée. En fait, les parties correspondent<br />
exactement à ce que vous pouvez sélectionner avec<br />
la fonction STYLE MORPHING (voyez p. 35).<br />
Vous pouvez aussi choisir “OFF” pour une partie que vous<br />
ne voulez pas entendre. Notez que le réglage effectué<br />
restera sans effet si vous avez utilisé BALANCE [KEY-<br />
BOARD®] pour régler le volume maximum des parties<br />
<strong>Keyboard</strong> (Upper1, Upper2, Lower, M.Bass).<br />
UP1 Octv, UP2 Octv, LWR Octv (octave up/down)<br />
(–1, 0, 1, Défaut: 0) Ces trois paramètres vous permettent<br />
de changer l’octave de la partie en question (Upper1,<br />
Upper2 ou Lower). Cette fonction peut être utile pour les<br />
morceaux Techno/Dance où vous voulez disposer d’un<br />
son de piano qui joue sur deux octaves différentes.<br />
Pour ce faire, affectez deux sons de piano différents (ou<br />
un même son) aux parties Upper1 et Upper2, activez la<br />
fonction LAYER (voyez p. 40) et réglez UP2 Octv sur “–1”<br />
(ou “1”).<br />
Arr Mem (Arranger Chord Memory)<br />
(On/Off, Défaut: On) La fonction Arranger Chord Memory<br />
mémorise les accords joués de la main gauche et continue<br />
à produire les notes correspondantes jusqu’à ce que<br />
vous jouiez un autre accord.<br />
Si vous coupez la fonction Arr Mem, les parties<br />
mélodiques de l’Arranger (A.Bass, Accomp) s’arrêtent de<br />
jouer dès que vous relâchez la ou les touche(s) dans la<br />
moitié gauche du clavier, ce qui ne vous laisse plus que<br />
l’accompagnement de batterie.<br />
Pour vous simplifier la vie, cette fonction est activée dès<br />
la mise sous tension de l’<strong>EM</strong>-<strong>25</strong>/<strong>EM</strong>-<strong>15</strong>.<br />
Bass Inv ( )<br />
(On/Off) Ce paramètre permet de changer la manière<br />
dont l’Arranger interprète les accords que vous jouez.<br />
Quand l’icône n’est pas affichée, la partie A. Bass joue la<br />
tonique des accords alimentant l’Arranger. Si vous jouez<br />
un Do (ou un accord de Do), la basse joue un Do; si vous<br />
jouez un accord de La mineur (ou si vous enfoncez le La<br />
et le Do à sa droite), la basse joue un La, etc.<br />
60
<strong>EM</strong>-<strong>25</strong>/<strong>EM</strong>-<strong>15</strong><br />
By activating Bass Inversion, you can specify the note<br />
played by the A. Bass part (the lowest note of your<br />
chords). Switch on Bass Inversion for songs that rely on<br />
bass rather than on chord patterns (for example C – C/B –<br />
C/Bb, etc.).<br />
LWR Int (Lower Chord Intelligence)<br />
(On/Off, Default setting: Off) When switched on in<br />
ORGAN mode (see p. <strong>25</strong>), the <strong>EM</strong>-<strong>25</strong>/<strong>EM</strong>-<strong>15</strong>’s Lower<br />
Chord Intelligence function allows you to play major<br />
chords by pressing just one key, minor chords by pressing<br />
two keys, and more complex chords by pressing three<br />
keys.<br />
LWR Mem (Lower Chord Memory)<br />
(On/Off, Default setting: Off) The Lower Chord Memory<br />
function memorizes the chords you play with your left<br />
hand (ORGAN mode) and holds the corresponding notes<br />
until you play another chord. If you need this Hold function<br />
for the Lower part, switch it on.<br />
MBassSwt (M. Bass switch)<br />
(On, OFF, Default setting: OFF) In ORGAN mode, you can<br />
add a bass line to your left-hand playing by switching on<br />
a part called M.Bass. The M.Bass part sounds bass notes<br />
based on the chords you play in the left half of the keyboard.<br />
If the Bass Inversion function (see p. 60) is off, the M.Bass<br />
part sounds the root notes (fundamentals) of the chords<br />
you play with your left hand (using the Lower part).<br />
If the Bass Inversion icon ( ) is displayed, the<br />
M. Bass part sounds the lowest note of the chords you<br />
play with your left hand (not necessarily the root).<br />
Si activa Bass Inversion, puede especificar la nota tocada<br />
mediante la parte A. Bass (la nota más baja de los acordes).<br />
Active Bass Inversion para las canciones que dependen<br />
del bajo en vez de los patrones de acordes (por ejemplo<br />
C – C/B – C/Bb, etc.).<br />
LWR Int (Lower Chord Intelligence)<br />
(On/Off, Valor por defecto: Off) Si la activa en el modo<br />
ORGAN (consulte la p. <strong>25</strong>), la función Lower Chord Intelligence<br />
del <strong>EM</strong>-<strong>25</strong>/<strong>EM</strong>-<strong>15</strong> le permite tocar acordes mayores<br />
sólo pulsando una tecla, acordes menores pulsando<br />
dos teclas, y acordes más complejos pulsando tres teclas.<br />
LWR Mem (Lower Chord Memory)<br />
(On/Off, Valor por defecto: Off) La función Lower Chord<br />
Memory memoriza los acordes que toque con la mano<br />
izquierda (modo ORGAN) y continúa tocando las notas<br />
correspondientes hasta que toque otro acorde. Si precisa<br />
esta función Hold para la parte Lower, actívela.<br />
MBassSwt (M. Bass switch)<br />
(On, OFF, Valor por defecto: OFF) En el modo ORGAN,<br />
puede añadir una línea de bajo a la mano izquierda activando<br />
una parte conocida como M.Bass. La parte M.Bass<br />
toca las notas de bajo basadas en los acordes que usted<br />
toca en la mitad izquierda del teclado.<br />
Si la función Bass Inversion (consulte la p. 60) está desactivada,<br />
la parte M.Bass toca las notas fundamentales de<br />
los acordes que usted toque con la mano izquierda (utilizando<br />
la parte Lower).<br />
Si se visualiza el icono Bass Inversion ( ), la<br />
parte M. Bass toca la nota más baja de los acordes que<br />
usted toque con la mano izquierda (no necesariamente la<br />
nota fundamental).<br />
En activant la fonction Bass Inversion, vous pouvez définir<br />
la note jouée par la partie A. Bass (la note la plus grave<br />
de vos accords). Activez Bass Inversion pour des morceaux<br />
reposant plus sur la basse que sur des motifs d’accord<br />
(par ex.: Do – Do/Si – Do/Sib, etc.).<br />
LWR Int (Lower Chord Intelligence)<br />
(On/Off, Défaut: Off) Lorsqu’elle est activée en mode<br />
ORGAN (voyez p. <strong>25</strong>), la fonction Lower Chord Intelligence<br />
de l’<strong>EM</strong>-<strong>25</strong>/<strong>EM</strong>-<strong>15</strong> permet de jouer des accords<br />
majeurs d’une pression sur une seule touche, des accords<br />
mineurs en appuyant sur deux touches et des accords<br />
plus complexes en actionnant trois touches.<br />
LWR Mem (Lower Chord Memory)<br />
(On/Off, Défaut: Off) La fonction Lower Chord Memory<br />
mémorise les accords joués de la main gauche (mode<br />
ORGAN) et continue à produire les notes correspondantes<br />
jusqu’à ce que vous jouiez un autre accord. Si vous avez<br />
besoin de cette fonction de maintien pour la partie Lower,<br />
activez-la.<br />
MBassSwt (M. Bass switch)<br />
(On, OFF, Défaut: OFF) En mode ORGAN, vous pouvez<br />
ajouter une ligne de basse à votre jeu de la main gauche<br />
en activant une partie appelée M.Bass. La partie M.Bass<br />
joue des notes de basse reposant sur les accords que vous<br />
jouez dans la moitié gauche du clavier.<br />
Quand la fonction Bass Inversion (voyez p. 60) est coupée,<br />
la partie M.Bass joue la tonique des accords que vous<br />
jouez de la main gauche (avec la partie Lower).<br />
Quand l’icône Bass Inversion ( ) est affichée, la<br />
partie M. Bass produit la note la plus basse des accords<br />
joués de la main gauche (pas nécessairement la tonique).<br />
61
<strong>EM</strong>-<strong>25</strong>/<strong>EM</strong>-<strong>15</strong><br />
ArrSplit (Arranger Split)<br />
(48~84, Default setting: 60) Use this parameter to set the<br />
split point for the Arranger mode.<br />
ArrSplit (Arranger Split)<br />
(48~84, Valor por defecto: 60) Utilice este parámetro<br />
para ajustar el punto de división para el modo Arranger.<br />
ArrSplit (Arranger Split)<br />
(48~84, Défaut: 60) Ce paramètre sert à régler le point de<br />
partage du mode Arranger.<br />
Arranger Upper 1 (+ Upper 2)<br />
Arranger Upper 1 (+ Upper 2)<br />
ArrSplit= 48<br />
The note you set here is the lowest note you can play<br />
with the Upper1/2 parts. The number refers to a note.<br />
“60” refers to the note “C4” (the one below the [INTRO]<br />
button).<br />
LwrSplit (Lower Split)<br />
(48~84, Default setting: 60) Use this parameter to set the<br />
split point for the ORGAN mode (see p. <strong>25</strong>). The note you<br />
select here is the lowest note you can play with the<br />
Upper1/2 parts.<br />
Minus One<br />
This parameter allows you to specify which part will be<br />
muted when you press the [MINUS ONE] button (see<br />
p. 46). Note that this only applies to Song (on the <strong>EM</strong>-<strong>25</strong><br />
also Standard MIDI File) playback.<br />
Option Meaning<br />
MEL The melody (Upper 1)<br />
Chr The chord backing (Lower)<br />
Drm The drums (M. Drums)<br />
Note: After the Resume parameter (see next page), you will find<br />
the MIDI parameters. See page 68 for a description.<br />
La nota que se ajusta aquí es la nota más baja que usted<br />
toca con las partes Upper1/2. El número hace referencia a<br />
una nota. “60” hace referencia a la nota “C4” (la nota que<br />
se encuentra debajo del botón [INTRO]).<br />
LwrSplit (Lower Split)<br />
(48~84, Valor por defecto: 60) Utilice este parámetro<br />
para ajustar el punto de división para el modo ORGAN<br />
(consulte la p. <strong>25</strong>). La nota que seleccione aquí es la nota<br />
más baja que puede tocar con las partes Upper1/2.<br />
Minus One<br />
Este parámetro le permite especificar qué parte enmudecerá<br />
al pulsar el botón [MINUS ONE] (consulte la p. 46).<br />
Observe que éste sólo se aplica a la reproducción de la<br />
Canción (en el <strong>EM</strong>-<strong>25</strong> también Archivos MIDI Estándar).<br />
Opción Significado<br />
MEL La melodía (Upper 1)<br />
Chr El acompañamiento del acorde (Lower)<br />
Drm Las percusiones (M. Drums)<br />
Nota: Después del parámetro Resume (consulte la siguiente<br />
pa´gina), encontrará una descripción de los parámetros MIDI.<br />
Consulte la página 68.<br />
ArrSplit= 84<br />
La note que vous spécifiez ici est la note la plus grave que<br />
vous pouvez jouer avec les parties Upper1/2. Le numéro<br />
fait référence à une note. “60” indique la note “C4” (celle<br />
en-dessous du bouton [INTRO]).<br />
LwrSplit (Lower Split)<br />
(48~84, Défaut: 60) Ce paramètre sert à régler le point de<br />
partage du mode ORGAN (voyez p. <strong>25</strong>). La note choisie ici<br />
correspond à la note la plus grave que vous pouvez jouer<br />
avec les parties Upper1/2.<br />
Minus One<br />
Ce paramètre vous permet de définir quelle partie est<br />
étouffée quand vous appuyez sur le bouton [MINUS ONE]<br />
(voyez p. 46). Notez que ce paramètre s’applique uniquement<br />
à la reproduction de Song (et aussi de fichiers SMF<br />
dans le cas de l’<strong>EM</strong>-<strong>25</strong>).<br />
Option Signification<br />
MEL La mélodie (Upper 1)<br />
Chr Les accords d’accompagnement (Lower)<br />
Drm La batterie (M. Drums)<br />
Remarque: Après le paramètre Resume (voyez la page suivante),<br />
vous trouverez une description des paramètres MIDI.<br />
Voyez page 68.<br />
62
<strong>EM</strong>-<strong>25</strong>/<strong>EM</strong>-<strong>15</strong><br />
Resume<br />
Select this function to recall the <strong>EM</strong>-<strong>25</strong>/<strong>EM</strong>-<strong>15</strong>’s factory<br />
Function settings.<br />
Note: Resume does not reset the MIDI parameters of the Function<br />
mode (see p. 68).<br />
Press T<strong>EM</strong>PO [+] in response to the flashing “YES” message.<br />
After showing the “Complete” message, the display<br />
returns to the RESUME message. Press [SONG], [STYLE],<br />
[TONE], or [USER PROGRAM] to leave the Function mode.<br />
Note: There is no “Sure?” question that gives you time to think.<br />
Only press T<strong>EM</strong>PO [+] if you are certain you want to recall ALL<br />
factory Function settings.<br />
Resume<br />
Seleccione esta función para recuperar los ajustes Function<br />
por defecto del <strong>EM</strong>-<strong>25</strong>/<strong>EM</strong>-<strong>15</strong>.<br />
Nota: Resume no reinicia los parámetros MIDI del modo Function<br />
(consulte la p. 68).<br />
Pulse T<strong>EM</strong>PO [+] como respuesta al mensaje intermitente<br />
“YES”. Una vez haya mostrado el mensaje “Complete”, la<br />
pantalla vuelve al mensaje RESUME. Pulse [SONG],<br />
[STYLE], [TONE], o [USER PROGRAM] para salir del modo<br />
Function.<br />
Nota: No existe ninguna pregunta “Sure?” que le deje tiempo<br />
para pensar. Sólo pulse T<strong>EM</strong>PO [+] si está seguro que desea recuperar<br />
TODOS los ajustes Function por defecto.<br />
Resume<br />
Choisissez cette fonction pour rappeler les réglages Function<br />
d’usine de l’<strong>EM</strong>-<strong>25</strong>/<strong>EM</strong>-<strong>15</strong>.<br />
Remarque: La fonction Resume n’initialise pas les paramètres<br />
MIDI du mode Function (voyez p. 68).<br />
Appuyez sur T<strong>EM</strong>PO [+] en réponse au message clignotant<br />
“YES”. L’écran affiche le message “Complete” puis<br />
retourne à la page RESUME. Appuyez sur [SONG], [STYLE],<br />
[TONE] ou [USER PROGRAM] pour quitter le mode Function.<br />
Remarque: Vous ne rencontrerez pas de message “Sure?” vous<br />
donnant l’occasion de réfléchir à votre choix. Appuyez donc sur<br />
T<strong>EM</strong>PO [+] uniquement si vous êtes sûr de vouloir rappeler TOUS<br />
les réglages Function d’usine.<br />
63
<strong>EM</strong>-<strong>25</strong>/<strong>EM</strong>-<strong>15</strong><br />
<strong>15</strong>. Working with User Programs<br />
The <strong>EM</strong>-<strong>25</strong>/<strong>EM</strong>-<strong>15</strong> is equipped with 8 User Program<br />
memories that allow you to store almost all settings (or<br />
registrations) you make on the front panel and via the<br />
Function menu (see p. 57).<br />
Note: MIDI settings (see p. 68) are not saved to a User Program<br />
because the <strong>EM</strong>-<strong>25</strong>/<strong>EM</strong>-<strong>15</strong> memorizes them automatically.<br />
<strong>15</strong>. Trabajar con Programas de<br />
Usuario<br />
El <strong>EM</strong>-<strong>25</strong>/<strong>EM</strong>-<strong>15</strong> dispone de 8 memorias de Programas de<br />
Usuario que le permiten guardar prácticamente todos los<br />
ajustes (o registros) que defina en el panel frontal y<br />
mediante el menú Function (consulte la p. 57).<br />
Nota: Los ajustes MIDI (consulte la p. 68) no se guardan en un<br />
Programa de Usuario debido a que el <strong>EM</strong>-<strong>25</strong>/<strong>EM</strong>-<strong>15</strong> los memoriza<br />
de forma automática.<br />
<strong>15</strong>. Tirer parti des programmes<br />
utilisateur<br />
L’<strong>EM</strong>-<strong>25</strong>/<strong>EM</strong>-<strong>15</strong> est doté de 8 mémoires de programme<br />
utilisateur permettant de conserver pratiquement tous les<br />
réglages que vous effectuez en face avant et avec le<br />
menu Function (voyez p. 57).<br />
Remarque: Les réglages MIDI (voyez p. 68) ne sont pas sauvegardés<br />
dans un programme utilisateur car l’<strong>EM</strong>-<strong>25</strong>/<strong>EM</strong>-<strong>15</strong> les<br />
mémorise automatiquement.<br />
Writing your settings to a User<br />
Program<br />
It is a good idea to write your settings frequently, even if<br />
you still need to do some editing afterwards. Those intermediary<br />
saves allow you to return to the previous stage<br />
whenever you do not like your last modifications.<br />
(1) Press and hold the [USER PROGRAM/WRITE] button.<br />
The <strong>EM</strong>-<strong>25</strong>/<strong>EM</strong>-<strong>15</strong> now displays “Write ?”.<br />
(2) Keep holding the [USER PROGRAM/WRITE] button<br />
while pressing a numeric button.<br />
The number you select appears in the USER PROGRAM<br />
field (“3” in the example above).<br />
The display now responds with the “Complete” message<br />
(your settings have been stored).<br />
(3) Release the [USER PROGRAM/WRITE] button.<br />
Write ?<br />
Escribir ajustes en un Programa de<br />
Usuario<br />
Es aconsejable escribir los ajustes de manera frecuente,<br />
aunque deba seguir editándolos. Estas versiones intermediarias<br />
le permitirán volver al estado previo siempre que<br />
no quede satisfecho con las últimas modificaciones.<br />
(1) Pulse y mantenga pulsado el botón [USER PROGRAM/<br />
WRITE].<br />
El <strong>EM</strong>-<strong>25</strong>/<strong>EM</strong>-<strong>15</strong> visualiza “Write ?”.<br />
(2) Mantenga pulsado el botón [USER PROGRAM/WRITE]<br />
mientras pulsa un botón numérico.<br />
El número que seleccione aparece en el campo USER<br />
PROGRAM (“3” en el ejemplo anterior).<br />
La pantalla responde con el mensaje “Complete” (sus<br />
ajustes han sido guardados).<br />
(3) Suelte el botón [USER PROGRAM/WRITE].<br />
3<br />
Enregistrer les réglages dans un programme<br />
utilisateur<br />
Nous vous recommandons d’enregistrer vos réglages relativement<br />
souvent même s’il vous reste des changements à<br />
faire après. Ces sauvegardes intermédiaires vous permettent<br />
de retrouver une version antérieure lorsque vous<br />
n’aimez pas vos dernières modifications.<br />
(1) Maintenez enfoncé le bouton [USER PROGRAM/<br />
WRITE].<br />
L’<strong>EM</strong>-<strong>25</strong>/<strong>EM</strong>-<strong>15</strong> affiche maintenant “Write ?”.<br />
(2) Continuez d’enfoncer le bouton [USER PROGRAM/<br />
WRITE] tout en appuyant sur le pavé numérique.<br />
Le numéro choisi sur le pavé s’affiche dans la zone USER<br />
PROGRAM (“3” dans l’exemple ci-dessus).<br />
L’écran répond à présent en vous affichant le message<br />
“Complete” (vos réglages ont été mémorisés).<br />
(3) Relâchez le bouton [USER PROGRAM/WRITE].<br />
64
<strong>EM</strong>-<strong>25</strong>/<strong>EM</strong>-<strong>15</strong><br />
Notes about writing User Programs<br />
Leaving the User Program environment<br />
Press [USER PROGRAM] to leave the User Program environment.<br />
The User Program field in the display will go<br />
blank again.<br />
Mode selection<br />
The mode (Arranger, p. 21; Organ, p. <strong>25</strong>; M.Drums, p. 27,<br />
Piano, p. 26) is also memorized when you write a User<br />
Program. You could take advantage of this facility to<br />
alternate between Arranger (song proper) and Organ (ad<br />
lib introduction or ending without Arranger backing)<br />
modes with suitable settings for both.<br />
Meaning of the dashes below the User Program<br />
number<br />
At some stage, you may come across four dashes below<br />
the User Program number (see the example).<br />
Notas acerca de la escritura de Programas de Usuario<br />
Salir del entorno de Programa de Usuario<br />
Pulse [USER PROGRAM] para salir del entorno de Programa<br />
de Usuario. El campo User Program de la pantalla<br />
volverá a quedar vacío.<br />
Selección de modo<br />
El modo (Arranger, p. 21; Organ, p. <strong>25</strong>; M.Drums, p. 27,<br />
Piano, p. 26) también se memoriza al escribir un Programa<br />
de Usuario. Puede aprovechar esta circunstancia<br />
para alternar entre el modo Arrange (adecuado para canciones)<br />
y el modo Organ (adecuado para introducciones o<br />
finales sin acompañamiento del Arranger) con ajustes<br />
adecuados para cada uno de ellos.<br />
Significado de los guiones por debajo del número<br />
User Program<br />
En algún momento, es posible que aparezcan cuatro<br />
guiones bajo el número de Programa de Usuario (consulte<br />
el ejemplo).<br />
Remarques sur la sauvegarde des programmes utilisateur<br />
Quitter l’environnement User Program<br />
Appuyez sur [USER PROGRAM] pour quitter l’environnement<br />
User Program. La zone User Program de l’écran<br />
redevient vide.<br />
Sélection de mode<br />
Le réglage de mode (Arranger, p. 21; Organ, p. <strong>25</strong>;<br />
M.Drums, p. 27, Piano, p. 26) est également mémorisé<br />
dans le programme utilisateur. Vous pourriez en profiter<br />
pour alterner entre les modes Arranger (morceau proprement<br />
dit) et Organ (introduction ou finale improvisée<br />
sans accompagnement Arranger) en gardant des réglages<br />
adéquats pour les deux modes.<br />
Signification des tirets sous le numéro de programme<br />
utilisateur<br />
Vous verrez parfois quatre tirets sous le numéro du programme<br />
utilisateur (voyez l’exemple).<br />
They mean that the last User Program you selected is still<br />
in effect but that the current settings no longer correspond<br />
to the ones in that memory. Such changes may<br />
include the status of the Reverb or Chorus effect, a<br />
changed volume value, etc.<br />
Before selecting another User Program or switching off<br />
the <strong>EM</strong>-<strong>25</strong>/<strong>EM</strong>-<strong>15</strong>, you should therefore write these settings<br />
to the same (or a different) User Program if you<br />
want to keep them. Otherwise, you lose these changes.<br />
Please also see p. 66.<br />
3<br />
Esto significa que el último Programa de Usuario que ha<br />
seleccionado sigue siendo efectivo, pero que los ajustes<br />
actuales ya no se corresponden con los de esta memoria.<br />
Estos cambios pueden incluir el estado del efecto Reverb<br />
o Chorus, un valor de volumen cambiado, etc.<br />
Antes de seleccionar otro Programa de Usuario o desactivar<br />
el <strong>EM</strong>-<strong>25</strong>/<strong>EM</strong>-<strong>15</strong>, debería escribir estos ajustes en el<br />
mismo (u otro) Programa de Usuario si desea conservarlos.<br />
Si no lo hace se perderán. Consulte también la p. 66.<br />
Ils indiquent que le dernier programme utilisateur<br />
sélectionné est toujours en vigueur mais que les réglages<br />
actuels ne correspondent plus à ceux contenus dans cette<br />
mémoire. De tels changements peuvent concerner l’état<br />
des effets Reverb et Chorus, une valeur Balance modifiée,<br />
etc.<br />
Avant de sélectionner un autre programme utilisateur ou<br />
de couper l’alimentation de l’<strong>EM</strong>-<strong>25</strong>/<strong>EM</strong>-<strong>15</strong>, sauvegardez<br />
ces réglages dans le programme utilisateur (ou dans un<br />
autre) si vous voulez les conserver. Yoyez aussi p. 66.<br />
65
<strong>EM</strong>-<strong>25</strong>/<strong>EM</strong>-<strong>15</strong><br />
User Programs and Disk User (<strong>EM</strong>-<strong>25</strong> only)<br />
The address of the last Music Style you selected before<br />
writing a User Program is also memorized. This even<br />
applies to the <strong>EM</strong>-<strong>25</strong>’s Style RAM memory that may contain<br />
a so-called Disk User Style (see p. 37). The <strong>EM</strong>-<strong>25</strong><br />
only remembers the memory address —not the name of<br />
the Style it contained when you wrote your settings to a<br />
User Program.<br />
Note: The <strong>EM</strong>-<strong>15</strong> does not support the Disk User Style facility<br />
because it has no disk drive.<br />
Selecting a User Program<br />
Though the User Program memory you specified above is<br />
already selected, there will be times when you need to<br />
select another memory. In that case, here is what you<br />
need to do:<br />
(1) Briefly press [USER PROGRAM/WRITE]. Do not hold this<br />
button down because doing so will start the Write procedure<br />
(see above).<br />
Programas de Usuario y Disk User (sólo <strong>EM</strong>-<strong>25</strong>)<br />
La dirección del último Estilo Musical seleccionado antes<br />
de escribir un Programa de Usuario también se memorizará.<br />
Esto también ocurre con la memoria RAM de Estilo<br />
del <strong>EM</strong>-<strong>25</strong> que puede contener un también llamado Estilo<br />
Disk User (consulte la p. 37). El <strong>EM</strong>-<strong>25</strong> sólo recuerda la<br />
dirección de la memoria —no el nombre del Estilo que<br />
ésta contiene al escribir los ajustes en un Programa de<br />
Usuario.<br />
Nota: El <strong>EM</strong>-<strong>15</strong> no permite utilizar el Estilo Disk User debido a<br />
que no dispone de unidad de disco.<br />
Seleccionar un Programa de Usuario<br />
Aunque la memoria del Programa de Usuario especificado<br />
anteriormente ya está seleccionada, algunas veces deberá<br />
seleccionar otra memoria. En este caso, siga los pasos que<br />
se indican a continuación:<br />
(1) Pulse brevemente [USER PROGRAM/WRITE]. No lo<br />
mantenga pulsado, ya que si lo hace iniciará el procedimiento<br />
de escritura (consulte más arriba).<br />
Programmes utilisateur et styles Disk User (<strong>EM</strong>-<strong>25</strong> uniquement)<br />
L’adresse du dernier style musical sélectionné avant la<br />
sauvegarde est aussi mémorisée. C’est également le cas<br />
pour la mémoire RAM de l’<strong>EM</strong>-<strong>25</strong> qui peut contenir un<br />
style Disk User (voyez p. 37). L’<strong>EM</strong>-<strong>25</strong>/<strong>EM</strong>-<strong>15</strong> ne mémorise<br />
que l’adresse de la mémoire —pas le nom du style qu’elle<br />
contenait lorsque vous avez enregistré les réglages dans<br />
le programme utilisateur.<br />
Remarque: L’<strong>EM</strong>-<strong>15</strong> ne dispose pas de style Disk User car il n’a<br />
pas de lecteur de disquette.<br />
Sélection d’un programme utilisateur<br />
Bien que le programme utilisateur spécifié ci-dessus soit<br />
déjà sélectionné, il faut parfois en changer. Dans ce cas,<br />
voici comment procéder:<br />
(1) Appuyez brièvement sur le bouton [USER PROGRAM/<br />
WRITE]. Ne maintenez pas ce bouton enfoncé car vous<br />
entameriez la procédure de sauvegarde (Write) dont il<br />
était question plus haut.<br />
The User Program field now indicates the number of the<br />
User Program you selected last, or “1” if you have not yet<br />
selected a User Program since switching on the <strong>EM</strong>-<strong>25</strong>/<br />
<strong>EM</strong>-<strong>15</strong>. The important thing to note here are the dashes<br />
below the number.<br />
They are meant to alert you to the fact that the <strong>EM</strong>-<strong>25</strong>/<br />
<strong>EM</strong>-<strong>15</strong> is still using the last manual changes you may<br />
have made before selecting the User Program function.<br />
The User Program number therefore only means “this is<br />
the last memory you selected”.<br />
3<br />
El campo User Program indicará ahora el número del Programa<br />
de Usuario que haya seleccionado en último lugar,<br />
o “1” si aún no ha seleccionado ningún Programa de<br />
Usuario después de poner en marcha el <strong>EM</strong>-<strong>25</strong>/<strong>EM</strong>-<strong>15</strong>.<br />
Aquí, lo importante son los guiones bajo el número.<br />
Estos guiones le avisan del hecho de que el <strong>EM</strong>-<strong>25</strong>/<strong>EM</strong>-<strong>15</strong><br />
todavía está utilizando los últimos cambios manuales que<br />
ha realizado antes de seleccionar la función User Program.<br />
El número User Program, por tanto, sólo significa<br />
“ésta es la última memoria que ha seleccionado”.<br />
La zone User Program indique le numéro du programme<br />
utilisateur sélectionné en dernier lieu ou “1” si vous<br />
n’avez pas encore sélectionné de programme utilisateur<br />
depuis la mise sous tension de l’<strong>EM</strong>-<strong>25</strong>/<strong>EM</strong>-<strong>15</strong>. Ici, il est<br />
important de noter les tirets sous le numéro.<br />
Ils vous avertissent que l’<strong>EM</strong>-<strong>25</strong>/<strong>EM</strong>-<strong>15</strong> se sert toujours<br />
des derniers changements manuels effectués avant de<br />
sélectionner la fonction User Program. Le numéro de programme<br />
utilisateur ne signifie rien de plus que “ceci est la<br />
dernière mémoire sélectionnée”.<br />
66
<strong>EM</strong>-<strong>25</strong>/<strong>EM</strong>-<strong>15</strong><br />
None of its settings are being used for the time being. By<br />
pressing [USER PROGRAM/WRITE] again, you can leave<br />
the User Program mode without changing your manual<br />
settings. This may be important to remember if you were<br />
about to write your settings and accidentally pressed the<br />
wrong button (or didn’t press it long enough).<br />
To actually select a User Program…<br />
(2) Press a numeric button.<br />
The settings of the selected User Program will be recalled.<br />
Note: As soon as you modify any setting (on the front panel or<br />
in the Function menu), four dashes appear below the User Program<br />
number.<br />
(3) Once again press [USER PROGRAM/WRITE] to leave the<br />
User Program mode.<br />
Note: On the <strong>EM</strong>-<strong>25</strong>, you can also press [STYLE] and [VARIA-<br />
TION/DISK USER] to leave this mode.<br />
Pero ya no se utiliza ninguno de sus ajustes. Si vuelve a<br />
pulsar [USER PROGRAM/WRITE], saldrá del modo User<br />
Program sin cambiar los ajustes manuales. Esto es importante<br />
recordarlo si desea escribir estos ajustes y pulsa<br />
accidentalmente el botón equivocado (o si no lo pulsa<br />
durante el tiempo suficiente).<br />
Para seleccionar realmente un Programa de Usuario…<br />
(2) Pulse un botón numérico.<br />
Los ajustes del Programa de Usuario seleccionado se<br />
recuperarán.<br />
Nota: En el momento en que modifique cualquier ajuste (en el<br />
panel frontal o en el menú Function), aparecerán cuatro guiones<br />
bajo el número User Program.<br />
(3) Vuelva a pulsar [USER PROGRAM/WRITE] para salir del<br />
modo User Program.<br />
Nota: En el <strong>EM</strong>-<strong>25</strong>, también puede pulsar [STYLE] y [VARIATION/<br />
DISK USER] para salir de este modo.<br />
Aucun de ces réglages n’est utilisé pour l’instant. En<br />
appuyant une fois de plus sur [USER PROGRAM/WRITE]<br />
(ou [USER PROGRAM]), vous pouvez quitter le mode User<br />
Program sans changer vos réglages manuels. Cela peut<br />
être important si vous étiez sur le point d’enregistrer vos<br />
réglages en appuyant accidentellement sur le mauvais<br />
bouton (ou si vous n’avez pas appuyé assez longtemps).<br />
Pour sélectionner un programme utilisateur…<br />
(2) Appuyez sur un bouton du pavé numérique.<br />
Les réglages du programme utilisateur en question sont<br />
alors rappelés.<br />
Remarque: Dès que vous modifiez le moindre réglage (en face<br />
avant ou dans le menu Function), les quatre tirets s’affichent<br />
sous le numéro du programme utilisateur.<br />
(3) Appuyez à nouveau sur le bouton [USER PROGRAM/<br />
WRITE] pour quitter le mode User Program.<br />
Remarque: Sur l’<strong>EM</strong>-<strong>25</strong>, vous pouvez aussi appuyer sur [STYLE]<br />
et [VARIATION/DISK USER] pour quitter ce mode.<br />
67
<strong>EM</strong>-<strong>25</strong>/<strong>EM</strong>-<strong>15</strong><br />
16. MIDI functions<br />
MIDI is short for Musical Instrument Digital Interface. The<br />
word refers to many things, the most obvious being a<br />
connector type that is used by musical instruments and<br />
other devices to exchange messages relating to the act of<br />
making music. Every time you play on the <strong>EM</strong>-<strong>25</strong>/<strong>EM</strong>-<strong>15</strong>’s<br />
keyboard or start the Arranger, your instrument transmits<br />
MIDI data to its MIDI OUT socket. If you connect this<br />
socket to the MIDI IN socket of another instrument, that<br />
instrument may play the same notes as one of the<br />
<strong>EM</strong>-<strong>25</strong>/<strong>EM</strong>-<strong>15</strong>’s parts, select sounds, etc.<br />
16. Funciones MIDI<br />
MIDI es la abreviación de Musical Instrument Digital<br />
Interface(Interface Digital para Instrumentos Musicales).<br />
Este término se refiere a muchas cosas, siendo la más<br />
obvia un tipo de conector utilizado por instrumentos<br />
musicales y otros dispositivos para intercambiar mensajes<br />
relacionados con la creación de música. Cada vez que<br />
toque en el teclado del <strong>EM</strong>-<strong>25</strong>/<strong>EM</strong>-<strong>15</strong> o que inicie el<br />
Arranger, el instrumento enviará información MIDI a su<br />
zócalo MIDI OUT. Si conecta este zócalo al zócalo MIDI IN<br />
de otro instrumento, este instrumento podrá tocar las<br />
mismas notas que una de las partes del <strong>EM</strong>-<strong>25</strong>/<strong>EM</strong>-<strong>15</strong>,<br />
seleccionar sonidos, etc.<br />
16. Fonctions MIDI<br />
MIDI est l’acronyme de Musical Instrument Digital Interface.<br />
Le terme fait référence à de nombreuses choses mais<br />
avant tout à un type de connexion permettant à des instruments<br />
de musique et d’autres appareils électroniques<br />
d’échanger des messages concernant l’élaboration musicale.<br />
Chaque fois que vous jouez sur le clavier de l’<strong>EM</strong>-<strong>25</strong>/<br />
<strong>EM</strong>-<strong>15</strong> ou que vous utilisez l’Arranger, votre instrument<br />
transmet des données MIDI via son port MIDI OUT. Si vous<br />
reliez ce port au port MIDI IN d’un autre instrument, cet<br />
instrument peut jouer les mêmes notes qu’une des parties<br />
de l’<strong>EM</strong>-<strong>25</strong>/<strong>EM</strong>-<strong>15</strong>, choisir des sons, etc.<br />
<strong>EM</strong>-<strong>25</strong>/<strong>EM</strong>-<strong>15</strong><br />
The <strong>EM</strong>-<strong>25</strong>/<strong>EM</strong>-<strong>15</strong> receives data<br />
El <strong>EM</strong>-<strong>25</strong>/<strong>EM</strong>-<strong>15</strong> recibe información<br />
L’<strong>EM</strong>-<strong>25</strong>/<strong>EM</strong>-<strong>15</strong> reçoit des données.<br />
External MIDI instrument/computer (*)<br />
Instrumento/ordenador MIDI externo (*)<br />
Instrument MIDI externe/ordinateur (*)<br />
(*) Direct connection to computer possible via optional MIDI/Joystick cable.<br />
(*) Conexión directa al ordenador posible mediante cable MIDI/Joystick opcional.<br />
(*) Branchement direct à l’ordinateur possible via un câble MIDI/de joystick en option.<br />
The <strong>EM</strong>-<strong>25</strong>/<strong>EM</strong>-<strong>15</strong> transmits data<br />
El <strong>EM</strong>-<strong>25</strong>/<strong>EM</strong>-<strong>15</strong> transmite información<br />
L’<strong>EM</strong>-<strong>25</strong>/<strong>EM</strong>-<strong>15</strong> transmet des données.<br />
MIDI is a universal standard, which means that musical<br />
data can be sent to and received by instruments of different<br />
types and manufacturers. Furthermore, MIDI allows<br />
you to connect your <strong>EM</strong>-<strong>25</strong>/<strong>EM</strong>-<strong>15</strong> to a computer or<br />
hardware sequencer.<br />
68<br />
Connect your <strong>EM</strong>-<strong>25</strong>/<strong>EM</strong>-<strong>15</strong> as shown above.<br />
Channels<br />
MIDI can simultaneously transmit and receive messages<br />
on 16 channels, so that up to 16 instruments can be controlled.<br />
Nowadays, most instruments –like your <strong>EM</strong>-<strong>25</strong>/<br />
<strong>EM</strong>-<strong>15</strong>– are multitimbral, which means that they can play<br />
several musical parts with different sounds.<br />
El MIDI es un estándar universal, que significa que la<br />
información musical podrá enviarse y recibirse en instrumentos<br />
de diferentes tipos y fabricantes. Además, el MIDI<br />
le permite conectar el <strong>EM</strong>-<strong>25</strong>/<strong>EM</strong>-<strong>15</strong> a un ordenador o a<br />
un secuenciador de hardware.<br />
Conecte el <strong>EM</strong>-<strong>25</strong>/<strong>EM</strong>-<strong>15</strong> de la siguiente manera.<br />
Canales<br />
El MIDI puede transmitir y recibir mensajes de manera<br />
simultánea en 16 canales, con lo que pueden controlarse<br />
hasta 16 instrumentos. Actualmente, la mayoría de los<br />
instrumentos –como el <strong>EM</strong>-<strong>25</strong>/<strong>EM</strong>-<strong>15</strong>– son multitímbricos,<br />
lo cual significa que pueden tocar diferentes partes<br />
musicales con diferentes sonidos.<br />
MIDI est une norme universelle: les données musicales<br />
peuvent donc être transmises et reçues par des instruments<br />
de différents types et de différents fabricants. En<br />
outre, MIDI vous permet de brancher votre <strong>EM</strong>-<strong>25</strong>/<strong>EM</strong>-<strong>15</strong><br />
à un ordinateur ou à un séquenceur.<br />
Branchez l’<strong>EM</strong>-<strong>25</strong>/<strong>EM</strong>-<strong>15</strong> comme montré ci-dessus.<br />
Canaux<br />
MIDI peut transmettre et recevoir des messages sur 16<br />
canaux simultanément, ce qui permet de contrôler<br />
jusqu’à 16 instruments. Actuellement, la plupart des instruments<br />
sont, à l’instar de l’<strong>EM</strong>-<strong>25</strong>/<strong>EM</strong>-<strong>15</strong>, multitimbraux.<br />
Cela signifie qu’ils peuvent jouer plusieurs parties<br />
musicales avec des sons différents.
<strong>EM</strong>-<strong>25</strong>/<strong>EM</strong>-<strong>15</strong><br />
Note: All <strong>EM</strong>-<strong>25</strong>/<strong>EM</strong>-<strong>15</strong> parts are set to receive MIDI messages.<br />
If they do not seem to respond to the messages you send from<br />
the external controller, you should check whether the external<br />
controller’s MIDI OUT is connected to the MIDI INput of your<br />
<strong>EM</strong>-<strong>25</strong>/<strong>EM</strong>-<strong>15</strong>.<br />
The <strong>EM</strong>-<strong>25</strong>/<strong>EM</strong>-<strong>15</strong>’s transmit and receive channels of all<br />
parts have been set in keeping with a tacit <strong>Roland</strong> standard<br />
and are therefore shared by all recent E, G, and RA<br />
series instruments. You cannot change them. See the<br />
table below if you need to know what a channel a given<br />
<strong>EM</strong>-<strong>25</strong>/<strong>EM</strong>-<strong>15</strong> part receives on.<br />
Nota: Todas las partes del <strong>EM</strong>-<strong>25</strong>/<strong>EM</strong>-<strong>15</strong> están ajustadas para<br />
recibir mensajes MIDI. Si parecen no responder a los mensajes<br />
que envía desde el controlador externo, compruebe si MIDI OUT<br />
del controlador externo está conectado al MIDI INput del<br />
<strong>EM</strong>-<strong>25</strong>/<strong>EM</strong>-<strong>15</strong>.<br />
Los canales de transmisión y recepción del <strong>EM</strong>-<strong>25</strong>/<strong>EM</strong>-<strong>15</strong><br />
de todas las partes han sido ajustados cumpliendo con un<br />
estándar tácito de <strong>Roland</strong> y, por tanto, se comparten por<br />
todos los instrumentos más recientes de la serie E, G, y<br />
RA. No puede cambiarlos. Consulte la siguiente tabla si<br />
desea conocer en qué canal del <strong>EM</strong>-<strong>25</strong>/<strong>EM</strong>-<strong>15</strong> se recibe<br />
una parte.<br />
Remarque: Toutes les parties de l’<strong>EM</strong>-<strong>25</strong>/<strong>EM</strong>-<strong>15</strong> peuvent recevoir<br />
des messages MIDI. Si elles ne semblent pas réagir aux messages<br />
venant d’un contrôleur externe, voyez si la prise MIDI OUT<br />
du contrôleur est correctement reliée à la prise MIDI IN de<br />
l’<strong>EM</strong>-<strong>25</strong>/<strong>EM</strong>-<strong>15</strong>.<br />
Les canaux de transmission et de réception de toutes les<br />
parties adoptés par l’<strong>EM</strong>-<strong>25</strong>/<strong>EM</strong>-<strong>15</strong> répondent à une<br />
norme tacite de <strong>Roland</strong> utilisée par les instruments<br />
récents des séries E, G et RA. Vous ne pouvez pas les<br />
modifier. Le tableau suivant permet de vérifier via quel<br />
canal une partie donnée de l’<strong>EM</strong>-<strong>25</strong>/<strong>EM</strong>-<strong>15</strong> reçoit les<br />
messages.<br />
Upper 1 4 A. Drums 10<br />
Upper 2 6 A. Bass 2<br />
Lower 11 Accomp. 1 1<br />
Accomp. 4 7<br />
Accomp. 5 8<br />
Accomp. 6 9<br />
M. Bass 12 Accomp. 2 3<br />
M. Drums 16 Accomp. 3 5<br />
NTA 1 14<br />
MIDI Function parameters<br />
See “Editing parameters (general procedure)” (p. 56) for<br />
how to select and set these Function parameters (they<br />
belong to the same Function menu as the “General Function<br />
parameters”).<br />
MIDI TxRx (MIDI transmission and reception)<br />
This parameter allows you to specify which <strong>EM</strong>-<strong>25</strong>/<strong>EM</strong>-<strong>15</strong><br />
parts should transmit and receive MIDI messages:<br />
Option Meaning<br />
ALL All parts.<br />
KBD Only the <strong>Keyboard</strong> parts (the 1st column in the table<br />
above).<br />
STL Only the Arranger parts (A.Drums~Accomp 6).<br />
OFF None of the <strong>EM</strong>-<strong>25</strong>/<strong>EM</strong>-<strong>15</strong>’s parts transmits/receives<br />
MIDI messages.<br />
Parámetros MIDI Function<br />
Consulte “Editar parámetros (procedimiento general)”<br />
(p. 56) para más información acerca de cómo seleccionar<br />
y ajustar los parámetros Function (pertenecen al mismo<br />
menú Function que “Parámetros Function generales”).<br />
MIDI TxRx (transmisión y recepción MIDI)<br />
Este parámetro le permite especificar qué partes del<br />
<strong>EM</strong>-<strong>25</strong>/<strong>EM</strong>-<strong>15</strong> deberían transmitir y recibir mensajes<br />
MIDI:<br />
Opción Significado<br />
ALL Todas las partes.<br />
KBD Sólo las partes del teclado (la 1ª columna de la tabla<br />
anterior).<br />
STL Sólo las partes del Arranger (A.Drums~Accomp 6).<br />
OFF Ninguna de las partes del <strong>EM</strong>-<strong>25</strong>/<strong>EM</strong>-<strong>15</strong> transmite/<br />
recibe mensajes MIDI.<br />
Paramètres de fonction MIDI<br />
Pour savoir comment choisir et régler ces paramètres<br />
Function, voyez “Edition de paramètres (procédure générale)”<br />
(p. 56) (ils font partie du même menu Function que<br />
les “Paramètres Function généraux”).<br />
MIDI TxRx (transfert et réception MIDI)<br />
Ce paramètre définit quelles parties de l’<strong>EM</strong>-<strong>25</strong>/<strong>EM</strong>-<strong>15</strong><br />
peuvent transmettre et recevoir des messages MIDI:<br />
Option<br />
ALL<br />
KBD<br />
STL<br />
OFF<br />
Signification<br />
Toutes les parties<br />
Uniquement les parties <strong>Keyboard</strong> (la 1e colonne du<br />
tableau ci-dessus).<br />
Uniquement les parties Arranger (A.Drums~Accomp<br />
6).<br />
Aucune des parties de l’<strong>EM</strong>-<strong>25</strong>/<strong>EM</strong>-<strong>15</strong> ne transmet<br />
et ne reçoit de messages MIDI.<br />
69
<strong>EM</strong>-<strong>25</strong>/<strong>EM</strong>-<strong>15</strong><br />
NTA Rx14 (Note-to-Arranger reception on/off)<br />
(On/Off) NTA is short for “Note-to-Arranger”, or the<br />
notes you play in the left half of the keyboard to feed the<br />
Arranger with chord information. These notes can also be<br />
received via MIDI. If you want the Arranger to use these<br />
notes, you must transmit them on MIDI channel 14 (from<br />
your computer or external MIDI instrument to the<br />
<strong>EM</strong>-<strong>25</strong>/<strong>EM</strong>-<strong>15</strong>) and select “On” here.<br />
NTA notes can only be received (they are not transmitted).<br />
The notes you play on the <strong>EM</strong>-<strong>25</strong>/<strong>EM</strong>-<strong>15</strong>’s keyboard are<br />
indeed transmitted to the Arranger, from there to the<br />
Arranger parts, and used to play the accompaniment in<br />
the right key. Since all Music Style notes are transmitted<br />
via MIDI, there is no need to send the NTA notes separately.<br />
Style PC (Style Select TxRx Channel)<br />
(1~16, Off, Default setting: 10) As its name implies, the<br />
Style Select channel is used to receive and transmit program<br />
changes that cause the <strong>EM</strong>-<strong>25</strong>/<strong>EM</strong>-<strong>15</strong> or the external<br />
instrument to select another Music Style.<br />
Lyrics Tx (Transmit Lyrics messages)<br />
(On/Off) The <strong>EM</strong>-<strong>25</strong>/<strong>EM</strong>-<strong>15</strong> is capable of transmitting<br />
Lyrics messages contained in Format 0 Standard MIDI<br />
Files you playback. It cannot display them but it allows<br />
you to transmit them to a device capable of displaying<br />
Lyrics messages (such as the <strong>Roland</strong> LVC-1). This filter<br />
allows you to enable (On) or disable (Off) the transmission<br />
of Lyrics data (Default setting: On).<br />
Sync Rx (MIDI synchronization)<br />
Use this parameter to specify how the <strong>EM</strong>-<strong>25</strong>/<strong>EM</strong>-<strong>15</strong><br />
should be synchronized (as slave) to an external MIDI<br />
sequencer, computer, drum machine, etc.<br />
“Synchronization” is a learned term for the fact that one<br />
device (or function) is set to start and stop at the same<br />
time as another device (or function), and to run at the<br />
same tempo (BPM).<br />
NTA Rx14 (activar/desactivar recepción de Note-to-<br />
Arranger)<br />
(On/Off) NTA es la abreviación de “Note-to-Arranger”, o<br />
las notas que se tocan en la mitad izquierda del teclado<br />
para alimentar al Arranger con información de acordes.<br />
Estas notas también se pueden recibir a través de MIDI. Si<br />
desea que el Arranger utilice estas notas, debe transmitirlas<br />
a través de los 14 canales MIDI (desde el ordenador o<br />
instrumento MIDI externo al <strong>EM</strong>-<strong>25</strong>/<strong>EM</strong>-<strong>15</strong>) y seleccionar<br />
“On”.<br />
Las notas NTA sólo se pueden recibir (no se transmiten).<br />
Las notas que toca en el teclado del <strong>EM</strong>-<strong>25</strong>/<strong>EM</strong>-<strong>15</strong> son<br />
transmitidas al Arranger, desde ahí a las partes del Arranger<br />
y utilizadas para tocar el acompañamiento en el tono<br />
adecuado. Puesto que todas las notas de los Estilos Musicales<br />
se transmiten vía MIDI, no hay necesidad de enviar<br />
las notas NTA por separado.<br />
Style PC (Style Select TxRx Channel)<br />
(1~16, Off, Valor por defecto: 10) Tal como su nombre<br />
indica, el canal Style Select se utiliza para recibir y transmitir<br />
cambios de programa que provocan que el <strong>EM</strong>-<strong>25</strong>/<strong>EM</strong>-<strong>15</strong> o<br />
el instrumento externo seleccione otro Estilo Musical.<br />
Lyrics Tx (Mensajes Transmit Lyrics)<br />
(On/Off) El <strong>EM</strong>-<strong>25</strong>/<strong>EM</strong>-<strong>15</strong> es capaz de transmitir mensajes<br />
de Letras de canción contenidos en los Archivos MIDI<br />
Estándar del Formato 0 que usted reproduce. No puede<br />
visualizarlos pero le permite transmitirlos a un dispositivo<br />
capaz de visualizar mensajes Letras de canción (como el<br />
<strong>Roland</strong> LVC-1). Este filtro le permite activar (On) o desactivar<br />
(Off) la transmisión de información de Letras de canción<br />
(Valor por defecto: On).<br />
Sync Rx (sincronización MIDI)<br />
Utilice este parámetro para especificar cómo debería sincronizarse<br />
el <strong>EM</strong>-<strong>25</strong>/<strong>EM</strong>-<strong>15</strong> (como esclavo) a un secuenciador<br />
MIDI externo, ordenador, unidad de ritmo, etc.<br />
La “Sincronización” se refiere al hecho que un dispositivo<br />
(o función) se inicie y se pare al mismo tiempo que otro<br />
dispositivo (o función), y que actúe al mismo tempo<br />
(BPM).<br />
NTA Rx14 (activation/coupure de réception NTA)<br />
(On/Off) NTA est l’abréviation de “Note-to-Arranger” et<br />
représente les notes jouées dans la partie gauche du clavier<br />
qui fournissent des informations d’accords à l’Arranger.<br />
Ces notes peuvent également être reçues via MIDI. Si<br />
vous souhaitez que l’Arranger utilise ces notes, transmettez-les<br />
à l’<strong>EM</strong>-<strong>25</strong>/<strong>EM</strong>-<strong>15</strong> sur le canal MIDI 14 (à partir de<br />
l’ordinateur ou d’instruments MIDI externes) et choisissez<br />
“On” ici.<br />
Les notes NTA peuvent uniquement être reçues (elles ne<br />
sont pas transmises). Les notes jouées sur le clavier de<br />
l’<strong>EM</strong>-<strong>25</strong>/<strong>EM</strong>-<strong>15</strong> sont effectivement transmises à l’Arranger<br />
et de là aux parties Arranger et utilisées pour produire<br />
l’arrangement dans la bonne tonalité. Comme toutes les<br />
notes des styles musicaux sont transmises via MIDI, il est<br />
inutile de transmettre les notes NTA séparément.<br />
Style PC (Style Select TxRx Channel)<br />
(1~16, Off, Défaut: 10) Comme son nom l’indique, le<br />
canal Style Select sert à la réception et à la transmission<br />
de changements de programme entraînant un changement<br />
de style sur l’<strong>EM</strong>-<strong>25</strong>/<strong>EM</strong>-<strong>15</strong> ou l’instrument externe.<br />
Lyrics Tx (messages Transmit Lyrics)<br />
(On/Off) L’<strong>EM</strong>-<strong>25</strong>/<strong>EM</strong>-<strong>15</strong> est capable de transmettre des<br />
données de paroles (Lyrics) contenues dans des fichiers<br />
standard MIDI de Format 0. Il ne peut pas les afficher<br />
mais peut les transmettre à un appareil capable d’afficher<br />
des paroles (tel que le <strong>Roland</strong> LVC-1). Ce filtre vous permet<br />
d’activer (On) et de couper (Off) la réception de données<br />
de paroles (Défaut: On).<br />
Sync Rx (synchronisation MIDI)<br />
Ce paramètre permet de spécifier la façon dont l’<strong>EM</strong>-<strong>25</strong>/<br />
<strong>EM</strong>-<strong>15</strong> doit se synchroniser (comme élément asservi) à un<br />
séquenceur, ordinateur, boîte à rythme MIDI, etc.<br />
Cette fonction permet de synchroniser un appareil (ou<br />
une fonction) sur un autre appareil (ou fonction) afin de<br />
les faire démarrer et de les arrêter simultanément et de<br />
fonctionner selon le même tempo (BPM).<br />
70
<strong>EM</strong>-<strong>25</strong>/<strong>EM</strong>-<strong>15</strong><br />
Please note that synchronization is only possible when<br />
you connect the external device’s MIDI OUT socket to the<br />
<strong>EM</strong>-<strong>25</strong>/<strong>EM</strong>-<strong>15</strong>’s MIDI IN socket (though you can also<br />
work the other way around; in that case, see the<br />
sequencer’s manual for details).<br />
Off<br />
On<br />
In this case, the <strong>EM</strong>-<strong>25</strong>/<strong>EM</strong>-<strong>15</strong> is not synchronized with<br />
other MIDI devices. It is thus impossible to start/stop it<br />
via MIDI.<br />
Arranger playback and Song recording/playback are<br />
synchronized if the <strong>EM</strong>-<strong>25</strong>/<strong>EM</strong>-<strong>15</strong> receives MIDI Start<br />
and Stop messages followed by MIDI Clock signals. If<br />
the <strong>EM</strong>-<strong>25</strong>/<strong>EM</strong>-<strong>15</strong> receives only a Start message, it will<br />
wait a moment to see if there are also MIDI Clock messages<br />
coming.<br />
If there are, it will synchronize to them. If there are no<br />
MIDI Clock messages, it will follow its own tempo. In<br />
either case, you can stop playback or recording with a<br />
MIDI Stop message.<br />
Clock Tx<br />
This option allows you to determine whether (On) or not<br />
(Off) the Arranger and Recorder send MIDI Clock messages<br />
when you start them. These messages are necessary<br />
for synchronizing external MIDI instruments/sequencers/<br />
software to the <strong>EM</strong>-<strong>25</strong>/<strong>EM</strong>-<strong>15</strong> (Default setting: On).<br />
StartStp (Start/Stop/Continue)<br />
(On/Off, Default setting: On) This option allows you to<br />
specify whether or not the Arranger and Recorder send<br />
Start/Stop/Continue messages when you start or stop<br />
them. Select “Off” when you wish to control the tone<br />
generator of a MIDI organ, etc., without starting or stopping<br />
its automatic accompaniment.<br />
Song Pos P (Song Position Pointer)<br />
(On/Off, Default setting: On) The <strong>EM</strong>-<strong>25</strong>/<strong>EM</strong>-<strong>15</strong>’s<br />
Recorder also sends Song Position Pointer messages that<br />
indicate the exact location of the notes that are being<br />
played back. Select “OFF” if you don’t want the Recorder<br />
to send these messages.<br />
Tenga en cuenta que la sincronización sólo es posible si<br />
conecta el zócalo MIDI OUT del dispositivo externo al<br />
zócalo MIDI IN del <strong>EM</strong>-<strong>25</strong>/<strong>EM</strong>-<strong>15</strong> (aunque también es<br />
posible otro modo; en este caso, consulte el manual del<br />
secuenciador para más detalles).<br />
Off<br />
On<br />
En este caso, el <strong>EM</strong>-<strong>25</strong>/<strong>EM</strong>-<strong>15</strong> no se sincronizará con<br />
otros dispositivos MIDI. Por lo tanto, será imposible<br />
ponerlo en marcha y pararlo mediante MIDI.<br />
La reproducción del Arranger y la reproducción/grabación<br />
de la Canción se sincronizan si el <strong>EM</strong>-<strong>25</strong>/<strong>EM</strong>-<strong>15</strong><br />
recibe mensaje de Inicio y Parada MIDI seguidos por las<br />
señales MIDI Clock. Si el <strong>EM</strong>-<strong>25</strong>/<strong>EM</strong>-<strong>15</strong> sólo recibe un<br />
mensaje de Inicio, esperará un momento para ver si<br />
también se están enviando mensajes MIDI Clock.<br />
Si los hay, se sincronizará con ellos. Si no existe ningún<br />
mensaje MIDI Clock, seguirá su propio tempo. En cualquier<br />
caso, puede detener la reproducción o grabación<br />
con un mensaje de Parada MIDI.<br />
Clock Tx<br />
Esta opción le permite determinar las condiciones del<br />
Arranger y el Grabador, si en activado (On) o desactivado<br />
(Off) envían mensajes MIDI Clock cuando los pone en<br />
marcha. Estos mensajes son necesarios para sincronizar<br />
instrumentos MIDI externos/secuenciadores/software al<br />
<strong>EM</strong>-<strong>25</strong>/<strong>EM</strong>-<strong>15</strong> (Valor por defecto: On).<br />
StartStp (Start/Stop/Continue)<br />
(On/Off, Valor por defecto: On) Esta opción le permite<br />
especificar si el Arranger y el Grabador envíarán o no<br />
mensajes de Inicio/Parada/Contiuación al iniciarlos o desactivarlos.<br />
Seleccione “Off” cuando desee controlar el<br />
generador de sonidos de un órgano MIDI, etc., sin iniciar<br />
ni detener su acompañamiento automático.<br />
Song Pos P (Song Position Pointer)<br />
(On/Off, Valor por defecto: On) El Grabador del <strong>EM</strong>-<strong>25</strong>/<br />
<strong>EM</strong>-<strong>15</strong> también envía mensajes Song Position Pointer que<br />
indican la localización exacta de las notas que se están<br />
reproduciendo. Seleccione “OFF” cuando no desee que el<br />
Grabador envíe estos mensajes.<br />
Notez qu’il ne peut y avoir synchronisation que si vous<br />
avez branché le port MIDI OUT de l’appareil externe au<br />
port MIDI IN de l’<strong>EM</strong>-<strong>25</strong>/<strong>EM</strong>-<strong>15</strong> (vous pouvez aussi faire<br />
l’inverse; voyez alors le manuel de l’appareil externe pour<br />
en savoir plus).<br />
Off<br />
On<br />
Dans ce cas, l’<strong>EM</strong>-<strong>25</strong>/<strong>EM</strong>-<strong>15</strong> n’est pas synchronisé avec<br />
d’autres appareils MIDI. Il est donc impossible de le faire<br />
démarrer/l’arrêter via MIDI.<br />
Ce mode synchronise la reproduction de l’Arranger et<br />
l’enregistrement/la reproduction de Song en réponse à<br />
des messages MIDI Start et Stop suivis d’un signal<br />
d’horloge MIDI. Si l’<strong>EM</strong>-<strong>25</strong>/<strong>EM</strong>-<strong>15</strong> reçoit uniquement<br />
un message Start, il attendra un moment pour voir si<br />
des messages MIDI Clock ne suivent pas.<br />
Si c’est le cas, il se synchronise sur ces messages. S’il n’y<br />
a pas de messages MIDI Clock, l’instrument utilisera son<br />
propre tempo. Dans les deux cas, vous pouvez arrêter la<br />
reproduction ou l’enregistrement avec un message<br />
MIDI Stop.<br />
Clock Tx<br />
Cette option vous permet de déterminer si l’Arranger et le<br />
Recorder envoient (On) ou non (Off) des signaux d’horloge<br />
MIDI lorsque vous les utilisez. Ces signaux sont indispensables<br />
pour synchroniser des instruments, séquenceurs,<br />
logiciels MIDI externes avec l’<strong>EM</strong>-<strong>25</strong>/<strong>EM</strong>-<strong>15</strong><br />
(Défaut: On).<br />
StartStp (Start/Stop/Continue)<br />
(On/Off, Défaut: On) Cette option permet de déterminer<br />
si l’Arranger et le Recorder envoient des messages Start/<br />
Stop/ Continue lorsqu’ils fonctionnent. Sélectionnez “Off”<br />
si vous souhaitez piloter le générateur de sons d’un orgue<br />
MIDI sans lancer son accompagnement automatique<br />
chaque fois que vous faites démarrer la reproduction de<br />
l’Arranger ou du Recorder sur l’<strong>EM</strong>-<strong>25</strong>/<strong>EM</strong>-<strong>15</strong>.<br />
Song Pos P (Song Position Pointer)<br />
(On/Off, Défaut: On) Le Recorder de l’<strong>EM</strong>-<strong>25</strong>/<strong>EM</strong>-<strong>15</strong><br />
envoie aussi des messages indiquant la position dans le<br />
morceau ou “Song Position Pointer”. Sélectionnez “OFF” si<br />
vous ne voulez pas que le Recorder envoie ces messages.<br />
71
<strong>EM</strong>-<strong>25</strong>/<strong>EM</strong>-<strong>15</strong><br />
Local<br />
(On/Off, Default setting: On) The Local parameter allows<br />
you to establish or remove the connection between the<br />
<strong>EM</strong>-<strong>25</strong>/<strong>EM</strong>-<strong>15</strong>’s keyboard/Recorder and the internal tone<br />
generator.<br />
When set to “ON” (default), playing on the <strong>EM</strong>-<strong>25</strong>/<br />
<strong>EM</strong>-<strong>15</strong>’s keyboard or playing back a Recorder song will<br />
cause the corresponding notes to sound. If you select<br />
“OFF”, the corresponding MIDI messages are no longer<br />
sent to the internal tone generator – but they are still<br />
transmitted to the MIDI OUT port and hence to external<br />
MIDI instruments.<br />
Local<br />
(On/Off, Valor por defecto: On) El parámetro Local permite<br />
establecer o eliminar la conexión entre el teclado/<br />
Grabador del <strong>EM</strong>-<strong>25</strong>/<strong>EM</strong>-<strong>15</strong> y el generador de sonidos<br />
interno.<br />
Si está ajustado a “ON” (valor por defecto), al tocar el<br />
teclado del <strong>EM</strong>-<strong>25</strong>/<strong>EM</strong>-<strong>15</strong> o al reproducir una canción del<br />
Grabador, provocará que se oigan las notas correspondientes.<br />
Si selecciona “OFF”, los correspondientes mensajes<br />
MIDI dejarán de enviarse al generador de sonidos<br />
interno – pero se continuarán transmitiendo al puerto<br />
MIDI OUT y de aquí a los instrumentos MIDI externos.<br />
Local<br />
(On/Off, Défaut: On) Le paramètre Local vous permet<br />
d’établir ou de couper le lien entre le clavier de l’<strong>EM</strong>-<strong>25</strong>/<br />
<strong>EM</strong>-<strong>15</strong> et le Recorder d’une part et le générateur de sons<br />
interne d’autre part.<br />
Avec un réglage “ON” (réglage usine), les notes jouées sur<br />
le clavier de l’<strong>EM</strong>-<strong>25</strong>/<strong>EM</strong>-<strong>15</strong> et la reproduction d’un Song<br />
du Recorder sont audibles. Si vous sélectionnez “OFF”<br />
pour couper le lien, les messages MIDI correspondants ne<br />
sont plus envoyés au générateur de sons interne. La fonction<br />
Local n’empêche cependant pas la transmission des<br />
données MIDI correspondantes à la sortie MIDI OUT<br />
Sound source<br />
Sound source<br />
MIDI OUT<br />
MIDI OUT<br />
LOCAL ON<br />
LOCAL OFF<br />
Note: The setting of this parameter is not memorized when you<br />
switch the <strong>EM</strong>-<strong>25</strong>/<strong>EM</strong>-<strong>15</strong> off.<br />
Note: You can also select this parameter by pressing and holding<br />
the [SONG] button.<br />
Nota: El ajuste de este parámetro no se memoriza al desactivar<br />
el <strong>EM</strong>-<strong>25</strong>/<strong>EM</strong>-<strong>15</strong>.<br />
Nota: También puede seleccionar este parámetro pulsando y<br />
manteniendo pulsado el botón [SONG].<br />
Remarque: Le réglage de ce paramètre n’est pas mémorisé<br />
quand vous mettez l’<strong>EM</strong>-<strong>25</strong>/<strong>EM</strong>-<strong>15</strong> hors tension.<br />
Remarque: Vous pouvez aussi choisir ce paramètre en appuyant<br />
sur [SONG] et en le maintenant enfoncé.<br />
72
<strong>EM</strong>-<strong>25</strong>/<strong>EM</strong>-<strong>15</strong><br />
17. Using the outputs and an<br />
optional pedal<br />
Using an external amplifier<br />
If you like, you can also record your performance (or the<br />
Recorder song) to cassette, MD, etc. To this end, you need<br />
to connect the <strong>EM</strong>-<strong>25</strong>/<strong>EM</strong>-<strong>15</strong>’s PHONES 1/OUTPUT socket<br />
to the external device’s REC IN jacks.<br />
17. Utilizar las salidas y un pedal<br />
opcional<br />
Utilizar un amplificador externo<br />
Si lo desea, también puede grabar su interpretación (o la<br />
canción del Grabador) al cassette, MD, etc. Para este fin,<br />
deberá conectar el zócalo PHONES 1/OUTPUT del <strong>EM</strong>-<strong>25</strong>/<br />
<strong>EM</strong>-<strong>15</strong> a los jacks REC IN del dispositivo externo.<br />
17. Utilisation des sorties et<br />
d’une pédale en option<br />
Utilisation d’un ampli externe<br />
Si vous voulez, vous pouvez aussi enregistrer votre jeu (ou<br />
le morceau Recorder) sur cassette, MD, etc. Il suffit de<br />
brancher la sortie PHONES 1/OUTPUT de l’<strong>EM</strong>-<strong>25</strong>/<strong>EM</strong>-<strong>15</strong><br />
aux entrées REC IN de l’appareil externe.<br />
DP-2, DP-6, or BOSS FS-5U footswitch<br />
Pedal interruptor DP-2, DP-6 o BOSS FS-5U<br />
Commutateur au pied DP-2, DP-6 ou BOSS FS-5U<br />
Cassette deck, power amplifier, HiFi amplifier, MA series active speakers, etc.<br />
Pletina de cassette, amplificador de potencia/HiFi, altavoces activos de la serie MA, etc.<br />
Platine à cassette, ampli de puissance, ampli hi-fi, enceintes actives de la série MA, etc.<br />
Use a “Y” cable for doing this connection (see your <strong>Roland</strong><br />
dealer). Another use for this output is to connect the<br />
<strong>EM</strong>-<strong>25</strong>/<strong>EM</strong>-<strong>15</strong> to your HiFi or keyboard amplifier (such as<br />
the <strong>Roland</strong> KC-500/300/100).<br />
Note: By connecting a “Y” cable (or headphones) to the PHONES<br />
1/OUTPUT socket, you switch off the <strong>EM</strong>-<strong>25</strong>/<strong>EM</strong>-<strong>15</strong>’s amplification<br />
system.<br />
Utilice un cable “Y” para establecer esta conexión (consulte<br />
con su distribuidor <strong>Roland</strong>). Otra utilización para<br />
esta salida es conectar el <strong>EM</strong>-<strong>25</strong>/<strong>EM</strong>-<strong>15</strong> al equipo HiFi o<br />
al amplificador de teclado (como el <strong>Roland</strong> KC-500/300/<br />
100).<br />
Nota: Al conectar un cable “Y” (o auriculares) al zócalo PHONES<br />
1/OUTPUT, desactivará el sistema de amplificación del <strong>EM</strong>-<strong>25</strong>/<br />
<strong>EM</strong>-<strong>15</strong>.<br />
Pour effectuer cette connexion, utilisez un câble en “Y”<br />
(consultez votre revendeur <strong>Roland</strong>). Cette sortie permet<br />
aussi de brancher l’<strong>EM</strong>-<strong>25</strong>/<strong>EM</strong>-<strong>15</strong> à votre ampli hi-fi ou<br />
de clavier (comme un <strong>Roland</strong> KC-500/300/100).<br />
Remarque: Quand vous branchez un câble en “Y” (ou un casque)<br />
à la prise PHONES 1/OUTPUT, vous coupez le système<br />
d’amplification de l’<strong>EM</strong>-<strong>25</strong>/<strong>EM</strong>-<strong>15</strong>.<br />
73
<strong>EM</strong>-<strong>25</strong>/<strong>EM</strong>-<strong>15</strong><br />
Sustain Footswitch<br />
You can connect an optional DP-2, DP-6, or BOSS FS-5U<br />
footswitch to the SUSTAIN FOOTSWITCH jack in order to<br />
hold the Upper Tone notes even after releasing the keys.<br />
Here’s how it works.<br />
(1) Connect a DP-2, DP-6, or BOSS FS-5U footswitch to<br />
the SUSTAIN FOOTSWITCH jack.<br />
(2) Play a note with your right hand.<br />
(3) Press the footswitch.<br />
(4) Release the key.<br />
The note(s) you played keep on sounding after you release<br />
the corresponding keys.<br />
(5) To stop the note(s) from sounding, release the footswitch.<br />
Note: This function is also available in ORGAN mode (see p. <strong>25</strong>)<br />
and applies to the Upper parts.<br />
Pedal interruptor Sustain<br />
Es posible conectar un pedal interruptor DP-2, DP-6, o<br />
BOSS FS-5U opcional al jack SUSTAIN FOOTSWITCH para<br />
sostener las notas de Tone Upper incluso después de soltar<br />
las teclas. Para ello.<br />
(1) Conecte el pedal interruptor DP-2, DP-6, o BOSS FS-5U<br />
al jack SUSTAIN FOOTSWITCH.<br />
(2) Toque una nota con la mano derecha.<br />
(3) Pulse el pedal interruptor.<br />
(4) Suelte la tecla.<br />
La(s) nota(s) que haya tocado seguirán sonando después<br />
de soltar las teclas correspondientes.<br />
(5) Para que las notas dejen de sonar, suelte el pedal interruptor.<br />
Nota: Esta función también está disponible en el modo ORGAN<br />
(consulte la p. <strong>25</strong>) y se aplica a las partes Upper.<br />
Commutateur au pied de Sustain<br />
En branchant un commutateur au pied DP-2, DP-6 ou<br />
BOSS FS-5U en option à la prise SUSTAIN FOOTSWITCH,<br />
vous pourrez maintenir le son des notes Upper même<br />
après le relâchement des touches. Voici comment ça marche:<br />
(1) Branchez un commutateur au pied DP-2, DP-6 ou<br />
BOSS FS-5U à la prise SUSTAIN FOOTSWITCH.<br />
(2) Jouez une note de la main droite.<br />
(3) Enfoncez le commutateur au pied.<br />
(4) Relâchez la touche.<br />
Vous entendez encore le son de la note ou des notes<br />
jouée(s) même après avoir relâché les touches correspondantes.<br />
(5) Pour couper le son des notes, relâchez le commutateur<br />
au pied.<br />
Remarque: Cette fonction est aussi disponible en mode ORGAN<br />
(voyez p. <strong>25</strong>) et s’applique aux parties Upper.<br />
74
<strong>EM</strong>-<strong>25</strong>/<strong>EM</strong>-<strong>15</strong><br />
18. Disk functions (<strong>EM</strong>-<strong>25</strong>)<br />
The <strong>EM</strong>-<strong>25</strong>’s Disk functions allow you to save the<br />
Recorder Song in the internal Song RAM memory to disk,<br />
to save and load your User Programs to and from disk, to<br />
format floppy disks, to delete files on a floppy disk, and to<br />
copy disks.<br />
You are free to use 2DD or 2HD disks. Please bear in mind,<br />
however, that 2HD disks have twice the capacity of 2DD<br />
disks, so use 2HDs whenever you can.<br />
Whenever the disk drive writes data to or reads data on<br />
disk, the Disk icon ( ) flashes in the display. Do not<br />
remove the floppy disk while this icon is displayed as<br />
that may damage both the disk drive and the disk (so that<br />
it becomes unreadable).<br />
Note: The following only applies to the <strong>EM</strong>-<strong>25</strong>. The <strong>EM</strong>-<strong>15</strong> does<br />
not have a disk drive.<br />
18. Funciones de disco (<strong>EM</strong>-<strong>25</strong>)<br />
Las funciones Disk del <strong>EM</strong>-<strong>25</strong> le permiten guardar la Canción<br />
del Grabador en la memoria RAM de Canción interna<br />
al disco, guardar y cargar los Programas de Usuario en y<br />
desde un disco, formatear disquetes, eliminar archivos de<br />
un disquete, y copiar discos.<br />
Puede utilizar discos 2DD o 2HD. No obstante, tenga en<br />
cuenta que los discos 2HD tienen el doble de capacidad<br />
que los discos 2DD, por lo que debería utilizar discos 2HD<br />
siempre que fuera posible.<br />
Siempre que la unidad de discos esté escribiendo o<br />
leyendo información en un disco, el icono Disk ( )<br />
parpadeará en la pantalla. No extraiga el disquete<br />
mientras se visualice este icono ya que podría dañar<br />
tanto la unidad de discos como el disco en si (con lo que<br />
quedaría ilegible).<br />
Nota: Las siguientes explicaciones sólo se aplican al <strong>EM</strong>-<strong>25</strong>. El<br />
<strong>EM</strong>-<strong>15</strong> no dispone de unidad de discos.<br />
18. Fonctions Disk (<strong>EM</strong>-<strong>25</strong>)<br />
Le mode Disk de l’<strong>EM</strong>-<strong>25</strong> permet de sauvegarder sur disquette<br />
le morceau Recorder contenu dans la mémoire<br />
RAM Song, sauvegarder et charger vos programmes utilisateur<br />
sur disquette, formater des disquettes, effacer des<br />
fichiers résidant sur disquette et copier des disquettes.<br />
Vous avez le choix entre des disquettes 2DD ou 2HD. Pensez<br />
cependant que la capacité des disquettes 2HD est le<br />
double de celle des disquettes 2DD; nous vous recommandons<br />
donc l’utilisation de disquettes 2HD.<br />
Quand le lecteur écrit ou lit des données sur la disquette,<br />
l’icone de disquette ( ) clignote à l’écran. N’éjectez<br />
pas la disquette tant que cette icône est affichée car<br />
vous endommageriez le lecteur de disquette et la disquette<br />
(qui deviendrait illisible).<br />
Remarque: Ce qui suit ne concerne que l’<strong>EM</strong>-<strong>25</strong>. L’<strong>EM</strong>-<strong>15</strong> ne<br />
dispose pas de lecteur de disquette.<br />
LOAD Upr<br />
Loading User Programs from disk<br />
This load function is called LOAD UPr. It allows you to<br />
transfer a set of 8 User Programs (i.e. for all eight memories)<br />
to the <strong>EM</strong>-<strong>25</strong>’s internal memory. This will overwrite<br />
the User Programs that currently reside in the internal<br />
memories.<br />
Note: If you wish to use the User Programs in the internal<br />
memory at a later stage, first save them to disk before proceeding.<br />
See p. 76.<br />
(1) Insert a disk into the drive.<br />
(2) Press [MENU] to place the mode arrow (√) next to the<br />
LOAD entry.<br />
Cargar Programas de Usuario desde un disco<br />
Esta función de carga se conoce como LOAD UPr. Le permite<br />
transferir un grupo de 8 Programas de Usuario (es<br />
decir, para todas las ocho memorias) a la memoria interna<br />
del <strong>EM</strong>-<strong>25</strong>. Con ello se sobrescribirán los Programas de<br />
Usuario que residen actualmente en las memorias internas.<br />
Nota: Si desea utilizar los Programas de Usuario en la memoria<br />
interna más adelante, guárdelos en un disco antes de proceder.<br />
Consulte la p. 76.<br />
(1) Inserte un disco en la unidad.<br />
(2) Pulse [MENU] para colocar la flecha de modo (√)<br />
junto a la entrada LOAD.<br />
Charger des programmes utilisateur<br />
de la disquette<br />
Cette fonction s’appelle LOAD UPr. Elle permet de transférer<br />
un jeu de 8 programmes utilisateur (c.-à-d. pour les<br />
huit mémoires) de la disquette dans la mémoire interne<br />
de l’<strong>EM</strong>-<strong>25</strong>. Ce transfert écrase les données qui s’y trouvent<br />
au profit des nouveaux programmes utilisateur.<br />
Remarque: Si vous voulez conserver les programmes utilisateur<br />
se trouvant dans la mémoire interne, sauvegardez-les sur disquette<br />
au préalable. Voyez p. 76.<br />
(1) Chargez une disquette dans le lecteur.<br />
(2) Appuyez sur [MENU] pour amener la flèche de mode<br />
(√) en face de LOAD.<br />
75
<strong>EM</strong>-<strong>25</strong>/<strong>EM</strong>-<strong>15</strong><br />
(3) Wait until the display contains the name of the first<br />
User Program file on disk (while the “VALUE” message<br />
flashes).<br />
(4) Use the T<strong>EM</strong>PO [–][+] buttons to select the file whose<br />
contents you wish to load (example: “USPR_000”).<br />
(5) Press the DISK [EXECUTE] button to load the selected<br />
file.<br />
Note: Press DISK [MENU] if you do not want to load the<br />
selected file after all.<br />
If you pressed [EXECUTE], the display now shows the message<br />
“Loading”. Once the data have been loaded, the<br />
“Complete” message briefly appears.<br />
(6) Press [MUSICAL GAME], [TONE], [STYLE], or [FUNCTION]<br />
to select another mode.<br />
Possible error messages<br />
No Disk You forgot to insert a floppy disk into the drive.<br />
No Files The disk you insert contains no User Program data.<br />
Disk Err The disk is probably damaged and cannot be used.<br />
File Err The file you selected is damaged and cannot be<br />
loaded.<br />
(3) Espere hasta que la pantalla muestre el nombre del primer<br />
archivo de Programa de Usuario en disco (mientras<br />
el mensaje “VALUE” parpadea).<br />
(4) Utilice los botones T<strong>EM</strong>PO [–][+] para seleccionar el<br />
archivo cuyo contenido desea cargar (ejemplo:<br />
“USPR_000”).<br />
(5) Pulse el botón DISK [EXECUTE] para cargar el archivo<br />
seleccionado.<br />
Nota: Pulse DISK [MENU] si decide no cargar el archivo seleccionado.<br />
Si pulsa [EXECUTE], la pantalla mostrará el mensaje<br />
“Loading”. Una vez se haya cargado la información, la<br />
pantalla mostrará brevemente el mensaje “Complete”.<br />
(6) Pulse [MUSICAL GAME], [TONE], [STYLE], o [FUNCTION]<br />
para seleccionar otro modo.<br />
Posibles mensajes de error<br />
No Disk No ha insertado ningún disquete en la unidad.<br />
No Files El disco que ha insertado no contiene información de<br />
Programas de Usuario.<br />
Disk Err El disco probablemente está dañado y no puede utilizarse.<br />
File Err El archivo que ha seleccionado está dañado y no<br />
puede cargarse.<br />
(3) Attendez que l’écran affiche le nom du premier fichier<br />
de programme utilisateur contenu sur la disquette (le<br />
message “VALUE” clignote alors).<br />
(4) Utilisez les boutons T<strong>EM</strong>PO [–][+] pour choisir le fichier<br />
dont vous voulez charger le contenu (ex.: “USPR_000”).<br />
(5) Appuyez sur DISK [EXECUTE] pour charger le fichier<br />
choisi.<br />
Remarque: Si après tout vous ne voulez pas charger le fichier<br />
choisi, appuyez sur DISK [MENU].<br />
Si vous avez appuyé sur [EXECUTE], l’écran affiche maintenant<br />
le message “Loading”. Une fois les données<br />
chargées, le message “Complete” s’affiche brièvement.<br />
(6) Appuyez sur [MUSICAL GAME], [TONE], [STYLE] ou<br />
[FUNCTION] pour choisir un autre mode.<br />
Messages d’erreur éventuels<br />
No Disk Vous avez oublié d’insérer une disquette dans le lecteur.<br />
No Files La disquette insérée ne contient pas de programme<br />
utilisateur.<br />
Disk Err La disquette est probablement endommagée et ne<br />
peut pas être utilisée.<br />
File Err Le fichier sélectionné est endommagé et ne peut<br />
pas être chargé.<br />
Saving files to disk<br />
The <strong>EM</strong>-<strong>25</strong> provides the following Save functions:<br />
SAVE UPr: Use this function to save the contents of the<br />
<strong>EM</strong>-<strong>25</strong>’s internal User Program memories (all 8 of them)<br />
to a floppy disk.<br />
SAVE Sng: This allows you to save the Song in the internal<br />
memory to a floppy disk. Please note that a Song<br />
saved to disk becomes a Standard MIDI File. You can<br />
therefore no longer replace the <strong>Keyboard</strong> parts (“2nd<br />
TRACK”) with new versions after transferring the Song<br />
back to the <strong>EM</strong>-<strong>25</strong>’s internal memory.<br />
Note: There is no LOAD Sng function. All you need to do to<br />
transfer the Song data back to the <strong>EM</strong>-<strong>25</strong>’s internal Song memory<br />
is play back the Standard MIDI File in question.<br />
Guardar archivos en disco<br />
El <strong>EM</strong>-<strong>25</strong> dispone de las siguientes funciones Save:<br />
SAVE UPr: Utilice esta función para guardar el contenido<br />
de las memorias de Programa de Usuario internas del<br />
<strong>EM</strong>-<strong>25</strong> (todas 8) en un disquete.<br />
SAVE Sng: Permite guardar la Canción de la memoria<br />
interna en un disquete. Tenga en cuenta que una Canción<br />
guardada en un disco se convierte en un Archivo MIDI Estándar.<br />
Por lo tanto, ya no podrá substituir las partes del teclado<br />
(“2nd TRACK”) por nuevas versiones después de volver a<br />
transferir la Canción a la memoria interna del <strong>EM</strong>-<strong>25</strong>.<br />
Nota: No existe ninguna función LOAD Sng. Todo lo que debe<br />
hacer para transferir la información de la Canción de nuevo a la<br />
memoria de Canción interna del <strong>EM</strong>-<strong>25</strong> es reproducir el Archivo<br />
MIDI Estándar en cuestión.<br />
Sauvegarde de fichiers sur disquette<br />
L’<strong>EM</strong>-<strong>25</strong> propose les fonctions de sauvegarde suivantes:<br />
SAVE UPr: Cette fonction sert à sauvegarder le contenu<br />
des 8 mémoires User Program de l’<strong>EM</strong>-<strong>25</strong> sur disquette.<br />
SAVE Sng: Cela vous permet de sauvegarder le morceau<br />
(Song) se trouvant en mémoire interne sur disquette.<br />
Notez qu’un morceau sauvegardé sur disquette devient<br />
un fichier standard MIDI. Vous ne pouvez donc plus remplacer<br />
les parties jouées (“2nd TRACK”) par de nouvelles<br />
versions quand vous rechargez le morceau dans la<br />
mémoire interne de l’<strong>EM</strong>-<strong>25</strong>.<br />
Remarque: Il n’y a d’ailleurs pas de fonction LOAD Sng. Pour<br />
ramener le morceau dans la mémoire interne de l’<strong>EM</strong>-<strong>25</strong>, il suffit<br />
de reproduire le fichier standard MIDI en question.<br />
76
<strong>EM</strong>-<strong>25</strong>/<strong>EM</strong>-<strong>15</strong><br />
(1) Insert a floppy disk into the drive.<br />
Every floppy contains a square tab that allows you to<br />
“close” a little window. With the tab in that position, you<br />
can save data to the disk. Do not forget to write-enable<br />
the disk by closing this little window prior to inserting the<br />
floppy disk.<br />
(2) Press DISK [MENU] to select “SAVE Sng”.<br />
The mode arrow (√) jumps to the “SAVE” entry and<br />
flashes.<br />
(3) Use T<strong>EM</strong>PO [–][+] (or DISK [MENU]) to select “SAVE<br />
Sng” or “SAVE UPr”.<br />
(4) Wait until the mode arrow (√) stops flashing, then use<br />
T<strong>EM</strong>PO [–][+] to move the flashing cursor to the character<br />
position you want to change (the “a” in the illustration<br />
below)<br />
(5) Enter the character with [A/B], the numeric keypad,<br />
and [VARIATION] (see the illustration).<br />
You may have to press the same button several times.<br />
(1) Inserte un disquete en la unidad.<br />
Cada disquete contiene un pestillo en forma cuadrada que<br />
le permite “cerrar” una pequeña ventana. Con el pestillo en<br />
esta posición, será posible guardar información en el disco.<br />
Debe desactivar la protección contra escritura del disco<br />
cerrando esta pequeña ventana antes de insertar el disquete.<br />
(2) Pulse DISK [MENU] para seleccionar “SAVE Sng”.<br />
La flecha de modo (√) avanza hasta la entrada “SAVE” y<br />
parpadea.<br />
(3) Utilice T<strong>EM</strong>PO [–][+] (o DISK [MENU]) para seleccionar<br />
“SAVE Sng” o “SAVE UPr”.<br />
(4) Espere hasta que la flecha de modo (√) deje de parpadear,<br />
y utilice T<strong>EM</strong>PO [–][+] para desplazar el cursor<br />
parpadeante a la posición del carácter que desee cambiar<br />
(la “a” en el dibujo que se muestra a continuación)<br />
(5) Introduzca el carácter mediante [A/B], los botones<br />
numéricos, y [VARIATION] (consulte la ilustración).<br />
(1) Chargez une disquette dans le lecteur.<br />
Chaque disquette comporte un onglet carré servant à<br />
“fermer” une petite fenêtre. Quand l’onglet est dans cette<br />
position, vous pouvez sauvegarder des données sur la disquette.<br />
Avant de charger la disquette, veillez à désactiver<br />
la protection contre l’écriture de la disquette en refermant<br />
cette petite fenêtre.<br />
(2) Appuyez sur DISK [MENU] pour choisir “SAVE Sng”.<br />
La flèche de mode (√) est en face de “SAVE” et clignote.<br />
(3) Utilisez T<strong>EM</strong>PO [–][+] (ou DISK [MENU]) pour choisir<br />
“SAVE Sng” ou “SAVE UPr”.<br />
(4) Attendez que la flèche de mode (√) cesse de clignoter<br />
puis déplacez le curseur clignotant avec T<strong>EM</strong>PO [–][+]<br />
jusqu’à l’emplacement du caractère que vous voulez<br />
modifier (“a” dans l’exemple illustré ci-dessous).<br />
(5) Entrez le caractère avec [A/B], le pavé numérique et<br />
[VARIATION] (voyez l’illustration).<br />
NameFile <br />
_ ! # $ % & ’ - @ ^ ‘ 0 1 2 3 4 5 6 7 8 9 A B C D<br />
E F G H I J K L M N O P Q R S T U V W X Y Z<br />
Though you could save the file with the current default<br />
name (“SONG_001”, or “USPR_000”), a proper name will<br />
help you identify the file at all times. We therefore suggest<br />
you take the time to specify a meaningful name.<br />
Note: If you select “SPACE” ([A/B] button), the display will insert<br />
a “_”. This is because MS-DOS® does not allow you to use spaces.<br />
(6) If necessary, use the T<strong>EM</strong>PO [–][+] buttons to move the<br />
cursor to the next position.<br />
Quizá deba pulsar el mismo botón varias veces.<br />
Aunque puede guardar el archivo con el nombre por<br />
defecto actual (“SONG_001”, o “USPR_000”), un nombre<br />
más adecuado le ayudará a identificar el archivo en todo<br />
momento. Por lo tanto, es aconsejable que especifique un<br />
nombre significativo para el archivo.<br />
Nota: Si selecciona “SPACE” (botón [A/B]), la pantalla insertará<br />
un “_”. Esto es debido a que el MS-DOS® no acepta la utilización<br />
de espacios.<br />
(6) Si es necesario, utilice los botones T<strong>EM</strong>PO [–][+] para<br />
desplazar el cursor a la siguiente posición.<br />
Vous devrez peut-être appuyer plusieurs fois sur le même<br />
bouton.<br />
Bien que vous puissiez sauvegarder le fichier avec le nom<br />
attribué par défaut (“SONG_001” ou “USPR_000”), il vaut<br />
mieux lui donner un nom qui vous permette d’en identifier<br />
immédiatement le contenu. Choisissez donc un nom<br />
évocateur.<br />
Remarque: Si vous choisissez “SPACE” (bouton [A/B]), l’instrument<br />
insère “_” à l’écran. Ceci est dû au fait que MS-DOS® ne<br />
permet pas l’utilisation d’espaces.<br />
77
<strong>EM</strong>-<strong>25</strong>/<strong>EM</strong>-<strong>15</strong><br />
(7) Repeat steps (5) and (6) to enter the remaining characters.<br />
(8) Press DISK [EXECUTE] to save the file to disk.<br />
The display now responds with the message “Saving” as<br />
well as a flashing disk icon ( ). When the file is<br />
saved, the “Complete” message appears.<br />
If the message “DiskProt” appears, you forgot to switch<br />
off the disk’s Write protection. Press the EJECT button of<br />
the disk drive, remove the floppy and close the tab, insert<br />
the disk again and press [EXECUTE].<br />
(9) Press [MUSICAL GAME], [TONE], [STYLE], or [FUNCTION]<br />
to select another mode.<br />
Possible error messages<br />
No Disk You forgot to insert a floppy disk into the drive.<br />
Disk Prot See above.<br />
Disk Full The remaining disk capacity does not allow to<br />
save your data to this disk.<br />
Disk Err The disk is probably damaged and cannot be<br />
used.<br />
Empty There is no Recorder song in the <strong>EM</strong>-<strong>25</strong>’s internal<br />
memory. Consequently, there is nothing to save.<br />
Impssble The song in the <strong>EM</strong>-<strong>25</strong>’s memory is bigger than<br />
the RAM actually supports, and can therefore not<br />
be saved to disk. (This is because the <strong>EM</strong>-<strong>25</strong> only<br />
loads specific blocks for playback.)<br />
OverWrt? The name you assigned to the data already exists<br />
on the floppy disk you inserted. If you press<br />
T<strong>EM</strong>PO [+] (YES) to continue, the file on disk will<br />
be overwritten (and the corresponding data will<br />
be erased). Either insert another floppy disk, or<br />
press T<strong>EM</strong>PO [–] (NO) and enter another name for<br />
the data you want to save.<br />
(7) Repita los pasos (5) y (6) para introducir los demás<br />
caracteres.<br />
(8) Pulse DISK [EXECUTE] para guardar el archivo en disco.<br />
La pantalla responderá con el mensaje “Saving y con el<br />
icono de disco intermitente ( ). Una vez guardada el<br />
archivo, el mensaje “Complete” aparecerá en la pantalla.<br />
Si aparece el mensaje “DiskProt”, habrá olvidado desactivar<br />
la protección contra Escritura del disco. Pulse el botón<br />
EJECT de la unidad de discos, retire el disquete y cierre el<br />
pestillo, inserte de nuevo el disco y pulse [EXECUTE].<br />
(9) Pulse [MUSICAL GAME], [TONE], [STYLE], o [FUNCTION]<br />
para seleccionar otro modo.<br />
Posibles mensajes de error<br />
No Disk Ha olvidado insertar un disquete en la unidad.<br />
Disk Prot Consulte más arriba.<br />
Disk Full La capacidad restante del disco no permite guardar<br />
la información en este disco.<br />
Disk Err El disco está probablemente dañado y no puede<br />
utilizarse.<br />
Empty No hay ninguna Canción del grabador en la<br />
memoria interna del <strong>EM</strong>-<strong>25</strong>. Por lo tanto, no hay<br />
nada que guardar.<br />
Impssble La canción de la memoria del <strong>EM</strong>-<strong>25</strong> es demasiado<br />
grande para la RAM, y por lo tanto no<br />
puede guardarse en disco. (Esto es debido a que<br />
el <strong>EM</strong>-<strong>25</strong> sólo carga bloques específicos para la<br />
reproducción.)<br />
OverWrt? El nombre que ha asignado a la información ya<br />
existe en el disquete que ha insertado. Si pulsa<br />
T<strong>EM</strong>PO [+] (YES) para continuar, el archivo del<br />
disco se sobrescribirá (y la información correspondiente<br />
se borrará). Inserte otro disquete, o<br />
pulse T<strong>EM</strong>PO [–] (NO) e introduzca otro nombre<br />
para la información que desea guardar.<br />
(6) Si nécessaire, utilisez les boutons T<strong>EM</strong>PO [–][+] pour<br />
amener le curseur jusqu’à la position suivante.<br />
(7) Répétez les étapes (5) et (6) pour entrer les caractères<br />
restants.<br />
(8) Appuyez sur DISK [EXECUTE] pour sauvegarder le<br />
fichier sur disquette.<br />
L’écran affiche le message “Saving” et l’icône ( ) de<br />
disquette clignote. Une fois le morceau sauvegardé, le<br />
message “Complete” s’affiche.<br />
Si le message “DiskProt” apparaît, c’est que vous avez<br />
oublié de couper la protection de la disquette. Appuyez<br />
sur le bouton EJECT du lecteur de disquette, enlevez la<br />
disquette et fermez l’onglet. Réinsérez ensuite la disquette<br />
et appuyez sur [EXECUTE].<br />
(9) Appuyez sur [MUSICAL GAME], [TONE], [STYLE] ou<br />
[FUNCTION] pour choisir un autre mode.<br />
Messages d’erreur éventuels<br />
No Disk Vous avez oublié d’insérer une disquette dans le<br />
lecteur.<br />
Disk Prot Voyez ci-dessus.<br />
Disk Full La capacité restante de la disquette ne permet<br />
plus de sauvegarder vos données sur disquette.<br />
Disk Err La disquette est probablement endommagée et<br />
ne peut pas être utilisée.<br />
Empty Il n’y a pas de morceau Recorder dans la mémoire<br />
interne de l’<strong>EM</strong>-<strong>25</strong>. Il n’y a donc rien à sauvegarder.<br />
Impssble Le morceau dans la mémoire interne de l’<strong>EM</strong>-<strong>25</strong><br />
est trop volumineux pour la mémoire RAM et ne<br />
peut donc pas être sauvegardé sur disquette.<br />
(L’<strong>EM</strong>-<strong>25</strong> ne charge que des blocs spécifiques<br />
pour la reproduction.)<br />
OverWrt? Le nom attribué aux données existe déjà sur la<br />
disquette. Si vous appuyez sur T<strong>EM</strong>PO [+] (YES), le<br />
fichier se trouvant sur la disquette sera écrasé par<br />
le nouveau (et ses données seront effacées). Insérez<br />
une autre disquette ou appuyez sur<br />
T<strong>EM</strong>PO [–] (NO) et entrez un autre nom pour les<br />
données que vous voulez sauvegarder.<br />
78
Deleting files on disk<br />
The Delete functions allow you to delete a file from the<br />
inserted floppy disk. This may be necessary to make room<br />
for a new file (e.g. when the “Disk Full” message appears).<br />
Be careful, though, to only delete files you are absolutely<br />
(positively) sure you will never need again. Once a file has<br />
been deleted, it is gone forever.<br />
Note: As a rule, you should first make a backup copy of your<br />
disk (see p. 80). After all, files really only become indispensable<br />
once they are no longer available…<br />
DEL Sng: This allows you to delete a song file on disk.<br />
DEL UPr: Use this function to delete a User Program file<br />
from disk. Be aware that by doing so, you actually erase 8<br />
User Program settings.<br />
(1) Insert the disk with the file you want to delete into the<br />
drive.<br />
(2) Press DISK [MENU] to place the mode arrow (√) next<br />
to the DELETE entry. The arrow flashes.<br />
(3) Use the T<strong>EM</strong>PO [–][+] buttons to select “DEL Sng” or<br />
“DEL UPr”.<br />
(4) Wait until the mode arrow stops flashing and use the<br />
T<strong>EM</strong>PO [–][+] buttons to select the file you want to<br />
delete (example: “USPR_005”).<br />
(5) Press the [EXECUTE] button.<br />
To be on the safe side, the <strong>EM</strong>-<strong>25</strong> now asks you whether<br />
you really want to delete the file (“Sure?”).<br />
(6) Press T<strong>EM</strong>PO [+] (YES) to delete the file, or T<strong>EM</strong>PO [–]<br />
(NO) to abort the operation.<br />
If you pressed T<strong>EM</strong>PO [+], the display now shows the<br />
message “Deleting”. Once the data have been deleted, the<br />
“Complete” message briefly appears.<br />
(7) Press [MUSICAL GAME], [TONE], [STYLE], or [FUNCTION]<br />
to select another mode.<br />
Eliminar archivos de un disco<br />
Las funciones Delete le permiten eliminar un archivo del<br />
disquete insertado. Esto puede ser necesario para crear<br />
espacio para un nuevo archivo (p.ej. cuando aparece el<br />
mensaje “Disk Full”). No obstante, asegúrese de eliminar<br />
sólo los archivos que no vaya a necesitar nunca más. Una<br />
vez eliminado un archivo será imposible recuperarlo.<br />
Nota: Por norma general, debería realizar antes una copia de<br />
seguridad del disco (consulte la p. 80). En muchas ocasiones, los<br />
archivos pasan a ser indispensables una vez ya no están disponibles<br />
…<br />
DEL Sng: Permite eliminar un archivo de canción del<br />
disco.<br />
DEL UPr: Utilice esta función para eliminar un archivo de<br />
Programa de Usuario del disco. Tenga en cuenta que, al<br />
hacerlo, en realidad está borrando los ajustes de 8 Programas<br />
de Usuario.<br />
(1) Inserte el disco con el archivo que desea eliminar en la<br />
unidad.<br />
(2) Pulse DISK [MENU] para colocar la flecha de modo (√)<br />
junto a la entrada DELETE. La flecha parpadea.<br />
(3) Utilice los botones T<strong>EM</strong>PO [–][+] para seleccionar “DEL<br />
Sng” o “DEL UPr”.<br />
(4) Espere hasta que la flecha de modo deje de parpadear<br />
y utilice los botones T<strong>EM</strong>PO [–][+] para seleccionar el<br />
archivo que desee eliminar (ejemplo: “USPR_005”).<br />
(5) Pulse el botón [EXECUTE].<br />
Para asegurarse de ello, el <strong>EM</strong>-<strong>25</strong> le pedirá ahora si está<br />
realmente seguro de querer eliminar el archivo (“Sure?”).<br />
(6) Pulse T<strong>EM</strong>PO [+] (YES) para eliminar el archivo, o<br />
T<strong>EM</strong>PO [–] (NO) para abortar la operación.<br />
Si ha pulsado T<strong>EM</strong>PO [+], la pantalla mostrará el mensaje<br />
“Deleting”. Una vez se haya eliminado la información, la<br />
pantalla mostrará brevemente el mensaje “Complete”.<br />
(7) Pulse [MUSICAL GAME], [TONE], [STYLE], o [FUNCTION]<br />
para seleccionar otro modo.<br />
<strong>EM</strong>-<strong>25</strong>/<strong>EM</strong>-<strong>15</strong><br />
Effacer des fichiers sur disquette<br />
Les fonctions Delete permettent d’effacer un fichier sur la<br />
disquette insérée. Cela permet de faire de la place pour de<br />
nouveaux fichiers (notamment après un message “Disk<br />
Full”). Veillez toutefois à n’effacer que des fichiers dont<br />
vous êtes absolument sûr de ne plus avoir besoin. Un<br />
fichier effacé est irrémédiablement perdu.<br />
Remarque: Il vaut généralement mieux faire une copie de la<br />
disquette au préalable (voyez p. 80). Certains fichiers ont une<br />
fâcheuse tendance à devenir indispensables une fois effacés…<br />
DEL Sng: Permet d’effacer un fichier de morceau sur disquette.<br />
DEL UPr: Utilisez cette fonction pour effacer un programme<br />
utilisateur sur disquette. Sachez que cette opération<br />
efface toute la série de 8 programmes utilisateur.<br />
(1) Insérez la disquette contenant le fichier à effacer dans<br />
le lecteur.<br />
(2) Appuyez sur DISK [MENU] pour amener la flèche de<br />
mode (√) en face de DELETE. La flèche clignote.<br />
(3) Utilisez les boutons T<strong>EM</strong>PO [–][+] pour choisir “DEL<br />
Sng” ou “DEL UPr”.<br />
(4) Attendez que la flèche de mode cesse de clignoter et<br />
servez-vous des boutons T<strong>EM</strong>PO [–][+] pour choisir le<br />
fichier à effacer (exemple: “USPR_005”).<br />
(5) Appuyez sur le bouton [EXECUTE].<br />
Par mesure de sécurité, l’<strong>EM</strong>-<strong>25</strong> vous demande à présent<br />
si vous voulez vraiment effacer le fichier (“Sure?”).<br />
(6) Appuyez sur T<strong>EM</strong>PO [+] (YES) pour effacer le fichier ou<br />
sur T<strong>EM</strong>PO [–] (NO) pour annuler l’opération.<br />
Si vous avez appuyé sur T<strong>EM</strong>PO [+], l’écran affiche le message<br />
“Deleting”. Une fois les données effacées, le message<br />
“Complete” s’affiche brièvement.<br />
(7) Appuyez sur [MUSICAL GAME], [TONE], [STYLE] ou<br />
[FUNCTION] pour choisir un autre mode.<br />
79
<strong>EM</strong>-<strong>25</strong>/<strong>EM</strong>-<strong>15</strong><br />
Possible error messages<br />
No Disk<br />
Disk Prot<br />
Disk Err<br />
No Files<br />
You forgot to insert a floppy disk into the drive.<br />
You forgot to switch off the disk’s Write protection.<br />
Press the EJECT button of the disk drive,<br />
remove the floppy and close the tab, insert the<br />
disk again and press [EXECUTE].<br />
The disk is probably damaged and cannot be used.<br />
The disk contains no files of the selected type.<br />
Insert another disk.<br />
Disk Copy (copying an entire disk)<br />
This function allows you to make backup copies of important<br />
disks.<br />
WARNING: The Disk Copy function uses the RAM memory<br />
and erases the <strong>EM</strong>-<strong>25</strong>’s Recorder song and its Disk<br />
User memory. Before using Disk Copy, save your song to<br />
disk if you haven’t already done so (see p. 76).<br />
Disk Copy copies all files of the Source disk (see below) to<br />
the Destin disk.<br />
(1) Press DISK [MENU] to place the mode arrow (√) next<br />
to the COPY entry.<br />
The mode arrow flashes.<br />
(2) In response to the “DISKCOPY” message, press the DISK<br />
[EXECUTE] button.<br />
The <strong>EM</strong>-<strong>25</strong> now tells you something you already know<br />
but may tend to forget at times:<br />
Posibles mensajes de error<br />
No Disk<br />
Disk Prot<br />
Disk Err<br />
No Files<br />
Ha olvidado insertar un disquete en la unidad.<br />
Ha olvidado desactivar el pestillo de protección<br />
contra Escritura del disco. Pulse el botón EJECT de la<br />
unida de discos, extraiga el disquete y cierre el pestillo,<br />
inserte de nuevo el disco y pulse [EXECUTE].<br />
El disco probablemente está dañado y no puede<br />
utilizarse.<br />
El disco no contiene ningún archivo del tipo<br />
seleccionado. Inserte otro disco.<br />
Disk Copy (copiar todo el contenido<br />
de un disco)<br />
Esta función le permite realizar copias de seguridad de<br />
discos importantes.<br />
ADVERTENCIA: La función Disk Copy utiliza la memoria<br />
RAM y borra la canción del Grabador del <strong>EM</strong>-<strong>25</strong> y su<br />
memoria Disk User. Antes de utilizar Disk Copy, guarde la<br />
canción en un disco si aún no lo ha hecho (consulte la<br />
p. 76).<br />
Disk Copy copia todos los archivos del disco Source (consulte<br />
más adelante) en el disco Destin.<br />
(1) Pulse DISK [MENU] para colocar la flecha de modo (√)<br />
junto a la entrada COPY.<br />
La flecha de modo parpadea.<br />
(2) En respuesta al mensaje “DISKCOPY”, pulse el botón<br />
DISK [EXECUTE].<br />
El <strong>EM</strong>-<strong>25</strong> le explicará ahora algo que ya sabe, pero que a<br />
veces tiene cierta tendencia a olvidar:<br />
Messages d’erreur éventuels<br />
No Disk<br />
Disk Prot<br />
Disk Err<br />
No Files<br />
Vous avez oublié d’insérer une disquette dans le<br />
lecteur.<br />
Vous avez oublié de couper la protection de la<br />
disquette. Appuyez sur le bouton EJECT du lecteur,<br />
enlevez la disquette et fermez l’onglet. Puis<br />
réinsérez la disquette et appuyez sur [EXECUTE].<br />
La disquette est probablement endommagée et ne<br />
peut pas être utilisée.<br />
La disquette ne contient pas de fichiers du type<br />
sélectionné. Insérez une autre disquette.<br />
Disk Copy (copier le contenu d’une<br />
disquette entière)<br />
Cette fonction vous permet de faire des copies de secours<br />
de disquettes importantes.<br />
AVERTISS<strong>EM</strong>ENT: La fonction Disk Copy se sert de la<br />
mémoire RAM et efface donc le morceau Recorder et la<br />
mémoire Disk User de l’<strong>EM</strong>-<strong>25</strong>. Sauvegardez donc votre<br />
morceau sur disquette si vous ne l’avez pas encore fait<br />
(voyez p. 76).<br />
Disk Copy copie tous les fichiers disquette Source (voyez<br />
ci-dessous) sur la disquette de destination (Destinat).<br />
(1) Appuyez sur DISK [MENU] pour amener la flèche de<br />
mode (√) en face de COPY.<br />
La flèche de mode se met à clignoter.<br />
(2) Appuyez sur le bouton DISK [EXECUTE] en réponse au<br />
message “DISKCOPY”.<br />
L’<strong>EM</strong>-<strong>25</strong> vous rappelle ce que vous savez déjà mais que<br />
vous risquez parfois d’oublier:<br />
Copying Songs from commercially available Standard<br />
MIDI File disks is OK as long as you keep the copy (as safeguard<br />
against possible disk errors). Under no circumstances,<br />
however, may you give copies of copyright-protected<br />
material to your friends.<br />
80<br />
Improper use of copy infringes<br />
Copyright!! For personal back-up<br />
use only! Song and User Style<br />
will be erased.<br />
Copiar Canciones de Archivos MIDI Estándar disponibles<br />
en el mercado no es ningún problema siempre y cuando<br />
guarde la copia (como protección contra posibles errores<br />
del disco). No obstante, bajo ninguna circunstancia podrá<br />
repartir copias de material protegido con copyright entre<br />
sus amigos.<br />
La copie de fichiers standard MIDI disponibles dans le<br />
commerce est autorisée tant que vous conservez la copie<br />
(comme copie de secours). Il est strictement interdit de<br />
distribuer des copies de ces données protégées par copyright<br />
à vos connaissances, voire de les vendre.
<strong>EM</strong>-<strong>25</strong>/<strong>EM</strong>-<strong>15</strong><br />
Also, the display tells you that the Disk Copy function<br />
needs the available RAM memory – i.e. the memory set<br />
aside for the Recorder song and for the Disk User Style.<br />
Be aware that really activating the Disk Copy function<br />
(which you haven’t done so far), erases the song in the<br />
internal memory. Save it to disk before proceeding.<br />
This message is followed by “Sure?” (do you want to proceed?).<br />
Note: You can abort the process at any time by pressing the<br />
DISK [MENU] button.<br />
(3) If you are sure you wish to make a backup copy of a<br />
disk, press T<strong>EM</strong>PO [+] (YES) (otherwise, press T<strong>EM</strong>PO<br />
[–]).<br />
The display now asks you to insert the original (or<br />
“Source”) disk into the drive.<br />
Note: Before doing so, you must write-protect it, otherwise the<br />
display tells you to do so (“No Prot”). In that case, remove the<br />
disk from the drive, set its WRITE tab to the PROTECT position (to<br />
open “the little window”), and insert the disk into the drive<br />
again.<br />
(4) Insert the original (Source) disk into the drive.<br />
The display now informs you that the <strong>EM</strong>-<strong>25</strong> is reading<br />
the first part of the data to be copied (“Read xx%”).<br />
Depending on the number of files on disk, you may<br />
encounter this message several times. Note also the indication<br />
of the disk type (in our example, the Source disk is<br />
a 2HD floppy):<br />
Además, la pantalla le indicará que la función Disk Copy<br />
necesita la memoria RAM disponible – es decir, la memoria<br />
reservada para la canción del Grabador y para el Estilo<br />
Disk User. Tenga en cuenta que al activar la función Disk<br />
Copy (cosa que aún no hemos hecho) se borrará la canción<br />
de la memoria interna. Guárdela en un disco antes<br />
de proceder.<br />
El mensaje anterior aparecerá seguido de la pregunta<br />
“Sure?” (¿desea continuar?).<br />
Nota: Puede abortar el proceso siempre que lo desee pulsando<br />
el botón DISK [MENU].<br />
(3) Si está seguro de que desea realizar una copia de seguridad<br />
de un disco, pulse T<strong>EM</strong>PO [+] (YES) (en caso contrario,<br />
pulse T<strong>EM</strong>PO [–]).<br />
La pantalla le pedirá que inserte el disco original (o<br />
“Source”) en la unidad.<br />
Nota: Antes de hacerlo, deberá protegerlo contra la escritura, ya<br />
que en caso contrario la pantalla le pedirá que lo haga (“No<br />
Prot”). En este caso, extraiga el disco de la unidad, coloque su<br />
pestillo WRITE en la posición PROTECT (para abrir “la pequeña<br />
ventana”), e inserte de nuevo el disco en la unidad.<br />
(4) Inserte el disco original (Source) en la unidad.<br />
La pantalla le explicará que el <strong>EM</strong>-<strong>25</strong> está leyendo la primera<br />
parte de la información que debe copiarse (“Read<br />
xx%”).<br />
Según el número de archivos que haya en el disco, este<br />
mensaje puede aparecer varias veces. Observe también la<br />
indicación del tipo de disco (en nuestro ejemplo, el disco<br />
Source es un disquete 2HD):<br />
L’écran vous rappelle aussi que Disk Copy a besoin de<br />
toute la mémoire RAM – celle utilisée pour le morceau<br />
Recorder et le style Disk User. Si vous activez la fonction<br />
Disk Copy (ce que vous n’avez pas encore fait), vous effacez<br />
le morceau résidant en mémoire interne. Sauvegardez-le<br />
donc sur disquette avant de continuer.<br />
Le message ci-dessus est suivi de la demande de confirmation<br />
“Sure?”.<br />
Remarque: Vous pouvez arrêter la procédure à tout moment<br />
en appuyant sur le bouton DISK [MENU].<br />
(3) Si vous êtes sûr de vouloir effectuer une copie de<br />
secours, appuyez sur T<strong>EM</strong>PO [+] (YES) (sinon, appuyez<br />
sur T<strong>EM</strong>PO [–]).<br />
L’écran vous demande d’insérer la disquette originale (ou<br />
“Source”) dans le lecteur.<br />
Remarque: Au préalable, protégez-la contre l’écriture (fenêtre<br />
ouverte) sinon l’écran vous demande de le faire (“No Prot”). Dans<br />
ce cas, éjectez la disquette, réglez son onglet en position PRO-<br />
TECT (“fenêtre” ouverte) et réinsérez-la.<br />
(4) Insérez la disquette originale (Source) dans le lecteur.<br />
L’écran vous annonce que l’<strong>EM</strong>-<strong>25</strong> lit la première partie<br />
des données à copier (“Read xx%”).<br />
Selon le nombre de fichiers sur la disquette, ce message<br />
peut apparaître plusieurs fois. Notez aussi l’indication du<br />
type de disquette (ici, la disquette Source est une 2HD):<br />
Read 54%<br />
Source<br />
When the first part is loaded, the display switches to the<br />
“Destin” message. It means that you need to insert a<br />
blank disk into the disk drive. That disk will contain a copy<br />
of the original data. Be sure to use a disk of the same<br />
type. If the “Source” disk is a 2DD type (“dd”), use a blank<br />
Una vez se haya cargado la primera parte, la pantalla<br />
cambiará al mensaje “Destin”. Esto significa que debe<br />
insertar un disco en blanco en la unidad de discos. Este<br />
disco contendrá una copia de la información original.<br />
Compruebe que utiliza un disco del mismo tipo. Si el<br />
Une fois la première partie chargée, l’écran affiche le<br />
message “Destin”. Il vous demande ainsi d’insérer une disquette<br />
vierge dans le lecteur. Elle constituera la copie de<br />
la disquette originale. Veillez à utiliser une disquette de<br />
même type. Si la disquette originale est une 2DD (“dd”),<br />
81
<strong>EM</strong>-<strong>25</strong>/<strong>EM</strong>-<strong>15</strong><br />
2DD disk, otherwise use a blank 2HD disk. Failure to use<br />
the right disk type will result in the “Incompat” message<br />
being displayed.<br />
(5) Remove the Source disk from the drive and insert the<br />
Destination disk.<br />
If the Destination disk isn’t formatted, you are given the<br />
opportunity to do so now (“Format?”).<br />
Next, the “Writ xx%” message appears to inform you that<br />
the first (or entire) data chunk is being copied to disk.<br />
As stated above, the Source message may be displayed<br />
again. If so...<br />
(6) Remove the Destination disk from the drive and proceed<br />
with step (4) until the display tells you “Complete”.<br />
The display now returns to the Disk Copy message.<br />
Possible error messages when using Disk Copy<br />
No Prot<br />
NoFormat<br />
DiskErr<br />
DiskProt<br />
Incompat<br />
The Source disk is not protected. Remove it from<br />
the drive and set the Write Protect tab to the<br />
PROTECT position.<br />
The Destination disk is not formatted. Press<br />
T<strong>EM</strong>PO [+] (YES) to format it an to continue.<br />
The disk is probably damaged and cannot be used.<br />
The Destination disk is write-protected. Remove it<br />
and disable the protection.<br />
See above.<br />
disco “Source” es un disquete del tipo 2DD (“dd”), utilice<br />
un disco 2DD en blanco, en caso contrario, utilice un disquete<br />
en blanco del tipo 2HD. Si no utiliza el tipo de disquete<br />
correcto, la pantalla mostrará el mensaje “Incompat”.<br />
(5) Extraiga el disco Source de la unidad e inserte el disco<br />
Destination.<br />
Si el disco Destination no está formateado, ahora tendrá<br />
la oportunidad de hacerlo (“Format?”).<br />
A continuación aparecerá el mensaje “Writ xx%” para<br />
informarle de que la primera parte de la información (o<br />
toda ella) ya se ha copiado en el disco.<br />
Tal como ya se ha explicado anteriormente, es posible que<br />
vuelva a aparecer el mensaje Source. Si se encuentra en<br />
esta situación...<br />
(6) Extraiga el disco Destination de la unidad y continúe<br />
con el paso (4) hasta que la pantalla muestre el mensaje<br />
“Complete”.<br />
La pantalla volverá a mostrar ahora el mensaje Disk Copy.<br />
Posibles mensajes de error al utilizar Disk Copy<br />
No Prot<br />
NoFormat<br />
DiskErr<br />
DiskProt<br />
Incompat<br />
El disco Source no está protegido. Extráigalo de la<br />
unidad y ajuste el pestillo Write Protect en la posición<br />
PROTECT.<br />
El disco Destination no está formateado. Pulse<br />
T<strong>EM</strong>PO [+] (YES) para formatearlo y poder continuar<br />
con la operación.<br />
Es probable que el disco esté dañado y que no<br />
pueda utilizarse.<br />
El disco Destination está protegido contra la escritura.<br />
Extráigalo y desactive la protección.<br />
Consulte más arriba.<br />
utilisez une 2DD pour la copie, sinon servez-vous d’une<br />
2HD. Si la disquette n’est pas du bon type, “Incompat”<br />
s’affiche.<br />
(5) Ejectez la disquette Source et insérez la disquette de<br />
Destination dans le lecteur.<br />
Si la disquette de Destination n’est pas formatée, vous<br />
pouvez le faire maintenant (“Format?”).<br />
Le message “Writ xx%” s’affiche ensuite pour vous indiquer<br />
que le premier bloc de données (ou toutes les données)<br />
est copié sur la disquette.<br />
Comme nous l’avons vu, le message Source pourrait<br />
s’afficher à nouveau. Si c’est le cas...<br />
(6) Retirez la disquette Destination du lecteur et effectuez<br />
l’étape (4) jusqu’à ce que l’écran affiche “Complete”.<br />
L’écran retourne alors au message Disk Copy.<br />
Messages d’erreur éventuels avec Disk Copy<br />
No Prot<br />
NoFormat<br />
DiskErr<br />
DiskProt<br />
Incompat<br />
La disquette Source n’est pas protégée. Ejectez la<br />
disquette et réglez son onglet en position PRO-<br />
TECT.<br />
La disquette de Destination n’est pas formatée.<br />
Appuyez sur T<strong>EM</strong>PO [+] (YES) pour la formater et<br />
poursuivez.<br />
La disquette est probablement endommagée et ne<br />
peut pas être utilisée.<br />
La disquette de Destination est protégée contre<br />
l’écriture. Ejectez-la et désactivez la protection.<br />
Voyez ci-dessus.<br />
82
Format<br />
Before being able to save files to a disk, you need to prepare<br />
a floppy disk. This is called “formatting”. If the floppy<br />
you are about to use is IBM PC formatted, there is no<br />
need to format it, though disk access is faster with <strong>EM</strong>-<strong>25</strong><br />
formatted disks. Otherwise proceed as follows:<br />
(1) Press DISK [MENU] to place the mode arrow (√) next<br />
to the FORMAT entry.<br />
The mode arrow flashes, while the “FORMAT” message is<br />
displayed.<br />
(2) Wait for the mode arrow to stop flashing and for the<br />
“EXE” message to flash, then press [EXECUTE].<br />
Note: If you do not want to format your floppy, press [MENU] to<br />
return to the first Disk function (“LOAD Upr”).<br />
Note: By formatting a disk, you erase all files it contains. It<br />
would be a good idea to first check what it contains (e.g. on<br />
your PC).<br />
(3) Press [EXECUTE] again in response to the “Sure?” message.<br />
(4) Press T<strong>EM</strong>PO [+] (YES) to confirm or T<strong>EM</strong>PO [–] to<br />
return to the menu.<br />
The value to the left of the “Formatng” message now<br />
counts down from “80” to “1” while the disk icon flashes<br />
to indicate that the disk is being accessed. When the disk<br />
is formatted, the message “Complete” is briefly displayed.<br />
Format<br />
Antes de poder guardar archivos en un disco, deberá preparar<br />
un disquete. Esto se conoce como “formatear”. Si el<br />
disquete que va a utilizar está formateado para IBM PC,<br />
no es necesario formatearlo, aunque el acceso al disco<br />
será más rápido con discos formateados en el <strong>EM</strong>-<strong>25</strong>. En<br />
caso contrario, proceda de la siguiente manera:<br />
(1) Pulse DISK [MENU] para colocar la flecha de modo(√)<br />
junto a la entrada FORMAT.<br />
La flecha de modo parpadea, mientras se visualiza el<br />
mensaje “FORMAT”.<br />
(2) Espere a que la flecha de modo deje de parpadear y<br />
que el mensaje “EXE” parpadee y a continuación pulse<br />
[EXECUTE].<br />
Nota: Si no desea formatear el disquete, pulse [MENU] para volver<br />
a la primera función Disk (“LOAD Upr”).<br />
Nota: Al formatear un disco, eliminará todos los archivos que<br />
contenga. Es aconsejable comprobar antes el contenido del disquete<br />
(p.ej. en el PC).<br />
(3) Pulse [EXECUTE] de nuevo en respuesta al mensaje<br />
“Sure?”.<br />
(4) Pulse T<strong>EM</strong>PO [+] (YES) para confirmar o T<strong>EM</strong>PO [–]<br />
para volver al menú.<br />
El valor a la izquierda del mensaje “Formatng” contará de<br />
“80” a “1” mientras el icono del disco parpadea para indicar<br />
que se está accediendo a él. Una vez formateado el<br />
disco, aparecerá brevemente el mensaje “Complete”.<br />
<strong>EM</strong>-<strong>25</strong>/<strong>EM</strong>-<strong>15</strong><br />
Formater une disquette<br />
Avant de pouvoir sauvegarder des fichiers sur disquette, il<br />
faut préparer la disquette. C’est ce qu’on appelle le “formatage”.<br />
Si la disquette que vous voulez utiliser est formatée<br />
pour IBM PC, il n’est pas nécessaire de la formater<br />
– quoique l’accès est plus rapide avec des disquettes formatées<br />
pour l’<strong>EM</strong>-<strong>25</strong>. Sinon, procédez comme suit:<br />
(1) Appuyez sur DISK [MENU] pour amener la flèche de<br />
mode (√) en face de FORMAT.<br />
La flèche de mode clignote et l’écran affiche le message<br />
“FORMAT”.<br />
(2) Attendez que la flèche cesse de clignoter et que le<br />
message “EXE” clignote puis appuyez sur [EXECUTE].<br />
Remarque: Si vous renoncez à formater la disquette, appuyez<br />
sur [MENU] pour revenir à la fonction Disk précédente (“LOAD<br />
Upr”).<br />
Remarque: En formatant une disquette, vous effacez tous les<br />
fichiers qu’elle contient. Jetez tout de même un coup d’œil sur<br />
son contenu (sur votre PC, par exemple).<br />
(3) Appuyez à nouveau sur [EXECUTE] en réponse au message<br />
de confirmation “Sure?”.<br />
(4) Appuyez sur T<strong>EM</strong>PO [+] (YES) pour confirmer ou sur<br />
T<strong>EM</strong>PO [–] pour retourner au menu.<br />
La valeur à gauche du message “Formatng” effectue<br />
maintenant un décompte de “80” à “1” tandis que l’icône<br />
de disquette clignote pour indiquer que l’instrument<br />
accède à la disquette. Une fois que la disquette est formatée,<br />
le message “Complete” s’affiche brièvement.<br />
83
<strong>EM</strong>-<strong>25</strong>/<strong>EM</strong>-<strong>15</strong><br />
19. Miscellaneous<br />
Functions for educational purposes<br />
The <strong>EM</strong>-<strong>25</strong>/<strong>EM</strong>-<strong>15</strong> provides two functions that may come<br />
in handy for music teachers or for those who use the<br />
<strong>EM</strong>-<strong>25</strong>/<strong>EM</strong>-<strong>15</strong> in class:<br />
Deactivating or activating the Demo function<br />
The <strong>EM</strong>-<strong>25</strong>/<strong>EM</strong>-<strong>15</strong>’s Demo function can be switched off<br />
so that pressing the [D<strong>EM</strong>O] button will have no effect at<br />
all. This may be useful in situations where the <strong>EM</strong>-<strong>25</strong>/<br />
<strong>EM</strong>-<strong>15</strong> is used in class. Here is how to deactivate the<br />
Demo function:<br />
(1) Switch off the <strong>EM</strong>-<strong>25</strong>/<strong>EM</strong>-<strong>15</strong>.<br />
(2) Hold down the [D<strong>EM</strong>O] button while switching the<br />
<strong>EM</strong>-<strong>25</strong>/<strong>EM</strong>-<strong>15</strong> back on again.<br />
This setting is remembered, so that next time you want to<br />
listen to a demo song, you have to repeat the above procedure.<br />
Deactivating the Arranger<br />
Use the following procedure to ensure that the Arranger<br />
cannot be started or stopped:<br />
(1) Switch off the <strong>EM</strong>-<strong>25</strong>/<strong>EM</strong>-<strong>15</strong>.<br />
(2) Hold down the [STYLE] button while you switch the<br />
<strong>EM</strong>-<strong>25</strong>/<strong>EM</strong>-<strong>15</strong> back on again.<br />
It will now be impossible to start/stop the Arranger using<br />
the [START/STOP] button, or to use the Sync Start function.<br />
Repeat the above procedure when you want to use the<br />
Arranger again.<br />
19. Miscelánea<br />
Funciones para fines educativos<br />
El <strong>EM</strong>-<strong>25</strong>/<strong>EM</strong>-<strong>15</strong> dispone de dos funciones que pueden<br />
resultar de gran utilidad para profesores de música o<br />
aquellos que utilicen el <strong>EM</strong>-<strong>25</strong>/<strong>EM</strong>-<strong>15</strong>:<br />
Desactivar o activar la función Demo<br />
La función Demo del <strong>EM</strong>-<strong>25</strong>/<strong>EM</strong>-<strong>15</strong> puede desactivarse<br />
para que al pulsar el botón [D<strong>EM</strong>O] no ocurra absolutamente<br />
nada. Esto puede ser útil en situaciones en las que<br />
se utilice el <strong>EM</strong>-<strong>25</strong>/<strong>EM</strong>-<strong>15</strong> en clase. Para desactivar la<br />
función Demo, siga los pasos que se indican a continuación:<br />
(1) Apague el <strong>EM</strong>-<strong>25</strong>/<strong>EM</strong>-<strong>15</strong>.<br />
(2) Mantenga pulsado el botón [D<strong>EM</strong>O] mientras vuelve a<br />
poner en marcha el <strong>EM</strong>-<strong>25</strong>/<strong>EM</strong>-<strong>15</strong>.<br />
Este ajuste se recordará, de manera que la próxima vez<br />
que desee escuchar una canción de demostración deberá<br />
volver a repetir el procedimiento.<br />
Desactivar el Arranger<br />
Utilice el procedimiento que se describe a continuación<br />
para garantizar que el Arranger no puede iniciarse ni<br />
pararse:<br />
(1) Apague el <strong>EM</strong>-<strong>25</strong>/<strong>EM</strong>-<strong>15</strong>.<br />
(2) Mantenga pulsado el botón [STYLE] mientras vuelve a<br />
poner en marcha el <strong>EM</strong>-<strong>25</strong>/<strong>EM</strong>-<strong>15</strong>.<br />
Ahora será imposible iniciar y parar el Arranger utilizando<br />
el botón [START/STOP], o utilizar la función Sync Start.<br />
Repita el procedimiento descrito anteriormente cuando<br />
desee utilizar de nuevo el Arranger.<br />
19. Divers<br />
Fonctions à caractère pédagogique<br />
L’<strong>EM</strong>-<strong>25</strong>/<strong>EM</strong>-<strong>15</strong> comporte deux fonctions qui pourraient<br />
bien tomber à pic pour les professeurs de musique mais<br />
aussi pour tous les utilisateurs de l’<strong>EM</strong>-<strong>25</strong>/<strong>EM</strong>-<strong>15</strong>:<br />
Couper ou activer la fonction de démonstration<br />
La fonction Demo de l’<strong>EM</strong>-<strong>25</strong>/<strong>EM</strong>-<strong>15</strong> peut être coupée de<br />
sorte qu’une pression sur le bouton [D<strong>EM</strong>O] reste sans<br />
effet. Cela peut s’avérer utile pour le travail en classe.<br />
Voici comment couper la fonction de démonstration:<br />
(1) Mettez l’<strong>EM</strong>-<strong>25</strong>/<strong>EM</strong>-<strong>15</strong> hors tension.<br />
(2) Maintenez le bouton [D<strong>EM</strong>O] enfoncé tout en remettant<br />
l’<strong>EM</strong>-<strong>25</strong>/<strong>EM</strong>-<strong>15</strong> sous tension.<br />
Ce réglage est mémorisé, ce qui signifie que si vous voulez<br />
écouter la démonstration, vous devrez répéter cette<br />
procédure.<br />
Couper l’Arranger<br />
La procédure suivante empêche de faire démarrer et<br />
d’arrêter l’Arranger:<br />
(1) Mettez l’<strong>EM</strong>-<strong>25</strong>/<strong>EM</strong>-<strong>15</strong> hors tension.<br />
(2) Maintenez le bouton [STYLE] enfoncé tout en remettant<br />
l’<strong>EM</strong>-<strong>25</strong>/<strong>EM</strong>-<strong>15</strong> sous tension.<br />
Il sera alors impossible de faire démarrer l’Arranger avec<br />
le bouton [START/STOP] ou la fonction Sync Start.<br />
Répétez cette procédure pour réactiver l’Arranger.<br />
84
<strong>EM</strong>-<strong>25</strong>/<strong>EM</strong>-<strong>15</strong><br />
Deactivating both the Arranger and the Demo function<br />
A third “educational” option is to switch off both the<br />
Demo and the Arranger functions in one go:<br />
(1) Switch off the <strong>EM</strong>-<strong>25</strong>/<strong>EM</strong>-<strong>15</strong>.<br />
(2) Hold down the [START/STOP] button while you switch<br />
the <strong>EM</strong>-<strong>25</strong>/<strong>EM</strong>-<strong>15</strong> back on again.<br />
It will now be impossible to start/stop the Arranger or<br />
demo song playback.<br />
Repeat the above procedure when you want to use the<br />
Arranger and Demo function again.<br />
Initializing your <strong>EM</strong>-<strong>25</strong>/<strong>EM</strong>-<strong>15</strong><br />
(Factory)<br />
After working extensively with your <strong>EM</strong>-<strong>25</strong>/<strong>EM</strong>-<strong>15</strong>, you<br />
may want to recall the original factory settings. Note that<br />
the Recorder song and User Program memories will be<br />
empty after initializing your <strong>EM</strong>-<strong>25</strong>/<strong>EM</strong>-<strong>15</strong>.<br />
Desactivar el Arranger y la función Demo<br />
Una tercera opción “educativa” es desactivar tanto la función<br />
Demo como el Arranger a la vez:<br />
(1) Apague el <strong>EM</strong>-<strong>25</strong>/<strong>EM</strong>-<strong>15</strong>.<br />
(2) Mantenga pulsado el botón [START/STOP] mientras<br />
vuelve a poner en marcha el <strong>EM</strong>-<strong>25</strong>/<strong>EM</strong>-<strong>15</strong>.<br />
Ahora será imposible iniciar y parar el Arranger y reproducir<br />
las canciones de demostración.<br />
Repita el procedimiento descrito anteriormente cuando<br />
desee utilizar de nuevo el Arranger y la función Demo.<br />
Inicializar el <strong>EM</strong>-<strong>25</strong>/<strong>EM</strong>-<strong>15</strong> (Factory)<br />
Después de trabajar extensamente con el <strong>EM</strong>-<strong>25</strong>/<strong>EM</strong>-<strong>15</strong>,<br />
es posible que desee recuperar los ajustes por defecto originales.<br />
Observe que la canción del Grabador y las<br />
memorias User Program estarán vacías después de inicializar<br />
el <strong>EM</strong>-<strong>25</strong>/<strong>EM</strong>-<strong>15</strong>.<br />
Verrouillage de l’Arranger et de la fonction Demo<br />
Une troisième option “pédagogique” consiste à couper<br />
simultanément la fonction Demo et l’Arranger:<br />
(1) Mettez l’<strong>EM</strong>-<strong>25</strong>/<strong>EM</strong>-<strong>15</strong> hors tension.<br />
(2) Maintenez le bouton [START/STOP] enfoncé tout en<br />
remettant l’<strong>EM</strong>-<strong>25</strong>/<strong>EM</strong>-<strong>15</strong> sous tension.<br />
Il sera alors impossible de faire démarrer l’Arranger ou la<br />
reproduction des morceaux de démonstration.<br />
Répétez cette procédure pour réactiver l’Arranger et la<br />
fonction Demo.<br />
Initialiser l’<strong>EM</strong>-<strong>25</strong>/<strong>EM</strong>-<strong>15</strong> (Factory)<br />
Après une session de travail intensif sur l’<strong>EM</strong>-<strong>25</strong>/<strong>EM</strong>-<strong>15</strong>,<br />
vous aurez peut-être envie de charger les réglages<br />
d’usine. Notez que le morceau du Recorder et les<br />
mémoires de programme utilisateur seront vides une<br />
fois votre <strong>EM</strong>-<strong>25</strong>/<strong>EM</strong>-<strong>15</strong> initialisé.<br />
+<br />
Here is how to initialize your <strong>EM</strong>-<strong>25</strong>/<strong>EM</strong>-<strong>15</strong>:<br />
(1) Power off your <strong>EM</strong>-<strong>25</strong>/<strong>EM</strong>-<strong>15</strong>.<br />
(2) Hold down the [USER PROGRAM/WRITE] button while<br />
turning your <strong>EM</strong>-<strong>25</strong>/<strong>EM</strong>-<strong>15</strong> back on again.<br />
The message “Factory!” will inform you that the <strong>EM</strong>-<strong>25</strong>/<br />
<strong>EM</strong>-<strong>15</strong> has been initialized.<br />
Siga los pasos descritos a continuación para inicializar el<br />
<strong>EM</strong>-<strong>25</strong>/<strong>EM</strong>-<strong>15</strong>:<br />
(1) Apague el <strong>EM</strong>-<strong>25</strong>/<strong>EM</strong>-<strong>15</strong>.<br />
(2) Mantenga pulsado el botón [USER PROGRAM/WRITE]<br />
mientras vuelve a poner en marcha el.<br />
El mensaje “Factory!” le informará de que el <strong>EM</strong>-<strong>25</strong>/<br />
<strong>EM</strong>-<strong>15</strong> se ha inicializado.<br />
Voici comment initialiser l’<strong>EM</strong>-<strong>25</strong>/<strong>EM</strong>-<strong>15</strong>:<br />
(1) Mettez l’<strong>EM</strong>-<strong>25</strong>/<strong>EM</strong>-<strong>15</strong> hors tension.<br />
(2) Maintenez le bouton [USER PROGRAM/WRITE] enfoncé<br />
tout en remettant votre <strong>EM</strong>-<strong>25</strong>/<strong>EM</strong>-<strong>15</strong> sous tension.<br />
Le message “Factory!” vous informe que l’<strong>EM</strong>-<strong>25</strong>/<strong>EM</strong>-<strong>15</strong><br />
est initialisé et a retrouvé ses réglages d’usine.<br />
85
<strong>EM</strong>-<strong>25</strong>/<strong>EM</strong>-<strong>15</strong><br />
Specifications<br />
<strong>EM</strong>-<strong>25</strong>/<strong>EM</strong>-<strong>15</strong> Creative <strong>Keyboard</strong><br />
GENERAL<br />
<strong>Keyboard</strong>: 61 keys, velocity sensitive<br />
Display: Custom graphic display (backlit)<br />
Output power: 2x 5W<br />
Memories: 8 User Programs<br />
Modes: Arranger, Piano, Organ, M.Drums<br />
SOUND SOURCE<br />
Tone generator: GM/GS compatible, 226 Tones,<br />
9 Drum Sets, 16 multitimbral parts<br />
MUSIC STYLES<br />
ROM: 64 Music Styles with Style Morphing (6 versions<br />
per Style) and Orchestrator (3 possibilities per Style)<br />
Disk User Style (direct load from floppy disk, <strong>EM</strong>-<strong>25</strong> only)<br />
One Touch: 4 One Touch memories (automatic registrations)<br />
per Style<br />
DISK DRIVE (<strong>EM</strong>-<strong>25</strong>)<br />
2HD/2DD floppy disk drive with realtime load capability<br />
(Music Styles, Songs)<br />
File management: Music Styles, Standard MIDI Files,<br />
User Program Sets<br />
CONNECTIONS<br />
PHONES 1/OUTPUT (headphones or audio)<br />
PHONES 2 (headphones)<br />
MIDI IN, OUT<br />
SUSTAIN FOOTSWITCH socket<br />
OTHERS<br />
Dimensions (W x D x H): 956 x 346 x 128 mm<br />
Power supply (included):<br />
ACN (<strong>EM</strong>-<strong>15</strong>), ACO (<strong>EM</strong>-<strong>25</strong>) adapter<br />
Weight: 6.5kg (<strong>EM</strong>-<strong>15</strong>); 7kg (<strong>EM</strong>-<strong>25</strong>)<br />
Supplied accessories: Owner’s manual, adapter<br />
Options: RH series headphones, DP-2, DP-6, or BOSS<br />
FS-5U footswitch, KS-12 keyboard stand<br />
Note: Specifications subject to change without prior notice.<br />
Especificaciones<br />
<strong>EM</strong>-<strong>25</strong>/<strong>EM</strong>-<strong>15</strong> Creative <strong>Keyboard</strong><br />
GENERAL<br />
Teclado: 61 teclas, sensible a la velocidad<br />
Pantalla: Pantalla gráfica personalizada (retroiluminación)<br />
Potencia de salida: 2x 5W<br />
Memorias: 8 Programas de Usuario<br />
Modos: Arranger, Piano, Organ, M.Drums<br />
FUENTE DE SONIDO<br />
Generador de sonidos: Compatible con GM/GS, 226 Tones,<br />
9 Grupos de percusión, 16 partes multitímbricas<br />
ESTILOS MUSICALES<br />
ROM: 64 Estilos Musicales con Style Morphing (6 versiones<br />
por Estilo) y Orchestrator (3 posibilidades por Estilo)<br />
Estilo Disk User (carga directa desde el disquete, sólo <strong>EM</strong>-<strong>25</strong>)<br />
One Touch: 4 memorias One Touch (registros automáticos)<br />
por Estilo<br />
UNIDAD DE DISCOS (<strong>EM</strong>-<strong>25</strong>)<br />
Unidad de disquetes 2HD/2DD con capacidad de<br />
carga a tiempo real (Estilos Musicales, Canciones)<br />
Gestión de archivo: Estilos Musicales, Archivos MIDI<br />
Estándar, Grupos de Programas de Usuario<br />
CONEXIONES<br />
PHONES 1/OUTPUT (auriculares o audio)<br />
PHONES 2 (auriculares)<br />
MIDI IN, OUT<br />
zócalo SUSTAIN FOOTSWITCH<br />
GENERAL<br />
Dimensiones (A x P x A): 956 x 346 x 128 mm<br />
Alimentación (incluida):<br />
adaptador ACN (<strong>EM</strong>-<strong>15</strong>), ACO (<strong>EM</strong>-<strong>25</strong>)<br />
Peso: 6.5kg (<strong>EM</strong>-<strong>15</strong>); 7kg (<strong>EM</strong>-<strong>25</strong>)<br />
Accesorios entregados: Manual del Usuario, adaptador<br />
Opciones: auriculares de la serie RH, interruptor de pedal<br />
DP-2, DP-6, o BOSS FS-5U, soporte para teclado KS-12<br />
Nota: Las especificaciones están sujetas a cambios sin previo<br />
aviso.<br />
Fiche technique<br />
<strong>EM</strong>-<strong>25</strong>/<strong>EM</strong>-<strong>15</strong> Creative <strong>Keyboard</strong><br />
Généralités<br />
Clavier: 61 touches, dynamique<br />
Ecran: Ecran graphique Custom (rétro-éclairé)<br />
Puissance: 2x 5W<br />
Mémoires: 8 programmes utilisateur<br />
Modes: Arranger, Piano, Organ, M.Drums<br />
Génération de sons<br />
Générateur de sons: Compatible GM/GS, 226 Tones,<br />
9 Drum Sets, 16 parties multitimbrales<br />
Styles musicaux<br />
ROM: 64 styles avec fonctions Style Morphing (6 options<br />
par style) et Orchestrator (3 niveaux par style)<br />
Styles Disk User (chargement direct de styles résidant sur<br />
disquette, <strong>EM</strong>-<strong>25</strong> uniquement)<br />
One Touch: 4 mémoires (réglage automatique) par style<br />
Lecteur de disquette (<strong>EM</strong>-<strong>25</strong>)<br />
Lecteur de disquette 2HD/2DD avec option de chargement<br />
en temps réel (styles musicaux, Songs)<br />
Fichiers gérés: Styles musicaux, fichiers Standard<br />
MIDI, ensembles de programmes utilisateur<br />
Prises<br />
PHONES 1/OUTPUT (casque d’écoute ou audio)<br />
PHONES 2 (casque)<br />
MIDI IN, OUT<br />
SUSTAIN FOOTSWITCH<br />
Divers<br />
Dimensions (L x P x H): 956 x 346 x 128 mm<br />
Alimentation (fournie):<br />
Adaptateur ACN (<strong>EM</strong>-<strong>15</strong>), ACO (<strong>EM</strong>-<strong>25</strong>)<br />
Poids: 6,5kg (<strong>EM</strong>-<strong>15</strong>); 7kg (<strong>EM</strong>-<strong>25</strong>)<br />
Accessoires fournis: Manuel d’utilisation, adaptateur<br />
Options: Casque de la série RH, commutateur au pied<br />
DP-2, DP-6 ou BOSS FS-5U, support pour clavier KS-12<br />
Remarque: Les données techniques sont susceptibles d’être<br />
modifiées sans avis préalable.<br />
86
<strong>EM</strong>-<strong>25</strong>/<strong>EM</strong>-<strong>15</strong><br />
Tone List<br />
PIANO<br />
GBN PC CC00 CC32 Sound Name Voices<br />
A11 01 00 0 Piano 1 1<br />
A111 08 0 Piano1w 2<br />
A112 16 0 Piano1d 1<br />
A12 02 00 0 Piano 2 1<br />
A121 08 0 Piano2w 2<br />
A13 03 00 0 Piano 3 1<br />
A131 08 0 Piano 3w 2<br />
A14 04 00 0 HonkTonk 2<br />
A141 08 0 HonkTnkw 1<br />
A<strong>15</strong> 05 00 0 E.Piano1 1<br />
A<strong>15</strong>1 08 0 DetunEP1 2<br />
A<strong>15</strong>2 16 0 EPiano1v 2<br />
A<strong>15</strong>3 24 0 60’Piano 2<br />
A16 06 00 0 E.Piano2 1<br />
A161 08 0 DetunEP2 2<br />
A162 16 0 EPiano2v 2<br />
A17 07 00 0 Harpsi 1<br />
A171 08 0 CouplHps 2<br />
A172 16 0 Harpsi.w 2<br />
A173 24 0 Harpsi.o 2<br />
A18 08 00 0 Clav. 1<br />
CHROMATIC PERCUSSION<br />
GBN PC CC00 CC32 Sound Name Voices<br />
A21 09 00 0 Celesta 1<br />
A22 10 00 0 Glocken 1<br />
A23 11 00 0 MusicBox 1<br />
A24 12 00 0 Vib 1<br />
A241 08 0 Vib.w 2<br />
A<strong>25</strong> 13 00 0 Marimba 1<br />
A<strong>25</strong>1 08 0 MarimbaW 2<br />
A26 14 00 0 Xylophon 1<br />
A27 <strong>15</strong> 00 0 Tub-bell 1<br />
A271 08 0 ChurcBel 1<br />
A272 09 0 Carillon 1<br />
A28 16 00 0 Santur 1<br />
ORGAN<br />
GBN PC CC00 CC32 Sound Name Voices<br />
A31 17 00 0 Organ 1 1<br />
A311 08 0 DetunOr1 2<br />
A312 16 0 60’sOrg1 1<br />
A313 32 0 Organ 4 1<br />
A32 18 00 0 Organ 2 1<br />
A321 08 0 DetunOr2 2<br />
A322 32 0 Organ 5 1<br />
A33 19 00 0 Organ 3 2<br />
A34 20 00 0 Church1 1<br />
A341 08 0 Church2 2<br />
A342 16 0 Church3 2<br />
A35 21 00 0 Reed Org 1<br />
A36 22 00 0 AccordFr 2<br />
A361 08 0 AccordIt 2<br />
A37 23 00 0 Harmonic 1<br />
A38 24 00 0 Bandneon 2<br />
GUITAR<br />
GBN PC CC00 CC32 Sound Name Voices<br />
A41 <strong>25</strong> 00 0 NylonGtr 1<br />
A411 08 0 Ukulele 1<br />
A412 16 0 NylonGto 2<br />
A413 32 0 NylonGt2 1<br />
A42 26 00 0 StStrGt 1<br />
A421 08 0 12-strGt 2<br />
A422 16 0 Mandolin 1<br />
A43 27 00 0 Jazz Gtr 1<br />
A431 08 0 HawaiGt 1<br />
A44 28 00 0 CleanGtr 1<br />
A441 08 0 ChorusGt 2<br />
A45 29 00 0 MutedGtr 1<br />
A451 08 0 FunkGtr 1<br />
A452 16 0 FunkGtr2 1<br />
A46 30 00 0 OvdrvGt1 1<br />
A47 31 00 0 DstortG1 1<br />
A471 08 0 FeedbGtr 2<br />
GBN PC CC00 CC32 Sound Name Voices<br />
A48 32 00 0 GtrHarmo 1<br />
A481 08 0 GtrFeedb 1<br />
BASS<br />
GBN PC CC00 CC32 Sound Name Voices<br />
A51 33 00 0 AcouBass 1<br />
A52 34 00 0 FingBass 1<br />
A53 35 00 0 PickBass 1<br />
A54 36 00 0 Fretless 1<br />
A55 37 00 0 Slap Bs1 1<br />
A56 38 00 0 Slap Bs2 1<br />
A57 39 00 0 SynthBs1 1<br />
A571 01 0 SyBas101 1<br />
A572 08 0 SyBass 3 1<br />
A58 40 00 0 SynthBs2 2<br />
A581 08 0 SyBass 4 2<br />
A582 16 0 RubrBass 2<br />
ORCHESTRA<br />
GBN PC CC00 CC32 Sound Name Voices<br />
A61 41 00 0 Violin 1<br />
A611 08 0 SlViolin 1<br />
A62 42 00 0 Viola 1<br />
A63 43 00 0 Cello 1<br />
A64 44 00 0 Contrabs 1<br />
A65 45 00 0 TremoStr 1<br />
A66 46 00 0 Pizzicat 1<br />
A67 47 00 0 Harp 1<br />
A68 48 00 0 Timpani 1<br />
ENS<strong>EM</strong>BLE<br />
GBN PC CC00 CC32 Sound Name Voices<br />
A71 49 00 0 Strings 1<br />
A711 08 0 Orchestr 2<br />
A72 50 00 0 SlowStr 1<br />
A73 51 00 0 Syn Str1 1<br />
A731 08 0 SyStrng3 2<br />
87
<strong>EM</strong>-<strong>25</strong>/<strong>EM</strong>-<strong>15</strong><br />
GBN PC CC00 CC32 Sound Name Voices<br />
A74 52 00 0 Syn.Str2 2<br />
A75 53 00 0 ChoirAah 1<br />
A751 32 0 ChoirAh2 1<br />
A76 54 00 0 VoiceOoh 1<br />
A77 55 00 0 SynVox 1<br />
A78 56 00 0 Orch Hit 2<br />
BRASS<br />
GBN PC CC00 CC32 Sound Name Voices<br />
A81 57 00 0 Trumpet 1<br />
A82 58 00 0 Trombone 1<br />
A821 01 0 Trombne2 2<br />
A83 59 00 0 Tuba 1<br />
A84 60 00 0 MutedTp 1<br />
A85 61 00 0 Fr Horn 2<br />
A851 01 0 FrHorn2 2<br />
A86 62 00 0 Brass 1 1<br />
A861 08 0 Brass 2 2<br />
A87 63 00 0 SyBrass1 2<br />
A871 08 0 SyBrass3 2<br />
A872 16 0 AnBrass1 2<br />
A88 64 00 0 SyBrass2 2<br />
A881 08 0 SyBrass4 1<br />
A882 16 0 AnBrass2 2<br />
REED<br />
GBN PC CC00 CC32 Sound Name Voices<br />
B11 65 00 0 SoprSax 1<br />
B12 66 00 0 Alto Sax 1<br />
B13 67 00 0 TenorSax 1<br />
B14 68 00 0 BaritSax 1<br />
B<strong>15</strong> 69 00 0 Oboe 1<br />
B16 70 00 0 EnglHorn 1<br />
B17 71 00 0 Bassoon 1<br />
B18 72 00 0 Clarinet 1<br />
PIPE<br />
GBN PC CC00 CC32 Sound Name Voices<br />
B21 73 00 0 Piccolo 1<br />
B22 74 00 0 Flute 1<br />
B23 75 00 0 Recorder 1<br />
B24 76 00 0 PanFlute 1<br />
B<strong>25</strong> 77 00 0 BotBlow 2<br />
B26 78 00 0 Shakuhac 2<br />
B27 79 00 0 Whistle 1<br />
B28 80 00 0 Ocarina 1<br />
SYNTH LEAD<br />
GBN PC CC00 CC32 Sound Name Voices<br />
B31 81 00 0 Square W 2<br />
B311 01 0 Square 1<br />
B312 08 0 SineWave 1<br />
B32 82 0 0 Saw Wave 2<br />
B321 01 0 Saw 1<br />
B322 08 0 DoctSolo 2<br />
B33 83 00 0 SynCall 2<br />
B34 84 00 0 ChifferL 2<br />
B35 85 00 0 Charang 2<br />
B36 86 00 0 Solo Vox 2<br />
B37 87 00 0 5th SawW 2<br />
B38 88 00 0 Bas&Lead 2<br />
SYNTH PAD<br />
GBN PC CC00 CC32 Sound Name Voices<br />
B41 89 00 0 Fantasia 2<br />
B42 90 00 0 Warm Pad 1<br />
B43 91 00 0 Polysynt 2<br />
B44 92 00 0 SpVoice 1<br />
B45 93 00 0 BowGlass 2<br />
B46 94 00 0 MetalPad 2<br />
B47 95 00 0 Halo Pad 2<br />
B48 96 00 0 SweepPad 1<br />
SYNTH SFX<br />
GBN PC CC00 CC32 Sound Name Voices<br />
B51 97 00 0 Ice Rain 2<br />
B52 98 00 0 Soundtrk 2<br />
B53 99 00 0 Crystal 2<br />
B531 01 0 SyMallet 1<br />
B54 100 00 0 Atmosph 2<br />
B55 101 00 0 Brightns 2<br />
B56 102 00 0 Goblin 2<br />
B57 103 00 0 EchoDrop 1<br />
B571 01 0 EchoBell 2<br />
B572 02 0 Echo Pan 2<br />
B58 104 00 0 StarThem 2<br />
ETHNIC MISC<br />
GBN PC CC00 CC32 Sound Name Voices<br />
B61 105 00 0 Sitar 1<br />
B611 01 0 Sitar 2 2<br />
B62 106 00 0 Banjo 1<br />
B63 107 00 0 Shamisen 1<br />
B64 108 00 0 Koto 1<br />
B641 08 0 TKoto 2<br />
B65 109 00 0 Kalimba 1<br />
B66 110 00 0 Bag Pipe 1<br />
B67 111 00 0 Fiddle 1<br />
B68 112 00 0 Shanai 1<br />
PERCUSSIVE<br />
GBN PC CC00 CC32 Sound Name Voices<br />
B71 113 00 0 TinkBell 1<br />
B72 114 00 0 Agogo 1<br />
B73 1<strong>15</strong> 00 0 SteelDrm 1<br />
B74 116 00 0 Woodblck 1<br />
B741 08 0 Castanet 1<br />
B75 117 00 0 Taiko 1<br />
B751 08 0 ConcrtBD 1<br />
B76 118 00 0 MeloTom1 1<br />
B761 08 0 MeloTom2 1<br />
B77 119 00 0 SynthDrm 1<br />
B771 08 0 808 Tom 1<br />
B772 09 0 ElecPerc 1<br />
88
<strong>EM</strong>-<strong>25</strong>/<strong>EM</strong>-<strong>15</strong><br />
SFX<br />
GBN PC CC00 CC32 Sound Name Voices<br />
B78 120 00 0 RevrsCym 1<br />
GBN PC CC00 CC32 Sound Name Voices<br />
B81 121 00 0 GFrtNois 1<br />
B811 01 0 GtCNoise 1<br />
B812 02 0 StrSlap 1<br />
B82 122 00 0 BrtNoise 1<br />
B821 01 0 FlKClick 1<br />
B83 123 00 0 Seashore 1<br />
B831 01 0 Rain 1<br />
B832 02 0 Thunder 1<br />
B833 03 0 Wind 1<br />
B834 04 0 Stream 2<br />
B835 05 0 Bubble 2<br />
B84 124 00 0 Bird 2<br />
B841 01 0 Dog 1<br />
B842 02 0 HorseGlp 1<br />
B843 03 0 Bird 2 1<br />
B85 1<strong>25</strong> 00 0 Telephn1 1<br />
B851 01 0 Telephn2 1<br />
B852 02 0 DCreakng 1<br />
B853 03 0 Door 1<br />
B854 04 0 Scratch 1<br />
B855 05 0 Windchim 2<br />
B86 126 00 0 Helicptr 1<br />
B861 01 0 CarEngin 1<br />
B862 02 0 Car Stop 1<br />
B863 03 0 Car Pass 1<br />
B864 04 0 CarCrash 2<br />
B865 05 0 Siren 1<br />
B866 06 0 Train 1<br />
B867 07 0 Jetplane 2<br />
B868 08 0 Starship 2<br />
B869 09 0 BrstNois 2<br />
GBN PC CC00 CC32 Sound Name Voices<br />
B87 127 00 0 Applause 2<br />
B871 01 0 Laughing 1<br />
B872 02 0 Screamin 1<br />
B873 03 0 Punch 1<br />
B874 04 0 Heart 1<br />
B875 05 0 Footstep 1<br />
B88 128 00 0 Gun Shot 1<br />
B881 01 0 MachGun 1<br />
B882 02 0 Lasergun 1<br />
B883 03 0 Explsion 2<br />
Names in bold type: automatic “best-of” selection when you use<br />
the numeric keypad for selecting Tones. This may be a Variation<br />
rather than the intended main (“Capital”) Tone.<br />
89
<strong>EM</strong>-<strong>25</strong>/<strong>EM</strong>-<strong>15</strong><br />
Music Style list<br />
No. Name BPM TimeS CC00 CC32<br />
ROCK & DANCE<br />
11 Rock1 90 4/4 1 43<br />
12 Rock2 120 4/4 1 44<br />
13 Rock3 126 4/4 1 46<br />
14 Sh Rock 120 4/4 1 45<br />
<strong>15</strong> Hip Hop 88 4/4 2 93<br />
16 Techno 137 4/4 2 95<br />
17 House 130 4/4 2 94<br />
18 Dance 108 4/4 2 96<br />
POP<br />
21 8B Pop1 60 4/4 6 60<br />
22 8B Pop2 68 4/4 6 59<br />
23 8B Pop3 73 4/4 6 58<br />
24 8B Pop4 88 4/4 6 57<br />
<strong>25</strong> 16B Pop1 77 4/4 7 63<br />
26 16B Pop2 94 4/4 7 65<br />
27 16B Pop3 98 4/4 7 66<br />
28 16B Pop4 100 4/4 7 64<br />
50's & 60's<br />
31 Sl Rock1 98 6/8 5 23<br />
32 Sl Rock2 92 4/4 5 24<br />
33 Ballad1 75 4/4 4 20<br />
34 Ballad2 116 4/4 4 21<br />
35 Rock'N1 180 4/4 10 27<br />
36 Rock'N2 185 4/4 10 28<br />
37 Boogie <strong>15</strong>6 4/4 9 10<br />
38 Twist 162 4/4 10 32<br />
No. Name BPM TimeS CC00 CC32<br />
JAZZ<br />
41 Sl Swing 56 4/4 13 19<br />
42 MedSwing 134 4/4 13 13<br />
43 Sw Combo <strong>15</strong>0 4/4 12 20<br />
44 BrtSwing 190 4/4 12 21<br />
45 FstSwing 208 4/4 12 22<br />
46 BigBand1 96 4/4 14 14<br />
47 BigBand2 136 4/4 14 12<br />
48 JazzWltz 100 3/4 17 26<br />
LATIN<br />
51 Bossa1 <strong>15</strong>0 4/4 22 23<br />
52 Bossa2 168 4/4 22 24<br />
53 Samba1 103 4/4 27 13<br />
54 Samba2 117 4/4 27 14<br />
55 ChaCha 132 4/4 24 8<br />
56 Mambo 95 4/4 38 8<br />
57 Salsa 98 4/4 <strong>25</strong> 10<br />
58 Merengue 138 4/4 59 5<br />
VARIETY 1<br />
61 Blues 61 4/4 44 19<br />
62 R&B 105 4/4 44 16<br />
63 Shuffle 145 4/4 <strong>15</strong> 7<br />
64 Foxtrot 185 4/4 34 8<br />
65 Charlest 205 4/4 11 5<br />
66 PopRock 138 4/4 39 17<br />
67 Rhumba 100 4/4 23 7<br />
68 Beguine 110 4/4 39 <strong>15</strong><br />
No. Name BPM TimeS CC00 CC32<br />
VARIETY 2<br />
71 March 1<strong>25</strong> 4/4 20 14<br />
72 Polka 130 4/4 19 11<br />
73 PDoble 122 4/4 40 3<br />
74 Country 130 4/4 16 9<br />
75 Musette 175 3/4 17 <strong>25</strong><br />
76 Sl Waltz 90 3/4 18 9<br />
77 Tango 120 4/4 26 8<br />
78 Reggae 140 4/4 8 9<br />
ACOUSTIC<br />
81 G Slow 93 4/4 6 40<br />
82 G Bossa 144 4/4 22 21<br />
83 G Pop 100 4/4 7 40<br />
84 G FstPop 85 4/4 22 22<br />
85 P Ballad 55 4/4 5 17<br />
86 P Shuffl 180 4/4 <strong>15</strong> 6<br />
87 P Night 60 4/4 13 11<br />
88 P Jazz <strong>15</strong>0 4/4 12 19<br />
90
Drum Sets<br />
PC 1 PC 9 PC 17 PC <strong>25</strong> PC 26 PC 33 PC 41<br />
STANDARD ROOM POWER ELECTRON TR-808 JAZZ BRUSH<br />
PC 49 PC 57<br />
ORCHSTRA SFX<br />
28<br />
29<br />
31<br />
33<br />
35<br />
C2 36<br />
38<br />
40<br />
41<br />
43<br />
45<br />
47<br />
C3 48<br />
50<br />
52<br />
53<br />
55<br />
57<br />
59<br />
C4 60<br />
62<br />
64<br />
65<br />
67<br />
69<br />
71<br />
C5 72<br />
74<br />
76<br />
77<br />
79<br />
81<br />
83<br />
C6 84<br />
86<br />
88<br />
27<br />
30<br />
32<br />
34<br />
37<br />
39<br />
42<br />
44<br />
46<br />
49<br />
51<br />
54<br />
56<br />
58<br />
61<br />
63<br />
66<br />
68<br />
70<br />
73<br />
75<br />
78<br />
80<br />
82<br />
85<br />
87<br />
High Q
92<br />
MIDI Implementation Chart<br />
[Creative <strong>Keyboard</strong>] Style mode Date: March 2001<br />
Model: <strong>EM</strong>-<strong>25</strong>/<strong>EM</strong>-<strong>15</strong> Version: 1.00<br />
Basic<br />
Channel<br />
Mode<br />
Function... Transmitted Recognized Remarks<br />
Default<br />
Changed<br />
Default<br />
Message<br />
Altered<br />
Note<br />
Number True Voice<br />
Velocity<br />
Note ON<br />
Note OFF<br />
1~12, 16<br />
X<br />
Mode 3<br />
Mode 3, 4 (M=1)<br />
*****<br />
0~127<br />
*****<br />
O<br />
X<br />
1~16<br />
X<br />
Mode 3<br />
Mode 3, 4 (M=1) *2<br />
0~127<br />
0~127<br />
O<br />
X<br />
1= ACC1, 2= A.BASS, 3= ACC2,<br />
4= Upper, 5= ACC3, 6= Layer<br />
7= ACC4, 8= ACC5, 9= ACC6<br />
10= A.Drums/Stl PC, 11= Lower,<br />
14= NTA, 16= M.Drums<br />
After<br />
Touch<br />
Key’s<br />
Ch’s<br />
X<br />
X<br />
O<br />
O<br />
Pitch Bend O *3 O<br />
Control<br />
Change<br />
0,32<br />
1<br />
5<br />
6, 38<br />
7<br />
10<br />
11<br />
64<br />
65<br />
66<br />
67<br />
84<br />
91<br />
93<br />
98, 99<br />
100, 101<br />
O<br />
O *3<br />
X *3<br />
O<br />
O<br />
O *3<br />
O *3<br />
O<br />
X<br />
X<br />
X<br />
O *3<br />
O<br />
O<br />
O *3<br />
X<br />
O<br />
O<br />
O<br />
O<br />
O<br />
O<br />
O<br />
O<br />
O<br />
O<br />
O<br />
O<br />
O (Reverb)<br />
O (Chorus)<br />
O<br />
O<br />
Bank Select<br />
Modulation<br />
Portamento Time<br />
Data Entry<br />
Volume<br />
Panpot<br />
Expression<br />
Hold 1<br />
Portamento<br />
Sostenuto<br />
Soft<br />
Portamento Control<br />
Effect 1 Depth<br />
Effect 3 Depth<br />
NRPN LSB, MSB<br />
RPN LSB, MSB<br />
Program<br />
Change True #<br />
O<br />
*****<br />
System Exclusive X O<br />
O<br />
0~127<br />
Program Number 1~128<br />
System<br />
Common<br />
Song Position Pointer<br />
Song Sel<br />
Tune<br />
X<br />
X<br />
X<br />
X<br />
X<br />
X<br />
System<br />
Real Time<br />
Clock<br />
Commands<br />
O *1<br />
O *1<br />
O<br />
O<br />
Aux<br />
Messages<br />
All Sounds Off<br />
Reset All Controllers<br />
Local On/Off<br />
All Notes Off<br />
Active Sense<br />
Reset<br />
X<br />
X<br />
X<br />
X<br />
O<br />
X<br />
O (120, 126, 127)<br />
O (121)<br />
O<br />
O (123-1<strong>25</strong>)<br />
O<br />
X<br />
Notes<br />
Mode 1: OMNI ON, POLY<br />
Mode 3: OMNI OFF, POLY<br />
*1 O X is selectable<br />
*2 Recognized as M=1 even if M≠1<br />
*3 Only for Style parts<br />
Mode 2: OMNI ON, MONO<br />
Mode 4: OMNI OFF, MONO<br />
O: Yes<br />
X: No
[Creative <strong>Keyboard</strong>] Song mode Date: March 2001<br />
Model: <strong>EM</strong>-<strong>25</strong>/<strong>EM</strong>-<strong>15</strong> Version: 1.00<br />
Basic<br />
Channel<br />
Mode<br />
Function... Transmitted Recognized Remarks<br />
Default<br />
Changed<br />
Default<br />
Message<br />
Altered<br />
Note<br />
Number True Voice<br />
Velocity<br />
After<br />
Touch<br />
Note ON<br />
Note OFF<br />
Key’s<br />
Ch’s<br />
1~16<br />
X<br />
Mode 3<br />
Mode 3, 4 (M=1)<br />
*****<br />
0~127<br />
*****<br />
O<br />
X<br />
O *3<br />
O *3<br />
1~16<br />
X<br />
Mode 3<br />
Mode 3, 4 (M=1) *2<br />
0~127<br />
0~127<br />
O<br />
X<br />
O<br />
O<br />
3=Lower, 4=Upper, 6=Layer<br />
10=M.Drums<br />
Pitch Bend O *3 O<br />
Control<br />
Change<br />
Program<br />
Change True #<br />
0,32<br />
1<br />
5<br />
6, 38<br />
7<br />
10<br />
11<br />
64<br />
65<br />
66<br />
67<br />
84<br />
91<br />
93<br />
98, 99<br />
100, 101<br />
O<br />
O *3<br />
O *3<br />
O<br />
O<br />
O<br />
O<br />
O<br />
O<br />
O<br />
O<br />
O *3<br />
O<br />
O<br />
O *3<br />
O *3<br />
O<br />
*****<br />
System Exclusive O O<br />
O<br />
O<br />
O<br />
O<br />
O<br />
O<br />
O<br />
O<br />
O<br />
O<br />
O<br />
O<br />
O (Reverb)<br />
O (Chorus)<br />
O<br />
O<br />
O<br />
0~127<br />
Bank Select<br />
Modulation<br />
Portamento Time<br />
Data Entry<br />
Volume<br />
Panpot<br />
Expression<br />
Hold 1<br />
Portamento<br />
Sostenuto<br />
Soft<br />
Portamento Control<br />
Effect 1 Depth<br />
Effect 3 Depth<br />
NRPN LSB, MSB<br />
RPN LSB, MSB<br />
Program Number 1~128<br />
System<br />
Common<br />
Song Position Pointer<br />
Song Sel<br />
Tune<br />
O *1<br />
X<br />
X<br />
O *1<br />
X<br />
X<br />
System<br />
Real Time<br />
Clock<br />
Commands<br />
O *1<br />
O *1<br />
O<br />
O<br />
Aux<br />
Messages<br />
All Sounds Off<br />
Reset All Controllers<br />
Local On/Off<br />
All Notes Off<br />
Active Sense<br />
Reset<br />
O<br />
O<br />
X<br />
O<br />
O<br />
X<br />
O (120, 126, 127)<br />
O (121)<br />
O<br />
O (123-1<strong>25</strong>)<br />
O<br />
X<br />
Notes<br />
Mode 1: OMNI ON, POLY<br />
Mode 3: OMNI OFF, POLY<br />
*1 O X is selectable<br />
*2 Recognized as M=1 even if M≠1<br />
*3 Only for Song parts<br />
Mode 2: OMNI ON, MONO<br />
Mode 4: OMNI OFF, MONO<br />
O: Yes<br />
X: No<br />
93
<strong>EM</strong>-<strong>25</strong>/<strong>EM</strong>-<strong>15</strong><br />
Index<br />
Numerics<br />
2nd TRK . . . . . . . . . . . . . . . . . . . . . . . . .31<br />
A<br />
Advanced. . . . . . . . . . . . . . . . . . . . . . . .16<br />
ALL . . . . . . . . . . . . . . . . . . . . . . . . . . . . .69<br />
Arr<br />
Mem . . . . . . . . . . . . . . . . . . . . . . . . . 60<br />
Split . . . . . . . . . . . . . . . . . . . . . . . . . 62<br />
Arranger. . . . . . . . . . . . . . . . . 11, 21, 84<br />
Split . . . . . . . . . . . . . . . . . . . . . . . . . 62<br />
Stop . . . . . . . . . . . . . . . . . . . . . . . . . 23<br />
B<br />
Beginner . . . . . . . . . . . . . . . . . . . . . . . .16<br />
C<br />
Chord<br />
Finder . . . . . . . . . . . . . . . . . . . . . . . . 19<br />
Memory . . . . . . . . . . . . . . . . . . . . . . 60<br />
Chorus . . . . . . . . . . . . . . . . . . . . . . . . . .59<br />
Chr . . . . . . . . . . . . . . . . . . . . . . . . . . . . .62<br />
Clock Tx . . . . . . . . . . . . . . . . . . . . . . . . .71<br />
Copy . . . . . . . . . . . . . . . . . . . . . . . . . . . .80<br />
D<br />
Delay . . . . . . . . . . . . . . . . . . . . . . . . . . .58<br />
Delete. . . . . . . . . . . . . . . . . . . . . . . . . . .79<br />
Demo . . . . . . . . . . . . . . . . . . . . . . . 13, 84<br />
Destin. . . . . . . . . . . . . . . . . . . . . . . . . . .81<br />
Disk Copy. . . . . . . . . . . . . . . . . . . . . . . .80<br />
Drm. . . . . . . . . . . . . . . . . . . . . . . . . . . . .62<br />
Drum Set . . . . . . . . . . . . . . . . . . . . . . . .27<br />
Drums. . . . . . . . . . . . . . . . . . . . . . . . . . .27<br />
E<br />
Ending . . . . . . . . . . . . . . . . . . . . . . . . . .22<br />
Expert. . . . . . . . . . . . . . . . . . . . . . . . . . .16<br />
F<br />
Feedback Chorus . . . . . . . . . . . . . . . . .59<br />
Fill . . . . . . . . . . . . . . . . . . . . . . . . . . . . . .22<br />
Flanger . . . . . . . . . . . . . . . . . . . . . . . . . .59<br />
G<br />
Game . . . . . . . . . . . . . . . . . . . . . . . . . . .<strong>15</strong><br />
Guess<br />
Style . . . . . . . . . . . . . . . . . . . . . . . . . 18<br />
Tone . . . . . . . . . . . . . . . . . . . . . . . . . 17<br />
H<br />
Hall . . . . . . . . . . . . . . . . . . . . . . . . . . . . .58<br />
I<br />
Impssble. . . . . . . . . . . . . . . . . . . . . . . . .78<br />
Incompat . . . . . . . . . . . . . . . . . . . . . . . .82<br />
Intro . . . . . . . . . . . . . . . . . . . . . . . . . . . .22<br />
K<br />
KBD. . . . . . . . . . . . . . . . . . . . . . . . . . . . .69<br />
Kbd Velocity . . . . . . . . . . . . . . . . . . . . .57<br />
L<br />
Load UPr . . . . . . . . . . . . . . . . . . . . . . . .75<br />
Local . . . . . . . . . . . . . . . . . . . . . . . . . . . .72<br />
Loop . . . . . . . . . . . . . . . . . . . . . . . . . . . .46<br />
Lower . . . . . . . . . . . . . . . . . . . . . . . . . . .<strong>25</strong><br />
LWR<br />
Int . . . . . . . . . . . . . . . . . . . . . . . . . . . 61<br />
Mem . . . . . . . . . . . . . . . . . . . . . . . . . 61<br />
Octv . . . . . . . . . . . . . . . . . . . . . . . . . 60<br />
Split. . . . . . . . . . . . . . . . . . . . . . . . . . 62<br />
Lyrics Tx . . . . . . . . . . . . . . . . . . . . . . . . .70<br />
M<br />
M.Bass . . . . . . . . . . . . . . . . . . . . . . . . . .59<br />
Switch . . . . . . . . . . . . . . . . . . . . . . . 61<br />
M.Drums . . . . . . . . . . . . . . . . . . . . 11, 27<br />
Marker A/B. . . . . . . . . . . . . . . . . . . . . . .46<br />
MEL. . . . . . . . . . . . . . . . . . . . . . . . . . . . .62<br />
Metro<br />
TS. . . . . . . . . . . . . . . . . . . . . . . . . . . . 57<br />
Vol. . . . . . . . . . . . . . . . . . . . . . . . . . . 58<br />
Metro TS . . . . . . . . . . . . . . . . . . . . . . . .26<br />
Metronome . . . . . . . . . . . . . . . . . . . . . .26<br />
MIDI . . . . . . . . . . . . . . . . . . . . . . . . . . . .68<br />
Sync . . . . . . . . . . . . . . . . . . . . . . . . .70<br />
Minus One . . . . . . . . . . . . . . . . . . .46, 62<br />
Mstr Tune. . . . . . . . . . . . . . . . . . . . . . . .57<br />
Music Style . . . . . . . . . . . . . . . . . . . . . .23<br />
Channel . . . . . . . . . . . . . . . . . . . . . .70<br />
N<br />
Note to Arranger . . . . . . . . . . . . . . . . .70<br />
NTA Rx14 . . . . . . . . . . . . . . . . . . . . . . . .70<br />
O<br />
Octave . . . . . . . . . . . . . . . . . . . . . . . . . .60<br />
ORGAN . . . . . . . . . . . . . . . . . . . . . . . . . .11<br />
Organ . . . . . . . . . . . . . . . . . . . . . . . . . . .<strong>25</strong><br />
Split. . . . . . . . . . . . . . . . . . . . . . . . . .62<br />
Original. . . . . . . . . . . . . . . . . . . . . . . . . .22<br />
P<br />
Panel. . . . . . . . . . . . . . . . . . . . . . . . . . . . .8<br />
PIANO . . . . . . . . . . . . . . . . . . . . . . . . . . .11<br />
Piano. . . . . . . . . . . . . . . . . . . . . . . . . . . .26<br />
Plate . . . . . . . . . . . . . . . . . . . . . . . . . . . .58<br />
PLAY® . . . . . . . . . . . . . . . . . . . . . . . . . .30<br />
R<br />
Record . . . . . . . . . . . . . . . . . . . . . . . . . .28<br />
Repeat . . . . . . . . . . . . . . . . . . . . . . . . . .46<br />
Resume. . . . . . . . . . . . . . . . . . . . . . . . . .63<br />
Reverb . . . . . . . . . . . . . . . . . . . . . . . . . .58<br />
Room . . . . . . . . . . . . . . . . . . . . . . . . . . .58<br />
Root . . . . . . . . . . . . . . . . . . . . . . . . . . . .19<br />
Rx . . . . . . . . . . . . . . . . . . . . . . . . . . . . . .69<br />
S<br />
Save . . . . . . . . . . . . . . . . . . . . . . . . . . . .76<br />
Short Delay . . . . . . . . . . . . . . . . . . . . . .59<br />
SMF . . . . . . . . . . . . . . . . . . . . . . . . . . . . .47<br />
Song<br />
Pos P . . . . . . . . . . . . . . . . . . . . . . . . .71<br />
Save . . . . . . . . . . . . . . . . . . . . . . . . .76<br />
Source. . . . . . . . . . . . . . . . . . . . . . . . . . 81<br />
Split. . . . . . . . . . . . . . . . . . . . . . . . . . . . <strong>25</strong><br />
Arranger . . . . . . . . . . . . . . . . . . . . . .62<br />
Lower . . . . . . . . . . . . . . . . . . . . . . . .62<br />
Standard MIDI File . . . . . . . . . . . . . . . 47<br />
STL. . . . . . . . . . . . . . . . . . . . . . . . . . . . . 69<br />
StrStpTx . . . . . . . . . . . . . . . . . . . . . . . . 71<br />
Style . . . . . . . . . . . . . . . . . . . . . . . . . . . 23<br />
Demo . . . . . . . . . . . . . . . . . . . . . . . .14<br />
PC . . . . . . . . . . . . . . . . . . . . . . . . . . .70<br />
Sync Rx. . . . . . . . . . . . . . . . . . . . . . . . . 70<br />
Sync Start. . . . . . . . . . . . . . . . . . . . . . . 23<br />
T<br />
Tempo. . . . . . . . . . . . . . . . . . . . . . . . . . 22<br />
Tone . . . . . . . . . . . . . . . . . . . . . . . . . . . 24<br />
Demo . . . . . . . . . . . . . . . . . . . . . . . .14<br />
Transpose . . . . . . . . . . . . . . . . . . . . . . . 43<br />
Value . . . . . . . . . . . . . . . . . . . . . . . . .57<br />
Trp Value . . . . . . . . . . . . . . . . . . . . . . . 57<br />
Tune . . . . . . . . . . . . . . . . . . . . . . . . . . . 57<br />
TxRx. . . . . . . . . . . . . . . . . . . . . . . . . . . . 69<br />
Type. . . . . . . . . . . . . . . . . . . . . . . . . . . . 20<br />
U<br />
UP1 Octv . . . . . . . . . . . . . . . . . . . . . . . 60<br />
UP2 Octv . . . . . . . . . . . . . . . . . . . . . . . 60<br />
User Program . . . . . . . . . . . . . . . . . . . 64<br />
V<br />
Variation. . . . . . . . . . . . . . . . . . . . . . . . 22<br />
Velocity. . . . . . . . . . . . . . . . . . . . . . . . . 57<br />
Volume . . . . . . . . . . . . . . . . . . . . . . . . . <strong>15</strong><br />
94