RABS 15A - Reloop
RABS 15A - Reloop
RABS 15A - Reloop

Create successful ePaper yourself
Turn your PDF publications into a flip-book with our unique Google optimized e-Paper software.
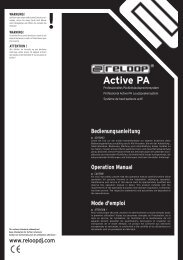
Bezeichnungen<br />
1. Anschlussbuchse für Netzkabel<br />
2. Sicherung<br />
3. EIN-/AUS-Schalter<br />
4. Spannungswahlschalter<br />
5. Lautstärkeregler<br />
6. Hochfrequenz-Equalizer<br />
7. Tieffrequenz-Equalizer<br />
8. Line/Mikrofon-Umschalter<br />
9. Mikronfon-LED<br />
10. Übersteuerungs-LEDs<br />
11. Line-LED<br />
12. Signal-Eingangsbuchse (6,3 mm Klinke)<br />
13. Signal-Eingangsbuchse (XLR)<br />
14. Link-Signal-Ausgangsbuchse (XLR)<br />
15. Stromversorgungs-LED<br />
Designation<br />
1. Connecting jack for mains cable<br />
2. Fuse<br />
3. ON/OFF switch<br />
4. Voltage selector<br />
5. Volume control<br />
6. High frequency equalizer<br />
7. Low frequency equalizer<br />
8. Line/microphone reversing switch<br />
9. Microphone LED<br />
10. Overmodulation LEDs<br />
11. Line LED<br />
12. Signal In jack (6.3 mm jack plug)<br />
13. Signal In jack (XLR)<br />
14. Link Signal In jack (XLR)<br />
15. Power supply LED<br />
Description<br />
1. Connecteur du câble secteur<br />
2. Fusible<br />
3. Interrupteur MARCHE/ARRÊT<br />
4. Sélecteur de tension<br />
5. Volume<br />
6. Égaliseur des aigus<br />
7. Égaliseur des mediums<br />
8. Commutateur Line/Micro<br />
9. DEL microphone<br />
10. DEL de saturation<br />
11. DEL Line<br />
12. Connecteur d'entrée du signal (6,3 mm jack)<br />
13. Connecteur d'entrée du signal (XLR)<br />
14. Connecteur de sortie du signal Link (XLR)<br />
15. DEL alimentation électrique<br />
Installation<br />
1. Um eine optimale Hörbarkeit der hohen Frequenzen zu<br />
gewährleisten, empfehlen wir eine Installation des <strong>Reloop</strong><br />
<strong>RABS</strong>-15 A auf Kopfhöhe des Publikums; nutzen Sie dazu<br />
gegebenenfalls einen geeigneten Lautsprecherständer.<br />
2. Platzieren Sie beim Einsatz eines Mikrofons dieses immer<br />
hinter dem Lautsprecher, um mögliche Feedbackprobleme<br />
beim Einsatz eines Mirkofons zu vermeiden.<br />
HINWEIS!<br />
Wenn Sie den <strong>Reloop</strong> <strong>RABS</strong>-15 A als Boden-Monitor-<br />
Lautspecher verwenden, um einen Musiker mit Mikrofon<br />
selbst zu beschallen, beachten Sie bitte die Bauart Ihres<br />
Mikrofons:<br />
Wenn Sie ein kardiodisches Mikrofon verwenden, platzieren<br />
Sie den Lautsprecher zentral zur Mikrofon-Achse:<br />
Installation<br />
1. For optimum audibility of the high frequencies we<br />
recommend installing the <strong>Reloop</strong> <strong>RABS</strong>-15 A at eye level of<br />
the audience; if necessary, use suitable loudspeaker stands.<br />
2. When using a microphone, be sure to position it at all times<br />
behind the loudspeaker to avoid potential feedback when<br />
activated.<br />
NOTE!<br />
When using the <strong>Reloop</strong> <strong>RABS</strong>-15 A as a ground monitor<br />
loudspeaker for a musician with mic, observe the<br />
following with regard to your microphone system:<br />
When using a cardiodic microphone position the loudspeaker<br />
in line with the mic axis:<br />
Installation<br />
1. Afin de garantir une écoute optimale des fréquences aigues,<br />
nous recommandons d'installer le <strong>Reloop</strong> <strong>RABS</strong>-15 A à<br />
hauteur de tête du public; utiliser au besoin un pied de<br />
haut-parleur adéquat.<br />
2. Lorsque vous utilisez le micro, toujours le placer derrière le<br />
haut-parleur afin de prévenir d'éventuels problèmes de<br />
feedback.<br />
REMARQUE<br />
Si le <strong>Reloop</strong> <strong>RABS</strong>-15 A est utilisé comme haut-parleur<br />
moniteur au sol comme retour pour un musicien avec<br />
microphone, il faut tenir compte du type de construction<br />
du microphone :<br />
Si vous utilisez un microphone à cardiode, centrez le<br />
haut-parleur dans l'axe du microphone :<br />
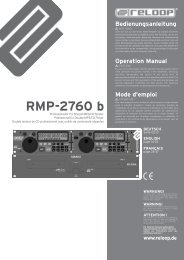
Wenn Sie ein Hyper-kardiodisches oder Super-kardiodisches<br />
Mikrofon verwenden, platzieren Sie den oder die<br />
Lautsprecher in einem 45-Grad-Winkel zur Mikrofon-Achse.<br />
When using a hypercardiodic or super kardiodic microphone<br />
position the loudspeaker at a 45-degree angle to the microphone<br />
axis.<br />
Si vous utilisez un microphone hypercardiode ou supercardiode,<br />
placez le haut-parleur à 45 par rapport à l'axe du micro.<br />
45°<br />
45°<br />
45°<br />
45°<br />
45°<br />
45°<br />
3. Achten Sie bei der Standortwahl darauf, dass eine ausreichende<br />
Luftzirkulation stattfinden kann. Dauerhafte Überhitzung<br />
kann zu Schäden an der integrierten Endstufe führen.<br />
4. Wenn Sie den <strong>Reloop</strong> <strong>RABS</strong>-15 A Lautsprecher aufgehangen (=<br />
"geflogen") installieren wollen, verwenden Sie dazu die<br />
Befestigungs-Vorrichtung auf der Oberseite; auf der<br />
Rückseite finden Sie eine zweite Befestigungs-Vorrichtung,<br />
mit der Sie - falls Ihre Trägeranlage ein solche Befestigung<br />
erlaubt - den Neigungswinkel des Lautsprechers verändern<br />
können.<br />
3. Choose a location which ensures sufficient ventilation of air.<br />
Long-term overheating may damage the integrated final<br />
amplifier.<br />
4. When suspending the <strong>Reloop</strong> <strong>RABS</strong>-15 A loudspeaker (= "fly<br />
mount") use the fixing device attached to the top; there is a<br />
second fixing device to the rear with which - provided your<br />
suspension system allows for such attachment - changes the<br />
inclination of the loudspeaker.<br />
3. Installer le haut-parleur dans un endroit permettant une<br />
circulation d'air suffisante. Une surchauffe prolongée peut<br />
endommager l'ampli intégré.<br />
4. Si vous désirez installer le haut-parleur <strong>Reloop</strong> <strong>RABS</strong>-15 A<br />
accroché au plafond ou au mur (suspendu), utilisez le<br />
dispositif de fixation de la face supérieure ; la face arrière<br />
comporte un deuxième dispositif de fixation qui vous permet,<br />
si le système d'accrochage est adapté, de modifier<br />
l'inclinaison du haut-parleur.<br />
5