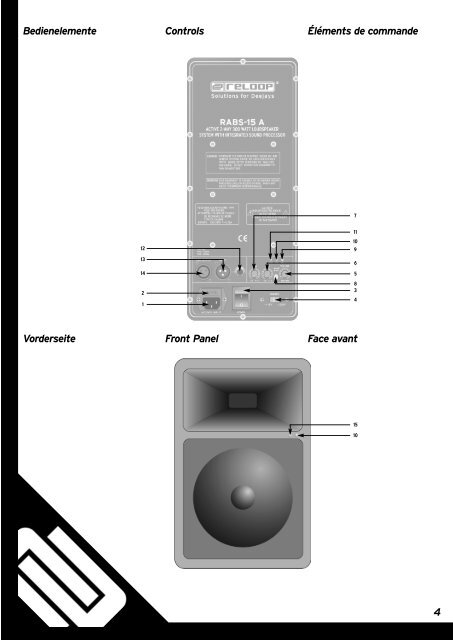
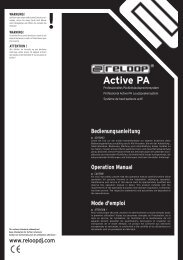
Bedienelemente Controls Éléments de commande 7 12 13 14 2 1 11 10 9 6 5 8 3 4 Vorderseite Front Panel Face avant 15 10 4
Bezeichnungen 1. Anschlussbuchse für Netzkabel 2. Sicherung 3. EIN-/AUS-Schalter 4. Spannungswahlschalter 5. Lautstärkeregler 6. Hochfrequenz-Equalizer 7. Tieffrequenz-Equalizer 8. Line/Mikrofon-Umschalter 9. Mikronfon-LED 10. Übersteuerungs-LEDs 11. Line-LED 12. Signal-Eingangsbuchse (6,3 mm Klinke) 13. Signal-Eingangsbuchse (XLR) 14. Link-Signal-Ausgangsbuchse (XLR) 15. Stromversorgungs-LED Designation 1. Connecting jack for mains cable 2. Fuse 3. ON/OFF switch 4. Voltage selector 5. Volume control 6. High frequency equalizer 7. Low frequency equalizer 8. Line/microphone reversing switch 9. Microphone LED 10. Overmodulation LEDs 11. Line LED 12. Signal In jack (6.3 mm jack plug) 13. Signal In jack (XLR) 14. Link Signal In jack (XLR) 15. Power supply LED Description 1. Connecteur du câble secteur 2. Fusible 3. Interrupteur MARCHE/ARRÊT 4. Sélecteur de tension 5. Volume 6. Égaliseur des aigus 7. Égaliseur des mediums 8. Commutateur Line/Micro 9. DEL microphone 10. DEL de saturation 11. DEL Line 12. Connecteur d'entrée du signal (6,3 mm jack) 13. Connecteur d'entrée du signal (XLR) 14. Connecteur de sortie du signal Link (XLR) 15. DEL alimentation électrique Installation 1. Um eine optimale Hörbarkeit der hohen Frequenzen zu gewährleisten, empfehlen wir eine Installation des <strong>Reloop</strong> <strong>RABS</strong>-15 A auf Kopfhöhe des Publikums; nutzen Sie dazu gegebenenfalls einen geeigneten Lautsprecherständer. 2. Platzieren Sie beim Einsatz eines Mikrofons dieses immer hinter dem Lautsprecher, um mögliche Feedbackprobleme beim Einsatz eines Mirkofons zu vermeiden. HINWEIS! Wenn Sie den <strong>Reloop</strong> <strong>RABS</strong>-15 A als Boden-Monitor- Lautspecher verwenden, um einen Musiker mit Mikrofon selbst zu beschallen, beachten Sie bitte die Bauart Ihres Mikrofons: Wenn Sie ein kardiodisches Mikrofon verwenden, platzieren Sie den Lautsprecher zentral zur Mikrofon-Achse: Installation 1. For optimum audibility of the high frequencies we recommend installing the <strong>Reloop</strong> <strong>RABS</strong>-15 A at eye level of the audience; if necessary, use suitable loudspeaker stands. 2. When using a microphone, be sure to position it at all times behind the loudspeaker to avoid potential feedback when activated. NOTE! When using the <strong>Reloop</strong> <strong>RABS</strong>-15 A as a ground monitor loudspeaker for a musician with mic, observe the following with regard to your microphone system: When using a cardiodic microphone position the loudspeaker in line with the mic axis: Installation 1. Afin de garantir une écoute optimale des fréquences aigues, nous recommandons d'installer le <strong>Reloop</strong> <strong>RABS</strong>-15 A à hauteur de tête du public; utiliser au besoin un pied de haut-parleur adéquat. 2. Lorsque vous utilisez le micro, toujours le placer derrière le haut-parleur afin de prévenir d'éventuels problèmes de feedback. REMARQUE Si le <strong>Reloop</strong> <strong>RABS</strong>-15 A est utilisé comme haut-parleur moniteur au sol comme retour pour un musicien avec microphone, il faut tenir compte du type de construction du microphone : Si vous utilisez un microphone à cardiode, centrez le haut-parleur dans l'axe du microphone : Wenn Sie ein Hyper-kardiodisches oder Super-kardiodisches Mikrofon verwenden, platzieren Sie den oder die Lautsprecher in einem 45-Grad-Winkel zur Mikrofon-Achse. When using a hypercardiodic or super kardiodic microphone position the loudspeaker at a 45-degree angle to the microphone axis. Si vous utilisez un microphone hypercardiode ou supercardiode, placez le haut-parleur à 45 par rapport à l'axe du micro. 45° 45° 45° 45° 45° 45° 3. Achten Sie bei der Standortwahl darauf, dass eine ausreichende Luftzirkulation stattfinden kann. Dauerhafte Überhitzung kann zu Schäden an der integrierten Endstufe führen. 4. Wenn Sie den <strong>Reloop</strong> <strong>RABS</strong>-15 A Lautsprecher aufgehangen (= "geflogen") installieren wollen, verwenden Sie dazu die Befestigungs-Vorrichtung auf der Oberseite; auf der Rückseite finden Sie eine zweite Befestigungs-Vorrichtung, mit der Sie - falls Ihre Trägeranlage ein solche Befestigung erlaubt - den Neigungswinkel des Lautsprechers verändern können. 3. Choose a location which ensures sufficient ventilation of air. Long-term overheating may damage the integrated final amplifier. 4. When suspending the <strong>Reloop</strong> <strong>RABS</strong>-15 A loudspeaker (= "fly mount") use the fixing device attached to the top; there is a second fixing device to the rear with which - provided your suspension system allows for such attachment - changes the inclination of the loudspeaker. 3. Installer le haut-parleur dans un endroit permettant une circulation d'air suffisante. Une surchauffe prolongée peut endommager l'ampli intégré. 4. Si vous désirez installer le haut-parleur <strong>Reloop</strong> <strong>RABS</strong>-15 A accroché au plafond ou au mur (suspendu), utilisez le dispositif de fixation de la face supérieure ; la face arrière comporte un deuxième dispositif de fixation qui vous permet, si le système d'accrochage est adapté, de modifier l'inclinaison du haut-parleur. 5