Bedienungsanleitung ∙ user guide Mode d´eMploi ∙ Manual de ... - LRP
Bedienungsanleitung ∙ user guide Mode d´eMploi ∙ Manual de ... - LRP
Bedienungsanleitung ∙ user guide Mode d´eMploi ∙ Manual de ... - LRP

Create successful ePaper yourself
Turn your PDF publications into a flip-book with our unique Google optimized e-Paper software.
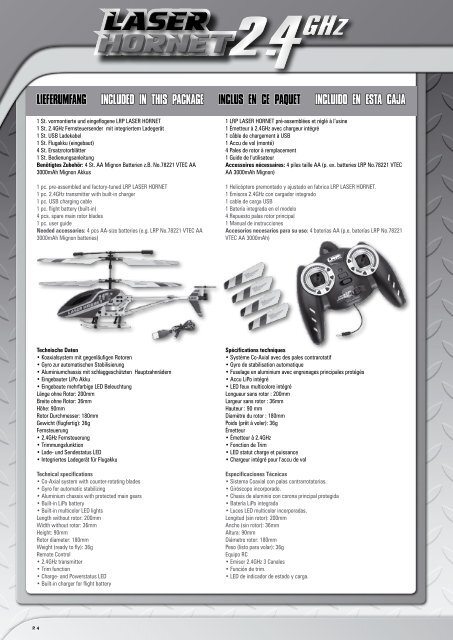
Lieferumfang Inclu<strong>de</strong>d in this package Inclus en ce paquet Incluido en esta caja<br />
Schnellstart Quick Start Départ rapi<strong>de</strong> Inicio rápido<br />
1 St. vormontierte und eingeflogene <strong>LRP</strong> LASER HORNET<br />
1 St. 2.4GHz Fernsteuersen<strong>de</strong>r mit integriertem La<strong>de</strong>gerät<br />
1 St. USB La<strong>de</strong>kabel<br />
1 St. Flugakku (eingebaut)<br />
4 St. Ersatzrotorblätter<br />
1 St. <strong>Bedienungsanleitung</strong><br />
Benötigtes Zubehör: 4 St. AA Mignon Batterien z.B. No.78221 VTEC AA<br />
3000mAh Mignon Akkus<br />
1 pc. pre-assembled and factory-tuned <strong>LRP</strong> LASER HORNET<br />
1 pc. 2.4GHz transmitter with built-in charger<br />
1 pc. USB charging cable<br />
1 pc. flight battery (built-in)<br />
4 pcs. spare main rotor bla<strong>de</strong>s<br />
1 pc. <strong>user</strong> <strong>gui<strong>de</strong></strong><br />
Nee<strong>de</strong>d accessories: 4 pcs AA-size batteries (e.g. <strong>LRP</strong> No.78221 VTEC AA<br />
3000mAh Mignon batteries)<br />
1 <strong>LRP</strong> LASER HORNET pré-assemblées et réglé à l‘usine<br />
1 Émetteur à 2.4GHz avec chargeur intégré<br />
1 câble <strong>de</strong> chargement à USB<br />
1 Accu <strong>de</strong> vol (monté)<br />
4 Pales <strong>de</strong> rotor à remplacement<br />
1 Gui<strong>de</strong> <strong>de</strong> l‘utilisateur<br />
Accessoires nécessaires: 4 piles taille AA (p. ex. batteries <strong>LRP</strong> No.78221 VTEC<br />
AA 3000mAh Mignon)<br />
1 Helicóptero premontado y ajustado en fabrica <strong>LRP</strong> LASER HORNET.<br />
1 Emisora 2.4GHz con cargador integrado<br />
1 cable <strong>de</strong> carga USB<br />
1 Batería integrada en el mo<strong>de</strong>lo<br />
4 Repuesto palas rotor principal<br />
1 <strong>Manual</strong> <strong>de</strong> instrucciones<br />
Accesorios necesarios para su uso: 4 baterías AA (p.e. baterías <strong>LRP</strong> No.78221<br />
VTEC AA 3000mAh)<br />
CHECKLISTE VOR DEM FLUG<br />
1. Überprüfung <strong>de</strong>r Komponenten auf sichtbare Beschädigungen. Beschädigte<br />
Komponenten müssen vor einem erneuten Flug ausgetauscht wer<strong>de</strong>n.<br />
2. Überprüfen aller Schraub- und Steckverbindungen auf festen Sitz. Lose<br />
Schraub- und Steckverbindungen müssen vor <strong>de</strong>m Betrieb gesichert wer<strong>de</strong>n.<br />
3. Überprüfung <strong>de</strong>r Umgebung auf Gefahrenstellen.<br />
4. 4x AA Mignon Batterien in die Fernsteuerung einsetzen.<br />
5. Erst <strong>de</strong>n Helikopter einschalten, dann die Fernsteuerung (diese piepst etwa 3<br />
Sekun<strong>de</strong>n und ist dann einsatzbereit).<br />
6. Funktionskontrolle aller Komponenten.<br />
7. Reichweitentest durchführen.<br />
START<br />
1. Flugakku la<strong>de</strong>n.<br />
2. Trimmungen neutral, Gas in Pos. Aus stellen.<br />
3. Helikopter anschalten.<br />
4. Sen<strong>de</strong>r anschalten.<br />
5. Fliegen.<br />
CHECKLISTE NACH DEM FLUG<br />
1. Hubschrauber ausschalten.<br />
2. Fernsteuerung ausschalten.<br />
3. Überprüfung <strong>de</strong>r Komponenten auf sichtbare Beschädigungen. Beschädigte<br />
Teile vor <strong>de</strong>m nächsten Flug austauschen.<br />
LISTE DE VÉRIFICATION AVANT LE VOL<br />
1. Vérifiez tous les composants pour <strong>de</strong> dommages visibles. Composants<br />
endommagés doivent être échangés avant le vol.<br />
2. Vérifiez tous les raccords à vis et connexions à brancher pour un ajustement<br />
serré. Vis en vrac ou bouchons doivent être serrées avant le vol.<br />
3. Vérifiez votre entourage pour <strong>de</strong>s endroits dangereuses.<br />
4. Insérez 4 piles AA dans l‘émetteur.<br />
5. Allumez l‘hélicoptère avant que vous allumez l‘émetteur (il émet un signal<br />
sonore pendant 3 secon<strong>de</strong>s et alors il est prêt à l‘emploi).<br />
6. Vérifier toutes les fonctions <strong>de</strong> votre hélicoptère avec ses composants.<br />
7. Faire vérifier la portée maximale <strong>de</strong> l‘émetteur.<br />
DÉCOLLAGE<br />
1. Chargez l‘accu <strong>de</strong> vol.<br />
2. Mettez toutes les boutons <strong>de</strong> trim sur neutre. Manette <strong>de</strong>s gaz à la position<br />
Off.<br />
3. Allumez l‘hélicoptère<br />
4. Allumez l‘émetteur<br />
5. Volez!<br />
LISTE DE VÉRIFICATION APRÈS LE VOL<br />
1. Désactivez l‘hélicoptère<br />
2. Désactivez l‘émetteur<br />
3. Vérifiez tous les composants pour <strong>de</strong> dommages visibles. Composants<br />
endommagés doivent être échangés avant le vol.<br />
Technische Daten<br />
• Koaxialsystem mit gegenläufigen Rotoren<br />
• Gyro zur automatischen Stabilisierung<br />
• Aluminiumchassis mit schlaggeschützten Hauptzahnrä<strong>de</strong>rn<br />
• Eingebauter LiPo Akku<br />
• Eingebaute mehrfarbige LED Beleuchtung<br />
Länge ohne Rotor: 200mm<br />
Breite ohne Rotor: 36mm<br />
Höhe: 90mm<br />
Rotor Durchmesser: 180mm<br />
Gewicht (flugfertig): 36g<br />
Fernsteuerung<br />
• 2.4GHz Fernsteuerung<br />
• Trimmungsfunktion<br />
• La<strong>de</strong>- und Sen<strong>de</strong>status LED<br />
• Integriertes La<strong>de</strong>gerät für Flugakku<br />
Technical specifications<br />
• Co-Axial system with counter-rotating bla<strong>de</strong>s<br />
• Gyro for automatic stabilizing<br />
• Aluminium chassis with protected main gears<br />
• Built-in LiPo battery<br />
• Built-in multicolor LED lights<br />
Length without rotor: 200mm<br />
Width without rotor: 36mm<br />
Height: 90mm<br />
Rotor diameter: 180mm<br />
Weight (ready to fly): 36g<br />
Remote Control<br />
• 2.4GHz transmitter<br />
• Trim function<br />
• Charge- and Powerstatus LED<br />
• Built-in charger for flight battery<br />
Spécifications techniques<br />
• Système Co-Axial avec <strong>de</strong>s pales contrarotatif<br />
• Gyro <strong>de</strong> stabilisation automatique<br />
• Fuselage en aluminium avec engrenages principales protégés<br />
• Accu LiPo intégré<br />
• LED feux multicolore intégré<br />
Longueur sans rotor : 200mm<br />
Largeur sans rotor : 36mm<br />
Hauteur : 90 mm<br />
Diamètre du rotor : 180mm<br />
Poids (prêt à voler): 36g<br />
Émetteur<br />
• Émetteur à 2.4GHz<br />
• Fonction <strong>de</strong> Trim<br />
• LED statut charge et puissance<br />
• Chargeur intégré pour l‘accu <strong>de</strong> vol<br />
Especificaciones Técnicas<br />
• Sistema Coaxial con palas contrarrotatorias.<br />
• Giróscopo incorporado.<br />
• Chasis <strong>de</strong> aluminio con corona principal protegida<br />
• Batería LiPo integrada<br />
• Luces LED multicolor incorporadas.<br />
Longitud (sin rotor): 200mm<br />
Ancho (sin rotor): 36mm<br />
Altura: 90mm<br />
Diámetro rotor: 180mm<br />
Peso (listo para volar): 36g<br />
Equipo RC<br />
• Emisor 2.4GHz 3 Canales<br />
• Función <strong>de</strong> trim.<br />
• LED <strong>de</strong> indicador <strong>de</strong> estado y carga.<br />
CHECKLIST BEFORE THE FLIGHT<br />
1. Check all components for visible damage. Damaged components have to be<br />
exchanged before the flight.<br />
2. Check all screw fittings and plug connections for a tight fit. Loose screws or<br />
plugs have to be secured before the flight.<br />
3. Check your surroundings for dangerous spots.<br />
4. Insert 4 pcs. AA-size batteries into the transmitter.<br />
5. Switch on the helicopter before you switch on the receiver (the receiver<br />
beeps for 3 seconds and is then ready to use).<br />
6. Check all functions of your helicopter and its components.<br />
7. Make a maximum range check.<br />
START<br />
1. Charge the flight battery.<br />
2. Put all trim buttons to neutral. Throttle to the Off-position.<br />
3. Switch on helicopter.<br />
4. Switch on transmitter.<br />
5. Fly!<br />
CHECKLIST AFTER THE FLIGHT<br />
1. Switch off helicopter.<br />
2. Switch off transmitter.<br />
3. Check all components for visible damage. Damaged components have to be<br />
exchanged before the next flight.<br />
COMPROBACIÓN ANTES DE VOLAR:<br />
1. Compruebe todos los componentes por si hay algún daño visible. Los componentes<br />
dañados o <strong>de</strong>fectuosos <strong>de</strong>ben <strong>de</strong> cambiarse antes <strong>de</strong> volar<br />
2. Compruebe todos los tornillos y conectores para asegurarse <strong>de</strong> su correcta<br />
fijación. Todos los tornillos y conectores que vea que están flojos <strong>de</strong>be<br />
asegurarlos antes <strong>de</strong> volar.<br />
3. Mire a su alre<strong>de</strong>dor para controlar que el entorno es seguro y no pue<strong>de</strong><br />
causar daños a personas o cosas.<br />
4. Coloque 4 baterías AA en la emisora.<br />
5. Siempre conecte la emisora antes <strong>de</strong> conectar el interruptor <strong>de</strong> ON en el<br />
helicóptero (El receptor pita durante tres segundos, ya está listo para su<br />
uso).<br />
6. Compruebe todas las funciones <strong>de</strong> su helicóptero y <strong>de</strong> sus componentes.<br />
7. Realice una comprobación <strong>de</strong>l alcance <strong>de</strong> la emisora<br />
EMPEZAR A VOLAR:<br />
1. Cargue la batería <strong>de</strong>l mo<strong>de</strong>lo.<br />
2. Coloque todos los trims <strong>de</strong>l emisor en posición neutra. Coloque el Gas abajo.<br />
3. Conecte el helicóptero.<br />
4. Conecte la emisora.<br />
5. A VOLAR.<br />
COMPROBACIÓN DESPUÉS DE VOLAR:<br />
1. Desconecte el helicóptero.<br />
2. Desconecte la emisora.<br />
3. Compruebe posibles daños <strong>de</strong> los componentes. Si algún componente está<br />
dañado <strong>de</strong>be cambiarlo antes <strong>de</strong>l siguiente vuelo.<br />
P. 4 P. 5