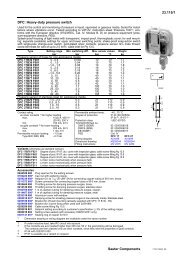
Corel DESIGNER 9 - mv505927.dsf
Corel DESIGNER 9 - mv505927.dsf
Corel DESIGNER 9 - mv505927.dsf

You also want an ePaper? Increase the reach of your titles
YUMPU automatically turns print PDFs into web optimized ePapers that Google loves.
Stellantrieb<br />
Servomoteur<br />
Actuator<br />
Servomotore<br />
Servomotor<br />
Ställdon<br />
Servomotor<br />
Installationsanweisung für die Fachkraft / Monteur<br />
Notice d'installation pour le spécialiste / monteur<br />
Guidelines for the technician / fitter<br />
Informazioni per il personale specializzato di montaggio<br />
Instrucciones para el especialista del ramo / montador<br />
Installatietip voor de vakman / monteur<br />
Installationsinstruktion för installatör / montör<br />
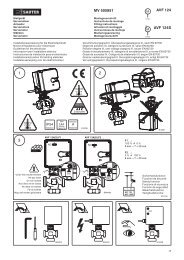
MV 505927 AVN 224S F . 32<br />
M<br />
VU . /BU ./VUP<br />
AVN 224S F132-5<br />
Montagevorschrift<br />
Instructions de montage<br />
Fitting instructions<br />
Istruzioni di montaggio<br />
Instrucciones de montaje<br />
Monteringsanvisning<br />
Montagevoorschrift<br />
Y07552<br />
Y07544<br />
Y07545<br />
Für den Einsatz in üblicher Umgebung<br />
Pour usage dans un environnement normal<br />
For use in normal environments<br />
Per impiego in ambiente usuale<br />
Para el uso en ambiente normal<br />
För användning i normal miljö<br />
Voor toepassing in normale omgeving<br />
V6 . /B6 . DN15...50<br />
VXD/VXE, BXD/BXE<br />
AVN 224S F132-6<br />
V6 . /B6 . DN65...150<br />
VXD/VXE, BXD/BXE<br />
1.1<br />
55<br />
°C<br />
-10<br />
131<br />
°F<br />
14<br />
5-95%RH<br />
min. 0 °C/ 32 °F<br />
max. 130 °C/ 266 °F<br />
CE - 0035<br />
(Directive: 97/ 23/ EC Cat IV)<br />
Only<br />
2.14<br />
(<br />
60<br />
°C<br />
-10<br />
140<br />
°F<br />
14<br />
min. 0 °C/ 32 °F<br />
(max. 110 °C/ 231 °F)<br />
B10543<br />
60<br />
73 230<br />
1.2<br />
b<br />
c<br />
a<br />
90<br />
Type a b c<br />
AVN 224S F132/232 64 289 44<br />
AVN 224S F132-5 58 289 38<br />
AVN 224S F132-6 78 382 60<br />
M10400a<br />
1.3<br />
B10544<br />
F132 F132-5 F132-6<br />
s24 (1×) s14 (1×) s19 (1×)<br />
s17 (1×) s24 (1×)<br />
s24 (1×)<br />
s3, s6 s3, s6 s3, s6<br />
T15 T15 T15<br />
3 3 3<br />
1 1 1<br />
B10545<br />
./2
– 2 – MV 505927<br />
1.4<br />
max.<br />
1<br />
DN15...50 M10 M A<br />
= 15 Nm<br />
DN65...150 M16 M A<br />
= 50 Nm<br />
V6 . / B6 .<br />
DN15...150<br />
VXD/VXE<br />
BXD/BXE<br />
DN65...150<br />
DN15...50<br />
1.4a<br />
max.<br />
2<br />
3 max.<br />
4<br />
VUD / BUD DN65...80<br />
VUE / BUE DN65...150<br />
VUG / BUG DN15...150<br />
VUP DN40...150<br />
1.5<br />
B10546<br />
1.4a<br />
max.<br />
3<br />
4<br />
DN15...50 M10 M A<br />
= 15 Nm<br />
DN65...150 M16 M A = 50 Nm<br />
max.<br />
5 max.<br />
VXD/VXE<br />
BXD/BXE<br />
DN15...50<br />
0378263 001<br />
1<br />
2<br />
6<br />
B10513<br />
1.5<br />
1<br />
2<br />
~ 0<br />
B10435<br />
1.6<br />
1.7<br />
open<br />
closed<br />
2<br />
1<br />
click<br />
1.8<br />
OK<br />
1.7<br />
B10436<br />
B10437<br />
./3
– 3 – MV 505927<br />
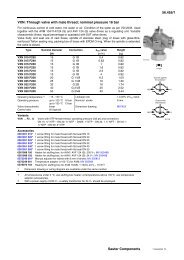
AVN 224S F132<br />
1.8a<br />
AVN 224S F132-5<br />
1.8b<br />
AVN 224S F232<br />
AVN 224S F132-6<br />
2<br />
2.7<br />
3<br />
1<br />
2.1<br />
.<br />
.<br />
.<br />
2.1<br />
.<br />
.<br />
.<br />
1 2<br />
M A<br />
= 10 Nm<br />
2.4<br />
3 4<br />
M A<br />
= 10 Nm<br />
2.4<br />
0 bar<br />
0 bar<br />
0 bar<br />
0 bar<br />
B10547<br />
B10547<br />
1.9<br />
Auto 2.6<br />
1.10<br />
Manual<br />
2.7<br />
0382080 001<br />
3 Nm<br />
B10548<br />
1<br />
2<br />
click<br />
OK<br />
B10511<br />
./4
– 4 – MV 505927<br />
Installationsanweisung für die Elektrofachkraft<br />
Notice d'installation pour l'électricien<br />
Guidelines for the electrician<br />
Informazioni per l'installatore elettrico<br />
Instrucciones de instalación para el electricista<br />
Installationsinstruktion för behörig elektriker<br />
Installatieaanwijzing voor de elektromonteur<br />
Für den Einsatz in üblicher Umgebung<br />
Pour usage dans un environnement normal<br />
For use in normal environments<br />
Per impiego in ambiente usuale<br />
Para el uso en ambiente normal<br />
För användning i normal miljö<br />
Voor toepassing in normale omgeving<br />
2.1<br />
2.2<br />
60 140<br />
°C °F<br />
-10 14 5-95%RH<br />
0386263<br />
Sofware<br />
A<br />
EN 60730<br />
Type<br />
1AA<br />
400ms<br />
EN 60730<br />
EN61558-2-6<br />
24 V~<br />
IP66<br />
EN 60529<br />
1<br />
2<br />
click<br />
230 V~ +<br />
Zubehör<br />
accessoire<br />
optional extras<br />
accessorio<br />
accesorios<br />
tillbehör<br />
toebehoren<br />
min. 0 °C/ 32 °F<br />
max. 130 °C/ 266 °F<br />
B10549<br />
B10441<br />
Verschmutzungsgrad III, Überspannungskategorie III, nach EN 60730<br />
Degré de pollution III, catégorie surtension III, selon EN 60730<br />
Pollution degree III; Overvoltage category III; as per EN 60730<br />
Grado di insudiciamento III, categoria di sovratensione III, EN 60730<br />
Grado de suciedad III , Categoría de altatensión III , según EN 60730<br />
Nedsmutsningsgrad III, Overspanningskategorie III, volgens EN 60730<br />
Grad av nedsmutsningsgrad III, Överspänningskategori III, enligt EN 60730<br />
2.3<br />
100%<br />
0<br />
2a<br />
2b<br />
0 10V<br />
C<br />
M<br />
24 V~<br />
Variant 3pt<br />
y = 0-10V y = 4-20mA yo = 0-10V<br />
21 1 2a 2b 3u<br />
3i<br />
44<br />
21 1<br />
S1 S2 S3 S4<br />
On<br />
Off<br />
S1; S2 = Runtime<br />
S3; S4 = Characteristic<br />
Variant continuous<br />
21 1<br />
2a<br />
Variant 2pt<br />
2a<br />
2b 3u 3i 44<br />
2b<br />
24 V~<br />
24 V~<br />
3u 3i 44<br />
AVN 3pt<br />
L<br />
N<br />
21 1 2a<br />
AVN 224<br />
! % ! !<br />
230 V<br />
2b<br />
B10460<br />
Ersatz von:<br />
Rechange de:<br />
Replacement of:<br />
Rimontaggio di:<br />
Al cambio de:<br />
Reserv av:<br />
Vervanging van:<br />
AVN 3 H . S<br />
AVN 5 H . S<br />
2.3a<br />
./5
– 5 – MV 505927<br />
2.3a<br />
Austausch eines 3-Punkt Ventilantriebs<br />
Remplacement d'un servomoteur de commande 3 points<br />
Replacing a 3-point valve drive<br />
Sostituzione di un azionamento ventilatore a 3 punti<br />
Recambio de un servomotor para válvula a 3 puntos<br />
Byte av 3-punks ventildrivning<br />
Vervanging van een 3-punts afsluiterservomotor<br />
AVN 3 or AVN 5<br />
Terminal 1<br />
Terminal 2<br />
Terminal 3<br />
Terminal 21<br />
AVF 234 / AVN 224<br />
Terminal 1<br />
Terminal 2b<br />
Terminal 2a<br />
Terminal 21<br />
Stetiger Ventilantrieb mit Sicherheitsfunktion oder Federrückzug<br />
Servomoteur de commande proportionnelle avec fonction de mise en sécurité ou rappel par ressort<br />
Continuous-action valve drive with a safety function or a spring return action<br />
Azionamento ventilatore costante con funzione di sicurezza o richiamo a molla<br />
Servomotor continuo para válvula con función de seguridad o muelle de retorno<br />
Kontinuerlig ventildrivning med säkerhetsfunktion eller fjäderretur<br />
Continue afsluiterservomotor met veiligheidsfunctie of veerteruggang<br />
Konfiguration 1:<br />
Configuration 1:<br />
Configuration 1:<br />
Configurazione 1:<br />
Configuración 1:<br />
Konfiguration 1:<br />
Configuratie 1:<br />
AVN 3S or AVN 5S<br />
Terminal 1<br />
Terminal 2<br />
Terminal 3<br />
Terminal 44<br />
Terminal 21<br />
Der Antrieb ist Normgerecht angeschlossen, der Sicherheitsschalter schaltet die Phase<br />
Le servomoteur est branché selon la norme, ce qui signifie que le coupe-circuit coupe le fil de phase<br />
The drive is connected according to the standard, i.e. the safety switch switches the phase<br />
L'azionamento è collegato secondo la norma, cioè l'interruttore di sicurezza inserisce la fase<br />
El accionamiento está conectado conforme a la norma, es decir que el interruptor de seguridad conmuta la fase<br />
Drivningen är korrekt ansluten, dvs. säkerhetsbrytaren styr fasen<br />
De servomotor is volgens de norm aangesloten, d.w.z. de veiligheidsschakelaar schakelt de fase<br />
AVF 234S / AVN 224S<br />
Terminal 1<br />
Terminal 2a<br />
Terminal 2b<br />
Terminal 3u<br />
Terminal 44<br />
Terminal 21<br />
Jumper<br />
Je nach Wirksinn<br />
Selon sens d'action<br />
Depending on the direction of action<br />
In base al senso di funzionamento<br />
Según el sentido de acción<br />
Beroende på funktionsriktning<br />
Al naar gelang de werkingsrichting<br />
Konfiguration 2:<br />
Configuration 2:<br />
Configuration 2:<br />
Configurazione 2:<br />
Configuración 2:<br />
Konfiguration 2:<br />
Configuratie 2:<br />
AVN 3S or AVN 5S<br />
Terminal 1<br />
Terminal 2<br />
Terminal 3<br />
Terminal 44<br />
Terminal 21<br />
Der Sicherheitsschalter schaltet den Nulleiter<br />
Le coupe-circuit coupe le fil neutre<br />
The safety switch switches the neutral (zero) conductor<br />
L'interruttore di securezza inserisce il conduttore neutro<br />
El interruptor de seguridad conmuta el conductor neutro<br />
Säkerhetsbrytaren styr nolledaren<br />
De veiligheidsschakelaar schakelt de nulleider<br />
Output:<br />
30 V<br />
AVF 234S / AVN 224S<br />
Terminal 1<br />
Terminal 2a<br />
Terminal 2b<br />
Terminal 3u<br />
Terminal 44<br />
Terminal 21<br />
Jumper<br />
Je nach Wirksinn<br />
Selon sens d'action<br />
Depending on the direction of action<br />
Inbase al senso di funzionamento<br />
Según el sentido de acción<br />
Beroende på funktionsriktning<br />
Al naar gelang de werkingsrichting<br />
Hinweis: Ein Funktionstest der Notstellung muss nach dem Auswechseln des Hydraulischen Antriebes unbedingt vorgenommen werden<br />
Remarque: Il est indispensable d'effectuer une vérification fonctionnelle de la position de secours après tout remplacement du servomoteur<br />
hydraulique<br />
Note: It is essential to carry a function test on the emergency function after replacing the hydraulic drive<br />
Avvertenza: Dopo la sostituzione dell'azionamento idraulico si deve eseguire assolutamente un test di funzionamento della posizione d'emergenza<br />
Aviso: Es Imprescindible realizar una de funcionamiento de la parada de emergencia después del recambio del accionamiento hidráulico<br />
Observera: Ett funktionstest av nödinställningen skall utan undantag genomföras efter byte av den hydrauliska driften<br />
Opgelet: Na het vervangen van de hydraulische servomotor is een functietest van de nulspanningsterugloop absoluut noodzakelijk<br />
2.4<br />
B10443<br />
./6
– 6 – MV 505927<br />
2.5<br />
Gilt nur für stetig Modus<br />
S'applique uniquement au mode de régulation continue<br />
Applies for continuous mode only<br />
Vale solo per modo "continuo"<br />
Se aplica sólo para modo continuo<br />
Gäller endast för kontinuerlig reglering<br />
Geldt uitsluitend voor continu modus<br />
M<br />
M<br />
1 2 3 4<br />
v<br />
stroke<br />
v<br />
On<br />
= %<br />
stroke<br />
Signal<br />
Signal<br />
1 2 3 4<br />
v<br />
stroke<br />
v<br />
On<br />
stroke<br />
Signal<br />
x 2 lin<br />
Signal<br />
1 2 3 4<br />
v<br />
stroke<br />
v<br />
On<br />
stroke<br />
Signal<br />
Signal<br />
1 2 3 4<br />
v<br />
stroke<br />
v<br />
On<br />
= %<br />
stroke<br />
Signal<br />
Signal<br />
1 2 3 4<br />
v<br />
stroke<br />
v<br />
On<br />
lin<br />
stroke<br />
Signal<br />
Signal<br />
Laufzeit pro mm<br />
Temps de marche<br />
par millimètre<br />
Running time<br />
per mm<br />
Tempo di marcia<br />
per mm<br />
Tiempo de funcionamiento<br />
por mm<br />
Gångtid pr. mm<br />
Looptijd per mm<br />
Schalterkodierung<br />
Codage de commutation<br />
Swith coding<br />
Codifica di intervento<br />
Codificación de conmutación<br />
Kodomkopplare<br />
Schakelcodering<br />
Laufzeit für 14 mm Hub<br />
Temps de marche pour<br />
une course de 14 mm<br />
Running time for 14 mm<br />
of stroke<br />
Tempo di marcia per<br />
corsa 14 mm<br />
Tiempo de funcionamiento<br />
para carrera de 14 mm<br />
Gångtid pr. 14 mm slaglängd<br />
Looptijd voor 14 mm slag<br />
Laufzeit für 20 mm Hub<br />
Temps de marche pour<br />
une course de 20 mm<br />
Running time for 20 mm<br />
of stroke<br />
Tempo di marcia per<br />
corsa 20 mm<br />
Tiempo de funcionamiento<br />
para carrera de 20 mm<br />
Gångtid pr. 20 mm slaglängd<br />
Looptijd voor 20 mm slag<br />
Laufzeit für 40 mm Hub<br />
Temps de marche pour<br />
une course de 40 mm<br />
Running time for 40 mm<br />
of stroke<br />
Tempo di marcia per<br />
corsa 40 mm<br />
Tiempo de funcionamiento<br />
para carrera de 40 mm<br />
Gångtid pr. 40 mm slaglängd<br />
Looptijd voor 40 mm slag<br />
1 2 3 4<br />
2s On<br />
28s ± 1 40s ± 1 80s ± 2<br />
4s<br />
1 2 3 4<br />
On<br />
56s ± 2 80s ± 2 160s ± 4<br />
1 2 3 4<br />
On<br />
6s 84s ± 4 120s ± 4 240s ± 8<br />
On<br />
B10444<br />
./7
– 7 – MV 505927<br />
2.6<br />
Variant continuous<br />
Die Initialisierung wird ausgelöst.<br />
- Beide Tasten (siehe Bild) gleichzeitig 5 s. gedrückt halten. Die Initialisierung beginnt. Während diesem Vorgang<br />
blinken beide LED am Antrieb rot.<br />
- Die Spindel fährt aus bis an den mechanischen Anschlag des Stellgeräts (Ventil voll offen).<br />
- Von dieser Stellung aus wird die Spindel eingezogen bis zum mechanischen Anschlag des Stellgeräts (Ventil zu).<br />
- Die Initialisierung ist beendet. Das Stellgerät geht in die Position ensprechend dem Steuersignal.<br />
- Durch kurzes Antippen einer der beiden Tasten, kann die Initialisierung abgebrochen werden.<br />
B10551<br />
Bei der Initialisierung ist ein Automatisches Ankoppeln möglich.<br />
L'initialisation est déclenchée.<br />
- Presser les deux touches (voir illustration) simultanément pendant 5 s. L'initialisation commence. Pendant cette procédure, les deux<br />
témoins LED sur le servomoteur clignotent en rouge.<br />
- La tige sort jusqu'à la butée mécanique du servomoteur (vanne entièrement ouverte).<br />
- A partir de cette position, la tige est rétractée jusqu'à la butée mécanique du servomoteur (vanne fermée).<br />
- L'initialisation est terminée. Le servomoteur se rend à la position correspondant au signal de commande.<br />
- L'initialisation peut être interrompue par une brève pression sur l'une des deux touches.<br />
Lors de l'initialisation, un accouplement automatique est possible.<br />
Initialisation is started.<br />
- Keep both buttons pressed (see diagram) at the same time for 5 seconds. The initialisation begins. During this procedure, both LEDs on the actuator flash red.<br />
- The spindle extends up to the mechanical stop on the control unit (valve fully open).<br />
- From this position, the spindle is retracted until it hits the mechanical stop on the control unit (valve closed).<br />
- Initialisation is ended. The control unit moves to the position that is in accordance with the control signal.<br />
- Initialisation can be aborted by tapping either of the two buttons.<br />
During initialisation, automatic coupling is possible.<br />
Avviamento dell'inizializzazione.<br />
- Tenere contemporaneamente premuti per 5 s entrambi i tasti (vedere figura). L'inizializzazione viene avviata. Durante questa fase entrambi i LED del<br />
servomotore lampeggiano in rosso.<br />
- Lo stelo viene estratto fino alla battuta meccanica del servomotore (valvola completamente aperta).<br />
- A partire da questa posizione lo stelo viene retratto fino alla battuta meccanica del servomotore (valvola chiusa).<br />
- L'inizializzazione è terminata. Il servomotore va nella posizione corrispondente al segnale di comando.<br />
- Premendo brevemente uno dei due tasti, l'inizializzazione può venire interrotta.<br />
Durante l'inizializzazione è possibile un accoppiamento automatico.<br />
Procedimiento para la inicialización.<br />
- Mantener ambos botones pulsados al mismo tiempo durante 5 segundos (ver figura). La inicialización comienza. Durante este procedimiento, ambos<br />
LEDs en el servomotor parpadean en rojo.<br />
- El eje se extiende buscando el extremo mecánico en la unidad de control (válvula completamente abierta).<br />
- Desde ésta posición, el eje se retrae hasta llegar al extremo opuesto en la unidad de control (válvula cerrada).<br />
- La inicialización ha finalizado. La unidad de control se desplaza a la posición que recibe de la señal de mando.<br />
- La inicialización puede abortarse pulsando cualquiera de los 2 botones.<br />
Durante la inicialización, es posible el acoplamiento automático.<br />
Initialiseringsstart.<br />
- Båda knapparna (se bild) måste hållas nedtryckt minst 5 sekunder.<br />
- Initialiseringen startar. Under tiden blinkar båda LED rödt.<br />
- Ställdonsspindeln trycks ut mot ventilens nedre ändläge (ventil öppen).<br />
- Ställdonsspindeln dras inn mot ventilens övre ändläge (ventil stängd).<br />
- Initialiseringen avslutat. Ställdonet ställer sig i läge motsvarande styrsignalen.<br />
- Med ett snabbt tryck på en av knapparna kan initialiseringen avbrytas.<br />
Vid initialiseringen är automatisk sammankoppling med ventil möjlig.<br />
De initialisatie wordt geactiveerd.<br />
- Beide toetsen (zie afb.) tegelijkertijd 5 sec. ingedrukt houden. De initialisatie begint. Tijdens deze procedure knipperen beide LEDs op de aandrijving rood.<br />
- De spindel schuift tot aan de mechanische aanslag van het corrigerend orgaan naar buiten (afsluiter volledig geopend).<br />
- Vanuit deze stand wordt de spindel tot aan de mechanische aanslag van het corrigerend orgaan weer naar binnen getrokken (afsluiter gesloten).<br />
- De initialisatie is beëindigd. Het corrigerend orgaan gaat in de stand staan die door het besturingssignaal is aangegeven.<br />
- Door kort op één van de beide toetsen te tippen kan de initialisatie onderbroken worden.<br />
Bij de initialisatie is een automatisch aankoppelen mogelijk.<br />
2.7<br />
Tasten-Funktion<br />
Eine der beiden Tasten 5 s gedrückt halten. Handbedienmodus ist aktiv.<br />
Im Handbedienmodus eine der beiden Tasten antippen. Der Antrieb fährt in die entsprechende Richtung bis zum Anschlag.<br />
Antippen einer der beiden Tasten während der Fahrt. Antrieb stoppt.<br />
Im Handbedienmodus eine der beiden Tasten 5 s gebdrückt halten und der Regelmodus ist wieder aktiv.<br />
Fonction des touches<br />
Presser une des deux touches pendant 5 secondes pour activer le mode de service manuel.<br />
Après avoir activé le mode manuel, taper légèrement une des deux touches pour que le servomoteur pase en position de fin de course dans la<br />
direction correspondante. Pour stopper le servomoteur, taper légèrement une des deux touches pendant la course<br />
Pour réactiver le mode de réglage, presser à une des deux touches pendant 5 secondes au mode manual.<br />
Operating the buttons<br />
Press one of the two buttons for 5 seconds in order to activate the manual operating mode.<br />
In manual operating mode, tap either of the two buttons. The actuator moves to the appropriate direction until it reaches the stop.<br />
Tap either of the two buttons while the actuator is moving; the actuator then stops.<br />
In manual operating mode, press either of the two buttons for 5 seconds in order to re-activate the control mode.<br />
Funzione dei tasti<br />
Tenere premuto per 5 s uno dei due tasti. Il modo comando manuale è attivo.<br />
Nel modo comando manuale premere brevemente uno dei due tasti. Il servomotore marcia nella corrispondente direzione fino al fermo.<br />
Premendo brevemente uno dei due tasti durante la marcia, il servomotore si arresta.<br />
Nel modo comando manuale tenere premuto per 5 s uno dei due tasti: il modo di regolazione è di nuovo attivo.<br />
Funcionamiento de los botones<br />
Pulse uno de los dos botones durante 5 segundos para activar el modo de funcionamiento manual.<br />
En modo de funcionamiento manual, pulse cualquiera de los dos botones. El servomotor se mueve en la dirección apropiada hasta alcanzar el tope.<br />
Pulse cualquiera de los dos botones mientras el servomotor se está moviendo; el servomotor entonces se para.<br />
En modo de funcionamiento manual, pulse cualquiera de los dos botones durante 5 segundos para reactivar el modo de regulación.<br />
Manövrering av knapparna<br />
Tryck på en av knapparna i 5 sekunder för att aktivera manuellt mode.<br />
I manuellt mode, tryck på en av de två knapparna. Ställdonet flyttar sig i bestämd riktning tills det når ändläget.<br />
Tryck på någon av knapparna när ställdonet rör på sig; ställdonet stoppar.<br />
I manuellt mode, tryck på någon av knapparna i 5 sekunder för att återgå till styrmode.<br />
Functie van de toetsen<br />
Eén van de beide toetsen gedurende 5 s ingedrukt houden. Manueel bedrijf is geactiveerd.<br />
Bij manueel bedrijf één van de beide toetsen kort aantippen. De aandrijving beweegt zich in de betreffende richting tot aan de aanslag.<br />
Tijdens het openen of sluiten een van de beide toetsen kort aantippen. Aandrijving stopt.<br />
Bij manueel bedrijf één van de beide toetsen 5 s ingedrukt houden en de regelmodus is weer actief.<br />
./8
– 8 – MV 505927<br />
2.8<br />
Beide LED leuchten grün: Wartezeit (45 s) nach abgelaufener Notstellfunktion<br />
Beide LED blinken rot: Initialisierung<br />
Eine LED blinkt grün: Antrieb macht Hub, Richtung entsprechend LED<br />
Eine LED leuchtet grün: Antrieb in Ruhestellung, letzte Laufrichtung ensprechen LED<br />
Eine LED leuchtet rot: Endposition erreicht. Ventilstellung (auf oder zu) entsprechend LED<br />
Keine LED leuchtet: Keine Spannungsversorgung oder im 3 pt Modus keine Ansteuerung<br />
LED Info<br />
Handbetrieb:<br />
Beide LED blinken rot/ grün: Antrieb steht<br />
Eine LED blinkt rot/ grün und die zweite LED blinkt grün: Antrieb macht Hub in Richtung der grün blinkenden LED<br />
B10552<br />
Les deux témoins sont allumés en vert: temps d'attente (45 s) après avoir effectué une fonction de secours.<br />
Les deux témoins LED clignotent en rouge: Initialisation<br />
Un témoin LED clignote en vert: le servomoteur effectue une course, direction correspondant au témoin LED<br />
Un témoin LED est allumé en vert: servomoteur en position de repos, dernier sens de déplacement correspondant au témoin LED<br />
Un témoin LED est allumé en rouge: position finale atteinte. Position de la vanne (ouverte ou fermée) correspondant au témoin LED<br />
Aucun témoin LED n'est allumé: pas d'alimentation électrique ou pas de commande en mode 3 pts<br />
Service manuel:<br />
Les deux témoins LED clignotent en rouge et vert: servomoteur à l'arrêt<br />
Un des témoins clignote en rouge et vert, l'autre clignote en vert: le servomoteur effectue une course en direction du témoin LED qui clignote en vert.<br />
Both LEDs light up green: waiting period (45 s) after emergency function has finished<br />
Both LEDs flash red: initialisation<br />
One LED flashes green: actuator extends its stroke; direction in accordance with LED<br />
One LED lights up green: actuator is in the home position; the last direction of operation is in accordance with LED<br />
One LED lights up red: end position reached. Valve position (open or closed) in accordance with LED<br />
No LED lights up: no power supply or (in 3-pt. mode) no modulation Manual mode: Both LEDs flash red/ green: actuator stands still<br />
Manual mode:<br />
Both LEDs flash red/ green: actuator stands still<br />
One LED flashes red/ green and the other flashes green: actuator extends its stroke towards the green flashing LED<br />
Informazione LED<br />
Entrambi i LED lampeggiano in verde: tempo di attesa (45 s) a funzione di disinserzione di emergenza decorsa.<br />
Entrambi i LED lampeggiano in rosso: inizializzazione.<br />
Un LED lampeggia in verde: il servomotore fa una corsa in direzione del LED corrispondente.<br />
Un LED si illumina in verde: servomotore in posizione di riposo, ultima corsa in direzione del LED corrispondente.<br />
Un LED si illumina in rosso: posizione di fine corsa raggiunta. Posizione della valvola (aperta o chiusa) corrispondentemente al LED<br />
Nessun LED illuminato: niente tensione di alimentazione o, nel funzionamento a 3 posizioni, niente segnale di comando.<br />
Funzionamento manuale:<br />
Entrambi i LED lampeggiano in rosso/verde: il servomotore è fermo.<br />
Un LED lampeggia in rosso/verde e il secondo lampeggia in verde: il servomotore fa una corsa in direzione del LED lampeggiante in verde.<br />
Ambos LEDs se encienden de color verde: periodo de espera (45 s) después de que la función de emergencia ha finalizado<br />
Ambos LEDs parpadean en rojo: inicialización<br />
Un LED parpadea en verde: el servomotor extiende su carrera; la dirección coincide con el LED<br />
Un LED se enciende de color verde: el servomotor está en posición de fábrica, la última dirección de operación coincide con el LED<br />
Un LED se enciende de color rojo: se ha alcanzado la posición final. La posición de la válvula (abierta o cerrada) coincide con el LED<br />
No se enciende el LED: no hay tensión de alimentación o no hay modulación (en modo 3-pt.)<br />
Modo manual:<br />
Ambos LEDs parpadean en rojo/verde: el servomotor se mantiene en la misma posición<br />
Un LED parpadea en rojo/verde y otro parpadea en verde: el servomotor extiende su carrera hacia el LED que parpadea en verde<br />
Båda LED lyser grönt: Väntetid (45 s) efter avslutat nödställfunktio<br />
Båda LED blinkar rödt: Initialisering<br />
En LED blinkar grönt : Ställdonet i drift i riktning med motsvarande LED<br />
En LED lyser grönt : Ställdonet står still. Senaste riktning med motsvarande LED<br />
En LED lyser rödt : Uppnådd ändläge motsvarande LED (öppet eller stängd)<br />
Ingen LED lyser : Ingen spänningsmatning (plint 21)<br />
Manuell drift:<br />
Båda LED blinkar rödt/grönt: Ställdonet står still<br />
En LED blinkar rödt/grönt och den andra LED blinkar grönt: Ställdonet rör sig i riktning mot den grönt blinkande LED<br />
Beide LED's knipperen groen: wachttijd (45 s) na beëindigde nulspanningsterugloop<br />
Beide LEDs knipperen rood: initialisatie<br />
Eén LED knippert groen: de aandrijving maakt een slag, richting volgens de LED<br />
Eén LED brandt groen: aandrijving in rustpositie, laatste looprichting volgens de LED<br />
Eén LED brandt rood: eindpositie bereikt. Stand van de afsluiter (open of dicht) volgens de LED<br />
Geen enkele LED brandt: geen spanningsvoorziening of in de 3-punts-modus geen aansturing<br />
Handbediening:<br />
Beide LED's knipperen rood/groen: aandrijving staat stil<br />
Eén LED knippert rood/groen en de andere LED knippert groen: de aandrijving maakt een slag in de richting van de groen knipperende LED<br />
2.9 2.10<br />
0313815 001<br />
zu<br />
fermé<br />
closed<br />
chiuso<br />
cerrado<br />
stängd<br />
dicht<br />
B10447<br />
Isolationsgrenze<br />
Limite de l'isolation<br />
Insulation limit<br />
Limite di isolamento<br />
Límite de aislamiento<br />
isoleringsgräns<br />
isolatiegrens<br />
B10448<br />
./9
– 9 – MV 505927<br />
2.11<br />
P < PN<br />
Druckprüfung nur bei geöffnetem Ventil<br />
Contrôle de pression uniquement lorsque la vanne est ouverte<br />
Pressure test only when valve is open<br />
Prova a pressione solo a valvola aperta<br />
Prueba de presión sólo cuando la válvula está abierta<br />
Trycktest endast när ventilen är öppen<br />
Drukcontrole uitsluitend bij geopende afsluiter<br />
0 bar<br />
P<br />
0 bar<br />
P<br />
B10553<br />
2.12<br />
B10527<br />
2.13<br />
V 6 . . .<br />
Schliessvorgang: gegen den Druck<br />
Fermeture contre la pression<br />
Closes against the pressure<br />
Chiusura. contro la pressione<br />
Cierra contra la presión<br />
Stänger mot trycket<br />
AB<br />
Sluitprocedure: tegen de druk<br />
A<br />
Schliessvorgang: mit dem Druck<br />
Fermeture avec la pression<br />
Closes with the pressure<br />
Chiusura. con la pressione<br />
Cierra con la presión<br />
Stänger med trycket<br />
Sluitprocedure:met de druk mee<br />
AB<br />
A<br />
AB A AB A<br />
036042100<br />
AB<br />
A<br />
B 6 . . .<br />
Mischventil<br />
Vanne mélangeuse<br />
Control valve<br />
Valvola miscelatrice<br />
Válvula de control<br />
Blandningsventil<br />
Mengafsluiter<br />
Verteilventil<br />
Vanne de distribution<br />
Diverting valve<br />
Valvola deviatrice<br />
Válvula diversora<br />
Fördelningsventil<br />
Verdeelafsluiter<br />
AB<br />
A<br />
AB<br />
A<br />
B<br />
B<br />
./10
– 10 – MV 505927<br />
, p max.<br />
2.14<br />
V G M<br />
(bar)<br />
, ps<br />
G M<br />
(bar)<br />
V<br />
, p max.<br />
G M<br />
(bar)<br />
, ps<br />
G M<br />
(bar)<br />
V<br />
, p max.<br />
G M<br />
(bar)<br />
, ps<br />
G M<br />
(bar)<br />
AVN 224S F132-5<br />
V6F15F374 10 6 16 16 V6G15F374 16 6 25 25 V6S15F375 16 6 32 32<br />
V6F15F364 10 6 16 16 V6G15F364 16 6 25 25 V6S15F365 16 6 32 32<br />
V6F15F354 10 6 16 16 V6G15F354 16 6 25 25 V6S15F355 16 6 32 32<br />
V6F15F344 10 6 16 16 V6G15F344 16 6 25 25 V6S15F345 16 6 32 32<br />
V6F15F334 10 6 16 16 V6G15F334 16 6 25 25 V6S15F335 16 6 32 32<br />
V6F15F324 10 6 16 16 V6G15F324 16 6 25 25 V6S15F325 16 6 32 32<br />
V6F15F314 10 6 16 16 V6G15F314 16 6 25 25 V6S15F315 16 6 32 32<br />
V6F15F304 10 6 16 16 V6G15F304 16 6 25 25 V6S15F305 16 6 32 32<br />
V6F20F304 10 6 16 16 V6G20F304 16 6 25 25 V6S20F305 16 6 25 32<br />
V6F25F924 10 6 14 16 V6G25F924 14 6 14 25 V6S25F925 10 6 14 32<br />
V6F25F914 10 6 14 16 V6G25F914 14 6 14 25 V6S25F915 10 6 14 32<br />
V6F25F304 10 6 14 16 V6G25F304 14 6 14 25 V6S25F305 10 6 14 32<br />
V6F32F304 10 6 14 16 V6G32F304 10 6 14 25 V6S32F305 10 6 14 32<br />
V6F40F304 4.5 5.7 6.6 16 V6G40F304 4.5 5.7 6.6 25 V6S40F305 4.5 5.7 6.6 32<br />
V6F50F924 3 3.9 4.3 16 V6S50F925 3 3.9 4.2 32<br />
V6F50F914 3 3.9 4.3 16 V6S50F915 3 3.9 4.2 32<br />
V6F50F304 3 3.9 4.3 16 V6G50F304 3 3.9 4.3 25 V6S50F305 3 3.9 4.2 32<br />
B6F15F324 10 6 16 16 B6G15F324 16 6 25 25 B6S15F325 16 6 32 32<br />
B6F15F314 10 6 16 16 B6G15F314 16 6 25 25 B6S15F314 16 6 32 32<br />
B6F15F304 10 6 16 16 B6G15F304 16 6 25 25 B6S15F304 16 6 32 32<br />
B6F20F304 10 6 16 16 B6G20F304 16 6 25 25 B6S20F305 16 6 25.1 32<br />
B6F25F924 10 6 14 16 B6S25F925 10 6 14 32<br />
B6F25F914 10 6 14 16 B6S25F915 10 6 14 32<br />
B6F25F304 10 6 14 16 B6G25F304 10 6 14 25 B6S25F305 10 6 14 32<br />
B6F32F304 10 6 14 16 B6G32F304 10 6 14 25 B6S32F305 10 6 14 32<br />
B6F40F304 4.5 5.7 6.6 16 B6G40F304 4.6 5.7 6.6 25 B6S40F304 4.5 5.7 6.6 32<br />
B6F50F924 3 3.9 4.3 16 B6S50F925 3 3.9 4.3 32<br />
B6F50F914 3 3.9 4.3 16 B6S50F915 3 3.9 4.3 32<br />
B6F50F304 3 3.9 4.3 16 B6G50F304 3 3.9 4.3 25 B6S50F305 3 3.9 4.3 32<br />
AVN 224S F132-6<br />
V6F65F304 2.5 2.5 3 16 V6S65F305 2.5 2.8 2.5 32<br />
V6F80F924 1.5 1.6 2 16 V6S80F925 1.5 1.9 1.6 32<br />
V6F80F914 1.5 1.6 2 16 V6S80F915 1.5 1.9 1.6 32<br />
V6F80F304 1.5 1.6 2 16 V6S80F305 1.5 1.9 1.6 32<br />
V6F100F304 1 1.1 1.2 16 V6S100F305 1 1.2 1.1 32<br />
V6F125F304 0.6 0.7 0.8 16 V6S125F305 0.6 0.8 0.7 32<br />
V6F150F304 0.4 0.5 0.5 16 V6S150F305 0.4 0.5 0.5 32<br />
B6F65F304 2.5 2.5 3 16 B6S65F305 2.5 2.5 3 32<br />
B6F80F924 1.5 1.6 3 16 B6S80F925 1.5 1.6 2 32<br />
B6F80F914 1.5 1.6 2 16 B6S80F915 1.5 1.6 2 32<br />
B6F80F304 1.5 1.6 2 16 B6S80F905 1.5 1.6 2 32<br />
B6F100F304 1 1.1 1.2 16 B6S100F305 1 1.1 1.2 32<br />
B6F125F304 0.6 0.7 0.8 16 B6S125F305 0.6 0.7 0.8 32<br />
B6F150F304 0.4 0.5 0.5 16 B6S150F305 0.4 0.5 0.5 32<br />
AVN 224S F132<br />
VUG15F374 16 6 25 25 BUG15F334 16 6 25 25<br />
VUG15F364 16 6 25 25 BUG15F324 16 6 25 25<br />
VUG15F354 16 6 25 25 BUG15F314 16 6 25 25<br />
VUG15F344 16 6 25 25 BUG15F304 16 6 25 25<br />
VUG15F334 16 6 25 25<br />
VUG15F324 16 6 25 25<br />
VUG15F314 16 6 25 25<br />
VUG15F304 16 6 25 25<br />
VUG20F304 16 6 25 25 BUG20F304 16 6 25 25<br />
VUG25F304 16 6 17 25 BUG25F304 16 6 17 25<br />
VUG32F304 10.5 6 10.5 25 BUG32F304 10.5 6 10.5 25<br />
VUG40F304 6.5 6 6.5 25 BUG40F304 6.5 6 6.5 25<br />
VUG50F304 4 4 4 25 BUG50F304 4 6 4 25<br />
VUG65F304 3 2.6 3 25 BUG65F304 3 1 2.5 25<br />
VUG80F304 2 1.7 2 25 BUG80F304 2 0.8 2 25<br />
VUG100F304 1.1 1.1 1.1 25 BUG100F304 1.1 0.5 1.1 25<br />
VUG125F304 0.8 0.8 0.8 25 BUG125F304 0.8 0.4 0.8 25<br />
VUG150F304 0.6 0.6 0.6 25 BUG150F304 0.6 0.3 0.6 25<br />
AVN 224S F232<br />
VUP40F304 25 - 25 - VUP80F304 12 - 15 - VUP150F304 4 - 4 -<br />
VUP50F304 20 - 25 - VUP100F304 9 - 12 -<br />
VUP65F304 16 - 17 - VUP125F304 6 - 6 -<br />
V: Ventiltyp; Type de vanne; Type of valve; Tipo di valvola; Tipo de válvula; Typ av ventil; Afsluitertype<br />
G: gegen Druck schliessend; Fermeture contre la pression; Closes against the pessure; Chiusura contro la pressione;<br />
Cierra contra la presión; Stänger med tryck; Tegen de druk sluitend<br />
M: mit Druck schliessend; Fermeture avec la pression; Closes with the pressure; Chiusura con la pressione; Cierra con la presión;<br />
Stänger med tryck; Met de druk mee sluitend<br />
./11
– 11 –<br />
2.15<br />
Leckdurchfluss: max. 0,05% Kvs<br />
Schliesszeit: DN50 0-30 s<br />
Schliesszeit: DN65 Tg = DN<br />
2<br />
Débit de fuite: max. 0,05% Kvs<br />
Temps de fermeture: DN50 0-30 s<br />
Temps de fermeture: DN65 Tg = DN<br />
2<br />
Leakage rate: max. 0,05% Kvs<br />
Closing time:<br />
Closing time:<br />
DN50 0-30 s<br />
DN65 Tg = DN<br />
2<br />
Portata di trafilamento: max. 0,05% Kvs<br />
Tempo di chiusura: DN50 0-30 s<br />
Tempo di chiusura: DN65 Tg = DN<br />
2<br />
Fugas:<br />
màx. 0,05% Kvs<br />
Tiempo de cierre: DN50 0-30 s<br />
Tiempo de cierre: DN65 Tg = DN<br />
2<br />
Läckageflöde:<br />
Stängningstid:<br />
Stängningstid:<br />
max. 0,05% Kvs<br />
DN50 0-30 s<br />
DN65 Tg = DN<br />
2<br />
Lekkage:<br />
Sluittijd:<br />
Sluittijd:<br />
max. 0,05% Kvs<br />
DN50 0-30 s<br />
DN65 Tg = DN<br />
2<br />
./12
– 12 –<br />
Deinstallationsanweisung<br />
Instructions pour de démontage<br />
De-installation instructions<br />
Istruzioni di disinstallazione<br />
Instrucción de desinstalación<br />
Isärtagningsinstruktion<br />
Instructie voor het verwijderen<br />
3.1<br />
0 bar<br />
0 bar<br />
B10554<br />
3.2 AVN 224S F132<br />
5 6<br />
2<br />
4<br />
8<br />
3 3 4<br />
0382080 001<br />
1<br />
7<br />
~ 0<br />
B10555<br />
AVN 224S F232<br />
1 2 6<br />
0382080 001<br />
~ 0<br />
5<br />
3<br />
4<br />
B10623<br />
Dokument aufbewahren/Ce document est à conserver/Retain this document/Conservare il documento/Guardar el documento/<br />
Spara dokumenationen/Document bewaren<br />
© Fr. Sauter AG CH-4016 Basel (Schweiz)<br />
Tel. +41 61 - 695 55 55 Fax +41 61 - 695 55 10<br />
http://www.sauter-controls.com<br />
e-mail: info@sauter-controls.com<br />
505927033 S11<br />
Printed in Switzerland