Télécharger la notice de mise en service(fichier PDF 0.67 ... - Salmson
Télécharger la notice de mise en service(fichier PDF 0.67 ... - Salmson
Télécharger la notice de mise en service(fichier PDF 0.67 ... - Salmson

You also want an ePaper? Increase the reach of your titles
YUMPU automatically turns print PDFs into web optimized ePapers that Google loves.
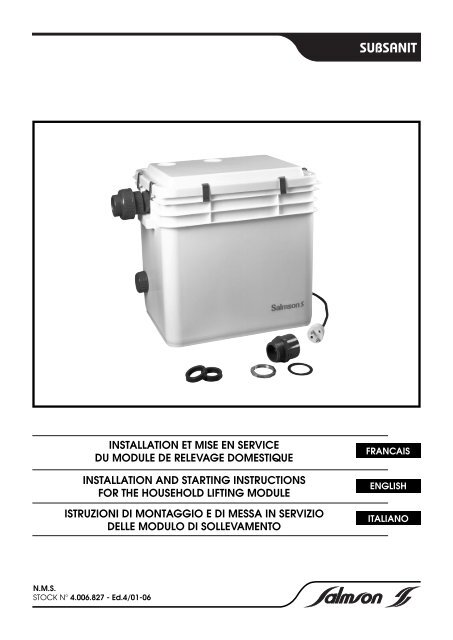
SUBSANIT<br />
INSTALLATION ET MISE EN SERVICE<br />
DU MODULE DE RELEVAGE DOMESTIQUE<br />
INSTALLATION AND STARTING INSTRUCTIONS<br />
FOR THE HOUSEHOLD LIFTING MODULE<br />
ISTRUZIONI DI MONTAGGIO E DI MESSA IN SERVIZIO<br />
DELLE MODULO DI SOLLEVAMENTO<br />
FRANCAIS<br />
ENGLISH<br />
ITALIANO<br />
N.M.S.<br />
STOCK N° 4.006.827 - Ed.4/01-06
DÉCLARATION DE CONFORMITÉ CE<br />
EC DECLARATION OF CONFORMITY<br />
Le fabricant/The manufacturer<br />
POMPES SALMSON<br />
53 Boulevard <strong>de</strong> <strong>la</strong> République<br />
Espace Lumière – Bâtim<strong>en</strong>t 6<br />
78400 CHATOU – France<br />
Déc<strong>la</strong>re que les types <strong>de</strong> pompes désignés ci-<strong>de</strong>ssous,<br />
Dec<strong>la</strong>res that the hereun<strong>de</strong>r types of pumps,<br />
SUBSANIT - 2<br />
sont conformes aux dispositions <strong>de</strong>s directives :<br />
are in conformity with the disposals of the directives :<br />
- "Basse T<strong>en</strong>sion" modifiée (Directive 73/23/CEE)<br />
- "Low Voltage" modified (73/23/CEE Directive)<br />
- "Compatibilité Electromagnétique" (Directive 89/336 CEE)<br />
- "Electromagnetic compatibility" (89/336 CEE directive)<br />
- "Produits <strong>de</strong> construction" modifiée (Directive 89/106/CEE)<br />
- "Construction products" modified (Directive 89/106/CEE)<br />
et aux légis<strong>la</strong>tions nationales les transposant,<br />
and with the relevant national legis<strong>la</strong>tion,<br />
Organisme : CSTB – 44323 Nantes – France<br />
Attestation d'exam<strong>en</strong> CE : GPE 03-048<br />
Body: CSTB – 44323 Nantes – France<br />
CE Examination certificate: GPE 03-048<br />
sont égalem<strong>en</strong>t conformes aux dispositions <strong>de</strong>s normes europé<strong>en</strong>nes harmonisées suivantes :<br />
are also in conformity with the disposals of the following harmonized European standards:<br />
Pr EN 13 386<br />
EN 61000-6-1<br />
EN 61000-6-2<br />
EN 61000-6-3<br />
EN 61000-6-4<br />
EN 12050-2<br />
R. DODANE<br />
Responsable Qualité<br />
Quality Manager<br />
Laval, le 28 avril 2004<br />
2
FRANÇAIS<br />
DECLARATION CE DE CONFORMITE<br />
Pompes SALMSON déc<strong>la</strong>re que les produits<br />
désignés dans <strong>la</strong> prés<strong>en</strong>te déc<strong>la</strong>ration sont conformes<br />
aux dispositions <strong>de</strong>s directives suivantes et aux<br />
légis<strong>la</strong>tions nationales les transposant : °Basse<br />
t<strong>en</strong>sion 73/23/CEE modifiée, Compatibilté<br />
électromagnétique 89/336/CEE modifiée, Produits <strong>de</strong><br />
construction 89/106/CEE modifiée et égalem<strong>en</strong>t aux<br />
normes harmonisées suivantes :<br />
PR EN 13 386-EN 61000-6-1/-6-2/-6-3/-6-4-<br />
EN12050-2<br />
ELLINIKA<br />
CE <br />
Pompes SALMSON <br />
<br />
<br />
:<br />
« »<br />
73/23/, <br />
« » 89/336/,<br />
89/106/ <br />
: PR EN 13 386-<br />
EN 61000-6-1/-6-2/-6-3/-6-4- EN12050-2<br />
PORTUGUES<br />
DECLARAÇÃO "C.E." DE CONFORMIDADE<br />
Pompes SALMSON <strong>de</strong>c<strong>la</strong>ra que os materiais<br />
<strong>de</strong>signados na pres<strong>en</strong>te <strong>de</strong>c<strong>la</strong>ração obe<strong>de</strong>cem às<br />
disposições da directiva e às legis<strong>la</strong>ções nacionais<br />
que as transcrevem :Directiva <strong>de</strong> baixa voltagem<br />
73/23/CEE,compatibilida<strong>de</strong> electromagnética<br />
89/336/CEE produtos <strong>de</strong> construção 89/106/CEE<br />
Obe<strong>de</strong>cem também às disposições das seguintes<br />
normas europeias harmonizadas: PR EN 13 386-EN<br />
61000-6-1/-6-2/-6-3/-6-4- EN12050-2<br />
ESKY<br />
PROHLÁŠENÍ O SHOD<br />
Spol<strong>en</strong>ost Pompes SALMSON proh<strong>la</strong>šuje, •e<br />
výrobky uve<strong>de</strong>né v tomto prohláš<strong>en</strong>í odpovídají<br />
ustanov<strong>en</strong>ím ní•e uve<strong>de</strong>ných smrnic a národním<br />
právním pedpism, které je pejímají:<br />
„Nízké naptí“ 73/23/EHS ve znní pozdjších<br />
zmn,Elektromagnetická kompatibilita“ 89/336/EHS<br />
ve znní pozdjších zmn Stavební produkty<br />
89/106/EHS ve znní pozdjších zmn<br />
a rovn• splují po•adavky následujících<br />
harmonizovaných norem: PR EN 13 386-EN 61000-<br />
6-1/-6-2/-6-3/-6-4- EN12050-2<br />
LIETUVISKAI<br />
EB ATITIKTIES DEKLARACIJA<br />
Pompes SALMSON pareiškia, kad šioje<br />
<strong>de</strong>k<strong>la</strong>racijoje nurodyti gaminiai atitinka ši direktyv<br />
ir jas perkeliani nacionalini statym nuostatus :<br />
•ema tampa » 73/23/EEB, pakeista,<br />
Elektromagnetinis su<strong>de</strong>rinamumas » 89/336/EEB,<br />
pakeista Statybos gaminiai 89/106/EEB, pakeista<br />
ir taip pat šias harmonizuotas normas : PR EN 13<br />
386-EN 61000-6-1/-6-2/-6-3/-6-4- EN12050-2<br />
ESPANOL<br />
DECLARACIÓN DE CONFORMIDAD “CE”<br />
Pompes SALMSON <strong>de</strong>c<strong>la</strong>ra que los materiales<br />
citados <strong>en</strong> <strong>la</strong> pres<strong>en</strong>ta <strong>de</strong>c<strong>la</strong>ración están conformes<br />
con <strong>la</strong>s disposiciones <strong>de</strong> <strong>la</strong>s sigui<strong>en</strong>tes directivas y<br />
con <strong>la</strong>s legis<strong>la</strong>ciones nacionales que les son<br />
aplicables: Directiva sobre equipos <strong>de</strong> baja t<strong>en</strong>sión<br />
73/23/CEE modificada, Compatibilidad<br />
electromagnética 89/336/CEE modificada, Productos<br />
<strong>de</strong> construcción 89/106/CEE modificada Igualm<strong>en</strong>te<br />
están conformes con <strong>la</strong>s disposiciones <strong>de</strong> <strong>la</strong>s<br />
sigui<strong>en</strong>tes normas europeas armonizadas : PR EN 13<br />
386-EN 61000-6-1/-6-2/-6-3/-6-4- EN12050-2<br />
ITALIANO<br />
DICHIARAZIONE DI CONFORMITA' "CE"<br />
Pompes SALMSON dichiara che i prodotti <strong>de</strong>scritti<br />
nel<strong>la</strong> pres<strong>en</strong>te<br />
dichiarazione sono conformi alle disposizioni <strong>de</strong>lle<br />
segu<strong>en</strong>ti direttive nonché alle legis<strong>la</strong>zioni nazionali<br />
che le traspongono: bassa t<strong>en</strong>sione 73/23/CEE<br />
modificata, compatibilità elettromagnetica<br />
89/336/CEE modificata prodotti da costruzione<br />
89/106/CEE Sono pure conformi alle disposizioni<br />
<strong>de</strong>lle segu<strong>en</strong>ti norme europee armonizzate: PR EN 13<br />
386-EN 61000-6-1/-6-2/-6-3/-6-4- EN12050-2<br />
SUOMI<br />
CE-VAATIMUSTENMUKAISUUSVAKUUTUS<br />
SALMSON-pumput vakuuttaa, että tässä<br />
vakuutuksessa kuvatut tuotteet ovat seuraavi<strong>en</strong><br />
direktiivi<strong>en</strong> määräyst<strong>en</strong> sekä niihin sovellettavi<strong>en</strong><br />
kansallist<strong>en</strong> <strong>la</strong>kiasetust<strong>en</strong> mukaisia: Mata<strong>la</strong> jännite<br />
Muutettu 73/23/CEE, Sähkömagneettin<strong>en</strong><br />
yhte<strong>en</strong>sopivuus Muutettu 89/336/CEE<br />
Rak<strong>en</strong>nustuotteet Muutettu 89/106/CEE<br />
Lisäksi ne ovat seuraavi<strong>en</strong> yh<strong>de</strong>nmukaistettuj<strong>en</strong><br />
normi<strong>en</strong> mukaisia: PR EN 13 386-EN 61000-6-1/-6-<br />
2/-6-3/-6-4- EN12050-2<br />
EESTI<br />
VASTAVUSTUNNISTUS<br />
Firma Pompes SALMSON kinnitab, et selles<br />
vastavustunnistuses kirjeldatud tooted on kooskõ<strong>la</strong>s<br />
alljärgnevate direktiivi<strong>de</strong> sätetega ning riiklike<br />
seadusandlustega, mis nimetatud direktiivid üle on<br />
võtnud: Madalpingeseadmed 73/23/EMÜ,<br />
Elektromagnetiline ühilduvus 89/336/EMÜ<br />
Ehitustooted 89/106/EMÜ Samuti on tooted<br />
kooskõ<strong>la</strong>s alljärgnevate harmoniseeritud<br />
standarditega: PR EN 13 386-EN 61000-6-1/-6-2/-6-<br />
3/-6-4- EN12050-2<br />
MAGYAR<br />
EK MEGFELELSÉGI NYILATKOZAT<br />
A Pompes SALMSON kijel<strong>en</strong>ti, hogy a jel<strong>en</strong><br />
megfelelségi nyi<strong>la</strong>tkozatban megjelölt termékek<br />
megfelelnek a következ irányelvek elírásainak,<br />
va<strong>la</strong>mint azok nemzeti jogr<strong>en</strong>dbe átültetett<br />
r<strong>en</strong><strong>de</strong>lkezéseinek: Módosított 73/23/EGK<br />
„Kisfeszültség vil<strong>la</strong>mos termékek (LVD)”,<br />
Módosított 89/336/EGK „Elektromágneses<br />
összeférhetség (EMC)” Módosított 89/106/EGK<br />
„Építési termékek” va<strong>la</strong>mint a következ harmonizált<br />
szabványoknak: PR EN 13 386-EN 61000-6-1/-6-2/-<br />
6-3/-6-4- EN12050-2<br />
DANSK<br />
EF OVERENSSTEMMELSESERKLÆRING<br />
SALMSON pumper erklærer, at produkterne, som<br />
beskrives i <strong>de</strong>nne erklæring, er i over<strong>en</strong>sstemmelse<br />
med bestemmelserne i følg<strong>en</strong><strong>de</strong> direktiver, samt <strong>de</strong><br />
nationale lovgivninger, <strong>de</strong>r g<strong>en</strong>nemfører <strong>de</strong>m:<br />
Lav spændings direktivet 73/23/EØF, ændret<br />
Direktiv 89/336/EØF vedrør<strong>en</strong><strong>de</strong> elektromagnetisk<br />
kompatibilitet, ændret , De er ligele<strong>de</strong>s i<br />
over<strong>en</strong>sstemmelse med , Direktiv 89/106/EØF<br />
vedrør<strong>en</strong><strong>de</strong> bestemmelser om byggevarer, ændret<br />
følg<strong>en</strong><strong>de</strong> harmonisere<strong>de</strong> europæiske standar<strong>de</strong>r: PR<br />
EN 13 386-EN 61000-6-1/-6-2/-6-3/-6-4-EN12050-2<br />
NEDERLANDS<br />
EG-VERKLARING VAN CONFORMITEIT<br />
Pompes SALMSON verk<strong>la</strong>art dat <strong>de</strong> in <strong>de</strong>ze<br />
verk<strong>la</strong>ring vermel<strong>de</strong> product<strong>en</strong> voldo<strong>en</strong> aan <strong>de</strong><br />
bepaling<strong>en</strong> van <strong>de</strong> volg<strong>en</strong><strong>de</strong> richtlijn<strong>en</strong> ev<strong>en</strong>als aan<br />
<strong>de</strong> nationale wetgeving<strong>en</strong> waarin <strong>de</strong>ze bepaling<strong>en</strong><br />
zijn overg<strong>en</strong>om<strong>en</strong>: <strong>la</strong>agspanningsrichtlijn 73/23/EEG<br />
gewijzigd,elektromagnetische compatibiliteit<br />
89/336/EEG gewijzigd bouwproduct<strong>en</strong> 89/106/EEG<br />
gewijzigd De product<strong>en</strong> voldo<strong>en</strong> ev<strong>en</strong>e<strong>en</strong>s aan <strong>de</strong><br />
volg<strong>en</strong><strong>de</strong> geharmoniseer<strong>de</strong> norm<strong>en</strong>: PR EN 13 386-<br />
EN 61000-6-1/-6-2/-6-3/-6-4- EN12050-2<br />
SVENSKA<br />
ÖVERENSSTÄMMELSEINTYG<br />
Pompes SALMSON intygar att materialet som<br />
beskrivs i följan<strong>de</strong> intyg över<strong>en</strong>sstämmer med<br />
bestämmelserna i följan<strong>de</strong> direktiv och nationel<strong>la</strong><br />
<strong>la</strong>gstiftningar som inför <strong>de</strong>m: EG-<br />
LŒgspŠnningsdirektiv 73/23/EWG med fšljan<strong>de</strong><br />
Šndringar, elektromagnetisk kompatibilitet<br />
89/336/CEE författningar om byggprodukter<br />
89/106/CEE Det över<strong>en</strong>sstämmer äv<strong>en</strong> med följan<strong>de</strong><br />
harmonisera<strong>de</strong> europeiska standar<strong>de</strong>r: PR EN 13<br />
386-EN 61000-6-1/-6-2/-6-3/-6-4- EN12050-2<br />
LATVISKI<br />
PAZIOJUMS PAR ATBILSTBU<br />
EK NOSACJUMIEM<br />
Uzmums «Pompes SALMSON» <strong>de</strong>k<strong>la</strong>r, ka<br />
izstrdjumi, kas ir nosaukti šaj <strong>de</strong>k<strong>la</strong>rcij, atbilst<br />
šeit uzskaitto direktvu nosacjumiem, k ar<br />
atsevišu valstu likumiem, kuros tie ir ietverti:<br />
Direktva par elektroiekrtm, kas paredztas<br />
lietošanai noteikts sprieguma robe•s 73/23/EEK ar<br />
grozjumiem Elektromagntisks sa<strong>de</strong>rbas direktva<br />
89/336/EEK ar grozjumiem Direktva par<br />
bvizstrdjumiem 89/106/EEK ar grozjumiem<br />
un šiem saskaotajiem standartiem: PR EN 13 386-<br />
EN 61000-6-1/-6-2/-6-3/-6-4- EN12050-2<br />
MALTI<br />
DIKJARAZZJONI TA’ KONFORMITÀ KE<br />
Pompes SALMSON jiddikjara li l-prodotti<br />
speifikati f’din id-dikjarazzjoni huma konformi<br />
mad-direttivi li jsegwu u mal-leis<strong>la</strong>zzjonijiet<br />
nazzjonali li japplikawhom : Vulta baxx<br />
73/23/CEE modifikat, Kompatibbiltà<br />
elettromanjetika 89/336/CEEmodifikat Prodotti<br />
gall-kostruzzjoni 89/106/CEE modifikat<br />
kif ukoll man-normi armoniati li jsegwu : PR EN<br />
13 386-EN 61000-6-1/-6-2/-6-3/-6-4- EN12050-2<br />
POLSKI<br />
DEKLARACJA ZGODNOCI CE<br />
Firma Pompes SALMSON owiadcza, e produkty<br />
wymi<strong>en</strong>ione w niniejszej <strong>de</strong>k<strong>la</strong>racji s zgodne z<br />
postanowi<strong>en</strong>iami nastpujcych dyrektyw i<br />
transponujcymi je przepisami prawa krajowego:<br />
niskich napi 73/23/EWG ze zmian,<br />
kompatybilnoci elektromagnetycznej 89/336/CEE<br />
wyrobów budow<strong>la</strong>nych 89/106/EWG zmi<strong>en</strong>iona<br />
oraz z nastepujcymi normami zharmonizowanymi:<br />
PR EN 13 386-EN 61000-6-1/-6-2/-6-3/-6-4-<br />
EN12050-2<br />
SLOVENCINA<br />
PREHLÁSENIE EC O ZHODE<br />
Firma SALMSON estne preh<strong>la</strong>suje, •e výrobky<br />
ktoré sú predmetom tejto <strong>de</strong>k<strong>la</strong>rácie, sú v sú<strong>la</strong><strong>de</strong> s<br />
po•iadavkami nasledujúcich direktív<br />
a odpovedajúcich národných legis<strong>la</strong>tívnych<br />
predpisov : Nízkonapäové zaria<strong>de</strong>nia 73/23/ EEC<br />
pozm<strong>en</strong><strong>en</strong>á, Elektromagnetická zhoda (EMC)<br />
89/336/ EEC pozm<strong>en</strong><strong>en</strong>á Stavebné materiály<br />
89/106/EEC pozm<strong>en</strong><strong>en</strong>á<br />
ako aj s nasledujúcimi harmonizovanými normami :<br />
PR EN 13 386-EN 61000-6-1/-6-2/-6-3/-6-4-<br />
EN12050-2<br />
3<br />
SLOVENŠINA<br />
IZJAVA O SKLADNOSTI<br />
Pompes SALMSON izjavlja, da so iz<strong>de</strong>lki, nave<strong>de</strong>ni<br />
v tej izjavi, v sk<strong>la</strong>du z doloili naslednjih direktiv in<br />
z nacionalnimi zakonodajami, ki jih vsebujejo:<br />
Nizka napetost 73/23/CEE sprem<strong>en</strong>j<strong>en</strong>o<br />
elektromagnetna zdru•ljivost 89/336/CEE Gradb<strong>en</strong>i<br />
iz<strong>de</strong>lki 89/106/CEE sprem<strong>en</strong>j<strong>en</strong>o<br />
pa tudi z naslednjimi usk<strong>la</strong>j<strong>en</strong>imi standardi: PR EN<br />
13 386-EN 61000-6-1/-6-2/-6-3/-6-4- EN12050-2
FIG. 1<br />
FIG. 2<br />
1 2<br />
9 6 7 13 8 2 14 10<br />
3<br />
4<br />
385<br />
310<br />
5<br />
300<br />
90<br />
12 5 11<br />
FIG. 3<br />
3 4 1<br />
510<br />
400<br />
75 125<br />
150<br />
78 75<br />
300<br />
2<br />
FIG. 4<br />
13<br />
Ø32x40<br />
1~230 V<br />
Ø25x32<br />
h≥270<br />
Ø32x40<br />
SUBSANIT<br />
Ø20x25<br />
20<br />
FIG. 5<br />
FIG. 6<br />
Ø32x40<br />
1~230 V<br />
KIT DOUCHE<br />
SHOWER KIT<br />
KIT DOCCIA<br />
2,5%<br />
Ø25x32<br />
h
FRANCAIS<br />
1. GÉNÉRALITÉS<br />
1.1 Applications<br />
Module <strong>de</strong> relevage <strong>de</strong>s eaux usées domestiques ne<br />
pouvant s’écouler naturellem<strong>en</strong>t vers l’égout ou un exutoire<br />
naturel.<br />
Eaux faiblem<strong>en</strong>t chargées et exemptes <strong>de</strong> toute substances<br />
grasses ou fibreuses.<br />
Option : Version eaux agressives sur <strong>de</strong>man<strong>de</strong>.<br />
A proscrire sur utilisation d’eaux chargées, <strong>de</strong> matières<br />
fécales <strong>en</strong> prov<strong>en</strong>ance <strong>de</strong> W.C. (nous consulter pour ce cas<br />
d’utilisation).<br />
1.2 Caractéristiques techniques<br />
• Granulométrie maxi<br />
: 10 mm<br />
• Température maxi du liqui<strong>de</strong> : + 35° C *<br />
• Courant d’alim<strong>en</strong>tation<br />
: Monophasé 230V - 50Hz<br />
• Débit maxi<br />
: 9 m3/h<br />
• Hauteur manométrique maxi : 8 m<br />
* + 90°C pour <strong>de</strong>s pério<strong>de</strong>s courtes inférieures à 3 minutes.<br />
2. SÉCURITÉ<br />
La prés<strong>en</strong>te <strong>notice</strong> <strong>de</strong>vra être lue avec att<strong>en</strong>tion avant<br />
instal<strong>la</strong>tion et <strong>mise</strong> <strong>en</strong> <strong>service</strong>. On veillera <strong>en</strong> particulier, au<br />
respect <strong>de</strong>s points concernant <strong>la</strong> sécurité du matériel vis à<br />
vis <strong>de</strong> l’utilisateur intermédiaire ou final.<br />
2.1 Symboles <strong>de</strong>s consignes du manuel<br />
Risque pot<strong>en</strong>tiel mettant <strong>en</strong> danger <strong>la</strong> sécurité <strong>de</strong>s<br />
personnes.<br />
Consignes <strong>de</strong> sécurité re<strong>la</strong>tives aux risques électriques.<br />
ATTENTION !<br />
Signale une instruction dont <strong>la</strong> nonobservation<br />
peut <strong>en</strong>g<strong>en</strong>drer un dommage<br />
pour le matériel et son fonctionnem<strong>en</strong>t.<br />
3. TRANSPORT ET STOCKAGE<br />
Dès réception du matériel, vérifier s’il n’a pas subi <strong>de</strong><br />
dommages durant son transport. En cas <strong>de</strong> défaut constaté,<br />
pr<strong>en</strong>dre dans les dé<strong>la</strong>is prévus toutes dispositions nécessaires<br />
auprès du transporteur.<br />
Si le matériel <strong>de</strong>vait être<br />
ATTENTION !<br />
installé ultérieurem<strong>en</strong>t, stockez-le dans un<br />
<strong>en</strong>droit sec et protégez-le contre les chocs et toutes<br />
influ<strong>en</strong>ces extérieures (humidité, gel, etc...).<br />
4. PRODUITS ET ACCESSOIRES<br />
Avant instal<strong>la</strong>tion, il est indisp<strong>en</strong>sable <strong>de</strong> pr<strong>en</strong>dre<br />
connaissance <strong>de</strong> tous les élém<strong>en</strong>ts constitutifs du SUBSANIT.<br />
4.1 Descriptif du module (voir FIG. 1)<br />
1 - Cuve <strong>de</strong> 32,5 litres<br />
2 - Couvercle<br />
3 - Pompe submersible SUBSON 20 MF<br />
4 - Interrupteur à flotteur<br />
5 - Câble électrique long. 2,5 m avec prise mâle<br />
(2 pôle + terre)<br />
5<br />
6 - C<strong>la</strong>pet anti-retour<br />
7 - Orifice pour év<strong>en</strong>t <strong>de</strong> <strong>mise</strong> à l’air libre<br />
8 - Orifice pour <strong>la</strong>vabo<br />
9 - Raccord tournant pour refoulem<strong>en</strong>t <strong>de</strong>s eaux usées<br />
10 - Raccord cannelé pour <strong>la</strong>ve-linge<br />
11 - Obturateur orifice version douche<br />
12 - Raccord adaptation cabine douche (livré non monté)<br />
13 - Joints pour orifice év<strong>en</strong>t et <strong>la</strong>vabo (livré non monté)<br />
14 - Etriers <strong>de</strong> fermeture couvercle<br />
4.2 La pompe<br />
- Electropompe submersible.<br />
- C<strong>en</strong>trifuge monocellu<strong>la</strong>ire.<br />
- Fonctionnem<strong>en</strong>t automatique par interrupteur à flotteur.<br />
- Moteur monophasé à con<strong>de</strong>nsateur perman<strong>en</strong>t avec<br />
protection thermique incorporée.<br />
4.3 Accessoires pour application douche (voir FIGS 1-4-5-6)<br />
Le raccor<strong>de</strong>m<strong>en</strong>t du SUBSANIT à une cabine <strong>de</strong> douche est<br />
possible à l’ai<strong>de</strong> du raccord douche (voir FIG. 1 - rep. 12).<br />
Le fonctionnem<strong>en</strong>t du SUBSANIT nécessite une cote <strong>de</strong><br />
270 mm <strong>en</strong>tre le fond du bac à douche et le sol (voir FIG. 4).<br />
Il faut selon <strong>la</strong> configuration <strong>de</strong> l’instal<strong>la</strong>tion, surélever <strong>la</strong><br />
douche ou <strong>en</strong>terrer le SUBSANIT.<br />
Nota : Pour une instal<strong>la</strong>tion avec cote (h) sol/douche<br />
inférieure à 270 mm, prévoir un kit douche (nous consulter).<br />
Cet accessoire <strong>Salmson</strong> permet un niveau <strong>de</strong> démarrage bas<br />
et évite que l’eau ne reflue dans <strong>la</strong> douche (voir FIGS. 5-6).<br />
4.4 Accessoires recommandé (<strong>en</strong> option)<br />
En supplém<strong>en</strong>t on peut comman<strong>de</strong>r :<br />
• Vanne d’isolem<strong>en</strong>t au refoulem<strong>en</strong>t <strong>de</strong>s eaux usées.<br />
• A<strong>la</strong>rme sonore (ALARMSON).<br />
5. INSTALLATION<br />
5.1 Local<br />
Le module doit être installé dans un local facilem<strong>en</strong>t<br />
accessible, normalem<strong>en</strong>t aéré et protégé du gel.<br />
Afin <strong>de</strong> faciliter l’<strong>en</strong>treti<strong>en</strong>, prévoir <strong>de</strong>s raccords démontables.<br />
5.2 Montage<br />
Le SUBSANIT est à poser à même le sol <strong>en</strong> position<br />
horizontale et si possible sous le <strong>la</strong>vabo.<br />
5.3 Raccor<strong>de</strong>m<strong>en</strong>ts hydrauliques (voir FIG. 1)<br />
- Retirer les étriers <strong>de</strong> fermeture (rep. 14) et <strong>en</strong>lever le<br />
couvercle.<br />
- Retirer le bouchon du raccord cannelé (rep. 10).<br />
- Dévisser le raccord cannelé (rep. 10) <strong>de</strong> l’intérieur et visser<br />
le sur le même orifice à l’extérieur <strong>de</strong> <strong>la</strong> cuve (le joint p<strong>la</strong>t<br />
est à mettre côté intérieur <strong>de</strong> <strong>la</strong> cuve).<br />
Découper les orifices du couvercle selon les<br />
ATTENTION !<br />
pointillés (voir FIG. 3) à l’ai<strong>de</strong> d’un cutter et p<strong>la</strong>cer<br />
les joints bleus fournis (rep. 13) <strong>en</strong> respectant le s<strong>en</strong>s <strong>de</strong> montage.<br />
Diamètres <strong>de</strong>s orifices à raccor<strong>de</strong>r (voir FIG. 2) :<br />
• Ev<strong>en</strong>t - Lavabo (rep.➀ et ➁), (inversion possible) : DN 32<br />
• Refoulem<strong>en</strong>t eaux usées (rep. ➂) : DN 40<br />
• Lave-linge (rep. ➃) (cannelé) : DN 25
FRANCAIS<br />
• Cabine <strong>de</strong> douche (rep.➄) - option kit douche : DN 40<br />
Canalisations <strong>en</strong> tube PVC ou flexible du commerce (voir<br />
FIG. 4 et 5 pour les diamètres <strong>de</strong>s tuyauteries).<br />
Impératif<br />
1 - La tuyauterie <strong>de</strong> refoulem<strong>en</strong>t <strong>de</strong>s eaux usées doit être<br />
raccordée sur le <strong>de</strong>ssus <strong>de</strong> <strong>la</strong> conduite du tout à l’égout,<br />
<strong>en</strong> formant une boucle.<br />
- Hauteur comprise <strong>en</strong>tre 3,50 et 7 mètres maxi (voir FIG. 4).<br />
2 - La hauteur minimale <strong>de</strong> <strong>la</strong> tuyauterie d’évacuation du<br />
<strong>la</strong>ve-linge doit être conforme à celle exigée dans <strong>la</strong><br />
<strong>notice</strong> du constructeur.<br />
3 - L’év<strong>en</strong>t <strong>de</strong> <strong>mise</strong> à l’air libre doit être ouvert (voir FIG. 4),<br />
ram<strong>en</strong>é vers l’extérieur et être conforme aux règles<br />
d’hygiène <strong>en</strong> vigueur.<br />
4 - Faire dépasser les tuyaux <strong>de</strong> raccor<strong>de</strong>m<strong>en</strong>t du <strong>la</strong>vabo et<br />
d’év<strong>en</strong>t d’<strong>en</strong>viron 20 mm dans <strong>la</strong> cuve (voir FIG. 3).<br />
5 - Pour raccor<strong>de</strong>r <strong>la</strong> douche prévoir une p<strong>en</strong>te <strong>de</strong> 2,5 cm par<br />
mètre <strong>de</strong> tuyauterie <strong>en</strong>tre <strong>la</strong> douche et le SUBSANIT (voir FIG. 6).<br />
ATTENTION !<br />
Ne <strong>la</strong>isser que le minimum <strong>de</strong> câble<br />
électrique (rep. 6) à l’intérieur <strong>de</strong> <strong>la</strong> cuve<br />
afin <strong>de</strong> ne pas gêner <strong>la</strong> course du flotteur.<br />
Après raccor<strong>de</strong>m<strong>en</strong>t <strong>de</strong>s appareils, remettre <strong>en</strong> p<strong>la</strong>ce le<br />
couvercle du SUBSANIT.<br />
Fixer le couvercle à l’ai<strong>de</strong> <strong>de</strong>s étriers <strong>en</strong> les<br />
ATTENTION ! p<strong>la</strong>çant impérativem<strong>en</strong>t le long <strong>de</strong>s<br />
nervures verticales du bac.<br />
5.4 Raccor<strong>de</strong>m<strong>en</strong>t électrique<br />
Raccor<strong>de</strong>r obligatoirem<strong>en</strong>t le SUBSANIT sur une fiche<br />
femelle 2 pôles avec terre.<br />
Faire vérifier <strong>la</strong> t<strong>en</strong>sion et <strong>la</strong> fréqu<strong>en</strong>ce (voir § 1.2) du réseau<br />
et s’assurer que l’instal<strong>la</strong>tion électrique est conforme à <strong>la</strong><br />
norme CEI 364.<br />
Les raccor<strong>de</strong>m<strong>en</strong>ts électriques doiv<strong>en</strong>t être à l’abri <strong>de</strong><br />
toute humidité.<br />
Le raccor<strong>de</strong>m<strong>en</strong>t se limite au branchem<strong>en</strong>t <strong>de</strong> <strong>la</strong> prise <strong>de</strong><br />
courant.<br />
6. MISE EN SERVICE<br />
ATTENTION !<br />
Ne jamais faire fonctionner le SUBSANIT à<br />
sec, même un court instant.<br />
- Ouvrir le robinet du <strong>la</strong>vabo pour remplir <strong>la</strong> cuve. Dès que le<br />
flotteur arrive <strong>en</strong> position haute, <strong>la</strong> pompe démarre et<br />
refoule l’eau dans <strong>la</strong> conduite (bruit <strong>de</strong> circu<strong>la</strong>tion d’eau).<br />
- Contrôler l’étanchéité <strong>de</strong> tous les raccor<strong>de</strong>m<strong>en</strong>ts.<br />
- Le fonctionnem<strong>en</strong>t automatique du SUBSANIT est à prés<strong>en</strong>t<br />
assuré par l’interrupteur à flotteur.<br />
7. ENTRETIEN<br />
Le SUBSANIT ne nécessite aucun <strong>en</strong>treti<strong>en</strong> particulier <strong>en</strong><br />
cours <strong>de</strong> fonctionnem<strong>en</strong>t.<br />
Nettoyer régulièrem<strong>en</strong>t <strong>la</strong> cuve à l’eau chau<strong>de</strong><br />
(év<strong>en</strong>tuellem<strong>en</strong>t mé<strong>la</strong>ngée à un produit non alcalin) pour<br />
éviter tout dépôt important sur les parois.<br />
Pour <strong>la</strong> pompe se reporter à <strong>la</strong> <strong>notice</strong> re<strong>mise</strong> avec le module.<br />
8. INCIDENTS DE FONCTIONNEMENT<br />
Avant toute interv<strong>en</strong>tion, mettre l’appareil hors<br />
t<strong>en</strong>sion.<br />
P<strong>en</strong>dant <strong>la</strong> pério<strong>de</strong> <strong>de</strong> garantie, si un inci<strong>de</strong>nt <strong>de</strong> fonctionnem<strong>en</strong>t v<strong>en</strong>ait à<br />
persister, nous vous recommandons <strong>de</strong> vous adresser au SAV SALMSON ou à<br />
notre réseau <strong>de</strong> réparateurs agréés, seuls habilités à procé<strong>de</strong>r au<br />
démontage/remontage <strong>de</strong> nos appareils (liste sur simple <strong>de</strong>man<strong>de</strong>).<br />
INCIDENTS PANNES REMÈDES<br />
8.1 LA POMPE TOURNE<br />
MAIS NE REFOULE<br />
PAS<br />
8.2 LA POMPE NE<br />
TOURNE PAS<br />
8.3 LA POMPE TOURNE<br />
MAIS LE DÉBIT EST<br />
DE PLUS EN PLUS<br />
FAIBLE<br />
8.4 INSUFFISANCE<br />
D’ÉTANCHÉITÉ<br />
8.5 STAGNATION DE<br />
L’EAU DANS LE<br />
BAC À DOUCHE<br />
a) Le c<strong>la</strong>pet anti-retour est monté à<br />
l’<strong>en</strong>vers :<br />
b) Conduite <strong>de</strong> refoulem<strong>en</strong>t d’eaux<br />
usées bouchée :<br />
c) Hauteur <strong>de</strong> refoulem<strong>en</strong>t à <strong>la</strong> conduite<br />
du tout-à-l’égout trop importante :<br />
a) Protection thermique moteur<br />
décl<strong>en</strong>chée :<br />
b) Instal<strong>la</strong>tion électrique générale<br />
défectueuse :<br />
c) Câble <strong>de</strong> raccor<strong>de</strong>m<strong>en</strong>t défectueux :<br />
d) Le câble électrique gêne le<br />
fonctionnem<strong>en</strong>t du flotteur :<br />
a) La pompe est obstruée par <strong>de</strong>s corps<br />
étrangers :<br />
b) Le moteur est alim<strong>en</strong>té à une t<strong>en</strong>sion<br />
insuffisante :<br />
a) C<strong>la</strong>pet anti-retour défectueux :<br />
b) Joints <strong>de</strong>s raccords usagers :<br />
a) Vérifier l’instal<strong>la</strong>tion. La cote<br />
sol/douche ne doit pas être inférieure<br />
à 270 mm.<br />
b) Utilisation d’un kit douche, vérifier <strong>la</strong><br />
libre course du flotteur sur <strong>la</strong> tige du kit :<br />
a) Démonter <strong>la</strong> conduite <strong>de</strong> refoulem<strong>en</strong>t <strong>de</strong>s eaux usées et vérifier si<br />
le battant du c<strong>la</strong>pet s’ouvre vers le refoulem<strong>en</strong>t. Dans le cas<br />
contraire, dévisser le raccord (rep. 6) et le revisser dans l’autre s<strong>en</strong>s<br />
(charnière vers le haut).<br />
b) Démonter <strong>la</strong> tuyauterie et <strong>la</strong> déboucher par <strong>de</strong>s systèmes ou<br />
produits adaptés.<br />
c) Cette hauteur doit être comprise <strong>en</strong>tre 3,5 et 7 m maxi.<br />
Revoir l’instal<strong>la</strong>tion.<br />
a) Le réarmem<strong>en</strong>t est automatique après refroidissem<strong>en</strong>t du moteur.<br />
Vérifier <strong>la</strong> température <strong>de</strong> l’eau.<br />
b) Faire vérifier le disjoncteur et les raccor<strong>de</strong>m<strong>en</strong>ts électriques <strong>de</strong><br />
l’instal<strong>la</strong>tion par un électrici<strong>en</strong> agréé.<br />
c) Faire procé<strong>de</strong>r au changem<strong>en</strong>t du câble <strong>de</strong> <strong>la</strong> pompe.<br />
d) Ne <strong>la</strong>isser que le minimum <strong>de</strong> câble à l’intérieur <strong>de</strong> <strong>la</strong> cuve.<br />
Contrôler et serrer le presse-étoupe <strong>de</strong> câble (fixer sur <strong>la</strong> cuve).<br />
a) Retirer le couvercle du module, et nettoyer à gran<strong>de</strong> eau <strong>la</strong><br />
crépine d’aspiration et le fond <strong>de</strong> <strong>la</strong> cuve. Au besoin, débrancher<br />
<strong>la</strong> pompe, <strong>la</strong> retirer et <strong>en</strong> démonter <strong>la</strong> crépine pour <strong>la</strong> <strong>la</strong>ver.<br />
Remettre <strong>la</strong> pompe et le couvercle conv<strong>en</strong>ablem<strong>en</strong>t <strong>en</strong> p<strong>la</strong>ce.<br />
b) Vérifier <strong>la</strong> t<strong>en</strong>sion du courant d’alim<strong>en</strong>tation.<br />
Faire mesurer <strong>la</strong> t<strong>en</strong>sion aux bornes moteur.<br />
a) Démonter et remp<strong>la</strong>cer le c<strong>la</strong>pet.<br />
b) Changer les joints.<br />
a) Au besoin, revoir l’instal<strong>la</strong>tion.<br />
Si <strong>la</strong> cote sol/douche est inférieure à 270 mm, acheter un kit<br />
douche.<br />
b) Nettoyer <strong>la</strong> cuve et le kit douche à l’eau chau<strong>de</strong>.<br />
6
ENGLISH<br />
1. GENERAL<br />
1.1 Applications<br />
Pumping unit for domestic waste water that cannot flow<br />
naturally to a sewer or natural outlet.<br />
Slightly muddied water that does not contain oily or fibrous<br />
substances.<br />
Option : Aggressive water version avai<strong>la</strong>ble on request.<br />
Not to be used for muddied water or for faecal matter from<br />
WCs (contact us with regard to this type of use).<br />
1.2 Technical characteristics<br />
• Maximum gra<strong>de</strong> of material in water: 10 mm<br />
• Maximum temperature of liquid : + 35° C *<br />
• Supply curr<strong>en</strong>t<br />
: single-phase 230V - 50Hz<br />
• Maximum flow rate<br />
: 9 m3/h<br />
• Maximum manometric height : 8 m<br />
* + 90°C for short periods of less than 3 minutes.<br />
2. SAFETY<br />
These instructions must be read carefully before instal<strong>la</strong>tion<br />
and commissioning. Particu<strong>la</strong>r care should be tak<strong>en</strong> in<br />
respect of safe operation of equipm<strong>en</strong>t by the intermediate<br />
or <strong>en</strong>d user.<br />
2.1 Warning symbols used in the manual<br />
Pot<strong>en</strong>tial danger to safety of persons.<br />
Warnings concerning electricity.<br />
CAUTION !<br />
Not heeding any instruction so marked may<br />
cause damage to the equipm<strong>en</strong>t or cause<br />
it to operate incorrectly.<br />
3. TRANSPORT AND STORAGE<br />
As soon as the equipm<strong>en</strong>t is <strong>de</strong>livered, check that it has not<br />
be<strong>en</strong> damaged in transit. If a fault is <strong>notice</strong>d, make the<br />
necessary arrangem<strong>en</strong>ts with the carrier.<br />
If the material being <strong>de</strong>livered is to be<br />
CAUTION !<br />
installed <strong>la</strong>ter, store it in a dry area and<br />
protect from impacts and outsi<strong>de</strong> influ<strong>en</strong>ce (moisture, frost<br />
etc.).<br />
4. ITEMS AND FITTINGS<br />
Before instal<strong>la</strong>tion, it is ess<strong>en</strong>tial to i<strong>de</strong>ntify all the SUBSANIT<br />
compon<strong>en</strong>ts.<br />
4.1 Unit <strong>de</strong>scription (see FIG. 1)<br />
1 - 32.5 litre tank<br />
2 - Cover<br />
3 - SUBSON 20 MF submersible pump<br />
4 - Float switch<br />
5 - Electrical cable, 2.5m in l<strong>en</strong>gth with plug<br />
(2 poles and an earth)<br />
6 - Non-return valve<br />
7 - V<strong>en</strong>ti<strong>la</strong>tion aperture to op<strong>en</strong> air<br />
8 - Port for washbasin<br />
9 - Swivel connection for waste water discharge<br />
10 - Ribbed connection for washing machine<br />
11 - Port plug for shower version<br />
12 - Shower cubicle adaptation connection<br />
(<strong>de</strong>livered disassembled)<br />
13 - Seals for v<strong>en</strong>ti<strong>la</strong>tion aperture and washbasin port<br />
(<strong>de</strong>livered disassembled)<br />
14 - Cover closure straps<br />
4.2 The pump<br />
- Submersible electropump.<br />
- Monocellu<strong>la</strong>r c<strong>en</strong>trifuge.<br />
- Automatic operation by float switch.<br />
- Single-phase motor with perman<strong>en</strong>t capacitor and<br />
incorporated thermal protection.<br />
4.3 Fittings for shower application (see figs. 1, 4, 5 & 6)<br />
The SUBSANIT can be connected to a shower cubicle with a<br />
shower connection (see FIG. 1 - item 12).<br />
For correct operation of the SUBSANIT, there must be a<br />
distance of 270 mm betwe<strong>en</strong> the base of the shower tray<br />
and the floor (see FIG. 4).<br />
According to the configuration of the instal<strong>la</strong>tion, either the<br />
shower should be raised or the SUBSANIT put below the floor.<br />
Note : To install the SUBSANIT with a floor/shower distance (h)<br />
of less than 270 mm, use a shower kit (contact us). This<br />
<strong>Salmson</strong> fitting allows for a low start level and prev<strong>en</strong>ts water<br />
flowing back to the shower (voir FIGS. 5-6).<br />
4.4 Recomm<strong>en</strong><strong>de</strong>d fittings (optional)<br />
The following items can also be or<strong>de</strong>red :<br />
• Iso<strong>la</strong>tion valve at waste water discharge.<br />
• Audible a<strong>la</strong>rm (ALARMSON).<br />
5. INSTALLATION<br />
5.1 Location<br />
The unit must be installed in a location that is easily<br />
accessible, normally v<strong>en</strong>ti<strong>la</strong>ted and protected from frost.<br />
Provi<strong>de</strong> connections that can be disassembled to facilitate<br />
maint<strong>en</strong>ance.<br />
5.2 Assembly<br />
The SUBSANIT must be p<strong>la</strong>ced horizontally directly on the<br />
floor, if possible un<strong>de</strong>r the washbasin.<br />
5.3 Hydraulic connections (see FIG. 1)<br />
- Remove the closure straps (item 14) and lift up the cover.<br />
- Remove the ribbed connection plug (item 10).<br />
- Unscrew the ribbed connection (item 10) from insi<strong>de</strong> and<br />
screw it onto the same port on the outsi<strong>de</strong> of the tank (the<br />
gasket is to be p<strong>la</strong>ced on the insi<strong>de</strong> of the tank).<br />
Cut out the cover ports according to the dotted<br />
CAUTION !<br />
lines (see FIG. 3) using a cutter and p<strong>la</strong>ce the<br />
blue seals supplied in position according to the assembly direction<br />
(item 13).<br />
Diameters of the ports to be connected (see FIG. 2) :<br />
• V<strong>en</strong>t - washbasin (item ➀ and ➁), (reverse possible) : DN 32<br />
• Waste water discharge (item ➂) : DN 40<br />
• Washing machine (rep. ➃) (ribbed) : DN 25<br />
7
ENGLISH<br />
• Shower cubicle (item ➄) - shower kit option : DN 40<br />
PVC or flexible piping avai<strong>la</strong>ble on the market (see FIG. 4<br />
and 5 for pipe diameters).<br />
Ess<strong>en</strong>tial Requirem<strong>en</strong>ts<br />
1 - The waste water discharge pipes must be connected to<br />
the top of the main drain conduit, forming a loop.<br />
- Height betwe<strong>en</strong> 3.5m and 7m (max.) (see FIG. 4).<br />
2 - The minimum height of the washing machine outlet pipes<br />
must comply with the value specified in the<br />
manufacturer's instructions.<br />
3 - The op<strong>en</strong> air v<strong>en</strong>t must be op<strong>en</strong> (see FIG. 4), connected<br />
to outsi<strong>de</strong> and compliant with curr<strong>en</strong>t hygi<strong>en</strong>e<br />
regu<strong>la</strong>tions.<br />
4 - The washbasin and v<strong>en</strong>t connection pipes should<br />
protru<strong>de</strong> in the tank by approximately 20mm (see FIG. 3).<br />
5 - To connect the shower, allow a slope of 2.5cm per metre of<br />
pipe betwe<strong>en</strong> the shower and the SUBSANIT (see FIG. 6).<br />
CAUTION !<br />
Only the minimum amount of electric cable<br />
(FIG. 6) is to be left insi<strong>de</strong> the tank so as not<br />
to obstruct the movem<strong>en</strong>t of the float.<br />
After connecting the equipm<strong>en</strong>t, put the SUBSANIT cover<br />
back in p<strong>la</strong>ce.<br />
Fix the cover in p<strong>la</strong>ce with closure straps<br />
CAUTION ! which must be p<strong>la</strong>ced along the vertical<br />
ribs of the tank.<br />
5.4 Electrical connection<br />
The SUBSANIT must be connected to a two-pole<br />
earthed socket.<br />
Check the network voltage and frequ<strong>en</strong>cy (see § 1.2) and<br />
<strong>en</strong>sure that the electrical instal<strong>la</strong>tion is compliant with the<br />
CEI 364 standard.<br />
Electrical connections must be protected from all<br />
humidity.<br />
Connection is limited to connecting the socket.<br />
6. STARTING UP<br />
CAUTION !<br />
The SUBSANIT must never be operated dry,<br />
ev<strong>en</strong> briefly.<br />
- Turn on the washbasin tap to fill the tank. As soon as the<br />
float reaches the high position, the pump starts and<br />
<strong>de</strong>livers water into the conduit (you will hear the water<br />
circu<strong>la</strong>ting).<br />
- Check the sealing of all connections.<br />
- The float switch now <strong>en</strong>sures the automatic operation of<br />
the SUBSANIT.<br />
7. MAINTENANCE<br />
The SUBSANIT requires no special maint<strong>en</strong>ance during<br />
operation.<br />
Clean the tank regu<strong>la</strong>rly with hot water (which can be mixed<br />
with a non-alkaline product if <strong>de</strong>sired) to prev<strong>en</strong>t the build<br />
up of any major <strong>de</strong>posits on the walls.<br />
For the pump, see the instructions provi<strong>de</strong>d with the unit.<br />
8. OPERATING INCIDENTS<br />
Power should always be removed from the<br />
equipm<strong>en</strong>t before any work is carried out.<br />
INCIDENT CAUSE REMEDY<br />
8.1 THE PUMP<br />
OPERATES BUT<br />
DOES NOT DELIVER<br />
8.2 THE PUMP DOES<br />
NOT OPERATE<br />
8.3 THE PUMP<br />
OPERATES BUT THE<br />
FLOW IS<br />
INCREASINGLY<br />
WEAK<br />
8.4 INSUFFICIENT<br />
SEALING<br />
8.5 WATER STAGNANT<br />
IN SHOWER TRAY<br />
a) The non-return valve is installed the<br />
wrong way round :<br />
b) Waste water discharge pipe is<br />
blocked :<br />
c) Height from discharge to the main<br />
drain conduit is too great :<br />
a) Motor thermal protection activated :<br />
b) G<strong>en</strong>eral electrical instal<strong>la</strong>tion is faulty :<br />
c) Connection cable is faulty :<br />
d) Electric cable is obstructing the<br />
working of the float:<br />
a) The pump is obstructed by foreign<br />
bodies :<br />
b) The motor is being supplied with<br />
insuffici<strong>en</strong>t voltage :<br />
a) Non-return valve faulty :<br />
b) Connection seals worn-out :<br />
a) Check the instal<strong>la</strong>tion. The floor/shower<br />
elevation must not be less than 270mm<br />
b) Check the instal<strong>la</strong>tion. The<br />
floor/shower elevation must not be<br />
less than 270mm :<br />
a) Disassemble the waste water discharge pipe and check if the<br />
valve f<strong>la</strong>p op<strong>en</strong>s towards the discharge. If it does not, unscrew the<br />
connector (FIG. 6) and screw it back on in the opposite direction<br />
(hinge towards the top).<br />
b) Disassemble the pipes and clean them using suitable systems or<br />
products.<br />
c) This height must be betwe<strong>en</strong> 3.5m and 7m (max.).<br />
Check instal<strong>la</strong>tion again<br />
a) Resetting occurs automatically after the motor cools.<br />
Check the temperature of the water.<br />
b) Have the circuit breaker and the electrical connections of the<br />
instal<strong>la</strong>tion checked by a registered electrician.<br />
c) Change the pump cable.<br />
d) Only leave the minimum amount of cable in the tank.<br />
Check, and close the cable stuffing box (fixed on the tank).<br />
a) Remove the cover from the unit, and clean the pump strainer and<br />
the bottom of the tank with pl<strong>en</strong>ty of water. If necessary, disconnect<br />
the pump, remove it and disassemble the strainer to clean it.<br />
Put the pump and the cover back in p<strong>la</strong>ce.<br />
b) Check the mains voltage.<br />
Measure the voltage at the motor terminals.<br />
a) Disassemble and rep<strong>la</strong>ce the valve.<br />
b) Change the seals.<br />
a) If necessary, check the instal<strong>la</strong>tion again.<br />
If the floor/shower elevation is less than 270mm, buy a shower kit.<br />
b) Clean the tank and the shower kit with hot water.<br />
8
ITALIANO<br />
1. GENERALITÀ<br />
1.1 Applicazioni<br />
Modulo per il sollevam<strong>en</strong>to <strong>de</strong>lle acque reflue domestiche<br />
s<strong>en</strong>za sbocco naturale verso <strong>la</strong> rete fognaria o un canale di<br />
evacquazione.<br />
Acque scarsam<strong>en</strong>te cariche e prive di qualsiasi sostanza<br />
grassa o fibrosa.<br />
Opzione : versione acque aggressive su richiesta.<br />
Non adatta per l'utilizzo con acque cariche cont<strong>en</strong><strong>en</strong>ti feci<br />
prov<strong>en</strong>i<strong>en</strong>ti da gabinetti a serbatoio d'acqua (contattarci in<br />
caso di un utilizzo di questo tipo).<br />
1.2 Caratteristiche tecniche<br />
• Granulometria massima<br />
: 10 mm<br />
• Temperatura massima <strong>de</strong>l liquido : + 35° C *<br />
• Alim<strong>en</strong>tazione<br />
: monofase 230V - 50Hz<br />
• Portata massima<br />
: 9 m3/h<br />
• Altezza manometrica massima : 8 m<br />
* + 90°C per periodi brevi, non superiori a 3 minuti.<br />
2. SICUREZZA<br />
Leggere att<strong>en</strong>tam<strong>en</strong>te le pres<strong>en</strong>ti istruzioni prima di<br />
proce<strong>de</strong>re all’instal<strong>la</strong>zione e al<strong>la</strong> messa in servizio. In<br />
partico<strong>la</strong>re, si dovrà badare al rispetto <strong>de</strong>i punti che<br />
riguardano <strong>la</strong> sicurezza <strong>de</strong>ll'apparecchiatura nei confronti<br />
<strong>de</strong>ll'ut<strong>en</strong>te intermedio o finale.<br />
2.1 Simboli di avvert<strong>en</strong>za utilizzati nel manuale<br />
Rischio pot<strong>en</strong>ziale, in grado di mettere in pericolo<br />
l'incolumità <strong>de</strong>lle persone.<br />
Avvert<strong>en</strong>ze re<strong>la</strong>tive ai rischi elettrici.<br />
ATTENZIONE !<br />
Segna<strong>la</strong> un'istruzione <strong>la</strong> cui inosservanza<br />
può causare danni all'apparecchiatura e al<br />
suo funzionam<strong>en</strong>to.<br />
3. TRASPORTO E STOCCAGGIO<br />
Al<strong>la</strong> consegna, control<strong>la</strong>re che l'apparecchiatura non abbia<br />
subito danni durante il trasporto. Nel caso si constatasse <strong>la</strong><br />
pres<strong>en</strong>za di difetti, pr<strong>en</strong><strong>de</strong>re tutti i provvedim<strong>en</strong>ti <strong>de</strong>l caso<br />
presso il trasportatore.<br />
Se l'apparecchiatura fornita dovesse essere<br />
ATTENZIONE !<br />
instal<strong>la</strong>ta in un secondo tempo, conservar<strong>la</strong><br />
in un luogo asciutto, protetta dagli urti e dagli ag<strong>en</strong>ti<br />
atmosferici (umidità, gelo ecc.).<br />
4. PRODOTTI E ACCESSORI<br />
Prima di proce<strong>de</strong>re all'instal<strong>la</strong>zione, è indisp<strong>en</strong>sabile<br />
conoscere tutti i compon<strong>en</strong>ti di SUBSANIT.<br />
4.1 Descrizione <strong>de</strong>l modulo (vedi FIG. 1)<br />
1 - Cisterna di 32,5 litri<br />
2 - Calotta di protezione<br />
3 - Pompa sommergibile SUBSON 20 MF<br />
4 - Interruttore a galleggiante<br />
5 - Cavo elettrico, lunghezza 2,5 m, presa maschio<br />
(2 poli + terra)<br />
6 - Valvo<strong>la</strong> anti-ritorno<br />
7 - Apertura <strong>de</strong>l condotto di v<strong>en</strong>ti<strong>la</strong>zione<br />
8 - Bocchetta per <strong>la</strong>vabo<br />
9<br />
9 - Raccordo girevole per mandata <strong>de</strong>lle<br />
acque di scolo<br />
10 - Raccordo scana<strong>la</strong>to per <strong>la</strong> <strong>la</strong>vatrice<br />
11 - Otturatore bocchetta versione doccia<br />
12 - Raccordo per adattam<strong>en</strong>to a cabina doccia<br />
(fornito non montato)<br />
13 - Giunture per l'apertura <strong>de</strong>l condotto di v<strong>en</strong>ti<strong>la</strong>zione<br />
e bocchetta <strong>la</strong>vabo (fornito non montato)<br />
14 - Morsetti per <strong>la</strong> chiusura <strong>de</strong>l<strong>la</strong> calotta di protezione<br />
4.2 La pompa<br />
- Pompa elettrica sommergibile.<br />
- C<strong>en</strong>trifuga monocellu<strong>la</strong>re.<br />
- Funzionam<strong>en</strong>to automatico mediante interruttore a<br />
galleggiante.<br />
- Motore monofase a con<strong>de</strong>nsatore perman<strong>en</strong>te con<br />
protezione termica incorporata.<br />
4.3 Accessori per applicazione doccia (vedi FIGG 1-4-5-6)<br />
È possibile collegare SUBSANIT a una cabina doccia<br />
mediante l'apposito raccordo (vedi FIG. 1 - rif. 12).<br />
Affinché SUBSANIT possa funzionare, <strong>la</strong> distanza tra il fondo<br />
<strong>de</strong>l piatto <strong>de</strong>l<strong>la</strong> doccia e il suolo <strong>de</strong>ve essere di alm<strong>en</strong>o 270<br />
mm (vedi FIG. 4).<br />
Secondo <strong>la</strong> configurazione <strong>de</strong>ll'instal<strong>la</strong>zione, sarà necessario<br />
sopraelevare <strong>la</strong> doccia oppure interrare SUBSANIT.<br />
Nota : per un'instal<strong>la</strong>zione con un dislivello suolo/doccia<br />
inferiore a 270 mm, preve<strong>de</strong>re l'utilizzo di un kit doccia<br />
(consultarci). Questo accessorio <strong>Salmson</strong> cons<strong>en</strong>te un livello<br />
basso di avvio e impedisce il riflusso <strong>de</strong>ll'acqua nel<strong>la</strong> doccia<br />
(vedi FIGG. 5-6).<br />
4.4 Accessori raccomandati (opzionali)<br />
È inoltre possibile ordinare :<br />
• Paratoia d'iso<strong>la</strong>m<strong>en</strong>to contro il ritorno <strong>de</strong>lle acque di scolo.<br />
• Al<strong>la</strong>rme sonoro (ALARMSON).<br />
5. INSTALLAZIONE<br />
5.1 Locale<br />
Il modulo <strong>de</strong>ve essere instal<strong>la</strong>to in un locale facilm<strong>en</strong>te<br />
accessibile, normalm<strong>en</strong>te aerato e protetto dal gelo.<br />
Per facilitare <strong>la</strong> manut<strong>en</strong>zione, preve<strong>de</strong>re <strong>de</strong>i raccordi<br />
smontabili.<br />
5.2 Montaggio<br />
Il SUBSANIT <strong>de</strong>ve essere posato direttam<strong>en</strong>te sul suolo, in<br />
posizione orizzontale, possibilm<strong>en</strong>te sotto il <strong>la</strong>vabo.<br />
5.3 Collegam<strong>en</strong>ti idraulici (vedi FIG. 1)<br />
- Rimuovere i morsetti di chiusura (rif. 14) e togliere <strong>la</strong> calotta<br />
di protezione.<br />
- Rimuovere il tappo <strong>de</strong>l raccordo scana<strong>la</strong>to (rif. 10).<br />
- Svitare il raccordo scana<strong>la</strong>to (rif. 10) dall'interno e riavvitarlo<br />
sul<strong>la</strong> me<strong>de</strong>sima apertura all'esterno <strong>de</strong>l<strong>la</strong> cisterna (<strong>la</strong><br />
giuntura piatta <strong>de</strong>ve trovarsi all'interno <strong>de</strong>l<strong>la</strong> cisterna).<br />
Eseguire le aperture sul<strong>la</strong> calotta segu<strong>en</strong>do <strong>la</strong><br />
ATTENZIONE !<br />
linea punteggiata (ve<strong>de</strong>re FIG. 3) con un<br />
taglierino e disporre le giunture blu fornite (rif. 13) rispettando <strong>la</strong><br />
direzione di montaggio.<br />
Diametri <strong>de</strong>lle aperture di collegam<strong>en</strong>to (vedi FIG. 2) :<br />
• Condotto v<strong>en</strong>ti<strong>la</strong>zione (rif.➀ e ➁), (inversione possibile) : DN 32<br />
• Mandata <strong>de</strong>lle acque torbi<strong>de</strong> (rif. ➂) : DN 40
ITALIANO<br />
• Lavatrice (rif. ➃) (cannelé) : DN 25<br />
• Cabina doccia (rif. ➄) - opzione kit doccia : DN 40<br />
Canalizzazione in tubi PVC o flessibili in commercio<br />
(vedi FIG. 4 e 5 per i diametri <strong>de</strong>lle tubature).<br />
È indisp<strong>en</strong>sabile che<br />
1 - Le tubature di mandata <strong>de</strong>lle acqua di scolo siano<br />
collegate al<strong>la</strong> parte superiore <strong>de</strong>l<strong>la</strong> condotta <strong>de</strong>l<strong>la</strong><br />
fognatura a sistema unitario, formando un anello.<br />
- L'altezza sia essere compresa tra 3,50 e 7 metri (massimo)<br />
(vedi FIG. 4).<br />
2 - L'altezza minima <strong>de</strong>l<strong>la</strong> tubatura di evacuazione <strong>de</strong>l<strong>la</strong><br />
<strong>la</strong>vatrice sia conforme a quel<strong>la</strong> indicata dal costruttore.<br />
3 - Il condotto di aerazione sia aperto (vedi FIG. 4), abbia<br />
uno sbocco verso l'esterno e risponda alle norme<br />
igi<strong>en</strong>iche in vigore.<br />
4 - Le tubature di connessione al <strong>la</strong>vabo e al condotto di<br />
aerazione siano inserite per alm<strong>en</strong>o 20 mm nel<strong>la</strong> cisterna<br />
(vedi FIG. 3).<br />
5 - Preve<strong>de</strong>re un dislivello di alm<strong>en</strong>o 2,5 cm x metro di tubatura per<br />
il collegam<strong>en</strong>to tra <strong>la</strong> doccia e SUBSANIT (vedi FIG. 6).<br />
Ridurre al minimo <strong>la</strong> lunghezza <strong>de</strong>l cavo<br />
ATTENZIONE ! elettrico (rif. 6) all'interno <strong>de</strong>l<strong>la</strong> cisterna per<br />
non ostaco<strong>la</strong>re i movim<strong>en</strong>ti <strong>de</strong>l galleggiante.<br />
Dopo aver collegato le apparecchiature, rimettere a posto<br />
<strong>la</strong> calotta di protezione <strong>de</strong>l SUBSANIT.<br />
Fissare <strong>la</strong> calotta mediante i morsetti,<br />
ATTENZIONE ! collocandoli lungo le nervature verticali<br />
<strong>de</strong>l<strong>la</strong> vaschetta.<br />
5.4 Collegam<strong>en</strong>ti elettrici<br />
È indisp<strong>en</strong>sabile collegare il SUBSANIT a una spina<br />
femmina a 2 poli con messa a terra.<br />
Verificare <strong>la</strong> t<strong>en</strong>sione e <strong>la</strong> frequ<strong>en</strong>za (vedi § 1.2) <strong>de</strong>l<strong>la</strong> rete e<br />
accertarsi che l'instal<strong>la</strong>zione elettrica sia conforme al<strong>la</strong><br />
norma CEI 364.<br />
I collegam<strong>en</strong>ti elettrici <strong>de</strong>vono trovarsi al riparo<br />
dall'umidità.<br />
Il collegam<strong>en</strong>to si limita all'inserim<strong>en</strong>to <strong>de</strong>l<strong>la</strong> presa <strong>de</strong>l<strong>la</strong><br />
corr<strong>en</strong>te.<br />
6. MESSA IN SERVIZIO<br />
Non far funzionare il SUBSANIT a secco,<br />
ATTENZIONE !<br />
neppure per un mom<strong>en</strong>to.<br />
- Aprire il rubinetto <strong>de</strong>l <strong>la</strong>vabo per riempire <strong>la</strong> cisterna.<br />
Quando il galleggiante raggiunge una <strong>de</strong>terminata<br />
altezza, <strong>la</strong> pompa si avvia e manda l'acqua nel<strong>la</strong><br />
condotta (rumore di circo<strong>la</strong>zione <strong>de</strong>ll'acqua).<br />
- Control<strong>la</strong>re <strong>la</strong> t<strong>en</strong>uta stagna di tutte le connessioni.<br />
- Il funzionam<strong>en</strong>to automatico di SUBSANIT è ora garantito<br />
dall'interruttore a galleggiante.<br />
7. MANUTENZIONE<br />
Il SUBSANIT non richie<strong>de</strong> una manut<strong>en</strong>zione partico<strong>la</strong>re<br />
durante il funzionam<strong>en</strong>to.<br />
Pulire rego<strong>la</strong>rm<strong>en</strong>te <strong>la</strong> cisterna con <strong>de</strong>ll'acqua calda<br />
(ev<strong>en</strong>tualm<strong>en</strong>te con l'aggiunta di un prodotto non alcalino)<br />
per evitare <strong>la</strong> formazione di <strong>de</strong>positi sulle pareti.<br />
Per <strong>la</strong> pompa, fare riferim<strong>en</strong>to alle istruzioni fornite con il<br />
modulo.<br />
8. PROBLEMI DI FUNZIONAMENTO<br />
Prima di qualsiasi interv<strong>en</strong>to, METTERE FUORI TENSIONE<br />
l'apparecchiaturan.<br />
PROBLEMA CAUSA SOLUZIONE<br />
8.1 LA POMPA GIRA<br />
SENZA MANDARE<br />
8.2 LA POMPA NON<br />
GIRA<br />
8.3 LA POMPA GIRA<br />
MA IL FLUSSO<br />
DIVENTA SEMPRE<br />
PIÙ DEBOLE<br />
8.4 LA TENUTA STAGNA<br />
È INSUFFICIENTE<br />
8.5 ACQUA<br />
STAGNANTE NEL<br />
PIATTO DELLA<br />
DOCCIA<br />
a) La valvo<strong>la</strong> anti-ritorno è montata al<strong>la</strong><br />
rovescia :<br />
b) La condotta di mandate <strong>de</strong>lle acque<br />
di scolo è ostruita :<br />
c) Altezza <strong>de</strong>lle tubature di mandate<br />
rispetto al<strong>la</strong> condotta <strong>de</strong>l<strong>la</strong> fognatura<br />
a sistema unitario troppo elevata :<br />
a) Protezione termica <strong>de</strong>l motore<br />
disinnestata :<br />
b) Instal<strong>la</strong>zione elettrica g<strong>en</strong>erale<br />
difettosa :<br />
c) Cavo di raccordo difettoso :<br />
d) Il cavo elettrico ostaco<strong>la</strong> il<br />
funzionam<strong>en</strong>to <strong>de</strong>l galleggiante :<br />
a) La pompa è ostruita da corpi<br />
estranei :<br />
b) L'alim<strong>en</strong>tazione <strong>de</strong>l motore è<br />
insuffici<strong>en</strong>te :<br />
a) Valvo<strong>la</strong> anti-ritorno difettosa :<br />
b) Giunture di raccordo consumate :<br />
a) Control<strong>la</strong>re l'instal<strong>la</strong>zione. Il dislivello<br />
suolo/doccia non <strong>de</strong>ve essere<br />
inferiore a 270 mm.<br />
b) Con kit doccia; control<strong>la</strong>re il movim<strong>en</strong>to<br />
<strong>de</strong>l galleggiante sull'asta <strong>de</strong>l kit :<br />
a) Smontare <strong>la</strong> condotta di mandate <strong>de</strong>lle acque di scolo e<br />
control<strong>la</strong>re se il batt<strong>en</strong>te <strong>de</strong>l<strong>la</strong> valvo<strong>la</strong> si apre nel<strong>la</strong> direzione di<br />
mandate. In caso contrario, svitare il raccordo (rif. 6) e riavvitarlo<br />
nel s<strong>en</strong>so opposto (cerniera verso l'alto).<br />
b) Smontare <strong>la</strong> tubatura e sturare mediante sistemi o prodotti adatti.<br />
c) Questa altezza <strong>de</strong>ve essere compresa tra 3,50 e 7 metri.<br />
Rive<strong>de</strong>re l'instal<strong>la</strong>zione.<br />
a) Il riarmo è automatico dopo il raffreddam<strong>en</strong>to <strong>de</strong>l motore.<br />
Control<strong>la</strong>re <strong>la</strong> temperatura <strong>de</strong>ll'acqua.<br />
b) Far control<strong>la</strong>re il disgiuntore e i collegam<strong>en</strong>ti elettrici<br />
<strong>de</strong>ll'instal<strong>la</strong>zione da un elettricista qualificato.<br />
c) Sostituire il cavo <strong>de</strong>l<strong>la</strong> pompa.<br />
d) Ridurre al minimo il cavo all'interno <strong>de</strong>l<strong>la</strong> cisterna. Control<strong>la</strong>re e<br />
stringere il premistoppa <strong>de</strong>l cavo (fissarlo al<strong>la</strong> cisterna).<br />
a) Rimuovere <strong>la</strong> calotta di protezione <strong>de</strong>l modulo e pulire con gran<strong>de</strong><br />
abbondanza di acqua <strong>la</strong> succhieruo<strong>la</strong> e il fondo <strong>de</strong>l<strong>la</strong> cisterna. Se<br />
necessario, scollegare <strong>la</strong> pompa, estrar<strong>la</strong> e smontare <strong>la</strong><br />
succhieruo<strong>la</strong> per <strong>la</strong>var<strong>la</strong>. Una volta terminata l'operazione,<br />
rimettere a posto pompa e calotta.<br />
b) Control<strong>la</strong>re <strong>la</strong> t<strong>en</strong>sione <strong>de</strong>l<strong>la</strong> corr<strong>en</strong>te di alim<strong>en</strong>tazione, fac<strong>en</strong>do<br />
misurare <strong>la</strong> t<strong>en</strong>sione in corrispon<strong>de</strong>nza <strong>de</strong>i terminali <strong>de</strong>l motore.<br />
a) Smontare e sostituire <strong>la</strong> valvo<strong>la</strong>.<br />
b) Sostituire le giunture.<br />
a) Se necessario, rive<strong>de</strong>re l'instal<strong>la</strong>zione. Se il dislivello suolo/doccia è<br />
inferiore a 270 mm, acquistare un kit doccia.<br />
b) Pulire <strong>la</strong> cisterna e il kit doccia con acqua calda.<br />
10
NOTES<br />
11
FRANCAIS<br />
CE MANUEL DOIT ETRE REMIS A<br />
L'UTILISATEUR FINAL ET ETRE TOUJOURS<br />
DISPONIBLE SUR SITE.<br />
ENGLISH<br />
THIS LEAFLET HAS TO BE GIVEN TO THE<br />
END USER AND MUST BE LEFT ON SITE.<br />
ITALIANO<br />
QUESTO LIBRETTO D'USO DEVE ESSERE<br />
RIMESSO ALL'UTILIZZATORE FINALE E<br />
RIMANERE SEMPRE DISPONIBILE SUL POSTO.<br />
CB.N° 4.005.905/Ed.2<br />
SALMSON VIETNAM<br />
E-TOWN - Unit 3-1C<br />
364 CONG HOA - TAN BINH Dist.<br />
Hochi minh-ville<br />
VIETNAM<br />
TEL. : (84-8) 810 99 75<br />
FAX : (84-8) 810 99 76<br />
nkm-salmson@com.vn<br />
W.S.L. LEBANON<br />
Bou Khater building - Mazda C<strong>en</strong>ter<br />
Jal El Dib Highway - PO Box 90-281<br />
Djei<strong>de</strong>h El Metn 1202 2030 - Beiruth<br />
LEBANON<br />
TEL. : (961) 4 722 280<br />
FAX : (961) 4 722 285<br />
wsl@cyberia.net.lb<br />
SALMSON ARGENTINA S.A.<br />
Av. Montes <strong>de</strong> Oca 1771/75<br />
C1270AABE<br />
Ciudad Autonoma <strong>de</strong> Bu<strong>en</strong>os Aires<br />
ARGENTINA<br />
TEL.: (54) 11 4301 5955<br />
FAX : (54) 11 4303 4944<br />
info@salmson.com.ar<br />
W.S.P. - UNITED KINGDOM<br />
C<strong>en</strong>trum 100 - Burton-on-tr<strong>en</strong>t<br />
Staffordshire - DE14 2WJ<br />
UNITED KINGDOM<br />
TEL. : (44) 12 83 52 30 00<br />
FAX : (44) 12 83 52 30 99<br />
SALMSON SOUTH AFRICA<br />
Unit 1, 9 Entreprise Close,<br />
Linbro Business Park - PO Box 52<br />
EDENVALE, 1610<br />
Republic of SOUTH AFRICA<br />
TEL. : (27) 11 608 27 80/ 1/2/3<br />
FAX : (27) 11 608 27 84<br />
admin@salmson.co.za<br />
PORTUGAL<br />
Rua Alvarez Cabral, 250/255<br />
4050 - 040 Porto<br />
PORTUGAL<br />
TEL. : (351) 22 208 0350<br />
TEL. : (351) 22 207 6910<br />
FAX : (351) 22 200 1469<br />
mail@salmson.pt<br />
SALMSON ITALIA<br />
Via J. PeriI 80 I<br />
41100 MODENA<br />
ITALIA<br />
TEL. : (39) 059 280 380<br />
FAX : (39) 059 280 200<br />
info.tecniche@salmson.it<br />
POMPES SALMSON<br />
53, BOULEVARD DE LA REPUBLIQUE - ESPACE LUMIÈRE - F-78403 CHATOU CEDEX<br />
TEL. : +33 (0) 1 30 09 81 81 - FAX : +33 (0) 1 30 09 81 01<br />
www.salmson.com<br />
POMPES SALMSON - SAS AU CAPITAL DE 16.775.000 †<br />
SIREN 313 986 838 RCS VERSAILLES - APE 291C