RT1000p RT2000p Manual - Polk Audio
RT1000p RT2000p Manual - Polk Audio
RT1000p RT2000p Manual - Polk Audio

Create successful ePaper yourself
Turn your PDF publications into a flip-book with our unique Google optimized e-Paper software.
ENGLISH ESPAÑOL FRANÇAIS DEUTSCH<br />
OPTION #2<br />
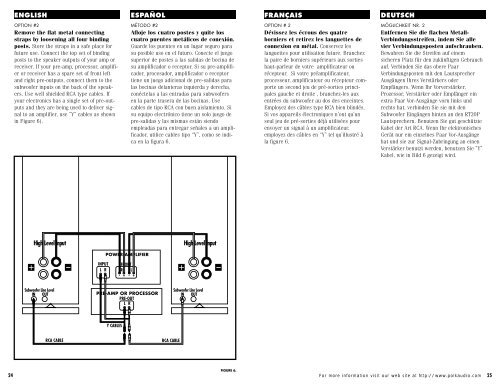
Remove the flat metal connecting<br />
straps by loosening all four binding<br />
posts. Store the straps in a safe place for<br />
future use. Connect the top set of binding<br />
posts to the speaker outputs of your amp or<br />
receiver. If your pre-amp, processor, amplifier<br />
or receiver has a spare set of front left<br />
and right pre-outputs, connect them to the<br />
subwoofer inputs on the back of the speakers.<br />
Use well shielded RCA type cables. If<br />
your electronics has a single set of pre-outputs<br />
and they are being used to deliver signal<br />
to an amplifier, use “Y” cables as shown<br />
in Figure 6).<br />
MÉTODO #2<br />
Afloje los cuatro postes y quite los<br />
cuatro puentes metálicos de conexión.<br />
Guarde los puentes en un lugar seguro para<br />
su posible uso en el futuro. Conecte el juego<br />
superior de postes a las salidas de bocina de<br />
su amplificador o receptor. Si su pre-amplificador,<br />
procesador, amplificador o receptor<br />
tiene un juego adicional de pre-salidas para<br />
las bocinas delanteras izquierda y derecha,<br />
conéctelas a las entradas para subwoofers<br />
en la parte trasera de las bocinas. Use<br />
cables de tipo RCA con buen aislamiento. Si<br />
su equipo electrónico tiene un solo juego de<br />
pre-salidas y las mismas están siendo<br />
empleadas para entregar señales a un amplificador,<br />
utilice cables tipo “Y”, como se indica<br />
en la figura 6.<br />
OPTION # 2<br />
Dévissez les écrous des quatre<br />
borniers et retirez les languettes de<br />
connexion en métal. Conservez les<br />
languettes pour utilisation future. Branchez<br />
la paire de borniers supérieurs aux sorties<br />
haut-parleur de votre amplificateur ou<br />
récepteur. Si votre préamplificateur,<br />
processeur, amplificateur ou récepteur comporte<br />
un second jeu de pré-sorties principales<br />
gauche et droite , branchez-les aux<br />
entrées du subwoofer au dos des enceintes.<br />
Employez des câbles type RCA bien blindés.<br />
Si vos appareils électroniques n’ont qu’un<br />
seul jeu de pré-sorties déjà utilisées pour<br />
envoyer un signal à un amplificateur,<br />
employez des câbles en “Y” tel qu’illustré à<br />
la figure 6.<br />
MÖGLICHKEIT NR. 2<br />
Entfernen Sie die flachen Metall-<br />
Verbindungsstreifen, indem Sie alle<br />
vier Verbindungsposten aufschrauben.<br />
Bewahren Sie die Streifen auf einem<br />
sicheren Platz für den zukünftigen Gebrauch<br />
auf. Verbinden Sie das obere Paar<br />
Verbindungsposten mit den Lautsprecher<br />
Ausgängen Ihres Verstärkers oder<br />
Empfängers. Wenn Ihr Vorverstärker,<br />
Prozessor, Verstärker oder Empfänger ein<br />
extra Paar Vor-Ausgänge vorn links und<br />
rechts hat, verbinden Sie sie mit den<br />
Subwoofer Eingängen hinten an den RT20P<br />
Lautsprechern. Benutzen Sie gut geschützte<br />
Kabel der Art RCA. Wenn Ihr elektronisches<br />
Gerät nur ein einzelnes Paar Vor-Ausgänge<br />
hat und sie zur Signal-Zubringung an einen<br />
Verstärker benutzt werden, benutzen Sie “Y”<br />
Kabel, wie in Bild 6 gezeigt wird.<br />
High Level Input<br />
High Level Input<br />
+<br />
POWER AMPLIFIER<br />
INPUT FRONT<br />
L R R L<br />
- + - +<br />
+<br />
Subwoofer Line Level<br />
IN OUT<br />
PRE-AMP OR PROCESSOR<br />
PRE-OUT<br />
L R<br />
Subwoofer Line Level<br />
IN OUT<br />
Y CABLES<br />
RCA CABLE<br />
RCA CABLE<br />
FIGURE 6.<br />
24 For more information visit our web site at http://www.polkaudio.com 25