Capteur de position du papillon Info Technique - Petit Fichier
Capteur de position du papillon Info Technique - Petit Fichier
Capteur de position du papillon Info Technique - Petit Fichier

You also want an ePaper? Increase the reach of your titles
YUMPU automatically turns print PDFs into web optimized ePapers that Google loves.
1<br />
<strong>Info</strong> <strong>Technique</strong><br />
© Hella KGaA Hueck & Co., Lippstadt 15 décembre 2002 1-2<br />
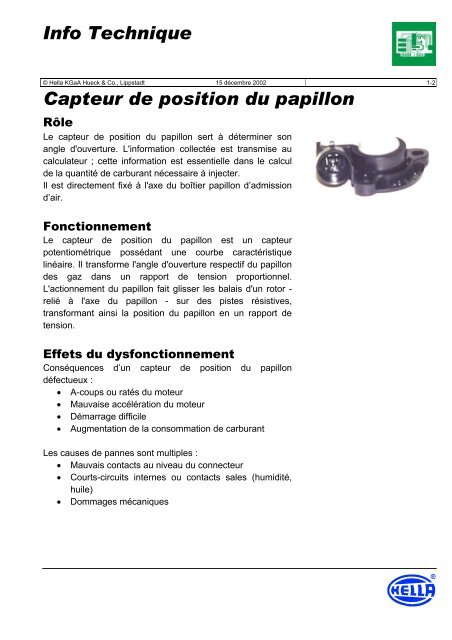
<strong>Capteur</strong> <strong>de</strong> <strong>position</strong> <strong>du</strong> <strong>papillon</strong><br />
Rôle<br />
Le capteur <strong>de</strong> <strong>position</strong> <strong>du</strong> <strong>papillon</strong> sert à déterminer son<br />
angle d'ouverture. L'information collectée est transmise au<br />
calculateur ; cette information est essentielle dans le calcul<br />
<strong>de</strong> la quantité <strong>de</strong> carburant nécessaire à injecter.<br />
Il est directement fixé à l'axe <strong>du</strong> boîtier <strong>papillon</strong> d’admission<br />
d’air.<br />
Fonctionnement<br />
Le capteur <strong>de</strong> <strong>position</strong> <strong>du</strong> <strong>papillon</strong> est un capteur<br />
potentiométrique possédant une courbe caractéristique<br />
linéaire. Il transforme l'angle d'ouverture respectif <strong>du</strong> <strong>papillon</strong><br />
<strong>de</strong>s gaz dans un rapport <strong>de</strong> tension proportionnel.<br />
L'actionnement <strong>du</strong> <strong>papillon</strong> fait glisser les balais d'un rotor -<br />
relié à l'axe <strong>du</strong> <strong>papillon</strong> - sur <strong>de</strong>s pistes résistives,<br />
transformant ainsi la <strong>position</strong> <strong>du</strong> <strong>papillon</strong> en un rapport <strong>de</strong><br />
tension.<br />
Effets <strong>du</strong> dysfonctionnement<br />
Conséquences d’un capteur <strong>de</strong> <strong>position</strong> <strong>du</strong> <strong>papillon</strong><br />
défectueux :<br />
• A-coups ou ratés <strong>du</strong> moteur<br />
• Mauvaise accélération <strong>du</strong> moteur<br />
• Démarrage difficile<br />
• Augmentation <strong>de</strong> la consommation <strong>de</strong> carburant<br />
Les causes <strong>de</strong> pannes sont multiples :<br />
• Mauvais contacts au niveau <strong>du</strong> connecteur<br />
• Courts-circuits internes ou contacts sales (humidité,<br />
huile)<br />
• Dommages mécaniques
1<br />
<strong>Info</strong> <strong>Technique</strong><br />
© Hella KGaA Hueck & Co., Lippstadt 15 décembre 2002 2-2<br />
Diagnostics<br />
Etapes à suivre en cas <strong>de</strong> panne :<br />
• Vérifier que le potentiomètre n'est pas endommagé<br />
• Vérifier que le connecteur est correctement enfiché et<br />
qu'il n'est pas encrassé<br />
• Vérifier l'alimentation électrique <strong>du</strong> calculateur <strong>de</strong><br />
gestion moteur (se reporter au schéma <strong>de</strong><br />
branchement pour connaître le brochage <strong>du</strong><br />
calculateur <strong>de</strong> gestion moteur).<br />
Valeur <strong>de</strong> référence : environ 5 V (Respecter les<br />
indications <strong>du</strong> fabricant).<br />
• Mesurer la résistance sur le potentiomètre <strong>de</strong> <strong>position</strong><br />
<strong>du</strong> <strong>papillon</strong> (se reporter au schéma <strong>de</strong> branchement<br />
pour connaître le brochage <strong>du</strong> calculateur <strong>de</strong> gestion<br />
moteur). Brancher l'ohmmètre et vérifier la résistance<br />
<strong>du</strong> <strong>papillon</strong> fermé. L’ouvrir lentement. Observer les<br />
modifications <strong>de</strong> la résistance. Si les balais <strong>du</strong> rotor ne<br />
sont plus en contact, on mesure alors une valeur nulle<br />
<strong>de</strong> résistance. Mesurer la résistance en ouvrant<br />
complètement le <strong>papillon</strong> (les comparer aux<br />
indications <strong>du</strong> fabricant).<br />
• Vérifier qu'il n'y a pas <strong>de</strong> court-circuit à la masse (se<br />
reporter au schéma <strong>de</strong> branchement pour connaître le<br />
brochage <strong>du</strong> calculateur <strong>de</strong> gestion moteur).<br />
Effectuer un test <strong>de</strong> continuité entre les divers câbles<br />
reliant le capteur au calculateur <strong>de</strong> gestion moteur,<br />
après avoir retiré le connecteur <strong>du</strong> calculateur <strong>de</strong><br />
gestion moteur et celui <strong>de</strong>s autres éléments.<br />
Valeur <strong>de</strong> référence : environ 0 Ohm.<br />
Effectuer également un test d’isolement.<br />
Valeur <strong>de</strong> référence : > 30 MOhm.