Bedienungsanleitung Digitaler Kartenmesser ... - Kasper & Richter
Bedienungsanleitung Digitaler Kartenmesser ... - Kasper & Richter
Bedienungsanleitung Digitaler Kartenmesser ... - Kasper & Richter

You also want an ePaper? Increase the reach of your titles
YUMPU automatically turns print PDFs into web optimized ePapers that Google loves.
<strong>Bedienungsanleitung</strong> <strong>Digitaler</strong> <strong>Kartenmesser</strong> ONLINE 1.<br />
Funktionen :<br />
· <strong>Digitaler</strong> Entfernungsmesser für Landkarten<br />
· Masstäbe von 1:100 bis 1:99.999.999<br />
· Taschenrechner<br />
· Uhrzeitanzeige / Count Down Timer<br />
· Thermometer °C / °F<br />
· Minileuchte<br />
· Kompass<br />
Bestimmungsgemäße Verwendung<br />
Mit diesem <strong>Kartenmesser</strong> kann die Strecke<br />
zwischen zwei Punkten auf einer Landkarte<br />
o.ä. ermittelt und am Display abgelesen<br />
werden. Zudem kann das Gerät als<br />
Taschenrechner, Uhr, zur Temperaturmessung<br />
und für eine Countdown-Funktion verwendet<br />
werden.<br />
Inbetriebnahme<br />
Entfernen Sie vor der ersten Inbetriebnahme<br />
des Gerätes, die Batterieschutzfolie aus dem<br />
Batteriefach<br />
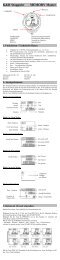
Uhrzeit<br />
Nach jedem Batteriewechsel oder Druck der [RESET] Taste wird die Uhr automatisch auf die Zeit AM 12-00 00<br />
und die Zeitzone 3 gestellt.<br />
Durch Betätigen der [CE] Taste, kann die Uhrzeit zwischen der 12- oder 24-Stundenanzeige gewechselt werden.<br />
Wird innerhalb von 2 Minuten keine Taste des Tastenfelds gedrückt, wechselt die Anzeige automatisch in den<br />
Uhrzeit-Modus.<br />
Zeiteinstellung<br />
Drücken Sie 4x die Taste [=]. Die erste Ziffer der Zeitanzeige beginnt zu blinken. Geben Sie nun die aktuelle<br />
Uhrzeit ein (Stunden/Minuten/Sekunden). Mit der [CE] Taste wird in der 12-Stundenanzeige zwischen AM und PM<br />
gewechselt. Uhrzeiteinstellung (Beispiel 14:30 Paris) Drücken Sie die Taste [RESET]. Drücken Sie die Taste [8]<br />
für Zeitzone „PARIS“. Drücken Sie die Taste [CE] um die Zeitzone für Paris abzuspeichern. Drücken Sie nun 4x<br />
die Taste [=] und geben Sie die Zahlenreihenfolge 14 30 00 ein. Die Einstellung der Uhrzeit ist nun<br />
abgeschlossen.<br />
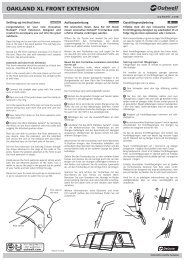
Zeitzoneneinstellung<br />
Betätigen Sie die [RESET] Taste. Drücken Sie nun die entsprechende Taste des Tastenfelds für Ihre Zeitzone<br />
(z.B. [8] für Paris = Deutschland). Drücken Sie die Taste [CE], um Ihre eingegebene Zeitzone zu speichern.<br />
Im Display erscheint nun die Uhrzeit für Ihre Zeitzone.<br />
Zeitzone<br />
0 = Denver; 1 = Sydney; 2 = Wellington; 3 = Honolulu; 4 = Karachi; 5 = Bangkok; 6 = Hongkong; 7 = London; 8 = Paris<br />
9 = Kairo; . = Chicago; + = Rio de Janeiro; - = Los Angeles; x = Tokio; : = Moskau; AC/ON = New York<br />
Wird während der Anzeige der Uhrzeit, eine dieser Tasten gedrückt, erscheint im Display für ca. 8 Sekunden die<br />
derzeit aktuelle Uhrzeit für diese Zeitzone.<br />
Taschenrechner-Funktion<br />
Drücken Sie ein oder mehrmals die Taste [=], bis im Display die Anzeige "0 " erscheint. Sie befinden sich jetzt im<br />
Taschenrechner-Modus. Über das Tastenfeld können nun die Rechenfunktionen eingegeben werden.<br />
Countdown-Funktion<br />
Drücken Sie ein oder mehrmals die Taste [=], bis im Display die Anzeige "00-00 CT 00" erscheint. Geben Sie nun<br />
die Countdown-Zeit ein (Stunden/Minuten/Sekunden). Mit der [CE] Taste, kann der Countdown gestartet oder<br />
auch wieder gestoppt werden. Ist der Countdown beendet, blinkt im Display die Anzeige "00-00 00".
Temperatur-Messung<br />
Drücken Sie ein oder mehrmals die Taste [=], bis im Display die aktuelle Temperatur angezeigt wird. Mit der<br />
Taste [CE], kann zwischen den gewünschten Einheiten gewechselt werden (°C = °Celsius / °F = °Fahrenheit).<br />
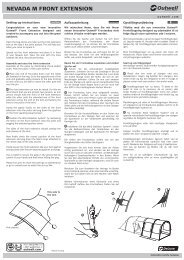
Einstellung des Maßstabes<br />
Nach jedem Batteriewechsel oder Druck der "RESET" Taste wird der Wert des Maßstabs automatisch auf<br />
1:1.000.000 gestellt.<br />
Sollte die verwendete Karte einen Maßstab von z.B. 1:1.000 besitzen, so drücken Sie die Taste [SCALE]. Im<br />
Display blinkt die Anzeige "0". Geben Sie nun den Wert 1.000 ein. Drücken Sie die Taste [=], um diesen Wert zu<br />
speichern.<br />
Entfernungsmessung<br />
Drücken Sie die Taste [MEASURE]", nachdem der richtige Maßstab eingegeben wurde.<br />
Setzen Sie das Rad des <strong>Kartenmesser</strong>s auf den Startpunkt der Karte. Fahren Sie möglichst genau mit dem Rad<br />
des Entfernungsmessers auf der Wegstrecke zwischen Start- und Zielpunkt der Karte. Wurde der Zielpunkt<br />
erreicht, kann am Display die Wegstrecke abgelesen werden.<br />
Drücken Sie die Taste [MEASURE] erneut um den Wert zu löschen und eine neue Messung zu beginnen.<br />
Wechseln Sie mit der Taste [CE]", zwischen Kilometer (KM) und Meilen (Mile).<br />
Beleuchtung und Kompass<br />
Drücken und halten Sie die [Lampentaste] auf der Gehäuserückseite um die LED einzuschalten.<br />
Auf der Rückseite des <strong>Kartenmesser</strong>s befindet sich ein Kompass. Zur Verwendung muss der <strong>Kartenmesser</strong><br />
waagrecht gehalten werden und sich die Kompassscheibe frei bewegen können.<br />
Batteriewechsel<br />
Wenn die Anzeige schwach oder unvollständig wird, ersetzen Sie bitte die Batterie (2 Stück AG10 oder<br />
Vergleichstyp). Hierzu öffnen Sie bitte mit einem Kreuzschlitz-Schraubendreher das Batteriefach, entnehmen die<br />
alten Batterien (bitte sachgerecht entsorgen, nicht in den Hausmüll werfen). Die neuen Batterien legen Sie mit<br />
dem + Pol nach oben in das Gerät ein.<br />
Fehlerbehebung<br />
Sollte die Anzeige schwach oder Fehlerhaft sein, betätigen Sie die Taste [RESET] auf der Gehäuserückseite oder<br />
wechseln Sie die Batterie. Nach einem Batteriewechsel betätigen Sie bitte auch die Taste [RESET] und stellen<br />
Sie den <strong>Kartenmesser</strong> wie beschrieben ein.<br />
Technische Daten<br />
Betriebsspannung: 3,0V DC<br />
Batterien: 2x AG 10 Knopfzellen (AG10 = Typ LR1130 )
OWNERS MANUAL Digital map measurer ONLINE 1.<br />
Features :<br />
· Digital map measurer for road maps<br />
· Scale range from 1:100 to 1:99,999,999<br />
· Calculator<br />
· Clock / Countdown Timer<br />
· Thermometer °C / °F<br />
· Mini lamp<br />
· Compass<br />
Intended Use<br />
With the digital telemeter, the route between<br />
two points on a map can be determined and<br />
read off on the display. In addition, the device<br />
can be used as a pocket calculator, clock, for<br />
measuring temperature and for a countdown<br />
function.<br />
Starting<br />
Before starting the device for the first time,<br />
remove the battery protection foil from the<br />
battery compartment.<br />
Time<br />
After each change of battery or pressing the [RESET] key, the clock is automatically set to the time AM 12-00 00<br />
and the time zone 3.<br />
By pressing the [CE] key, the time can be alternated between the 24 and 12-hour display. If no key of the keypad<br />
is pressed within 2 minutes, the display will change automatically to the time mode.<br />
Time setting<br />
Press the key [=] 4x. The first numeral of the time display begins to blink. Now enter the correct time (hours/<br />
minutes/seconds). With the [CE] key, you can alternate in the 12-hour display between AM and PM. Time setting<br />
(example 14:30 Paris) Press the [RESET] key. Press the [8] key. Press the button [CE] to store your the time<br />
zone for Paris. Now press the key [=] 4x. Enter the series of figures 14 30 00. Setting the time is now completed.<br />
Time zone setting<br />
Press the [RESET] key. Now press the appropriate key of the keypad for your time zone (e.g. [8] for Paris =<br />
Germany). Then press the button [CE] to store your entered time zone. The time for your time zone will now<br />
appear in the display.<br />
Time zone<br />
0 = Denver; 1 = Sydney; 2 = Wellington; 3 = Honolulu; 4 = Karachi; 5 = Bangkok; 6 = Hong Kong; 7 = London<br />
8 = Paris; 9 = Cairo; . = Chicago; + = Rio de Janeiro; - = Los Angeles; x = Tokyo; : = Moscow; AC/ON = New York<br />
If one of these keys is pressed during display of the time, the present current time for this time zone will appear in<br />
the display for approx. 8 seconds.<br />
Pocket calculator function<br />
Press the key [=] several times until the indication [=] appears in the display . You are now in the pocket calculator<br />
mode. Arithmetic functions can now be entered on the keypad.<br />
Countdown function<br />
Press the key [=] one or several times until the indication "00-00 CT 00" appears in the display . Now enter the<br />
countdown time (hours/minutes/seconds). With the [CE] key, the countdown can be started or stopped again. If<br />
the countdown has been completed, the indication "00-00 00" will flash in the display.
Temperature measurement<br />
Press the key [=] one or several times until the "the current air temperature" is displayed in the display . With the<br />
key [CE], it is possible to alternated between the desired units (°C = °Celsius / °F = °Fahrenheit).<br />
Setting the scale<br />
After each change of battery or pressing the [RESET], the value of the scale is automatically set to 1:1,000,000.<br />
If the map used has a scale of, for example, 1:1,000, please press the key [SCALE]. The indication "0" will flash<br />
in the display. Now enter the value 1,000. Press the key [=] to store this value.<br />
Distance measurement<br />
Press the key [MEASURE], after the correct scale has been entered. With the key [CE], you can alternate<br />
between kilometres (km) and miles (miles). Set the wheel of the mapmeasurer to the starting point of the map.<br />
Move as exactly as possible with the wheel of the mapmeasurer on the route between the start and goal point of<br />
the map. If the goal has been reached, the route can be read off on the display.<br />
Press the key [MEASURE] again to delete the value and to commence a new measure.<br />
Lighting and compass<br />
Press and hold the [lamp] key to switch on the LED. On the rear of the mapmeasurer, there is a compass in<br />
addition. To use it, the compass disc has to be able to move freely.<br />
BATTERY REPLACEMENT<br />
When the display becomes dim or is fading, replace the batteries with new AG10, or equivalent. Use a “+“type<br />
screwdriver to open the battery cover. Take the old batteries out and insert the new one into the battery holder.<br />
(with + side up).<br />
Trouble shooting<br />
Should the display show no numbers or signs of fading, please press the button [RESET] on the back of the unit<br />
or change the batteries. After a replacement of batteries, please also press the button [RESET] and set the<br />
mapmeasurer according to instructions above.<br />
Technical data<br />
Operating voltage: 3,0V DC<br />
Batteries: 2x AG 10 button cells (AG10 = type LR1130 )
Manuel d’utilisation Télémétre digital pour cartes géographiques ONLINE 1.<br />
Fonctions :<br />
· Télémétre digital pour cartes géographiques<br />
· Échelle 1:100 - 1:99.999.999<br />
· Calculateurr<br />
· Chronomètre Timer Count Up/ Down<br />
· Thermométre °C / °F<br />
· Eclairage<br />
· Boussole<br />
Utilisation conforme<br />
Le curvimètre digital permet de déterminer la<br />
distance entre deux points sur une carte. La<br />
distance déterminée est affichée sur l'écran.<br />
De plus, l'appareil peut servir en tant que<br />
calculatrice, d'horloge ainsi que de<br />
thermomètre et dispose d'une fonction de<br />
compte à rebours.<br />
Avant la première mise en service<br />
Avant la première mise en service, enlevez la<br />
bande protectrice des piles du compartiment à<br />
piles.<br />
L'heure<br />
Après tout remplacement des piles ou appui sur la touche [RESET], l'horloge se règle automatiquement sur AM<br />
12-00 00 et sur le fuseau horaire 3.<br />
En appuyant sur la touche [CE], vous pouvez choisir entre le format d'indication de l'heure sur 12 heures ou sur<br />
24 heures. Si aucune touche du clavier n'est actionnée pendant 2 minutes, l'affichage passe automatiquement au<br />
mode horloge.<br />
Réglage de l'heure<br />
Appuyez 4 fois sur la touche [=]. Le premier chiffre de l'heure affichée commence à clignoter. Entrez maintenant<br />
l'heure correcte (heures / minutes / secondes). Dans le format d'indication de l'heure sur 12 heures, vous pouvez<br />
passer de AM à PM à l'aide de la touche [CE]. Réglage de l'heure pour un fuseau particulier (exemple 14:30<br />
Paris) Appuyez sur la touche [RESET]. Appuyez sur la touche [8]. Ensuite appuyez sur la touche [CE]" pour<br />
mémoriser le fuseau horaire de Paris. Appuyez 4 fois sur la touche [=]. Entrez maintenant les chiffres 14 30 00.<br />
Le réglage de l'heure est à présent terminé.<br />
Réglage des fuseaux horaires<br />
Appuyez sur la touche [RESET]. Ensuite appuyez sur la touche correspondante du fuseau horaire souhaité (par<br />
ex. 8 pour Paris). Appuyez sur la touche [CE] pour mémoriser le fuseau entré.<br />
L'écran affiche à présent l'heure de votre fuseau horaire.<br />
Fuseau horaire<br />
0 = Denver; 1 = Sydney; 2 = Wellington; 3 = Honolulu; 4 = Karachi; 5 = Bangkok; 6 = Hongkong; 7 = Londres<br />
8 = Paris; 9 = Le Caire; . = Chicago; + = Rio de Janeiro; - = Los Angeles; x = Tokyo; : = Moscou; AC/ON = New York<br />
Si, pendant l'affichage de l'heure, une de ces touches est actionnée, l'écran affiche pour env. 8 secondes l'heure<br />
actuelle du fuseau horaire choisi.<br />
Fonction calculatrice<br />
Appuyez une ou plusieurs fois sur la touche [=], jusqu'à ce que l'écran affiche [0]. Vous êtes maintenant en mode<br />
calculatrice. Entrez les opérations numériques à l'aide du clavier.<br />
Fonction compte à rebours<br />
Appuyez une ou plusieurs fois sur la touche [=], jusqu'à ce que l'écran affiche "00-00 CT 00". Entrez maintenant<br />
la durée du compte à rebours (heures / minutes / secondes). Le compte à rebours peut être démarré et arrêté à<br />
l'aide de la touche [CE]. Lorsque le compte à rebours est terminé, l'écran affiche "00-00 00".
Fonction thermomètre<br />
Appuyez une ou plusieurs fois sur la touche [=], jusqu'à ce que l'écran affiche la température de l'air ambiant. La<br />
touche [CE] vous permet de passer d'une unité de mesure à l'autre (°C = °Celsius / °F = °Fahrenheit).<br />
Réglage de l'échelle<br />
Après chaque remplacement des piles ou pression de la touche "RESET", l'échelle est réglée automatiquement<br />
sur 1:1.000.000. Si la carte utilisée a une échelle de par ex. 1:1.000, appuyez sur la touche "SCALE". L'écran<br />
affiche "0" en clignotant. Entrez maintenant la valeur 1.000. Appuyez sur la touche "=" pour mémoriser la valeur.<br />
Fonction mesure de distance<br />
Après l'entrée de l'échelle correcte, appuyez sur la touche [MEASURE]. Vous pouvez choisir entre les unités de<br />
mesure kilomètres (KM) et miles (Mile) à l'aide de la touche [CE]. Placez la molette du curvimètre sur le point de<br />
départ sur la carte. Suivez avec la molette du curvimètre aussi exactement que possible la route entre le point de<br />
départ et le point de destination sur la carte. Arrivé au point de destination, la distance de la route peut être lue à<br />
l'écran.<br />
Appuyez de nouveau sur la touche [MEASURE] pour effacer la valeur et commencer une nouvelle mesure.<br />
Eclairage et boussole<br />
Appuyez sur la touche de la lampe et maintenez-la enfoncée afin d'allumer la diode LED. Le curvimètre est doté<br />
d'une boussole au dos de l'appareil. Le cadran de la boussole doit pouvoir bouger librement afin d'être utilisé.<br />
Echange de batteries<br />
Si l’affichage est faible ou incomplet, substituez la batterie (2 pièce AG10 ou batterie équivalente). ouvrez le<br />
boîtier de la batterie avec un tournevis pour vis de crosse, éliminez la vieille batterie (s’il vous plait éliminez-la de<br />
manière adéquate, ne la jetez pas dans les déchets domestiques). Insérez la nouvelle batterie avec le pole + vers<br />
le haut dans l’appareil.<br />
Réparation des dérangements<br />
Si l’affichage est faible ou erroné, actionnez la touche [RESET] sur la partie postérieure du boîtier ou changez la<br />
batterie. Après avoir changé la batterie actionnez la touche [RESET] aussi et réglez le curvimètre comme décrit.<br />
Caractéristiques techniques<br />
Tension de service : 3,0 V DC<br />
Piles : 2 piles boutons AG 10 (AG10 = type LR1130)