ROTO SILENTA 630 RS - Hettich Instruments
ROTO SILENTA 630 RS - Hettich Instruments
ROTO SILENTA 630 RS - Hettich Instruments

Create successful ePaper yourself
Turn your PDF publications into a flip-book with our unique Google optimized e-Paper software.
EN<br />
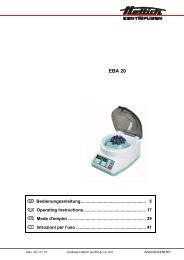
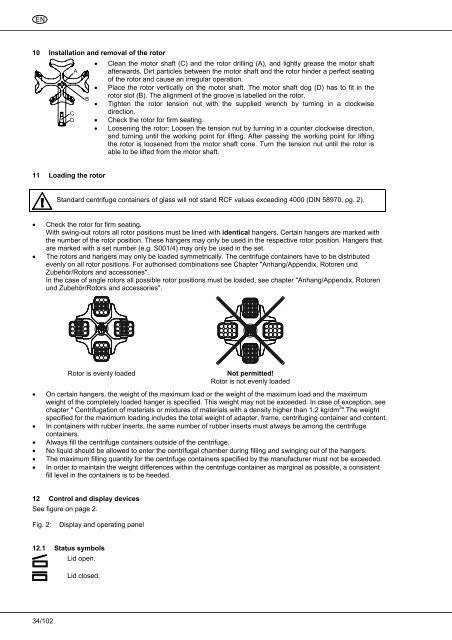
10 Installation and removal of the rotor<br />
A<br />
C<br />
D<br />
B<br />
• Clean the motor shaft (C) and the rotor drilling (A), and lightly grease the motor shaft<br />
afterwards. Dirt particles between the motor shaft and the rotor hinder a perfect seating<br />
of the rotor and cause an irregular operation.<br />
• Place the rotor vertically on the motor shaft. The motor shaft dog (D) has to fit in the<br />
rotor slot (B). The alignment of the groove is labelled on the rotor.<br />
• Tighten the rotor tension nut with the supplied wrench by turning in a clockwise<br />
direction.<br />
• Check the rotor for firm seating.<br />
• Loosening the rotor: Loosen the tension nut by turning in a counter clockwise direction,<br />
and turning until the working point for lifting. After passing the working point for lifting<br />
the rotor is loosened from the motor shaft cone. Turn the tension nut until the rotor is<br />
able to be lifted from the motor shaft.<br />
11 Loading the rotor<br />
Standard centrifuge containers of glass will not stand RCF values exceeding 4000 (DIN 58970, pg. 2).<br />
• Check the rotor for firm seating.<br />
With swing-out rotors all rotor positions must be lined with identical hangers. Certain hangers are marked with<br />
the number of the rotor position. These hangers may only be used in the respective rotor position. Hangers that<br />
are marked with a set number (e.g. S001/4) may only be used in the set.<br />
• The rotors and hangers may only be loaded symmetrically. The centrifuge containers have to be distributed<br />
evenly on all rotor positions. For authorised combinations see Chapter "Anhang/Appendix, Rotoren und<br />
Zubehör/Rotors and accessories".<br />
In the case of angle rotors all possible rotor positions must be loaded, see chapter "Anhang/Appendix, Rotoren<br />
und Zubehör/Rotors and accessories".<br />
Rotor is evenly loaded<br />
Not permitted!<br />
Rotor is not evenly loaded<br />
• On certain hangers, the weight of the maximum load or the weight of the maximum load and the maximum<br />
weight of the completely loaded hanger is specified. This weight may not be exceeded. In case of exception, see<br />
chapter " Centrifugation of materials or mixtures of materials with a density higher than 1.2 kg/dm 3 ".The weight<br />
specified for the maximum loading includes the total weight of adapter, frame, centrifuging container and content.<br />
• In containers with rubber inserts, the same number of rubber inserts must always be among the centrifuge<br />
containers.<br />
• Always fill the centrifuge containers outside of the centrifuge.<br />
• No liquid should be allowed to enter the centrifugal chamber during filling and swinging out of the hangers.<br />
• The maximum filling quantity for the centrifuge containers specified by the manufacturer must not be exceeded.<br />
• In order to maintain the weight differences within the centrifuge container as marginal as possible, a consistent<br />
fill level in the containers is to be heeded.<br />
12 Control and display devices<br />
See figure on page 2.<br />
Fig. 2:<br />
Display and operating panel<br />
12.1 Status symbols<br />
Lid open.<br />
Lid closed.<br />
34/102