WIK Espresso_9731_Einband - Kaffeevollautomaten.org
WIK Espresso_9731_Einband - Kaffeevollautomaten.org
WIK Espresso_9731_Einband - Kaffeevollautomaten.org

You also want an ePaper? Increase the reach of your titles
YUMPU automatically turns print PDFs into web optimized ePapers that Google loves.
<strong>WIK</strong> <strong>Espresso</strong>_<strong>9731</strong>_<strong>Einband</strong> 13.05.2005 16:28 Uhr Seite 1<br />
Gewährleistung<br />
DE<br />
6 … 14<br />
Für unsere Geräte leisten wir 2 Jahre Gewährleistung.<br />
Die Gewährleistung beginnt mit dem Tage des Kaufes, welcher durch Rechnung oder Quittung nachzuweisen ist.<br />
Eine Gewährleistung bewirkt keine Verlängerung der Gewährleistungsfrist.<br />
Bei notwendigen Reparaturen setzen Sie sich bitte mit Ihrem Fachgeschäft in Verbindung.<br />
Guarantee<br />
We give a two year guarantee on our appliances.<br />
The guarantee period begins on the date of purchase and must be verified by an invoice or receipt.<br />
Services under guarantee do not extend the guarantee period.<br />
If any repairs are required, please contact your specialized dealer.<br />
Bedienungsanleitung<br />
Instructions for use<br />
Mode d'emploi<br />
GB<br />
FR<br />
15 … 23<br />
24 … 32<br />
b<br />
b1<br />
c d e f g h<br />
Garantie<br />
Nos appareils bénéficient de 2 ans de garantie.<br />
La garantie commence le jour de l’achat, qui doit être justifié par une facture ou un reçu.<br />
En cas de prestation de garantie, le délai de garantie ne se trouvera pas prolongé.<br />
Pour toute réparation, veuillez vous mettre en contact avec votre commerce spécialisé.<br />
Dies ist Ihre Gewährleistungskarte als Erwerbsnachweis<br />
a<br />
i<br />
Wenn Sie eine Reparatur an dem Gerät haben, bringen Sie es mit diesem Abschnitt zu Ihrem Fachgeschäft.<br />
Gekauft am:<br />
Name und Adresse des Fachgeschäftes:<br />
This is your Warranty Card<br />
j<br />
If your appliance has to be repaired, bring it over to your specialized dealer together with this coupon.<br />
Purchased on:<br />
Name and address of the specialized dealer:<br />
Carte de garantie<br />
Ceci est votre carte de garantie en tant que preuve de l’achat. Si vous devez faire exécuter une réparation<br />
sur cet appareil, veuillez apporter ce coupon à votre commerce spécialisé.<br />
m<br />
l<br />
k<br />
Acheté le :<br />
Nom et adresse du commerce spécialisé :<br />
05.05 / 002<br />
<strong>WIK</strong><br />
Elektro-Hausgeräte<br />
o<br />
P.O. Box 11 04 63<br />
D-45334 Essen<br />
Germany<br />
Tel.: (+49) 2 01 / 86 66-0<br />
Fax.: (+49) 2 01 / 86 66-1 21<br />
Gedruckt auf umweltgerechtem chlorfrei gebleichten Papier<br />
Printed on environment-friendly paper bleached without chlorine<br />
Imprimé sur papier écologique blanchi sans chlore<br />
www.wik.de<br />
Änderungen vorbehalten / Modifications reserved / Modifications éventuelles<br />
Chlor<br />
Mod. <strong>9731</strong><br />
n<br />
p q r
Rückseiten f. <strong>Einband</strong> 1 01.04.2004 15:58 Uhr Seite 1<br />
1<br />
2 3<br />
7 8 9<br />
13<br />
14 15<br />
19 20 21
Rückseiten f. <strong>Einband</strong> 2 01.04.2004 15:58 Uhr Seite 1<br />
4 5 6<br />
10 a<br />
11 12<br />
10 b<br />
16<br />
17 18<br />
22 23 24
Rückseiten f. <strong>Einband</strong> 3 01.04.2004 15:59 Uhr Seite 6<br />
DE<br />
<strong>WIK</strong> <strong>Espresso</strong>-Information<br />
Lieber Kunde,<br />
das Zubereiten von <strong>Espresso</strong> erfordert etwas<br />
Geschick und anfangs ein wenig Geduld.<br />
Nehmen Sie sich etwas Zeit und machen Sie<br />
sich mit Ihrer <strong>Espresso</strong>-Maschine und dem<br />
Zubereitungsverfahren vertraut.<br />
<strong>Espresso</strong>mehl<br />
Sparen Sie gerade am Anfang nicht mit<br />
Kaffeemehl und variieren Sie auch zwischen<br />
verschiedenen Sorten. Bis Sie Ihre <strong>Espresso</strong>sorte,<br />
sowohl geschmacklich als auch vom<br />
Mahlgrad gefunden haben, sollten Sie evtl.<br />
mehrere Sorten testen. Falls Sie bei Ihrem<br />
Lebensmittelhändler nicht die für Sie geeignete<br />
Sorte finden sollten, so versuchen Sie<br />
es doch einmal bei einem kleinen italienischen<br />
Lebensmittelhändler. Dort können Sie<br />
sich beraten lassen und zum Teil sogar Ihren<br />
Kaffee individuell aus verschiedenen Sorten<br />
mischen lassen.<br />
Charakteristik des <strong>Espresso</strong>kaffees<br />
Kennzeichen des <strong>Espresso</strong>kaffees ist sein<br />
aromatischer und kräftiger Geschmack<br />
sowie seine typische „Crema“. Voraussetzung<br />
dafür ist, daß das Wasser unter hohem<br />
Druck und mit der richtigen Temperatur<br />
durch geeignetes Kaffeemehl gedrückt wird.<br />
Der Unterschied des <strong>Espresso</strong> zum herkömmlichen<br />
Kaffee liegt in seiner Sortenzusammensetzung,<br />
der kürzeren Röstdauer<br />
und seiner geringeren Kontaktzeit mit dem<br />
Wasser bei seiner Zubereitung.<br />
Diese geringere Wasserkontaktzeit führt<br />
dazu, daß der <strong>Espresso</strong> weniger Reizstoffe<br />
(z.B. Gerbstoffe, ätherische Öle) sowie ca.<br />
30 % weniger Koffein enthält als herkömmlicher<br />
Filterkaffee und damit trotz seines stärkeren<br />
Geschmackes wesentlich magenbekömmlicher<br />
ist.<br />
Verwenden Sie nach Möglichkeit dickwandige,<br />
v<strong>org</strong>ewärmte <strong>Espresso</strong>tassen /<br />
Cappuccinotassen, da diese die Wärme länger<br />
speichern. Geben Sie den Zucker<br />
bereits vor der Zubereitung in die Tasse<br />
oder schütten Sie ihn mit einer raschen<br />
Bewegung in die Tasse und rühren ihn nur<br />
zwei- bis dreimal um, da sonst zuviel<br />
Aroma entweicht.<br />
6<br />
Gerätekennwerte<br />
<strong>Espresso</strong>maschine<br />
Bezeichnung: <strong>Espresso</strong> & Cappuccino<br />
Bestellnummer: <strong>9731</strong><br />
Spannung: 230 V ~ / 50 Hz.<br />
Nennaufnahme: 1050 W<br />
Heizsystem: Thermostatgeregelter<br />
Thermoblock-Durchlauferhitzer;<br />
1000 W<br />
Pumpe: Elektromagnetische Hochleistungspumpe<br />
(50W)<br />
Druck: 12-16 bar<br />
Netzleitung: max. 1,1 m<br />
Maße:<br />
303,5 x 203,5 x 274 mm<br />
Gewicht: ca. 4 kg<br />
Schutzklasse: I<br />
Funkentstörung: Dieses Gerät ist entsprechend<br />
den Funkentstörungsrichtlinien funkentstört.<br />
Geräteelemente<br />
a Abnehmbarer Frischwasserbehälter<br />
b Aufklappbarer Wasserbehälterdeckel<br />
b1 Siebhalter<br />
c Ein-Aus-Schalter<br />
d Umschalter für Kaffee/Dampf<br />
e Drehschalter für Kaffee/Dampf/Heißwasser<br />
f Aufheizkontrolleuchte (rot)<br />
g Betriebskontrolleuchte (grün)<br />
h Warmhaltefläche für Tassen<br />
i Dampfrohr<br />
j Aufschäumhilfe<br />
k Abstellgitter<br />
l Auffangschale<br />
m Füllstandsanzeige<br />
n Filterträger<br />
o Siebverriegelung<br />
p Meßlöffel mit Stopfer und Sechskantschlüssel<br />
q Eintassensieb<br />
r Zweitassensieb
Text_DE_<strong>9731</strong> 01.04.2004 16:13 Uhr Seite 7<br />
Zu Ihrer Sicherheit!<br />
Die Bedienungsanleitung vermittelt wichtige<br />
Sicherheitshinweise und Informationen,<br />
die zum einwandfreien Betrieb des Gerätes<br />
erforderlich sind!<br />
Die Anleitung vollständig lesen, aufbewahren<br />
und ggf. an Nachbesitzer weitergeben.<br />
Alle Sicherheitshinweise dienen stets auch<br />
Ihrer persönlichen Sicherheit!<br />
Sicherheitshinweise beim Anschluß des<br />
Gerätes<br />
● Dieses Gerät entspricht den anerkannten<br />
Regeln der Technik und den einschlägigen<br />
Sicherheitsbestimmungen für Elektrogeräte!<br />
● Bei Beschädigung der Anschlussleitung<br />
dieses Gerätes darf diese nur durch eine<br />
vom Hersteller benannte Reparaturwerkstatt<br />
ausgetauscht werden, um eine Gefährdung<br />
zu vermeiden.<br />
● Die Netzspannung muß mit der Spannungsangabe<br />
(V) auf dem Typenschild des<br />
Gerätes übereinstimmen!<br />
● Das Gerät nur an Wechselstrom, an eine<br />
Schutzkontaktsteckdose anschließen. Kabel<br />
dabei nicht über scharfe Kanten ziehen, einklemmen<br />
oder herunterhängen lassen.<br />
Kabel vor Hitze und Feuchtigkeit schützen!<br />
● Stecker nur bei ausgeschaltetem Gerät in die<br />
Steckdose einstecken!<br />
● Gerät nie auf heiße Oberflächen wie z.B.<br />
Herdplatten, Öfen oder in deren Nähe abstellen!<br />
Netzkabel nie mit heißen Teilen in<br />
Berührung bringen!<br />
● Bei Verwendung einer Verlängerungsschnur,<br />
nur ein geerdetes Kabel mit einem Leiterquerschnitt<br />
von mind. 1,5 mm 2 benutzen!<br />
Sicherheitshinweise bei der Bedienung des<br />
Gerätes<br />
● Das Gerät nie unbeaufsichtigt und außer<br />
Reichweite von Kindern betreiben!<br />
● Personen mit motorischen Störungen sollten<br />
nie ohne Begleitperson das Gerät in<br />
Betrieb nehmen, um eine Gefährdung zu<br />
vermeiden.<br />
● Das Gerät nur betreiben, wenn sich Wasser<br />
im System befindet! Befüllen Sie den Wasserbehälter<br />
ausschließlich nur mit Wasser!<br />
● Das Gerät nur betreiben, wenn die Auffangschale<br />
und das Abstellgitter eingesetzt sind!<br />
● Achtung!<br />
Heiße Geräteteile (Dampfrohr/ Filtersieb).<br />
Diese können bei Berührung Verbrennungen<br />
verursachen.<br />
● Warnung!<br />
System steht während des Betriebs unter<br />
Druck. Die Entnahme des Filterträgers<br />
während des Durchlaufs kann zu Verbrühungen<br />
oder Verletzungen führen.<br />
Filterträger nur bei drucklosem Gerät (nach<br />
dem Durchlauf) entfernen.<br />
● Keine entzündbaren Flüssigkeiten mit Dampf<br />
erhitzen!<br />
● Die Dampfdüse nur bei drucklosem und ausgeschaltetem<br />
Zustand reinigen!<br />
Sicherheitshinweise für die Reinigung und<br />
Pflege<br />
● Das Gerät kann nicht geöffnet werden.<br />
● Bei Betriebsstörungen und bei der Reinigung<br />
und Pflege stets den Netzstecker ziehen!<br />
Gerät muß drucklos sein!<br />
● Den Netzstecker nicht an der Leitung oder mit<br />
nassen Händen aus der Steckdose ziehen!<br />
● Das Gerät vor Feuchtigkeit schützen! Niemals<br />
in die Spülmaschine stecken! Nicht ins Wasser<br />
tauchen!<br />
● Entkalkungshinweise beachten!<br />
Bestimmungsgemäßer Gebrauch<br />
Das Gerät darf ausschließlich nur zum<br />
Zubereiten von <strong>Espresso</strong>kaffee, normalen<br />
Kaffees, Aufschäumen von Milch und Heißwasserzubereitung<br />
verwendet werden.<br />
Bei Zweckentfremdung, falscher Bedienung<br />
oder nicht fachgerechter Reparatur<br />
wird keine Haftung für eventuelle Schäden<br />
übernommen. Ebenso sind Garantieleistungen<br />
in solchen Fällen ausgeschlossen.<br />
Das Gerät ist nicht für den gewerblichen<br />
Gebrauch bestimmt!<br />
7
Text_DE_<strong>9731</strong> 01.04.2004 16:13 Uhr Seite 8<br />
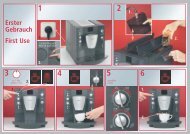
BILDER 1 – 7<br />
Vor dem ersten Gebrauch sollten Sie das<br />
Gerät mit ein bis zwei Frischwasserbehälterfüllungen<br />
ohne Kaffeemehl durchspülen.<br />
V<strong>org</strong>ang:<br />
● Deckel öffnen und den Wasserbehälter<br />
entnehmen (1).<br />
● Wasserbehälter mit kaltem Wasser füllen<br />
und wieder in das Gerät einsetzen (2)/(3).<br />
Dabei das Bodenventil des Frischwasserbehälters<br />
in die dafür v<strong>org</strong>esehene Öffnung<br />
fest eindrücken.<br />
● Filterträger “n“ einsetzen. Hierbei die<br />
Siebverriegelung “o“ nach hinten ziehen<br />
und den Filterträger handfest bis zum<br />
rechten Anschlag drehen (4).<br />
● Gerät bestimmungsgemäß anschließen<br />
(Sicherheitshinweise beachten).<br />
● Umschalter für Kaffee & Dampf “d“ nach<br />
oben auf Stellung Kaffee stellen und<br />
das Gerät am Ein-Aus-Schalter “c“ einschalten<br />
(5).<br />
● Während der Aufheizphase leuchtet die<br />
Aufheizkontrolleuchte “f“ rot (6).<br />
● Nach Beendigung der Aufheizphase<br />
erlischt die Aufheizkontrolleuchte rot “f“<br />
und die Betriebskontrolleuchte “g“ grün<br />
leuchtet auf. Ein ausreichend großes Auffanggefäß<br />
unter das Brühsieb stellen und<br />
Drehschalter “e“ nach rechts auf Stellung<br />
Kaffeeförderung drehen (7).<br />
☛ Hinweis<br />
Den gesamten Inhalt des Wasserbehälters<br />
durchlaufen lassen. Gegebenenfalls den<br />
V<strong>org</strong>ang unterbrechen und das Auffanggefäß<br />
entleeren. V<strong>org</strong>ang ein- bis zweimal<br />
wiederholen.<br />
BILDER 1 – 4; 8 – 9<br />
Das Gerät bietet Ihnen zwei unterschiedliche<br />
Möglichkeiten zum Vorwärmen der Tassen.<br />
8<br />
Erste Inbetriebnahme<br />
Tassenvorwärmung<br />
1. Möglichkeit<br />
● Frischwasserbehälter füllen und einsetzen<br />
(1-3). Filterträger “n“ einsetzen. Hierbei<br />
die Siebverriegelung “o“ nach hinten<br />
ziehen und den Filterträger handfest<br />
bis zum rechten Anschlag drehen (4).<br />
● Gerät am Ein-Aus-Schalter “c“ einschalten.<br />
Eine bzw. zwei Tassen unter den Filterträger<br />
stellen. Nach Aufleuchten der<br />
grünen Betriebskontrolleuchte “g“, den<br />
Drehschalter “e“ nach rechts drehen und<br />
Wasser zur Erwärmung des Filterträgers<br />
und zum Vorwärmen der Tassen durchlaufen<br />
lassen (8).<br />
● Sind die Tassen gefüllt, drehen Sie den<br />
Drehschalter “e“ wieder zurück auf die<br />
Mittelstellung 0.<br />
2. Möglichkeit<br />
● Stellen Sie Ihre <strong>Espresso</strong>tassen mit der<br />
Öffnung nach unten auf die Warmhaltefläche<br />
“h“ (9) und lassen Sie diese dort<br />
stehen. Bei Betriebsbereitschaft des<br />
Gerätes wird über den Thermoblock<br />
Wärme an die Warmhaltefläche abgegeben,<br />
wodurch sich die Tassen erwärmen.<br />
<strong>Espresso</strong>zubereitung<br />
BILDER 1 – 3; 10 – 16<br />
● Frischwasserbehälter füllen und einsetzen.<br />
● Filterträger “n“ abnehmen. Hierbei die<br />
Siebverriegelung “o“ nach hinten ziehen<br />
und den Filterträger bis zum Anschlag<br />
nach links drehen.<br />
● Gewünschtes Filtersieb (Ein- oder Zweitassensieb)<br />
einsetzen (10 a). Achten Sie<br />
beim Einsetzen darauf, daß der jeweilige<br />
Verschlußnocken des Filterträgers immer<br />
zwischen den Nasen des Filtersiebes sitzt<br />
(10 b). Ein bzw. zwei gestrichene Meßlöffel<br />
<strong>Espresso</strong>kaffee einfüllen (11), das Kaffeemehl<br />
mit dem Stopfer “p“ andrücken<br />
(12) und den Rand des Filters vom Kaffeemehl<br />
säubern (13).<br />
● Siebverriegelung“o“ nach hinten ziehen.<br />
Den Filterträger nun wieder in den Brühkopf<br />
einsetzen und fest anziehen (14).
Text_DE_<strong>9731</strong> 01.04.2004 16:13 Uhr Seite 9<br />
● Eine bzw. zwei v<strong>org</strong>ewärmte <strong>Espresso</strong>tassen<br />
unter den Filterträger stellen und den<br />
Drehschalter “e“ nach rechts auf Stellung<br />
Kaffeeförderung drehen (15).<br />
Um den Tassenfüllv<strong>org</strong>ang zu beenden,<br />
drehen Sie den Drehschalter “e“ wieder<br />
zurück auf die Mittelstellung 0.<br />
☛ Hinweis<br />
Ein mögliches Aufleuchten der roten Aufheizkontrolleuchte<br />
“f“ während der Zubereitung<br />
ist normal (Thermoblock heizt sich auf).<br />
● Nach dem Durchlauf den Filterträger<br />
abnehmen, Siebverriegelung “o“ nach<br />
vorne schnappen lassen und den Kaffeesatz<br />
ausklopfen (16).<br />
Bei Aufleuchten der grünen Betriebskontrolleuchte<br />
“g“ kann der nächste <strong>Espresso</strong><br />
zubereitet werden.<br />
Milchaufschäumen/<br />
Cappuccinozubereitung<br />
BILDER 17 – 19<br />
Einen Cappuccino erhalten Sie, wenn Sie<br />
die Menge eines <strong>Espresso</strong> mit aufgeschäumter<br />
Milch auffüllen.<br />
V<strong>org</strong>ehensweise:<br />
● Bereiten Sie Ihren <strong>Espresso</strong> vor (siehe<br />
<strong>Espresso</strong>zubereitung). Verwenden Sie<br />
hierbei anstatt <strong>Espresso</strong>tassen größere,<br />
v<strong>org</strong>ewärmte Cappuccinotassen<br />
● Schalten Sie den Umschalter “d“ nach<br />
unten auf Stellung Dampf .<br />
Die rote Aufheizkontrolleuchte “f“ leuchtet<br />
auf. Dabei wird das Gerät auf Dampftemperatur<br />
aufgeheizt. (17)<br />
● Füllen Sie nun für eine Tasse Cappuccino<br />
ca. 100 ml kalte Milch (Kühlschranktemperatur)<br />
in ein Edelstahlkännchen.<br />
● Aufschäumhilfe “j“ aufstecken (18).<br />
Aufschäumhilfe “j“ bis zum Anschlag<br />
auf das Dampfrohr “i“ schieben.<br />
Die Aufschäumhilfe muß hierbei mit<br />
einem click in die Führung einrasten.<br />
Zur Arretierung nun die Aufschäumhilfe<br />
bis zum Anschlag nach rechts drehen.<br />
● Sobald die grüne Kontrolleuchte “g“ aufleuchtet,<br />
ist das Gerät betriebsbereit. Die<br />
Aufschäumhilfe in die Milch eintauchen<br />
und den Drehschalter “e“ nach links auf<br />
Stellung Dampf<br />
drehen (19). Während<br />
des Aufschäumens sollte die Aufschäumhilfe<br />
den Boden des Kännchens nicht<br />
berühren. Schäumen Sie die Milch mindestens<br />
bis zur Volumenverdoppelung auf.<br />
☛ Hinweis<br />
Ein mögliches Aufleuchten der roten Aufheizkontrolleuchte<br />
“f“ während des Milchaufschäumens<br />
ist normal (Thermoblock heizt<br />
sich auf). Taktgeräusche der Pumpe während<br />
der Dampfzubereitung sind normal.<br />
● Drehschalter “e“ auf die Mittelstellung 0<br />
zurückdrehen und Kännchen entfernen.<br />
● Geben Sie nun mit einem Löffel den<br />
Schaum über den <strong>Espresso</strong> und füllen Sie<br />
die Tasse dann mit der restlichen Milch auf.<br />
☛ Hinweis<br />
Wenn sie direkt im Anschluß an die<br />
Dampfzubereitung <strong>Espresso</strong> zubereiten<br />
möchten, sollte das Gerät auf <strong>Espresso</strong>temperatur<br />
abgekühlt werden.<br />
Das Abkühlen kann auf zwei verschiedene<br />
Weisen durchgeführt werden:<br />
● Umschalter “d“ nach oben auf Stellung<br />
Kaffee schalten.<br />
1. Variante<br />
Gerät von alleine abkühlen lassen;<br />
Kontrolleuchten müssen von grün auf rot<br />
(Abkühlphase) und anschließend wieder<br />
auf grün (Betriebsbereit für <strong>Espresso</strong>zubereitung)<br />
wechseln.<br />
2. Variante<br />
Gerät durch Wasserförderung abkühlen;<br />
● Wenn erforderlich, Frischwasserbehälter<br />
neu befüllen und einsetzen.<br />
● Gefäß unter das Filtersieb stellen.<br />
● Drehschalter “e“ nach rechts auf Stellung<br />
Kaffeeförderung drehen.<br />
Solange Wasser fördern, bis die rote<br />
Kontrolleuchte aufleuchtet. Das anschließende<br />
Aufleuchten der grünen<br />
Kontrollampe signalisiert die Betriebsbereitschaft<br />
für die <strong>Espresso</strong>zubereitung.<br />
9
Text_DE_<strong>9731</strong> 01.04.2004 16:13 Uhr Seite 10<br />
☛ Hinweis<br />
Nach jedem Aufschäumv<strong>org</strong>ang die Aufschäumhilfe<br />
abnehmen und unter fließendem<br />
Wasser die Milchrückstände abspülen.<br />
Reinigen Sie die Dampfdüse durch kurzzeitiges<br />
Einschalten der Heißwasserförderung<br />
(siehe Heißwasserentnahme).<br />
10<br />
Warnung: Heißes Wasser tritt aus der<br />
Düse. Verbrühungsgefahr.<br />
Dampferzeugung zum Erhitzen<br />
von Flüssigkeiten<br />
BILD 20<br />
Mit dem Dampfrohr (ohne Aufschäumhilfe)<br />
können Getränke wie z.B. heiße Schokolade,<br />
Wasser oder Tee erhitzt werden.<br />
V<strong>org</strong>ehensweise:<br />
● Frischwasserbehälter füllen und einsetzen.<br />
● Bereiten Sie Ihr Gerät für die Dampferzeugung<br />
vor (siehe Milchaufschäumen/<br />
Cappuccinozubereitung).<br />
● Entfernen Sie die Aufschäumhilfe “j“<br />
vom Dampfrohr (bis zum Anschlag nach<br />
links drehen und abziehen).<br />
● Gefäß nicht randvoll befüllen.<br />
● Tauchen Sie das Dampfrohr in die zu<br />
erhitzende Flüssigkeit ein. Den Drehschalter<br />
“e“ nach links auf die Stellung<br />
Dampf drehen, um die Dampfförderung<br />
zu starten (20).<br />
☛ Hinweis<br />
Ein mögliches Aufleuchten der roten Aufheizkontrolleuchte<br />
“f“ während des Erhitzens<br />
ist normal (Thermoblock heizt sich auf).<br />
Taktgeräusche der Pumpe während der<br />
Dampfzubereitung sind normal.<br />
● Drehschalter “e“ auf Mittelstellung 0<br />
zurückdrehen und Kännchen entfernen.<br />
Heißwasserentnahme<br />
BILD 21<br />
Durch die Entnahme von heißem Wasser<br />
können Sie Heißgetränke wie z.B. Tee oder<br />
auch Fertigsuppen zubereiten.<br />
V<strong>org</strong>ehensweise:<br />
● Frischwasserbehälter füllen und einsetzen.<br />
● Entfernen Sie die Aufschäumhilfe “j“<br />
vom Dampfrohr (bis zum Anschlag nach<br />
links drehen und abziehen). Schalten Sie<br />
den Umschalter “d“ nach oben auf Stellung<br />
Kaffee .<br />
Tauchen Sie das Dampfrohr in das verwendete<br />
Gefäß ein. Den Drehschalter<br />
“e“ nach links auf Stellung Dampf<br />
drehen (21).<br />
● Wenn Sie genug heißes Wasser gefördert<br />
haben, Drehschalter auf Mittelstellung<br />
zurückdrehen und Gefäß entfernen.<br />
☛ Hinweis<br />
Sollte Ihnen das Wasser nicht heiß genug<br />
sein, so können Sie dieses durch Umschalten<br />
des Schalters “d“ nach unten auf Stellung<br />
Dampf zum Kochen bringen.<br />
Ein mögliches Aufleuchten der roten Aufheizkontrolleuchte<br />
“f“ während der Heißwasserentnahme<br />
ist normal (Thermoblock<br />
heizt sich auf). Taktgeräusche der Pumpe<br />
während der Dampfzubereitung sind normal.<br />
Tipps<br />
● Bewahren Sie das <strong>Espresso</strong>mehl am<br />
besten luft- und lichtgeschützt im Kühlschrank<br />
auf, da es so länger sein Aroma<br />
behält.<br />
● Vor der ersten Inbetriebnahme und nach<br />
längeren Benutzungspausen sollte das<br />
Gerät gereinigt und frisches Wasser in<br />
den Frischwasserbehälter gefüllt werden.<br />
● Filterträger nicht überfüllen.<br />
Benutzen Sie den mitgelieferten Meßlöffel<br />
“p“. Ein gestrichener Löffel entspricht<br />
einer Tasse (siehe Bild 11).<br />
● Für das Aufschäumen von Milch empfehlen<br />
wir Ihnen ein Edelstahlkännchen mit<br />
einem Fassungsvermögen von etwa<br />
einem halben Liter. Sie können jedoch<br />
auch Porzellan- oder Keramikgefäße<br />
benutzen.<br />
● Das Gerät nach der letzten Zubereitung<br />
nicht sofort abschalten.
Text_DE_<strong>9731</strong> 01.04.2004 16:13 Uhr Seite 11<br />
Lassen Sie es ca. 1 Minute nachlaufen,<br />
um Restwasser aus dem System zu<br />
befördern.<br />
Während der Entspannung entsteht ein<br />
Zischgeräusch, welches völlig normal ist.<br />
Umweltschutz<br />
● Verpackungsmaterial sowie Gerät und<br />
Zubehör sind aus recycelfähigen Materialien<br />
hergestellt.<br />
● Die getrennte, umweltgerechte Ents<strong>org</strong>ung<br />
von Materialresten fördert die Wiederverwertung<br />
von Wertstoffen.<br />
Reinigung & Pflege<br />
● Vor jeder Reinigung Netzstecker<br />
ziehen und das Gerät<br />
abkühlen lassen.<br />
● Gerät nie ins Wasser tauchen<br />
sowie keine scharfen oder<br />
scheuerende Putzmittel verwenden!<br />
BILDER 22 – 24<br />
● Das Gerätegehäuse nur mit einem feuchten<br />
Tuch abwischen.<br />
● Frischwasserbehälter, Abstellrost und<br />
Auffangschale regelmäßig unter fließend<br />
warmen Wasser reinigen.<br />
● Die Auffangschale regelmäßig entleeren.<br />
Spätestens jedoch dann, wenn der<br />
rote Schwimmer “Füllstandsanzeige m“<br />
durch die Öffnung des Abstellgitters “k“<br />
erscheint (22).<br />
● Brühsieb mit feuchtem Tuch o.ä. abwischen.<br />
Vorsicht heiß! Verbrennungsgefahr.<br />
● Bei stärkerer Verschmutzung des Brühsiebs<br />
kann dieses am Brühkopf zur<br />
gründlichen Reinigung mit einer Münze<br />
herausgeschraubt werden (23).<br />
● Nach dem Milchaufschäumen die Dampfdüse<br />
und die Aufschäumhilfe reinigen.<br />
V<strong>org</strong>ehensweise:<br />
● Netzstecker ziehen, Gerät ausschalten<br />
und abkühlen lassen.<br />
● Entfernen Sie die Aufschäumhilfe “j“<br />
vom Dampfrohr “i“ (bis zum Anschlag<br />
nach links drehen und abziehen). Diese<br />
unter fließendem Wasser abspülen oder<br />
mit einem feuchten Tuch abwischen. Die<br />
Luftansaugöffnung unterhalb des Verschlusses<br />
ggf. mit einer Nadel reinigen.<br />
● Eine verstopfte Dampfdüse können Sie<br />
am Dampfrohr“i“ mit dem am Meßlöffel<br />
“p“ befindlichen Sechskantschlüssel<br />
abschrauben und mit einer Nadel durchstechen<br />
(24).<br />
● Bei längerem Nichtgebrauch des Gerätes,<br />
Filterträger nicht einsetzen oder<br />
beim Einsetzen nur in Mittelstellung drehen,<br />
um die Lebensdauer der Dichtung<br />
zu erhöhen.<br />
Entkalken<br />
Je nach Härtegrad des Wassers (diesen<br />
erfahren Sie bei Ihrem zuständigen Wasserwerk)<br />
sollten Sie das Gerät gelegentlich<br />
entkalken. Verwenden Sie handelsübliche<br />
Flüssigentkalkungsmittel (Gebrauchsanweisung<br />
beachten) oder lösen Sie zwei Esslöffel<br />
Weinsteinsäure oder Zitronensäure in<br />
einem halben Liter lauwarmen Wasser auf.<br />
Keinen Essig verwenden, die Lebensdauer<br />
der Dichtung wird dadurch erheblich verkürzt.<br />
V<strong>org</strong>ehensweise “Thermoblock entkalken“<br />
● Filterträger entfernen!<br />
● Brühsieb am Brühkopf mit einer Münze<br />
abschrauben (23). Eventuell vorhandene<br />
Kaffeereste mit einem feuchten Tuch entfernen.<br />
● Füllen Sie die Enkalkungslösung in den<br />
Frischwasserbehälter. Stellen Sie nun ein<br />
ausreichend großes Gefäß unter den<br />
Brühkopf.<br />
11
Text_DE_<strong>9731</strong> 01.04.2004 16:13 Uhr Seite 12<br />
● Gerät einschalten, Umschalter “d“ auf<br />
Stellung Kaffee schalten. Drehschalter<br />
“e“ auf Stellung Kaffeeförderung<br />
drehen, die Lösung wird durch das<br />
System gepumpt.<br />
☛ Hinweis<br />
Sie müssen hierbei nicht warten, bis die<br />
rote Aufheizkontrolleuchte “f“ erlischt.<br />
1 /3 bis 1 / 2 der Lösung durchlaufen lassen.<br />
Gerät am Ein-Aus-Schalter “c“ ausschalten<br />
(Den Drehschalter “e“ dabei nicht zurückstellen).<br />
Lassen Sie die Lösung 10-15 Minuten<br />
einwirken, bevor Sie das Gerät wieder<br />
einschalten und die restliche Lösung<br />
durchlaufen lassen.<br />
V<strong>org</strong>ang ggf. wiederholen.<br />
V<strong>org</strong>ehensweise “Dampfrohr entkalken“<br />
● Wie “Thermoblock entkalken“, allerdings<br />
hierbei den Drehschalter “e“ auf Stellung<br />
Dampf stellen.<br />
Gefäß unter das Dampfrohr stellen.<br />
☛ Hinweis<br />
Nach dem Entkalkungsv<strong>org</strong>ang unbedingt<br />
die Wassermenge von 1 bis 2 Frischwasserbehältern<br />
durchlaufen lassen.<br />
Brühsieb wieder aufschrauben.<br />
Problembehebung<br />
KAFFEE LÄUFT SEITLICH AUS DEM<br />
FILTERTRÄGER<br />
Filterträger nicht bis zum Anschlag eingesetzt.<br />
Filterträger ganz nach rechts drehen.<br />
Rand des Filtersiebes war nicht von Kaffeemehl<br />
gesäubert.<br />
Wasserförderung abschalten, Filterträger<br />
entnehmen und Filtersiebrand<br />
reinigen.<br />
Dichtring im Brühkopf ist verschmutzt.<br />
Dichtring reinigen. Vorsicht heiß!<br />
Dichtring ohne Elastizität.<br />
Dichtring muß gewechselt werden.<br />
LAUTES GERÄUSCH DER PUMPE<br />
Kein Wasser im Behälter.<br />
Wasser einfüllen.<br />
Wasserbehälter nicht richtig eingesetzt.<br />
Wasserbehälter anheben und richtig<br />
aufsetzen.<br />
ES LÄUFT KEIN ESPRESSO DURCH<br />
Kein Wasser im Behälter.<br />
Wasser einfüllen.<br />
Umschalter “d“ steht auf Dampf.<br />
Filterträger entnehmen, Umschalter<br />
umschalten und Thermoblock auf Kaffeetemperatur<br />
abkühlen.<br />
Brühsieb verstopft.<br />
Filterträger entnehmen, Wasserförderung<br />
einschalten, Wasser muß aus<br />
dem Brühsieb laufen. Ggf. Brühsieb<br />
abschrauben (Vorsicht heiß, Netzstecker<br />
ziehen) und reinigen.<br />
12
Text_DE_<strong>9731</strong> 01.04.2004 16:13 Uhr Seite 13<br />
ESPRESSO LÄUFT NUR TROPFENWEISE<br />
AUS<br />
Kaffeemehl zu fein oder zu stark gestopft.<br />
Kaffeemarke wechseln. Kaffeemehl<br />
weniger stark stopfen.<br />
Brühsieb verstopft.<br />
Filterträger entnehmen, Wasserförderung<br />
einschalten, Wasser muß aus<br />
dem Brühsieb laufen. Netzstecker ziehen,<br />
ggf. Brühsieb abschrauben (Vorsicht<br />
heiß) und reinigen.<br />
Maschine verkalkt.<br />
Gerät entkalken.<br />
ESPRESSO OHNE CREMA<br />
Alter oder ausgetrockneter Kaffee.<br />
Frischen Kaffee verwenden.<br />
<strong>Espresso</strong>mehl nicht genügend gestopft.<br />
Kaffeemehl fester andrücken.<br />
<strong>Espresso</strong>mehl zu grobkörnig.<br />
<strong>Espresso</strong>sorte wechseln.<br />
Kaffeeemischung nicht für <strong>Espresso</strong>kaffee<br />
geeignet.<br />
<strong>Espresso</strong>sorte wechseln.<br />
ESPRESSO ZU KALT<br />
Gerät nicht genügend v<strong>org</strong>ewärmt.<br />
Gerät länger aufheizen.<br />
Tassen nicht bzw. zu wenig v<strong>org</strong>ewärmt.<br />
Tassen mit heißem Wasser vorwärmen.<br />
KEIN DAMPF AUS DEM DAMPFROHR<br />
Dampfdüse verstopft.<br />
Dampfdüse abschrauben und ohne<br />
Düse dampfen. Kommt Dampf oder<br />
Wasser aus dem Dampfrohr: Verstopfte<br />
Dampfdüse reinigen, evtl. mit<br />
einer Nadel durchstechen. Kommt<br />
kein Dampf oder Wasser aus dem<br />
Dampfrohr: Dampfrohr entkalken<br />
(siehe Seite 12). Ist das Gerät anschließend<br />
immer noch verstopft, wenden<br />
Sie sich bitte an den Hersteller.<br />
ZU WENIG SCHAUM BEIM MILCHAUF-<br />
SCHÄUMEN<br />
Alte Milch.<br />
Frische Milch verwenden.<br />
Ungeeignete Milch.<br />
Milch mit 1,5 % Fettgehalt.<br />
Milch war zu Beginn bereits zu warm.<br />
Milch mit Kühlschranktemperatur verwenden.<br />
Aufschäumgefäß ungeeignet.<br />
Edelstahlkännchen verwenden.<br />
WASSERBEHÄLTER TROPFT BEIM<br />
TRANSPORTIEREN<br />
Ventil am Behälterboden klemmt.<br />
Ventil mit Finger wieder einrasten.<br />
UNGLEICHMÄßIGE TASSENBEFÜLLUNG<br />
Auslauf im Filterträger verstopft.<br />
Filterträger reinigen.<br />
Einlegeblech nicht eingesetzt.<br />
Einlegeblech einsetzen.<br />
FILTERTRÄGER LÄßT SICH NUR SCHWER<br />
EINSETZEN<br />
Filterträgerführung durch Kaffeemehlreste<br />
verunreinigt.<br />
Netzstecker ziehen, Führung mit feuchtem<br />
Tuch reinigen (Vorsicht heiß).<br />
ESPRESSO SCHMECKT SAUER<br />
Gerät nach Entkalkung nicht oder nicht<br />
genügend ausgespült.<br />
Eine Wassertankfüllung durch das<br />
Gerät laufen lassen.<br />
GERÄT FUNKTIONIERT NICHT<br />
Mechanischer oder elektronischer Defekt.<br />
Gerät zum Kundendienst geben.<br />
13
Text_DE_<strong>9731</strong> 13.05.2005 16:22 Uhr Seite 14<br />
Rezepte<br />
Original <strong>Espresso</strong><br />
Er wird ohne Milch aber mit viel Zucker<br />
getrunken. Man unterscheidet in:<br />
<strong>Espresso</strong> ristretto: Kurz, stark und bitter im<br />
Geschmack (Tasse<br />
maximal bis zur Hälfte<br />
gefüllt)<br />
<strong>Espresso</strong> lungo: Lang und weniger konzentriert<br />
(Tasse ca. 3 / 4 gefüllt)<br />
Cappuccino<br />
Die Menge eines <strong>Espresso</strong>s mit aufgeschäumter<br />
Milch auffüllen. Mit Kakaopulver<br />
oder Schokoladenstreusel verzieren.<br />
Italienischer Eiskaffee<br />
Zutaten:4 Kugeln Vanilleeis; 1 / 8 l Milch;<br />
2 Tassen kalter, gesüßter <strong>Espresso</strong>; Schokoladenstreusel.<br />
Die Milch mit dem <strong>Espresso</strong> vermischen,<br />
über das Eis gießen und mit den Schokoladenstreuseln<br />
verzieren.<br />
Geräte-Ents<strong>org</strong>ung<br />
Dieses Symbol auf dem Produkt, der Bedienungsanleitung<br />
oder der Verpackung<br />
weist darauf hin, dass dieses Produkt am<br />
Ende seiner Lebensdauer nicht über den<br />
normalen Haushaltsabfall ents<strong>org</strong>t werden<br />
darf.<br />
Es muss einer Sammelstelle für das Recycling<br />
von elektrischen und elektronischen<br />
Geräten zugeführt werden. Die Werkstoffe<br />
sind gemäß ihrer Kennzeichnung wiederverwertbar.<br />
Mit der ordnungsgemäßen<br />
Zuführung des Altgerätes zur Wiederverwertung,<br />
der stofflichen Verwertung<br />
oder anderen Formen der Verwertung leisten<br />
Sie einen wichtigen Beitrag zum Schutz<br />
unserer Umwelt.<br />
Bitte erfragen Sie bei der Gemeindeverwaltung<br />
die zuständige Ents<strong>org</strong>ungsstelle.<br />
<strong>Espresso</strong> flambò<br />
Zutaten:4 Gläschen Weinbrand; 2 Teelöffel<br />
brauner Zucker; 2 Tassen <strong>Espresso</strong>; Schlagsahne.<br />
Den Weinbrand in feuerfeste Gläser geben,<br />
erhitzen, entzünden. Zucker hinzufügen,<br />
umrühren, <strong>Espresso</strong> darüber gießen und<br />
mit einem Sahnehäubchen garnieren.<br />
Änderungen vorbehalten<br />
14
Text_GB_<strong>9731</strong> 01.04.2004 16:14 Uhr Seite 15<br />
GB<br />
<strong>WIK</strong> <strong>Espresso</strong> Information<br />
Dear Customer,<br />
Preparing espresso coffee initially requires<br />
a little skill and patience. Take the time to<br />
get to know your <strong>Espresso</strong> machine and<br />
the method of making espresso.<br />
<strong>Espresso</strong> coffee<br />
Do not be sparing with coffee, especially at<br />
the beginning. You should sample and test<br />
a variety of different kinds until you discover<br />
the brand of espresso which is just<br />
right for you in terms of taste and fineness<br />
of grinding. If your retailer does not stock<br />
the kind which is right for you, try to find<br />
one who specialises in coffee beans. There<br />
you can get advice, and even have your<br />
coffee blended individually from different<br />
kinds.<br />
Characteristics of espresso coffee<br />
The identifying features of espresso coffee<br />
are its strong aromatic flavour and its<br />
typical cream. This requires the water to be<br />
forced through the coffee at the right<br />
temperature and under the right pressure.<br />
The difference between espresso and<br />
conventional coffee is the shorter roasting<br />
time of the former and the reduced length<br />
of time in which it is in contact with water<br />
during preparation.<br />
Owing to the shorter length of contact with<br />
water, espresso contains fewer irritants<br />
(e.g. tannic acids, essential oils) and<br />
approx. 30% less caffeine than conventional<br />
filter coffee. This makes it much kinder<br />
to your stomach in spite of its stronger<br />
flavour.<br />
If possible, use thick-sided pre-heated<br />
espresso/cappucino cups which keep hot<br />
longer. Add the sugar before pouring<br />
espresso into the cup or simply shake<br />
some sugar briefly into the cup, stirring<br />
just once or twice, otherwise too much<br />
flavour escapes.<br />
Appliance specifications<br />
<strong>Espresso</strong> machine<br />
Name: <strong>Espresso</strong> & Cappuccino<br />
Order no.: <strong>9731</strong><br />
Voltage: 230 V ~ / 50 Hz.<br />
Rated input: 1050 W<br />
Heating system: thermostat-controlled unit<br />
heater/flow heater; 1000 W<br />
Pump: electromagnetic highpower<br />
pump (50W)<br />
Pressure: 12-16 bar<br />
Mains cable: max. 1.1 metres<br />
Dimensions: 303,5 x 203,5 x 274 mm<br />
Weight: approx. 4 kg<br />
Protection type: I<br />
Interference suppression: this appliance<br />
has been interference- suppressed in<br />
accordance with the interference-suppression<br />
directives.<br />
Parts of the appliance<br />
a Detachable freshwater reservoir<br />
b Hinged reservoir lid<br />
b1 Sieve storage<br />
c ON/OFF switch<br />
d Coffee/steam selector switch<br />
e Rotary switch for coffee/steam/<br />
hot water<br />
f Heating control lamp (red)<br />
g Operating control lamp (green)<br />
h Warming plate for cups<br />
i Steam tube<br />
j Frothing device<br />
k Support grid<br />
l Drip tray<br />
m Filling level indicator<br />
n Filter holder<br />
o Filter lock<br />
p Measuring spoon with stopper and<br />
hexagonal key<br />
q One-cup filter insert<br />
r Two-cup filter insert<br />
15
Text_GB_<strong>9731</strong> 01.04.2004 16:14 Uhr Seite 16<br />
For your safety!<br />
The Instructions for Use contain important<br />
notes on safety and the information<br />
required for proper operation of the<br />
appliance.<br />
Read the instructions in full, keep them in<br />
a safe place and pass them on to any subsequent<br />
owner.<br />
All safety instructions are always intended<br />
for your own safety.<br />
Safety instructions when connecting the<br />
appliance<br />
● This appliance complies with the<br />
recognised rules of technology and the<br />
pertinent safety regulations for electrical<br />
appliances.<br />
● If the connecting cable of this appliance<br />
becomes damaged, have it replaced only<br />
by a repair workshop nominated by the<br />
manufacturer, to prevent any danger.<br />
● The voltage of the power source must be<br />
the same as specified on the rating plate!<br />
● Connect the appliance only to an AC<br />
supply and to a socket with earthing<br />
contact.<br />
Do not pull the cable over sharp edges,<br />
clamp it into place or allow it to hang<br />
down. Keep the cable away from heat<br />
and damp!<br />
● Put the plug into the socket only with the<br />
appliance switched off!<br />
● Never place the appliance on or beside<br />
hot surfaces, for example, cooking rings<br />
or stoves. Never allow the mains cable to<br />
come into contact with hot parts!<br />
● If an extension lead is required, use only<br />
an earthed cable with a conductor crosssection<br />
of at least 1.5 mm 2 !<br />
Safety instructions when operating the<br />
appliance<br />
● Never leave the appliance unattended during<br />
operation and keep it out of reach of children!<br />
● Persons with nervous disorders should<br />
never use the appliance without<br />
accompanying person in order to avoid<br />
any danger.<br />
● Operate the appliance only after it has<br />
been filled with water! Never put anything<br />
except water into the water reservoir!<br />
● Operate the appliance only with the drip<br />
tray and support grid in place!<br />
● Attention!<br />
Hot parts (steam tube/filter)<br />
These can cause scalding when touched!<br />
● Warning!<br />
The system is under pressure during<br />
operation. Removing the filter holder<br />
during operation can lead to scalds or<br />
injury.<br />
Remove the filter holder only when the<br />
appliance is no longer under pressure<br />
(after water has run through).<br />
● Never heat inflammable liquids using<br />
steam!<br />
● Clean the steam nozzle only when the<br />
appliance is not under pressure and has<br />
been switched off!<br />
Safety instructions for cleaning and<br />
maintenance<br />
● The appliance cannot be opened.<br />
● Always disconnect the plug from the<br />
mains if faults occur during operation or<br />
for cleaning and maintenance! The<br />
appliance must not be under pressure!<br />
● Do not use the cable to pull on the plug<br />
or pull the plug out of the socket when<br />
hands are wet!<br />
● Protect the appliance against damp.<br />
Never put it into the dishwasher!<br />
Never immerse it in water!<br />
● Follow the instructions for descaling.<br />
Use only as instructed<br />
The appliance may only be used to make<br />
espresso coffee or normal coffee, to froth<br />
milk and to heat water, in accordance with<br />
these instruction.<br />
No liability is accepted for any damage<br />
resulting from use for other purposes,<br />
faulty operation or amateur repairs.<br />
16
Text_GB_<strong>9731</strong> 01.04.2004 16:14 Uhr Seite 17<br />
Guarantee services are also excluded in<br />
such cases.<br />
The appliance is not intended for catering<br />
purposes!<br />
Operating the appliance for<br />
the first time<br />
Figs. 1 – 7<br />
You should rinse the appliance before<br />
using it for the first time by filling the<br />
reservoir once or twice with water and<br />
letting the water run through without<br />
coffee.<br />
Method:<br />
● Open the lid and remove the reservoir (1).<br />
● Fill the reservoir with cold water and put<br />
it back into the appliance (2)/(3). Push<br />
the base valve of the reservoir firmly into<br />
position in the opening provided.<br />
● Insert filter holder „n“: pull back the filter<br />
lock „o“ and turn the filter holder to the<br />
right until it locks into place (4).<br />
● Connect the appliance according to<br />
instructions (Follow safety instructions).<br />
● Push the „coffee“ and „steam“ selector<br />
switch „d“ up for „coffee“ and<br />
switch on the appliance using ON/OFF<br />
switch „c“ (5).<br />
● The red heating control lamp „f“ lights<br />
up while the appliance is heating up (6).<br />
● After the appliance reaches operating<br />
temperature, the red heating control<br />
lamp „f“ extinguishes and the green<br />
operating control lamp „g“ lights up.<br />
Place a sufficiently large collecting vessel<br />
below the brewing filter and turn the<br />
rotary switch „e“ to the right for the<br />
coffee-making position (7).<br />
☛ Note<br />
Allow all the water in the reservoir to run<br />
through. If necessary, interrupt the process<br />
and empty the collecting vessel. Repeat the<br />
process once or twice.<br />
Cup preheating<br />
Figs.1 – 4; 8 – 9<br />
You can heat the cups on the appliance<br />
using two different methods.<br />
Method 1<br />
● Fill the water reservoir and put it into<br />
place (1-3). Insert the filter holder „n“:<br />
pull back the filter lock „o“ and turn the<br />
filter holder to the right until it locks into<br />
place (4).<br />
● Switch on the appliance at the ON/OFF<br />
switch „c“. Position one or two cups<br />
below the filter holder. After the green<br />
operating control lamp „g“ lights up,<br />
turn rotary switch „e“ to the right and let<br />
hot water pass through to warm the filter<br />
holder and pre-heat the cups (8).<br />
● After filling the cups with hot water, turn<br />
rotary switch „e“ back into the centre<br />
position 0.<br />
Method 2<br />
● Place your espresso cups upside down<br />
on the warming plate „h“ (9) and leave<br />
them there. When the appliance is ready<br />
for operation, the unit heater will heat the<br />
warming plate which then heats the cups.<br />
Making espresso<br />
Figs. 1 – 3; 10 – 16<br />
● Fill the water reservoir and put it into place.<br />
● Remove filter holder „n“: pull back the<br />
filter lock „o“ and turn the filter holder as<br />
far left as possible.<br />
● Insert the required filter insert (for one or<br />
two cups) (10 a). Ensure during insertion<br />
that the relevant locking cams of the filter<br />
holder are always located between the<br />
projections on the filter strainer (10 b).<br />
Spoon in one or two level spoonfuls of<br />
espresso coffee (11), push down the<br />
coffee grounds with the stopper „p“ (12)<br />
and wipe off any coffee grounds on the<br />
edge of the filter (13).<br />
● Pull back the filter lock „o“. Now insert<br />
the filter holder back into the brewing<br />
head and pull it tight (14).<br />
17
Text_GB_<strong>9731</strong> 01.04.2004 16:14 Uhr Seite 18<br />
● Place one or two pre-heated espresso<br />
cups below the filter holder and turn the<br />
rotary switch „e“ to the (15). To stop<br />
filling the cups, turn the rotary switch<br />
„e“ back into the centre position 0.<br />
☛ Note<br />
It is quite normal for the red heating<br />
control lamp „f“ to light up during<br />
preparation (unit heater is heating up).<br />
● After the water has run through, remove<br />
the filter holder, snap the filter lock „o“<br />
forwards, turn it upside down and tap<br />
out the used coffee grounds (16).<br />
When the green operating control lamp<br />
„g“ lights up, the appliance is ready to<br />
make the next espresso.<br />
Frothing milk /<br />
making cappuccino<br />
Figs. 17 – 19<br />
You get a cup of cappuccino when you top<br />
up a cup of espresso with frothed milk.<br />
Method:<br />
● Make your espresso (see „Making<br />
espresso“), but use larger pre-heated<br />
cappuccino cups instead of espresso cups<br />
● Turn the selector switch „d“ down into<br />
the „steam“ .position.<br />
The red heating control lamp „f“ lights<br />
up. The appliance is heated to steam<br />
temperature (17).<br />
● Now pour approx. 100 ml of cold milk<br />
(fridge temperature) into a stainless steel<br />
jug for one cup of cappuccino.<br />
● Attach frothing device „j“ (18). Slide the<br />
frothing device „j“ onto the steam tube<br />
„i“ until it makes contact. The frothing<br />
device must click into the groove. Now<br />
turn the frothing device as far as possible<br />
to the right to lock it into place.<br />
● The appliance is ready to operate when<br />
the green control lamp „g“ lights up. Dip<br />
the frothing device in the milk and turn<br />
the rotary switch „e“ to the left into steam<br />
position (19). The frothing device<br />
should not come into contact with the<br />
base of the jug while frothing. Froth the<br />
milk until it has at least doubled its<br />
volume.<br />
☛ Note<br />
It is quite normal for the red heating<br />
control lamp „f“ to light up while frothing<br />
(unit heater is heating up). It is also quite<br />
normal for the pump to make ticking<br />
noises when making steam.<br />
● Turn rotary switch „e“ to the centre<br />
position 0 and remove the jug.<br />
● Spoon the frothy milk over the espresso<br />
and then top up the cup with the rest of<br />
the milk.<br />
☛ Note<br />
If you want to make espresso immediately<br />
after preparing steam, the appliance must<br />
cool down to espresso temperature.<br />
There are two methods of cooling it:<br />
● Switch the selector switch „d“ up into<br />
the coffee-making position for both<br />
methods.<br />
Method 1<br />
Letting appliance cool down itself;<br />
The control lamps must change from<br />
green to red (cooling phase) and then<br />
back to green (ready to make espresso).<br />
Method 2<br />
Cooling appliance by passing water through;<br />
● Fill the reservoir if necessary and<br />
replace it.<br />
● Place a vessel below the filter insert.<br />
● Turn rotary switch „e“ to the coffee<br />
making position . Continue<br />
passing water through until the red<br />
control lamp lights up. The subsequent<br />
lighting up of the green control lamp<br />
indicates that the appliance is ready to<br />
make espresso.<br />
☛ Note<br />
Remove the frothing device and rinse off<br />
the remaining milk under running water<br />
every time you have frothed milk.<br />
Clean the steam nozzle by briefly switching<br />
on the hot water function (see “Heating<br />
water for drinks“).<br />
18
Text_GB_<strong>9731</strong> 01.04.2004 16:14 Uhr Seite 19<br />
Warning:<br />
Hot water from the nozzle.<br />
Danger of scalding.<br />
Producing steam to heat liquids<br />
Fig. 20<br />
The steam tube (without the frothing<br />
device) can be used to make hot beverages<br />
like drinking chocolate, water or tea.<br />
Method:<br />
● Fill the reservoir with fresh water and<br />
replace it.<br />
● Prepare your appliance to make steam<br />
(see Frothing milk/making cappuccino).<br />
● Remove the frothing aid „j“ from the<br />
steam tube (turn as far as possible to the<br />
left and then pull it off).<br />
● Do not fill the vessel right to the top.<br />
● Dip the steam tube into the liquid to be<br />
heated. Turn the rotary switch „e“ to the<br />
left into the steam position to start<br />
making steam (20).<br />
☛ Note<br />
It is quite normal for the red heating<br />
control lamp „f“ to light up during heating<br />
(unit heater is heating up). It is also quite<br />
normal for the pump to make ticking<br />
noises when making steam.<br />
● Turn the rotary switch „e“ back to the<br />
centre position 0 and remove the jug.<br />
Heating water for drinks<br />
Fig. 21<br />
You can heat water for hot drinks like tea<br />
or ready-made soups.<br />
Method:<br />
● Fill the reservoir with water and replace it.<br />
● Remove the frothing device „j“ from the<br />
steam tube (turn as far as possible to the<br />
left and then pull it off). Switch the<br />
selector switch „d“ up into the coffee<br />
making position .<br />
Dip the steam tube into the vessel used.<br />
Turn the rotary switch „e“ to the left into<br />
the steam position (21).<br />
● When you have obtained enough hot<br />
water, turn the rotary switch back into<br />
the centre position and remove the<br />
vessel.<br />
☛ Note<br />
If you find that the water is not hot enough,<br />
you can bring it to the boil by switching<br />
the „d“ switch down into the steam position<br />
.<br />
It is quite normal for the red heating<br />
control lamp „f“ to light up during heating<br />
water (unit heater is heating up). It is also<br />
quite normal for the pump to make ticking<br />
noises when making steam.<br />
Tips<br />
● It is best to keep espresso coffee in the<br />
fridge where it is protected against light<br />
and air and keeps its flavour longer.<br />
● You should clean the appliance and put<br />
fresh water into the reservoir before using<br />
it for the first time and after it has not<br />
been used over a longer period of time.<br />
● Do not overfill the filter holder.<br />
Use the measuring spoon supplied „p“.<br />
One level spoonful is sufficient for one<br />
cup (see Fig. 11).<br />
● We recommend that you use a half-litre<br />
stainless steel jug to froth milk, but you<br />
can also use porcelain or ceramic jugs.<br />
● Do not switch the appliance off<br />
immediately after making your last<br />
coffee. Let it continue operating for<br />
about another minute to clear the rest of<br />
the water from the system.<br />
You will hear a hissing sound as the<br />
steam expands - this is perfectly normal.<br />
19
Text_GB_<strong>9731</strong> 01.04.2004 16:14 Uhr Seite 20<br />
Environmental protection<br />
● Packaging material, appliance and<br />
accessories are made from environmentfriendly<br />
recyclable materials.<br />
● Waste disposal separation for<br />
environmental reasons supports the<br />
reutilization of valuable materials.<br />
Cleaning & Maintenance<br />
Figs. 22 – 24<br />
● The appliance housing should merely be<br />
wiped down with a damp cloth.<br />
● Clean the freshwater reservoir, the<br />
support grid and drip tray at regular<br />
intervals by rinsing under running water.<br />
● Empty the drip tray at regular intervals,<br />
but, always as soon as the red float<br />
„filling level indicator m“ becomes<br />
visible through the opening in the<br />
support grid (22).<br />
● Wipe the brewing filter with a damp<br />
cloth or similar. Caution hot! Danger of<br />
burning or scalding!<br />
● If the brewing filter becomes heavily<br />
soiled, it can be unscrewed from the<br />
brewing head, using a coin, for thorough<br />
cleaning (23).<br />
● After frothing milk, clean the steam<br />
nozzle and the frothing device.<br />
20<br />
● Always disconnect the plug from<br />
the mains and allow the<br />
appliance to cool down before<br />
cleaning.<br />
● Never immerse the appliance in<br />
water and never use any aggressive<br />
or abrasive cleaning agents!<br />
Method:<br />
● Disconnect the plug from the mains.<br />
Switch off the device and allow it to cool<br />
down.<br />
● Remove the frothing device „j“ from<br />
steam tube „i“ (turn as far as possible to<br />
the left and then pull it off). Then rinse it<br />
under running water or wipe it down<br />
with a damp cloth. Clean the air intake<br />
opening below the seal, using a needle if<br />
necessary.<br />
● You can unscrew the steam nozzle „i“ if<br />
it becomes blocked using the hexagon<br />
key on the measuring spoon „p“ and<br />
unblock it with a needle (24).<br />
● If the appliance is not used over a longer<br />
period of time, either do not insert the<br />
filter holder or insert it only as far as the<br />
centre position in order to extend the life<br />
of the seal.<br />
Descaling<br />
You must descale your appliance from<br />
time to time. How often this is necessary<br />
depends on your water hardness (ask the<br />
water company).<br />
Use normal commercial liquid descaling<br />
agents (follow the instructions for use) or<br />
dissolve two dessertspoons of tartaric acid<br />
or citric acid in half a litre of lukewarm<br />
water.<br />
Do not use vinegar as this will considerably<br />
shorten the life of the seal.<br />
How to descale the unit heater<br />
● Remove the filter holder!<br />
● Unscrew the filter insert from the<br />
brewing head with a coin (23). Wipe off<br />
any coffee residue with a damp cloth.<br />
● Fill the reservoir with the descaling<br />
solution. Now place a sufficiently large<br />
vessel beneath the brewing head.<br />
● Switch on the appliance, set the selector<br />
switch „d“ to the coffee-making position<br />
. Turn the rotary switch „e“ into the<br />
coffee-making position . The<br />
solution is pumped through the system.
Text_GB_<strong>9731</strong> 01.04.2004 16:14 Uhr Seite 21<br />
☛ Note<br />
There is no need to wait for the red heating<br />
control lamp „f“ to go off.<br />
Allow 1 / 3 to 1 / 2 of the solution to pass<br />
through. Switch off the device at the<br />
ON/OFF switch „c“ (leave the rotary switch<br />
„e“ in the same position).<br />
Let the solution take effect for 10-15<br />
minutes, then switch the appliance back on<br />
and allow the rest of the solution to pass<br />
through.<br />
Repeat the process as required.<br />
How to descale the steam tube<br />
● Proceed as for „How to descale the unit<br />
heater“, but set the rotary switch „e“ to<br />
the steam position instead.<br />
Place a vessel below the steam tube.<br />
☛ Note<br />
After descaling, it is absolutely necessary<br />
to allow 1-2 times the volume of the<br />
reservoir of fresh water to run through the<br />
appliance before putting it back into use.<br />
Screw the brewing filter back into place.<br />
Eliminating problems<br />
COFFEE RUNS DOWN THE SIDE OF THE<br />
FILTER HOLDER<br />
Filter holder not properly in contact<br />
position.<br />
Turn the filter holder to the extreme<br />
right.<br />
Edge of filter insert not free of coffee.<br />
Switch off water supply, remove the<br />
filter holder and clean the edge of the<br />
filter insert.<br />
Sealing ring in brewing head is dirty.<br />
Clean the sealing ring. Caution<br />
hot!<br />
Sealing ring no longer has elasticity.<br />
Sealing ring must be replaced.<br />
LOUD NOISE OF THE PUMP<br />
No water in reservoir.<br />
Fill with water.<br />
Water reservoir not correctly in position.<br />
Raise water reservoir and put into the<br />
correct position.<br />
NO ESPRESSO RUNS THROUGH<br />
No water in reservoir.<br />
Fill up with water.<br />
Selector switch „d“ set for steam.<br />
Remove filter holder, reverse selector<br />
switch and cool the unit heater down<br />
to coffee-making temperature.<br />
Brewing filter blocked.<br />
Remove filter holder, switch on water<br />
supply. Water must run out of the<br />
brewing filter. If necessary, unscrew<br />
brewing filter (Caution hot,<br />
disconnect plug from mains) and<br />
clean it.<br />
21
Text_GB_<strong>9731</strong> 01.04.2004 16:14 Uhr Seite 22<br />
ESPRESSO RUNS OUT ONLY AS DROPS<br />
Coffee grounds too fine or pushed down<br />
too firmly.<br />
Change brand of coffee, do not push<br />
down the coffee grounds quite so<br />
firmly.<br />
Brewing filter blocked.<br />
Remove filter holder, switch on water<br />
supply, water must run out of the<br />
brewing filter. Disconnect the plug from<br />
mains. If necessary, unscrew brewing<br />
filter (Caution hot!) and clean it.<br />
Machine blocked by limescale.<br />
Descale the appliance.<br />
ESPRESSO WITHOUT CREMA<br />
Coffee old or too dry.<br />
Use fresh coffee.<br />
Coffee not pushed down firmly enough.<br />
Push down coffee grounds more<br />
firmly.<br />
Coffee too coarse.<br />
Change brand of espresso.<br />
Coffee blend not suited to espresso coffee.<br />
Change brand of espresso.<br />
ESPRESSO TOO COLD<br />
Appliance not properly preheated.<br />
Heat appliance for longer.<br />
Cups not or insufficiently preheated.<br />
Preheat cups with hot water.<br />
NO STEAM FROM THE STEAM TUBE<br />
Steam nozzle blocked.<br />
Unscrew steam nozzle and activate<br />
steam function without nozzle. If steam<br />
or water comes out of the steam tube:<br />
clean blocked steam nozzle, possibly<br />
using a needle. If no steam or water<br />
comes out of the steam tube:<br />
descale steam tube (see page 21).<br />
If the appliance is then still blocked,<br />
please refer to the manufacturer.<br />
NOT ENOUGH FROTH WHEN<br />
FROTHING MILK<br />
Milk not fresh.<br />
Use fresh milk.<br />
Milk not suitable.<br />
Use milk with 1.5% fat content.<br />
Milk was too warm from the start.<br />
Use milk of fridge temperature.<br />
Frothing vessel unsuitable.<br />
Use a stainless steel jug.<br />
WATER RESERVOIR DRIPS WHEN<br />
REMOVED<br />
Valve in base has become stuck.<br />
Use finger to push valve back into<br />
place.<br />
UNEVEN CUP FILLING<br />
Outlet in filter holder blocked.<br />
Clean filter holder.<br />
Inlay plate not in position.<br />
Insert inlay plate.<br />
DIFFICULT TO INSERT FILTER HOLDER<br />
Filter holder groove soiled by coffee<br />
ground residues.<br />
Disconnect plug from mains, wipe<br />
down groove with damp cloth<br />
(Caution hot!)<br />
ESPRESSO TASTES SOUR<br />
Appliance has not been rinsed properly<br />
after descaling.<br />
Run a reservoir full of water through<br />
the appliance.<br />
APPLIANCE DOES NOT OPERATE<br />
Mechanical or electronic defect.<br />
Take appliance to an authorised<br />
service agent.<br />
22
Text_GB_<strong>9731</strong> 13.05.2005 16:23 Uhr Seite 23<br />
Recipes<br />
Original espresso<br />
Original espresso is drunk without milk but<br />
with lots of sugar. A distinction is made<br />
between:<br />
<strong>Espresso</strong> ristretto: small, strong and bitter<br />
to taste (cup 1 / 2 filled<br />
maximum)<br />
<strong>Espresso</strong> lungo: medium and less<br />
concentrated (cup<br />
approx. 3 / 4 filled)<br />
Cappuccino<br />
Fill an espresso up to the top with frothed<br />
milk. Garnish with cocoa power or<br />
chocolate vermicelli.<br />
Italian-style Iced Coffee<br />
Ingredients: 4 scoops of vanilla ice-cream;<br />
1 /8 litre of milk; 2 cups of cold, sweetened<br />
espresso; chocolate vermicelli.<br />
Mix the milk and espresso, pour over the<br />
ice-cream and decorate with the chocolate<br />
vermicelli.<br />
Disposal of appliance<br />
This symbol on the product, operating<br />
instructions or packaging indicates that this<br />
product, at the end of its service life, may not<br />
be disposed of as normal household waste.<br />
It must be disposed of at a collection point for<br />
the recycling of electric and electronic<br />
appliances.<br />
Materials are to be recycled according to their<br />
classification. Through the correct disposal of<br />
the used appliance, recycling of materials and<br />
other forms of recycling, you are making a<br />
valuable contribution towards the protection<br />
of our environment.<br />
Please ask your local authorities for a list of<br />
appropriate recycling points.<br />
<strong>Espresso</strong> flambé<br />
Ingredients: 5 measures of brandy;<br />
2 teaspoons of brown sugar, 2 cups of<br />
espresso; whipping cream.<br />
Pour the brandy into heat-resistant glasses,<br />
heat and then set alight. Add sugar and<br />
stir. Pour espresso over the top and<br />
garnish with a topping of dairy cream.<br />
The right to make modifications is reserved<br />
23
Text_F_<strong>9731</strong> 01.04.2004 16:14 Uhr Seite 24<br />
FR<br />
Information sur l’expresso <strong>WIK</strong><br />
Cher client,<br />
la préparation d’expresso nécessite un peu<br />
d’adresse et au début un peu de patience.<br />
Prenez un peu de temps pour vous<br />
familiariser avec votre machine à expresso<br />
et avec la procédure de préparation.<br />
Mouture d’expresso<br />
Surtout au début n’économisez pas en<br />
mouture de café et essayez aussi<br />
différentes sortes de café. Jusqu’à ce que<br />
vous ayez trouvé votre sorte d’expresso,<br />
aussi bien au niveau du goût que du degré<br />
de moulure, il faudra éventuellement que<br />
vous testiez plusieurs sortes. Si vous ne<br />
trouvez pas la sorte appropriée chez votre<br />
commerçant, essayez donc un petit<br />
commerçant italien. On pourra sûrement<br />
vous y conseiller et même peut-être créer<br />
votre mélange individuel à partir de<br />
différentes sortes de café.<br />
Caractéristiques du café expresso<br />
La particularité du café expresso, c’est son<br />
goût aromatique et plus fort ainsi que sa<br />
«Crème» typique. La condition pour cela,<br />
c’est que l’eau soit poussée avec grande<br />
pression et à la bonne température, à<br />
travers un café moulu approprié.<br />
La différence de l’expresso par rapport au<br />
café ordinaire se trouve dans la composition<br />
des différentes sortes, la courte durée de<br />
torréfaction, et le temps de contact minime<br />
avec l’eau lors de sa préparation.<br />
Ce temps de contact minime avec l’eau fait<br />
que l’expresso contient moins de substances<br />
irritantes (p.ex. tanin, huiles volatiles),<br />
environ 30 % de caféine en moins que le<br />
café filtré normale, et ainsi malgré son goût<br />
plus fort, il est beaucoup plus digestible.<br />
Utilisez si possible des tasses à expresso /<br />
à cappuccino à parois épaisses et<br />
préchauffées, car elles conservent plus<br />
longtemps la chaleur. Mettez le sucre dans<br />
la tasse avant la préparation, ou versez le<br />
rapidement dans la tasse, et ne le remuez<br />
que deux ou trois fois, car sinon il<br />
s’échappe trop d’arôme.<br />
24<br />
Caractéristiques de l’appareil<br />
Expresso<br />
Désignation: Expresso & Cappuccino<br />
Numéro de<br />
référence: <strong>9731</strong><br />
Tension: 230 V ~ / 50 Hz.<br />
Courant absorbé: 1050 W<br />
Système de<br />
chauffage: Chauffe-eau à bloc<br />
thermique et à réglage<br />
par thermostat, 1000W<br />
Pompe: Pompe électromagnétique<br />
à grande puissance (50W)<br />
Pression: 12-16 bars<br />
Cordon<br />
d’alimentation: maxi. 1,1 m<br />
Dimensions: 303,5 x 203,5 x 274 mm<br />
Poids:<br />
environ 4 kg<br />
Catégorie de<br />
protection: I<br />
Antiparasitage: Cet appareil est équipé<br />
d’un système conforme aux prescriptions<br />
d’antiparasite.<br />
Eléments de l’appareil<br />
a Réservoir amovible d’eau fraîche<br />
b Couvercle du réservoir d’eau<br />
b1 Support de filtre<br />
c Interrupteur Marche-Arrêt<br />
d Interrupteur pour café / vapeur<br />
e Bouton pour café / vapeur /eau chaude<br />
f Voyant de contrôle de chauffe (rouge)<br />
g Voyant de contrôle de fonctionnement<br />
(vert)<br />
h Plateau chauffe-tasses<br />
i Bec vapeur<br />
j Accessoire mousse<br />
k Grille d’égouttoir<br />
l Bac de récupération<br />
m Témoin de niveau<br />
n Porte-filtre<br />
o Verrouillage du filtre<br />
p Doseur avec tampon et clé à six pans<br />
q Filtre pour une tasse<br />
r Filtre pour deux tasses
Text_F_<strong>9731</strong> 01.04.2004 16:14 Uhr Seite 25<br />
Pour votre sécurité!<br />
Le mode d’emploi vous donne des prescriptions<br />
de sécurité et des informations,<br />
nécessaires pour le fonctionnement<br />
correct de l’appareil!<br />
Lisez le mode d’emploi complètement,<br />
gardez-le et le cas échéant donnez-le au<br />
prochain propriétaire.<br />
Toutes les consignes de sécurité sont<br />
destinées à votre sécurité personnelle!<br />
Consignes de sécurité lors du branchement<br />
de l’appareil<br />
● Cet appareil est conforme aux règles<br />
techniques généralement admises, et<br />
aux prescriptions de sécurité en vigueur<br />
pour les appareils électriques!<br />
● En cas d'endommagement du câble de<br />
raccordement de cet appareil, il ne devra<br />
être remplacé que par un atelier de<br />
réparation désigné par le fabricant, afin<br />
d'éviter tout risque.<br />
● La tension de la source de courant doit<br />
concorder avec les indications de la<br />
plaque signalétique!<br />
● Ne brancher l’appareil qu’à du courant<br />
alternatif et à une prise de protection. Il ne<br />
faut pas tirer le câble sur des arêtes<br />
coupantes, le coincer ou le laisser pendre.<br />
Protéger le câble contre la chaleur et<br />
l’humidité!<br />
● Ne mettre la fiche dans la prise de<br />
courant que lorsque l’appareil est éteint!<br />
● Ne jamais déposer l’appareil sur ou à<br />
côté de surfaces chaudes telles que p.ex.<br />
plaques de cuisinières, fours! Ne jamais<br />
mettre le cordon en contact avec des<br />
pièces chaudes!<br />
● En cas d’utilisation d’une rallonge, n’employer<br />
qu’un câble avec mise à la terre et<br />
d’une section d’au moins 1,5 mm 2 !<br />
Consignes de sécurité pour l’utilisation de<br />
l’appareil<br />
● Ne laissez jamais l’appareil en marche<br />
sans surveillance ou à la portée des<br />
enfants!<br />
● Afin d’éviter tout problème, ne laissez<br />
jamais un handicapé moteur utiliser<br />
l’appareil sans surveillance.<br />
● Ne mettre l’appareil en marche que s’il y a<br />
de l’eau dans le système! Remplissez le<br />
réservoir d’eau uniquement avec de l’eau!<br />
● Ne mettre l’appareil en marche que si le<br />
bac de récupération et la grille<br />
d’égouttoir sont en place!<br />
● Attention!<br />
Pièces brûlantes de l’appareil<br />
(bec vapeur / filtre d’écoulement).<br />
Celles-ci peuvent entraîner des brûlures<br />
en cas de contact.<br />
● Avertissement!<br />
Pendant la marche, le système est sous<br />
pression. L’enlèvement du porte-filtre<br />
pendant le fonctionnement peut<br />
entraîner des brûlures ou des blessures.<br />
N’enlever le porte-filtre que lorsque<br />
l’appareil est sous pression (après le<br />
fonctionnement).<br />
● Ne pas chauffer à la vapeur de liquides<br />
inflammables!<br />
● Nettoyer la buse vapeur que lorsque<br />
l’appareil n’est plus sous pression et<br />
lorsqu’il est éteint!<br />
Consignes de sécurité pour le nettoyage et<br />
l’entretien<br />
● Il n’est pas possible d’ouvrir l’appareil.<br />
● En cas de panne, ou lors du nettoyage et<br />
de l’entretien, toujours retirer la fiche de<br />
la prise de courant! L’appareil ne doit<br />
pas être sous pression!<br />
● Ne pas tirer la fiche de la prise de<br />
courant, en tirant sur le cordon ou avec<br />
des mains mouillées!<br />
● Protéger l’appareil contre l’humidité!<br />
Ne jamais le mettre dans le lavevaisselle!<br />
Ne pas le plonger dans l’eau!<br />
● Suivre les instructions de détartrage!<br />
25
Text_F_<strong>9731</strong> 01.04.2004 16:14 Uhr Seite 26<br />
L’appareil doit être utilisé exclusivement<br />
pour la préparation de café expresso, de<br />
café normal, pour faire mousser du lait et<br />
chauffer de l’eau.<br />
En cas d’autres utilisations, de mauvais<br />
emploi ou de réparation non<br />
professionnelle, il n’y aura pas de garantie<br />
pour les dommages éventuels. De tels cas<br />
ne sont pas couverts par la garantie.<br />
L’appareil n’est pas destiné à l’usage<br />
professionnel!<br />
ILLUSTRATIONS 1 -7<br />
Avant la première utilisation, vous devriez<br />
rincer l’appareil avec un ou deux réservoirs<br />
d’eau sans utiliser de café.<br />
Procédure:<br />
● Ouvrir le couvercle et enlever le réservoir<br />
d’eau (1).<br />
● Remplir le réservoir d’eau froide et le<br />
remettre dans l’appareil (2)/(3), tout en<br />
appuyant fermement la soupape au fond<br />
du réservoir à eau dans l’ouverture prévue<br />
à cet effet.<br />
● Mettre en place le porte-filtre «n». Ce<br />
faisant, tirer le verrouillage de filtre «o»<br />
vers l’arrière et tourner le porte-filtre à la<br />
main jusqu’à la butée de droite (4).<br />
● Brancher l’appareil de manière appropriée<br />
(respecter les consignes de sécurité).<br />
● Appuyer l’interrupteur pour Café & Vapeur<br />
«d» vers le haut sur la position Café et<br />
mettre l’appareil en marche avec<br />
l’interrupteur Marche-Arrêt «c» (5).<br />
● Pendant la phase de chauffage, le voyant<br />
rouge de contrôle de chauffe «f» est<br />
allumé (6).<br />
● Après la phase de chauffage, le voyant<br />
rouge de contrôle «f» s’éteint et le<br />
voyant vert «g» de contrôle de<br />
fonctionnement s’allume. Placer au<br />
dessous du filtre d’écoulement, un<br />
récipient de récupération suffisamment<br />
grand et tourner le bouton «e» vers la<br />
droite sur la position café (7).<br />
26<br />
Utilisation prévue<br />
Première mise en service<br />
☛ Remarque<br />
Faire couler tout le contenu du réservoir<br />
d’eau. Le cas échéant, interrompre la<br />
procédure et vider le bac de récupération.<br />
Répéter la procédure une ou deux fois.<br />
Préchauffage des tasses<br />
ILLUSTRATIONS 1 - 4; 8 - 9<br />
L’appareil vous donne deux possibilités<br />
différentes pour préchauffer les tasses.<br />
1ère possibilité<br />
● Remplir et mettre en place le réservoir<br />
d’eau (1-3). Mettre en place le porte-filtre «n».<br />
Ce faisant, tirer le verrouillage de filtre «o»<br />
vers l’arrière et tourner le porte-filtre à la<br />
main jusqu’à la butée de droite (4).<br />
● Mettre en marche l’appareil avec l’interrupteur<br />
Marche - Arrêt «c». Placer une ou<br />
deux tasses sous le porte-filtre. Lorsque<br />
le voyant de contrôle vert «g» est allumé,<br />
tourner le bouton «e» vers la droite et<br />
laisser couler l’eau pour chauffer le<br />
porte-filtre et préchauffer les tasses (8).<br />
● Lorsque les tasses sont remplies, tourner<br />
le bouton «e» vers la position du milieu 0.<br />
2ème possibilité<br />
● Placez vos tasses à expresso avec<br />
l’ouverture vers le bas sur le plateau<br />
chauffe-tasses «h» (9). Lorsque l’appareil<br />
est prêt, le bloc thermique transmet<br />
de la chaleur au plateau chauffe-tasses<br />
qui préchauffe ainsi les tasses.<br />
Préparation d’un expresso<br />
ILLUSTRATIONS 1 - 3; 10 - 16<br />
● Remplir et mettre en place le réservoir<br />
d’eau.<br />
● Enlever le porte-filtre «n». Ce faisant, tirer<br />
le verrouillage de filtre «o» vers l’arrière et<br />
tourner le porte-filtre vers la gauche<br />
jusqu’à la butée.<br />
● Placer le filtre souhaité (à une ou deux<br />
tasses) (10 a). A la mise en place, s’assurer<br />
que la came de fermeture respective du<br />
porte-filtre se trouve toujours entre les<br />
ergots du tamis de filtre (10 b).
Text_F_<strong>9731</strong> 01.04.2004 16:14 Uhr Seite 27<br />
Le remplir d’une ou deux doses de café expresso<br />
(11), tasser le café avec le tampon<br />
«p» (12) et enlever le café sur les bords du<br />
filtre (13).<br />
● Tirer vers l’arrière le verrouillage du filtre<br />
«o». Remettre le porte-filtre dans la tête<br />
et serrer à fond (14).<br />
● Placer une ou deux tasses sous le portefiltre<br />
et tourner le bouton «e» vers la<br />
droite sur la position Café (15).<br />
Pour arrêter le remplissage des tasses,<br />
retourner le bouton «e» vers la position<br />
du milieu 0.<br />
☛ Remarque<br />
Il est possible que le voyant rouge de<br />
contrôle de chauffe «f» s’allume pendant la<br />
préparation, c’est normal (le bloc thermique<br />
chauffe).<br />
● Après l’écoulement, enlever le portefiltre,<br />
faire s’encranter le verrouillage de<br />
filtre «o» vers l’avant et faire tomber le<br />
marc de café en tapant (16).<br />
Lorsque le voyant de contrôle vert «g»<br />
s’allume, le prochain expresso peut être<br />
préparé.<br />
Faire mousser du lait /<br />
Préparer un cappuccino<br />
ILLUSTRATIONS 17 - 19<br />
Pour obtenir un cappuccino, il faut faire<br />
mousser du lait et l’ajouter à un expresso.<br />
Procédure:<br />
● Préparez un expresso (voir Préparation<br />
d’un expresso). Utilisez à la place des<br />
tasses à expresso, des tasses à<br />
cappuccino plus grandes et préchauffées.<br />
● Poussez l’interrupteur «d» vers le bas sur<br />
la position Vapeur .<br />
Le voyant rouge de contrôle de chauffe<br />
«f» s’allume. L’appareil est chauffé à la<br />
température de la vapeur (17).<br />
● Remplissez maintenant un petit pot en<br />
inox avec environ 100 ml de lait froid<br />
(température du réfrigérateur) pour une<br />
tasse de cappuccino.<br />
● Mettre en place l’accessoire mousse «j»<br />
(18). Le pousser à fond sur le bec vapeur<br />
«i».<br />
L’accessoire mousse doit s’enclencher<br />
avec un clic dans la glissière. Pour<br />
bloquer, tourner à fond l’accessoire<br />
mousse vers la droite.<br />
● Dès que le voyant vert de contrôle «g»<br />
s’allume, l’appareil est prêt. Plonger<br />
l’accessoire mousse dans le lait et tourner<br />
vers la gauche le bouton «e» sur la<br />
position Vapeur<br />
(19). Pendant que<br />
vous faites mousser le lait, l’accessoire<br />
mousse ne doit pas toucher le fond du pot.<br />
Faire mousser le lait jusqu’à ce qu’il ait<br />
atteint au moins le double de son volume.<br />
☛ Remarque<br />
Il est possible que le voyant rouge de<br />
contrôle de chauffe «f» s’allume pendant la<br />
préparation, c’est normal (le bloc<br />
thermique chauffe). Les bruits en cadence<br />
de la pompe pendant la préparation de la<br />
vapeur sont normaux.<br />
● Remettre le bouton «e» sur la position<br />
du milieu 0, et enlever le pot.<br />
● Mettez maintenant avec une cuillère, la<br />
mousse sur l’expresso, et remplissez la<br />
tasse avec le lait restant.<br />
☛ Remarque<br />
Si tout de suite après la préparation de la<br />
vapeur, vous voulez préparer un expresso,<br />
il faut que l’appareil refroidisse à la<br />
température pour expresso. Le refroidissement<br />
peut être effectué de deux<br />
manières:<br />
● Pousser l’interrupteur «d» vers le haut<br />
sur la position Café .<br />
1ère possibilité<br />
Laisser refroidir l’appareil de lui-même;<br />
Les voyants doivent passer de vert à<br />
rouge (phase de refroidissement) et<br />
ensuite de nouveau à vert (prêt pour la<br />
préparation d’un expresso).<br />
2ème possibilité<br />
Refroidir l’appareil en faisant circuler de<br />
l’eau;<br />
● Si nécessaire, remplir de nouveau le<br />
réservoir d’eau et le mettre en place.<br />
● Mettre un récipient sous le filtre.<br />
27
Text_F_<strong>9731</strong> 01.04.2004 16:14 Uhr Seite 28<br />
● Tourner vers la droite le bouton «e» sur<br />
la position Café . Faire couler de<br />
l’eau jusqu’à ce que le voyant rouge<br />
s’allume. Ensuite l’allumage du voyant<br />
de contrôle vert indique que l’appareil<br />
est prêt pour la préparation d’un<br />
expresso.<br />
☛ Remarque<br />
Après chaque utilisation, enlever<br />
l’accessoire mousse et rincer à l’eau<br />
courante les restes de lait.<br />
Nettoyez la buse vapeur en allumant à<br />
nouveau un instant la prise d’eau chaude<br />
(voir prise d’eau chaude).<br />
Avertissement:<br />
De l’eau chaude s’échappe de la buse.<br />
Danger de brûlures.<br />
Préparation de vapeur pour<br />
réchauffer des liquides<br />
ILLUSTRATION 20<br />
Avec le bec vapeur (sans accessoire mousse),<br />
il est possible de réchauffer des boissons,<br />
telles que du chocolat, de l’eau ou du thé.<br />
Procédure:<br />
● Remplir et mettre en place le réservoir<br />
d’eau.<br />
● Préparez votre appareil pour la production<br />
de vapeur (voir Faire mousser du lait<br />
/ Préparer un cappuccino).<br />
● Enlevez l’accessoire mousse «j» du bec<br />
vapeur (le tourner à fond vers la gauche<br />
et le retirer).<br />
● Ne pas remplir complètement le récipient.<br />
● Plongez le bec vapeur dans le liquide à<br />
réchauffer. Tourner vers la gauche le<br />
bouton «e» sur la position Vapeur ,<br />
pour lancer la sortie de vapeur (20).<br />
☛ Remarque<br />
Il est possible que le voyant rouge de<br />
contrôle de chauffe «f» s’allume pendant la<br />
chauffe, c’est normal (le bloc thermique<br />
chauffe). Les bruits en cadence de la<br />
pompe pendant la préparation de la vapeur<br />
sont normaux.<br />
28<br />
● Remettre le bouton «e» sur la position<br />
du milieu 0, et enlever le pot.<br />
Prise d’eau chaude<br />
ILLUSTRATION 21<br />
En prenant de l’eau chaude, vous pouvez<br />
préparer des boissons chaudes telles que<br />
p.ex. du thé ou des soupes toutes prêtes.<br />
Procédure<br />
● Remplir et mettre en place le réservoir<br />
d’eau.<br />
● Enlevez l’accessoire mousse «j» du bec<br />
vapeur (le tourner à fond vers la gauche<br />
et le retirer). Pousser vers le haut l’interrupteur<br />
«d» sur la position Café .<br />
Plongez le bec vapeur dans le récipient<br />
utilisé. Tourner vers la gauche le bouton<br />
«e» sur la position Vapeur (21).<br />
● Quand vous avez assez d’eau chaude,<br />
remettre le bouton «e» sur la position du<br />
milieu, et enlever le récipient.<br />
☛ Remarque<br />
Si vous ne trouvez pas l’eau assez chaude,<br />
vous pouvez la faire bouillir en poussant<br />
l’interrup-teur «d» vers le bas sur la<br />
position Vapeur . Il est possible que le<br />
voyant rouge de contrôle de chauffe «f»<br />
s’allume pendant la prise de l’eau chaude,<br />
c’est normal (le bloc thermique chauffe).<br />
Les bruits en cadence de la pompe<br />
pendant la préparation de la vapeur sont<br />
normaux.<br />
Conseils<br />
● Le mieux c’est de conserver le café à<br />
expresso à l’abri de l’air et de la lumière,<br />
au réfrigérateur, car ainsi il conserve<br />
plus longtemps son arôme.<br />
● Avant la première mise en service et<br />
après des arrêts prolongés d’utilisation,<br />
il faut nettoyer l’appareil et mettre de<br />
l’eau propre dans le réservoir.<br />
● Ne pas trop remplir le filtre. Utilisez le<br />
doseur fourni «p». Une cuillère rase correspond<br />
à une tasse (voir llustration 11).
Text_F_<strong>9731</strong> 01.04.2004 16:14 Uhr Seite 29<br />
● Pour faire mousser le lait, nous vous<br />
conseillons d’utiliser un pot en inox d’un<br />
volume d’environ un demi-litre.<br />
Cependant, vous pouvez aussi utiliser des<br />
récipients en porcellaine ou en terre cuite.<br />
● Après la dernière préparation, ne pas<br />
éteindre immédiatement l’appareil.<br />
Laissez-le marcher encore environ 1<br />
minute, pour enlever l’eau restante du<br />
système.<br />
Pendant la détente, il se produit un<br />
sifflement qui est tout à fait normal.<br />
Protection de l’environnement<br />
● L’emballage ainsi que l’appareil et les<br />
accessoires sont fabriqués à partir de<br />
matériaux recyclables.<br />
● L’évacuation triée et adaptée à<br />
l’environnement des restes de matériaux<br />
favorise le recyclage des matériaux.<br />
Nettoyage & Entretien<br />
● Avant tout nettoyage,<br />
débrancher l’appareil et le<br />
laisser refroidir.<br />
● Ne jamais plonger l’appareil<br />
dans l’eau, et ne jamais<br />
utiliser de détergent agressif<br />
ou abrasif!<br />
ILLUSTRATIONS 22 - 24<br />
● Ne nettoyer le boîtier de l’appareil<br />
qu’avec un chiffon humide.<br />
● Nettoyer régulièrement à l’eau chaude<br />
courante le réservoir d’eau, la grille<br />
d’égouttoir et le bac de récupération.<br />
● Vider régulièrement le bac de<br />
récupération. Cependant au plus tard<br />
lorsque le flotteur «Témoin de niveau<br />
m» apparaît à travers l’ouverture de la<br />
grille d’égouttoir «k» (22).<br />
● Nettoyer le filtre d’écoulement avec un<br />
chiffon humide. Attention c’est chaud!<br />
Danger de brûlures.<br />
● Si le filtre d’écoulement est très<br />
encrassé, il peut être dévissé à la tête de<br />
l’appareil à l’aide d’une pièce de<br />
monnaie, pour être nettoyé à fond (23).<br />
● Après avoir fait mousser le lait, nettoyer<br />
la buse vapeur et l’accessoire mousse.<br />
Procédure:<br />
● Enlever la fiche de la prise de courant,<br />
éteindre l’appareil et le laisser refroidir.<br />
● Enlever l’auxiliaire mousse «j» du bec<br />
vapeur «i» (le tourner à fond vers la<br />
gauche et le retirer). Le rincer à l’eau<br />
courante ou le nettoyer avec un chiffon<br />
humide. Le cas échéant, nettoyer avec<br />
une aiguille l’orifice d’aspiration, en<br />
dessous de l’obturateur.<br />
● Si la buse vapeur est bouchée, vous<br />
pouvez la dévisser du bec vapeur «i»<br />
avec la clé à six pans intégrée dans le<br />
doseur «p», ou la percer avec une<br />
aiguille (24).<br />
● Si vous n’utilisez pas l’appareil<br />
pendant longtemps, ne pas mettre le<br />
porte-filtre en place, ou ne le tourner<br />
qu’en position, pour augmenter la<br />
longévité du joint.<br />
Détartrage<br />
Selon la dureté de l’eau (vous pouvez vous<br />
informer aux Services des Eaux de votre<br />
ville) il faut détartrer de temps en temps<br />
l’appareil.<br />
Utiliser les détartrants courants dans le<br />
commerce (respecter le mode d’emploi) ou<br />
dissoudre deux cuillères à soupe d’acide<br />
tartrique ou d’acide citrique dans un demilitre<br />
d’eau tiède.<br />
Ne pas utiliser de vinaigre, cela diminuerait<br />
considérablement la longévité du joint.<br />
29
Text_F_<strong>9731</strong> 01.04.2004 16:14 Uhr Seite 30<br />
Procédure de<br />
«Détartrage du bloc thermique»<br />
● Enlever le porte-filtre!<br />
● Dévisser le filtre d’écoulement à la tête<br />
de l’appareil, avec une pièce de monnaie<br />
(23). Enlever les restes de café éventuels<br />
avec un chiffon humide.<br />
● Versez le détartrant dans le réservoir<br />
d’eau. Placez un récipient suffisamment<br />
grand en dessous de la tête de l’appareil.<br />
● Mettre l’appareil en marche, mettre<br />
l’interrupteur «d» sur la position<br />
Café . Tourner le bouton «e» sur la<br />
position Café , le détartrant est<br />
pompé par le système.<br />
☛ Remarque<br />
Vous n’avez pas besoin d’attendre que le<br />
voyant rouge de contrôle de chauffe «f»<br />
s’éteigne.<br />
Faire passer entre le tiers et la moitié du<br />
détartrant. Eteindre l’appareil avec<br />
l’interrupteur Marche-Arrêt «c» (ne pas<br />
retourner le bouton «e» en position<br />
initiale). Laissez agir le détartrant pendant<br />
10 - 15 minutes, avant de remettre l’appareil<br />
en marche et de laisser s’écouler le<br />
reste du détartrant.<br />
Le cas échéant, recommencer la<br />
procédure.<br />
Procédure de «Détartrage du bec vapeur»<br />
● Comme le «Détartrage du bloc<br />
thermique», cependant ici mettre le<br />
bouton «e» sur la position Vapeur .<br />
Placer un récipient en dessous du bec<br />
vapeur.<br />
☛ Remarque<br />
Après le détartrage, il faut absolument<br />
rincer avec 1 ou 2 réservoirs d’eau.<br />
Revisser le filtre d’écoulement.<br />
Problèmes et solutions<br />
LE CAFE S’ECHAPPE DU PORTE-FILTRE<br />
Le porte-filtre n’est pas tourné à fond.<br />
Tourner le porte-filtre à fond vers la<br />
droite.<br />
Il y a un reste de café sur le bord du portefiltre.<br />
Couper la circulation d’eau, enlever le<br />
porte-filtre et nettoyer le bord du<br />
porte-filtre.<br />
Le joint de la tête de l’appareil est sale.<br />
Nettoyer le joint. Attention<br />
c’est chaud!<br />
Le joint a perdu son élasticité.<br />
Il faut changer le joint.<br />
BRUIT TRES FORT DANS LA POMPE<br />
Pas d’eau dans le réservoir.<br />
Remettre de l’eau.<br />
Le réservoir d’eau n’est pas bien mis en<br />
place.<br />
Soulever le réservoir d’eau et le<br />
mettre bien en place.<br />
L’EXPRESSO NE S’ECOULE PAS<br />
Pas d’eau dans le réservoir.<br />
Remettre de l’eau<br />
L’interrupteur «d» est sur vapeur.<br />
Enlever le porte-filtre, mettre<br />
l’interrupteur sur Café et laisser<br />
refroidir le bloc thermique à la<br />
température café.<br />
Filtre d’écoulement bouché.<br />
Enlever le porte-filtre, mettre l’eau en<br />
marche, l’eau doit s’écouler du filtre.<br />
Le cas échéant dévisser le filtre<br />
d’écoulement (Attention c’est chaud,<br />
débrancher l’appareil) et le nettoyer.<br />
30
Text_F_<strong>9731</strong> 01.04.2004 16:15 Uhr Seite 31<br />
L’EXPRESSO NE S’ECOULE QUE GOUTTE<br />
A GOUTTE<br />
Café moulu trop fin ou trop tassé.<br />
Changer de marque de café. Tasser<br />
moins le café.<br />
Filtre d’écoulement bouché.<br />
Enlever le porte-filtre, mettre l’eau en<br />
marche, l’eau doit s’écouler du filtre.<br />
Débrancher l’appareil, le cas échéant<br />
dévisser le filtre d’écoulement<br />
(Attention c’est chaud) et le nettoyer.<br />
La machine est entartrée.<br />
Détartrer l’appareil.<br />
EXPRESSO SANS CREME<br />
Café trop vieux ou trop sec.<br />
Utiliser du café frais.<br />
Mouture pas assez tassée.<br />
Tasser plus le café.<br />
Café à expresso pas moulu assez fin.<br />
Changer de marque de café.<br />
Le mélange de café n’est pas adapté pour<br />
l’expresso.<br />
Changer de marque de café.<br />
EXPRESSO FROID<br />
Appareil pas assez préchauffé.<br />
Laisser chauffer plus longtemps<br />
l’appareil.<br />
Tasses pas préchauffées, ou pas assez.<br />
Préchauffer les tasses avec de l’eau<br />
chaude.<br />
IL NE SORT PAS DE VAPEUR DU BEC VAPEUR<br />
Buse vapeur bouchée.<br />
Dévisser la buse vapeur et activer la<br />
fonction vapeur sans la buse. Lorsque<br />
le tuyau à vapeur laisse échapper de<br />
l’eau ou bien de la vapeur, nettoyer la<br />
buse vapeur bouchée, éventuellement<br />
avec une épingle. Lorsque le tuyau à<br />
vapeur ne laisse pas échapper de<br />
l’eau ou de la vapeur, détartrer la<br />
buse vapeur (cf. à la page 30).<br />
Si l'appareil est toujours bouché à la<br />
suite de cette opération, veuillez bien<br />
vous adresser au fabricant.<br />
PAS ASSEZ DE MOUSSE<br />
Le lait n’est pas frais.<br />
Utiliser du lait frais.<br />
Lait pas adapté.<br />
Lait avec 1,5 % de matières grasses.<br />
Le lait était déjà chaud au début.<br />
Utiliser du lait qui sort du<br />
réfrigérateur.<br />
Récipient pas adapté.<br />
Utiliser un pot en inox.<br />
RESERVOIR GOUTTE LORS DU TRANSPORT<br />
La soupape coince au fond du réservoir.<br />
Enclencher la soupape avec le doigt.<br />
LES TASSES NE SONT PAS REMPLIES DE<br />
MANIERE HOMOGENE<br />
La sortie du porte-filtre est bouchée.<br />
Nettoyer le porte-filtre.<br />
Plaque pas mise en place.<br />
Mettre la plaque en place.<br />
LE PORTE-FILTRE EST DIFFICILE A<br />
METTRE EN PLACE<br />
Il y a de la mouture de café sur la glissière<br />
du porte-filtre.<br />
Débrancher l’appareil, nettoyer la<br />
glissière avec un chiffon humide<br />
(Attention c’est chaud).<br />
L’EXPRESSO A UN GOUT AIGRE<br />
Appareil pas rincé ou pas assez, après le<br />
détartrage.<br />
Faire passer un réservoir plein d’eau<br />
dans l’appareil.<br />
L’APPAREIL NE FONCTIONNE PAS<br />
Défaut mécanique ou électronique.<br />
Apporter l’appareil au service aprèsvente.<br />
31
Text_F_<strong>9731</strong> 13.05.2005 16:25 Uhr Seite 32<br />
Recettes<br />
Expresso original<br />
Il se boit sans lait mais avec beaucoup de<br />
sucre. On fait la différence entre:<br />
Expresso ristretto: goût court, fort et amer<br />
(tasse remplie à moitié<br />
au maximum)<br />
Expresso lungo: long et peu concentré<br />
(tasse remplie au 3 / 4 )<br />
Cappuccino<br />
Ajouter à un expresso le lait que vous avez<br />
fait mousser. Garnir de cacao en poudre ou<br />
de paillettes en chocolat.<br />
Café glacé italien<br />
Ingrédients: 4 boules de glace à la vanille;<br />
1 /8 de lait; 2 tasses d’expresso froid sucré;<br />
paillettes en chocolat.<br />
Mélanger le lait avec l’expresso, verser le<br />
mélange sur la glace et garnir de paillettes<br />
en chocolat.<br />
Elimination de l’appareil<br />
Ce symbole présent sur le produit, le mode<br />
d’emploi ou bien sur l’emballage, attire votre<br />
attention sur le fait qu’il est interdit de<br />
l’éliminer en fin de vie avec les déchets<br />
ménagers habituels. Les appareils électriques<br />
et électroniques usagés doivent être remis à<br />
un point de collecte en vue de leur recyclage.<br />
Les matériaux sont recyclables conformément<br />
à leur caractérisation. En remettant votre<br />
appareil usagé en bonne et due forme en vue<br />
de son recyclage, du recyclage des matériaux<br />
ou encore de toute autre forme de recyclage,<br />
vous apportez une contribution importante à la<br />
protection de l'environnement.<br />
Votre administration municipale vous fournira<br />
les coordonnées du service d’élimination des<br />
déchets compétent.<br />
Expresso flambò<br />
Ingrédients: 4 verts de cognac; 2 cuillères à<br />
café de sucre brun; 2 tasses d’expresso;<br />
crème chantilly.<br />
Verser le cognac dans des verres résistants<br />
à la chaleur, chauffer, enflammer. Ajouter<br />
le sucre, remuer, verser l’expresso et<br />
garnir de crème chantilly.<br />
Sous réserve de modifications<br />
32
Text_F_<strong>9731</strong> 01.04.2004 16:15 Uhr Seite 33
Text_F_<strong>9731</strong> 01.04.2004 16:15 Uhr Seite 34
Rückseiten f. <strong>Einband</strong> 4 01.04.2004 16:01 Uhr Seite 1