- Page 1 and 2: Projector IN5132/IN5132c/IN5142/IN5
- Page 3 and 4: Projecteur IN5132/IN5142/IN5134/IN5
- Page 5 and 6: Réglementations À propos des inte
- Page 7 and 8: Préparer la télécommande Veuille
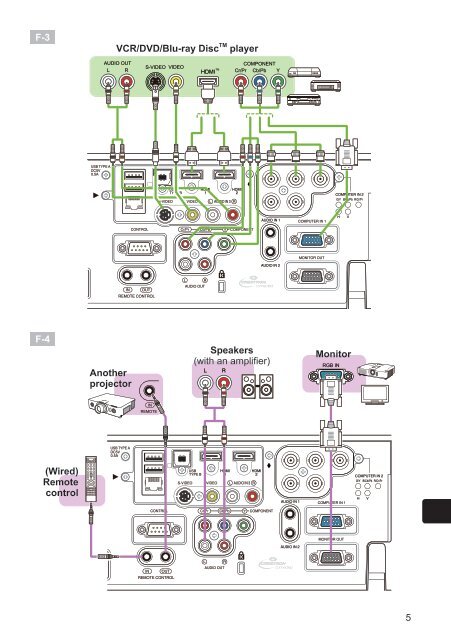
- Page 9 and 10: Connecter vos appareils Avant de ra
- Page 11 and 12: Mise sous tension 1. 2. 3. Assurez
- Page 13 and 14: Affichage de l'image 1. 2. 3. 4. 5.
- Page 15 and 16: Remplacement de la lampe La lampe a
- Page 17 and 18: Nettoyer et remplacer le filtre à
- Page 19 and 20: Caractéristiques techniques Poste
- Page 21 and 22: Dépannage - Garantie Et Service Ap
- Page 23 and 24: H x V : Screen size a: Projection d
- Page 25: H x V : Screen size a: Projection d
- Page 29 and 30: GNU GENERAL PUBLIC LICENSE Version
- Page 31 and 32: collective works based on the Progr
- Page 33 and 34: goals of preserving the free status
- Page 35 and 36: GNU LESSER GENERAL PUBLIC LICENSE V
- Page 37 and 38: GNU LESSER GENERAL PUBLIC LICENSE T
- Page 39 and 40: a "work that uses the Library" uses
- Page 41 and 42: section is held invalid or unenforc
- Page 43 and 44: , 1 April 1990 Ty Coon, President o
- Page 45 and 46: Projecteur IN5132/IN5142/IN5134/IN5
- Page 47 and 48: Introduction Caractéristiques Le p
- Page 49 and 50: Introduction Identification des pi
- Page 51 and 52: Mise en place Mise en place Install
- Page 53 and 54: Mise en place Disposition (suite) A
- Page 55 and 56: Mise en place Connecter vos apparei
- Page 57 and 58: Mise en place Connecter vos apparei
- Page 59 and 60: Attacher le couvercle d'adaptateur
- Page 61 and 62: Télécommande Télécommande Mise
- Page 63 and 64: (1) Touche PAGE UP : Appuyez sur la
- Page 65 and 66: Moniteur du statut Affichage de l
- Page 67 and 68: Moniteur du statut Affichage du jo
- Page 69 and 70: Opération 1. Opération Régler le
- Page 71 and 72: Opération Sélectionner un rapport
- Page 73 and 74: Réglage de l’objectif Régler le
- Page 75 and 76: Utiliser la fonction de réglage au
- Page 77 and 78:
Opération Correction de la distors
- Page 79 and 80:
Utiliser la fonction de grossisseme
- Page 81 and 82:
Opération Img/Img (Images Juxtapos
- Page 83 and 84:
Utiliser la fonction de menu Opéra
- Page 85 and 86:
Opération Utiliser la fonction de
- Page 87 and 88:
MENU COURT Rubrique MODE IMAGE (sui
- Page 89 and 90:
Menu IMAGE Rubrique Description Com
- Page 91 and 92:
Menu AFFICHAGE Menu AFFICHAGE Avec
- Page 93 and 94:
Menu AFFICHAGE Rubrique PHASE.H TAI
- Page 95 and 96:
Rubrique FORMAT VIDEO FORMAT HDMI P
- Page 97 and 98:
Menu ENTR. Rubrique RESOLUTION Desc
- Page 99 and 100:
Menu INSTALLAT° Rubrique KEYSTONE
- Page 101 and 102:
Menu AUDIO IN Menu AUDIO IN A parti
- Page 103 and 104:
Menu ECRAN Menu ECRAN A partir du M
- Page 105 and 106:
Menu ECRAN Rubrique V. Mon Écran M
- Page 107 and 108:
Menu ECRAN Rubrique NOM DU SOURCE (
- Page 109 and 110:
Menu OPT. A partir du Menu OPT., vo
- Page 111 and 112:
Menu OPT. Rubrique USB TYPE B TEMPS
- Page 113 and 114:
Menu OPT. Rubrique Description Le m
- Page 115 and 116:
Menu OPT. Rubrique SERVICE (suite)
- Page 117 and 118:
Menu OPT. Rubrique Description RÉG
- Page 119 and 120:
Menu OPT. Rubrique Description IINF
- Page 121 and 122:
Menu RÉSEAU Rubrique CONFIGURATION
- Page 123 and 124:
Menu RÉSEAU Rubrique CONFIGURATION
- Page 125 and 126:
Menu RÉSEAU Rubrique CONFIGURATION
- Page 127 and 128:
Menu RÉSEAU Rubrique NOM DU PROJEC
- Page 129 and 130:
Menu RÉSEAU Rubrique PRESENT. Desc
- Page 131 and 132:
Menu SECURITE Rubrique MODIF. MOT D
- Page 133 and 134:
Rubrique VERROU PIN (voir page suiv
- Page 135 and 136:
Rubrique M. D. P. MON TEXTE (voir p
- Page 137 and 138:
Menu SECURITE Rubrique INDICATEUR S
- Page 139 and 140:
Outils de présentation Presentatio
- Page 141 and 142:
Outils de présentation Presentatio
- Page 143 and 144:
Outils de présentation Presentatio
- Page 145 and 146:
Outils de présentation Presentatio
- Page 147 and 148:
Outils de présentation Presentatio
- Page 149 and 150:
Affichage USB (suite) Cette applica
- Page 151 and 152:
Outils de présentation Affichage U
- Page 153 and 154:
Entretien Remplacer la lampe (suite
- Page 155 and 156:
Entretien Nettoyer et remplacer le
- Page 157 and 158:
Dépannage Dépannage En cas d’op
- Page 159 and 160:
Dépannage A propos des voyants de
- Page 161 and 162:
Dépannage A propos des voyants de
- Page 163 and 164:
Dépannage Phénomènes qui peuvent
- Page 165 and 166:
Dépannage Phénomènes qui peuvent
- Page 167:
Caractéristiques techniques Caract