instrucciones de instalación, funcionamiento y - Hitecsa
instrucciones de instalación, funcionamiento y - Hitecsa
instrucciones de instalación, funcionamiento y - Hitecsa

Create successful ePaper yourself
Turn your PDF publications into a flip-book with our unique Google optimized e-Paper software.
MANDO POR CABLE MPCE / WIRED CONTROLLER MPCE / COMMANDE CÂBLÉE MPCE<br />
MANUAL DE USUARIO / USER'S MANUAL / MANUEL DE L'UTILISATEUR<br />
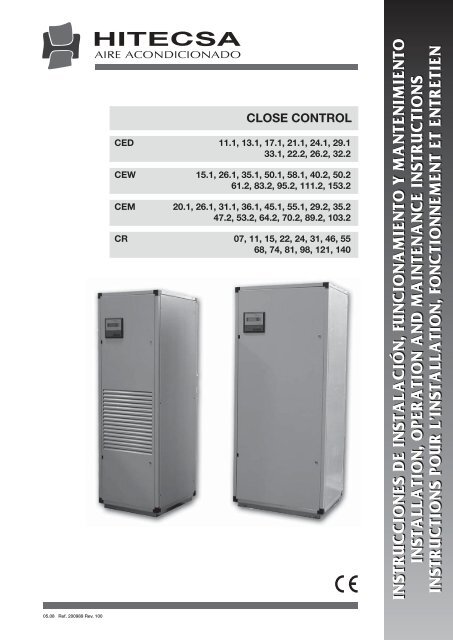
CLOSE CONTROL<br />
CED 11.1, 13.1, 17.1, 21.1, 24.1, 29.1<br />
33.1, 22.2, 26.2, 32.2<br />
CEW 15.1, 26.1, 35.1, 50.1, 58.1, 40.2, 50.2<br />
61.2, 83.2, 95.2, 111.2, 153.2<br />
CEM 20.1, 26.1, 31.1, 36.1, 45.1, 55.1, 29.2, 35.2<br />
47.2, 53.2, 64.2, 70.2, 89.2, 103.2<br />
CR 07, 11, 15, 22, 24, 31, 46, 55<br />
68, 74, 81, 98, 121, 140<br />
INSTRUCCIONES DE INSTALACIÓN, FUNCIONAMIENTO Y MANTENIMIENTO<br />
INSTALLATION, OPERATION AND MAINTENANCE INSTRUCTIONS<br />
INSTRUCTIONS POUR L'INSTALLATION, FONCTIONNEMENT ET ENTRETIEN<br />
05.08 Ref. 200989 Rev. 100<br />
1
INDICE<br />
CONSIDERACIONES DE SEGURIDAD............................................4<br />
INFORMACION GENERAL..........................................................5,6<br />
RECEPCION DE LA UNIDAD......................................................7,8<br />
INSTALACIÓN........................................................................9-18<br />
PUESTA EN MARCHA.............................................................19,21<br />
MANTENIMIENTO..................................................................22-25<br />
AVERIAS FRECUENTES.............................................................26
CONSIDERACIONES DE SEGURIDAD<br />
RIESGOS MECÁNICOS<br />
Peligro para las manos <strong>de</strong> cortes, magulladuras y amputaciones durante el mantenimiento, con la máquina abierta y en<br />
<strong>funcionamiento</strong> (con los paneles y los dispositivos <strong>de</strong> seguridad quitados). Por favor, consulte las etiquetas fijadas en el<br />
interior <strong>de</strong> la máquina.<br />
La operación <strong>de</strong> mantenimiento <strong>de</strong>berá llevarla a cabo única y exclusivamente personal especializado y autorizado.<br />
RIESGOS ELÉCTRICOS<br />
Peligro <strong>de</strong> electrocución <strong>de</strong>bido a un contacto acci<strong>de</strong>ntal en el conmutador <strong>de</strong> alimentación principal cuando se están<br />
llevando a cabo las operaciones <strong>de</strong> mantenimiento con el armario eléctrico abierto.<br />
La operación <strong>de</strong> mantenimiento <strong>de</strong>berá llevarla a cabo única y exclusivamente personal especializado y autorizado.<br />
RIESGOS DERIVADOS DE FUENTES CALOR<br />
Peligro para las manos <strong>de</strong> quemaduras al entrar en contacto con las tuberías <strong>de</strong>l circuito <strong>de</strong>l con<strong>de</strong>nsador durante el<br />
mantenimiento con la máquina abierta y en <strong>funcionamiento</strong> (con los paneles y los dispositivos <strong>de</strong> protección quitados). Por<br />
favor, consulte las etiquetas fijadas en el interior <strong>de</strong> la máquina.<br />
La operación <strong>de</strong> mantenimiento <strong>de</strong>berá llevarla a cabo única y exclusivamente personal especializado y autorizado.<br />
PELIGROS POR RUIDO O VIBRACIONES<br />
No existen.<br />
PELIGROS POR FUENTES DE RIESGO (electricidad, electricidad estática, campos magnéticos, radiaciones, láser,<br />
etc.)<br />
No existen.<br />
OTROS RIESGOS DERIVADOS DE FUENTES DE CALOR (polvos, gases, agua, vapor, fluidos, niebla, humo,<br />
explosiones, sustancias biológicas y microbiológicas, productos químicos, etc.)<br />
Gases refrigerantes - No afectan a ninguna soldadura <strong>de</strong> las tuberías ni a los recipientes en don<strong>de</strong> están contenidos.<br />
RIESGOS ERGONÓMICOS (distancias <strong>de</strong> seguridad, dimensiones y geometría ergonómica etc.)<br />
No existen.<br />
COMBINACIÓN DE PELIGROS (interrupción <strong>de</strong>l suministro eléctrico)<br />
No hay peligro.<br />
PELIGRO DERIVADO DE CAUSAS IMPREVISTAS<br />
No existe.<br />
4 05.08 Ref.200989 Rev.100
INFORMACION GENERAL<br />
DEFINICIÓN DE LOS CÓDIGOS Y DE LA SERIE DEL EQUIPO<br />
• CED Unida<strong>de</strong>s verticales <strong>de</strong> aire acondicionado <strong>de</strong> precisión usadas para aplicaciones estándar.<br />
• CEM Unida<strong>de</strong>s verticales <strong>de</strong> aire acondicionado <strong>de</strong> precisión usadas para aplicaciones estándar y especiales.<br />
• CEW Unida<strong>de</strong>s <strong>de</strong> aire acondicionado <strong>de</strong> precisión <strong>de</strong> agua refrigerada.<br />
IDENTIFICACIÓN<br />
15... - dimensión <strong>de</strong> la unidad (la unidad estándar es <strong>de</strong> flujo <strong>de</strong>scen<strong>de</strong>nte).<br />
/A - indica que la unidad es <strong>de</strong> flujo ascen<strong>de</strong>nte.<br />
CONF. - indica la configuración <strong>de</strong> la unidad.<br />
CONF. SERIE DESCRIPCIÓN<br />
1 CED, CEM Versión refrigerada por agua con con<strong>de</strong>nsador <strong>de</strong> placas y compresor en la unidad interior<br />
(circuito abierto).<br />
2 CED, CEM Versión refrigerada por aire con compresor en la unidad interior y aerocon<strong>de</strong>nsador remoto.<br />
3 CED, CEM Versión split refrigerada por agua con compresor y con<strong>de</strong>nsador refrigerado por agua como<br />
unidad exterior.<br />
4 CED, CEM Versión split refrigerada por aire con compresor y con<strong>de</strong>nsador refrigerado por aire como<br />
unidad exterior.<br />
5 CEW Versión <strong>de</strong> agua fría.<br />
6 CED, CEM Versión refrigerada por agua con glicol, en cuya unidad interior hay un compresor y un<br />
con<strong>de</strong>nsador <strong>de</strong> placas (circuito cerrado).<br />
7 CEM Unida<strong>de</strong>s “Dual Cool” con dos sistemas <strong>de</strong> refrigeración: por agua fría y por expansión<br />
directa.<br />
8 CEM Unida<strong>de</strong>s “Cool Recovery” con posibilida<strong>de</strong>s <strong>de</strong> enfriamiento gratuito durante la media<br />
estación y el invierno.<br />
9 CEM Unida<strong>de</strong>s con bomba <strong>de</strong> calor.<br />
HR CEM Unida<strong>de</strong>s con <strong>de</strong>srecalentador para la producción <strong>de</strong> agua caliente sanitaria.<br />
Las unida<strong>de</strong>s que pertenecen a las configuraciones anteriormente <strong>de</strong>scritas pue<strong>de</strong>n estar equipadas con los siguientes<br />
accesorios:<br />
- humidificador <strong>de</strong> vapor con electrodos;<br />
- uno o más calentadores eléctricos <strong>de</strong> etapas;<br />
- batería <strong>de</strong> agua fría ;<br />
- batería <strong>de</strong> gas caliente (sólo en las series CED, CEW y CEM con las configuraciones 1 y 2);<br />
- toma <strong>de</strong> aire exterior;<br />
- kit <strong>de</strong> temperatura ambiental baja para controlar la velocidad <strong>de</strong>l ventilador <strong>de</strong>l con<strong>de</strong>nsador (config. 2 y 4)<br />
- controlador por microprocesador <strong>de</strong> la temperatura electrónica y <strong>de</strong> la humedad relativa. (Consulten la <strong>de</strong>scripción y<br />
las <strong>instrucciones</strong> en el manual correspondiente.)<br />
05.08 Ref.200989 Rev.100 5
INFORMACION GENERAL<br />
EN PANELES CERRADOS<br />
Queda terminantemente prohibido quitar los dispositivos <strong>de</strong> seguridad mientras el equipo está funcionando.<br />
Es obligatorio volver a colocar los dispositivos <strong>de</strong> seguridad en su sitio antes <strong>de</strong> poner en marcha el<br />
equipo.<br />
EN EL PANEL FRONTAL O EN LA UNIDAD INTERIOR<br />
Queda terminantemente prohibido realizar operaciones <strong>de</strong> mantenimiento mientras el equipo esté en<br />
<strong>funcionamiento</strong>.<br />
EN EL TABLERO ELÉCTRICO<br />
Consulte el manual <strong>de</strong> <strong>funcionamiento</strong>, los esquemas eléctricos o los procedimientos.<br />
Sólo pue<strong>de</strong> abrir el tablero eléctrico el personal autorizado.<br />
Tablero eléctrico: peligro <strong>de</strong> electrocución.<br />
Queda terminantemente prohibido utilizar agua para extinguir los incendios.<br />
CUANDO SEA NECESARIO<br />
Precaución - Conexión a una protección eléctrica: no quitar.<br />
6 05.08 Ref.200989 Rev.100
RECEPCION DE LA UNIDAD<br />
RECEPCIÓN DEL EQUIPO<br />
Cuando reciba el equipo, la primera operación que <strong>de</strong>berá llevar a cabo será comprobar la existencia o no <strong>de</strong> daños que<br />
puedan haberse producido durante el transporte.<br />
A menos que exista un acuerdo individual, el equipo siempre se suministra EX FÁBRICA y, por lo tanto, HITECSA no es<br />
responsable <strong>de</strong> los eventuales daños que puedan verificarse durante el transporte.<br />
Para informar <strong>de</strong> un daño, hay que notificarlo por escrito en el albarán <strong>de</strong> entrega y comunicárselo verbalmente al<br />
encargado <strong>de</strong>l transporte.<br />
Los acondicionadores han sido fabricados para ser instalados en espacios cerrados, por lo que no <strong>de</strong>berían <strong>de</strong>jarse al aire<br />
libre o expuestos a condiciones meteorológicas adversas.<br />
Se aconseja, <strong>de</strong> cualquier modo, mantener las unida<strong>de</strong>s en su embalaje original hasta que vayan a ser instaladas.<br />
Fig. 1<br />
05.08 Ref.200989 Rev.100 7
INSTALACIÓN<br />
INSTALACIÓN DE LAS UNIDADES DE EXPANSIÓN DIRECTA<br />
Por lo general, el acondicionador se instala en ambientes que necesitan ser refrigerados; la unidad (unidad <strong>de</strong> flujo<br />
<strong>de</strong>scen<strong>de</strong>nte) pue<strong>de</strong> colocarse directamente sobre suelos elevados o falsos, con la condición <strong>de</strong> que dichos suelos puedan<br />
aguantar el peso <strong>de</strong> la unidad en <strong>funcionamiento</strong>.<br />
También pue<strong>de</strong> usarse una estructura base, con o sin transportador <strong>de</strong> aire; esto permite que todo el peso <strong>de</strong>scanse en el<br />
suelo real evitando tanto las sobrecargas como que las vibraciones se noten en el suelo falso.<br />
La estructura base no sólo facilita la instalación, también evita la necesidad <strong>de</strong> tener hacer orificios suplementarios en el<br />
suelo para cables, tuberías, etc. y simplifica el mantenimiento, pues la persona encargada sólo tendrá que quitar los paneles<br />
<strong>de</strong>l suelo situados alre<strong>de</strong>dor <strong>de</strong>l acondicionador para po<strong>de</strong>r acce<strong>de</strong>r.<br />
Si no se usa la estructura base, hay que colocar el bor<strong>de</strong> <strong>de</strong> la máquina directamente en el suelo falso y <strong>de</strong>jar suficiente<br />
suelo para po<strong>de</strong>r <strong>de</strong>positar la unidad. (Véase la figura 3, P y Q son las dimensiones <strong>de</strong>l acondicionador.)<br />
- El acondicionador <strong>de</strong>berá colocarse <strong>de</strong> tal forma que el aire <strong>de</strong> retorno no que<strong>de</strong> obstruido y que sea fácil la<br />
inspección <strong>de</strong> las unida<strong>de</strong>s. Deberá <strong>de</strong>jarse un área libre mínima <strong>de</strong> 60-70 centímetros. (Véase la figura 4.)<br />
Fig. 3 Fig. 4<br />
Otras dimensiones, el tamaño <strong>de</strong> las tuberías, las posiciones y cualquier otra información podrá encontrarlas en el “Manual<br />
técnico” <strong>de</strong> esta serie <strong>de</strong> máquinas.<br />
La unidad exterior en las configuraciones 2 - 4 - 6 <strong>de</strong>be ser instalada en el exterior y, en función <strong>de</strong>l espacio disponible, la<br />
distancia entre ésta y la unidad interior <strong>de</strong>be ser lo más corta posible.<br />
Se colocará en una posición a la que pueda acce<strong>de</strong>rse con facilidad y a su alre<strong>de</strong>dor <strong>de</strong>berá tener un área libre para las<br />
labores <strong>de</strong> mantenimiento y para la toma <strong>de</strong> aire <strong>de</strong> al menos 50 cm.<br />
A<strong>de</strong>más, nada <strong>de</strong>berá obstaculizar el camino <strong>de</strong>l aire saliente proce<strong>de</strong>nte <strong>de</strong>l con<strong>de</strong>nsador o <strong>de</strong> la unidad en al menos un<br />
espacio <strong>de</strong> 100 cm. El flujo <strong>de</strong> aire no se dirigirá hacia la toma <strong>de</strong> aire <strong>de</strong> otras unida<strong>de</strong>s <strong>de</strong> refrigeración.<br />
En el caso <strong>de</strong> los con<strong>de</strong>nsadores remotos (configuración 2), la empresa contratista <strong>de</strong>berá prever la instalación <strong>de</strong> un<br />
amortiguador y <strong>de</strong> un silenciador entre el compresor y el con<strong>de</strong>nsador (véase la figura 5).<br />
Por lo que se refiere a las unida<strong>de</strong>s <strong>de</strong> con<strong>de</strong>nsación (configuración 4), la empresa contratista <strong>de</strong>berá instalar un colector <strong>de</strong><br />
aceite cada 2/3 metros en altura e inclinar el conducto como mínimo un 1% (véase la figura 6).<br />
Para más información sobre las dimensiones y los pesos, remítase al correspondiente “Manual técnico” relativo a las<br />
unida<strong>de</strong>s exteriores.<br />
La unidad exterior con la configuración 3 se instalará facilitando el acceso al personal <strong>de</strong> mantenimiento, pero sin quedar<br />
expuesta directamente a los elementos atmosféricos, por lo que <strong>de</strong>berá protegerse <strong>de</strong> la lluvia y <strong>de</strong> la escarcha.<br />
05.08 Ref.200989 Rev.100 9
INSTALACIÓN<br />
1) amortiguador<br />
2) silenciador<br />
3) <strong>de</strong>pósito <strong>de</strong> líquido<br />
Fig. 5<br />
2/3 metros 2/3 metros<br />
Min. 1%<br />
Fig. 6<br />
10 05.08 Ref.200989 Rev.100
INSTALACIÓN<br />
CONEXIONES DEL CIRCUITO DE REFRIGERACIÓN (para las configuraciones 2-3-4-7-8-9)<br />
El circuito <strong>de</strong> refrigeración interno <strong>de</strong> las unida<strong>de</strong>s <strong>de</strong> aire acondicionado sale listo <strong>de</strong> la fábrica. Des<strong>de</strong> el interior <strong>de</strong> la<br />
unidad pue<strong>de</strong> acce<strong>de</strong>rse a los puntos <strong>de</strong> conexión <strong>de</strong> terminales, que están cerrados mediante válvulas <strong>de</strong> corte.<br />
Las únicas conexiones necesarias en el lugar <strong>de</strong> instalación son las que se encuentran entre la unidad interior y la remota (o<br />
exterior).<br />
Las dimensiones <strong>de</strong> los conductos <strong>de</strong>berían calcularse en función <strong>de</strong> la distancia y <strong>de</strong> las caídas <strong>de</strong> presión <strong>de</strong>bidas a las<br />
curvas, a los colectores <strong>de</strong> aceite, etc. De cualquier forma, en el Apéndice III se incluyen algunos datos indicativos.<br />
Para llevar a cabo estas líneas <strong>de</strong> refrigeración hay que tener presente los siguientes puntos:<br />
- usar únicamente tuberías <strong>de</strong> cobre y asegurarse <strong>de</strong> que sus dimensiones sean correctas en función <strong>de</strong> la capacidad<br />
refrigerante;<br />
- para evitar las vibraciones, las tuberías no <strong>de</strong>berán tocarse entre ellas cuando hayan sido colocadas unas al lado <strong>de</strong><br />
otras.<br />
ADVERTENCIA: Cuando realice el tendido <strong>de</strong>l conducto refrigerante, asegúrese <strong>de</strong> que la tubería <strong>de</strong> suministro <strong>de</strong><br />
gas esté perfectamente aislada, pues las altas temperaturas podrían provocar quemaduras.<br />
- Cuando sea necesario un cambio <strong>de</strong> dirección en el conducto, habrá que hacerlo con curvas <strong>de</strong> gran radio y no con<br />
codos (esto reducirá notablemente las caídas <strong>de</strong> presión y los niveles <strong>de</strong> ruido); el radio <strong>de</strong>bería ser, como mínimo,<br />
igual al diámetro <strong>de</strong> la tubería.<br />
- Limpiar y secar los conductos cuidadosamente purgándolos con nitrógeno.<br />
- Si no está seguro <strong>de</strong> haber lavado y secado bien el circuito, es aconsejable que instale el filtro <strong>de</strong>shidratador en el<br />
conducto <strong>de</strong>l líquido (para la Conf. 2) o en el conducto <strong>de</strong>l gas (para las Conf. 3 y 4).<br />
- El filtro usado <strong>de</strong>berá permitir una correcta inspección así como la sustitución <strong>de</strong>l cartucho <strong>de</strong>shidratador.<br />
- Es posible que este cartucho <strong>de</strong>shidratador <strong>de</strong>ba ser sustituido varias veces antes <strong>de</strong> que todo el circuito se<br />
consi<strong>de</strong>re limpio.<br />
- También es recomendable <strong>de</strong>jar instalado el último <strong>de</strong> estos cartuchos funcionando al menos 48 horas antes <strong>de</strong><br />
quitarlo y liberar el conducto.<br />
RECUERDE QUE LA PRINCIPAL CAUSA DE DAÑOS GRAVES EN EL COMPRESOR SE DEBE ESENCIALMENTE A<br />
UNA MALA OPERACIÓN DE LIMPIEZA Y DE SECADO DEL CONDUCTO DE REFRIGERACIÓN.<br />
- En el conducto <strong>de</strong>bería instalarse un punto <strong>de</strong> conexión para crear un vacío antes <strong>de</strong> que las válvulas <strong>de</strong> la unidad<br />
interior se abran, pues las unida<strong>de</strong>s HITECSA ya llegan a su <strong>de</strong>stino cargadas con el gas refrigerante. El tipo <strong>de</strong> gas<br />
se indica en la unidad.<br />
- Una vez que las conexiones estén terminadas y haya sido creado un vacío en los conductos, recargaremos estos<br />
últimos con gas freón (sea cual sea el tipo usado en la unidad) y comprobaremos que no haya fugas ni en los<br />
empalmes ni en la instalación (usando un apropiado <strong>de</strong>tector <strong>de</strong> fugas).<br />
- Si se <strong>de</strong>tectasen fugas, <strong>de</strong>berían repararse y comprobarse antes <strong>de</strong> crear nuevamente el vacío en los conductos.<br />
ADVERTENCIA: si la unidad <strong>de</strong> con<strong>de</strong>nsación (para las Conf. 3 y 4) se instala en una posición más elevada con respecto a<br />
la unidad interior, será necesario colocar colectores <strong>de</strong> aceite en la línea <strong>de</strong>l gas para garantizar los retornos <strong>de</strong> aceite al<br />
compresor (un colector <strong>de</strong> aceite cada 2-3 metros en altura; véase la fig. 6).<br />
Por lo que se refiere a las dimensiones correctas <strong>de</strong> los conductos, remítase a las indicaciones incluidas en las<br />
tablas facilitadas por HITECSA para distancias que no superen los 10 metros; si la distancia fuese superior a 10<br />
metros, <strong>de</strong>bería consular a nuestro Departamento <strong>de</strong> Ingeniería o a un especialista en sistemas <strong>de</strong> refrigeración.<br />
05.08 Ref.200989 Rev.100 11
INSTALACIÓN<br />
VACÍO DEL CIRCUITO DE REFRIGERACIÓN<br />
La creación <strong>de</strong> un vacío es un proceso largo durante el que <strong>de</strong>bería tener en cuenta los siguientes puntos:<br />
- Use únicamente una bomba <strong>de</strong> vacío cuya eficiencia haya podido comprobar; si tuviese dudas respecto a su<br />
eficiencia, verifique el vacío creado antes <strong>de</strong> conectarlo al circuito.<br />
- Deberían alcanzarse y mantenerse durante como mínimo una hora 1 mBar con R22 y, al menos, 0,3 mBar<br />
con R407c o R134 (en circuitos largos, incluso más tiempo, hasta que la humedad sea inferior a los 10 ppm).<br />
- Para comprobar el vacío no es necesario el uso <strong>de</strong> manómetros.<br />
- Conecte la bomba a los dos puntos <strong>de</strong> conexión previamente preparados.<br />
- Arranque la bomba y compruebe que gira en la dirección correcta.<br />
- Sujete la bomba con algo pesado durante la primera hora <strong>de</strong> <strong>funcionamiento</strong>, como mínimo.<br />
- Si no se ha instalado una válvula <strong>de</strong> seguridad automática, no abandone la instalación mientras la bomba esté<br />
funcionando, ya que si esta última se parase, por un corte <strong>de</strong> corriente o cualquier otra razón, su aceite retroce<strong>de</strong>ría<br />
al circuito <strong>de</strong> refrigeración.<br />
- Recuer<strong>de</strong> que el vacío en una instalación <strong>de</strong>berá alcanzar los niveles indicados en la sección 4.1 y que la bomba<br />
tendrá que funcionar durante al menos otra hora y <strong>de</strong> vez en cuando liberando parte <strong>de</strong> la carga.<br />
PREPARATIVOS PARA CARGAR EL REFRIGERANTE EN LA INSTALACIÓN<br />
Recuer<strong>de</strong> que las unida<strong>de</strong>s <strong>de</strong> expansión directa <strong>de</strong> HITECSA, a menos que se especifique algo diferente en el pedido, se<br />
suministran siempre con una carga completa <strong>de</strong> freón; por lo tanto, sólo se necesitaría refrigerante para completar la carga<br />
<strong>de</strong> la tubería <strong>de</strong> la instalación.<br />
Para llevar a cabo esta operación, tendrá que realizar los siguientes pasos:<br />
- Colocar un manómetro en la válvula <strong>de</strong> erogación <strong>de</strong>l compresor y girarlo en el sentido <strong>de</strong> las agujas <strong>de</strong>l reloj.<br />
- Conectar el cilindro y el manómetro a la válvula <strong>de</strong> aspiración.<br />
- Eliminar el aire <strong>de</strong> los conductos situados entre el cilindro y el racor <strong>de</strong> conexión eyectando gas <strong>de</strong>s<strong>de</strong> el cilindro al<br />
conducto y aflojando ligeramente la conexión entre el racor y la válvula <strong>de</strong> succión.<br />
- Ajustar nuevamente la conexión a la válvula <strong>de</strong> succión y, con el cilindro abierto, dar dos vueltas completas a la<br />
válvula <strong>de</strong> succión <strong>de</strong>l compresor en el sentido <strong>de</strong> las agujas <strong>de</strong>l reloj .<br />
- PRECAUCIÓN: cuando se vaya a proce<strong>de</strong>r al llenado <strong>de</strong>l circuito con R22 o R134a, es recomendable hacerlo con el<br />
refrigerante en estado gaseoso para así evitar emulsionar el aceite y el retorno <strong>de</strong>l líquido a las válvulas <strong>de</strong>l<br />
compresor; en cambio, con el R407c, al ser una mezcla compuesta <strong>de</strong><br />
23% R32 (CH 2 F 2 )<br />
25% R125 (CH 3 -CHF 3 )<br />
52% R134a (CF 3 -CH 2 F),<br />
todos ellos gases volátiles en diferentes grados, el circuito <strong>de</strong>berá llenarse con el refrigerante en estado líquido para<br />
asegurarnos <strong>de</strong> que los porcentajes sean los indicados anteriormente.<br />
La operación <strong>de</strong> carga <strong>de</strong>l refrigerante <strong>de</strong> un acondicionador <strong>de</strong> aire <strong>de</strong>berá realizarla un técnico especializado en<br />
aire acondicionado y siempre con sumo cuidado.<br />
- Abrir la válvula <strong>de</strong> cierre <strong>de</strong> la unidad interior y la <strong>de</strong> la unidad exterior.<br />
PUNTOS IMPORTANTES PARA LA PUESTA EN MARCHA DE LOS COMPRESORES<br />
Para aquellas unida<strong>de</strong>s cuyos compresores tengan una capacidad superior a los 2 HP (1,4 kW), es absolutamente<br />
necesario, antes <strong>de</strong> su puesta en marcha, realizar un precalentamiento inicial <strong>de</strong>l aceite contenido en el compresor.<br />
La duración <strong>de</strong> esta fase <strong>de</strong> precalentamiento no <strong>de</strong>berá ser inferior en ningún caso al requisito mínimo <strong>de</strong> 6 horas.<br />
El precalentamiento se efectúa encendiendo el interruptor principal externo para suministrar energía a la unidad.<br />
Durante esta fase, el controlador <strong>de</strong> la unidad <strong>de</strong>berá <strong>de</strong>jarse en la posición “OFF”, lo que significa que el<br />
compresor no <strong>de</strong>be ponerse en <strong>funcionamiento</strong>.<br />
Una vez transcurrido el periodo <strong>de</strong> seis horas, podrá poner en marcha el compresor evitando tocar el cárter <strong>de</strong> aceite pues<br />
estará caliente.<br />
Compruebe que todas las conexiones eléctricas hayan sido realizadas correctamente, que los tornillos terminales estén<br />
apretados y que la tensión <strong>de</strong> alimentación sea la misma indicada en la etiqueta <strong>de</strong> i<strong>de</strong>ntificación <strong>de</strong> la unidad. Tras todas<br />
estas comprobaciones podrá poner en marcha el compresor.<br />
Es muy probable que el compresor se <strong>de</strong>tenga casi inmediatamente <strong>de</strong>spués <strong>de</strong> haberlo arrancado, y esto se <strong>de</strong>be a la<br />
intervención <strong>de</strong>l interruptor <strong>de</strong> baja presión ya que el circuito sólo está parcialmente cargado.<br />
12 05.08 Ref.200989 Rev.100
INSTALACIÓN<br />
Mientras sigue el <strong>funcionamiento</strong>, compruebe los manómetros (<strong>de</strong> alta y <strong>de</strong> baja presión) así como el visor <strong>de</strong> nivel<br />
<strong>de</strong> líquido, parando temporalmente el cilindro.<br />
En función <strong>de</strong>l tipo <strong>de</strong> controlador <strong>de</strong>l con<strong>de</strong>nsador instalado, la presión <strong>de</strong> con<strong>de</strong>nsación durante el <strong>funcionamiento</strong> pue<strong>de</strong><br />
ser más o menos estable:<br />
- Cuando se haya instalado un controlador MODULANTE (config. 2 - 4), la presión se mantendrá estable a un valor<br />
aproximado <strong>de</strong> 16 bar (R22 y R407c) o los 10 bar (R134a).<br />
- Cuando se haya instalado un controlador <strong>de</strong>l con<strong>de</strong>nsador ON - OFF (config. 2 - 4), la presión alcanzará los 16 bar y<br />
<strong>de</strong>spués <strong>de</strong>scen<strong>de</strong>rá más o menos rápidamente <strong>de</strong>pendiendo <strong>de</strong> la temperatura <strong>de</strong>l aire.<br />
- En las configuraciones 1 y 3 en que el controlador <strong>de</strong> presión <strong>de</strong> con<strong>de</strong>nsación está equipado con una válvula <strong>de</strong><br />
presión que <strong>de</strong>be usarse con agua buena, la válvula <strong>de</strong> presión <strong>de</strong>berá ser ajustada tal como se indica en la Figura<br />
9; si se usa, en cambio, agua proce<strong>de</strong>nte <strong>de</strong> una torre <strong>de</strong> refrigeración en un circuito cerrado, la instalación <strong>de</strong>berá<br />
disponer <strong>de</strong> un controlador <strong>de</strong> la temperatura <strong>de</strong>l agua entrante en el con<strong>de</strong>nsador.<br />
- Si la presión <strong>de</strong> con<strong>de</strong>nsación supera los 19 bar (R22 y R07c) o los 10 bar (R134a), hay que parar el compresor y<br />
comprobar el con<strong>de</strong>nsador, el cual, casi con toda seguridad, no estará siendo enfriado lo suficiente.<br />
- En el caso en que se verifique un temperatura <strong>de</strong> con<strong>de</strong>nsación alta con con<strong>de</strong>nsadores <strong>de</strong> agua, habrá que<br />
comprobar tanto la temperatura <strong>de</strong>l agua que entra en el con<strong>de</strong>nsador como la que sale y, si fuese necesario,<br />
ajustar la válvula <strong>de</strong> control <strong>de</strong>l flujo <strong>de</strong> agua.<br />
- La presión <strong>de</strong> aspiración variará paralelamente con la presión <strong>de</strong> alimentación.<br />
Durante el periodo en que el circuito no está completamente cargado, será posible notar:<br />
• a través <strong>de</strong>l visor <strong>de</strong> nivel, un liquido blanco opaco burbujeante que pasa rápidamente;<br />
• que la batería <strong>de</strong> expansión directa sólo está fría en su tramo cercano al tubo <strong>de</strong>l distribuidor (que podría<br />
estar incluso helado), mientras que las tuberías <strong>de</strong> retorno al compresor ya no lo están.<br />
Mientras continua el proceso <strong>de</strong> carga, el líquido que hemos visto a través <strong>de</strong>l visor se irá aclarando y se llenará con el<br />
refrigerante en su estado líquido. Entonces <strong>de</strong>berán ejecutarse los siguientes pasos:<br />
- parar el compresor;<br />
- cerrar el cilindro y comprobar que el manómetro situado en la línea <strong>de</strong> aspiración indica una presión superior a los 4<br />
bar (R22 y R407c) o a los 1 bar (R134a);<br />
- volver a poner en marcha el compresor;<br />
- seguir con el proceso <strong>de</strong> carga hasta que sólo se vean por el visor unas pocas burbujas <strong>de</strong> gas freón.<br />
A esta altura el sistema está completamente cargado con gas y es posible quitar el cilindro. Los manómetros, sin embargo,<br />
<strong>de</strong>ben seguir conectados para comprobar que las presiones <strong>de</strong> evaporación y con<strong>de</strong>nsación se ajusten a las presiones <strong>de</strong><br />
ejercicio.<br />
Ejemplo (configuración 2):<br />
Aire entrante en el evaporador +24°C.<br />
Temperatura <strong>de</strong> evaporación +5°C.<br />
Aire entrante en el evaporador +22°C.<br />
Temperatura <strong>de</strong> evaporación +4°C.<br />
Aire entrante en el con<strong>de</strong>nsador +20°C<br />
Temperatura <strong>de</strong> con<strong>de</strong>nsación +38°C.*<br />
Aire entrante en el con<strong>de</strong>nsador +25°C<br />
Temperatura <strong>de</strong> con<strong>de</strong>nsación +43°C.*<br />
Aire entrante en el con<strong>de</strong>nsador +30°C<br />
Temperatura <strong>de</strong> con<strong>de</strong>nsación +48°C.*<br />
Aire entrante en el con<strong>de</strong>nsador +32°C<br />
Temperatura <strong>de</strong> con<strong>de</strong>nsación +50°C.*<br />
Aire entrante en el con<strong>de</strong>nsador +35°C<br />
Temperatura <strong>de</strong> con<strong>de</strong>nsación +52°C.*<br />
05.08 Ref.200989 Rev.100 13
INSTALACIÓN<br />
Por favor, recuer<strong>de</strong>: es posible que se registren diferentes temperaturas <strong>de</strong> con<strong>de</strong>nsación si la unidad <strong>de</strong> aire<br />
acondicionado ha sido dotada con un kit <strong>de</strong> temperatura ambiental baja (modulante).<br />
Para completar correctamente la carga <strong>de</strong>l circuito <strong>de</strong> refrigeración, sobre todo en el caso <strong>de</strong> unida<strong>de</strong>s refrigeradas por aire,<br />
es necesario satisfacer todas las condiciones <strong>de</strong> diseño relativas a la temperatura <strong>de</strong>l líquido <strong>de</strong> con<strong>de</strong>nsación así como<br />
constatar que en el ambiente haya una carga calorífica suficiente; <strong>de</strong> esta forma, el circuito <strong>de</strong> refrigeración funcionará (en<br />
condiciones ambientales <strong>de</strong> proyecto) durante el tiempo suficiente para po<strong>de</strong>r verificar que todo el sistema está trabajando<br />
correctamente.<br />
Por favor, recuer<strong>de</strong>: Si la instalación ha sido cargada con gas refrigerante durante el invierno, no hay que cargar<br />
completamente el circuito para evitar que el sistema se pare durante el verano <strong>de</strong>bido a una presión alta.<br />
Problemas <strong>de</strong>bidos a una carga excesiva <strong>de</strong> gas refrigerante<br />
Una carga <strong>de</strong> gas refrigerante excesiva implicará un <strong>de</strong>sbordamiento <strong>de</strong> parte <strong>de</strong>l con<strong>de</strong>nsador y la consiguiente reducción<br />
<strong>de</strong> la capacidad <strong>de</strong> transferencia <strong>de</strong> calor <strong>de</strong> la batería. De hecho, esto representa una reducción <strong>de</strong> la superficie total<br />
disponible <strong>de</strong> la batería <strong>de</strong>l con<strong>de</strong>nsador. Por lo tanto, la temperatura <strong>de</strong> con<strong>de</strong>nsación será muy alta, mientras la línea <strong>de</strong><br />
líquido que sale <strong>de</strong>l con<strong>de</strong>nsador tendrá una temperatura más baja que la correspondiente a la presión <strong>de</strong> con<strong>de</strong>nsación<br />
(indicada en el manómetro <strong>de</strong> presión).<br />
Comprobación <strong>de</strong> la potencia empleada por el compresor<br />
Cuando el equipo esté en pleno <strong>funcionamiento</strong> y haya alcanzado la temperatura <strong>de</strong> con<strong>de</strong>nsación máxima <strong>de</strong> 52°C (19<br />
kg/cm²) (esta temperatura <strong>de</strong> con<strong>de</strong>nsación es generalmente la más alta registrada en unida<strong>de</strong>s <strong>de</strong> refrigeradas por aire), el<br />
motor <strong>de</strong>l compresor registrará una entrada inferior al valor “FLA” (Full Load Amperes - plena carga en Amperios) indicado<br />
en la placa <strong>de</strong> i<strong>de</strong>ntificación <strong>de</strong>l compresor.<br />
Si la entrada es igual o superior al valor indicado en la placa, es el resultado <strong>de</strong> una alimentación eléctrica equivocada (una<br />
caída excesiva en las líneas <strong>de</strong> alimentación) o bien <strong>de</strong> unas temperaturas <strong>de</strong> expansión y con<strong>de</strong>nsación muy altas <strong>de</strong>bidas<br />
a un error en la instalación o <strong>de</strong> la carga <strong>de</strong> gas <strong>de</strong>l sistema.<br />
CONEXIONES DEL CIRCUITO HIDRÁULICO<br />
Todos los mo<strong>de</strong>los en todas las configuraciones <strong>de</strong>ben disponer, <strong>de</strong>ntro <strong>de</strong> la unidad interior, <strong>de</strong> una salida para el líquido<br />
con<strong>de</strong>nsado con un diámetro <strong>de</strong> ¾”.<br />
Esta salida o drenaje <strong>de</strong>be tener una inclinación a<strong>de</strong>cuada ya que drena por la fuerza <strong>de</strong> la gravedad y no <strong>de</strong>be conectarse<br />
con otras salidas que estén bajo presión.<br />
Es aconsejable el uso <strong>de</strong> un sifón para evitar los malos olores proce<strong>de</strong>ntes <strong>de</strong>l conducto <strong>de</strong> <strong>de</strong>scarga.<br />
Para todos los mo<strong>de</strong>los en todas las configuraciones que estén equipados con un humidificador, hay que suministrar a la<br />
unidad interior agua corriente <strong>de</strong>l grifo que no haya sido tratada. El agua se suministrará a través <strong>de</strong> unos a<strong>de</strong>cuados tubos<br />
<strong>de</strong> plástico o PVC con un diámetro <strong>de</strong> 6 mm y dotados <strong>de</strong> una válvula <strong>de</strong> cierre.<br />
La presión <strong>de</strong> suministro <strong>de</strong> agua <strong>de</strong>be estar comprendida entre los 1,5 y los 5 Bar.<br />
También hay que prever un conducto <strong>de</strong> drenaje a<strong>de</strong>cuadamente inclinado y con un diámetro <strong>de</strong> ¾”.<br />
Advertencia: este sumi<strong>de</strong>ro <strong>de</strong>scarga agua con una temperatura aproximada <strong>de</strong> 100°C, por lo que el tubo empleado <strong>de</strong>berá<br />
ser resistente al calor.<br />
En las configuraciones <strong>de</strong> equipo 1-3-5-6 cuyos con<strong>de</strong>nsadores y serpentines <strong>de</strong> enfriamiento y calentamiento necesiten<br />
suministro <strong>de</strong> agua, las tuberías <strong>de</strong>berán presentar unos diámetros y dimensiones que se ajusten a los caudales indicados<br />
en los diagramas individuales <strong>de</strong> las unida<strong>de</strong>s A/C y estar a<strong>de</strong>cuadamente aisladas y equipadas con válvulas <strong>de</strong> cierre.<br />
CONEXIONES ELÉCTRICAS<br />
Cada unidad A/C se suministra con su esquema eléctrico; por lo tanto, todas las conexiones <strong>de</strong> cableado <strong>de</strong>berán<br />
efectuarse siguiendo las indicaciones <strong>de</strong> dichos esquemas. Las dimensiones <strong>de</strong> las secciones <strong>de</strong> los cables <strong>de</strong>berán<br />
adaptarse a<strong>de</strong>cuadamente a la potencia <strong>de</strong> la unidad y a la longitud <strong>de</strong> la línea para mantener <strong>de</strong>ntro <strong>de</strong> los límites<br />
prescritos cualquier posible bajada <strong>de</strong>l suministro eléctrico.<br />
La línea <strong>de</strong> suministro eléctrico <strong>de</strong>berá estar protegida contra cortocircuitos.<br />
14 05.08 Ref.200989 Rev.100
INSTALACIÓN<br />
Si tanto la unidad interna como la externa se suministran, en conformidad con la solicitud, sin interruptores principales, el<br />
contratista que instale el equipo <strong>de</strong>berá colocar interruptores principales cerca <strong>de</strong> cada una <strong>de</strong> ellas (<strong>de</strong> acuerdo con la<br />
normativa <strong>de</strong> seguridad eléctrica <strong>de</strong>l país en el que se vayan a instalar las unida<strong>de</strong>s).<br />
Las unida<strong>de</strong>s A/C y los con<strong>de</strong>nsadores se suministran con bornes <strong>de</strong> tierra, que <strong>de</strong>berán conectarse correctamente a tierra<br />
para evitar acci<strong>de</strong>ntes.<br />
Compruebe los esquemas <strong>de</strong> cableado eléctrico para realizar una correcta instalación entre la unidad interna y la externa.<br />
El contratista que instale el equipo <strong>de</strong>berá verificar que el suministro eléctrico equivale al indicado en la placa <strong>de</strong><br />
i<strong>de</strong>ntificación <strong>de</strong> las unida<strong>de</strong>s A/C así como en los esquemas eléctricos facilitados.<br />
El fabricante no será responsable <strong>de</strong> ningún tipo <strong>de</strong> daño si no se siguen correctamente las indicaciones anteriores.<br />
INSTALACIÓN DE LA UNIDADES DE AGUA FRÍA<br />
La unida<strong>de</strong>s <strong>de</strong> aire acondicionado que funcionan con agua enfriada y / o que tienen baterías <strong>de</strong> agua caliente <strong>de</strong>berán<br />
empalmarse con una toma <strong>de</strong> agua (agua caliente y fría) tal como se indica en los diagramas facilitados junto con la unidad.<br />
Todos los circuitos tendrán la posibilidad <strong>de</strong> ser aislados; asimismo <strong>de</strong>berán instalarse válvulas <strong>de</strong> cierre en los puntos más<br />
bajos <strong>de</strong>l circuito para facilitar las operaciones <strong>de</strong> mantenimiento.<br />
Todos las tuberías para el suministro y el retorno <strong>de</strong>l agua <strong>de</strong>berán estar perfectamente aisladas para evitar la dispersión <strong>de</strong><br />
calor y la formación <strong>de</strong> con<strong>de</strong>nsación.<br />
Compruebe que no haya fugas en el circuito, llene la instalación y elimine el aire que pueda haber quedado atrapado en los<br />
circuitos con la ayuda <strong>de</strong> las válvulas <strong>de</strong> escape presentes normalmente en el colector <strong>de</strong> la batería o en cualquier otro<br />
punto alto <strong>de</strong>l circuito.<br />
Si la unidad se suministra con una válvula motorizada, compruebe que el servomotor funciona correctamente y que la<br />
apertura <strong>de</strong> la válvula está sincronizada con la <strong>de</strong>manda <strong>de</strong> refrigeración.<br />
La <strong>de</strong>scarga <strong>de</strong> con<strong>de</strong>nsación, las conexiones con el humidificador así como las conexiones eléctricas han sido <strong>de</strong>scritas en<br />
los capítulos anteriores.<br />
05.08 Ref.200989 Rev.100 15
INSTALACIÓN<br />
VÁLVULA DIFERENCIAL DE PRESIÓN<br />
A<br />
B<br />
C<br />
D<br />
A Pomo <strong>de</strong> regulación (en el sentido <strong>de</strong> las agujas <strong>de</strong>l reloj, reduce el flujo <strong>de</strong> agua; en el sentido contrario, lo aumenta).<br />
B Dirección <strong>de</strong>l flujo <strong>de</strong> agua.<br />
C Boquilla para conectar el tubo capilar a la línea <strong>de</strong> gas <strong>de</strong>l compresor.<br />
D Tubo capilar.<br />
16 05.08 Ref.200989 Rev.100
INSTALACIÓN<br />
TRANSDUCTOR DE PRESIÓN<br />
El punto <strong>de</strong> <strong>funcionamiento</strong> necesario para una alimentación eléctrica completa (FVS) pue<strong>de</strong> regularse a través <strong>de</strong>l tornillo<br />
(R) <strong>de</strong> los transductores <strong>de</strong> presión.<br />
Éstas son las regulaciones <strong>de</strong> fábrica <strong>de</strong> los transductores P35AC:<br />
8 - 14 bar = 10 bar (=FVS)<br />
14 - 24 bar = 16 bar (=FVS)<br />
Velocidad mínima<br />
Con el objetivo <strong>de</strong> evitar que la velocidad <strong>de</strong>l ventilador se sitúe por <strong>de</strong>bajo <strong>de</strong> los niveles aceptables, la potencia <strong>de</strong> la<br />
velocidad mínima (Vrms) pue<strong>de</strong> ser ajustada entre el 45% y el 90% <strong>de</strong> la alimentación eléctrica mediante el pomo <strong>de</strong><br />
regulación <strong>de</strong>l módulo electrónico P38AA.<br />
El valor <strong>de</strong> la velocidad mínima se refleja en la banda proporcional: el más alto equivale a la velocidad mínima y el más bajo<br />
a la banda proporcional actual.<br />
Punto <strong>de</strong> corte<br />
Si el controlador no necesita funcionar a la velocidad mínima, situaremos el pomo que está en el módulo electrónico en el<br />
punto <strong>de</strong> corte. La alimentación al motor se cortará en el momento en que la presión <strong>de</strong>scienda por <strong>de</strong>bajo <strong>de</strong>l valor <strong>de</strong>l<br />
punto <strong>de</strong> <strong>funcionamiento</strong> necesario menos la banda proporcional (las paradas <strong>de</strong>l ventilador).<br />
El controlador se ajusta en la fábrica para que el ventilador pueda funcionar entre el 0 y el 100% <strong>de</strong> su velocidad, ya que los<br />
ventiladores usados normalmente pue<strong>de</strong>n trabajar en todo el rango <strong>de</strong> tensión.<br />
Control <strong>de</strong>l sistema<br />
Cuando la unidad <strong>de</strong> control haya sido instalada y ajustada, compruebe el sistema haciéndolo trabajar durante al menos un<br />
ciclo completo. Si algo no funcionase correctamente, <strong>de</strong>berá comprobar tanto el cableado como los diferentes componentes.<br />
05.08 Ref.200989 Rev.100 17
INSTALACIÓN<br />
CONTROL DE PRESIÓN MODULANTE<br />
3<br />
1<br />
2<br />
Control <strong>de</strong> presión modulante<br />
1. Tornillo para el ajuste <strong>de</strong> corrección (punto <strong>de</strong> ajuste)<br />
2. Regleta <strong>de</strong> terminales<br />
3. Ajuste <strong>de</strong> la velocidad mínima (corte)<br />
Ajustes:<br />
a. para aumentar la presión: girar el tornillo 1 en la dirección <strong>de</strong> las agujas <strong>de</strong>l reloj;<br />
b. corte: ajustar en OFF y la velocidad <strong>de</strong>l ventilador pasará <strong>de</strong>l 0% al 100% en función <strong>de</strong> la presión <strong>de</strong><br />
con<strong>de</strong>nsación; en cambio, si se gira en la dirección <strong>de</strong> las agujas <strong>de</strong>l reloj es posible regular la velocidad<br />
mínima <strong>de</strong>l ventilador.<br />
El controlador se ajusta en la fábrica para que el ventilador pueda funcionar entre el 0 y el 100% <strong>de</strong> su velocidad, ya que los<br />
ventiladores usados normalmente pue<strong>de</strong>n trabajar en todo el rango <strong>de</strong> tensión.<br />
18 05.08 Ref.200989 Rev.100
PUESTA EN MARCHA<br />
MÉTODO DE PUESTA EN MARCHA Y LISTA DE CONTROL<br />
La carga <strong>de</strong> refrigerante en los sistemas refrigerados por aire y en los split es un aspecto muy importante en el<br />
<strong>funcionamiento</strong> correcto <strong>de</strong> toda la instalación; por lo tanto, este proceso <strong>de</strong>berá estar en manos <strong>de</strong> un técnico frigorista que<br />
siga las indicaciones facilitadas anteriormente. El sistema sólo podrá cargarse con el gas refrigerante indicado en la etiqueta<br />
<strong>de</strong> i<strong>de</strong>ntificación <strong>de</strong> la unidad.<br />
PUESTA EN MARCHA DE LA SECCIÓN DEL VENTILADOR<br />
Compruebe que la alimentación, tal como se prescribe en el diseño <strong>de</strong> sistema, llegue a los terminales R, S y T, que el<br />
neutro esté conectado al terminal N y que el circuito esté conectado a<strong>de</strong>cuadamente a tierra.<br />
Si temporalmente no existe la necesidad <strong>de</strong> que funcionen las restantes partes <strong>de</strong>l sistema <strong>de</strong> aire acondicionado (que, en<br />
función <strong>de</strong> las condiciones ambientales, podrían ponerse en marcha automáticamente), <strong>de</strong>sconecte los interruptores<br />
correspondientes.<br />
Para poner en marcha los ventiladores, presione el botón ON si la unidad está equipada con un regulador por<br />
microprocesador; si no fuese así, active los ventiladores accionando el conmutador situado en la parte frontal <strong>de</strong> la unidad<br />
interior.<br />
IMPORTANTE En las unida<strong>de</strong>s CED, los motores <strong>de</strong>l ventilador son casi siempre monofásicos, por lo que la dirección<br />
<strong>de</strong> rotación llega ajustada <strong>de</strong> fábrica. En otras unida<strong>de</strong>s especiales o en unida<strong>de</strong>s CEM, los motores <strong>de</strong>l ventilador son<br />
trifásicos, por lo que habrá que comprobar la dirección correcta <strong>de</strong> rotación. Para ver si un motor es monofásico o trifásico,<br />
es suficiente con consultar los esquemas eléctricos suministrados junto con la unidad.<br />
Cuando se usen ventiladores <strong>de</strong> transmisión por correa, habrá que comprobar la tensión <strong>de</strong> las correas y la alineación <strong>de</strong> las<br />
poleas, incluso si éstas se comprueban siempre durante las pruebas <strong>de</strong> fábrica (véase la sección <strong>de</strong> MANTENIMIENTO).<br />
LOS VENTILADORES NO DEBERÁN FUNCIONAR CON EL PANEL ABIERTO DURANTE MÁS DE 20 SEGUNDOS.<br />
Verifique la potencia <strong>de</strong> entrada <strong>de</strong> los motores <strong>de</strong>l ventilador: <strong>de</strong>berá estar <strong>de</strong>ntro <strong>de</strong> los valores indicados en la placa <strong>de</strong><br />
i<strong>de</strong>ntificación <strong>de</strong> los motores.<br />
Si la alimentación o corriente absorbida es mayor <strong>de</strong>bido a que las caídas <strong>de</strong> presión externas han sido exageradas,<br />
entonces será necesario bloquear parte <strong>de</strong>l suministro o <strong>de</strong>l flujo <strong>de</strong> retorno, o incluso bloquear parte <strong>de</strong>l paso <strong>de</strong> aire en la<br />
boca <strong>de</strong>l ventilador, para así llegar a los límites indicados en la etiqueta <strong>de</strong> i<strong>de</strong>ntificación. Si el ventilador cuenta con un<br />
motor monofásico (CED), será posible ajustar el flujo <strong>de</strong> aire con la ayuda <strong>de</strong> un regulador <strong>de</strong> velocidad (siempre y cuando<br />
esté instalado).<br />
PUESTA EN MARCHA DE LA SECCIÓN DEL COMPRESOR<br />
Cierre los interruptores abiertos durante la puesta en marcha <strong>de</strong> la sección <strong>de</strong>l ventilador y compruebe que todo el cableado<br />
esté bien atornillado en su terminal.<br />
Realice todos los ajustes en el regulador por microprocesador o, si no estuviese instalado, en el termostato para provocar la<br />
puesta en marcha <strong>de</strong>l compresor.<br />
Los compresores sólo funcionarán si las condiciones ambientales sobrepasan los límites fijados en el controlador <strong>de</strong><br />
temperatura <strong>de</strong> la unidad interior.<br />
Compruebe que los conmutadores <strong>de</strong> relé (que controlan los retrasos/intervalos <strong>de</strong> tiempo <strong>de</strong> las puestas en marcha <strong>de</strong> los<br />
compresores) hayan sido programados con intervalos mínimos <strong>de</strong> tres minutos entre cada puesta en marcha para evitar que<br />
un compresor arranque con <strong>de</strong>masiada frecuencia.<br />
En unida<strong>de</strong>s con más <strong>de</strong> un compresor, también es una buena i<strong>de</strong>a programar los conmutadores <strong>de</strong> relé con diferentes<br />
intervalos <strong>de</strong> tiempo para evitar que los compresores se pongan en marcha a la vez. En el caso <strong>de</strong> los acondicionadores <strong>de</strong><br />
aire equipados con un regulador por microprocesador, el retraso/intervalo <strong>de</strong> tiempo ya ha sido programado en el mismo<br />
regulador; los retrasos o intervalos <strong>de</strong> tiempo están reflejados en el manual específico <strong>de</strong>l regulador por microprocesador.<br />
La puesta en marcha <strong>de</strong> los compresores provocará el arranque <strong>de</strong>l ventilador(es) <strong>de</strong>l con<strong>de</strong>nsador una vez que el<br />
interruptor <strong>de</strong> alta presión o el regulador modulante <strong>de</strong>l con<strong>de</strong>nsador hayan dado su consentimiento.<br />
Los ajustes en los reguladores <strong>de</strong> presión se realizan normalmente en fábrica. Si <strong>de</strong>sea cambiarlos o reajustarlos, <strong>de</strong>berá<br />
llevar a cabo cuanto sigue:<br />
05.08 Ref.200989 Rev.100 19
PUESTA EN MARCHA<br />
• regulador ON-OFF <strong>de</strong> la presión <strong>de</strong> con<strong>de</strong>nsación: seleccionar nuevamente el ajuste en el conmutador <strong>de</strong> presión;<br />
• regulador electrónico MODULANTE <strong>de</strong> la presión <strong>de</strong> con<strong>de</strong>nsación: girar el transductor en la dirección <strong>de</strong> las<br />
agujas <strong>de</strong>l reloj para aumentar la presión <strong>de</strong> con<strong>de</strong>nsación y en la dirección contraria para reducirla. En las figuras<br />
10/11 se facilitan algunas indicaciones relativas a los diferentes tipos <strong>de</strong> reguladores <strong>de</strong> la presión <strong>de</strong> con<strong>de</strong>nsación<br />
usados más habitualmente.<br />
Compruebe, por un lado, que la potencia absorbida <strong>de</strong> los compresores sea inferior a la indicada en la placa <strong>de</strong><br />
i<strong>de</strong>ntificación y, por otro, que la carga <strong>de</strong> gas refrigerante esté completa.<br />
PUESTA EN MARCHA DE LOS CALENTADORES ELÉCTRICOS Y DE LA SECCIÓN DEL HUMIDIFICADOR<br />
Las unida<strong>de</strong>s A/C sólo funcionarán si los ajustes, en lo que concierne a las condiciones ambientales, lo requieren, ya estén<br />
equipadas las unida<strong>de</strong>s con un regulador por microprocesador o con un sencillo controlador eléctrico.<br />
Una vez que las unida<strong>de</strong>s hayan sido puestas en marcha, compruebe que la potencia absorbida por los diferentes<br />
componentes no sobrepase los valores <strong>de</strong>l proyecto.<br />
Asegúrese <strong>de</strong> que los termostatos <strong>de</strong> seguridad <strong>de</strong> los calentadores eléctricos hayan sido programados entre los 70 y los<br />
80°C.<br />
Los humidificadores <strong>de</strong>berán tener suministro <strong>de</strong> agua potable doméstica y los tubos serán <strong>de</strong> plástico o PVC (RILSAN) con<br />
un diámetro <strong>de</strong> 6 mm. La presión oscilará entre los 1,5 bar y los 5 bar.<br />
El suministro <strong>de</strong> agua para el humidificador no <strong>de</strong>berá ser tratado químicamente ni <strong>de</strong> ninguna otra forma.<br />
IMPORTANTE: Cuando conecte los tubos al humidificador, asegúrese <strong>de</strong> que en su interior no que<strong>de</strong> rastro <strong>de</strong><br />
suciedad ni <strong>de</strong> otro material. I<strong>de</strong>almente, <strong>de</strong>spués <strong>de</strong> que la unidad haya sido puesta en marcha y funcionado durante un<br />
breve lapso <strong>de</strong> tiempo, habría que quitar la válvula solenoi<strong>de</strong> <strong>de</strong>l humidificador, purgar algo <strong>de</strong> agua, limpiar la base, la<br />
válvula misma y el filtro para tener la certeza <strong>de</strong> que en los tubos no queda rastro <strong>de</strong> suciedad o <strong>de</strong> otro material (<strong>de</strong> lo<br />
contrario, la válvula y su base podrían estropearse y verificarse pérdidas).<br />
Si <strong>de</strong>sea disponer <strong>de</strong> más información relativa al humidificador, consulte el manual específico así como las indicaciones <strong>de</strong>l<br />
fabricante.<br />
CARGA DEL GAS REFRIGERANTE EN LAS DIFERENTES UNIDADES<br />
Por lo que se respecta a las unida<strong>de</strong>s con con<strong>de</strong>nsadores separados (con<strong>de</strong>nsadores remotos o unida<strong>de</strong>s <strong>de</strong> con<strong>de</strong>nsación<br />
split), los valores indicados hacen referencia a una distancia <strong>de</strong> unos 10 metros entre la unidad interior y la exterior.<br />
Para los circuitos que superan los 10 metros, la cantidad <strong>de</strong> gas refrigerante <strong>de</strong>bería aumentar <strong>de</strong> acuerdo con la longitud y<br />
las dimensiones <strong>de</strong> los conductos.<br />
Por cada kg <strong>de</strong> gas añadido para llenar la tubería, habrá que añadir al compresor 50/80 gr <strong>de</strong> aceite no congelable.<br />
La cantidad <strong>de</strong> aceite <strong>de</strong>pen<strong>de</strong>rá <strong>de</strong>l tipo <strong>de</strong> instalación <strong>de</strong>l sistema, ya permita un retorno <strong>de</strong>l aceite al compresor más o<br />
menos fácilmente.<br />
EL TIPO DE ACEITE ESTÁ SIEMPRE INDICADO EN LA ETIQUETA DEL COMPRESOR – el tipo es SHELL,<br />
generalmente Suniso Oil 3G cuando el gas refrigerante es R22.<br />
Si usa gas R407c o R134a, <strong>de</strong>berá emplear el aceite Poliéster (POE), generalmente EAL Artic 22CC Mobil o<br />
EMKARATE RL32S ICI (estos aceites usados por el mismo gas pue<strong>de</strong>n mezclarse). Evite a cualquier costa que los<br />
aceites entren en contacto con el aire y compruebe que las tuberías hayan sido secadas perfectamente.<br />
En los sistemas que tengan tuberías largas y anchas y/o estén equipados con con<strong>de</strong>nsadores más gran<strong>de</strong>s <strong>de</strong> lo normal,<br />
sería conveniente instalar en el circuito una botella acumuladora <strong>de</strong> líquido adicional para manipular mejor la mayor cantidad<br />
<strong>de</strong> gas refrigerante cargada. Gracias a esta incorporación extra, es posible reunir todo el gas en estos recipientes cuando<br />
<strong>de</strong>ban realizarse operaciones <strong>de</strong> mantenimiento o reparaciones específicas <strong>de</strong>l sistema.<br />
20 05.08 Ref.200989 Rev.100
PUESTA EN MARCHA<br />
HITECSA proporciona sus unida<strong>de</strong>s con una carga completa <strong>de</strong> gas refrigerante. Las tablas siguientes indican la cantidad<br />
<strong>de</strong> gas contenido en la máquina y su con<strong>de</strong>nsador o grupo <strong>de</strong> con<strong>de</strong>nsación. Las cargas <strong>de</strong> gas adicionales podrán ser<br />
necesarias para la instalación, estas adiciones <strong>de</strong>berán ser hechas por el mismo instalador. La cantidad se indica en kg.<br />
CED CED 11.1 CED 13.1 CED 17.1 CED 21.1 CED 24.1<br />
Configuración 1 y 6 1.0 1.1 1.4 1.8 2.1<br />
Configuración 2 3.1 3.6 4.5 5.8 6.3<br />
CED 29.1 CED 33.1 CED 22.2 CED 26.2 CED 32.2<br />
Configuración 1 y 6 2.5 2.8 1.0 1.1 1.4<br />
Configuración 2 8.1 9.0 3.1 3.6 4.5<br />
CEM CEM 20.1 CEM 26.1 CEM 31.1 CEM 36.1 CEM 45.1<br />
Configuración 1 y 6 1.7 2.1 2.5 2.8 3.6<br />
Configuración 2 5.6 6.7 8.1 9.0 11.7<br />
CEM 55.1 CEM 29.2 CEM 35.2 CEM 47.2 CEM 53.2<br />
Configuración 1 y 6 4.2 1.1 1.4 1.8 2.1<br />
Configuración 2 13.5 3.6 4.5 5.8 6.7<br />
CEM 64.2 CEM 70.2 CEM 89.2 CEM 103.2<br />
Configuración 1 y 6 2.5 2.8 3.6 4.2<br />
Configuración 2 8.1 9.0 11.7 13.5<br />
05.08 Ref.200989 Rev.100 21
MANTENIMIENTO<br />
MANTENIMIENTO<br />
Las series CED - CEM - CEW <strong>de</strong> las unida<strong>de</strong>s <strong>de</strong> aire acondicionado HITECSA no necesitan particulares<br />
operaciones <strong>de</strong> mantenimiento ya que todas las piezas móviles <strong>de</strong>scansan sobre cojinetes prelubricados y<br />
herméticos.<br />
Por lo tanto, sólo serán necesarias las siguientes operaciones estándar <strong>de</strong> mantenimiento:<br />
LIMPIEZA DE LOS FILTROS DE AIRE<br />
La frecuencia con que <strong>de</strong>ben limpiarse los filtros <strong>de</strong> aire <strong>de</strong>pen<strong>de</strong>rá en gran parte <strong>de</strong> la suciedad y el polvo acumulado en el<br />
aire suministrado. De cualquier forma, es una buena regla no <strong>de</strong>jar pasar más <strong>de</strong> 15-20 días entre una limpieza y la<br />
siguiente.<br />
Los filtros <strong>de</strong> eficiencia EU4 (estándar en las unida<strong>de</strong>s) pue<strong>de</strong>n limpiarse inyectando aire comprimido en el filtro en la<br />
dirección OPUESTA a la <strong>de</strong>l flujo <strong>de</strong> aire en las unida<strong>de</strong>s A/C (lado <strong>de</strong> salida <strong>de</strong>l aire).<br />
En cambio, si se usa un aspirador, entonces el filtro <strong>de</strong>bería limpiarse por el otro lado, es <strong>de</strong>cir, por don<strong>de</strong> entra el aire en<br />
las unida<strong>de</strong>s A/C (lado <strong>de</strong> entrada <strong>de</strong>l aire).<br />
ADVERTENCIA: Los filtros pue<strong>de</strong>n ser regenerados 3 o 4 veces <strong>de</strong>pendiendo <strong>de</strong> su estado; <strong>de</strong>spués <strong>de</strong>berán<br />
reemplazarse.<br />
He aquí las consecuencias <strong>de</strong>rivadas <strong>de</strong> un filtro excesivamente sucio:<br />
* reducción <strong>de</strong>l flujo <strong>de</strong> aire y <strong>de</strong> la capacidad refrigerante;<br />
* excesiva <strong>de</strong>shumidificación;<br />
* posible escarchado o congelación <strong>de</strong>l serpentín <strong>de</strong> enfriamiento;<br />
* activación <strong>de</strong>l interruptor <strong>de</strong> baja presión y parada <strong>de</strong> la unidad A/C;<br />
* posibles daños en el compresor <strong>de</strong>bido a que el refrigerante no se ha evaporado totalmente volviendo al estado líquido.<br />
En el caso <strong>de</strong> FILTROS DE MANGAS (normalmente con una eficiencia <strong>de</strong> EU5 o superior), <strong>de</strong>berán siempre sustituirse<br />
puesto que no pue<strong>de</strong>n regenerarse. El filtro no podrá usarse cuando la caída <strong>de</strong> presión sea excesivamente alta.<br />
Dispondremos <strong>de</strong> esta última información gracias a un conmutador <strong>de</strong> presión diferencial, que es un accesorio<br />
opcional <strong>de</strong> la unidad (alarma <strong>de</strong> filtro obstruido).<br />
LIMPIEZA DEL HUMIDIFICADOR<br />
Estas operaciones <strong>de</strong> limpieza son más frecuentes durante la estación <strong>de</strong> invierno que en verano.<br />
La frecuencia con que <strong>de</strong>be ser limpiado el humidificador <strong>de</strong>pen<strong>de</strong> <strong>de</strong> las horas <strong>de</strong> <strong>funcionamiento</strong> y <strong>de</strong> las características<br />
<strong>de</strong>l agua, en particular <strong>de</strong> la cantidad <strong>de</strong> sarro acumulada (dureza <strong>de</strong>l agua).<br />
Es muy recomendable, sin embargo, limpiar o, si fuese necesario, sustituir el cilindro <strong>de</strong>l humidificador (botella)<br />
cada 1 o 2 meses o cada 200/400 horas <strong>de</strong> <strong>funcionamiento</strong>.<br />
Si el intervalo fuese mayor que el indicado arriba, también habría que limpiar la válvula solenoi<strong>de</strong> (drenaje), el filtro, la<br />
boquilla y la válvula <strong>de</strong> alimentación así como su reductor <strong>de</strong> presión <strong>de</strong>l agua. La frecuencia con que han <strong>de</strong> efectuarse<br />
estas operaciones se incrementará durante el invierno.<br />
Pue<strong>de</strong> conseguir más información consultando el Manual <strong>de</strong> Instalación y Mantenimiento facilitado por el fabricante <strong>de</strong>l<br />
humidificador.<br />
LIMPIEZA DE LOS CONDENSADORES<br />
Con<strong>de</strong>nsadores <strong>de</strong> agua – Configuraciones 1 - 3 - 6.<br />
Los tubos o las placas por los que fluye el agua <strong>de</strong>ben limpiarse periódicamente para garantizar el buen <strong>funcionamiento</strong> <strong>de</strong>l<br />
con<strong>de</strong>nsador.<br />
La frecuencia <strong>de</strong> la operación <strong>de</strong> limpieza <strong>de</strong>pen<strong>de</strong> <strong>de</strong> la calidad y <strong>de</strong> las características <strong>de</strong>l agua y <strong>de</strong> las horas <strong>de</strong><br />
<strong>funcionamiento</strong>.<br />
22 05.08 Ref.200989 Rev.100
MANTENIMIENTO<br />
La limpieza pue<strong>de</strong> ser química o, en caso <strong>de</strong> con<strong>de</strong>nsadores <strong>de</strong> tubos, mediante el uso <strong>de</strong> cepillos para limpiar el interior <strong>de</strong><br />
los tubos.<br />
También es recomendable analizar el agua y adoptar, si fuese necesario, un a<strong>de</strong>cuado sistema <strong>de</strong> tratamiento <strong>de</strong>l agua para<br />
evitar estratos excesivos, <strong>de</strong>pósitos <strong>de</strong> sarro, la corrosión así como la formación <strong>de</strong> hongos, algas, etc.<br />
Con<strong>de</strong>nsadores <strong>de</strong> aire - Configuraciones 2 - 4.<br />
La superficie <strong>de</strong> aletas <strong>de</strong> la batería <strong>de</strong> con<strong>de</strong>nsación <strong>de</strong>be limpiarse al menos una vez al mes durante el periodo en que el<br />
sistema está funcionando, para evitar la acumulación <strong>de</strong> suciedad o <strong>de</strong> otras materias.<br />
La operación <strong>de</strong> limpieza pue<strong>de</strong> efectuarse manualmente usando un peine o cepillo específico o bien un chorro fuerte <strong>de</strong><br />
agua fría. También es recomendable realizar una limpieza química una vez al año para eliminar incrustaciones y <strong>de</strong>pósitos<br />
oleosos. Si llega a acumularse mucha suciedad, el sistema será forzado a funcionar a una presión muy alta, lo que reducirá<br />
la capacidad refrigerante <strong>de</strong> la unidad interior e incrementará, incluso pudiendo alcanzar niveles peligrosos, la temperatura<br />
<strong>de</strong> con<strong>de</strong>nsación.<br />
Una presión <strong>de</strong> con<strong>de</strong>nsación alta pue<strong>de</strong> provocar daños en el compresor e incluso llegar a parar el sistema.<br />
Periódicamente también habría que apretar los tornillos <strong>de</strong>l ventilador <strong>de</strong>l con<strong>de</strong>nsador, así como controlar que las palas <strong>de</strong>l<br />
ventilador no presenten grietas o corrosión.<br />
ADVERTENCIA: en particular durante la puesta en marcha y los primeros meses <strong>de</strong> <strong>funcionamiento</strong>, es importante<br />
comprobar <strong>de</strong> vez en cuando que todas las uniones <strong>de</strong> tubos (en las válvulas <strong>de</strong> cierre, filtros, válvula <strong>de</strong><br />
expansión, etc.) estén bien selladas. Las vibraciones <strong>de</strong>bidas al <strong>funcionamiento</strong> <strong>de</strong>l equipo y los cambios <strong>de</strong><br />
temperatura pue<strong>de</strong>n favorecer el aflojamiento <strong>de</strong> los tornillos en conexiones <strong>de</strong> tubos abocinadas y la consiguiente<br />
pérdida <strong>de</strong> gas refrigerante.<br />
CONTROL DE LOS VENTILADORES<br />
Para asegurarse <strong>de</strong> que los ventiladores están siempre en buen estado <strong>de</strong> marcha, es aconsejable comprobarlos una vez al<br />
mes.<br />
Hay que comprobar el estado global <strong>de</strong>l ventilador, que no haya puntos <strong>de</strong> corrosión en el cuerpo (éstos pue<strong>de</strong>n limpiarse y<br />
retocarse usando revestimiento al cinc), que el ventilador esté perfectamente fijado al cuerpo <strong>de</strong> la unidad (no flojo) y que los<br />
rodamientos no hagan ruidos extraños.<br />
En el caso <strong>de</strong> las unida<strong>de</strong>s CED con ventiladores <strong>de</strong> transmisión por correa, <strong>de</strong>bería controlarse el estado y la tensión<br />
<strong>de</strong> la correa.<br />
Para modificar la tensión <strong>de</strong> la correa, hay que ajustar la posición <strong>de</strong>l motor. Para llevar a cabo esta operación más<br />
fácilmente, el motor está colocado sobre guías (para movimientos laterales, para alinear las poleas) y sobre una rampa<br />
(para movimientos longitudinales, para tensar la correa).<br />
Cada vez que se modifique la tensión <strong>de</strong> la correa, habrá que cambiar también la alineación <strong>de</strong> las poleas. Para asegurarse<br />
<strong>de</strong> que las poleas están alineadas, pue<strong>de</strong> usarse una simple regla (véase la fig. 7).<br />
Si las poleas tienen grosores diferentes, entonces hay que actuar como en la fig. 8.<br />
ADVERTENCIA: Si la tensión es insuficiente, el <strong>de</strong>sgaste <strong>de</strong> la correa <strong>de</strong> transmisión es más rápido y las roturas<br />
más frecuentes.<br />
Si la tensión es excesiva, se <strong>de</strong>sgastan más rápidamente tanto los rodamientos <strong>de</strong>l motor como los <strong>de</strong>l ventilador.<br />
05.08 Ref.200989 Rev.100 23
MANTENIMIENTO<br />
Fig. 7<br />
Fig. 8<br />
IMPORTANTE: Para tener la seguridad <strong>de</strong> que las operaciones anteriores han sido efectuadas correcta y<br />
eficientemente, es aconsejable, sin embargo, firmar un contrato <strong>de</strong> prestación <strong>de</strong> servicios con un distribuidor<br />
autorizado o empresa <strong>de</strong> servicios <strong>de</strong> HITECSA. Gracias a esto, el usuario tendrá garantizado un servicio <strong>de</strong><br />
mantenimiento programado a cargo <strong>de</strong> personal especializado <strong>de</strong> 2 a 6 intervenciones al año en función <strong>de</strong>l tipo <strong>de</strong><br />
instalación, dimensiones y horas <strong>de</strong> <strong>funcionamiento</strong> <strong>de</strong>l sistema.<br />
24 05.08 Ref.200989 Rev.100
MANTENIMIENTO<br />
ELIMINACIÓN DE PIEZAS Y MATERIALES<br />
Filtros:<br />
Los filtros <strong>de</strong>berían ser juntados, colocados en contenedores herméticos y enviados a un punto <strong>de</strong> recogida autorizado, <strong>de</strong><br />
acuerdo con la normativa en vigor.<br />
Materiales y accesorios <strong>de</strong> goma y <strong>de</strong> plástico: Deberán ser enviados a centros <strong>de</strong> eliminación especializados, tal como<br />
prevé la legislación actual.<br />
Materiales ferrosos:<br />
Deberán ser enviados a centros <strong>de</strong> eliminación especializados, tal como prevé la legislación actual.<br />
Aceites:<br />
La legislación actual prohíbe la <strong>de</strong>scarga <strong>de</strong> aceites en las re<strong>de</strong>s <strong>de</strong> alcantarillado y/o directamente en el medio ambiente.<br />
Todos los aceites <strong>de</strong>berán ser recogidos y llevados a centros <strong>de</strong> eliminación autorizados; nunca <strong>de</strong>berán eliminarse<br />
directamente en el medio ambiente.<br />
Este producto es i<strong>de</strong>al para la combustión en un específico quemador controlado y cerrado, o para el reciclado en una<br />
planta especializada.<br />
Algunos aceites pue<strong>de</strong>n ser vertidos en terrenos agrícolas o en plantas <strong>de</strong> <strong>de</strong>puración, pero para ello es necesario obtener<br />
el permiso <strong>de</strong> las autorida<strong>de</strong>s locales.<br />
Las condiciones <strong>de</strong>l aceite, en el momento <strong>de</strong> la eliminación, pue<strong>de</strong>n influir en las opciones disponibles.<br />
Gases refrigerantes:<br />
Las cantida<strong>de</strong>s <strong>de</strong> gases sobrantes y/o no utilizadas no <strong>de</strong>ben verterse bajo ninguna circunstancia en el medio ambiente.<br />
Las soluciones no reciclables o las cantida<strong>de</strong>s sobrantes <strong>de</strong>ben ser entregadas a empresas autorizadas para su eliminación,<br />
en conformidad con la normativa o legislación local.<br />
El fabricante o suministrador <strong>de</strong>bería aportar la información necesaria relativa a las operaciones <strong>de</strong> recuperación o reciclado<br />
<strong>de</strong> gases realizadas por especialistas en refrigeración.<br />
No use nunca los contenedores no presurizados vacíos: éstos han <strong>de</strong> <strong>de</strong>volverse al suministrador.<br />
05.08 Ref.200989 Rev.100 25
AVERIAS FRECUENTES<br />
LISTADO INDICATIVO DE LAS AVERÍAS MÁS FRECUENTES QUE PUEDEN PROVOCAR UN MAL FUNCIONAMIENTO<br />
DEL EQUIPO<br />
A pesar <strong>de</strong> que todas las unida<strong>de</strong>s HITECSA han sido controladas y probadas en fábrica antes <strong>de</strong> enviarlas a su lugar <strong>de</strong><br />
instalación o al local <strong>de</strong>l ven<strong>de</strong>dor, no se <strong>de</strong>scarta la posibilidad <strong>de</strong> mal <strong>funcionamiento</strong>s. Antes <strong>de</strong> aplicar las condiciones<br />
generales <strong>de</strong> garantía, es imprescindible comprobar la entidad <strong>de</strong>l daño o mal <strong>funcionamiento</strong> y <strong>de</strong>terminar sus causas. A<br />
continuación incluimos un listado con algunas <strong>de</strong> las causas más frecuentes <strong>de</strong> daños o mal <strong>funcionamiento</strong>s <strong>de</strong>rivados <strong>de</strong><br />
un ina<strong>de</strong>cuado cuidado <strong>de</strong>spués <strong>de</strong> que las unida<strong>de</strong>s hayan salido <strong>de</strong> fábrica. Es conveniente pues estudiarlas antes <strong>de</strong><br />
instalar o poner en marcha las unida<strong>de</strong>s.<br />
• Rotura <strong>de</strong> los tubos capilares y <strong>de</strong> las conexiones <strong>de</strong>l conmutador <strong>de</strong> presión <strong>de</strong>bida a una manipulación brusca o<br />
bien a las vibraciones excesivas durante el transporte.<br />
• Rotura <strong>de</strong> las tuberías internas <strong>de</strong>l circuito <strong>de</strong> refrigeración como resultado <strong>de</strong> una manipulación brusca en el lugar <strong>de</strong><br />
instalación.<br />
• Conexiones aflojadas <strong>de</strong>bido a una falta <strong>de</strong> mantenimiento.<br />
• Filtros obstruidos o sucios <strong>de</strong>bido a la falta <strong>de</strong> mantenimiento <strong>de</strong> arranque que provoca un <strong>funcionamiento</strong><br />
ina<strong>de</strong>cuado <strong>de</strong>l circuito <strong>de</strong> refrigeración.<br />
• Suciedad, partículas, objetos, etc. que hayan podido caer en la cóclea <strong>de</strong> los ventiladores.<br />
• Incorrecta alimentación <strong>de</strong>l motor <strong>de</strong>l ventilador <strong>de</strong>bido a una discordancia entre la presión disponible requerida y la<br />
actual caída <strong>de</strong> presión, o bien a que los ventiladores están trabajando con el panel frontal abierto.<br />
(La empresa que instale el equipo <strong>de</strong>berá recordar controlar la potencia absorbida <strong>de</strong> los motores <strong>de</strong>l<br />
ventilador.)<br />
• Contactos mal cerrados y consiguientemente ruidosos <strong>de</strong>bido a la acumulación <strong>de</strong> suciedad u otros materiales<br />
durante el almacenamiento <strong>de</strong> la unidad in situ.<br />
• Activación <strong>de</strong>l conmutador <strong>de</strong> alta presión como resultado <strong>de</strong> una instalación incorrecta <strong>de</strong>l con<strong>de</strong>nsador, <strong>de</strong> un flujo<br />
<strong>de</strong> aire bajo o bien <strong>de</strong> una carga excesiva <strong>de</strong> gas refrigerante.<br />
• Activación <strong>de</strong>l conmutador <strong>de</strong> baja presión <strong>de</strong>bido a que la unidad A/C está trabajando con poco gas refrigerante,<br />
<strong>de</strong>bido a un flujo <strong>de</strong> aire bajo (suciedad o filtros obstruidos) o bien <strong>de</strong>bido a que el aire <strong>de</strong> la batería tiene una<br />
temperatura más baja que la temperatura original <strong>de</strong>l proyecto.<br />
• En sistemas refrigerados por aire con un con<strong>de</strong>nsador remoto, es posible que se active frecuentemente el<br />
conmutador <strong>de</strong> baja presión durante la puesta en marcha o el <strong>funcionamiento</strong> en invierno <strong>de</strong>bido a la acumulación<br />
<strong>de</strong> gas refrigerante en el con<strong>de</strong>nsador. La importancia <strong>de</strong> este problema se reduce al colocar un controlador por<br />
microprocesador en las unida<strong>de</strong>s A/C puesto que se produce un retraso en la activación <strong>de</strong>l conmutador <strong>de</strong> baja<br />
presión durante la puesta en marcha (véase el manual <strong>de</strong> <strong>instrucciones</strong> <strong>de</strong>l MICRO AC).<br />
• Es aconsejable instalar válvulas <strong>de</strong> retención en las uniones <strong>de</strong> tubos <strong>de</strong>l con<strong>de</strong>nsador para así reducir<br />
este problema, en particular cuando el con<strong>de</strong>nsador se encuentra en una posición más alta que la unidad<br />
interior.<br />
26 05.08 Ref.200989 Rev.100
INDEX<br />
SAFETY PRECAUTIONS..............................................................28<br />
GENERAL INFORMATION.......................................................29,30<br />
EQUIPMENT RECEPTION.......................................................31,32<br />
INSTALLATION.....................................................................33-42<br />
STARTING UP.......................................................................43-45<br />
MAINTENANCE......................................................................46-49<br />
TROUBLESHOOTING..................................................................50
SAFETY PRECAUTIONS<br />
MECHANICAL RISKS<br />
Danger to hands of cuts, bruises and amputation during maintenance, with machine open and in operation (with panels and<br />
guards removed), see appropriate labels insi<strong>de</strong> the machine.<br />
Maintenance must be carried out only by qualified and authorised personnel.<br />
ELECTRICAL RISKS<br />
Danger of electrical shock due to acci<strong>de</strong>ntal contact on main power supply switch when maintenance is being carried out with<br />
electrical panel open.<br />
Maintenance must be carried out only by qualified and authorised personnel.<br />
HEAT RISKS<br />
Danger to hands of burns from the piping of the con<strong>de</strong>nser circuit during maintenance, with machine open and in operation<br />
(with panels and guards removed), see appropriate labels insi<strong>de</strong> the machine.<br />
Maintenance must be carried out only by qualified and authorised personnel.<br />
DANGER FROM NOISE OR VIBRATIONS<br />
NO DANGER<br />
DANGER FROM SOURCES OF RISK (electricity, static electricity, magnetic fields, radiations, laser etc...)<br />
NO DANGER<br />
OTHER SOURCES OF HEALTH RISK (pow<strong>de</strong>rs, gases, water, vapour, fluids, fog, smoke, fire explosion, biological<br />
and microbiological substances, chemicals etc...)<br />
Refrigerant gases : do not effect any welding on piping or recipients that contain the refrigerant gas.<br />
ERGONOMIC RISKS (safety distances, dimensions and ergonomic geometry etc...)<br />
NO RISK<br />
COMBINATION OF DANGERS (interruption of power supply)<br />
NO DANGER<br />
DANGER FROM UNFORSEEN CAUSES<br />
NO DANGER<br />
28 05.08 Ref.200989 Rev.100
GENERAL INFORMATION<br />
DEFINITION OF MACHINE SERIES AND CODES<br />
• CED series vertical precision air-conditioning units used for standard applications.<br />
• CEM series vertical precision air-conditioning units used for standard and for special applications.<br />
• CEW series chilled water precision air-conditioning units.<br />
1.1 IDENTIFICATION<br />
15... - size of the unit (standard unit is DOWNFLOW)<br />
/A - indicates the unit is UPFLOW<br />
CONF. - indicates the configuration of the unit<br />
CONF. SERIES DESCRIPTION<br />
1 CED, CEM water-cooled version with plate con<strong>de</strong>nser and compressor in the indoor unit, open circuit<br />
2 CED, CEM air-cooled version with compressor in the indoor unit and remote air-cooled con<strong>de</strong>nser<br />
3 CED, CEM water-cooled split version with compressor and water-cooled con<strong>de</strong>nser as outdoor unit<br />
4 CED, CEM air-cooled split version with compressor and air-cooled con<strong>de</strong>nser as outdoor unit<br />
5 CEW chilled water version<br />
6 CED, CEM glycol & water-cooled version with compressor and plate con<strong>de</strong>nser within the indoor unit<br />
(closed circuit)<br />
7 CEM “Dual Cool” units with two cooling systems, chilled water and also direct expansion<br />
8 CEM “Cool Recovery” units with free-cooling capabilities in mid-season and winter<br />
9 CEM heat pump units<br />
HR CEM units with <strong>de</strong>superheater for the production of hot sanitary water<br />
The units belonging to the above configurations can be equipped with the following accessories:<br />
- electro<strong>de</strong> steam humidifier<br />
- one or more stage electric heaters<br />
- hot water coil<br />
- hot gas coil (only on CED, CEW and CEM in config. 1 & 2)<br />
- fresh air intake<br />
- low ambient kit to control con<strong>de</strong>nser fan speed (config. 2 & 4)<br />
- Electronic temperature and relative humidity microprocessor control (see <strong>de</strong>scription and instructions in relevant<br />
manual).<br />
05.08 Ref.200989 Rev.100 29
GENERAL INFORMATION<br />
ON CLOSED PANELS<br />
It is forbid<strong>de</strong>n to remove the safety guards while the machine is in operation.<br />
It is obligatory to replace the safety guards in position before starting the machine.<br />
ON FRONT PANEL OR INSIDE UNIT<br />
It is forbid<strong>de</strong>n to effect any maintenance while the machine is in operation.<br />
ON ELECTRICAL PANEL<br />
Consult the operation manual, electrical schematics or procedures.<br />
Only authorised personnel may open the electrical panel.<br />
Electrical panel with power.<br />
It is forbid<strong>de</strong>n to use water to extinguish fire.<br />
IF REQUIRED<br />
Warnings, connection to electrical protection, do not remove.<br />
30 05.08 Ref.200989 Rev.100
EQUIPMENT RECEPTION<br />
RECIEPT OF MACHINE<br />
On receiving the machine(s), the first operation to be effected is a check of possible damage that can have been done during<br />
transport.<br />
Unless an individual agreement exists, the equipment is always supplied EX WORKS and therefore HITECSA is not liable for<br />
any damages caused during transportation.<br />
If any damage should be noted, this should be noted in writing on the <strong>de</strong>livery bill and ma<strong>de</strong> known to the<br />
forwarding agent.<br />
The air-conditioners are manufactured for indoor installation and therefore should not be left outdoors or in any way exposed<br />
to bad weather conditions.<br />
It is advisable, in any case, to leave the units in their original packing until they are to be installed.<br />
Fig. 1<br />
05.08 Ref.200989 Rev.100 31
EQUIPMENT RECEPTION<br />
MACHINE HANDLING<br />
All the air-conditioners are shipped (unless specifically requested by the customer) packed on pallets, and should therefore<br />
be moved only with the aid of a forklift or a transpallet.<br />
If, because of a specific reason, it is necessary to lift with a crane, then the air-conditioner should be strapped and lifted as<br />
indicated in fig. 1.<br />
The unit must NEVER be placed on its si<strong>de</strong> or in an inclined position as this may not only damage internal components,<br />
but can also be dangerous because the unit is not entirely fixed to the pallet, and so is free to move and cause harm to<br />
persons (see fig. 2b-2c). Fig. 2a shows how the unit must ALWAYS be kept.<br />
Fig. 2a OK Fig. 2b NO Fig. 2c NO<br />
32 05.08 Ref.200989 Rev.100
INSTALLATION<br />
INSTALLATION DIRECT EXPANSION UNITS<br />
The air-conditioner is normally installed within the environment that requires cooling; the unit (down flow unit) can be<br />
positioned directly onto a raised floor, on condition that the floor can bear the weight of the unit in operation.<br />
On the other hand, a base frame can be used, with or without airflow conveyor; this allows all the weight to sit on the real<br />
floor, and so avoiding overloading and transmitting vibrations to the raised floor.<br />
The base frame not only makes installation simpler, but also avoids having to make supplementary holes in the floor for<br />
cables, piping, etc., and also maintenance becomes easier since one removes the floor panels around the air-conditioner for<br />
access.<br />
If the base frame is not used. Then the edge of the machine will be positioned on the raised floor itself, and so it is necessary<br />
to leave enough floors for the unit to sit on (see fig. 3, P and Q are the dimensions of the air-conditioner).<br />
- The air-conditioner must be positioned so that the return air is not obstructed in any way and so that it is<br />
easy to inspect the units. The free area to be left is minimum 60-70 cm. (see fig. 4).<br />
Fig. 3 Fig. 4<br />
Other dimensions, pipe sizing and positions and other information are all available in the “Technical Handbook” for that<br />
particular series of machines.<br />
The outdoor unit for configurations 2 - 4 - 6 must be positioned outdoors and, <strong>de</strong>pending on the space available, the<br />
distance between it and the indoor unit must be as short as possible.<br />
It must be installed in a position that is easily accessible and must have a free area all around for maintenance and for air<br />
intake of at least 50 cm.<br />
Furthermore, there must not be any obstacle to the air leaving the con<strong>de</strong>nser or con<strong>de</strong>nsing unit for at least 100 cm. The<br />
airflow must not be directed towards the air intake of any other air-cooled units.<br />
For remote con<strong>de</strong>nsers (configuration 2), shock absorber and silencer should be installed by the contractor between<br />
compressor and con<strong>de</strong>nser (see fig. 5).<br />
For con<strong>de</strong>nsing units (configuration 4), contractor should install oil-trap every 2/3 metres in height and incline pipeline by<br />
minimum 1% (see fig. 6).<br />
Further information, dimensions and weights are available in the relevant “Technical Handbook” for the outdoor units.<br />
The outdoor unit for configuration 3 must be easily accessible for maintenance, but must not be directly exposed to the<br />
elements, and should be protected from rain and frost.<br />
05.08 Ref.200989 Rev.100 33
INSTALLATION<br />
1) shock-absorber<br />
2) silencer<br />
3) liquid receiver<br />
Fig. 5<br />
2/3 metres 2/3 metres<br />
Min. 1%<br />
Fig. 6<br />
34 05.08 Ref.200989 Rev.100
INSTALLATION<br />
REFRIGERATION CIRCUIT CONNECTIONS (for conf. 2-3-4-7-8-9)<br />
The internal refrigeration circuit of the air-conditioning units is factory prepared; the terminal connection points are accessible<br />
from within the unit and closed with shut-off valves.<br />
The only circuit connections required on site are those between indoor and remote (outdoor) unit.<br />
The sizing of the pipes should be calculated keeping in mind distance and pressure drops due to curves and oil traps, etc. An<br />
indication is found. An indication is found in Appendix III.<br />
These refrigeration lines should be carried out keeping the following points in mind:<br />
- Use only copper piping making sure that it has been sized correctly according to the refrigeration capacity.<br />
- So as to avoid vibrations, pipes should not be touching each other when placed si<strong>de</strong> by si<strong>de</strong>.<br />
WARNING: When laying the refrigerant piping make sure that the supply (gas) pipe is very well insulated due to the<br />
high temperature that could cause burns to persons.<br />
- When a change of direction in the piping is required do this with large radius curves and not with sharp bends (this<br />
will notably reduce pressure drops and noise level); the radius should at least be equal to the diameter of the pipe.<br />
- Wash out and dry the pipelines very carefully by blowing Nitrogen through them.<br />
- If there is some uncertainty as to how well the circuit has been cleaned and dried, then it is advisable, on the liquid<br />
pipeline (for Conf.2) or on the gas pipeline (for Conf.3 & 4) to install a filter-drier.<br />
- The filter used should be of the type that allows inspection and substitution of the drier cartridge.<br />
- This drier cartridge could require changing several times before the entire circuit is to be consi<strong>de</strong>red clean.<br />
- It is also recommen<strong>de</strong>d that the last of these cartridges be left on the installation for at least 48 hours of real<br />
operation before removing and leaving the pipeline free.<br />
REMEMBER THAT THE MAIN CAUSE OF SERIOUS DAMAGE TO THE COMPRESSOR IS PRINCIPALLY DUE TO BAD<br />
CLEANING AND DRYING OF THE REFRIGERATION PIPING.<br />
- On the pipeline a connection point should be installed so that a vacuum can be drawn before the valves to the indoor<br />
unit are opened since HITECSA units are are already charged with refrigerant gas. The type of gas is indicated on<br />
the unit.<br />
- Once the connections have been terminated and a vacuum has been drawn in the pipelines, these should be now<br />
charged with FREON gas (whichever type has been used in the unit), making sure that there are no leaks in the<br />
joints and in the installation (make use of an appropriate leak <strong>de</strong>tector).<br />
- If leaks are <strong>de</strong>tected, they should be repaired and checked before drawing the vacuum again in the pipelines.<br />
WARNING : if the con<strong>de</strong>nsing unit (for Conf.3 & 4) is installed in a position that is higher than the indoor unit, it will be<br />
necessary to add oil-traps on the gas line in or<strong>de</strong>r to ensure oil returns to the compressor (one oil-trap every 2-3 metres in<br />
height, see fig. 6).<br />
For correct pipe sizing, follow indication in the tables supplied by HITECSA for distances not greater than 10<br />
metres; should the distance be more than 10 metres; consult our Engineering Dept. or a Refrigeration Specialist.<br />
05.08 Ref.200989 Rev.100 35
INSTALLATION<br />
VACUUM OF THE REFRIGERATION CIRCUIT<br />
The creation of a vacuum is a long process, keep in mind the following points:<br />
- Use only a vacuum pump of which you can be absolutely certain of its efficiency and if in doubt verify the vacuum<br />
created before connecting to the circuit<br />
- 1 mBar with R22 and at least 0,3 mBar with R407c or R134a should be reached and maintained for at least 1<br />
hour (in long circuits, for even longer, until the humidity is less than 10 ppm)<br />
- Manometers are not required to check the vacuum.<br />
- Connect the pump to the two connection points that have been previously prepared.<br />
- Start the pump and check that it is turning in the right direction.<br />
- Weigh the pump down at least during the first hour of operation.<br />
- Never leave the installation while the pump is in operation if there is no automatic safety valve fitted, because if the<br />
pump should stop (power cut or other reason) the oil of the pump will be redrawn into the refrigeration circuit.<br />
- Keep in mind that the vacuum in an installation should reach the levels indicated in section 4.1 and the pump should<br />
be left to run for at least another hour and every now and then releasing part of the load.<br />
PREPARING TO LOAD REFRIGERANT INTO THE INSTALLATION<br />
Remember that HITECSA direct expansion units, unless specifically indicated in the or<strong>de</strong>r, are always supplied with a full<br />
freon load, therefore any refrigerant required is to complete the load within the pipework in the installation.<br />
To effect this operation, one should proceed as follows:<br />
- Fit a manometer on the supply valve of the compressor and give the valve shaft one turn in a clockwise direction.<br />
- Connect the cylin<strong>de</strong>r and manometer to the suction valve.<br />
- Eliminate all air from piping between the cylin<strong>de</strong>r and connecting nipple by ejecting gas from the cylin<strong>de</strong>r through the<br />
pipe and loosening slightly the connection between nipple and suction valve.<br />
- Retighten connection to suction valve and, with the cylin<strong>de</strong>r open, effect two full clockwise turns of the shaft of the<br />
compressor suction valve.<br />
- WARNING : when the circuit is being filled with R22 or R134a, it is advisable to do this with the refrigerant in gas<br />
form in or<strong>de</strong>r to avoid emulsifying the oil and liquid return to the compressor valves. Whereas with R407c, since it is a<br />
mixture composed of:<br />
23% R32 (CH 2 F 2 )<br />
25% R125 (CH 3 -CHF 3 )<br />
52% R134a (CF 3 -CH 2 F)<br />
and since these gases are volatile in different <strong>de</strong>grees one to the other, the circuit must be filled with the refrigerant in<br />
liquid form to ensure that the percentages are as indicated previously.<br />
The refrigerant charge of an air-conditioner should be effected by an expert refrigeration engineer and with the<br />
utmost attention.<br />
- Open the shut-off valves both on the indoor unit as well as the external unit.<br />
IMPORTANT POINTS WHEN STARTING-UP COMPRESSORS<br />
For all those units having compressors with a capacity greater than 2 HP (1,4 kW), it is absolutely necessary, before the<br />
start-up, to effect an initial preheat of the oil contained within the compressor itself.<br />
The duration of this preheat phase should in no circumstances be less than the minimum requirement of 6 hours.<br />
The preheat is effected by turning on the external main switch so that power is supplied to the unit.<br />
During this phase, the controller of the unit itself must be left in the “OFF” position, meaning that the compressor<br />
must not be ma<strong>de</strong> to operate.<br />
After the six hour period has elapsed, the compressor can be started up, having ma<strong>de</strong> sure that the oil sump is warm to the<br />
touch.<br />
Check that all the electrical connections have been correctly effected, check that terminal screws are tight, check that the<br />
supply voltage is the same as indicated on the i<strong>de</strong>ntification sticker of the unit, after which the compressor can be started up.<br />
It very probable that the compressor may stop almost immediately after start-up due to intervention of the low pressure<br />
switch since the circuit is only partially loa<strong>de</strong>d.<br />
36 05.08 Ref.200989 Rev.100
INSTALLATION<br />
As the operation continues, check the manometers (high and low pressure) as well as the<br />
liquid sight glass, shutting temporarily the cylin<strong>de</strong>r.<br />
Depending on the type of con<strong>de</strong>nser control that has been fitted, con<strong>de</strong>nsing pressure during operation can result more or<br />
less stable:<br />
- When a MODULATING con<strong>de</strong>nser control (config. 2 - 4) has been fitted, the pressure will be stable at a value of<br />
about 16 bar (R22 and R407c) or 10 bar (R134a).<br />
- When an ON - OFF con<strong>de</strong>nser control (config. 2 - 4) has been fitted, the pressure will rise to 16 bar and then<br />
<strong>de</strong>crease more or less rapidly <strong>de</strong>pending on the temperature of the air.<br />
- When a pressure valve has been fitted to control con<strong>de</strong>nsing pressure (config. 1 - 3) for use with well-water, the<br />
pressure valve must be adjusted as indicated in Figure 9; if cooling-tower water is used in a closed circuit, the<br />
installation must foresee a temperature control of the water coming to the con<strong>de</strong>nser.<br />
- If the con<strong>de</strong>nsing pressure exceeds 19 bar (R22 and R07c) or 10 bar (R134a), stop the compressor and check the<br />
con<strong>de</strong>nser which will almost certainly be insufficiently cooled.<br />
- In the case of high con<strong>de</strong>nsing temperature with water-cooled con<strong>de</strong>nsers, check the temperature of the water<br />
entering and exiting the con<strong>de</strong>nser and if necessary, adjust the water flow valve.<br />
- The suction pressure will vary in parallel with the supply pressure.<br />
During the period that the circuit is not fully loa<strong>de</strong>d, one can notice:<br />
• Through the sight glass one will be able to see a bubbling opaque white liquid rushing quickly past.<br />
• The direct expansion coil will be cold only in the portion near the distributor pipes which could even be<br />
frozen (frosted) whereas the return pipes to the compressor are not cold yet.<br />
As the loading process continues the liquid seen through the sight glass will become clearer and will fill up with refrigerant in<br />
its liquid state:<br />
- Stop the compressor<br />
- Shut the cylin<strong>de</strong>r and check that the manometer on the suction line indicates a pressure greater than 4 bar (R22 and<br />
R407c) or 1 bar (R134a).<br />
- Restart the compressor.<br />
- Continue the loading process until through the sight glass one sees only very few small bubbles of Freon gas.<br />
At this point the system is fully loa<strong>de</strong>d with gas and the cylin<strong>de</strong>r can be removed leaving, however, the manometers<br />
connected to check that the evaporating and con<strong>de</strong>nsing pressures are as per <strong>de</strong>sign pressures.<br />
Example (configuration 2):<br />
Air entering evaporator +24°C.<br />
Evaporating temperature +5°C.<br />
Air entering evaporator +22°C.<br />
Evaporating temperature +4°C.<br />
Air entering con<strong>de</strong>nser +20°C<br />
Con<strong>de</strong>nsing temperature +38°C.*<br />
Air entering con<strong>de</strong>nser +25°C<br />
Con<strong>de</strong>nsing temperature +43°C.*<br />
Air entering con<strong>de</strong>nser +30°C<br />
Con<strong>de</strong>nsing temperature +48°C.*<br />
Air entering con<strong>de</strong>nser +32°C<br />
Con<strong>de</strong>nsing temperature +50°C.*<br />
Air entering con<strong>de</strong>nser +35°C<br />
Con<strong>de</strong>nsing temperature +52°C.*<br />
05.08 Ref.200989 Rev.100 37
INSTALLATION<br />
* Please note : there can be different con<strong>de</strong>nsing temperatures if the low ambient kit (modulating) has been fitted to the air<br />
conditioning unit.<br />
To properly complete the loading of the refrigeration circuit, especially in the case of air-cooled units, it is necessary to satisfy<br />
all the <strong>de</strong>sign conditions regarding the temperature of the con<strong>de</strong>nsing liquid and that there is a sufficient heat-load within the<br />
ambient; in this way the refrigeration circuit will operate (at ambient <strong>de</strong>sign conditions) for a long enough time to allow one to<br />
verify that the entire system is running correctly.<br />
Please note : If the installation has been loa<strong>de</strong>d with refrigerant gas during the winter season, do not fully load the circuit in<br />
or<strong>de</strong>r to avoid the system stopping during the summer due to high pressure.<br />
Problems arising from an excessive loading of refrigerant gas<br />
An excessive refrigerant gas load will result in the flooding of part of the con<strong>de</strong>nser and subsequent reduction of the heat<br />
exchange capacity of the coil. In fact, this represents a reduction in the available surface area of the con<strong>de</strong>nser coil. The<br />
con<strong>de</strong>nsing temperature will consequently be very high while the liquid line leaving the con<strong>de</strong>nser will have a temperature<br />
much lower than that which corresponds to the con<strong>de</strong>nsing pressure (as indicated on the pressure-guage).<br />
Checking the engaged power of the compressor<br />
Once the machine is in full operation and the maximum con<strong>de</strong>nsing temperature of 52°C (19 kg/cm²) has been reached<br />
(this con<strong>de</strong>nsing temperature is generally the highest normally found in air-cooled units), the compressor motor will have an<br />
input that is lower than the “FLA” (Full Load Amperes) value indicated on the i<strong>de</strong>ntification plate of the compressor itself.<br />
If the input is the same as or higher than the value indicated on the plate, this is the result of either wrong power supply<br />
(excessive drop in power lines) or very high expansion and con<strong>de</strong>nsing temperatures due to an error in the installation or the<br />
gas loading of the system.<br />
WATER CIRCUIT CONNECTIONS<br />
For all mo<strong>de</strong>ls in all configurations, it is necessary to fit within the indoor unit, a con<strong>de</strong>nsate discharge with a diameter of ¾”.<br />
This discharge or drain must have an a<strong>de</strong>quate inclination, keeping in mind that it drains by force of gravity, and must not be<br />
connected to other drains that are un<strong>de</strong>r pressure.<br />
It is advisable to use a syphon in or<strong>de</strong>r to avoid return of bad odours through the discharge pipe.<br />
For all mo<strong>de</strong>ls in all configurations that are equipped with a humidifier, it is necessary to supply to the indoor unit, normal tap<br />
water that has not been treated. The water can be supplied through a<strong>de</strong>quate plastic or PVC tubes having a diameter of<br />
6mm with a shut-off valve fitted on the tubes.<br />
The water supply pressure should be between 1,5 and 5 Bar.<br />
A drain pipe, a<strong>de</strong>quately inclined, must also be fitted, and have a diameter of ¾”.<br />
Warning : this drain discharges water with a temperature of about 100°C and the tube utilised must therefore be heat<br />
resistant.<br />
In machine configurations 1-3-5-6, con<strong>de</strong>nsers and cooling or heating coils that require water supply, piping should be of the<br />
diameters and sizes for the flow rates indicated in the individual diagrams of the A/C units, as well as being a<strong>de</strong>quately<br />
insulated and fitted with shut-off valves.<br />
ELECTRICAL CONNECTIONS<br />
Each A/C unit is supplied with its own electrical wiring diagram and all wiring connections are to be effected following the<br />
indications of the wiring diagram itself. The wire sections must be of a<strong>de</strong>quately sized in relation to the power of the unit and<br />
the length of the line in or<strong>de</strong>r to maintain within prescribed limits any drop in power supply.<br />
The power supply line must be protected against short-circuit.<br />
If both internal and external units are requested to be supplied without main switches, the contractor installing the equipment<br />
must fit main switches near both the internal and external units (in accordance with the safety norms current in the country<br />
where the units are installed).<br />
38 05.08 Ref.200989 Rev.100
INSTALLATION<br />
The A/C units and the con<strong>de</strong>nsers are supplied with earth terminals and these must be correctly earthed in or<strong>de</strong>r to avoid<br />
possible acci<strong>de</strong>nts.<br />
Check the electrical wiring diagrams for correct wiring between indoor and outdoor units.<br />
The contractor installing the equipment must verify that the supply power corresponds to that which is indicated on the<br />
i<strong>de</strong>ntification plate of the A/C unit as well as on the electrical diagrams supplied.<br />
The manufacturer is not responsible for any damages of any sort if the above indications have not been correctly<br />
followed.<br />
INSTALLATION CHILLED WATER UNITS<br />
Air conditioning units that run on chilled water and / or have hot water coils must be connected to a respective water supply<br />
(hot and chilled water) as indicated in the diagrams that are supplied with each unit.<br />
Each single circuit must have the possibility of being isolated and so shut-off valves should be installed in the lowest points of<br />
the circuit for general maintenance operations.<br />
All the piping for the supply and return of the water should be well insulated in or<strong>de</strong>r to avoid heat dispersion and the<br />
formation of con<strong>de</strong>nsate.<br />
Ensure that there are no leakages in the circuit, fill the installation and remove any air that may have remained in the various<br />
circuits by acting on the relief valves that are normally found on the collector of the coil or any other high point in the circuit.<br />
If the unit is supplied with a motorised valve, check that the servomotor operates correctly and the the opening of the valve is<br />
synchronised with the <strong>de</strong>mand for cooling.<br />
The con<strong>de</strong>nsate discharge and the connections to the humidifier, as well as electrical connections, have all been <strong>de</strong>scribed in<br />
the previous chapters.<br />
05.08 Ref.200989 Rev.100 39
INSTALLATION<br />
DIFERENCIAL PRESSURE VALVE<br />
A<br />
B<br />
C<br />
D<br />
A Adjustment knob (clockwise reduces water-flow, ant-clockwise increases water-flow)<br />
B Direction of water-flow<br />
C Nozzle to connect capillary tube to compressor gas line<br />
D Capillary tube<br />
40 05.08 Ref.200989 Rev.100
INSTALLATION<br />
PRESSURE TRANSDUCER<br />
The point of operation required by the full power supply (FVS) can be adjusted by acting on the screw (R) of the pressure<br />
transducers.<br />
The factory settings of the transducers P35AC are:<br />
8 - 14 bar = 10 bar (=FVS)<br />
14 - 24 bar = 16 bar (=FVS)<br />
Minimum Speed<br />
In or<strong>de</strong>r to avoid that the fan speed goes below accepted levels, the power of the minimum speed (Vrms) can be set between<br />
45% and 90% of the power supply by acting on the knob of the electronic module P38AA.<br />
The value of the minimum speed is reflected on the proportional band . The higher the value of the minimum speed, the<br />
lower the actual proportional band.<br />
Cut-off Point<br />
If the controller does not need to run at minimum speed, set the knob that is on the electronic module at the cut-off point. The<br />
output to the motor will be cut-off the moment the pressure <strong>de</strong>scends below the value of the operating point required less the<br />
proportional band (the fan stops).<br />
The control is factory set so that the fan is able to work from 0 to 100% of its speed, since the fans normally used are capable<br />
of operating throughout the whole tension range.<br />
System control<br />
Once the control unit has been installed and adjusted, check the system by making the equipment run for at least one full<br />
operating cycle. If something should not operate correctly, check both the wiring as well as the components.<br />
05.08 Ref.200989 Rev.100 41
INSTALLATION<br />
MODULATING PRESSURE CONTROL<br />
3<br />
1<br />
2<br />
1. Screw for setting adjustment (set point)<br />
2. Terminal block<br />
3. Minimum speed adjustment (cut-off)<br />
Adjustments :<br />
a. to increase pressure: turn screw 1 clockwise<br />
b. cut-off: turn setting to OFF and the speed of the fan will vary from 0 to 100% <strong>de</strong>pending on the con<strong>de</strong>nsing<br />
pressure, whereas if turned clockwise it is possible to set the minimum fan speed.<br />
The control is factory set so that the fan is able to work from 0 to 100% of its speed, since the fans normally used are capable<br />
of operating throughout the whole tension range.<br />
42 05.08 Ref.200989 Rev.100
STARTING UP<br />
START-UP PROCEDURE AND CHECKLIST<br />
The refrigerant load in air-cooled and split systems is a particularly important aspect in the correct operation of the entire<br />
installation; it is therefore necessary this process be done by an expert Refrigeration Contractor following the indications<br />
given in the previous pages. The system is to be loa<strong>de</strong>d only with the refrigerant gas indicated on the unit i<strong>de</strong>ntification label.<br />
START-UP OF FAN SECTION<br />
Check that the power, as prescribed by the system <strong>de</strong>sign, reaches terminals R-S-T, that the neutral is wired to terminal N<br />
and that the circuit is a<strong>de</strong>quately earthed.<br />
If, temporarily, there is no requirement to operate the other parts of the air-conditioning system (which, <strong>de</strong>pending on the<br />
ambient conditions, could start-up automatically) disconnect the relevant interruptor switches.<br />
Push the ON button if the unit is equipped with the microprocessor controller, and, if not, activate via the switch on the front<br />
of the indoor unit, and in this way the fans will start.<br />
N.B. On the CED units the fan motors are almost always single phase and therefore the direction of rotation is factory set.<br />
On other special units or CEM units the fan motors are three phase and therefore one has to check the correct direction of<br />
rotation. To see if a motor is single or three phase it is sufficient to check the electrical diagrams supplied with the unit.<br />
When belt drive fans are used, always check the tension of the belts and the alignment of the pulleys, even if these are<br />
always checked during factory tests (see the MAINTENANCE section).<br />
THE FANS MUST NOT BE ALLOWED TO RUN WITH THE PANEL OPEN FOR MORE THAN 20 SECONDS.<br />
Verify the input power of the electric fan motors, which must be contained within the values indicated on the i<strong>de</strong>ntification<br />
plate of the motors.<br />
If the engaged power / current is higher because the external pressure drops have been overestimated, then it is necessary<br />
to block part of the supply or return airflow, or even to block part of the air passage on the fan mouth, in or<strong>de</strong>r to return within<br />
the limits indicated on the i<strong>de</strong>ntification label. Then, if a single phase fan-motor is fitted (CED), it is possible to adjust the<br />
airflow by acting on a speed regulator (if fitted).<br />
START-UP OF COMPRESSOR SECTION<br />
Close the interruptor switches opened during start-up of the fan section and check that all wiring is tightly screwed into its<br />
terminal.<br />
Set all the adjustments on the microprocessor control or, if not fitted, on the thermostats in or<strong>de</strong>r to provoke the start-up of<br />
the compressor.<br />
The compressors will only operate if ambient conditions exceed the limits set on the temperature control of the indoor unit.<br />
Check that the relay switches, that control the <strong>de</strong>lay/time interval of the starts of the compressors, have been set for at least<br />
3 minutes between starts in or<strong>de</strong>r to avoid that a compressor starts too frequently.<br />
It is also a good i<strong>de</strong>a that the different relay switches, in units with more than one compressor, be set with different time<br />
intervals in or<strong>de</strong>r to avoid compressors staring together. For those air-conditioners that are equipped with the microprocessor<br />
controller, the <strong>de</strong>lay/time-interval has been already set in the control itself and the time <strong>de</strong>lays are indicated in the specific<br />
manual for the microprocessor control.<br />
The start of the compressors will provoke the start of the con<strong>de</strong>nser fan(s) once consent has been given by the High<br />
Pressure switch or the Modulating Control of the con<strong>de</strong>nser.<br />
The settings on the pressure regulators are normally factory set. To change or readjust these, the following procedure<br />
applies:<br />
• ON-OFF control of con<strong>de</strong>nsing pressure: reselect the setting on the pressure switch<br />
• electronic MODULATING control of con<strong>de</strong>nsing pressure: act on the transducer in a clockwise direction to increase<br />
the con<strong>de</strong>nsing pressure and anti-clockwise to reduce the con<strong>de</strong>nsing pressure. See Fig.10/11 for<br />
indications as to the various types of con<strong>de</strong>nsing pressure regulators that are normally used.<br />
Check that the input power of the compressors is lower than that indicated on the i<strong>de</strong>ntification plate, and check also that the<br />
refrigerant gas load is complete.<br />
05.08 Ref.200989 Rev.100 43
STARTING UP<br />
START-UP OF ELECTRIC HEATERS AND HUMIDIFIER SECTION<br />
The A/C units will operate only if the settings, with respect to ambient conditions, require it, regardless of whether the units<br />
are equipped with a microprocessor controller or a plain electrical control.<br />
Once the units have been started-up, check that the input power of the various components do not exceed <strong>de</strong>sign values.<br />
Be sure that the safety thermostats for the electric heaters have been set at about 70-80°C.<br />
The humidifiers must be supplied with normal, domestic tap water, and the tubes should be of plastic or PVC (RILSAN) with<br />
a diameter of 6mm. Pressure should be contained between 1,5 and 5 bar.<br />
The supply water to the humidifier should not be treated chemically or otherwise.<br />
N.B. When connecting tubes to the humidifier, make sure that no dirt or other material remains in the tubes. I<strong>de</strong>ally, after the<br />
unit has been started-up and ma<strong>de</strong> to operate for a little while, remove the solenoid valve of the humidifier, drain a little<br />
water, clean the base and the valve as well as the filter in or<strong>de</strong>r to ensure that no material or dirt has remained within the<br />
tubes (otherwise this could damage the valve and the valve-base and cause leakage).<br />
For further information regarding the humidifier refer to the specific manual and the indications of the humidifier<br />
manufacturer.<br />
REFRIGERANT GAS CHARGE FOR THE VARIOUS UNITS<br />
For those units that have separate con<strong>de</strong>nsers (remote con<strong>de</strong>nsers or split con<strong>de</strong>nsing units), the values indicated refer to a<br />
distance of about 10 metres between indoor unit and outdoor unit.<br />
For circuits that are greater than 10 metres, the amount of refrigerant gas should be increased according to the length and<br />
size of the piping.<br />
For each kg. of gas ad<strong>de</strong>d to fill the piping, 50/80 gr. of non-freeze oil for the compressor should ad<strong>de</strong>d. The quantity<br />
of oil <strong>de</strong>pends on how the system has been installed, whether it allows the return of the oil to the compressor more or less<br />
easily.<br />
THE TYPE OF OIL IS ALWAYS INDICATED ON THE COMPRESSOR LABEL - the type is SHELL, usually Suniso Oil<br />
3G when the refrigerant gas is R22.<br />
If R407c or R134a is used, the oil is Polyester (POE), usually EAL Artic 22CC Mobil or EMKARATE RL32S ICI (these<br />
oils used for the same gas can be mixed). Great care should be taken that the oils do not come into contact with the air<br />
and that the piping has been perfectly dried.<br />
Keep in mind that in systems that have lengthy and extensive pipe work and/or are equipped with larger con<strong>de</strong>nsers than<br />
normal, it is advisable to fit in the circuit an extra liquid receiver in or<strong>de</strong>r to better handle the larger quantity of refrigerant gas<br />
that has been loa<strong>de</strong>d. This should allow the possibility of gathering all the gas in the receivers in case of maintenance or<br />
specific repair work to the system.<br />
44 05.08 Ref.200989 Rev.100
STARTING UP<br />
HITECSA supplies units with a complete refrigerant charge. The following sheets indicate the amount of gas contained in the<br />
unit and its con<strong>de</strong>nsor or con<strong>de</strong>nsing group. Additional gas charges may be necessary to installation, these additions should<br />
be carried out by the same installer. The quantity is shown in kg.<br />
CED CED 11.1 CED 13.1 CED 17.1 CED 21.1 CED 24.1<br />
Configuration 1 y 6 1.0 1.1 1.4 1.8 2.1<br />
Configuration 2 3.1 3.6 4.5 5.8 6.3<br />
CED 29.1 CED 33.1 CED 22.2 CED 26.2 CED 32.2<br />
Configuration 1 y 6 2.5 2.8 1.0 1.1 1.4<br />
Configuration 2 8.1 9.0 3.1 3.6 4.5<br />
CEM CEM 20.1 CEM 26.1 CEM 31.1 CEM 36.1 CEM 45.1<br />
Configuration 1 y 6 1.7 2.1 2.5 2.8 3.6<br />
Configuration 2 5.6 6.7 8.1 9.0 11.7<br />
CEM 55.1 CEM 29.2 CEM 35.2 CEM 47.2 CEM 53.2<br />
Configuration 1 y 6 4.2 1.1 1.4 1.8 2.1<br />
Configuration 2 13.5 3.6 4.5 5.8 6.7<br />
CEM 64.2 CEM 70.2 CEM 89.2 CEM 103.2<br />
Configuration 1 y 6 2.5 2.8 3.6 4.2<br />
Configuration 2 8.1 9.0 11.7 13.5<br />
05.08 Ref.200989 Rev.100 45
MAINTENANCE<br />
MAINTENANCE<br />
The CED - CEM - CEW series of HITECSA air conditioning units do not require any particular maintenance<br />
operations since all moving parts are supported by airtight and prelubricated bearings.<br />
Only the following standard maintenance operations are necessary:<br />
CLEANING OF AIR-FILTERS<br />
The frequency at which the filters must be cleaned <strong>de</strong>pends largely on the dirt and dust contained in the supply air. It is,<br />
however, good practice never to allow more than 15-20 days to elapse between one cleaning and the next.<br />
The high efficiency EU4 (standard on the units) filters can be cleaned with compressed air blown onto the filter in the<br />
direction OPPOSITE to the airflow when in the A/C unit (air exit si<strong>de</strong>).<br />
If, on the other hand, a vacuum-cleaner is used, then the filter should be cleaned on the other si<strong>de</strong>, where the air enters the<br />
A/C unit (air entry si<strong>de</strong>).<br />
WARNING: The filters can be regenerated 3 or 4 times <strong>de</strong>pending on their state, after which they must be replaced.<br />
If the filters are too dirty, the result is:<br />
* reduction of the airflow and of the cooling capacity<br />
* excessive <strong>de</strong>humidification<br />
* possible frosting or freezing of the cooling coil<br />
* activation of the low pressure switch and stop of the A/C unit<br />
* possible damage to the compressor due to refrigerant not entirely evaporated returning as liquid.<br />
In the case of BAG FILTERS (normally with efficiency of EU5 or above), these can not be regenerated and must always be<br />
substituted. The filter can not be used when the pressure drop becomes too high - this is indicated by a differential<br />
pressure switch which is an optional accessory on the unit (clogged filter alarm).<br />
CLEANING OF HUMIDIFIER<br />
These cleaning operations are necessarily more frequent during Winter than in Summer.<br />
The frequency at which the humidifier must be cleaned is <strong>de</strong>termined by the hours of operation and by the characteristics of<br />
the water, in particular by the amount of scale that is <strong>de</strong>posited (hardness of the water).<br />
It is, however, highly advisable to clean or if necessary substitute the humidifier cylin<strong>de</strong>r (bottle) every 1 - 2 months<br />
or 200 - 400 hours of operation.<br />
If the interval is greater than that indicated above, one should also clean the solenoid valve (drain), the filter and the supply<br />
nozzle and valve with its water pressure reducer. The frequency at which these operations are to be effected must be<br />
increased during Winter.<br />
Further information can be obtained from the Installation and Maintenance manual supplied by the humidifier manufacturer.<br />
CLEANING OF CONDENSERS<br />
Water-cooled con<strong>de</strong>nsers - Configuration 1 - 3 - 6.<br />
The tubes or plates through which the water flows must be cleaned periodically in or<strong>de</strong>r to ensure optimum efficiency of the<br />
con<strong>de</strong>nser.<br />
The frequency of the cleaning operation is <strong>de</strong>termined by the quality and characteristics of the water and hours of operation.<br />
The operation can be chemical cleansing or, in the case of tube con<strong>de</strong>nsers, by using brushes to clean the tubes internally.<br />
It is also advisable to have the water analysed and to adopt an a<strong>de</strong>quate water treatment system if necessary, in or<strong>de</strong>r to<br />
avoid excessive coating, scale <strong>de</strong>posits, corrosion as well as formation of fungus, algae, etc.<br />
46 05.08 Ref.200989 Rev.100
MAINTENANCE<br />
Air-cooled con<strong>de</strong>nsers - Configuration 2 - 4.<br />
The finned surface of the con<strong>de</strong>nsing coil must be cleaned at least once a month during the period that the system is in<br />
operation, in or<strong>de</strong>r to avoid accumulation of dirt or other matter.<br />
The cleaning operation can be done manually using a specific comb / brush or using a strong jet of cold water. It is advisable<br />
to also effect a chemical cleansing once a year to remove encrustations and oily <strong>de</strong>posits. If too much dirt is allowed to<br />
<strong>de</strong>posit, the system will be forced to operate at a higher pressure, reducing the cooling capacity of the indoor unit, and<br />
increasing, even to a dangerous level, the con<strong>de</strong>nsing temperature.<br />
High con<strong>de</strong>nsing pressure can provoke, as well as stopping the system, damage to the compressor.<br />
The screws of the con<strong>de</strong>nser fan should also be periodically tightened and the fan bla<strong>de</strong>s should be checked for corrosion or<br />
cracks.<br />
WARNING: particularly during the start-up and the first months of operation, it is very important to check<br />
occasionally that all the pipe connections (on shut-off valves, filters, expansion valve, etc.) are tight. Vibrations dur<br />
to the machine in operation and the changes in temperature can cause loosening of the screws in flaired pipe<br />
connections and subsequent loss of refrigerant gas.<br />
CHECKING THE FANS<br />
To make sure that the fans are always in good working or<strong>de</strong>r, it is advisable that they are checked once a month.<br />
Check the overall state of the fan, that there are no points of corrosion on the body (these should be cleaned and touched up<br />
using a zinc based paint) and that the fan is tightly fixed to the body of the unit (not loose) and that there are no unusual<br />
noises coming from the bearings.<br />
In the case of CED units with belt drive fans, the state and the tension of the drive belt should be checked.<br />
To modify the tension of the drive belt, one must adjust the position of the motor. To make this operation easier, the motor is<br />
placed on gui<strong>de</strong>s (for si<strong>de</strong>ways movement, to align the pulleys) and on a sli<strong>de</strong> (for lengthwise movement, to tension the belt.<br />
Each time that the belt tension is modified, check also the alignment of the pulleys. To ensure the pulleys are aligned, one<br />
can use a simple ruler (see fig. 7).<br />
If the pulleys have a different thickness, then act as in fig. 8.<br />
WARNING : Insufficient tension - rapid wearing and breakage of the drive belt .<br />
Excessive tension - rapid wearing of the motor bearings and of the fan bearings.<br />
05.08 Ref.200989 Rev.100 47
MAINTENANCE<br />
Fig. 7<br />
Fig. 8<br />
N.B.: It is advisable, however, that (in or<strong>de</strong>r to ensure that the above-mentioned operations are efficiently and<br />
correctly effected) a service contract be drawn up with a HITECSA authorised <strong>de</strong>aler or service-company. This will<br />
guarantee a programmed maintenance service by specialised personnel allowing for 2 - 6 interventions per year<br />
<strong>de</strong>pending on the installation type and size and the working hours of the system.<br />
48 05.08 Ref.200989 Rev.100
MAINTENANCE<br />
DISPOSAL OF MATERIALS<br />
Filters:<br />
Filters should be collected, placed in hermetic containers and sent to an authorised collection point, as per current norms.<br />
Plastic or rubber materials and accessories: To be sent to specialised disposal centres, as foreseen by current norms.<br />
Ferrous materials:<br />
To be sent to specialised disposal centres, as foreseen by current norms.<br />
Oils:<br />
Current legislation prohibits the discharge of oils into sewer network and/or directly into the environment.<br />
All oils must be collected and han<strong>de</strong>d over to authorised disposal centres and must not be left in the environment.<br />
This product is suitable for combustion in a specific closed and controlled burner, or for recycling in a specialised plant.<br />
It may be possible to dispose of certain oils in agricultural terrain or in a purification plant, but it is necessary always to obtain<br />
permission from local authorities.<br />
The conditions of the oil, at the moment of disposal, may influence the options that are available.<br />
Refrigerant gases:<br />
Remains and/or unused quantities of gases; these should un<strong>de</strong>r no circumstances be discharged into the environment.<br />
Non recyclable solutions or excess quantities should always be han<strong>de</strong>d over to companies authorised to dispose of them, in<br />
conformity with any local norms or legislation.<br />
The producer or supplier should be able to give any information regarding recuperating or recycling gases by expert<br />
refrigeration engineers.<br />
Never use empty unpressurised containers. Any unpressurised containers should be returned to the supplier.<br />
05.08 Ref.200989 Rev.100 49
TROUBLESHOOTING<br />
INDICATIVE LIST OF THE MORE FREQUENT FAULTS THAT CAN CAUSE MACHINE MALFUNCTION<br />
Even though all HITECSA units are fully checked and tested in the factory before they are shipped to site or to <strong>de</strong>aler’s<br />
premises, malfunctions can occur. Before applying the general Warranty Terms, it is imperative to ensure the entity of any<br />
damage or malfunction and to <strong>de</strong>termine its causes. Below is a list of the more frequent causes of damages or malfunction<br />
that occur as a result of ina<strong>de</strong>quate care after the units have left the factory. It is a good i<strong>de</strong>a to check these before installing<br />
or running the units.<br />
• Breakage of the capillary tubes and of the pressure switch connections due to rough handling or excessive vibrations<br />
during transport.<br />
• Breakage of the piping within the refrigeration circuit as a result of rough handling on site.<br />
• Loosened connections due to lack of maintenance.<br />
• Clogged or dirty filters due to lack of start-up maintenance causing ina<strong>de</strong>quate function of the refrigeration circuit.<br />
• Dirt, particles, objects, etc. that have fallen into the cochlea of the fans.<br />
• Incorrect fan motor current, resulting from a discordance between required available pressure and actual pressure<br />
drop, or resulting from the fans being ma<strong>de</strong> to run with their front panel open.<br />
• (The contractor installing the equipment must remember to check the power input of the fan motors).<br />
• Contactors that do not close properly and remain noisy as a result of dirt or other <strong>de</strong>posits during storage of unit on<br />
site.<br />
• Activation of high pressure switch as a result of incorrect installation of the con<strong>de</strong>nser or as a result of low air-flow or<br />
as a result of excessive refrigerant gas load.<br />
• Activation of low pressure switch because the A/C unit is operating with insufficient refrigerant gas, a low air-flow (dirty<br />
or clogged filters), or because the air on the coil has lower temperature than the original <strong>de</strong>sign temperature.<br />
• In air-cooled systems with a remote con<strong>de</strong>nser, there can be frequent activations of the low pressure switch during<br />
start-up or operation in Winter as a result of the refrigerant gas accumulating in the con<strong>de</strong>nser. The entity of this<br />
problem is reduced when the microprocessor controller is fitted to the A/C units since there is a <strong>de</strong>lay on the<br />
activation of the low pressure switch during start-up (see MICRO AC instruction manual).<br />
• It is advisable to install non-return valves on the pipes connecting the con<strong>de</strong>nser in or<strong>de</strong>r to reduce this<br />
problem, in particular when the con<strong>de</strong>nser is in a position higher than the indoor unit.<br />
50 05.08 Ref.200989 Rev.100
SOMMAIRE<br />
PRÉCAUTIONS DE SÉCURITÉ......................................................52<br />
INFORMATION GÉNÉRALE......................................................53,54<br />
RÉCEPTION DE L’UNITÉ.........................................................55,56<br />
INSTALLATION......................................................................57-66<br />
MISE EN MARCHE..................................................................67-69<br />
ENTRETIEN...........................................................................70-73<br />
RECHERCHE DE PANNES............................................................74
PRÉCAUTIONS DE SÉCURITÉ<br />
RISQUES MECANIQUES<br />
Risque <strong>de</strong> coup et <strong>de</strong> coupures aux mains pendant les travaux <strong>de</strong> maintenance, avec l’unité ouverte<br />
et en fonction (sans panneaux <strong>de</strong> sécurité), voir signaux appliqués à l’intérieur <strong>de</strong> l’unité.<br />
Les travaux <strong>de</strong> maintenance ne sont permis qu’aux personnes autorisées et qualifiées.<br />
RISQUES ELECTRIQUES<br />
Le danger peut se vérifier s’il y a un contact acci<strong>de</strong>ntel avec la ligne d’alimentation à l’entrée du<br />
sectionneur dans le cas <strong>de</strong> maintenance avec panneau électrique ouvert.<br />
Les travaux <strong>de</strong> maintenance ne sont permis qu’aux personnes autorisées et qualifiées.<br />
RISQUES THERMIQUES<br />
Risque <strong>de</strong> brulure aux mains sur les tuyaux du circuit <strong>de</strong> con<strong>de</strong>nsation, pendant les opérations <strong>de</strong> maintenance, avec l’unité<br />
ouverte et en fonction (sans panneaux <strong>de</strong> sécurité), voir signaux appliqués à l’intérieur <strong>de</strong> l’unité. Les travaux <strong>de</strong><br />
maintenance ne sont permis qu’aux personnes autorisées et qualifiées.<br />
DANGER A CAUSE DE BRUIT OU VIBRATIONS<br />
AUCUN<br />
DANGER A CAUSE D’UNE SOURCE NUISIBLE (electricité, electricité statique, champs magnétiques, radiations,<br />
laser etc...)<br />
AUCUN<br />
AUTRES SOURCES NUISIBLE A LA SANTE (poudres, gaz, eau, vapeur, flui<strong>de</strong>s, brumes, fumée, feu explosion,<br />
matiéres biologiques, e microbiologiques, chimiques etc...)<br />
Gaz frigorifiques : ne sou<strong>de</strong>z pas sur tuyau o conteneurs qui contient du gaz.<br />
RISQUES ERGONOMIQUES (distances <strong>de</strong> sécurité, dimensions et geometries ergonomiques etc...)<br />
AUCUN<br />
COMBINAISON DE DANGERS (interruption <strong>de</strong> l’energie)<br />
AUCUN<br />
DANGERS A CAUSE DE SITUATIONS NON PREVUES<br />
AUCUN<br />
52 05.08 Ref.200989 Rev.100
INFORMATION GÉNÉRALE<br />
DEFINITION DES SERIES ET DES CODES<br />
• CED armoires verticales compactes <strong>de</strong> climatisation informatique à détente directe<br />
• CEM armoires verticales moyennes / gran<strong>de</strong>s <strong>de</strong> climatisation informatique à détente directe<br />
• CEW armoires verticales très compactes <strong>de</strong> climatisation informatique à eau glacée<br />
IDENTIFICATION<br />
15... - la taille <strong>de</strong> l’armoire<br />
/A - indique climatiseur avec soufflage en AMBIANCE<br />
CONF. - indique climatiseur avec soufflage dans le FAUX PLANCHER<br />
CONF. SERIES DESCRIPTION<br />
1 CED, CEM climatiseurs avec compresseur et con<strong>de</strong>nseur incorporés refroidis à eau<br />
2 CED, CEM climatiseurs avec compresseur incorporé et con<strong>de</strong>nseur à distance refroidi à air<br />
3 CED, CEM climatiseurs avec groupe <strong>de</strong> con<strong>de</strong>nsation refroidi à eau<br />
4 CED, CEM climatiseurs avec groupe <strong>de</strong> con<strong>de</strong>nsation refroidi à air<br />
5 CEW climatiseurs à eau glacée<br />
6 CED, CEM climatiseurs avec compresseur et con<strong>de</strong>nseur refroidis à eau glycolée et incorporés dans<br />
l’unité (circuit fermé)<br />
7 CEM climatiseurs “Dual Cool” avec <strong>de</strong>ux moyens <strong>de</strong> refroidissement, batterie à eau glacée et<br />
batterie à détente directe<br />
8 CEM climatiseurs “Cool Recovery” avec possibilité <strong>de</strong> freecooling pendant les saisons froi<strong>de</strong>s<br />
9 CEM climatiseurs à pompe à chaleur<br />
HR CEM units with <strong>de</strong>superheater for the production of hot sanitary water<br />
Toutes les armoires peuvent avoir, sur <strong>de</strong>man<strong>de</strong>, les accessoires suivants:<br />
-humidificateur à vapeur<br />
-batterie électrique <strong>de</strong> rechauffage à un ou plusieurs étage<br />
-batterie <strong>de</strong> rechauffage à eau chau<strong>de</strong><br />
-batterie <strong>de</strong> rechauffage à gaz chaud (seulement pour les armoires CED et CEM avec les conf. 1 et 2)<br />
-kit air neuf<br />
-kit toutes saisons (régulation <strong>de</strong> la vitesse <strong>de</strong>s ventilateurs du con<strong>de</strong>nseur, conf. 2 et 4)<br />
-regulation <strong>de</strong> temperature et hygrométrie avec controle à microprocesseur (voir noticespécifique pour les instructions).<br />
05.08 Ref.200989 Rev.100 53
INFORMATION GÉNÉRALE<br />
APPLIQUE SUR PANNEAUX FERMES<br />
Interdit d’enléver les panneaux <strong>de</strong> sécurité avec l’unité en fonction.<br />
Il est obligatoire <strong>de</strong> repositioner les panneaux <strong>de</strong> sécurité avant <strong>de</strong> démarrer l’unité.<br />
APPLIQUE SUR PANNEAU FRONT<br />
Interdit d’effectuer opérations <strong>de</strong> maintenance avec l’unité en fonction.<br />
APPLIQUE SUR PANNEAU ELECTRIQUE<br />
Consulter la notice d’opération, le schéma électrique ou les procédures.<br />
Interdit d’ouvrir le panneau électrique par personnes non autorisées.<br />
Panneau sous tension.<br />
Interdit d’utiliser <strong>de</strong> l’eau pour éteindre un incendie.<br />
SI NECESSAIRE<br />
Attention, branchement <strong>de</strong> protection electrique, ne pas enlever.<br />
54 05.08 Ref.200989 Rev.100
RÉCEPTION DE L’UNITÉ<br />
RECEPTION<br />
Au moment <strong>de</strong> la réception <strong>de</strong>s machines il faut procé<strong>de</strong>r à un contrôle soigné pour relever immédiatement s’il y a <strong>de</strong>s<br />
endommagements dus au transport.<br />
Les machines sont fournies départ usine et la HITECSA n’est pas responsable <strong>de</strong>s endommagements éventuels dus au<br />
transport.<br />
Si l’endommagement est évi<strong>de</strong>nt il <strong>de</strong>vra alors être noté sur les bor<strong>de</strong>reaux <strong>de</strong> livraison et réclamé au transporteur.<br />
Les climatiseurs sont construits pour l’installation à l’intérieur <strong>de</strong>s locaux et ils ne doivent donc pa être exposés aux<br />
intempéries. Nous conseillons <strong>de</strong> laisser les groupes emballés pendant leur mouvement et déplacement sur le site et <strong>de</strong><br />
n’enlever l’emballage qu’au moment <strong>de</strong> l’installation.<br />
Fig. 1<br />
05.08 Ref.200989 Rev.100 55
RÉCEPTION DE L’UNITÉ<br />
DEPLACEMENT DES UNITES<br />
Toutes les armoires sont expédiées sur palettes (sauf s’il y a une <strong>de</strong>man<strong>de</strong> spécifique <strong>de</strong> la part du client), et pour déplacer<br />
les unités, il faut utiliser un élévateur ou transpallet. Dans le cas qu’il faut soulever l’unité avec une grue, l’armoire doit etre<br />
soutenue <strong>de</strong> la manière indiquée en fig.1.<br />
L’armoire ne doit JAMAIS être couchée ou inclinée, à part le risque <strong>de</strong> dommages aux composants à l’intérieur, il peut etre<br />
aussi très dangereux pour les personnes (l’armoire n’est pas fixée fermement sur sa palette et donc peut glisser et se<br />
détacher facilement) -voir fig. 2b-2c. L’unité doit TOUJOURS rester <strong>de</strong>bout voir fi<br />
Fig. 2a OK Fig. 2b NO Fig. 2c NO<br />
56 05.08 Ref.200989 Rev.100
INSTALLATION<br />
INSTALLATION UNITES A’ DETENTE DIRECTE<br />
Le climatiseur es t installé normalement à l’interieur <strong>de</strong> l’ambiance qui doit etre climatisé; l’unité (soufflage dans le faux<br />
plancher) peut etre posée directement sur le faux plancher à condition que le meme peut supporter le poids en fonction <strong>de</strong><br />
l’unité. Sinon il y a la possibilité d’utiliser un socle, soit avec, soit sans convoyeur <strong>de</strong> l’air, afin <strong>de</strong> poser tout le poids<br />
directement au sol, et ainsi éviter <strong>de</strong> surcharger le faux plancher et d’y transmettre <strong>de</strong> vibrations. Le socle rend plus facile<br />
l’installation <strong>de</strong> l’unité et évite la nécessité <strong>de</strong> faire <strong>de</strong>s trous supplementaire dans le faux plancher pour le passage <strong>de</strong><br />
cables, tuyaux, etc. La maintenance <strong>de</strong>vient aussi plu aisée puisqu’on peut enlever tous les panneux du plancher autour <strong>de</strong><br />
l’unité pour l’accés. Dans le cas ou le socle ne vient pas utilisé, les bords <strong>de</strong> l’unité s’appuyent directement sur le faux<br />
plancher, et il est donc nécessaire laisser <strong>de</strong> la place ou il se peut appuyer (voir fig. 3, P et Q sont le dimensions <strong>de</strong> l’unité).<br />
- L’armoire doit etre positionnée <strong>de</strong> façon qu’il n’y a pas d’obstacle à la reprise <strong>de</strong> l’air et que<br />
l’inspection à l’interieur soit possible. Ces armoires ont seulement inspection frontale. La zone libre est <strong>de</strong> minimum 60-<br />
70 cm. (voir fig. 4).<br />
Fig. 3 Fig. 4<br />
Autres dimensions, position et dimensions raccords et autres informations qui peuvent etre utile à l’installateur se trouvent<br />
dans la notice technique “Technical Handbook“ <strong>de</strong> la série <strong>de</strong>s machines.<br />
L’unité extérieure utilisée pour les configurations 2 -4 -6 doit etre positionée à l’extérieur et on doit chercher, selon la place<br />
disponible, <strong>de</strong> gar<strong>de</strong>r une distance la plus courte possible entre l’armoire et l’unité extérieure. Elle doit etre installée en<br />
position facilement accessible et avoir assez <strong>de</strong> place (au moins 50cm) tout autour pour la maintenance et pour l’aspiration<br />
<strong>de</strong> l’air. L’air qui sort d’un con<strong>de</strong>nseur ou d’un groupe <strong>de</strong> con<strong>de</strong>nsation à air ne doit pas avoir aucun obstacle pour une<br />
distance minimum <strong>de</strong> 100 cm. et l’air ne doit pas eter convo ée vers l’aspiration d’autres con<strong>de</strong>nseurs. En cas <strong>de</strong><br />
con<strong>de</strong>nseur (configuration 2), l’installateur doit ajouter sur la ligne du compresseur au con<strong>de</strong>nseur, un antivibratil et un<br />
silencieur (voir fig. 5). En cas <strong>de</strong> groupe <strong>de</strong> con<strong>de</strong>nsation (configuration 4), l’installateur doit prévoir un syphon chaque 2/3<br />
metres en hauteur et incliner les lignes <strong>de</strong> 1% (voir fig. 6). Autres informations sont disponibles dans les notice technique<br />
“Technical Handbook <strong>de</strong>s unités extérieures.<br />
Le groupe <strong>de</strong> con<strong>de</strong>nsation à eau (configuration 3) doit etre facilement accessible pour la maintenance, mais non pas<br />
exposé au mauvais temp- elle doit etre protegé <strong>de</strong> la pluie et du géle.<br />
05.08 Ref.200989 Rev.100 57
INSTALLATION<br />
1) antivibrantil<br />
2) silencieur<br />
3) recepteur liqui<strong>de</strong><br />
Fig. 5<br />
2/3 metres 2/3 metres<br />
Min. 1%<br />
Fig. 6<br />
58 05.08 Ref.200989 Rev.100
INSTALLATION<br />
RACCORDEMENTS FRIGORIFIQUES<br />
Les circuits frigorifiques intérieurs aux climatiseurs sont réalisés en usine; les points <strong>de</strong> raccor<strong>de</strong>ment sont accessibles à<br />
l’intérieur <strong>de</strong> la machine et sont interceptés avec <strong>de</strong>s robinets.<br />
Les raccor<strong>de</strong>ments frigorifiques qui doivent se faire sur place sont les raccords entre unité intérieure et unité à distance<br />
(extérieure). Le calcul <strong>de</strong>s dimensions <strong>de</strong>s tuyaux doit être fait tenant compte <strong>de</strong>s distances et <strong>de</strong> les pertes <strong>de</strong> charges due<br />
aux courbes, syphons, etc. Les diagrammes à l’Appendix III peuvent donner <strong>de</strong> indications.<br />
Pour la réalisation <strong>de</strong> ces lignes:<br />
-Utiliser exclusivement <strong>de</strong>s canalisations en cuivre <strong>de</strong> section a<strong>de</strong>quate à la puissance frigorifique.<br />
-Les canalisations ne doivent pas être mises côte à côte afin d’éviter du bruit causé par <strong>de</strong>s vibrations.<br />
ATTENTION: Lors <strong>de</strong> la réalisation et positionnement <strong>de</strong>s lignes frigorifiques, il faut bien isoler la<br />
ligne <strong>de</strong> refoulement pour éviter, à cause <strong>de</strong> sa temperature elevée, brulures aux personnes.<br />
-Dans les changements <strong>de</strong> direction <strong>de</strong>s canalisations d’aspiration utiliser <strong>de</strong>s courbes <strong>de</strong> rayons amples plutôt qu’à angle<br />
(on obtient <strong>de</strong> cette façon une bonne réduction du bruit et <strong>de</strong> pertes <strong>de</strong> charge).<br />
-Le nettoyage <strong>de</strong>s canalisations doit etre parfait ainsi que le séchage, soufflant avec <strong>de</strong> l’azote.<br />
-Dans le cas qu’on n’obtient pas une garantie suffisante <strong>de</strong> nettoyage et <strong>de</strong> séchage du circuit, prévoir sur la ligne du liqui<strong>de</strong><br />
(pour conf.2), ou sur la ligne d’aspiration (pour les conf. 3 et 4), un filtre déhydrateur.<br />
-Le filtre <strong>de</strong>vra pouvoir être inspecté afin <strong>de</strong> pouvoir remplacer la cartouche <strong>de</strong>hydratante.<br />
-Le remplacement <strong>de</strong> la cartouche du filtre peut être nécessaire plusieurs fois, avant que la ligne soit propre. -Il est<br />
reccomandé <strong>de</strong> laisser la <strong>de</strong>rnière cartouche sur l’installation pendant au moins 48 ionnement effectif, avant <strong>de</strong> l’enlever,<br />
et <strong>de</strong> laisser ensuite la canalisation libre.<br />
NOTEZ QUE LA CAUSE PRINCIPALE DES ENDOMMAGEMENTS IMPORTANTS AU COMPRESSEUR EST DU<br />
POUR LA PLUPART AU NETTOYAGE ET SECHAGE IMPARFAITS DES CANALISATIONS FRIGORIFIQUES.<br />
-Sur les tuyaux mettre un raccord <strong>de</strong> charge pour réaliser le vi<strong>de</strong> absolu <strong>de</strong> ces tuyaux avant d’ouvrir les robinets vu que nos<br />
unités sont déjà chargées avec du gaz FREON. Le type <strong>de</strong> gaz est indiqué sur la machine.<br />
-Une fois terminé les raccor<strong>de</strong>ments et le vi<strong>de</strong>, introduire le FREON (le meme utilisé dans la machine) et effectuer un<br />
contrôle soigné sur le circuit afin d’i<strong>de</strong>ntifier <strong>de</strong>s pertes éventuelle avec l’ai<strong>de</strong> d’un recherche perte <strong>de</strong> gaz.<br />
-Si <strong>de</strong>s pertes ont été i<strong>de</strong>ntifiées, elles <strong>de</strong>vront être réparées et, après avoir recontrôlé la tenue, effectuer à nouveau le vi<strong>de</strong><br />
absolu <strong>de</strong>s tuyaux installés.<br />
ATTENTION: dans le cas d’un groupe <strong>de</strong> con<strong>de</strong>nsation (conf.3 -4) soit plus haut que l’unité intérieure, il faudra ajouter <strong>de</strong>s<br />
syphons opportuns à la ligne <strong>de</strong> refoulement <strong>de</strong> façon à reporter l’huile au compresseur (un syphon chaque 2-3 mètres <strong>de</strong><br />
dénivellation). Voir fig. 6 et “Technical Handbook” du groupe <strong>de</strong> con<strong>de</strong>nsation.<br />
Pour le dimensionement <strong>de</strong>s canalisations, s’abstenir aux dimensions indiquées sur les schémas pour une distance<br />
non supérieure à 10 mètres; pour <strong>de</strong>s distances supérieures consulter notre bureau technique ou un frigoriste<br />
spécialisé.<br />
05.08 Ref.200989 Rev.100 59
INSTALLATION<br />
VIDE PNEUMATIQUE DU CIRCUIT FRIGORIFIQUE<br />
L’exécution du vi<strong>de</strong> <strong>de</strong>man<strong>de</strong>rait une longue exposition, mais nous retenons suffisants les points suivants:<br />
-Employer <strong>de</strong>s pompes pour le vi<strong>de</strong> dont l’efficacité soit absolument sûre et eventuellement contrôler avec un bon<br />
vacuomètre la valeur du vi<strong>de</strong> effectuée par la pompe avant <strong>de</strong> l’installer dans le circuit.<br />
-On doit arriver à 1 mBar avec R22 et 0,3mBar avec R407c ou R134a et le vi<strong>de</strong> va gardé pour 1 heure (dans un<br />
longue circuit, meme plus, jusqu’à ce que l’humidité soit moins <strong>de</strong> 10 ppm).<br />
-Pour le contrôle du vi<strong>de</strong> il n’est pas nécessaire l’utilisation <strong>de</strong> manomètres.<br />
-Raccor<strong>de</strong>r la pompe aux <strong>de</strong>ux raccords prédisposés précé<strong>de</strong>mment.<br />
-Faire partir la pompe et en contrôler le sens exact <strong>de</strong> rotation.<br />
-Maintenir lestée la pompe au moins pendant la première heure <strong>de</strong> fonctionnement<br />
-Ne jamais laisser l’installation avec la pompe en fonction si elle n’a pas une vanne automatique opportune car si la<br />
pompe s’arrête, pour manque d’énergie électrique ou pour d’autres raisons, l’huile <strong>de</strong> la pompe ira dans le circuit<br />
frigorifique.<br />
-Tenez présent que le vi<strong>de</strong> d’une installation <strong>de</strong>vrait arriver au moins aux valeurs indiquées ci-<strong>de</strong>ssus et on <strong>de</strong>vra<br />
encore laisser fonctionner la pompe pendant au moins une heure en ouvrant <strong>de</strong> temps en temps le robinet <strong>de</strong><br />
lestage.<br />
PREPARATION A LA CHARGE FRIGORIFIQUE DE L’INSTALLATION<br />
Se rappellez toujours que nos unités à détente directe, sauf si spécifié différemment au moment <strong>de</strong> la comman<strong>de</strong>, sont déjà<br />
chargées <strong>de</strong> fréon, donc la charge s’entend pour le remplissage <strong>de</strong>s canalisations installées. Pour effectuer cette opération<br />
on procè<strong>de</strong> comme suit:<br />
- Introduire un manomètre sur le robinet <strong>de</strong> soufflage du compresseur et tourner en sens horaire, d’ un tour, le<br />
manche du robinet.<br />
- Introduire la bouteille et le manomètre sur le robinet d’aspiration. -éliminer l’air <strong>de</strong> la canalisation entre la bouteille et<br />
le niples en déch argeant le gaz <strong>de</strong> la bouteille, à travers le tube, et <strong>de</strong>sserrer légèrement la buse <strong>de</strong> connexion au<br />
niples du robinet d’aspiration.<br />
- Bloquer à nouveau la buse et, avec la bouteille ouverte, tourner en sens horaire, <strong>de</strong> <strong>de</strong>ux tour le goujon du robinet<br />
d’aspiration du compresseur.<br />
- ATTENTION: lorsqu’on charge le circuit avec R22 ou R134a il est conseillé the charger le circuit avec le réfrigerant<br />
en forme gazeuse afin d’éviter le danger d’emulsification <strong>de</strong> l’huile et <strong>de</strong> coups <strong>de</strong> liqui<strong>de</strong> aux vannes du<br />
compresseur. Tandis que pour le R407c, puisqu’il s’agit d’une mélange instable composée <strong>de</strong>:<br />
23% R32 (CH 2 F 2 )<br />
25% R125 (CH 3 -CHF 3 )<br />
52% R134a (CF 3 -CH 2 F)<br />
et puisque ces gaz sont volatile <strong>de</strong> façon différente l’un <strong>de</strong> l’autre, le circuit doit être chargé avec le réfrigerant en<br />
forme liqui<strong>de</strong> pour être sur <strong>de</strong> l’avoir chargé la mélange dans pourcentage indiqués. La charge du circuit doit être<br />
faite par un frigoriste expert et en faisant beaucoup d’attention.<br />
- Ouvrir les robinets soit sur l’armoire soit sur l’unité extérieure.<br />
CONSEILS IMPORTANTS POUR LA MISE EN SERVICE DES COMPRESSEURS FRIGORIFIQUES<br />
Pour tous les appareils employant <strong>de</strong>s machines frigorifiques <strong>de</strong> puissance supérieure à 2 HP (1,4 kW) il est <strong>de</strong>mandé, <strong>de</strong><br />
façon la plus absolue, une phase <strong>de</strong> pré-réchauffement <strong>de</strong> l’huile dans le compresseur avant la mise en service.<br />
La durée du pré-réchauffement ne peut être en aucun cas inférieure à minimum 6 heures.<br />
Le pré-réchauffement s’effectue en arrêtant l’intérupteur général, extérieur à l’appareil, <strong>de</strong> façon à ce que la borne<br />
d’alimentation <strong>de</strong> celui-ci soit sous tension.<br />
Pendant cette pério<strong>de</strong> on doit laisser en position “OFF” la comman<strong>de</strong> <strong>de</strong> l’appareil et ne faire fonctionner pour<br />
aucune raison le compresseur frigorifique.<br />
60 05.08 Ref.200989 Rev.100
INSTALLATION<br />
Passées les 6 heures on pourra faire fonctionner le compresseur, après s’être assuré que la coupe <strong>de</strong><br />
l’huile <strong>de</strong> celui-ci soit chau<strong>de</strong> en touchant avec la main.<br />
Contrôler que tous les liaisons électriques soient parfaitement faites, contrôler le serrage <strong>de</strong>s bornes,contrôler que la<br />
tension d’alimentation soit celle <strong>de</strong> la plaque d’i<strong>de</strong>ntification <strong>de</strong> la machine, et seulement après faire démarrer le<br />
compresseur.<br />
Il est très probable que le compresseur frigorifique s’arrête pratiquement <strong>de</strong> suite pour l’intervention du pressostat <strong>de</strong> basse<br />
pression vu que le circuit est seulement chargé partiellement.<br />
Continuant l’opération <strong>de</strong> charge, contrôler les manomètres (haute et basse pression) et la vitre témoin <strong>de</strong><br />
l’indicateur <strong>de</strong> liqui<strong>de</strong> en fermant temporairement la bouteille.<br />
Suivant le type <strong>de</strong> contrôle <strong>de</strong> con<strong>de</strong>nsation prévu (kit toutes saisons), dans le fonctionnement on obtiendra une pression <strong>de</strong><br />
con<strong>de</strong>nsation plus ou moins stable et précisemment:<br />
- Avec un contrôle <strong>de</strong> la con<strong>de</strong>nsation MODULAN (conf. 2 -4) la pression sera stable à une valeur d’environ<br />
16 Bar (R22 et R407c) ou 10 bar (R134a).<br />
- Avec un contrôle <strong>de</strong> la con<strong>de</strong>nsation TOUT-RIEN (conf. 2 -4) la pression montera jusqu’à 16 bar pour ensuite<br />
<strong>de</strong>scendre plus ou moins rapi<strong>de</strong>ment en fonction <strong>de</strong> la température <strong>de</strong> l’air <strong>de</strong> refroidissement.<br />
- Avec un contrôle <strong>de</strong> la pression <strong>de</strong> con<strong>de</strong>nsation pressostatique (conf. 1-3) avec alimentation à eau <strong>de</strong> puits il faut<br />
régler opportunement la vanne pressostatique en agissant sur le manche <strong>de</strong> la régulation comme indiqué sur la<br />
figure 9. Si par contre le climatiseur est alimenté avec <strong>de</strong> l’eau <strong>de</strong> tour à circuit fermé, l’installation doit avoir une<br />
régulation <strong>de</strong> la température <strong>de</strong> l’eau d’alimentation au con<strong>de</strong>nseur.<br />
- Si la pression <strong>de</strong> con<strong>de</strong>nsation passe 19 bar (R22 et R407c) ou 10 bar (R134a), arrêter le compresseur et<br />
contrôler le con<strong>de</strong>nseur qui ne sera surement pas refroidi suffisament.<br />
- En cas <strong>de</strong> haute température <strong>de</strong> con<strong>de</strong>nsation avec <strong>de</strong>s con<strong>de</strong>nseurs à eau, contrôler la température d’entrée et<br />
sortie <strong>de</strong> l’eau et régler éventuellement la vanne <strong>de</strong> l’eau.<br />
- La pression d’aspiration subira parallèlement les variations <strong>de</strong> celle <strong>de</strong> soufflage<br />
Lorsque le circuit frigorifique est à moitié chargé, on notera les points suivants<br />
• La vitre témoin présentera un passage tourbillonaire du liqui<strong>de</strong> en ébullition <strong>de</strong> couleur blanchastre<br />
opaque.<br />
• La batterie à détente directe sera refroidie seulement en correspondance <strong>de</strong>s tube plus près au distributeur<br />
qui peut carrément être gelé (givré) tandis que le tube <strong>de</strong> retour au compresseur n’est pas encore bien<br />
froid.<br />
En continuant la charge on notera que la vitre témoin s’éclaircie petit à petit et se remplit <strong>de</strong> réfrigérant<br />
à l’état liqui<strong>de</strong>:<br />
- Arrêter le compresseur<br />
- Fermer la bouteille et contrôler que le manomètre sur l’aspiration signale une pression supérieure à 4 bar (R22 et<br />
R407c) ou 1 bar (R134a).<br />
- Faire dèmarrer le compresseur.<br />
- Continuer la charge jusqu’à ce que l’on note sur la vitre témoin seulement quelques petite bulles <strong>de</strong> Fréon gazeux.<br />
A partir <strong>de</strong> ce moment la machine est chargée <strong>de</strong> gaz et on peut enlever la bouteille en laissant installés les manomètre pour<br />
le contrôle <strong>de</strong> la pression d’évaporation et <strong>de</strong> con<strong>de</strong>nsation qui <strong>de</strong>vront être égales à celles du<br />
Exemple (configuration 2):<br />
Air à l’entrée <strong>de</strong> l’evaporateur +24°C.<br />
Température d’evaporation +5°C.<br />
Air à l’entrée <strong>de</strong> l’evaporateur +22°C.<br />
Température d’evaporation +4°C.<br />
Air à l’entrée du con<strong>de</strong>nseur +20°C<br />
Température <strong>de</strong> con<strong>de</strong>nsation +38°C.*<br />
05.08 Ref.200989 Rev.100 61
INSTALLATION<br />
Air à l’entrée du con<strong>de</strong>nseur +25°C<br />
Température <strong>de</strong> con<strong>de</strong>nsation +43°C.*<br />
Air à l’entrée du con<strong>de</strong>nseur +30°C<br />
Température <strong>de</strong> con<strong>de</strong>nsation +48°C.*<br />
Air à l’entrée du con<strong>de</strong>nseur +32°C<br />
Température <strong>de</strong> con<strong>de</strong>nsation +50°C.*<br />
Air à l’entrée du con<strong>de</strong>nseur +35°C<br />
Température <strong>de</strong> con<strong>de</strong>nsation +52°C.*<br />
* Attention : il est possible avoir <strong>de</strong>s températures <strong>de</strong> con<strong>de</strong>nsation différentes si le con<strong>de</strong>nseur monte la régulation<br />
“toutes saisons” modulante.<br />
Pour completer parfaitement la charge du circuit frigorifique, particulièrement pour les unité con<strong>de</strong>nsées à air, il est<br />
nécessaire que les conditions <strong>de</strong> projet relatives à la température du flui<strong>de</strong> <strong>de</strong> con<strong>de</strong>nsation soient à peu près satisfaisantes<br />
et qu’il y est en ambiance une charge thermique suffisante, <strong>de</strong> façon à ce que le circuit frigorifique fonctionne (aux conditions<br />
<strong>de</strong> l’ambiance prévue dans le projet) pour une durée suffisamment longue permettant le bon fonctionnement du complexe.<br />
Attention : Si la charge est effectuée en hiver il faut laisser l’installation légèrement déchargée afin d’éviter qu’en été<br />
l’installation s’arrete à cause <strong>de</strong> la haute pression.<br />
Inconvénients dûs à une charge excéssive <strong>de</strong> gaz<br />
La charge excessive <strong>de</strong> gaz détermine l’innondation <strong>de</strong>s tubes du con<strong>de</strong>nseur dont la surface ne fait plus partie du change<br />
thermique. Ceci représente une réduction <strong>de</strong> la surface du con<strong>de</strong>nseur. On obtiendra par conséquent une température <strong>de</strong> la<br />
con<strong>de</strong>nsation élevée tandis que la canalisation du liqui<strong>de</strong> sortant par le con<strong>de</strong>nseur sera à une température beaucoup plus<br />
basse par rapport à la pression <strong>de</strong> la con<strong>de</strong>nsation (lue sur le manomètre).<br />
Contrôle <strong>de</strong> l’absorption du compresseur<br />
Avec la machine en fonction et avec la température <strong>de</strong> la con<strong>de</strong>nsation maximale égale à 52°C. (19 Kg./cm2), qui est<br />
normalement la plus élevée que l’on puisse rencontrer dans les unitées avec le con<strong>de</strong>nseur à air, le moteur électrique du<br />
compresseur frigorifique aura une absorption inférieure à celle indiquée sur la plaquette sous le nom <strong>de</strong> “FLA” (Full Load<br />
Amperes = absorption électrique à charge pleine).<br />
Une absorption supérieure ou égale à celle <strong>de</strong> l’étiquette d’in<strong>de</strong>ntification est sinonyme <strong>de</strong> tension d’alimentation non<br />
correcte (chute <strong>de</strong> tension excessive en ligne) ou <strong>de</strong> température d’expansion et <strong>de</strong> con<strong>de</strong>nsation excessivement élevées<br />
pour quelques erreurs commises dans l’installation ou dans la charge.<br />
RACCORDEMENTS HYDRAULIQUES<br />
Pour tous les modèles et les configurations il faut pré voir, pour l’unité intérieure, à une évacuation <strong>de</strong> con<strong>de</strong>nsats <strong>de</strong><br />
dimensions diam. 3/4". Cette évacuation doit être réalisée avec une pente opportune, en tenant compte que l’on évacue par<br />
gravité, et ne doit pas être raccordé à d’autres évacuations en pression. Il est conseillé d’employer un syphon, pour éviter<br />
l’aspiration <strong>de</strong> mauvaises o<strong>de</strong>urs à travers la canalisation d’évacuation.<br />
Pour tous les modèles et les configurations munis du système d’humidification il faut alimenter le climatiseur avec <strong>de</strong> l’eau <strong>de</strong><br />
ville non traîtée, avec <strong>de</strong>s canalisations en materiel plastique “rilsan” <strong>de</strong> diam. 6 mm. complète <strong>de</strong> robinet d’interception.<br />
La pression d’alimentation doit être comprise entre 1,5 et 5 bar.<br />
62 05.08 Ref.200989 Rev.100
INSTALLATION<br />
Il faut prévoir aussi un tuyau <strong>de</strong> drainage, bien incliné et avec diamètre ¾”.<br />
Attention : ce drainage peut évacuer l’eau à la température d’environ 100°C., il est donc nécessaire d’utiliser <strong>de</strong>s<br />
canalisations qui résistent à la haute chaleur. Pour les groupes en conf. 1-3-5 et 6 les con<strong>de</strong>nseurs et les batteries <strong>de</strong> froid<br />
ou <strong>de</strong> chaud <strong>de</strong>vront être alimentés avec <strong>de</strong>s canalisations opportunément interceptées ou isolées, dans les diamètres et<br />
débit indiqués sur les schémas <strong>de</strong>s climatiseurs.<br />
RACCORDEMENTS ELECTRIQUES<br />
Chaque climatiseur est compris du schéma électrique relatif et les raccor<strong>de</strong>ments doivent être effectués comme indiqué sur<br />
ce schéma. Les câbles <strong>de</strong>vront être <strong>de</strong> section adéquate à la puissance <strong>de</strong> la machine en tenant compte <strong>de</strong> la longueur <strong>de</strong> la<br />
ligne pour contenir dans les tollérances la chute <strong>de</strong> tension.<br />
La ligne d’alimentation doit être protégée du court circuit.<br />
Si les unités intérieures et extérieures sont <strong>de</strong>mandées sans les sectionneurs relatifs, l’installateur doit s’occuper d’installer<br />
les sectionneurs en proximité aussi bien <strong>de</strong> l’unitée intérieure que <strong>de</strong> l’unitée extérieure.<br />
Les climatiseurs et les con<strong>de</strong>nseurs sont fournis <strong>de</strong> bornes <strong>de</strong> terre et ceux-ci doivent absolument être raccordés avec le<br />
rèseau <strong>de</strong> terre pour éviter <strong>de</strong>s inci<strong>de</strong>nts possibles. Pour les liaisons électriques entre armoire et unité extérieure voir les<br />
schémas jointes à l’unité et tenez compte <strong>de</strong>s puissances indiquées.<br />
L’installateur <strong>de</strong>vra s’assurer que la tension d’alimentation correspon<strong>de</strong> à celle indiquée sur la plaquette du climatiseur et sur<br />
le schéma électrique.<br />
Le fabricant n’est pas responsable pour aucun dommage qui peut résulter si toutes les indications c -<strong>de</strong>ssus n’ont<br />
pas été suivies correctement<br />
INSTALLATION UNITES A’ EAU GLACEE<br />
Les armoires à eau glacée et / ou avec batterie <strong>de</strong> chauffage à eau chau<strong>de</strong> doivent être raccordées à une alimentation d’eau<br />
(glacée et chau<strong>de</strong>) comme il est indiqué dans les schémas fournis ave chaque unité.<br />
Il est conseillé avoir sur chaque raccor<strong>de</strong>ment <strong>de</strong>s robinets, installés sur les points plus bas <strong>de</strong> chaque circuit, et cela pour<br />
les normales opérations d’entretien.<br />
Tous les tuyaux d’alimentation et <strong>de</strong> retour <strong>de</strong> l’eau doivent être bien isolés afin d’éviter dispersion thermique et la formation<br />
<strong>de</strong> con<strong>de</strong>nsats.<br />
S’assurer aussi <strong>de</strong> la bonne tenue du circuit et le remplir en faisant attention à enlever toute l’air qui peut s’y trouver -il faut<br />
agir sur les vannes d’évent qui se trouvent sur les collecteurs <strong>de</strong>s batteries ou en autres endroits hauts.<br />
Dans les armoires complètes <strong>de</strong> vanne motorisée, vérifier le fonctionnement du servomoteur et que l’ouverture <strong>de</strong> la vanne<br />
soit synchronisée avec la <strong>de</strong>man<strong>de</strong> <strong>de</strong> froid.<br />
Les raccords pour le drainage <strong>de</strong>s con<strong>de</strong>nsats les raccords <strong>de</strong> l’umidificateur, ainsi que les raccord électriques, sont les<br />
memes indiquès dans les pages précé<strong>de</strong>ntes.<br />
05.08 Ref.200989 Rev.100 63
INSTALLATION<br />
VANNE PRESSOSTATIQUE <strong>de</strong> l’eau <strong>de</strong> con<strong>de</strong>nsation<br />
A<br />
B<br />
C<br />
D<br />
A Poignée <strong>de</strong> régulation (en vissant le débit d’eau diminue en dévissant il augmente)<br />
B Direction <strong>de</strong> l’eau<br />
C Manchon pour raccor<strong>de</strong>r le tube capillaire au à la ligne <strong>de</strong> refoulement du compresseur<br />
D Tube capillaire<br />
64 05.08 Ref.200989 Rev.100
INSTALLATION<br />
TRANSDUCTOR DE PRESSION<br />
Le point <strong>de</strong> fonctionnement <strong>de</strong>mandé <strong>de</strong> la tension pleine (FVS) peut être réglé en agissant sur la vi<br />
<strong>de</strong> régulation (R) <strong>de</strong>s transducteurs <strong>de</strong> pression.<br />
Les impostations d’usine <strong>de</strong>s transducteurs P35AC sont:<br />
8-14 bar = 10 bar (=FVS)<br />
14-24 bar = 16 bar (=FVS)<br />
Vitesse minimale<br />
Afin d’empêcher que la vitesse du ventilateur <strong>de</strong>scen<strong>de</strong> en <strong>de</strong>ssous <strong>de</strong>s niveaux admissibles, la tension <strong>de</strong> la vitesse<br />
minimale (Vrms) peut être installée entre 45 et 90% <strong>de</strong> la tension <strong>de</strong> ligne, en agissant sur la poignée <strong>de</strong> l’unitée électronique<br />
P38AA. La valeur <strong>de</strong> la vitesse minimale a une influence sur la ban<strong>de</strong> proportionnelle. Plus la valeur <strong>de</strong> la vitesse minimale<br />
est élevée, plus la ban<strong>de</strong> proportionnelle effective est basse.<br />
Point d’interdiction<br />
Si le régulateur ne doit pas tourner à une vitesse minimale, mettre la poignée qui se trouve sur l’unitée électronique sur le<br />
point d’interdiction. La ortie au moteur se met en fonction à peine la pression <strong>de</strong>scend en <strong>de</strong>ssous <strong>de</strong> la valeur du point <strong>de</strong><br />
fonctionnement <strong>de</strong>mandé moins la ban<strong>de</strong> proportionnelle (le ventilateur s’arrête). Le régulateur est réglé à l’usine <strong>de</strong> manière<br />
que le ventilateur puisse aller <strong>de</strong> 0 jusqu’à 100% <strong>de</strong> sa vitesse, puisque les ventilateurs normalement utilisés peuvent<br />
fonctionner sur tout le champ <strong>de</strong> tension.<br />
Contrôle du système<br />
Une fois installé et réglé le dispositif <strong>de</strong> contrôle, contrôler le système en faisant faire à l’appareilau moins un cycle opératif<br />
complet. Si quelque chose ne fonctionnait pas bien, recontrôler aussi bien le cablâge que les composants <strong>de</strong> l’appareil.<br />
05.08 Ref.200989 Rev.100 65
INSTALLATION<br />
PRESSOSTAT MODULAN<br />
3<br />
1<br />
2<br />
1. Vis <strong>de</strong> régulation du point <strong>de</strong> tarage (point <strong>de</strong> consigne)<br />
2. Bornier<br />
3. Régulation <strong>de</strong> la vitesse minimale (cut off)<br />
Réglages :<br />
a. pour augmenter la pression: tourner la vis 1 en sens horaire<br />
b. cut-off: tourner l’échelle <strong>de</strong> graduation en position OFF et la vitesse du ventilateur varie <strong>de</strong> 0 à 100% <strong>de</strong>s tours<br />
selon la pression <strong>de</strong> con<strong>de</strong>nsation, tandis que tournant en sens horarire on peut fixer la vitesse minimum du<br />
ventilateur.<br />
Le régulateur est réglé à l’usine <strong>de</strong> manière que le ventilateur puisse aller <strong>de</strong> 0 jusqu’à 100% <strong>de</strong> sa vitesse, puisque les<br />
ventilateurs normalement utilisés peuvent fonctionner sur tout le champ <strong>de</strong> tension.<br />
66 05.08 Ref.200989 Rev.100
MISE EN MARCHE<br />
MISE EN SERVICE ET CONTROLES PRELIMINAIRES<br />
La charge frigorifique <strong>de</strong>s installations avec con<strong>de</strong>nseur à air ou avec motocon<strong>de</strong>nseur à distance est particulièrement<br />
importante pour le bon fonctionnement <strong>de</strong> tout le complexe. Il est donc nécessaire que cette charge soit faite par <strong>de</strong>s<br />
frigoristes experts en suivant ce qui a èté dit préce<strong>de</strong>mment. La charge doit être effectuée avec le gaz frigorigène indiqué sur<br />
l’étiquette <strong>de</strong> l’unité.<br />
MISE EN FONCTION DES VENTILATEURS DE L’UNITE<br />
Contrôler que la tension <strong>de</strong> projet arrive effectivement aux bornes R-S-T, quele neutre soit raccordé à la borne N et que soit<br />
effectué le raccor<strong>de</strong>ment à la terre. Si on ne veut pas faire fonctionner les autres parties du groupe climatiseur (qui, selon les<br />
condition thermoigrométriques en ambiance pourraient partir automatiquement), <strong>de</strong>brancher les interrupteur magnetiques.<br />
Appuyer sur le bouton ON dans le cas <strong>de</strong> règulation à microprocesseur ou bien agir sur l’intérrupteur toujours installé sur la<br />
face avant <strong>de</strong> la machine en faisant ainsi partir la ventilation.<br />
N.B. Les unités ont presque toujours <strong>de</strong>s ventilateurs monophasé et donc le sens <strong>de</strong> rotation est <strong>de</strong>terminé à l’usine, tandis<br />
que certaines unités spéciales et unités avec ventilateurs triphasé, il faut vérifier le sens <strong>de</strong> rotation. Les s hémas électriques<br />
fournies avec l’unité indiquent si un moteur est mono ou triphasé. Lorsqu’on utilise <strong>de</strong>s ventilateurs entrainé par courroie, il<br />
faut controler la tension <strong>de</strong>s courroies et l’alignement <strong>de</strong>s poulies, meme si cela a déjà été fait à l’usine ( oir section<br />
ENTRETIEN).<br />
IL NE FAUT PAS LAISSER FONCTIONNER LES VENTILATEURS AVEC LE PANNEAU OUVERT POUR PLUS DE<br />
VINGT SECONDES<br />
Procé<strong>de</strong>r au contrôle <strong>de</strong> la puissance engagée <strong>de</strong>s moteurs électriques <strong>de</strong>s ventilateurs, qui doit être compris entre les<br />
valeurs indiquès sur la plaque <strong>de</strong>s moteurs.<br />
Dans le cas que la puissance / courant engagée soit plus élevée, cela à cause <strong>de</strong>s pertes <strong>de</strong> charge extérieures qui ont été<br />
calculées trop élevées, il faut bloquer une partie du soufflage ou reprise <strong>de</strong> l’air, ou bloquer meme une partie <strong>de</strong> la bouche du<br />
ventilateur afin que les valeurs rentrent entre les limites indiqués sur la plaque. Après, s’il s’agit d’un moteur monophasé, on<br />
peut varier la vitesse du ventilateur avec le reglage <strong>de</strong> vitesse (si installé) afin <strong>de</strong> regler le débit d’air.<br />
MISE EN FONCTION DES COMPRESSEURS FRIGORIFIQUES<br />
Refermer les interrupteurs qu’on a ouvert précé<strong>de</strong>mment et s’assurer que les bornes <strong>de</strong>s appareil soient parfaitement<br />
serrées.<br />
Effectuer le câlibrage <strong>de</strong>s thermostats ou <strong>de</strong> la régulation à microprocesseur <strong>de</strong> façon à provoquer le départ du<br />
compresseur.<br />
Les compresseurs ne <strong>de</strong>marreront que si les conditions en ambiance dépassent celles du point <strong>de</strong> consigne et différentiel du<br />
controle <strong>de</strong> tempèrature.<br />
Contrôler que les réseaux retardataires, qui comman<strong>de</strong>nt le départ <strong>de</strong>s compresseurs, soient câlibrés pour un retard d’au<br />
moins 3 minutes avant afin d’éviter <strong>de</strong> trops frèquentes démarrages <strong>de</strong> compresseurs.<br />
Il est également opportun que les divers réseaux, dans les groupes à plus compresseurs, soient câlibrés avec <strong>de</strong>s retards<br />
diffèrents afin d’éviter les compresseurs démarrent tous au meme temps. Pour les climatiseurs équipés <strong>de</strong> régulation à<br />
microprocesseur, le retard a déjà été introduit dan lecontrole meme et ce temps est indiqué sur la notice du controle.<br />
Le démarrage <strong>de</strong>s compresseurs provoquera le fonctionnement <strong>de</strong>s ventilateurs <strong>de</strong>s con<strong>de</strong>nseurs, après consensus <strong>de</strong>s<br />
pressostats relatifs <strong>de</strong> haute pression ou du controle “toutes saisons” modulant.<br />
Le câlibrage <strong>de</strong>s régulateurs <strong>de</strong> pression est normalement effectué en usine. Pour changer ce calibrages il faut procé<strong>de</strong>r<br />
comme suit:<br />
• régulation ON-OFF <strong>de</strong> la pression <strong>de</strong> con<strong>de</strong>nsation: pousser le point d’intervention du pressostat<br />
• régulation électronique MODULANTE <strong>de</strong> la pression <strong>de</strong> con<strong>de</strong>nsation agir sur le tran ducteur en sens<br />
horaire pour augmenter la pression <strong>de</strong> con<strong>de</strong>nsation et en sens contraire pour diminuer la pression. Voir<br />
Fig.10/11 où sont indiqués les différents type <strong>de</strong> régulateurs <strong>de</strong> la pression généralement utilisés.<br />
05.08 Ref.200989 Rev.100 67
MISE EN MARCHE<br />
Vérifier que les valeurs d’absorption <strong>de</strong>s compresseurs soientinférieures à celles <strong>de</strong>la plaque, et que la charge <strong>de</strong> fréon soit<br />
complétée.<br />
MISE EN TRAIN DES BATTERIES DE CHAUD ET DES SYSTEMES D’HUMIDIFICATION<br />
Aussi bien pour les climatiseurs avec régulation électrique que pour les climatiseurs avec régulation à microprocesseur les<br />
appareils fonctionneront seulement si les valeurs <strong>de</strong> câlibrage seront telles, par rapport aux conditions en ambiance, à<br />
<strong>de</strong>man<strong>de</strong>r l’intervention <strong>de</strong>s différents appareils.<br />
Une fois mises en fonction les machines, contrôler que les absorptions électriques ne dépassent pa les valeurs <strong>de</strong> projet.<br />
S’assurer que les thermostats <strong>de</strong> sécurité <strong>de</strong>s batteries électriques soient câlibrés à environ 70-80°C.<br />
Les humidificateurs sont alimentés avec <strong>de</strong> l’eau normale d’aqueduc avec tube en rilsan <strong>de</strong> diamètre 6 mm avec pression: 1<br />
-5 Bar.<br />
L’eau d’alimentation <strong>de</strong>s humidificateurs électrolythiques ne <strong>de</strong>vra pas être traîtée.<br />
N.B. Dans la réalisation du raccor<strong>de</strong>ment hydraulique à l’humidificateur il faut faire très attention qu’il ne reste pas <strong>de</strong> saletés<br />
ou <strong>de</strong>s corps étrangers dans les tuyaux. Eventuellement, après la mise en fonction, démonter le corps <strong>de</strong> la vanne<br />
solenoî<strong>de</strong>, faire évacuer un peu d’eau, nettoyer les sièges et le filtre <strong>de</strong> façon à être sûr <strong>de</strong> ne pas avoir du matériel dans les<br />
tuyaux qui pourrat abîmer les sièges <strong>de</strong> la vanne avec <strong>de</strong>s fuites d’eau conséquentes.<br />
Pour d’autres informations sur les humidificateurs voir le manuel spécifique et les indications du fabricant.<br />
CHARGES DE GAZ POUR LES DIFFERENTES UNITES<br />
Pour les groupes avec con<strong>de</strong>nseur et groupe <strong>de</strong> con<strong>de</strong>nsation séparés, les valeurs sont valables pour une distance entre<br />
armoire et unitée extérieure d’environ 10 mt.<br />
Pour les circuits plus longs <strong>de</strong> 10 mt. la charge <strong>de</strong> fréon <strong>de</strong>vra être augmenté suivant la longueur et les dimensions <strong>de</strong>s<br />
tuyaux.<br />
En ce qui concerne la charge <strong>de</strong> l’huile du compresseur ajoutez <strong>de</strong> 50/80 gr. d’huile pour chaque Kg. <strong>de</strong> gaz ajouté<br />
pour le remplissage <strong>de</strong>s tuyaux. La quantité d’huile dépend du type d’installation réalisée qu’il facilite ou moins le retour <strong>de</strong><br />
l’huile au compresseur.<br />
LE TYPE DE L’HUILE E ST TOUJOURS INDIQUÉ SUR L’ÉTIQUETTE DU C OMPRESSEUR -du type SHELL,<br />
généralement Oil Suniso 3G lorsqu’il s’agit <strong>de</strong> gaz R22.<br />
S’il s’agit <strong>de</strong> gaz R407c ou R134a, l’huile est du type Polyestère (POE), normalement EAL Artic 22CC Mobil ou<br />
EMKARATE RL32S ICI, qui peuvent être mélangés entre eux. Il faut faire très attention que l’huile n’aie pas <strong>de</strong> contact<br />
avec l’airet que les tuyaux soient parfaitement sechés.<br />
Tenez présent qu’avec <strong>de</strong>s réalisations d’installation très étendues et/ou avec l’adoption <strong>de</strong>s con<strong>de</strong>nseurs majeurés il est<br />
conseillé d’installer sur le circuit un ultérieur receveur <strong>de</strong> liqui<strong>de</strong> pour l’augmentation du volume <strong>de</strong> gaz en plus dans le<br />
système, <strong>de</strong> façon à ce q u’il soit possible <strong>de</strong> récuperer tout le gaz dans les receveurs en cas d’entretien our <strong>de</strong> réparations<br />
particulières.<br />
68 05.08 Ref.200989 Rev.100
MISE EN MARCHE<br />
HITECSA fournit ses unités avec une charge complète <strong>de</strong> gaz réfrigérant. Les tables ci-<strong>de</strong>ssous<br />
indiquent la quantité <strong>de</strong> gaz contenu dans l’armoire et son con<strong>de</strong>nseur ou groupe <strong>de</strong> con<strong>de</strong>nsation.<br />
Des additions <strong>de</strong> gaz pourront être nécessaire dans les tuyaux <strong>de</strong> l’installation, ces additions <strong>de</strong>vront<br />
être faite par l’installateur meme. La quantité est indiquée en kg.<br />
CED CED 11.1 CED 13.1 CED 17.1 CED 21.1 CED 24.1<br />
Configuration 1 y 6 1.0 1.1 1.4 1.8 2.1<br />
Configuration 2 3.1 3.6 4.5 5.8 6.3<br />
CED 29.1 CED 33.1 CED 22.2 CED 26.2 CED 32.2<br />
Configuration 1 y 6 2.5 2.8 1.0 1.1 1.4<br />
Configuration 2 8.1 9.0 3.1 3.6 4.5<br />
CEM CEM 20.1 CEM 26.1 CEM 31.1 CEM 36.1 CEM 45.1<br />
Configuration 1 y 6 1.7 2.1 2.5 2.8 3.6<br />
Configuration 2 5.6 6.7 8.1 9.0 11.7<br />
CEM 55.1 CEM 29.2 CEM 35.2 CEM 47.2 CEM 53.2<br />
Configuration 1 y 6 4.2 1.1 1.4 1.8 2.1<br />
Configuration 2 13.5 3.6 4.5 5.8 6.7<br />
CEM 64.2 CEM 70.2 CEM 89.2 CEM 103.2<br />
Configuration 1 y 6 2.5 2.8 3.6 4.2<br />
Configuration 2 8.1 9.0 11.7 13.5<br />
05.08 Ref.200989 Rev.100 69
ENTRETIEN<br />
MAINTENANCE<br />
Les climatiseurs HITECSA <strong>de</strong> la série CED – CEM - CEW n’ont pas besoin d’entretien particulier vu que tous les<br />
organes en mouvement sont supportés par <strong>de</strong>s roulements étanches et prélubrifiés.<br />
Les opérations suivantes sont suffisantes:<br />
NETTOYAGE DES FILTRES A AIR<br />
La fréquence <strong>de</strong> cette opération dépend <strong>de</strong> la quantité <strong>de</strong> poussière qu’il y a dans l’air aspirée; il est toutefois conseillé <strong>de</strong> ne<br />
jamais dépasser un intervale <strong>de</strong> 15 à 20 jours entre un nettoyage et l’autre.<br />
Les filtres à haute efficacité (standard sur les unités) peuvent être nettoyé avec <strong>de</strong> l’air comprimé en soufflant sur les filtres<br />
en sens contraire à celui parcouru par l’air.<br />
Dans le cas qu’on utilise un aspirateur les filtres <strong>de</strong>vront être nettoyés du côté <strong>de</strong> l’entrée <strong>de</strong> l’air.<br />
ATTENTION: les filtres peuvent être réutilisés ju squ’à 3 ou 4 fois selon leur état, et après, ils <strong>de</strong>vront absolument<br />
être changés.<br />
Les filtres qui sont excessivement sales peuvent causer:<br />
.* la diminution du flux <strong>de</strong> l’air et <strong>de</strong> la puissance frigorifique<br />
.* une déshumidification excessive<br />
.* la possibilité <strong>de</strong> givre ou gel sur la batterie<br />
.* l’intervention du pressostat <strong>de</strong> basse pression et l’arret <strong>de</strong> l’installation<br />
* la possibilité <strong>de</strong> rupture du compresseur à cause du retour <strong>de</strong> liqui<strong>de</strong> non complètement évaporé.<br />
Les FILTRES A POCHES (normalement avec éfficacité EU5 ou supérieure) ne sont pas du tout réutilisable et <strong>de</strong>vront être<br />
toujours changé. Le filtre n’est plus utilisable du moment que la perte <strong>de</strong> charge <strong>de</strong>vient trop élevée -cela est signalé<br />
par le pressostat differentiel qui peut être installé dans l’armoire en tant qu’accessoire optionnel (allarme filtres<br />
encrassés).<br />
NETTOYAGE DES HUMIDIFICATEURS<br />
Cette opération est nécessaire plus fréquemment en hiver et moins en été. La fréquence <strong>de</strong> l’opération <strong>de</strong> nettoyage <strong>de</strong><br />
l’humidificateur dépend <strong>de</strong>s heures <strong>de</strong> fonctionnement, <strong>de</strong>s caractéristiques <strong>de</strong> l’eau et du calcaire contenu dans l’eau.<br />
Il est toutefois conseillé d’effectuer le nettoyage ou le remplacement du cylindre tous les 1 à 2 mois ou bien entre<br />
les 200 à 400 heures <strong>de</strong> fonctionnement effectif.<br />
Il est conseillé d’effectuer le nettoyage <strong>de</strong> la vanne solenoi<strong>de</strong>, du filtre <strong>de</strong> l’eau, <strong>de</strong> la vanne <strong>de</strong> réduction <strong>de</strong> la pression et du<br />
tuyau <strong>de</strong> l’eau avec <strong>de</strong>s intervales un peu plus longues. La fréquence <strong>de</strong> l’opération doit être augmentée en hiver. Pour <strong>de</strong>s<br />
informations plus complètes, consulter la notice spécifique du fabricant.<br />
NETTOYAGE DES CONDENSEURS<br />
Con<strong>de</strong>nseurs à eau -Configuration 1 -3 -6.<br />
Les tuyaux ou les plaques parcourus par l’eau doivent être nettoyés périodiquement pour s’assurer que le con<strong>de</strong>nseur rend<br />
<strong>de</strong> façon optimale. La fréquence <strong>de</strong> nettoyage dépend <strong>de</strong>s conditions <strong>de</strong> l’eau employée et <strong>de</strong>s heures <strong>de</strong> fonctionnement.<br />
Le nettoyage peut être effectué par un lavage chimique ou bien, pour les con<strong>de</strong>nseurs à faisceau <strong>de</strong> tuyaux, en utilisant <strong>de</strong>s<br />
brosses ou écouvillons.<br />
Il est également conseillé d’effectuer une analyse <strong>de</strong> l’eau pour adopter le traitement éventuel <strong>de</strong> celle-ci et ceci afin d’éviter<br />
<strong>de</strong>s phénomènes d’incrustation, <strong>de</strong> corrosion, formation d’algues et <strong>de</strong> moisi..<br />
70 05.08 Ref.200989 Rev.100
ENTRETIEN<br />
Con<strong>de</strong>nseurs à air -Configuration 2 -4<br />
La surface aileté <strong>de</strong> la batterie <strong>de</strong> con<strong>de</strong>nsation doit être nettoyée au moins une fois par mois pendant la pério<strong>de</strong> <strong>de</strong><br />
fonctionnement, afin d’éviter l’accumulation <strong>de</strong> saletés et <strong>de</strong> corps étrangers.<br />
Le nettoyage doit se faire manuellement avec un peigne spécifique ou bien avec un jet puissant d’eau froi<strong>de</strong>. Une fois par<br />
an il est conseillé <strong>de</strong> faire un lavage chimique pour enlever les incrustations et le dépôts huileux. Si on laisse déposer trop<br />
<strong>de</strong> saletés, le fonctionnement du groupe sera avec une pression plus élevée, et cela causera la diminution <strong>de</strong> la puissance<br />
du climatiseur et augmentera dangereusement la température <strong>de</strong> con<strong>de</strong>nsation.<br />
Une pression élevée <strong>de</strong> con<strong>de</strong>nsation peut provoquer, ainsi que l’arrêt total du système, un dommage irréparable au<br />
compresseur.<br />
Il faut également serrer périodiquement les vis <strong>de</strong> fixage du ventilateur du con<strong>de</strong>nseur et inspecter le pâles <strong>de</strong> celui-ci contre<br />
la corrosion ou les fissures.<br />
ATTENTION: en particulier pendant la mise en route et pendant les premiers mois <strong>de</strong> fonctionnement, il est<br />
important controler periodiquement que les lunettes soient bien serrées (celles <strong>de</strong>s robinets, <strong>de</strong>s filtres, <strong>de</strong> la vanne<br />
d’expansion, etc.) puisqu’elles peuvent se <strong>de</strong>serrer à cause <strong>de</strong>s vibrations du fonctionnement et les excursions <strong>de</strong><br />
la température et créer <strong>de</strong>s fuites <strong>de</strong> gaz.<br />
CONTROLE DES VENTILATEURS<br />
Afin <strong>de</strong> conserver les ventilateurs en parfait état <strong>de</strong> fonctionnement, il est conseillé d’effectuer tous le mois <strong>de</strong>s simples<br />
vérifications. Vérifier l’état général du ventilateur, qu’il n’y ait pas <strong>de</strong> points <strong>de</strong> corrosion (nettoyer et repeindre avec <strong>de</strong> la<br />
peinture aux poudres <strong>de</strong> zinc) et vérifier qu’il soit toujours bien fixé et qu’il n’y ait pas <strong>de</strong> bruit anormaux dûs à la détérioration<br />
<strong>de</strong>s roulements.<br />
Dans le cas <strong>de</strong>s unités CED, qui montent <strong>de</strong>s ventilateurs directement acouplés, il n’est pa nécessaires effectuer d’autres<br />
vérifications ou maintenance. Dans le cas <strong>de</strong>s unités qui montent <strong>de</strong>s ventilateurs entrainés par courroie, il faudrait<br />
contrôler l’état et la tension <strong>de</strong> la courroie.<br />
Pour modifier la tension <strong>de</strong> la courroie <strong>de</strong> trasmission, déplacer le moteur. Pour faciliter cette opération, le moteur est<br />
positionné sur <strong>de</strong>s gui<strong>de</strong>s (pour un mouvement laterale, et l’alignement <strong>de</strong> poulies) et sur une glissière (pour un mouvement<br />
longitudinale et la tension <strong>de</strong> la courroie).<br />
A chaque tension <strong>de</strong> la courroie, vérifier aussi l’alignement <strong>de</strong>s poulies. Pour les aligner on Pert utiliser une simple règle (voir<br />
fig. 7). Si llies ont une épaisseur différente, agir comme indiqué en fig. 8.<br />
ATTENTION Tension insuffisante -usure rapi<strong>de</strong> et eventuelle rupture <strong>de</strong> la courroie. Tension excessive -usure rapi<strong>de</strong><br />
<strong>de</strong>s roulements du moteur et du ventilateur.<br />
05.08 Ref.200989 Rev.100 71
ENTRETIEN<br />
Fig. 7<br />
Fig. 8<br />
N.B.:Il est conseillé toutefois,afin que les opérations citées ci-<strong>de</strong>ssus soi exécutées dans le meilleur <strong>de</strong>s mo<strong>de</strong>s,<br />
confier le service d’entretien périodique et programmé à une société ou à un frigoriste spécialisé qui effectue 2 à 6<br />
interventions par an suivant les heures/années <strong>de</strong> fonctionnement <strong>de</strong>s machines et <strong>de</strong> l’importance <strong>de</strong> l’installation<br />
oû elles sont installées.<br />
72 05.08 Ref.200989 Rev.100
ENTRETIEN<br />
ELIMINATION DU MATERIEL<br />
Filtres:<br />
Renfermer dans <strong>de</strong>s conteneurs hermétiques et les envoyer aux centres <strong>de</strong> recyclage autorisés, selon les normes en<br />
vigueur.<br />
Materiel plastique, caoutchouc et autres accessoires:<br />
Envoyer exclusivement aux décheteries autorisées, selon les normes en vigueur.<br />
Fer:<br />
Envoyer exclusivement aux décheteries autorisées, selon les normes en vigueur.<br />
Huile:<br />
Les dispositions courantes interdisent que l’huile <strong>de</strong> n’importe quelle genre soit abandonnée dans la nature ou décharger<br />
dans les conduites d’eau.<br />
L’huile doit toujours être conservée dans conteneurs et livrée aux décheteries autorisées.<br />
Une fois à la décheterie, ce produit peut être eliminé dans un incinérateur controlé et autorisé ou, alternativement, il peut être<br />
recyclé à travers un processus spécifique.<br />
Dans certains cas, il existe la possibilité <strong>de</strong> l’éliminer sur terrains agricoles ou par un système d’épuration, mais toujours avec<br />
l’approbation ou l’autori ation nécessaire <strong>de</strong> la part <strong>de</strong>s autorité locales.<br />
La qualité <strong>de</strong> l’huile au moment <strong>de</strong> l’élimination peut conditionner le choix <strong>de</strong> la façon d’élimination.<br />
Gaz frigorifique:<br />
Qu’il s’agisse d’un gaz inutilisé ou d’un déchet, ce gaz ne doit pas s’échapper dan s l’air environnant.<br />
Tous les gaz, qu’ils soient utilisés ou non, constituent un produit non-recyclable et donc doivent éter livrés à une décheterie<br />
autorisée selon les normes locales en vigueur.<br />
Le fournisseur du gaz est obligé à donner les informations nécessaires pour récuperer et éliminer le gaz, et dans tous les cas<br />
<strong>de</strong> figure, cette opération doit être faite par un frigoriste spécialisé.<br />
N’utilisez pas <strong>de</strong>s conteneurs vi<strong>de</strong>s non-pressurisés.<br />
Les conteneurs non-pressurisés doivent toujours être retournés au fournisseur du gaz.<br />
05.08 Ref.200989 Rev.100 73
RECHERCHE DE PANNES<br />
LISTE INDICATIVE DES CAUSES PLUS FREQUENTES DE NON FONCTIONNEMENT DES CLIMATISEURS<br />
Meme si toutes les unités HITECSA ont été vérifiées et essayée en usine avant l’expédition en chantier ou chez le<br />
distributeur, un mauvais fonctionnement est toujours possible. Avant l’application <strong>de</strong>s termes <strong>de</strong> la Garantie, il e st<br />
nécessaire se rendre compte <strong>de</strong> l’entité <strong>de</strong>s dommages ou du mauvais fonctionnement et en <strong>de</strong>terminer les causes. Ci <strong>de</strong><br />
suite il y a une liste <strong>de</strong> situations qui peuvent se créer à cause d’une mauvaise attention pendant le <strong>de</strong>placement <strong>de</strong>s unités.<br />
Il est toujours conseillé <strong>de</strong> controler ces points avant l’installation ou la mise en route <strong>de</strong> l’unité.<br />
• Rupture <strong>de</strong>s capillaires et <strong>de</strong>s raccords <strong>de</strong>s pressostats à cause d’une mauvaise manipulation ou <strong>de</strong>s vibrations<br />
pendant le transport.<br />
• Rupture <strong>de</strong>s tubes du circuit frigorifique pour maltraitement subit en chantier.<br />
• Manchons et raccords <strong>de</strong>sserés à cause d’une mauvais ou manque d’entretien.<br />
• Filtres encrassés à cause d’une manque d’entretien et nettoyage à la mise en route et par conséquent un mauvais<br />
fonctionnement du circuit frigorifique.<br />
• Corps étrangers tombé dans la volute du ventilateur.<br />
• Moteurs électriques <strong>de</strong>s ventilateurs hors absorption pour incohérence entre la pression <strong>de</strong>mandée et les pertes <strong>de</strong><br />
charge effectives, ou bien parce qu’on fait fonctionner le ventilateur avec le panneau d’inspection ouvert..<br />
(Se rappeler que l’installateur doit toujours contrôler l’absorption <strong>de</strong>s ventilateurs).<br />
• Télérupteurs qui ne se ferment pas avec la sécurité et qui restent bruyants pour le dépôt <strong>de</strong> poussière ou autre<br />
pendant le stationement en chantier.<br />
• Interventions <strong>de</strong>s pressostats <strong>de</strong> haute pression pour installation erronée du con<strong>de</strong>nseur ou pour un manque <strong>de</strong> débit<br />
d’air ou pour charge excessive <strong>de</strong> gaz.<br />
• Interventions <strong>de</strong>s pressostats <strong>de</strong> basse pression car le climatiseur fonctionne avec une charge insuffisante <strong>de</strong> gaz<br />
réfrigerant, une manque d’air (filtres sales), ou bien avec une entrée d’air à la batterie ayant une température<br />
inférieure à celle du projet.<br />
• Dans les machines avec con<strong>de</strong>nseur à air, il est évidant qu’à la mise en service ou pendant l’hiver, on peut avoir <strong>de</strong><br />
fréquentes interventions du pressostat <strong>de</strong> basse pression car la charge <strong>de</strong> gaz s’accumule dans le con<strong>de</strong>nseur durant<br />
la saison froi<strong>de</strong>. Ce problème est réduit avec la régulation à microprocesseur vu que l’intervention du pressostat <strong>de</strong><br />
basse pression est temporisée à la mise en service (voir instructions du MICRO AC).<br />
• On conseille toutefois <strong>de</strong> monter <strong>de</strong>s vannes <strong>de</strong> non retour sur les tuyaux <strong>de</strong> raccor<strong>de</strong>ment du con<strong>de</strong>nseur<br />
afin <strong>de</strong> réduire cet effet surtout lorsque le con<strong>de</strong>nseur se trouve installé plus haut <strong>de</strong> l’armoire.<br />
74 05.08 Ref.200989 Rev.100
MANDO POR CABLE MPCE / WIRED CONTROLLER MPCE / COMMANDE CÂBLÉE MPCE<br />
MANUAL DE USUARIO / USER'S MANUAL / MANUEL DE L'UTILISATEUR<br />
Reservado el <strong>de</strong>recho a efectuar modificaciones sin previo aviso / Specifications subject to change without previous notice / Sujet à modifications sans préavis.<br />
05.08 Ref. 200989 Rev. 100<br />
2<br />
10.07 Ref. 200914 Rev. 100