


You also want an ePaper? Increase the reach of your titles
YUMPU automatically turns print PDFs into web optimized ePapers that Google loves.
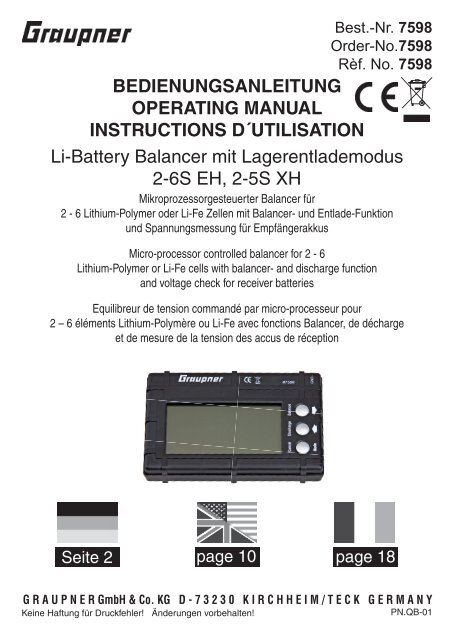
Best.-Nr. 7598<br />
Order-No.7598<br />
Rèf. No. 7598<br />
BEDIENUNGSANLEITUNG<br />
OPERATING MANUAL<br />
INSTRUCTIONS D´UTILISATION<br />
Li-Battery Balancer mit Lagerentlademodus<br />
2-6S EH, 2-5S XH<br />
Mikroprozessorgesteuerter Balancer für<br />
2 - 6 Lithium-Polymer oder Li-Fe Zellen mit Balancer- und Entlade-Funktion<br />
und Spannungsmessung für Empfängerakkus<br />
Micro-processor controlled balancer for 2 - 6<br />
Lithium-Polymer or Li-Fe cells with balancer- and discharge function<br />
and voltage check for receiver batteries<br />
Equilibreur de tension commandé par micro-processeur pour<br />
2 – 6 éléments Lithium-Polymère ou Li-Fe avec fonctions Balancer, de décharge<br />
et de mesure de la tension des accus de réception<br />
Seite 2 page 10 page 18<br />
G R A U P N E R GmbH & Co. KG D - 7 3 2 3 0 K I R C H H E I M / T E C K G E R M A N Y<br />
Keine Haftung für Druckfehler! Änderungen vorbehalten!<br />
PN.QB-01
Allgemeine Sicherheitshinweise<br />
Allgemeine Hinweise zur Sicherheit<br />
Einleitung<br />
Mit dem Kauf des Li-BATTERY BALANCER haben<br />
Sie ein ausgereiftes Produkt mit ausgezeichneter<br />
Leistung erworben.<br />
Bestimmungsgemäße Verwendung<br />
Der Li-BATTERY BALANCER ist ein praktisches<br />
Prüfgerät für Empfänger- und Li-Akkus 2 - 6<br />
S (max. 22.2 V DC Nennspannung) mit integriertem<br />
Balancer- und Entlademodus zum anschließenen<br />
Lagern Ihrer Akkus.<br />
Sie können die Einzellzellenspannungen Ihres<br />
LiPo- oder LiFe-Akkus messen, außerdem Einzelzellen<br />
balancieren und entladen. Die Balancerfunktion<br />
kann vor, während oder nach dem<br />
Ladevorgang verwendet werden. Sie stellt sicher,<br />
dass sich alle Zellen auf einem Niveau befi nden,<br />
um die maximale Lebensdauer Ihres Akkus zu<br />
gewährleisten. Außerdem kann mit der kombinierten<br />
Entlade-/Balancerfunktion, mit der der<br />
Akkku auf eine voreingestellte Spannung entladen<br />
wird, z.B. ein vollgeladener Akku soweit entladen<br />
werden, dass er problemlos eine längeren<br />
Zeitraum gelagert werden kann.<br />
Zusätzlich kann die Spannung eines 1.2 -12 V<br />
DC Empfängerakkus direkt gemessen werden.<br />
Bitte machen Sie sich mit dieser <strong>Anleitung</strong> vertraut,<br />
indem Sie sie vollständig und aufmerksam<br />
lesen. bevor Sie sich an den ersten Einsatz<br />
dieses Geräts machen. Dann haben Sie eine<br />
Garantie dafür, dass Sie alle Möglichkeiten Ihres<br />
neuen Geräts ausschöpfen können. Die Warnungen<br />
und Sicherheitshinweise sind besonders<br />
wichtig. Bewahren Sie diese <strong>Anleitung</strong> an einem<br />
sicheren Ort auf; sollten Sie sich jemals von Ihrem<br />
Ladegerät trennen, geben Sie diese <strong>Anleitung</strong><br />
bitte an den neuen Besitzer weiter.<br />
Hinweis<br />
Es ist wichtig, dass Sie stets die Anweisungen<br />
zum Entladen beachten, die von den Akkuherstellern<br />
vorgelegt werden, und dass Sie sich an<br />
die empfohlenen Ströme halten. Wieder aufl adbare<br />
Batterien – und besonders Lithium-Polymer-Zellen<br />
– sind empfi ndlich und können leicht<br />
Schaden nehmen.<br />
Deshalb ist es wichtig, dass der Entladevorgang<br />
ganz überwacht wird.<br />
WARN- UND SICHERHEITSHINWEISE<br />
• Dieses Erzeugnis ist nicht für Kinder unter 14<br />
Jahren geeignet, es ist kein Spielzeug! Es soll<br />
auch nicht von Personen mit eingeschränkten<br />
körperlichen, sensorischen oder geistigen<br />
Fähigkeiten oder ungenügender Erfahrung<br />
und Kenntnisstand benutzt werden, Kinder<br />
eingeschlossen, wenn sie nicht unter Aufsicht<br />
stehen oder wenn sie keine Einführung in<br />
den Gebrauch des Geräts durch eine für ihre<br />
Sicherheit verantwortliche Person erhalten<br />
haben.<br />
• Kinder müssen beaufsichtigt werden, um sicherzustellen,<br />
dass sie nicht mit dem Gerät<br />
spielen.<br />
• Schützen Sie das Gerät vor Staub, Feuchtigkeit,<br />
Regen, Hitze (z.B. direkter Sonneneinstrahlung)<br />
und vor Erschütterungen. Es<br />
darf nur in trockenen Innenräumen benützt<br />
werden.<br />
• Sie selbst dürfen das Gerät nicht öffnen!<br />
• Die Schlitze im Gehäuse dienen zur Kühlung<br />
des Geräts. Sie dürfen nicht abgedeckt oder<br />
verschlossen werden. Stellen Sie das Gerät<br />
frei auf, so dass Kühlluft ungehindert zirkulieren<br />
kann.<br />
• Falls die Eingangsspannung über 25.2 V DC<br />
liegt, wird das Gerät beschädigt und es kann<br />
Feuer entstehen. Gefahr!<br />
• Der Balancer darf in keiner Weise verändert<br />
werden.<br />
• Das Gerät und der Akku müssen vor Gebrauch<br />
auf eine Wärme hemmende, nicht brennbare<br />
und nicht leitende Unterlage gestellt werden.<br />
Stellen Sie das Gerät niemals auf einen Autositz,<br />
einen Teppich o. ä. Halten Sie brennbare<br />
oder fl üchtige Substanzen fern vom Ladebereich.<br />
Sorgen Sie für gute Durchlüftung.<br />
• Die Buchsen dürfen nicht verändert oder in<br />
irgendeiner Form zusammengeschlossen<br />
werden.<br />
• Lassen Sie den Balancer nie unbeaufsichtigt,<br />
wenn ein Akku angeschlossen ist.<br />
• Es darf immer nur ein Akku angeschlossen<br />
werden.<br />
• Die einzigen Akkutypen, die sicher an die Balancerstecker<br />
angeschlossen werden dürfen,<br />
sind LiXX-Packs aus zwei bis sechs Zellen.<br />
•<br />
Lithium-Polymer-Zellen<br />
Dieses Gerät eignet sich nur zum Entladen/Balancieren<br />
von Lithium-Polymer oder LiFe-Akkus<br />
mit einer Zellen-Nennspannung von 3.2 oder 3,7<br />
V. Die herausragende Besonderheit von Lithium-<br />
Akkus ist ihre im Vergleich zu anderen Akkutypen<br />
weit höhere Kapazität.<br />
Dies ist ein wichtiger Vorteil, der aber durch die<br />
Notwendigkeit relativiert wird, diese Akkus vor<br />
allem beim Laden und Entladen anders zu behandeln,<br />
wenn die Gefahren beim Umgang mit<br />
ihnen klein gehalten werden sollen. Der Umgang<br />
2 Sicherheitshinweise
Allgemeine Sicherheitshinweise<br />
mit diesen Zellen unterliegt einigen wichtigen<br />
Grundregeln, und diese müssen ständig beachtet<br />
werden. Bitte befassen Sie sich mit den Datenblättern<br />
der Hersteller, wenn Sie zusätzliche<br />
Informationen und Sicherheitshinweise fi nden<br />
wollen. Der Balancer gleicht die Spannungen der<br />
einzelnen Zellen aus („balanciert“), wenn diese<br />
unterschiedlich sind, was die Sicherheit erhöht.<br />
Haftungsausschluss<br />
Die Einhaltung der Betriebsanleitung sowie die<br />
Bedingungen und Methoden bei Installation, Betrieb,<br />
Verwendung und Wartung des Ladegerätes<br />
können von der Fa. GRAUPNER nicht überwacht<br />
werden. Daher übernimmt die Fa. GRAUPNER<br />
keinerlei Haftung für Verluste, Schäden oder Kosten,<br />
die sich aus fehlerhafter Verwendung und<br />
Betrieb ergeben oder in irgendeiner Weise damit<br />
zusammenhängen.<br />
Komponenten und Zubehör<br />
Die Firma GRAUPNER GmbH & Co. KG als<br />
Hersteller empfi ehlt, Komponenten und Zubehörprodukte<br />
zu verwenden, die von GRAUPNER<br />
auf Tauglichkeit, Funktion und Sicherheit geprüft,<br />
freigegeben sind.GRAUPNER übernimmt für Sie<br />
die Produktverantwortung.Die Fa. GRAUPNER<br />
übernimmt für nicht freigegebene Teile oder Zubehörprodukte<br />
von anderen Herstellern keine<br />
Haftung und kann nicht jedes einzelne Fremdprodukt<br />
beurteilen, ob es ohne Sicherheitsrisiko<br />
eingesetzt werden kann.<br />
Hinweise zum Umweltschutz<br />
Das Symbol auf dem Produkt, der Gebrauchsanleitung<br />
oder der Verpackung<br />
weist darauf hin, dass dieses Produkt<br />
bzw. elektronische Teile davon am Ende seiner<br />
Lebensdauer nicht über den normalen Haushaltsabfall<br />
entsorgt werden dürfen. Es muss an<br />
einem Sammelpunkt für das Recycling von elektrischen<br />
und elektronischen Geräten abgegeben<br />
werden.<br />
Die Werkstoffe sind gemäß ihrer Kennzeichnung<br />
wiederverwertbar. Mit der Wiederverwendung,<br />
der stoffl ichen Verwertung oder anderen Formen<br />
der Verwertung von Altgeräten leisten Sie einen<br />
wichtigen Beitrag zum Umweltschutz.<br />
Batterien und Akkus müssen aus dem Gerät<br />
entfernt werden und bei einer entsprechenden<br />
Sammelstelle getrennt entsorgt werden.<br />
Bei RC-Modellen müssen Elektronikteile, wie z.B.<br />
Servos, Empfänger oder Fahrtenregler aus dem<br />
Produkt ausgebaut und getrennt bei einer entsprechenden<br />
Sammelstelle als Elektro-Schrott<br />
entsorgt werden.<br />
Bitte erkundigen Sie sich bei der Gemeindeverwaltung<br />
nach der zuständigen Entsorgungsstelle.<br />
Sicherheitshinweise 3
Inbetriebnahme<br />
Beschreibung<br />
Einzelzellenspannung<br />
Entladen-Symbol<br />
Zellenzahl des<br />
Akkus<br />
2S XH-Buchse<br />
3S XH-Buchse<br />
Check<br />
Battery<br />
Balancer-Modus<br />
Entladeschlussspannung<br />
pro Zelle<br />
Minimale Balancerspannung<br />
pro Zelle<br />
Balance<br />
Mode<br />
Discharge<br />
Mode<br />
Dischrge Voltage set<br />
Balance Voltage Limit<br />
Total<br />
4S XH-Buchse<br />
5S XH-Buchse<br />
Entlade-Modus<br />
Cancel Discharge Balance<br />
Mode<br />
#7598<br />
GND-<br />
2-6S EH-Buchse<br />
Gesamtspannung<br />
Abbruch / Modus<br />
Modus Entladen / Wert<br />
heraufsetzen<br />
Modus Balancieren / Wert<br />
heruntersetzen<br />
JST<br />
Rx Batt<br />
S<br />
Externe Versorgung<br />
7.4 - 11.1 V DC,<br />
BEC-Stecker<br />
Empfängerakku<br />
1.2 - 12 V,<br />
JR-Stecker<br />
Balancer programmieren<br />
Vor der ersten Inbetriebnahme müssen die Entladeschluss- und Balancerspannung<br />
überprüft und gegebenenfalls eingestellt werden. Stecken Sie<br />
dazu einen Akku an einen seitlichen Balanceranschluss, damit die Anzeige<br />
aktiviert wird.<br />
1. Drücken Sie nun die linke Taste „Mode“ einmal, um die Balancerspannung<br />
oder zweimal, um die Entladeschlussspannung einzustellen.<br />
Wenn Sie nichts einstellen wollen, kommen Sie durch erneutes Drücken<br />
der „Mode“ Taste wieder zurück in die Grundanzeige.<br />
Cancel Discharge Balance<br />
Mode<br />
4 Inbetriebnahme
Inbetriebnahme<br />
Cancel Discharge Balance<br />
2. Taste „Mode“ einmal gedrückt: Einstellen der unteren Balancerspannung<br />
(Balance Voltage Limit). Die Einzelzellen-Spannung des zu balancierenden<br />
Akkus muss oberhalb dieser Spannung liegen, damit der Vorgang<br />
gestartet wird.<br />
Drücken Sie die oder Taste, um die Spannung zu verändern.<br />
Um die Einstellungen zu speichern, drücken Sie abschließend wieder<br />
die „Mode“-Taste.<br />
Werkseinstellung: 3.3 V - für LiPo-Akkus, für LiFe-Akkus muss die Spannung<br />
auf 2.9 V geändert werden.<br />
Beachte: stellen Sie die Spannung niemals unter die minimale erlaubte<br />
Spannung Ihres Akkus, dies kann den Akku beschädigen!<br />
Die Minimalspannung ist auf dem Akku angegeben!<br />
Mode<br />
Cancel Discharge Balance<br />
3. Taste „Mode“ zweimal gedrückt: Einstellen der Entladeschlussspannung<br />
(Discharge Voltage Set). Achtung: die optimale Lagerspannung muss an<br />
den angeschlossenen Akku angepasst werden!<br />
Drücken Sie die oder Taste, um die Spannung zu verändern.<br />
Um die Einstellungen zu speichern, drücken Sie abschließend wieder<br />
die „Mode“-Taste.<br />
Werkseinstellung: 3.9 V - für LiPo-Akkus, für LiFe-Akkus muss die Spannung<br />
auf 3.2 V geändert werden.<br />
Beachte: stellen Sie die Spannung niemals unter die minimale erlaubte<br />
Spannung Ihres Akkus, dies kann den Akku beschädigen!<br />
Die Minimalspannung ist auf dem Akku angegeben!<br />
Mode<br />
4. Der Balancer geht wieder in die Grundanzeige zurück.<br />
Cancel Discharge Balance<br />
Mode<br />
Inbetriebnahme 5
Bedienung<br />
Balancer aktivieren<br />
Stecken Sie den Akku an den passenden seitlichen Balanceranschluss, damit<br />
die Anzeige aktiviert wird.<br />
Nur EH-Buchse: beachten Sie die Aufschrift GND-, hier muss der Minuspol<br />
des Balancersteckers eingesteckt werden!<br />
Die Einzelzellenspannungen links und die Symbole für die Anzahl der angeschlossenen<br />
Zellen rechts werden angezeigt, außerdem die Gesamtspannung<br />
„Total“ unten im Display.<br />
1. Drücken Sie nun die Taste „Balance“ einmal.<br />
Cancel Discharge Balance<br />
Mode<br />
2. Der Balancer nimmt die niedrigste Zellenspannung als Referenz und<br />
startet den Balanciervorgang, angezeigt durch das Waage-Symbol. Das<br />
blinkende Symbol erscheint hinter den Zellen, die gerade aktiv<br />
balanciert werden.<br />
Der Balancer balanciert bzw. entlädt die Einzelzellen auf die Spannung<br />
der Zelle mit der niedrigsten Spannung. Dieser Vorgang läuft so lange,<br />
bis alle Zellen innerhalb von 0.01 V liegen.<br />
Cancel Discharge Balance<br />
Mode<br />
3. Der Balancier-Vorgang ist abgeschlossen, wenn alle Symbole erloschen<br />
sind. Drücken Sie nun die Taste „Cancel“, um den Modus zu<br />
verlassen. Sie können den Akku nun abstecken.<br />
Beachte: Sie können den laufenden Balanciervorgang auch jederzeit<br />
durch einen Druck auf die „Cancel“-Taste abbrechen.<br />
Cancel Discharge Balance<br />
Mode<br />
Sie können den Balancer auch an den Akku anschließen und balancieren,<br />
während Sie ihn am Ladegerät aufl aden. Beachten Sie hier besonders die<br />
Spannungsanzeige im Display: sollte sie unnormal schwanken oder sogar<br />
die Meldung „Check Battery“ erscheinen, stoppen Sie den Ladevorgang<br />
sofort und stecken den Akku ab, um Beschädigungen des Akkus oder Ladegeräts<br />
zu vermeiden!<br />
Beachten Sie in jedem Fall auch die Ladehinweise Ihres Ladegeräts!<br />
6 Bedienung
Bedienung<br />
Lagerentladen aktivieren<br />
Stecken Sie den Akku an den passenden seitlichen Balanceranschluss, damit<br />
die Anzeige aktiviert wird.<br />
Nur EH-Buchse: beachten Sie die Aufschrift GND-, hier muss der Minuspol<br />
des Balancersteckers eingesteckt werden!<br />
Die Einzelzellenspannungen links und die Symbole für die Anzahl der angeschlossenen<br />
Zellen rechts werden angezeigt, außerdem die Gesamtspannung<br />
„Total“ unten im Display.<br />
1. Drücken Sie nun die Taste „Discharge“ einmal.<br />
Cancel Discharge Balance<br />
Mode<br />
2. Der Balancer startet den Balanciervorgang, angezeigt durch das Batterie-Symbol.<br />
Das blinkende Symbol erscheint hinter den Zellen, die<br />
gerade aktiv entladen werden.<br />
Der Balancer entlädt und balanciert die Einzelzellen auf die unter<br />
„Discharge Voltage Set“ programmierte Spannung. Dieser Vorgang<br />
läuft so lange, bis alle Zellen diese Spannung erreicht haben.<br />
Cancel Discharge Balance<br />
Mode<br />
3. Der Entlade-Vorgang ist abgeschlossen, wenn alle Symbole erloschen<br />
sind. Drücken Sie nun die Taste „Cancel“, um den Modus zu<br />
verlassen. Sie können den Akku nun abstecken.<br />
Beachte: Sie können den laufenden Entladevorgang auch jederzeit<br />
durch einen Druck auf die „Cancel“-Taste abbrechen.<br />
Cancel Discharge Balance<br />
Mode<br />
Bedienung 7
Bedienung<br />
Fehlermeldung „Check Battery“<br />
Die Fehlermeldung „Check Battery“ erscheint, wenn die Einzelzellenspannungen mehr als 0.2 V voneinander<br />
abweichen. Dies ist ein Anzeichen dafür, dass der angeschlossene Akku defekt sein kann.<br />
Überprüfen Sie in diesem Fall Ihren Akku!<br />
Wenn diese Meldung erscheint, kann der Balancier- oder Entladevorgang nicht gestartet werden!<br />
Dreiecksymbol<br />
erscheint<br />
(eines oder mehrere)<br />
Check<br />
Battery<br />
„Check Battery“<br />
blinkt<br />
Empfängerakku prüfen<br />
Mit dem Balancer können Sie auch die aktuelle Spannung eines beliebigen Akkus (JR- oder Futaba-<br />
Stecksystem) mit einer Spannung zwischen 1.2 und 12 V DC überprüfen.<br />
Stecken Sie den Akku in die JR-Buchse auf der Unterseite des Balancers. Achten Sie auf die Polung!<br />
In diesem Modus ist keine Einzelzellenanzeige verfügbar!<br />
Beachte: bei Akkus unter 4.8 V muss eine zusätzliche Spannungsversorgung (7.4 - 11.1 V DC) für den<br />
Balancer an der Buchse „JST“ angeschlossen werden, um die Displayanzeige zu ermöglichen.<br />
JST<br />
Rx Batt<br />
S<br />
Externe Versorgung<br />
7.4 - 11.1 V DC,<br />
BEC-Stecker<br />
Empfängerakku<br />
1.2 - 12 V,<br />
JR-Stecker<br />
8 Bedienung
Technische Daten<br />
Technische Daten<br />
Akkutyp:<br />
Zellenzahl:<br />
Akkutyp Rx:<br />
Balancerspannung:<br />
Entladespannung:<br />
Lithium-Polymer / LiFe<br />
2-6 Zellen<br />
über Balancerstecker<br />
2-6S EH<br />
2-5S XH<br />
alle 1.2 - 12 V DC mit JR-Stecker<br />
(unter 4.8 V wird eine seperate<br />
Stromversorgung benötigt)<br />
2.0 - 3.9 V<br />
Werkseinstellung: 3.3 V<br />
3.0 - 4.2 V<br />
Werkseinstellung: 3.9 V<br />
Abmessungen (L/B/H): ca. 93.5 x 60 x 17 mm<br />
Gewicht:<br />
ca. 72 g<br />
Technische Daten 9
General Safety Notes<br />
Introduction<br />
In purchasing the Li-BATTERY BALANCER you<br />
have acquired a mature product with an excellent<br />
performance.<br />
Intended use<br />
The Li-BATTERY BALANCER is a practical test<br />
ing device for receiver and Li batteries 2-6 S (up<br />
to 22.2 V DC nominal voltage) with integrated<br />
balancer and discharge mode for subsequent<br />
storage of your battery.<br />
You can measure the single cell voltage of your<br />
LiPo and LiFe batteries, also you can balance<br />
and discharge individual cells. The balancer function<br />
can be used before, during or after charging.<br />
It ensures that all cells are at the same level to<br />
ensure maximum life of your battery. Combined<br />
with the discharge-/balancer function, which<br />
discharges the battery to a preset voltage, eg. a<br />
fully charged battery will be discharge for easily<br />
storage for a longer period.<br />
In addition, the voltage of a 1.2-12V DC receiver<br />
battery can be measured directly.<br />
Please study these instructions, reading them<br />
completely and attentively, before you use the<br />
unit for the fi rst time. This will guarantee that you<br />
will be able to exploit all the facilities of your new<br />
battery charger. The warnings and safety notes<br />
are particularly important. Please store these instructions<br />
in a safe place, and be sure to pass<br />
them on to the new owner if you ever dispose<br />
of the charger.<br />
Note<br />
It is important always to observe the discharging<br />
instructions supplied by the battery manufacturer,<br />
and to keep to the recommended currents and<br />
times. Rechargeable batteries generally - and<br />
Lithium-Polymer cells in particular - are sensitive<br />
and easily damaged.<br />
It is therefore essential to supervise the whole of<br />
the discharge process.<br />
WARNINGS AND SAFETY NOTES<br />
• This product isn‘t designed for use by children<br />
under the age of 14, it isn‘t a toy! This appliance<br />
is not intended for use by persons (including<br />
children) with reduced physical, sensory<br />
or mental capabilities, or lack of experience<br />
and knowledge, unless they have been given<br />
supervision or instruction concerning use of<br />
the appliance by a person responsible for their<br />
safety.<br />
• Children should be supervised to ensure that<br />
they do not play with the appliance.<br />
• Protect the device from dust, damp, rain, heat<br />
(e.g. direct sunshine) and vibration. It should<br />
only be operated in dry indoor conditions.<br />
• Do not open the device by yourselve!<br />
• The case slots serve to cool the device, and<br />
must not be covered or enclosed; set up the<br />
device with space round it, so that cooling air<br />
can circulate unhindered.<br />
• If the input voltage of the device is over 25.2 V<br />
DC, this will damage the device and can cause<br />
even fi re. Danger!<br />
• Do not modify the device in any way.<br />
• The charger and the battery to be charged<br />
should be set up on a heat-resistant, non-infl<br />
ammable and non-conductive surface before<br />
use. Never place the charger directly on a car<br />
seat, carpet or similar. Keep all infl ammable<br />
and volatile materials well away from the charging<br />
area. Provide good ventilation.<br />
• The output sockets must not be modifi ed, and<br />
must not be inter-connected in any way.<br />
• Never leave the device running unsupervised.<br />
• Only one battery may be connected to the device<br />
at one time.<br />
• The only types of battery which may safely be<br />
connected to the charger are: LiXX consisting<br />
of two to six cells.<br />
Lithium-Polymer cells<br />
This device is only suitable for Lithium-Polymer<br />
or LiFe-batteries with a nominal cell voltage of<br />
3.2 or 3.7 V.<br />
The main outstanding feature of Lithium batteries<br />
is their much higher capacity compared to other<br />
battery types.<br />
This is an important advantage, but it is balanced<br />
by the requirement to handle the batteries<br />
differently, especially with respect to charging<br />
and discharging, if the danger of using them is<br />
to be minimised. There are important basic rules<br />
governing the handling of these cells, and they<br />
must be observed at all times. For additional<br />
information and safety notes please study the<br />
battery manufacturer’s published specifi cations.<br />
The device does also balance the voltage of the<br />
single cells, if it‘s different, so this increases safety<br />
and the life time of the battery.<br />
Liability Exclusion<br />
As manufacturers, we at GRAUPNER are not in<br />
a position to ensure that you observe the correct<br />
methods of operation when installing, using and<br />
maintaining this product. For this reason we are<br />
obliged to deny all liability for loss, damage or<br />
costs which are incurred due to the incompetent<br />
or incorrect use and operation of our products,<br />
or which are connected with such operation in<br />
any way.<br />
10 Safety Notes
General Operating Information<br />
Components and accessories<br />
As manufacturer of this product, the company of<br />
GRAUPNER GmbH & Co. KG recommends the<br />
use of associated components and accessory<br />
products which have been checked and approved<br />
by GRAUPNER for their suitability, proper<br />
function and safety. In such cases GRAUPNER<br />
accepts responsibility for these products on<br />
your behalf. We are unable to accept liability<br />
for parts or accessories made by other manufacturers,<br />
which are not expressly approved by<br />
GRAUPNER, as we are not in a position to assess<br />
every individual non-<strong>Graupner</strong> item to decide<br />
whether it represents a safety risk or not.<br />
Environmental Protection Notes<br />
Whenever you see this symbol on a product,<br />
in the user instructions or the packaging,<br />
it means that you must not dispose<br />
of that item, or the electronic components in<br />
it, in the ordinary domestic waste when it comes<br />
to the end of its useful life. The correct method of<br />
disposal is to take it to your local collection point<br />
for recycling electrical and electronic equipment.<br />
Individual markings indicate which materials can<br />
be recycled and re-used. You can make an important<br />
contribution to the protection of our shared<br />
environment by re-using the product, recycling<br />
the basic materials or recycling redundant<br />
equipment in other ways.<br />
Dry cells and rechargeable batteries must be removed<br />
from the device and taken separately to a<br />
suitable battery disposal centre.<br />
If you don’t know the location of your nearest disposal<br />
centre, please enquire at your local council<br />
offi ce.<br />
Operating Information 11
Using the charger for the fi rst time<br />
Description<br />
BalancingDischarging<br />
symbol<br />
Single cell voltage<br />
Cells in battery<br />
pack<br />
2S XH connector<br />
3S XH connector<br />
Check<br />
Battery<br />
Balance mode<br />
Discharge target<br />
Voltage for each cell<br />
Minimum cell voltage<br />
allow balancing<br />
Balance<br />
Mode<br />
Discharge<br />
Mode<br />
Dischrge Voltage set<br />
Balance Voltage Limit<br />
Total<br />
4S XH connector<br />
5S XH connector<br />
Discharge mode<br />
Cancel Discharge Balance<br />
#7598<br />
2-6S EH connector<br />
Cancel<br />
set key<br />
Mode<br />
GND-<br />
Total batteries<br />
voltage<br />
Balance function value added key<br />
Balancer function <br />
value reduce key<br />
JST<br />
Rx Batt<br />
S<br />
External power<br />
7.4 - 11.1 V DC,<br />
BEC connector<br />
Receiver battery<br />
1.2 - 12 V,<br />
JR connector<br />
Programming the balancer<br />
For the fi rst use the minimum discharge- and balancer voltage must be checked<br />
and adjusted if necessary. For this connect a battery to the balancer<br />
connector on the side so that the display is activated.<br />
1. Now press the left button „Mode“ once for the balancer voltage or twice<br />
to adjust the discharge voltage. If you do not want to adjust anything,<br />
press the „Mode“ button again to go back to the basic display.<br />
Cancel Discharge Balance<br />
Mode<br />
12 Using the charger for the fi rst time
Using the charger for the fi rst time<br />
2. „Mode“ button is pressed once: Setting the lower balancer voltage<br />
limit. The single cell voltage of the balanced battery must be above this<br />
voltage, so the process is started.<br />
Press the or button to change the voltage. To save the settings,<br />
press the „Mode“ button again.<br />
Factory setting: 3.3 V - for Li-Po battery, for LiFe batteries the voltage<br />
must be changed to 2.9 V.<br />
Note: Never set the voltage below the minimum voltage allowed<br />
for your battery, this can damage the battery! The minimum voltage<br />
is indicated on the battery!<br />
Cancel Discharge Balance<br />
Mode<br />
3. „Mode“ button is pressed twice: Setting the discharge voltage limit. Attention:<br />
check the minimum storage voltage of the connected battery<br />
type!<br />
Press the or button to change the voltage. To save the settings,<br />
press the „Mode“ button again.<br />
Factory setting: 3.9 V - for Li-Po battery, for LiFe batteries the voltage<br />
must be changed to 3.2 V.<br />
Note: Never set the voltage below the minimum voltage allowed<br />
for your battery, this can damage the battery! The minimum voltage<br />
is indicated on the battery!<br />
Cancel Discharge Balance<br />
Mode<br />
4. The balancer goes back to the basic display.<br />
Cancel Discharge Balance<br />
Mode<br />
Using the charger for the fi rst time 13
Operation<br />
Activate the balancer function<br />
Connect the battery on the right side balancer jacks so that the display is<br />
activated.<br />
EH-jack only: note the marked GND-, here the negative terminal of the balancer<br />
must be inserted!<br />
The individual cell voltages on the left and the symbols for the number of<br />
cells appear to the right, also the total voltage „Total“ at the bottom of the<br />
display.<br />
1. Now press the button „Balance“ once.<br />
Cancel Discharge Balance<br />
Mode<br />
2. The balancer accepts the lowest cell voltage as a reference and starts<br />
the balancing process indicated by the scale icon. The fl ashing icon<br />
appears behind these cells which are currently balanced active.<br />
The balancer balances or discharge the individual cells to the voltage of<br />
the cell with the lowest voltage. This process stops when all cells are<br />
within 0.01 V.<br />
Cancel Discharge Balance<br />
Mode<br />
3. The balance process is complete when all icons are off. Now press<br />
the button „Cancel“ to exit. You can now disconnect the battery.<br />
Note: You can cancel the ongoing balancing process at any time by pressing<br />
the „Cancel“ button.<br />
Cancel Discharge Balance<br />
Mode<br />
You can also connect the balancer to the battery while you charge it on the<br />
charger. Note especially the voltage on the display: when fl uctuating abnormally<br />
or even the message „Check Battery“ appears, stop the charging<br />
process immediately and disconnect the battery pack to avoid damaging<br />
the battery or charger!<br />
Note in each case the charging instructions for your charger!<br />
14 Operation
Operation<br />
Activate the storage discharge function<br />
Connect the battery on the right side balancer jacks so that the display is<br />
activated.<br />
EH-jack only: note the marked GND-, here the negative terminal of the balancer<br />
must be inserted!<br />
The individual cell voltages on the left and the symbols for the number of<br />
cells appear to the right, also the total voltage „Total“ at the bottom of the<br />
display.<br />
1. Now press the button „Discharge“ once.<br />
Cancel Discharge Balance<br />
Mode<br />
2. The balancer starts the balancing process indicated by the battery icon.<br />
The fl ashing icon appears behind these cells which are currently<br />
discharged.<br />
The balancer discharges and balances the individual cells to the under<br />
„Discharge Voltage Set“ programmed voltage. This process continues<br />
until all cells have reached this voltage.<br />
Cancel Discharge Balance<br />
Mode<br />
3. The discharge process is completed when all icons are off. Now<br />
press the button „Cancel“ to exit. You can now disconnect the battery.<br />
Note: You can cancel the ongoing discharge at any time by pressing the<br />
„Cancel“ button.<br />
Cancel Discharge Balance<br />
Mode<br />
Operation 15
Operation<br />
Error message „Check Battery“<br />
The error message „Check Battery“ appears when the individual cell voltages differs over 0.2 V.<br />
This is an indication that the connected battery may be defective. In this case check your battery<br />
immediately!<br />
If this message appears, the balancing- or discharge process will not start!<br />
Appear triangle<br />
one or more<br />
Check<br />
Battery<br />
Check Battery<br />
is flashed<br />
Receiver battery check<br />
The balancer can also be used to check the actual voltage of any battery (with JR or Futaba) with a<br />
voltage between 1.2 and 12 V DC.<br />
Plug the battery into the JR connector on the bottom of the balancer. Pay attention to the polarity!<br />
In this mode, no single cell display is available!<br />
Note: when checking batteries under 4.8 V an additional power supply (7.4 - 11.1 V DC) must be connected<br />
to the socket „JST“ to enable the display.<br />
JST<br />
Rx Batt<br />
S<br />
External power<br />
7.4 - 11.1 V DC,<br />
BEC connector<br />
Receiver battery<br />
1.2 - 12 V,<br />
JR connector<br />
16 Operation
Specifi cations<br />
Specification<br />
Battery type:<br />
Cell count:<br />
Battery type Rx:<br />
Balancer voltage:<br />
Discharge voltage:<br />
Dimensions (L/W/H):<br />
Weight:<br />
Lithium-Polymer / LiFe<br />
2-6 cells<br />
via balancer plug<br />
2-6S EH<br />
2-5S XH<br />
1.2 - 12 V DC with JR-plug<br />
(below 4.8 V a seperate power source<br />
is required)<br />
2.0 - 3.9 V<br />
Factory set: 3.3 V<br />
3.0 - 4.2 V<br />
Factory set: 3.9 V<br />
approx. 93.5 x 60 x 17 mm<br />
approx. 72 g<br />
Specifi cations 17
Généralités<br />
Généralités relatives à la sécurité<br />
Introduction<br />
Vous venez de faire l‘acquisition d‘un BALANCER<br />
pour accus Lithium, Li-BATTERY BALANCER avec<br />
d‘excellentes performances.<br />
Utilisation en toute conformité<br />
Le Li-BATTERY BALANCER est un appareil de<br />
mesure bien pratique pour les accus de réception<br />
et les accus Li de 2 – 6 S (tension nominale max<br />
22.2V DC) avec équilibreur de tension (Balancer)<br />
intégré et mode de décharge pour le stockage de<br />
vos accus.<br />
Vous pouvez non seulement mesurer la tension de<br />
chaque élément de vos accus LiPo ou LiFe, mais<br />
également équilibrer la tension entre les différents<br />
éléments d‘un accu et les décharger. La fonction<br />
Balancer peut être utilisée soit avant, soit pendant,<br />
soit après la charge. Elle permet de s‘assurer que<br />
tous les éléments sont au même niveau, ce qui<br />
permet d‘assurer une durée de vie maximale de<br />
votre accu. Par ailleurs, en combinant la fonction<br />
de décharge et de Balancer, vous pouvez enregistrer<br />
un seuil de tension de décharge à ne pas<br />
dépasser, pour que vous puissiez, par exemple,<br />
décharger un accu plein sans le moindre soucis et<br />
le stocker pour une longue période.<br />
De plus, vous pouvez mesurer directement la tension<br />
d‘un accu de réception de<br />
1,2 –12 V DC.<br />
Avant d‘utiliser cet appareil pour la première fois,<br />
lisez attentivement cette notice. Vous pourrez ainsi<br />
exploiter toutes les possibilités de votre nouvel<br />
appareil. Les consignes de prudence et de sécurité<br />
sont très importantes. Gardez précieusement<br />
cette notice toujours à portée de main, et si vous<br />
deviez vous séparer de ce chargeur, transmettez-la<br />
au nouvel acquéreur.<br />
Remarque<br />
En ce qui concerne la décharge, il est important<br />
de suivre les instructions du fabricant de l‘accu et<br />
de respecter les intensités recommandées. Les<br />
éléments rechargeables, et plus particulièrement<br />
les éléments Lithium-Polymère, sont très sensibles<br />
et peuvent facilement s‘altérer.<br />
C‘est pourquoi il est important de surveiller en<br />
permanence, la procédure de décharge.<br />
CONSIGNES DE PRUDENCE ET DE SECU-<br />
RITE<br />
• Ce produit n‘est pas destiné aux enfants de<br />
moins de 14 ans, ce n‘est pas un jouet! Il<br />
ne peut être utilisé par des personnes avec<br />
des défaillances mentales ou des personnes<br />
n‘ayant pas les connaissances nécessaires, y<br />
compris les enfants,<br />
• s‘ils ne sont pas sous la surveillance d‘une<br />
personne adulte et responsable.<br />
• Ne jamais laisser les enfants sans surveillance,<br />
pour être sûr qu‘ils ne jouent pas<br />
avec cet appareil.<br />
• N‘exposez pas l‘appareil aux poussières, à<br />
l‘humidité, à la pluie, à la chaleur (par ex. en<br />
plein soleil) et protégez-le des chocs.<br />
Il ne peut être utilisé que dans un endroit fer-<br />
•<br />
mé à l‘abri de l‘humidité.<br />
• Vous n‘avez pas le droit d‘ouvrir cet appareil!<br />
• Les fentes/ouvertures sur le boîtier sont des<br />
ouilles de refroidissement. Il ne faut pas les<br />
recouvrir ou les boucher. Posez l‘appareil de<br />
manière à ce que le flux d‘air de refroidissement<br />
puisse circuler.<br />
• Si la tension d‘alimentation est supérieure à<br />
25.2 V DC, l‘appareil se détériore, et peut déclencher<br />
un incendie. Danger!<br />
• Ne modifiez en aucun cas le balancer.<br />
• Le chargeur et l‘accu doit reposer sur une surface<br />
ignifugée et non conductrice.<br />
• Ne posez jamais le chargeur sur un siège de<br />
voiture, un tapis, ou autre. Ne laissez pas de<br />
produits volatiles ou inflammables à proximité.<br />
Veillez à ce que le local soit suffisamment<br />
aéré.<br />
• Les prises ne doivent pas être modifiées ou<br />
reliées entre elles sous quelque forme que<br />
ce soit.<br />
• Ne laissez jamais le Balancer sans surveillance<br />
lorsque un accu y est branché.<br />
• Ne branchez qu‘un seul accu à la fois.<br />
• Les seuls accus qui peuvent être branchés sur<br />
la prise Balancer sont les accus LiXX de 2 à<br />
6 éléments.<br />
Eléments au Lithium Polymer<br />
Cet appareil n‘est destiné qu‘à la décharge et à<br />
l‘équilibrage des éléments des accus Lithium-<br />
Polymère ou accus LiFe ayant une tension nominale<br />
par élément de 3,2 ou 3,7 V. La particularité<br />
des accus Lithium, par rapport à d‘autres types<br />
d‘accus, c‘est leur capacité qui est bien plus élevée.<br />
C‘est un avantage certain qu‘il faut toutefois relativiser,<br />
car il est nécessaire d‘entretenir ces accus<br />
différemment, notamment lors de la charge<br />
et de la décharge, pour maintenir les risques, lors<br />
de leur manipulation, au plus bas.<br />
La manipulation de ces éléments est soumise<br />
à des règles importantes qui doivent constamment<br />
être respectées. Si vous recherchez des<br />
informations ou conseils de sécurité supplémentaires,<br />
consultez les données fournies par le<br />
fabricant. Le Balancer équilibre la tension entre<br />
18 Généralités
Généralités<br />
les éléments si cette dernière est différente d‘un<br />
élément à l‘autre, ce qui améliore encore la sécurité<br />
Exclusion de responsabilité<br />
Le respect des instructions d’utilisation ainsi<br />
que les conditions et les méthodes d’installation,<br />
d’utilisation et d’entretien du chargeur ne peuvent<br />
pas être surveillés par la Firme <strong>Graupner</strong>. En<br />
conséquence, la Firme <strong>Graupner</strong> décline toute<br />
responsabilité pour les pertes, les détériorations<br />
et les coûts survenus à la suite d’une mauvaise<br />
utilisation, ainsi que sa participation d’une façon<br />
quelconque aux dédommagements.<br />
Composants et accessoires<br />
En tant que fabricant, la Firme GRAUPNER<br />
GmbH & Co. KG conseille les composants et les<br />
accessoires à utiliser dont la compatibilité, la fonction<br />
et la sécurité ont été éprouvés par ses soins<br />
et assure la responsabilité de ses produits.<br />
La Firme GRAUPNER n’assure aucune responsabilité<br />
pour tout autre composant ou accessoires<br />
produits par d’autres fabricants, car elle ne<br />
peut pas juger si chaque produit étranger pourra<br />
être utilisé sans risque pour la sécurité.<br />
Protection de l’environnement<br />
Le symbole fi gurant sur l’appareil, dans les<br />
instructions d’utilisation ou sur l’emballage<br />
indique que ce produit ne devra pas être<br />
jeté dans une poubelle domestique normale à la<br />
fi n de sa durée de vie. Il devra être déposé dans<br />
un container spécial pour le recyclage des appareils<br />
électriques et électroniques.<br />
La matière est re-valorisable conformément à sa<br />
désignation. Avec la réutilisation, l’exploitation des<br />
matières ou pour d’autres formes d’utilisation des<br />
vieux appareils, vous apportez une importante<br />
contribution à la protection de l’environnement.<br />
Les batteries et les accus devront être retirées<br />
des appareils et jetés dans un container séparé<br />
correspondant.<br />
Renseignez-vous sur la présence de ces containers<br />
à l’administration de votre commune.<br />
Généralités 19
Mise en service<br />
Description<br />
Symbole Décharge<br />
Tension de chaque<br />
élément<br />
Nb d'éléments<br />
de l'accu<br />
Prise 2S XH<br />
Prise 3S XH<br />
Check<br />
Battery<br />
Mode Balancer<br />
Tension de décharge<br />
par élément<br />
Tension Balancer minimale<br />
par éléments<br />
Balance<br />
Mode<br />
Discharge<br />
Mode<br />
Dischrge Voltage set<br />
Balance Voltage Limit<br />
Total<br />
Prise 4S XH<br />
Prise 5S XH<br />
Mode Décharge<br />
Cancel Discharge Balance<br />
Mode<br />
#7598<br />
GND-<br />
Prise EH 2-6S<br />
Tension totale<br />
Interruption / mode<br />
Mode Décharge / rehausser<br />
la valeur<br />
Mode Equilibrage / Abaisser<br />
la valeur<br />
JST<br />
Rx Batt<br />
S<br />
Alimentation externe<br />
7.4 - 11.1 V DC,<br />
Prise BEC<br />
Accu de réception<br />
1.2 - 12 V,<br />
Prise JR<br />
Programmation du Balancer<br />
Avant la première utilisation, il faut vérifi er et régler éventuellement la tension<br />
maximale de décharge et la tension du Balancer. Branchez un accu sur la<br />
prise Balancer latérale pour activer l‘affi chage.<br />
1. Pour régler la tension du Balancer, appuyez une fois sur la touche<br />
„Mode“ de gauche, et deux fois pour régler la tension max. de décharge.<br />
Si vous ne voulez enregistrer aucune valeur, appuyez une nouvelle fois<br />
sur la touche „Mode“ pour revenir sur l‘affi chage initial.<br />
Cancel Discharge Balance<br />
Mode<br />
20 Mise en service
Mise en service<br />
Cancel Discharge Balance<br />
2. Une impulsion sur la touche „Mode“: Réglage du seuil inférieur de la<br />
tension du Balancer (Balancer Voltage Limit). La tension de chaque<br />
élément de l‘accu à équilibrer doit se situer au-dessus de cette tension<br />
pour que la procédure se lance.<br />
Appuyez sur la touche ou pour modifi er la tension. Pour enregis<br />
trer les réglages, appuyez une nouvelle fois sur la touche „Mode“.<br />
Réglages d‘origine: 3,3 V pour accus LiPo, pour les accus LiFe, il faut<br />
modifi er la tension et la ramener à 2,9V.<br />
Attention: N‘enregistrez jamais une tension inférieure à la tension<br />
minimale autorisée de votre accu, cela peut conduire à la détérioration<br />
de l‘accu!<br />
La tension minimale est indiquée sur l‘accu!<br />
Mode<br />
Cancel Discharge Balance<br />
3. Deux impulsions sur la touche „Mode“: Réglage de la tension de fi n de<br />
décharge (Discharge Voltage Set). Attention: La tension optimale pour le<br />
stockage doit être ajustée à l‘accu!<br />
Appuyez sur la touche ou pour modifi er la tension. Pour enregistrer<br />
les réglages, appuyez une nouvelle fois sur la touche „Mode“.<br />
Réglages d‘origine: 3,9 V pour accus LiPo, pour les accus LiFe, il faut<br />
modifi er la tension et la ramener à 3,0 V.<br />
Attention: N‘enregistrez jamais une tension inférieure à la tension<br />
minimale autorisée de votre accu, cela peut conduire à la détérioration<br />
de l‘accu!<br />
La tension minimale est indiquée sur l‘accu!<br />
Mode<br />
4. Le Balancer se remet sur l‘affi chage initial.<br />
Cancel Discharge Balance<br />
Mode<br />
Mise en service 21
Operation<br />
Activer le Balancer<br />
Pour activer l‘affi chage, branchez l‘accu sur la prise Balancer latérale correspondante.<br />
Que les prises EH: Attention au marquage GND-, c‘est là que le pôle Moins<br />
de la prise Balancer doit être branché!<br />
La tension de chaque élément est indiquée à gauche, et le nombre<br />
d‘éléments est affi ché à droite, par ailleurs, la tension totale „Total“ est affi<br />
chée en bas de l‘écran.<br />
1. Appuyez une fois sur la touche „Balance“.<br />
Cancel Discharge Balance<br />
Mode<br />
2. Le Balancer se réfère à la tension par élément la plus basse et lance<br />
la procédure d‘équilibrage, représenté par le symbole d‘une balance.<br />
Le symbole clignotant apparaît derrière les éléments qui sont en cours<br />
d‘équilibrage.<br />
Le Balancer équilibre, ou décharge chaque élément en se référant à<br />
l‘élément qui a la tension la plus basse. Cette procédure mettra le temps<br />
qu‘il faut jusqu‘à ce que tous les éléments soient équilibrés à 0,01 V<br />
près.<br />
Cancel Discharge Balance<br />
Mode<br />
3. La procédure d‘équilibrage est terminé lorsque tous les symboles clignotants<br />
se sont éteints. Appuyez maintenant sur la touche „Cancel“<br />
pour quitter le mode. Vous pouvez maintenant débrancher l‘accu.<br />
A savoir: vous pouvez interrompre la procédure d‘équilibrage à tout moment<br />
en appuyant sur la touche „Cancel“.<br />
Cancel Discharge Balance<br />
Mode<br />
Vous pouvez aussi brancher l‘accu sur le Balancer et l‘équilibrer durant sa<br />
charge. Dans ce cas, surveillez l‘affi chage de la tension à l‘écran: Si vous<br />
constatez des écarts anormaux ou si le message „Check Battery“ apparaît,<br />
interrompez immédiatement la charge et débranchez l‘accu, pour éviter<br />
tout problème avec l‘accu ou avec le chargeur!<br />
Quoiqu‘il en soit, respectez les consignes de charge de votre chargeur!<br />
22 Mise en service
Operation<br />
Activer la décharge en vue du stockage<br />
Pour activer l‘affi chage, branchez l‘accu sur la prise Balancer latérale correspondante.<br />
Que les prises EH: Attention au marquage GND-, c‘est là que le pôle Moins<br />
de la prise Balancer doit être branché!<br />
La tension de chaque élément est indiquée à gauche, et le nombre<br />
d‘éléments est affi ché à droite, par ailleurs, la tension totale „Total“ est affi<br />
chée en bas de l‘écran.<br />
1. Appuyez une fois sur la touche „Discharge“.<br />
Cancel Discharge Balance<br />
Mode<br />
2. Le Balancer lance la procédure d‘équilibrage, qui est visualisée par le<br />
symbole de la batterie. Le symbole clignotant apparaît derrière les<br />
éléments qui sont en cours de décharge.<br />
Le Balancer décharge et équilibre chaque élément à la tension enregistrée<br />
sous „Discharge Voltage Set“. Cette procédure mettra le temps qu‘il<br />
faut jusqu‘à ce que tous les éléments aient atteint la même tension.<br />
Cancel Discharge Balance<br />
Mode<br />
3. La procédure de décharge est terminée lorsque tous les symboles<br />
se sont éteints. Appuyez maintenant sur la touche „Cancel“ pour quitter<br />
le mode. Vous pouvez maintenant débrancher l‘accu.<br />
A savoir: vous pouvez interrompre la procédure de décharge à tout moment<br />
en appuyant sur la touche „Cancel“.<br />
Cancel Discharge Balance<br />
Mode<br />
Mise en service 23
Operation<br />
Message d‘erreur „Check Battery“<br />
Le message d‘erreur „Check Battery“ apparaît lorsque les tensions de chaque élément divergent de<br />
plus de 0,2 V les unes par rapport aux autres. C‘est le premier signe d‘un accu défectueux. Dans ce<br />
cas, vérifi ez votre accu!<br />
Tant que ce message est affi ché, vous ne pourrez pas lancer une procédure d‘équilibrage ou de décharge!<br />
Le symbole d‘un<br />
triangle apparaît<br />
(un ou plusieurs)<br />
Check<br />
Battery<br />
„Check Battery“<br />
clignote<br />
Contrôle de l‘accu de réception<br />
Avec ce Balancer, vous pouvez également mesurer la tension actuelle de n‘importe quel accu (système<br />
de fi ches JR ou Futaba) d‘une tension de 1,2 et 12V DC.<br />
Branchez l‘accu sur la prise JR située sur le dessous du Balancer. Attention à la polarité! Dans ce<br />
mode, aucun affi chage de la tension par éléments n‘est disponible!<br />
Attention: pour des accus dont la tension est inférieure à 4,8 V il faut brancher, sur la prise „JST“ une<br />
alimentation complémentaire (7,4 – 11,1 V DC) pour le Balancer, pour permettre l‘affi chage écran.<br />
JST<br />
Rx Batt<br />
S<br />
Alimentation externe<br />
7.4 - 11.1 V DC,<br />
Prise BEC<br />
Accu de réception<br />
1.2 - 12 V,<br />
Prise JR<br />
24 Mise en service
Caractéristiques techniques<br />
Caractéristiques techniques<br />
Type d‘accu:<br />
Lithium-Polymère / LiFe<br />
Nombre d‘éléments: 2-6 éléments<br />
par prise balancer<br />
2-6S EH<br />
2-5S XH<br />
Type d‘accus Rx: tous ceux 1.2 - 12 V DC avec<br />
prise JR (en-dessous de 4,8 V, il faut<br />
une alimentation séparée)<br />
Tension Balancer: 2.0 - 3.9 V<br />
Réglage d‘origine: 3.3 V<br />
Tension de décharge: 3.0 - 4.2 V<br />
Réglage d‘origine: 3.9 V<br />
Dimensions (L/I/H): env. 93.5 x 60 x 17 mm<br />
Poids:<br />
env. 72 g<br />
Mise en service 25
Konformitätserklärung / Conformity Declaration /<br />
Déclaration de conformitè<br />
EG-Konformitätserklärung<br />
Für das folgend bezeichnete Erzeugnis<br />
Li-Battery Balancer; Best.-Nr. 7598<br />
wird hiermit bestätigt, dass es den wesentlichen<br />
Schutzanforderungen entspricht, die in<br />
der Richtlinie des Rates zur Angleichung der<br />
Rechtsvorschriften der Mitgliedstaaten über die<br />
elektromagnetische Verträglichkeit (2004/108/<br />
EC) festgelegt sind.<br />
This declaration was produced by:<br />
<strong>Graupner</strong> GmbH & Co. KG<br />
Henriettenstr. 94-96<br />
73230 Kirchheim/Teck<br />
and is valid for the manufacturer / importer of<br />
the product<br />
73230 Kirchheim/Teck, Germany, on 21.02.2012<br />
Zur Beurteilung des Erzeugnisses hinsichtlich<br />
elektromagnetischer Verträglichkeit wurden folgende<br />
Normen herangezogen:<br />
EMC: EN 61326-1:2006<br />
Diese Erklärung wird verantwortlich für den<br />
Hersteller/Importeur<br />
<strong>Graupner</strong> GmbH & Co. KG<br />
Henriettenstr. 94-96<br />
73230 Kirchheim/Teck<br />
abgegeben durch<br />
73230 Kirchheim/Teck, den 21.02.2012<br />
Stefan <strong>Graupner</strong><br />
Geschäftsführer<br />
EU Conformity Declaration<br />
We hereby declare that the following product:<br />
Li-Battery Balancer Order-No. 7598<br />
conforms with the essential protective requirements<br />
as laid down in the directive for harmonising<br />
the statutory directives of the member<br />
states concerning electro-magnetic interference<br />
(2004/108/EC).<br />
This product has been tested for electromagnetic<br />
interference in accordance with the<br />
following norms:<br />
EMC: EN 61326-1:2006<br />
Déclaration de conformité EG :<br />
Pour le produits suivant<br />
Stefan <strong>Graupner</strong><br />
Managing Director<br />
Li-Battery Balancer; Réf.-N°. 7598<br />
Nous confi rmons que la compatibilité électronique<br />
correspond aux directives (2004/108/EC).<br />
Normes appliquées :<br />
EMC: EN 61326-1:2006<br />
Cette déclaration est sous la responsabilité du<br />
Fabricant/Importateur<br />
<strong>Graupner</strong> GmbH & Co. KG<br />
Henriettenstr. 94-96<br />
73230 Kirchheim/Teck<br />
Fait à<br />
73230 Kirchheim/Teck, le 21.02.2012<br />
Stefan <strong>Graupner</strong><br />
Le Directeur d’Entreprise<br />
26 Conformity
Wir gewähren auf dieses Erzeugnis eine / This product is / Sur ce produit nous accordons une<br />
Garantie von<br />
warrantied for<br />
garantie de 24 Monaten<br />
month<br />
mois<br />
Die Fa. <strong>Graupner</strong> GmbH & Co. KG, Henriettenstraße<br />
94-96. 73230 Kirchheim/Teck gewährt ab dem<br />
Kaufdatum auf dieses Produkt eine Garantie von 24<br />
Monaten.<br />
Die Garantie gilt nur für die bereits beim Kauf des<br />
Produktes vorhandenen Material- oder Funktionsmängel.<br />
Schäden die auf Abnützung, Überlastung,<br />
falsches Zubehör oder unsachgemäße Behandlung<br />
zurückzuführen sind, sind von der Garantie ausgeschlossen.<br />
Die gesetzlichen Rechte und Gewährleistungsansprüche<br />
des Verbrauchers werden durch diese Garantie<br />
nicht berührt.<br />
Bitte überprüfen Sie vor einer Reklamation oder<br />
Rücksendung das Produkt genau auf Mängel, da wir<br />
Ihnen bei Mängelfreiheit die entstandenen Unkosten<br />
in Rechnung stellen müssen.<br />
<strong>Graupner</strong> GmbH & Co. KG, Henriettenstraße 94-<br />
96, 73230 Kirchheim/Teck, Germany guarantees<br />
this product for a period of 24 months from date of<br />
purchase.<br />
The guarantee applies only to such material or<br />
operational defects witch are present at the time of<br />
purchase of the product.<br />
Damage due to wear, overloading, incompetent<br />
handling or the use of incorrect accessories is not<br />
covered by the guarantee.<br />
The user´s legal rights and claims under garantee are<br />
not affected by this guarantee.<br />
Please check the product carefully for defects before<br />
you are make a claim or send the item to us, since<br />
we are obliged to make a charge for our cost if the<br />
product is found to be free of faults.<br />
La société <strong>Graupner</strong> GmbH & Co. KG, Henriettenstraße<br />
94-96, 73230 Kirchheim/Teck, Allemagne, accorde<br />
sur ce produit une garantie de 24 mois à partir<br />
de la date d´achat.<br />
La garantie prend effet uniquement sur les vices de<br />
fonctionnement et de matériel du produit acheté. Les<br />
dommages dûs à de l´usure, à de la surcharge, à de<br />
mauvais accessoires ou à d´une application inadaptée,<br />
sont exclus de la garantie.Cette garantie ne<br />
remet pas en cause les droits et prétentions légaux<br />
du consommateur.<br />
Avant toute réclamation et tout retour du prouit, veuillez<br />
s.v.p. cotrôler et noter exactement les défauts ou<br />
vices du produit, car tout autre frais relatif au produit<br />
vous sera facturé.<br />
Servicestellen / Service / Service après-vente<br />
<strong>Graupner</strong>-Zentralservice<br />
<strong>Graupner</strong> GmbH & Co. KG<br />
Postfach 1242<br />
D-73220 Kirchheim<br />
Schweiz<br />
<strong>Graupner</strong> Service<br />
Wehntalerstrasse 37<br />
CH 8181 Höri<br />
(+41) 4 32 66 65 83<br />
Fax: (+41) 4 32 66 65 83<br />
Email: hb9ail@bluewin.ch<br />
Italia<br />
GiMax s.n.c.<br />
Via Manzoni, no. 8<br />
I 25064 Gussago<br />
(+39) 30 25 22 732<br />
Email: gimax1@virgilio.it<br />
Espana<br />
Anguerra Hobbies<br />
C/Terrassa 14<br />
E 43206 Reus (Tarragona)<br />
(+34) 97 77 55 32 0<br />
Email: info@anguerrahobbies.com<br />
UK<br />
<strong>Graupner</strong> Service UK<br />
Brunel Drive<br />
Newark, Nottinghamshire<br />
NG24 2EG<br />
(+44) 16 36 61 05 39<br />
Email: sales@gliders.uk.com<br />
Belgie/Nederland<br />
Jan van Mouwerik<br />
Slot de Houvelaan 30<br />
NL 3155 Maasland VT<br />
(+31)10 59 13 59 4<br />
Email: van_mouwerik@planet.nl<br />
Servicehotline<br />
(+49)(01805) 472876<br />
Montag - Freitag 9:30 -11:30<br />
und 13:00 -15:00 Uhr<br />
France<br />
<strong>Graupner</strong> Service France<br />
Gérard Altmayer<br />
86, rue ST. Antoine<br />
F 57601 Forbach-Oeting<br />
(+33) 3 87 85 62 12<br />
Email: GERALD.ALTMAYER@wanadoo.fr<br />
Sverige<br />
Baltechno Electronics<br />
Box 5307<br />
S 40227 Göteborg<br />
(+46) 31 70 73 00 0<br />
Email: balte@salgonet.se<br />
Luxembourg<br />
Kit Flammang<br />
129, route d’Arlon<br />
8009 Strassen<br />
(+35) 23 12 23 2<br />
Email: kitfl am@pt.lu<br />
Ceská Republika/Slovenská<br />
Republika<br />
RC Servis Z. Hnizdil<br />
Leteckà 666/22<br />
CZ-16100 Praha 6 - Ruzynè<br />
(+42) 2 33 31 30 95<br />
Email: info@rcservis.cz<br />
Garantie-Urkunde<br />
Warranty certifi cate / Certifi cat de garantie<br />
Li-Battery Balancer #7598<br />
Übergabedatum, Date of purchase/delivery, Date de remise<br />
Name des Käufers, Owner´s name, Nom de l´acheteur<br />
Strasse, Wohnort, Complete adress, Domicie et rue<br />
Firmenstempel und Unterschrift des Einzelhändlers, Stamp and signature of dealer,<br />
Cachet de la fi rme et signature du detailant<br />
27
<strong>Graupner</strong> GmbH & Co. KG<br />
Henriettenstraße 94 – 96<br />
D-73230 Kirchheim/Teck<br />
Germany<br />
www.graupner.de<br />
Änderungen sowie Liefermöglichkeiten vorbehalten. Lieferung durch den Fachhandel.<br />
Bezugsquellen werden nachgewiesen. Für Druckfehler kann keine Haftung übernommen<br />
werden.<br />
Specifi cations and availability subject to change. Supplied through specialist model<br />
shops only. We will gladly inform you of your nearest supplier. We accept no liability for<br />
printing errors.<br />
Sous réserve de modifi cations et de possibilité de livraison. Livraison uniquement au<br />
travers de magasins spécialisés en modélisme. Nous pourrons vous communiquer<br />
l’adresse de votre revendeur le plus proche. Nous ne sommes pas responsables<br />
d’éventuelles erreurs d’impression.<br />
Li-Battery Balancer / Februar 2012 - V1.0


