Rezept
Rezept
Rezept

You also want an ePaper? Increase the reach of your titles
YUMPU automatically turns print PDFs into web optimized ePapers that Google loves.
www.birkmann.de<br />
<strong>Rezept</strong>
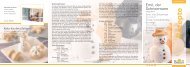
LOVE-Kekse<br />
100 g Puderzucker<br />
200 g Butter<br />
300 g Mehl<br />
1 Eigelb<br />
1 Prise Salz<br />
Für den Guss:<br />
300 g Puderzucker<br />
Lebensmittelfarbe<br />
1 EL geschmolzene Butter<br />
Alle Zutaten zu einem geschmeidigen Teig verkneten<br />
und dann in Frischhaltefolie einwickeln,<br />
etwa eine Stunde im Kühlschrank kühl stellen.<br />
Danach den Teig zwischen zwei Backfolien<br />
etwa 3 mm dick ausrollen (am besten mit Teighölzern,<br />
die gleichmäßiges Ausrollen vereinfachen).<br />
Die LOVE-Kekse ausstechen und den<br />
Teig rund um die zukünftigen Plätzchen entfernen.<br />
Die Plätzchen auf der Backfolie belassen<br />
und auf ein Blech legen. Im vorgeheizten Ofen<br />
(Ober- und Unterhitze) bei 190 °C 7–10 Minuten<br />
backen. Danach auskühlen lassen.<br />
Puderzucker mit geschmolzener Butter und<br />
etwas Wasser vermischen, so dass eine dickfl<br />
üssige Paste entsteht. Nach Geschmack mit<br />
verschiedenen Farben einfärben. Entweder mit<br />
einem Pinsel auf die Plätzchen aufstreichen<br />
oder in einen Spritzbeutel mit feiner Rundtülle<br />
geben. Dabei zunächst die Kontur nachmalen,<br />
dann die innere Fläche ausfüllen. Trocknen lassen<br />
und LOVE-Kekse genießen oder mit Liebe<br />
verschenken!<br />
LOVE Biscuits<br />
100 g icing sugar<br />
200 g butter<br />
300 g fl our<br />
1 egg yolk<br />
1 pinch of salt<br />
For the glaze:<br />
300 g icing sugar<br />
Food colouring<br />
1 tbsp of melted butter<br />
Mix all ingredients to a smooth dough and then<br />
wrap in cling foil. Leave to cool in the fridge for<br />
about one hour. Then roll out the pastry between<br />
two pieces of baking foil to a thickness<br />
of about 3 mm (it’s best to use wooden slats<br />
as well – these make it easier to attain an even<br />
thickness). Cut out the LOVE biscuits and remove<br />
residue pastry from the cut-out shapes.<br />
Leave the biscuits on the baking foil and place<br />
on a baking tray. Bake in a pre-set oven (top<br />
and bottom heat) at 190 °C for 7–10 minutes.<br />
Then allow to cool.<br />
Mix icing sugar with melted butter and a little<br />
water until you have got a thickish paste.<br />
Colour to taste using different colours. Either<br />
paint the biscuits using a brush or apply using<br />
an icing bag and small round nozzle. First paint<br />
the shape and then fi ll out the inner surface.<br />
Allow to dry and then enjoy your LOVE biscuits<br />
or make them a lovely present!
Biscuits LOVE<br />
100 g de sucre glace<br />
200 g de beurre<br />
300 g de farine<br />
1 jaune d’œuf<br />
1 pincée de sel<br />
Pour le nappage :<br />
300 g de sucre glace<br />
Colorants alimentaires<br />
1 CS de beurre fondu<br />
Mélanger tous les ingrédients pour en faire<br />
une pâte souple et ensuite l’enrouler dans un<br />
fi lm de fraîcheur et la laisser au réfrigérateur<br />
pendant environ une heure. Ensuite rouler la<br />
pâte entre deux feuilles à pâtisserie sur une<br />
épaisseur de 3 mm (de préférence avec des<br />
rouleaux en bois qui permettent de rouler plus<br />
facilement et régulièrement). Découper les<br />
biscuits LOVE et enlever la pâte se trouvant<br />
autour des futurs biscuits. Placer les biscuits<br />
sur la feuille à pâtisserie et les poser sur une<br />
plaque de cuisson. Faites cuire pendant 7 à 10<br />
minutes dans le four préchauffé à 190 °C (haut<br />
et bas du four). Ensuite, laisser refroidir.<br />
Mélanger le sucre glace avec du beurre fondu<br />
et un peu d’eau pour obtenir une pâte souple.<br />
Selon vos goûts, colorez avec différents colorants.<br />
Badigeonner les biscuits avec un pinceau<br />
ou décorer avec une poche et une douille<br />
ronde. Souligner d’abord les contours, ensuite<br />
remplissez la surface. Laisser sécher et déguster<br />
les biscuits LOVE ou les offrir avec amour !<br />
Biscottini LOVE<br />
100 g di zucchero a velo<br />
200 g di burro<br />
300 g di farina<br />
1 tuorlo d’uovo<br />
1 pizzico di sale<br />
Per la glassa:<br />
300 g di zucchero a velo<br />
Colorante alimentare<br />
1 cucchiaio di burro fuso<br />
Lavorare insieme tutti gli ingredienti fi no a formare<br />
un impasto morbido che va poi avvolto<br />
nella pellicola trasparente e lasciato raffreddare<br />
in frigorifero per circa un’ora. In seguito, stendere<br />
l’impasto tra due fogli di carta da forno<br />
(circa 3 mm). L’ideale è usare dei legnetti che<br />
aiutano a stendere l’impasto in modo omogeneo.<br />
Ritagliare i biscottini LOVE con gli stampini<br />
e togliere l’impasto tutt’intorno. Lasciare i<br />
biscottini sulla carta da forno che va messa su<br />
una teglia. Cuocere in forno preriscaldato per<br />
7 – 10 minuti a 190 °C, con calore proveniente<br />
dall’alto e dal basso. Fare quindi raffreddare i<br />
biscottini.<br />
Lavorare insieme lo zucchero a velo, il burro<br />
fuso e un po’ d’acqua, in modo da formare una<br />
crema densa. Colorare a proprio piacimento ed<br />
applicare sui biscottini con un pennello o usando<br />
una tasca da pasticciere con un beccuccio<br />
piccolo. Procedere prima con il contorno, poi<br />
riempire la parte interna. Lasciare asciugare i<br />
biscottini LOVE e poi gustarseli, oppure regalarli<br />
con tanto amore!
Ebenfalls erhältlich:<br />
Also available:<br />
Aussi disponible:<br />
Anche disponibile:<br />
Art.-Nr. 312 142<br />
Herzbackform<br />
Springform heart<br />
Moule en cœur<br />
Stampo a cuore