EBR-99ST/9900(W)/(SL) - Sharp
EBR-99ST/9900(W)/(SL) - Sharp
EBR-99ST/9900(W)/(SL) - Sharp

Create successful ePaper yourself
Turn your PDF publications into a flip-book with our unique Google optimized e-Paper software.
INSTALLATION INSTRUCTIONS<br />
1. (For U.K. use)<br />
A cut-out will have to be provided in the side of the kitchen cabinet for the plug of the oven.<br />
N.B.The mains plug must be accessible after installation or an all-pole switch disconnection must be<br />
provided with a contact separation of at least 3 mm in each pole.<br />
(For Continental use)<br />
The electric outlet must be installed at 150 mm high from the floor of the built-in cabinet and at 50 mm<br />
from the right wall of the built-in cabinet as shown in Fig. 1. The mains plug must be accessible after<br />
installation or the oven must be connected to an electric circuit provided with an all-pole switch (contact<br />
gap no less than 3 mm) to disconnect the oven in case of danger. A safety-device like a fuse in the<br />
installation may be used as a switch.<br />
2. Remove the built-in kit from the package.<br />
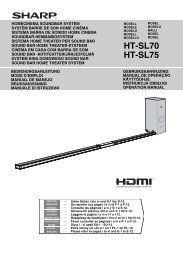
3. Set the spacing brackets 1 on the shelf along the right and left walls of the kitchen cabinet, adjusting<br />
the front ends of the shelf and the spacing brackets, and attach them with the four screws B, as<br />
shown in Fig.1.<br />
Caution: The arrow marks on each spacing bracket should be pointing towards you.<br />
4. Place the exhaust duct 2 on the ceiling of the kitchen cabinet along the back wall of the cupboard D and<br />
left wall of the kitchen cabinet without the clearance as shown in Fig.1 and 2. Secure to the ceiling of the<br />
kitchen cabinet with two screws B from below as shown in Fig. 3.<br />
5. Remove the backing paper from the cushion 6. Attach the cushion 6 to the edge of the exhaust duct<br />
3 as shown in Fig. 4.<br />
6. Insert two tabs of the exhaust duct 2 into the slits of the exhaust duct 3. And fold the tabs.<br />
7. Remove the screw E from the oven as shown in Fig. 5.<br />
8. Let the power supply cord pass through the hole of the lower side of the intake duct 4 as shown in Fig. 6.<br />
9. Install the intake duct 4 to the rear of the oven with two screws C and E (removed at step 7) as shown<br />
in Fig. 6.<br />
Caution: Avoid pinching the power supply cord between the oven and the intake duct 4.<br />
10. Install the intake duct 5 to the rear of the oven with three screws C as shown in Fig. 7.<br />
Caution: Avoid pinching the power supply cord between the oven and the intake duct 4.<br />
11. Remove the backing paper from the three cushions 7, 8 and 9. Attach the cushion 7 at the left side along<br />
the intake duct 4 then attach the cushion 8 at the top of the intake duct 4, and along the left side of the<br />
cushion 7 and the oven as shown in Figs. 8-a and 8-b. Attach the cushion 9 to the top of the oven as shown<br />
in Figs 8-a and 8-b.<br />
12. (For U.K. use)<br />
Place the oven on a table/stand positioned in front of the kitchen cabinet. If you do not prepare the table/<br />
stand, two persons are required. One to hold the oven whilst the other feeds the power supply cord<br />
through the prepared cut out.<br />
(For Continental use)<br />
Place the oven on a table/stand positioned in front of the kitchen cabinet.<br />
If you do not prepare the table/stand, two persons are required. One to hold the oven whilst the other<br />
connects it to the power supply.<br />
13. Connect the oven to the power supply.<br />
Caution: a. In U.K., connect the oven to the power supply 230-240 V, 50 Hz.<br />
b. In the Continent, connect the oven to the power supply 230 V, 50 Hz.<br />
14. Make sure the oven is on the spacing brackets on the shelf of the kitchen cabinet. Then adjust the position<br />
of the oven so that the feet of the oven are fitted into the recesses of the spacing brackets as shown in<br />
Fig. 2.<br />
Caution: Make sure that the power supply cord does not touch the air vent openings behind the oven.<br />
15. Place the built-in frame element 0 on top of the oven making sure that it is level both vertically and<br />
horizontally. Secure loosely to the kitchen cabinet with two screws D as shown in Fig. 9.<br />
16. Insert two built-in frame side elements A between the built-in frame element 0 and the kitchen cabinet.<br />
And secure two screws D tightly as shown in Fig. 9. Check location by measuring distance between right<br />
and left built-in frame side elements A. The distance is stated in Fig. 10.<br />
Note: Fit the hole of the built-in frame side element A to the screw D when inserting.<br />
17. Install the second built-in frame element 0 over the built-in frame side elements A at bottom edge of the<br />
oven. And secure the built-in frame element 0 through the holes of the built-in frame side elements A<br />
to the kitchen cabinet with two screws D as shown in Fig. 9.<br />
Caution: Make sure that 6.5 mm of the frames (upper and lower) and cabinet overlap each other as<br />
shown in Fig. 11, or the kitchen cabinet door may touch the built-in frame elements.<br />
2