Create successful ePaper yourself
Turn your PDF publications into a flip-book with our unique Google optimized e-Paper software.
GB<br />
1<br />
2<br />
4<br />
english<br />
Positioning/unpacking<br />
Castors Legs<br />
6<br />
2<br />
Castors/legs/feet<br />
Fitting Shelves<br />
Marine Units<br />
Cabinet Bulkhead<br />
Fixings<br />
Cabinet<br />
Counter<br />
Please refer to label on back<br />
and base of unit for correct<br />
fitting of castors<br />
Cabinet Counter<br />
Marine Leg<br />
installation<br />
IMPORTANT:<br />
To the installer: Installation of these units should be carried out by a competent person and<br />
the appropriate codes of practice adhered to, thus ensuring safe installation.<br />
Pass to the user: Do not discard this document as it contains important guidelines on<br />
Operation, Loading, Cleaning and Maintenance and should be kept for reference.<br />
DISPOSAL REQUIREMENTS<br />
If not disposed of properly all refrigerators have components that can be harmful<br />
to the environment. All end of life refrigerators must be disposed of by<br />
appropriately registered and licensed waste contractors, and in accordance with<br />
National Laws & Regulations.<br />
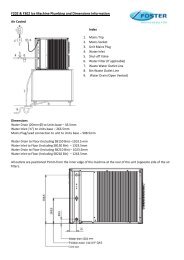
Important (Cabinets only): Ensure a minimum clearance of 150mm above the unit for ventilation and<br />
efficient operation. Where possible, ensure the unit is not adjacent to a heat source.<br />
Unpacking: The unit is delivered on a pallet and shrink-wrapped. Documentation is inserted into a clear<br />
pocket located inside the unit. Carefully remove the protective plastic film and cardboard from the<br />
unit exterior and from the door opening surround making sure that any sharp instrument used does not cause<br />
damage, plus remove any quality labels.<br />
Cabinet removal from the pallet: Remove the shelf holding the package containing the castors or legs.<br />
Remove the retaining bolts which secures the unit to the pallet. Move the unit over the front of the pallet and<br />
fit the lockable castors or legs in the mounting holes. To fit the rear castors or legs, lock the front castors, tilt<br />
the unit forwards, remove the pallet and fit the castors or legs in the mounting holes. Ensure that all are<br />
tightened firmly into position.<br />
On double door top mount cabinets, ensure 3 castors are fitted at the front.<br />
N.B Gastro Pro 300/300 and all Fish Cabinets only. Take care not to damage the drain outlet under the base.<br />
All cabinets are heavy and care should be taken when handling.<br />
Counter removal from the pallet:<br />
Counters fitted with castors - Remove fittings from inside the unit and ensure all drawers and doors are<br />
locked before removal from the pallet. Cut the heavy duty cable ties that hold the front castors to the pallet.<br />
Unlock the castors and then carefully roll the unit forward off the pallet.<br />
Counters fitted with legs - Remove fittings from inside the unit and ensure all drawers and doors are<br />
locked before removal from the pallet. Remove the fixing blocks located in front of the legs at the front of the<br />
unit and cut the straps securing the unit to the pallet. Carefully manoeuvre the unit forward, off the pallet.<br />
All models are normally fitted<br />
with swivel castors. Ensure<br />
during installation the unit is level<br />
if not the door(s) may not close<br />
correctly. Adjust castors by<br />
inserting spacers under the<br />
appropriate castor and the base<br />
of the unit until level.<br />
As an alternative adjustable legs<br />
can be fitted to all models.<br />
8mm threaded adjustable levelling<br />
feet are available for ‘U’ mount<br />
cabinet models, for all other<br />
models 12mm threaded<br />
adjustable levelling feet are<br />
available. (Fitting method as<br />
castors or legs).<br />
Shelves must be inserted<br />
into the unit so that they<br />
sit at the back of the unit.<br />
Units for marine<br />
applications are provided<br />
with special marine legs<br />
and bulkhead fixings.<br />
These units must be<br />
installed by specialist<br />
marine installation<br />
companies.<br />
3<br />
5<br />
Shelf/Tray Supports<br />
Vaporiser Tray<br />
Counter Bulkhead Fixings<br />
To adjust the position of the<br />
trayslides insert the ends into<br />
the vertical support with the<br />
‘hooks’ pointing downwards<br />
and ‘slot downwards’ into<br />
position. Ensure the<br />
trayslides are parallel and<br />
level after fitting.<br />
This is only fitted to the Pro<br />
300/300 cabinet models.<br />
Slide the vaporiser tray onto<br />
its runners on the underside<br />
of the cabinet and insert the<br />
electrical plug into the socket<br />
provided. If the runners are<br />
tight loosen slightly and<br />
re-tighten after inserting the<br />
tray. Ensure tray covers drain<br />
outlet.<br />
16<br />
17<br />
20<br />
21<br />
Geleiders & roosters (vervolg)<br />
Standaard Geleiders<br />
Verwijderen van lades<br />
18 Belading: goede<br />
luchtstroom<br />
Zorg er bij de belading<br />
van producten voor<br />
dat de lucht kan<br />
circuleren langs en<br />
door de producten.<br />
19<br />
Belading: voedsel<br />
Probleemoplossing<br />
Verwijderen Geleiders<br />
Gekoelde lades<br />
Om deze lades te<br />
verwijderen, trekt u de<br />
lade geheel uit en tilt u<br />
deze zó op dat de rollers<br />
(B) door de gaatjes in de<br />
ladegeleiders vallen.<br />
Onthoud hierbij de<br />
volgorde van de lades,<br />
want als ze in een andere<br />
volgorde worden<br />
teruggeplaatst, kan het<br />
gebeuren dat ze niet<br />
goed aansluiten.<br />
Belading<br />
Dek al het voedsel af en houd<br />
rauw en gekookt voedsel<br />
gescheiden. Voor verwarmde<br />
kasten: dek het voedsel af om<br />
uitdroging te voorkomen en<br />
vul het reservoir voor de hoge<br />
luchtvochtigheidsgraad op de<br />
bodem van de kast met<br />
water.<br />
Belading:<br />
gewichtsverdeling<br />
40Kg<br />
Probleemoplossing<br />
N<br />
Variant Visrek Variant Verwarmd Rooster<br />
nederlands<br />
Messenlade<br />
(indien van<br />
toepassing)<br />
Deze lades zijn<br />
vastgemaakt aan<br />
de ladegeleiders<br />
door middel van<br />
afsluitclips (A).<br />
Deze clips<br />
moeten naar<br />
beneden worden<br />
geduwd om de<br />
lade los te<br />
maken.<br />
Zorg voor een<br />
gelijkmatige verdeling<br />
van het gewicht over het<br />
rooster. De maximale<br />
belasting is 40 kg per<br />
rooster en 120 kg per<br />
kast met enkele deur.<br />
Plaats geen producten<br />
op de binnenvloer van<br />
de kast.<br />
Controles moeten worden uitgevoerd door een vakkundig persoon.<br />
Controleer de volgende punten, voordat u contact opneemt met de klantenservice:<br />
a) stroomuitval (netstroom kan zijn weggevallen)<br />
b) storingen zoals omschreven in de bedieningshandleiding voor de gebruiker: Alarmeringen en<br />
Waarschuwingen<br />
c) defecte zekering<br />
Wanneer u om assistentie vraagt van de klantenservice dient u altijd de volgende gegevens bij de hand te<br />
hebben:<br />
a) serienummer van de machine (E..........)<br />
b) het modelnummer aan de hand van het serienummer dat aan de binnenkant van de machine vermeld is<br />
c) de ‘foutcodereferentie’, wanneer er een foutcode wordt weergegeven.<br />
23